mr. wilsons technology site - home page -...
TRANSCRIPT

Residential Doors
Discuss the PhotoCareful Fitting A door has many functions. It improves security, ensures privacy, protects against the weather, and lends beauty and character to the home’s architecture. All of these functions require careful installation. Why do most doors open into a room rather than outwards?
Writing Activity: Descriptive ParagraphThink about the doors in your home. Consider their locations, their
sizes, and the materials they are made of. Choose one door. What is its function? Is it an interior door (for the inside of a house) or an exterior door (a door that leads to or from the outside)? Describe the door and its function in a descriptive paragraph.
Chapter ObjectivesAfter completing this chapter, you will be able to:
• Identify the various types of interior and exterior doors and door hardware.
• Explain how to handle a door properly at a job site.
• Identify the hand of any door.
• List at least three aspects of exterior door construction and installation that improve energy effi ciency.
• Identify the correct clearances for installing exterior and interior doors.
• Summarize how to install an interior pre-hung door.
Section 21.1Door Basics
Section 21.2Exterior Doors & Frames
Section 21.3Interior Doors & Frames
21
594 Chapter 21 Residential DoorsAlamy

21
Exterior Doors Interior Doors
sliding-glass doors
French doors
Content Vocabulary
Academic VocabularyYou will fi nd these words in your reading and on your tests. Use the academic vocabulary glossary to look up their defi nitions if necessary.
■ dexterity ■ accommodate ■ consistent
Graphic OrganizerAs you read, use a chart like this one to categorize types of doors. Add more rows if necessary.
Before You Read PreviewThere are many kinds of residential doors. Builders and carpenters can choose from many different designs, materials, assembly techniques, and sizes. Choose a content vocabulary or academic vocabulary word that is new to you. When you fi nd it in the text, write down the defi nition.
Go to glencoe.com for this book’s OLC for a downloadable version of this graphic organizer.
●● passage door●● strike plate●● solid-core construction
●● hollow-core construction●● stiles ●● door frame
●● gain●● lockset●● hand
Academic Standards
English Language Arts
Use language to accomplish individual purposes (NCTE 12)
Science
Earth and Space Science: Geochemical cycles (NSES)Science and Technology: Abilities of technological design (NSES)
Mathematics
Measurement: Apply appropriate techniques, tools, and formulas to determine measurements (NCTM)Problem Solving: Apply and adapt a variety of appropriate strategies to solve problems (NCTM)Data Analysis and Probability: Formulate questions that can be addressed with data and collect, organize, and display relevant data to answer them (NCTM)
Industry StandardsInterior and Exterior Door Installation
NCTE National Council of Teachers of EnglishNCTM National Council of Teachers of Mathematics
NSES National Science Education Standards
Chapter 21 Reading Guide 595

Types of DoorsWhat is hollow-core consruction?
All doors require mounting hardware, such as hinges and tracks. They also require hardware for operation, such as knobs or pulls. Beyond that, however, doors come in a variety of types. They can be categorized in the following ways:• Location (exterior wall or interior wall)• Material (wood, fi berglass, vinyl, metal,
and others)• Operation (hinged doors, sliding doors,
folding doors)• End use (new construction or replacement)• Purpose (closet doors, garage doors, fi re
doors)• Construction type (solid core, foam core,
hollow core)
• Style (raised panel, fl at panel, arched top)• Installation method (pre-hung, hung on
site)Any door can be described using a com-
bination of any of these characteristics. For example, a door may be a pre-hung, exterior, hinged, wood door having raised panels, as in Figure 21-1.
The most common type of door is a fl at-panel or raised-panel passage door. A panel is a wide piece of solid wood or plywood. A passage door is a door that swings open and closed on two or more leaf hinges mounted along one side. It allows passage from one area into another. It has two doorknobs, a latching mechanism, and sometimes a lock-ing mechanism. The latch slips into a hole in a strike plate, a metal plate which fi ts into an opening in the door jamb. The latch holds the door closed.
An exterior passage door is often sur-rounded by moldings that emphasize the architectural style of the house. This is particularly common on houses with tradi-tional styling.
Flat-Panel DoorsFlat-panel doors are sometimes referred
to as fl ush doors or slab doors. Their entire surface is fl at. They are made with plywood, hardboard, metal, or some other suitable fac-ing applied over a light framework and core. Cores are either solid or hollow, as shown in Figure 21-2.Solid-Core Construction Solid-core construction consists of strips of wood, particleboard, rigid foam, or other core material covered with a thin outer material, such as wood veneer (Figure 21-2A). Solid-core construc-tion reduces warping and is generally preferred for exterior doors. It is also more fi re-resistant than hollow-core doors.
Door Basics 21.1
Figure 21-1 A Patio DoorDoor Features This sliding door can serve as an entrance, but it also allows views.
596 Chapter 21 Residential DoorsJoe Mallon

Solid-coreconstruction
A
Hollow-coreconstruction
B
20"
11/8" 11/8"
4"
21/2"
4"
Stile
Top rail
Dowelsor tenons
Mullion
Panels
Bottom rail
Hollow-Core Construction Hollow-core construction consists of a light framework of wood or corrugated cardboard faced with thin plywood or hardboard (Figure 21-2B). Plywood-faced fl ush doors usually have surface veneers of birch, oak, or mahogany. Most of these are suitable for natural fi nishes. Other wood veneers are usually painted, as are hardboard-faced doors. Areas of a hollow-core door are built up with solid wood, as shown in Figure 21-2B. This provides solid backing for the lock. Solid wood around the edge allows a carpenter to trim the door to fi t the opening.
Raised-Panel DoorsRaised-panel wood doors have panels
that are thicker at the center than at the edges. They consist of stiles (vertical side members), rails (horizontal crosspieces), and the raised panels that fi ll the spaces between as shown in Figure 21-3. Stiles and rails are generally made of solid wood. The panels may be made of solid wood or plywood.
Figure 21-2 Core ConstructionHidden Structure The core construction of a fl at-panel door can be A. solid or B. hollow.
Figure 21-3 Raised-Panel Wood DoorBasic Anatomy The individual parts of a door are held together with a combination of interlocking joinery and adhesives. Nails and screws are not typically used.
Section 21.1 Door Basics 597

Sidecasing
Side jamb
Side jamb
Drip cap Drip cap
Headcasing
CASING
SILLASSEMBLED UNIT
Sill
JAMBS
Sillbevelallow-ance
Sill dado
Doorstoprabbet
Headjamb
Head jamb dado
49/16"
1/2" drywall1/2" drywall
31/2" framing
Jamb
Figure 21-4 Wood Door FrameDoor Frame Parts Parts of a door frame: sill, casing, and jamb assembly.
Figure 21-5 Jamb WidthSized to the Wall The width of an interior door jamb should match the overall thickness of the wall.
door frame on the inside of the house after the frame is installed. Exterior molding and wood stops are sometimes attached by the door manufacturer. However, they are often installed on site.
The door jambs fi t inside a rough opening in the wall framing. They are installed so that their outer edges will be aligned with the fi nished wall surfaces. For example, a standard interior jamb is 49⁄16" wide, as shown in Figure 21-5. Jambs are manufac-tured in standard widths to suit various wall thicknesses. However, wood jambs may be easily cut to fi t. If the wall is unusually thick, strips of solid wood called jamb extensions can be nailed to the edges of the jamb to make it wider. Jambs may also be custom-made to any size.
Wood is the traditional material used for jambs. However, metal is not uncom-mon in a residential building, particularly when the door itself is metal. When exterior door frames include a sill, it is usually
Door FramesA door is mounted on a door frame, which
is attached to the wall framing. The door frame consists of two side jambs and a head jamb, and is the surrounding assembly into which the door fi ts, as shown in Figure 21-4. Exterior door frames may also include a sill or threshold. Molding is usually nailed to the
598 Chapter 21 Residential Doors

Ball tip
Loose pin
Doorjamb
Door
Hingesetbacknot less
than 1/8"
Width of hingegain
Width of hinge
Leng
th o
f hin
ge
Leaf
made of oak (for wear resistance), alu-minum, or a combination of wood and aluminum.
Door frames may be purchased knocked down or preassembled with just the exte-rior casing or brick molding applied. Brick molding is a type of exterior casing. In some cases, door frames come preassembled with the door already hung in the opening. These are called pre-hung doors.Door Frames for Masonry Preassembled metal door frames with welded corners are often specifi ed for exterior walls made of concrete block. These frames are installed as the masonry is laid up. Metal tabs embedded in selected courses hold the frame in place. The hollow area between the frame and the masonry may be fi lled with masonry grout. If this is done, temporarily brace the frame until the grout hardens. This will prevent the frame from bowing outwards. Metal thresh-olds should be bedded in high-performance sealant or otherwise sealed according to the manufacturer’s instructions. KD Metal Door Frames Metal door frames are sometimes installed in residential construc-tion because of their durability. Knock-down (KD) frames consist of three U-shaped channels sized to fi t over the combined thickness of framing and drywall. The top channel, called a header, is installed fi rst. The jamb channels are installed next. After the door has been hung, the frame should be plumbed, squared and secured by screws. Finally, metal casing can be snapped in place over the frame.
Recall Which type of door construction is preferred for exterior doors?
Door HardwareWhat materials would not be suitable for door hardware?
Hardware for doors is made using various metals and fi nishes. Steel, brass, bronze, and nickel are perhaps the most common. The
type of metal and its fi nish affect not only how the hardware looks, but also its durabil-ity and cost.
HingesThe loose-pin butt mortise hinge is most
often used for hanging residential doors, as shown in Figure 21-6. It has two rectan-gular leaves that pivot on a loose metal pin that can be removed. One leaf is screwed to the edge of the door. The other leaf is screwed to the door jamb. The pin connects the two. The door may be removed from the jamb simply by removing the hinge pins and lifting the door out. On exterior doors, hinges are mounted so the pins cannot be removed from the outside. This prevents an intruder from getting into the house simply by removing the hinge pins. The size of a loose-pin butt mortise hinge is the length of a leaf in inches.
The leaves fi t into gains cut into the edge of the door and the jamb. A gain is a
Figure 21-6 Typical Door HingeBasic Hinge A loose-pin butt mortise hinge.
Section 21.1 Door Basics 599

3/16"
Leaf
Interiordoor
Hingeknuckles
Door edge
Hinge gain
mortise (notch) that has a depth equal to the thickness of a single hinge leaf, as shown in Figure 21-7.
LocksetsPassage doors are fi tted with different
types of opening hardware such as the ones shown in Figure 21-8. The assembly of knobs, latch, and locking mechanism is called a lockset. In some cases, lever handles replace the knobs. Lever handles are easier to use for people with limited strength or dexterity.
Locksets are available in three basic types: entry, privacy, and passage. Bored locks fi t into a large hole bored into the face of the door stile. Mortise locks fi t into a large notch cut into the edge of the door stile.Entry Locksets These are used on exterior doors and contain a locking mechanism and key. They may be of the bored or mortise type.Privacy Locksets These light-duty locksets are used on doors leading to bedrooms and
bathrooms. They can be locked from the inside by pressing or turning a button in the knob. There is usually a small slot or hole in the non-locking knob. A small screwdriver inserted into the hole pops the lock open. This is a safety feature that allows the door to be opened from the outside in an emer-gency. All privacy locksets are bored locks.Passage Locksets These are sometimes referred to as latchsets. They are similar in design to privacy locksets but do not include a locking mechanism. They are often used on closet doors.
Storage and HandlingWhen should doors be delivered to a job site?
Proper care and fi nishing of a door will ensure the most service and satisfaction. Proper door care includes the following:• Wood doors should not be delivered to
the house until wet materials, such as plaster and concrete, have given up most of their moisture. Otherwise, the doors can swell and will not fi t properly.
Figure 21-7 Hinge GainCorrect Depth The hinge gain, or mortise, recesses each hinge leaf so that its surface is fl ush with the surface of the door’s edge.
Figure 21-8 LocksetsDifferent Grips Two locksets with lever handles and one with knobs. The tall model is a mortise-type lockset. How do passage locksets differ from privacy locksets?
600 Chapter 21 Residential DoorsJoe Mallon

• Keep all doors away from unusual heat or dryness. Sudden changes, such as heat forced into a building to dry it out, should be avoided.
• Store doors under cover in a clean, dry, well-ventilated area.
• Condition wood doors to the average local moisture content before hanging (see Chapter 12).
• Store doors on edge on a level surface.• Handle doors wearing clean gloves. Bare
hands leave fi nger marks and soil stains on surfaces that have not yet been sealed or painted. When moving a door, carry it. Do not drag it.
• Seal the top and bottom edges of wood doors immediately upon taking delivery to prevent moisture from reaching the end grain. Any warranty that covers the door may be void if the door is not sealed promptly and properly. Even doors that are ordered factory-primed may not have properly sealed edges.
Direction of SwingWhat can happen if a door swings in the wrong direction?
When ordering and installing a door, it is important to know the direction in which the door should swing. A door that opens in the wrong direction may interfere with
wall switches, cabinetry, and traffi c pat-terns. The direction in which a door swings is called its hand. Doors are either left-hand doors or right-hand doors. Unfortunately, there are several methods commonly used to describe the hand of a door. Some of them contradict each other, and even door companies differ in the way they describe door hand.
Here are the two most common methods to determine the hand of a door:• Method 1 Stand with your back against
the hinge jamb. A door that swings toward your right is a right-hand door. One that swings to your left is a left-hand door. This is shown in Figure 21-9 on page 602.
• Method 2 Face the inside of a closed door. In general, the inside of the door is the side from which the hinge knuckles are visible when the door is closed. If the hinges are on the right side of the door, it is a right-hand door. If they are on the left, it is a left-hand door.
As you can see, each of these methods gives different results. It is therefore impor-tant to make sure you understand what is intended when ordering or installing a door. The hand of a door will generally be noted on the building plans and door schedules. The door swing is indicated by a curved line that visually indicates the direction.
Humidity Humidity is the amount of water in the air. It is expressed as a percentage. You know that wood can shrink or swell as a result of humidity. What are some things or activities that could increase the humidity of the air in your home?Starting Hint Think about household activities that involve water.
Earth Science Carrying a Door All doors are unwieldy to carry, particularly pre-hung units. Solid-core doors are very heavy. Get help when moving a door. This will reduce the chance of strained muscles and any damage to the door or fi nished wall surfaces.
Go to glencoe.com for this book’s OLC for more on job safety.
Section 21.1 Door Basics 601

Inactive
PAIRS OF DOORSHand of doors is determined bylocation of active leaf when doorsswing away from point viewed.
SINGLE DOORHand of door may be determined byreferring to sketches below. Door mustalways swing away from the point from which it is viewed.
Inactive
Point of view
Left hand
Right hand
Active
Active
Point of view
Left hand
Right hand
Figure 21-9 Door HandTwo Methods Two ways to determine the swing direction of a door. Double doors are divided into active and inactive sections.
After You Read: Self-Check 1. What is the most common type of door used in residential construction?2. Describe a hollow-core door.
3. What is the standard width of an interior door jamb?4. What type of hinge is most often used for hanging residential doors?
Academic Integration: English Language Arts 5. Gathering and Displaying Information A table organizes information into rows and
columns. With a partner, make a table listing three different doors in the building where you live or in your school. Include the following information about each door: location, dimensions, type of door (exterior or interior), type of lockset, and the hand of the door. Record this information in the table. Use one column for each door.
Go to glencoe.com for this book’s OLC to check your answers.
21.1
Door 1
Door 2
Door 3
602 Chapter 21 Residential Doors

Door
Metalthreshold
21/4"
33/4"
1/2"5/8"
Weatherstripping
Exterior DoorsHow does climate affect door choice?
Many combinations of door and entry designs, trim, and decorative elements are available, from modern to classical. Just as with windows, care should be taken to select a door that is correct for the architectural style of the house. Strength, durability, and energy effi ciency are also important charac-teristics of exterior doors.
Exterior doors are sometimes installed along with glazed panels called sidelights and transoms, as in Figure 21-10. A sidelight is a tall glazed panel installed at one or both sides of a door. A transom is a horizontal glazed panel that fi ts above a door. Side-lights and transoms do not open. Their role is to allow natural light into the entry area.
Exterior doors are usually 13⁄4" thick and not less than 6'-8" high. The main entrance door is required by building codes to be at least 3' wide, but a side or rear ser-vice door may be 2'-8" wide. A hardwood or metal threshold helps to prevent water from getting under a door. It also serves as a base for weatherstripping, as shown in Figure 21-11.
Types of Exterior DoorsTypes of exterior doors include combina-
tion, sliding-glass, French, entry, fi re-rated, and garage doors.Combination Doors Lightweight screen or storm doors are often attached to the frame of an exterior door. Screen doors allow extra ventilation during hot weather. Storm doors protect the main door from weather dam-age and reduce heat loss in cold weather. Combination storm and screen doors are the most common. The screen panel and the storm panel may be exchanged as needed. Figure 21-12 on page 604 shows design details that include a combination door.
Exterior Doors & Frames 21.2
Figure 21-10 Entry DoorElegant Entry This entry includes a solid-wood door, two sidelights, and a curved transom.
Figure 21-11 Door ThresholdWeather Blocker A metal threshold with a vinyl weatherstripping insert. What does this prevent?
Section 21.2 Exterior Doors & Frames 603Joe Mallon

Rain hood
Blocking
Header
Exterior doorHead jamb
Exterior casing
Combinationdoor
Exterior door
Threshold andweatherstrip
InsertGlass
Sill
Combinationdoor
Vertical Section
Sliding-Glass Doors Sliding-glass doors, or patio doors, are available with either wood, vinyl, or metal frames, as shown in Figure 21-13. Insulating glazing helps limit heat loss, but these doors are not as energy effi cient as other types. One side of the door is usu-ally stationary; the other side slides. Door operation may be right-hand or left-hand (as viewed from the outside). Doors are avail-able in widths from 30" to 120".French Doors French doors are hung in pairs on hinges located at each side of the door opening. The doors swing toward each other and meet at the center, as shown in Figure 21-14. French doors are usually fully glazed
and often lead to a deck or patio. They can swing into the room or out. When both sides of the door are open, the area between the jambs is unobstructed and unusually wide.
Molding with a T-shaped profi le is attached to the edge of one of the doors.
Figure 21-12 Door DetailsTraditional Style Cross section details of a door assembly. Note how the combination door relates to the exterior door.
Figure 21-13 Sliding-Glass DoorOne Side Opens A wood sliding-glass door with muntins.
Figure 21-14 French DoorsBoth Sides Open A pair of French doors with decorative muntins.
604 Chapter 21 Residential DoorsJoe Mallon
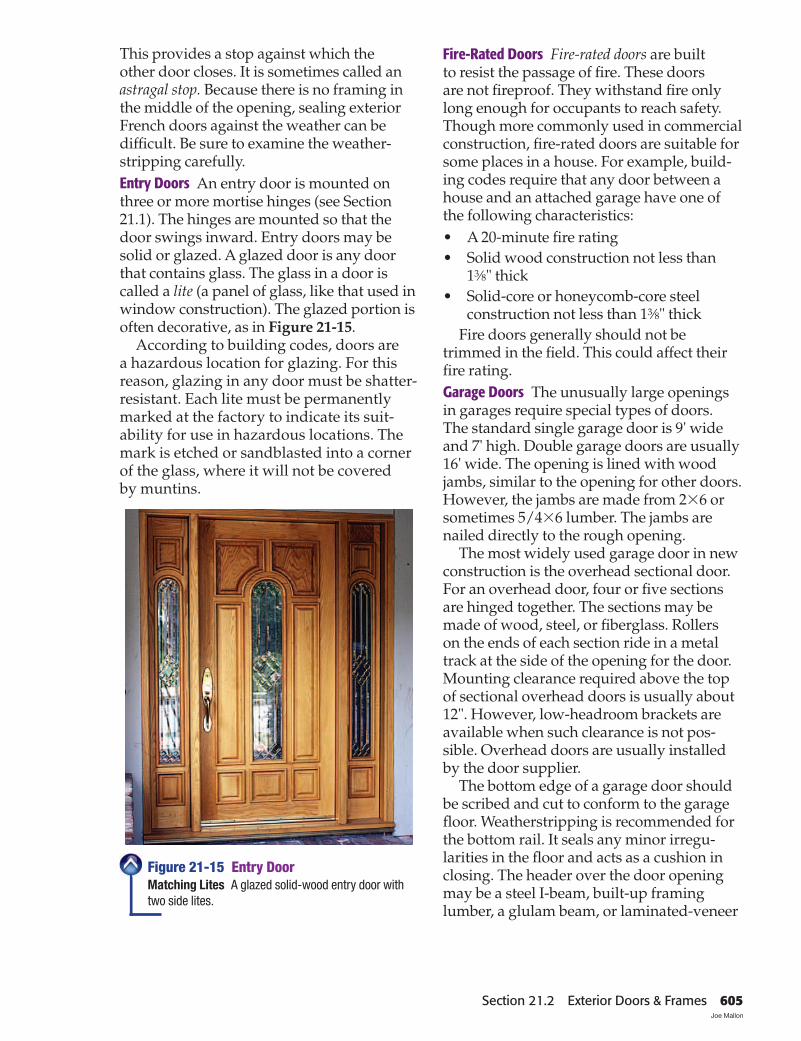
This provides a stop against which the other door closes. It is sometimes called an astragal stop. Because there is no framing in the middle of the opening, sealing exterior French doors against the weather can be diffi cult. Be sure to examine the weather-stripping carefully. Entry Doors An entry door is mounted on three or more mortise hinges (see Section 21.1). The hinges are mounted so that the door swings inward. Entry doors may be solid or glazed. A glazed door is any door that contains glass. The glass in a door is called a lite (a panel of glass, like that used in window construction). The glazed portion is often decorative, as in Figure 21-15.
According to building codes, doors are a hazardous location for glazing. For this reason, glazing in any door must be shatter-resistant. Each lite must be permanently marked at the factory to indicate its suit-ability for use in hazardous locations. The mark is etched or sandblasted into a corner of the glass, where it will not be covered by muntins.
Fire-Rated Doors Fire-rated doors are built to resist the passage of fi re. These doors are not fi reproof. They withstand fi re only long enough for occupants to reach safety. Though more commonly used in commercial construction, fi re-rated doors are suitable for some places in a house. For example, build-ing codes require that any door between a house and an attached garage have one of the following characteristics:• A 20-minute fi re rating• Solid wood construction not less than
13⁄8" thick• Solid-core or honeycomb-core steel
construction not less than 13⁄8" thickFire doors generally should not be
trimmed in the fi eld. This could affect their fi re rating.Garage Doors The unusually large openings in garages require special types of doors. The standard single garage door is 9' wide and 7' high. Double garage doors are usually 16' wide. The opening is lined with wood jambs, similar to the opening for other doors. However, the jambs are made from 2�6 or sometimes 5/4�6 lumber. The jambs are nailed directly to the rough opening.
The most widely used garage door in new construction is the overhead sectional door. For an overhead door, four or fi ve sections are hinged together. The sections may be made of wood, steel, or fi berglass. Rollers on the ends of each section ride in a metal track at the side of the opening for the door. Mounting clearance required above the top of sectional overhead doors is usually about 12". However, low-headroom brackets are available when such clearance is not pos-sible. Overhead doors are usually installed by the door supplier.
The bottom edge of a garage door should be scribed and cut to conform to the garage fl oor. Weatherstripping is recommended for the bottom rail. It seals any minor irregu-larities in the fl oor and acts as a cushion in closing. The header over the door opening may be a steel I-beam, built-up framing lumber, a glulam beam, or laminated-veneer
Figure 21-15 Entry DoorMatching Lites A glazed solid-wood entry door with two side lites.
Section 21.2 Exterior Doors & Frames 605Joe Mallon

Threshold
Plywood
Rim joist
Sill
Sheathing
Cut joist andrim joist to fit sill
Add whennecessary
Floor covering(tile, etc.)
Caulk and use1/4 round molding
Casing
lumber (LVL). Sizing charts for garage-door headers are found in building code books and in instructions provided by header manufacturers.
Sectional doors may be raised manually, but it is common to install an electric door opener. For safety, building codes require sen-sors on all newly installed garage doors fi tted with electric openers. These sensors, one on each side of the opening, detect the presence of a person or object beneath the door. Then they will not allow the door to close.
Installing Exterior DoorsInstalling an exterior door requires a
high level of ability. In terms of installation technique, there are two basic types of doors: pre-hung doors and those hung on site. Hanging a door on site is described here. A pre-hung door is installed as an entire unit, much as a pre-hung window is installed as a unit. Follow manufacturer’s instructions when installing a pre-hung door.
Estimating Materials and TimeThe cost of materials for an exterior door
and frame depends on the style and trim.
An accurate price should be obtained from a local supplier.
A conventional exterior frame and brick molding with an oak sill requires about two hours to assemble and install. It requires one extra hour to hang the door and half an hour to install the lockset. Combination storm and screen doors require about one hour for installation.
Installing the Door FrameBefore installing the frame, prepare the
rough opening. The opening should be about 2" wider and 2" higher than the door. The sill should rest fi rmly on the fl oor framing, which must sometimes be sloped to accommodate solid wood sills. The top of the sill should be even with the fi nished fl oor surface, as shown in Figure 21-16. This will allow the threshold to bridge any gap between the sill and the fl ooring. The top of the threshold should be higher than the fi nished fl oor. This allows the door to open over entry rugs or mats.
Another method would be to use an adjustable metal sill, as in Figure 21-17. This type of sill has a built-in threshold. It often incorporates weatherstripping.
Figure 21-16 Exterior Door SillDoor Sill Components The top of the sill should be set even with the surface of the fi nish fl oor.
606 Chapter 21 Residential Doors

Finishfloor
Door
Subfloor
Sill
The trimmer studs should be set so that they are plumb and straight. This is conveniently done with a 6' long level or by measuring to the string of a plumb line hung from the head jamb. Once the trimmers are plumbed, they should be secured to the king studs in a way that prevents them from moving. Many carpenters clinch trimmers. They do this by driving a 16d nail partway into the trimmer at various points. They then bend it over horizontally so that the edge of the nail head is embedded in the edge of the king stud. Last, they drive a second nail partway into the king stud and bend it downwards to secure the fi rst nail. Another method is to use wood shims to plumb each trimmer. The trimmer is then face-nailed to the king stud through the shims.
Line the rough opening with a strip of 15 lb. asphalt felt or fl exible self-adhesive fl ashing that is 10" or 12" wide. Another way to protect this area from moisture is to install a prefabricated pan fl ashing system. This ensures that any moisture that gets under the sill cannot reach the subfl ooring or fl oor joists below.
To install the frame, tip the frame into place in the rough opening. Brace it loosely to keep it from falling out during adjustment.
Once it is in place, the frame must be plumbed carefully. This will ensure that the door will close properly and that the weath-erstripping will be effective.
Plumb the frame by inserting wood shingles as wedges. Check the sill with a level, and wedge it up as necessary. Insert wedges on each side alternately between the side jambs and the trimmer studs until the space between them is exactly the same on both sides. Then drive a 16d casing nail through the side casing and into the trimmer studs on each side, near the bottom of the casing. This will hold the sill in position. Drive the nails in only part way. Do not drive any nails all the way in until all the nails have been placed and a fi nal check has been made for level and plumb.
Next, place your level against one of the side jambs, as shown in Figure 21-18. Adjust the remaining wedges on that side until the jamb is perfectly true and plumb. Repeat on the other side. Make a fi nal check for level and plumb. Fasten the frame in place with 16d casing nails driven through the casings
Figure 21-17 Adjustable Door SillTime Saver This preassembled door frame features a sill that is adjustable.
Figure 21-18 Installing a Door FrameStraight and Plumb Installing and leveling the frame.
Section 21.2 Exterior Doors & Frames 607Tim Fuller

1 6 jaw piece
1 2 brace1 6 brace
2 4 cross piece 2 6 8' base piece
2 4 block
Approximate3° bevel
Square Door
Gap should be1/8" on a 13/4"door, or 1/16"on a 13/8" door
into the trimmer studs and the door header. Place nails 3⁄4" from the outer edges of the casings and space them about 16" on center. Set all nails with a nail set. Preparing the Door Check the door for imperfections as you remove any protective packaging. The door should be square and fl at, with smooth and unmarked surfaces. You may notice a minor warp or bow caused by unequal moisture conditions on the two sides. The door will usually straighten when the moisture equalizes.
Determine from the fl oor plan which edge of the door is the hinge edge and which is the lock edge. Mark both door edges and the corresponding jambs accordingly.
Carefully measure the height of the fi nished opening on both side jambs and the width of the opening at top and bottom. The opening should be perfectly rectangular. When hung properly, the door should fi t with an opening clearance of 1⁄16" at the sides and on top. If the door has a sill but no threshold, the bottom clearance should be 1⁄16" above the sill. If it has a threshold, the bottom clearance should be 1⁄8" above the threshold. Any sill or threshold should be in place before the door is hung. Lay out
the dimensions of the fi nished opening, less clearance allowances, on the door.
Plane the door edges to the lines. Set the door in the opening frequently to check the fi t. Bevel the lock edge so that the inside edge will clear the jamb. This angle is about 3°, as shown in Figure 21-19.
As an aid in fi tting the door, you might want to build a door jack, or door stand, such as the one in Figure 21-20. The jack holds
Figure 21-19 Beveling the Lock EdgeGradual Trimming Use a square to gauge the bevel while planing the edge of a door.
Figure 21-20 Building a Door Jack Door Holder A site-built door jack or stand holds the door steady as it is being worked on.
608 Chapter 21 Residential Doors

Shim
Doorhook
Hook
Jamb
DoorCenterof middle hinge
Bottomof bottom hinge
Top oftop hinge
Equ
alE
qual
7"11
"
4d finish nail
WedgeA
WedgeB
Figure 21-21 Using a Door HookDoor Holder A door hook can be used to hold a door in position for scribing.
the door upright for planing edges and for the installation of hardware. Commercially made jacks are also available.
Some carpenters prefer to scribe a door to the jamb opening directly. This removes the need to move the door frequently to check its fi t. To do this, the door is held against the opening and marked. A simple tool called a door hook, shown in Figure 21-21, can be used to hold the door in position as it is marked.
Hanging the DoorAfter the door has been properly fi tted,
lay out the locations of the hinges on its edge and on the hinge jamb. Exterior doors usu-ally have three hinges. If the exact positions are not specifi ed, the measurements used are
Figure 21-22 Laying Out Hinge LocationsBasic Layout Measurements commonly used in laying out hinge locations on the exterior door and door jambs.
those shown in Figure 21-22. For an exterior door, a 31⁄2" or 4" hinge is recommended. Three or more hinges help to prevent the door from warping.
Set the door in the frame and force the hinge edge of the door against the hinge jamb with a wedge. See Wedge A in Figure 21-22. Then insert a 4d fi nish nail between the top of the door and the head jamb. Force the top of the door up against the nail with another wedge (Wedge B in Figure 21-22). Since a 4d fi nish nail has a diameter of 1⁄16" (the standard top clearance), the door is now at the correct height.
Measure the distance from the top of the door to the top of the upper hinge and from the fl oor up to the bottom of the lowest hinge. Mark these locations.
Section 21.2 Exterior Doors & Frames 609

Door stoprabbet
Casing
Hinge
Wedges
1" maximum clearance
Exterior ofdoor jamb
13/4" door opened
13/4" door closed
1/16" clearance
1/4" setback
When marking for the middle hinge, remember that the mark must locate the center of the hinge. If a 4" hinge is used, measure 2" from each side of the location line and make a mark. The gain will be cut between the marks.
Remove the door from the opening. Place it in a door jack and lay out the outlines of the gains on the edge of the door using a hinge leaf or a butt-hinge marking gauge as a marker such as the one shown in Figure 21-23. The door-edge hinge setback (see
Figure 21-6 on page 599), should not be less than 1⁄8". It is usually about 1⁄4", as in Figure 21-24. Lay out gains of exactly the same size on the hinge jamb. Chisel out the gains to a depth equal to the thickness of a single hinge leaf.
Separate the hinge leaves by removing the pin. Screw the leaves into the gains on the door and the jamb. Make sure that the leaf into which the pin will be inserted is in the uppermost position when the door is hung in place.
Hang the door, insert the pins, and check the clearances at the side jambs. If the clear-ance along the hinge jamb is too large (more than 1⁄16") and that along the lock jamb is too small (less than 1⁄16"), remove the pins from the hinges and remove the door. Then remove the hinge leaves from the gains and deepen the gains slightly. If the clearance along the hinge jamb is too small and that along the lock jamb is too large, the gains are too deep. This can be corrected by shims of stiff paper stock (such as business cards) placed in the gains.
Figure 21-23 Butt-Hinge Marking GaugeMark the Gains A butt-hinge marking gauge is struck with a hammer to create incised layout marks for a hinge gain.
Figure 21-24 Door Swing ClearancesImportant Details The door hinge should be set back enough to allow the door to clear the casing when it is swung wide open.
610 Chapter 21 Residential DoorsJoe Mallon

Door
Chisel
Rounded cornersleft by router
Routing for a Butt HingeA special metal template is available for
locating the gains for butt hinges, as shown in Figure 21-25. The butt-hinge template may be adjusted for most common hinge spacings. It is easily mounted on the door by driving small pins into the door edge.
The template guides a router, and the gains are cut quickly and accurately. The template is then transferred to the door jamb for cutting the gains that match those on the door. Because router bits leave a rounded corner, the corners must be chiseled square, as shown in Figure 21-26. An alternative is to use hinges with leaves that have rounded corners. The radius of the corners may vary by brand, size, or type of hinge.
Installing an Entry LocksetEntry locksets come in many styles, from
very simple to very sophisticated. Some-times a separate deadbolt is installed to increase security. A deadbolt can have a separate key from that of the lockset, or it can have a matching key. A bored-hole lockset is inexpensive and fairly easy to install. Steps for installing a lockset are given on pages 612–613. An electric drill fi t with two different sizes of hole-saws, shown in
Figure 21-25 Butt-Hinge TemplateTime Saver Use a butt-hinge template and a router to cut hinge gains on the edge of a door.
Figure 21-26 Squaring the Hinge GainsFor a Good Fit If the hinge to be installed has square corners, use a sharp chisel to square up rounded corners left by a router.
Figure 21-27 Tools for Lockset InstallationTwo Sizes Two holesaws, a drill, and a latch assembly.
Figure 21-27, is required for this work. Forstner bits can also be used. The smaller hole-saw (7⁄8") is for the latch assembly. The larger one (21⁄8") is for the knob assembly.
Section 21.2 Exterior Doors & Frames 611Joe Mallon

2-3/8" BACKSET
LOCKS
–– 1st –– –– 2nd ––
For standard 2 3/8" BacksetDOOR THICKNESS
FOLD
ON
EDGE
OF
DOOR
Bore a 7/8" Hole
Thru To
Cross Hole
Bore a 15/8" HoleThru door
TE
MP
LA
TE
13/8" 13/4"
Template onlow edge ifbeveled
Template
Location of 15/8" hole on face
of doorLocations for
7/8" hole on door edge (use one only)
Installing a Bored-Hole Lockset Methods for installing locksets vary with the manufacturer. Always refer to the instructions. A general procedure is explained here. The same method is used for locksets on interior doors.
Step 1 Open the door to a con-venient position. Place wedges under the bottom near the outer edge to hold it steady. You may prefer to remove the door and place it on padded sawhorses.
Step 2 Measure up 36" from the bottom of the door to locate the lockset.
Step 3 Fold the marking template (which comes with the lockset) along the indicated lines. Place it on the beveled edge of the door (Figure 21-28). Using the template guides, mark the center of the door edge and the
Figure 21-28 Marking Templatecenter of the hole. (If a special boring jig is used, no template is needed.) The distance from the door edge to the center of the hole is called the backset. It is typically 21/8" or 21/4".
Step 4 Using a 21/8" hole saw, bore a hole of the correct size in the face of the door. To prevent splitting of the faces, bore the hole on one side until the point of the pilot bit breaks through. Then complete the boring from the other side.
Step 5 Using a 7/8" hole saw, bore a hole of the correct size in the center of the door edge for the latch.
Step 6 Insert the latch assembly into the hole. Keep the faceplate parallel to the edge of the door and mark its outline with a sharp pencil or utility knife.
Step 7 Remove the latch assembly. Chisel out the marked area so that the faceplate will be mounted fl ush with the edge of the door (Figure 21-29).
Figure 21-29 Mortise for Latch Faceplate
612 Chapter 21 Residential Doors

Stems
(Down) - Correct position of keyway wheninstalling locksets
Latch holes
Clearance holefor latch bolt
Figure 21-31 Installing the Strike Plate
Figure 21-30 Installing the Knobs
Go to glencoe.com for this book’s OLC for additional step-by-step procedures, applications, and certifi cation practice.
Step 8 Install the latch with its curved surface facing in the direction of the door closing. Insert and tighten the screws.
Step 9 Insert the exterior knob with the stems into the latch. Make certain that the stems are positioned correctly inside the latch holes (Figure 21-30).
Step 10 Install the interior knob by placing it over the stems and aligning the screw guides. Push the assembly fl ush with the door. Insert the screws and tighten them until the lockset is fi rm.
Step 11 To locate the strike plate, place it over the latch in the door. Then carefully close the door against the stops. The strike plate will hang on the latch in the clearance area between the door edge and the jamb. Push the strike plate in against the latch. With a pencil, mark its position on the jamb.
Step 12 Open the door and hold the strike plate in position against the jamb. Make sure that it is parallel to the edge of the jamb. Mark around the strike plate. Chisel out the marked area so that the strike plate will mount fl ush with the surface of the jamb.
Step 13 Drill a 15/16" clearance hole for the latch bolt 1/2" deep in the door jamb (Figure21-31). Locate it on the centerline of the screws (top to bottom). Install the strike plate and tighten the screws.
Section 21.2 Exterior Doors & Frames 613

Side of doorHead of door Door bottom
Figure 21-32 WeatherstrippingTwo Types Many kinds of weatherstripping are available. Two types are shown here: bulb weatherstripping for the head and side of the door and sweep weatherstripping for the bottom.
After You Read: Self-Check 1. How much larger than an exterior door should the rough opening for the door be? 2. What is the difference between a butt-hinge gauge and a butt-hinge template? 3. Exterior doors should be hung on three hinges. One should be centered on the door’s
length. Where should the other two be positioned? 4. How many holes must be bored in a door to mount a typical entry lockset, and where
should these holes be bored?
Academic Integration: English Language Arts 5. Analyze Information Obtain installation instructions for any type of bored-hole entry
lockset for an exterior door. What types of drill bits does the manufacturer recommend for installation? Do you think these bits would be suitable for all types of exterior doors? Write a paragraph explaining your reasoning.
Go to glencoe.com for this book’s OLC to check your answers.
21.2
attached to the edge of the door or its frame. Magnetic weatherstripping is available for use with metal doors. Any weatherstripping material must close air gaps around the door without interfering with door operation, as shown in Figure 21-32.
Over time, weatherstripping wears down and becomes less effective. It should be replaced as a regular part of door main-tenance. Weatherstripping should not be painted.
WeatherstrippingAn exterior door provides a barrier to the
weather. It must also prevent heated indoor air from being lost in the winter and cooled air from being lost in the summer. The con-struction of the door helps to accomplish both of these tasks. However, weatherstrip-ping is equally important. Weatherstripping consists of fl exible
lengths of rubber, vinyl, polypropylene pile, fl exible metal, or other materials that are
614 Chapter 21 Residential Doors

Interior DoorsWhat are folding doors?
Most interior passage doors are 13⁄8" thick. Standard interior door height is 6'-8". Com-mon minimum widths for single doors are as follows:• Bedrooms and other habitable rooms:
2'-6"• Bathrooms: 2'-4"• Small closets and linen closets: 2'
In most cases, jambs, a stop, and a casing are used to frame and fi nish the opening. Hinged doors should swing in the direction of natural entry, against a blank wall when-ever possible. They should not be obstructed by other doors. For safety reasons, interior doors should never swing into a hallway. See Figure 21-9 on page 602 for determining the hand, or swing, of a door.
Types of Interior DoorsIn addition to basic fl ush or panel styles,
other types of interior doors are available to solve special problems.Louvered Doors A louvered door is used for closets because it provides some ventilation. It is essentially a standard passage door in which the panels have been replaced by louvers (angled slats).Sliding Doors The bypass sliding door is designed for closets and storage walls with wide openings. It requires no open swinging area, so it does not interfere with furniture placement. Only half of the opening is exposed at one time. The exterior surface of sliding doors is sometimes covered with a shatter-resistant mirror.
Sliding doors hang from small roller wheels mounted in a metal track. The track is screwed to the underside of the door head
jamb and can be hidden from view with a piece of trim. The doors are guided at the bottom by a small piece of hardware screwed into the fl oor where the doors overlap.
Doors are available 13⁄8" thick, 6'-8" or 7'-0" high, and in many widths. Most sliding door hardware will also adapt to 13⁄4" or 11⁄8" door thicknesses. The rollers are adjustable so the door may be plumbed and aligned in the opening. Rough opening sizes for sliding doors differ among manufacturers. Be sure to consult the specifi cations.Bifold Doors Bifold doors, shown in Figure 21-33, are often used to enclose a closet, pantry, or laundry area. The doors may be wood, metal, or a composite such as wood covered with vinyl. Unlike sliding doors, bifold doors can be opened so the entire opening is exposed at one time.
Interior Doors & Frames 21.3
Figure 21-33 Louvered Bifold DoorsCompact When Folded Each side of a bifold door can be folded upon itself and stored against the door jamb.
Section 21.3 Interior Doors & Frames 615Tim Fuller

Spring-loadedupper pivot pin
Track
Lower pivot pinLower pivot pin
Floor mounting plate
The doors are available in 6'-8", 7'-6", and 8'-0" heights and in widths of 3', 4', 5', and 6'. Each individually hinged portion of the door is called a panel. If desired, the tracks may be cut in half and only two panels installed. For example, two panels from a 3'-0" door could be used for a 1'-6" linen closet opening.
A bifold door is usually installed in a conventional door frame. The frame may be trimmed with casing to match the trim in the rest of the house, or the jamb may be fi nished the same as the walls. The rough opening is framed in the same way as for a conventional swinging door. The fi nish opening size varies with the manufacturer.
To install a bifold door, install the top track fi rst. The top track contains a fi xed pivot near the jamb. It also serves as a guide for another pivot that is at the opposite side of the door. Then fasten the pivot mounting plates directly to the fl oor and against each side jamb. The doors pivot on pins inserted in their top and bottom edges, as shown in Figure 21-34. The pins fi t into adjustable metal sockets in the tracks. Install the doors by inserting the bottom pivot pin into the bottom track socket. Then insert the upper pivot pin into the top track socket. Adjust the panels to the opening by adjusting the position of the sockets. To make the tops of the panels even, raise or lower the panels by adjusting the lower pins. Folding Doors A folding door may be used as a room divider or to close off a laundry area, closet, or storage wall. They are made from wood, reinforced vinyl, or plastic-coated wood. Folding doors with a metal frame-work covered with vinyl are sometimes called accordion-fold doors.
Folding doors hang on nylon rollers that glide smoothly in a metal track that may be concealed with matching wood molding. Standard or stock doors are available 6'-8" high and 2'-4", 2'-8", 3', or 4' wide. They are installed in a standard frame and trimmed in a conventional manner, as shown in Figure 21-35. Doors are shipped from the factory in a package containing hardware, latch fi t-tings, and installation instructions.
Double-Acting Doors Double-acting doors are common in commercial construction, par-ticularly in restaurants. They are typically full-height and are often used to separate restaurant kitchens from the dining room. However, in residential construction, they are called café doors. These doors are much lighter than commercial doors and do not cover the entire opening. They are usually only about 40" tall, and come in widths to fi t standard openings. They are centered in the door opening. Café doors are often made much like interior wood shutters. They have a wood frame that is typically 11⁄8" thick.
Each café door panel is connected to a jamb so that both doors meet in the middle of the door opening. Each door panel is hinged so that it can swing inward or outwards. This allows someone to push the door open from either side. Some hinges,
Figure 21-34 Bifold Door MountingPivots The doors are supported on pivots. The top pivot fi ts in a track. The bottom pivot is attached to the fl oor.
616 Chapter 21 Residential Doors

CasingWood jamb
Opening width
Jamb mold
End post
Jamb attaching panel
Pocket door
Mounting frame
Header
called gravity hinges, are designed so that the panel raises slightly as it is opened. The weight of the panel then causes the panel to swing closed. Other hinges contain a spring mechanism that automatically closes the door when someone passes through.
Café doors are easy to install. They should be trimmed to the proper width for the opening, with a clearance allowance for swing. Once the hinges are screwed to the door jambs, the doors can be mounted on the hinges. Pocket Doors A pocket door slides into an opening or pocket inside the wall, as shown in Figure 21-36. When a pocket door is open, it is concealed except for one edge. A pocket door is convenient where there is not enough clearance space for a swinging door. One disadvantage is that a pocket door can be diffi cult to repair or adjust because the tracks are inaccessible.
Standard widths are 2'-0", 2'-4", 2'-6", 2'-8", and 3'-0". Any style of door with a thickness of 13⁄8" can be installed in the pocket to match the other doors in the home. However, special hardware is required when the door itself is unusually heavy.
Framing carpenters must be made aware of special framing needs for pocket doors. Before the opening for the pocket unit is roughed in, the manufacturer should be consulted for specifi cations. The rough opening is usually 6'-111⁄2" or 7' high and
twice the door width plus 2" or 21⁄2". The wall header above the pocket must be adequate to support any weight on the wall so there will be no weight on the door itself. The pocket door mounting frame, a stiff metal assembly, comes complete and ready for installation into the rough wall opening. After the fi nish wall covering has been applied, hang the door and install the stops.
Figure 21-35 Folding DoorNeatly Stacked A section view showing a folding door installed with wood jambs.
Figure 21-36 Pocket DoorHidden Door A pocket door is supported on a mounting frame that fi ts in the wall cavity.
Section 21.3 Interior Doors & Frames 617

Side jamb
Head jamb
Provide clearance betweenframe and header
Hinge sideof door
Shims
Spreader
Top of finish flooring
X
XSidejamb
Notch
Nail side jambto head jamb
Head jamb
Stop
Installing Interior DoorsRough openings in the stud walls for inte-
rior doors are usually 2" higher than the door and 2" wider. This provides room for plumb-ing and leveling the frame in the opening.
Interior door frames are made of two side jambs, a head jamb, and stop mold-ings that the door closes against, as shown in Figure 21-37. They are available in 51⁄4" widths for plaster walls and 49⁄16" widths for walls with 1⁄2" drywall fi nish. Wider jambs are required if the walls are thicker. Two- and three-piece adjustable jambs (also called split jambs) are available. Their chief advantage is in being adaptable to differ-ent wall thicknesses. Some manufacturers produce interior door frames with the door fi tted and pre-hung, ready for installation. Adding the casing completes the job.Installing the Door Frame If a door unit is not pre-hung, the jambs must be cut to length, assembled, and installed. The side jambs should be nailed through the notch into the head jamb with three 7d or 8d coated nails (Figure 21-37). Cut a spreader to a length exactly equal to the distance between the jambs at the head jamb (Figure 21-38). A spreader is a temporary spacing device that ensures that the side jambs will be a consistent distance apart. Place the
Figure 21-37 Interior Door Frame DetailsDoor Support A door frame supports the door and provides a fi nished look to the rough opening.
Figure 21-38 Door Frame DetailsSpacing Aid Cut the spreader equal to the distance (X) between the side jambs just below the head jamb.
Care with Wall Materials Do not use overly long fasteners when installing the wall covering over a pocket door pocket. If they project into the opening, they may scratch the surface of the door or prevent it from moving in the pocket. Take the same care when installing the door casing and base molding.
618 Chapter 21 Residential Doors

3/16"
Jamb
Nail
reveal
Framing
Shingleshims
Casing
Stop
Nail
12
spreader at the fl oor line so that the dis-tance between jambs will be identical to the distance near the head jamb. This is more accurate than measuring the distance.
Plumb the assembled frame in the rough opening using pairs of shingle shims placed between the side jambs and the studs, as in Figure 21-39. One jamb, usually the hinge jamb, is plumbed using four or fi ve sets of shims along the height of the frame. Two 8d fi nishing nails are installed at each wedged area, one driven so that the door stop will cover it.
Place the spreader in position at the fl oor line. Fasten the opposite jamb in place using shingle shims and fi nishing nails. Use the fi rst jamb as a guide in keeping a uniform width. This can be done by using a second
precut spreader as a gauge, checking several points. It can also be done by care-fully measuring at various points along the height of the door frame between the side jambs. Installing a Pre-Hung Door If the door unit is pre-hung, installing the frame follows much the same process as for one that is not pre-hung. However, spreaders may not be necessary if the unit has already been squared and braced at the factory. If so, leave the braces on and fi t the entire unit into the rough opening. Then shim the frame and nail it as before. When the frame is secure, remove the braces and double-check the fi t of the door. Hanging an Interior Door Interior doors are often hung with two 31⁄2" by 31⁄2" loose-pin butt hinges. However, three hinges will strengthen the door and help to prevent it from warping. Gains should be routed into the edge about 3⁄16" from the door back (see Figure 21-7 on page 600).
The door fi ts into the opening with the clearances shown in Figure 21-40 on page 620. Clearances and locations for hinges, lockset, and doorknob may vary depending on the products being used. However, the dimen-sions in Figure 21-40 are generally accepted.
The lock stile is the door stile on which the lock will be located. The door stile on which the hinges are located is sometimes called the hinge stile. The edge of the lock stile should be beveled slightly to permit the door to clear the jamb when swung open. This detail is shown in Figure 21-19 on page 608. If the door is to swing across thick carpeting, the bottom clearance should be increased.
When fi tting doors, the stops are usu-ally temporarily nailed in place until after the door has been hung. Stops for doors in single-piece jambs are generally 7⁄16" thick and may be 3⁄4" to 21⁄4" wide. They are installed with mitered joints at the junction of the side and head jambs.
Many interior doors feature hollow-core construction and a wood-veneer surface. To prevent the veneer from splintering when
Figure 21-39 Installation DetailsFrame and Casing Drive a 6d or 7d fi nish nail at arrow 1 to nail through the casing into the wall stud. At arrow 2, use a 4d or 5d fi nish nail to fasten the casing to the jamb.
Section 21.3 Interior Doors & Frames 619

Approximately 2"
Cut line
Stop
Clamp both ends
1/4" plywoodguide
Edge of saw shoe slidesagainst this edge
Figure 21-41 Door Cutting GuideCarpenter-Made Guide A cutting guide is used when trimming doors to length. It must be clamped to the door.
the door is trimmed, some carpenters use a site-built cutting guide such as the one shown in Figure 21-41. The shoe (base) of a circular saw rides on top of the guide, and the shoe’s edge is guided by the stop. The stop is fastened in place with glue and brads.
Door Stops and Trim After the door is in place, permanently nail the stops with 11⁄2" fi nish nails. Nail the stop on the lock side fi rst, setting it tightly against the door face while the door is latched. Space the nails 16" apart in pairs.
Nail the stop behind the hinge side next. Allow a 1⁄32" clearance from the door face to prevent scraping as the door is opened, as shown in Figure 21-42. Finally, nail the head-jamb stop in place. Note that when the doors and trim are painted, some of the clearances will be taken up.
Splinter Stoppers When trimming interior doors, some carpenters use a cutting guide such as the one shown in Figure 21-41. Use a blade specifi cally designed for crosscutting plywood to help reduce splintering even more. Another method is to score the cut line with a utility knife before trimming the door.
Knob
Tophinge
36"–38"
11"
7"
Bottomhinge
1/2" or more
1/8"
1/8"
1/16"
Figure 21-40 Fitting a DoorProper Fit These dimensions and clearances are commonly used when installing interior doors.
620 Chapter 21 Residential Doors

Casing
Jamb
Stop Stop
Slight bevel on edge of door
Hinge side Lock sidePlan view
1/32" clearance
Door Trim Door trim, or casing, is nailed around openings and is also used to fi nish the room side of exterior door frames. Casings are nailed to both the jambs and the framing studs or header. When the casings have been installed, the door opening is complete except for fi tting and securing the hardware. For more on installing door casing, see Chapter 28.
Estimating Materials and TimeThe cost of interior doors and door frames
varies a great deal with the type of door, the materials it is made of, and the quality of its
manufacture. The number, type, and often the manufacturer are specifi ed on the plans.
Check the door schedule and specifi ca-tions. Then confi rm the number and type of doors by checking the fl oor plans. The cost of each door must be established separately. Be sure to determine if the cost includes the door frame and mounting hardware.
The time needed to install an interior door depends on the type of door. A pre-hung door may take approximately 11⁄2 hours. A sliding door may take as much as 3 hours. Pocket doors may take even longer.
Figure 21-42 Door Stop Installation DetailsLast Step The door stops prevent the door from swinging into the opening.
After You Read: Self-Check 1. What is the standard thickness of an interior passage door?2. What is a pocket door?
3. When installing an interior door frame, what is the purpose of a spreader?4. What can be done to prevent the surface veneer of a door from splintering?
Academic Integration: Mathematics 5. Calculate Dimensions The maximum height for the rough opening of a pocket door
is 7'. Determine the maximum size of the width of a rough opening for a 2'6" pocket door. Draw a sketch and label the appropriate measurements.
Creating a sketch of a geometric object and labeling the measurements can help you visualize the missing measurements.
Go to glencoe.com for this book’s OLC to check your answers.
21.3
Section 21.3 Interior Doors & Frames 621

21
Review Content Vocabulary and Academic Vocabulary 1. Use each of these content vocabulary and academic vocabulary words in a sentence or diagram.
Content Vocabulary• passage door (p. 596)• strike plate (p. 596)• solid-core construction (p. 596)• hollow-core construction (p. 597)• stiles (p. 597)
• door frame (p. 598)• gain (p. 599)• lockset (p. 600)• hand (p. 601)
Academic Vocabulary• dexterity (p. 600)• accommodate (p. 606)• consistent (p. 618)
Like a ProTechnical Terms 2. Work with a classmate to defi ne the following
terms used in the chapter: latch (p. 596), fl at-panel doors (p. 596), fl ush doors (p. 596), slab doors (p. 596), jamb extensions (p. 598), pre-hung doors (p. 599), loose-pin butt mortise (p. 599), leaves (p. 599), bored locks (p. 600), mortise locks (p. 600), latchsets (p. 600), sliding-glass doors (p. 604), patio doors (p. 604), French doors (p. 604), astragal stop (p. 605), fi re-rated doors (p. 605), door jack (p. 608), door stand (p. 608), weatherstripping (p. 614), louvered door (p. 615), sliding door (p. 615), bifold doors (p. 615), folding door (p. 616), accordion-fold doors (p. 616), double-acting doors (p. 616), café doors (p. 616), pocket door (p. 617).
Review Key Concepts 3. Name three types of exterior doors
and three types of interior doors.
4. List three things you can do to protect a door after it is delivered to a job site.
5. Describe one method used to determine the hand of a door.
6. List the features of an exterior door that would result in maximum energy effi ciency.
7. Recall the standard height for interior doors.
8. Demonstrate how to install an interior pre-hung door.
Review and Assessment
21.1
Chapter SummaryFlat-panel or raised-panel passage doors are the most common types of doors in houses. They may be made of various materials, though wood is the most common material. Door quality depends upon the door’s construction and hardware.
An important feature of any exterior door is its energy effi ciency, which depends on construction and weatherstripping. Exterior doors can be part of a preassembled package that includes the hinges and jambs. One of several types of keyed locksets may be used, depending on the level of security required.
Various types of sliding and folding doors are available for closets, storage areas, and other locations. They are sometimes mounted on metal tracks instead of on hinges. Installation of an interior door is less complicated than the installation of an exterior door because it does not include a sill or weatherstripping.
21.2
Section
Section
21.3Section
622 Chapter 21 Review and Assessment

Critical Thinking 9. Analyze Identify two types of doors that
would not be good to have in a region with high winds. Explain your reasoning.
Academic and Workplace Applications
10. Estimating Costs Tino has been hired to install 6 pre-hung doors and 2 sliding doors for a house remodeling project. He also needs to allow 5 hours to install a pocket door. The work needs to be completed in 2 days, and he will charge time-and-a-half overtime for any hours he needs to work beyond 8 hours a day. If he charges $20 per hour, how much will Tino earn for the job?
Making a chart can help you keep track of different types of infor-mation in story problems. It can also help you to eliminate the information in the story problem that you do not need.
Starting Hint Organize the information you need in a chart like the one below.
11. Customized Doors You have been asked to create a customized interior door for a specifi c user who uses wheelchairs and braces to get around. Brainstorm what modifi cations you might make to doors for this person so that the door would be easy for him or her to operate. Think about the materials the door will be made from, how the door will be used, and what locking mechanism might be used. Record your ideas in a bulleted list or a one-paragraph description. You might also include a sketch of your door that includes measurements.
12. Career Skills: Work Orders If you have been asked to make a repair to a newly completed house, you may be given a work order. Work orders describe work that needs to be done. They help maintenance departments schedule jobs and keep track of work in progress. They include the date the request is made, the date by which the work should be completed, where the prob-lem or task is located, and a description of it. A list of necessary materials and parts may also be included, as well as any special safety warnings. Most work orders also require that you enter information on them, such as your name, the date you received the order, the date you fi nished the work, your diagnosis of the problem, what you did to correct it, and the hours it required. Obtain or create a sample blank work order. Print or make a copy of the work order. Assume that you have been asked to replace a door trim. Include the information from the requesting party, as well as the information you will need to fi ll in as the individual completing the order.
True/FalseDirections Decide if the following statements are true or false by fi lling in T or F.
13. Steel, brass, bronze, and nickel are the most common materials used for door hardware.
14. A conventional exterior frame and brick molding with an oak sill requires about six hours to assemble and install.
15. Folding doors with a metal framework covered with vinyl are sometimes called accordion-fold doors.
Be sure to reread true/false questions to make sure that you have not misread a false statement as a true statement by mistake.
* These questions will help you practice for nationalcertifi cation assessment.
T F
T F
T F
type of doornumber of
doorstime per
doortotal time
pre-hung
sliding
Chapter 21 Review and Assessment 623