mysql installer guide · mysql installer can install and manage multiple, separate mysql server...
TRANSCRIPT

MySQL Installer Guide

Abstract
This document describes MySQL™ Installer, an application that simplifies the installation and updating process fora wide range of MySQL products, including MySQL Notifier, MySQL Workbench, and MySQL for Excel.
For notes detailing the changes in each release of MySQL Installer, see MySQL Installer Release Notes.
For legal information, see the Legal Notices.
For help with using MySQL, please visit the MySQL Forums, where you can discuss your issues with otherMySQL users.
Document generated on: 2020-03-25 (revision: 65472)

Table of ContentsPreface and Legal Notices ............................................................................................................ v1 MySQL Installer for Windows ..................................................................................................... 12 MySQL Installer Initial Setup ...................................................................................................... 33 Setting Alternative Server Paths with MySQL Installer ................................................................. 74 Installation Workflow with MySQL Installer .................................................................................. 9
4.1 MySQL Server Configuration with MySQL Installer ......................................................... 104.1.1 High Availability .................................................................................................. 104.1.2 Type and Networking ......................................................................................... 134.1.3 Authentication Method ........................................................................................ 144.1.4 Accounts and Roles ........................................................................................... 154.1.5 Windows Service ................................................................................................ 164.1.6 Logging Options ................................................................................................. 164.1.7 Advanced Options .............................................................................................. 174.1.8 Apply Server Configuration ................................................................................. 17
4.2 MySQL Router Configuration with MySQL Installer ......................................................... 175 MySQL Installer Product Catalog and Dashboard ...................................................................... 216 MySQLInstallerConsole Reference ............................................................................................ 29
iii

iv

Preface and Legal NoticesThis document describes MySQL Installer, an application that simplifies the installation and updatingprocess for a wide range of MySQL products, including MySQL Notifier, MySQL Workbench, andMySQL for Excel.
Licensing information. This product may include third-party software, used under license. If youare using a Commercial release of MySQL Installer, see the MySQL Installer Commercial LicenseInformation User Manual for licensing information, including licensing information relating to third-partysoftware that may be included in this Commercial release. If you are using a Community release ofMySQL Installer, see the MySQL Installer Community License Information User Manual for licensinginformation, including licensing information relating to third-party software that may be included in thisCommunity release.
Legal Notices
Copyright © 1997, 2020, Oracle and/or its affiliates. All rights reserved.
This software and related documentation are provided under a license agreement containingrestrictions on use and disclosure and are protected by intellectual property laws. Except as expresslypermitted in your license agreement or allowed by law, you may not use, copy, reproduce, translate,broadcast, modify, license, transmit, distribute, exhibit, perform, publish, or display any part, in anyform, or by any means. Reverse engineering, disassembly, or decompilation of this software, unlessrequired by law for interoperability, is prohibited.
The information contained herein is subject to change without notice and is not warranted to be error-free. If you find any errors, please report them to us in writing.
If this is software or related documentation that is delivered to the U.S. Government or anyonelicensing it on behalf of the U.S. Government, then the following notice is applicable:
U.S. GOVERNMENT END USERS: Oracle programs, including any operating system, integratedsoftware, any programs installed on the hardware, and/or documentation, delivered to U.S.Government end users are "commercial computer software" pursuant to the applicable FederalAcquisition Regulation and agency-specific supplemental regulations. As such, use, duplication,disclosure, modification, and adaptation of the programs, including any operating system, integratedsoftware, any programs installed on the hardware, and/or documentation, shall be subject to licenseterms and license restrictions applicable to the programs. No other rights are granted to the U.S.Government.
This software or hardware is developed for general use in a variety of information managementapplications. It is not developed or intended for use in any inherently dangerous applications, includingapplications that may create a risk of personal injury. If you use this software or hardware in dangerousapplications, then you shall be responsible to take all appropriate fail-safe, backup, redundancy, andother measures to ensure its safe use. Oracle Corporation and its affiliates disclaim any liability for anydamages caused by use of this software or hardware in dangerous applications.
Oracle and Java are registered trademarks of Oracle and/or its affiliates. Other names may betrademarks of their respective owners.
Intel and Intel Xeon are trademarks or registered trademarks of Intel Corporation. All SPARCtrademarks are used under license and are trademarks or registered trademarks of SPARCInternational, Inc. AMD, Opteron, the AMD logo, and the AMD Opteron logo are trademarks orregistered trademarks of Advanced Micro Devices. UNIX is a registered trademark of The Open Group.
This software or hardware and documentation may provide access to or information about content,products, and services from third parties. Oracle Corporation and its affiliates are not responsiblefor and expressly disclaim all warranties of any kind with respect to third-party content, products,and services unless otherwise set forth in an applicable agreement between you and Oracle. Oracle
v

Access to Oracle Support
Corporation and its affiliates will not be responsible for any loss, costs, or damages incurred due toyour access to or use of third-party content, products, or services, except as set forth in an applicableagreement between you and Oracle.
This documentation is NOT distributed under a GPL license. Use of this documentation is subject to thefollowing terms:
You may create a printed copy of this documentation solely for your own personal use. Conversionto other formats is allowed as long as the actual content is not altered or edited in any way. You shallnot publish or distribute this documentation in any form or on any media, except if you distribute thedocumentation in a manner similar to how Oracle disseminates it (that is, electronically for downloadon a Web site with the software) or on a CD-ROM or similar medium, provided however that thedocumentation is disseminated together with the software on the same medium. Any other use, suchas any dissemination of printed copies or use of this documentation, in whole or in part, in anotherpublication, requires the prior written consent from an authorized representative of Oracle. Oracle and/or its affiliates reserve any and all rights to this documentation not expressly granted above.
Access to Oracle Support
Oracle customers that have purchased support have access to electronic support through My OracleSupport. For information, visithttps://www.oracle.com/corporate/accessibility/learning-support.html#support-tab.
vi

Chapter 1 MySQL Installer for WindowsMySQL Installer is a standalone application designed to ease the complexity of installing andconfiguring MySQL products that run on Microsoft Windows. It supports the following MySQL products:
• MySQL Servers
MySQL Installer can install and manage multiple, separate MySQL server instances on the samehost at the same time. For example, MySQL Installer can install, configure, and upgrade a separateinstance of MySQL 5.6, MySQL 5.7, and MySQL 8.0 on the same host. MySQL Installer does notpermit server upgrades between major and minor version numbers, but does permit upgrades withina release series (such as 5.7.18 to 5.7.19).
Note
MySQL Installer cannot install both Community and Commercial (StandardEdition and Enterprise Edition) releases of MySQL server on the same host.If you require both releases on the same host, consider using the ZIP archivedistribution to install one of the releases.
• MySQL Applications
MySQL Workbench, MySQL Shell, MySQL Router, MySQL for Visual Studio, MySQL for Excel, andMySQL Notifier.
• MySQL Connectors
MySQL Connector/NET, MySQL Connector/Python, MySQL Connector/ODBC, MySQL Connector/J,and MySQL Connector/C++.
Note
To install MySQL Connector/Node.js, see https://dev.mysql.com/downloads/connector/nodejs/. Connector/Node.js does not provide an .msi file for usewith MySQL Installer.
• Documentation and Samples
MySQL Reference Manuals (by version) in PDF format and MySQL database samples (by version).
Installation Requirements
MySQL Installer requires Microsoft .NET Framework 4.5.2 or later. If this version is not installed on thehost computer, you can download it by visiting the Microsoft website.
MySQL Installer Community Release
Download software from https://dev.mysql.com/downloads/installer/ to install the Community release ofall MySQL products for Windows. Select one of the following MySQL Installer package options:
• Web: Contains MySQL Installer and configuration files only. The web package downloads onlythe MySQL products you select to install, but it requires an internet connection for each download.The size of this file is approximately 2 MB; the name of the file has the form mysql-installer-community-web-VERSION.N.msi where VERSION is the MySQL server version number such as8.0 and N is the package number, which begins at 0.
• Full or Current Bundle: Bundles all of the MySQL products for Windows (including the MySQLserver). The file size is over 300 MB, and the name has the form mysql-installer-community-VERSION.N.msi where VERSION is the MySQL Server version number such as 8.0and N is the package number, which begins at 0.
1

MySQL Installer Commercial Release
MySQL Installer Commercial Release
Download software from https://edelivery.oracle.com/ to install the Commercial (Standard Edition orEnterprise Edition) release of MySQL products for Windows. The Commercial release includes all ofthe current and previous GA versions in the Community release (excludes development-milestoneversions) and also includes the following products:
• Workbench SE/EE
• MySQL Enterprise Backup
• MySQL Enterprise Firewall
The Commercial release integrates with your My Oracle Support (MOS) account. For knowledge-basecontent and patches, see My Oracle Support.
2

Chapter 2 MySQL Installer Initial Setup• Choosing a Setup Type
• Path Conflicts
• Check Requirements
• MySQL Installer Configuration Files
When you download MySQL Installer for the first time, a setup wizard guides you through the initialinstallation of MySQL products. As the following figure shows, the initial setup is a one-time activity inthe overall process. MySQL Installer detects existing MySQL products installed on the host during itsinitial setup and adds them to the list of products to be managed.
Figure 2.1 MySQL Installer Process Overview
MySQL Installer extracts configuration files (described later) to the hard drive of the host during theinitial setup. Although MySQL Installer is a 32-bit application, it can install both 32-bit and 64-bitbinaries.
The initial setup adds a link to the Start menu under the MySQL group. Click Start, All Programs,MySQL, MySQL Installer to open MySQL Installer.
Choosing a Setup Type
During the initial setup, you are prompted to select the MySQL products to be installed on the host.One alternative is to use a predetermined setup type that matches your setup requirements. By default,both GA and pre-release products are included in the download and installation with the DeveloperDefault, Client only, and Full setup types. Select the Only install GA products option to restrict theproduct set to include GA products only when using these setup types.
Choosing one of the following setup types determines the initial installation only and does not limit yourability to install or update MySQL products for Windows later:
• Developer Default: Install the following products that compliment application development withMySQL:
• MySQL Server (Installs the version that you selected when you downloaded MySQL Installer.)
• MySQL Shell
• MySQL Router
• MySQL Workbench
• MySQL for Visual Studio
• MySQL for Excel
• MySQL Notifier
3

Path Conflicts
• MySQL Connectors (for .NET / Python / ODBC / Java / C++)
• MySQL Documentation
• MySQL Samples and Examples
• Server only: Only install the MySQL server. This setup type installs the general availability (GA) ordevelopment release server that you selected when you downloaded MySQL Installer. It uses thedefault installation and data paths.
• Client only: Only install the most recent MySQL applications and MySQL connectors. This setuptype is similar to the Developer Default type, except that it does not include MySQL server orthe client programs typically bundled with the server, such as mysql or mysqladmin.
• Full: Install all available MySQL products.
• Custom: The custom setup type enables you to filter and select individual MySQL products from theMySQL Installer catalog.
Use the Custom setup type to install:
• A product or product version that is not available from the usual download locations. The catalogcontains all product releases, including the other releases between pre-release (or development)and GA.
• An instance of MySQL server using an alternative installation path, data path, or both. Forinstructions on how to adjust the paths, see Chapter 3, Setting Alternative Server Paths withMySQL Installer.
• Two or more MySQL server versions on the same host at the same time (for example, 5.6, 5.7,and 8.0).
• A specific combination of products and features not offered as a predetermine setup type. Forexample, you can install a single product, such as MySQL Workbench, instead of installing allclient applications for Windows.
Path ConflictsWhen the default installation or data folder (required by MySQL server) for a product to be installedalready exists on the host, the wizard displays the Path Conflict step to identify each conflict andenable you to take action to avoid having files in the existing folder overwritten by the new installation.You see this step in the initial setup only when MySQL Installer detects a conflict.
To resolve the path conflict, do one of the following:
• Select a product from the list to display the conflict options. A warning symbol indicates which path isin conflict. Use the browse button to choose a new path and then click Next.
• Click Back to choose a different setup type or product version, if applicable. The Custom setup typeenables you to select individual product versions.
• Click Next to ignore the conflict and overwrite files in the existing folder.
• Delete the existing product. Click Cancel to stop the initial setup and close MySQL Installer. OpenMySQL Installer again from the Start menu and delete the installed product from the host using theDelete operation from the dashboard.
Check RequirementsMySQL Installer uses entries in the package-rules.xml file to determine whether the prerequisitesoftware for each product is installed on the host. When the requirements check fails, MySQL Installer
4

Description of Check Requirements Elements
displays the Check Requirements step to help you update the host. Requirements are evaluatedeach time you download a new product (or version) for installation. The following figure identifies anddescribes the key areas of this step.
Figure 2.2 Check Requirements
Description of Check Requirements Elements
1. Shows the current step in the initial setup. Steps in this list may change slightly depending on theproducts already installed on the host, the availability of prerequisite software, and the products tobe installed on the host.
2. Lists all pending installation requirements by product and indicates the status as follows:
• A blank space in the Status column means that MySQL Installer can attempt to download andinstall the required software for you.
• The word Manual in the Status column means that you must satisfy the requirement manually.Select each product in the list to see its requirement details.
3. Describes the requirement in detail to assist you with each manual resolution. When possible, adownload URL is provided. After you download and install the required software, click Check toverify that the requirement has been met.
4. Provides the following set operations to proceed:
• Back – Return to the previous step. This action enables you to select a different the setup type.
• Execute – Have MySQL Installer attempt to download and install the required software for allitems without a manual status. Manual requirements are resolved by you and verified by clickingCheck.
• Next – Do not execute the request to apply the requirements automatically and proceed to theinstallation without including the products that fail the check requirements step.
• Cancel – Stop the installation of MySQL products. Because MySQL Installer is already installed,the initial setup begins again when you open MySQL Installer from the Start menu and click Add
5
MySQL Installer Configuration Files
from the dashboard. For a description of the available management operations, see ProductCatalog.
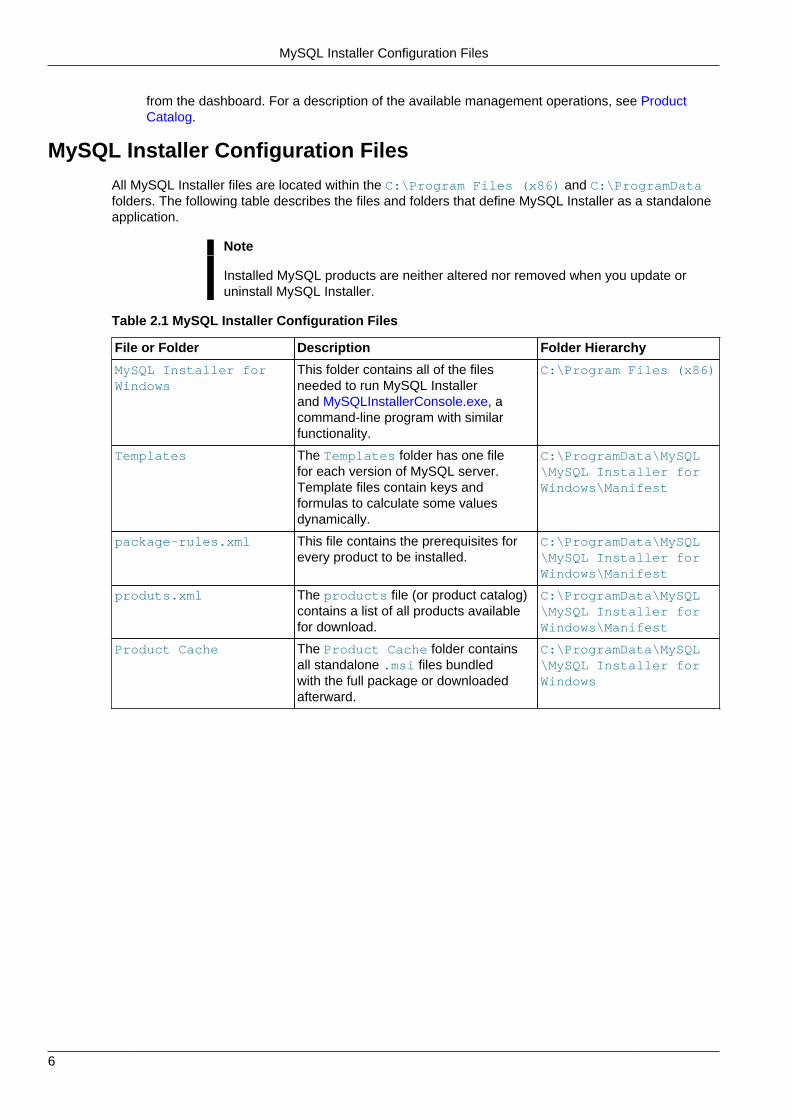
MySQL Installer Configuration Files
All MySQL Installer files are located within the C:\Program Files (x86) and C:\ProgramDatafolders. The following table describes the files and folders that define MySQL Installer as a standaloneapplication.
Note
Installed MySQL products are neither altered nor removed when you update oruninstall MySQL Installer.
Table 2.1 MySQL Installer Configuration Files
File or Folder Description Folder Hierarchy
MySQL Installer forWindows
This folder contains all of the filesneeded to run MySQL Installerand MySQLInstallerConsole.exe, acommand-line program with similarfunctionality.
C:\Program Files (x86)
Templates The Templates folder has one filefor each version of MySQL server.Template files contain keys andformulas to calculate some valuesdynamically.
C:\ProgramData\MySQL\MySQL Installer forWindows\Manifest
package-rules.xml This file contains the prerequisites forevery product to be installed.
C:\ProgramData\MySQL\MySQL Installer forWindows\Manifest
produts.xml The products file (or product catalog)contains a list of all products availablefor download.
C:\ProgramData\MySQL\MySQL Installer forWindows\Manifest
Product Cache The Product Cache folder containsall standalone .msi files bundledwith the full package or downloadedafterward.
C:\ProgramData\MySQL\MySQL Installer forWindows
6

Chapter 3 Setting Alternative Server Paths with MySQLInstaller
You can change the default installation path, the data path, or both when you install MySQL server.After you have installed the server, the paths cannot be altered without removing and reinstalling theserver instance.
To change paths for MySQL server
1. Identify the MySQL server to change and display the Advanced Options link.
a. Navigate to the Select Products and Features step by doing one of the following:
i. If this is an initial setup of MySQL Installer, select the Custom setup type and click Next.
ii. If MySQL Installer is installed already, launch it from the Start menu and then click Addfrom the dashboard.
b. Click Edit to apply a filter on the product list shown in Available Products (see LocatingProducts to Install.
c. With the server instance selected, use the arrow to move the selected server to the Products/Features To Be Installed list.
d. Click the server to select it. When you select the server, the Advanced Options link appears.For details, see the figure that follows.
2. Click Advanced Options to open a dialog box where you can enter alternative path names. Afterthe path names are validated, click Next to continue with the configuration steps.
Figure 3.1 Change MySQL Server Path
7

8

Chapter 4 Installation Workflow with MySQL Installer
Table of Contents4.1 MySQL Server Configuration with MySQL Installer ................................................................. 10
4.1.1 High Availability .......................................................................................................... 104.1.2 Type and Networking ................................................................................................. 134.1.3 Authentication Method ................................................................................................ 144.1.4 Accounts and Roles ................................................................................................... 154.1.5 Windows Service ........................................................................................................ 164.1.6 Logging Options ......................................................................................................... 164.1.7 Advanced Options ...................................................................................................... 174.1.8 Apply Server Configuration ......................................................................................... 17
4.2 MySQL Router Configuration with MySQL Installer ................................................................. 17
MySQL Installer provides a wizard-like tool to install and configure new MySQL products for Windows.Unlike the initial setup, which runs only once, MySQL Installer invokes the wizard each time youdownload or install a new product. For first-time installations, the steps of the initial setup proceeddirectly into the steps of the installation. For assistance with product selection, see Locating Products toInstall.
Note
Full permissions are granted to the user executing MySQL Installer to allgenerated files, such as my.ini. This does not apply to files and directories forspecific products, such as the MySQL server data directory in %ProgramData%that is owned by SYSTEM.
Products installed and configured on a host follow a general pattern that might require your input duringthe various steps. If you attempt to install a product that is incompatible with the existing MySQL serverversion (or a version selected for upgrade), you are alerted about the possible mismatch.
MySQL Installer loads all selected products together using the following workflow:
• Product download. If you installed the full (not web) MySQL Installer package, all .msifiles were loaded to the Product Cache folder during the initial setup and are not downloadedagain. Otherwise, click Execute to begin the download. The status of each product changes fromDownloading to Downloaded.
• Product installation. The status of each product in the list changes from Ready to Install,to Installing, and lastly to Complete. During the process, click Show Details to view theinstallation actions.
If you cancel the installation at this point, the products are installed, but the server (if installed) is notyet configured. To restart the server configuration, open MySQL Installer from the Start menu andclick the Reconfigure link next to the appropriate server in the dashboard.
• Product configuration. This step applies to MySQL Server, MySQL Router, and samples only.The status for each item in the list should indicate Ready to Configure.
Click Next to start the configuration wizard for all items in the list. The configuration optionspresented during this step are specific to the version of database or router that you selected toinstall.
Click Execute to begin applying the configuration options or click Back (repeatedly) to return to eachconfiguration page. Click Finish to open the MySQL Installer dashboard.
9

MySQL Server Configuration with MySQL Installer
• Installation complete. This step finalizes the installation for products that do not requireconfiguration. It enables you to copy the log to a clipboard and to start certain applications, such asMySQL Workbench and MySQL Shell. Click Finish to open the MySQL Installer dashboard.
4.1 MySQL Server Configuration with MySQL InstallerMySQL Installer performs the initial configuration of the MySQL server. For example:
• For the MySQL 8.0 release series, a server can be configured to run as a standalone database, asa sandbox InnoDB cluster on a single host, or to create a production InnoDB cluster inside a localnetwork (see Section 4.1.1, “High Availability”).
• It creates the configuration file (my.ini) that is used to configure the MySQL server. The valueswritten to this file are influenced by choices you make during the installation process. Somedefinitions are host dependent. For example, query_cache is enabled if the host has fewer than threecores.
Note
Query cache was deprecated in MySQL 5.7 and removed in MySQL 8.0 (andlater).
• By default, a Windows service for the MySQL server is added.
• Provides default installation and data paths for MySQL server. For instructions on how to change thedefault paths, see Chapter 3, Setting Alternative Server Paths with MySQL Installer.
• It can optionally create MySQL server user accounts with configurable permissions based on generalroles, such as DB Administrator, DB Designer, and Backup Admin. It optionally creates a Windowsuser named MysqlSys with limited privileges, which would then run the MySQL Server.
User accounts may also be added and configured in MySQL Workbench.
• Checking Show Advanced Options enables additional Logging Options to be set. This includesdefining custom file paths for the error log, general log, slow query log (including the configuration ofseconds it requires to execute a query), and the binary log.
During the configuration process, click Next to proceed to the next step or Back to return to theprevious step. Click Execute at the final step to apply the server configuration.
The sections that follow describe the server configuration options that apply to MySQL server onWindows. The server version you installed will determine which steps and options you can configure.Configuring MySQL server may include some or all of the steps.
4.1.1 High Availability
MySQL Installer enables you to install, configure, and deploy MySQL Server as a standalone instanceor as a member of a highly available cluster using MySQL Group Replication. In either case, MySQLInstaller restricts the installation and configuration of the server (or servers) to the local Windows hostcomputer.
• Standalone MySQL Server / Classic MySQL Replication (default)
Select this option to configure one MySQL instance to run as a standalone database server. Thisoption is ideal if you intend to set up classic replication later and then to include this server in yourcustom solution. The remaining configuration steps are described in the sections that follow, startingwith Type and Networking.
• InnoDB cluster
Select this option to create or extend an InnoDB cluster solution that is based on MySQL GroupReplication (see Introducing InnoDB Cluster). You can configure (or reconfigure) a minimum of three
10

High Availability
server instances to perform a basic setup as a test-only sandbox cluster on a single computer or tocreate a production cluster inside a local network.
InnoDB Cluster Log Verbosity Level. This configuration step includes an adjustable log thatcaptures information during the configuration of each server instance in the production or sandboxcluster. The values are: MINIMAL, MEDIUM (default), and DEBUG. If the cluster configuration fails, usethe Reconfigure action from the MySQL Installer dashboard to restart the configuration and then setthe verbosity level to DEBUG to gather additional information during your next attempt.
MySQL Installer provides the following configuration variations to deploy an InnoDB cluster:
• Set Up a Local Server Cluster for Testing Only
Select Create a Sandbox InnoDB cluster for Testing to enable this option. When prompted,define the number of server sandbox instances in the cluster, set a password for the root user,and adjust the InnoDB cluster log verbosity level as needed. For a more detailed description of theconfiguration, see Deploying a Sandbox InnoDB Cluster with MySQL Installer. This setup requiresMySQL 5.7.17 or higher.
• Create or Join an InnoDB cluster
To set up a highly available InnoDB cluster using MySQL Installer, you must have a minimum ofthree computers on a local network. If you require a more advanced setup, use MySQL Shell toconfigure some or all of the server instances in the cluster. For details about how to perform alocal-network cluster setup, see Setting up an InnoDB cluster with MySQL Installer. This setuprequires MySQL 8.0.0 or higher.
InnoDB cluster was designed to operate with MySQL Shell, which enables you to perform advancedcluster administration, and MySQL Router to automate the connections made between clientapplications and server instances. Neither MySQL Shell nor MySQL Router are required to deploy acluster on Windows using MySQL Installer.
Deploying a Sandbox InnoDB Cluster with MySQL Installer
A sandbox deployment includes multiple server sandbox instances that run together on the samecomputer. Because all server instances reside on the same computer, a sandbox cluster does notmeet the requirements of a highly available solution. Instead, this deployment option simulates anenvironment from which you can explore the techniques associated with InnoDB cluster administration.
When you select Create a Sandbox InnoDB cluster for Testing, a follow-on step prompts youto select a cluster consisting of three, five, seven, or nine MySQL server instances. Unlike theother server setups provided by MySQL Installer, the sandbox deployment skips the usual serverconfiguration steps (except Authentication Method). The resulting cluster, named sandboxCluster, isavailable on selected ports that are configured for you.
Note
MySQL Installer deletes ports 3310 to 3390 during the configuration, if thoseports were set for the sandbox InnoDB cluster manually using MySQL Shell.
Each sandbox instance is configured to run as a process (not a Windows service). You must start eachinstance in the sandbox cluster manually after restarting the computer.
After you create the test cluster, click the Summary tab to view the specific ports that apply to yourcluster. To modify the number of server instances within the existing cluster or to adjust the logginglevel, use the Reconfigure quick action from the MySQL Installer dashboard.
11
High Availability
Warning
MySQL Installer deletes all existing sandbox cluster data when the clusteris reconfigured or when the server instances within the sandbox cluster areupgraded.
MySQL Installer stores all sandbox InnoDB cluster configuration entries in theinstaller_config.xml file. By default, MySQL Installer creates the sandbox instances in%userprofile%\MySQL\mysql-sandboxes on the local host.
Setting up InnoDB Cluster with MySQL Installer
To create a single InnoDB cluster, select InnoDB Cluster as the High Availability option and thenselect Create a New InnoDB Cluster. Adjust the log verbosity level (as needed), and click Next toconfigure the first server instance. This setup process involves installing and running MySQL Installeron multiple computers.
Define the first server instance (or seed) by providing the following configuration information:
• InnoDB Cluster Name:
The default cluster name is myCluster. If you intend to configure multiple clusters, replace thedefault name with one that is meaningful within your solution. Alphanumeric characters, spaces, andunderscore (_) characters are valid for this field. The limit is 40 characters.
• Cluster Admin User Name:
The default cluster administrator name is ic. You can reuse the same MySQL administrativeaccount across multiple clusters. You will be prompted for this account name (and password) laterwhen you configure other server instances to join the cluster. The limit is 32 characters.
• Cluster Admin Password:
Enter a password for the cluster administrator account (minimum length is four characters). MySQLInstaller will evaluate the strength of the MySQL password as you type. Use the Repeat Passwordfield to confirm the password.
• Host Address:
Select the host name or IP address of the local host from the list. When joining additional serverinstances to the cluster, you will be prompted to identify the seed instance by the host name or IPaddress.
• Server ID:
The default value is 1. This identifier is required to record the events of a server instance in thebinary log. The ID of each server instance within a cluster must be unique; however, you can reusethe same number in a different cluster. The server ID you specify in this field also appears later inAdvanced Options step. If you change the value in Advanced Option, the number is changed for theInnoDB cluster Setup too.
Click Next and then complete the remaining configuration steps, which are described in the sectionsthat follow, starting with Type and Networking. After the seed instance is added and the cluster iscreated, it requires more instances for full tolerance. At this point, the status is OK_NO_TOLERANCE.
To add the second and third server instances to the cluster, you must use a separate computer insidethe local network for each. Some of the configuration details of the seed instance are required tocomplete the join operation.
After you start MySQL Installer and install the server instance on the next computer, begin theconfiguration by selecting InnoDB Cluster as the High Availability option and then select Add Local
12

Type and Networking
MySQL Server Instance to an InnoDB Cluster. Adjust the InnoDB Cluster Log Verbosity Level (asneeded) and then click Next.
Define the joining server instance by providing the following configuration information:
• Seed Instance Address:
Enter the host name or IP address of the computer that hosts the seed instance.
• Seed Instance Port:
The default value is 3306, which is the port for classic MySQL. Use the same TCP port that youconfigured for the seed instance.
• Cluster Admin User Name:
The default cluster administrator name is ic. If you assigned a different name when you configuredthe seed instance, enter the alternative cluster administrator name.
• Cluster Admin Password:
Enter the password assigned to the cluster administrator account.
• Host Address:
Select the host name or IP address of the local host from the list.
• Server ID:
The default value is 1. This identifier is required to record the events of a server instance in thebinary log. The ID of each server instance within a cluster must be unique; however, you can reusethe same number in a different cluster. The server ID you specify in this field also appears later inAdvanced Options step. If you change the value in Advanced Option, the number is changed for theInnoDB cluster Setup too.
• Test Connection
Use this button to verify the connection between the local server instance and the seed instancedefined for the cluster. A valid connection is required to proceed.
Click Next and then complete the remaining configuration steps, which are described in the sectionsthat follow, starting with Type and Networking.
With one seed instance and a second server instance in the cluster, the status is OK_NO_TOLERANCE.After you add the third server instance, the status is OK, which indicates that the cluster now is tolerantto the failure of one instance.
4.1.2 Type and Networking
• Server Configuration Type
Choose the MySQL server configuration type that describes your setup. This setting defines theamount of system resources (memory) to assign to your MySQL server instance.
• Development: A computer that hosts many other applications, and typically this is your personalworkstation. This setting configures MySQL to use the least amount of memory.
• Server: Several other applications are expected to run on this computer, such as a web server.The Server setting configures MySQL to use a medium amount of memory.
• Dedicated: A computer that is dedicated to running the MySQL server. Because no other majorapplications run on this server, this setting configures MySQL to use the majority of availablememory.
13

Authentication Method
• Connectivity
Connectivity options control how the connection to MySQL is made. Options include:
• TCP/IP: This option is selected by default. You may disable TCP/IP Networking to permit local hostconnections only. With the TCP/IP connection option selected, you can modify the following items:
• Port for the classic MySQL protocol connections. The default value is 3306.
• X Protocol Port shown when configuring MySQL 8.0 server only.
• Open Windows Firewall port for network access, which is selected by default for TCP/IP.
If a port number is in use already, you will see the information icon ( ) next to the default valueand Next is disabled until you provide a new port number.
• Named Pipe: Enable and define the pipe name, similar to setting the named_pipe systemvariable. The default name is MySQL.
• Shared Memory: Enable and define the memory name, similar to setting the shared_memorysystem variable. The default name is MySQL.
• Advanced Configuration
Check Show Advanced and Logging Options to set custom logging and advanced options in latersteps. The Logging Options step enables you to define custom file paths for the error log, generallog, slow query log (including the configuration of seconds it requires to execute a query), and thebinary log. The Advanced Options step enables you to set the unique server ID required when binarylogging is enabled in a replication topology.
• MySQL Enterprise Firewall (Enterprise Edition only)
The Enable MySQL Enterprise Firewall check box is deselected by default. Select this option toenable a security whitelist that offers protection against certain types of attacks. Additional post-installation configuration is required (see MySQL Enterprise Firewall).
Important
There is an issue for MySQL 8.0.19 that prevents the server from starting ifMySQL Enterprise Firewall is selected during the server configuration steps.If the server startup operation fails, click Cancel to end the configurationprocess and return to the dashboard. You must uninstall the server.
The workaround is to run MySQL Installer without MySQL Enterprise Firewallselected. (That is, do not select the Enable MySQL Enterprise Firewallcheck box.) Then install MySQL Enterprise Firewall afterward using theinstructions for manual installation (see Installing or Uninstalling MySQLEnterprise Firewall).
4.1.3 Authentication Method
The Authentication Method step is visible only during the installation or upgrade of MySQL 8.0.4or higher. It introduces a choice between two server-side authentication options. The MySQL useraccounts that you create in the next step will use the authentication method that you select in this step.
MySQL 8.0 connectors and community drivers that use libmysqlclient 8.0 now support themysql_native_password default authentication plugin. However, if you are unable to update yourclients and applications to support this new authentication method, you can configure the MySQLserver to use mysql_native_password for legacy authentication. For more information about theimplications of this change, see caching_sha2_password as the Preferred Authentication Plugin.
14

Accounts and Roles
If you are installing or upgrading to MySQL 8.0.4 or higher, select one of the following authenticationmethods:
• Use Strong Password Encryption for Authentication (RECOMMENDED)
MySQL 8.0 supports a new authentication based on improved, stronger SHA256-based passwordmethods. It is recommended that all new MySQL server installations use this method going forward.
Important
The caching_sha2_password authentication plugin on the server requiresnew versions of connectors and clients, which add support for the newMySQL 8.0 default authentication.
• Use Legacy Authentication Method (Retain MySQL 5.x Compatibility)
Using the old MySQL 5.x legacy authentication method should be considered only in the followingcases:
• Applications cannot be updated to use MySQL 8.0 connectors and drivers.
• Recompilation of an existing application is not feasible.
• An updated, language-specific connector or driver is not available yet.
4.1.4 Accounts and Roles
• Root Account Password
Assigning a root password is required and you will be asked for it when performing other MySQLInstaller operations. Password strength is evaluated when you repeat the password in the boxprovided. For descriptive information regarding password requirements or status, move your mouse
pointer over the information icon ( ) when it appears.
• MySQL User Accounts (Optional)
Click Add User or Edit User to create or modify MySQL user accounts with predefined roles. Next,enter the required account credentials:
• User Name: MySQL user names can be up to 32 characters long.
• Host: Select localhost for local connections only or <All Hosts (%)> when remoteconnections to the server are required.
• Role: Each predefined role, such as DB Admin, is configured with its own set of privileges. Forexample, the DB Admin role has more privileges than the DB Designer role. The Role drop-down list contains a description of each role.
• Password: Password strength assessment is performed while you type the password. Passwordsmust be confirmed. MySQL permits a blank or empty password (considered to be insecure).
MySQL Installer Commercial Release Only: MySQL Enterprise Edition for Windows, acommercial product, also supports an authentication method that performs external authentication onWindows. Accounts authenticated by the Windows operating system can access the MySQL serverwithout providing an additional password.
To create a new MySQL account that uses Windows authentication, enter the user nameand then select a value for Host and Role. Click Windows authentication to enable theauthentication_windows plugin. In the Windows Security Tokens area, enter a token for eachWindows user (or group) who can authenticate with the MySQL user name. MySQL accounts can
15
Windows Service
include security tokens for both local Windows users and Windows users that belong to a domain.Multiple security tokens are separated by the semicolon character (;) and use the following formatfor local and domain accounts:
• Local account
Enter the simple Windows user name as the security token for each local user or group; forexample, finley;jeffrey;admin.
• Domain account
Use standard Windows syntax (domain\domainuser) or MySQL syntax (domain\\domainuser) to enter Windows domain users and groups.
For domain accounts, you may need to use the credentials of an administrator within the domainif the account running MySQL Installer lacks the permissions to query the Active Directory. If thisis the case, select Validate Active Directory users with to activate the domain administratorcredentials.
Windows authentication permits you to test all of the security tokens each time you add or modifya token. Click Test Security Tokens to validate (or revalidate) each token. Invalid tokens generatea descriptive error message along with a red X icon and red token text. When all tokens resolve asvalid (green text without an X icon), you can click OK to save the changes.
4.1.5 Windows Service
On the Windows platform, MySQL server can run as a named service managed by the operatingsystem and be configured to start up automatically when Windows starts. Alternatively, you canconfigure MySQL server to run as an executable program that requires manual configuration.
• Configure MySQL server as a Windows service (Selected by default.)
When the default configuration option is selected, you can also select the following:
• Start the MySQL Server at System Startup
When selected (default), the service startup type is set to Automatic; otherwise, the startup type isset to Manual.
• Run Windows Service as
When Standard System Account is selected (default), the service logs on as Network Service.
The Custom User option must have privileges to log on to Microsoft Windows as a service. TheNext button will be disabled until this user is configured with the required privileges.
A custom user account is configured in Windows by searching for "local security policy" in the Startmenu. In the Local Security Policy window, select Local Policies, User Rights Assignment,and then Log On As A Service to open the property dialog. Click Add User or Group to add thecustom user and then click OK in each dialog to save the changes.
• Deselect the Windows Service option
4.1.6 Logging Options
This step is available if the Show Advanced Configuration check box was selected during the Typeand Networking step. To enable this step now, click Back to return to the Type and Networking stepand select the check box.
Advanced configuration options are related to the following MySQL log files:
16

Advanced Options
• Error Log
• General Log
• Slow Query Log
• Bin Log
Note
The binary log is enabled by default for MySQL 5.7 and higher.
4.1.7 Advanced Options
This step is available if the Show Advanced Configuration check box was selected during the Typeand Networking step. To enable this step now, click Back to return to the Type and Networking stepand select the check box.
The advanced-configuration options include:
• Server ID
Set the unique identifier used in a replication topology. If binary logging is enabled, you must specifya server ID. The default ID value depends on the server version. For more information, see thedescription of the server_id system variable.
Tip
If you specified an ID for a server instance of an InnoDB cluster, then MySQLInstaller adjusts the ID (shown on this page) to match the previous identifier.
• Table Names Case
You can set the following options during the initial and subsequent configuration the server. For theMySQL 8.0 release series, these options apply only to the initial configuration of the server.
• Lower Case
Sets the lower_case_table_names option value to 1 (default), in which table names are storedin lowercase on disk and comparisons are not case-sensitive.
• Preserve Given Case
Sets the lower_case_table_names option value to 2, in which table names are stored as givenbut compared in lowercase.
4.1.8 Apply Server Configuration
All configuration settings are applied to the MySQL server when you click Execute. Use theConfiguration Steps tab to follow the progress of each action; the icon for each toggles from white togreen (with a check mark) on success. Otherwise, the process stops and displays an error message ifan individual action times out. Click the Log tab to view the log.
When the installation completes successfully and you click Finish, MySQL Installer and the installedMySQL products are added to the Microsoft Windows Start menu under the MySQL group. OpeningMySQL Installer loads the dashboard where installed MySQL products are listed and other MySQLInstaller operations are available.
4.2 MySQL Router Configuration with MySQL InstallerMySQL Installer downloads and installs a suite of tools for developing and managing business-criticalapplications on Windows. The suite consist of applications, connectors, documentation, and samples.
17

MySQL Router Configuration
During the initial setup, choose any predetermined setup type, except Server only, to install thelatest GA version of the tools. Use the Custom setup type to install an individual tool or specificversion. If MySQL Installer is installed on the host already, use the Add operation to select and installtools from the MySQL Installer dashboard.
MySQL Router Configuration
MySQL Installer provides a configuration wizard that can bootstrap an installed instance of MySQLRouter 8.0 or later to route traffic between MySQL applications and an InnoDB cluster. Whenconfigured, MySQL Router runs as a local Windows service. For detailed information about usingMySQL Router with an InnoDB cluster, see Routing for MySQL InnoDB cluster.
Note
You are prompted to configure MySQL Router after the initial installation andwhen you reconfigure an installed router explicitly. In contrast, the upgradeoperation does not require or prompt you to configure the upgraded product.
To configure MySQL Router, do the following:
1. Set up InnoDB cluster. For instructions on how to configure a sandbox InnoDB cluster on the localhost using MySQL Installer, see Section 4.1.1, “High Availability”.
For general InnoDB cluster information, see InnoDB Cluster.
2. Using MySQL Installer, download and install the MySQL Router application. After the installationfinishes, the configuration wizard prompts you for information. Select the Configure MySQLRouter for InnoDB cluster check box to begin the configuration and provide the followingconfiguration values:
• Hostname: Host name of the primary (seed) server in the InnoDB cluster (localhost bydefault).
• Port: The port number of the primary (seed) server in the InnoDB cluster (3310 by default).
• Management User: An administrative user with root-level privileges.
• Password: The password for the management user.
• Classic MySQL protocol connections to InnoDB cluster
Read/Write: Set the first base port number to one that is unused (between 80 and 65532) andthe wizard will select the remaining ports for you.
The figure that follows shows an example of the MySQL Router configuration page, with the firstbase port number specified as 6446 and the remaining ports set by the wizard as 6447, 6448,and 6449.
18

MySQL Router Configuration
Figure 4.1 MySQL Router Configuration
3. Click Next and then Execute to apply the configuration. Click Finish to close MySQL Installer orreturn to the MySQL Installer dashboard.
After installing a production cluster with MySQL Router, the root account only exists in the user tableas root@localhost (local), instead of root@% (remote). Regardless of where the router or clientare located, even if both are located on the same host as the seed server, any connection that passesthrough the router is viewed by server as being remote, not local. As a result, a connection made to theserver using the local host (see the example that follows), does not authenticate.
shell> \c root@localhost:6446
19

20

Chapter 5 MySQL Installer Product Catalog and Dashboard• Product Catalog
• MySQL Installer Dashboard
• Locating Products to Install
• Upgrading MySQL Installer
This section describes the MySQL Installer product catalog and the dashboard.
Product Catalog
The product catalog stores the complete list of released MySQL products for Microsoft Windows thatare available to download from MySQL Downloads. By default, and when an Internet connection ispresent, MySQL Installer updates the catalog daily. You can also update the catalog manually from thedashboard (described later).
An up-to-date catalog performs the following actions:
• Populates the Available Products pane of the Select Products and Features step. This stepappears when you select:
• The Custom setup type during the initial setup.
• The Add operation from the dashboard.
• Identifies when product updates are available for the installed products listed in the dashboard.
The catalog includes all development releases (Pre-Release), general releases (Current GA), andminor releases (Other Releases). Products in the catalog will vary somewhat, depending on theMySQL Installer release that you download.
MySQL Installer Dashboard
The MySQL Installer dashboard is the default view that you see when you start MySQL Installer afterthe initial setup finishes. If you closed MySQL Installer before the setup was finished, MySQL Installerresumes the initial setup before it displays the dashboard.
21

Description of MySQL Installer Dashboard Elements
Figure 5.1 MySQL Installer Dashboard Elements
Description of MySQL Installer Dashboard Elements
1. MySQL Installer dashboard operations provide a variety of actions that apply to installed productsor products listed in the catalog. To initiate the following operations, first click the operation link andthen select the product or products to manage:
• Add: This operation opens the Select Products and Features page. From there, you can filter theproduct in the product catalog, select one or more products to download (as needed), and beginthe installation. For hints about using the filter, see Locating Products to Install.
• Modify: Use this operation to add or remove the features associated with installed products.Features that you can modify vary in complexity by product. When the Program Shortcut checkbox is selected, the product appears in the Start menu under the MySQL group.
• Upgrade: This operation loads the Select Products to Upgrade page and populates it with all theupgrade candidates. An installed product can have more than one upgrade version and requiresa current product catalog.
Important server upgrade conditions:
• MySQL Installer does not permit server upgrades between major release versions or minorrelease versions, but does permit upgrades within a release series, such as an upgrade from5.7.18 to 5.7.19.
• Upgrades between milestone releases (or from a milestone release to a GA release) are notsupported. Significant development changes take place in milestone releases and you mayencounter compatibility issues or problems starting the server.
• For upgrades to MySQL 8.0.16 server and higher, a check box enables you to skip theupgrade check and process for system tables, while checking and processing data dictionarytables normally. MySQL Installer does not prompt you with the check box when the previousserver upgrade was skipped or when the server was configured as a sandbox InnoDB cluster.This behavior represents a change in how MySQL Server performs an upgrade (see What the
22

Description of MySQL Installer Dashboard Elements
MySQL Upgrade Process Upgrades) and it alters the sequence of steps that MySQL Installerapplies to the configuration process.
If you select Skip system tables upgrade check and process. (Not recommended),MySQL Installer starts the upgraded server with the --upgrade=MINIMAL server option,which upgrades the data dictionary only. If you stop and then restart the server without the --upgrade=MINIMAL option, the server upgrades the system tables automatically, if needed.
The following information appears in the Log tab and log file after the upgrade configuration(with system tables skipped) is complete:
WARNING: The system tables upgrade was skipped after upgrading MySQL Server. The server will be started now with the --upgrade=MINIMAL option, but then each time the server is started it will attempt to upgrade the system tables, unless you modify the Windows service (command line) to add --upgrade=MINIMAL to bypass the upgrade.FOR THE BEST RESULTS: Run mysqld.exe --upgrade=FORCE on the command line to upgradethe system tables manually.
To choose a new product version:
a. Click Upgrade. Confirm that the check box next to product name in the UpgradeableProducts pane has a check mark. Deselect the products that you do not intend to upgrade atthis time.
Note
For server milestone releases in the same release series, MySQLInstaller deselects the server upgrade and displays a warning toindicate that the upgrade is not supported, identifies the risks ofcontinuing, and provides a summary of the steps to perform a logicalupgrade manually. You can reselect server upgrade at your own risk.For instructions on how to perform a logical upgrade with a milestonerelease, see Logical Upgrade.
b. Click a product in the list to highlight it. This action populates the Upgradeable Versionspane with the details of each available version for the selected product: version number,published date, and a Changes link to open the release notes for that version.
MySQL Installer upgrades all of the selected products in one action. Click Show Details to viewthe actions performed by MySQL Installer.
• Remove: This operation opens the Remove Products page and populates it with the MySQLproducts installed on the host. Select the MySQL products you want to remove (uninstall) and
23

Description of MySQL Installer Dashboard Elements
then click Execute to begin the removal process. During the operation, an indicator shows thenumber of steps that are executed as a percentage of all steps.
To select products to remove, do one of the following:
• Select the check box for one or more products.
• Select the Product check box to select all products.
To remove a local MySQL server:
a. Determine whether the local data directory should be removed. If you retain the datadirectory, another server installation can reuse the data. This option is enabled by default(removes the data directory).
b. If the local server is a member of an InnoDB cluster, reconfigure the cluster as follows:
i. Type the administrator password for the cluster affected when the local server is removedand then click Test Connection to verify the credentials. MySQL Installer can perform thefollowing actions, depending on the configuration of the existing cluster:
• If the local server is a seed instance and the number of instances in the cluster is one,dissolve the cluster when you remove the local server.
• If the local server is a seed instance and the number of instances in the cluster isgreater than one, remove the instance from the cluster or dissolve the cluster when youremove the local server.
• If the local server is a slave instance within the cluster and the number of instancesin the cluster is greater than two, remove the local instance from the cluster. (A singleslave instance within a cluster reverts to a seed instance automatically.)
• If the local server is configured as a sandbox InnoDB cluster, remove all instancescreated for the sandbox server installation.
ii. When prompted, do one of the following:
• Select an action to apply to the cluster and click Next.
• Click Next without selecting an action. In most cases, MySQL Group Replication canmanage the cluster when the local server becomes unavailable. A warning messagereminds you that skipping the step may result in an inconsistent InnoDB clusterconfiguration.
c. Click Execute to begin uninstalling the local server. Note that all products that you selected toremove are also uninstalled at this time.
d. (Optional) Click the Log tab to display the current actions performed by MySQL Installer.
2. The Reconfigure link in the Quick Action column next to each installed server loads the currentconfiguration values for the server and then cycles through all configuration steps enabling you tochange the options and values. You must provide credentials with root privileges to reconfigurethese items. Click the Log tab to show the output of each configuration step performed by MySQLInstaller.
On completion, MySQL Installer stops the server, applies the configuration changes, and restartsthe server for you. For a description of each configuration option, see Section 4.1, “MySQL ServerConfiguration with MySQL Installer”. Installed Samples and Examples associated with a specificMySQL server version can be also be reconfigured to apply new feature settings, if any.
24

Description of MySQL Installer Dashboard Elements
3. The Catalog link enables you to download the latest catalog of MySQL products manually andthen to integrate those product changes with MySQL Installer. The catalog-download action doesnot perform an upgrade of the products already installed on the host. Instead, it returns to thedashboard and displays an arrow icon in the Version column for each installed product that has anewer version. Use the Upgrade operation to install the newer product version.
You can also use the Catalog link to display the current change history of each product withoutdownloading the new catalog. Select the Do not update at this time check box to view the changehistory only.
4.The MySQL Installer About icon ( ) shows the current version of MySQL Installer and generalinformation about MySQL. The version number is located above the Back button.
Tip
Always include this version number when reporting a problem with MySQLInstaller.
In addition to the About MySQL information ( ), you can also select the following icons from theside panel:
•License icon ( ) for MySQL Installer.
This product may include third-party software, used under license. If you are using a Commercialrelease of MySQL Installer, the icon opens the MySQL Installer Commercial License InformationUser Manual for licensing information, including licensing information relating to third-partysoftware that may be included in this Commercial release. If you are using a Community releaseof MySQL Installer, the icon opens the MySQL Installer Community License Information UserManual for licensing information, including licensing information relating to third-party softwarethat may be included in this Community release.
•Resource links icon ( ) to the latest MySQL product documentation, blogs, webinars, andmore.
5.The MySQL Installer Options icon ( ) includes the following tabs:
• Product Catalog: Manages the daily automatic catalog updates. By default, catalog updates arescheduled at a fixed hour. When new products or product versions are available, MySQL Installer
adds them to the catalog and then displays an arrow icon ( ) next to the version number ofinstalled products listed in the dashboard.
Use this option to enable or disable automatic catalog updates and to reset the time of day whenthe MySQL Installer updates the catalog automatically. For specific settings, see the task namedManifestUpdate in the Windows Task Scheduler.
• Connectivity Settings: Several operations performed by MySQL Installer require internetaccess. This option enables you to use a default value to validate the connection or to usea different URL, one selected from a list or added by you manually. With the Manual optionselected, new URLs can be added and all URLs in the list can be moved or deleted. When theAutomatic option is selected, MySQL Installer attempts to connect to each default URL in the list(in order) until a connection is made. If no connection can be made, it raises an error.
25

Locating Products to Install
Locating Products to Install
MySQL products in the catalog are listed by category: MySQL Servers, Applications, MySQLConnectors, and Documentation. Only the latest GA versions appear in the Available Products paneby default. If you are looking for a pre-release or older version of a product, it may not be visible in thedefault list.
To change the default product list, click Add on the dashboard to open the Select Products andFeatures page, and then click Edit to open the filter dialog box (see the figure that follows). Modify theproduct values and then click Filter.
Figure 5.2 Filter Available Products
Reset one or more of the following values to filter the list of available products:
• Text: Filter by text.
• Category: All Software (default), MySQL Servers, Applications, MySQL Connectors, orDocumentation (for samples and documentation).
• Maturity: Current Bundle (appears initially with the full package only), Pre-Release, Current GA, orOther Releases.
Note
The Commercial release of MySQL Installer does not display any MySQLproducts when you select the Pre-Release age filter. Products in developmentare available from the Community release of MySQL Installer only.
• Already Downloaded (the check box is deselected by default).
• Architecture: Any (default), 32-bit, or 64-bit.
Upgrading MySQL Installer
MySQL Installer remains installed on your computer, and like other software, MySQL Installer canbe upgraded from the previous version. In some cases, other MySQL software may require that youupgrade MySQL Installer for compatibility. This section describes how to identify the current version ofMySQL Installer and how to upgrade MySQL Installer manually.
To locate the installed version of MySQL Installer:
1. Start MySQL Installer from the search menu. The MySQL Installer dashboard opens.
2.Click the MySQL Installer About icon ( ). The version number is located above the Back button.
26

Upgrading MySQL Installer
To initiate an on-demand upgrade of MySQL Installer:
1. Connect the computer with MySQL Installer installed to the internet.
2. Start MySQL Installer from the search menu. The MySQL Installer dashboard opens.
3. Click Catalog on the bottom of the dashboard to open the Update Catalog window.
4. Click Execute to begin the process. If the installed version of MySQL Installer can be upgraded,you will be prompted to start the upgrade.
5. Click Next to review all changes to the catalog and then click Finish to return to the dashboard.
6. Verify the (new) installed version of MySQL Installer (see the previous procedure).
27

28

Chapter 6 MySQLInstallerConsole ReferenceMySQLInstallerConsole.exe provides command-line functionality that is similar to MySQLInstaller. It is installed when MySQL Installer is initially executed and then available within the MySQLInstaller directory. Typically, that is in C:\Program Files (x86)\MySQL\MySQL Installer\, and the console must be executed with administrative privileges.
To use, invoke the command prompt with administrative privileges by choosing Start, Accessories,then right-click on Command Prompt and choose Run as administrator. And from the commandline, optionally change the directory to where MySQLInstallerConsole.exe is located:
C:\> cd Program Files (x86)\MySQL\MySQL Installer for WindowsC:\Program Files (x86)\MySQL\MySQL Installer for Windows> MySQLInstallerConsole.exe help=================== Start Initialization ===================MySQL Installer is running in Community modeAttempting to update manifest.Initializing product requirementsLoading product catalogChecking for product catalog snippetsChecking for product packages in the bundleCategorizing product catalogFinding all installed packages.Your product catalog was last updated at 11/1/2016 4:10:38 PM=================== End Initialization ===================The following commands are available:Configure - Configures one or more of your installed programs.Help - Provides list of available commands.Install - Install and configure one or more available MySQL programs.List - Provides an interactive way to list all products available.Modify - Modifies the features of installed products.Remove - Removes one or more products from your system.Status - Shows the status of all installed products.Update - Update the current product catalog.Upgrade - Upgrades one or more of your installed programs.
MySQLInstallerConsole.exe supports the following commands:
Note
Configuration block values that contain a colon (":") must be wrapped in doublequotes. For example, installdir="C:\MySQL\MySQL Server 8.0".
• configure [product1]:[setting]=[value]; [product2]:[setting]=[value];[...]
Configure one or more MySQL products on your system. Multiple setting=value pairs can beconfigured for each product.
Switches include:
• -showsettings : Displays the available options for the selected product, by passing in theproduct name after -showsettings.
• -silent : Disable confirmation prompts.
C:\> MySQLInstallerConsole configure -showsettings serverC:\> MySQLInstallerConsole configure server:port=3307
• help [command]
Displays a help message with usage examples, and then exits. Pass in an additional command toreceive help specific to that command.
C:\> MySQLInstallerConsole helpC:\> MySQLInstallerConsole help install
29

• install [product]:[features]:[config block]:[config block]:[configblock]; [...]
Install one or more MySQL products on your system. If pre-release products are available, both GAand pre-release products are installed when the value of the -type switch is Developer, Client,or Full. Use the -only_ga_products switch to restrict the product set to GA products only whenusing these setup types.
Switches and syntax options include:
• -only_ga_products : Restricts the product set to include GA products only.
• -type=[SetupType] : Installs a predefined set of software. The "SetupType" can be one of thefollowing:
Note
Non-custom setup types can only be chosen if no other MySQL productsare installed.
• Developer: Installs a complete development environment.
• Server: Installs a single MySQL server
• Client: Installs client programs and libraries
• Full: Installs everything
• Custom: Installs user selected products. This is the default option.
• -showsettings : Displays the available options for the selected product, by passing in theproduct name after -showsettings.
• -silent : Disable confirmation prompts.
• [config block]: One or more configuration blocks can be specified. Each configuration blockis a semicolon separated list of key value pairs. A block can include either a "config" or "user" typekey, where "config" is the default type if one is not defined.
Configuration block values that contain a colon character (:) must be wrapped in double quotes.For example, installdir="C:\MySQL\MySQL Server 8.0".
Only one "config" type block can be defined per product. A "user" block should be defined for eachuser that should be created during the product's installation.
Note
Adding users is not supported when a product is being reconfigured.
• [feature]: The feature block is a semicolon separated list of features, or an asterisk character(*) to select all features.
C:\> MySQLInstallerConsole install server;5.6.25:*:port=3307;serverid=2:type=user;username=foo;password=bar;role=DBManagerC:\> MySQLInstallerConsole install server;5.6.25;x64 -silent
An example that passes in additional configuration blocks, separated by ^ to fit:
C:\> MySQLInstallerConsole install server;5.6.25;x64:*:type=config;openfirewall=true; ^ generallog=true;binlog=true;serverid=3306;enable_tcpip=true;port=3306;rootpasswd=pass; ^ installdir="C:\MySQL\MySQL Server 5.6":type=user;datadir="C:\MySQL\data";username=foo;password=bar;role=DBManager
30

• list
Lists an interactive console where all of the available MySQL products can be searched. ExecuteMySQLInstallerConsole list to launch the console, and enter in a substring to search.
C:\> MySQLInstallerConsole list
• modify [product1:-removelist|+addlist] [product2:-removelist|+addlist][...]
Modifies or displays features of a previously installed MySQL product.
• -silent : Disable confirmation prompts.
C:\> MySQLInstallerConsole modify serverC:\> MySQLInstallerConsole modify server:+documentationC:\> MySQLInstallerConsole modify server:-debug
• remove [product1] [product2] [...]
Removes one ore more products from your system.
• * : Pass in * to remove all of the MySQL products.
• -continue : Continue the operation even if an error occurs.
• -silent : Disable confirmation prompts.
C:\> MySQLInstallerConsole remove *C:\> MySQLInstallerConsole remove server
• status
Provides a quick overview of the MySQL products that are installed on the system. Informationincludes product name and version, architecture, date installed, and install location.
C:\> MySQLInstallerConsole status
• update
Downloads the latest MySQL product catalog to your system. On success, the download catalog willbe applied the next time either MySQLInstaller or MySQLInstallerConsole is executed.
C:\> MySQLInstallerConsole update
Note
The Automatic Catalog Update GUI option executes this command from theWindows Task Scheduler.
• upgrade [product1:version] [product2:version] [...]
Upgrades one or more products on your system. Syntax options include:
• * : Pass in * to upgrade all products to the latest version, or pass in specific products.
• ! : Pass in ! as a version number to upgrade the MySQL product to its latest version.
• -silent : Disable confirmation prompts.
C:\> MySQLInstallerConsole upgrade *C:\> MySQLInstallerConsole upgrade workbench:6.3.5C:\> MySQLInstallerConsole upgrade workbench:!C:\> MySQLInstallerConsole upgrade workbench:6.3.5 excel:1.3.2
31

32