n vsphere 5 - vmware · vsphere security update 2 vmware vsphere 5.5 ... virtual machine snapshot...
TRANSCRIPT
vSphere SecurityUpdate 2VMware vSphere 5.5VMware ESXi 5.5vCenter Server 5.5

vSphere Security
VMware, Inc. 2
You can find the most up-to-date technical documentation on the VMware website at:
https://docs.vmware.com/
If you have comments about this documentation, submit your feedback to
Copyright © 2009–2014 VMware, Inc. All rights reserved. Copyright and trademark information.
VMware, Inc.3401 Hillview Ave.Palo Alto, CA 94304www.vmware.com

Contents
About vSphere Security 7
Updated Information 8
1 Security in the vSphere Environment 9
Security and the Virtualization Layer 9
Security and the Virtual Networking Layer 11
Security Resources and Information 11
2 vSphere Authentication with vCenter Single Sign-On 13
How vCenter Single Sign-On Protects Your Environment 13
vCenter Single Sign-On Components 15
How vCenter Single Sign-On Affects vCenter Server Installation 15
How vCenter Single Sign-On Affects vCenter Server Upgrades 17
Using vCenter Single Sign-On with vSphere 18
Configuring vCenter Single Sign-On 20
Managing vCenter Single Sign-On Users and Groups 34
Troubleshooting vCenter Single Sign-On 41
3 vSphere Security Certificates and Encryption 45
Certificates Used in vSphere 45
Certificate Replacement Overview 47
Certificate Automation Tool Deployment Options 48
Replacing vCenter Certificates With the vCenter Certificate Automation Tool 50
Replace vCenter Server Appliance Certificates 58
Replace vCenter Server Heartbeat Certificates 59
4 vSphere Users and Permissions 60
Hierarchical Inheritance of Permissions 60
Multiple Permission Settings 62
Permission Validation 65
Using Roles to Assign Privileges 65
Best Practices for Roles and Permissions 66
Required Privileges for Common Tasks 66
Password Requirements 69
vCenter Server User Directory Settings 70
VMware, Inc. 3

5 vCenter User Management Tasks 71Managing Permissions for vCenter Components 71
Roles in vCenter Server and ESXi 74
Adjust the Search List in Large Domains in the vSphere Web Client 76
6 Securing vCenter Server Systems 78
Hardening the vCenter Server Host Operating System 78
Best Practices for vCenter Server Privileges 79
Enable Certificate Checking and Verify Host Thumbprints in the vSphere Web Client 80
Removing Expired or Revoked Certificates and Logs from Failed Installations 81
Enable SSL Certificate Validation Over Network File Copy 81
Limiting vCenter Server Network Connectivity 82
7 Securing ESXi Hosts 85
General ESXi Security Recommendations 85
ESXi Firewall Configuration 92
Assigning Permissions for ESXi 97
Using Active Directory to Manage ESXi Users 101
Replacing ESXi SSL Certificates and Keys 103
Uploading an SSH Key to Your ESXi Host 108
Using the ESXi Shell 110
Lockdown Mode 115
Using vSphere Authentication Proxy 118
Replace the Authentication Proxy Certificate for the ESXi Host 123
Modifying ESXi Web Proxy Settings 124
vSphere Auto Deploy Security Considerations 128
Managing ESXi Log Files 128
8 Securing Virtual Machines 132
General Virtual Machine Protection 132
Disable Unnecessary Functions Inside Virtual Machines 133
Use Templates to Deploy Virtual Machines 139
Prevent Virtual Machines from Taking Over Resources 139
Limit Informational Messages from Virtual Machines to VMX Files 140
Prevent Virtual Disk Shrinking in the vSphere Web Client 140
Minimize Use of Virtual Machine Console 141
Configuring Logging Levels for the Guest Operating System 141
9 Securing vSphere Networking 144
Introduction to vSphere Network Security 144
Securing the Network with Firewalls 146
Secure the Physical Switch 152
vSphere Security
VMware, Inc. 4

Securing Standard Switch Ports With Security Policies 153
Securing Standard Switch MAC Addresses 153
Standard Switch Protection and VLANs 155
Secure vSphere Distributed Switches 157
Securing Virtual Machines with VLANs 158
Creating a Network DMZ on a Single ESXi Host 159
Creating Multiple Networks Within a Single ESXi Host 161
Internet Protocol Security 163
Ensure Proper SNMP Configuration 167
Use Virtual Switches on the vSphere Network Appliance Only If Required 167
10 Best Practices for Virtual Machine and Host Security 169
Synchronizing Clocks on the vSphere Network 169
Securing iSCSI Storage 171
Masking and Zoning SAN Resources 172
Control CIM-Based Hardware Monitoring Tool Access 173
Verify That Sending Host Performance Data to Guests is Disabled 174
11 Defined Privileges 175
Alarms 176
Datacenter 177
Datastore 178
Datastore Cluster 178
vSphere Distributed Switch 179
ESX Agent Manager 180
Extension 180
Folder 181
Global 181
Host CIM 182
Host Configuration 182
Host Inventory 184
Host Local Operations 184
Host vSphere Replication 185
Host Profile 185
Network 186
Performance 186
Permissions 187
Profile-driven Storage 187
Resource 188
Scheduled Task 188
Sessions 189
Storage Views 189
vSphere Security
VMware, Inc. 5

Tasks 190
vApp 190
vCenter Inventory Service Tagging 191
Virtual Machine Configuration 192
Virtual Machine Guest Operations 194
Virtual Machine Interaction 195
Virtual Machine Inventory 197
Virtual Machine Provisioning 198
Virtual Machine Snapshot Management Privileges 199
Virtual Machine vSphere Replication 200
dvPort Group 200
vServices 201
VRM Policy 201
vSphere Security
VMware, Inc. 6

About vSphere Security
vSphere Security provides information about securing your vSphere® environment for VMware® vCenter®
Server and VMware ESXi.
To help you protect your vSphere environment, this documentation describes security features availablein the vSphere environment and the measures that you can take to safeguard your environment fromattack.
Intended AudienceThis information is for experienced Windows or Linux system administrators who are familiar with virtualmachine technology and datacenter operations.
VMware, Inc. 7

Updated Information
This vSphere Security document is updated with each release of the product or when necessary.
This table provides the update history of the vSphere Security document.
Revision Description
EN-001517-04 n Corrected port for vSphere Replication in TCP and UDP Portsn Removed information about DSA keys from Upload an SSH Key Using a vifs Commandn Added clarification to Configure SSL Timeouts. Also added a note that a timeout longer than the default is
not recommended.
EN-001517-03 n Updated Edit the vCenter Single Sign-On Password Policy. Password policies apply to both administratorusers and other users.
EN-001517-02 n Added information about Multiple Permission Settings.n Updated Add Members to a vCenter Single Sign-On Group. You cannot add groups to groups.n Added PCI and PCIe Devices and ESXi.n Added warning that administrators should not delete groups that are predefined in the vsphere.local domain
to Managing vCenter Single Sign-On Users and Groups.
EN-001517-01 n Updated vCenter Single Sign-On user management topics to include an additional step.
EN-001517-00 Initial release.
VMware, Inc. 8

Security in the vSphereEnvironment 1To secure your vSphere environment, you must become familiar with many aspects of security includingauthentication, authorization, users and permissions, and aspects of securing vCenter Server systems,ESXi hosts, and virtual machines.
A high level overview of different areas of vSphere that require attention helps you plan your securitystrategy. You also benefit from additional vSphere Security resources on the VMware website.
This chapter includes the following topics:n Security and the Virtualization Layer
n Security and the Virtual Networking Layer
n Security Resources and Information
Security and the Virtualization LayerVMware designed the virtualization layer, or VMkernel, to run virtual machines. It controls the hardwarethat hosts use and schedules the allocation of hardware resources among the virtual machines. Becausethe VMkernel is fully dedicated to supporting virtual machines and is not used for other purposes, theinterface to the VMkernel is strictly limited to the API required to manage virtual machines.
VMware, Inc. 9

ESXi provides additional VMkernel protection with the following features:
Memory Hardening The ESXi kernel, user-mode applications, and executable componentssuch as drivers and libraries are located at random, non-predictablememory addresses. Combined with the non-executable memoryprotections made available by microprocessors, this provides protectionthat makes it difficult for malicious code to use memory exploits to takeadvantage of vulnerabilities.
Kernel Module Integrity Digital signing ensures the integrity and authenticity of modules, drivers andapplications as they are loaded by the VMkernel. Module signing allowsESXi to identify the providers of modules, drivers, or applications andwhether they are VMware-certified. VMware software and certain third-party drivers are signed by VMware.
Trusted PlatformModule (TPM)
vSphere uses Intel Trusted Platform Module/Trusted Execution Technology(TPM/TXT) to provide remote attestation of the hypervisor image based onhardware root of trust. The hypervisor image consists of the followingelements:
n ESXi software (hypervisor) in VIB (package) format
n Third-party VIBs
n Third-party drivers
To leverage this capability, your ESXi system must have TPM and TXTenabled.
When TPM and TXT are enabled, ESXi measures the entire hypervisorstack when the system boots and stores these measurements in thePlatform Configuration Registers (PCR) of the TPM. The measurementsinclude the VMkernel, kernel modules, drivers, native managementapplications that run on ESXi, and any boot-time configuration options. AllVIBs that are installed on the system are measured.
Third-party solutions can use this feature to build a verifier that detectstampering of the hypervisor image, by comparing the image with an imageof the expected known good values. vSphere does not provide a userinterface to view these measurements.
The measurements are exposed in a vSphere API. An event log is providedas part of the API, as specified by the Trusted Computing Group (TCG)standard for TXT.
vSphere Security
VMware, Inc. 10

Security and the Virtual Networking LayerThe virtual networking layer includes virtual network adapters and virtual switches. ESXi relies on thevirtual networking layer to support communications between virtual machines and their users. In addition,hosts use the virtual networking layer to communicate with iSCSI SANs, NAS storage, and so forth.
The methods you use to secure a virtual machine network depend on which guest operating system isinstalled, whether the virtual machines operate in a trusted environment, and a variety of other factors.Virtual switches provide a substantial degree of protection when used with other common securitypractices, such as installing firewalls.
ESXi also supports IEEE 802.1q VLANs, which you can use to further protect the virtual machine networkor storage configuration. VLANs let you segment a physical network so that two machines on the samephysical network cannot send packets to or receive packets from each other unless they are on the sameVLAN.
Security Resources and InformationYou can find additional information about security on the VMware Web site.
The table lists security topics and the location of additional information about these topics.
Table 1‑1. VMware Security Resources on the Web
Topic Resource
VMware security policy, up-to-date security alerts,security downloads, and focus discussions ofsecurity topics
http://www.vmware.com/security/
Corporate security response policy http://www.vmware.com/support/policies/security_response.html
VMware is committed to helping you maintain a secure environment.Security issues are corrected in a timely manner. The VMware SecurityResponse Policy states our commitment to resolve possible vulnerabilitiesin our products.
Third-party software support policy http://www.vmware.com/support/policies/
VMware supports a variety of storage systems, software agents such asbackup agents, system management agents, and so forth. You can find listsof agents, tools, and other software that supports ESXi by searching http://www.vmware.com/vmtn/resources/ for ESXi compatibility guides.
The industry offers more products and configurations than VMware can test.If VMware does not list a product or configuration in a compatibility guide,Technical Support will attempt to help you with any problems, but cannotguarantee that the product or configuration can be used. Always evaluatesecurity risks for unsupported products or configurations carefully.
General information about virtualization andsecurity
VMware Virtual Security Technical Resource Center http://www.vmware.com/go/security
Compliance and security standards, as well aspartner solutions and in-depth content aboutvirtualization and compliance
http://www.vmware.com/go/compliance
vSphere Security
VMware, Inc. 11

Table 1‑1. VMware Security Resources on the Web (Continued)
Topic Resource
Information on VMware vCloud networking andsecurity.
http://www.vmware.com/go/vmsafe
Hardening guides for different versions of vSphereand other VMware products.
https://www.vmware.com/support/support-resources/hardening-guides.html
Information on security certifications andvalidations such as CCEVS and FIPS for differentversions of the components of vSphere.
https://www.vmware.com/support/support-resources/certifications.html
vSphere Security
VMware, Inc. 12

vSphere Authentication withvCenter Single Sign-On 2vCenter Single Sign-On is an authentication broker and security token exchange. When a user isauthenticated with vCenter Single Sign-On, that user can access all installed vCenter services to whichthe user has been granted access. Because traffic is encrypted for all communications and onlyauthenticated users can be granted access, your environment is secure.
Install or upgrade vCenter Single Sign-On before you install or upgrade any other vSphere components.See the vSphere Installation and Setup or the vSphere Upgrade documentation.
For information on replacing certificates for services that use vCenter Single Sign-On, see Chapter 3vSphere Security Certificates and Encryption.
This chapter includes the following topics:n How vCenter Single Sign-On Protects Your Environment
n vCenter Single Sign-On Components
n How vCenter Single Sign-On Affects vCenter Server Installation
n How vCenter Single Sign-On Affects vCenter Server Upgrades
n Using vCenter Single Sign-On with vSphere
n Configuring vCenter Single Sign-On
n Managing vCenter Single Sign-On Users and Groups
n Troubleshooting vCenter Single Sign-On
How vCenter Single Sign-On Protects Your EnvironmentvCenter Single Sign-On allows vSphere components to communicate with each other through a securetoken mechanism instead of requiring users to authenticate separately with each component.
vCenter Single Sign-On uses a combination of STS (Security Token Service), SSL for secure traffic, andauthentication through Active Directory or OpenLDAP, as shown in the following illustration.
VMware, Inc. 13

Figure 2‑1. vCenter Single Sign-On Handshake
vCenterServer
vCenter SingleSign-On
VMwareDirectoryService
CA
Kerberos
vSphere Web Client
12
3 4
5
6
1 A user logs in to the vSphere Web Client with a user name and password to access thevCenter Server system or another vCenter service.
The user can also log in without a password and check the Use Windows session authenticationcheckbox. The checkbox becomes available after you install the VMware Client Integration Plugin.
2 The vSphere Web Client passes the login information to the vCenter Single Sign-On service, whichchecks the SAML token of the vSphere Web Client. If the vSphere Web Client has a valid token,vCenter Single Sign-On then checks whether the user is in the configured identity source (forexample Active Directory).
n If only the user name is used, vCenter Single Sign-On checks in the default domain.
n If a domain name is included with the user name (DOMAIN\user1), vCenter Single Sign-Onchecks that domain.
3 If the user is in the identity source, vCenter Single Sign-On returns a token that represents the user tothe vSphere Web Client.
4 The vSphere Web Client passes the token to the vCenter Server system.
5 vCenter Server checks with the vCenter Single Sign-On server that the token is valid and not expired.
6 The vCenter Single Sign-On server returns the token to the vCenter Server system.
The user can now authenticate to vCenter Server and view and modify any objects that the user haspermissions for..
Note Initially, each user is assigned the No Access permission. A vCenter Server administrator mustassign the user at least Read Only permissions before the user can log in. See Assign Permissions in thevSphere Web Client and Chapter 5 vCenter User Management Tasks.
vSphere Security
VMware, Inc. 14

vCenter Single Sign-On ComponentsvCenter Single Sign-On includes the Security Token Service (STS), an administration server, and vCenterLookup Service, as well as the VMware Directory Service (vmdir).
The components are deployed as part of installation.
STS (Security TokenService)
STS certificates enable a user who has logged on through vCenter SingleSign-On to use any vCenter service that vCenter Single Sign-On supportswithout authenticating to each one. The STS service issues SecurityAssertion Markup Language (SAML) tokens. These security tokensrepresent the identity of a user in one of the identity source types supportedby vCenter Single Sign-On.
Administration server The administration server allows users with administrator privileges tovCenter Single Sign-On to configure the vCenter Single Sign-On server andmanage users and groups from the vSphere Web Client. Initially, only theuser [email protected] has these privileges.
vCenter LookupService
vCenter Lookup Service contains topology information about the vSphereinfrastructure, enabling vSphere components to connect to each othersecurely. Unless you are using Simple Install, you are prompted for theLookup Service URL when you install other vSphere components. Forexample, the Inventory Service and the vCenter Server installers ask forthe Lookup Service URL and then contact the Lookup Service to findvCenter Single Sign-On. After installation, the Inventory Service andvCenter Server system are registered in vCenter Lookup Service so othervSphere components, like the vSphere Web Client, can find them.
VMware DirectoryService
Directory service associated with the vsphere.local domain. This service isa multi-tenanted, multi-mastered directory service that makes an LDAPdirectory available on port 11711. In multisite mode, an update of VMwareDirectory Service content in one VMware Directory Service instance resultsin the automatic update of the VMware Directory Service instancesassociated with all other vCenter Single Sign-On nodes.
How vCenter Single Sign-On Affects vCenter ServerInstallationStarting with version 5.1, vSphere includes a vCenter Single Sign-On component as part of thevCenter Server management infrastructure. This change affects vCenter Server installation.
Authentication by vCenter Single Sign-On makes the VMware cloud infrastructure platform more secureby allowing the vSphere software components to communicate with each other through a secure tokenexchange mechanism.
vSphere Security
VMware, Inc. 15

For the first installation of vCenter Server, you must install all components. In subsequent installations inthe same environment, or if you add services, you do not have to install vCenter Single Sign-On. OnevCenter Single Sign-On server can serve your entire vSphere environment. After you install vCenterSingle Sign-On once, you can connect all new vCenter Server instances to the same vCenter SingleSign-On service. You must install an Inventory Service instance for each vCenter Server instance.
Simple InstallThe Simple Install option installs vCenter Single Sign-On, the vSphere Web Client, vCenter InventoryService, and vCenter Server on the same host or virtual machine. Simple Install is appropriate for mostdeployments.
Custom InstallIf you want to customize the location and setup of each component, you can install the componentsseparately by performing a custom install and selecting the individual installation options, in the followingorder:
1 vCenter Single Sign-On
2 vSphere Web Client
3 vCenter Inventory Service
4 vCenter Server
You can install each component on a different host or virtual machine.
If you decide on installing multiple vCenter Server systems, you can point to the same vCenter SingleSign-On service for each vCenter Server.
Installing in Multiple LocationsUnlike vCenter Single Sign-On version 5.1, vCenter Single Sign-On 5.5 synchronizes authentication dataacross locations.
If you install vCenter Server systems in multiple locations, you can install a vCenter Single Sign-On serverin each location. When you install the second and subsequent instances of vCenter Single Sign-On, youcan point those instances to the first vCenter Single Sign-On instance during installation. The twoinstances synchronize their VMware Directory Service instances. Changes to one instance arepropagated to the other instance.
vSphere Security
VMware, Inc. 16

Figure 2‑2. Installing vCenter Single Sign-On in Multiple Locations
vCenterServer
1
vCenterSingle
Sign-On1
vCenterServer
2
vCenterSingle
Sign-On2
VMwareDirectoryService
vSphere.local
Solutions users
Active Directory
VMwareDirectoryService
How vCenter Single Sign-On Affects vCenter ServerUpgradesWhich users can log in to vCenter Server after an upgrade depends on the version that you are upgradingfrom and the deployment configuration.
In upgrades to vCenter Server 5.0 and earlier, which do not include a vCenter Single Sign-On service,both the local operating system users and Active Directory users that are registered with vCenter Servercontinue to work with the upgraded vCenter Server.
This behavior changes if you are upgrading from a version that does not include vCenter Single Sign-Onto a version that does include vCenter Single Sign-On: vCenter Server version 5.1 or vCenter Serverversion 5.5.
Note With vCenter Single Sign-On, local operating system users become far less important than theusers in a directory service such as Active Directory. As a result, it is not always possible, or evendesirable, to keep local operating system users as authenticated users.
After the upgrade from a version earlier than version 5.1, you might be prompted for the administrator ofthe root folder in the vSphere inventory hierarchy during installation. This might happen because ofchanges in user stores from pre-5.1 versions to 5.1 and later versions of vSphere. See HierarchicalInheritance of Permissions.
Simple Install UpgradeA Simple Install upgrade installs or upgrades a single vCenter Server and related components.
vSphere Security
VMware, Inc. 17

If you upgrade to vCenter Server 5.5 from a vCenter Server version that does not include vCenter SingleSign-On, vCenter Single Sign-On recognizes existing local operating system users. In addition, the [email protected] can log in as an administrator user to vCenter Single Sign-On andvCenter Server. If your previous installation supported Active Directory users, you can add the ActiveDirectory domain as an identity source.
If you upgrade vCenter Single Sign-On and vCenter Server, vCenter Single Sign-On recognizes existinglocal operating system users. In addition, the user [email protected] can log in to vCenterSingle Sign-On and vCenter Server as an administrator user. If your previous installation included anActive Directory domain as an identity source, that identity source is still available after the upgrade.Because vCenter Server supports only one default identity source, users might have to specify thedomain when they log in (DOMAIN\user).
Custom UpgradeA custom upgrade might install different vCenter Server components on different machines or install asecond vCenter Server system on the same machine. You also use Custom Install to upgrade anenvironment that is installed in different locations.
If you upgrade to vCenter Server 5.5 from a vCenter Server version that does not include vCenter SingleSign-On, and you install vCenter Single Sign-On on a different machine than vCenter Server, vCenterSingle Sign-On does not recognize existing local operating system users. The [email protected] can log in to vCenter Single Sign-On and vCenter Server as anadministrator user. If your previous installation supported Active Directory users, you can add the ActiveDirectory domain as an identity source.
If you are upgrading vCenter Server from a version that includes vCenter Single Sign-On in multisitemode, and if the different vCenter Server systems use Linked mode, you must resynchronize first. Youcan then upgrade all vCenter Single Sign-On instances and maintain Linked Mode functionality. LinkedMode is required for a single view of all vCenter Server systems. Multisite vCenter Single Sign-On issupported only if all nodes are the same version.
If you are upgrading vCenter Server from a version that includes vCenter Single Sign-On in highavailability mode, you must upgrade all of the vCenter Single Sign-On high availability instances. Performthe upgrade first, and configure high availability by protecting both vCenter Server and vCenter SingleSign-On with VMware HA or VMware Heartbeat after the upgrade is complete.
Note When you install the vCenter Single Sign-On component that is included with vCenter Serverversion 5.5 in multiple locations, the VMware Directory Service is updated for all vCenter Single Sign-Oninstances if you make a change in one location.
Using vCenter Single Sign-On with vSphereWhen a user logs in to a vSphere component, vCenter Single Sign-On is used for authentication. Usersmust be authenticated with vCenter Single Sign-On and must have been granted vCenter Serverpermissions to view and manage vSphere objects.
vSphere Security
VMware, Inc. 18

When users log in to the vSphere Web Client, they are first authenticated by vCenter Single Sign-On. Forauthenticated users, vCenter Server checks the permissions. What a user can see, and what a user cando, is determined by vSphere permission settings for vCenter Server and ESXi and by the applications inthe environment. vCenter Server administrators assign those permissions from the Manage >Permissions interface in the vSphere Web Client, not through vCenter Single Sign-On. See Chapter 4vSphere Users and Permissions and Chapter 5 vCenter User Management Tasks.
vCenter Single Sign-On and vCenter Server UsersUsing the vSphere Web Client, users authenticate to vCenter Single Sign-On by entering their credentialson the vSphere Web Client login page. After connecting to vCenter Server, authenticated users can viewall of the vCenter Server instances or other vSphere services for which they have permissions. No furtherauthentication is required. The actions that authenticated users can perform on objects depend on theuser's vCenter Server permissions on those objects. See Chapter 4 vSphere Users and Permissions and Chapter 5 vCenter User Management Tasks.
After installation, the [email protected] user has administrator access to both vCenter SingleSign-On and vCenter Server. That user can then add identity sources, set the default identity source, andmanage users and groups in the vCenter Single Sign-On domain (vsphere.local).
While most vCenter Single Sign-On management tasks require vCenter Single Sign-On administratorcredentials, all users that can authenticate to vCenter Single Sign-On can reset their password, even ifthe password has expired. See Reset an Expired vCenter Single Sign-On Password.
vCenter Single Sign-On Administrator UsersThe vCenter Single Sign-On administrative interface is accessible from the vSphere Web Client.
To configure vCenter Single Sign-On and manage vCenter Single Sign-On users and groups, the [email protected] or a user with vCenter Single Sign-On administrator privileges must log in tothe vSphere Web Client. Upon authentication, that user can access the vCenter Single Sign-Onadministration interface to manage identity sources and default domains, specify password policies, andperform other administrative tasks. See Configuring vCenter Single Sign-On.
Note You cannot rename the [email protected] user. For improved security, consider creatingadditional users in the vsphere.local domain and assigning them administrative privileges. You can thenstop using [email protected].
Authentication in Different Versions of vSphereIf a user connects to a vCenter Server system version 5.0.x or earlier, vCenter Server authenticates theuser by validating the user against an Active Directory domain or against the list of local operating systemusers. In vCenter Server 5.1 and later, users authenticate through vCenter Single Sign-On.
Note You cannot use the vSphere Web Client to manage vCenter Server version 5.0 or earlier. UpgradevCenter Server to version 5.1 or later.
vSphere Security
VMware, Inc. 19

ESXi UsersESXi 5.1 is not integrated with vCenter Single Sign-On. You add the ESXi host to an Active Directorydomain explicitly. See Add an ESXi Host to an Active Directory Domain.
You can still create local ESXi users with the vSphere Client, vCLI, or PowerCLI. vCenter Server is notaware of users that are local to ESXi and ESXi is not aware of vCenter Server users.
Login BehaviorWhen a user logs in to a vCenter Server system from the vSphere Web Client, the login behaviordepends on whether the user is in the default domain.
n Users who are in the default domain can log in with their user name and password.
n Users who are in a domain that has been added to vCenter Single Sign-On as an identity source butis not the default domain can log in to vCenter Server but must specify the domain in one of thefollowing ways.
n Including a domain name prefix, for example, MYDOMAIN\user1
n Including the domain, for example, [email protected]
n Users who are in a domain that is not a vCenter Single Sign-On identity source cannot log in tovCenter Server. If the domain that you add to vCenter Single Sign-On is part of a domain hierarchy,Active Directory determines whether users of other domains in the hierarchy are authenticated or not.
Configuring vCenter Single Sign-OnvCenter Single Sign-On lets you add identity sources, manage default domains, configure a passwordpolicy, and edit the lockout policy.
You configure vCenter Single Sign-On from the vSphere Web Client. To configure vCenter Single Sign-On, you must have vCenter Single Sign-On administrator privileges. Having vCenter Single Sign-Onadministrator privileges is different from having the Administrator role on vCenter Server or ESXi. Bydefault, only the user [email protected] has administrator privileges on the vCenter SingleSign-On server in a new installation.
n Reset an Expired vCenter Single Sign-On Password
By default, vCenter Single Sign-On passwords for user accounts expire after 90 days. ThevSphere Web Client provides a warning when a password is about to expire. You can reset anexpired password from the vSphere Web Client.
n Edit the vCenter Single Sign-On Password Policy
The vCenter Single Sign-On password policy is a set of rules and restrictions on the format andexpiration of vCenter Single Sign-On user passwords. The password policy applies only to users inthe vCenter Single Sign-On domain (vsphere.local).
vSphere Security
VMware, Inc. 20
n Edit the vCenter Single Sign-On Lockout Policy
A vCenter Single Sign-On lockout policy specifies the conditions under which a user's vCenterSingle Sign-On account is locked when the user attempts to log in with incorrect credentials. Youcan edit the lockout policy.
n Edit the vCenter Single Sign-On Token Policy
The vCenter Single Sign-On token policy specifies the clock tolerance, renewal count, and othertoken properties. You can edit the vCenter Single Sign-On token policy to ensure that the tokenspecification conforms to your corporation's security standards.
n Identity Sources for vCenter Server with vCenter Single Sign-On
Identity sources allow you to attach one or more domains to vCenter Single Sign-On. A domain is arepository for users and groups that the vCenter Single Sign-On server can use for userauthentication.
n Set the Default Domain for vCenter Single Sign-On
Each vCenter Single Sign-On identity source is associated with a domain. vCenter Single Sign-Onuses the default domain to authenticate a user who logs in without a domain name. Users whobelong to a domain that is not the default domain must include the domain name when they log in.
n Add a vCenter Single Sign-On Identity Source
Users can log in to vCenter Server only if they are in a domain that has been added as a vCenterSingle Sign-On identity source. vCenter Single Sign-On administrator users can add identity sourcesfrom the vSphere Web Client.
n Edit a vCenter Single Sign-On Identity Source
vSphere users are defined in an identity source. You can edit the details of an identity source that isassociated with vCenter Single Sign-On.
n Remove a vCenter Single Sign-On Identity Source
vSphere users are defined in an identity source. You can remove an identity source from the list ofregistered identity sources.
n Refresh the Security Token Service (STS) Root Certificate
vCenter Single Sign-On provides a Security Token Service (STS). The Security Token Service is aWeb service that issues, validates, and renews security tokens. You can manually refresh theexisting Security Token Service certificate when it expires or changes.
n Determine the Expiration Date of an SSL Certificate
CA-signed SSL certificates expire after a predefined lifespan. Knowing when a certificate expireslets you replace or renew the certificate before the expiration date.
n Determine Whether a Certificate is Being Used
Before you start with certificate replacement, you can check whether the certificates you have arealready being used. You can use the Compute Usage feature to determine whether or not thesystem is using a certificate.
vSphere Security
VMware, Inc. 21

n Use vCenter Single Sign-On with Windows Session Authentication
You can use vCenter Single Sign-On with Windows Session Authentication (SSPI). To make thecheckbox on the login page available, you must install the Client Integration Plug-in.
Reset an Expired vCenter Single Sign-On PasswordBy default, vCenter Single Sign-On passwords for user accounts expire after 90 days. ThevSphere Web Client provides a warning when a password is about to expire. You can reset an expiredpassword from the vSphere Web Client.
In vSphere 5.5 and later, a user with an expired password is prompted to reset the password upon login.To reset passwords for earlier versions of vCenter Single Sign-On, see the documentation for that versionof the product.
Prerequisites
You must know the current, expired password corresponding to the user name.
Procedure
1 Go to the vSphere Web Client URL.
2 When prompted, provide the user name, the current password, and the new password.
If you are unable to log in, contact a vCenter Single Sign-On system administrator for assistance.
Edit the vCenter Single Sign-On Password PolicyThe vCenter Single Sign-On password policy is a set of rules and restrictions on the format and expirationof vCenter Single Sign-On user passwords. The password policy applies only to users in the vCenterSingle Sign-On domain (vsphere.local).
Procedure
1 Log in to the vSphere Web Client as [email protected] or as another user with vCenterSingle Sign-On administrator privileges.
Users with vCenter Single Sign-On administrator privileges are in the CAAdmins group.
2 Browse to Administration > Single Sign-On > Configuration.
3 Click the Policies tab and select Password Policies.
4 Click Edit.
5 Edit the password policy parameters.
Option Description
Description Password policy description. Required.
Maximum lifetime Maximum number of days that a password can exist before the user must changeit.
Restrict re-use Number of the user's previous passwords that cannot be selected. For example, ifa user cannot reuse any of the last five passwords, type 5.
vSphere Security
VMware, Inc. 22

Option Description
Maximum length Maximum number of characters that are allowed in the password.
Minimum length Minimum number of characters required in the password. The minimum lengthmust be no less than the combined minimum of alphabetic, numeric, and specialcharacter requirements.
Character requirements Minimum number of different character types that are required in the password.n Special: & # %n Alphabetic: A b c Dn Uppercase: A B Cn Lowercase: a b cn Numeric: 1 2 3
The minimum number of alphabetic characters must be no less than thecombined uppercase and lowercase requirements.
The following characters are not supported in passwords: non-ASCII characters,semicolon (;), double quotation mark ("), single quotation mark ('), circumflex (^),and backslash.
Identical adjacent characters Maximum number of identical adjacent characters that are allowed in thepassword. The number must be greater than 0. For example, if you enter 1, thefollowing password is not allowed: p@$$word.
6 Click OK.
Edit the vCenter Single Sign-On Lockout PolicyA vCenter Single Sign-On lockout policy specifies the conditions under which a user's vCenter SingleSign-On account is locked when the user attempts to log in with incorrect credentials. You can edit thelockout policy.
If a user logs in to vsphere.local multiple times with the wrong password, the user is locked out. Thelockout policy allows you to specify the maximum number of failed login attempts and how much time canelapse between failures. The policy also specifies how much time must elapse before the account isautomatically unlocked.
Procedure
1 Log in to the vSphere Web Client as [email protected] or as another user with vCenterSingle Sign-On administrator privileges.
Users with vCenter Single Sign-On administrator privileges are in the CAAdmins group.
2 Browse to Administration > Single Sign-On > Configuration.
3 Click the Policies tab and select Lockout Policy.
4 Click Edit.
vSphere Security
VMware, Inc. 23

5 Edit the parameters.
Option Description
Description Description of the lockout policy. Currently a required field.
Max number of failed login attempts Maximum number of failed login attempts that are allowed before the account islocked.
Time interval between failures(seconds)
Time period in which failed login attempts must occur to trigger a lockout.
Unlock time (seconds) Amount of time that the account remains locked. If you enter 0, the administratormust unlock the account explicitly.
6 Click OK.
Edit the vCenter Single Sign-On Token PolicyThe vCenter Single Sign-On token policy specifies the clock tolerance, renewal count, and other tokenproperties. You can edit the vCenter Single Sign-On token policy to ensure that the token specificationconforms to your corporation's security standards.
Procedure
1 Log in to the vSphere Web Client.
2 Select Administration > Single Sign-On, and select Configuration.
3 Click the Policies tab and select Token Policy.
The vSphere Web Client displays the current configuration settings. If you have not modified thedefault settings, vCenter Single Sign-On uses them.
4 Edit the token policy configuration parameters.
Option Description
Clock tolerance Time difference, in milliseconds, that vCenter Single Sign-On tolerates between aclient clock and the domain controller clock. If the time difference is greater thanthe specified value, vCenter Single Sign-On declares the token invalid.
Maximum token renewal count Maximum number of times that a token can be renewed. After the maximumnumber of renewal attempts, a new security token is required.
Maximum token delegation count Holder-of-key tokens can be delegated to services in the vSphere environment. Aservice that uses a delegated token performs the service on behalf of the principalthat provided the token. A token request specifies a DelegateTo identity. TheDelegateTo value can either be a solution token or a reference to a solution token.This value specifies how many times a single holder-of-key token can bedelegated.
vSphere Security
VMware, Inc. 24

Option Description
Maximum bearer token lifetime Bearer tokens provide authentication based only on possession of the token.Bearer tokens are intended for short-term, single-operation use. A bearer tokendoes not verify the identity of the user or entity that is sending the request. Thisvalue specifies the lifetime value of a bearer token before the token has to bereissued.
Maximum holder-of-key token lifetime Holder-of-key tokens provide authentication based on security artifacts that areembedded in the token. Holder-of-key tokens can be used for delegation. A clientcan obtain a holder-of-key token and delegate that token to another entity. Thetoken contains the claims to identify the originator and the delegate. In thevSphere environment, a vCenter Server obtains delegated tokens on a user'sbehalf and uses those tokens to perform operations.
This value determines the lifetime of a holder-of-key token before the token ismarked invalid.
5 Click OK.
Identity Sources for vCenter Server with vCenter Single Sign-OnIdentity sources allow you to attach one or more domains to vCenter Single Sign-On. A domain is arepository for users and groups that the vCenter Single Sign-On server can use for user authentication.
An identity source is a collection of user and group data. The user and group data is stored in ActiveDirectory, OpenLDAP, or locally to the operating system of the machine where vCenter Single Sign-On isinstalled. Upon installation, every instance of vCenter Single Sign-On has the Local OS identity sourceidentity source vsphere.local. This identity source is internal to vCenter Single Sign-On.
A vCenter Single Sign-On administrator user can create vCenter Single Sign-On users and groups.
Types of Identity SourcesvCenter Server versions earlier than version 5.1 supported Active Directory and local operating systemusers as user repositories. As a result, local operating system users could always authenticate to thevCenter Server system. vCenter Server version 5.1 and version 5.5 uses vCenter Single Sign-On forauthentication. See the vSphere 5.1 documentation for a list of supported identity sources with vCenterSingle Sign-On 5.1. vCenter Single Sign-On 5.5 supports the following types of user repositories asidentity sources, but supports only one default identity source.
n Active Directory versions 2003 and later. vCenter Single Sign-On allows you to specify a single ActiveDirectory domain as an identity source. The domain can have child domains or be a forest rootdomain. Shown as Active Directory (Integrated Windows Authentication) in the vSphere WebClient.
n Active Directory over LDAP. vCenter Single Sign-On supports multiple Active Directory over LDAPidentity sources. This identity source type is included for compatibility with the vCenter Single Sign-On service included with vSphere 5.1. Shown as Active Directory as an LDAP Server in thevSphere Web Client.
n OpenLDAP versions 2.4 and later. vCenter Single Sign-On supports multiple OpenLDAP identitysources. Shown as OpenLDAP in the vSphere Web Client.
vSphere Security
VMware, Inc. 25

n Local operating system users. Local operating system users are local to the operating system wherethe vCenter Single Sign-On server is running. The local operating system identity source exists onlyin Simple vCenter Server installation and in Custom installations with a standalone vCenter SingleSign-On deployment. The local operating system identity source is not available in deployments withmultiple vCenter Single Sign-On instances. Only one local operating system identity source isallowed. Shown as localos in the vSphere Web Client.
n vCenter Single Sign-On system users. Exactly one system identity source named vsphere.local iscreated when you install vCenter Single Sign-On. Shown as vsphere.local in the vSphere WebClient.
Note At any time, only one default domain exists. If a user from a non-default domain logs in, that usermust add the domain name (DOMAIN\user) to authenticate successfully.
vCenter Single Sign-On identity sources are managed by vCenter Single Sign-On administrator users.
You can add identity sources to a vCenter Single Sign-On server instance. Remote identity sources arelimited to Active Directory and OpenLDAP server implementations.
Login BehaviorWhen a user logs in to a vCenter Server system from the vSphere Web Client, the login behaviordepends on whether the user is in the default domain.
n Users who are in the default domain can log in with their user name and password.
n Users who are in a domain that has been added to vCenter Single Sign-On as an identity source butis not the default domain can log in to vCenter Server but must specify the domain in one of thefollowing ways.
n Including a domain name prefix, for example, MYDOMAIN\user1
n Including the domain, for example, [email protected]
n Users who are in a domain that is not a vCenter Single Sign-On identity source cannot log in tovCenter Server. If the domain that you add to vCenter Single Sign-On is part of a domain hierarchy,Active Directory determines whether users of other domains in the hierarchy are authenticated or not.
vCenter Single Sign-On does not propagate permissions that result from nested groups from dissimilaridentity sources. For example, if you add the Domain Administrators group to the Local Administratorsgroup, the permissions are not propagated because Local OS and Active Directory are separate identitysources.
Set the Default Domain for vCenter Single Sign-OnEach vCenter Single Sign-On identity source is associated with a domain. vCenter Single Sign-On usesthe default domain to authenticate a user who logs in without a domain name. Users who belong to adomain that is not the default domain must include the domain name when they log in.
vSphere Security
VMware, Inc. 26

When a user logs in to a vCenter Server system from the vSphere Web Client, the login behaviordepends on whether the user is in the default domain.
n Users who are in the default domain can log in with their user name and password.
n Users who are in a domain that has been added to vCenter Single Sign-On as an identity source butis not the default domain can log in to vCenter Server but must specify the domain in one of thefollowing ways.
n Including a domain name prefix, for example, MYDOMAIN\user1
n Including the domain, for example, [email protected]
n Users who are in a domain that is not a vCenter Single Sign-On identity source cannot log in tovCenter Server. If the domain that you add to vCenter Single Sign-On is part of a domain hierarchy,Active Directory determines whether users of other domains in the hierarchy are authenticated or not.
Procedure
1 Log in to the vSphere Web Client as [email protected] or as another user with vCenterSingle Sign-On administrator privileges.
Users with vCenter Single Sign-On administrator privileges are in the CAAdmins group.
2 Browse to Administration > Single Sign-On > Configuration.
3 On the Identity Sources tab, select an identity source and click the Set as Default Domain icon.
In the domain display, the default domain shows (default) in the Domain column.
Add a vCenter Single Sign-On Identity SourceUsers can log in to vCenter Server only if they are in a domain that has been added as a vCenter SingleSign-On identity source. vCenter Single Sign-On administrator users can add identity sources from thevSphere Web Client.
An identity source can be a native Active Directory (Integrated Windows Authentication) domain or anOpenLDAP directory service. For backward compatibility, Active Directory as an LDAP Server is alsoavailable.
Immediately after installation, the following default identity sources and users are available:
localos All local operating system users. These users can be granted permissionsto vCenter Server. If you are upgrading, those users who already havepermissions keep those permissions.
vsphere.local Contains the vCenter Single Sign-On internal users.
Procedure
1 Log in to the vSphere Web Client as [email protected] or as another user with vCenterSingle Sign-On administrator privileges.
Users with vCenter Single Sign-On administrator privileges are in the CAAdmins group.
vSphere Security
VMware, Inc. 27

2 Browse to Administration > Single Sign-On > Configuration.
3 On the Identity Sources tab, click the Add Identity Source icon.
4 Select the type of identity source and enter the identity source settings.
Option Description
Active Directory (Integrated WindowsAuthentication)
Use this option for native Active Directory implementations. The machine onwhich the vCenter Single Sign-On service is running must be in an ActiveDirectory domain if you want to use this option.
See Active Directory Identity Source Settings.
Active Directory as an LDAP Server This option is available for backward compatibility. It requires that you specify thedomain controller and other information. See Active Directory LDAP Server andOpenLDAP Server Identity Source Settings.
OpenLDAP Use this option for an OpenLDAP identity source. See Active Directory LDAPServer and OpenLDAP Server Identity Source Settings.
LocalOS Use this option to add the local operating system as an identity source. You areprompted only for the name of the local operating system. If you select this option,all users on the specified machine are visible to vCenter Single Sign-On, even ifthose users are not part of another domain.
Note If the user account is locked or disabled, authentications and group and user searches in theActive Directory domain will fail. The user account must have read-only access over the User andGroup OU, and must be able to read user and group attributes. This is the default Active Directorydomain configuration for user permissions. VMware recommends using a special service user.
5 If you configured an Active Directory as an LDAP Server or an OpenLDAP identity source, click TestConnection to ensure that you can connect to the identity source.
6 Click OK.
What to do next
When an identity source is added, all users can be authenticated but have the No access permission. Auser with vCenter Server Modify.permissions privileges can assign permissions to users or groups ofusers to enable them to log in to vCenter Server. See Assign Permissions in the vSphere Web Client.
Active Directory Identity Source SettingsIf you select the Active Directory (Integrated Windows Authentication) identity source type, you can eitheruse the local machine account as your SPN (Service Principal Name) or specify an SPN explicitly.
Select Use machine account to speed up configuration. If you expect to rename the local machine onwhich vCenter Single Sign-On runs, specifying an SPN explicitly is preferable.
vSphere Security
VMware, Inc. 28

Table 2‑1. Add Identity Source Settings
Field Description
Domain name FDQN of the domain. Do not provide an IP address in this field.
Use machine account Select this option to use the local machine account as theSPN. When you select this option, you specify only the domainname. Do not select this option if you expect to rename thismachine.
Use SPN Select this option if you expect to rename the local machine.You must specify an SPN, a user who can authenticate withthe identity source, and a password for the user.
Service Principal SPN that helps Kerberos to identify the Active Directoryservice. Include the domain in the name, for example,STS/example.com.
You might have to run setspn -S to add the user you want touse. See the Microsoft documentation for information onsetspn.
The SPN must be unique across the domain. Running setspn-S checks that no duplicate is created.
User Principal Name Name of a user who can authenticate with this identity source.Use the email address format, for example,[email protected]. You can verify the User Principal Namewith the Active Directory Service Interfaces Editor (ADSI Edit).
Password Password for the user who is used to authenticate with thisidentity source, which is the user who is specified in UserPrincipal Name. Include the domain name, for example,[email protected].
Active Directory LDAP Server and OpenLDAP Server Identity Source SettingsThe Active Directory as an LDAP Server identity source is available for backward compatibility. Use theActive Directory (Integrated Windows Authentication) option for a setup that requires less input. TheOpenLDAP Server identity source is available for environments that use OpenLDAP.
If you are configuring an OpenLDAP identity source, see VMware Knowledge Base article 2064977 foradditional requirements.
Table 2‑2. Active Directory as an LDAP Server and OpenLDAP Settings
Field Description
Name Name of the identity source.
Base DN for users Base Distinguished Name for users.
Domain name FDQN of the domain, for example, example.com. Do notprovide an IP address in this field.
vSphere Security
VMware, Inc. 29

Table 2‑2. Active Directory as an LDAP Server and OpenLDAP Settings (Continued)
Field Description
Domain alias For Active Directory identity sources, the domain's NetBIOSname. Add the NetBIOS name of the Active Directory domainas an alias of the identity source if you are using SSPIauthentications.
For OpenLDAP identity sources, the domain name in capitalletters is added if you do not specify an alias.
Base DN for groups The base Distinguished Name for groups.
Primary Server URL Primary domain controller LDAP server for the domain.
Use the format ldap://hostname:port or ldaps://hostname:port.The port is typically 389 for ldap: connections and 636 forldaps: connections. For Active Directory multi-domaincontroller deployments, the port is typically 3268 for ldap:connections and 3269 for ldaps: connections.
A certificate that establishes trust for the LDAPS endpoint ofthe Active Directory server is required when you use ldaps:// inthe primary or secondary LDAP URL.
Secondary server URL Address of a secondary domain controller LDAP server that isused for failover.
Username ID of a user in the domain who has a minimum of read-onlyaccess to Base DN for users and groups.
Password Password of the user who is specified by Username.
Edit a vCenter Single Sign-On Identity SourcevSphere users are defined in an identity source. You can edit the details of an identity source that isassociated with vCenter Single Sign-On.
Procedure
1 Log in to the vSphere Web Client as [email protected] or as another user with vCenterSingle Sign-On administrator privileges.
Users with vCenter Single Sign-On administrator privileges are in the CAAdmins group.
2 Browse to Administration > Single Sign-On > Configuration.
3 Click the Identity Sources tab.
4 Right-click the identity source in the table and select Edit Identity Source.
vSphere Security
VMware, Inc. 30

5 Edit the identity source settings. The available options depend on the type of identity source youselected.
Option Description
Active Directory (Integrated WindowsAuthentication)
Use this option for native Active Directory implementations. The machine onwhich the vCenter Single Sign-On service is running must be in an ActiveDirectory domain if you want to use this option.
See Active Directory Identity Source Settings.
Active Directory as an LDAP Server This option is available for backward compatibility. It requires that you specify thedomain controller and other information. See Active Directory LDAP Server andOpenLDAP Server Identity Source Settings.
OpenLDAP Use this option for an OpenLDAP identity source. See Active Directory LDAPServer and OpenLDAP Server Identity Source Settings.
LocalOS Use this option to add the local operating system as an identity source. You areprompted only for the name of the local operating system. If you select this option,all users on the specified machine are visible to vCenter Single Sign-On, even ifthose users are not part of another domain.
6 Click Test Connection to ensure that you can connect to the identity source.
7 Click OK.
Remove a vCenter Single Sign-On Identity SourcevSphere users are defined in an identity source. You can remove an identity source from the list ofregistered identity sources.
Procedure
1 Log in to the vSphere Web Client as [email protected] or as another user with vCenterSingle Sign-On administrator privileges.
Users with vCenter Single Sign-On administrator privileges are in the CAAdmins group.
2 Browse to Administration > Single Sign-On > Configuration.
3 On the Identity Sources tab, select an identity source and click the Delete Identity Source icon.
4 Click Yes when prompted to confirm.
Refresh the Security Token Service (STS) Root CertificatevCenter Single Sign-On provides a Security Token Service (STS). The Security Token Service is a Webservice that issues, validates, and renews security tokens. You can manually refresh the existing SecurityToken Service certificate when it expires or changes.
vSphere Security
VMware, Inc. 31

STS certificates expire or change periodically and must be updated or refreshed. In some environments,your system administrator might implement automatic updates of the certificate. Otherwise, you canupdate the certificate manually.
Note The vCenter Certificate Automation Tool can only replace the SSL certificates. The tool cannot beused to replace the STS certificates.
Procedure
1 Log in to the vSphere Web Client as [email protected] or as another user with vCenterSingle Sign-On administrator privileges.
Users with vCenter Single Sign-On administrator privileges are in the CAAdmins group.
2 Browse to Administration > Single Sign-On > Configuration.
3 Select the Certificates tab, then the STS Signing subtab, and click Add STS Signing Certificate.
4 Click Browse to browse to the key store JKS file that contains the new certificate and click Open.
If the key store file is valid, the STS certificate table is populated with the certificate information.
5 Click OK.
The new certificate information appears on the STS Signing tab.
What to do next
Restart the vSphere Web Client service.
Determine the Expiration Date of an SSL CertificateCA-signed SSL certificates expire after a predefined lifespan. Knowing when a certificate expires lets youreplace or renew the certificate before the expiration date.
Procedure
1 Log in to the vSphere Web Client as [email protected] or as another user with vCenterSingle Sign-On administrator privileges.
Users with vCenter Single Sign-On administrator privileges are in the CAAdmins group.
2 Browse to Administration > Single Sign-On > Configuration.
3 Click the Certificates tab, and then the Identity Sources TrustStore subtab .
4 Find the certificate and verify the expiration date in the Valid To text box.
You might see a warning at the top of the tab which indicates that a certificate is about to expire.
What to do next
Renew or replace SSL certificates that are getting close to their expiration date.
vSphere Security
VMware, Inc. 32

Determine Whether a Certificate is Being UsedBefore you start with certificate replacement, you can check whether the certificates you have are alreadybeing used. You can use the Compute Usage feature to determine whether or not the system is using acertificate.
Procedure
1 Log in to the vSphere Web Client as [email protected] or as another user with vCenterSingle Sign-On administrator privileges.
Users with vCenter Single Sign-On administrator privileges are in the CAAdmins group.
2 Browse to Administration > Single Sign-On > Configuration.
3 Click the Certificates tab, and then the Identity Sources TrustStore subtab.
4 Click Compute Usage.
For each certificate in the list, the vSphere Web Client communicates with each registered LDAPSidentity source to determine whether a valid connection exists.
5 The Used By Domain column shows whether a certificate is in use, and helps you determine whetheryou can safely remove a certificate.
Use vCenter Single Sign-On with Windows Session AuthenticationYou can use vCenter Single Sign-On with Windows Session Authentication (SSPI). To make thecheckbox on the login page available, you must install the Client Integration Plug-in.
Using SSPI speeds up login for the user who is currently logged in to a machine.
Prerequisites
Your Windows domain must be set up properly.
Procedure
1 Navigate to the vSphere Web Client login page.
2 If the Use Windows session authentication check box is not available, click Download the ClientIntegration Plug-in at the bottom of the login page.
3 If the browser blocks the installation by issuing certificate errors or by running a pop-up blocker, followthe Help instructions for your browser to resolve the problem.
4 Close other browsers if you are prompted to do so.
After installation, the plug-in is available for all browsers.
5 Exit and restart your browser.
After the restart, you can select the Use Windows session authentication check box.
vSphere Security
VMware, Inc. 33

Managing vCenter Single Sign-On Users and GroupsA vCenter Single Sign-On administrator user can manage users and groups in the vsphere.local domainfrom the vSphere Web Client.
The vCenter Single Sign-On administrator user can perform the following tasks.
Note Do not delete any of the groups that are predefined in the vsphere.local domain. Unexpectederrors with authentication might result.
n Add vCenter Single Sign-On Users
Users listed on the Users tab In the vSphere Web Client are internal to vCenter Single Sign-On andbelong to the vsphere.local domain.
n Disable and Enable vCenter Single Sign-On Users
When a vCenter Single Sign-On user account is disabled, the user cannot log in to the vCenterSingle Sign-On server until the account is enabled by an administrator. You can disable and enableusers from the vSphere Web Client interface.
n Delete a vCenter Single Sign-On User
You can delete users that are in the vsphere.local domain from the vSphere Web Client. You cannotdelete local operating system users or users in another domain from the vSphere Web Client.
n Edit a vCenter Single Sign-On User
You can change the password or other details of a vCenter Single Sign-On user from thevSphere Web Client. You cannot rename users in the vsphere.local domain. That means you cannotrename [email protected].
n Add a vCenter Single Sign-On Group
In the vSphere Web Client, groups listed on the Groups tab are internal to vCenter Single Sign-On.A group lets you create a container for a collection of group members (principals).
n Edit a vCenter Single Sign-On Group
You can change the description of a vCenter Single Sign-On group in the vSphere Web Client. Youcannot change the name of the group.
n Add Members to a vCenter Single Sign-On Group
You can add new members to a vCenter Single Sign-On group from the vSphere Web Client.
n Remove Members from a vCenter Single Sign-On Group
You can remove members from a vCenter Single Sign-On group from the vSphere Web Client.When you remove a member (user or group) from a local group, you do not delete the member fromthe system.
n Delete vCenter Single Sign-On Application Users
vCenter Single Sign-On recognizes vCenter services such as vCenter Server, vCenter InventoryServer, and the vSphere Web Client and grants privileges to those services as application users.
vSphere Security
VMware, Inc. 34
n Change Your vCenter Single Sign-On Password
Users in the local domain, vsphere.local by default, can change their vCenter Single Sign-Onpasswords from a Web interface. Users in other domains change their passwords following the rulesfor that domain.
Add vCenter Single Sign-On UsersUsers listed on the Users tab In the vSphere Web Client are internal to vCenter Single Sign-On andbelong to the vsphere.local domain.
You can select other domains and view information about the users in those domains, but you cannot addusers to other domains from the vCenter Single Sign-On management interface of thevSphere Web Client.
Procedure
1 Log in to the vSphere Web Client as [email protected] or as another user with vCenterSingle Sign-On administrator privileges.
Users with vCenter Single Sign-On administrator privileges are in the CAAdmins group.
2 Click Home, and browse to Administration > Single Sign-On > Users and Groups.
3 If vsphere.local is not the currently selected domain, select it from the dropdown menu.
You cannot add users to other domains.
4 On the Users tab, click the New User icon.
5 Type a user name and password for the new user.
You cannot change the user name after you create a user.
The password must meet the password policy requirements for the system.
6 (Optional) Type the first name and last name of the new user.
7 (Optional) Enter an email address and description for the user.
8 Click OK.
When you add a user, that user initially has no permissions to perform management operations.
What to do next
Add the user to a group in the vsphere.local domain, for example, to the administrator group. See AddMembers to a vCenter Single Sign-On Group.
Disable and Enable vCenter Single Sign-On UsersWhen a vCenter Single Sign-On user account is disabled, the user cannot log in to the vCenter SingleSign-On server until the account is enabled by an administrator. You can disable and enable users fromthe vSphere Web Client interface.
vSphere Security
VMware, Inc. 35

Disabled user accounts remain available in the vCenter Single Sign-On system, but the user cannot log inor perform operations on the server. Users with administrator privileges can disable and enable usersfrom the vCenter Users and Groups page.
Prerequisites
You must be a member of the vCenter Single Sign-On Administrators group to disable and enablevCenter Single Sign-On users.
Procedure
1 Log in to the vSphere Web Client as [email protected] or as another user with vCenterSingle Sign-On administrator privileges.
Users with vCenter Single Sign-On administrator privileges are in the CAAdmins group.
2 Click Home, and browse to Administration > Single Sign-On > Users and Groups.
3 Select a user, click the Disable icon, and click Yes when prompted.
4 To enable the user again, right-click the user, select Enable, and click Yes when prompted.
Delete a vCenter Single Sign-On UserYou can delete users that are in the vsphere.local domain from the vSphere Web Client. You cannotdelete local operating system users or users in another domain from the vSphere Web Client.
Caution If you delete the administrator user in the vsphere.local domain, you can no longer log in tovCenter Single Sign-On. Reinstall vCenter Server and its components.
Procedure
1 Log in to the vSphere Web Client as [email protected] or as another user with vCenterSingle Sign-On administrator privileges.
Users with vCenter Single Sign-On administrator privileges are in the CAAdmins group.
2 Click Home, and browse to Administration > Single Sign-On > Users and Groups.
3 Select the Users tab, and select the vsphere.local domain.
4 In the list of users, select the user that you want to delete and click the Delete icon.
Proceed with caution. You cannot undo this action.
Edit a vCenter Single Sign-On UserYou can change the password or other details of a vCenter Single Sign-On user from thevSphere Web Client. You cannot rename users in the vsphere.local domain. That means you cannotrename [email protected].
You can create additional users with the same privileges as [email protected].
vCenter Single Sign-On users are stored in the vCenter Single Sign-On vsphere.local domain.
vSphere Security
VMware, Inc. 36

You can review the vCenter Single Sign-On password policies from the vSphere Web Client. Log in [email protected] and select Configuration > Policies > Password Policies.
Procedure
1 Log in to the vSphere Web Client as [email protected] or as another user with vCenterSingle Sign-On administrator privileges.
Users with vCenter Single Sign-On administrator privileges are in the CAAdmins group.
2 Click Home, and browse to Administration > Single Sign-On > Users and Groups.
3 Click the Users tab.
4 Right-click the user and select Edit User.
5 Make changes to the user.
You cannot change the user name of the user.
The password must meet the password policy requirements for the system.
6 Click OK.
Add a vCenter Single Sign-On GroupIn the vSphere Web Client, groups listed on the Groups tab are internal to vCenter Single Sign-On. Agroup lets you create a container for a collection of group members (principals).
When you add a vCenter Single Sign-On group from the vCenter Single Sign-On administration interface,the group is added to the vsphere.local domain.
Procedure
1 Log in to the vSphere Web Client as [email protected] or as another user with vCenterSingle Sign-On administrator privileges.
Users with vCenter Single Sign-On administrator privileges are in the CAAdmins group.
2 Click Home, and browse to Administration > Single Sign-On > Users and Groups.
3 Select the Groups tab and click the New Group icon.
4 Enter a name and description for the group.
You cannot change the group name after you create the group.
5 Click OK.
What to do next
n Add members to the group.
Edit a vCenter Single Sign-On GroupYou can change the description of a vCenter Single Sign-On group in the vSphere Web Client. Youcannot change the name of the group.
vSphere Security
VMware, Inc. 37
vCenter Single Sign-On groups are stored in the vCenter Single Sign-On database, which runs on thesystem where vCenter Single Sign-On is installed. These groups are part of the vsphere.local domain.
Procedure
1 Log in to the vSphere Web Client as [email protected] or as another user with vCenterSingle Sign-On administrator privileges.
Users with vCenter Single Sign-On administrator privileges are in the CAAdmins group.
2 Click Home, and browse to Administration > Single Sign-On > Users and Groups.
3 Click the Groups tab.
4 Right-click the group to edit and select Edit Group.
5 Edit the description for the group.
You cannot change the group name after you create the group.
6 Click OK.
Add Members to a vCenter Single Sign-On GroupYou can add new members to a vCenter Single Sign-On group from the vSphere Web Client.
You can add members of Microsoft Active Directory or OpenLDAP groups to a vCenter Single Sign-Ongroup. You cannot add groups from external identity sources to a vCenter Single Sign-On group.
Groups that are listed on the Groups tab in the vSphere Web Client are internal to vCenter Single Sign-On and are part of the vsphere.local domain.
Procedure
1 Log in to the vSphere Web Client as [email protected] or as another user with vCenterSingle Sign-On administrator privileges.
Users with vCenter Single Sign-On administrator privileges are in the CAAdmins group.
2 Click Home, and browse to Administration > Single Sign-On > Users and Groups.
3 Click the Groups tab and click the group (for example, Administrators).
4 In the Group Members area, click the Add Members icon.
5 Select the identity source that contains the member to add to the group.
6 (Optional) Enter a search term and click Search.
7 Select the member and click Add.
You can simultaneously add multiple members.
8 Click OK.
vSphere Security
VMware, Inc. 38

Remove Members from a vCenter Single Sign-On GroupYou can remove members from a vCenter Single Sign-On group from the vSphere Web Client. When youremove a member (user or group) from a local group, you do not delete the member from the system.
Procedure
1 Log in to the vSphere Web Client as [email protected] or as another user with vCenterSingle Sign-On administrator privileges.
Users with vCenter Single Sign-On administrator privileges are in the CAAdmins group.
2 Click Home, and browse to Administration > Single Sign-On > Users and Groups.
3 Select the Groups tab and click the group.
4 In the list of group members, select the user or group that you want to remove and click the RemoveMember icon.
5 Click OK.
The user is removed from the group, but is still available in the system.
Delete vCenter Single Sign-On Application UsersvCenter Single Sign-On recognizes vCenter services such as vCenter Server, vCenter Inventory Server,and the vSphere Web Client and grants privileges to those services as application users.
When you uninstall an vCenter service, the service is removed from the list of vCenter Single Sign-Onapplication users as part of uninstallation by default. If you forcefully remove an application, or if thesystem becomes unrecoverable while the application user is still in the system, you can remove theapplication user explicitly from the vSphere Web Client.
Important If you remove an application, the application no longer has access to vCenter Single Sign-On.
Procedure
1 Log in to the vSphere Web Client as [email protected] or as another user with vCenterSingle Sign-On administrator privileges.
Users with vCenter Single Sign-On administrator privileges are in the CAAdmins group.
2 Browse to Administration > Single Sign-On > Users and Groups.
3 Click the Applications Users tab, and click the application user name.
4 Click the Delete Application User icon.
5 Click Yes.
The application (or solution) no longer has access to vCenter Server and cannot function as a vCenterservice.
vSphere Security
VMware, Inc. 39

Change Your vCenter Single Sign-On PasswordUsers in the local domain, vsphere.local by default, can change their vCenter Single Sign-On passwordsfrom a Web interface. Users in other domains change their passwords following the rules for that domain.
The password policy that is defined in the vCenter Single Sign-On configuration interface determineswhen your password expires. By default, vCenter Single Sign-On passwords expire after 90 days, butyour system administrator might change this default depending on the policy of your organization. ThevSphere Web Client reminds you when your password is about to expire. You can reset an expiredpassword if you know the old password.
Note You can change a password only if it is not expired.
If the password is expired, the administrator of the local domain, [email protected] by default,can reset the password by using the dir-cli password reset command. Only members of theAdministrator group for the vCenter Single Sign-On domain can reset passwords.
Procedure
1 From a Web browser, connect to the vSphere Web Client or the Platform Services Controller.
Option Description
vSphere Web Client https://vc_hostname_or_IP/vsphere-client
Platform Services Controller https://psc_hostname_or_IP/psc
In an embedded deployment, the Platform Services Controller host name or IPaddress is the same as the vCenter Server host name or IP address.
2 Specify the user name and password for [email protected] or another member of the
vCenter Single Sign-On Administrators group.
If you specified a different domain during installation, log in as administrator@mydomain.
3 In the upper navigation pane, to the left of the Help menu, click your user name to pull down themenu.
As an alternative, you can select Single Sign-On > Users and Groups and select Edit User fromthe right-button menu.
4 Select Change Password and type your current password.
5 Type a new password and confirm it.
The password must conform to the password policy.
6 Click OK.
vSphere Security
VMware, Inc. 40

Troubleshooting vCenter Single Sign-OnConfiguring vCenter Single Sign-On can be a complex process.
The following topics provide a starting point for troubleshooting vCenter Single Sign-On. Search thisdocumentation center and the VMware Knowledge Base system for additional pointers.
vCenter Single Sign-On Installation FailsIn a Windows environment, vCenter Single Sign-On installation might fail for several reasons.
Problem
The vCenter Single Sign-On installation fails in a Windows environment.
Cause
Multiple causes of an installation failure.
Solution
1 Verify that all installation setup prerequisites are met.
At the time the installation fails, the installer displays a message similar to ####: Installationfailed due to....
2 At a command line, run the following command to gather a vCenter Single Sign-On support bundle.
C:\Windows\System32\cscript.exe "SSO Server\scripts\sso-support.wsf" /z
3 Click OK
4 View the logs in %TEMP%\vminst.log for details about the failure and possible solutions.
For a complete list of logs, see VMware Knowledge Base article 2033430.
Determining the Cause of a Lookup Service ErrorvCenter Single Sign-On installation displays an error referring to the vCenter Server or the vSphere WebClient.
Problem
vCenter Server and Web Client installers show the error Could not contact Lookup Service.Please check VM_ssoreg.log....
Cause
This problem has several causes, including unsynchronized clocks on the host machines, firewallblocking, and services that must be started.
vSphere Security
VMware, Inc. 41

Solution
1 Verify that the clocks on the host machines running vCenter Single Sign-On, vCenter Server, and theWeb Client are synchronized.
2 View the specific log file found in the error message.
In the message, system temporary folder refers to %TEMP%.
3 Within the log file, search for the following messages.
The log file contains output from all installation attempts. Locate the last message that showsInitializing registration provider...
Message Cause and solution
java.net.ConnectException:Connection timed out: connect
The IP address is incorrect, a firewall is blocking access to vCenter Single Sign-On, or vCenter Single Sign-On is overloaded.
Ensure that a firewall is not blocking the vCenter Single Sign-On port (by default7444) and that the machine on which vCenter Single Sign-On is installed hasadequate free CPU, I/O. and RAM capacity.
java.net.ConnectException:Connection refused: connect
IThe IP address or FQDN is incorrect and the vCenter Single Sign-On has notstarted or has started within the past minute.
Verify that vCenter Single Sign-On is working by checking the status of vCenterSingle Sign-On service (Windows) and vmware-sso daemon (Linux).
Restart the service. If this does not correct the problem, see the recovery sectionof the vSphere troubleshooting guide.
Unexpected status code: 404. SSOServer failed during initialization
Restart vCenter Single Sign-On. If this does not correct the problem, see theRecovery section of the vSphere Troubleshooting Guide.
The error shown in the UI begins withCould not connect to vCenter
Single Sign-on.
You also see the return code SslHandshakeFailed. This is an uncommon error.It indicates that the provided IP address or FQDN that resolves to vCenter SingleSign-On host was not the one used when you installed vCenter Single Sign-On.
In %TEMP%\VM_ssoreg.log, find the line that contains the following message.
host name in certificate did not match: <install-configured FQDN
or IP> != <A> or <B> or <C> where A was the FQDN you entered during thevCenter Single Sign-On installation, and B and C are system-generated allowablealternatives.
Correct the configuration to use the FQDN on the right of the != sign in the log file.In most cases, use the FQDN that you specified during vCenter Single Sign-Oninstallation.
If none of the alternatives are possible in your network configuration, recover yourvCenter Single Sign-On SSL configuration.
Unable to Log In Using Active Directory Domain AuthenticationYou log in to a vCenter Server component from the vSphere Web Client. You use your Active Directoryuser name and password. Authentication fails.
Problem
You add an Active Directory identity source to vCenter Single Sign-On, but users cannot log in to vCenter.
vSphere Security
VMware, Inc. 42

Cause
Users use their user name and password to log in to the default domain. For all other domains, usersmust include the domain name (user@domain or DOMAIN\user).
If you are using the vCenter Server Appliance, other problems might exist.
Solution
For all vCenter Single Sign-On deployments, you can change the default identity source. After thatchange, users can log in to the default identity source with username and password only.
If you are using the vCenter Server Appliance, and changing the default identity source does not resolvethe issue, perform the following additional troubleshooting steps.
1 Synchronize the clocks between the vCenter Server Appliance and the Active Directory domaincontrollers.
2 Verify that each domain controller has a pointer record (PTR) in the Active Directory domain DNSservice and that the PTR record information matches the DNS name of the controller. When using thevCenter Server Appliance, you can run the following commands to perform the task:
a To list the domain controllers run the following command:
# dig SRV _ldap._tcp.my-ad.com
The relevant addresses are in the answer section, as in the following example:
;; ANSWER SECTION:
_ldap._tcp.my-ad.com. (...) my-controller.my-ad.com
...
b For each domain controller, verify forward and reverse resolution by running the followingcommand:
# dig my-controller.my-ad.com
The relevant addresses are in the answer section, as in the following example:
;; ANSWER SECTION:
my-controller.my-ad.com (...) IN A controller IP address
...
# dig -x <controller IP address>
The relevant addresses are in the answer section, as in the following example:
;; ANSWER SECTION:
IP-in-reverse.in-addr.arpa. (...) IN PTR my-controller.my-ad.com
...
vSphere Security
VMware, Inc. 43

3 If that does not resolve the problem, remove the vCenter Server Appliance from the Active Directorydomain and then rejoin the domain.
4 Restart vCenter Single Sign-On.
vCenter Server Login Fails Because the User Account is LockedWhen you log in to vCenter Server from the vSphere Web Client login page, an error indicates that theaccount is locked.
Problem
After several failed attempts, you cannot log in to the vSphere Web Client using vCenter Single Sign-On.You see the message that your account is locked.
Cause
You exceeded the maximum number of failed login attempts.
Solution
n If you log in as a user from the system domain (vsphere.local), ask your vCenter Single Sign-Onadministrator to unlock your account. As an alternative, you can wait until your account is unlocked, ifthe lock is set to expire in the password policy.
n If you log in as a user from an Active Directory or LDAP domain, ask your Active Directory or LDAPadministrator to unlock your account.
vSphere Security
VMware, Inc. 44

vSphere Security Certificatesand Encryption 3ESXi and vCenter Server components communicate securely over SSL to ensure confidentiality, dataintegrity and authentication. Data is private, protected, and cannot be modified in transit without detection.
By default, vSphere services use the certificates that are created as part of the installation process andstored on each system. These default certificates are unique and make it possible to begin using thesoftware, but they are not signed by a trusted certificate authority (CA).
To receive the full benefit of certificate checking, particularly if you intend to use SSL connections over theInternet, install new certificates that are signed by a valid internal certificate authority or purchase acertificate from a trusted security authority.
This chapter includes the following topics:n Certificates Used in vSphere
n Certificate Replacement Overview
n Certificate Automation Tool Deployment Options
n Replacing vCenter Certificates With the vCenter Certificate Automation Tool
n Replace vCenter Server Appliance Certificates
n Replace vCenter Server Heartbeat Certificates
Certificates Used in vSphereDifferent types of certificates are used for different purposes in your vSphere environment.
SAML Tokens Issued by vCenter Single Sign-On STS ServiceSTS certificates enable a user who has logged on through vCenter Single Sign-On to use any vCenterService that vCenter Single Sign-On supports without authenticating to each one. The STS service issuesSecurity Assertion Markup Language (SAML) tokens. These security tokens represent the identity of auser in one of the of the identity source types supported by vCenter Single Sign-On. See How vCenterSingle Sign-On Protects Your Environment.
VMware, Inc. 45

The vCenter Single Sign-On service deploys an Identity Provider which issues SAML Tokens usedthroughout the vSphere for authentication purposes. A SAML token is a piece of XML that represents theuser's identity (user name, first, last name). In addition the SAML token contains group membershipinformation so that the SAML token could be used for authorization operations. When vCenter SingleSign-On issues SAML tokens, it signs each token with the certificate chain so that clients of vCenterSingle Sign-On can verify that the SAML token comes from a trusted source.
SSL CertificatesSSL certificates secure communication throughout your vSphere environment. The client verifies theauthenticity of the certificate presented during the SSL handshake phase, before encryption. Thisverification protects against man-in-the-middle attacks.
VMware products use standard X.509 version 3 (X.509v3) certificates to encrypt session information thatis sent over Secure Socket Layer (SSL) protocol connections between components.
vSphere components include default certificates. You can replace the default certificates with self-signedor CA-signed certificates. For the vCenter core components, you can use the Certificate Automation Tool.
SSH KeysSSH keys are used to control access to the ESXi hosts that are using the Secure Shell (SSH) protocol.See Uploading an SSH Key to Your ESXi Host.
Cipher StrengthTo encrypt data, the sending component, such as a gateway or redirector, applies cryptographicalgorithms, or ciphers, to alter the data before transmitting it. The receiving component uses a key todecrypt the data, returning it to its original form. Several ciphers are in use, and the level of security thateach provides is different. One measure of a cipher’s ability to protect data is its cipher strength—thenumber of bits in the encryption key. The larger the number, the more secure the cipher.
Administrators specify the desired cipher strength when they prepare a certificate request. Companypolicy might dictate the cipher strength that the administrator chooses.
256-bit AES encryption and 1024-bit RSA for key exchange are the default for the following connections.
n vSphere Web Client connections to vCenter Server and to ESXi through the management interface.
n SDK connections to vCenter Server and to ESXi.
n Connections to the virtual machine virtual machine console.
n Direct SSH connections to ESXi.
vSphere Security
VMware, Inc. 46

Certificate Replacement OverviewFor the core vCenter components, you can generate certificate requests and replace the defaultcertificates with self-signed or CA-signed certificates by using the Certificate Automation Tool. You canalso generate the requests, create the certificates, and replace the certificates from the command linewithout the tool.
Where to Find InformationHow you want to replace certificates determines where you can find information. You can performcertificate replacement in several ways.
n Use the Certificate Replacement tool in your Windows environment, as described in this document.
n Replace certificates on Windows explicitly, as explained in VMware Knowledge Base article 2058519.
n Replace certificates on the vCenter Server Appliance, as explained in VMware Knowledge Basearticle 2057223.
If want to use certificates that are signed by a CA, you must generate a certificate request (CSR) for eachcomponent. You can use the tool to generate the CSRs. See Preparing Your Environment for a list ofcertificate requirements.
Certificate Replacement Tool OverviewThe Certificate Automation Tool is a command-line tool that helps you replace the certificates for the corevCenter components listed below. In most cases, you replace the default certificates with customcertificates. You use the tool after you install all vCenter components. If you add a new component to yourvSphere environment, you can run the tool again to perform certificate replacement for the newcomponent. When you run the tool on a vCenter component such as the vCenter Server system or thevCenter Single Sign-On server, it performs the following tasks.
n Prompts you for required input.
n Validates the input (x.509 certificate and URL formats).
n Updates the SSL certificate of a component and the corresponding LookupService entries of theservices that are exposed by the components if necessary.
n Restarts the corresponding service if necessary.
n Updates the trust of the component to all other components that it connects to. Restarts thecomponent if necessary.
vSphere Security
VMware, Inc. 47

n Provides the next steps to the user where necessary.
Note Certificate replacement with the tool has been tested with vCenter Single Sign-On, vCenterInventory Service, vCenter Server, vSphere Web Client, vSphere Update Manager, vCenter Log Browserand vCenter Orchestrator. If you have to perform a certificate replacement with another vSpherecomponent, the instructions in VMware documentation or the VMware Knowledge base for that product.You might have to update certificates on one of the supported components as part of the process.
The tool supports the following vCenter components:
n vCenter Single Sign-On
n vCenter Inventory Service
n vCenter Server
n vSphere Web Client
n vSphere Update Manager
n vCenter Log Browser
n vCenter Orchestrator
Each component must have an SSL certificate and a solution user certificate. Most components use thesame certificate for both purposes. On Windows, the solution user certificates must be unique, so aunique SSL certificate for each component is required.
UpgradesIf you replaced the default certificates in vSphere version 5.0 or version 5.1, and you upgrade to vSphereversion 5.5, the certificates are migrated. If you are upgrading and you want to replace the defaultcertificates, you can run the Certificate Automation Tool after the upgrade.
Certificate Automation Tool Deployment OptionsThe vCenter Certificate Automation Tool automates certificate renewal for core vCenter components onWindows operating systems.
The tool supports several deployment options. How the tool interacts with the user depends on thedeployment option. See Certificate Replacement Overview
All Services on One MachineYou can edits the ssl-environment.bat file and enter environment-specific information, and run the toolon the machine without being prompted. As an alternative, you can run the tool and provide input whenprompted.
vSphere Security
VMware, Inc. 48

Each Service on a Separate MachineIf each service runs on a separate machine or virtual machine in your environment, follow the steps belowto update certificates. If some of these services run on the same machine, follow the information in theUpdate Planner list that is generated by the Certificate Automation Tool. If you are not including some ofthe services in your environment, you can skip the corresponding steps.
1 Install and run the tool on one machine. The tool generates the update planner list.
2 Install and run the tool on the machine on which vCenter Single Sign-on is running to update thevCenter Single Sign-On SSL certificate.
3 Install and run the tool on the Inventory Service machine. The tool performs these tasks:
a Updates the trust from vCenter Inventory Service to vCenter Single Sign-On.
b Updates the vCenter Inventory Service SSL certificate.
4 Install and run the tool on the machine on which vCenter Server is running. The tool performs thesetasks:
a Updates the trust from the vCenter Server service to the vCenter Single Sign-On service.
b Updates the vCenter Server SSL certificate.
c Updates the trust from the vCenter Server to the vCenter Inventory Service.
d Updates the trust from the vCenter Server to the vSphere Update Manager.
5 Install and run the tool on the vCenter Orchestrator machine. The tool performs these tasks:
a Updates the trust from the vCenter Orchestrator service to the vCenter Single Sign-On service.
b Updates the trust from the vCenter Orchestrator service to the vCenter Server service.
c Updates the vCenter Orchestrator SSL certificate.
6 Install and run the tool on the vSphere Web Client machine. The tool performs these tasks:
a Updates the trust from the vSphere Web Client to the vCenter Single Sign-On service.
b Updates the trust from the vSphere Web Client to the vCenter Inventory Service and restarts theservice.
c Updates the trust from the vSphere Web Client to the vCenter Server service and restarts theservice.
d Updates the trust from the vSphere Web Client to the vCenter Orchestrator service and restartsthe service.
e Updates the vSphere Web Client SSL certificate.
You have to restart the vSphere Web Client to complete the updates of the trust relationships.
vSphere Security
VMware, Inc. 49

7 Install and run the tool on the Log Browser machine. The vSphere Web Client and the vCenter LogBrowser always run on the same machine. The tool performs these tasks.
a Updates the trust from the Log Browser service to the vCenter Single Sign-On service.
b Updates the Log Browser SSL certificate.
8 Install and run the tool on the vSphere Update Manager machine.
The tool updates the vSphere Update Manager SSL certificate. As part of the certificate update, thevCenter Server trust to vSphere Update manger is updated.
Mixed Mode DeploymentIn a mixed mode deployment, for example, when two services are on one machine and three services areon a second machine, you can run the tool as if each service were on a different machine.
Replacing vCenter Certificates With the vCenterCertificate Automation ToolYou can replace the default vCenter SSL certificates with CA-signed or self-signed certificates if companypolicy requires it. The vCenter Certificate Automation Tool is a command-line tool that helps you replacecertificates in the correct order for the core vCenter services in your environment. You can use the tool togenerate certificate requests, generate an update plan, and perform the update.
Each vSphere service has an identity, which is used to create an x509 certificate. You can replace thecertificates for the core vCenter components with the vCenter Certificate Automation Tool. You canreplace certificates for other vCenter components manually.
n Use the vCenter Certificate Automation Tool to replace SSL certificates for vCenter components thatare installed on supported Windows operating systems. The tool helps you generate certificaterequests and to plan the process of replacing certificates. The tool supports vCenter Single Sign-On,vCenter Inventory Service, vCenter Server, vSphere Web Client, vSphere Update Manager, vCenterLog Browser and vCenter Orchestrator.
n If you are using other vSphere components, see VMware documentation or the VMware KnowledgeBase for certificate replacement information.
n If you are using a third-party component, you must replace the certificates manually. See VMwareKnowledge Base article 2058519.
n If you are using the vCenter Server Appliance, replace SSL certificates manually. Some servicesshare certificates. See VMware Knowledge Base article 2057223.
Replacing the certificates consists of several tasks.
1 Preparing Your Environment
Before you run the vCenter Certificate Automation Tool, verify that you are running on one of thesupported operating systems and verify that you have the correct platform, that the certificates meetrequirement, and that your system setup meets requirements.
vSphere Security
VMware, Inc. 50

2 Install the vCenter Certificate Automation Tool
You install the vCenter Certificate Automation Tool on each machine on which a vCenter corecomponent resides. To do the initial planning, you can install the tool on a single machine.
3 Predefine Default Values for vCenter Certificate Automation Tool
Predefining default values in a configuration file for the tool helps prevent typing errors and savestime. With default values predefined, the tool no longer prompts you for those values. You cannotspecify default passwords.
4 Generate Certificate Requests and Set Up CA Signed Certificates
If you want to use trusted certificates that are generated by a CA (Certificate Authority), you mustcreate certificate requests and submit them to a CA.
5 Run the Update Planner
The update planner, part of the vCenter Certificate Automation Tool, allows you to determine thecorrect order for certificate replacement. Follow the steps in the order that the tool recommends forbest results.
6 Run the Tool to Update SSL Certificates and Trusts
After you obtain the SSL certificates and you generate the list of update steps, you can run the toolto replace the existing certificates, reestablish trust, and optionally restart some of the services.
7 Rolling Back Your Updates
Each update operation successfully performs the update for one certificate and key, or fails in a waythat preserves the original state. If an update fails, you might need to roll back the failed step.
Preparing Your EnvironmentBefore you run the vCenter Certificate Automation Tool, verify that you are running on one of thesupported operating systems and verify that you have the correct platform, that the certificates meetrequirement, and that your system setup meets requirements.
Review the Known Issues listed in VMware Knowledge Base Article 2057340.
Supported PlatformsThe tool has been tested on the following Windows operating systems.
n Windows 2008 R2 SP1
n Windows 2012 Standard
n Windows 2012 R2
Tool and Product VersionsDifferent versions of the tool are supported with different versions of vSphere.
n Version 1.0 of the tool is supported with vSphere 5.1
n Version 1.0.1 of the tool is supported with vSphere 5.1 Update 1
vSphere Security
VMware, Inc. 51

n Version 5.5 of the tool is supported with vSphere 5.5
Certificate RequirementsYou can obtain the CA-signed certificates before you run the tool, or you can have the tool generate thecertificate requests for you. Before you run the tool to replace certificates, make sure that certificatesmeet the following requirements:
n The SSL certificate for each vSphere component has a unique base DN.
n The certificates and private keys meet these requirements:
n Private key algorithm: RSA
n Private key length >= 1024
n Private key standard: PKCS#1 or PKCS#8
n Private key storage: PEM
n Recommended certificate signature algorithm:
n sha256WithRSAEncryption 1.2.840.113549.1.1.11
n sha384WithRSAEncryption 1.2.840.113549.1.1.12
n sha512WithRSAEncryption 1.2.840.113549.1.1.13
Note The algorithms md2WithRSAEncryption 1.2.840.113549.1.1.2, md5WithRSAEncryption1.2.840.113549.1.1.4 , and sha1WithRSAEncryption 1.2.840.113549.1.1.5 are not recommended.The algorithm RSASSA-PSS with OID 1.2.840.113549.1.1.10 is not supported.
n The certificate chain format meets these requirements:
n Single PEM file that does not contain any comments.
n The file starts with the header of the first certificate, that is, -----BEGIN CERTIFICATE------.
n Self-signed certificates are ordered from the leaf to the root.
n No extra certificates are in the file.
n The certificate chain is complete.
n The path or file name for certificates and keys does not contain any of the following specialcharacters:
n ^ (caret)
n % (percent)
n & (ampersand)
n ; (semicolon)
n ) (closing parenthesis)
The tool exits, throws an exception, or reports that certificate or key files are not found if it encountersthose characters.
vSphere Security
VMware, Inc. 52

System RequirementsInstall all vCenter components, obtain administrator permissions, and shut down dependent solutions, asfollows:
n Verify that all vCenter components that require certificate updates are installed and running, and thatyou have access to the server for each component.
n Verify that you have administrative privileges on the server or servers that you are running the tool on.Although nonadministrator users can download and launch the tool, all operations fail without theproper permissions.
n Shut down the following dependent solutions that are running in the environment:
n VMware Site Recovery Manager
n vSphere Data Recovery
n vCloud Director
n Any third-party solution which might be connecting to vCenter Server
Install the vCenter Certificate Automation ToolYou install the vCenter Certificate Automation Tool on each machine on which a vCenter core componentresides. To do the initial planning, you can install the tool on a single machine.
Install the tool on each physical or virtual machine on which a service is running whose certificate updateis planned. You can install the tool in several configurations. See Certificate Automation Tool DeploymentOptions.
Note Different versions of the tool are supported with different versions of vSphere.
n Version 1.0 of the tool is supported with vSphere 5.1
n Version 1.0.1 of the tool is supported with vSphere 5.1 Update 1
n Version 5.5 of the tool is supported with vSphere 5.5
Prerequisites
n Verify that all requirements are met. See Preparing Your Environment.
n Obtain certificates for each machine on which a vSphere component resides before you install thetool, or use the tool to generate Certificate Signing Requests (CSRs) and obtain certificates from yourCertificate Authority. See Generate Certificate Requests and Set Up CA Signed Certificates.
Procedure
1 Download the vCenter Certificate Automation Tool.
The download is located in the Drivers and Tools section of the VMware vSphere download page.
2 For initial planning, copy the downloaded ZIP file to one machine and generate the Update Plannerlist.
vSphere Security
VMware, Inc. 53

3 Depending on your deployment, you might copy the downloaded ZIP file to each machine on which avCenter core component resides.
4 Unzip the file into any directory, preserving the directory structure.
What to do next
You can predefine your preferred default values, see Predefine Default Values for vCenter CertificateAutomation Tool, or respond to the prompts when you run the tool.
If a newer version of the tool becomes available, you can download and unzip that version of the tool to adifferent directory and delete the old version of the tool.
Predefine Default Values for vCenter Certificate Automation ToolPredefining default values in a configuration file for the tool helps prevent typing errors and saves time.With default values predefined, the tool no longer prompts you for those values. You cannot specifydefault passwords.
Predefining default values is not required, but might help speed up the process later. If the tool does notencounter defaults, it prompts you.
Prerequisites
Verify that the vCenter Certificate Automation Tool is not running. The tool reads the values in ssl-environment.bat when you start it.
Procedure
1 Open ssl-environment.bat in a text editor.
2 Specify parameters that you want to change for each vSphere component that requires updatedcertificates.
For example, for vCenter Server, you can edit the vc_cert_chain, vc_private_key, andvc_username parameters.
3 Save and close ssl-environment.bat.
4 Start the tool.
The tool picks up your default values each time you start it.
The vCenter Certificate Automation Tool saves the information and uses it to automatically prefill requiredinput.
What to do next
Generate certificate requests if necessary, or run the update planner if you deployed on multiplemachines to plan your certificate update tasks. See Run the Update Planner.
vSphere Security
VMware, Inc. 54

Generate Certificate Requests and Set Up CA Signed CertificatesIf you want to use trusted certificates that are generated by a CA (Certificate Authority), you must createcertificate requests and submit them to a CA.
You can create the certificate requests manually, or use the vCenter Certificate Automation Tool togenerate certificate requests for each component. See VMware KB article 2061934 for detailedinstruction on manual generation and replacement.
For increased security, generate each certificate and private key on the machine where it will be used.
Note This procedure explains how to prepare your CA-signed certificates. The tool also works with self-signed certificates.
Procedure
1 You can use the tool to generate the certificate requests for each of the following services if you areusing them in your environment.
n vCenter Single Sign-On service
n vCenter Inventory Service
n vCenter Server
n vCenter Orchestrator
n vSphere Web Client
n vCenter Log Browser
n vCenter Update Manager
2 Submit the certificate requests to the CA that you are using.
The CA returns the generated certificates and keys.
3 When you later supply the certificates and keys to the tool, the tool generates the PFX and JKS filesthat are required by the vCenter Single Sign-On infrastructure and places them in the correct location.
What to do next
n Run the tool to generate update planner information.
Run the Update PlannerThe update planner, part of the vCenter Certificate Automation Tool, allows you to determine the correctorder for certificate replacement. Follow the steps in the order that the tool recommends for best results.
Procedure
1 Log into a machine on which the vCenter Certificate Automation Tool is installed.
vSphere Security
VMware, Inc. 55

2 From a command line, navigate to the location to which you unzipped the tool and run the followingcommand.
ssl-updater.bat
3 When prompted, select 1. Plan your steps to update SSL certificates.
4 Enter the numbers that correspond to the services that you want to update.
u To update more than one SSL certificate, separate the numbers with a comma. For example, toupdate the SSL certificates on vCenter Single Sign-On, vCenter Server, and the vSphere WebClient, type:1,3,4
u To update the certificate on all services that are supported by the tool, type 8.
The vSphere Web Client and the vCenter Log Browser always run on the same machine.
Note Enter all of the services you intend to update. If you leave out some services initially and runthe Update Planner again later, the steps might be incorrect and the update might fail.
The Update Planner displays the tasks to perform and the order to perform them in.
5 Save the Update Planner output to a text file.
Sample output for an environment where all certificates will be replaced is shown below.
1. Go to the machine with Single Sign-On installed and
- Update the Single Sign-On SSL certificate.
2. Go to the machine with Inventory Service installed and
- Update Inventory Service trust to Single Sign-On.
3. Go to the machine with Inventory Service installed and
- Update the Inventory Service SSL certificate.
4. Go to the machine with vCenter Server installed and
- Update vCenter Server trust to Single Sign-On.
5. Go to the machine with vCenter Server installed and
- Update the vCenter Server SSL certificate.
6. Go to the machine with vCenter Server installed and
- Update vCenter Server trust to Inventory Service.
7. Go to the machine with Inventory Service installed and
- Update the Inventory Service trust to vCenter Server.
8. Go to the machine with vCenter Orchestrator installed and
- Update vCenter Orchestrator trust to Single Sign-On.
9. Go to the machine with vCenter Orchestrator installed and
- Update vCenter Orchestrator trust to vCenter Server.
10. Go to the machine with vCenter Orchestrator installed and
- Update the vCenter Orchestrator SSL certificate.
vSphere Security
VMware, Inc. 56

11. Go to the machine with vSphere Web Client installed and
- Update vSphere Web Client trust to Single Sign-On.
12. Go to the machine with vSphere Web Client installed and
- Update vSphere Web Client trust to Inventory Service.
13. Go to the machine with vSphere Web Client installed and
- Update vSphere Web Client trust to vCenter Server.
14. Go to the machine with vSphere Web Client installed and
- Update the vSphere Web Client SSL certificate.
15. Go to the machine with Log Browser installed and
- Update the Log Browser trust to Single Sign-On.
16. Go to the machine with Log Browser installed and
- Update the Log Browser SSL certificate.
17. Go to the machine with vSphere Update Manager installed and
- Update the vSphere Update Manager SSL certificate.
18. Go to the machine with vSphere Update Manager installed and
- Update vSphere Update Manager trust to vCenter Server.
6 Type 9 to return to the main menu.
What to do next
Update certificates and trusts. See Run the Tool to Update SSL Certificates and Trusts.
Run the Tool to Update SSL Certificates and TrustsAfter you obtain the SSL certificates and you generate the list of update steps, you can run the tool toreplace the existing certificates, reestablish trust, and optionally restart some of the services.
See Certificate Automation Tool Deployment Options for an overview of how the tool proceeds in differentdeployments.
The tool gives you a list of update tasks and specifies the machine on which to perform each task. If youselect a task, the tool prompts for input to perform that task. For example, to update the InventoryService, you select Inventory Service from the menu. The tool prompts you for information that it requiresto update the Inventory Service Trust to Single Sign-On, and to update the Inventory Service SSLCertificate options.
Perform the tasks in sequence. If the update planner instructs you to perform tasks on multiple machines,keep the tool running on each machine to avoid entering information again.
Procedure
1 Move to the first machine on the task list and start the tool by running ssl-updater.bat.
The tool does not list machines by name but points you to the machine on which a service is running.
2 Select Update SSL certificate.
vSphere Security
VMware, Inc. 57

3 When prompted, specify the service whose certificate you want to update.
If you prespecified the default, the tool does not prompt you.
To update multiple SSL certificates, update the certificate for one service and then proceed to thenext service on the machine where it is deployed. The SSL certificate for each vSphere componentmust be unique.
4 When prompted, type the requested information, such as the locations of the new SSL chain andprivate key, passwords and so on.
5 Continue until you have provided all information.
6 Check the planner for the next step.
You might have to deploy and start the tool on a different machine to update some of the services.
7 After you have completed your update plan, you can close the command prompt window to end yoursession.
Rolling Back Your UpdatesEach update operation successfully performs the update for one certificate and key, or fails in a way thatpreserves the original state. If an update fails, you might need to roll back the failed step.
Before beginning the update process, the vCenter Certificate Automation Tool saves a copy of theexisting certificate information in a backup folder, ensuring that you can roll back to the previously usedcertificate to keep the entire system up and running.
You can use the tool's menu item to let you roll back to the original.
Note After rolling back the vCenter Server certificate, you must update the vCenter Server trust toVMware Update Manager again.
Replace vCenter Server Appliance CertificatesYou can replace vCenter Server Appliance certificates. Because the Certificate Automation Tool issupported only on Windows, you must replace the certificates by hand.
Replacing the default SSL certificate and key with a self-signed or CA-signed certificate on vCenterServer Appliance is a manual process. You cannot use the Certificate Automation Tool to update thecertificate and key on Linux.
Prerequisites
Obtain certificate files (including the certificate and private key).
Procedure
u Follow the steps in VMware Knowledge Base article 2057223.
vSphere Security
VMware, Inc. 58

Replace vCenter Server Heartbeat CertificatesIf you have a problem with the current certificate, or if your corporate security policy requires doing so,you can replace default vCenter ServerHeartbeat certificates.
Prerequisites
n Install OpenSSL on the system where you intend to replace the certificate.
n Obtain the certificate files rui.crt, rui.key, and rui.pfx.
Procedure
1 Download the SSLImport.jar utility from the VMware Knowledge Base article Replacing SSLCertificates for vCenter Server Heartbeat 6.x (KB 2013041).
2 Follow the steps in the knowledge base article to replace the certificate.
vSphere Security
VMware, Inc. 59

vSphere Users and Permissions 4vCenter Single Sign-On supports authentication, which means it determines whether a user can accessvSphere components at all. In addition, each user must be authorized to view or manipulate vSphereobjects.
vCenter Server allows fine-grained control over authorization with permissions and roles. Review first thebackground information about hierachical inheritance of permissions, permission validation, and relatedtopics. You can then move on to vCenter Server User Management Tasks (Chapter 5 vCenter UserManagement Tasks).
This chapter includes the following topics:n Hierarchical Inheritance of Permissions
n Multiple Permission Settings
n Permission Validation
n Using Roles to Assign Privileges
n Best Practices for Roles and Permissions
n Required Privileges for Common Tasks
n Password Requirements
n vCenter Server User Directory Settings
Hierarchical Inheritance of PermissionsWhen you assign a permission to an object, you can choose whether the permission propagates downthe object hierarchy. You set propagation for each permission. Propagation is not universally applied.Permissions defined for a child object always override the permissions that are propagated from parentobjects.
The figure illustrates inventory hierarchy and the paths by which permissions can propagate.
VMware, Inc. 60

Figure 4‑1. vSphere Inventory Hierarchy
template host standardswitch VDS datastore
virtual machine
virtual machine
virtual machine
virtual machine
cluster
resource pool
vAppvApp
vApp
resource pool
VM folder host folder network folder datastore folder
data center folder
data center
root folder
distributedport group
datastorecluster
resource pool
vSphere Security
VMware, Inc. 61

Most inventory objects inherit permissions from a single parent object in the hierarchy. For example, adatastore inherits permissions from either its parent datastore folder or parent datacenter. Virtualmachines inherit permissions from both the parent virtual machine folder and the parent host, cluster, orresource pool simultaneously. To restrict a user’s privileges on a virtual machine, you must setpermissions on both the parent folder and the parent host, cluster, or resource pool for that virtualmachine.
To set permissions for a distributed switch and its associated distributed port groups, set permissions on aparent object, such a folder or datacenter. You must also select the option to propagate these permissionsto child objects.
Permissions take several forms in the hierarchy:
Managed entities You can define permissions on managed entities.
n Clusters
n Datacenters
n Datastores
n Datastore clusters
n Folders
n Hosts
n Networks (except vSphere Distributed Switches)
n Distributed port groups
n Resource pools
n Templates
n Virtual machines
n vSphere vApps
Global entities Global entities derive permissions from the root vCenter Server system.
n Custom fields
n Licenses
n Roles
n Statistics intervals
n Sessions
Multiple Permission SettingsObjects might have multiple permissions, but only one permission for each user or group. For example,one permission might specify that Group A has Administrator privileges on an object. Another permissionmight specify that Group B might have Virtual Machine Administrator privileges on the same object.
vSphere Security
VMware, Inc. 62

If an object inherits permissions from two parent objects, the permissions on one object are added to thepermissions on the other object. For example, if a virtual machine is in a virtual machine folder and alsobelongs to a resource pool, that virtual machine inherits all permission settings from both the virtualmachine folder and the resource pool.
Permissions applied on a child object always override permissions that are applied on a parent object.See Example 2: Child Permissions Overriding Parent Permissions.
If multiple group permissions are defined on the same object and a user belongs to two or more of thosegroups, two situations are possible:
n If no permission is defined for the user on that object, the user is assigned the set of privilegesassigned to the groups for that object.
n If a permission is defined for the user on that object, the user's permission takes precedence over allgroup permissions.
Example 1: Inheritance of Multiple PermissionsThis example illustrates how an object can inherit multiple permissions from groups that are grantedpermission on a parent object.
In this example, two permissions are assigned on the same object for two different groups.
n Role 1 can power on virtual machines.
n Role 2 can take snapshots of virtual machines.
n Group A is granted Role 1 on VM Folder, with the permission set to propagate to child objects.
n Group B is granted Role 2 on VM Folder, with the permission set to propagate to child objects.
n User 1 is not assigned specific privileges.
User 1, who belongs to groups A and B, logs on. User 1 can both power on and take snapshots of VM Aand VM B.
Figure 4‑2. Example 1: Inheritance of Multiple Permissions
VM A
VM B
VM Folder
group B + role 2user 1 has permissions of role 1 and role 2
group A + role 1
Example 2: Child Permissions Overriding Parent PermissionsThis example illustrates how permissions that are assigned on a child object can override permissionsthat are assigned on a parent object. You can use this overriding behavior to restrict user access toparticular areas of the inventory.
vSphere Security
VMware, Inc. 63

In this example, permissions are defined on two different objects for two different groups.
n Role 1 can power on virtual machines.
n Role 2 can take snapshots of virtual machines.
n Group A is granted Role 1 on VM Folder, with the permission set to propagate to child objects.
n Group B is granted Role 2 on VM B.
User 1, who belongs to groups A and B, logs on. Because Role 2 is assigned at a lower point in thehierarchy than Role 1, it overrides Role 1 on VM B. User 1 can power on VM A, but not take snapshots.User 1 can take snapshots of VM B, but not power it on.
Figure 4‑3. Example 2: Child Permissions Overriding Parent Permissions
VM A
VM B
VM Folder
group B + role 2
user 1 has permissions of role 1 only
user 1 has permissions of role 2 only
group A + role 1
Example 3: User Role Overriding Group RoleThis example illustrates how the role assigned directly to an individual user overrides the privilegesassociated with a role assigned to a group.
In this example, permissions are defined on the same object. One permission associates a group with arole, the other permission associates an individual user with a role. The user is a member of the group.
n Role 1 can power on virtual machines.
n Group A is granted Role 1 on VM Folder.
n User 1 is granted No Access role on VM Folder.
User 1, who belongs to group A, logs on. The No Access role granted to User 1 on VM Folder overridesthe role assigned to the group. User 1 has no access to VM Folder or VMs A and B.
Figure 4‑4. Example 3: User Permissions Overriding Group Permissions
VM A
VM B
VM Folder
user 1 + no access
user 1 has no access to the folder or the virtual machines
group A + role 1
vSphere Security
VMware, Inc. 64

Permission ValidationvCenter Server and ESXi hosts that use Active Directory regularly validate users and groups against theWindows Active Directory domain. Validation occurs whenever the host system starts and at regularintervals specified in the vCenter Server settings.
For example, if user Smith was assigned permissions and in the domain the user’s name was changed toSmith2, the host concludes that Smith no longer exists and removes permissions for that user when thenext validation occurs.
Similarly, if user Smith is removed from the domain, all permissions are removed when the next validationoccurs. If a new user Smith is added to the domain before the next validation occurs, the new user Smithreceives all the permissions the old user Smith was assigned.
Using Roles to Assign PrivilegesA role is a predefined set of privileges. Privileges define individual rights that a user requires to performactions and read properties.
When you assign permissions to a user or group, you pair the user or group with a role and associate thatpairing with an inventory object. A single user might have different roles for different objects in theinventory. For example, if you have two resource pools in your inventory, Pool A and Pool B, you mightassign a particular user the Virtual Machine User role on Pool A and the Read Only role on Pool B. Theseassignments allow that user to turn on virtual machines in Pool A, but to only view virtual machines inPool B.
The roles created on a host are separate from the roles created on a vCenter Server system. When youmanage a host using vCenter Server, the roles that are created through vCenter Server are available. Ifyou connect directly to the host, the roles created directly on the host are available.
vCenter Server and ESXi hosts provide default system roles and sample roles:
System roles System roles are permanent. You cannot edit the privileges associated withthese roles.
Sample roles VMware provides sample roles for convenience as guidelines andsuggestions. You can modify or remove these roles.
See Roles in vCenter Server and ESXi for information on creating, cloning, and editing roles.
All roles permit the user to schedule tasks by default. Users can schedule only tasks they havepermission to perform at the time the tasks are created.
Note Changes to permissions and roles take effect immediately, even if the users involved are logged in.The exception is searches, where permission changes take effect after the user has logged out andlogged back in.
vSphere Security
VMware, Inc. 65

Best Practices for Roles and PermissionsUse best practices for roles and permissions to maximize the security and manageability of yourvCenter Server environment.
VMware recommends the following best practices when configuring roles and permissions in yourvCenter Server environment:
n Where possible, grant permissions to groups rather than individual users.
n Grant permissions only where needed. Using the minimum number of permissions makes it easier tounderstand and manage your permissions structure.
n If you assign a restrictive role to a group, check that the group does not contain the Administratoruser or other users with administrative privileges. Otherwise, you could unintentionally restrictadministrators' privileges in parts of the inventory hierarchy where you have assigned that group therestrictive role.
n Use folders to group objects. For example, if you want to grant modify permission to one set of hostsand view permission to another set of hosts to a group of users, place each set of hosts in a folder.
n Use caution when granting a permission at the root vCenter Server level. Users with permissions atthe root level have access to global data on vCenter Server, such as roles, custom attributes,vCenter Server settings, and licenses. Changes to licenses and roles propagate to all vCenter Serversystems in a Linked Mode group, even if the user does not have permissions on all of thevCenter Server systems in the group.
n In most cases, enable propagation on permissions. This ensures that when new objects are insertedin to the inventory hierarchy, they inherit permissions and are accessible to users.
n Use the No Access role to mask specific areas of the hierarchy if you do not want for certain users orgroups to have access.
Required Privileges for Common TasksMany tasks require permissions on more than one object in the inventory. You can review the privilegesrequired to perform the tasks and, where applicable, the appropriate sample roles.
The following table lists common tasks that require more than one privilege. You can use the ApplicableRoles on the inventory objects to grant permission to perform these tasks, or you can create your ownroles with the equivalent required privileges.
vSphere Security
VMware, Inc. 66

Table 4‑1. Required Privileges for Common Tasks
Task Required Privileges Applicable Role
Create a virtual machine On the destination folder or datacenter:n Virtual machine.Inventory.Create newn Virtual machine.Configuration.Add new disk (if creating a new virtual
disk)n Virtual machine.Configuration.Add existing disk (if using an existing
virtual disk)n Virtual machine.Configuration.Raw device (if using an RDM or SCSI
pass-through device)
Administrator
On the destination host, cluster, or resource pool:
Resource.Assign virtual machine to resource poolResource pooladministrator orAdministrator
On the destination datastore or folder containing a datastore:
Datastore.Allocate spaceDatastoreConsumer orAdministrator
On the network that the virtual machine will be assigned to:
Network.Assign networkNetworkConsumer orAdministrator
Deploy a virtual machine froma template
On the destination folder or datacenter:n Virtual machine .Inventory.Create from existingn Virtual machine.Configuration.Add new disk
Administrator
On a template or folder of templates:
Virtual machine.Provisioning.Deploy templateAdministrator
On the destination host, cluster or resource pool:
Resource.Assign virtual machine to resource poolAdministrator
On the destination datastore or folder of datastores:
Datastore.Allocate spaceDatastoreConsumer orAdministrator
On the network that the virtual machine will be assigned to:
Network.Assign networkNetworkConsumer orAdministrator
Take a virtual machinesnapshot
On the virtual machine or a folder of virtual machines:
Virtual machine.Snapshot management. Create snapshotVirtual MachinePower User orAdministrator
On the destination datastore or folder of datastores:
Datastore.Allocate spaceDatastoreConsumer orAdministrator
Move a virtual machine into aresource pool
On the virtual machine or folder of virtual machines:n Resource.Assign virtual machine to resource pooln Virtual machine.Inventory.Move
Administrator
On the destination resource pool:
Resource.Assign virtual machine to resource poolAdministrator
vSphere Security
VMware, Inc. 67

Table 4‑1. Required Privileges for Common Tasks (Continued)
Task Required Privileges Applicable Role
Install a guest operatingsystem on a virtual machine
On the virtual machine or folder of virtual machines:n Virtual machine.Interaction.Answer questionn Virtual machine.Interaction.Console interactionn Virtual machine.Interaction.Device connectionn Virtual machine.Interaction.Power Offn Virtual machine.Interaction.Power Onn Virtual machine.Interaction.Resetn Virtual machine.Interaction.Configure CD media (if installing from a
CD)n Virtual machine.Interaction.Configure floppy media (if installing from
a floppy disk)n Virtual machine.Interaction.VMware Tools install
Virtual MachinePower User orAdministrator
On a datastore containing the installation media ISO image:
Datastore.Browse datastore (if installing from an ISO image on adatastore)
On the datastore to which you upload the installation media ISO image:n Datastore.Browse datastoren Datastore.Low level file operations
Virtual MachinePower User orAdministrator
Migrate a virtual machine withvMotion
On the virtual machine or folder of virtual machines:n Resource.Migrate powered on virtual machinen Resource.Assign Virtual Machine to Resource Pool (if destination is
a different resource pool from the source)
Resource PoolAdministrator orAdministrator
On the destination host, cluster, or resource pool (if different from thesource):
Resource.Assign virtual machine to resource pool
Resource PoolAdministrator orAdministrator
Cold migrate (relocate) avirtual machine
On the virtual machine or folder of virtual machines:n Resource.Migrate powered off virtual machinen Resource.Assign virtual machine to resource pool (if destination is
a different resource pool from the source)
Resource PoolAdministrator orAdministrator
On the destination host, cluster, or resource pool (if different from thesource):
Resource.Assign virtual machine to resource pool
Resource PoolAdministrator orAdministrator
On the destination datastore (if different from the source):
Datastore.Allocate spaceDatastoreConsumer orAdministrator
Migrate a virtual machine withStorage vMotion
On the virtual machine or folder of virtual machines:
Resource.Migrate powered on virtual machineResource PoolAdministrator orAdministrator
On the destination datastore:
Datastore.Allocate spaceDatastoreConsumer orAdministrator
vSphere Security
VMware, Inc. 68

Table 4‑1. Required Privileges for Common Tasks (Continued)
Task Required Privileges Applicable Role
Move a host into a cluster On the host:
Host.Inventory.Add host to clusterAdministrator
On the destination cluster:
Host.Inventory.Add host to clusterAdministrator
Password RequirementsPassword requirements differ for vCenter Server and for ESXi hosts.
vCenter Server PasswordsIn vCenter Server, password requirements are dictated by vCenter Single Sign-On or by the configuredidentity source, which can be Active Directory, OpenLDAP, or the local operating system for the vCenterSingle Sign-On server. See Edit the vCenter Single Sign-On Password Policy, or see the relevant ActiveDirectory or OpenLDAP documentation.
ESXi PasswordsBy default, ESXi enforces requirements for user passwords.
Your user password must meet the following length requirements.
n Passwords containing characters from one or two character classes must be at least eight characterslong.
n Passwords containing characters from three character classes must be at least seven characterslong.
n Passwords containing characters from all four character classes must be at least six characters long.
When you create a password, include a mix of characters from four character classes: lowercase letters,uppercase letters, numbers, and special characters such as an underscore or dash.
The password cannot contain the words root, admin, or administrator in any form.
Note An uppercase character that begins a password does not count toward the number of characterclasses used. A number that ends a password does not count toward the number of character classesused.
You can also use a passphrase, which is a phrase consisting of at least three words, each of which is 8 to40 characters long.
Example: Creating Acceptable ESXi PasswordsThe following password candidates meet the requirements of ESXi.
n xQaTEhbU: Contains eight characters from two character classes.
vSphere Security
VMware, Inc. 69

n xQaT3pb: Contains seven characters from three character classes.
n xQaT3#: Contains six characters from four character classes.
The following password candidates do not meet the requirements of ESXi.
n Xqat3hb: Begins with an uppercase character, reducing the effective number of character classes totwo. Eight characters are required when you use only two character classes.
n xQaTEh2: Ends with a number, reducing the effective number of character classes to two. Eightcharacters are required when you use only two character classes.
vCenter Server User Directory SettingsYou can limit the number of results returned when you search for users and groups and set a userdirectory timeout for vCenter Server.
vCenter Server systems that use a directory service regularly validate users and groups against the userdirectory domain. Validation occurs at regular intervals specified in the vCenter Server settings. Forexample, if user Smith was assigned permissions and in the domain the user’s name was changed toSmith2, the host concludes that Smith no longer exists and removes permissions for that user when thenext validation occurs.
Similarly, if user Smith is removed from the domain, all permissions are removed when the next validationoccurs. If a new user Smith is added to the domain before the next validation occurs, the new user Smithreceives all the permissions the old user Smith was assigned.
vSphere Security
VMware, Inc. 70

vCenter User Management Tasks 5Users in the vCenter environment must be authenticated, and they must be authorized to view andchange vSphere objects. Administrators perform user management tasks from the vSphere Web Client.
This chapter includes the following topics:
n Managing Permissions for vCenter Components
n Roles in vCenter Server and ESXi
n Adjust the Search List in Large Domains in the vSphere Web Client
Managing Permissions for vCenter ComponentsPermissions are access roles that consist of a user and the user’s assigned role for an object such as avirtual machine or ESXi host. Permissions grant users the right to perform the activities specified by therole on the object to which the role is assigned.
For example, to configure memory for the host, you must grant a role to a user that includes theHost.Configuration.Memory Configuration privilege. By assigning different roles to users for differentobjects, you control the tasks that users can perform in your vSphere environment.
Users other than root and vpxuser initially have no permissions on any objects, which means they cannotview these objects or perform operations on them. A user with Administrator privileges must assignpermissions to these users to allow them to perform tasks.
The list of privileges is the same for ESXi and vCenter Server. See Chapter 11 Defined Privileges for acomplete list of privileges.
Multiple PermissionsMany tasks require permissions on more than one object.
Permissions applied on a child object always override permissions that are applied on a parent object.Virtual machine folders and resource pools are equivalent levels in the hierarchy. If you assignpropagating permissions to a user or group on a virtual machine's folder and its resource pool, the userhas the privileges propagated from the resource pool and from the folder.
VMware, Inc. 71

If multiple group permissions are defined on the same object and the user belongs to two or more ofthose groups, two situations are possible:
n If no permission is defined for the user on that object, the user is assigned the set of privilegesassigned to the groups for that object.
n If a permission is defined for the user on that object, the user's permission takes precedence over allgroup permissions.
Permission ExamplesThese rules can help you determine where you must assign permissions to allow particular operations:
n Any operation that consumes storage space, such as creating a virtual disk or taking a snapshot,requires the Datastore.Allocate Space privilege on the target datastore, as well as the privilege toperform the operation itself.
n Moving an object in the inventory hierarchy requires appropriate privileges on the object itself, thesource parent object (such as a folder or cluster), and the destination parent object.
n Each host and cluster has its own implicit resource pool that contains all the resources of that host orcluster. Deploying a virtual machine directly to a host or cluster requires the Resource.AssignVirtual Machine to Resource Pool privilege.
Assign Permissions in the vSphere Web ClientAfter you create users and groups and define roles, you must assign the users and groups and their rolesto the relevant inventory objects. You can assign the same permissions at one time on multiple objects bymoving the objects to a folder and setting the permissions on the folder.
Permissions assigned from the vSphere Web Client must match permissions, including case, inActiveDirectory precisely. If you upgraded from earlier versions of vSphere, check for caseinconsistencies if you experience problems with groups.
Prerequisites
Permissions.Modify permission on object whose permissions you want to modify.
Procedure
1 Browse to the object in the vSphere Web Client object navigator.
2 Click the Manage tab and select Permissions.
3 Click Add Permission.
4 Click Add.
vSphere Security
VMware, Inc. 72
5 Identify the user or group that will have the permission.
a Select the domain where the user or group is located from the Domain drop-down menu.
b Type a name in the Search box or select a name from the list.
The system searches user names, group names, and descriptions.
c Select the user or group and click Add.
The name is added to either the Users or Groups list.
d (Optional) Click Check Names to verify that the user or group exists in the database.
e Click OK.
6 Select a role from the Assigned Role drop-down menu.
The roles that are assigned to the object appear in the menu. The privileges contained in the role arelisted in the section below the role title.
7 (Optional) Deselect the Propagate to Child Objects check box.
The role is applied only to the selected object and does not propagate to the child objects.
8 Verify that the users and groups are assigned to the appropriate permissions and click OK.
The server adds the permission to the list of permissions for the object.
The list of permissions references all users and groups that have roles assigned to the object andindicates where in the vCenter Server hierarchy the role is assigned.
Change Permissions in the vSphere Web ClientAfter a user or group and role pair is set for an inventory object, you can change the role paired with theuser or group or change the setting of the Propagate check box. You can also remove the permissionsetting.
Procedure
1 Browse to the object in the vSphere Web Client object navigator.
2 Click the Manage tab and select Permissions.
3 Click the line item to select the user or group and role pair.
4 Click Change role on permission.
5 Select a role for the user or group from the Assigned Role drop-down menu.
6 To propagate the privileges to the children of the assigned inventory object, click the Propagatecheck box and click OK.
vSphere Security
VMware, Inc. 73

Remove Permissions in the vSphere Web ClientRemoving a permission for a user or group does not remove the user or group from the list of thoseavailable. It also does not remove the role from the list of available items. It removes the user or groupand role pair from the selected inventory object.
Procedure
1 Browse to the object in the vSphere Web Client object navigator.
2 Click the Manage tab and select Permissions.
3 Click the appropriate line item to select the user or group and role pair.
4 Click Remove permission.
vCenter Server removes the permission setting.
Change Permission Validation Settings in the vSphere Web ClientvCenter Server periodically validates its user and group lists against the users and groups in the userdirectory. It then removes users or groups that no longer exist in the domain. You can disable validation orchange the interval between validations.
Procedure
1 Browse to the vCenter Server system in the vSphere Web Client object navigator.
2 Select the Manage tab and click Settings.
3 Click General and click Edit.
4 Select User directory.
5 (Optional) Deselect the Validation check box to disable validation.
Validation is enabled by default. Users and groups are validated when vCenter Server system starts,even if validation is disabled.
6 (Optional) If validation is enabled, enter a validation period to specify a time, in minutes, betweenvalidations.
7 Click OK.
Roles in vCenter Server and ESXivCenter Server grants access to an object only to users who are assigned permissions for the object.When you assign a user permissions for the object, you pair the user with a role. A role is a predefinedset of privileges.
vSphere Security
VMware, Inc. 74

vCenter Server provides three default roles. You cannot change the privileges associated with the defaultroles. The default roles are organized as a hierarchy; each role inherits the privileges of the previous role.For example, the Administrator role inherits the privileges of the Read Only role. Roles that you create donot inherit privileges from any of the default roles.
You can create custom roles for vCenter Server and all object it manages, or for individual hosts.
vCenter Server CustomRoles (Recommended)
You can create custom roles by using the role-editing facilities in thevSphere Web Client to create privilege sets that match your user needs.
ESXi Custom Roles You can create custom roles for individual hosts by using a CLI or thevSphere Client. Custom host roles are not accessible from vCenter Server.
If you manage ESXi hosts through vCenter Server, maintaining customroles in both the host and vCenter Server can result in confusion andmisuse. In most cases, defining vCenter Server roles is recommended.
Note When you add a custom role and do not assign any privileges to it, the role is created as a ReadOnly role with three system-defined privileges: System.Anonymous, System.View, and System.Read.
Create a Role in the vSphere Web ClientVMware recommends that you create roles to suit the access control needs of your environment.
If you create or edit a role on a vCenter Server system that is part of a connected group in Linked Mode,the changes that you make are propagated to all other vCenter Server systems in the group.Assignments of roles to specific users and objects are not shared across linked vCenter Server systems.
Prerequisites
Verify that you are logged in as a user with Administrator privileges.
Procedure
1 Browse to Administration > Role Manager in the vSphere Web Client.
2 Select a vCenter Server system from the drop-down menu.
3 Click Create role action.
4 Type a name for the new role.
5 Select privileges for the role and click OK.
Edit a Role in the vSphere Web ClientWhen you edit a role, you can change the privileges selected for that role. When completed, theseprivileges are applied to any user or group that is assigned the edited role.
If you create or edit a role on a vCenter Server system that is part of a connected group in Linked Mode,the changes you make are propagated to all other vCenter Server systems in the group. Assignments ofroles to specific users and objects are not shared across linked vCenter Server systems.
vSphere Security
VMware, Inc. 75

Prerequisites
Verify that you are logged in as a user with Administrator privileges.
Procedure
1 Browse to Administration > Role Manager in the vSphere Web Client.
2 Select a vCenter Server system from the drop-down menu.
3 Select a role and click Edit role action.
4 Select privileges for the role and click OK.
Clone a Role in the vSphere Web ClientYou can make a copy of an existing role, rename it, and edit it. When you make a copy, the new role isnot applied to any users or groups and objects. You must assign the role to users or groups and objects.
If you create or edit a role on a vCenter Server system that is part of a connected group in Linked Mode,the changes you make are propagated to all other vCenter Server systems in the group. Assignments ofroles to specific users and objects are not shared across linked vCenter Server systems.
Prerequisites
Verify that you are logged in as a user with Administrator privileges.
Procedure
1 Browse to Administration > Role Manager in the vSphere Web Client.
2 Select a vCenter Server system from the drop-down menu.
3 Click Clone role action.
4 Type a name for the cloned role.
5 Select privileges for the role and click OK.
Adjust the Search List in Large Domains in thevSphere Web ClientIf you have domains with thousands of users or groups, or if searches take a long time to complete,adjust the search settings.
Note This procedure applies only to vCenter Server user lists. ESXi host user lists cannot be searchedin the same way.
Procedure
1 Browse to the vCenter Server system in the vSphere Web Client object navigator.
2 Select the Manage tab and click Settings.
3 Click General and click Edit.
vSphere Security
VMware, Inc. 76

4 Select User directory.
5 Change the values as needed.
Option Description
User directory timeout Timeout interval in seconds for connecting to the Active Directory server. Thisvalue specifies the maximum amount of time vCenter Server allows a search torun on the selected domain. Searching large domains can take a long time.
Query limit Select the checkbox to set a maximum number of users and groups that vCenterServer displays.
Query limit size Specifies the maximum number of users and groups vCenter Server displaysfrom the selected domain in the Select Users or Groups dialog box. If you enter 0(zero), all users and groups appear.
6 Click OK.
vSphere Security
VMware, Inc. 77

Securing vCenter ServerSystems 6Securing vCenter Server includes ensuring security of the host where vCenter Server is running, followingbest practices for assigning privileges and roles, and verifying the integrity of the clients that connect tovCenter Server.
This chapter includes the following topics:n Hardening the vCenter Server Host Operating System
n Best Practices for vCenter Server Privileges
n Enable Certificate Checking and Verify Host Thumbprints in the vSphere Web Client
n Removing Expired or Revoked Certificates and Logs from Failed Installations
n Enable SSL Certificate Validation Over Network File Copy
n Limiting vCenter Server Network Connectivity
Hardening the vCenter Server Host Operating SystemProtect the host where vCenter Server is running against vulnerabilities and attacks by ensuring that theoperating system of the host (Windows or Linux) is as secure as possible.
n Maintain a supported operating system, database, and hardware for the vCenter Server system. IfvCenter Server is not running on a supported operating system, it might not run properly, makingvCenter Server vulnerable to attacks.
n Keep the vCenter Server system properly patched. By staying up-to-date with operating systempatches, the server is less vulnerable to attack.
n Provide operating system protection on the vCenter Server host. Protection includes antivirus andanti-malware software.
n On each Windows computer in the infrastructure, ensure that Remote Desktop (RDP) HostConfiguration settings are set to ensure the highest level of encryption according to industry-standardguidelines or internal guidelines.
For operating system and database compatibility information, see the vSphere Compatibility Matrixes.
VMware, Inc. 78

Best Practices for vCenter Server PrivilegesStrictly control vCenter Server administrator privileges to increase security for the system.
n Full administrative rights to vCenter Server should be removed from the local Windows administratoraccount and granted to a special-purpose local vCenter Server administrator account. Grant fullvSphere administrative rights only to those administrators who are required to have it. Do not grantthis privilege to any group whose membership is not strictly controlled.
n Avoid allowing users to log in directly to the vCenter Server system. Allow only those users who havelegitimate tasks to perform to log into the system and ensure that these events are audited.
n Install vCenter Server using a service account instead of a Windows account. You can use a serviceaccount or a Windows account to run vCenter Server. Using a service account allows you to enableWindows authentication for SQL Server, which provides more security. The service account must bean administrator on the local machine.
n Check for privilege reassignment when you restart vCenter Server. If the user or user group that isassigned the Administrator role on the root folder of the server cannot be verified as a valid user orgroup, the Administrator privileges are removed and assigned to the local Windows Administratorsgroup.
n Grant minimal privileges to the vCenter Server database user. The database user requires onlycertain privileges specific to database access. In addition, some privileges are required only forinstallation and upgrade. These can be removed after the product is installed or upgraded.
Restrict Use of the Administrator PrivilegeBy default, vCenter Server grants full administrator privileges to the administrator of the local system,which can be accessed by domain administrators. To minimize risk of this privilege being abused, removeadministrative rights from the local operating system's administrator account and assign these rights to aspecial-purpose local vSphere administrator account. Use the local vSphere account to create individualuser accounts.
Grant the Administrator privilege only to administrators who are required to have it. Do not grant theprivilege to any group whose membership is not strictly controlled.
Procedure
1 Create a user account that you will use to manage vCenter Server (for example, vi-admin).
Ensure that the user does not belong to any local groups, such as the Administrators group.
2 Log into the vCenter Server system as the local operating system administrator and grant the role ofglobal vCenter Server administrator to the user account you created (for example, vi-admin).
3 Log out of vCenter Server and log in with the user account you created (vi-admin).
4 Verify that the user can perform all tasks available to a vCenter Server administrator.
vSphere Security
VMware, Inc. 79

5 Remove the administrator privileges that are assigned to the local operating system administratoruser or group.
Restrict Use of the Administrator RoleSecure the vCenter Server Administrator role and assign it only to certain users.
Protect the vCenter Server administrator user from regular use by relying on user accounts associatedwith specific individuals.
Prerequisites
n Create a user account to manage vCenter Server and assign full vCenter Server administratorprivileges to the user. See Managing Permissions for vCenter Components.
n Remove vCenter Server administrator privileges from the local operating system administrator.
Procedure
1 Log in to the vCenter Server system as the vCenter Server administrator you created (for example, vi-admin).
2 Grant full administrator privileges to the minimum number of individuals required.
3 Log out as the vCenter Server administrator.
What to do next
Protect the vCenter Server administrator account password. For example, create a password with twohalves, each half of which is known to only one person, or lock a printout of the password in a safe.
Enable Certificate Checking and Verify Host Thumbprintsin the vSphere Web ClientTo prevent man-in-the-middle attacks and to fully use the security that certificates provide, certificatechecking is enabled by default. You can verify that certificate checking is enabled in thevSphere Web Client.
Note vCenter Server certificates are preserved across upgrades.
Procedure
1 Browse to the vCenter Server system in the vSphere Web Client object navigator.
2 Select the Manage tab, click Settings, and click General.
3 Click Edit.
4 Click SSL Settings and verify that vCenter requires verified host SSL certificates is selected.
vSphere Security
VMware, Inc. 80
5 If there are hosts that require manual validation, compare the thumbprints listed for the hosts to thethumbprints in the host console.
To obtain the host thumbprint, use the Direct Console User Interface (DCUI).
a Log in to the direct console and press F2 to access the System Customization menu.
b Select View Support Information.
The host thumbprint appears in the column on the right.
6 If the thumbprint matches, select the Verify check box next to the host.
Hosts that are not selected will be disconnected after you click OK.
7 Click OK.
Removing Expired or Revoked Certificates and Logs fromFailed InstallationsLeaving expired or revoked certificates or leaving vCenter Server installation logs for failed installation onyour vCenter Server system can compromise your environment.
Removing expired or revoked certificates is required for the following reasons.
n If expired or revoked certificates are not removed from the vCenter Server system, the environmentcan be subject to a MiTM attack
n In certain cases, a log file that contains the database password in plain text is created on the systemif vCenter Server installation fails. An attacker who breaks into the vCenter Server system, might gainaccess to this password and, at the same time, access to the vCenter Server database.
Enable SSL Certificate Validation Over Network File CopyNetwork File Copy (NFC) provides a file-type-aware FTP service for vSphere components. ESXi usesNFC for operations such as copying and moving data between datastores by default. You can disable andreenable SSL certificate validation for NFC operations.
When SSL over NFC is enabled, connections between vSphere components over NFC are secure. Thisconnection can help prevent man-in-the-middle attacks within a datacenter.
Because using NFC over SSL causes some performance degradation, you might consider disabling thisadvanced setting in some development environments.
Procedure
1 Connect to the vCenter Server with the vSphere Web Client.
2 Select the Settings tab, and click Advanced Settings.
3 Click Edit.
vSphere Security
VMware, Inc. 81

4 At the bottom of the dialog, enter the following Key and Value.
Field Value
Key nfc.useSSL
Value true
5 Click OK.
Limiting vCenter Server Network ConnectivityFor improved security, avoid putting the vCenter Server system on any network other than themanagement network, and ensure that vSphere management traffic is on a restricted network. By limitingnetwork connectivity, you limit certain types of attack.
vCenter Server requires access to the management network only. Avoid putting the vCenter Serversystem on other networks such as your production network or storage network, or on any network withaccess to the Internet. vCenter Server does not need access to the network where vMotion operates.
vCenter Server requires network connectivity to the following systems.
n All ESXi hosts.
n The vCenter Server database.
n Other vCenter Server systems (linked mode only)
n Systems that are authorized to run management clients. For example, the vSphere Web Client, aWindows system where you use the PowerCLI, or any other SDK-based client.
n Systems that run add-on components such as VMware vSphere Update Manager.
n Infrastructure services such as DNS, Active Directory, and NTP.
n Other systems that run components that are essential to functionality of the vCenter Server system.
Use a local firewall on the Windows system where vCenter Server system is running or use a networkfirewall. Include IP-based access restrictions so that only necessary components can communicate withthe vCenter Server system.
Restricting the Use of Linux ClientsCommunications between client components and vCenter Server system or ESXi hosts are protected bySSL-based encryption by default. Linux versions of these components do not perform certificatevalidation, so you should restrict the use of these clients.
Even if you have replaced the self-signed certificates on the vCenter Server system and the ESXi hostswith legitimate certificates signed by your local root certificate authority or a third party CA,communications with Linux clients are still vulnerable to man-in-the-middle attacks. The followingcomponents are vulnerable when they run on the Linux operating system.
n vCLI commands
n vSphere SDK for Perl scripts
vSphere Security
VMware, Inc. 82

n Programs written using the vSphere SDK
You can relax the restriction against using Linux clients if you enforce proper controls.
n Restrict management network access to authorized systems only.
n Use firewalls to ensure that only authorized hosts are allowed to access vCenter Server.
n Use jump-box systems to ensure that Linux clients are behind the jump.
Verifying the Integrity of the vSphere Web ClientvSphere Web Client extensions run at the same privilege level as the user who is logged in. A maliciousextension can masquerade as a useful plug-in and perform harmful operations such as stealingcredentials or changing the system configuration. To increase security, use a vSphere Web Clientinstallation that includes only authorized extensions from trusted sources.
A vCenter installation includes the vSphere Web Client extensibility framework, which provides the abilityto extend the vSphere Web Client with menu selections or toolbar icons that provide access to vCenteradd-on components or external, Web-based functionality. This flexibility results in a risk of introducingunintended capabilities. For example, if an administrator installs a plug-in in an instance of thevSphere Web Client, the plug-in can then execute arbitrary commands with the privilege level of thatadministrator.
To protect against potential compromise, do not install any vSphere Web Client plug-ins that do not comefrom a trusted source.
Examine Installed Plug-InsvSphere Web Client extensions run at the same privilege level as the user who is logged in. A maliciousextension can masquerade as a useful plug-in and perform harmful operations such as stealingcredentials or changing the system configuration. To increase security, use a vSphere Web Clientinstallation that includes only authorized extensions from trusted sources.
A vCenter installation includes the vSphere Web Client extensibility framework, which provides the abilityto extend the vSphere Web Client with menu selections or toolbar icons that provide access to vCenteradd-on components or external, Web-based functionality. This flexibility results in a risk of introducingunintended capabilities. For example, if an administrator installs a plug-in in an instance of thevSphere Web Client, the plug-in can then execute arbitrary commands with the privilege level of thatadministrator.
To protect against potential compromise of your vSphere Web Client you can periodically examine allinstalled plug-ins and make sure that all plug-ins come from a trusted source.
Prerequisites
You must have privileges to access the vCenter Single Sign-On server. These privileges differ fromvCenter Server privileges.
vSphere Security
VMware, Inc. 83

Procedure
1 Log in to the vSphere Web Client as [email protected] or a user with vCenter Single Sign-On privileges.
2 From the Home page, select Administration, and then select Client Plug-Ins under Solutions
3 Examine the list of client plug-ins.
Remove the tcpdump Package from the vCenter Server VirtualApplianceBy default, the vCenter Server virtual appliance includes the tcpdump package. You can remove thatpackage if security considerations require it.
The tcpdump package allows administrators to analyze TCP packets for troubleshooting and testing.However, in some situations security considerations require a removal of the package. For example, youmust remove the package to ensure compliance with GEN003865 in the DIS STIG, run the followingcommand as root to remove the tcpdump package from the system:
Procedure
1 Log in to the vCenter Server Virtual Appliance as root.
2 Run the following command.
rpm -e tcpdump
vSphere Security
VMware, Inc. 84

Securing ESXi Hosts 7Restricting access to the services and ports on an ESXi host is critical to protecting against unauthorizedintrusion in your vSphere environment.
If a host is compromised, the virtual machines on that host are now threatened to be compromised aswell. Restrict access to services and ports, an ESXi host is protected with a firewall. Using the ESXilockdown mode and limiting access to the ESXi Shell can further contribute to a more secureenvironment.
This chapter includes the following topics:
n General ESXi Security Recommendations
n ESXi Firewall Configuration
n Assigning Permissions for ESXi
n Using Active Directory to Manage ESXi Users
n Replacing ESXi SSL Certificates and Keys
n Uploading an SSH Key to Your ESXi Host
n Using the ESXi Shell
n Lockdown Mode
n Using vSphere Authentication Proxy
n Replace the Authentication Proxy Certificate for the ESXi Host
n Modifying ESXi Web Proxy Settings
n vSphere Auto Deploy Security Considerations
n Managing ESXi Log Files
General ESXi Security RecommendationsTo protect the host against unauthorized intrusion and misuse, VMware imposes constraints on severalparameters, settings, and activities. You can loosen the constraints to meet your configuration needs. Ifyou do, make sure that you are working in a trusted environment and that you have taken enough othersecurity measures to protect the network as a whole and the devices connected to the host.
VMware, Inc. 85

Consider the following recommendations when evaluating host security and administration.
n Limit user access.
To improve security, restrict user access to the Direct Console User Interface (DCUI) and theESXi Shell and enforce access security policies, for example, by setting up password restrictions.
The ESXi Shell has privileged access to certain parts of the host. Provide only trusted users withESXi Shell login access.
n Use the vSphere Client to administer standalone ESXi hosts.
Whenever possible, use the vSphere Client or a third-party network management tool to administeryour ESXi hosts instead of working though the command-line interface as the root user. Using thevSphere Client lets you limit the accounts with access to the ESXi Shell, safely delegateresponsibilities, and set up roles that prevent administrators and users from using capabilities they donot need.
n Use the vSphere Web Client to administer ESXi hosts that are managed by a vCenter Server. Do notaccess managed hosts directly with the vSphere Client, and do not make changes to managed hostsfrom the host's DCUI.
n Use only VMware sources to upgrade ESXi components.
The host runs a variety of third-party packages to support management interfaces or tasks that youmust perform. VMware does not support upgrading these packages from anything other than aVMware source. If you use a download or patch from another source, you might compromisemanagement interface security or functions. Regularly check third-party vendor sites and the VMwareknowledge base for security alerts.
In addition to implementing the firewall, risks to the hosts are mitigated using other methods.
n ESXi runs only services essential to managing its functions, and the distribution is limited to thefeatures required to run ESXi.
n By default, all ports not specifically required for management access to the host are closed. You mustspecifically open ports if you need additional services.
n By default, weak ciphers are disabled and all communications from clients are secured by SSL. Theexact algorithms used for securing the channel depend on the SSL handshake. Default certificatescreated on ESXi use PKCS#1 SHA-256 With RSA encryption as the signature algorithm.
n The Tomcat Web service, used internally by ESXi to support access by Web clients, has beenmodified to run only those functions required for administration and monitoring by a Web client. As aresult, ESXi is not vulnerable to the Tomcat security issues reported in broader use.
n VMware monitors all security alerts that could affect ESXi security and issues a security patch ifneeded.
vSphere Security
VMware, Inc. 86

n Insecure services such as FTP and Telnet are not installed, and the ports for these services areclosed by default. Because more secure services such as SSH and SFTP are easily available, alwaysavoid using these insecure services in favor of their safer alternatives. For example, use Telnet withSSL instead of Telnet to access virtual serial ports. If you must use insecure services and haveimplemented sufficient protection for the host, you must explicitly open ports to support them.
Note Follow the VMware security advisories at http://www.vmware.com/security/.
ESXi Networking Security RecommendationsIsolation of network traffic is essential to a secure ESXi environment. Different networks require differentaccess and level of isolation.
Your ESXi host uses several networks. Use appropriate security measures for each network, and isolatetraffic for specific applications and functions. For example, ensure that vSphere vMotion traffic does nottravel over networks where virtual machines are located. Isolation prevents snooping. Having separatenetworks also is recommended for performance reasons.
n vSphere infrastructure networks are used for features such as VMware vSphere vMotion®, VMwarevSphere Fault Tolerance, and storage. These networks are considered to be isolated for their specificfunctions and often are not routed outside a single physical set of server racks.
n A management network isolates client traffic, command-line interface (CLI) or API traffic, and third-party software traffic from normal traffic. This network should be accessible only by system, network,and security administrators. Use jump box or virtual private network (VPN) to secure access to themanagement network. Strictly control access within this network to potential sources of malware.
n Virtual machine traffic can flow over one or many networks. You can enhance the isolation of virtualmachines by using virtual firewall solutions that set firewall rules at the virtual network controller.These settings travel with a virtual machine as it migrates from host to host within your vSphereenvironment.
Disable the Managed Object Browser (MOB)The managed object browser provides a way to explore the VMkernel object model. However, attackerscan use this interface to perform malicious configuration changes or actions. The managed objectbrowser lets you change the host configuration. This interface is used primarily for debugging thevSphere Web Services SDK.
Procedure
1 Connect directly to the host using the ESXi Shell.
vSphere Security
VMware, Inc. 87
2 (Optional) Determine if the managed object browser (MOB) is enabled by running the followingcommand.
vim-cmd proxysvc/service_list
If the service is running, the following text appears in the list of services:
...
serverNamespace = '/mob',
accessMode = "httpsWithRedirect",
pipeName = "/var/run/vmware/proxy-mob",
...
3 Disable the service by running the following command.
vim-cmd proxysvc/remove_service "/mob" "httpsWithRedirect"
Changes are effective immediately and persist across reboots.
The managed object browser is no longer available for diagnostics. Some third-party tools use thisinterface to gather information.
What to do next
After you disable the managed object browser, perform tests to verify that third-party applications stillfunction as expected.
To reenable the service, run the following command.
vim-cmd proxysvc/add_np_service "/mob" httpsWithRedirect /var/run/vmware/proxy-mob
Disable Authorized (SSH) KeysAuthorized keys allow you to enable access to an ESXi host through SSH without requiring userauthentication. To increase host security, do not allow users to access a host using authorized keys.
A user is considered trusted if their public key is in the /etc/ssh/keys-root/authorized_keys file on ahost. Trusted remote users are allowed to access the host without providing a password.
Procedure
n For day-to-day operations, disable SSH on ESXi hosts.
n If SSH is enabled, even temporarily, monitor the contents of the /etc/ssh/keys-root/authorized_keys file to ensure that no users are allowed to access the host without properauthentication.
n Monitor the /etc/ssh/keys-root/authorized_keys file to verify that it is empty and no SSH keyshave been added to the file.
n If you find that the /etc/ssh/keys-root/authorized_keys file is not empty, remove any keys.
vSphere Security
VMware, Inc. 88

Disabling remote access with authorized keys might limit your ability to run commands remotely on a hostwithout providing a valid login. For example, this can prevent you from running an unattended remotescript.
Configure SSL TimeoutsYou can configure SSL timeouts for ESXi by editing a configuration file on the ESXi host.
Timeout periods can be set for two types of idle connections:
n The Read Timeout setting applies to connections that have completed the SSL handshake processwith port 443 of ESXi.
n The Handshake Timeout setting applies to connections that have not completed the SSL handshakeprocess with port 443 of ESXi.
Both connection timeouts are set in milliseconds.
Idle connections are disconnected after the timeout period. By default, fully established SSL connectionshave a timeout of infinity.
Note Using a longer timeout than the default is not recommended.
Procedure
1 Log in to the ESXi Shell as a user with administrator privileges.
2 Change to the directory /etc/vmware/rhttpproxy/.
3 Use a text editor to open the config.xml file.
4 In the <http>...</http> section, enter the <readTimeoutMs> value in milliseconds.
If the <readTimeoutMs> tag does not exist you can create it.
5 In the <ssl>...</ssl> section, enter the <handshakeTimeoutMs> value in milliseconds.
If the <handshakeTimeoutMs> tag does not exist you can create it.
6 Save your changes and close the file.
7 Restart the rhttpproxy process:
/etc/init.d/rhttpproxy restart
Example: Configuration FileThe following section from the file /etc/vmware/rhttpproxy/config.xml shows where to add the SSLtimeout settings.
<vmacore>
...
<http>
...
<readTimeoutMs>20000</readTimeoutMs>
...
vSphere Security
VMware, Inc. 89

</http>
...
<ssl>
...
<handshakeTimeoutMs>20000</handshakeTimeoutMs>
...
</ssl>
</vmacore>
Check the Acceptance Levels of Hosts and VIBsTo protect the integrity of the ESXi host, do not allow users to install unsigned (community-supported)VIBs. An unsigned VIB contains code that is not certified by, accepted by, or supported by VMware or itspartners. Community-supported VIBs do not have a digital signature.
You can use ESXCLI commands to set an acceptance level for a host. The host's acceptance level mustbe the same or less restrictive than the acceptance level of any VIB you want to add to the host. Toprotect the security and integrity of your ESXi hosts, do not allow unsigned (CommunitySupported) VIBsto be installed on hosts in production systems.
The following acceptance levels are supported.
VMwareCertified The VMwareCertified acceptance level has the most stringentrequirements. VIBs with this level go through thorough testing fullyequivalent to VMware in-house Quality Assurance testing for the sametechnology. Today, only IOVP drivers are published at this level. VMwaretakes support calls for VIBs with this acceptance level.
VMwareAccepted VIBs with this acceptance level go through verification testing, but the testsdo not fully test every function of the software. The partner runs the testsand VMware verifies the result. Today, CIM providers and PSA plugins areamong the VIBs published at this level. VMware directs support calls forVIBs with this acceptance level to the partner's support organization.
PartnerSupported VIBs with the PartnerSupported acceptance level are published by apartner that VMware trusts. The partner performs all testing. VMware doesnot verify the results. This level is used for a new or nonmainstreamtechnology that partners want to enable for VMware systems. Today, driverVIB technologies such as Infiniband, ATAoE, and SSD are at this level withnonstandard hardware drivers. VMware directs support calls for VIBs withthis acceptance level to the partner's support organization.
CommunitySupported The Community Supported acceptance level is for VIBs created byindividuals or companies outside of VMware partner programs. VIBs at thislevel have not gone through any VMware-approved testing program andare not supported by VMware Technical Support or by a VMware partner.
vSphere Security
VMware, Inc. 90

Procedure
1 Connect to each ESXi host and verify that the acceptance level is set to VMwareCertified orVMwareAccepted by running the following command.
esxcli software acceptance get
2 If the host acceptance level is not VMwareCertified or VMwareAccepted, determine whether any ofthe VIBs are not at the VMwareCertified or VMwareAccepted level by running the followingcommands.
esxcli software vib list
esxcli software vib get -n vibname
3 Remove any VIBs that are at the PartnerSupported or CommunitySupported level by running thefollowing command.
esxcli software vib remove --vibname vib
4 Change the acceptance level of the host by running the following command.
esxcli software acceptance set --level acceptance_level
Add an ESXi Host to an Active Directory DomainBecause ESXi does not support vCenter Single Sign-On, it does not support the identity sources you setup with vCenter Single Sign-On. You can add an ESXi host to an Active Directory Domain from thevSphere Web Client.
Procedure
1 In the vSphere Web Client, select the ESXi host.
2 In the Settings tab, select Authentication Services in the System area.
3 Click Join Domain, supply the domain settings, and click OK.
PCI and PCIe Devices and ESXiUsing the VMware DirectPath I/O feature to pass through a PCI or PCIe device to a virtual machineresults in a potential security vulnerability. The vulnerability can be triggered by buggy or malicious code,such as a device driver, running in privileged mode in the guest OS. Industry-standard hardware andfirmware does not currently have sufficient error containment support to make it possible for ESXi to fullyclose the vulnerability.
VMware recommends that you use PCI or PCIe passthrough to a virtual machine only if the virtualmachine is owned and administered by a trusted entity. You must be sure that this entity does not toattempt to crash or exploit the host from the virtual machine.
vSphere Security
VMware, Inc. 91

Your host might be compromised in one of the following ways.
n The guest OS might generate an unrecoverable PCI or PCIe error. Such an error does not corruptdata, but can crash the ESXi host. Such errors might occur because of bugs or incompatibilities in thehardware devices that are being passed through, or because of problems with drivers in the guestOS.
n The guest OS might generate a Direct Memory Access (DMA) operation that causes an IOMMU pagefault on the ESXi host, for example, if the DMA operation targets an address outside the virtualmachine's memory. On some machines, host firmware configures IOMMU faults to report a fatal errorthrough a non-maskable interrupt (NMI), which causes the ESXi host to crash. This problem mightoccur because of problems with the drivers in the guest OS.
n If the operating system on the ESXi host is not using interrupt remapping, the guest OS might inject aspurious interrupt into the ESXi host on any vector. ESXi currently uses interrupt remapping on Intelplatforms where it is available; interrupt mapping is part of the Intel VT-d feature set. ESXi does notuse interrupt mapping on AMD platforms. A spurious interrupt most likely results in a crash of theESXi host; however, other ways to exploit these interrupts might exist in theory.
ESXi Firewall ConfigurationESXi includes a firewall between the management interface and the network. The firewall is enabled bydefault.
At installation time, the ESXi firewall is configured to block incoming and outgoing traffic, except traffic forthe default services listed in TCP and UDP Ports.
Note The firewall also allows Internet Control Message Protocol (ICMP) pings and communication withDHCP and DNS (UDP only) clients.
You can manage ESXi firewall ports as follows:
n From the security profile for each host.
n Using ESXCLI commands to modify firewall rules, from the command line or in scripts. See ESXiFirewall Configuration.
n Using a custom VIB if the port you want to open is not included in the security profile. You createcustom VIBs with the vibauthor tool available from VMware Labs. To install the custom VIB, you haveto change the acceptance level of the the ESXi host to CommunitySupported. See VMwareKnowledge Base Article 2007381.
Note If you engage VMware Technical Support to investigate a problem on an ESXi host with aCommunitySupported VIB installed, VMware Support might request that this CommunitySupportedVIB be uninstalled as a troubleshooting step to determine if that VIB is related to the problem beinginvestigated.
vSphere Security
VMware, Inc. 92

You can view supported services and management agents that are required to operate the host in thehost's Security Profile section in the vSphere Web Client.
Note The behavior of the NFS Client rule set (nfsClient) is different from other rule sets. When theNFS Client rule set is enabled, all outbound TCP ports are open for the destination hosts in the list ofallowed IP addresses. See NFS Client Rule Set Behavior for more information.
Manage ESXi Firewall SettingsYou can configure incoming and outgoing firewall connections for a service or a management agent fromthe vSphere Web Client or at the command line..
Note If different services have overlapping port rules, enabling one service might implicitly enableoverlapping services. You can specify which IP addresses are allowed to access each service on the hostto avoid this problem.
Procedure
1 Browse to the host in the vSphere Web Client inventory.
2 Click the Manage tab and click Settings.
3 Click Security Profile.
The vSphere Web Client displays a list of active incoming and outgoing connections with thecorresponding firewall ports.
4 In the Firewall section, click Edit.
The display shows firewall rule sets, which include the name of the rule and the associatedinformation.
5 Select the rule sets to enable, or deselect the rule sets to disable.
Column Description
Incoming Ports and Outgoing Ports The ports that the vSphere Web Client opens for the service
Protocol Protocol that a service uses.
Daemon Status of daemons associated with the service
6 For some services, you can manage service details.
n Use the Start, Stop, or Restart buttons to change the status of a service temporarily.
n Change the Startup Policy to have the service start with the host or with port usage.
7 For some services, you can explicitly specify IP addresses from which connections are allowed.
See Add Allowed IP Addresses in the vSphere Web Client.
8 Click OK.
vSphere Security
VMware, Inc. 93

Add Allowed IP Addresses in the vSphere Web ClientBy default, the firewall for each service allows access to all IP addresses. To restrict traffic, change eachservice to allow traffic only from your management subnet. You might also deselect some services if yourenvironment does not use them.
You can use the vSphere Web Client, vCLI, or PowerCLI to update the Allowed IP list for a service. Bydefault, all IP addresses are allowed.
Procedure
1 Browse to the host in the vSphere Web Client inventory.
2 Click the Manage tab and click Settings.
3 Under System, click Security Profile.
4 In the Firewall section, click Edit and select a service from the list.
5 In the Allowed IP Addresses section, deselect Allow connections from any IP address and enterthe IP addresses of networks that are allowed to connect to the host.
Separate IP addresses with commas. You can use the following address formats:
n 192.168.0.0/24
n 192.168.1.2, 2001::1/64
n fd3e:29a6:0a81:e478::/64
6 Click OK.
NFS Client Rule Set BehaviorThe NFS Client rule set behaves differently than other ESXi firewall rule sets. ESXi configures NFS Clientsettings when you mount or unmount an NFS datastore.
When you add or mount an NFS datastore, ESXi checks the state of the NFS Client (nfsClient) firewallrule set.
n If the NFS Client rule set is disabled, ESXi enables the rule set and disables the Allow All IPAddresses policy by setting the allowedAll flag to FALSE. The IP address of the NFS server isadded to the allowed list of outgoing IP addresses.
n If the NFS Client rule set is enabled, the state of the rule set and the allowed IP address policy arenot changed. The IP address of the NFS server is added to the allowed list of outgoing IP addresses.
When you remove or unmount an NFS datastore, ESXi performs one of the following actions.
n If ESXi is mounted on any NFS datastore, the IP address of the unmounted NFS server is removedfrom the list of allowed outgoing IP addresses and the NFS Client rule set remains enabled.
vSphere Security
VMware, Inc. 94

n If ESXi is not mounted on any NFS datastore, the IP address of the unmounted NFS server isremoved from the list of allowed outgoing IP addresses and the NFS Client rule set is disabled.
Note If you manually enable the NFS Client rule set or manually set the Allow All IP Addresses policy,either before or after you add an NFS datastore to the system, your settings are overridden when the lastNFS datastore is unmounted. The NFS Client rule set is disabled when all NFS datastores areunmounted.
Automating Service Behavior Based on Firewall SettingsESXi can automate whether services start based on the status of firewall ports.
Automation helps ensure that services start if the environment is configured to enable their function. Forexample, starting a network service only if some ports are open can help avoid the situation whereservices are started, but are unable to complete the communications required to complete their intendedpurpose.
In addition, having accurate information about the current time is a requirement for some protocols, suchas Kerberos. The NTP service is a way of getting accurate time information, but this service only workswhen required ports are opened in the firewall. The service cannot achieve its goal if all ports are closed.The NTP services provide an option to configure the conditions when the service starts or stops. Thisconfiguration includes options that account for whether firewall ports are opened, and then start or stopthe NTP service based on those conditions. Several possible configuration options exist, all of which arealso applicable to the SSH server.
Note The settings described in this section only apply to service settings configured through thevSphere Web Client or applications created with the vSphere Web services SDK. Configurations madethrough other means, such as the ESXi Shell or configuration files in /etc/init.d/, are not affected bythese settings.
n Start automatically if any ports are open, and stop when all ports are closed: The default settingfor these services that VMware recommends. If any port is open, the client attempts to contact thenetwork resources pertinent to the service in question. If some ports are open, but the port for aparticular service is closed, the attempt fails, but there is little drawback to such a case. If and whenthe applicable outgoing port is opened, the service begins completing its tasks.
n Start and stop with host: The service starts shortly after the host starts and closes shortly before thehost shuts down. Much like Start automatically if any ports are open, and stop when all ports areclosed, this option means that the service regularly attempts to complete its tasks, such ascontacting the specified NTP server. If the port was closed but is subsequently opened, the clientbegins completing its tasks shortly thereafter.
vSphere Security
VMware, Inc. 95
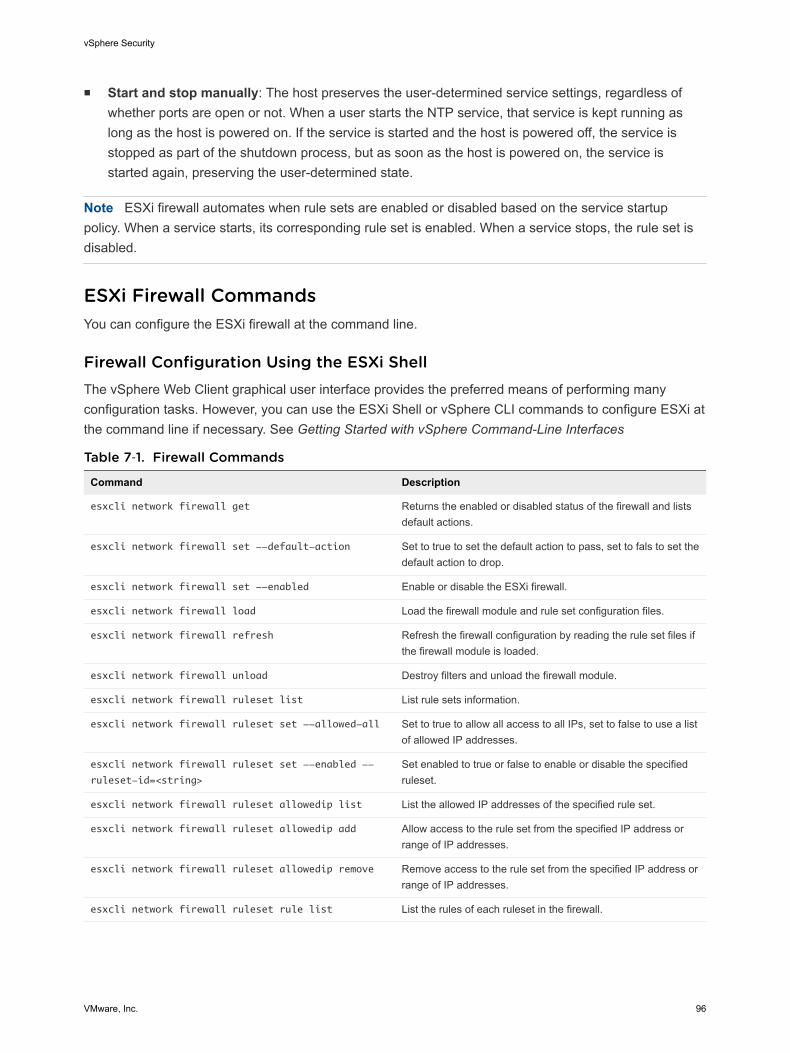
n Start and stop manually: The host preserves the user-determined service settings, regardless ofwhether ports are open or not. When a user starts the NTP service, that service is kept running aslong as the host is powered on. If the service is started and the host is powered off, the service isstopped as part of the shutdown process, but as soon as the host is powered on, the service isstarted again, preserving the user-determined state.
Note ESXi firewall automates when rule sets are enabled or disabled based on the service startuppolicy. When a service starts, its corresponding rule set is enabled. When a service stops, the rule set isdisabled.
ESXi Firewall CommandsYou can configure the ESXi firewall at the command line.
Firewall Configuration Using the ESXi ShellThe vSphere Web Client graphical user interface provides the preferred means of performing manyconfiguration tasks. However, you can use the ESXi Shell or vSphere CLI commands to configure ESXi atthe command line if necessary. See Getting Started with vSphere Command-Line Interfaces
Table 7‑1. Firewall Commands
Command Description
esxcli network firewall get Returns the enabled or disabled status of the firewall and listsdefault actions.
esxcli network firewall set --default-action Set to true to set the default action to pass, set to fals to set thedefault action to drop.
esxcli network firewall set --enabled Enable or disable the ESXi firewall.
esxcli network firewall load Load the firewall module and rule set configuration files.
esxcli network firewall refresh Refresh the firewall configuration by reading the rule set files ifthe firewall module is loaded.
esxcli network firewall unload Destroy filters and unload the firewall module.
esxcli network firewall ruleset list List rule sets information.
esxcli network firewall ruleset set --allowed-all Set to true to allow all access to all IPs, set to false to use a listof allowed IP addresses.
esxcli network firewall ruleset set --enabled --
ruleset-id=<string>
Set enabled to true or false to enable or disable the specifiedruleset.
esxcli network firewall ruleset allowedip list List the allowed IP addresses of the specified rule set.
esxcli network firewall ruleset allowedip add Allow access to the rule set from the specified IP address orrange of IP addresses.
esxcli network firewall ruleset allowedip remove Remove access to the rule set from the specified IP address orrange of IP addresses.
esxcli network firewall ruleset rule list List the rules of each ruleset in the firewall.
vSphere Security
VMware, Inc. 96

Assigning Permissions for ESXiForESXi, permissions are defined as access roles that consist of a user and the user’s assigned role foran object such as a virtual machine or ESXi host. Permissions grant users the right to perform theactivities specified by the role on the object to which the role is assigned.
The vSphere Single Host Management document explains how you can perform permission validationand assign and remove permissions with the vSphere Client. This document discusses the different typesof permissions.
Specify Users with DCUI Access in Lockdown ModeYou can specify which users can log into a host that is lockdown mode. DCUI Access users do not needto have full administrative privileges on the host. You grant the DCUI Access privilege in AdvancedSettings in the vSphere Web Client.
In versions of vSphere earlier than vSphere 5.1, the root user can log into the DCUI on a host that is inlockdown mode. In vSphere 5.1, you can specify which local ESXi users are allowed to log in to the DCUIwhen the host is in lockdown mode. These special users do not need to have full administrative privilegeson the host. Specifying users other than the anonymous root user allows you to log which users haveperformed operations on the host while it is in lockdown mode.
Important When you disable lockdown mode using the DCUI, all users with the DCUI Access privilegeare granted the Administrator role on the host.
Procedure
1 Browse to the host in the vSphere Web Client object navigator.
2 Click the Manage tab and select Settings.
3 Click Advanced System Settings and select the setting DCUI.Access.
4 Click Edit and enter the user names, separated by commas.
By default, the root user is specified. You can remove root from the list of DCUI access users, as longas you specified at least one other user.
5 Click OK.
Multiple Permission SettingsObjects might have multiple permissions, but only one permission for each user or group. For example,one permission might specify that Group A has Administrator privileges on an object. Another permissionmight specify that Group B might have Virtual Machine Administrator privileges on the same object.
If an object inherits permissions from two parent objects, the permissions on one object are added to thepermissions on the other object. For example, if a virtual machine is in a virtual machine folder and alsobelongs to a resource pool, that virtual machine inherits all permission settings from both the virtualmachine folder and the resource pool.
vSphere Security
VMware, Inc. 97

Permissions applied on a child object always override permissions that are applied on a parent object.See Example 2: Child Permissions Overriding Parent Permissions.
If multiple group permissions are defined on the same object and a user belongs to two or more of thosegroups, two situations are possible:
n If no permission is defined for the user on that object, the user is assigned the set of privilegesassigned to the groups for that object.
n If a permission is defined for the user on that object, the user's permission takes precedence over allgroup permissions.
Example 1: Inheritance of Multiple PermissionsThis example illustrates how an object can inherit multiple permissions from groups that are grantedpermission on a parent object.
In this example, two permissions are assigned on the same object for two different groups.
n Role 1 can power on virtual machines.
n Role 2 can take snapshots of virtual machines.
n Group A is granted Role 1 on VM Folder, with the permission set to propagate to child objects.
n Group B is granted Role 2 on VM Folder, with the permission set to propagate to child objects.
n User 1 is not assigned specific privileges.
User 1, who belongs to groups A and B, logs on. User 1 can both power on and take snapshots of VM Aand VM B.
Figure 7‑1. Example 1: Inheritance of Multiple Permissions
VM A
VM B
VM Folder
group B + role 2user 1 has permissions of role 1 and role 2
group A + role 1
Example 2: Child Permissions Overriding Parent PermissionsThis example illustrates how permissions that are assigned on a child object can override permissionsthat are assigned on a parent object. You can use this overriding behavior to restrict user access toparticular areas of the inventory.
In this example, permissions are defined on two different objects for two different groups.
n Role 1 can power on virtual machines.
n Role 2 can take snapshots of virtual machines.
n Group A is granted Role 1 on VM Folder, with the permission set to propagate to child objects.
n Group B is granted Role 2 on VM B.
vSphere Security
VMware, Inc. 98

User 1, who belongs to groups A and B, logs on. Because Role 2 is assigned at a lower point in thehierarchy than Role 1, it overrides Role 1 on VM B. User 1 can power on VM A, but not take snapshots.User 1 can take snapshots of VM B, but not power it on.
Figure 7‑2. Example 2: Child Permissions Overriding Parent Permissions
VM A
VM B
VM Folder
group B + role 2
user 1 has permissions of role 1 only
user 1 has permissions of role 2 only
group A + role 1
Example 3: User Role Overriding Group RoleThis example illustrates how the role assigned directly to an individual user overrides the privilegesassociated with a role assigned to a group.
In this example, permissions are defined on the same object. One permission associates a group with arole, the other permission associates an individual user with a role. The user is a member of the group.
n Role 1 can power on virtual machines.
n Group A is granted Role 1 on VM Folder.
n User 1 is granted No Access role on VM Folder.
User 1, who belongs to group A, logs on. The No Access role granted to User 1 on VM Folder overridesthe role assigned to the group. User 1 has no access to VM Folder or VMs A and B.
Figure 7‑3. Example 3: User Permissions Overriding Group Permissions
VM A
VM B
VM Folder
user 1 + no access
user 1 has no access to the folder or the virtual machines
group A + role 1
root User PermissionsCreate a non-root user account for local admin access.
By default each ESXi host has a single root user account with full administrator privileges that can beused for local administration and to connect the host to vCenter Server. Sharing a common root accountcan make it easier to break into an ESXi host.
vSphere Security
VMware, Inc. 99

Create at least one named user account and assign it full administrative privileges and use this accountinstead of the root account. Set a highly complex password for the root account and limit the use of theroot account. (Do not remove the root user itself.)
Important If you remove the access permissions for the root user, you must first create anotherpermission at the root level that has a different user assigned to the Administrator role.
Note In vSphere 5.1 and later, only the root user and no other user with administrator privileges ispermitted to add a host to vCenter Server.
Assigning the Administrator role to a different user helps you maintain security through traceability. ThevSphere Client logs all actions that the Administrator role user initiates as events, providing you with anaudit trail. If all administrators log in as the root user, you cannot tell which administrator performed anaction. If you create multiple permissions at the root level—each associated with a different user—youcan track the actions of each administrator.
vpxuser PermissionsThe vpxuser permission is used for vCenter Server when managing activities for the host.
vCenter Server has Administrator privileges on the host that it manages. For example, vCenter Servercan move virtual machines to and from hosts and perform configuration changes needed to supportvirtual machines.
The vCenter Server administrator can perform most of the same tasks on the host as the root user andalso schedule tasks, work with templates, and so forth. However, the vCenter Server administrator cannotdirectly create, delete, or edit local users and groups for hosts. These tasks can only be performed by auser with Administrator permissions directly on each host.
Note You cannot manage the vpxuser using Active Directory.
Caution Do not change vpxuser in any way. Do not change its password. Do not change itspermissions. If you do so, you might experience problems when working with hosts throughvCenter Server.
Ensure that vpxuser Password Meets PolicyWhen you add a host to the vCenter Server inventory, vCenter Server creates a special user accountcalled vpxuser on the host. vpxuser is a privileged account that acts as a proxy for all actions initiatedthrough vCenter Server. Ensure that the default settings for the vpxuser password meet the requirementsof your organization's password policy.
By default, vCenter Server generates a new vpxuser password every 30 days using OpenSSL cryptolibraries as a source of randomness. The password is 32 characters long and is guaranteed to contain atleast one symbol from four character classes: symbols (-./:=@[\\]^_{}~), digits (1-9), uppercase letters,and lowercase letters. Ensuring that the password expires periodically limits the amount of time anattacker can use the vpxuser password if it is compromised.
vSphere Security
VMware, Inc. 100

You can change the default value for password expiration and for password length to meet your passwordpolicy. Using shorter passwords and allowing less frequent password changes makes your environmentless secure.
Important To preclude the possibility that vCenter Server is locked out of the ESXi host, the passwordaging policy must not be shorter than the interval that is set to automatically change the vpxuserpassword.
Procedure
1 To change the password length policy, edit the vpxd.hostPasswordLength parameter in thevCenter Server configuration file on the system where vCenter Server is running.
Operating System Default Location
Windows C:\Documents and Settings\All Users\Application Data\VMware
VirtualCenter\vpxd.cfg
Linux /etc/vmware-vpx/vpxd.cfg
2 To change the password aging requirement, use the Advanced Settings dialog box in the
vSphere Web Client.
a Browse to the vCenter Server system in the vSphere Web Client inventory.
b Click the Manage tab and click Settings.
c Select Advanced Settings
d Click Edit and locate the VirtualCenter.VimPasswordExpirationInDays parameter.
e Type the new value and click OK.
3 Restart vCenter Server.
dcui User PermissionsThe dcui user runs on hosts and acts with Administrator rights. This user’s primary purpose is to configurehosts for lockdown mode from the Direct Console User Interface (DCUI).
This user acts as an agent for the direct console and cannot be modified or used by interactive users.
Using Active Directory to Manage ESXi UsersYou can configure ESXi to use a directory service such as Active Directory to manage users.
vSphere Security
VMware, Inc. 101

Creating local user accounts on each host presents challenges with having to synchronize accountnames and passwords across multiple hosts. Join ESXi hosts to an Active Directory domain to eliminatethe need to create and maintain local user accounts. Using Active Directory for user authenticationsimplifies the ESXi host configuration and reduces the risk for configuration issues that could lead tounauthorized access.
When you use Active Directory, users supply their Active Directory credentials and the domain name ofthe Active Directory server when adding a host to a domain.
Configure a Host to Use Active Directory in thevSphere Web ClientYou can configure a host to use a directory service such as Active Directory to manage users and groups.
When you add an ESXi host to Active Directory all user and group accounts are assigned fulladministrative access to the host if the group ESX Admins exists. If you do not want to make fulladministrative access available, see VMware Knowledge Base article 1025569 for a workaround.
Note When you define user account settings in Active Directory, you can limit the computers that a usecan log in to by the computer name. By default, no equivalent restrictions are set on a user account. Ifyou set this limitation, LDAP Bind requests for the user account fail with the message LDAP binding notsuccessful, even if the request is from a listed computer. You can avoid this issue by adding thenetBIOS name for the Active Directory server to the list of computers that the user account can log in to.
Prerequisites
n Verify that you have an Active Directory domain. See your directory server documentation.
n Verify that the host name of ESXi is fully qualified with the domain name of the Active Directory forest.
fully qualified domain name = host_name.domain_name
Procedure
1 Synchronize the time between ESXi and the directory service system using NTP.
See the VMware Knowledge Base for information about how to synchronize ESXi time with aMicrosoft Domain Controller.
2 Ensure that the DNS servers you configured for the host can resolve the host names for the ActiveDirectory controllers.
a Browse to the host in the vSphere Web Client object navigator.
b Click the Manage tab and click Networking.
c Click DNS, and verify that the host name and DNS server information for the host are correct.
What to do next
Use the vSphere Web Client to join a directory service domain.
vSphere Security
VMware, Inc. 102

Add a Host to a Directory Service Domain in thevSphere Web ClientTo use a directory service, you must join the host to the directory service domain.
You can enter the domain name in one of two ways:
n name.tld (for example, domain.com): The account is created under the default container.
n name.tld/container/path (for example, domain.com/OU1/OU2): The account is created under aparticular organizational unit (OU).
To use the vSphere Authentication Proxy service, see Use vSphere Authentication Proxy to Add a Host toa Domain in the vSphere Web Client.
Procedure
1 Browse to the host in the vSphere Web Client inventory.
2 Click the Manage tab and click Settings.
3 Under System, select Authentication Services.
4 Click Join Domain.
5 Enter a domain.
Use the form name.tld or name.tld/container/path.
6 Enter the user name and password of a directory service user who has permissions to join the host tothe domain, and click OK.
7 Click OK to close the Directory Services Configuration dialog box.
View Directory Service Settings in the vSphere Web ClientYou can view the type of directory server, if any, the host uses to authenticate users and the directoryserver settings.
Procedure
1 Browse to the host in the vSphere Web Client inventory.
2 Click the Manage tab and click Settings.
3 Under System, select Authentication Services.
The Authentication Services page displays the directory service and domain settings.
Replacing ESXi SSL Certificates and KeysYour company's security policy might require that you replace the default ESXi SSL certificate with atrusted certificate on each host. You can also regenerate a self-signed certificate and key if the defaultcertificate and key were accidentally deleted.
vSphere Security
VMware, Inc. 103

SSL certificates are used to vouch for the identity of the components involved in the communication andto secure communication between vSphere components.
By default, vSphere components use the self-signed certificate and key that are created duringinstallation. Self-signed certificates are as secure as certificates that are issued by an external CertificateAuthority as long as the user validates the certificate and its thumbprint when the warning dialog appears.
Replace self-signed certificates with certificates from a trusted CA, either a commercial CA or anorganizational CA, if company policy requires it. Consider also replacing certificates to avoid having usersget used to clicking through browser warnings. The warning might be an indication of a man-in-the-middleattack, and only inspection of the certificate and thumbprint can guard against such attacks.
You can replace the default certificates with trusted certificates in a number of ways.
n Replace a Default ESXi Certificate and Key from the ESXi Shell
n Replace a Default ESXi Certificate and Key by Using the vifs Command
n Replace a Default ESXi Certificate and Key Using HTTPS PUT
If you accidentally deleted the default self-signed certificate and key or you changed the host name, youcan generate a new self-signed certificate and key from the ESXi Shell. See Generate New Self-SignedCertificates for ESXi.
Preparing Your Environment for ESXi Certificate ReplacementIf you plan to replace the default certificate and key with a certificate and key from a certificate authority,ensure that your environment has the required software installed.
Your environment does not have to meet these requirements if you use self-signed certificates.
n Microsoft CA (2000 or higher), with Web Server template
n Microsoft Visual C++ 2008 Redistributable Package (x86) installed on the system where you willgenerate the certificate-signing request
n OpenSSL 0.98r or higher installed on the system where you will generate the certificate-signingrequest
n Putty or other SSH client (recommended)
n WinSCP or other SFTP/SCP client
n vCenter Server
n ESXi 5.1 or later
vSphere Security
VMware, Inc. 104

Generate New Self-Signed Certificates for ESXiYou typically generate new certificates only if you change the host name or accidentally delete thecertificate. Under certain circumstances, you must force the host to generate new certificates.
Note To receive the full benefit of certificate checking, particularly if you intend to use encrypted remoteconnections externally, do not use a self signed certificate. Instead, install new certificates that are signedby a valid internal certificate authority or purchase a certificate from a trusted security authority.
Procedure
1 Log in to the ESXi Shell as a user with administrator privileges.
2 In the directory /etc/vmware/ssl, back up any existing certificates by renaming them using thefollowing commands.
mv rui.crt orig.rui.crt
mv rui.key orig.rui.key
Note If you are regenerating certificates because you have deleted them, this step is unnecessary.
3 Run the command /sbin/generate-certificates to generate new certificates.
4 Restart the host.
Generating the certificates places them in the correct location. You can alternatively put the host intomaintenance mode, install the new certificate, and then use the Direct Console User Interface (DCUI)to restart the management agents.
5 Confirm that the host successfully generated new certificates by using the following command andcomparing the time stamps of the new certificate files with orig.rui.crt and orig.rui.key.
ls -la
What to do next
Consider replacing the self-signed certificate and key with a trusted certificate and key.
Replace a Default ESXi Certificate and Key from the ESXi ShellESXi uses automatically generated certificates that are created as part of the installation process. Thesecertificates are unique and make it possible to begin using the server, but they are not verifiable and theyare not signed by a trusted certificate authority (CA). This topic explains how to replace the defaultcertificates with self-signed or CA-signed certificates.
vSphere Security
VMware, Inc. 105

Using default certificates might not comply with the security policy of your organization. If you require acertificate from a trusted certificate authority, you can replace the default certificate.
Note If the host has Verify Certificates enabled, replacing the default certificate might cause vCenterServer to stop managing the host. Disconnect and reconnect the host if vCenter Server cannot verify thenew certificate.
ESXi supports only X.509 certificates to encrypt session information sent over SSL connections betweenserver and client components.
Prerequisites
n If you want to use CA-signed certificates, generate the certificate request, send it to the certificateauthority, and store the certificates you receive in a location that the host can access.
n If necessary, enable the ESXi Shell or enable SSH traffic from the vSphere Web Client. See Use thevSphere Web Client to Enable Access to the ESXi Shell.
n All file transfers and other communications occur over a secure HTTPS session. The user who isused to authenticate the session must have the privilege Host.Config.AdvancedConfig on the host.For more information on ESXi privileges, see the vSphere Single Host Management publication.
Procedure
1 Log in to the ESXi Shell, either directly from the DCUI or from an SSH client, as a user withadministrator privileges.
2 In the directory /etc/vmware/ssl, rename the existing certificates using the following commands.
mv rui.crt orig.rui.crt
mv rui.key orig.rui.key
3 Copy the certificates you want to use to /etc/vmware/ssl.
4 Rename the new certificate and key to rui.crt and rui.key.
5 Restart the host after you install the new certificate.
Alternatively, you can put the host into maintenance mode, install the new certificate, use the DirectConsole User Interface (DCUI) to restart the management agents, and set the host to exitmaintenance mode.
Replace a Default ESXi Certificate and Key by Using the vifsCommandESXi uses automatically generated certificates that are created as part of the installation process. Thesecertificates are unique and make it possible to begin using the server, but they are not verifiable and theyare not signed by a trusted certificate authority (CA).
vSphere Security
VMware, Inc. 106

Using default certificates might not comply with the security policy of your organization. If you require acertificate from a trusted certificate authority, you can replace the default certificate.
Note If the host has Verify Certificates enabled, replacing the default certificate might causevCenter Server to stop managing the host. Disconnect and reconnect the host if vCenter Server cannotverify the new certificate.
ESXi supports only X.509 certificates to encrypt session information sent over SSL connections betweenserver and client components.
Prerequisites
All file transfers and other communications occur over a secure HTTPS session. The user who is used toauthenticate the session must have the privilege Host.Config.AdvancedConfig on the host. For moreinformation on ESXi privileges, see the vSphere Single Host Management publication.
Procedure
1 Back up the existing certificates.
2 Generate a certificate request following the instructions from the certificate authority.
3 At the command line, use the vifs command to upload the certificate to the appropriate location onthe host.
vifs --server hostname --username username --put rui.crt /host/ssl_cert
vifs --server hostname --username username --put rui.key /host/ssl_key
4 Restart the host.
Alternatively, you can put the host into maintenance mode, install the new certificate, and then usethe Direct Console User Interface (DCUI) to restart the management agents.
Replace a Default ESXi Certificate and Key Using HTTPS PUTYou can use third-party applications to upload certificates and key. Applications that support HTTPS PUToperations work with the HTTPS interface that is included with ESXi.
Procedure
1 In your upload application, open the file.
2 Publish the file to one of these locations.
Option Description
Certificates https://hostname/host/ssl_cert
Keys https://hostname/host/ssl_key
The location /host/ssl_cert and host/ssl_key link to the certificate files in /etc/vmware/ssl.
3 In the Direct Console User Interface (DCUI), use the Restart Management Agents operation to initiatethe settings.
vSphere Security
VMware, Inc. 107

Uploading an SSH Key to Your ESXi HostYou can use SSH keys to restrict, control, and secure access to an ESXi host. By using an SSH key, youcan allow trusted users or scripts to log in to a host without specifying a password.
You can copy the SSH key to the host by using the vifs vSphere CLI command. See Getting Startedwith vSphere Command-Line Interfaces for information on installing and using the vSphere CLI commandset. It is also possible to use HTTPS PUT to copy the SSK key to the host.
Instead of generating the keys externally and uploading them, you can create the keys on the the ESXihost and download them. See VMware Knowledge Base article 1002866.
Enabling SSH and adding SSH keys to the host has inherent risks and is not recommended in ahardened environment. See Disable Authorized (SSH) Keys.
Note For ESXi 5.0 and earlier, a user with an SSH key can access the host even when the host is inlockdown mode. This is fixed in ESXi 5.1.
Upload an SSH Key Using a vifs CommandIf you decide you want to use authorized keys to log in to a host with SSH, you can upload authorizedkeys with a vifs command.
Note Because authorized keys allow SSH access without requiring user authentication, considercarefully whether you want to use SSH keys in your environment.
Authorized keys allow you to authenticate remote access to a host. When users or scripts try to access ahost with SSH, the key provides authentication without a password. With authorized keys you canautomate authentication, which is useful when you write scripts to perform routine tasks.
You can upload the following types of SSH keys to a host.
n Authorized keys file for root user
n RSA key
n RSA public key
Starting with the vSphere 6.0 Update 2 release, DSS/DSA keys are no longer supported.
Important Do not modify the /etc/ssh/sshd_config file.
vSphere Security
VMware, Inc. 108

Procedure
u At the command line or an administration server, use the vifs command to upload the SSH key toappropriate location on the ESXi host.
vifs --server hostname --username username --put filename /host/ssh_host_dsa_key_pub
Type of key Location
Authorized key files for the root user /host/ssh_root_authorized keys
You must have full administrator privileges to upload this file.
RSA keys /host/ssh_host_rsa_key
RSA public keys /host/ssh_host_rsa_key_pub
Upload an SSH Key Using HTTPS PUTYou can use authorized keys to log in to a host with SSH. You can upload authorized keys with HTTPSPUT.
Authorized keys allow you to authenticate remote access to a host. When users or scripts try to access ahost with SSH, the key provides authentication without a password. With authorized keys you canautomate authentication, which is useful when you write scripts to perform routine tasks.
You can upload the following types of SSH keys to a host using HTTPS PUT:
n Authorized keys file for root user
n DSA key
n DSA public key
n RSA key
n RSA public key
Important Do not modify the /etc/ssh/sshd_config file.
Procedure
1 In your upload application, open the key file.
2 Publish the file to the following locations.
Type of key Location
Authorized key files for the root user https://hostname_or_IP_address/host/ssh_root_authorized_keys
You must have full administrator privileges on the host to upload this file.
DSA keys https://hostname_or_IP_address/host/ssh_host_dsa_key
DSA public keys https://hostname_or_IP_address/host/ssh_host_dsa_key_pub
RSA keys https://hostname_or_IP_address/host/ssh_host_rsa_key
RSA public keys https://hostname_or_IP_address/host/ssh_host_rsa_key_pub
vSphere Security
VMware, Inc. 109

Using the ESXi ShellThe ESXi Shell (formerly Tech Support Mode or TSM) is disabled by default on ESXi. You can enablelocal and remote access to the shell if necessary.
Enable the ESXi Shell for troubleshooting only. The ESXi Shell can be enabled and disabled whether ornot the host is running in lockdown mode.
ESXi Shell Enable this service to access the ESXi Shell locally.
SSH Enable this service to access the ESXi Shell remotely using SSH.
Direct Console UI(DCUI)
When you enable this service while running in lockdown mode, you can login locally to the direct console user interface as the root user and disablelockdown mode. You can then access the host using a direct connection tothe vSphere Client or by enabling the ESXi Shell.
The root user and users with the Administrator role can access the ESXi Shell. Users who are in theActive Directory group ESX Admins are automatically assigned the Administrator role. By default, only theroot user can execute system commands (such as vmware -v) using the ESXi Shell.
Note Do not enable the ESXi Shell until it is required.
n Use the vSphere Web Client to Enable Access to the ESXi Shell
You can use the vSphere Web Client to enable local and remote (SSH) access to the ESXi Shell andto set the idle timeout and availability timeout.
n Use the Direct Console User Interface (DCUI) to Enable Access to the ESXi Shell
The Direct Console User Interface (DCUI) allows you to interact with the host locally using text-based menus. Evaluate carefully whether the security requirements of your environment supportenabling the Direct Console User Interface.
n Log in to the ESXi Shell for Troubleshooting
Perform ESXi configuration tasks with the vSphere Web Client. the vSphere CLI, or vSpherePowerCLI. Log in to the ESXi Shell (formerly Tech Support Mode or TSM) for troubleshootingpurposes only.
n SSH Security
You can use SSH to remotely log in to the ESXi Shell and perform troubleshooting tasks for the host.
vSphere Security
VMware, Inc. 110

Use the vSphere Web Client to Enable Access to the ESXi ShellYou can use the vSphere Web Client to enable local and remote (SSH) access to the ESXi Shell and toset the idle timeout and availability timeout.
Note Access the host by using the vSphere Web Client, remote command-line tools (vCLI andPowerCLI), and published APIs. Do not enable remote access to the host using SSH unless specialcircumstances require that you enable SSH access.
Prerequisites
If you want to use an authorized SSH key, you can upload it. See Uploading an SSH Key to Your ESXiHost.
Procedure
1 Browse to the host in the vSphere Web Client inventory.
2 Click the Manage tab and click Settings.
3 Under System, select Security Profile.
4 In the Services panel, click Edit.
5 Select a service from the list.
n ESXi Shell
n SSH
n Direct Console UI
6 Click Service Details and select the startup policy Start and stop manually.
When you select Start and stop manually, the service does not start when you reboot the host. Ifyou want the service to start when you reboot the host, select Start and stop with host.
7 Select Start to enable the service.
8 Click OK.
What to do next
Set the availability and idle timeouts for the ESXi Shell. See Create a Timeout for ESXi Shell Availabilityin the vSphere Web Client and Create a Timeout for Idle ESXi Shell Sessions in the vSphere Web Client
Create a Timeout for ESXi Shell Availability in the vSphere Web ClientThe ESXi Shell is disabled by default. You can set an availability timeout for the ESXi Shell to increasesecurity when you enable the shell.
The availability timeout setting is the amount of time that can elapse before you must log in after theESXi Shell is enabled. After the timeout period, the service is disabled and users are not allowed to log in.
vSphere Security
VMware, Inc. 111

Procedure
1 Browse to the host in the vSphere Web Client inventory.
2 Click the Manage tab and click Settings.
3 Under System, select Advanced System Settings.
4 Select UserVars.ESXiShellTimeOut and click the Edit icon.
5 Enter the idle timeout setting.
You must restart the SSH service and the ESXi Shell service for the timeout to take effect.
6 Click OK.
If you are logged in when the timeout period elapses, your session will persist. However, after you log outor your session is terminated, users are not allowed to log in.
Create a Timeout for Idle ESXi Shell Sessions in the vSphere Web ClientIf a user enables the ESXi Shell on a host, but forgets to log out of the session, the idle session remainsconnected indefinitely. The open connection can increase the potential for someone to gain privilegedaccess to the host. You can prevent this by setting a timeout for idle sessions.
The idle timeout is the amount of time that can elapse before a user is logged out of an idle interactivesession. You can control the amount of time for both local and remote (SSH) session from the DirectConsole Interface (DCUI) or from the vSphere Web Client.
Procedure
1 Browse to the host in the vSphere Web Client inventory.
2 Click the Manage tab and click Settings.
3 Under System, select Advanced System Settings.
4 Select UserVars.ESXiShellInteractiveTimeOut, click the Edit icon, and enter the timeout setting.
5 Restart the ESXi Shell service and the SSH service for the timeout to take effect.
If the session is idle, users are logged out after the timeout period elapses.
Use the Direct Console User Interface (DCUI) to Enable Access tothe ESXi ShellThe Direct Console User Interface (DCUI) allows you to interact with the host locally using text-basedmenus. Evaluate carefully whether the security requirements of your environment support enabling theDirect Console User Interface.
vSphere Security
VMware, Inc. 112

You can use the Direct Console User Interface to enable local and remote access to the ESXi Shell.
Note Changes made to the host using the Direct Console User Interface, the vSphere Web Client,ESXCLI, or other administrative tools are committed to permanent storage every hour or upon gracefulshutdown. Changes might be lost if the host fails before they are committed.
Procedure
1 From the Direct Console User Interface, press F2 to access the System Customization menu.
2 Select Troubleshooting Options and press Enter.
3 From the Troubleshooting Mode Options menu, select a service to enable.
n Enable ESXi Shell
n Enable SSH
4 Press Enter to enable the service.
5 Press Esc until you return to the main menu of the Direct Console User Interface.
What to do next
Set the availability and idle timeouts for the ESXi Shell. See Create a Timeout for ESXi Shell Availabilityin the Direct Console User Interface and Create a Timeout for Idle ESXi Shell Sessions.
Create a Timeout for ESXi Shell Availability in the Direct Console UserInterfaceThe ESXi Shell is disabled by default. You can set an availability timeout for the ESXi Shell to increasesecurity when you enable the shell.
The availability timeout setting is the amount of time that can elapse before you must log in after theESXi Shell is enabled. After the timeout period, the service is disabled and users are not allowed to log in.
Procedure
1 From the Troubleshooting Mode Options menu, select Modify ESXi Shell and SSH timeouts andpress Enter.
2 Enter the availability timeout.
You must restart the SSH service and the ESXi Shell service for the timeout to take effect.
3 Press Enter and press Esc until you return to the main menu of the Direct Console User Interface.
4 Click OK.
If you are logged in when the timeout period elapses, your session will persist. However, after you log outor your session is terminated, users are not allowed to log in.
vSphere Security
VMware, Inc. 113

Create a Timeout for Idle ESXi Shell SessionsIf a user enables the ESXi Shell on a host, but forgets to log out of the session, the idle session remainsconnected indefinitely. The open connection can increase the potential for someone to gain privilegedaccess to the host. You can prevent this by setting a timeout for idle sessions.
The idle timeout is the amount of time that can elapse before the user is logged out of an idle interactivesessions. Changes to the idle timeout apply the next time a user logs in to the ESXi Shell and do notaffect existing sessions.
You can specify the timeout from the Direct Console User Interface in seconds, or from thevSphere Web Client in minutes.
Procedure
1 From the Troubleshooting Mode Options menu, select Modify ESXi Shell and SSH timeouts andpress Enter.
2 Enter the idle timeout, in seconds.
You must restart the SSH service and the ESXi Shell service for the timeout to take effect.
3 Press Enter and press Esc until you return to the main menu of the Direct Console User Interface.
If the session is idle, users are logged out after the timeout period elapses.
Log in to the ESXi Shell for TroubleshootingPerform ESXi configuration tasks with the vSphere Web Client. the vSphere CLI, or vSphere PowerCLI.Log in to the ESXi Shell (formerly Tech Support Mode or TSM) for troubleshooting purposes only.
Procedure
1 Log in to the ESXi Shell using one of the following methods.
n If you have direct access to the host, press Alt+F1 to open the login page on the machine'sphysical console.
n If you are connecting to the host remotely, use SSH or another remote console connection to starta session on the host.
2 Enter a user name and password recognized by the host.
SSH SecurityYou can use SSH to remotely log in to the ESXi Shell and perform troubleshooting tasks for the host.
vSphere Security
VMware, Inc. 114

SSH configuration in ESXi is enhanced to provide a high security level.
Version 1 SSH protocoldisabled
VMware does not support Version 1 SSH protocol and uses Version 2protocol exclusively. Version 2 eliminates certain security problems presentin Version 1 and provides you with a safe way to communicate with themanagement interface.
Improved cipherstrength
SSH supports only 256-bit and 128-bit AES ciphers for your connections.
These settings are designed to provide solid protection for the data you transmit to the managementinterface through SSH. You cannot change these settings.
Lockdown ModeTo increase the security of your ESXi hosts, you can put them in lockdown mode. In lockdown mode, alloperations must be performed through vCenter Server. Only the vpxuser user has authenticationpermissions, no other users can perform operations against the host directly.
When a host is in lockdown mode, you cannot run vSphere CLI commands from an administration server,from a script, or from vMA against the host. External software or management tools might not be able toretrieve or modify information from the ESXi host.
Note Users can be assigned DCUI access privileges explicitly via the DCUI Access advancedconfiguration option. The option has DCUI.Access as the key, and a comma-separated list of ESXi usersas the value. Users in the list which can access the DCUI at any time, even if these users are notadministrators (Admin role), and even when the host is in lockdown mode.
Enabling or disabling lockdown mode affects which types of users are authorized to access host services,but it does not affect the availability of those services. In other words, if the ESXi Shell, SSH, or DirectConsole User Interface (DCUI) services are enabled, they will continue to run whether or not the host is inlockdown mode.
You can enable lockdown mode using the Add Host wizard to add a host to vCenter Server, using thevSphere Web Client to manage a host, or using the Direct Console User Interface (DCUI).
Note If you enable or disable lockdown mode using the Direct Console User Interface (DCUI),permissions for users and groups on the host are discarded. To preserve these permissions, you mustenable and disable lockdown mode using the vSphere Web Client connected to vCenter Server.
Lockdown mode is available only on ESXi hosts that have been added to vCenter Server.
Lockdown Mode BehaviorEnabling lockdown mode affects which users are authorized to access host services.
vSphere Security
VMware, Inc. 115

Users Logged in When Lockdown Mode Is EnabledUsers who were logged in to the ESXi Shell before lockdown mode was enabled remain logged in andcan run commands. However, these users cannot disable lockdown mode. No other users, including theroot user and users with the Administrator role on the host, can use the ESXi Shell to log in to a host thatis in lockdown mode.
Access Through vCenter ServerUsers with administrator privileges on the vCenter Server system can use the vSphere Web Client todisable lockdown mode for hosts that are managed by the vCenter Server system.
Access From the DCUIUsers granted the DCUI Access privilege can always log directly in to the host using the Direct ConsoleUser Interface (DCUI) to disable lockdown mode, even if the user does not have the Administrator role onthe host. You must use Advanced Settings to grant the DCUI Access privilege.
Note When you disable lockdown mode using the DCUI, all users with the DCUI Access privilege aregranted the Administrator role on the host.
Root users or users with the Administrator role on the host cannot log directly in to the host with the DCUIif they have not been granted the DCUI Access privilege. If the host is not managed by vCenter Server orif the host is unreachable, only DCUI Access users can log into the DCUI and disable lockdown mode. Ifthe DCUI service is stopped, you must reinstall ESXi.
Lockdown Mode Services for Different UsersThe following table shows the services that are are available to different types of users when the host isrunning in lockdown mode and in normal mode. As a rule, changes can be made only through vCenterServer. The root user can make changes from the Direct Console Interface, but not from the ESXi Shell orthrough an SSH session.
Table 7‑2. Lockdown Mode Behavior
Service Normal Mode Lockdown Mode
vSphere WebServices API All users, based on ESXi permissions vCenter only (vpxuser)
CIM Providers Root users and users with Admin role onthe host
vCenter only (ticket)
Direct Console UI (DCUI) Root users and users with Admin role onthe host
Root users
ESXi Shell Root users and users with Admin role onthe host
No users
SSH Root users and users with Admin role onthe host
No users
vSphere Security
VMware, Inc. 116
Enable Lockdown Mode Using the vSphere Web ClientEnable lockdown mode to require that all configuration changes go through vCenter Server. You can alsoenable or disable lockdown mode through the Direct Console User Interface (DCUI).
Procedure
1 Browse to the host in the vSphere Web Client inventory.
2 Click the Manage tab and click Settings.
3 Under System, select Security Profile.
4 In the Lockdown Mode panel, click Edit.
5 Select Enable Lockdown Mode.
6 Click OK.
Enable Lockdown Mode from the Direct Console User InterfaceYou can enable lockdown mode from the Direct Console User Interface (DCUI).
Note If you enable or disable lockdown mode using the Direct Console User Interface, permissions forusers on the host are discarded. To preserve these permissions, you must enable and disable lockdownmode using a vSphere Web Client connected to vCenter Server.
Procedure
1 At the Direct Console User Interface of the host, press F2 and log in.
2 Scroll to the Configure Lockdown Mode setting and press Enter.
3 Press Esc until you return to the main menu of the Direct Console User Interface.
Specify Users with DCUI Access in Lockdown ModeYou can specify which users can log into a host that is lockdown mode. DCUI Access users do not needto have full administrative privileges on the host. You grant the DCUI Access privilege in AdvancedSettings in the vSphere Web Client.
In versions of vSphere earlier than vSphere 5.1, the root user can log into the DCUI on a host that is inlockdown mode. In vSphere 5.1, you can specify which local ESXi users are allowed to log in to the DCUIwhen the host is in lockdown mode. These special users do not need to have full administrative privilegeson the host. Specifying users other than the anonymous root user allows you to log which users haveperformed operations on the host while it is in lockdown mode.
Important When you disable lockdown mode using the DCUI, all users with the DCUI Access privilegeare granted the Administrator role on the host.
vSphere Security
VMware, Inc. 117

Procedure
1 Browse to the host in the vSphere Web Client object navigator.
2 Click the Manage tab and select Settings.
3 Click Advanced System Settings and select the setting DCUI.Access.
4 Click Edit and enter the user names, separated by commas.
By default, the root user is specified. You can remove root from the list of DCUI access users, as longas you specified at least one other user.
5 Click OK.
Using vSphere Authentication ProxyWhen you use the vSphere Authentication Proxy, you do not need to transmit Active Directory credentialsto the host. Users supply the domain name of the Active Directory server and the IP address of theauthentication proxy server when they add a host to a domain.
Install the vSphere Authentication Proxy ServiceTo use the vSphere Authentication Proxy service for authentication, you must install the service on a hostmachine.
You can install the vSphere Authentication Proxy on the same machine as the associated vCenter Server,or on a different machine that has a network connection to the vCenter Server. The vSphereAuthentication Proxy is not supported with vCenter Server versions earlier than version 5.0.
The vSphere Authentication Proxy service binds to an IPv4 address for communication with vCenterServer, and does not support IPv6. vCenter Server can be on an IPv4-only, IPv4/IPv6 mixed-mode, orIPv6-only host machine, but the machine that connects to vCenter Server through the vSphere Clientmust have an IPv4 address for the vSphere Authentication Proxy service to work.
Prerequisites
n Verify that you have administrator privileges on the host machine where you install the vSphereAuthentication Proxy service.
n Verify that the host machine has Windows Installer 3.0 or later.
n Verify that the host machine has a supported processor and operating system. The vSphereAuthentication Proxy supports the same processors and operating systems as vCenter Server.
n Verify that the host machine has a valid IPv4 address. You can install vSphere Authentication Proxyon an IPv4-only or IPv4/IPv6 mixed-mode host machine, but you cannot install vSphereAuthentication Proxy on an IPv6-only host machine.
vSphere Security
VMware, Inc. 118

n If you are installing vSphere Authentication Proxy on a Windows Server 2008 R2 host machine,download and install the Windows hotfix described in Windows KB Article 981506 on thesupport.microsoft.com Web site. If this hotfix is not installed, the Authentication Proxy Adapter fails toinitialize. This problem is accompanied by error messages in camadapter.log similar to Failed tobind CAM website with CTL and Failed to initialize CAMAdapter.
Gather the following information to complete the installation:
n The location where you will install the vSphere Authentication Proxy, if you are not using the defaultlocation.
n The IP address or host name, HTTP port, and credentials for the vCenter Server system that thevSphere Authentication Proxy will connect to.
n The host name or IP address to identify the vSphere Authentication Proxy host machine on thenetwork.
Procedure
1 On the host machine where you will install the vSphere Authentication Proxy service, install the .NETFramework 3.5.
2 Install vSphere Auto Deploy.
You do not have to install Auto Deploy on the same host machine as the vSphere AuthenticationProxy service.
3 Add the host machine where you will install the authentication proxy service to the domain.
4 Use the Domain Administrator account to log in to the host machine.
5 In the software installer directory, double-click the autorun.exe file to start the installer.
6 Select VMware vSphere Authentication Proxy and click Install.
7 Follow the wizard prompts to complete the installation.
During installation, the authentication service registers with the vCenter Server instance where AutoDeploy is registered.
The authentication proxy service is installed on the host machine.
Note When you install the vSphere Authentication Proxy service, the installer creates a domain accountwith appropriate privileges to run the authentication proxy service. The account name begins with theprefix CAM- and has a 32-character, randomly generated password associated with it. The password is setto never expire. Do not change the account settings.
What to do next
Configure the host to use the authentication proxy service to join the domain.
vSphere Security
VMware, Inc. 119

Configure a Host to Use the vSphere Authentication Proxy forAuthenticationAfter you install the vSphere Authentication Proxy service (CAM service), you must configure the host touse the authentication proxy server to authenticate users.
Prerequisites
Install the vSphere Authentication Proxy service (CAM service) on a host as described in Install thevSphere Authentication Proxy Service.
Procedure
1 Use the IIS manager on the host to set up the DHCP range.
Setting the range allows hosts that are using DHCP in the management network to use theauthentication proxy service.
Option Action
For IIS 6 a Browse to Computer Account Management Web Site.
b Right-click the virtual directory CAM ISAPI.c Select Properties > Directory Security > Edit IP Address and Domain
Name Restrictions > Add Group of Computers.
For IIS 7 a Browse to Computer Account Management Web Site.
b Click the CAM ISAPI virtual directory in the left pane and open IPv4 Addressand Domain Restrictions.
c Select Add Allow Entry > IPv4 Address Range.
2 If a host is not provisioned by Auto Deploy, change the default SSL certificate to a self-signedcertificate or to a certificate signed by a commercial certificate authority (CA).
Option Description
Self-signed certificate If you replace the default certificate with a self-signed certificate, add the host tovCenter Server so that the authentication proxy server will trust the host.
CA-signed certificate Add the CA-signed certificate (DER-encoded) to the local trust certificate store onthe system where the authentication proxy service is installed and restart thevSphere Authentication Proxy Adapter service.n For Windows 2003, copy the certificate file to C:\Documents and
Settings\All Users\Application Data\VMware\vSphere
Authentication Proxy\trust.n For Windows 2008, copy the certificate file to C:\Program
Data\VMware\vSphere Authentication Proxy\trust.
vSphere Security
VMware, Inc. 120

Authenticating vSphere Authentication Proxy to ESXiBefore you use the vSphere Authentication Proxy to connect ESXi to a domain, you must authenticate thevSphere Authentication Proxy server to ESXi. If you use Host Profiles to connect a domain with thevSphere Authentication Proxy server, you do not need to authenticate the server. The host profileauthenticates the proxy server to ESXi.
To authenticate ESXi to use the vSphere Authentication Proxy, export the server certificate from thevSphere Authentication Proxy system and import it to ESXi. You need only authenticate the server once.
Note By default, ESXi must authenticate the vSphere Authentication Proxy server when using it to join adomain. Make sure that this authentication functionality is enabled at all times. If you must disableauthentication, you can use the Advanced Settings dialog box to set theUserVars.ActiveDirectoryVerifyCAMCertifcate attribute to 0.
Export vSphere Authentication Proxy CertificateTo authenticate the vSphere Authentication Proxy to ESXi, you must provide ESXi with the proxy servercertificate.
Prerequisites
Install the vSphere Authentication Proxy service on a host as described in Install the vSphereAuthentication Proxy Service.
Procedure
1 On the authentication proxy server system, use the IIS Manager to export the certificate.
Option Action
For IIS 6 a Right-click Computer Account Management Web Site.
b Select Properties > Directory Security > View Certificate.
For IIS 7 a Click Computer Account Management Web Site in the left pane.
b Select Bindings to open the Site Bindings dialog box.
c Select https binding.
d Select Edit > View SSL Certificate .
2 Select Details > Copy to File.
3 Select the options Do Not Export the Private Key and Base-64 encoded X.509 (CER).
What to do next
Import the certificate to ESXi.
Import a Proxy Server Certificate to ESXi in the vSphere Web ClientTo authenticate the vSphere Authentication Proxy server to ESXi, upload the proxy server certificate toESXi.
vSphere Security
VMware, Inc. 121

You use the vSphere Web Clientuser interface to upload the vSphere Authentication Proxy servercertificate to ESXi.
Prerequisites
Install the vSphere Authentication Proxy service on a host as described in Install the vSphereAuthentication Proxy Service.
Export the vSphere Authentication Proxy server certificate as described in Export vSphere AuthenticationProxy Certificate.
Procedure
1 Upload the certificate for the authentication proxy server to a temporary location accessible to thehost.
a In the vSphere Web Client, browse to a datastore accessible to the host and click the Managetab.
b Click Files and click Upload File.
2 Browse to the certificate and select Open.
To upload or download files from a datastore, you must have the Client Integration Plug-in installed onthe system where you use the vSphere Web Client.
3 Browse to the host and click the Manage tab.
4 Select the Configuration tab and click Authentication Services.
5 Click Import Certificate.
6 Enter the full path to the authentication proxy server certificate file on the host and the IP address ofthe authentication proxy server.
Use the form [datastore name] file path to enter the path to the proxy server.
7 Click Import.
What to do next
Set up the host to use vSphere Authentication Proxy server to authenticate users.
Use vSphere Authentication Proxy to Add a Host to a Domain inthe vSphere Web ClientWhen you join a host to a directory service domain, you can use the vSphere Authentication Proxy serverfor authentication instead of transmitting user-supplied Active Directory credentials.
You can enter the domain name in one of two ways:
n name.tld (for example, domain.com): The account is created under the default container.
n name.tld/container/path (for example, domain.com/OU1/OU2): The account is created under aparticular organizational unit (OU).
vSphere Security
VMware, Inc. 122

Prerequisites
n Connect to a vCenter Server system with the vSphere Web Client.
n If ESXi is configured with a DHCP address, set up the DHCP range.
n If ESXi is configured with a static IP address, verify that its associated profile is configured to use thevSphere Authentication Proxy service to join a domain so that the authentication proxy server cantrust the ESXi IP address.
n If ESXi is using a self-signed certificate, verify that the host has been added to vCenter Server. Thisallows the authentication proxy server to trust ESXi.
n If ESXi is using a CA-signed certificate and is not provisioned by Auto Deploy, verify that the CAcertificate has been added to the local trust certificate store of the authentication proxy server asdescribed in Configure a Host to Use the vSphere Authentication Proxy for Authentication.
n Authenticate the vSphere Authentication Proxy server to the host.
Procedure
1 Browse to the host in the vSphere Web Client and click the Manage tab.
2 Click Settings and select Authentication Services.
3 Click Join Domain.
4 Enter a domain.
Use the form name.tld or name.tld/container/path.
5 Select Using Proxy Server.
6 Enter the IP address of the authentication proxy server.
7 Click OK.
Replace the Authentication Proxy Certificate for the ESXiHostYou can import a certificate from a trusted certificate authority from the vSphere Web Client
Prerequisites
n Upload the authentication proxy certificate file to the ESXi host.
Procedure
1 In the vSphere Web Client, select the ESXi host.
2 In the Settings tab, select Authentication Services in the System area.
3 Click Import Certificate.
4 Enter the SSL certificate path and the vSphere Authentication Proxy server.
vSphere Security
VMware, Inc. 123

Modifying ESXi Web Proxy SettingsWhen you modify Web proxy settings, you have several encryption and user security guidelines toconsider.
Note Restart the host process after making any changes to host directories or authenticationmechanisms.
n Do not set up certificates using a password or pass phrases. ESXi does not support passwords orpass phrases, also known as encrypted keys. If you set up a pass word or pass phrase, ESXiprocesses cannot start correctly.
n You can configure the Web proxy so that it searches for certificates in a location other than the defaultlocation. This capability proves useful for companies that prefer to centralize their certificates on asingle machine so that multiple hosts can use the certificates.
Caution If certificates are not stored locally on the host—for example, if they are stored on an NFSshare—the host cannot access those certificates if ESXi loses network connectivity. As a result, aclient connecting to the host cannot successfully participate in a secure SSL handshake with the host.
n To support encryption for user names, passwords, and packets, SSL is enabled by default forvSphere Web services SDK connections. If you want to configure the these connections so that theydo not encrypt transmissions, disable SSL for your vSphere Web Services SDK connection byswitching the connection from HTTPS to HTTP.
Consider disabling SSL only if you created a fully trusted environment for these clients, wherefirewalls are in place and transmissions to and from the host are fully isolated. Disabling SSL canimprove performance, because you avoid the overhead required to perform encryption.
n To protect against misuse of ESXi services, most internal ESXi services are accessible only throughport 443, the port used for HTTPS transmission. Port 443 acts as a reverse proxy for ESXi. You cansee a list of services on ESXi through an HTTP welcome page, but you cannot directly access theStorage Adapters services without proper authorization.
You can change this configuration so that individual services are directly accessible through HTTPconnections. Do not make this change unless you are using ESXi in a fully trusted environment.
n When you upgrade vCenter Server, the certificate remains in place.
Change Security Settings for a Web Proxy ServiceYou can change the security configuration so that individual services are directly accessible throughHTTP connections.
To configure security settings for vSphere 5.0 and earlier, see Change Security Settings for a Web ProxyService 5.0 and earlier.
vSphere Security
VMware, Inc. 124

Procedure
1 Log in to the ESXi Shell as a user with administrator privileges.
2 Change to the /etc/vmware/rhttpproxy directory.
3 Use a text editor to open the endpoints.conf file.
4 Change the security settings as required.
For example, you might want to modify entries for services that use HTTPS to add the option of HTTPaccess.
Option Description
connection-type Acceptable values include:n localn remoten namedpipen localtunneln remotetunneln namedpipetunnel
endpoint-address n For local and localtunnel, supply the port number.n For remote and remotetunnel, supply the HostName/IP_address:Port.n For namedpipe and namedpipetunnel, supply the location of the name pipe in
the file system.
HTTP Access mode Forms of communication the service permits. Acceptable values include:n allow - Allow HTTP access.n redirect – If the Endpoint address is a local port, then the client is redirected
to 443. If the Endpoint address is a remote host, then the client is redirectedto that host.
n reject - No HTTP access.
HTTPS Access mode Acceptable values include:n allow - Allow HTTPS access.n reject - Do not allow HTTPS access.
5 Save your changes and close the file.
The following example shows a completed endpoints.conf file.
# Endpoint Connection-type Endpoint-address HTTP-access-Mode HTTPS-access-mode
/ local 8309 redirect allow
/sdk local 8307 redirect allow
/client/clients.xml local 8309 allow allow
/ui local 8308 redirect allow
/vpxa local 8089 reject allow
/mob namedpipe /var/run/vmware/proxy-mob redirect allow
/wsman local 8889 redirect allow
/sdkTunnel namedpipetunnel /var/run/vmware/proxy-sdk-tunnel allow reject
/ha-nfc local 12001 allow allow
/nfc local 12000 allow allow
vSphere Security
VMware, Inc. 125

What to do next
After you make the changes to the endpoints.conf file, make the reverse proxy reload the newendpoints by using the command kill -HUP <pid_of_rhttpproxy>
Change Security Settings for a Web Proxy Service 5.0 and earlierYou can change the security configuration so that individual services are directly accessible throughHTTP connections.
These steps are for version 5.0 and earlier. Beginning with 5.1, the file that needs to be modified iscompletely different. For instructions to modify the new file, see Change Security Settings for a WebProxy Service.
Procedure
1 Log in to the ESXi Shell as a user with administrator privileges.
2 Change to the /etc/vmware/hostd/directorydirectory.
3 Use a text editor to open the proxy.xml file.
The contents of the file typically appears as follows.
<ConfigRoot>
<EndpointList>
<_length>10</_length>
<_type>vim.ProxyService.EndpointSpec[]</_type>
<e id="0">
<_type>vim.ProxyService.LocalServiceSpec</_type>
<accessMode>httpsWithRedirect</accessMode>
<port>8309</port>
<serverNamespace>/</serverNamespace>
</e>
<e id="1">
<_type>vim.ProxyService.LocalServiceSpec</_type>
<accessMode>httpAndHttps</accessMode>
<port>8309</port>
<serverNamespace>/client/clients.xml</serverNamespace>
</e>
<e id="2">
<_type>vim.ProxyService.LocalServiceSpec</_type>
<accessMode>httpAndHttps</accessMode>
<port>12001</port>
<serverNamespace>/ha-nfc</serverNamespace>
</e>
<e id="3">
<_type>vim.ProxyService.NamedPipeServiceSpec</_type>
<accessMode>httpsWithRedirect</accessMode>
<pipeName>/var/run/vmware/proxy-mob</pipeName>
<serverNamespace>/mob</serverNamespace>
</e>
<e id="4">
<_type>vim.ProxyService.LocalServiceSpec</_type>
<accessMode>httpAndHttps</accessMode>
vSphere Security
VMware, Inc. 126

<port>12000</port>
<serverNamespace>/nfc</serverNamespace>
</e>
<e id="5">
<_type>vim.ProxyService.LocalServiceSpec</_type>
<accessMode>httpsWithRedirect</accessMode>
<port>8307</port>
<serverNamespace>/sdk</serverNamespace>
</e>
<e id="6">
<_type>vim.ProxyService.NamedPipeTunnelSpec</_type>
<accessMode>httpOnly</accessMode>
<pipeName>/var/run/vmware/proxy-sdk-tunnel</pipeName>
<serverNamespace>/sdkTunnel</serverNamespace>
</e>
<e id="7">
<_type>vim.ProxyService.LocalServiceSpec</_type>
<accessMode>httpsWithRedirect</accessMode>
<port>8308</port>
<serverNamespace>/ui</serverNamespace>
</e>
<e id="8">
<_type>vim.ProxyService.LocalServiceSpec</_type>
<accessMode>httpsOnly</accessMode>
<port>8089</port>
<serverNamespace>/vpxa</serverNamespace>
</e>
<e id="9">
<_type>vim.ProxyService.LocalServiceSpec</_type>
<accessMode>httpsWithRedirect</accessMode>
<port>8889</port>
<serverNamespace>/wsman</serverNamespace>
</e>
</EndpointList>
</ConfigRoot>
4 Change the security settings as required.
For example, you might want to modify entries for services that use HTTPS to add the option of HTTPaccess.
Option Description
e id ID number for the server ID XML tag. ID numbers must be unique within theHTTP area.
_type Name of the service you are moving.
accessmode Forms of communication the service permits. Acceptable values include:n httpOnly – The service is accessible only over plain-text HTTP connections.n httpsOnly – The service is accessible only over HTTPS connections.n httpsWithRedirect – The service is accessible only over HTTPS connections.
Requests over HTTP are redirected to the appropriate HTTPS URL.n httpAndHttps – The service is accessible both over HTTP and HTTPS
connections.
vSphere Security
VMware, Inc. 127

Option Description
port Port number assigned to the service. You can assign a different port number tothe service.
serverNamespace Namespace for the server that provides this service, for example /sdk or /mob.
5 Save your changes and close the file.
6 Restart the hostd process:
/etc/init.d/hostd restart
vSphere Auto Deploy Security ConsiderationsTo best protect your environment, be aware of security risks that might exist when you use Auto Deploywith host profiles.
Networking SecuritySecure your network as you would for any other PXE-based deployment method. vSphere Auto Deploytransfers data over SSL to prevent casual interference and snooping. However, the authenticity of theclient or of the Auto Deploy server is not checked during a PXE boot.
You can greatly reduce the security risk of Auto Deploy by completely isolating the network where AutoDeploy is used.
Boot Image and Host Profile SecurityThe boot image that the vSphere Auto Deploy server downloads to a machine can have the followingcomponents.n The VIB packages that the image profile consists of are always included in the boot image.
n The host profile and host customization are included in the boot image if Auto Deploy rules are set upto provision the host with a host profile or a host customization setting.n The administrator (root) password and user passwords that are included with host profile and
host customization are MD5 encrypted.
n Any other passwords associated with profiles are in the clear. If you set up Active Directory byusing host profiles, the passwords are not protected.
Use the vSphere Authentication Service for setting up Active Directory to avoid exposing theActive Directory passwords. If you set up Active Directory using host profiles, the passwords arenot protected.
n The host's public and private SSL key and certificate are included in the boot image.
Managing ESXi Log FilesLog files are an important component of troubleshooting attacks and obtaining information aboutbreaches of host security. Logging to a secure, centralized log server can help prevent log tampering.Remote logging also provides a long-term audit record.
vSphere Security
VMware, Inc. 128

Take the following measures to increase the security of the host.
n Configure persistent logging to a datastore. By default, the logs on ESXi hosts are stored in the in-memory file system. Therefore, they are lost when you reboot the host, and only 24 hours of log datais stored. When you enable persistent logging, you have a dedicated record of server activityavailable for the host.
n Remote logging to a central host allows you to gather log files onto a central host, where you canmonitor all hosts with a single tool. You can also do aggregate analysis and searching of log data,which might reveal information about things like coordinated attacks on multiple hosts.
n Configure remote secure syslog on ESXi hosts using a remote command line such as vCLI orPowerCLI, or using an API client.
n Query the syslog configuration to make sure that a valid syslog server has been configured, includingthe correct port.
Configure Syslog on ESXi HostsAll ESXi hosts run a syslog service (vmsyslogd), which logs messages from the VMkernel and othersystem components to log files.
You can use the vSphere Web Client or the esxcli system syslog vCLI command to configure thesyslog service.
For more information about using vCLI commands, see Getting Started with vSphere Command-LineInterfaces.
Procedure
1 In the vSphere Web Client inventory, select the host.
2 Click the Manage tab.
3 In the System panel, click Advanced System Settings.
4 Locate the Syslog section of the Advanced System Settings list.
5 To set up logging globally, select the setting to change and click the Edit icon.
Option Description
Syslog.global.defaultRotate Sets the maximum number of archives to keep. You can set this number globallyand for individual subloggers.
Syslog.global.defaultSize Sets the default size of the log, in KB, before the system rotates logs. You can setthis number globally and for individual subloggers.
Syslog.global.LogDir Directory where logs are stored. The directory can be located on mounted NFS orVMFS volumes. Only the /scratch directory on the local file system is persistentacross reboots. The directory should be specified as [datastorename] path_to_filewhere the path is relative to the root of the volume backing the datastore. Forexample, the path [storage1] /systemlogs maps to thepath /vmfs/volumes/storage1/systemlogs.
vSphere Security
VMware, Inc. 129

Option Description
Syslog.global.logDirUnique Selecting this option creates a subdirectory with the name of the ESXi host underthe directory specified by Syslog.global.LogDir. A unique directory is useful ifthe same NFS directory is used by multiple ESXi hosts.
Syslog.global.LogHost Remote host to which syslog messages are forwarded and port on which theremote host receives syslog messages. You can include the protocol and the port,for example, ssl://hostName1:514. UDP (default), TCP, and SSL aresupported. The remote host must have syslog installed and correctly configuredto receive the forwarded syslog messages. See the documentation for the syslogservice installed on the remote host for information on configuration.
6 (Optional) To overwrite the default log size and log rotation for any of the logs.
a Click the name of the log you that want to customize.
b Click the Edit icon and enter the number of rotations and log size you want.
7 Click OK.
Changes to the syslog options take effect immediately.
ESXi Log File LocationsESXi records host activity in log files, using a syslog facility.
Component Location Purpose
VMkernel /var/log/vmkernel.log Records activities related to virtualmachines and ESXi.
VMkernel warnings /var/log/vmkwarning.log Records activities related to virtualmachines.
VMkernel summary /var/log/vmksummary.log Used to determine uptime andavailability statistics for ESXi (commaseparated).
ESXi host agent log /var/log/hostd.log Contains information about the agentthat manages and configures the ESXihost and its virtual machines.
vCenter agent log /var/log/vpxa.log Contains information about the agentthat communicates with vCenter Server(if the host is managed by vCenterServer).
Shell log /var/log/shell.log Contains a record of all commands typedinto the ESXi Shell as well as shellevents (for example, when the shell wasenabled).
Authentication /var/log/auth.log Contains all events related toauthentication for the local system.
vSphere Security
VMware, Inc. 130

Component Location Purpose
System messages /var/log/syslog.log Contains all general log messages andcan be used for troubleshooting. Thisinformation was formerly located in themessages log file.
Virtual machines The same directory as the affectedvirtual machine's configuration files,named vmware.log and vmware*.log. Forexample, /vmfs/volumes/datastore/virtual machine/vwmare.log
Contains virtual machine power events,system failure information, tools statusand activity, time sync, virtual hardwarechanges, vMotion migrations, machineclones, and so on.
Securing Fault Tolerance Logging TrafficWhen you enable Fault Tolerance (FT), VMware vLockstep captures inputs and events that occur on aPrimary VM and sends them to the Secondary VM, which is running on another host.
This logging traffic between the Primary and Secondary VMs is unencrypted and contains guest networkand storage I/O data, as well as the memory contents of the guest operating system. This traffic caninclude sensitive data such as passwords in plaintext. To avoid such data being divulged, ensure that thisnetwork is secured, especially to avoid "man-in-the-middle" attacks. For example, use a private networkfor FT logging traffic.
vSphere Security
VMware, Inc. 131
Securing Virtual Machines 8The guest operating system that runs in the virtual machine is subject to the same security risks as aphysical system. Secure virtual machines as you would secure physical machines.
This chapter includes the following topics:
n General Virtual Machine Protection
n Disable Unnecessary Functions Inside Virtual Machines
n Use Templates to Deploy Virtual Machines
n Prevent Virtual Machines from Taking Over Resources
n Limit Informational Messages from Virtual Machines to VMX Files
n Prevent Virtual Disk Shrinking in the vSphere Web Client
n Minimize Use of Virtual Machine Console
n Configuring Logging Levels for the Guest Operating System
General Virtual Machine ProtectionA virtual machine is, in most respects, the equivalent of a physical server. Employ the same securitymeasures in virtual machines that you do for physical systems.
Keep all security measures up-to-date, including applying appropriate patches. It is especially importantto keep track of updates for dormant virtual machines that are powered off, because it can be easy tooverlook them. For example, ensure that antivirus, anti-spy ware, intrusion detection, and other protectionare enabled for every virtual machine in your virtual infrastructure. You should also ensure that you haveenough space for the virtual machine logs.
Installing Anti-Virus SoftwareBecause each virtual machine hosts a standard operating system, you must protect it from viruses byinstalling antivirus software. Depending on how you are using the virtual machine, you might also want toinstall a software firewall.
Stagger the schedule for virus scans, particularly in deployments with a large number of virtual machines.Performance of systems in your environment degrades significantly if you scan all virtual machinessimultaneously.
VMware, Inc. 132

Because software firewalls and antivirus software can be virtualization-intensive, you can balance theneed for these two security measures against virtual machine performance, especially if you are confidentthat your virtual machines are in a fully trusted environment.
Configure Logging Levels for the Guest Operating SystemVirtual machines can write troubleshooting information into a virtual machine log file stored on the VMFSvolume. Virtual machine users and processes can abuse logging either on purpose or inadvertently sothat large amounts of data flood the log file. Over time, the log file can consume enough file system spaceto cause a denial of service.
To prevent this problem, consider modifying logging settings for virtual machine guest operating systems.These settings can limit the total size and number of log files. Normally, a new log file is created each timeyou reboot a host, so the file can grow to be quite large. You can ensure new log file creation happensmore frequently by limiting the maximum size of the log files. VMware recommends saving 10 log files,each one limited to 100KB. These values are large enough to capture sufficient information to debug mostproblems that might occur.
Each time an entry is written to the log, the size of the log is checked. If it is over the limit, the next entry iswritten to a new log. If the maximum number of log files exists, the oldest log file is deleted. A Denial ofService attack that avoids these limits could be attempted by writing an enormous log entry, but each logentry is limited in size to 4KB, so no log files are ever more than 4KB larger than the configured limit.
Disable Unnecessary Functions Inside Virtual MachinesAny service running in a virtual machine provides the potential for attack. By disabling unnecessarysystem components that are not necessary to support the application or service running on the system,you reduce the number of components that can be attacked.
Virtual machines do not usually require as many services or functions as physical servers. When youvirtualize a system, evaluate whether a particular service or function is necessary.
Procedure
n Disable unused services in the operating system.
For example, if the system runs a file server, turn off any Web services.
n Disconnect unused physical devices, such as CD/DVD drives, floppy drives, and USB adaptors.
See Removing Unnecessary Hardware Devices.
n Turn off screen savers.
n Do not run the X Window system on Linux, BSD, or Solaris guest operating systems unless it isnecessary.
vSphere Security
VMware, Inc. 133

Removing Unnecessary Hardware DevicesAny enabled or connected device represents a potential attack channel. Users and processes withoutprivileges on a virtual machine can connect or disconnect hardware devices, such as network adaptersand CD-ROM drives. Attackers can use this capability to breach virtual machine security. Removingunnecessary hardware devices can help prevent attacks.
Use the following guidelines to increase virtual machine security.
n Ensure that unauthorized devices are not connected and remove any unneeded or unused hardwaredevices.
n Disable unnecessary virtual devices from within a virtual machine. An attacker with access to a virtualmachine can connect a disconnected CD-ROM drive and access sensitive information on the medialeft in the drive, or disconnect a network adapter to isolate the virtual machine from its network,resulting in a denial of service.
n Ensure that no device is connected to a virtual machine if it is not required. Serial and parallel portsare rarely used for virtual machines in a datacenter environment, and CD/DVD drives are usuallyconnected only temporarily during software installation.
n For less commonly used devices that are not required, either the parameter should not be present orits value must be false. Ensure that the following parameters are either not present or set to falseunless the device is required.
Parameter Value Device
floppyX.present false floppy drives
serialX.present false serial ports
parallelX.present false parallel ports
usb.present false USB controller
ideX:Y.present false CD-ROM
Disable Unexposed FeaturesVMware virtual machines are designed to work on both vSphere systems and hosted virtualizationplatforms such as Workstation and Fusion. Certain VMX parameters do not need to be enabled when yourun a virtual machine on a vSphere system. Disable these parameters to reduce the potential forvulnerabilities.
Prerequisites
Turn off the virtual machine.
vSphere Security
VMware, Inc. 134

Procedure
1 Find the virtual machine in the vSphere Web Client inventory.
a To find a virtual machine, select a datacenter, folder, cluster, resource pool, or host.
b Click the Related Objects tab and click Virtual Machines.
2 Right-click the virtual machine and click Edit Settings.
3 Select VM Options.
4 Click Advanced and click Edit Configuration.
5 Add or edit the following parameters.
Name Value
isolation.tools.unity.push.update.disable
TRUE
isolation.tools.ghi.launchmenu.change TRUE
isolation.tools.memSchedFakeSampleStats.disable
TRUE
isolation.tools.getCreds.disable TRUE
isolation.tools.ghi.autologon.disable TRUE
isolation.bios.bbs.disable TRUE
isolation.tools.hgfsServerSet.disable TRUE
6 Click OK.
Setting isolation.tools.hgfsServerSet.disable to true disables registration of the guest's HGFSserver with the host. APIs that use HGFS to transfer files to and from the guest operating system, such assome VIX commands or the VMware Tools auto-upgrade utility, will not function.
Disable Copy and Paste Operations Between Guest OperatingSystem and Remote ConsoleCopy and paste operations between the guest operating system and remote console are disabled bydefault. For a secure environment, retain the default setting. If you require copy and paste operations, youmust enable them using the vSphere Client.
Prerequisites
Turn off the virtual machine.
Procedure
1 Log into a vCenter Server system using the vSphere Web Client.
2 Right-click the virtual machine and click Edit Settings.
3 Click VM Options, and click Edit Configuration.
vSphere Security
VMware, Inc. 135

4 Ensure that the following values are in the Name and Value columns, or click Add Row to add them.
Name Value
isolation.tools.copy.disable true
isolation.tools.paste.disable true These options override any settings made in the guest operating system’s VMware Tools controlpanel.
5 Click OK.
6 (Optional) If you made changes to the configuration parameters, restart the virtual machine.
Limiting Exposure of Sensitive Data Copied to the ClipboardCopy and paste operations are disabled by default for hosts to prevent exposing sensitive data that hasbeen copied to the clipboard.
When copy and paste is enabled on a virtual machine running VMware Tools, you can copy and pastebetween the guest operating system and remote console. As soon as the console window gains focus,non-privileged users and processes running in the virtual machine can access the clipboard for the virtualmachine console. If a user copies sensitive information to the clipboard before using the console, the user—perhaps unknowingly—exposes sensitive data to the virtual machine. To prevent this problem, copyand paste operations for the guest operating system are disabled by default.
It is possible to enable copy and paste operations for virtual machines if necessary.
Restrict Users from Running Commands Within a Virtual MachineBy default, the vCenter Server Administrator role lets users interact with files and programs within a virtualmachine's guest operating system. To reduce the risk of breaching guest confidentiality, availability, orintegrity, create a nonguest access role without the Guest Operations privilege.
For security, be as restrictive about allowing access to the virtual datacenter as you are to the physicaldatacenter. To avoid giving users full administrator access, apply the nonguest access role to users whorequire administrator privileges, but who are not authorized to interact with files and programs within aguest operating system.
For example, a configuration might include a virtual machine on the infrastructure that has sensitiveinformation on it. Tasks such as migration with vMotion and Storage vMotion require that the IT role hasaccess to the virtual machine. In this case, you want to disable some remote operations within a guestOS to ensure that the IT role cannot access the sensitive information.
Prerequisites
Verify that you have Administrator privileges on the vCenter Server system where you create the role.
Procedure
1 Log in to the vSphere Web Client as a user who has Administrator privileges on the vCenter Serversystem where you will create the role.
vSphere Security
VMware, Inc. 136

2 Click Administration and select Access > Roles.
3 Click the Create role icon and type a name for the role.
For example, type Administrator No Guest Access.
4 Select All Privileges.
5 Deselect All Privileges.Virtual machine.Guest Operations to remove the Guest Operations set ofprivileges.
6 Click OK.
What to do next
Assign users who require Administrator privileges without guest access privileges to the newly createdrole, ensuring that these users are removed from the default Administrator role.
Prevent a Virtual Machine User or Process from DisconnectingDevices in the vSphere Web ClientUsers and processes without root or administrator privileges within virtual machines have the capability toconnect or disconnect devices, such as network adaptors and CD-ROM drives, as well as the ability tomodify device settings. To increase virtual machine security, remove these devices. If you do not want topermanently remove a device, you can prevent a virtual machine user or process from connecting ordisconnecting the device from within the guest operating system.
Prerequisites
Turn off the virtual machine.
Procedure
1 Find the virtual machine in the vSphere Web Client inventory.
a To find a virtual machine, select a datacenter, folder, cluster, resource pool, or host.
b Click the Related Objects tab and click Virtual Machines.
2 Right-click the virtual machine and click Edit Settings.
3 Select VM Options > Advanced and click Edit Configuration.
4 Verify that the following values are in the Name and Value columns, or click Add Row to add them.
Name Value
isolation.device.connectable.disable true
isolation.device.edit.disable true These options override any settings made in the guest operating system's VMware Tools controlpanel.
5 Click OK to close the Configuration Parameters dialog box, and click OK again to close the VirtualMachine Properties dialog box.
vSphere Security
VMware, Inc. 137
Limiting Guest Operating System Writes to Host MemoryThe guest operating system processes send informational messages to the host through VMware Tools. Ifthe amount of data the host stored as a result of these messages was unlimited, an unrestricted data flowwould provide an opportunity for an attacker to stage a denial-of-service (DoS) attack.
The informational messages sent by guest operating processes are known as setinfo messages andtypically contain name-value pairs that define virtual machine characteristics or identifiers that the hoststores (for example, ipaddress=10.17.87.224). The configuration file containing these name-valuepairs is limited to a size of 1MB, which prevents attackers from staging a DoS attack by writing softwarethat mimics VMware Tools and filling the host's memory with arbitrary configuration data, which consumesspace needed by the virtual machines.
If you require more than 1MB of storage for name-value pairs, you can change the value as required. Youcan also prevent the guest operating system processes from writing any name-value pairs to theconfiguration file.
Modify Guest Operating System Variable Memory Limit in thevSphere Web ClientYou can increase the guest operating system variable memory limit if large amounts of custominformation are being stored in the configuration file.
Prerequisites
Turn off the virtual machine.
Procedure
1 Find the virtual machine in the vSphere Web Client inventory.
a To find a virtual machine, select a datacenter, folder, cluster, resource pool, or host.
b Click the Related Objects tab and click Virtual Machines.
2 Right-click the virtual machine and click Edit Settings.
3 Select VM Options > Advanced and click Edit Configuration .
4 Add or edit the parameter tools.setInfo.sizeLimit and set the value to the number of bytes.
5 Click OK.
Prevent the Guest Operating System Processes from Sending ConfigurationMessages to the HostYou can prevent guests from writing any name-value pairs to the configuration file. This is appropriatewhen guest operating systems must be prevented from modifying configuration settings.
Prerequisites
Turn off the virtual machine.
vSphere Security
VMware, Inc. 138

Procedure
1 Log in to a vCenter Server system using the vSphere Client.
2 Select the virtual machine in the inventory panel.
3 On the Summary tab, click Edit Settings.
4 Select Options > Advanced > General and click Configuration Parameters.
5 Click Add Row and type the following values in the Name and Value columns.
n In the Name column: isolation.tools.setinfo.disable
n In the Value column: true
6 Click OK to close the Configuration Parameters dialog box, and click OK again to close the VirtualMachine Properties dialog box.
Use Templates to Deploy Virtual MachinesWhen you manually install guest operating systems and applications on a virtual machine, you introducea risk of misconfiguration. By using a template to capture a hardened base operating system image withno applications installed, you can ensure that all virtual machines are created with a known baseline levelof security.
You can use templates that can contain a hardened, patched, and properly configured operating systemto create other, application-specific templates, or you can use the application template to deploy virtualmachines.
Procedure
u Provide templates for virtual machine creation that contain hardened, patched, and properlyconfigured operating system deployments.
If possible, deploy applications in templates as well. Ensure that the applications do not depend oninformation specific to the virtual machine to be deployed.
What to do next
You can convert a template to a virtual machine and back to a template in the vSphere Web Client, whichmakes updating templates easy. For more information about templates, see the vSphere Virtual MachineAdministration documentation.
You can use vSphere Update Manager to automatically patch the operating system and certainapplications in the template. See the vSphere Update Manager documentation.
Prevent Virtual Machines from Taking Over ResourcesWhen one virtual machine consumes so much of the host resources that other virtual machines on thehost cannot perform their intended functions, a Denial of Service (DoS) might occur. To prevent a virtualmachine from causing a DoS, use host resource management features such as setting shares and limitsto control the server resources that a virtual machine consumes.
vSphere Security
VMware, Inc. 139

By default, all virtual machines on a host share resources equally.
Procedure
u Use shares or reservations to guarantee resources to critical virtual machines.
Limits constrain resource consumption by virtual machines that have a greater risk of being exploitedor attacked, or that run applications that are known to have the potential to greatly consumeresources.
What to do next
See the vSphere Resource Management documentation for information about shares and limits.
Limit Informational Messages from Virtual Machines toVMX FilesLimit informational messages from the virtual machine to the VMX file to avoid filling the datastore andcausing a Denial of Service (DoS). A Denial of Service can occur when you do not control the size of avirtual machine's VMX file and the amount of information exceeds the datastore's capacity.
The configuration file containing the informational name-value pairs is limited to 1MB by default. Thiscapacity is sufficient in most cases, but you can change this value if necessary. For example, you mightincrease the limit if large amounts of custom information are being stored in the configuration file.
Note Consider carefully how much information you require. If the amount of information exceeds thedatastore's capacity, a Denial of Service might result.
The default limit of 1MB is applied even when the sizeLimit parameter is not listed in the VMX file.
Procedure
1 On the ESXi system that hosts the virtual machine, browse to the VMX file.
Virtual machine configuration files are located in the /vmfs/volumes/datastore directory, wheredatastore is the name of the storage device on which the virtual machine files reside. Forexample, /vmfs/volumes/vol1/vm-finance/.
2 Use a text editor to add or edit the following line in the VMX file:
tools.setInfo.sizeLimit=104857
3 Save and close the file.
Prevent Virtual Disk Shrinking in the vSphere Web ClientNonadministrative users in the guest operating system are able to shrink virtual disks. Shrinking a virtualdisk reclaims the disk's unused space. However, if you shrink a virtual disk repeatedly, the disk canbecome unavailable and cause a denial of service. To prevent this, disable the ability to shrink virtualdisks.
vSphere Security
VMware, Inc. 140

Prerequisites
Turn off the virtual machine.
Procedure
1 Find the virtual machine in the vSphere Web Client inventory.
a To find a virtual machine, select a datacenter, folder, cluster, resource pool, or host.
b Click the Related Objects tab and click Virtual Machines.
2 Right-click the virtual machine and click Edit Settings.
3 Select VM Options.
4 Click Advanced and click Edit Configuration.
5 Add or edit the following parameters.
Name Value
isolation.tools.diskWiper.disable TRUE
isolation.tools.diskShrink.disable TRUE
6 Click OK.
When you disable this feature, you cannot shrink virtual machine disks when a datastore runs out ofspace.
Minimize Use of Virtual Machine ConsoleThe virtual machine console provides the same function for a virtual machine that a monitor on a physicalserver provides. Users with access to the virtual machine console have access to virtual machine powermanagement and removable device connectivity controls, which might allow a malicious attack on avirtual machine.
Procedure
u Use native remote management services, such as terminal services and SSH, to interact with virtualmachines.
Grant access to the virtual machine console only when necessary.
Configuring Logging Levels for the Guest OperatingSystemVirtual machines can write troubleshooting information into a virtual machine log file stored on the VMFSvolume. Virtual machine users and processes can abuse logging either on purpose or inadvertently sothat large amounts of data flood the log file. Over time, the log file can consume enough file system spaceto cause a denial of service.
vSphere Security
VMware, Inc. 141

To prevent this problem, consider modifying logging settings for virtual machine guest operating systems.These settings can limit the total size and number of log files. Normally, a new log file is created each timeyou reboot a host, so the file can grow to be quite large. You can ensure new log file creation happensmore frequently by limiting the maximum size of the log files. VMware recommends saving 10 log files,each one limited to 100KB. These values are large enough to capture sufficient information to debug mostproblems that might occur.
Each time an entry is written to the log, the size of the log is checked. If it is over the limit, the next entry iswritten to a new log. If the maximum number of log files exists, the oldest log file is deleted. A DoS attackthat avoids these limits could be attempted by writing an enormous log entry, but each log entry is limitedin size to 4KB, so no log files are ever more than 4KB larger than the configured limit.
Limit the Number of Log Files in the vSphere Web ClientTo prevent virtual machine users and processes from creating large numbers of log files, which can leadto denial of service, you can limit the number of the log files for a virtual machine. You cannot limit the logfile size for individual virtual machines.
You can limit the number of log files for all virtual machines on a host by editingthe /etc/vmware/config file. If the vmx.log.KeepOld property is not defined in the file, you can add it.For example, to keep ten log files for each virtual machine, add the following to /etc/vmware/config:
vmx.log.keepOld = "10"
You can also use a PowerCLI script to change this property on all the virtual machines on a host.
Prerequisites
Turn off the virtual machine.
Procedure
1 Find the virtual machine in the vSphere Web Client inventory.
a To find a virtual machine, select a datacenter, folder, cluster, resource pool, or host.
b Click the Related Objects tab and click Virtual Machines.
2 Right-click the virtual machine and click Edit Settings.
3 Select VM Options.
4 Click Advanced and click Edit Configuration.
5 Add or edit the vmx.log.keepOld parameter to specify the number of files to keep. For example, tokeep 8 log files and begin deleting the oldest files as new ones are created, enter 8.
6 Click OK.
vSphere Security
VMware, Inc. 142

Disable Logging for the Guest Operating System in thevSphere Web ClientIf you choose not to write troubleshooting information into a virtual machine log file stored on the VMFSvolume, you can stop logging altogether.
If you disable logging for the guest operating system, be aware that you might not be able to gatheradequate logs to allow troubleshooting. Further, VMware does not offer technical support for virtualmachine problems if logging has been disabled.
Procedure
1 Find the virtual machine in the vSphere Web Client inventory.
a To find a virtual machine, select a datacenter, folder, cluster, resource pool, or host.
b Click the Related Objects tab and click Virtual Machines.
2 Right-click the virtual machine and click Edit Settings.
3 Select VM Options > Advanced.
4 In Settings, deselect Enable logging.
5 Click OK.
vSphere Security
VMware, Inc. 143
Securing vSphere Networking 9Securing vSphere Networking is an essential part of protecting your environment. You secure differentvSphere components in different ways. See the vSphere Networking documentation for detailedinformation about networking in the vSphere environment.
This chapter includes the following topics:
n Introduction to vSphere Network Security
n Securing the Network with Firewalls
n Secure the Physical Switch
n Securing Standard Switch Ports With Security Policies
n Securing Standard Switch MAC Addresses
n Standard Switch Protection and VLANs
n Secure vSphere Distributed Switches
n Securing Virtual Machines with VLANs
n Creating a Network DMZ on a Single ESXi Host
n Creating Multiple Networks Within a Single ESXi Host
n Internet Protocol Security
n Ensure Proper SNMP Configuration
n Use Virtual Switches on the vSphere Network Appliance Only If Required
Introduction to vSphere Network SecurityNetwork security in the vSphere environment shares many characteristics of securing a physical networkenvironment, but also includes some characteristics that apply only with virtual machines.
FirewallsAdd firewall protection to your virtual network by installing and configuring host-based firewalls on someor all of its virtual machines.
VMware, Inc. 144

For efficiency, you can set up private virtual machine Ethernet networks or virtual networks. With virtualnetworks, you install a host-based firewall on a virtual machine at the head of the virtual network. Thisfirewall serves as a protective buffer between the physical network adapter and the remaining virtualmachines in the virtual network.
Because host-based firewalls can slow performance, balance your security needs against performancegoals before you install host-based firewalls on virtual machines elsewhere in the virtual network.
See Securing the Network with Firewalls.
SegmentationKeep different virtual machine zones within a host on different network segments. If you isolate eachvirtual machine zone on its own network segment, you minimize the risk of data leakage from one virtualmachine zone to the next. Segmentation prevents various threats, including Address Resolution Protocol(ARP) spoofing, in which an attacker manipulates the ARP table to remap MAC and IP addresses,thereby gaining access to network traffic to and from a host. Attackers use ARP spoofing to generate manin the middle (MITM) attacks, perform denial of service (DoS) attacks, hijack the target system, andotherwise disrupt the virtual network.
Planning segmentation carefully lowers the chances of packet transmissions between virtual machinezones, which prevents sniffing attacks that require sending network traffic to the victim. Also, an attackercannot use an insecure service in one virtual machine zone to access other virtual machine zones in thehost. You can implement segmentation by using either of two approaches. Each approach has differentbenefits.
n Use separate physical network adapters for virtual machine zones to ensure that the zones areisolated. Maintaining separate physical network adapters for virtual machine zones is probably themost secure method and is less prone to misconfiguration after the initial segment creation.
n Set up virtual local area networks (VLANs) to help safeguard your network. Because VLANs providealmost all of the security benefits inherent in implementing physically separate networks without thehardware overhead, they offer a viable solution that can save you the cost of deploying andmaintaining additional devices, cabling, and so forth. See Securing Virtual Machines with VLANs.
Preventing Unauthorized AccessIf your virtual machine network is connected to a physical network, it can be subject to breaches just likea network that consists of physical machines. Even if the virtual machine network is isolated from anyphysical network, virtual machines in the network can be subject to attacks from other virtual machines inthe network. The requirements for securing virtual machines are often the same as those for securingphysical machines.
Virtual machines are isolated from each other. One virtual machine cannot read or write another virtualmachine’s memory, access its data, use its applications, and so forth. However, within the network, anyvirtual machine or group of virtual machines can still be the target of unauthorized access from othervirtual machines and might require further protection by external means.
vSphere Security
VMware, Inc. 145

Securing the Network with FirewallsSecurity administrators use firewalls to safeguard the network or selected components in the networkfrom intrusion.
Firewalls control access to devices within their perimeter by closing all communication pathways, exceptfor those that the administrator explicitly or implicitly designates as authorized. The pathways, or ports,that administrators open in the firewall allow traffic between devices on different sides of the firewall.
Important The ESXi firewall in ESXi 5.5 does not allow per-network filtering of vMotion traffic. Therefore,you must install rules on your external firewall to ensure that no incoming connections can be made to thevMotion socket.
In a virtual machine environment, you can plan the layout for firewalls between components.
n Firewalls between physical machines such as vCenter Server systems and ESXi hosts.
n Firewalls between one virtual machine and another—for example, between a virtual machine actingas an external Web server and a virtual machine connected to your company’s internal network.
n Firewalls between a physical machine and a virtual machine, such as when you place a firewallbetween a physical network adapter card and a virtual machine.
How you use firewalls in your ESXi configuration is based on how you plan to use the network and howsecure any given component needs to be. For example, if you create a virtual network where each virtualmachine is dedicated to running a different benchmark test suite for the same department, the risk ofunwanted access from one virtual machine to the next is minimal. Therefore, a configuration wherefirewalls are present between the virtual machines is not necessary. However, to prevent interruption of atest run from an outside host, you might set up the configuration so that a firewall is present at the entrypoint of the virtual network to protect the entire set of virtual machines.
Firewalls for Configurations with vCenter ServerIf you access ESXi hosts through vCenter Server, you typically protect vCenter Server using a firewall.This firewall provides basic protection for your network.
A firewall might lie between the clients and vCenter Server. Alternatively, depending on your deployment,vCenter Server and the clients can both be behind the firewall. The main point is to ensure that a firewallis present at what you consider to be an entry point for the system.
For a comprehensive list of TCP and UDP ports, including those for vSphere vMotion™ and vSphereFault Tolerance, see TCP and UDP Ports.
Networks configured with vCenter Server can receive communications through the vSphere Web Client orthird-party network management clients that use the SDK to interface with the host. During normaloperation, vCenter Server listens for data from its managed hosts and clients on designated ports.vCenter Server also assumes that its managed hosts listen for data from vCenter Server on designatedports. If a firewall is present between any of these elements, you must ensure that the firewall has openports to support data transfer.
vSphere Security
VMware, Inc. 146
You might also include firewalls at a variety of other access points in the network, depending on how youplan to use the network and the level of security various devices require. Select the locations for yourfirewalls based on the security risks that you have identified for your network configuration. The followingis a list of firewall locations common to ESXi implementations.
n Between the vSphere Web Client or a third-party network-management client and vCenter Server.
n If your users access virtual machines through a Web browser, between the Web browser and theESXi host.
n If your users access virtual machines through the vSphere Web Client, between thevSphere Web Client and the ESXi host. This connection is in addition to the connection between thevSphere Web Client and vCenter Server, and it requires a different port.
n Between vCenter Server and the ESXi hosts.
n Between the ESXi hosts in your network. Although traffic between hosts is usually considered trusted,you can add firewalls between them if you are concerned about security breaches from machine tomachine.
If you add firewalls between ESXi hosts and plan to migrate virtual machines between the servers,perform cloning, or use vMotion, you must also open ports in any firewall that divides the source hostfrom the target hosts so that the source and targets can communicate.
n Between the ESXi hosts and network storage such as NFS or iSCSI storage. These ports are notspecific to VMware, and you configure them according to the specifications for your network.
Connecting to vCenter Server Through a FirewallThe port that vCenter Server uses to listen for data transfer from its clients is 443. If you have a firewallbetween vCenter Server and its clients, you must configure a connection through which vCenter Servercan receive data from the clients.
To enable vCenter Server to receive data from the vSphere Web Client, open port 443 in the firewall toallow data transfer from the vSphere Web Client to vCenter Server. Contact the firewall systemadministrator for additional information on configuring ports in a firewall.
If you are using the vSphere Web Client and do not want to use port 443 as the port forvSphere Web Client-to-vCenter Server communication, you can switch to another port by changing thevCenter Server settings in the vSphere Web Client. To learn how to change these settings, see thevCenter Server and Host Management documentation.
Firewalls for Configurations Without vCenter ServerYou can connect clients directly to your ESXi network instead of using vCenter Server.
vSphere Security
VMware, Inc. 147
Networks configured without vCenter Server receive communications through the vSphere Client, one ofthe vSphere command-line interfaces, the vSphere Web Services SDK, or third-party clients. For the mostpart, the firewall needs are the same as when a vCenter Server is present, but several key differencesexist.
n As you would for configurations that include vCenter Server, be sure a firewall is present to protectyour ESXi layer or, depending on your configuration, your clients and ESXi layer. This firewallprovides basic protection for your network. The firewall ports you use are the same as those you useif vCenter Server is in place.
n Licensing in this type of configuration is part of the ESXi package that you install on each of the hosts.Because licensing is resident to the server, a separate license server is not required. This eliminatesthe need for a firewall between the license server and the ESXi network.
Connecting ESXi Hosts Through FirewallsIf you have a firewall between two ESXi hosts and you want to allow transactions between the hosts oruse vCenter Server to perform any source or target activities, such as vSphere High Availability (vSphereHA) traffic, migration, cloning, or vMotion, you must configure a connection through which the managedhosts can receive data.
To configure a connection for receiving data, open ports for traffic from services such as vSphere HighAvailability, vMotion, and vSphere Fault Tolerance. See ESXi Firewall Configuration for a discussion ofconfiguration files, vSphere Web Client access, and firewall commands. See TCP and UDP Ports for a listof ports. Refer to the firewall system administrator for additional information on configuring the ports.
Connecting to the Virtual Machine Console Through a FirewallWhen you connect your client to ESXi hosts through vCenter Server, certain ports are required for userand administrator communication with virtual machine consoles. These ports support different clientfunctions, interface with different layers on ESXi, and use different authentication protocols.
How you connect to the virtual machine console depends on whether you are using thevSphere Web Client or whether you are using a different client such as the vSphere SDK.
Connecting by Using the vSphere Web ClientWhen you are connecting with the vSphere Web Client, you always connect to the vCenter Server thatmanages the host, and access the virtual machine console from there.
The following ports are involved.
Port 9443 and Port 9090 The vSphere Web Client uses port 9443 for HTTPS communication withvCenter Server and port 9090 for HTTP communication withvCenter Server. Once users can accessvCenter Server, they can alsoaccess individual ESXi hosts and virtual machines.
vSphere Security
VMware, Inc. 148

These ports can be changed during vSphere Web Client installation.
Port 443 and Port 902 Open ports 443 and 902 in the firewall to allow data transfer to ESXi hostsfrom vCenter Server if you have a firewall between your vCenter Serversystem and the ESXi host managed by vCenter Server.
Figure 9‑1. Port Use for vSphere Web Client Communications with an ESXi Host Managed byvCenter Server
ESXi
vSphere Web Client
Port 443/9443
vmware-hostd vmware-authd
virtual machinemanagement functions
virtual machineconsole
Port 902/9090firewall
For additional information on configuring the ports, see the firewall system administrator.
Connecting Through vCenter Server with the vSphere ClientWhen you are connecting with the vSphere Client, the required ports depend on whether you connectdirectly to the ESXi host or you connect to a vCenter Server system.
Port 443 Port 443 connects clients such as the vSphere Web Services SDK to ESXithrough the Tomcat Web service or the SDK. The host process multiplexesport 443 data to the appropriate recipient for processing.
When the vSphere SDK is connected directly to ESXi, it can use this port tosupport any management functions related to the host and its virtualmachines. Port 443 is the port that clients such as the vSphere SDKassume is available when sending data to ESXi. VMware does not supportconfiguring a different port for these connections.
Port 902 This is the port that vCenter Server assumes is available for receiving datafrom ESXi.
Port 902 connects vCenter Server to the host through the VMwareAuthorization Daemon (vmware-authd). This daemon multiplexes port 902data to the appropriate recipient for processing. VMware does not supportconfiguring a different port for this connection.
vSphere Security
VMware, Inc. 149

Connecting Directly with the vSphere ClientWith the vSphere Client, you can connect directly to an ESXi host.
Port 902 The vSphere Client uses this port to provide a connection for guestoperating system MKS activities on virtual machines. It is through this portthat users interact with the guest operating systems and applications of thevirtual machine. VMware does not support configuring a different port forthis function.
TCP and UDP PortsvCenter Server, ESXi hosts, and other network components are accessed using predetermined TCP andUDP ports. If you manage network components from outside a firewall, you might be required toreconfigure the firewall to allow access on the appropriate ports.
The table lists TCP and UDP ports, and the purpose and the type of each. Ports that are open by defaultat installation time are indicated by (Default). For an up to date list of ports of all vSphere components forthe different versions of vSphere, see http://kb.vmware.com/kb/1012382.
Table 9‑1. TCP and UDP Ports
Port Purpose Traffic Type
22 SSH Server (vSphere Client) Incoming TCP
53 (Default) DNS Client Incoming andoutgoing UDP
68 (Default) DHCP Client Incoming andoutgoing UDP
80 (Default) HTTP access
vCenter Server requires port 80 for direct HTTP connections. Port 80 redirectsrequests to HTTPS port 443. This redirection is useful if you accidentally usehttp://server instead of https://server
WS-Management (also requires port 443 to be open)
Incoming TCP
Outgoing TCP, UDP
88, 2013 Control interface RPC for Kerberos, used by vCenter Single Sign-On
111 (Default) RPC service that is used for the NIS register by the vCenter Server Appliance Incoming andoutgoing TCP
123 NTP Client Outgoing UDP
135 (Default) For the vCenter Server Appliance, this port is designated for Active Directoryauthentication.
For a vCenter Server Windows installation, this port is used for Linked mode and port88 is used for Active Directory authentication.
Incoming andoutgoing TCP
161 (Default) SNMP Server Incoming UDP
vSphere Security
VMware, Inc. 150

Table 9‑1. TCP and UDP Ports (Continued)
Port Purpose Traffic Type
443 (Default) The default port that the vCenter Server system uses to listen for connections from thevSphere Client. To enable the vCenter Server system to receive data from thevSphere Client, open port 443 in the firewall.
The vCenter Server system also uses port 443 to monitor data transfer from SDKclients.
This port is also used for the following services:n WS-Management (also requires port 80 to be open)n vSphere Client access to vSphere Update Managern Third-party network management client connections to vCenter Servern Third-party network management clients access to hosts
Incoming TCP
427 (Default) The CIM client uses the Service Location Protocol, version 2 (SLPv2) to find CIMservers.
Incoming andoutgoing UDP
513 (Default) vCenter Server Appliance used for logging activity Incoming UDP
902 (Default) The default port that the vCenter Server system uses to send data to managed hosts.Managed hosts also send a regular heartbeat over UDP port 902 to thevCenter Server system. This port must not be blocked by firewalls between the serverand the hosts or between hosts.
Port 902 must not be blocked between the vSphere Client and the hosts. The vSphereClient uses this port to display virtual machine consoles.
Incoming andoutgoing TCP,outgoing UDP
903 Access a virtual machine console from the vSphere Client when the vSphere Client isconnected directly to the ESXi host (no vCenter Server).
MKS transactions (xinetd/vmware-authd-mks)
Incoming TCP
2012 Control interface RPC for vCenter Single Sign-On vmdir.
2014 RPC port for all VMCA (VMware Certificate Authority) APIs
2049 Transactions from NFS storage devices
This port is used on the VMkernel interface.
Incoming andoutgoing TCP
31031 44046.(Default)
vSphere Replication Outgoing TCP
3260 Transactions to iSCSI storage devices Outgoing TCP
5900-5964 RFB protocol, which is used by management tools such as VNC Incoming andoutgoing TCP
5988 (Default) CIM transactions over HTTP Incoming TCP
5989 (Default) CIM XML transactions over HTTPS Incoming andoutgoing TCP
7444 vCenter Single Sign-On HTTPS
8000 (Default) Requests from vMotion Incoming andoutgoing TCP
8009 AJP connector port for vCenter Server Appliance communication with Tomcat Outgoing TCP
8100, 8200(Default)
Traffic between hosts for vSphere Fault Tolerance (FT) Incoming andoutgoing TCP, UDP
vSphere Security
VMware, Inc. 151

Table 9‑1. TCP and UDP Ports (Continued)
Port Purpose Traffic Type
8182 Traffic between hosts for vSphere High Availability (HA) Incoming andoutgoing TCP,incoming andoutgoing UDP
9009 Used to allow a vCenter Server Appliance to communicate with thevSphere Web Client
Incoming andoutgoing TCP
9090 Remote console traffic generated by user access to virtual machines on a specifichost.
vSphere Web Client HTTPS access to virtual machine consoles
Incoming TCP
9443 vSphere Web Client HTTP access to ESXi hosts Incoming TCP
11711 vCenter Single Sign-On LDAP
11712 vCenter Single Sign-On LDAPS
12721 VMware Identity Management service
In addition to the TCP and UDP ports, you can configure other ports depending on your needs.
Secure the Physical SwitchSecure the physical switch on each ESXi host to prevent attackers from gaining access to the host and itsvirtual machines.
For best protection of your hosts, ensure that physical switch ports are configured with spanning treedisabled and ensure that the non-negotiate option is configured for trunk links between external physicalswitches and virtual switches in Virtual Switch Tagging (VST) mode.
Procedure
1 Log in to the physical switch and ensure that spanning tree protocol is disabled or that Port Fast isconfigured for all physical switch ports that are connected to ESXi hosts.
2 For virtual machines that perform bridging or routing, check periodically that the first upstreamphysical switch port is configured with BPDU Guard and Port Fast disabled and with spanning treeprotocol enabled.
In vSphere 5.1 and later, to prevent the physical switch from potential Denial of Service (DoS)attacks, you can turn on the guest BPDU filter on the ESXi hosts.
3 Log in to the physical switch and ensure that Dynamic Trunking Protocol (DTP) is not enabled on thephysical switch ports that are connected to the ESXi hosts.
4 Routinely check physical switch ports to ensure that they are properly configured as trunk ports ifconnected to virtual switch VLAN trunking ports.
vSphere Security
VMware, Inc. 152

Securing Standard Switch Ports With Security PoliciesAs with physical network adapters, a virtual machine network adapter can send frames that appear to befrom a different machine or impersonate another machine so that it can receive network frames that areintended for that machine. Also, like physical network adapters, a virtual machine network adapter can beconfigured so that it receives frames targeted for other machines. Both scenarios present a security risk.
When you create a standard switch for your network, you add port groups in the vSphere Web Client toimpose a policy for the virtual machines and VMkernel adapters for system traffic attached to the switch.
As part of adding a VMkernel port group or virtual machine port group to a standard switch, ESXiconfigures a security policy for the ports in the group. You can use this security policy to ensure that thehost prevents the guest operating systems of its virtual machines from impersonating other machines onthe network. This security feature is implemented so that the guest operating system responsible for theimpersonation does not detect that the impersonation was prevented.
The security policy determines how strongly you enforce protection against impersonation andinterception attacks on virtual machines. To correctly use the settings in the security profile, you mustunderstand how virtual machine network adapters control transmissions and how attacks are staged atthis level. See the Security Policy section in the vSphere Networking publication.
.
Securing Standard Switch MAC AddressesYou can secure standard switch traffic against Layer 2 attacks by restricting some of the MAC addressmodes.
Each virtual machine network adapter has an initial MAC address and an effective MAC address.
Initial MAC address The initial MAC address is assigned when the adapter is created. Althoughthe initial MAC address can be reconfigured from outside the guestoperating system, it cannot be changed by the guest operating system.
Effective MAC address Each adapter has an effective MAC address that filters out incomingnetwork traffic with a destination MAC address that is different from theeffective MAC address. The guest operating system is responsible forsetting the effective MAC address and typically matches the effective MACaddress to the initial MAC address.
Upon creating a virtual machine network adapter, the effective MAC address and initial MAC address arethe same. The guest operating system can alter the effective MAC address to another value at any time.If an operating system changes the effective MAC address, its network adapter receives network trafficthat is destined for the new MAC address.
vSphere Security
VMware, Inc. 153

When sending packets through a network adapter, the guest operating system typically places its ownadapter effective MAC address in the source MAC address field of the Ethernet frames. It places the MACaddress for the receiving network adapter in the destination MAC address field. The receiving adapteraccepts packets only if the destination MAC address in the packet matches its own effective MACaddress.
An operating system can send frames with an impersonated source MAC address. This means anoperating system can stage malicious attacks on the devices in a network by impersonating a networkadapter that the receiving network authorizes.
You can secure the traffic through the standard switches against this type of Layer 2 attacks by restrictingthe following modes:
n Promiscuous mode
n MAC address changes
n Forged transmission
To change any default settings for a port, you modify the security policy of the standard switch or of theport group from the vSphere Web Client.
MAC Address ChangesThe security policy of a virtual switch includes a MAC address changes option. This option affects trafficthat a virtual machine receives.
When the Mac address changes option is set to Accept, ESXi accepts requests to change the effectiveMAC address to a different address than the initial MAC address.
When the Mac address changes option is set to Reject, ESXi does not honor requests to change theeffective MAC address to a different address than the initial MAC address. This setting protects the hostagainst MAC impersonation. The port that the virtual machine adapter used to send the request isdisabled and the virtual machine adapter does not receive any more frames until the effective MACaddress matches the initial MAC address. The guest operating system does not detect that the MACaddress change request was not honored.
Note The iSCSI initiator relies on being able to get MAC address changes from certain types of storage.If you are using ESXi iSCSI with iSCSI storage, set the MAC address changes option to Accept.
In some situations, you might have a legitimate need for more than one adapter to have the same MACaddress on a network—for example, if you are using Microsoft Network Load Balancing in unicast mode.When Microsoft Network Load Balancing is used in the standard multicast mode, adapters do not shareMAC addresses.
Forged TransmissionsThe Forged transmits option affects traffic that is transmitted from a virtual machine.
When the Forged transmits option is set to Accept, ESXi does not compare source and effective MACaddresses.
vSphere Security
VMware, Inc. 154

To protect against MAC impersonation, you can set the Forged transmits option to Reject. If you do, thehost compares the source MAC address being transmitted by the guest operating system with theeffective MAC address for its virtual machine adapter to see if they match. If the addresses do not match,the ESXi host drops the packet.
The guest operating system does not detect that its virtual machine adapter cannot send packets byusing the impersonated MAC address. The ESXi host intercepts any packets with impersonatedaddresses before they are delivered, and the guest operating system might assume that the packets aredropped.
Promiscuous Mode OperationPromiscuous mode eliminates any reception filtering that the virtual machine adapter performs so that theguest operating system receives all traffic observed on the wire. By default, the virtual machine adaptercannot operate in promiscuous mode.
Although promiscuous mode can be useful for tracking network activity, it is an insecure mode ofoperation, because any adapter in promiscuous mode has access to the packets even if some of thepackets are received only by a particular network adapter. This means that an administrator or root userwithin a virtual machine can potentially view traffic destined for other guest or host operating systems.
Note In some situations, you might have a legitimate reason to configure a standard or a distributedvirtual switch to operate in promiscuous mode, for example, if you are running network intrusion detectionsoftware or a packet sniffer.
Standard Switch Protection and VLANsVMware standard switches provide safeguards against certain threats to VLAN security. Because of theway that standard switches are designed, they protect VLANs against a variety of attacks, many of whichinvolve VLAN hopping.
Having this protection does not guarantee that your virtual machine configuration is invulnerable to othertypes of attacks. For example, standard switches do not protect the physical network against theseattacks; they protect only the virtual network.
vSphere Security
VMware, Inc. 155

Standard switches and VLANs can protect against the following types of attacks.
MAC flooding Floods a switch with packets that contain MAC addresses tagged as havingcome from different sources. Many switches use a content-addressablememory table to learn and store the source address for each packet. Whenthe table is full, the switch can enter a fully open state in which everyincoming packet is broadcast on all ports, letting the attacker see all of theswitch’s traffic. This state might result in packet leakage across VLANs.
Although VMware standard switches store a MAC address table, they donot get the MAC addresses from observable traffic and are not vulnerableto this type of attack.
802.1q and ISL taggingattacks
Force a switch to redirect frames from one VLAN to another by tricking theswitch into acting as a trunk and broadcasting the traffic to other VLANs.
VMware standard switches do not perform the dynamic trunking requiredfor this type of attack and, therefore, are not vulnerable.
Double-encapsulationattacks
Occur when an attacker creates a double-encapsulated packet in which theVLAN identifier in the inner tag is different from the VLAN identifier in theouter tag. For backward compatibility, native VLANs strip the outer tag fromtransmitted packets unless configured to do otherwise. When a nativeVLAN switch strips the outer tag, only the inner tag is left, and that inner tagroutes the packet to a different VLAN than the one identified in the now-missing outer tag.
VMware standard switches drop any double-encapsulated frames that avirtual machine attempts to send on a port configured for a specific VLAN.Therefore, they are not vulnerable to this type of attack.
Multicast brute-forceattacks
Involve sending large numbers of multicast frames to a known VLANalmost simultaneously to overload the switch so that it mistakenly allowssome of the frames to broadcast to other VLANs.
VMware standard switches do not allow frames to leave their correctbroadcast domain (VLAN) and are not vulnerable to this type of attack.
vSphere Security
VMware, Inc. 156

Spanning-tree attacks Target Spanning-Tree Protocol (STP), which is used to control bridgingbetween parts of the LAN. The attacker sends Bridge Protocol Data Unit(BPDU) packets that attempt to change the network topology, establishingthemselves as the root bridge. As the root bridge, the attacker can sniff thecontents of transmitted frames.
VMware standard switches do not support STP and are not vulnerable tothis type of attack.
Random frame attacks Involve sending large numbers of packets in which the source anddestination addresses stay the same, but in which fields are randomlychanged in length, type, or content. The goal of this attack is to forcepackets to be mistakenly rerouted to a different VLAN.
VMware standard switches are not vulnerable to this type of attack.
Because new security threats develop over time, do not consider this an exhaustive list of attacks.Regularly check VMware security resources on the Web to learn about security, recent security alerts,and VMware security tactics.
Secure vSphere Distributed SwitchesAdministrators have several options for securing a vSphere Distributed Switches in their vSphereenvironment.
Procedure
1 Verify that the Auto Expand feature for the distributed port groups with static binding is disabled.
Auto Expand is enabled by default in vSphere 5.1 and later.
To disable Auto Expand, configure the autoExpand property under the distributed port group with thevSphere Web Services SDK or with a command-line interface . See the vSphere API/SDKDocumentation.
2 Ensure that all private VLAN IDs of any vSphere Distributed Switch are fully documented.
3 Ensure that no unused ports exist on a virtual port group associated with a vSphere DistributedSwitch.
4 Protect virtual traffic against impersonation and interception Layer 2 attacks by configuring a securitypolicy on port groups or ports.
The security policy on distributed port groups and ports includes the following options:
n Promiscuous mode (see Promiscuous Mode Operation)
n MAC address changes (seeMAC Address Changes)
vSphere Security
VMware, Inc. 157

n Forged transmits (see Forged Transmissions)
You can view and change the current settings by selecting Manage Distributed Port Groups fromthe right-button menu of the distributed switch and selecting Security in the wizard. See the vSphereNetworking documentation.
Securing Virtual Machines with VLANsThe network can be one of the most vulnerable parts of any system. Your virtual machine networkrequires as much protection as your physical network. Using VLANs can improve networking security inyour environment.
VLANs are an IEEE standard networking scheme with specific tagging methods that allow routing ofpackets to only those ports that are part of the VLAN. When properly configured, VLANs provide adependable means for you to protect a set of virtual machines from accidental or malicious intrusions.
VLANs let you segment a physical network so that two machines in the network are unable to transmitpackets back and forth unless they are part of the same VLAN. For example, accounting records andtransactions are among a company’s most sensitive internal information. In a company whose sales,shipping, and accounting employees all use virtual machines in the same physical network, you mightprotect the virtual machines for the accounting department by setting up VLANs.
Figure 9‑2. Sample VLAN Layout
VM3 VM4
Standard Switch
VM5
Standard Switch
VM6 VM7 VM8
Standard Switch
VM0 VM1 VM2
Standard Switch
VM9 VM10 VM11
VM12VLAN
B
VM13VLAN
A
VM14VLAN
B
Standard Switch
Router
Host 1
Host 3
Host 4
Host 2
Switch 1
Switch 2Multiple VLANson the samevirtual switch
BroadcastDomains A and B
VLAN A
BroadcastDomain A
VLAN B
BroadcastDomain B
In this configuration, all employees in the accounting department use virtual machines in VLAN A and theemployees in sales use virtual machines in VLAN B.
vSphere Security
VMware, Inc. 158

The router forwards packets containing accounting data to the switches. These packets are tagged fordistribution to VLAN A only. Therefore, the data is confined to Broadcast Domain A and cannot be routedto Broadcast Domain B unless the router is configured to do so.
This VLAN configuration prevents the sales force from intercepting packets destined for the accountingdepartment. It also prevents the accounting department from receiving packets intended for the salesgroup. The virtual machines serviced by a single virtual switch can be in different VLANs.
Security Considerations for VLANsThe way you set up VLANs to secure parts of a network depends on factors such as the guest operatingsystem and the way your network equipment is configured.
ESXi features a complete IEEE 802.1q-compliant VLAN implementation. VMware cannot make specificrecommendations on how to set up VLANs, but there are factors to consider when using a VLANdeployment as part of your security enforcement policy.
Secure VLANsAdministrators have several options for securing the VLANs in their vSphere environment.
Procedure
1 Ensure that port groups are not configured to VLAN values that are reserved by upstream physicalswitches
Do not set VLAN IDs to values reserved for the physical switch.
2 Ensure that port groups are not configured to VLAN 4095 unless you are using for Virtual GuestTagging (VGT).
Three types of VLAN tagging exist in vSphere:n External Switch Tagging (EST)
n Virtual Switch Tagging (VST) - The virtual switch tags with the configured VLAN ID the traffic thatis incoming to the attached virtual machines and removes the VLAN tag from the traffic that isleaving them. To set up VST mode, assign a VLAN ID between 1 and 4095.
n Virtual Guest Tagging (VGT) - Virtual machines handle VLAN traffic. To activate VGT mode, setthe VLAN ID to 4095. On a distributed switch, you can also allow virtual machine traffic based onits VLAN by using the VLAN Trunking option.
On a standard switch you can configure VLAN networking mode at switch or port group level, and ona distributed switch at distributed port group or port level.
3 Ensure that all VLANs on each virtual switch are fully documented and that each virtual switch has allrequired VLANs and only required VLANs.
Creating a Network DMZ on a Single ESXi HostOne example of how to use ESXi isolation and virtual networking features to configure a secureenvironment is the creation of a network demilitarized zone (DMZ) on a single host.
vSphere Security
VMware, Inc. 159

Figure 9‑3. DMZ Configured on a Single ESXi Host
hardware network adapter 1
External Network Internal Network
hardware network adapter 2
ESXi
Virtual Machine1
firewall server web server application server firewall server
StandardSwitch 1
StandardSwitch 2
StandardSwitch 3
Virtual Machine2
Virtual Machine3
Virtual Machine4
In this example, four virtual machines are configured to create a virtual DMZ on Standard Switch 2:
n Virtual Machine 1 and Virtual Machine 4 run firewalls and are connected to physical network adaptersthrough standard switches. Both of these virtual machines are using multiple switches.
n Virtual Machine 2 runs a Web server, and Virtual Machine 3 runs as an application server. Both ofthese virtual machines are connected to one virtual switch.
The Web server and application server occupy the DMZ between the two firewalls. The conduit betweenthese elements is Standard Switch 2, which connects the firewalls with the servers. This switch has nodirect connection with any elements outside the DMZ and is isolated from external traffic by the twofirewalls.
From an operational viewpoint, external traffic from the Internet enters Virtual Machine 1 throughHardware Network Adapter 1 (routed by Standard Switch 1) and is verified by the firewall installed on thismachine. If the firewall authorizes the traffic, it is routed to the standard switch in the DMZ, StandardSwitch 2. Because the Web server and application server are also connected to this switch, they canserve external requests.
Standard Switch 2 is also connected to Virtual Machine 4. This virtual machine provides a firewallbetween the DMZ and the internal corporate network. This firewall filters packets from the Web serverand application server. If a packet is verified, it is routed to Hardware Network Adapter 2 throughStandard Switch 3. Hardware Network Adapter 2 is connected to the internal corporate network.
When creating a DMZ on a single host, you can use fairly lightweight firewalls. Although a virtual machinein this configuration cannot exert direct control over another virtual machine or access its memory, all thevirtual machines are still connected through a virtual network. This network could be used for viruspropagation or targeted for other types of attacks. The security of the virtual machines in the DMZ isequivalent to separate physical machines connected to the same network.
vSphere Security
VMware, Inc. 160

Creating Multiple Networks Within a Single ESXi HostThe ESXi system is designed so that you can connect some groups of virtual machines to the internalnetwork, others to the external network, and still others to both—all on the same host. This capability isan outgrowth of basic virtual machine isolation coupled with a well-planned use of virtual networkingfeatures.
Figure 9‑4. External Networks, Internal Networks, and a DMZ Configured on a Single ESXiHost
physical network adapters
ExternalNetwork 1
InternalNetwork 2
ExternalNetwork 2
InternalNetwork 1
ESXi
VM 2
internaluser
VM 3
internaluser
VM 4
internaluser
VM 5
internaluser
VM 6
firewallserver
VM 7
Webserver
VM 8
firewallserver
VM 1
FTP server
Internal NetworkExternal Network DMZ
In the figure, the system administrator configured a host into three distinct virtual machine zones: FTPserver, internal virtual machines, and DMZ. Each zone serves a unique function.
FTP server Virtual Machine 1 is configured with FTP software and acts as a holdingarea for data sent to and from outside resources such as forms andcollateral localized by a vendor.
This virtual machine is associated with an external network only. It has itsown virtual switch and physical network adapter that connect it to ExternalNetwork 1. This network is dedicated to servers that the company uses toreceive data from outside sources. For example, the company usesExternal Network 1 to receive FTP traffic from vendors and allow vendorsaccess to data stored on externally available servers though FTP. Inaddition to servicing Virtual Machine 1, External Network 1 services FTPservers configured on different ESXi hosts throughout the site.
vSphere Security
VMware, Inc. 161

Because Virtual Machine 1 does not share a virtual switch or physicalnetwork adapter with any virtual machines in the host, the other residentvirtual machines cannot transmit packets to or receive packets from theVirtual Machine 1 network. This restriction prevents sniffing attacks, whichrequire sending network traffic to the victim. More importantly, an attackercannot use the natural vulnerability of FTP to access any of the host’s othervirtual machines.
Internal virtualmachines
Virtual Machines 2 through 5 are reserved for internal use. These virtualmachines process and store company-private data such as medicalrecords, legal settlements, and fraud investigations. As a result, the systemadministrators must ensure the highest level of protection for these virtualmachines.
These virtual machines connect to Internal Network 2 through their ownvirtual switch and network adapter. Internal Network 2 is reserved forinternal use by personnel such as claims processors, in-house lawyers, oradjustors.
Virtual Machines 2 through 5 can communicate with one another throughthe virtual switch and with internal virtual machines elsewhere on InternalNetwork 2 through the physical network adapter. They cannot communicatewith externally facing machines. As with the FTP server, these virtualmachines cannot send packets to or receive packets from the other virtualmachines’ networks. Similarly, the host’s other virtual machines cannotsend packets to or receive packets from Virtual Machines 2 through 5.
DMZ Virtual Machines 6 through 8 are configured as a DMZ that the marketinggroup uses to publish the company’s external Web site.
This group of virtual machines is associated with External Network 2 andInternal Network 1. The company uses External Network 2 to support theWeb servers that use the marketing and financial department to host thecorporate Web site and other Web facilities that it hosts to outside users.Internal Network 1 is the conduit that the marketing department uses topublish content to the corporate Web site, post downloads, and maintainservices like user forums.
Because these networks are separate from External Network 1 and InternalNetwork 2, and the virtual machines have no shared points of contact(switches or adapters), there is no risk of attack to or from the FTP serveror the internal virtual machine group.
By capitalizing on virtual machine isolation, correctly configuring virtual switches, and maintaining networkseparation, the system administrator can house all three virtual machine zones in the same ESXi hostand be confident that there will be no data or resource breaches.
vSphere Security
VMware, Inc. 162

The company enforces isolation among the virtual machine groups by using multiple internal and externalnetworks and making sure that the virtual switches and physical network adapters for each group arecompletely separate from those of other groups.
Because none of the virtual switches straddle virtual machine zones, the system administrator succeedsin eliminating the risk of packet leakage from one zone to another. A virtual switch, by design, cannot leakpackets directly to another virtual switch. The only way for packets to travel from one virtual switch toanother is under the following circumstances:
n The virtual switches are connected to the same physical LAN.
n The virtual switches connect to a common virtual machine, which could be used to transmit packets.
Neither of these conditions occur in the sample configuration. If system administrators want to verify thatno common virtual switch paths exist, they can check for possible shared points of contact by reviewingthe network switch layout in the vSphere Web Client.
To safeguard the virtual machines’ resources, the system administrator lowers the risk of DoS and DDoSattacks by configuring a resource reservation and a limit for each virtual machine. The systemadministrator further protects the ESXi host and virtual machines by installing software firewalls at thefront and back ends of the DMZ, ensuring that the host is behind a physical firewall, and configuring thenetworked storage resources so that each has its own virtual switch.
Internet Protocol SecurityInternet Protocol Security (IPsec) secures IP communications coming from and arriving at a host. ESXihosts support IPsec using IPv6.
When you set up IPsec on a host, you enable authentication and encryption of incoming and outgoingpackets. When and how IP traffic is encrypted depends on how you set up the system's securityassociations and security policies.
A security association determines how the system encrypts traffic. When you create a securityassociation, you specify the source and destination, encryption parameters, and a name for the securityassociation.
A security policy determines when the system should encrypt traffic. The security policy includes sourceand destination information, the protocol and direction of traffic to be encrypted, the mode (transport ortunnel) and the security association to use.
List Available Security AssociationsESXi can provide a list of all security associations available for use by security policies. The list includesboth user created security associations and any security associations the VMkernel installed usingInternet Key Exchange.
You can get a list of available security associations using the esxcli vSphere CLI command.
Procedure
u At the command prompt, enter the command esxcli network ip ipsec sa list.
vSphere Security
VMware, Inc. 163

ESXi displays a list of all available security associations.
Add a Security AssociationAdd a security association to specify encryption parameters for associated IP traffic.
You can add a security association using the esxcli vSphere CLI command.
Procedure
u At the command prompt, enter the command esxcli network ip ipsec sa add with one or moreof the following options.
Option Description
--sa-source= source address Required. Specify the source address.
--sa-destination= destinationaddress
Required. Specify the destination address.
--sa-mode= mode Required. Specify the mode, either transport or tunnel.
--sa-spi= security parameter index Required. Specify the security parameter index. The security parameter indexidentifies the security association to the host. It must be a hexadecimal with a 0xprefix. Each security association you create must have a unique combination ofprotocol and security parameter index.
--encryption-algorithm= encryptionalgorithm
Required. Specify the encryption algorithm using one of the following parameters.n 3des-cbc
n aes128-cbc
n null
null provides no encryption.
--encryption-key= encryption key Required when you specify an encryption algorithm. Specify the encryption key.You can enter keys as ASCII text or as a hexadecimal with a 0x prefix.
--integrity-algorithm=authentication algorithm
Required. Specify the authentication algorithm, either hmac-sha1 or hmac-sha2-256.
--integrity-key= authentication key Required. Specify the authentication key. You can enter keys as ASCII text or asa hexadecimal with a 0x prefix.
--sa-name=name Required. Provide a name for the security association.
Example: New Security Association CommandThe following example contains extra line breaks for readability.
esxcli network ip ipsec sa add
--sa-source 3ffe:501:ffff:0::a
--sa-destination 3ffe:501:ffff:0001:0000:0000:0000:0001
--sa-mode transport
--sa-spi 0x1000
--encryption-algorithm 3des-cbc
vSphere Security
VMware, Inc. 164

--encryption-key 0x6970763672656164796c6f676f336465736362636f757432
--integrity-algorithm hmac-sha1
--integrity-key 0x6970763672656164796c6f67736861316f757432
--sa-name sa1
Remove a Security AssociationYou can remove a security association from the host.
You can remove a security association using the esxcli vSphere CLI command.
Prerequisites
Be sure that the security association you want to use is not currently in use. If you try to remove a securityassociation that is in use, the removal operation fails.
Procedure
u At the command prompt, enter the commandesxcli network ip ipsec sa remove --sa-namesecurity_association_name.
List Available Security PoliciesESXi can provide a list of all security policies on the host.
You can get a list of available security policies using the esxcli vSphere CLI command.
Procedure
u At the command prompt, enter the command esxcli network ip ipsec sp list.
The host displays a list of all available security policies.
Create a Security PolicyCreate a security policy to determine when to use the authentication and encryption parameters set in asecurity association.
You can add a security policy using the esxcli vSphere CLI command.
Prerequisites
Before creating a security policy, add a security association with the appropriate authentication andencryption parameters as described in Add a Security Association.
vSphere Security
VMware, Inc. 165

Procedure
u At the command prompt, enter the command esxcli network ip ipsec sp add with one or moreof the following options.
Option Description
--sp-source= source address Required. Specify the source IP address and prefix length.
--sp-destination= destinationaddress
Required. Specify the destination address and prefix length.
--source-port= port Required. Specify the source port. The source port must be a number between 0and 65535.
--destination-port= port Required. Specify the destination port. The source port must be a numberbetween 0 and 65535.
--upper-layer-protocol= protocol Specify the upper layer protocol using one of the following parameters.n tcp
n udp
n icmp6
n any
--flow-direction= direction Specify the direction in which you want to monitor traffic using either in or out.
--action= action Specify the action to take when traffic with the specified parameters isencountered using one of the following parameters.n none: Take no actionn discard: Do not allow data in or out.n ipsec: Use the authentication and encryption information supplied in the
security association to determine whether the data comes from a trustedsource.
--sp-mode= mode Specify the mode, either tunnel or transport.
--sa-name=security association name Required. Provide the name of the security association for the security policy touse.
--sp-name=name Required. Provide a name for the security policy.
Example: New Security Policy CommandThe following example includes extra line breaks for readability.
esxcli network ip ipsec add
--sp-source=2001:db8:1::/64
--sp-destination=2002:db8:1::/64
--source-port=23
--destination-port=25
--upper-layer-protocol=tcp
--flow-direction=out
--action=ipsec
--sp-mode=transport
--sa-name=sa1
--sp-name=sp1
vSphere Security
VMware, Inc. 166
Remove a Security PolicyYou can remove a security policy from the ESXi host.
You can remove a security policy using the esxcli vSphere CLI command.
Prerequisites
Be sure that the security policy you want to use is not currently in use. If you try to remove a securitypolicy that is in use, the removal operation fails.
Procedure
u At the command prompt, enter the commandesxcli network ip ipsec sp remove --sa-name security policy name.
To remove all security policies, enter the commandesxcli network ip ipsec sp remove --remove-all.
Ensure Proper SNMP ConfigurationIf SNMP is not properly configured, monitoring information can be sent to a malicious host. The malicioushost can then use this information to plan an attack.
Procedure
1 Run esxcli system snmp get to determine whether SNMP is currently used.
2 If your system does require SNMP, make sure that it is not running by running the esxcli systemsnmp set --enable true command.
3 If your system uses SNMP, see the Monitoring and Performance publication for setup information forSNMP 3.
SNMP must be configured on each ESXi host. You can use vCLI, PowerCLI, or the vSphere WebServices SDK for configuration.
Use Virtual Switches on the vSphere Network ApplianceOnly If RequiredIf you are not using products that make use of the vSphere Network Appliance API (DvFilter), do notconfigure your host to send network information to a virtual machine. If the vSphere Network ApplianceAPI is enabled, an attacker might attempt to connect a virtual machine to the filter. This connection mightprovide access to the network of other virtual machines on the host.
If you are using a product that makes use of this API, verify that the host is configured correctly. See thesections on DvFilter in Developing and Deploying vSphere Solutions, vServices, and ESX Agents. If yourhost is set up to use the API, make sure that the value of the Net.DVFilterBindIpAddress parametermatches the product that uses the API.
vSphere Security
VMware, Inc. 167

Procedure
1 To ensure that the Net.DVFilterBindIpAddress kernel parameter has the correct value, locate theparameter by using the vSphere Web Client.
a Select the host and click the Manage tab.
b Under System, select Advanced System Settings.
c Scroll down to Net.DVFilterBindIpAddress and verify that the parameter has an empty value.
The order of parameters is not strictly alphabetical. Scroll until you find the parameter.
2 If you are not using DvFilter settings, make sure that the value is blank.
3 If you are using DvFilter settings, make sure the value of the parameter matches the value that theproduct that uses the DvFilter is using.
vSphere Security
VMware, Inc. 168

Best Practices for VirtualMachine and Host Security 10Consider basic security recommendations when creating and configuring hosts and virtual machines.
This chapter includes the following topics:
n Synchronizing Clocks on the vSphere Network
n Securing iSCSI Storage
n Masking and Zoning SAN Resources
n Control CIM-Based Hardware Monitoring Tool Access
n Verify That Sending Host Performance Data to Guests is Disabled
Synchronizing Clocks on the vSphere NetworkBefore you install vCenter Single Sign-On, install the vSphere Web Client, or deploy the vCenter ServerAppliance, make sure that all machines on the vSphere network have their clocks synchronized.
If the clocks on vCenter Server network machines are not synchronized, SSL certificates, which are time-sensitive, might not be recognized as valid in communications between network machines.Unsynchronized clocks can result in authentication problems, which can cause the vSphere Web Clientinstallation to fail or prevent the vCenter Server Appliance vpxd service from starting.
Make sure that any Windows host on which a vCenter component runs is synchronized with the NTPserver. See the Knowledge Base article Timekeeping best practices for Windows, including NTP.
n Synchronize ESX and ESXi Clocks with a Network Time Server
Before you install vCenter Single Sign-On, the vSphere Web Client, or the vCenter Serverappliance, make sure all machines on the vSphere network have their clocks synchronized.
n Synchronize thevCenter Server Appliance Clock with an NTP Server
Before you deploy the vCenter Server Appliance, make sure all machines on the network have theirclocks synchronized. Unsynchronized clocks can cause installation and authentication errors.
Synchronize ESX and ESXi Clocks with a Network Time ServerBefore you install vCenter Single Sign-On, the vSphere Web Client, or the vCenter Server appliance,make sure all machines on the vSphere network have their clocks synchronized.
VMware, Inc. 169

Procedure
1 From the vSphere Web Client, connect to the vCenter Server.
2 Select the host in the inventory.
3 Select the Manage tab.
4 Select Settings.
5 In the System section, select Time Configuration.
6 Click Edit and set up the NTP server.
a Select Use Network Time Protocol (Enable NTP client).
b Set the NTP Service Startup Policy.
c Enter the IP addresses of the NTP servers to synchronize with.
d Click Start or Restart in the NTP Service Status section.
7 Click OK.
The host synchronizes with the NTP server.
Synchronize the vCenter Server Appliance Clock with an NTPServerBefore you deploy the vCenter Server Appliance, make sure all machines on the network have theirclocks synchronized. Unsynchronized clocks can cause installation and authentication errors.
On systems that are joined to a Windows domain, the vCenter Server Appliance clock is synchronizedautomatically with the domain controller. On other systems, you can enable synchronizing the clockthrough VMware Tools. As an alternative, you can use this procedure.
Procedure
1 Open a Web browser and navigate to the vCenter Server Appliance Management Interface(https://vCenter-Appliance-IP-Address:5480/).
2 Log in as root.
3 From the vCenter Server tab, select the Time subtab.
4 Select one or more of the available options.
Option Description
No synchronization Does not perform synchronization.
NTP synchronization Select this option and specify one or more NTP servers to configure the applianceto synchronize with an NTP server directly.
VMware Tools synchronization Select this option to synchronize all virtual machines.
Active Directory synchronization This option becomes available only if you add the appliance to an Active Directorydomain. If you select this option, none of the other options is available.
vSphere Security
VMware, Inc. 170

5 Click Save Settings.
The vCenter Server Appliance clock is synchronized with the NTP server.
Securing iSCSI StorageThe storage you configure for a host might include one or more storage area networks (SANs) that useiSCSI. When you configure iSCSI on a host, you can take several measures to minimize security risks.
iSCSI is a means of accessing SCSI devices and exchanging data records by using TCP/IP over anetwork port rather than through a direct connection to a SCSI device. In iSCSI transactions, blocks ofraw SCSI data are encapsulated in iSCSI records and transmitted to the requesting device or user.
iSCSI SANs let you make efficient use of existing Ethernet infrastructures to provide hosts access tostorage resources that they can dynamically share. iSCSI SANs provide an economical storage solutionfor environments that rely on a common storage pool to serve numerous users. As with any networkedsystem, your iSCSI SANs can be subject to security breaches.
Note The requirements and procedures for securing an iSCSI SAN are similar for the hardware iSCSIadapters you can use with hosts and for iSCSI configured directly through the host.
Securing iSCSI Devices Through AuthenticationOne means of securing iSCSI devices from unwanted intrusion is to require that the host, or initiator, beauthenticated by the iSCSI device, or target, whenever the host attempts to access data on the targetLUN.
The goal of authentication is to prove that the initiator has the right to access a target, a right grantedwhen you configure authentication.
ESXi does not support Kerberos, Secure Remote Protocol (SRP), or public-key authentication methodsfor iSCSI. Additionally, it does not support IPsec authentication and encryption.
Use the vSphere Web Client to determine whether authentication is being performed and to configure theauthentication method.
Protecting an iSCSI SANWhen you plan your iSCSI configuration, take measures to improve the overall security of the iSCSI SAN.Your iSCSI configuration is only as secure as your IP network, so by enforcing good security standardswhen you set up your network, you help safeguard your iSCSI storage.
The following are some specific suggestions for enforcing good security standards.
Protect Transmitted DataA primary security risk in iSCSI SANs is that an attacker might sniff transmitted storage data.
Take additional measures to prevent attackers from easily seeing iSCSI data. Neither the hardware iSCSIadapter nor ESXi iSCSI initiator encrypts the data that they transmit to and from the targets, making thedata more vulnerable to sniffing attacks.
vSphere Security
VMware, Inc. 171

Allowing your virtual machines to share standard switches and VLANs with your iSCSI configurationpotentially exposes iSCSI traffic to misuse by a virtual machine attacker. To help ensure that intruderscannot listen to iSCSI transmissions, make sure that none of your virtual machines can see the iSCSIstorage network.
If you use a hardware iSCSI adapter, you can accomplish this by making sure that the iSCSI adapter andESXi physical network adapter are not inadvertently connected outside the host by virtue of sharing aswitch or some other means. If you configure iSCSI directly through the ESXi host, you can accomplishthis by configuring iSCSI storage through a different standard switch than the one used by your virtualmachines.
In addition to protecting the iSCSI SAN by giving it a dedicated standard switch, you can configure youriSCSI SAN on its own VLAN to improve performance and security. Placing your iSCSI configuration on aseparate VLAN ensures that no devices other than the iSCSI adapter have visibility into transmissionswithin the iSCSI SAN. Also, network congestion from other sources cannot interfere with iSCSI traffic.
Secure iSCSI PortsWhen you run iSCSI devices, ESXi does not open any ports that listen for network connections. Thismeasure reduces the chances that an intruder can break into ESXi through spare ports and gain controlover the host. Therefore, running iSCSI does not present any additional security risks at the ESXi end ofthe connection.
Any iSCSI target device that you run must have one or more open TCP ports to listen for iSCSIconnections. If any security vulnerabilities exist in the iSCSI device software, your data can be at riskthrough no fault of ESXi. To lower this risk, install all security patches that your storage equipmentmanufacturer provides and limit the devices connected to the iSCSI network.
Masking and Zoning SAN ResourcesYou can use zoning and LUN masking to segregate SAN activity and restrict access to storage devices.
You can protect access to storage in your vSphere environment by using zoning and LUN masking withyour SAN resources. For example, you might manage zones defined for testing independently within theSAN so they do not interfere with activity in the production zones. Similarly, you might set up differentzones for different departments.
When you set up zones, take into account any host groups that are set up on the SAN device.
Zoning and masking capabilities for each SAN switch and disk array and the tools for managing LUNmasking are vendor specific.
See your SAN vendor's documentation and the vSphere Storage documentation.
vSphere Security
VMware, Inc. 172

Control CIM-Based Hardware Monitoring Tool AccessThe Common Information Model (CIM) system provides an interface that enables hardware-levelmanagement from remote applications using a set of standard APIs. To ensure that the CIM interface issecure, provide only the minimum access necessary to these applications. If an application has beenprovisioned with a root or full administrator account and the application is compromised, the full virtualenvironment might be compromised.
CIM is an open standard that defines a framework for agent-less, standards-based monitoring ofhardware resources for ESXi. This framework consists of a CIM object manager, often called a CIMbroker, and a set of CIM providers.
CIM providers are used as the mechanism to provide management access to device drivers andunderlying hardware. Hardware vendors, including server manufacturers and specific hardware devicevendors, can write providers to provide monitoring and management of their particular devices. VMwarealso writes providers that implement monitoring of server hardware, ESXi storage infrastructure, andvirtualization-specific resources. These providers run inside the ESXi system and therefore are designedto be extremely lightweight and focused on specific management tasks. The CIM broker takes informationfrom all CIM providers, and presents it to the outside world via standard APIs, the most common onebeing WS-MAN.
Do not provide root credentials to remote applications to access the CIM interface. Instead, create aservice account specific to these applications and grant read-only access to CIM information to any localaccount defined on the ESXi system, as well as any role defined in vCenter Server.
Procedure
1 Create a service account specific to CIM applications.
2 Grant read-only access to CIM information to any local account defined on the ESXi system, as wellas any role defined in vCenter Server.
3 (Optional) If the application requires write access to the CIM interface, create a role to apply to theservice account with only two privileges:
n Host.Config.SystemManagement
n Host.CIM.CIMInteraction
This role can be local to the host or centrally defined on vCenter Server, depending on how themonitoring application works.
When a user logs into the host with the service account you created for CIM applications, the user hasonly the privileges SystemManagement and CIMInteraction, or read-only access.
vSphere Security
VMware, Inc. 173

Verify That Sending Host Performance Data to Guests isDisabledvSphere includes virtual machine performance counters on Windows operating systems where VMwareTools is installed. Performance counters allow virtual machine owners to do accurate performanceanalysis within the guest operating system. By default, vSphere does not expose host information to theguest virtual machine.
The ability to send host performance data to a guest virtual machine is disabled by default. This defaultsetting prevents a virtual machine from obtaining detailed information about the physical host, and doesnot make host data available if a breach of security of the virtual machine occurs.
Note The procedure below illustrates the basic process. Use the vSphere or one of the vSpherecommand-line interfaces (vCLI, PowerCLI, and so on) for performing this task on all hosts simultaneouslyinstead.
Procedure
1 On the ESXi system that hosts the virtual machine, browse to the VMX file.
Virtual machine configuration files are located in the /vmfs/volumes/datastore directory, wheredatastore is the name of the storage device where the virtual machine files are stored.
2 In the VMX file, verify that the following parameter is set.
tools.guestlib.enableHostInfo=FALSE
3 Save and close the file.
You cannot retrieve performance information about the host from inside the guest virtual machine.
vSphere Security
VMware, Inc. 174

Defined Privileges 11The following tables list the default privileges that, when selected for a role, can be paired with a user andassigned to an object. The tables in this appendix use VC to indicate vCenter Server and HC to indicatehost client, a standalone ESXi or Workstation host.
When setting permissions, verify all the object types are set with appropriate privileges for each particularaction. Some operations require access permission at the root folder or parent folder in addition to accessto the object being manipulated. Some operations require access or performance permission at a parentfolder and a related object.
vCenter Server extensions might define additional privileges not listed here. Refer to the documentationfor the extension for more information on those privileges.
This chapter includes the following topics:
n Alarms
n Datacenter
n Datastore
n Datastore Cluster
n vSphere Distributed Switch
n ESX Agent Manager
n Extension
n Folder
n Global
n Host CIM
n Host Configuration
n Host Inventory
n Host Local Operations
n Host vSphere Replication
n Host Profile
n Network
VMware, Inc. 175

n Performance
n Permissions
n Profile-driven Storage
n Resource
n Scheduled Task
n Sessions
n Storage Views
n Tasks
n vApp
n vCenter Inventory Service Tagging
n Virtual Machine Configuration
n Virtual Machine Guest Operations
n Virtual Machine Interaction
n Virtual Machine Inventory
n Virtual Machine Provisioning
n Virtual Machine Snapshot Management Privileges
n Virtual Machine vSphere Replication
n dvPort Group
n vServices
n VRM Policy
AlarmsAlarms privileges control the ability to set and respond to alarms on inventory objects.
The table describes privileges needed to create, modify, and respond to alarms.
You can set this privilege at different levels in the hierarchy. For example, if you set a privilege at thefolder level, you can propagate the privilege to one or more objects within the folder. The object listed inthe Required On column must have the privilege set, either directly or inherited.
vSphere Security
VMware, Inc. 176

Table 11‑1. Alarms Privileges
Privilege Name Description Required On
Alarms.Acknowledge alarm Allows suppression of all alarm actions onall triggered alarms.
Object on which an alarm is defined
Alarms.Create alarm Allows creation of a new alarm.
When creating alarms with a custom action,privilege to perform the action is verifiedwhen the user creates the alarm.
Object on which an alarm is defined
Alarms.Disable alarm action Allows stopping an alarm action fromoccurring after an alarm has been triggered.This does not disable the alarm.
Object on which an alarm is defined
Alarms.Modify alarm Allows changing the properties of an alarm. Object on which an alarm is defined
Alarms.Remove alarm Allows deletion of an alarm. Object on which an alarm is defined
Alarms.Set alarm status Allows changing the status of the configuredevent alarm. The status can change toNormal, Warning, or Alert.
Object on which an alarm is defined
DatacenterDatacenter privileges control the ability to create and edit datacenters in the vSphere Web Clientinventory.
The table describes the privileges required to create and edit datacenters. All datacenter privileges areused in vCenter Server only. The Create datacenter privilege is defined on datacenter folders or the rootobject. All other datacenter privileges are pair with datacenters, datacenter folders, or the root object.
You can set this privilege at different levels in the hierarchy. For example, if you set a privilege at thefolder level, you can propagate the privilege to one or more objects within the folder. The object listed inthe Required On column must have the privilege set, either directly or inherited.
Table 11‑2. Datacenter Privileges
Privilege Name Description Required On
Datacenter.Createdatacenter
Allows creation of new datacenter. Datacenter folder or root object
Datacenter.Movedatacenter
Allows moving a datacenter.
Privilege must be present at both the sourceand destination.
Datacenter, source and destination
Datacenter.Networkprofile configuration
Allows configuration of the network profile fora datacenter.
Datacenter
Datacenter.Query IPpool allocation
Allows configuration of a pool of IPaddresses.
Datacenter
Datacenter.Reconfiguredatacenter
Allows reconfiguration of a datacenter. Datacenter
Datacenter.Release IPallocation
Allows releasing the assigned IP allocationfor a datacenter.
Datacenter
vSphere Security
VMware, Inc. 177

Table 11‑2. Datacenter Privileges (Continued)
Privilege Name Description Required On
Datacenter.Removedatacenter
Allows removal of a datacenter.
In order to have permission to perform thisoperation, you must have this privilegeassigned to both the object and its parentobject.
Datacenter plus parent object
Datacenter.Renamedatacenter
Allows changing the name of a datacenter. Datacenter
DatastoreDatastore privileges control the ability to browse, manage, and allocate space on datastores.
The table describes the privileges required to work with datastores.
You can set this privilege at different levels in the hierarchy. For example, if you set a privilege at thefolder level, you can propagate the privilege to one or more objects within the folder. The object listed inthe Required On column must have the privilege set, either directly or inherited.
Table 11‑3. Datastore Privileges
Privilege Name Description Required On
Datastore.Allocate space Allows allocating space on a datastore for a virtual machine,snapshot, clone, or virtual disk.
Datastores
Datastore.Browse datastore Allows browsing files on a datastore. Datastores
Datastore.Configuredatastore
Allows configuration of a datastore. Datastores
Datastore.Low level fileoperations
Allows performing read, write, delete, and rename operations inthe datastore browser.
Datastores
Datastore.Move datastore Allows moving a datastore between folders.
Privileges must be present at both the source and destination.
Datastore, source anddestination
Datastore.Remove datastore Allows removal of a datastore.
This privilege is deprecated.
To have permission to perform this operation, you must have thisprivilege assigned to both the object and its parent object.
Datastores
Datastore.Remove file Allows deletion of files in the datastore.
This privilege is deprecated. Assign the Low level file operationsprivilege.
Datastores
Datastore.Rename datastore Allows renaming a datastore. Datastores
Datastore.Update virtualmachine files
Allows updating file paths to virtual machine files on a datastoreafter the datastore has been resignatured.
Datastores
Datastore ClusterDatastore cluster privileges control the configuration of datastore clusters for Storage DRS.
vSphere Security
VMware, Inc. 178

The table describes privileges used for configuring datastore clusters.
You can set this privilege at different levels in the hierarchy. For example, if you set a privilege at thefolder level, you can propagate the privilege to one or more objects within the folder. The object listed inthe Required On column must have the privilege set, either directly or inherited.
Table 11‑4. Datastore Cluster Privileges
Privilege Name Description Required On
Datastorecluster.Configure adatatstore cluster
Allows creation of and configuration of settings for datastore clustersfor Storage DRS.
Datastore Clusters
vSphere Distributed SwitchvSphere Distributed Switch privileges control the ability to perform tasks related to the management ofvSphere Distributed Switches.
The table describes the privileges required to create and configure vSphere Distributed Switches.
You can set this privilege at different levels in the hierarchy. For example, if you set a privilege at thefolder level, you can propagate the privilege to one or more objects within the folder. The object listed inthe Required On column must have the privilege set, either directly or inherited.
Table 11‑5. vSphere Distributed Switch Privileges
Privilege Name Description Required On
vSphere DistributedSwitch.Create
Allows creation of a vSphere Distributed Switch. Datacenters, Networkfolders
vSphere DistributedSwitch.Delete
Allows removal of a vSphere Distributed Switch.
To have permission to perform this operation, you must have thisprivilege assigned to both the object and its parent object.
vSphere DistributedSwitches
vSphere DistributedSwitch.Host operation
Allows changing the host members of a vSphere Distributed Switch. vSphere DistributedSwitches
vSphere DistributedSwitch.Modify
Allows changing the configuration of a vSphere Distributed Switch. vSphere DistributedSwitches
vSphere DistributedSwitch.Move
Allows moving a vSphere Distributed Switch to another folder. vSphere DistributedSwitches
vSphere DistributedSwitch.Network I/O controloperation
Allow changing the resource settings for a vSphere Distributed Switch. vSphere DistributedSwitches
vSphere DistributedSwitch.Policy operation
Allows changing the policy of a vSphere Distributed Switch. vSphere DistributedSwitches
vSphere DistributedSwitch .Port configurationoperation
Allow changing the configuration of a port in a vSphere DistributedSwitch.
vSphere DistributedSwitches
vSphere Security
VMware, Inc. 179

Table 11‑5. vSphere Distributed Switch Privileges (Continued)
Privilege Name Description Required On
vSphere DistributedSwitch.Port settingoperation
Allows changing the setting of a port in a vSphere Distributed Switch. vSphere DistributedSwitches
vSphere DistributedSwitch.VSPAN operation
Allows changing the VSPAN configuration of a vSphere DistributedSwitch.
vSphere DistributedSwitches
ESX Agent ManagerESX Agent Manager privileges control operations related to ESX Agent Manager and agent virtualmachines.
The table describes privileges related to ESX Agent Manager and agent virtual machines
You can set this privilege at different levels in the hierarchy. For example, if you set a privilege at thefolder level, you can propagate the privilege to one or more objects within the folder. The object listed inthe Required On column must have the privilege set, either directly or inherited.
Table 11‑6. ESX Agent Manager
Privilege Name Description Required On
ESX AgentManager.Config
Allows deployment of an agent virtual machine on a host or cluster. Virtual machines
ESX AgentManager.Modify
Allows modifications to an agent virtual machine such as powering off ordeleting the virtual machine.
Virtual machines
ESX Agent View.View Allows viewing of an agent virtual machine. Virtual machines
ExtensionExtension privileges control the ability to install and manage extensions.
The table describes privileges required to install and manage plug-ins.
You can set this privilege at different levels in the hierarchy. For example, if you set a privilege at thefolder level, you can propagate the privilege to one or more objects within the folder. The object listed inthe Required On column must have the privilege set, either directly or inherited.
Table 11‑7. Extension Privileges
Privilege Name Description Required On
Extension.Registerextension
Allows registration of an extension (plug-in). Root vCenter Server
Extension.Unregisterextension
Allows unregistering an extension (plug-in). Root vCenter Server
Extension.Updateextension
Allows updates to an extension (plug-in). Root vCenter Server
vSphere Security
VMware, Inc. 180

FolderFolder privileges control the ability to create and manage folders.
The table describes privileges required to create and manage folders.
You can set this privilege at different levels in the hierarchy. For example, if you set a privilege at thefolder level, you can propagate the privilege to one or more objects within the folder. The object listed inthe Required On column must have the privilege set, either directly or inherited.
Table 11‑8. Folder Privileges
Privilege Name Description Required On
Folder.Create folder Allows creation of a new folder. Folders
Folder.Delete folder Allows deletion of a folder.
To have permission to perform this operation, you must have thisprivilege assigned to both the object and its parent object.
Folders
Folder.Move folder Allows moving a folder.
Privilege must be present at both the source and destination.
Folders
Folder.Rename folder Allows changing the name of a folder. Folders
GlobalGlobal privileges control global tasks related to tasks, scripts, and extensions.
The table describes privileges required for global tasks in the vSphere Web Client.
You can set this privilege at different levels in the hierarchy. For example, if you set a privilege at thefolder level, you can propagate the privilege to one or more objects within the folder. The object listed inthe Required On column must have the privilege set, either directly or inherited.
Table 11‑9. Global Privileges
Privilege Name Description Required On
Global.Act as vCenterServer
Allows preparation or initiation of a vMotion send operation or avMotion receive operation.
Root vCenter Server
Global.Cancel task Allows cancellation of a running or queued task. Inventory object relatedto the task
Global.Capacity planning Allows enabling the use of capacity planning for planning consolidationof physical machines to virtual machines.
Root vCenter Server
Global.Diagnostics Allows retrieval of a list of diagnostic files, log header, binary files, ordiagnostic bundle.
To avoid potential security breaches, limit this privilege to the vCenterServer Administrator role.
Root vCenter Server
Global.Disable methods Allows servers forvCenter Server extensions to disable certainoperations on objects managed by vCenter Server.
Root vCenter Server
Global.Enable methods Allows servers for vCenter Server extensions to enable certainoperations on objects managed byvCenter Serverr.
Root vCenter Server
vSphere Security
VMware, Inc. 181

Table 11‑9. Global Privileges (Continued)
Privilege Name Description Required On
Global.Global tag Allows adding or removing global tags. Root host or vCenterServer
Global.Health Allows viewing the health ofvCenter Server components. Root vCenter Server
Global.Licenses Allows viewing installed licenses and adding or removing licenses. Root host or vCenterServer
Global.Log event Allows logging a user-defined event against a particular managedentity.
Any object
Global.Manage customattributes
Allows adding, removing, or renaming custom field definitions. Root vCenter Server
Global.Proxy Allows access to an internal interface for adding or removing endpointsto or from the proxy.
Root vCenter Server
Global.Script action Allows scheduling a scripted action in conjunction with an alarm. Any object
Global.Service managers Allows use of the resxtop command in the vSphere CLI. Root host or vCenterServer
Global.Set customattribute
Allows viewing, creating, or removing custom attributes for a managedobject.
Any object
Global.Settings Allows reading and modifying runtime vCenter Server configurationsettings.
Root vCenter Server
Global.System tag Allows adding or removing system tags. Root vCenter Server
Host CIMHost CIM privileges control the use of CIM for host health monitoring.
The table describes privileges used for CIM host health monitoring.
You can set this privilege at different levels in the hierarchy. For example, if you set a privilege at thefolder level, you can propagate the privilege to one or more objects within the folder. The object listed inthe Required On column must have the privilege set, either directly or inherited.
Table 11‑10. Host CIM Privileges
Privilege Name Description Required On
Host.CIM.CIM Interaction Allow a client to obtain a ticket to use for CIM services. Hosts
Host ConfigurationHost configuration privileges control the ability to configure hosts.
The table describes the privileges required to configure host settings.
You can set this privilege at different levels in the hierarchy. For example, if you set a privilege at thefolder level, you can propagate the privilege to one or more objects within the folder. The object listed inthe Required On column must have the privilege set, either directly or inherited.
vSphere Security
VMware, Inc. 182

Table 11‑11. Host Configuration Privileges
Privilege Name Description Required On
Host.Configuration.AdvancedSettings
Allows setting advanced options in host configuration. Hosts
Host.Configuration.Authentication Store
Allows configuring Active Directory authentication stores. Hosts
Host.Configuration.Change dateand time settings
Allows changes to date and time settings on the host. Hosts
Host.Configuration.ChangePciPassthru settings
Allows changes to PciPassthru settings for a host. Hosts
Host.Configuration.Changesettings
Allows setting of lockdown mode on ESXi hosts. Lockdownmode is not supported on ESX hosts.
Hosts
Host.Configuration.ChangeSNMP settings
Allows configuring, restarting, and stopping the SNMP agent. Hosts
Host.Configuration.Connection Allows changes to the connection status of a host(connected or disconnected).
Hosts
Host.Configuration.Firmware Allows updates to the ESXi host's firmware. Hosts
Host.Configuration.Hyperthreading
Allows enabling and disabling hyperthreading in a host CPUscheduler.
Hosts
Host.Configuration.Imageconfiguration
Allows changes to the image associated with a host.
Host.Configuration.Maintenance Allows putting the host in and out of maintenance mode andshutting down and restarting the host.
Hosts
Host.Configuration.Memoryconfiguration
Allows modifications to the host configuration Hosts
Host.Configuration.Networkconfiguration
Allows configuration of network, firewall, and vMotionnetwork.
Hosts
Host.Configuration.Power Allows configuration of host power management settings. Hosts
Host.Configuration.Query patch Allows querying for installable patches and installing patcheson the host.
Hosts
Host.Configuration.Securityprofile and firewall
Allows configuration of Internet services, such as SSH,Telnet, SNMP, and of the host firewall.
Hosts
Host.Configuration.Storagepartition configuration
Allows VMFS datastore and diagnostic partitionmanagement. Users with this privilege can scan for newstorage devices and manage iSCSI.
Hosts
Host.Configuration.SystemManagement
Allows extensions to manipulate the file system on the host. Hosts
Host.Configuration.Systemresources
Allows updates to the configuration of the system resourcehierarchy.
Hosts
Host.Configuration.Virtualmachine autostart configuration
Allows changes to the auto-start and auto-stop order ofvirtual machines on a single host.
Hosts
vSphere Security
VMware, Inc. 183

Host InventoryHost inventory privileges control adding hosts to the inventory, adding hosts to clusters, and moving hostsin the inventory.
The table describes the privileges required to add and move hosts and clusters in the inventory.
You can set this privilege at different levels in the hierarchy. For example, if you set a privilege at thefolder level, you can propagate the privilege to one or more objects within the folder. The object listed inthe Required On column must have the privilege set, either directly or inherited.
Table 11‑12. Host Inventory Privileges
Privilege Name Description Required On
Host.Inventory.Add hostto cluster
Allows addition of a host to an existing cluster. Clusters
Host.Inventory.Addstandalone host
Allows addition of a standalone host. Host folders
Host.Inventory.Createcluster
Allows creation of a new cluster. Host folders
Host.Inventory.Modifycluster
Allows changing the properties of a cluster. Clusters
Host.Inventory.Movecluster or standalonehost
Allows moving a cluster or standalone host between folders.
Privilege must be present at both the source and destination.
Clusters
Host.Inventory.Move host Allows moving a set of existing hosts into or out of a cluster.
Privilege must be present at both the source and destination.
Clusters
Host.Inventory.Removecluster
Allows deletion of a cluster or standalone host.
To have permission to perform this operation, you must have thisprivilege assigned to both the object and its parent object.
Clusters, Hosts
Host.Inventory.Removehost
Allows removal of a host.
To have permission to perform this operation, you must have thisprivilege assigned to both the object and its parent object.
Hosts plus parent object
Host.Inventory.Renamecluster
Allows renaming a a cluster. Clusters
Host Local OperationsHost local operations privileges control actions performed when the vSphere Client is connected directlyto a host.
The table describes the privileges required for actions performed when the vSphere Client is connecteddirectly to a single host.
You can set this privilege at different levels in the hierarchy. For example, if you set a privilege at thefolder level, you can propagate the privilege to one or more objects within the folder. The object listed inthe Required On column must have the privilege set, either directly or inherited.
vSphere Security
VMware, Inc. 184

Table 11‑13. Host Local Operations Privileges
Privilege Name Description Required On
Host.Localoperations.Add host tovCenter
Allows installation and removal of vCenter agents, such as vpxa andaam, on a host.
Root host
Host.Localoperations.Create virtualmachine
Allows creation of a new virtual machine from scratch on a diskwithout registering it on the host.
Root host
Host.Localoperations.Delete virtualmachine
Allows deletion of a virtual machine on disk. Supported for registeredand unregistered virtual machines.
Root host
Host.Localoperations.ExtractNVRAM content
Allows extraction of the NVRAM content of a host.
Host.Localoperations.Manage usergroups
Allows management of local accounts on a host. Root host
Host.Localoperations.Reconfigurevirtual machine
Allows reconfiguring a virtual machine. Root host
Host.Localoperations.Relayoutsnapshots
Allows changes to the layout of a virtual machine's snapshots. Root host
Host vSphere ReplicationHost vSphere replication privileges control the use of replication for a host's virtual machines.
The table describes privileges used for virtual machine replication by VMware vCenter Site RecoveryManager™.
You can set this privilege at different levels in the hierarchy. For example, if you set a privilege at thefolder level, you can propagate the privilege to one or more objects within the folder. The object listed inthe Required On column must have the privilege set, either directly or inherited.
Table 11‑14. Host vSphere Replication Privileges
Privilege Name Description Required On
Host.vSphereReplication.ManageReplication
Allows managment of virtual machine replication on this host. Hosts
Host ProfileHost Profile privileges control operations related to creating and modifying host profiles.
The table describes privileges required for creating and modifying host profiles.
vSphere Security
VMware, Inc. 185

You can set this privilege at different levels in the hierarchy. For example, if you set a privilege at thefolder level, you can propagate the privilege to one or more objects within the folder. The object listed inthe Required On column must have the privilege set, either directly or inherited.
Table 11‑15. Host Profile Privileges
Privilege Name Description Required On
Host profile.Clear Allows clearing of profile related information. Root vCenter Server
Host profile.Create Allows creation of a host profile. Root vCenter Server
Host profile.Delete Allows deletion of a host profile. Root vCenter Server
Host profile.Edit Allows editing a host profile. Root vCenter Server
Host profile.Export Allows exporting a host profile Root vCenter Server
Host profile.View Allows viewing a host profile. Root vCenter Server
NetworkNetwork privileges control tasks related to network management.
The table describes privileges required for network management.
You can set this privilege at different levels in the hierarchy. For example, if you set a privilege at thefolder level, you can propagate the privilege to one or more objects within the folder. The object listed inthe Required On column must have the privilege set, either directly or inherited.
Table 11‑16. Network Privileges
Privilege Name Description Required On
Network.Assign network Allows assigning a network to a virtual machine. Networks, VirtualMachines
Network.Configure Allows configuring a network. Networks, VirtualMachines
Network.Move network Allows moving a network between folders.
Privilege must be present at both the source and destination.
Networks
Network.Remove Allows removal of a network.
This privilege is deprecated.
To have permission to perform this operation, you must have thisprivilege assigned to both the object and its parent object.
Networks
PerformancePerformance privileges control modifying performance statistics settings.
The table describes privileges required to modify performance statistics settings.
You can set this privilege at different levels in the hierarchy. For example, if you set a privilege at thefolder level, you can propagate the privilege to one or more objects within the folder. The object listed inthe Required On column must have the privilege set, either directly or inherited.
vSphere Security
VMware, Inc. 186

Table 11‑17. Performance Privileges
Privilege Name Description Required On
Performance.Modifyintervals
Allows creating, removing, and updating performance data collectionintervals.
Root vCenter Server
PermissionsPermissions privileges control the assigning of roles and permissions.
The table describes permissions required for assigning roles and permissions.
You can set this privilege at different levels in the hierarchy. For example, if you set a privilege at thefolder level, you can propagate the privilege to one or more objects within the folder. The object listed inthe Required On column must have the privilege set, either directly or inherited.
Table 11‑18. Permissions Privileges
Privilege Name Description Required On
Permissions.Modifypermission
Allows defining one or more permission rules on an entity, or updatingrules if rules are already present for the given user or group on theentity.
To have permission to perform this operation, you must have thisprivilege assigned to both the object and its parent object.
Any object plus parentobject
Permissions.Modify role Allows updating a role's name and its privileges. Any object
Permissions.Reassignrole permissions
Allows reassigning all permissions of a role to another role. Any object
Profile-driven StorageProfile-driven storage privileges control operations related to storage profiles.
The table describes privileges required for viewing and updating storage profiles.
You can set this privilege at different levels in the hierarchy. For example, if you set a privilege at thefolder level, you can propagate the privilege to one or more objects within the folder. The object listed inthe Required On column must have the privilege set, either directly or inherited.
Table 11‑19. Profile-driven Storage Privileges
Privilege Name Description Required On
Profile-driven storage.Profile-driven storage update
Allows changes to be made to storage profiles,such as creating and updating storage capabilitiesand virtual machine storage profiles.
Root vCenter Server
Profile-driven storage.Profile-driven storage view
Allows viewing of defined storage capabilities andstorage profiles.
Root vCenter Server
vSphere Security
VMware, Inc. 187

ResourceResource privileges control the creation and management of resource pools, as well as the migration ofvirtual machines.
The table describes privileges that control resource management and virtual machine migration.
You can set this privilege at different levels in the hierarchy. For example, if you set a privilege at thefolder level, you can propagate the privilege to one or more objects within the folder. The object listed inthe Required On column must have the privilege set, either directly or inherited.
Table 11‑20. Resource Privileges
Privilege Name Description Required On
Resource.Apply recommendation Allows accepting a suggestion by the server to performa migration with vMotion.
Clusters
Resource.Assign vApp to resourcepool
Allows assignment of a vApp to a resource pool. Resource pools
Resource.Assign virtual machine toresource pool
Allows assignment of a virtual machine to a resourcepool.
Resource pools
Resource.Create resource pool Allows creation of resource pools. Resource pools, clusters
Resource.Migrate powered off virtualmachine
Allows migration of a powered off virtual machine to adifferent resource pool or host.
Virtual machines
Resource.Migrate powered on virtualmachine
Allows migration with vMotion of a powered on virtualmachine to a different resource pool or host.
Resource.Modify resource pool Allows changes to the allocations of a resource pool. Resource pools
Resource.Move resource pool Allows moving a resource pool.
Privilege must be present at both the source anddestination.
Resource pools
Resource.Query vMotion Allows querying the general vMotion compatibility of avirtual machine with a set of hosts.
Root vCenter Server
Resource.Relocate Allows cold migration of a virtual machine's execution toa specific resource pool or host.
Virtual machines
Resource.Remove resource pool Allows deletion of a resource pool.
To have permission to perform this operation, you musthave this privilege assigned to both the object and itsparent object.
Resource pools
Resource.Rename resource pool Allows renaming of a resource pool. Resource pools
Scheduled TaskScheduled task privileges control creation, editing, and removal of scheduled tasks.
The table describes privileges required for creating and modifying scheduled tasks.
vSphere Security
VMware, Inc. 188
You can set this privilege at different levels in the hierarchy. For example, if you set a privilege at thefolder level, you can propagate the privilege to one or more objects within the folder. The object listed inthe Required On column must have the privilege set, either directly or inherited.
Table 11‑21. Scheduled Task Privileges
Privilege Name Description Required On
Scheduled task.Createtasks
Allows scheduling of a task. Required in addition to the privileges toperform the scheduled action at the time of scheduling.
Any object
Scheduled task.Modifytask
Allows reconfiguration of the scheduled task properties. Any object
Scheduled task.Removetask
Allows removal of a scheduled task from the queue. Any object
Scheduled task.Run task Allows running the scheduled task immediately.
Creating and running a scheduled task also requires permission toperform the associated action.
Any object
SessionsSessions privileges control the ability of extensions to open sessions on the vCenter Server.
The table describes the privileges associated with sessions on vCenter Server.
You can set this privilege at different levels in the hierarchy. For example, if you set a privilege at thefolder level, you can propagate the privilege to one or more objects within the folder. The object listed inthe Required On column must have the privilege set, either directly or inherited.
Table 11‑22. Session Privileges
Privilege Name Description Required On
Sessions.Impersonateuser
Allow impersonation of another user. This capability is used byextensions.
Root vCenter Server
Sessions.Message Allow setting of the global log in message. Root vCenter Server
Sessions.Validate session Allow verification of session validity. Root vCenter Server
Sessions.View and stopsessions
Allow viewing sessions and forcing log out of one or more logged-onusers.
Root vCenter Server
Storage ViewsStorage Views privileges control the ability to configure and use storage views on vCenter Server.
The table describes privileges required to configure and use storage views.
You can set this privilege at different levels in the hierarchy. For example, if you set a privilege at thefolder level, you can propagate the privilege to one or more objects within the folder. The object listed inthe Required On column must have the privilege set, either directly or inherited.
vSphere Security
VMware, Inc. 189
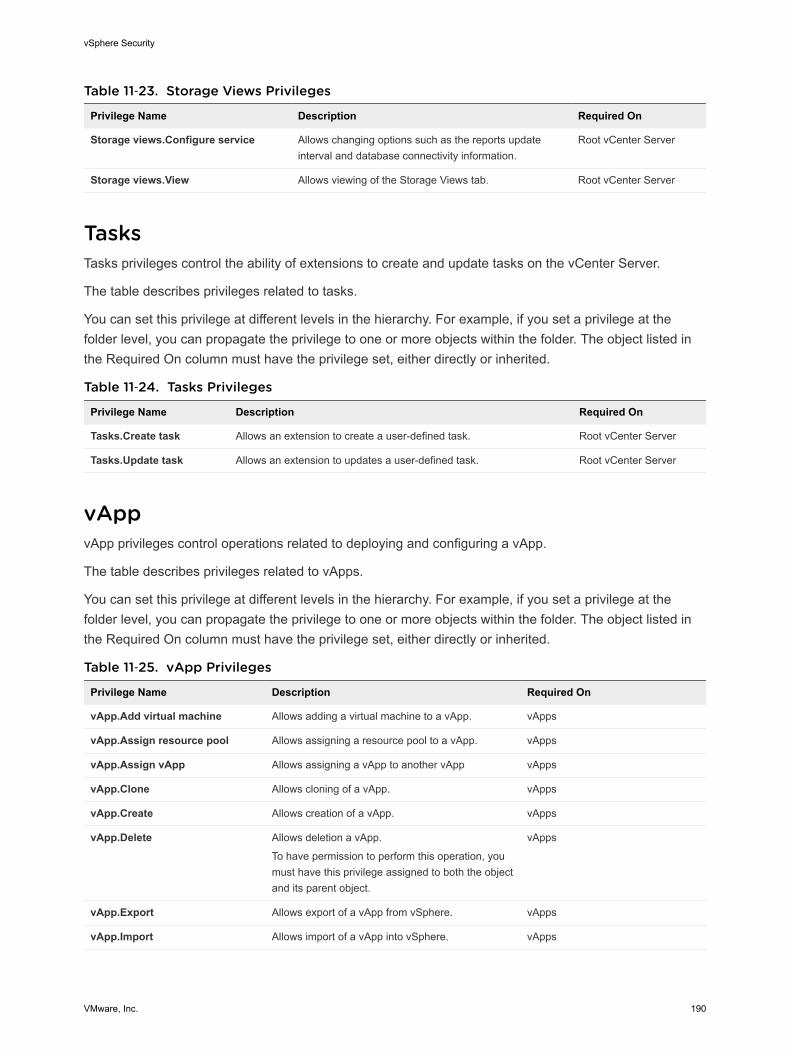
Table 11‑23. Storage Views Privileges
Privilege Name Description Required On
Storage views.Configure service Allows changing options such as the reports updateinterval and database connectivity information.
Root vCenter Server
Storage views.View Allows viewing of the Storage Views tab. Root vCenter Server
TasksTasks privileges control the ability of extensions to create and update tasks on the vCenter Server.
The table describes privileges related to tasks.
You can set this privilege at different levels in the hierarchy. For example, if you set a privilege at thefolder level, you can propagate the privilege to one or more objects within the folder. The object listed inthe Required On column must have the privilege set, either directly or inherited.
Table 11‑24. Tasks Privileges
Privilege Name Description Required On
Tasks.Create task Allows an extension to create a user-defined task. Root vCenter Server
Tasks.Update task Allows an extension to updates a user-defined task. Root vCenter Server
vAppvApp privileges control operations related to deploying and configuring a vApp.
The table describes privileges related to vApps.
You can set this privilege at different levels in the hierarchy. For example, if you set a privilege at thefolder level, you can propagate the privilege to one or more objects within the folder. The object listed inthe Required On column must have the privilege set, either directly or inherited.
Table 11‑25. vApp Privileges
Privilege Name Description Required On
vApp.Add virtual machine Allows adding a virtual machine to a vApp. vApps
vApp.Assign resource pool Allows assigning a resource pool to a vApp. vApps
vApp.Assign vApp Allows assigning a vApp to another vApp vApps
vApp.Clone Allows cloning of a vApp. vApps
vApp.Create Allows creation of a vApp. vApps
vApp.Delete Allows deletion a vApp.
To have permission to perform this operation, youmust have this privilege assigned to both the objectand its parent object.
vApps
vApp.Export Allows export of a vApp from vSphere. vApps
vApp.Import Allows import of a vApp into vSphere. vApps
vSphere Security
VMware, Inc. 190

Table 11‑25. vApp Privileges (Continued)
Privilege Name Description Required On
vApp.Move Allows moving a vApp to a new inventory location. vApps
vApp.Power Off Allows power off operations on a vApp. vApps
vApp.Power On Allows power on operations on a vApp. vApps
vApp.Rename Allows renaming a vApp. vApps
vApp.Suspend Allows suspension of a vApp. vApps
vApp.Unregister Allows unregistering a vApp.
To have permission to perform this operation, youmust have this privilege assigned to both the objectand its parent object.
vApps
vApp.View OVF Environment Allows viewing the OVF environment of a powered-on virtual machine within a vApp.
vApps
vApp.vApp applicationconfiguration
Allows modification of a vApp's internal structure,such as product information and properties.
vApps
vApp.vApp instanceconfiguration
Allows modification of a vApp's instanceconfiguration, such as policies.
vApps
vApp.vApp managedByconfiguration
Allows an extension or solution to mark a vApp asbeing managed by that extension or solution.
No vSphere Web Client user interface elementsare associated with this privilege.
vApps
vApp.vApp resourceconfiguration
Allows modification of a vApp's resourceconfiguration.
To have permission to perform this operation, youmust have this privilege assigned to both the objectand its parent object.
vApps
vCenter Inventory Service TaggingvCenter Inventory Service Tagging privileges control the ability to create and delete tags and tagcategories, and assign and remove tags on vSphere inventory objects.
The table describes privileges related to tagging.
You can set this privilege at different levels in the hierarchy. For example, if you set a privilege at thefolder level, you can propagate the privilege to one or more objects within the folder. The object listed inthe Required On column must have the privilege set, either directly or inherited.
vSphere Security
VMware, Inc. 191

Table 11‑26. vCenter Inventory Service Privileges
Privilege Name Description Required On
vCenter Inventory Service.vCenter Inventory ServiceTagging.Assign or Unassign Inventory Service Tag
Allowsassignment orunassignment ofa tag for an objectin thevCenter Serverinventory.
Any object
vCenter Inventory Service.vCenter Inventory ServiceTagging.Create Inventory Service Tag Category
Allows creation ofa tag category.
Any object
vCenter Inventory Service.vCenter Inventory ServiceTagging.Create Inventory Service Tag
Allows creation ofa tag.
Any object
vCenter Inventory Service.vCenter Inventory ServiceTagging.Delete Inventory Service Tag Category
Allows deletion ofa tag category.
Any object
vCenter Inventory Service.vCenter Inventory ServiceTagging.Delete Inventory Service Tag
Allows deletion ofa tag.
Any object
vCenter Inventory Service.vCenter Inventory ServiceTagging.Edit Inventory Service Tag Category
Allows editing of atag caategory.
Any object
vCenter Inventory Service.vCenter Inventory ServiceTagging.Edit Inventory Service Tag
Allows editing of atag.
Any object
Virtual Machine ConfigurationVirtual Machine Configuration privileges control the ability to configure virtual machine options anddevices.
The table describes privileges required for configuring virtual machine options and devices.
You can set this privilege at different levels in the hierarchy. For example, if you set a privilege at thefolder level, you can propagate the privilege to one or more objects within the folder. The object listed inthe Required On column must have the privilege set, either directly or inherited.
Table 11‑27. Virtual Machine Configuration Privileges
Privilege Name Description Required On
Virtualmachine.Configuration.Add existing disk
Allows adding an existing virtual disk to a virtual machine. Virtual machines
Virtualmachine.Configuration.Add new disk
Allows creation of a new virtual disk to add to a virtual machine. Virtual machines
Virtualmachine.Configuration.Add or remove device
Allows addition or removal of any non-disk device. Virtual machines
Virtualmachine.Configuration.Advanced
Allows addition or modification of advanced parameters in the virtualmachine's configuration file.
Virtual machines
vSphere Security
VMware, Inc. 192

Table 11‑27. Virtual Machine Configuration Privileges (Continued)
Privilege Name Description Required On
Virtualmachine.Configuration.Change CPU count
Allows changing the number of virtual CPUs. Virtual machines
Virtualmachine.Configuration.Change resource
Allows changing the resource configuration of a set of virtual machinenodes in a given resource pool.
Virtual machines
Virtualmachine.Configuration.Configure managedBy
Allows an extension or solution to mark a virtual machine as beingmanaged by that extension or solution.
Virtual machines
Virtualmachine.Configuration.Disk change tracking
Allows enabling or disabling of change tracking for the virtualmachine's disks.
Virtual machines
Virtualmachine.Configuration.Display connection settings
Allows configuration of virtual machine remote console options. Virtual machines
Virtualmachine.Configuration.Extend virtual disk
Allows expansion of the size of a virtual disk. Virtual machines
Virtualmachine.Configuration.Host USB device
Allows attaching a host-based USB device to a virtual machine. Virtual machines
Virtualmachine.Configuration.Memory
Allows changing the amount of memory allocated to the virtualmachine.
Virtual machines
Virtualmachine.Configuration.Modify device settings
Allows changing the properties of an existing device. Virtual machines
Virtualmachine.Configuration.Query Fault Tolerancecompatibility
Allows checking if a virtual machine is compatible for Fault Tolerance. Virtual machines
Virtualmachine.Configuration.Query unowned files
Allows querying of unowned files. Virtual machines
Virtualmachine.Configuration.Raw device
Allows adding or removing a raw disk mapping or SCSI pass throughdevice.
Setting this parameter overrides any other privilege for modifying rawdevices, including connection states.
Virtual machines
Virtualmachine.Configuration.Reload from path
Allows changing a virtual machine configuration path while preservingthe identity of the virtual machine. Solutions such as VMware vCenterSite Recovery Manager use this operation to maintain virtual machineidentity during failover and failback.
Virtual machines
Virtualmachine.Configuration.Remove disk
Allows removal of a virtual disk device. Virtual machines
vSphere Security
VMware, Inc. 193

Table 11‑27. Virtual Machine Configuration Privileges (Continued)
Privilege Name Description Required On
Virtualmachine.Configuration.Rename
Allows renaming a virtual machine or modifying the associated notes ofa virtual machine.
Virtual machines
Virtualmachine.Configuration.Reset guest information
Allows editing the guest operating system information for a virtualmachine.
Virtual machines
Virtualmachine.Configuration.Set annotation
Allows adding or editing a virtual machine annotation. Virtual machines
Virtualmachine.Configuration.Settings
Allows changing general virtual machine settings. Virtual machines
Virtualmachine.Configuration.Swapfile placement
Allows changing the swapfile placement policy for a virtual machine. Virtual machines
Virtualmachine.Configuration.Unlock virtual machine
Allows decrypting a virtual machine. Virtual machines
Virtualmachine.Configuration.Upgrade virtual machinecompatibility
Allows upgrade of the virtual machine’s virtual machine compatibilityversion.
Virtual machines
Virtual Machine Guest OperationsVirtual Machine Guest operations privileges control the ability to interact with files and programs inside avirtual machine's guest operating system.
The table describes privileges required for virtual machine guest operations accessed through theVMware vSphere API. See the VMware vSphere API Reference documentation for more information onthese operations.
You can set this privilege at different levels in the hierarchy. For example, if you set a privilege at thefolder level, you can propagate the privilege to one or more objects within the folder. The object listed inthe Required On column must have the privilege set, either directly or inherited.
vSphere Security
VMware, Inc. 194

Table 11‑28. Virtual Machine Guest Operations
Privilege Name Description Effective on Object
Virtual machine.GuestOperations.GuestOperation Modifications
Allows virtual machine guest operations that involve modifications to aguest operating system in a virtual machine, such as transferring a fileto the virtual machine.
No vSphere Web Client user interface elements are associated withthis privilege.
Virtual machines
Virtual machine.GuestOperations.GuestOperation ProgramExecution
Allows virtual machine guest operations that involve executing aprogram in the virtual machine.
No vSphere Web Client user interface elements are associated withthis privilege.
Virtual machines
Virtual machine.GuestOperations.GuestOperation Queries
Allows virtual machine guest operations that involve querying theguest operating system, such as listing files in the guest operatingsystem.
No vSphere Web Client user interface elements are associated withthis privilege.
Virtual machines
Virtual Machine InteractionVirtual Machine Interaction privileges control the ability to interact with a virtual machine console,configure media, perform power operations, and install VMware Tools.
The table describes privileges required for virtual machine interaction.
You can set this privilege at different levels in the hierarchy. For example, if you set a privilege at thefolder level, you can propagate the privilege to one or more objects within the folder. The object listed inthe Required On column must have the privilege set, either directly or inherited.
Table 11‑29. Virtual Machine Interaction
Privilege Name Description Required On
Virtualmachine.Interaction.Answer question
Allows resolution of issues with virtual machine state transitions orruntime errors.
Virtual machines
Virtualmachine.Interaction.Backup operation on virtualmachine
Allows performance of backup operations on virtual machines. Virtual machines
Virtualmachine.Interaction.Configure CD media
Allows configuration of a virtual DVD or CD-ROM device. Virtual machines
Virtualmachine.Interaction.Configure floppy media
Allows configuration of a virtual floppy device. Virtual machines
Virtualmachine.Interaction.Console interaction
Allows interaction with the virtual machine’s virtual mouse, keyboard,and screen.
Virtual machines
vSphere Security
VMware, Inc. 195

Table 11‑29. Virtual Machine Interaction (Continued)
Privilege Name Description Required On
Virtualmachine.Interaction.Create screenshot
Allows creation of a virtual machine screen shot. Virtual machines
Virtualmachine.Interaction.Defragment all disks
Allows defragment operations on all disks of the virtual machine. Virtual machines
Virtualmachine.Interaction.Device connection
Allows changing the connected state of a virtual machine’sdisconnectable virtual devices.
Virtual machines
Virtualmachine.Interaction.Disable Fault Tolerance
Allows disabling the Secondary virtual machine for a virtual machineusing Fault Tolerance.
Virtual machines
Virtualmachine.Interaction.Enable Fault Tolerance
Allows enabling the Secondary virtual machine for a virtual machineusing Fault Tolerance.
Virtual machines
Virtualmachine.Interaction.Guest operating systemmanagement by VIX API
Allows management of the virtual machine's operating system throughthe VIX API.
Virtual machines
Virtualmachine.Interaction.InjectUSB HID scan codes
Allows injection of USP HID scan codes. Virtual machines
Virtualmachine.Interaction.Perform wipe or shrinkoperations
Allows performing wipe or shrink operations on the virtual machine. Virtual machines
Virtualmachine.Interaction.Power Off
Allows powering off a powered-on virtual machine. This operationpowers down the guest operating system.
Virtual machines
Virtualmachine.Interaction.Power On
Allows powering on a powered-off virtual machine, and resuming asuspended virtual machine.
Virtual machines
Virtualmachine.Interaction.Record session on VirtualMachine
Allows recording a session on a virtual machine. Virtual machines
Virtualmachine.Interaction.Replay session on VirtualMachine
Allows replaying of a recorded session on a virtual machine. Virtual machines
Virtualmachine.Interaction.Reset
Allows resetting of a virtual machine and reboots the guest operatingsystem.
Virtual machines
Virtualmachine.Interaction.Suspend
Allows suspending a powered-on virtual machine. This operation putsthe guest in standby mode.
Virtual machines
vSphere Security
VMware, Inc. 196

Table 11‑29. Virtual Machine Interaction (Continued)
Privilege Name Description Required On
Virtualmachine.Interaction.Testfailover
Allows testing of Fault Tolerance failover by making the Secondaryvirtual machine the Primary virtual machine.
Virtual machines
Virtualmachine.Interaction.Testrestart Secondary VM
Allows termination of a Secondary virtual machine for a virtualmachine using Fault Tolerance.
Virtual machines
Virtualmachine.Interaction.TurnOff Fault Tolerance
Allows turning off Fault Tolerance for a virtual machine. Virtual machines
Virtualmachine.Interaction.TurnOn Fault Tolerance
Allows turning on Fault Tolerance for a virtual machine. Virtual machines
Virtualmachine.Interaction.VMware Tools install
Allows mounting and unmounting the VMware Tools CD installer as aCD-ROM for the guest operating system.
Virtual machines
Virtual Machine InventoryVirtual Machine Inventory privileges control adding, moving, and removing virtual machines.
The table describes privileges required to add, move, and remove virtual machines in the inventory.
You can set this privilege at different levels in the hierarchy. For example, if you set a privilege at thefolder level, you can propagate the privilege to one or more objects within the folder. The object listed inthe Required On column must have the privilege set, either directly or inherited.
Table 11‑30. Virtual Machine Inventory Privileges
Privilege Name Description Required On
Virtualmachine .Inventory.Create from existing
Allows creation of a virtual machine based on an existing virtualmachine or template, by cloning or deploying from a template.
Clusters, Hosts, Virtualmachine folders
Virtualmachine.Inventory.Createnew
Allow creation of a virtual machine and allocation of resources for itsexecution.
Clusters, Hosts, Virtualmachine folders
Virtualmachine.Inventory.Move
Allows relocating a virtual machine in the hierarchy.
The privilege must be present at both the source and destination.
Virtual machines
Virtualmachine.Inventory.Register
Allows adding an existing virtual machine to a vCenter Server or hostinventory.
Clusters, Hosts, Virtualmachine folders
vSphere Security
VMware, Inc. 197

Table 11‑30. Virtual Machine Inventory Privileges (Continued)
Privilege Name Description Required On
Virtualmachine.Inventory.Remove
Allows deletion of a virtual machine. Deletion removes the virtualmachine's underlying files from disk.
To have permission to perform this operation, you must have thisprivilege assigned to both the object and its parent object.
Virtual machines
Virtualmachine.Inventory.Unregister
Allows unregistering a virtual machine from a vCenter Server or hostinventory.
To have permission to perform this operation, you must have thisprivilege assigned to both the object and its parent object.
Virtual machines
Virtual Machine ProvisioningVirtual Machine Provisioning privileges control activities related to deploying and customizing virtualmachines.
The table describes privileges required for virtual machine provisioning.
You can set this privilege at different levels in the hierarchy. For example, if you set a privilege at thefolder level, you can propagate the privilege to one or more objects within the folder. The object listed inthe Required On column must have the privilege set, either directly or inherited.
Table 11‑31. Virtual Machine Provisioning Privileges
Privilege Name Description Required On
Virtualmachine.Provisioning.Allowdisk access
Allows opening a disk on a virtual machine for random read andwrite access. Used mostly for remote disk mounting.
Virtual machines
Virtualmachine.Provisioning.Allowread-only disk access
Allows opening a disk on a virtual machine for random read access.Used mostly for remote disk mounting.
Virtual machines
Virtualmachine.Provisioning.Allowvirtual machine download
Allows read operations on files associated with a virtual machine,including vmx, disks, logs, and nvram.
Root host or vCenterServer
Virtualmachine.Provisioning.Allowvirtual machine files upload
Allows write operations on files associated with a virtual machine,including vmx, disks, logs, and nvram.
Root host or vCenterServer
Virtualmachine.Provisioning.Clonetemplate
Allows cloning of a template. Templates
Virtualmachine.Provisioning.Clonevirtual machine
Allows cloning of an existing virtual machine and allocation ofresources.
Virtual machines
Virtualmachine.Provisioning.Createtemplate from virtualmachine
Allows creation of a new template from a virtual machine. Virtual machines
vSphere Security
VMware, Inc. 198

Table 11‑31. Virtual Machine Provisioning Privileges (Continued)
Privilege Name Description Required On
Virtualmachine.Provisioning.Customize
Allows customization of a virtual machine’s guest operating systemwithout moving the virtual machine.
Virtual machines
Virtualmachine.Provisioning.Deploy template
Allows deployment of a virtual machine from a template. Templates
Virtualmachine.Provisioning.Markas template
Allows marking an existing powered off virtual machine as atemplate.
Virtual machines
Virtualmachine.Provisioning.Markas virtual machine
Allows marking an existing template as a virtual machine. Templates
Virtualmachine.Provisioning.Modify customizationspecification
Allows creation, modification, or deletion of customizationspecifications.
Root vCenter Server
Virtualmachine.Provisioning.Promote disks
Allows promote operations on a virtual machine's disks. Virtual machines
Virtualmachine.Provisioning.Readcustomization specifications
Allows reading a customization specification. Virtual machines
Virtual Machine Snapshot Management PrivilegesVirtual machine snapshot management privileges control the ability to take, delete, rename, and restoresnapshots.
The table describes privileges required to work with virtual machine snapshots.
You can set this privilege at different levels in the hierarchy. For example, if you set a privilege at thefolder level, you can propagate the privilege to one or more objects within the folder. The object listed inthe Required On column must have the privilege set, either directly or inherited.
Table 11‑32. Virtual Machine State Privileges
Privilege Name Description Required On
Virtual machine.Snapshotmanagement. Createsnapshot
Allows creation of a snapshot from the virtual machine’s current state. Virtual machines
Virtual machine.Snapshotmanagement.RemoveSnapshot
Allows removal of a snapshot from the snapshot history. Virtual machines
vSphere Security
VMware, Inc. 199

Table 11‑32. Virtual Machine State Privileges (Continued)
Privilege Name Description Required On
Virtual machine.Snapshotmanagement.RenameSnapshot
Allows renaming a snapshot with a new name, a new description, orboth.
Virtual machines
Virtual machine.Snapshotmanagement.Revert tosnapshot
Allows setting the virtual machine to the state it was in at a givensnapshot.
Virtual machines
Virtual Machine vSphere ReplicationVirtual Machine vSphere replication privileges control the use of replication for virtual machines.
The table describes privileges used for virtual machine replication by VMware vCenter Site RecoveryManager™.
You can set this privilege at different levels in the hierarchy. For example, if you set a privilege at thefolder level, you can propagate the privilege to one or more objects within the folder. The object listed inthe Required On column must have the privilege set, either directly or inherited.
Table 11‑33. Virtual Machine vSphere Replication
Privilege Name Description Required On
Virtual machine.vSphereReplication.ConfigurevSphere Replication
Allows configuration of replication for the virtual machine. Virtual machines
Virtual machine.vSphereReplication.ManagevSphere Replication
Allows triggering of full sync, online sync or offline sync on areplication.
Virtual machines
Virtual machine.vSphereReplication.MonitorvSphere Replication
Allows monitoring of replication. Virtual machines
dvPort GroupDistributed virtual port group privileges control the ability to create, delete, and modify distributed virtualport groups.
The table describes the privileges required to create and configure distributed virtual port groups.
You can set this privilege at different levels in the hierarchy. For example, if you set a privilege at thefolder level, you can propagate the privilege to one or more objects within the folder. The object listed inthe Required On column must have the privilege set, either directly or inherited.
vSphere Security
VMware, Inc. 200

Table 11‑34. Distributed Virtual Port Group Privileges
Privilege Name Description Required On
Distributed switch.Create Allows creation of a distributed virtual port group. Virtual port groups
Distributed switch.Delete Allows deletion of distributed virtual port group.
To have permission to perform this operation, you must have thisprivilege assigned to both the object and its parent object.
Virtual port groups
Distributed switch.Modify Allows modification of a distributed virtual port group configuration. Virtual port groups
Distributed switch.Policyoperation
Allows setting the policy of a distributed virtual port group. Virtual port groups
Distributed switch.Portconfiguration operation
Allows setting the scope of a distributed virtual port group. Virtual port groups
vServicesvServices privileges control the ability to create, configure, and update vService dependencies for virtualmachines and vApps.
The table describes privileges related to vService dependencies.
You can set this privilege at different levels in the hierarchy. For example, if you set a privilege at thefolder level, you can propagate the privilege to one or more objects within the folder. The object listed inthe Required On column must have the privilege set, either directly or inherited.
Table 11‑35. vServices
Privilege Name Description Required On
vService.Createdependency
Allows creation of a vService dependency for a virtual machine orvApp.
vApps and virtualmachines
vService.Destroydependency
Allows removal of a vService dependency for a virtual machine orvApp.
vApps and virtualmachines
vService.Reconfiguredependency configuration
Allows reconfiguration of a dependency to update the provider orbinding.
vApps and virtualmachines
vService.Updatedependency
Allows updates of a dependence to configure the name or description. vApps and virtualmachines
VRM PolicyVRM policy privileges control the ability to query and update virtual rights management policies.
The table describes privileges related to virtual rights management.
You can set this privilege at different levels in the hierarchy. For example, if you set a privilege at thefolder level, you can propagate the privilege to one or more objects within the folder. The object listed inthe Required On column must have the privilege set, either directly or inherited.
vSphere Security
VMware, Inc. 201

Table 11‑36. VRM Policy Privileges
Privilege Name Description Required On
VRMPolicy.QueryVRMPolicy
Allows querying virtual rights management policy. Virtual machines
VRMPolicy.UpdateVRMPolicy
Allows update of virtual rights management policy. Virtual machines
vSphere Security
VMware, Inc. 202