nas113 workshop 1 - msc softwarepages.mscsoftware.com/...hole_tension_test_021312.pdf ·...
TRANSCRIPT

WS3-1
Composites Technology Day, February 2012
Copyright 2012 MSC.Software Corporation
WORKSHOP 3
Open-Hole Tension Test Coupon

WS3-2
Composites Technology Day, February 2012
Copyright 2012 MSC.Software Corporation

WS3-3
Composites Technology Day, February 2012
Copyright 2012 MSC.Software Corporation
Objectives
• Workshop Objectives
– Become familiar with the basic steps of setting up a progressive ply
failure analysis
• Software Version
– Patran 2011
– MD Nastran 2011.1
• Required File:
– tension_test_coupon.db

WS3-4
Composites Technology Day, February 2012
Copyright 2012 MSC.Software Corporation
Problem Description
• Determine the allowable strength of a new 15-ply composite layup
design
• The left end is fixed and a tensile load is applied to the right end.

WS3-5
Composites Technology Day, February 2012
Copyright 2012 MSC.Software Corporation
a
Step 1. Open an existing Patran Database
Start Patran and open a database
containing the composite test
coupon:
a. Click File Open in the Defaults
group.
b. Select
tension_test_coupon.db as
the File name.
c. Click OK.
c
b

WS3-6
Composites Technology Day, February 2012
Copyright 2012 MSC.Software Corporation
Plot loads and boundary conditions:
a. Click the Loads/BCs tab.
b. Set Action to Plot Markers.
c. Select Displ_fixed and click
Apply. This plots the simple
support at the left end of the
part.
d. Select Displ_pull and click
Apply. This plots the 0.2 in
enforced displacement applied
to the right end of the part.
e. Click Reset Graphics to clear
the markers.
Step 2. Review Loads and Boundary Conditions a
b
c
e
d
WS3-7
Composites Technology Day, February 2012
Copyright 2012 MSC.Software Corporation
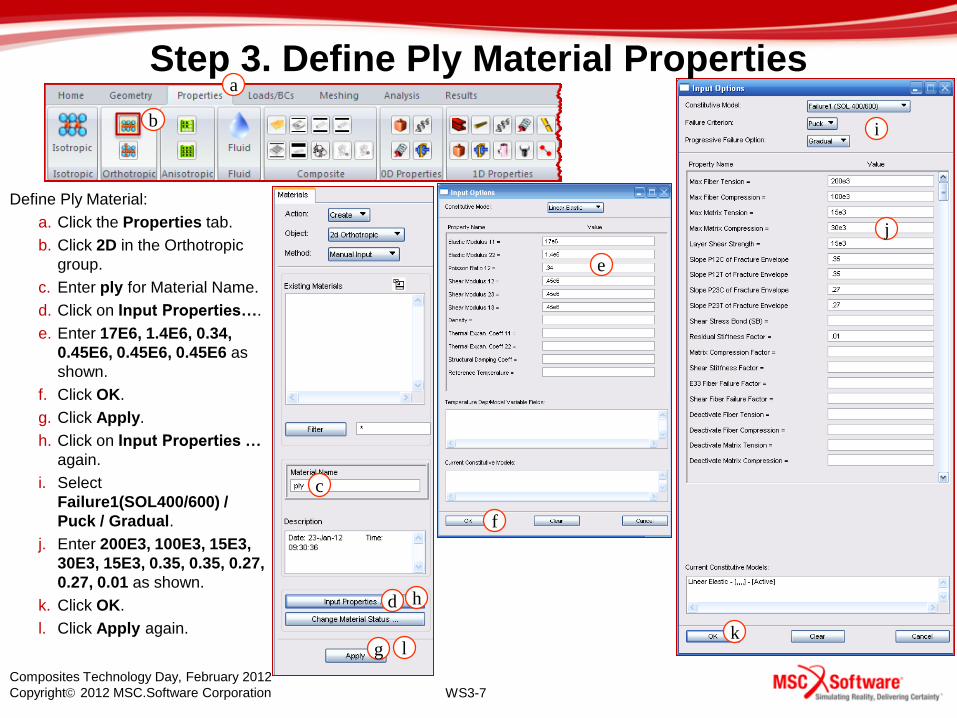
Step 3. Define Ply Material Properties
Define Ply Material:
a. Click the Properties tab.
b. Click 2D in the Orthotropic
group.
c. Enter ply for Material Name.
d. Click on Input Properties….
e. Enter 17E6, 1.4E6, 0.34,
0.45E6, 0.45E6, 0.45E6 as
shown.
f. Click OK.
g. Click Apply.
h. Click on Input Properties …
again.
i. Select
Failure1(SOL400/600) /
Puck / Gradual.
j. Enter 200E3, 100E3, 15E3,
30E3, 15E3, 0.35, 0.35, 0.27,
0.27, 0.01 as shown.
k. Click OK.
l. Click Apply again.
b
c
d
e
h
f
g
i
j
k l
a

WS3-8
Composites Technology Day, February 2012
Copyright 2012 MSC.Software Corporation
b
c d
e
g
f
Step 4. Define Composite Layup
Define the layup:
a. Click Laminate in the Composite Group.
b. Enter laminate for Material Name.
c. Click ply under Existing Materials 15 times to make 15 plies.
d. Click on ply 1’s empty Thickness cell.
e. Enter 0.01 in the Set Thickness box and press the Enter key.
f. Click on ply 1’s empty Orientation cell.
g. Enter the following into the Input Data box: 45/-45/45/-45/90/45/-45/0/-45/45/90/-45/45/-45/45 and press the Enter key.
h. Click Apply.
h
a

WS3-9
Composites Technology Day, February 2012
Copyright 2012 MSC.Software Corporation
f
Step 5. Define Element Property
Define element property:
a. Click Shell in the 2D
Properties group.
b. Enter plate for Property Set
Name.
c. Select Laminate for Options.
d. Click Input Properties….
e. Click on the Mat Prop Name
icon and select laminate.
f. Click in the Material
Orientation box, then screen
select Coord 0.
g. Select Large Strain for
Nonlinear Formulation.
h. Click OK.
b
d
c
a
f
e
e
g
h
WS3-10
Composites Technology Day, February 2012
Copyright 2012 MSC.Software Corporation
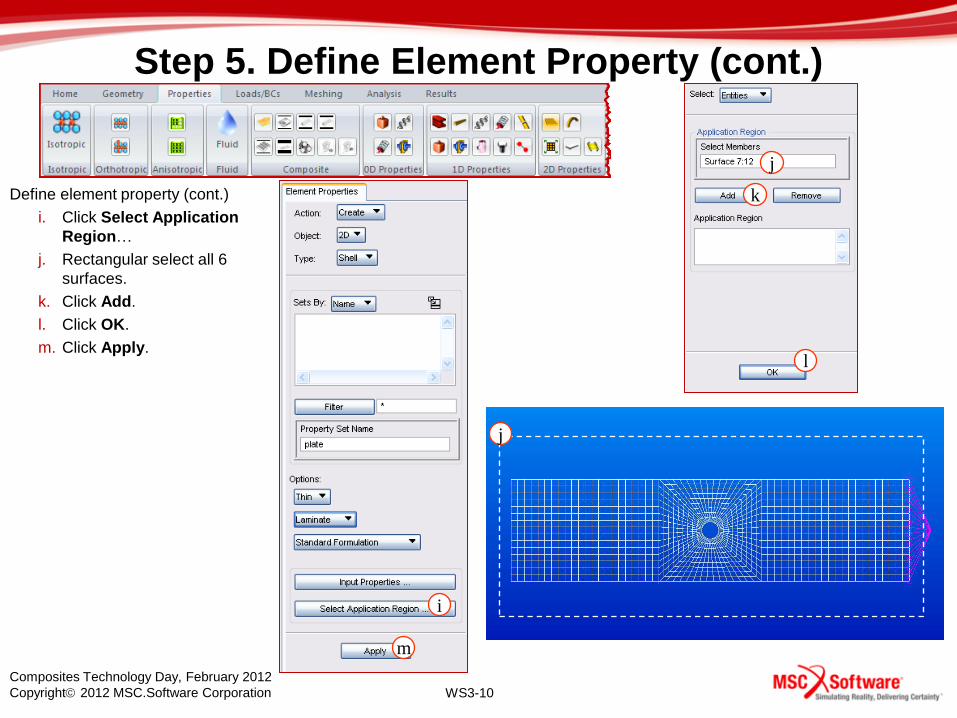
Step 5. Define Element Property (cont.)
Define element property (cont.)
i. Click Select Application
Region…
j. Rectangular select all 6
surfaces.
k. Click Add.
l. Click OK.
m. Click Apply.
i
m
j
j
k
l

WS3-11
Composites Technology Day, February 2012
Copyright 2012 MSC.Software Corporation
Step 6. Set up Analysis
Set up analysis:
a. Click the Analysis tab.
b. Select Analysis Deck.
c. Enter Job Name
tensile_coupon.
d. Click on Solution Type….
e. Select Implicit Nonlinear.
f. Click on Solution
Parameters….
g. Select Shell Shear
Correction and SOL400
Run.
h. Click OK.
i. Click OK.
b
c
d
e
f
g
h
i
a

WS3-12
Composites Technology Day, February 2012
Copyright 2012 MSC.Software Corporation
Step 6. Set up Analysis (Cont.)
Setup Analysis:
j. Click on
Subcases….
k. Click on Default
under Available
Subcases.
l. Click on Subcase
Parameters….
m. Click on Load
Increment
Params….
n. Select Adaptive for
Increment Type.
o. Enter 0.05 for
Maximum Time
Step.
p. Click OK.
q. Click OK.
r. Click Apply.
s. Click Cancel.
t. Click Apply.
j
k
l
m
n
o
p q
r s t

WS3-13
Composites Technology Day, February 2012
Copyright 2012 MSC.Software Corporation
Step 7. Edit Nastran Input File
– Open the newly created input file tensile_coupon.bdf with
WordPad (or any other text editor)
– Search for MATF (Edit/Find…).
– Change the third field from 0 to 2 (for gradual selective PFA).
– Save the modified file.
2

WS3-14
Composites Technology Day, February 2012
Copyright 2012 MSC.Software Corporation
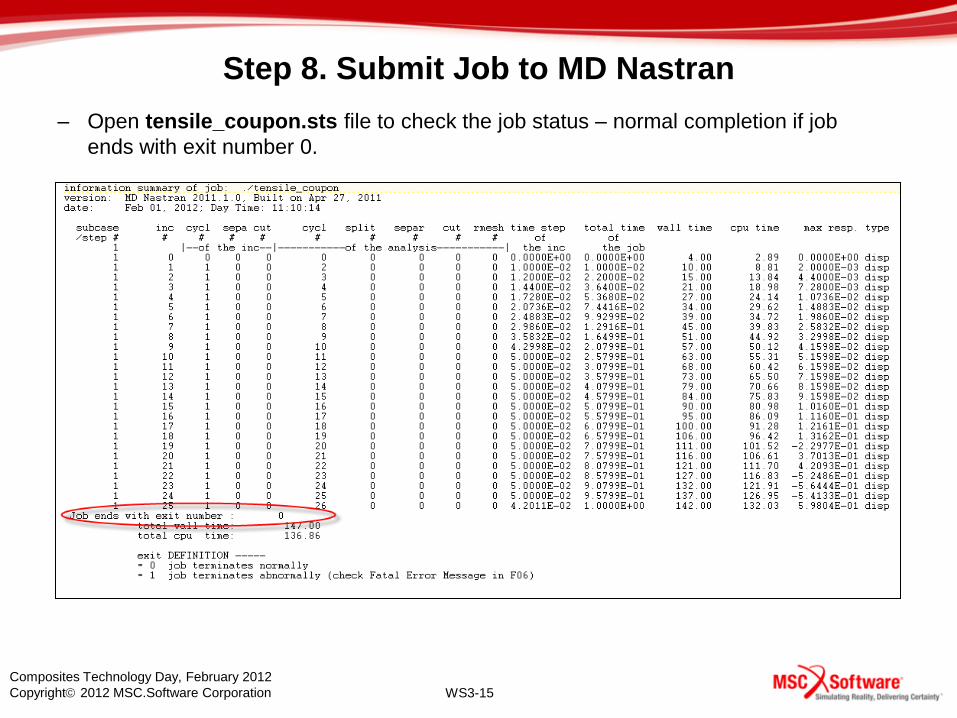
Step 8. Submit Job to MD Nastran
Run the analysis:
a. Double click the MD Nastran icon
on the desktop.
b. Browse and select
tensile_coupon.bdf.
c. Click Open
d. Enter scr=no as optional keywords
e. Click Run
a
b
c
d
e
WS3-15
Composites Technology Day, February 2012
Copyright 2012 MSC.Software Corporation
Step 8. Submit Job to MD Nastran
– Open tensile_coupon.sts file to check the job status – normal completion if job
ends with exit number 0.

WS3-16
Composites Technology Day, February 2012
Copyright 2012 MSC.Software Corporation
Step 9. Attach Results File
Access Results file:
a. Select MASTER/DBALL.
b. Click on Select Results
File….
c. Browse to the working
directory and select
tensile_coupon.MASTER.
d. Click OK.
e. Click Apply.
a
b
c
d
e
WS3-17
Composites Technology Day, February 2012
Copyright 2012 MSC.Software Corporation
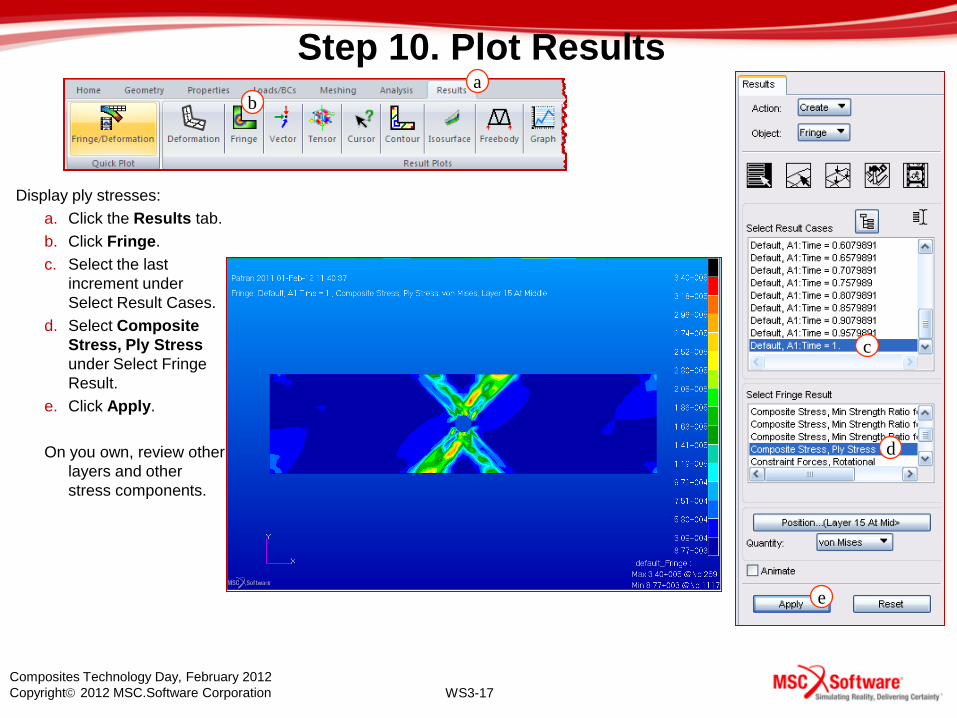
Step 10. Plot Results
Display ply stresses:
a. Click the Results tab.
b. Click Fringe.
c. Select the last
increment under
Select Result Cases.
d. Select Composite
Stress, Ply Stress
under Select Fringe
Result.
e. Click Apply.
On you own, review other
layers and other
stress components.
d
b
c
a
e

WS3-18
Composites Technology Day, February 2012
Copyright 2012 MSC.Software Corporation
Step 10. Plot Results (cont.)
Display damage:
a. Select Total Damage for
Progressive Failure under
Select Fringe Result.
b. Click Apply.
c. Select Matrix Damage for
Progressive Failure and
click Apply.
d. Select Fiber Damage for
Progressive Failure and
click Apply.
Damage value indicates the
degree of material stiffness
degradation.
Damage = 1.0 – residual
stiffness
b
a
c
d

WS3-19
Composites Technology Day, February 2012
Copyright 2012 MSC.Software Corporation
Step 10. Plot Results (cont.)
Change fringe plot extrapolation
option to average:
a.Click Plot Options
b.Set Extrapolation to Average.
c.Click Apply.
a
a

WS3-20
Composites Technology Day, February 2012
Copyright 2012 MSC.Software Corporation
Step 11. Plot Load-Deflection Curve
e
f g
j
h
b
c
i
d
Plot load-deflection curve:
a. Click the Reset Graphics icon.
b. Click Graph.
c. Select all increments under
Select Result Cases.
d. Select Constraint Forces
Translational under Y Result.
e. Select X Component Quantity.
f. Select Result for X.
g. Click Select X Result….
h. Select Displacements,
Translational under Select X
Result.
i. Select X Component Quantity
j. Click OK.
k. Click the Target Entities icon.
l. Pick the independent node of
the RBE2 where the enforced
displacement is applied.
m. Click Apply.
k
l
m
a
l

WS3-21
Composites Technology Day, February 2012
Copyright 2012 MSC.Software Corporation
Step 11. Plot Load-Deflection Curve (Cont.)

WS3-22
Composites Technology Day, February 2012
Copyright 2012 MSC.Software Corporation
End of Workshop 3
File/Quit to exit Patran.