nasuni mobile access guide issues with linux clients, in global locking guide, administration guide,...
TRANSCRIPT

Nasuni Mobile Access Guide
Version 8.0
April 2018 Last modified: April 10, 2018
© 2018 Nasuni Corporation All Rights Reserved

Document Information
Nasuni Mobile Access Guide Version 8.0 April 2018
Copyright
Copyright © 2010-2018 Nasuni Corporation. All rights reserved.
Notice
The Information in this document is subject to change without notice and does not represent a commitment on the part of Nasuni Corporation (“Nasuni”). The software and services described in this document are furnished under terms and conditions found at www.nasuni.com/legal. The software and services may be used only in accordance with such terms. These terms are subject to change from time to time, so you should check our website from time to time for the latest terms. This document contains the confidential and proprietary information of Nasuni and may not be used or disclosed to any third party except as specifically set forth in such terms and conditions and any confidentiality agreement in place with Nasuni. No part of this manual may be reproduced in any form or by any means, electronic or mechanical, including photocopying and recording, without the express written permission of Nasuni. Licensed users may contact Nasuni for access to additional copies.
Although Nasuni has attempted to ensure the accuracy of the content of this document, it is possible that this document might contain technical inaccuracies, typos or other errors. Nasuni assumes no liability for any error in this document and disclaims all damages that might arise from the use of this document, whether direct, indirect, incidental, consequential or otherwise, including, but not limited to loss of data or profits. Nasuni provides this publication “as is” without warranty of any kind, either express or implied, including, but not limited to implied warranties of merchantability or fitness for a particular purpose.
Trademarks
NASUNI, the NASUNI logo, and UNIFS are registered trademarks and/or service marks of Nasuni Corporation. All other
marks are the property of their respective owners.
Contacting Nasuni Corporation
Nasuni Corporation One Marina Park Drive Boston, MA 02210
Telephone: 1-857-444-8500 Sales: 1-800-208-3418 http://www.nasuni.com Email: [email protected]
Technical Support
Telephone: 1-888-6NASUNI (888-662-7864) Email: [email protected] Technical Support is available 24/7/365 for full production customers.

Nasuni Mobile Access Guide 8.0 iii
Contents
Contents . . . . . . . . . . . . . . . . . . . . . . . . . . . . . . . . . . . . . . . . . . . . . . . . . . . . . .iii
Product Documentation . . . . . . . . . . . . . . . . . . . . . . . . . . . . . . . . . . . . . . . . . . vElectronic Publications . . . . . . . . . . . . . . . . . . . . . . . . . . . . . . . . . . . . . . . . . . . . . . . . v
Release Notes for Nasuni Documentation Set . . . . . . . . . . . . . . . . . . . . . . . . . . . . . vi
Chapter 1: Introduction . . . . . . . . . . . . . . . . . . . . . . . . . . . . . . . . . . . . . . . . . . . 1About Mobile Access . . . . . . . . . . . . . . . . . . . . . . . . . . . . . . . . . . . . . . . . . . . . . . . . . 1
Using Mobile Access . . . . . . . . . . . . . . . . . . . . . . . . . . . . . . . . . . . . . . . . . . . . . . . . . 1
Chapter 2: Setting Up Mobile Access . . . . . . . . . . . . . . . . . . . . . . . . . . . . . . . 2Overview of the Setup Process . . . . . . . . . . . . . . . . . . . . . . . . . . . . . . . . . . . . . . . . . 2
Configuring Data Volume to Allow Mobile Access . . . . . . . . . . . . . . . . . . . . . . . . . . . 2
Configuring Preferences for Mobile Access . . . . . . . . . . . . . . . . . . . . . . . . . . . . . . . . 5
Adding and Enabling Mobile Devices . . . . . . . . . . . . . . . . . . . . . . . . . . . . . . . . . . . . . 6
Inviting Users to Mobile Access . . . . . . . . . . . . . . . . . . . . . . . . . . . . . . . . . . . . . . . . . 8
Providing Mobile Access to Users . . . . . . . . . . . . . . . . . . . . . . . . . . . . . . . . . . . . . . 10
Chapter 3: Using Mobile Access . . . . . . . . . . . . . . . . . . . . . . . . . . . . . . . . . . 11Downloading the Nasuni Mobile Access app . . . . . . . . . . . . . . . . . . . . . . . . . . . . . 11
Logging In . . . . . . . . . . . . . . . . . . . . . . . . . . . . . . . . . . . . . . . . . . . . . . . . . . . . . . . . . 11
Mobile Access Quick Reference Sheet . . . . . . . . . . . . . . . . . . . . . . . . . . . . . . . . . . 13
Using Mobile Access . . . . . . . . . . . . . . . . . . . . . . . . . . . . . . . . . . . . . . . . . . . . . . . . 14
Folder-Level Tasks . . . . . . . . . . . . . . . . . . . . . . . . . . . . . . . . . . . . . . . . . . . . . . . 15
File Operations . . . . . . . . . . . . . . . . . . . . . . . . . . . . . . . . . . . . . . . . . . . . . . . . . . 16
File Access . . . . . . . . . . . . . . . . . . . . . . . . . . . . . . . . . . . . . . . . . . . . . . . . . . . . . 20
Folder-Level Operations . . . . . . . . . . . . . . . . . . . . . . . . . . . . . . . . . . . . . . . . . . . 24
Administrative Operations . . . . . . . . . . . . . . . . . . . . . . . . . . . . . . . . . . . . . . . . . 26
Chapter 4: Operations . . . . . . . . . . . . . . . . . . . . . . . . . . . . . . . . . . . . . . . . . . . 27Firewalls . . . . . . . . . . . . . . . . . . . . . . . . . . . . . . . . . . . . . . . . . . . . . . . . . . . . . . . . . . 27
Multiple Volume Protocols . . . . . . . . . . . . . . . . . . . . . . . . . . . . . . . . . . . . . . . . . . . . 30
Nasuni Mobile Access Guide 8.0 iv
Contents
Monitoring Mobile Access Traffic . . . . . . . . . . . . . . . . . . . . . . . . . . . . . . . . . . . . . . . 33
Network Activity Charts on Home page . . . . . . . . . . . . . . . . . . . . . . . . . . . . . . . 33
Network Status page . . . . . . . . . . . . . . . . . . . . . . . . . . . . . . . . . . . . . . . . . . . . . 34
Network Activity Charts . . . . . . . . . . . . . . . . . . . . . . . . . . . . . . . . . . . . . . . . . . . 35
SNMP Monitoring . . . . . . . . . . . . . . . . . . . . . . . . . . . . . . . . . . . . . . . . . . . . . . . . . . . 38
Appendix A: DNS Configuration . . . . . . . . . . . . . . . . . . . . . . . . . . . . . . . . . . . 40Configuring the DNS for Mobile Access or Desktop Sync . . . . . . . . . . . . . . . . . . . . 40
Overview of configuring the DNS . . . . . . . . . . . . . . . . . . . . . . . . . . . . . . . . . . . . 40
A record type . . . . . . . . . . . . . . . . . . . . . . . . . . . . . . . . . . . . . . . . . . . . . . . . . . . 40
SRV record type . . . . . . . . . . . . . . . . . . . . . . . . . . . . . . . . . . . . . . . . . . . . . . . . . 41
TXT record type . . . . . . . . . . . . . . . . . . . . . . . . . . . . . . . . . . . . . . . . . . . . . . . . . 42
PTR record type . . . . . . . . . . . . . . . . . . . . . . . . . . . . . . . . . . . . . . . . . . . . . . . . . 42
Microsoft Windows DNS Manager . . . . . . . . . . . . . . . . . . . . . . . . . . . . . . . . . . . 44
Using third-party DNS configuration software . . . . . . . . . . . . . . . . . . . . . . . . . . 48
. . . . . . . . . . . . . . . . . . . . . . . . . . . . . . . . . . . . . . . . . . . . . . . . . . . . . . . . . . . . . . . . . 48
Index . . . . . . . . . . . . . . . . . . . . . . . . . . . . . . . . . . . . . . . . . . . . . . . . . . . . . . . . . 49

Nasuni Mobile Access Guide 8.0 v
Product Documentation
Electronic Publications
Extensive documentation is available for all aspects of installing, configuring, and operating the Nasuni Filer. The latest version of each of the following documents is available in PDF format at http://www.nasuni.com/support/documentation.
• Hardware Getting Started Guide: For setting up the Nasuni Filer on the Nasuni Filer hardware appliance. To download this guide for the NF-60, visit:
http://info.nasuni.com/hubfs/Nasuni.com-assets/Support-Docs/Nasuni_Filer_HW_GS_Guide_NF-60.pdf
To download this guide for the NF-200, visit:
http://info.nasuni.com/hubfs/Nasuni.com-assets/Support-Docs/Nasuni_Filer_HW_GS_Guide_NF-200.pdf
To download this guide for the NF-400, visit:
http://info.nasuni.com/hubfs/Nasuni.com-assets/Support-Docs/Nasuni_Filer_HW_GS_Guide_NF-400.pdf
To download this guide for the NF-440, visit:
http://info.nasuni.com/hubfs/Nasuni.com-assets/Support-Docs/Nasuni_Filer_HW_GS_Guide_NF-440.pdf
To download this guide for the NF-600, visit:
http://info.nasuni.com/hubfs/Nasuni.com-assets/Support-Docs/Nasuni_Filer_HW_GS_Guide_NF-600.pdf
• Installing the Nasuni Filer on Virtual Platforms: For installing the Nasuni Filer on a virtual machine within a corporate network. To download this guide, visit:
http://info.nasuni.com/hubfs/Nasuni.com-assets/Support-Docs/Installing-on-Virtual.pdf
• Installing the Nasuni Filer on the Azure Platform: For installing the Nasuni Filer on the Microsoft Azure cloud virtual machine. To download this guide, visit:
http://info.nasuni.com/hubfs/Nasuni.com-assets/Support-Docs/Installing-on-Azure.pdf
• Installing the Nasuni Filer on the EC2 Platform: For installing the Nasuni Filer on the Amazon EC2 cloud virtual machine. To download this guide, visit:
http://info.nasuni.com/hubfs/Nasuni.com-assets/Support-Docs/Installing-on-EC2.pdf

Nasuni Mobile Access Guide 8.0 vi
Release Notes for Nasuni Documentation Set
• Initial Configuration Guide: For configuring and deploying the Nasuni Filer after the initial installation on the hardware appliance or virtual machine. To download this guide, visit:
http://info.nasuni.com/hubfs/Nasuni.com-assets/Support-Docs/Nasuni_Filer_Initial_Configuration_Guide.pdf
• Administration Guide: For managing unified storage using the Nasuni Filer. To download this guide, visit:
http://info.nasuni.com/hubfs/Nasuni.com-assets/Support-Docs/Nasuni_Filer_Administration_Guide.pdf
• Nasuni Management Console Guide: For managing multiple Nasuni Filers. To download this guide, visit:
http://info.nasuni.com/hubfs/Nasuni.com-assets/Support-Docs/NMCGuide.pdf
• Nasuni Management Console Quick Start Guide: To quickly get started using the Nasuni Management Console to manage multiple Nasuni Filers. To download this guide, visit:
http://info.nasuni.com/hubfs/Nasuni.com-assets/Support-Docs/NMCQuickStartGuide.pdf
• Using Multiple Protocols: Discusses scenarios requiring particular access to data, and how different combinations of protocols can help provide the access that clients need. To download this guide, visit:
http://info.nasuni.com/hubfs/Nasuni.com-assets/Support-Docs/UsingMultipleProtocols.pdf
• Third-Party Licensing Guide: Listing of third-party software used in the Nasuni Filer. To download this guide, visit:
http://info.nasuni.com/hubfs/Nasuni.com-assets/Support-Docs/Nasuni_Filer_Third-Party_Licensing_Guide.pdf
Release Notes for Nasuni Documentation Set
Date (As Of) Changes
2018-04-10 Clarified behavior when deleting directories containing blocked files, in Administration Guide, NMC Guide, Mobile Access Guide, Mobile Access User Guide, Web Access User Guide, Web Access Shared Links, and Initial Configuration Guide.
Warned that CIFS folders with Advanced Global Locking might have access issues with Linux clients, in Global Locking Guide, Administration Guide, and NMC Guide.

Nasuni Mobile Access Guide 8.0 vii
Release Notes for Nasuni Documentation Set
Clarified rules for Filer-forced snapshots, in Snapshot Processing.Clarified non-support for Hyper-V Dynamic Memory, in Suggestions for VM
Installation.Added numerous Mac OS X details and suggestions, in Mac OS X Best
Practices Guide.
2018-03-30 Added details of new considerations affecting Mac client performance, in Mac OS X Performance Guide.
Clarified when updates to antivirus database occur, in Best Practices Guide, Administration Guide, and NMC Guide.
Added support for Varonis and other systems that use Advanced Message Queuing Protocol (AMQP), in Administration Guide and NMC Guide.
Added explanations of Safe Delete feature, in Administration Guide and NMC Guide.
Added a description of the NMC API, in NMC API.
Cautioned about deleting files deleted from folder that two different Nasuni Filers have enabled Global Locking on, in Administration Guide. Global Locking Guide. and NMC Guide.
Clarified supported instance types, in Installing the Nasuni Filer on the EC2 Platform.
Added procedures for accessing software through Azure Marketplace, in Configuring Customer-Provided Azure Tenant.
Updated screen shots and procedures for SSL certificates, in Administration Guide.
Updated screen shot, in Configuring Customer-Provided Azure Tenant.Fixed incorrect screen shot, in DFS Configuration Guide.Added procedure for removing Revit Worksharing Monitor, in Revit
Configuration Guide.
2018-02-28 Added information about time to generate an encryption key, in Best Practices Guide, Encryption Key Best Practices, NMC Guide, Recovery Guide, and Administration Guide.
Date (As Of) Changes

Nasuni Mobile Access Guide 8.0 viii
Release Notes for Nasuni Documentation Set
Added considerations about MTU on the EC2 platform, in Installing the Nasuni Filer on the EC2 Platform.
Noted that enabling "Snapshot Directory Access" prevents directories from being deleted, in NMC Guide, Administration Guide, and Best Practices Guide.
Clarified behavior of Security indication when permission of remote volume is set to Disabled, in NMC Guide.
Noted that you cannot create an internal link to folders created by using the "%U" wildcard, in several documents.
Clarified the relative size of the COW disk, in Cache Configuration Guide and Installing on Virtual.
Added tip on hard links with Linux and Mac OS X clients using global locking with CIFS, in Administration Guide.
Updated default number of cores to 4, in Initial Configuration Guide and Installing on Virtual.
Added tip on case-sensitive volumes and multiple volume protocols, in Administration Guide.
Added tip on using Windows “net use” command, in Administration Guide and Initial Configuration Guide.
Added details of the suggested usage, in Revit Configuration Guide.Clarified how Auto Cache works, in Administration Guide and NMC Guide.Specified that the user names for CIFS Administrative Users should not
have the leading domain, in Administration Guide.
Added tip about Embedded Host Client for installing the Nasuni Filer into VMware ESXi using the vSphere Web interface, in Installing on Virtual.
Added description of backup keys, which enable recovery of Nasuni Filers that don’t have owned volumes or snapshots, in Administration Guide and Recovery Guide.
Updated procedure for installing Nasuni Filer and NMC on Microsoft Azure platform, in Configuring Customer-Provided Azure Tenant for the Nasuni Filer.
Added the Device ID and Logged In fields to the Mobile Licenses table, in NMC Guide.
Added description of Prioritize Snapshot feature, in NMC Guide and Administration Guide.
Created tip for error when installing to non-default location on Hyper-V, in Installing on Virtual.
Date (As Of) Changes

Nasuni Mobile Access Guide 8.0 ix
Release Notes for Nasuni Documentation Set
2017-11-15 Clarified when the file syncs occur related to Global Locking, in Cache Configuration Guide, Best Practices Guide, Global Locking Guide, and Administration Guide.
Clarified processing when a Nasuni Filer goes under the control of a Nasuni Management Console, in NMC Guide and Administration Guide.
Added details about how certain types of loads can affect syncs, in NMC Guide, Merge Conflicts Guide, and Administration Guide.
Warned that downloading large files from the NMC can take a long time, in NMC Guide.
Added warning against saving encryption key files to volume, in Best Practices Guide, NMC Guide, Recovery Guide, and Administration Guide.
Updated copyright, trademark, disclaimer, and liability statements, in most documents.
Updated maximum Azure disk size to 4,095 GiB, in Best Practices Guide, Cache Configuration Guide, Initial Configuration Guide, Resizing Cache Guide, Installing on Virtual Platforms, and Suggestions for VM Installation.
2017-10-31 Added procedure for possible notification during snapshot or sync, in NMC Guide and Administration Guide.
Added details about the Clam AntiVirus (ClamAV®) open-source antivirus engine, in Best Practices Guide, NMC Guide, Third-Party Licensing Guide, and Administration Guide.
New screenshots, in Installing the Nasuni Filer on the EC2 Platform.Added reminders to keep COW disk in proportion to cache disk when
changing the size of the cache disk, in Cache Configuration and several other documents.
Selecting the “Secure transfer required” feature for an Azure Storage account does not affect the operation of the Nasuni Filer, in Configuring Customer-Provided Azure Storage for the Nasuni Filer and Installing Nasuni Filer on Customer-Provided Azure Storage Getting Started Guide.
Corrected the default number of cores for a Nasuni Filer, in Best Practices Guide, Initial Configuration Guide, and Installing on Virtual Platforms.
Clarified the processing for recovery after resetting the administrative account, in Recovery Guide, Administration Guide, and NMC Guide.
Clarified the prerequisites for performing the Side Load procedure, in Recovery Guide, Administration Guide, and Side Load Guide.
Date (As Of) Changes

Nasuni Mobile Access Guide 8.0 x
Release Notes for Nasuni Documentation Set
Clarified the default outbound Quality of Service, in Best Practices Guide, Cache Configuration Guide, Administration Guide, and NMC Guide.
Added material about enabling Auditing to help mitigate ransomware, in Best Practices Guide, Administration Guide, and NMC Guide.
Clarified meaning of Restrict Anonymous setting for CIFS, in Administration Guide and NMC Guide.
2017-09-29 Added material on Cloud I/O and Cloud Credentials, in Administration Guide and NMC Guide.
Added discussion of chunk size and related topics, in Best Practices Guide, Cache Configuration Guide, Administration Guide, and NMC Guide.
Rewrote section on General CIFS Settings to clarify processing in different situations, in Administration Guide and NMC Guide.
Added details about how long notifications are retained, in Administration Guide and NMC Guide.
Added procedure for obtaining JSON format of shares configuration in NMC, in NMC Guide.
Clarified use of DFS for failover, in DFS Configuration and Best Practices Guide.
Reconciled the recovery procedures, in Administration Guide and Recovery Guide.
Removed mentions of default volume and default CIFS share, in Best Practices Guide, Best Practices Guide, and Administration Guide.
Clarified best use cases for Side Load procedure, in Side Load Feature.Added warnings against restoring a virtual machine from a virtual machine
snapshot or backup, in Cache Configuration Guide and Installing on Virtual Platforms.
Added information about how permissions affect the ability to download files, in Administration Guide and NMC Guide.
Added procedure for SMB3 encryption, in Administration Guide, Security Features, and NMC Guide.
Added instructions for “Snapshot ran out of internal space” error, in Administration Guide and Best Practices Guide.
Date (As Of) Changes

Nasuni Mobile Access Guide 8.0 xi
Release Notes for Nasuni Documentation Set
Updated the supported Cleversafe/IBM Cloud Object Storage version to 3.8.3.
Added details of auditing becoming disabled if Varonis or AMQP destinations are removed, in Administration Guide and NMC Guide.
Added details of the use of encryption keys with remote volumes, in Encryption Key Best Practices.
Added details of auditing output types, including Varonis, AMQP, and local CSV, in NMC Guide.
Clarified details of NTFS Exclusive Mode and NTFS Compatible Mode, in Administration Guide and others.
2017-08-31 Formatting and pagination, in Data API doc.Added Varonis integration, in Administration Guide and NMC Guide.Clarified NMC procedure for changing SMB protocol.Added procedure for installing NMC using Azure Resource Manager, in
Installing the Nasuni Filer on the Azure Platform.
Clarified that displayed size might differ from external size indications, in Administration Guide and other documents.
Clarified the distinction between “private cloud”, “customer-controlled public cloud”, “BYOC”, and “public cloud” in many docs. Changed name of Private-Cloud-Getting-Started-Guide-Azure to GS-Guide-for-Azure-BYOC.
Added link to NASUNI-FILER-MIB for SNMP support, in Administration Guide.
Added NTFS Exclusive Mode to available permissions for volume, in Administration Guide and other documents.
Created Upgrading Nasuni Filers to Use Case-Insensitive Volumes procedure.
Clarified that changes to the Snapshot Retention setting go into effect when the next snapshot occurs, and that it is normal to temporarily see more snapshots than the Snapshot Retention setting would suggest, in Administration Guide and NMC Guide.
Date (As Of) Changes

Nasuni Mobile Access Guide 8.0 xii
Release Notes for Nasuni Documentation Set
Added detailed instructions in volume creation procedures about preferring case-insensitive CIFS volumes, in Administration Guide, Best Practices Guide, and Worksheets for Configuring NMC, Nasuni Filers, Volumes, and Shares.
Added best practices for handling historical SIDs before adding data, in Administration Guide, Best Practices Guide, and NMC Guide.
Removed references to fsck, since it is unnecessary with OS7, in Administration Guide, NMC Guide, Recovery Guide, Installing on Virtual.
Date (As Of) Changes

Nasuni Mobile Access Guide 8.0 1
Chapter 1: Introduction
This Guide is intended to help the IT administrator to configure and manage Nasuni Mobile Access for users.
About Mobile Access
You can access data stored in the Nasuni Filer using mobile devices, including iOS-based devices (such as iPhone and iPad) and Android phones.
You can enable Mobile Access to CIFS shares. This enables users to access data using mobile devices, including iOS-based devices (such as iPhone and iPad) and Android phones.
You can specify details of the Mobile Service, such as adding another port for Mobile Access, limiting how long users remain authenticated on mobile devices, limiting users to only one mobile device, and limiting the types of mobile devices that can use Mobile Access.
You can enable, disable, and delete individual licenses for the Mobile Access service.
Using Mobile Access
Users can use Mobile Access for tasks such as the following:
• Viewing documents and images, and playing audio and video on their mobile device.
• Opening documents, images, and video to use with apps on their mobile device.
• Uploading documents, images, and video to their folders on the Nasuni Filer.
• Downloading documents, images, and video from their folders on the Nasuni Filer.
• View file information such as file name, file size, and date and time of last modification.
• Emailing links to files.
• Sharing files as attachments.
• Viewing and accessing previous versions of files.
• Identifying “favorite” files for easier access.

Nasuni Mobile Access Guide 8.0 2
Chapter 2: Setting Up Mobile Access
Overview of the Setup Process
Setting up Mobile Access for users involves several steps, including the following:
• Ensuring that the data volume is configured to allow Mobile Access.
• Configuring your preferences for the use of Mobile Access.
• Adding and enabling mobile devices.
• Inviting users to Mobile Access.
• Providing Mobile Access to users.
Configuring Data Volume to Allow Mobile AccessCreate
Mobile Access is available for CIFS shares on a volume. You must enable Mobile Access for a CIFS share on a volume.
Tip: To use Mobile Access with NFS volumes, you must use multiple protocols with the NFS volume. See “Multiple Volume Protocols” on page 30.
Tip: To enable Mobile Access to a CIFS share for some users, but not all users, create a second CIFS share to the same data as the original CIFS share. Then enable Mobile Access to the second CIFS share and permit only those specific users to have access to the second CIFS share.
To verify that Mobile Access is enabled for a shared folder to a volume:
1. Click Volumes, then select a volume that has the CIFS protocol enabled from the list.
Note: If this Nasuni Filer is under Nasuni Management Console control, this page is not available on the Nasuni Filer. Instead, use the Nasuni Management Console to view information or perform actions.

Nasuni Mobile Access Guide 8.0 3
Setting Up Mobile Access Configuring Data Volume to Allow Mobile Access
2. The Volume properties page appears. The Total Shares status is visible.
Figure 2-1: Total Shares status.
3. Click the Total Shares status. Alternatively, select CIFS Shares from the Properties drop-down list. The CIFS Shares page appears.
Figure 2-2: CIFS Shares page.
4. Click Edit Share. The Add CIFS Share/Edit Settings page appears.
Figure 2-3: Add CIFS Share/Edit Settings page.

Nasuni Mobile Access Guide 8.0 4
Setting Up Mobile Access Configuring Data Volume to Allow Mobile Access
5. Click Show Advanced Options. The Advanced Options pane appears.
Figure 2-4: Advanced Options pane.
6. To enable access by mobile devices, such as iPhones and Android phones, select the Desktop and Mobile Access check box. .
7. To save changes to the CIFS share, click Save Share. The CIFS share is ready for use.

Nasuni Mobile Access Guide 8.0 5
Setting Up Mobile Access Configuring Preferences for Mobile Access
Configuring Preferences for Mobile Access
Mobile Access offers several optional features that you can configure.
To configure optional Nasuni Mobile Access features, follow these steps:
1. Click Services, then select Mobile Service Settings from the list. The Mobile Service Settings page appears.
Figure 2-5: Mobile Service Settings page.
Note: If this Nasuni Filer is under Nasuni Management Console control, this page is not available on the Nasuni Filer. Instead, use the Nasuni Management Console to view information or perform actions.
2. To add another port for Mobile Access, enter the port number in the Additional API port text box. The port number must be between 1 and 65535, inclusive. Leave blank to disable an additional port.
3. To limit how long users remain authenticated on mobile devices, enter the maximum length of time in minutes in the Session Expiration text field. To allow unlimited session time, enter 0 (zero).
4. To limit users to only one mobile device, select Limit to a single device.
5. You can limit the types of mobile devices that can use Mobile Access. To allow Android devices to use Mobile Access, select Android. To allow iOS devices to use Mobile Access, select iOS. To allow Linux systems to use Mobile Access, select Linux. To allow OSX systems to use Mobile Access, select OSX. To allow Windows systems to use Mobile Access, select Windows.
6. To save your changes, click Save.
Nasuni Mobile Access Guide 8.0 6
Setting Up Mobile Access Adding and Enabling Mobile Devices
Adding and Enabling Mobile DevicesManage
You can disable, enable, and delete licenses for mobile devices.
To manage access to Nasuni Mobile Access by mobile devices, follow these steps:
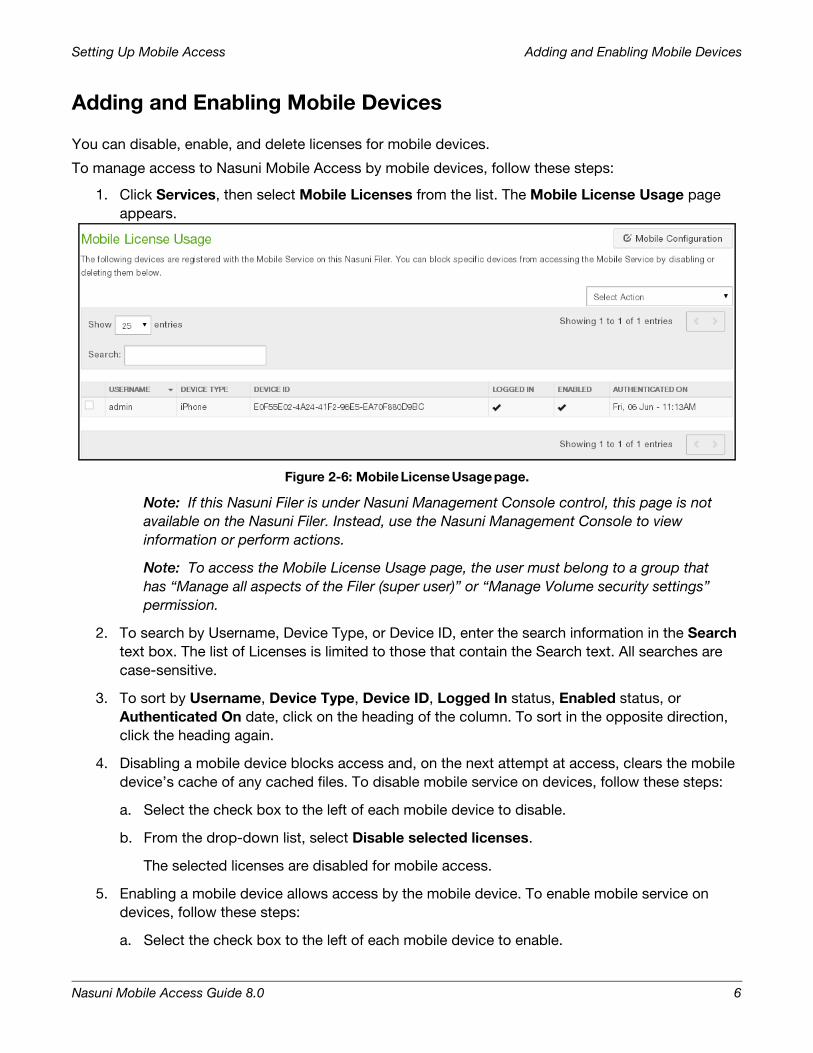
1. Click Services, then select Mobile Licenses from the list. The Mobile License Usage page appears.
Figure 2-6: Mobile License Usage page.
Note: If this Nasuni Filer is under Nasuni Management Console control, this page is not available on the Nasuni Filer. Instead, use the Nasuni Management Console to view information or perform actions.
Note: To access the Mobile License Usage page, the user must belong to a group that has “Manage all aspects of the Filer (super user)” or “Manage Volume security settings” permission.
2. To search by Username, Device Type, or Device ID, enter the search information in the Search text box. The list of Licenses is limited to those that contain the Search text. All searches are case-sensitive.
3. To sort by Username, Device Type, Device ID, Logged In status, Enabled status, or Authenticated On date, click on the heading of the column. To sort in the opposite direction, click the heading again.
4. Disabling a mobile device blocks access and, on the next attempt at access, clears the mobile device’s cache of any cached files. To disable mobile service on devices, follow these steps:
a. Select the check box to the left of each mobile device to disable.
b. From the drop-down list, select Disable selected licenses.
The selected licenses are disabled for mobile access.
5. Enabling a mobile device allows access by the mobile device. To enable mobile service on devices, follow these steps:
a. Select the check box to the left of each mobile device to enable.

Nasuni Mobile Access Guide 8.0 7
Setting Up Mobile Access Adding and Enabling Mobile Devices
b. From the drop-down list, select Enable selected licenses.
The selected licenses are enabled for mobile access.
6. Deleting a mobile device removes the mobile device from the list, but does not block future access. Instead, the user must log in again the next time they run the Nasuni Mobile Access application. To delete mobile devices, such as when people stop using a mobile device, follow these steps:
a. Select the check box to the left of each mobile device to delete.
b. From the drop-down list, select Delete selected licenses.
The selected licenses are deleted.

Nasuni Mobile Access Guide 8.0 8
Setting Up Mobile Access Inviting Users to Mobile Access
Inviting Users to Mobile Access
You can create a link to invite users to Mobile Access to your Nasuni Filers. This link can include the hostname or IP address, the port number, and the username. You can then email this link to users to simplify the process of connecting them to Mobile Access.
To create an invitation link to Nasuni Mobile Access, follow these steps:
1. Click Services, then select Mobile Service Settings from the list. The Mobile Service Settings page appears.
Figure 2-7: Mobile Service Settings page.
Note: If this Nasuni Filer is under Nasuni Management Console control, this page is not available on the Nasuni Filer. Instead, use the Nasuni Management Console to view information or perform actions.
2. Click Invitation Link. The Generate Invitation Link page appears.
Figure 2-8: Generate Invitation Link page.
3. Enter the Host and the Port that mobile clients use to access the Web server. Ensure that you provide the port for HTTPS access.

Nasuni Mobile Access Guide 8.0 9
Setting Up Mobile Access Inviting Users to Mobile Access
4. Click Generate. A link is generated of the form:https://<host_name>:<port_number>/fs/mobile/configwhere <host_name> and <port_number> are the Host and Port specified in step 3. If Port is 443, <port_number> is omitted from the link.
5. Copy the link, and paste it as a URL into the email that you send to users to inform them of the availability of Mobile Access.

Nasuni Mobile Access Guide 8.0 10
Setting Up Mobile Access Providing Mobile Access to Users
Providing Mobile Access to Users
The Nasuni Mobile application needs the following information to access your Nasuni Filers: host address, port number, and user credentials. The administrator has several options for providing this information to configure the Nasuni Mobile application for users. Several of these methods simplify login, so that the user does not need to know the host or port.
Configuring DNS to Simplify User Login
The administrator can configure the company DNS server to simplify user login to your Nasuni Filers. A properly configured DNS includes the host and port necessary for Mobile Access. When the user enters their company email address and password into the Nasuni Mobile Access application, the application retrieves the host and port from the DNS to simplify the login. As a result, the user only needs to enter their company email address and password, instead of entering their username, password, host, and port.
For more information on configuring DNS, see Appendix A, “DNS Configuration,” on page 40.
Providing Link to Users
The administrator can also create a link to share access information for your Nasuni Filers. This link can include the hostname or IP address, the port number, and the username. The administrator can then email this link to users to simplify the process of connecting them to Mobile Access. The link has this form:
https://<hostname>:<portnumber>/fs/mobile/config?username=<username>
Since the username is optional, the link might also have this form:
https://<hostname>:<portnumber>/fs/mobile/config
Opening this link on the mobile device launches the Nasuni Mobile Access application, and fills in information necessary to log in to the Nasuni Filer.
The user can then log in to the Nasuni Mobile Access application using Active Directory credentials, which might include the domain, and their username and password.
Providing Hostname and Port to Users
If the administrator has not configured the company DNS server to simplify user login to your Nasuni Filers, the administrator can, alternatively, directly provide the hostname or IP address of the Nasuni Filer, along with the port. If VPN access is required for your mobile deployment, then the hostname should be the internal hostname or IP address and the port should be 443. If direct external access is allowed for mobile devices, then the administrator should provide the external hostname or IP address and port that has been configured. Those should use network address translation (NAT) to re-direct to the internal hostname or IP address and the port 443, or another port that the Administrator has set up for Mobile Access.

Nasuni Mobile Access Guide 8.0 11
Chapter 3: Using Mobile Access
Downloading the Nasuni Mobile Access app
Each user must download and install the appropriate Nasuni Mobile Access app for their mobile device. The Nasuni Mobile Access application is freely available to your users from the app store for their mobile device.
Logging In
If the administrator has configured the company DNS server to simplify user login to your Nasuni Filers, the login screen looks like this.
Figure 3-1: Initial Login screen.
You must enter your company email address and password. If available, the host and port are retrieved from DNS.
If multiple sites are defined, you can select a site from a list:
Figure 3-2: Initial Login screen when DNS configured for multiple sites.

Nasuni Mobile Access Guide 8.0 12
Using Mobile Access Logging In
If the administrator has not configured the company DNS server to simplify user login to your Nasuni Filers, but you have used the administrator-created link containing the host and port, the login screen looks like this.
Figure 3-3: Login screen when using link.
You must enter Active Directory credentials, which might include the domain, and username and password. The host and port are provided.
If the administrator has not configured the company DNS server to simplify user login to your Nasuni Filers, and you have not employed the administrator-created link containing the host and port, the Advanced check box appears. Select the Advanced check box, and the login screen looks like this.
Figure 3-4: Login screen when entering host, port, and credentials.
You then log in to the Nasuni Mobile Access application using your Active Directory credentials. Credentials include the domain, username, and password. The domain is optional, depending upon how Active Directory is configured.

Nasuni Mobile Access Guide 8.0 13
Using Mobile Access Mobile Access Quick Reference Sheet
Mobile Access Quick Reference SheetPrint this page and keep for future use.
Task Action
Open a share or folder. Tap the name of that share or folder. The contents appears as a list.
Sort the display. Tap the filter icon at the top right, then tap Name, Modified Time, or Type.
Navigate up in the folder hierarchy. Tap the up arrow at the top left.
Enter path manually. Tap the three-dot icon at top right, then tap Browse. Enter path, then tap Browse.
View information about a folder or file.
Tap the drop-down-arrow, then tap Details. A page appears showing information.
Tag a file or folder as a favorite. Tap the drop-down-arrow, then tap the star icon. Favorite files and folders remain on the device for off-line access.
Download a file. Tap the drop-down-arrow, then tap Download.
View or restore other versions of a file or folder.
Tap the drop-down-arrow, then tap Versions. If other versions are available, they appear in a list. To restore a previous version, tap Restore.
Open a file. Tap the file name. If the device can handle the format, the file opens.
Email the file or email a link to the file.
Tap the drop-down-arrow, then tap Share. Select Attachment or Link.
Open the file in other applications on the mobile device.
Tap the drop-down-arrow, then tap Open with. If the device does not recognize format, you can download.
Delete a file or an empty folder. Tap the drop-down-arrow, then tap Delete.
Upload a file to a folder. Navigate to the destination folder. Tap Upload icon near the bottom of the display. Navigate to the file. Tap OK.
View favorite files or folders. Tap menu icon at top left, then tap Favorites. A list of favorite files and folders appears. Favorite files remain on the device for off-line access.
Stay logged in even when the Nasuni Application is not running.
Tap menu icon at top left, then tap Settings. Select “Stay logged in”.
Use a passcode instead of the full credentials when logging in.
Tap menu icon at top left, then tap Settings. Select “Use Passcode”.
Get warned before downloading data when not on a Wi-Fi connection.
Tap menu icon at top left, then tap Settings. Select “Warn before downloading when not on a Wi-Fi connection”.
Logout from the Nasuni App. Tap the three-dot icon at top right, then tap Logout.

Nasuni Mobile Access Guide 8.0 14
Using Mobile Access Using Mobile Access
Using Mobile Access
This section presents some of the actions that you can perform using mobile devices. Some of the actions available depend on which mobile platform you are using.
Tip: The figures show images from an Android tablet. The screens might appear different on other mobile platforms.
After you log in to the Nasuni Mobile Access application, a list of the CIFS shares available on this Nasuni Filer appears.
Figure 3-5: Shares available on mobile device.

Nasuni Mobile Access Guide 8.0 15
Using Mobile Access Using Mobile Access
Folder-Level Tasks
Opening a CIFS share or folder
To open a CIFS share or folder, tap the name of that CIFS share or folder. The contents appear as a list.
Figure 3-6: List of folders.
To sort the display, tap the Sort icon at the top right. From the drop-down list, select one of the following:
Name: To sort the list by name of the item.
Modified Time: To sort the list by the time the item was last modified.
Type: To sort the list by type of item.
Tip: For iOS, the same sort options appear at the top of the list of folders and files.

Nasuni Mobile Access Guide 8.0 16
Using Mobile Access Using Mobile Access
Navigating folder hierarchy
To navigate to a higher point in the folder hierarchy, tap the upward-facing arrow button at the top left.
Tip: For iOS, tap the leftward-facing arrow button at the top left.
Manually entering paths
To manually enter a path to a file or folder, tap the three-dot icon in the upper right corner. A drop-down menu appears.
Figure 3-7: Drop-down menu.
Tap Go to. The “Go to Path” dialog box appears. Enter the path, then tap Browse. The specified path opens.
File Operations
Viewing details about a file
To view information about a file, tap the drop-down icon beside its name. The drop-down menu pane appears.
Figure 3-8: Drop-down menu pane.

Nasuni Mobile Access Guide 8.0 17
Using Mobile Access Using Mobile Access
Tap Details. A page appears showing information including the name, size, and date modified.
Figure 3-9: File information.
Note: Nasuni’s display of size might differ from other indications of size, such as Windows Explorer and other utilities. Typically, such utilities display only the size of the data currently present in the local cache, while Nasuni displays the full size, regardless of where the data is.
Note: For iOS, if a file is in the cache, a symbol appears next to the file name.
Figure 3-10: Symbol indicating file in cache.
Buttons are available to perform the following operations:
• View File, if the mobile device can handle the file format. Otherwise, Download the file. See “Opening a file” on page 18.
• Versions: view any available previous versions of the file. See “Viewing and restoring previous versions of a file” on page 19.

Nasuni Mobile Access Guide 8.0 18
Using Mobile Access Using Mobile Access
• Share: Sharing the file as either an attachment or a link. See “Sharing a file as an attachment” on page 22 and “Sharing a file as a link” on page 23.
Tip: For iOS, tap the share icon at the top right.
• Favorite: To tag a file as a favorite. See “Tagging a file or folder as favorite” on page 24.
Tip: For iOS, tap the star icon above the file name.
• Open with: To select an app to open a file with. See “Opening a file with a specific app” on page 20.
Tip: For iOS, tap the share icon at the top right.
Opening a file
To open a file, tap the file name. If the file is of a format that the mobile device can handle (such as graphics, text, or PDF), a preview of the file opens. (On some mobile platforms, a new display opens on which you can choose an action.)
Figure 3-11: Open file preview.
To see a full-screen version of the file, tap the arrow at the upper left of the preview pane.
Figure 3-12: Open PDF file.
You can perform additional actions by tapping the three-dot icon in the upper right corner. For some file formats, such as videos, this icon might not be available.
If the file is an image file, such as a .JPG or .PNG file, among other image files, you can move from one image to the next in a folder by swiping left or swiping right.

Nasuni Mobile Access Guide 8.0 19
Using Mobile Access Using Mobile Access
Viewing and restoring previous versions of a file
To view any available previous versions of the file, tap the drop-down icon beside its name, then tap Versions. If any previous versions of the file are available, they appear in a list.
Figure 3-13: Versions of file.
The different versions include the file name, file size, and file date and time.
Note: Nasuni’s display of size might differ from other indications of size, such as Windows Explorer and other utilities. Typically, such utilities display only the size of the data currently present in the local cache, while Nasuni displays the full size, regardless of where the data is.
To view one of the previous versions, tap the file name.
To view a menu of other available actions for a previous version, tap the drop-down icon beside its name.
Figure 3-14: Available actions for versions of file.
To view details of a previous version, tap Details.
To open a previous version with a specific app, tap Open with and select the app from the list. The file opens in the selected app.
To replace the current version of the file with the selected previous version, tap Restore. To verify that you want to restore the selected previous version as the current version, tap Restore. The selected previous version of the file becomes the current version.

Nasuni Mobile Access Guide 8.0 20
Using Mobile Access Using Mobile Access
File Access
Opening a file with a specific app
To select an app to open a file with, tap the drop-down icon beside its name, then tap “Open with”. A list of apps appears that can open the file on the device.
Figure 3-15: Apps that can open file on device.
Tip: For iOS, tap the share icon at the top right.
Select an app from the list. To always open similar files with the selected app, click Always. Otherwise, click “Just once”. The file opens in the selected app.
Accessing files directly from apps
On Android platforms, apps can directly open files on the Nasuni Filer. You must first log in to the Nasuni Mobile Access application.
To open a file on the Nasuni Filer from within the app, perform the usual File Open procedure for that app. Select Browse. A list of file sources appears.
Figure 3-16: Sources for files on device.
Select Nasuni from the list. The Nasuni app displays available files on the Nasuni Filer. Navigate to the file you want. When done with the file in the app, perform the usual File Save procedure. The file is saved to the Nasuni Filer.
On both iOS and Android platforms, apps can directly save files on the Nasuni Filer. You must first log in to the Nasuni Mobile Access application.

Nasuni Mobile Access Guide 8.0 21
Using Mobile Access Using Mobile Access
To create a new file on the Nasuni Filer within the app, perform the usual New File procedure for that app. When done with the file in the app, perform the usual File Save As procedure. Select Browse or Share. A list of available destinations, including the Nasuni Filer, appears.
Figure 3-17: Destinations for file on device.
Select Nasuni from the list. The Nasuni app displays the Nasuni Filer. Navigate to the folder where you want to save the new file. The file is saved to the Nasuni Filer.
Uploading a file
Tip: Before adding data to a Nasuni Filer, it is a Best Practice to clean up historical and orphaned SIDs. This can help prevent later difficulties with permissions. For more details, see CIFS Permissions Best Practices.
To upload a file to a folder on the Nasuni Filer, navigate to the destination folder, then tap the Upload icon at the bottom of the display.
Figure 3-18: Upload icon.
Tip: For iOS, tap the three-dot icon at the top right, then tap “Upload File”.
A menu appears with several choices of the kind of item to upload.
Figure 3-19: Upload list.
Select the type of item from the list. A list appears of folders and available files for that type of item on the device. Navigate to the file to upload, then select it. Tap OK.
Note: For iOS, when uploading multiple files, the limit is 25.

Nasuni Mobile Access Guide 8.0 22
Using Mobile Access Using Mobile Access
Sharing a file as an attachment
To share the file as an attachment, such as an attachment to an email, tap the drop-down icon beside its name. The drop-down pane appears showing available actions, including Share, Favorite, Details, Versions, Open with, and Delete.
Figure 3-20: Drop-down pane.
Tap Share, then tap Attachment.
Tip: For iOS, tap the share icon at the top right. Then tap “Email File” or “Email Link”.
A window appears with a list of available apps that can share this file as an attachment.
Figure 3-21: Apps that can share file as attachment.
Select the app from the list, then follow instructions for that app.

Nasuni Mobile Access Guide 8.0 23
Using Mobile Access Using Mobile Access
Sharing a file as a link
To share a link to the file, tap the drop-down icon beside its name, then tap Share, then tap Internal Link.
Tip: For iOS, tap the share icon at the top right. Then tap “Email Link” or “Copy Link”.
Tip: You cannot create an internal link to folders created by using the "%U" wildcard in the CIFS share name.
A window appears with a list of available apps that can share a link to this file. Select the app from the list, then follow instructions for that app.
Tip: Users should use a Web browser to open shared links.
Tip: After a recovery, if any of the original source Nasuni Filer’s CIFS shares had Shared Links defined, these links must be regenerated. Use Web Access to view links that must be regenerated, and regenerate them.
To Edit or Update a link, tap the link, then tap Edit or Update.
Figure 3-22: Update shared link.
You can change the expiration date, the password, and other features of the link. To retain the same link with the new features, tap Update.

Nasuni Mobile Access Guide 8.0 24
Using Mobile Access Using Mobile Access
To create a new link with the new features, and make the existing link invalid, tap Regenerate.
Figure 3-23: Regenerate shared link.
To remove a link on Android platforms, tap Remove.
Figure 3-24: Remove shared link.
To remove a link on iOS platforms, turn off “Share via a public link”, then tap Delete.
Folder-Level Operations
Creating a folder
To create a folder, navigate to the folder in which to create the new folder. In the upper right corner, tap the three-dot icon, then tap New Folder. The “Enter a directory name” dialog box appears.
Figure 3-25: “Enter a directory name” dialog box.
Enter a name for the new folder, then tap OK. A new folder is created.
Tagging a file or folder as favorite
To tag a file or folder as a favorite, tap the drop-down icon beside its name, then tap the star icon . Favorite files and folders remain on the device for off-line access.
Tip: For iOS, tap the star icon above the file name.
Note: The files and folders within a favorite folder are not automatically also Favorites. You must tag each item as a favorite separately.

Nasuni Mobile Access Guide 8.0 25
Using Mobile Access Using Mobile Access
Viewing favorite files or folders
Favorite files remain on the device for off-line access.
To view favorite files or folders, tap the menu icon in the upper left, then select Favorites.
Tip: For iOS, tap the star icon at the bottom of the display.
A list of favorite files and folders appears. Favorite files remain on the device for off-line access.
Figure 3-26: Favorites list.
Note: The files and folders within a favorite folder are not automatically also Favorites. You must tag each item as a favorite separately.
Searching for file names
To search for file names in a folder, navigate to the folder, then tap in the Search area at the top of the screen.
Figure 3-27: Search area.
Enter text in the Search area. Any files in the folder that contain the text appear in a list with the search text highlighted.
Figure 3-28: Search list.
Tip: The search does not include any subfolders of the selected folder.
Deleting a file or empty folder
To delete a file or an empty folder, tap the drop-down icon beside its name, then tap Delete.
Tip: For iOS, tap the three-dot icon at the top right, then tap Delete. Select files or folders to delete.
Tip: On a Nasuni Filer, non-empty directories that contain only blocked files appear empty to a client, and might lead to unexpected behavior when attempting to delete those directories. For example, if a directory contains only blocked files, and you try to delete that directory, the directory is removed from view temporarily, but is not deleted, and reappears upon refresh. In Windows, the Nasuni Filer sends the error STATUS_DIRECTORY_NOT_EMPTY to report that the delete failed, but Windows does not act on that error.
A message appears, verifying that you want to delete the file. Tap Delete.

Nasuni Mobile Access Guide 8.0 26
Using Mobile Access Using Mobile Access
Administrative Operations
Settings
To access the app settings, tap the menu icon at the top left (for iOS, bottom right), then select Settings. The Settings page appears.
Figure 3-29: Settings page.
On the Settings page, you can view the User name, Host name, and Company Name for the currently logged in user. You can also view the Favorites size and App version. You can also view information About Nasuni Mobile.
To specify that you stay logged in even when the Nasuni Mobile Access application is not running, select “Stay Logged In”.
If you have selected “Stay Logged In”: To use a passcode instead of the full credentials when logging in, select “Use Security Passcode”. Enter the passcode, then verify the passcode. You can then use this passcode when logging in.
To specify that you be warned before attempting to download data when not on a Wi-Fi connection, select “Warn before downloading when not on a Wi-Fi connection”.
To send feedback to Nasuni, tap Send Feedback, then use the appropriate app to send a message.
Logging out
To log out from the Nasuni Mobile Access application, tap the three-dot icon at the top right of the display, then tap Log Out. A dialog appears warning you that logging out removes all saved data from the device. To continue anyway, tap Remove Data. Otherwise, tap Cancel.

Nasuni Mobile Access Guide 8.0 27
Chapter 4: Operations
Several details about operations are available.Volumes
FirewallsEdit
It’s important to ensure that firewalls allow secure access to data. In particular, you must ensure that Mobile Access is possible with the current configuration.
In the following configuration, the parts pertaining to Mobile Access are indicated by large asterisks *To configure firewall protection, follow these steps:
1. Click Configuration, then select Firewall from the list. The Firewall page appears.
Figure 4-1: Firewall page.

Nasuni Mobile Access Guide 8.0 28
Operations Firewalls
2. In the Traffic Group area, to configure the firewall policy for each Traffic Group, click Edit beside the Traffic Group. The Edit Firewall Policy dialog box appears.
Figure 4-2: Edit Firewall Policy dialog box.
a. From the Policy drop-down list, select one of the following choices:
Note: All policies permit outbound traffic. That traffic is fully controlled by the configuration of the Nasuni Filer's local networks and gateways.
• ***All Protocols Permitted: This policy allows all inbound traffic.***• Deny All Incoming Connections: This policy allows no inbound traffic.
• Client Protocols Permitted: This policy allows only CIFS, CIFS Web, NFS, FTP, and iSCSI inbound traffic.
• ***Mobile/Web Clients Permitted: This policy allows only Mobile Access or CIFS Web inbound traffic, such as Web Access.***
• Custom Protocol Selection: This policy allows selected inbound traffic. You can select one or more of the following inbound protocols:
• Admin UI: Traffic to the user interface.
• FTP: FTP inbound traffic.
• iSCSI: iSCSI inbound traffic.
• ***Mobile: Mobile Access inbound traffic.***• NFS: NFS inbound traffic.
• SFTP (SSH FTP): SSH FTP inbound traffic.
• CIFS/SMB: CIFS/SMB inbound traffic.
• SNMP: SNMP inbound traffic.
• SSH: SSH inbound traffic.

Nasuni Mobile Access Guide 8.0 29
Operations Firewalls
Warning: If you disable Mobile Access and CIFS/SMB Web inbound traffic and enable Admin UI traffic, you might not be able to open the default URL of the Nasuni Filer user interface. Normally, the default URL is redirected from port 80 to port 8443, but this cannot happen when Mobile Access and CIFS Web inbound traffic are disabled. Use this URL to access the Nasuni Filer user interface: https://<your Nasuni Filer URL>:8443
b. Click Save to save your changes. Otherwise, click Cancel.
3. Click Save Firewall Settings to save your entries. The message “Updated firewall configuration” appears.
Tip: If you configure the firewall in such a way that you cannot access the Nasuni Filer user interface, you can reset the firewall using the console for the Nasuni Filer. For the Nasuni Filer hardware appliance, use a keyboard and monitor attached to the hardware appliance. For the Nasuni Filer virtual machine, use the virtual machine console window. The console prompt appears. Press Enter to access the Service menu. The login prompt appears. Enter the username and password. The login username is service, and the default password is service. The Service Menu appears. Enter resetfirewall The firewall resets.

Nasuni Mobile Access Guide 8.0 30
Operations Multiple Volume Protocols
Multiple Volume Protocols
You can assign CIFS protocols to existing NFS volumes. This enables you to allow access to data using multiple protocols. This might be helpful for simplifying access by users or applications.
Tip: You cannot assign multiple protocols to a volume to which a volume running a pre-6.0 version is connected. Update the connected volume to version 6.0 or later first, then perform a snapshot for the volume.
Note: If this volume has Remote Access enabled and other volumes connect to this volume, the connected volumes inherit the same protocols as this volume. If these protocols change, the connected volumes inherit the changed protocols. This can take some time. You can refresh the volume connections in order to inherit the changed protocols immediately. The connected Nasuni Filer must be running version 6.0 or later software in order to connect to a remote volume that has multiple protocols defined.
Warning: Protocols work in parallel. Enabling an additional protocol to an original protocol does not affect the original protocol. However, writing data to the volume using one protocol can affect the permissions or other metadata used by another protocol. This can inadvertently affect permissions in unexpected ways.
Viewing multiple volume protocols
To view the protocols that are enabled for a volume, follow these steps:
1. Click Volumes, then select the volume from the list.
Note: If this Nasuni Filer is under Nasuni Management Console control, this page is not available on the Nasuni Filer. Instead, use the Nasuni Management Console to view information or perform actions.
2. The Volume properties page appears. The Protocol status is visible.
Figure 4-3: Protocol status. If multiple protocols are enabled for a volume, the protocols are listed.
Enabling multiple volume protocols
To enable CIFS protocols for an NFS volume, follow these steps:
1. Click Volumes, then select an NFS volume from the list.
Note: If this Nasuni Filer is under Nasuni Management Console control, this page is not available on the Nasuni Filer. Instead, use the Nasuni Management Console to view information or perform actions.

Nasuni Mobile Access Guide 8.0 31
Operations Multiple Volume Protocols
2. Select Volume Protocols from the Properties drop-down list. The Enabled Volume Protocols page appears.
Figure 4-4: Enabled Volume Protocols page. The currently enabled protocols for the volume are selected.
3. To enable another protocol, select that protocol also.
Warning: After enabling a protocol, you cannot disable that protocol.
4. From the Volume Permissions Policy drop-down list, select one of the following:
• UNIX/NFS Permissions Only Mode: Default mode for NFS volumes. Recommended for primary or heavy NFS use. Not recommended for Windows users. Only the traditional UNIX mode bits control permissions (chmod). Windows can view permissions as access control lists (ACLs), but cannot add or remove access control entries (ACEs). Windows CIFS users can change permissions using the Security tab of the Windows Properties dialog box.
• NTFS Compatible Mode: Default mode for CIFS volumes on Nasuni Filers joined to Active Directory. This mode is required for multiple protocol support, such as NFS or FTP/SFTP protocols, as well as CIFS/SMB. NFS and FTP/SFTP protocols cannot see all NTFS permissions and do not obey all access rules in NTFS permissions. NFS and FTP/SFTP protocols obey only the POSIX access control list (ACL) component of inheritance rules. A high level of Windows compatibility is supported through the CIFS/SMB protocol, with some limitations.
• NTFS Exclusive Mode: Optional mode for CIFS volumes on Nasuni Filers joined to Active Directory. Recommended for CIFS volumes that do not require mixed mode access, because multiple protocols, such as NFS or FTP/SFTP, are not supported. Produces full NTFS permissions, as supported on CIFS/SMB. Windows clients obey inheritance rules. This policy has the greatest Windows compatibility.
Important: You cannot switch from NTFS Exclusive Mode to NTFS Compatible Mode.
Important: Volumes in NTFS Exclusive Mode do not support multiple protocols.

Nasuni Mobile Access Guide 8.0 32
Operations Multiple Volume Protocols
• POSIX Mixed Mode: Default mode for CIFS volumes on Nasuni Filers joined to LDAP. Recommended for combined CIFS and FTP/SFTP volumes, with light NFS use. Also recommended for CIFS-only volumes with Linux or Mac clients, with UNIX extensions enabled. Access control lists (ACLs) are supported entirely through POSIX ACLs. Windows clients receive mapping of POSIX ACLs to NTFS ACLs. However, the mappings are not as complete as mappings done for NTFS Compatible Mode. NFS clients cannot view the ACLs. The NFSv4 protocol automatically translates the underlying ACLs to NFSv4 ACLs. The common tools for managing POSIX ACLs are not supported on NFSv4. To manage ACLs using NFSv4, you must use the NFSv4 ACL tools. Not all Nasuni Filers support NFSv4. You can check whether NFSv4 is supported on the NFS Status page (Nasuni Filers) or the Exports page (NMC).
• Unauthenticated Access Mode: Default mode for CIFS volumes on Nasuni Filers that are not joined to Active Directory or to LDAP. Recommended for CIFS Public-mode volumes. For CIFS clients, this mode acts as an open share. For all other protocols, this mode acts identically to POSIX Mixed Mode.
Click Save. The selected protocol is enabled.

Nasuni Mobile Access Guide 8.0 33
Operations Monitoring Mobile Access Traffic
Monitoring Mobile Access Traffic
Network Activity Charts on Home page
You can view charts of the network activity of the Nasuni Filer, including Mobile Access. One chart shows data transmitted to and received from cloud storage. The other chart shows other network traffic to and from the Nasuni Filer. The scale is in Kbits/second or Mbits/second, depending on throughput.
There is a chart of Cloud Traffic (upper chart) and a chart of Local Traffic (lower chart).
Figure 4-5: Network Activity charts.
Both charts have the same vertical scale. You can select the time period of these charts by clicking the drop-down list and selecting one of the following time periods:
• Previous Hour.
• Previous Day.
On the Cloud Traffic chart (upper chart), you can select which network activity to include or exclude by clicking Cloud Transmit (for data transmitted to the cloud by the Nasuni Filer), Cloud Receive (for data received from the cloud by the Nasuni Filer), Mobile Transmit (for data transmitted to mobile devices by the Nasuni Filer), or Mobile Receive (for data received from mobile devices by the Nasuni Filer) under the Cloud Traffic chart.
On the Local Traffic chart (lower chart), you can select which network activity to include or exclude by clicking UI Transmit (for data transmitted to the user interface by the Nasuni Filer), UI Receive (for data received from the user interface by the Nasuni Filer), Client Transmit (for data transmitted to the client by the Nasuni Filer), Client Receive (for data received from the client by the Nasuni Filer), Migration Transmit (for data transmitted to a data migration by the Nasuni Filer), or Migration Receive (for data received from a data migration by the Nasuni Filer) under the Local Traffic chart.
To zoom in on a specific range of displayed data, click the chart at the high end of the range you want, then drag to the low end of the range you want, then release. The chart rescales to zoom in on the

Nasuni Mobile Access Guide 8.0 34
Operations Monitoring Mobile Access Traffic
selected range. To reset the zoom to the default display, click Reset zoom.
If you hover the mouse over any part of either chart, a label appears displaying details about the amount of network activity at that date and time.
Figure 4-6: Details of network activity on Network Activity charts.
Network Status page
You can also view current network information for the Nasuni Filer, including Mobile Access.Status
To view the network status:
1. Click Status, then select Network Status from the list. The Network Status page appears.
Figure 4-7: Network Status page.
Note: Your display might look different from this. The number of entries depends upon the number of configured networks.

Nasuni Mobile Access Guide 8.0 35
Operations Monitoring Mobile Access Traffic
Network Activity ChartsCharts
You can view charts of the network activity of the Nasuni Filer, including Mobile Access. The scale is in Kbits/second or Mbits/second, depending on throughput.
Charts of Cloud Traffic and Local Traffic by Traffic Type
From the left-hand drop-down list, select Display Graphs by Traffic Type. This displays a chart of Cloud Traffic and a chart of Local Traffic.
Figure 4-8: Network Activity charts.
You can select the time period of these charts by clicking the drop-down list on the right and selecting one of the following time periods:
• Previous Hour
• Previous Day
On the Cloud Traffic chart (upper chart), you can select which network activity to include or exclude by clicking Cloud Transmit (for data transmitted to the cloud by the Nasuni Filer), Cloud Receive (for data received from the cloud by the Nasuni Filer), Mobile Transmit (for data transmitted to mobile devices by the Nasuni Filer), or Mobile Receive (for data received from mobile devices by the Nasuni Filer) under the Cloud Traffic chart.
On the Local Traffic chart, you can select which network activity to include or exclude by clicking UI Transmit (for data transmitted to the user interface by the Nasuni Filer), UI Receive (for data received from the user interface by the Nasuni Filer), Client Transmit (for data transmitted to the client by the Nasuni Filer), Client Receive (for data received from the client by the Nasuni Filer), Migration Transmit (for data transmitted to a data migration by the Nasuni Filer), or Migration Receive (for data received from a data migration by the Nasuni Filer) under the Local Traffic chart.

Nasuni Mobile Access Guide 8.0 36
Operations Monitoring Mobile Access Traffic
If you hover the mouse over any part of either chart, a label appears displaying details about the amount of network activity at that date and time.
Figure 4-9: Details of network activity and time on Network Activity charts.
To zoom in on a specific range of displayed data, click the chart at the high end of the range you want, then drag to the low end of the range you want, then release. The chart rescales to zoom in on the selected range. To reset the zoom to the default display, click Reset zoom.
Charts of Traffic by Device Layout
From the left-hand drop-down list, select Display Graphs by Device Layout. This displays a chart of traffic received and transmitted by the Nasuni Filer as a whole.
Figure 4-10: Network Activity chart.
You can select the time period of this chart by clicking the drop-down list on the right and selecting one of the following time periods:
• Previous Hour.
• Previous Day.
You can select which network activity to include or exclude by clicking Transmit (for data transmitted by the Nasuni Filer) or Receive (for data received by the Nasuni Filer) under the chart.
If you hover the mouse over any part of either chart, a label appears displaying details about the amount of network activity at that date and time.

Nasuni Mobile Access Guide 8.0 37
Operations Monitoring Mobile Access Traffic
To zoom in on a specific range of displayed data, click the chart at the high end of the range you want, then drag to the low end of the range you want, then release. The chart rescales to zoom in on the selected range. To reset the zoom to the default display, click Reset zoom.

Nasuni Mobile Access Guide 8.0 38
Operations SNMP Monitoring
SNMP MonitoringEnable
You can configure SNMP monitoring of Nasuni Filers, which includes Mobile Access clients.
The Nasuni Filer supports monitoring via the Simple Network Management Protocol (SNMP) v1, v2c, and v3. The Nasuni Filer exposes the standard SNMPv1 MIB (management information base), as well as the NASUNI-FILER-MIB, SNMPv2-MIB, HOST-RESOURCES-MIB, UCD-SNMP-MIB, UCD-DISKIO-MIB, and IF-MIB. Both 32-bit and 64-bit SNMP network counters are supported. The SNMP server is available on port 161.
Each of the displayed MIBs is a link. If you click a link, a page with that MIB information appears.
Data available in SNMP updates includes the following:
• Client information, such as: Number of connected CIFS, iSCSI, and Mobile Access clients
To configure SNMP monitoring:
1. Click Configuration, then select SNMP Monitoring from the list. The SNMP Monitoring Settings page appears.
Figure 4-11: SNMP Monitoring Settings page.
Note: If this Nasuni Filer is under Nasuni Management Console control, this page is not available on the Nasuni Filer. Instead, use the Nasuni Management Console to view information or perform actions.

Nasuni Mobile Access Guide 8.0 39
Operations SNMP Monitoring
2. To enable SNMP v1 and v2c monitoring, select Enable v1,v2c Support. If you enable SNMP v1 and v2c monitoring, in the Community Name text box, enter the SNMP community name for the Nasuni Filer. The default community name is public. Changing the community name from the default improves security.
3. To enable SNMP v3 monitoring, select Enable v3 Support. If you enable SNMP v3 monitoring, enter a Username and Password for SNMP v3 authorization.
4. If you enable SNMP monitoring, in the System Location text box, enter the physical location of the Nasuni Filer.
5. If you enable SNMP monitoring, in the System Contact text box, enter the contact information of the person responsible for SNMP monitoring for the Nasuni Filer.
6. If you enable SNMP monitoring, in the Trap Addresses text box, enter a list of IP addresses or hostnames listening for SNMP traps, separated by commas. If you do not want to listen for SNMP traps, leave this blank. If you enter any trap addresses, you can send a test trap by clicking Send Test Trap.
7. Click Save SNMP Settings. The SNMP monitoring settings are saved for this Nasuni Filer.

Nasuni Mobile Access Guide 8.0 40
Configuring the DNS for Mobile Access or Desktop Sync
Appendix A: DNS Configuration
Configuring the DNS for Mobile Access or Desktop Sync
To simplify user login to your Nasuni Filers, the administrator can configure the company DNS server entry to include the host and port necessary for Mobile Access or Desktop Sync. When the user logs into the Nasuni mobile application using their company email address and password, the application retrieves the host and port from the DNS to complete the login.
We present the general method of configuring the DNS, as well as considerations for using Microsoft Windows DNS Manager and third-party DNS configuration software.
Overview of configuring the DNS
The DNS includes records for locating and identifying computer services and devices with the underlying network protocols. You can find general DNS help and information on sites such as https://support.dnsimple.com/categories/dns/.
Mobile Access and Desktop Sync are looking for the following record types:
A record.
SRV record.
TXT record.
PTR record. If your ISP does not allow you to make a PTR record, you can make another TXT record, as described below.
In addition, if you do not have direct access to register a service, you might need to contact your ISP to register the "_nasunifiler" service.
You probably also have an SOA record created to define your domain. If using an ISP, your ISP probably created this SOA record for you.
A record type
For the A (Address) record type, the record is generally of the form:<target> A <ip-address>
where:<target> is the fully qualified domain name (FQDN) of the target host, as in the SRV record. <ip-address> is the IP address of the target.

Nasuni Mobile Access Guide 8.0 41
Configuring the DNS for Mobile Access or Desktop Sync
You probably already have an A record for your Nasuni Filer that maps your Nasuni Filer’s fully qualified domain name (FQDN) to the IP address. Below is an example of how it might look:
myfiler.domainname.com. IN A 192.168.100.100
Note: Your ISP might or might not add the period at the end of the fully qualified domain name.
SRV record type
The SRV (Service) record is used to discover a service. In the case of Mobile Access or Desktop Sync, this is the "_nasunifiler" service.
For the SRV record type, the record is generally of the form:<service-instance>._nasunifiler._tcp SRV <priority> <weight> <port>
<target>.
where:<service-instance> is the name that you give to the Mobile Access or Desktop Sync
service you are offering. This is called the service instance name. This is the instance of the _nasunifiler._tcp service that the SRV record links to. The same service instance name is used in the PTR record.
_nasunifiler._tcp is the symbolic service name and the TCP protocol name, respectively, and must not be changed.
<priority> is used for advanced prioritization of multiple servers, otherwise set this to 0. This specifies the relative priority of this target, from 0 through 65535. Lowest number is highest priority. Priority and weight are only relevant when there is more than one SRV record with the same instance.
<weight> is also used for advanced prioritization of multiple servers, otherwise set this to 0. This represents the weight, which is used when there is more than one target with the same instance and with the same priority, from 0 through 65535. Higher number means greater weight and greater probability. 0 indicates no weighting should be applied. Priority and weight are only relevant when there is more than one SRV record with the same instance.
Note: Nasuni Mobile follows the DNS Service Discovery standard (RFC 6763) for priority and weight, and properly handles complex configurations with multiple Nasuni Filers using various priorities and weights. If you need assistance in setting up such a configuration, contact Nasuni Support.
<port> is the TCP port number where the Nasuni Filer is reachable. Usually: 443.<target> is the fully qualified domain name (FQDN) of the target host. This must match the A
record. Does not have to be in the same domain as the SRV record.
Note: Your ISP might or might not add the period at the end of the fully qualified domain name.
An example of the SRV record is:mymobile._nasunifiler._tcp SRV 0 0 443 myfiler.domainname.com.

Nasuni Mobile Access Guide 8.0 42
Configuring the DNS for Mobile Access or Desktop Sync
TXT record type
The TXT (Text) record is used to associate some arbitrary and unformatted text with a name.
For the TXT record type, the record should be of the form:<service-instance>._nasunifiler._tcp TXT "txtvers=1"
"companyfullname=<companyname>"
where:<service-instance> is the name that you give to the Mobile Access or Desktop Sync
service you are offering. This is called the service instance name. This is the instance of the _nasunifiler._tcp service that the SRV record links to. The same service instance name is used in the PTR record.
_nasunifiler._tcp is the symbolic service name and the TCP protocol name, respectively, and must not be changed.
<companyname> is the name of the company (optional).
Note: The "txtvers=1" parameter is necessary.
Here is an example TXT record:myfiler._nasunifiler._tcp TXT "txtvers=1" "companyfullname=My Company"
PTR record type
A PTR (pointer) record provides a pointer to a canonical name. If you are using an ISP that does not allow you to add a PTR record, you can add a TXT record as a replacement. Below we describe both ways to do this.
Adding as a PTR Record
For the PTR record type, the record should be of the form:_nasunifiler._tcp PTR <service-instance>._nasunifiler._tcp.mydomain.com
where:<service-instance> is the name that you give to the Mobile Access or Desktop Sync
service you are offering. This is called the service instance name. This is the instance of the _nasunifiler._tcp service that the SRV record links to. The same service instance name is used in the PTR record.
_nasunifiler._tcp is the symbolic service name and the TCP protocol name, respectively, and must not be changed.
mydomain.com is the domain name, if not specified globally.
Here is an example PTR record:
_nasunifiler._tcp PTR myfiler._nasunifiler._tcp.domainname.com
Adding as a TXT Record
Use this if you are not allowed to add a PTR record. Otherwise, see above.
For the TXT record type, the record should be of the form:_nasunifiler._tcp.mydomain.com. TXT
"PTR-V1=<service-instance>._nasunifiler._tcp.mydomain.com."

Nasuni Mobile Access Guide 8.0 43
Configuring the DNS for Mobile Access or Desktop Sync
where:_nasunifiler._tcp is the symbolic service name and the TCP protocol name, respectively,
and must not be changed.mydomain.com is the domain name, if not specified globally.
Note: Your ISP might or might not add the period at the end of the domain name.<service-instance> is the name that you give to the Mobile Access or Desktop Sync
service you are offering. This is called the service instance name. This is the instance of the _nasunifiler._tcp service that the SRV record links to. The same service instance name is used in the PTR record.
Here is an example TXT record:_nasunifiler._tcp.mydomainname.com. TXT "PTR-V1=mymobile._nasunifiler._tcp.mydomainname.com."

Nasuni Mobile Access Guide 8.0 44
Configuring the DNS for Mobile Access or Desktop Sync
Microsoft Windows DNS Manager
To use the Microsoft Windows DNS Manager to configure the DNS, follow these steps:
1. The screen for configuring the A record looks like this:
Figure A-1: A record.
a. In the Host text box, specify the DNS name of the target host, as in the SRV record. The Fully qualified domain name (FQDN) text box might be automatically populated, using the domain name.
b. In the IP address text box, enter the IP address of the target.
Note: The “Update associated pointer (PTR) record” setting is for reverse lookup configurations, not for this DNS procedure.
c. In the Time to live (TTL) text box, enter the TTL (time to live) as days, hours, minutes, and seconds.
d. Click OK.

Nasuni Mobile Access Guide 8.0 45
Configuring the DNS for Mobile Access or Desktop Sync
2. The screen for configuring the PTR record looks like this:
Figure A-2: PTR record.
a. In the Host IP Address text box, specify both the Nasuni Filer service and the TCP protocol:
_nasunifiler._tcp
The Windows DNS Manager might move the protocol to the Fully qualified domain name (FQDN) text box. The Fully qualified domain name (FQDN) text box might be automatically populated, using the domain name.
b. In the Host name text box, enter the name of the instance of the _nasunifiler._tcp service that the SRV record links to. Your entry is automatically appended with the Nasuni Filer service, the TCP protocol, and the domain. Whatever you enter here appears in the Mobile Access or Desktop Sync app: you can use the actual host name of the Nasuni Filer, or a name that users might recognize more easily.
Important: For some implementations, the PTR record MUST end with a period (.), while, for other implementations, the PTR record MUST NOT end with a period. It is suggested to omit the period and test the configuration. If the configuration does not work, try adding the period.

Nasuni Mobile Access Guide 8.0 46
Configuring the DNS for Mobile Access or Desktop Sync
c. In the Time to live (TTL) text box, enter the TTL (time to live) as days, hours, minutes, and seconds.
d. Click OK.
3. The screen for configuring the SRV record looks like this:
Figure A-3: SRV record.
a. The Domain text box might be populated automatically using the domain name. If not, enter the domain name.
b. In the Service text box, enter the name of the instance of the _nasunifiler._tcp service, as in the PTR record, then append the Nasuni Filer service:
._nasunifiler
c. In the Protocol text box, enter the protocol:
_tcp
d. In the Priority text box, enter the priority, as discussed above.
e. In the Weight text box, enter the weight, as discussed above.
f. In the Port number text box, enter the port.

Nasuni Mobile Access Guide 8.0 47
Configuring the DNS for Mobile Access or Desktop Sync
g. In the Host offering this service text box, enter the actual host name of the Nasuni Filer, as a fully qualified domain name.
Important: For some implementations, the SRV record MUST end with a period (.), while, for other implementations, the SRV record MUST NOT end with a period. It is suggested to add the period and test the configuration. If the configuration does not work, try omitting the period.
h. In the Time to live (TTL) text box, enter the TTL (time to live) as days, hours, minutes, and seconds.
i. Click OK.
4. The screen for configuring the TXT record looks like this:
Figure A-4: TXT record.
a. In the Record name text box, enter the name of the instance of the _nasunifiler._tcp service, as in the PTR record, then append the Nasuni Filer service and protocol:
._nasunifiler_tcp
The Fully qualified domain name (FQDN) text box might be automatically populated, using the domain name.

Nasuni Mobile Access Guide 8.0 48
b. In the Text text box, you must enter the text:
”txtvers=1”
Any other text entries, such as the company name, are optional.
c. In the Time to live (TTL) text box, enter the TTL (time to live) as days, hours, minutes, and seconds.
d. Click OK.
Using third-party DNS configuration software
If you are using third-party software to configure DNS, ensure that the following is defined as a service:_nasunifiler
Although you might not be able to specify other records, you might be able to specify the TXT record to define a PTR record. For example, the following TXT record specifies a PTR record:
_nasunifiler._tcp.mydomainname.com. TXT "PTR-V1=mymobile._nasunifiler._tcp.mydomainname.com."

Nasuni Mobile Access Guide 8.0 49
Index
0-9161 (port)
SNMP monitoring 38443 41443 (port)
mobile access 9, 10VPN for mobile access 10
Aaccess control lists (ACLs) 31ACLs 32ACLs (access control lists) 31adding
datato volume 21
share 2share folder 2
Administration Guide viAndroid 1, 5
limiting mobile access to 5attachment
Mobile Access 18, 22
Bblocked files 25
Cchart
Local Traffic 33local traffic 35network activity 33, 35
CIFS/SMB protocol 31
Cloud Traffic chartchart
Cloud Traffic 33, 35console 29creating
foldermobile access 24
Ddata
addingto volume 21
deletelink 24
deletingdirectory 25folder 25
devicemobile access 1
DNSmobile access 11, 40
DNS configurationMobile Access 40Sync 40, 41, 42, 43, 45
domain name 42, 43, 46Download
Mobile Access 17
Eedit
link 23email
Nasuni iiNasuni Support ii

Nasuni Mobile Access Guide 8.0 50
Index
empty directory 25enabling
multiple protocols 30
Ffavorite
mobile access 18, 24, 25file information
mobile access 16firewall policy
traffic group 28FTP 31
HHardware Getting Started Guide v
IInitial Configuration Guide viInstalling the Nasuni Filer on the Azure Platform vInstalling the Nasuni Filer on the EC2 Platform vInstalling the Nasuni Filer on Virtual Platforms viOS 1, 5
limiting mobile access to 5iPad 1iPhone 1
LLDAP 32link
delete 24edit 23regenerate 24remove 24shared
Mobile Access 18, 23update 23
Linuxmobile access 5
Local Traffic chart 33local traffic chart 35
MMobile Access
DNS configuration 40Download 17shared link 18, 23View File 17
mobile accessadditional port 5configuring 5, 8creating folder 24device 1DNS 11, 40favorite 18, 24, 25file information 16invitation link 8limiting device type 5limiting time 5limiting to one device 5Nasuni Application 7, 10, 11port 443 10uploading 21Wi-Fi 26
monitoringSNMP
Nasuni Management Console 38multiple protocols 30
enabling 30viewing 30
NNasuni Application
mobile access 7, 10, 11Nasuni Management Console Guide viNasuni Management Console Quick Start Guide vinetwork
status 34network activity
chart 33, 35NFS protocol 31NFSv4 32NFSv4 ACL 32NFSv4 protocol 32NTFS 31NTFS Compatible Mode 31NTFS Exclusive Mode 31
OOSX
mobile access 5

Nasuni Mobile Access Guide 8.0 51
Index
Ppath
Mobile Accessentering 16
port161
SNMP monitoring 38443
mobile access 9, 10VPN for mobile access 10
POSIX 31POSIX ACL 32POSIX Mixed Mode 32previous versions
Mobile Accessrestoring 19viewing 17, 19
priority 41protocols
multiple 30PTR record 42
Rransomware xregenerate
link 24remove
link 24
SSFTP 31share
adding 2shared folder 2
adding 2shared link
Mobile Access 18, 23SMB protocol 31SNMP
monitoringNasuni Filer 38Nasuni Management Console 38
port 161 38trap 39v1 39v2c 39v3 39
SRV record 41
statusnetwork 34
SyncDNS configuration 40, 41, 42, 43, 45
TTCP 41Third-Party Licensing Guide vitime to live 44, 46, 47, 48traffic group
firewall policy 28trap
SNMP 39TTL 44, 46, 47, 48
UUnauthenticated Access Mode 32UNIX 31UNIX/NFS Permissions Only Mode 31update
link 23uploading
mobile access 21Using Multiple Protocols vi
VView File
Mobile Access 17viewing
multiple protocols 30volume
addingdata 21
dataadding 21
protocols 30VPN for mobile access
port 443 10
Wweight 41Wi-Fi
mobile access 26Windows
mobile access 5