national program of cancer registries (npcr) · cdmis user training manual – reports introduction...
TRANSCRIPT

Final Performance Report
Version 1.0

Copyright 2014

CDMIS User Training Manual – Reports Contents
i
Contents
Introduction ....................................................................................................................... 3
Accessing Reports in CDMIS: ........................................................................................ 3
Final Performance Report ............................................................................................... 4
Creating a Final Performance Report ............................................................................. 4
Step 1: Review Errors in Current Action Plan ................................................................ 4
Missing Objectives Warning: ....................................................................................... 10
Step 2: Enter Report Narrative ...................................................................................... 11
Step 4: Update Report Status ........................................................................................ 13
Viewing and Printing a Report ...................................................................................... 16

CDMIS User Training Manual – Reports Introduction
3
Introduction
The Reports section allows you to generate the Interim, Annual, and Final Performance Reports required
by the CDC each budget period. Your Project Officer/Program Consultant will provide you with the
exact date for submission of the reports.
Interim Report – Includes Action Plan progress for the first six months of the budget year, and the
Action Plan for the upcoming budget year.
Annual Report – Includes progress for the entire budget year.
Final Performance Report – Includes information on the comparison of actual accomplishments to
objectives established for the project period.
Information from various sections of CDMIS is used to generate the reports. CDMIS guides you through
a series of steps required for creating the report. Before finalizing the report, you will have the option to
create a draft version of the report for review. Any updates necessary once the draft report is generated
should be made in CDMIS and a new draft copy of the report should be run. Once you are satisfied with
the information contained in the draft report, you will have the option to finalize and print the report for
submission to the CDC.
Accessing Reports in CDMIS:
To access a report, click the Reports tab. The system displays the Reports page.
The system will default to the correct report (Interim, Annual, or Final Performance) based on the
current date. If the report you want to access is not displayed by default, click on its link.

Final Performance Report CDMIS User Training Manual – Reports
4
Final Performance Report
The Final Performance Report contains information on the comparison of actual accomplishments to
objectives established for the project period.
Creating a Final Performance Report
The Final Performance Report can be completed in the following four (4) steps:
Step 1: Review Errors in Current Action Plan
Step 2: Enter Report Narrative
Step 3: Transfer Information (Disabled)
Step 4: Update Report Status
The steps must be completed in order since the information needed in each step is dependent on
information from the previous step. After the successful completion of the four steps, the report can then
be submitted to CDC. Once a report is finalized for you to submit to CDC, the report can no longer be
modified, without assistance.
The steps must be completed in order since the information needed in each step is
dependent on information from the previous step.
After the successful completion of the four steps, the report can then be submitted to
CDC.
The Final Performance Report is available to be finalized only when your FOA is in its
final reporting year and the current funding year’s Interim Report status is Finalized or
Past Due.
Step 3: Transfer Information is disabled and marked as "Not applicable" if your
program is in its final reporting year and the current report is not finalized.
Once a report is finalized for you to submit to CDC, the report can no longer be
modified, without assistance.
Step 1: Review Errors in Current Action Plan
Step 1 allows you to review the errors that are present in your current action plan, if any, and then
correct them. If errors are present in your current action plan, the system will not allow you to advance
to step 2 of the Final Performance Report process. You must review the errors and correct them before
the system will enable the Step 2: Enter Report Narrative link and allow you to enter a narrative.
When completing Step 1, ensure that you have entered at least one:
progress for each Annual Objective.
activity for each Annual Objective.

CDMIS User Training Manual – Reports Final Performance Report
5
To complete Step 1 of the Final Performance Report process:
1. Click the Reports tab, and select the final year if not selected.
Result: The system displays the Final Performance Report page by default when the Interim Report
for the final year is finalized. Otherwise, the Final Performance Report can be selected with Step 1
available when the Interim Report is finalized or Past Due.
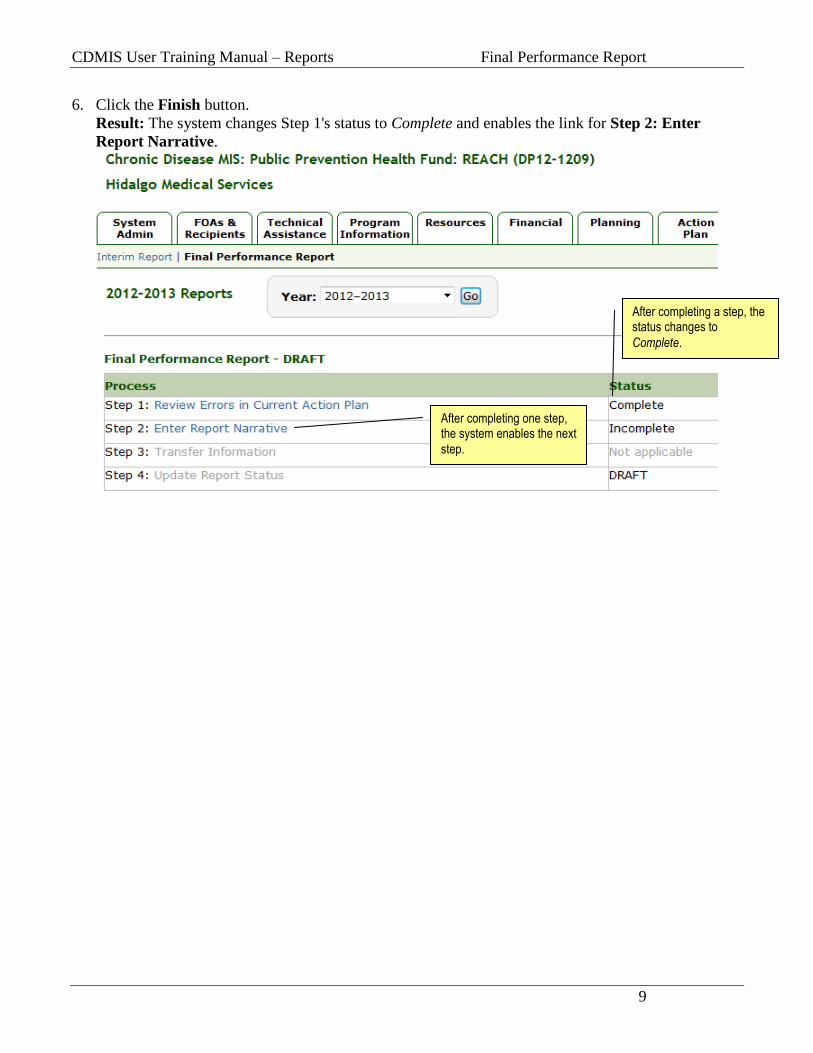
Initially, the status of each step is set to Incomplete. As you finish a step, the status is
automatically changed to Complete.
Each step must be completed in the order shown. Subsequent steps are not accessible until the
current step is complete.
Step 3: Transfer Information is disabled and marked as Not applicable if your program is in
its final reporting year and the current report is not finalized.
2. Click on the Step 1: Review Errors in Current Action Plan link, if enabled.
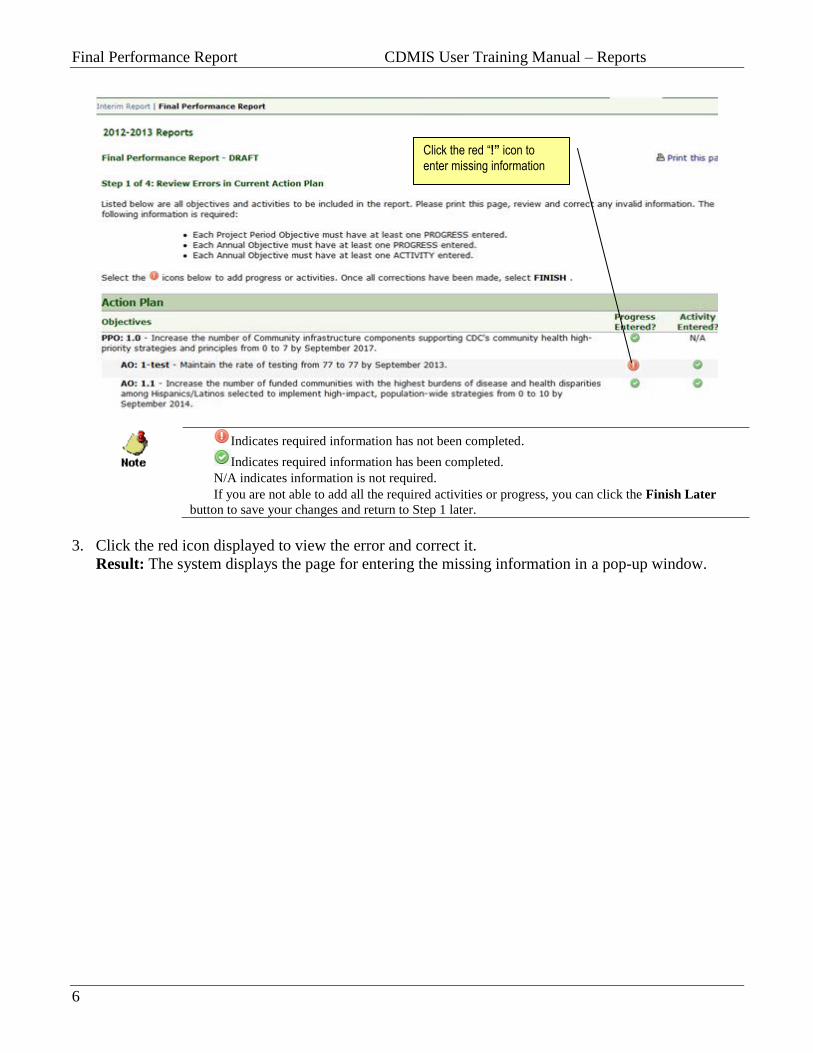
Result: The system displays the Step 1 of 4: Review Errors in Current Action Plan page. The system
displays the errors in your action plan and displays a red icon in the affected row and column. The
Finish button is also disabled if errors are present.
Final Performance Report CDMIS User Training Manual – Reports
6
Click the red “!” icon to
enter missing information
Indicates required information has not been completed.
Indicates required information has been completed.
N/A indicates information is not required.
If you are not able to add all the required activities or progress, you can click the Finish Later
button to save your changes and return to Step 1 later.
3. Click the red icon displayed to view the error and correct it.
Result: The system displays the page for entering the missing information in a pop-up window.

CDMIS User Training Manual – Reports Final Performance Report
7
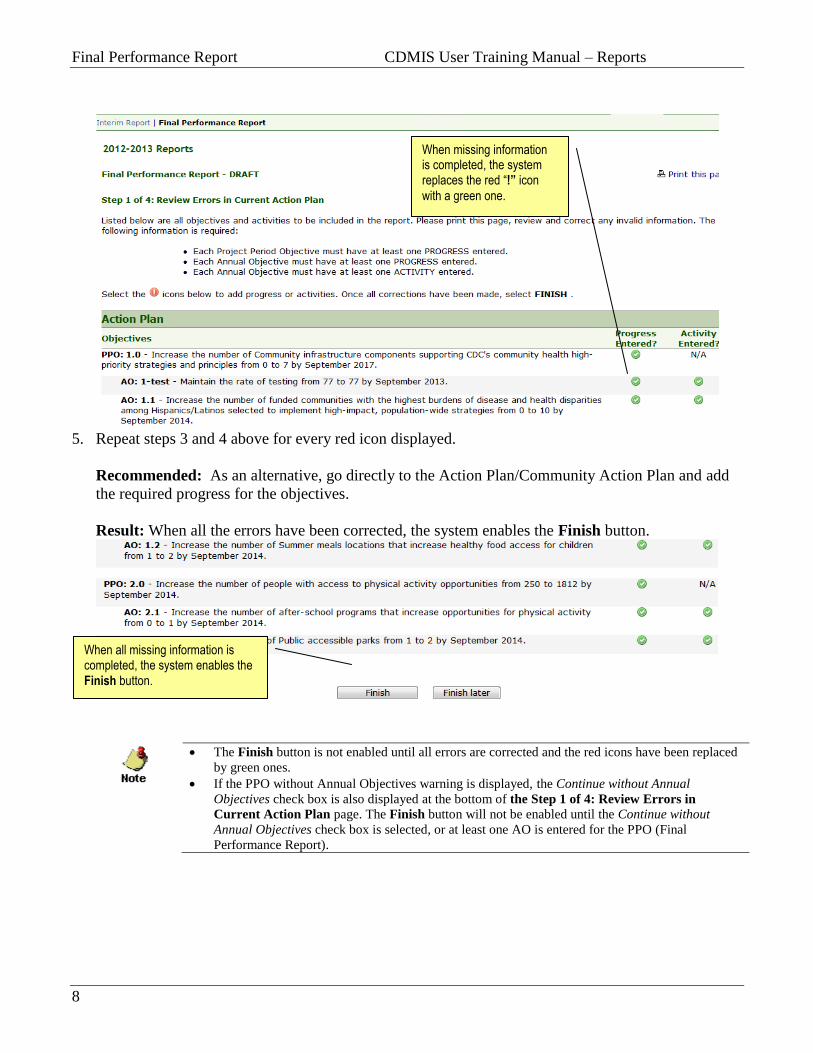
4. Enter the required information and save the entry.
Result: The system closes the page and returns to the previous page. Notice that the red icon has
now been replaced by a green icon indicating that the error has been corrected.
Final Performance Report CDMIS User Training Manual – Reports
8
When missing information is completed, the system replaces the red “!” icon
with a green one.
5. Repeat steps 3 and 4 above for every red icon displayed.
Recommended: As an alternative, go directly to the Action Plan/Community Action Plan and add
the required progress for the objectives.
Result: When all the errors have been corrected, the system enables the Finish button.
When all missing information is completed, the system enables the Finish button.
The Finish button is not enabled until all errors are corrected and the red icons have been replaced
by green ones.
If the PPO without Annual Objectives warning is displayed, the Continue without Annual
Objectives check box is also displayed at the bottom of the Step 1 of 4: Review Errors in
Current Action Plan page. The Finish button will not be enabled until the Continue without
Annual Objectives check box is selected, or at least one AO is entered for the PPO (Final
Performance Report).
CDMIS User Training Manual – Reports Final Performance Report
9
6. Click the Finish button.
Result: The system changes Step 1's status to Complete and enables the link for Step 2: Enter
Report Narrative.
After completing a step, the status changes to
Complete.
After completing one step, the system enables the next
step.

Final Performance Report CDMIS User Training Manual – Reports
10
Missing Objectives Warning:
Some programs require at least one Annual Objective for each Project Period Objective (PPO) entered
in the Action Plan. CDMIS checks for this condition and issues a warning message if it finds PPOs
without Annual Objectives (AO). Each PPO missing an AO is highlighted, and a message with a check
box to Continue without annual objectives is displayed at the end of the page.
Each PPO must have at least one associated AO for Final Performance Report.
Do not select the Continue without Annual Objectives check box. Instead, click the Return to the
Action Plan link to go back to the Action Plan and enter an AO for the highlighted PPO. Please
refer to your program guidance to determine if this applies to you. If your Program Guidance allows
a PPO to be entered without an AO, click the check box to continue. The system then enables the
Finish button and allows you to complete Step 1.
If you were not able to add all the required activities or progress, you can click the Finish Later
button to save your changes and return to Step 1 later.
If you complete step 1 and make changes to the current action plan (or community) which adds
items that should be corrected, step 1 becomes Incomplete. You must visit the step again and correct
all resulting errors in order to mark the step as complete.
Refer to your Program Guidance to determine if your program allows a PPO to be entered
without an AO.

CDMIS User Training Manual – Reports Final Performance Report
11
Step 2: Enter Report Narrative
To complete Step 2 of the Final Performance Report process:
1. Click on the Step 2: Enter Report Narrative link.
Result: The system displays the Step 2 of 4: Enter Report Narrative page.
2. In the Please describe the most significant accomplishments during the reporting period field, enter
a detailed description of the significant accomplishments made by your program during the reporting
period. Be sure to include information such as collaboration across other chronic disease programs
(such as leveraged resources). The maximum characters allowed for this field is 5,000 characters or
1000 words.
3. In the Please describe the most significant challenges during the reporting period field, enter a
detailed description of the significant challenges encountered by your program during the reporting
period. The maximum characters allowed for this field is 5,000 characters or 1000 words.
4. In the What lessons learned can you provide for advancing this type of program field, enter
appropriate text. The maximum characters allowed for this field is 5,000 characters or 1000 words.
5. In the What were the number and types of sub-recipient organizations funded? (NOTE: This
question applies to REACH and CTG programs only. All other programs please enter, "Not

Final Performance Report CDMIS User Training Manual – Reports
12
applicable") field, enter appropriate text. The maximum characters allowed for this field is 5,000
characters or 1000 words.
6. Complete primary and secondary contacts for your program with someone who will be available for
at least six months after the end of the project period for follow-up as needed.
7. Click Save.
Result: The system saves the information entered, marks Step 2 as Complete, and enables the link
for Step 4: Update Report Status.
Once the report narrative is saved, you can go back and edit the narrative up until you finalize the
report in Step 4.
The Transfer process is disabled and marked as Not applicable if your program is in its final
reporting year and the current report is not finalized.
CDMIS User Training Manual – Reports Final Performance Report
13
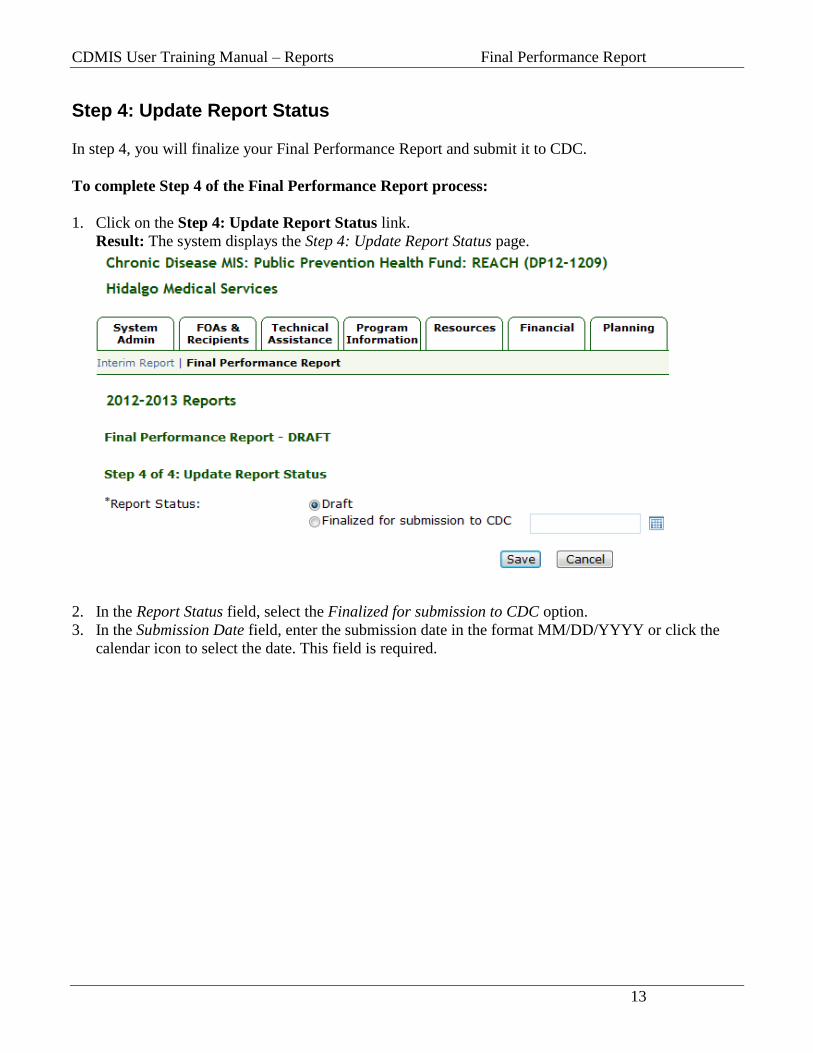
Step 4: Update Report Status
In step 4, you will finalize your Final Performance Report and submit it to CDC.
To complete Step 4 of the Final Performance Report process:
1. Click on the Step 4: Update Report Status link.
Result: The system displays the Step 4: Update Report Status page.
2. In the Report Status field, select the Finalized for submission to CDC option.
3. In the Submission Date field, enter the submission date in the format MM/DD/YYYY or click the
calendar icon to select the date. This field is required.

Final Performance Report CDMIS User Training Manual – Reports
14
4. Click the Save button.
Result: The system displays a confirmation page.
5. Click Yes.
Result: The system displays the status message shown below.
6. Click My Reports, Click Clear this request.
CDMIS User Training Manual – Reports Final Performance Report
15
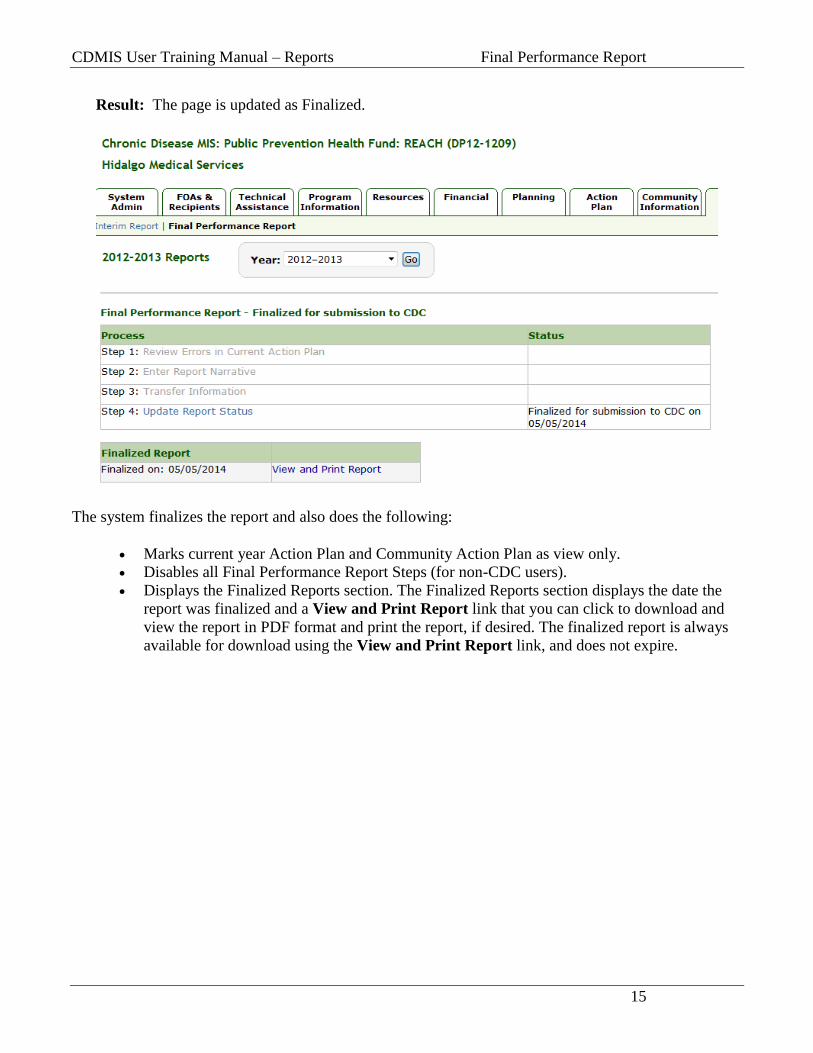
Result: The page is updated as Finalized.
The system finalizes the report and also does the following:
Marks current year Action Plan and Community Action Plan as view only.
Disables all Final Performance Report Steps (for non-CDC users).
Displays the Finalized Reports section. The Finalized Reports section displays the date the
report was finalized and a View and Print Report link that you can click to download and
view the report in PDF format and print the report, if desired. The finalized report is always
available for download using the View and Print Report link, and does not expire.

Viewing and Printing a Report CDMIS User Training Manual – Reports
16
Viewing and Printing a Report
After you select a report to run, you can click the My Reports link at the top right of the page to open a
pop-up window and check the status of the report(s) being generated. While the report is being
generated, you can continue working in the system and access other pages in the system without
disrupting the progress of the report being generated.
The draft Final Performance Report uses My Reports.
The My Reports link is available for all tabs and reporting years.
Reports are specific to the user, meaning you can view only the reports that you select to run.
If you run the same report multiple times, the most recently generated report is displayed at the top
of the list on the report pop-up page.
A generated report is available for 18 hours from the submitted date and time, or until you click
the Download link for the report.
The finalized Final Performance Report does not use My Reports.
The pop-up window displays the information for each report generated in the following columns:
Column/Field/Link Description
Report The name of the report. For Interim and Annual reports, this column also
indicates if the report is in the draft state or finalized. Click on the report name
to open the report or save the report to a location on your computer.
Submitted Indicates the date and time the request to run the report was submitted.
Available Until Indicates the date and time during which the request will be displayed in the
pop-up window. After the displayed date and time, the report will no longer be
available. To view the report after this date, you must run the report again.
[Status] Indicates the status of the report, (e.g. processing) the report format (PDF),
and the size. When the report is ready, this column displays a Download link,
which you can click to view the report or download it to a location on your
computer.
Clear this Message When you've just generated a finalized Interim, Annual, or Final Performance
Report, the system displays a message saying your report is available for
download. Clicking the Clear this Message link refreshes the page and makes
the View and Print Report link available in the Reports tab.
Clear this Request If reporting errors occur, click this link to cancel your report request.
Close Click this link to close the pop-up window.
The MIS does not automatically submit the report to CDC; you must
manually submit the report according to CDC and PGO guidance.
If your report is not finalized in the CDMIS by the report due date, the
report will be locked down and marked as “Past Due.” If this occurs, you
must contact your project officer to unlock the report for editing.
If your report has been finalized by mistake, you must contact your project
officer for assistance.

CDMIS User Training Manual – Reports Viewing and Printing a Report
17
If your report has been finalized and is then reverted to DRAFT status for
any corrections, both the original (View and Print Report link) and the
newly submitted report (Print Report link) will be saved in the CDMIS.
If your report is finalized again, only the latest will be saved in the CDMIS
(both report links).