need html5 ads? adobe animate cc to the...
TRANSCRIPT

Need HTML5 Ads? Adobe Animate CC to the Rescue! By Cory Hudson
VP, Creative Technology & Innovation, BannerWave
Chair, IAB HTML5 Working Group Table of Contents The Journey To Adobe Animate CC .................................................................................................................. 2
Adobe Animate Publish Settings ........................................................................................................................ 3
Basic Tab Settings ............................................................................................................................................. 3
Advanced Tab Settings...................................................................................................................................... 6
Spritesheet Tab Settings ................................................................................................................................. 11
Webfonts Tab Settings .................................................................................................................................... 16
Text Support .................................................................................................................................................... 18
AdHelper.js ...................................................................................................................................................... 21
Somnia (Sleep & Wake) .................................................................................................................................. 21
Performance Monitoring .................................................................................................................................. 23
Fallback & Alternative Content ......................................................................................................................... 23
Time Synched Animation ................................................................................................................................. 25
Retina / High-DPI ............................................................................................................................................. 27
Visibility ........................................................................................................................................................... 28
AdHelper Set-Up ............................................................................................................................................. 28
Where to go from here? ................................................................................................................................... 30

The Journey To Adobe Animate CC I’ve been primarily focused on digital advertising creation for the last ten years now. I’ve designed, coded and tested every ad format imaginable and used and evaluated almost every relevant tool and technology that has existed. I’ve also trained and led large teams that were responsible for learning and leveraging these methods in order to expertly create premium advertising experiences for some of the biggest brands in the world. With the transition to HTML5 I’ve come to fully appreciate the importance of knowing the best tools for the job at hand. They allow you to produce the highest quality results in the shortest amount of time possible. They allow you to innovate freely and easily bring your ideas to life in a way that is both intuitive and achievable. They deliver predictable, human-readable, technically sound and highly optimized output. They enable efficient testing and successful delivery of the intended ad experience across all of the devices and platforms that the advertiser is targeting. They facilitate efficient and flexible workflows that allow designers and coders to collaborate most effectively. They continually introduce and update new features that address unique challenges that are specific to our industry. They make our jobs easier and maximize our efforts by consistently producing high quality results that are true to the initial creative vision. From my professional experience, there is a single tool that checks all of these boxes, effectively meeting these criteria. For several years now there has been ongoing debate regarding which content creation tool had the most overall potential and was the best available option for producing HTML5 advertising experiences. This resulted in plenty of differing opinions, widespread confusion and a fragmented industry landscape. Early adopters were creating their HTML5 ad units inconsistently, and the industry began to resemble the “wild, wild, west” with ad creators building using their own preferred methods and adhering to no set of standardized HTML5 specs or best practices. This made it difficult for ad-serving vendors to efficiently intake, evaluate and serve the ads in a scalable manner. This was probably the main reason why the SWF file format was able to hold on for so long, because the ad industry wasn’t systematically prepared for HTML5 and it has taken some time for the ad-serving platforms and tools to adjust to the specific requirements and characteristics of the new technology. The ad industry benefits greatly from the emergence of robust tools that become industry standards. These tools provide ad-serving vendors with a consistent and familiar format allowing for greater overall efficiency and scalability, both of which are vitally important for the continued prosperity of the advertising operations that support the multi-billion dollar digital advertising industry. With browsers, publishers and ad-serving platforms now universally supporting HTML5, and in some cases exclusively, the timing appears to be right for a content creation tool to emerge as the tool of choice for ad creators everywhere. Considering the impressive evolution of Adobe Animate CC’s HTML5 capabilities, I believe that it will be the tool that deservedly fills this roll, successfully becoming the new de facto industry standard. Quietly, and somehow under the radar Adobe Animate has been steadily growing into a robust HTML5 ad creation tool that produces highly optimized results that can be flawlessly delivered to all screens and effectively meets the specific needs of today’s advertising landscape. And now, with the rebranding and latest release of Adobe Animate, which now includes even more useful functionality for ad creators than ever before, this powerful tool is clearly positioned to be the one that the digital ad industry will rely upon moving forward, for the efficient creation and flawless delivery of standardized HTML5 advertising units.
Adobe Animate Publish Settings In this comprehensive whitepaper, I will walk you through the some of the most relevant and important Adobe Animate features that HTML5 ad creators will need to harness in order to take full advantage of it’s capabilities. I’ll also sprinkle in some random tips, tricks and techniques that will help facilitate an efficient workflow as well as achieve professional quality results that comply with emerging IAB specs and standards. Now the key to unlocking all of the powerful ad creation capabilities of Adobe Animate mainly lies in understanding how to properly configure and utilize the Publish Settings. Knowing how to best use these settings will allow you to truly get the most out of what Adobe Animate has to offer ad creators. The Publish Settings dialog box for HTML5 Canvas has been revamped in the latest Adobe Animate release and I can tell you that there are a ton of useful goodies packed inside. Basic Tab Settings So let’s begin with reviewing the Basic tab of Adobe Animate’s Publish Settings where you will find our first important setting, one called “Overwrite HTML file on publish.” This may at first appear to be an insignificant checkbox, however this is a very useful feature that when utilized properly can literally save you from wanting to bang your head against a wall after realizing that you’ve mistakenly overwritten and lost a bunch of your code. The way it works is that you can uncheck this setting, and the contents of the HTML wrapper file will not be overwritten on subsequent publishes. This can be extremely useful since you'll need to customize the HTML file for tracking implementation, meta tags, CSS, backup image logic, linking to externally referenced JavaScript libraries, helper files, web font services etc. That said, you would definitely be much better off leveraging Adobe Animate’s custom templates in order to include these types of edits within the HTML5 wrapper. Custom templates provide a far superior solution that is much more efficient at handling these types of modifications compared to having to worry about manually adjusting this setting. How “Overwrite HTML file on publish” is most useful, is for allowing you to write custom code within the HTML wrapper that is unique and specific to the ad unit and that you do not want to be overwritten when you republish your FLA. Most of the time, you’ll probably want to have this option selected for your initial publish, and then immediately uncheck the setting for all subsequent publishes so that you are free to make edits to the HTML wrapper without risking accidentally overwriting your additions. Forget to do this a single time and I guarantee that you will very quickly learn to respect and utilize this feature appropriately. Properly using this feature in conjunction with custom templates will provide you with all-around benefits and a very flexible and efficient workflow.

In my opinion, the second most important setting to understand on the Basic tab would be the option that determines if and how to export your image assets. This setting is called “Export image assets” and allows you to specify if your assets should be exported on publish, and if so, where they should be exported and whether or not they should be combined into sprite sheets. If you check “Export image assets” then Adobe Animate will automatically export all of your bitmap assets and place them into the directory that you specify, with the default being a relative folder named “images”. If you decide to uncheck this setting then Adobe Animate will no longer overwrite your images with each republish. This is very useful because it allows you to replace your initially published images with more highly optimized versions in order to reduce your overall file size. The reason that this feature is so significant is because unfortunately, Adobe Animate's default bitmap compression is not very aggressive and you can achieve far better results by leveraging 3rd party image optimization tools such as ImageOptim, ImageAlpha or TinyPNG/JPG in order to fully optimize your images. By removing unused color information, comments, and meta-data these tools can produce impressive results that are high in quality and low in file size. These types of tools can often provide more effective compression than even Photoshop, and in some cases can reduce your overall image size by 50-75% without any visible loss in quality. These tools can also be integrated into automated build processes.

The next setting that needs to be mentioned is available under “Export image assets” and is called “Combine into spritesheets”. When this setting is selected it will activate the options under the Spritesheet tab, which allows you the ability to fully configure your sprite sheet approach and corresponding image settings. My suggested workflow for using these two settings together, would be to leave both the “Export image assets” and “Combine into spritesheets” settings enabled and only deactivate them after you have finalized your design. Once your design has been finalized and you are fairly confident that the image assets won’t be changing, you can then safely deselect these options and then manually compress the sprite sheets that Adobe Animate generated for you within your “images” directory, using the 3rd party tools that I previously mentioned. That said, we all know how picky clients can be, so if revisions were requested to any of the imagery after you had already deactivated these options and compressed your sprite sheets, you’d just need to remember that if you add new images to your FLA after unchecking the “Export image assets” setting, then the new images will not be exported until you re-enable this option. Please be aware that only image assets that are actually used on the Stage of your FLA will be exported during publish. This means that images placed on guide layers as well as any unused images sitting in your Library will not be exported when you publish your file. If you have any image assets in your Library that you would still like to export, perhaps to reference them later through code, then you’ll need to assign these unused images “Linkage IDs” in the Library panel. Images with “Linkage IDs” will also be added to your sprite sheets if you’ve chosen to let Adobe Animate generate them for you. Once an image or MovieClip is assigned a “Linkage ID”, it will then become an exported asset even if it is not physically placed on the Stage of your FLA. This is very important if you plan to export your Library assets in order to allow yourself or another developer to reference these assets via code, outside of Adobe Animate and using another text editor. Even if you plan to reference these assets via code within Adobe Animate’s Actions panel, you’ll still need to be sure to give these assets “Linkage IDs” if they are not going to physically exist on the Stage. Lastly, even if you have selected “Combine into spritesheets” but you happen to publish your FLA with only a single image asset of a particular format (PNG or JPG) then because it is only a single image it will not actually generate a sprite sheet or the corresponding JSON. Instead, Adobe Animate will only generate the individual PNG and/or JPG. This is only worth mentioning because if you publish your FLA with only a single image asset of a particular format (PNG or JPG), but then add additional images of the same format, causing for the original image to then be included within a sprite sheet, the original individual image will still exist within your “images” folder. The original individual image should then be manually deleted in order to ensure that it is not duplicated, and that it doesn’t get packaged with your final deliverable assets, unnecessarily bloating your file size.

Advanced Tab Settings Now let’s move on to the Advanced tab where we can find one of the most exciting and useful new features available from Adobe Animate, which is the ability to create customized templates that insert reusable code into the HTML wrapper of your Canvas output. These personalized templates allow for you to configure and inject common and reusable code modifications into the outputted HTML file that Adobe Animate automatically generates. This is an extremely valuable capability that allows for greater overall efficiency and consistency in your ad production workflow. Reusable code snippets that are frequently leveraged across multiple ad executions would have previously required repetitive manual edits for each individual advertising project. Now you can simply insert your reusable code directly into custom templates that can then be easily accessed through Adobe Animate’s Publish Settings and without requiring any further manual updates. Code modifications that I would suggest as being good candidates for inclusion in your custom templates would be commonly needed and shared functionality such as the implementation of specific meta tags, unique CSS, vendor specific click tracking methods, web font usage, and inclusion of external JavaScript libraries such as GreenSock and AdHelper. Basically anything that is reusable

and configured with characteristics that would frequently be used across multiple ad executions would most likely benefit from being included in a custom template. In order to get started using custom templates you should first familiarize yourself with the available options within the Advanced tab. You can currently use the default template, import a custom HTML template file, or export the current template to an external file. The following buttons are now available under Publish Settings/Advanced: Use Default: Use the default template for generating the HTML wrapper file while publishing. Import New: Import a custom template that will be used to inject your specific modifications into the HTML wrapper file that is created while publishing. Please note that previously existing template import restrictions have now been removed in the latest release of Adobe Animate. Export: Export the current template being used for publishing. In order to create and use your custom template you should follow these steps:
1. Under Publish Settings/Advanced select “Use Default” in order to ensure that you are starting the process with a standard, unmodified template and then choose “Export” to export the default template. This will be the file that you will start with and apply your custom modifications.
2. Modify the exported template within your text editor of choice including any applicable customizations as I previously described. Please be aware that your modified template should still include all of the tokens that were present in the default template. All of the existing tokens are required during publishing and removing or renaming any of them will cause your code to break. That said, you are now allowed to reuse the default tokens elsewhere within the template as needed and Adobe Animate will replace all of the values during publishing. This can come in really handy! You can also replace some tokens with hardcoded values, such as the Canvas background color ($BG) in the form of RGBA so you can specify the background color and transparency. In addition you can also hardcode $WT, $HT and $TITLE.
3. Import the customized template into your project using the “Import New” button. 4. Publish your project and you should now see your modifications included in the HTML wrapper
that is outputted from Adobe Animate.

After you’ve created multiple custom templates you may find it useful to assign each individual template to a unique publish Profile name in order to better organize and easily access your collection of custom templates. This new feature allows for you to attach your custom templates to publish Profiles that you define, providing greater efficiency and consistency across your various ad configurations. For example, you could set up unique publish Profiles for specific ad vendors, sizes, formats etc. and then quickly select from these Profiles when you begin each new project. You could basically have a single FLA starter file for each new project that contains your collection of custom Profiles, with each Profile having a different custom template attached, that targets a different platform (DoubleClick, Sizmek, etc.). With each new project, you can then easily and instantly select from the dropdown list of your custom Profiles with each already having the appropriate custom template attached to it, incredibly speeding up your workflow. To add an existing custom template to a custom Profile, follow these steps:
1. Select File > Publish Settings. In the Publish Settings dialog box, select the Advanced tab.
2. Click the gear icon next to the Profile box in the upper left of the Publish Settings in order to create a new custom Profile.
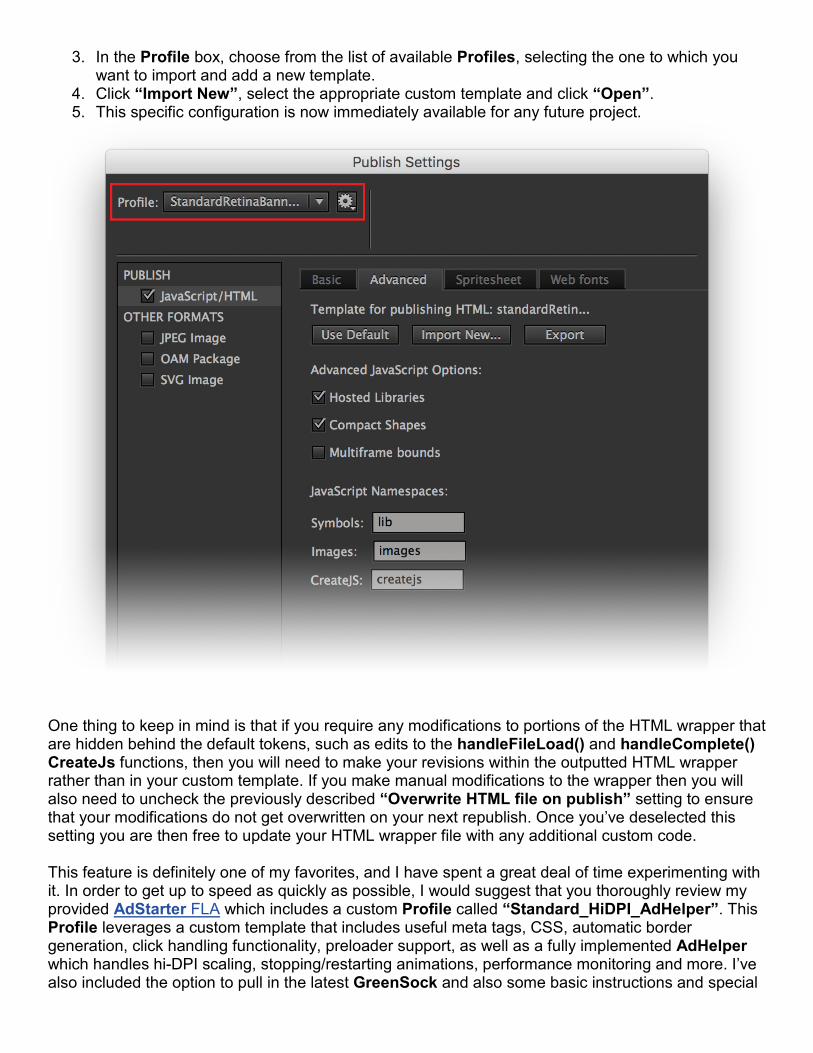
3. In the Profile box, choose from the list of available Profiles, selecting the one to which you want to import and add a new template.
4. Click “Import New”, select the appropriate custom template and click “Open”. 5. This specific configuration is now immediately available for any future project.
One thing to keep in mind is that if you require any modifications to portions of the HTML wrapper that are hidden behind the default tokens, such as edits to the handleFileLoad() and handleComplete() CreateJs functions, then you will need to make your revisions within the outputted HTML wrapper rather than in your custom template. If you make manual modifications to the wrapper then you will also need to uncheck the previously described “Overwrite HTML file on publish” setting to ensure that your modifications do not get overwritten on your next republish. Once you’ve deselected this setting you are then free to update your HTML wrapper file with any additional custom code. This feature is definitely one of my favorites, and I have spent a great deal of time experimenting with it. In order to get up to speed as quickly as possible, I would suggest that you thoroughly review my provided AdStarter FLA which includes a custom Profile called “Standard_HiDPI_AdHelper”. This Profile leverages a custom template that includes useful meta tags, CSS, automatic border generation, click handling functionality, preloader support, as well as a fully implemented AdHelper which handles hi-DPI scaling, stopping/restarting animations, performance monitoring and more. I’ve also included the option to pull in the latest GreenSock and also some basic instructions and special

testing functions that will help you get up and running with AdHelper. Please note that if you decide to create an ad from this FLA then you should rename your FLA specific to your project and leave the original AdStarter FLA unchanged so that you can use it to begin all of your similar projects. Simply publish your FLA to see the HTML wrapper that uses the custom template. To review the custom template on it’s own, you would go to Publish Settings/Advanced/Export in order to save a local copy. Lastly, be aware that you do not need to include a border or any click handling methods within the FLA. The AdStarter template handles those features for you automatically. I’d like to mention one final tip regarding the outputted HTML. If you look inside the HTML wrapper and locate the script tag that references your FLA’s corresponding JavaScript file, you will see that a random cache-busting query string variable has been appended to the file name. You should see something like: <script src=“Your_FLA_Filename.js?1456939808514"></script> Adobe Animate is automatically appending this cache-busting variable to the file name in order to ensure that the browser is not caching an outdated version of the file when you view and test your work. Now, the only issue with this is that some ad-serving platforms will reject your ad because their automated systems do not recognize the file name with the appended cache-busting variable as being the same file as the actual file that is located within your assets. Because of this fact, I would suggest that you make it a habit to manually remove the cache-busting query string variable before packaging and submitting your finalized assets to your ad-serving vendor. Simply delete the “?” and the random number that follows, so that your file names match up exactly: <script src=“Your_FLA_Filename.js"></script> Another great feature under the Advanced tab is nested beneath the “Advanced JavaScript Options”. This is the option to choose to use “Hosted Libraries”. Selecting this option allows you the benefit of leveraging the centrally located and CDN hosted version of the CreateJs library rather than having to reference a local copy of the library. The CreateJs library is required to support the output from Adobe Animate and cannot be excluded from your assets. The ability to reference the CDN hosted library is extremely advantageous because many ad-serving vendors and publishers will allow you to exclude the file size consideration of the CDN hosted library from your overall file size calculation. This is allowed because CreateJs is a widely used and distributed library that is commonly leveraged across the ad industry and it is very likely to be already cached by most users’ browsers. Even if your ad-serving vendor does not allow calls to externally hosted libraries, it is highly probable that they will be hosting their own version of CreateJs on their CDN for you to use instead. For example, DoubleClick is one such vendor that hosts their own version of the CreateJs library for ad creators to leverage within their HTML5 advertising campaigns. All that you would have to do in this case, would be to locate the reference to the centrally hosted CDN library within the published HTML wrapper, and then swap that URL with the URL of the vendor’s hosted library accordingly: <script src="https://code.createjs.com/createjs-2015.11.26.min.js"></script> Libraries such as CreateJs and GreenSock that are widely used across the industry, professionally maintained, well documented, frequently updated and backwards compatible are suitable candidates for CDN hosting by ad vendors, so check with your vendor to see what they support. Now you may have noticed in the above script tag, that there is now only a single request required for the CreateJs library, rather than the multiple requests that were previously necessary. In the past, there were several individual calls made in order to pull in all of the separate pieces of functionality that comprise the CreateJs library. Instead of the preceding line of code above, you would have seen something like the following:

<script src="http://code.createjs.com/easeljs-0.7.1.min.js"></script> <script src="http://code.createjs.com/tweenjs-0.5.1.min.js"></script> <script src="http://code.createjs.com/movieclip-0.7.1.min.js"></script> <script src="http://code.createjs.com/preloadjs-0.4.1.min.js"></script> The reduction in required calls is the result of Adobe Animate now using the latest combined CreateJS library instead of the individual libraries that were used in previous versions. This change reduces the number of server requests from the published HTML5 Canvas output and improves performance. The file size of the combined libraries is also extremely small, which is yet another benefit when compared to the output of some other HTML5 design tools and libraries. The entire CreateJs library, including MovieClip is only 48.6kb gzipped. This small file size is extremely advantageous to ad builders who might be serving their ads with publishers or vendors who are not yet allowing a file size exemption for the CreateJs library.
Spritesheet Tab Settings Now let’s move on the Spritesheet tab which I mentioned earlier. This tab hosts the settings for a super powerful feature that saves ad creators a tremendous amount of time and manual labor. Here is where you will find the settings for the newly updated and optimized “HTML5 Canvas Spritesheet” functionality. Using sprite sheets rather than leveraging numerous individual image assets is not only

a best practice, but vital to producing a fully optimized HTML5 ad experience. Packing your image assets into sprite sheets effectively combines multiple images or frames of animation into a single larger image. By combining the color profiles of the comprised images, the sprite sheet is able to reduce the overall combined weight of similar assets as opposed to saving out individual images. With file size constraints being the main challenge right now with HTML5 advertising, sprite sheets are an important part of your file size management strategy, allowing you to leverage the greatest number of image assets possible, while still adhering to IAB and publisher specs. Using sprite sheets can not only dramatically reduce your overall file size but can also increase available runtime memory and reduces the number of server requests associated with your ad unit, both of which can severely impact performance, especially on mobile devices. Using sprite sheets is also generally preferred for animation of static assets, because vector drawing calculations don’t have to be executed on every animation frame which reduces CPU overhead. Now please be aware that even with the emergence of HTTP2 it will still be advantageous to reduce the number of server requests associated with your ad experiences, and as I just described sprite sheets can also provide additional, tangible benefits. Keep in mind that HTTP requests are only one aspect of performance, so don’t make the mistake of thinking that you no longer have to use sprite sheets just because of the growing support for HTTP2. Unlike with most websites, the initial loading of our ad experiences will require all of the assets that we are delivering and rendering in the browser. All of the images will be used and displayed, and because of this fact we should be respectful of the end user and deliver our assets in the most optimized and performant way possible. Using sprite sheets is a smart and solid approach that provides all around optimization benefits. The relevant settings that comprise this feature can be found under Publish Settings/Spritesheet. Prior to the latest Adobe Animate update, whenever you chose to export all of your bitmap assets as a sprite sheet, Adobe Animate would automatically combine all of the utilized images within your Library into a single, PNG32 sprite sheet. The main problem with this approach was that it unnecessarily bloated file size by combining all image assets, both JPG and PNG assets, into a single sprite sheet that couldn’t be fully optimized. This is no longer the case as Adobe Animate now provides you with full control over how you would like to export your image assets. The Spritesheet tab now provides separate controls for both PNG and JPEG settings that are enabled or disabled based on the format that you select. You can easily decide between outputting a single PNG or JPG sprite sheet or multiple sprite sheets depending on your specific needs. Adobe Animate provides you the following options to customize your sprite sheets. First either select “Combine image assets into sprite sheets” from the Basic settings tab as previously described in order to enable the functionality, or you can also enable it directly here within the Spritesheet tab. After the option has been activated, you then decide between the following image format options for your sprite sheet(s): PNG: All images will be packaged as a .png sprite sheet. JPEG: All images will packaged as a .jpeg sprite sheet. BOTH: All PNG images will be packaged as a .png sprite sheet and the remaining image files will be packaged as a .jpeg sprite sheet. I would suggest that you always combine similar images into sprite sheets, a single JPG sprite sheet for photographic images with opaque backgrounds and another separate PNG sprite sheet for crisp graphics and imagery that requires transparency. There should generally be no need for more than 2 sprite sheets per ad unit. Because of this fact, my recommendation would be to always have the “Combine image assets into spritesheets” setting activated and that you select the “BOTH” option so that your images are always distributed into appropriate sprite sheets that can then be fully

compressed using the 3rd party image optimization tools that I introduced earlier. Optimizing the JPG and PNG sprite sheets separately will allow for maximum compression and smaller overall file size then what was previously possible, when Adobe Animate only outputted to a single PNG32 sprite sheet. You can also adjust the settings for each individual sprite sheet accordingly: Quality/Bit Depth: You can generate a JPEG sprite sheet with different quality values (0- 100). Similarly, for a PNG sprite sheet, you have an option to select the bit depth (8, 24, or 32). Max Size: You can specify the maximum dimensions of the sprite sheet generated. Background: You can specify the background color/alpha for the sprite sheet generated. You most likely won’t ever need to adjust the Max Size, as using the defaults will be fine in most scenarios and won’t actually affect the actual dimensions needed to render the sprite sheet. The sprite sheet will only be generated at the most suitable size required for the images contained. That said, if you decided that you wanted your sprite sheet to flow horizontally or vertically you could adjust the settings accordingly in order to affect the outputted layout of your sprite sheet. You should be aware that if you enter dimensions that are smaller than what is required to combine all of the images within a sprite sheet, then Adobe Animate will spit out multiple sprite sheets, combining wherever possible. If the dimensions that you’ve entered are smaller than a single image, then Adobe Animate will not generate the sprite sheet and will instead output individual images for your assets. Now although all of this is possible, needing this level of control from the auto sprite sheet generation feature would seem to be rare. If you needed precise placement of the images within the sprite sheet, for say code driven animation purposes, then you’d be much better off manually creating your own sprite sheet using Photoshop, specialized standalone tools (e.g. Retina CSS Sprite Generator, CSS Sprites, TexturePacker, Zoe) or even Adobe Animate’s built in “Generate Sprite Sheet” functionality, available via the Library panel. Keep in mind that if you decide to use any of these other approaches rather than the auto sprite sheet generation feature, then you will be required to repeatedly place the sprite sheets and mask out each of your individual images within separate MovieClips. This manual process can require a great deal of time and effort and by doing so, you would lose out on the main benefit of this incredibly powerful feature, which is having Adobe Animate automatically do all of the hard work for you behind the scenes, while you spend your time on other tasks. Allowing Adobe Animate to automatically handle sprite sheet generation for you is a significant time-saver, versus the manual process that was previously required before the feature was introduced. It can’t be overstated just how useful this feature is. The amount of time that is saved on each and every project is very significant and the optimization benefits make it an extremely important piece of the HTML5 ad building puzzle. Once you start taking advantage of this feature you’ll wonder how you ever got along without it.

When generating your sprite sheets Adobe Animate will also output corresponding JSON files that contain all of the dimensions and coordinates of the separate image regions that comprise the sprite sheets. This information is used by Adobe Animate to render your images successfully. The problem with the JSON files is that some ad-serving platforms will reject your ad because they do not support or allow the JSON file format to be uploaded within their systems. The good news is that Adobe is working on removing the existing dependency on the JSON file and the fix should be implemented within the very next release of Adobe Animate, so you shouldn’t have to worry about this issue for very much longer. In the meantime, I wanted to share the process for manually removing the dependency on the JSON file yourself so that you can confidently build HTML5 ads with Adobe Animate that will be accepted and approved by all of the most prominent and popular ad-serving vendors. Please use the following workaround process to manually remove the dependency on the JSON file. In this example let’s assume that we have selected to output our images to two sprite sheets (my recommended best practice), and that we have already published from our FLA. We would then be able to see that the following sprite sheet JSON files were generated (alongside the outputted corresponding sprite sheets):

Example_atlas_P_.json (Alongside Example_atlas_P_.png) Example_atlas_NP_.json (Alongside Example_atlas_NP_.jpg) We would now need to make the following changes to the code inside of the outputted HTML wrapper file:
1. Inside of function init(), is were the JSON files are presently being loaded. Rather than loading these JSON files we will instead now need to load image files in their place. In our example we would see the following lines: loader.loadFile({src:"images/Example_atlas_P_.json", type:"spritesheet", id:”Example_atlas_P_"}, true); loader.loadFile({src:"images/Example_atlas_NP_.json", type:"spritesheet", id:"Example_atlas_NP_"}, true);
Replace the “src” attribute with the image file path and the type attribute with “image”. So the two lines referenced above should now be changed to the following:
loader.loadFile({src:"images/Example_atlas_P_.png", type:"image", id:"Example_atlas_P_"}, true); loader.loadFile({src:"images/Example_atlas_NP_.jpg", type:"image", id:"Example_atlas_NP_"}, true);
2. Inside of function handleComplete(evt), is where we currently point to the loaded sprite
sheets as follows: ss["Example_atlas_P_"] = queue.getResult("Example_atlas_P_"); ss["Example_atlas_NP_"] = queue.getResult("Example_atlas_NP_");
Now instead, we have to explicitly create the sprite sheet objects ourselves. In order to accomplish this, the two lines referenced above should now be replaced with the following generically formatted placeholders:
ss[/*ID*/] = new createjs.SpriteSheet(/*Copy JSON data and replace image path with queue.getResult(ID)*/); ss[/*ID*/] = new createjs.SpriteSheet(/*Copy JSON data and replace image path with queue.getResult(ID)*/);
3. In our example let’s assume that Example_atlas_P_.json and Example_atlas_NP_.json
contain the following data: {"images": ["images/Example_atlas_P_.png”], "frames": [[0,0,300,200],[0,404,275,200],[0,202,275,200]]} {"images": ["images/Example_atlas_NP_.jpg"], "frames": [[0,770,1024,768],[0,0,1024,768]]}
We now need to edit the placeholder lines of code from the previous step (where we created our sprite sheet objects), by making the following edits. Please note that the ID values referenced below (inside of the two instances of ss[/*ID*/]), should be the same IDs that were used during function loadFile(), which if you remember was inside of function init(). For our example the two lines of code should be changed as follows:

ss[“Example_atlas_P_”] = new createjs.SpriteSheet({"images": ["images/Example_atlas_P_.png"], "frames": [[0,0,300,200],[0,404,275,200],[0,202,275,200]]}); ss[“Example_atlas_NP_”] = new createjs.SpriteSheet({"images": ["images/Example_atlas_NP_.jpg"], "frames": [[0,770,1024,768],[0,0,1024,768]]});
4. Next, we would then replace the image paths with queue.getResult (/*ID*/) as follows:
ss[“Example_atlas_P_”] = new createjs.SpriteSheet({"images": [queue.getResult(“Example_atlas_P_”)], "frames": [[0,0,300,200],[0,404,275,200],[0,202,275,200]]}); ss[“Example_atlas_NP_”] = new createjs.SpriteSheet({"images": [queue.getResult(“Example_atlas_NP_”)], "frames": [[0,770,1024,768],[0,0,1024,768]]});
So, the original lines of code that we started with should end up looking like this:
ss[“Example_atlas_P_"] = new createjs.SpriteSheet({"images": [queue.getResult(“Example_atlas_P_")], "frames": [[0,0,300,200],[0,404,275,200],[0,202,275,200]]}); ss["Example_atlas_NP_"] = new createjs.SpriteSheet({"images": [queue.getResult(“Example_atlas_NP_")], "frames": [[0,770,1024,768],[0,0,1024,768]]});
Please note, that it is very important that you don’t forget to place square brackets “[ ]” around “images” and “frames”, otherwise the code will break.
5. Finally, we would complete this process by deleting the JSON files from inside of our “images”
folder and test our ad to ensure that everything is displaying and functioning as expected.
Webfonts Tab Settings Let’s conclude our overview of the Publish Settings with a few notes regarding the new Webfonts tab. Adobe Animate now supports Typekit Web Fonts integration which allows you to create dynamic textual content that can access thousands of quality, premium fonts from top foundry partners. You can access Typekit Web Fonts directly within Adobe Animate and implement them seamlessly within your HTML5 Canvas output, using your Creative Cloud membership. Using Typekit Web Fonts is extremely easy. Just follow these simple steps:
1. Open an HTML5 Canvas document and select the Text component in the toolbar. 2. In the Property Inspector, select Dynamic Text and click the TypeKit globe icon next to the
Family dropdown box. 3. In the Add Webfonts window that appears, click Get Started. 4. You can now browse through fonts, search for specific font families and fonts, or filter by font
properties. 5. Select a font and click OK. Adobe Animate adds the selected font to the Text> Font menu
and in the Family dropdown box under the Webfonts category.

6. Before publishing your content on the Web, open the Publish Settings, click the Webfonts tab, and specify the URL of the page on which your HTML5 content will be published. For example, www.adobe.com.
Please note that for TypeKit Web Fonts to appear in your content, you must ensure that you specify the URL accurately in the Publish Settings. Content hosted on a page other than the one that is configured in your Publish Settings will not display the Web Fonts that you have used. And it is because of this requirement, that the fun must end for us ad builders! Unfortunately, at the time of this writing the current Typekit model requires that you provide the referrer domain while publishing. This cannot be known upfront and hence it will not work for within advertising use cases. The Adobe Animate team is aware of this limitation and they are currently working to establish alternative workflows that will allow ad creators to use Web Fonts within their ads. In the meantime if you need to leverage Web Fonts, you can continue to manually integrate them into your ads, by adding them inside of the HTML wrapper file, either by making an API call to a hosted web font service, linking to the Web Font asset in your document’s <head> or with CSS using @font-face or @import along with possibly leveraging subsetting and base64 encoding in order to reduce file size and decrease load time.

I’ve experienced great results using all of these methods, and in addition to Typekit have successfully leveraged both Google Web Fonts and Monotype Web Fonts within my Adobe Animate generated output. So even though we cannot currently use the integrated Typekit functionality within our ad experiences, I still wanted to introduce this feature because once it is made available for advertising purposes, it will unlock all of the amazing benefits that Web Fonts provide. For example, being able to dynamically determine our text at runtime while maintaining the client’s branding requirements, providing scalability across varying screens, the ability to quickly apply edits, sharing resources across multiple ad campaigns, etc. Web Fonts are very important to HTML5 ads, so I will be eagerly awaiting the next iteration of this feature, with hopes that we will soon be able to easily and seamlessly integrate Web Fonts within our ads created with Adobe Animate. Text Support So now that you are up to speed with all of the relevant Publish Settings required to create IAB compliant HTML5 ad units with Adobe Animate, let’s move on to Text which is an area where Adobe Animate has recently greatly improved it’s level of support. The next super awesome feature that I’d like to highlight is a brand new setting that does not actually exist within the Publish Settings,

and because of this it may go unnoticed by many ad creators. Now the reason this feature doesn’t live within the Publish Settings, is because it was determined that it didn’t make much sense for it to exist as an optional setting, but rather that the behavior should always be enabled by default. I am referring to a new feature called “Publish text as outlines” which works by default for Static Text. What this feature does is it automatically takes all of the Static Text within your Canvas document and converts it to outlines while publishing, thus ensuring that the font, formatting and overall appearance of your text are consistent across any browser or device. All Dynamic Text will be published as such and remain unchanged. This is a major step forward, because Static Text fields were previously unsupported within Adobe Animate’s Canvas document type, limiting you to solely using Dynamic Text fields for all of your text. This was a big headache because the Dynamic Text fields could only have a single style applied which severely limited your ability to control the appearance of your type with custom weight, leading, kerning, tracking, etc. Being able to finely control the styling of text was obviously an essential capability in order to meet the branding requirements of advertisers. Because this functionality was missing from the Canvas doc type, what resulted was the need to begin your projects within an AS3 document, where you would create and style all your text and then duplicate your editable text layer (saving the original layer for future editing) and converting the duplicated layer to outlines. You would then either copy and paste your outlined text from the AS3 file into your working Canvas document, or convert your entire AS3 document over to a Canvas document using Commands/Convert To Other Document Formats/HTML5 Canvas. You could have alternately included all of your text within a bitmap sprite sheet and then imported that into your Canvas document, but that approach was not recommended because you lost all of the benefits of using vector text (e.g. small file size, scalability, etc.). Anyway, I only mention all of this for context, so that you can fully appreciate just how much of a time saver it is to have Adobe Animate fully supporting Static Text and automatically converting it to outlines during publishing, while still remaining editable within the FLA. This is an amazing feature that you don’t have to worry about selecting from the Publish Settings because it’s already there for you automatically! I do have a couple of best practices for you, in regards to handling text inside of Adobe Animate. Because all of your Static Text is now being converted to outlines, it is suggested that you place all of your Static Text fields inside of MovieClips, rather than having the text fields sitting on your main stage. Once you have your Static Text fields contained within MovieClips you should then set each to “Cache as Bitmap” which can be done from the Properties panel under Display/Render. This will improve performance by lessening the work the CPU has to do because the complex vector drawing calculations won't have to be repeatedly processed on every stage tick. Very similar to what was available with your AS3 projects, you can also leverage bitmap caching with your Canvas projects as well. This functionality allows you to pre-render complex graphics to an off-screen bitmap, so it does not have to be rendered on each frame. This can provide significant performance benefits when used appropriately with static assets. The rules for using bitmap caching are similar to using it with AS3, use it only on static content, and only when the complexity of the graphics are sufficient to warrant its use. This is because bitmap caching creates new bitmaps, which use both RAM and graphics memory. The latter is limited on mobile devices and overuse can cause performance problems. Static text that has been converted to outlines will often fall into the category of an asset that would warrant using “Cache as Bitmap”.
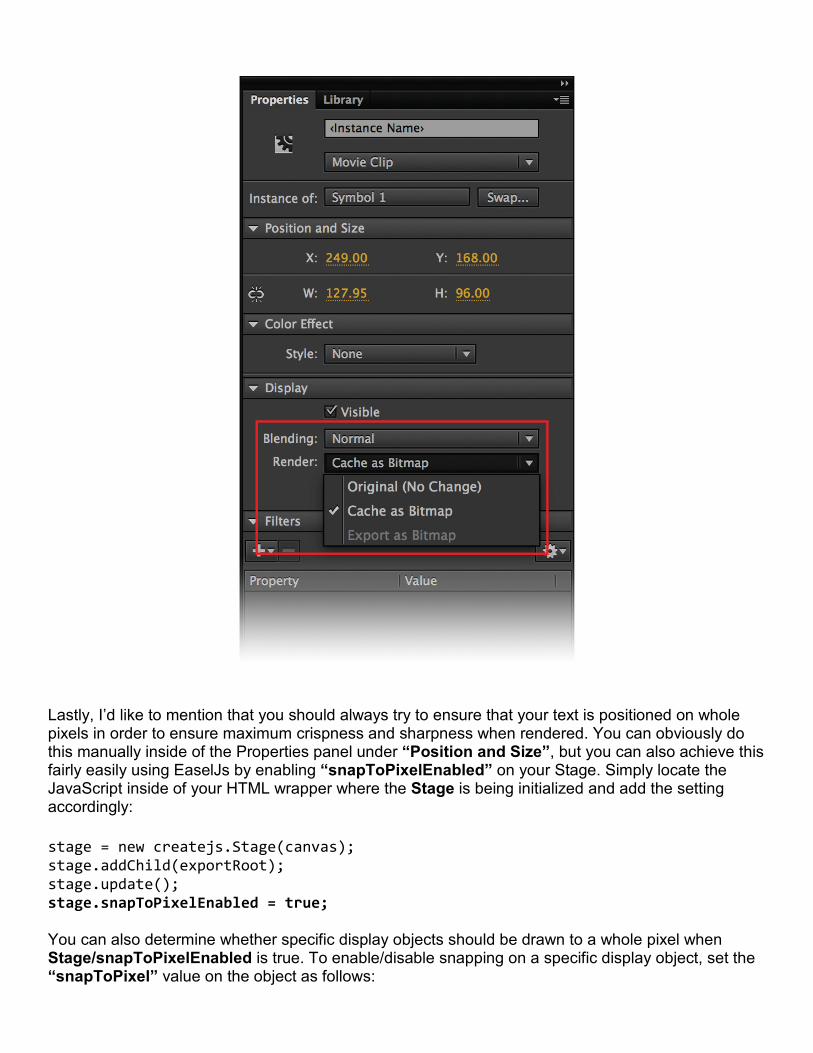
Lastly, I’d like to mention that you should always try to ensure that your text is positioned on whole pixels in order to ensure maximum crispness and sharpness when rendered. You can obviously do this manually inside of the Properties panel under “Position and Size”, but you can also achieve this fairly easily using EaselJs by enabling “snapToPixelEnabled” on your Stage. Simply locate the JavaScript inside of your HTML wrapper where the Stage is being initialized and add the setting accordingly: stage = new createjs.Stage(canvas); stage.addChild(exportRoot); stage.update(); stage.snapToPixelEnabled = true; You can also determine whether specific display objects should be drawn to a whole pixel when Stage/snapToPixelEnabled is true. To enable/disable snapping on a specific display object, set the “snapToPixel” value on the object as follows:

this.yourMovieClipInstance.snapToPixel = false; AdHelper.js I’d now like to introduce to your new best friend, a very useful CreateJs helper class appropriately called AdHelper. AdHelper makes it easier to build and deploy ads using CreateJS. It serves a number of ad specific functions, and is very easy to set up. Now even though AdHelper is not technically a part of Adobe Animate, I am mentioning it within this article because Adobe is currently evaluating the integration of this functionality within the product. Because of this, there is a good chance that the features of this helper class will become available via the Publish Settings in the very near future. This would obviously eliminate the need to manually include a reference to the helper class within the HTML wrapper file, while still providing support for the functionality within the code that Adobe Animate generates. For now, we need to manually include a reference to a local copy of the library. Keep in mind that you can include this reference to AdHelper within a custom template as described earlier in this article, so that you don’t have to do this repeatedly with each new ad. I have also already gone ahead and fully implemented AdHelper for you within my provided AdStarter FLA template. That said, if you decide to do this for yourself, it’s as simple as linking to the file, as follows: <script src="js/AdHelper.min.js"></script> The AdHelper class is only 2kb over the wire, and provides a number of capabilities for HTML5 banner ads built with CreateJS such as:
• Pausing and muting while in background tabs • Setting sleep schedules (e.g. pause after 15s) • Waking on interaction for configurable time • Displaying alternative content on old browsers or in poor performance scenarios • Ensuring full resolution graphics on high DPI screens • Performance monitoring • Time synching content
Now let’s take a look at all of this powerful functionality that AdHelper provides in greater detail. Somnia (Sleep & Wake) Somnia puts the ad to sleep according to a configurable schedule and wakes it for the specified amount of time when the mouse is within the ad, or the user clicks in the ad. When an ad is put to sleep, its Ticker is paused, its tick listener is unsubscribed, any GreenSock tweens are paused, and a “sleep” event is dispatched to allow for custom handling. On wake, this is reversed, and a “wake” event is generated. This functionality is ideal for controlling multiple animations simultaneously and instructing them to stop after 15 seconds, which is a standardized requirement by most publishers across the ad industry. Custom handling of the “sleep” event also allows you to effectively handle resolving animation states, sending animations to suitable end frames that display the assets most effectively and ensuring that messaging is in a completed state. ad.setSleep(start, mousedown, inBounds, useTicks, listener);
Parameters:
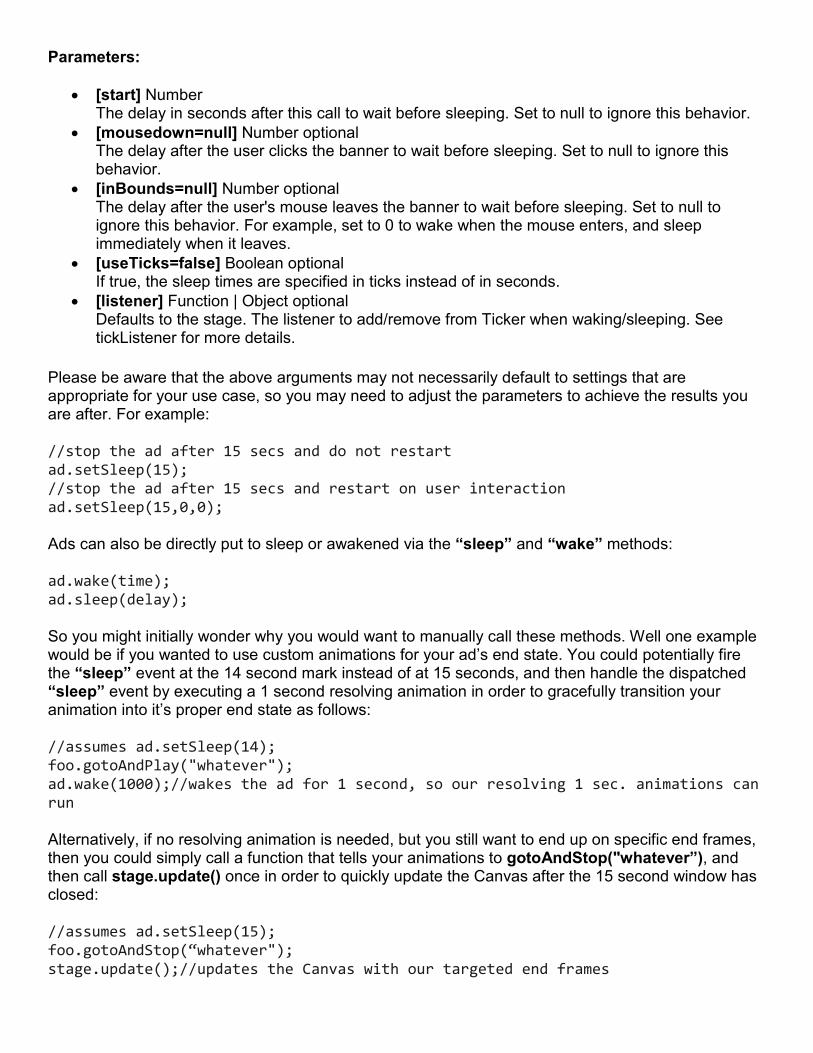
• [start] Number The delay in seconds after this call to wait before sleeping. Set to null to ignore this behavior.
• [mousedown=null] Number optional The delay after the user clicks the banner to wait before sleeping. Set to null to ignore this behavior.
• [inBounds=null] Number optional The delay after the user's mouse leaves the banner to wait before sleeping. Set to null to ignore this behavior. For example, set to 0 to wake when the mouse enters, and sleep immediately when it leaves.
• [useTicks=false] Boolean optional If true, the sleep times are specified in ticks instead of in seconds.
• [listener] Function | Object optional Defaults to the stage. The listener to add/remove from Ticker when waking/sleeping. See tickListener for more details.
Please be aware that the above arguments may not necessarily default to settings that are appropriate for your use case, so you may need to adjust the parameters to achieve the results you are after. For example: //stop the ad after 15 secs and do not restart ad.setSleep(15); //stop the ad after 15 secs and restart on user interaction ad.setSleep(15,0,0); Ads can also be directly put to sleep or awakened via the “sleep” and “wake” methods: ad.wake(time); ad.sleep(delay); So you might initially wonder why you would want to manually call these methods. Well one example would be if you wanted to use custom animations for your ad’s end state. You could potentially fire the “sleep” event at the 14 second mark instead of at 15 seconds, and then handle the dispatched “sleep” event by executing a 1 second resolving animation in order to gracefully transition your animation into it’s proper end state as follows: //assumes ad.setSleep(14); foo.gotoAndPlay("whatever"); ad.wake(1000);//wakes the ad for 1 second, so our resolving 1 sec. animations can run Alternatively, if no resolving animation is needed, but you still want to end up on specific end frames, then you could simply call a function that tells your animations to gotoAndStop("whatever”), and then call stage.update() once in order to quickly update the Canvas after the 15 second window has closed: //assumes ad.setSleep(15); foo.gotoAndStop(“whatever"); stage.update();//updates the Canvas with our targeted end frames
Performance Monitoring The watchFPS() method monitors playback framerate, and applies a simple process to determine when the ad has been running too slowly for too long. When the criteria have been met, a “slow” event is dispatched and can also optionally display alternative content. Works with visibility features to avoid failing while in a background tab due to throttling. ad.watchFPS(showAlt, minFPS, tolerance); Parameters:
• [showAlt] Boolean optional If true, then when the ad is detected to be slow, showAlt is automatically called.
• [minFPS] Number optional The minimum framerate considered acceptable. Calculated automatically if null.
• [tolerance=1] Number optional The tolerance of the system. A higher value (e.g. 2) allows more slow frames before acting than a lower number (e.g. 0.5). Default is 1. Please note that the tolerance setting is rather ambiguous. In simple terms, setting it to 2 makes it twice as tolerant and setting to 0.5 makes it half as tolerant.
The way that watchFPS() determines the number of animation frames that are allowed to be missed before firing the “slow” event is based off of several factors including the tolerance setting and how badly the frame was missed (e.g. it will only allow a couple of frames running at half framerate, but it will allow a few at 90% framerate). Fallback & Alternative Content In order to test to see if CreateJs is supported in the current browser, the following should be placed within function init() within the HTML wrapper. This check can be used to determine if you need to display fallback content. //check for CreateJS support, and show alternate content if necessary if (!createjs.AdHelper.isSupported()) { createjs.AdHelper.showAltImage(myCanvas, “myBackupImage.jpg", “clickThroughUrl”, “alt text”, "_blank"); return; //don't bother with continuing with anything else. } You also have the ability to display alternative content if performance monitoring determines the ad is running too slowly. There are three static methods that provide different levels of control: setAltImage //displays a static image for alternative or back-up content ad.setAltImage(src, href, alt, target);

Parameters:
• [src] String The URL for the image to display.
• [href] String optional The URL to link.
• [alt=""] String optional Text to use as alt text for the image.
• [target="_blank"] String optional The link target to use (e.g. _blank, _parent). Default is _blank.
Specifies alternative content to display if the browser is not supported or you want to fallback to a static image due to poor performance. You can set a link HREF/URL, an image, and text. If an image is specified, the text is used as its “alt text”. If you require more control over the content use setAltHTML instead. When the alternative content is displayed, the banner is put to “sleep”, and the Stage's target Canvas is replaced with a DIV element containing the alternative content and with an ID of "adAlt", which you can use for styling or JavaScript. The image is not loaded until the alternative content is displayed. setAltHTML //renders a string of HTML for alternative content ad.setAltHTML(html); Parameters:
• [html] String The HTML content to display.
Specifies alternative HTML content to display if the browser is not supported or you want to switch to alternative content due to poor performance. When the alternative content is displayed, the banner is put to “sleep”, and the Stage's target Canvas is replaced with a DIV element containing the alternative content and with an ID of "adAlt", which you can use for styling or JavaScript. The HTML is not parsed until the alternative content is displayed, which prevents images from loading, and scripts from executing. setAlt //displays an existing DOM element for alternative content ad.setAlt(element); Parameters:
• [element] HTMLElement The HTML element to display.
Specifies an HTML element to display as alternative content if the browser is not supported or you want to switch to alternative content due to poor performance. The element will be removed from its parent node immediately, but it is still recommended to set its CSS display value to “none” to prevent it from displaying briefly when the page loads. When the alternative content is displayed, the banner is put to “sleep”, and the Stage's target canvas is replaced with the element. The element will have

its CSS display value set to “block”. You can override this via the “alt” event. Note that any images or scripts you have in your element will be loaded and run as usual, so using setAltHTML may be preferable in some situations. If the main difference between setAltHTML and setAlt is not immediately clear, understand that setAlt is basically just a shortcut to setAltHTML. The advantage of setAltHTML over setAlt, is that the HTML is not rendered by the browser unless its actually needed, so images aren't loaded, scripts don't execute, etc. With setAlt the element is already defined in your HTML document and is thus "handled" by the browser, whereas for setAltHTML, you're passing a string that only gets interpreted as HTML by the browser if the alternative content is needed. Because of this, in most scenarios I would probably suggest using setAltHTML. Now let’s look at a few common scenarios and how we might use these different methods.
1. If we want to show the same static backup for non-supported browsers and for slow performance, then we would call setAltImage from our initial function that checks for CreateJs support, use watchFPS() to fire the “slow” event, and then call setAltImage from our function that handles the “slow” event.
2. If we want to show a static backup for non-supported browsers but then show alternative
HTML content for slow performance, then we would call setAltImage from our initial function that checks for CreateJs support, use watchFPS() to fire the “slow” event, and then call setAltHTML from our function that handles the “slow” event.
3. If we want to show a static backup for non-supported browsers but then handle poor
performance scenarios by adjusting our animations and/or executing other logic, then we would call setAltImage from our initial function that checks for CreateJs support, use watchFPS() to fire the “slow” event, and then from our function that handles the “slow” event would take the following approach rather than calling one of the methods:
evt.preventDefault(); //the ad will not be put to sleep // insert custom code to optimize performance this.watchFPS(15, 1); //restart the framerate watcher
Time Synched Animation The timeSync() method forces all MovieClips within the ad to operate in time-synced mode (ie. by setting framerate on all MovieClip instances).This allows the ad to play back with a predictable duration even if the real framerate fluctuates. This feature is very useful in order to ensure that your animations run in their entirety and that they also complete on time. This feature works by injecting code into EaselJS that causes all MovieClip instances to use a master framerate as their framerate property value. This doesn’t change the actual framerate that your ad executes. ad.timeSync(framerate); Parameters:
• [framerate] Number optional The target framerate. Usually the framerate your ad was authored at.
Please note that if a framerate value is not specified, it will use lib.properties.fps if available, and then finally fall back to Ticker.getFPS() which would return the current framerate of the Ticker. If the

latter occurs, and the Ticker framerate has not been correctly set yet, you may see unexpected playback speed. In almost all cases, you'd most likely just call timeSync() with no parameters in order to synch to the framerate that was defined inside of your FLA. Keep in mind that even if you did pass a different FPS parameter to timeSync(), the actual FPS that your ad is running at wouldn’t change. For example, let’s say you author at 30FPS, and then pass 60FPS to timeSync(). Visually, your ad may appear to be running at a faster framerate, however the ad is actually still running at 30FPS. The Stage is still updating at 30FPS. The Ticker is still running at 30FPS. What you’ve done with timeSync(), is essentially instructed every MovieClip in the ad to advance as though it were playing at 60FPS, regardless of the actual framerate being achieved in the browser. So in this example, where we’ve decided to target 60FPS, the ad ends up playing multiple frames (2) on each animation tick. Conversely, if your actual framerate was 10fps either because you set it that way, or because things got really slow, then on every animation tick your MovieClips would advance 6 frames to keep up with the targeted FPS. In summary, it is important to understand that specifying a framerate with timeSync() simplify specifies the framerate you would like to synch to, it does not actually change the Ticker’s framerate. Now let’s talk about choosing an ideal FPS setting for your FLA. There is now less of a need to dictate a FPS with our HTML5 ads because of the emergence of CSS animations which can’t have a FPS cap applied to them and requestAnimationFrame for JavaScript animations which let’s them update as frequently as the browser will allow and up to 60FPS, which is the refresh rate of most displays. The IAB has recognized this unique nature of HTML5 animation and has done away with any FPS spec for HTML5, so you are pretty much free to run your animations at whatever framerate you desire. That being said, we still need to set a FPS within our FLA so that our timeline animations know how fast to run. Your first inclination might be to set the framerate to 60FPS since that is the max FPS that we can achieve within the browser. I would personally recommend against this for several reasons. Setting your framerate to 60FPS only sets the targeted framerate to 60FPS, there is no guarantee that your ad will actually achieve that framerate within the browser. Combine this with the fact that it isn’t a good idea to unnecessarily push the browser to its max capacity when you can achieve suitable results with less CPU resources. Because of this, it’s probably a smart idea to go with a lower framerate, such as 30FPS. A framerate of 30FPS should allow for smooth playback at a lower framerate, providing results that are good enough for the human eye, while avoiding any potential frame stuttering and using less CPU. This being the case, please feel free to experiment with different FPS settings, test your animation performance on actual devices, and see what works best for your particular scenario. The appropriate FPS could potentially vary from project to project, depending on the specific animations or effects that are you are running within your ad. Another reason that I personally like to use 30FPS is because it allows me to take advantage of using requestAnimationFrame to power the heartbeat of the CreateJs Ticker. Most modern browsers support requestAnimationFrame, which provides the benefit of syncing programmatic changes with screen redraws which can result in smoother looking animations. It will also automatically throttle the framerate of background content (such as an unfocused tab) to reduce CPU and battery use. CreateJs has a Ticker.timingMode which allows you to choose what API to use to drive the animation ticks. By default, it uses Ticker.TIMEOUT and the setTimeout API. This is supported in all browsers, and provides a predictable framerate but without any of the benefits of requestAnimationFrame. It also allows you to easily reduce CPU/GPU load by reducing the framerate. There are two modes for using requestAnimationFrame, which will automatically fallback to using setTimeout if the browser does not support the API. Ticker.RAF simply passes through the

RAF heartbeat, ignoring the specified framerate completely. Because RAF frequency is indeterminate, your content should be time based when using this mode. I have experienced great results using Ticker.RAF_SYNCHED mode in order to match up the requestAnimationFrame heartbeat to the specified framerate within the FLA. This mode provides many of the benefits of the both the TIMEOUT and RAF modes, but will generally have the highest variance in frame times. Because of this, it typically works best when the framerate is set to a divisor of 60 (i.e. 10, 12, 15, 20, 30). So, if we have set our framerate within our FLA to 30FPS and we want to use requestAnimationFrame to power our Ticker while still synching to our targeted framerate, then we would adjust the code within Adobe Animate’s HTML wrapper to look like this: createjs.Ticker.timingMode = createjs.Ticker.RAF_SYNCHED; createjs.Ticker.setFPS(lib.properties.fps); createjs.Ticker.addEventListener("tick", stage); Retina / High-DPI The highDPI() method enables full resolution rendering on high-DPI screens by scaling the Canvas and content appropriately and updating the pixelRatio property accordingly. It can also be used to disable full resolution rendering on high-DPI screens to improve performance. Also allows for authoring the ad at a different scale. ad.highDPI(enabled, nominalScale); Parameters:
• [enabled=true] Boolean optional If false, disables high-DPI rendering. If false is passed to the enabled parameter, then high-DPI rendering will be disabled, including downscaling the Canvas on devices that automatically render at high-DPI. This can be useful for reducing render cost on slower devices.
• [nominalScale=1] Number optional The scale the content was authored at. The ad will be downscaled by this value. Allows you to author content at higher resolution, and have AdHelper scale it appropriately for the device.
In order to properly set-up your Adobe Animate ads for high-DPI support you will most likely need to author your ads at double the actual dimensions. For example if you were building a 300x250 ad unit, you would size the dimensions of your stage to 600x500. The reason that this is required is because you will most likely want to ensure that any bitmaps and MovieClips that are cached as bitmaps are high resolution and that they will not be scaled up on high-DPI devices, thus becoming blurry. If this approach is taken, then you will need to specify a nominalScale of 2 in order to actually display the ad at the intended size of 300x250. Please note, that this will change the Canvas width/height attributes, the Canvas's CSS width/height, and the Stage's scaleX/Y as necessary. Both arguments are required when authoring at 2x scale within Adobe Animate as follows: ad.highDPI(true, 2); Lastly, I’d like to briefly describe a scenario where you might want to disable high-DPI support even though you’ve authored your ad at 2x scale. You could for example, use this approach as your first line of defense to deal with a “slow” event. Once the “slow” event has been dispatched, you could handle that event with a function that included the following:

this.highDPI(false); //disable high DPI this.watchFPS(20, 1); //restart the framerate watcher So, what you would essentially be doing here, is detecting that your ad is running slow and then switching to render the ad at 300x250 instead of 600x500, even if the ad was being delivered to a high-DPI screen. On a high-DPI device, this would reduce the number of pixels being rendered by 75% (because pixel count is squared), while still allowing consumers to continue to view the ad. Because images are two dimensional, if you double the width and height, you are quadrupling the pixel count, and roughly quadrupling the cost to fill and render those pixels. This is also an important thing to remember when considering the memory taken up by images and bitmap caching. I don't believe that using highDPI() in this manner will be a common practice, however it is good to be aware that possibility exists, as I can definitely see this coming in handy from time to time. Visibility Detects when the ad is not visible (e.g. in a background browser tab), and sleeps the ad and mutes all sound. Resumes and unmutes the ad when it is visible. The "hidden" property is set accordingly and the “sleep” and “wake” events are dispatched as normal. This feature is enabled automatically when using AdHelper and is the only non-optional method. This is the case, because there is no reason we wouldn’t want this functionality enabled for all of our ad experiences. AdHelper Set-Up So now that we’ve thoroughly reviewed all of the pieces of functionality that comprise AdHelper, let’s take a look at how we might put everything together in a holistic example. The following additions would be made within Adobe Animate’s outputted HTML wrapper: <!-- load AdHelper --> <script src="js/AdHelper.min.js"></script> function init() { canvas = document.getElementById("canvas"); //check for CreateJS support, and show alternate content if necessary if (!createjs.AdHelper.isSupported()) { createjs.AdHelper.showAltImage(myCanvas, “myBackupImage.jpg", “clickThroughUrl”, “alt text”, "_blank"); return; //don't bother with continuing with anything else. } } function handleComplete(evt) { exportRoot = new lib.ExampleAd_300x250(); stage = new createjs.Stage(canvas); stage.addChild(exportRoot); stage.update(); stage.enableMouseOver(); // ensure whole pixels for crisper graphics stage.snapToPixelEnabled = true; // use rAF and synch FPS

createjs.Ticker.timingMode = createjs.Ticker.RAF_SYNCHED; createjs.Ticker.setFPS(lib.properties.fps); createjs.Ticker.addEventListener("tick", stage); // enable touch for mobile devices createjs.Touch.enable(stage); // create the AdHelper, and point it at the stage // it's important to do this after the FPS is set if you're using timeSynch var ad = new createjs.AdHelper(stage) //sleep 15s after start, 0s after a click, 0s after the mouse leaves .setSleep(15) // force MCs to be time-synched .timeSync() //if framerate drops for too long, fire slow event //default settings are [minFPS = targetFPS * 0.9 -1, tolerance = 1] //so, if you're targeting 20fps, it'll be (17,1) .watchFPS(20, 1) //render at full resolution on high DPI devices and tell adhelper that we've authored at double the size so that it scales the ad properly .highDPI(true, 2); //optional variable to track number of slow events, manually set to 2 in order to show static back-up on first fail var failCount = 0; ad.on("slow", function(evt) { failCount++; if (failCount === 1) { // if we can speed things up by optimizing our animations, do it here evt.preventDefault(); // the ad will not be put to sleep // insert custom code to optimize performance this.watchFPS(20, 1); // restart the framerate watcher } else if (failCount >= 2){ // We've either failed enough already, or want to show alternate content of some kind by default // swap in some alt content: createjs.AdHelper.showAltImage(canvas, “myBackupImage.jpg", “clickThroughUrl”, “alt text”, "_blank"); //createjs.AdHelper.showAltHTML(canvas, myAltHTMLString); //createjs.AdHelper.showAlt(canvas, myAltElement); } }); };

Where to go from here? Please check out the white paper that I co-authored with Grant Skinner in order to learn more about transitioning your ad code from ActionScript to JavaScript and other important Adobe Animate ad building considerations and techniques that will complement the information you’ve gained from this article: White Paper: HTML5 Banner Ads With CreateJs: http://createjs.com/html5ads/ You can also reference the white paper on GitHub as well as grab the latest version of AdHelper: https://github.com/createjs/html5ads/ Get started with EaselJs, which is basically your new ActionScript equivalent: http://www.createjs.com/docs/easeljs/modules/EaselJS.html Stay updated on all of the latest IAB HTML5 Ad Creation Best Practices. This document will be frequently updated as technology evolves: http://www.iab.com/guidelines/html5-for-digital-advertising-1-0-guidance-for-ad-designers-creative-technologists/ Reference the latest IAB HTML5 Ad Specs: http://www.iab.com/guidelines/iab-display-advertising-guidelines/ Please don’t hesitate to reach out to me directly with any questions or feedback. I welcome all correspondence and would be glad to provide as much help and guidance as needed as you begin your journey of building HTML5 ads with Adobe Animate and CreateJs. I’d also very much appreciate the opportunity to ask YOU some questions in order to learn about how you are currently using the tools and techniques that I’ve shared within this article, discuss any pain points that you might be experiencing as well as exploring potential opportunities for improvement or expansion of the available features. Even if there are no immediate needs, please don’t hesitate to contact me even if you’d simply like to “talk shop”! So much can be gained from establishing an open dialogue, sharing information and exchanging ideas. I look forward to speaking with as many of you as possible in the months ahead and hopefully seeing some award-winning work being produced with Adobe Animate and CreateJs! Cory Hudson | [email protected] | LinkedIn | Twitter: @coryhudson4