nextgen assessment, plan, diagnostics, & referrals demonstration this example illustrates the...
TRANSCRIPT
NEXTGENASSESSMENT, PLAN, DIAGNOSTICS, &
REFERRALSDEMONSTRATION
This example illustrates the process of choosing assessments & documenting plans in NextGen. It also covers ordering diagnostic studies such as X-rays & requesting referrals.
This has been prepared for EHR 5.8 & KBM 8.3. Subsequent updates may display cosmetic & functional changes.
Use the keyboard or mouse to pause, review, & resume as necessary.

When you’ve worked your way to the bottom of the SOAP tab, you might next perform any of several activities: Document assessments & plans, prescribe meds, order labs, plan X-rays, or request referrals. The order you do them will vary by clinic, the day’s patient flow, & personal preference.
For this exercise, we’ll first address Assessment/Plan. Begin by clicking the Add/Update button.
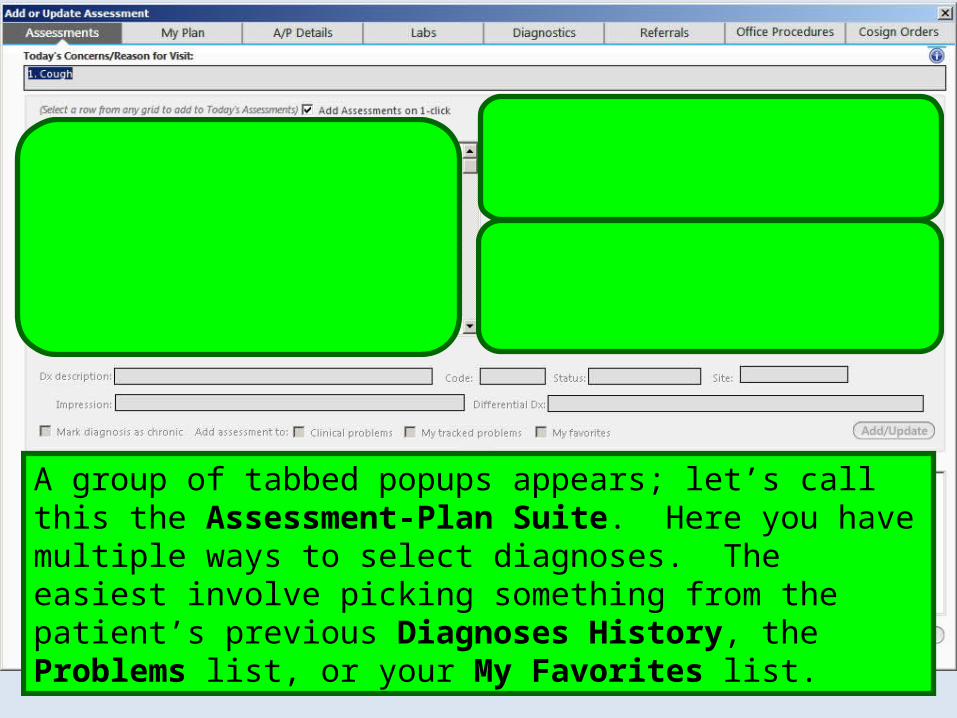
A group of tabbed popups appears; let’s call this the Assessment-Plan Suite. Here you have multiple ways to select diagnoses. The easiest involve picking something from the patient’s previous Diagnoses History, the Problems list, or your My Favorites list.
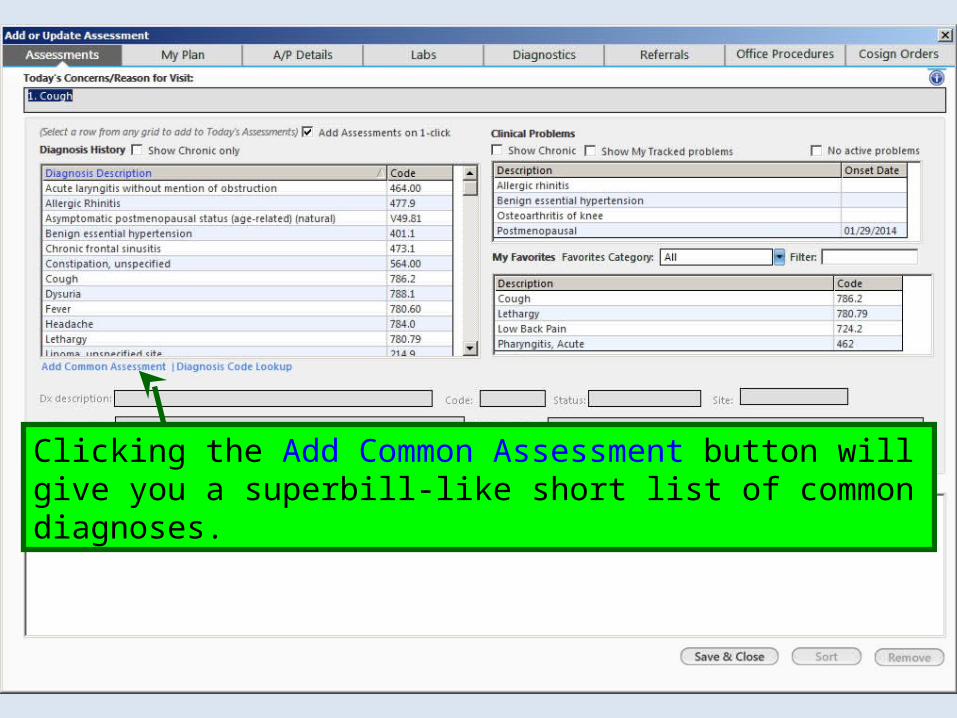
Clicking the Add Common Assessment button will give you a superbill-like short list of common diagnoses.
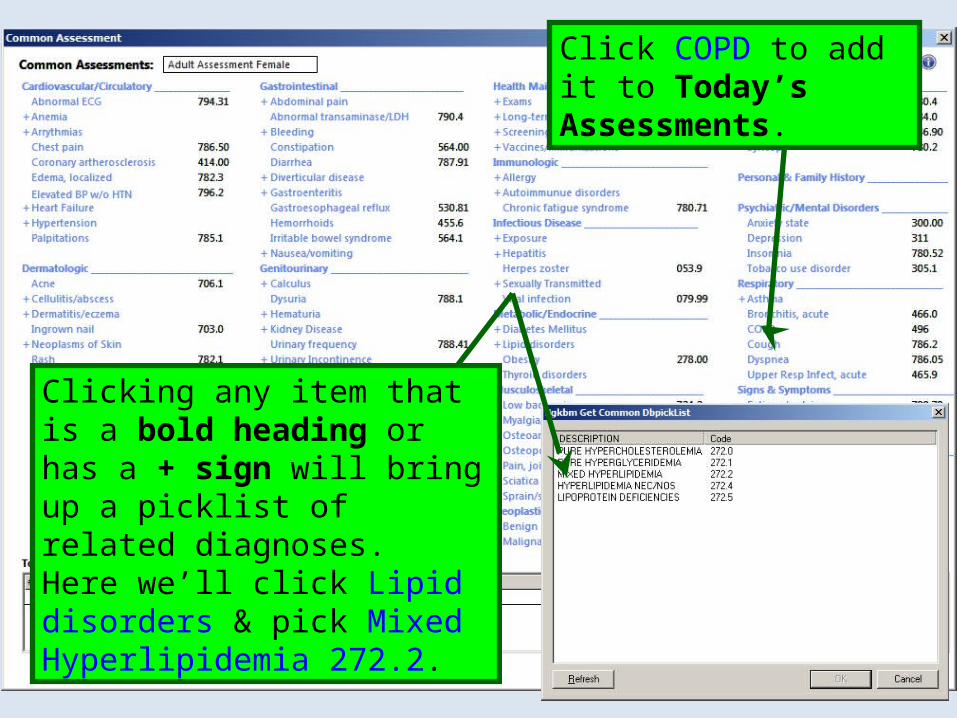
Click COPD to add it to Today’s Assessments.
Clicking any item that is a bold heading or has a + sign will bring up a picklist of related diagnoses. Here we’ll click Lipid disorders & pick Mixed Hyperlipidemia 272.2.
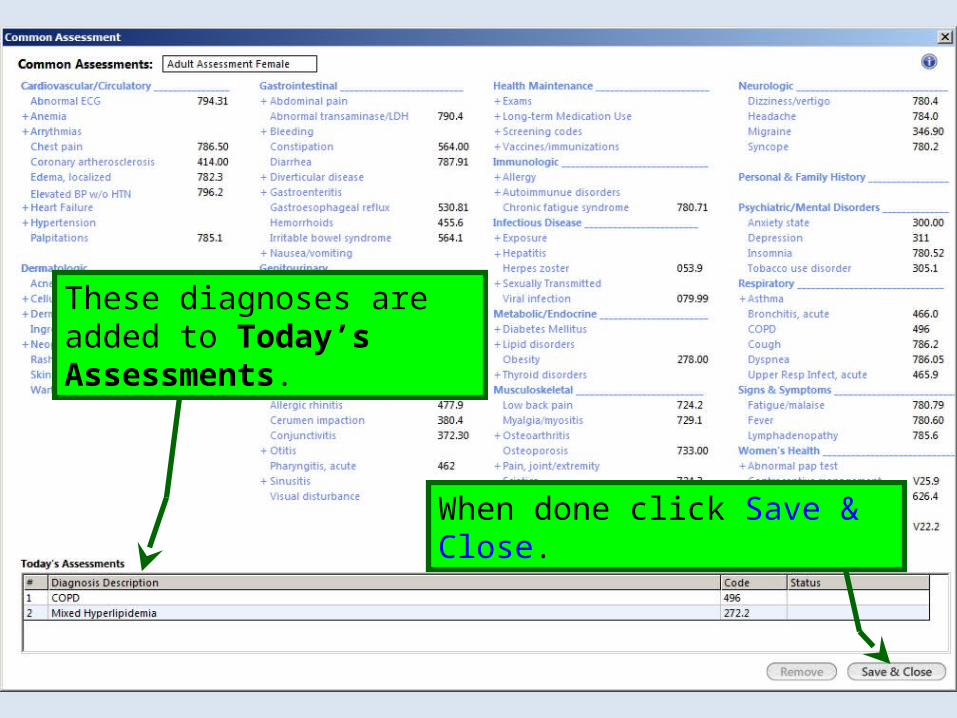
When done click Save & Close.
These diagnoses are added to Today’s Assessments.

Let’s add COPD to the Problem list. Select COPD & click the Add assessment to Clinical problems checkbox.
Then click Add/Update.
You can also click Mark diagnosis as chronic, though that seems pretty much implied here.

COPD is now on the Problem list. (I’ve added Mixed Hyperlipidemia as well in a similar fashion.)
In a similar way, you can add diagnoses to your My Favorites list. Select Mixed Hyperlipidemia, then check the Add assessment to My favorites checkbox.

You’ll next see a field where you can type the name of the Favorites Category you would like to add it to.
Alternately, you can click the dropdown arrow & select from categories you’ve already established. Here I’ll pick Metabolic.
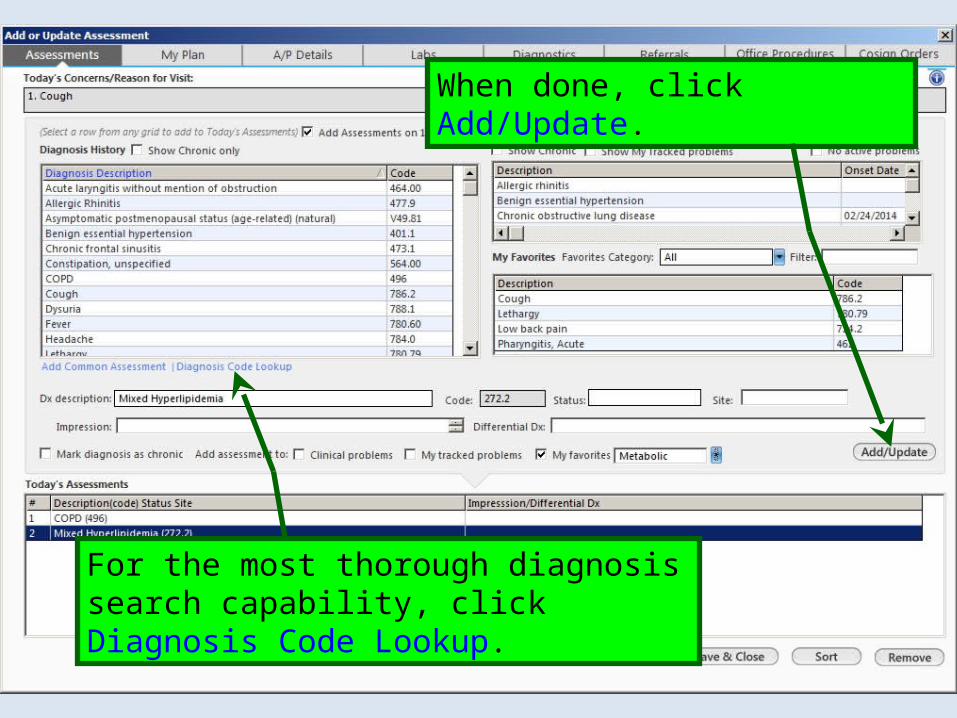
When done, click Add/Update.
For the most thorough diagnosis search capability, click Diagnosis Code Lookup.

There are several ways to search here. You can select from the patient’s prior diagnoses, chronic problems, your “My Favorites” list, & categorized lists of related diagnoses.
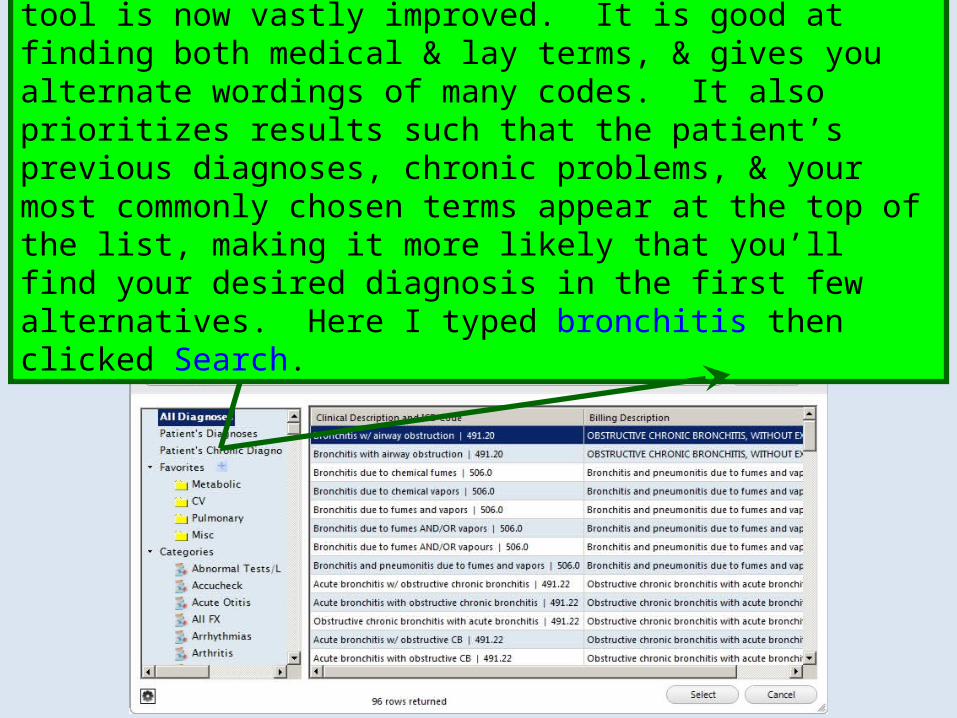
While those are all helpful, the raw search tool is now vastly improved. It is good at finding both medical & lay terms, & gives you alternate wordings of many codes. It also prioritizes results such that the patient’s previous diagnoses, chronic problems, & your most commonly chosen terms appear at the top of the list, making it more likely that you’ll find your desired diagnosis in the first few alternatives. Here I typed bronchitis then clicked Search.

Sometimes, though, you might want to see the results alphabetized. Click on the column header to do this.
For the purposes of this example I’ll select Acute bronchitis.

Here’s another search tip. The less you enter, the longer the search will take, & the more results you will have to wade through. Spending a couple extra seconds typing (for example diabetes mellitus type 2 instead of diabetes) may speed you up in the long run.

Note that if you wanted to rearrange your diagnoses you could do so by clicking Sort.
Next you’d probably like to add some plans. Let’s click My Plan.

However, for now I’d suggest moving to the next tab, A/P Details.
The My Plan tab opens, initially focused on the My Plan Tab. This template has potential, but over the years it has been shackled with flaws & configuration issues that have impaired our ability to do much with it. As time allows, the EHR team will be evaluating the My Plan template more thoroughly, & we’ll update you in the future if we feel we can incorporate this into our workflow.

You have a number of fields here, which you can use in a mix & match fashion for each diagnosis. You can type or use My Phrases to enter documentation.
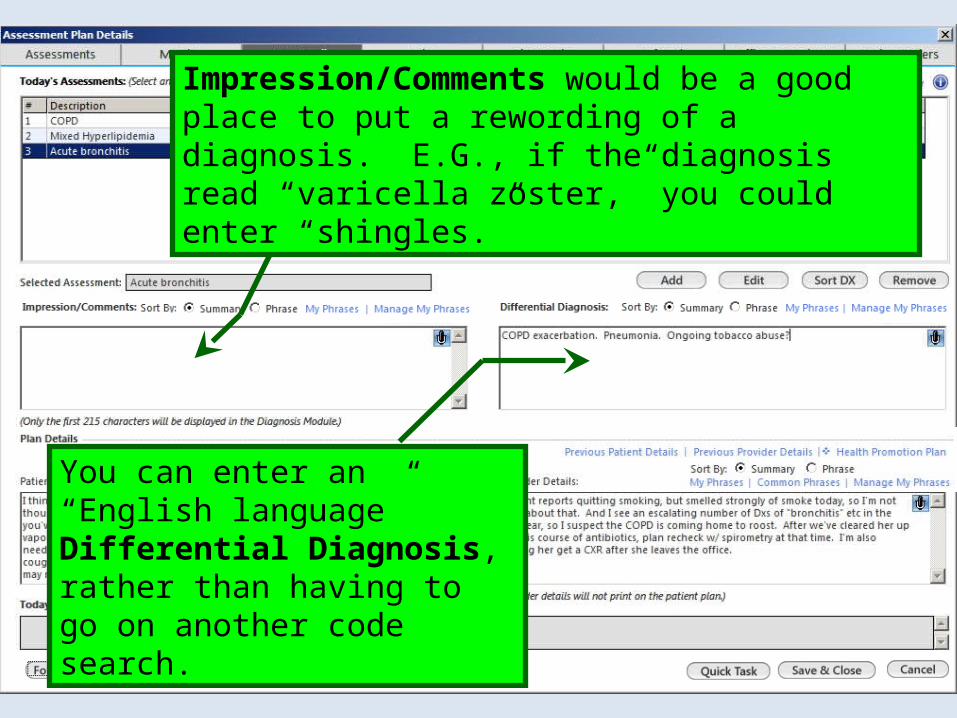
Impression/Comments would be a good place to put a rewording of a diagnosis. E.G., if the diagnosis read “varicella zoster,” you could enter “shingles.”
You can enter an “English language” Differential Diagnosis, rather than having to go on another code search.

Sometimes you want to say things to patients different from what you’d typically put in a visit note. You can do that in the Patient Details section; these are the details that appear in the Patient Plan document that is generated for patients after the visit.
You can expand on that using “doctor language” in the Provider Details section. This appears in your visit note, but not in the Patient Plan.
Many providers will feel more comfortable having this separation, so that you don’t have to worry as much about the patient seeing a confusing or frightening term in the Patient Plan.

You can also indicate follow-up plans here. Click the Follow Up button, & in the ensuing popup, select the desired details.
Then click Place Order, OK.

For this demonstration let’s also order an X-ray. Move to the Diagnostics tab.

We’ll select the COPD diagnosis to associate with the X-ray.
Note, though, that if you didn’t have an appropriate diagnosis, you could click Add Screening Assessment & pick one from this popup, such as Cough.

For some films you might need to enter more details, but not for a chest X-ray.
Click the X-ray Body link, & in the ensuing popup scroll down & double-click on X-ray, chest, two views, frontal/lateral.

Click Place Order.
A tasking popup will appear, at least for the first study you order. Use this if you need to send a task about the study, e.g., if it were a CT scan your referrals staff needed to schedule. Otherwise, you can cancel out of it.
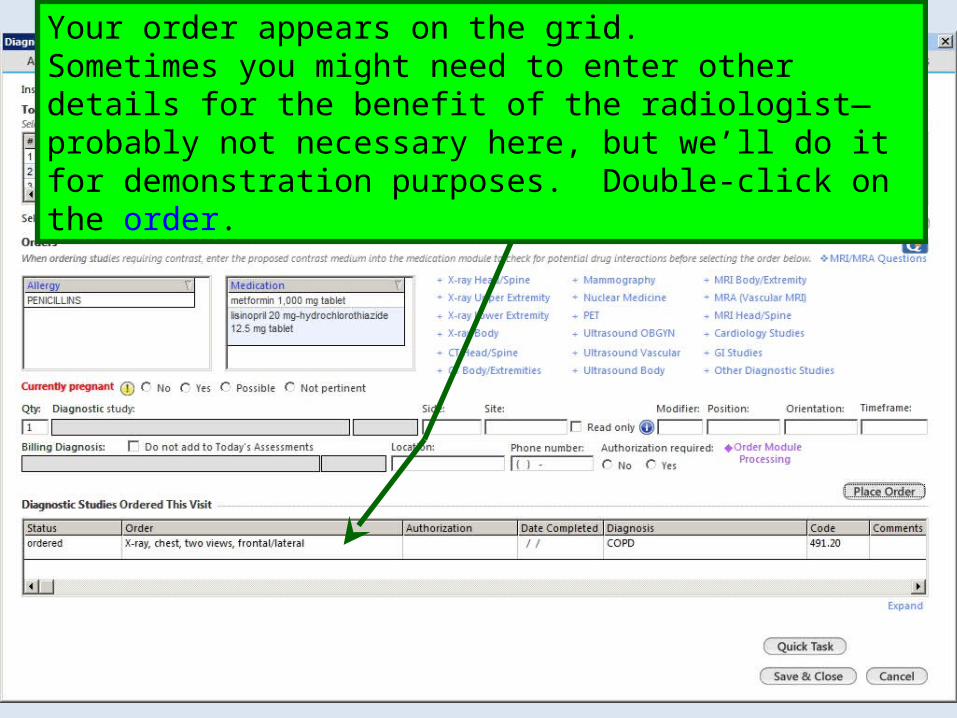
Your order appears on the grid.Sometimes you might need to enter other details for the benefit of the radiologist—probably not necessary here, but we’ll do it for demonstration purposes. Double-click on the order.

Use one or both of these two boxes to enter your info.
When done click Save then Close.

We’d often want to print an X-ray requisition at this point. Unfortunately, NextGen’s workflow for this isn’t very user-friendly. Click Save & Close.
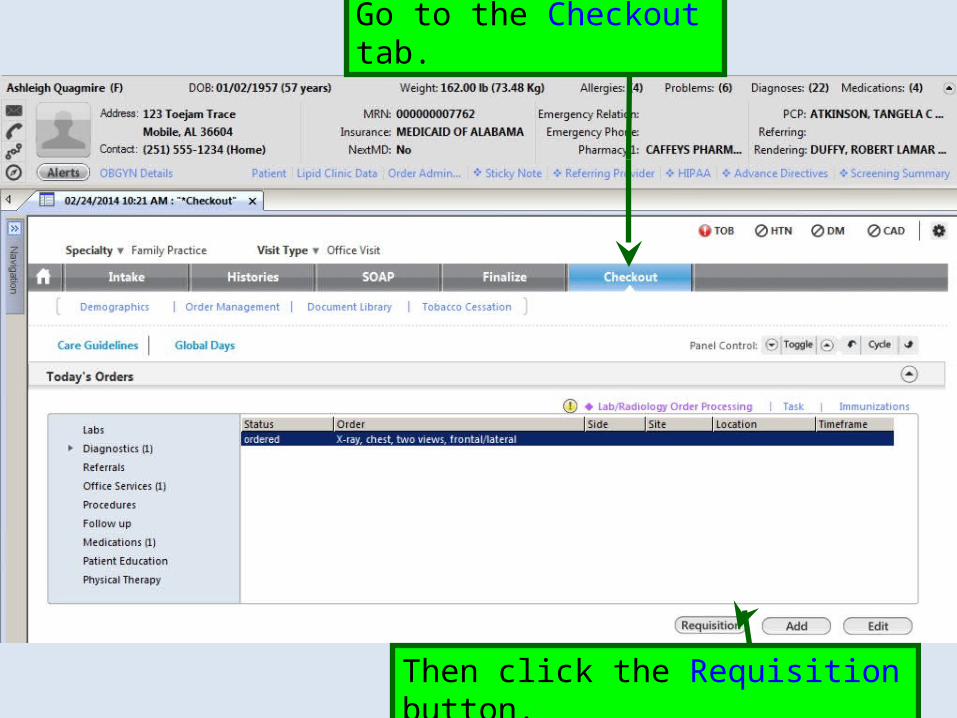
Go to the Checkout tab.
Click the Diagnostics Heading, & highlight the X-ray order.
Then click the Requisition button.

The requisition generates. Click the Printer icon to print it.
Now that that little side-trip is over, close the document & navigate back to the bottom of the SOAP tab.

Here we’re back at the bottom of the SOAP tab. For demonstration purposes, let’s also place a referral to pulmonology on this patient. Click Referrals.

We’re back on the Assessment-Plan Suite, on the Referrals tab. Click the Specialty/specialist name/site bullet, then click in the Specialty box.
Scroll down the list in the popup & double-click on Pulmonology.

You can add up to 4 diagnoses if necessary.
Click the 1st Diagnosis box. You’ll see a list of today’s assessments & the patient’s chronic problems. Double-click on COPD.

There may be something on the ensuing popup you can use, but most of the time you’ll just close out of it & type something like Smoker with recurrent bouts of bronchitis. Please evaluate & treat further. CXR available in USA system. You could also add info about a specific doctor, such as He requests Dr. Beringer.
Click Evaluate and treat, then click in the Reason for referral box.
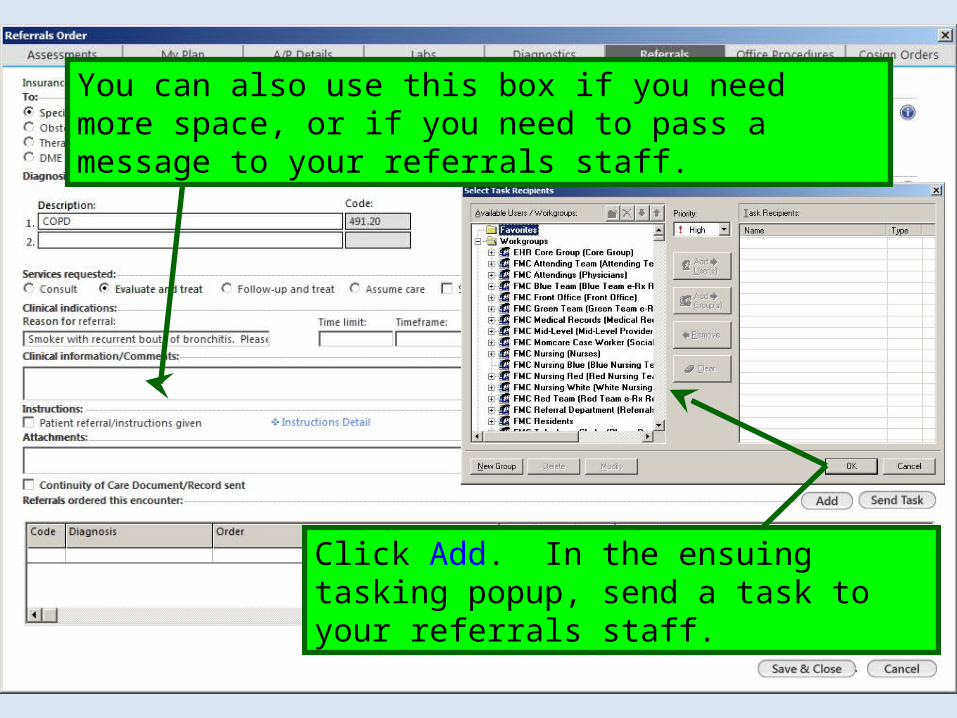
Click Add. In the ensuing tasking popup, send a task to your referrals staff.
You can also use this box if you need more space, or if you need to pass a message to your referrals staff.

When done click Save & Close.

You’re returned to the SOAP Tab, where you can finish your documentation. Note that the plans, X-rays, & referrals you entered display above.

This concludes the NextGenAssessment, Plan, Diagnostics, &
Referralsdemonstration.
I feel like I’m diagonally parked in a parallel universe.
R. Lamar Duffy, M.D.Associate ProfessorUniversity of South AlabamaCollege of MedicineDepartment of Family Medicine

R. Lamar Duffy, M.D.Associate ProfessorUniversity of South AlabamaCollege of MedicineDepartment of Family Medicine
This concludes the NextGenAssessment, Plan, Diagnostics, &
Referralsdemonstration.
I feel like I’m diagonally parked in a parallel universe.