nexus 210 manual - evolution · pdf filethis manual will give you all the information needed...
TRANSCRIPT
Evolution Aqua LtdEvolution House Kellet Close Wigan WN5 0LP England +44(0)1942 216554
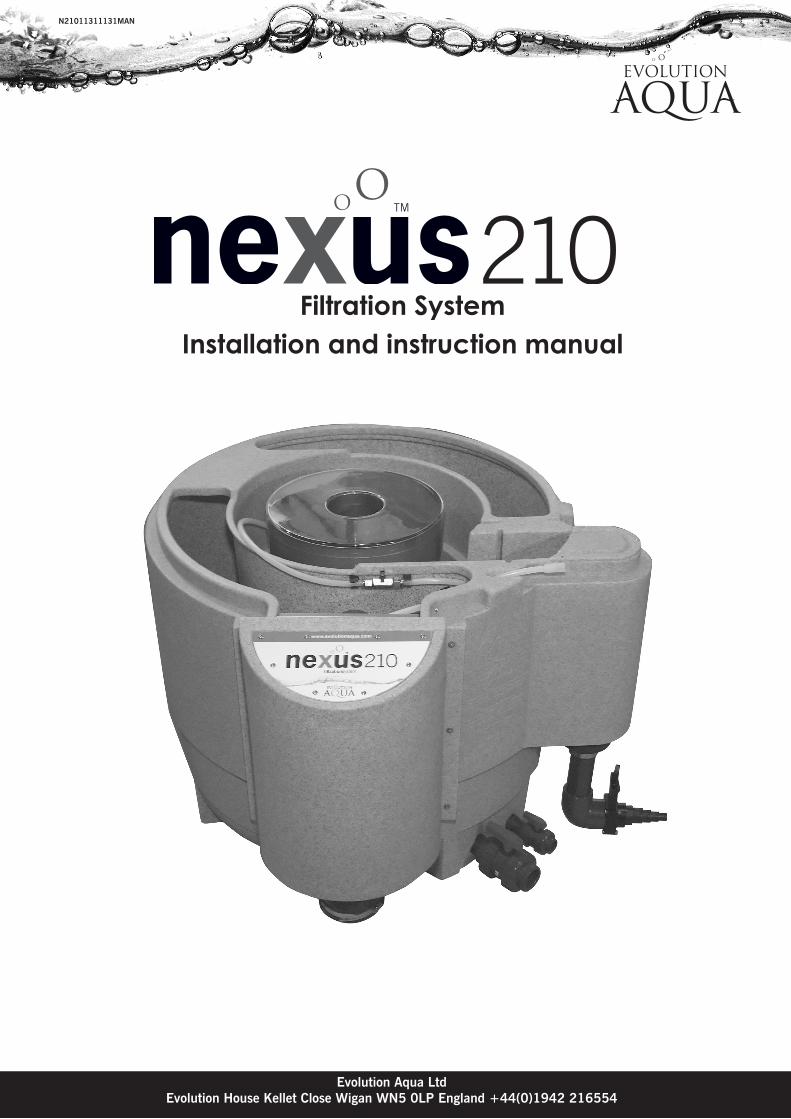
Filtration SystemInstallation and instruction manual
N21011311131MAN
The difference is clear at www.evolutionaqua.com1
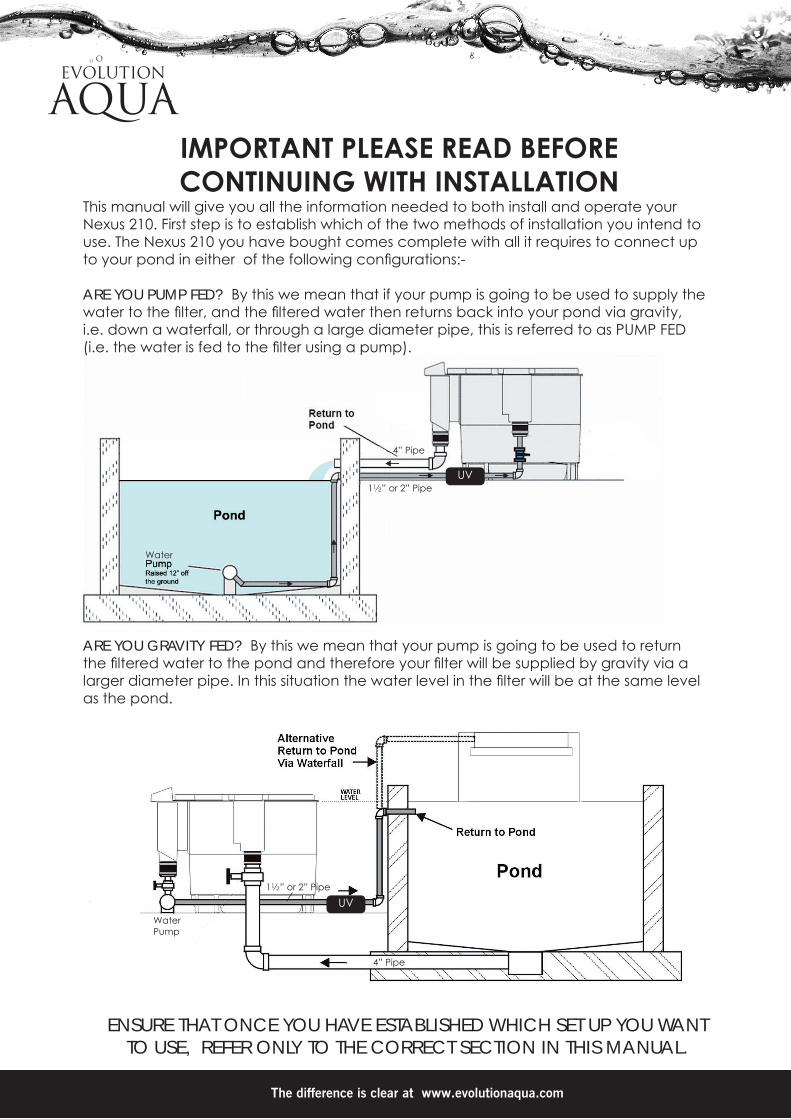
This manual will give you all the information needed to both install and operate your Nexus 210. First step is to establish which of the two methods of installation you intend to use. The Nexus 210 you have bought comes complete with all it requires to connect up to your pond in either of the following configurations:-
ARE YOU PUMP FED? By this we mean that if your pump is going to be used to supply the water to the filter, and the filtered water then returns back into your pond via gravity, i.e. down a waterfall, or through a large diameter pipe, this is referred to as PUMP FED (i.e. the water is fed to the filter using a pump).
ARE YOU GRAVITY FED? By this we mean that your pump is going to be used to return the filtered water to the pond and therefore your filter will be supplied by gravity via a larger diameter pipe. In this situation the water level in the filter will be at the same level as the pond.
ENSURE THAT ONCE YOU HAVE ESTABLISHED WHICH SET UP YOU WANT TO USE, REFER ONLY TO THE CORRECT SECTION IN THIS MANUAL.
IMPORTANT PLEASE READ BEFORE CONTINUING WITH INSTALLATION
Water
4” Pipe
1½” or 2” PipeUV
Water Pump
4” Pipe
1½” or 2” Pipe
UV
Evolution Aqua LtdEvolution House Kellet Close Wigan WN5 0LP England +44(0)1942 216554
2
PageTable of contents 2How your nexus filter works 3Nexus 210 pump fed installation and operation 4Nexus 210 gravity fed installation and operation 9K1 moving bed 14How to get the best from your Nexus filter 15
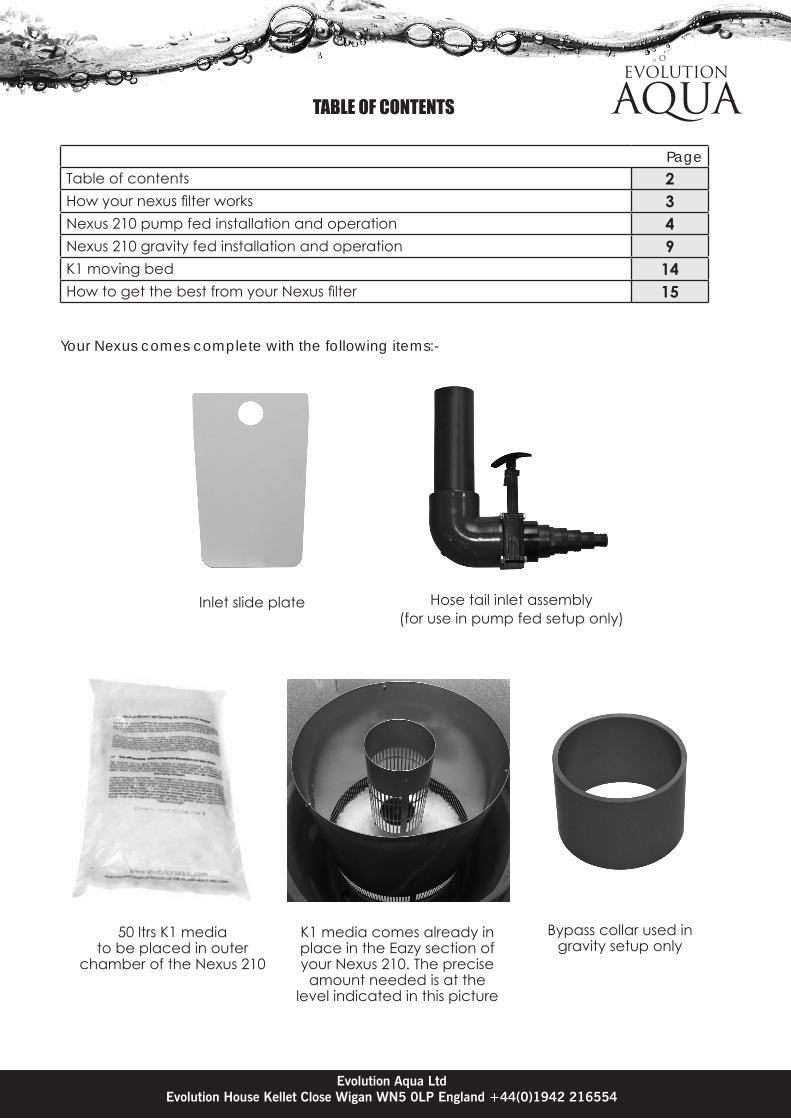
Your Nexus comes complete with the following items:-
TABLE OF CONTENTS
Hose tail inlet assembly(for use in pump fed setup only)
Bypass collar used in gravity setup only
K1 media comes already in place in the Eazy section of your Nexus 210. The precise
amount needed is at the level indicated in this picture
Inlet slide plate
50 ltrs K1 media to be placed in outer
chamber of the Nexus 210

The difference is clear at www.evolutionaqua.com3
OPERATING YOUR NEXUS:The Nexus filter is simple yet innovative. Water enters the Nexus via inlet (A) into the inner chamber (B) which works as a basic vortex allowing larger solids to settle out. The water then passes through the Eazy (C) where the finer particles are removed and the first step in biological treatment takes place. From the Eazy the water passes into the outer chamber (D) where the remainder of the biological treatment takes place using the K1 Moving Bed Process (for further information see page 14 on K1 moving bed)
The water then passes through the grill into the Exit Chamber (E), where it is returned to the pond through the outlet (F). Waste is discharged through the larger Ball valve (G). The Eazy is cleaned by diverting the air from the Outside chamber to the Eazy using the air valves (H).
EAZY :The Eazy is a stainless steel vessel containing a set volume of static K1 media (30L for Nexus 210) which is lo-cated within the centre chamber of the Nexus. After water enters the Nexus it rotates around the Eazy in the centre chamber with a downward mo-tion allowing the larger solids to settle to the bottom of the chamber before passing through the slots of the Eazy into the static K1 media. The water flows upwards through the K1 media where mechanical filtration takes place as any small particles are caught within the K1 media. The water then flows through the slots in the centre column and into the outer chamber.
OUTER CHAMBER:The outer chamber of the Nexus contains the K1 Moving Bed Process. This is where the final stage of biological treatment occurs. Biological breakdown occurs through different strains of bacteria living on the K1 media. These bacteria convert Ammonia and Nitrite into harmless Nitrate. The amount of Ammonia and Nitrite produced in the pond is dependant on feed rates and the type of food. For higher feed rates additional K1 media should be added into the outer chamber (250g/day of average protein content food will be broken down by 50L of K1).
HOW IT WORKS
C
D
E
F
G
A
H
B
Evolution Aqua LtdEvolution House Kellet Close Wigan WN5 0LP England +44(0)1942 216554
4
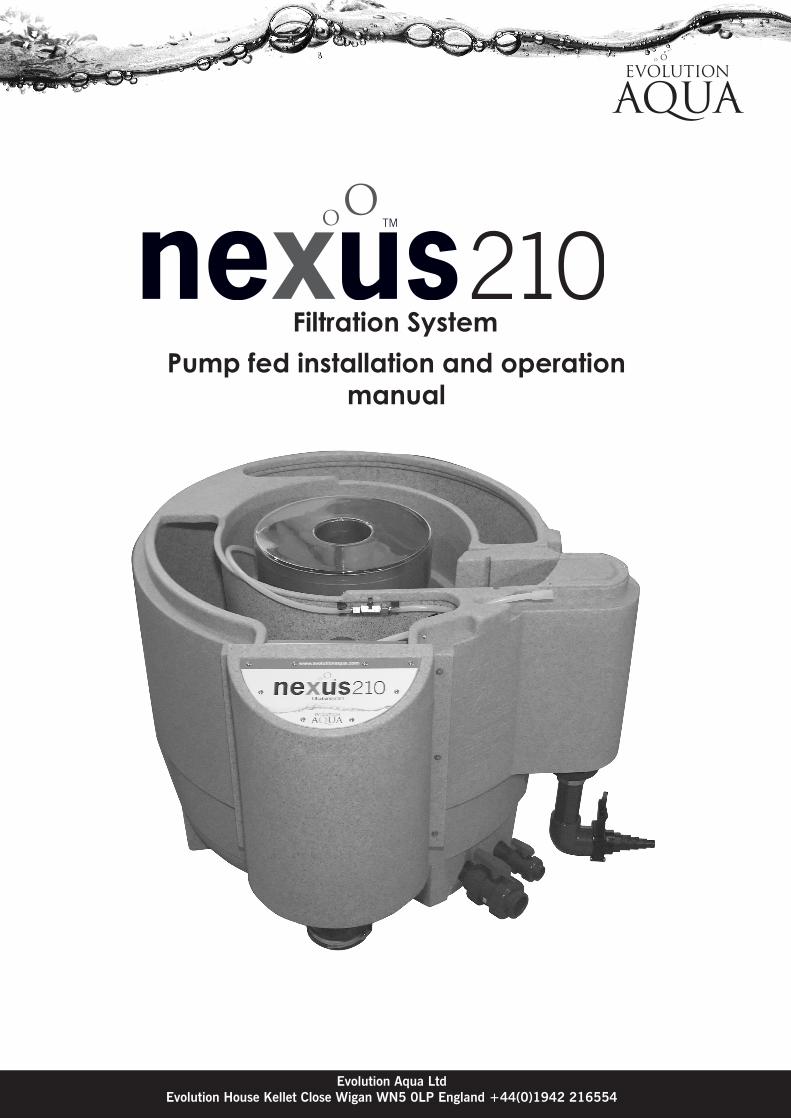
Filtration SystemPump fed installation and operation
manual
The difference is clear at www.evolutionaqua.com5
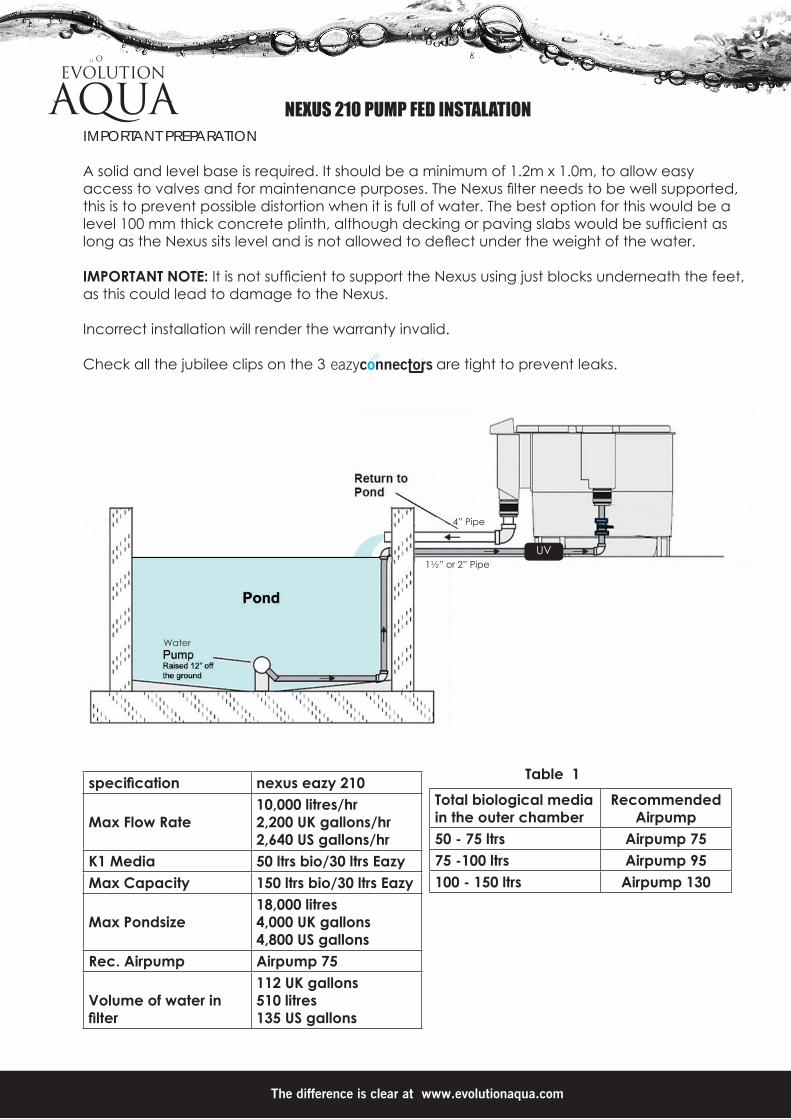
IMPORTANT PREPARATION
A solid and level base is required. It should be a minimum of 1.2m x 1.0m, to allow easy access to valves and for maintenance purposes. The Nexus filter needs to be well supported, this is to prevent possible distortion when it is full of water. The best option for this would be a level 100 mm thick concrete plinth, although decking or paving slabs would be sufficient as long as the Nexus sits level and is not allowed to deflect under the weight of the water.
IMPORTANT NOTE: It is not sufficient to support the Nexus using just blocks underneath the feet, as this could lead to damage to the Nexus.
Incorrect installation will render the warranty invalid.
Check all the jubilee clips on the 3 are tight to prevent leaks.
NEXUS 210 PUMP FED INSTALATION
specification nexus eazy 210
Max Flow Rate10,000 litres/hr2,200 UK gallons/hr2,640 US gallons/hr
K1 Media 50 ltrs bio/30 ltrs EazyMax Capacity 150 ltrs bio/30 ltrs Eazy
Max Pondsize18,000 litres4,000 UK gallons4,800 US gallons
Rec. Airpump Airpump 75
Volume of water in filter
112 UK gallons510 litres135 US gallons
Total biological media in the outer chamber
Recommended Airpump
50 - 75 ltrs Airpump 7575 -100 ltrs Airpump 95100 - 150 ltrs Airpump 130
Table 1
Water
4” Pipe
1½” or 2” PipeUV

Evolution Aqua LtdEvolution House Kellet Close Wigan WN5 0LP England +44(0)1942 216554
6
INSTALLATION EQUIPMENT REQUIRED
1. Pond Pump, with an actual flow rate that delivers to the filter a maximum of 10.000 Ltrs/hour or the entire volume of water in the pond, every two hours, whichever is the greater. 2. Air Pump. See table 1 on page 5.3. A valve should be fitted before and after the Nexus so that the Nexus can be isolated if required. 4. It is highly recommended that a suitably sized UV unit is installed with the Nexus for removal of single celled algae. UV systems are always installed after the pump.
NEXUS 210 PUMP FED INSTALLATION
Your Nexus 210 has been supplied to you ready for you to set up for Pump fed operation.
Pump Fed Installation Steps:
1. Attach the Hosetail assembly (fig 1) to the Nexus Inlet (A)2. Connect the hose/pipework from your pump to the hosetail, cutting down the Hose tail to fit the correct hose, we recommend using 11/2”.3. Connect your 4” pipework from the Exit pipe back to the Pond. (F)4. Pour the 50L K1 media bag into the outside chamber of the Nexus 5. Connect your air pump to the Nexus air inlet (H) 6. Connect the waste valves (G) to your waste outlet as described.
NEXUS 210 PUMP FED INSTALLATION
Fig 1
How to remove the clear lid from the Eazy. This is a tight
fit. Do not remove the screws
H
A
G
F
The difference is clear at www.evolutionaqua.com7
NEXUS210 PUMP FED INSTALLATION
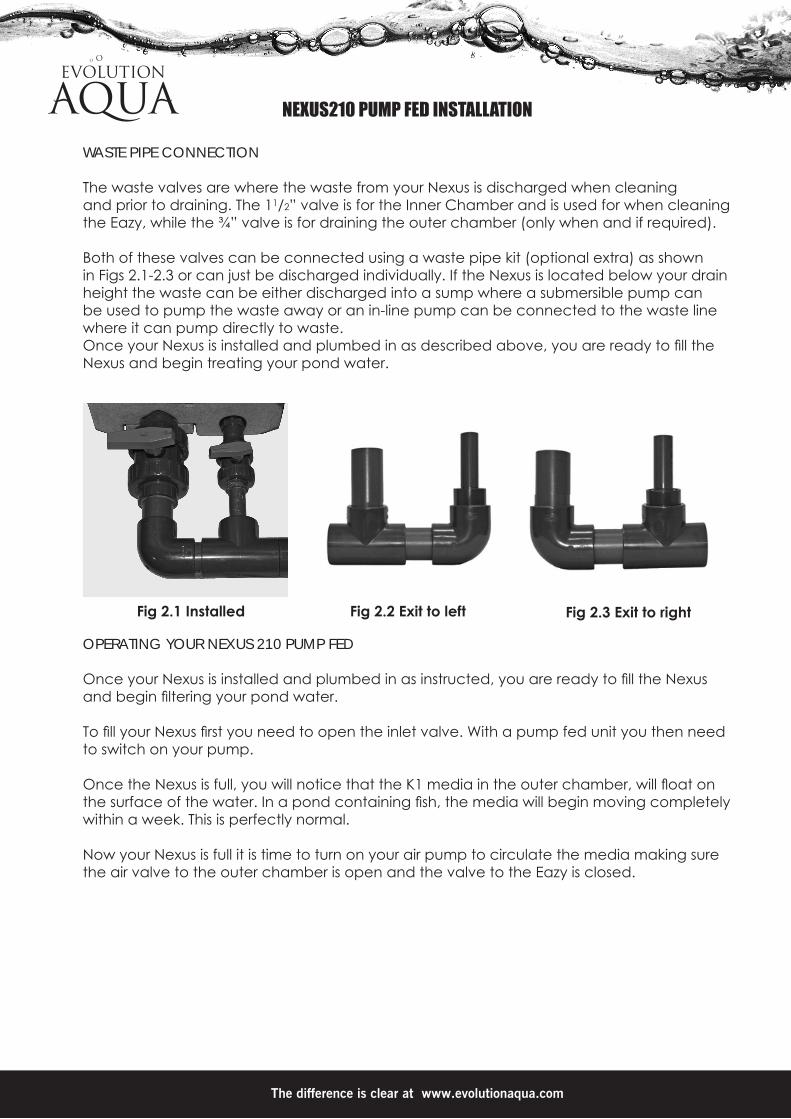
WASTE PIPE CONNECTION
The waste valves are where the waste from your Nexus is discharged when cleaning and prior to draining. The 11/2” valve is for the Inner Chamber and is used for when cleaning the Eazy, while the ¾” valve is for draining the outer chamber (only when and if required).
Both of these valves can be connected using a waste pipe kit (optional extra) as shown in Figs 2.1-2.3 or can just be discharged individually. If the Nexus is located below your drain height the waste can be either discharged into a sump where a submersible pump can be used to pump the waste away or an in-line pump can be connected to the waste line where it can pump directly to waste.Once your Nexus is installed and plumbed in as described above, you are ready to fill the Nexus and begin treating your pond water.
OPERATING YOUR NEXUS 210 PUMP FED
Once your Nexus is installed and plumbed in as instructed, you are ready to fill the Nexus and begin filtering your pond water.
To fill your Nexus first you need to open the inlet valve. With a pump fed unit you then need to switch on your pump.
Once the Nexus is full, you will notice that the K1 media in the outer chamber, will float on the surface of the water. In a pond containing fish, the media will begin moving completely within a week. This is perfectly normal.
Now your Nexus is full it is time to turn on your air pump to circulate the media making sure the air valve to the outer chamber is open and the valve to the Eazy is closed.
Fig 2.1 Installed Fig 2.2 Exit to left Fig 2.3 Exit to right
Evolution Aqua LtdEvolution House Kellet Close Wigan WN5 0LP England +44(0)1942 216554
8
NEXUS210 PUMP FED INSTALLATION
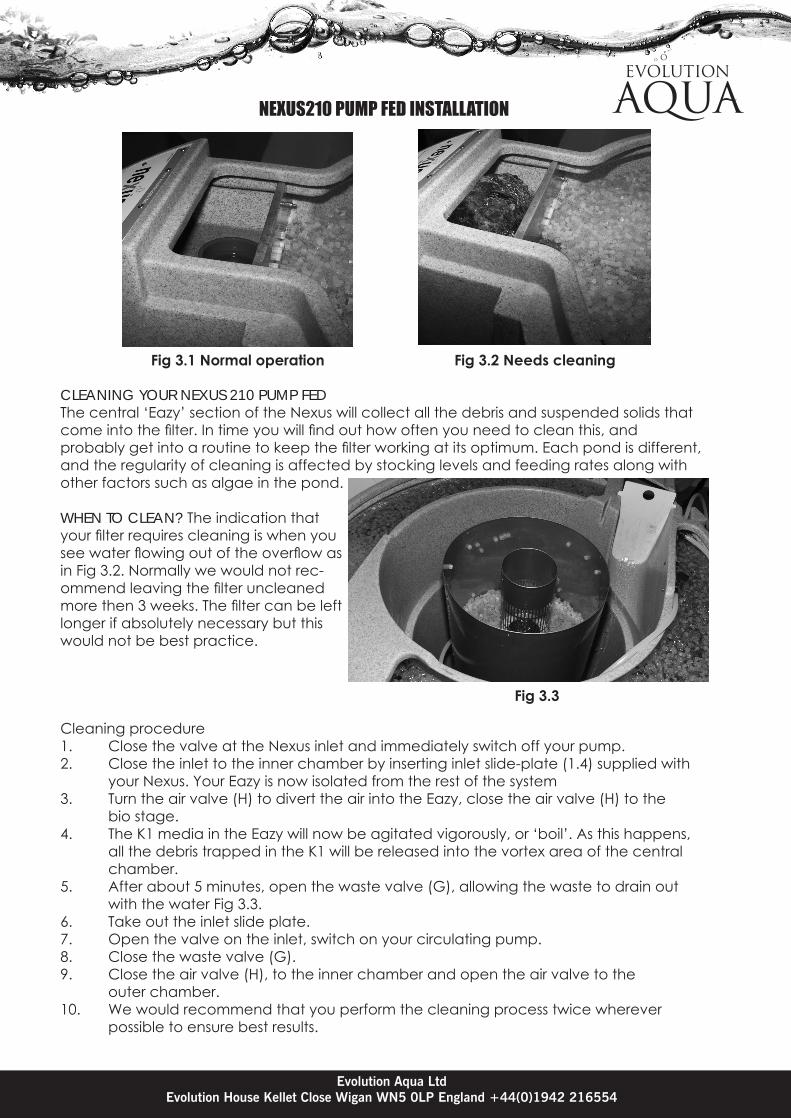
CLEANING YOUR NEXUS 210 PUMP FEDThe central ‘Eazy’ section of the Nexus will collect all the debris and suspended solids that come into the filter. In time you will find out how often you need to clean this, and probably get into a routine to keep the filter working at its optimum. Each pond is different, and the regularity of cleaning is affected by stocking levels and feeding rates along with other factors such as algae in the pond.
WHEN TO CLEAN? The indication that your filter requires cleaning is when you see water flowing out of the overflow as in Fig 3.2. Normally we would not rec-ommend leaving the filter uncleaned more then 3 weeks. The filter can be left longer if absolutely necessary but this would not be best practice.
Cleaning procedure1. Close the valve at the Nexus inlet and immediately switch off your pump.2. Close the inlet to the inner chamber by inserting inlet slide-plate (1.4) supplied with your Nexus. Your Eazy is now isolated from the rest of the system3. Turn the air valve (H) to divert the air into the Eazy, close the air valve (H) to the bio stage.4. The K1 media in the Eazy will now be agitated vigorously, or ‘boil’. As this happens, all the debris trapped in the K1 will be released into the vortex area of the central chamber.5. After about 5 minutes, open the waste valve (G), allowing the waste to drain out with the water Fig 3.3.6. Take out the inlet slide plate.7. Open the valve on the inlet, switch on your circulating pump. 8. Close the waste valve (G).9. Close the air valve (H), to the inner chamber and open the air valve to the outer chamber. 10. We would recommend that you perform the cleaning process twice wherever possible to ensure best results.
Fig 3.1 Normal operation Fig 3.2 Needs cleaning
Fig 3.3
The difference is clear at www.evolutionaqua.com9
Filtration SystemGravity fed installation and operation
manual

NEXUS 210 GRAVITY FED INSTALLATION
IMPORTANT PREPARATION
A solid and level base is required. It should be a minimum of 1.2m x 1.0m, to allow easy access to valves and for maintenance purposes. The Nexus filter needs to be well supported, this is to prevent possible distortion when it is full of water. The best option for this would be a level 100 mm thick concrete plinth, although decking or paving slabs would be sufficient as long as the Nexus sits level and is not allowed to deflect under the weight of the water.
IMPORTANT NOTE: It is not sufficient to support the Nexus using just blocks underneath the feet, as this could lead to damage to the Nexus.
Incorrect installation will render the warranty invalid. A gravity fed system is where the water level in the Nexus is at the same height as the water level in the pond, therefore it is critical that the Nexus is installed so that the lip at the top of the Nexus should be level with the proposed finished surface water level of the pond. The plinth for your Nexus, should be 735mm below where you want the finished pond water surface to be. Please see diagrams below.
The water on a Gravity fed system should be fed from an appropriately placed bottom drain through at least a 4 inch (110mm) pipe with as short a length and fewer bends as possible (For optimum flow swept bends should be used). At the end of the bottom drain line before entering the Nexus, a valve is required so that the line can be shut and the Nexus isolated.
For long bottom drain pipe runs, it is recommended that a ‘T’ purge valve line is installed to remove solids that may settle in the bottom drain line. This should discharge straight to waste (if possible) or into a suitably sized sump.
It is very important that when laying the bottom drain line that there is no section where the pipework rises then falls as airlocks can form in this area which will block flow. Figure 1 below describes what should and shouldn’t be done.
Pipework should be level until reaching the filterhouse where it should ideally go through a swept bend 90 into the Nexus inlet.
Evolution Aqua LtdEvolution House Kellet Close Wigan WN5 0LP England +44(0)1942 216554
10
NEXUS210 GRAVITY FED INSTALLATION
From PondTo Nexus
From Pond
To Nexus
Fig 1
Water Pump
4” Pipe
1½” or 2” Pipe
UV

The difference is clear at www.evolutionaqua.com11
NEXUS 210 GRAVITY FED INSTALLATIONNEXUS 210 GRAVITY FED INSTALLATIONYour Nexus 210 comes with a stand pipe in the outlet. This is for use in PUMP FED SET UPS ONLY.Please remove the standpipe from the Nexus outlet by undoing the jubilee clip (Fig 2.1) and removing the 4”- 4” eazyconnector (Fig 2.2), remove the 3 retaining screws (Fig 2.3)and slide out the 4” PVC pipe (Fig 2.4).
Your nexus 210 is now ready to be connected up for gravity fed operation.
Setup procedure
1. Remove the 4”- 2” eazyconnector from Nexus inlet (A) (Fig 3.1).2. Attach the 4”-2” eazyconnector (Fig 3.3) to the Nexus Outlet (F) (Fig 3.2).3. Attach the 4”-4” eazyconnector to the Nexus Inlet (A) (Fig 3.4) and then to the 4”
pipe work from your pond.4. Connect your water pump to the 4”-2” eazyconnector using suitable pipe work. A valve should be positioned between the pump and the Nexus, to isolate the Nexus during cleaning.5. Pour the 50L K1 media into the outside chamber (D) of the Nexus (Fig 5).6. Fit the bypass collar provided into position. See fig 4.1 to 4.3.7. Connect your air pump to the Nexus air valves (H).8. Connect your pump outlet to the remainder of your pipework including a UV steriliser.9. Connect the waste valves (G) to your waste outlet.
Fig 2.1
Fig 3.1
Fig 2.2 Fig 2.3 Fig 2.4
Fig 4.1
Fig 3.4Fig 3.3Fig 3.2
Fig 4.3Fig 4.2

Evolution Aqua LtdEvolution House Kellet Close Wigan WN5 0LP England +44(0)1942 216554
12
NEXUS 210 GRAVITY FED INSTALLATION
WASTE PIPE CONNECTION
The waste valves are where the waste from your Nexus is discharged when cleaning and prior to draining. The 11/2” valve is for the Inner Chamber (B) and is used for when cleaning the Eazy, while the ¾” valve is for draining the outer chamber (D)(only when and if required).
Both of these valves can be connected using a waste pipe kit (optional extra) as shown in Figs 6.1-3 or can just be discharged individually. If the Nexus is located below your drain height the waste can be either discharged into a sump where a submersible pump can be used to pump the waste away or an in-line pump can be connected to the wasteline where it can pump directly to waste. Once your Nexus is installed and plumbed in as described above, you are ready to fill the Nexus and begin treating your pond water.
Fig 5
Fig 6.1 Installed Fig 6.3 Exit to leftFig 6.2 Exit to right
How to remove the clear lid from the Eazy.
This is a tight fit. Do not remove the
screws
D
B
H
G
AF
The difference is clear at www.evolutionaqua.com13
NEXUS 210 GRAVITY FED INSTALLATIONOPERATING YOUR NEXUS 210 GRAVITY FEDOnce your Nexus is installed and plumbed in as instructed, you are ready to fill the Nexus and begin filtering your pond water.To fill your Nexus first you need to open all the valves before and after the Nexus. The system should be filled until the water levels are equal.Once the Nexus is full, you will notice that the K1 media in the outer chamber, will float on the surface of the water. In a pond containing fish the media will beginmoving completely within a week, this is perfectly normal. Now your Nexus is full it is time to turn on your air pump to circulate the media making sure the air valve to the outer chamber is open and the air valve to the Eazy is closed.
CLEANING YOUR NEXUS 210 GRAVITY FEDThe central ‘Eazy’ section of the Nexus will collect all the debris and suspended solids that come into the filter. In time you will find out how often you need to clean this, and probably get into a routine to keep the filter working at its optimum. Each pond is different, and the regularity of cleaning is affected by stocking levels and feeding rates along with other factors such as algae in the pond. WHEN TO CLEAN? You may also notice that the water level in the outer chamber – the Biological stage – lowers as water is prevented from getting through the Eazy as quickly as it is being pumped back into the pond. When this water level falls beneath the level of the bypass pipe, this is the indication that you should clean the Eazy. Normally we would not recommend leaving the filter uncleaned more then 3 weeks. The filter can be left longer if absolutely necessary but this would not be best practice.
Cleaning procedure
1. Switch off your circulation pump. 2. Close the inlet to the Nexus by inserting inlet slide-plate supplied with your Nexus. Your Eazy is now isolated from the rest of the system3. Turn the air valve to divert the air into the Eazy, close the air valve to the bio stage.4. The K1 media in the Eazy will now be agitated vigorously, or ‘boil’. As this happens, all the debris trapped in the K1 will be released into the vortex area of the central chamber.5. After about 5 minutes, open the waste valve (G), allowing the waste to drain out with the water.6. Close the waste valve (G).7. Take out the slide plate 8. We would recommend that you perform the cleaning process twice wherever possible to ensure best results. 9. Close the air valve, to the inner chamber and open the air valve to the outer chamber. 10. Switch on your circulation pump.
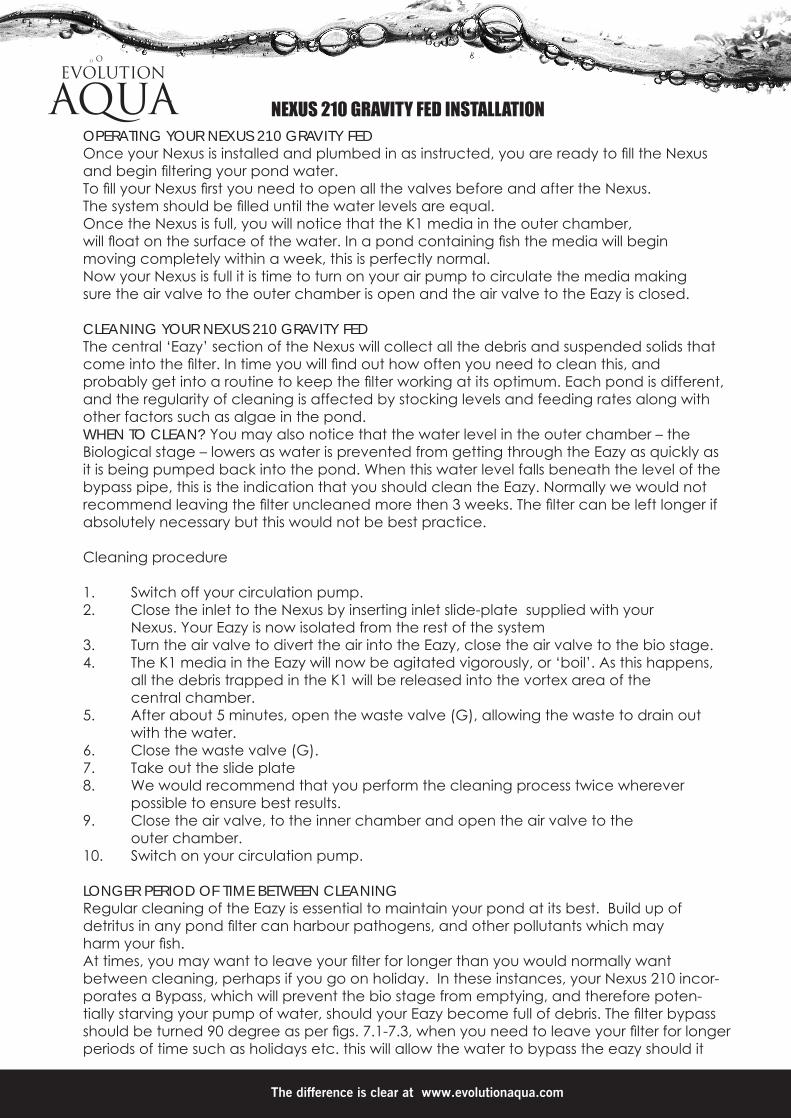
LONGER PERIOD OF TIME BETWEEN CLEANINGRegular cleaning of the Eazy is essential to maintain your pond at its best. Build up of detritus in any pond filter can harbour pathogens, and other pollutants which may harm your fish.At times, you may want to leave your filter for longer than you would normally want between cleaning, perhaps if you go on holiday. In these instances, your Nexus 210 incor-porates a Bypass, which will prevent the bio stage from emptying, and therefore poten-tially starving your pump of water, should your Eazy become full of debris. The filter bypass should be turned 90 degree as per figs. 7.1-7.3, when you need to leave your filter for longer periods of time such as holidays etc. this will allow the water to bypass the eazy should it
Evolution Aqua LtdEvolution House Kellet Close Wigan WN5 0LP England +44(0)1942 216554
14
NEXUS 210 GRAVITY FED INSTALLATIONbecome blocked. On return from your holidays - turn the bypass back to 12.00 o’clock see Fig 7.1. Normally we would not recommend leaving the filter uncleaned more then 3 weeks. The filter can be left longer if absolutely necessary but this would not be best practice.
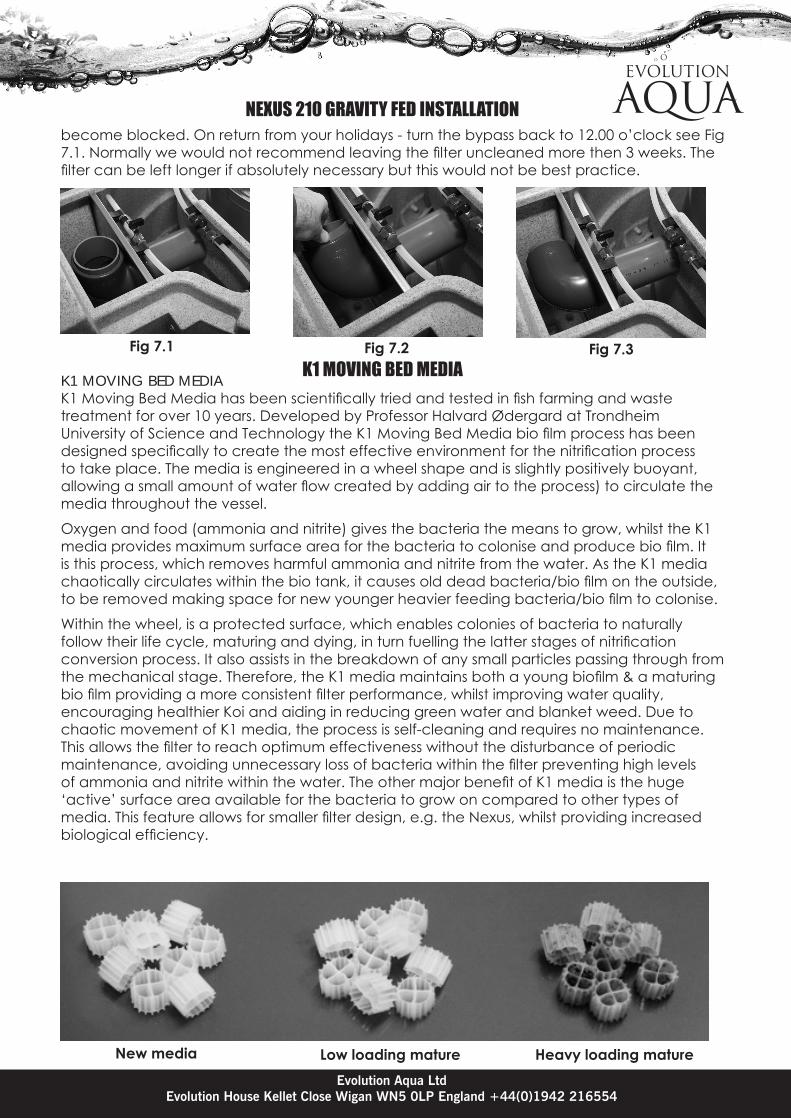
K1 MOVING BED MEDIAK1 Moving Bed Media has been scientifically tried and tested in fish farming and waste treatment for over 10 years. Developed by Professor Halvard Ødergard at Trondheim University of Science and Technology the K1 Moving Bed Media bio film process has been designed specifically to create the most effective environment for the nitrification process to take place. The media is engineered in a wheel shape and is slightly positively buoyant, allowing a small amount of water flow created by adding air to the process) to circulate the media throughout the vessel.
Oxygen and food (ammonia and nitrite) gives the bacteria the means to grow, whilst the K1 media provides maximum surface area for the bacteria to colonise and produce bio film. It is this process, which removes harmful ammonia and nitrite from the water. As the K1 media chaotically circulates within the bio tank, it causes old dead bacteria/bio film on the outside, to be removed making space for new younger heavier feeding bacteria/bio film to colonise.
Within the wheel, is a protected surface, which enables colonies of bacteria to naturally follow their life cycle, maturing and dying, in turn fuelling the latter stages of nitrification conversion process. It also assists in the breakdown of any small particles passing through from the mechanical stage. Therefore, the K1 media maintains both a young biofilm & a maturing bio film providing a more consistent filter performance, whilst improving water quality, encouraging healthier Koi and aiding in reducing green water and blanket weed. Due to chaotic movement of K1 media, the process is self-cleaning and requires no maintenance. This allows the filter to reach optimum effectiveness without the disturbance of periodic maintenance, avoiding unnecessary loss of bacteria within the filter preventing high levels of ammonia and nitrite within the water. The other major benefit of K1 media is the huge ‘active’ surface area available for the bacteria to grow on compared to other types of media. This feature allows for smaller filter design, e.g. the Nexus, whilst providing increased biological efficiency.
Fig 7.1 Fig 7.2 Fig 7.3K1 MOVING BED MEDIA
New media Low loading mature Heavy loading mature

The difference is clear at www.evolutionaqua.com15
HOW TO GET THE BEST FROM YOUR NEXUS FILTERHOW TO GET THE BEST FROM YOUR NEXUS FILTERTake a look of our new Pure Pond bacteria gel balls. With over 8 billion bacteria per Litre of Pure Pond Balls, your pond will shine, especially if you add them monthly into the K1 Moving bed.The Pure Pond balls are made from a biodegradable polymer, and crammed full of bacteria that are slowly released when they are needed most.When you introduce the Pure Pond balls into the biological chamber of your Nexus, they become one with moving bed, agitating alongside the K1 media, just waiting to smooth out the peaks and troughs of the Ammonia/Nitrite cycle.Contact your Nexus dealer to find out more. Getting the most from your Nexus has never been easier.
Pure Pond bacteria gel balls in the K1 moving bed filter.

WARRANTY CARD
WARRANTY CARD
WARRANTY PROVISIONS
1. Your Nexus Filter is covered by your warranty for 1 year from the date of purchase (2 years if the warranty card is correctly completed and returned) provided that: a. It is installed, operated and regularly maintained in accordance with the
instruction manual. b. Any warranty repairs to the Nexus must be undertaken by Evolution Aqua Ltd or
its authorised representatives. c. If returning a product for warranty repair it must be returned in the original
packaging (or a suitable alternative) together with your proof of purchase. Evolution Aqua Ltd. accepts no responsibility for damage during transit or consequential loss relating to this.
2. Though the warranty period may not have expired, payment for repairs must be made in the following cases: a. When the fault is due to misuse or unauthorised repairs have been attempted. b. When the fault is due to fire, natural disaster, act of God etc. c. If the warranty has been lost, incorrectly completed or details
fraudulently changed.
Evolution Aqua Ltd. accepts no responsibility or liability for any consequential loss caused by or arising from the use of any Evolution Aqua products. Therefore, any dispute arising from the provisions of the warranty will be dealt with under the laws of England and Wales subject to the exclusive jurisdiction of the English Courts.
ACTIVATE YOUR 1 YEAR EXTRA FREE WARRANTY COVER,COMPLETE THE FORM & POST IT TODAY,
OR GO TO www.evolutionaqua.comAND COMPLETE ONLINE.
NEXUS WARRANTIES - EVOLUTION AQUA - KELLET CLOSE - WIGAN - LANCASHIRE - WN5 0LP - TEL: 01942 216554
WARRANTY CARD
Your Name:
Customer Address:
Postcode:
Country:
Tel:
Mobile:
Purchased From:
Address:
Postcode:
Country:
Tel:
Web:
Date of Purchase: / /
Model:
Serial Number:
Signature: Date: / /
I have read and accept the terms and conditions listed in the warranty card, and understand the obligations of the Customer under this warranty.
Returning this registration form will amount to your consent for us to disclose your details and other personal information to other companies within the Evolution Aqua group including any subsidiary company or subcontractor of Evolution Aqua for the purposes of performing our obligations under the warranty. Evolution Aqua Ltd. may contact you in the future with product updates or offers, which may be of interest to you. If you do not wish to receive this information please tick this box.
NEXUS WARRANTIES - EVOLUTION AQUA - KELLET CLOSE - WIGAN - LANCASHIRE - WN5 0LP - TEL: 01942 216554