note: this equipment has been tested and found to comply...
TRANSCRIPT

2
PrecautionsLocationUsing the unit in the following locations can result in a malfunction.• In direct sunlight• Locations of extreme temperature or humidity• Excessively dusty or dirty locations• Locations of excessive vibration• Close to magnetic fields
Power supplyPlease connect the designated AC adapter to an AC outlet of the correct voltage. Do not connect it to an AC outlet of voltage other than that for which your unit is intended.
Interference with other electrical devicesRadios and televisions placed nearby may experience re-ception interference. Operate this unit at a suitable distance from radios and televisions.
HandlingTo avoid breakage, do not apply excessive force to the switches or controls.
CareIf the exterior becomes dirty, wipe it with a clean, dry cloth. Do not use liquid cleaners such as benzene or thin-ner, or cleaning compounds or flammable polishes.
Keep this manualAfter reading this manual, please keep it for later reference.
Keeping foreign matter out of your equip-mentNever set any container with liquid in it near this equip-ment. If liquid gets into the equipment, it could cause a breakdown, fire, or electrical shock.Be careful not to let metal objects get into the equipment. If something does slip into the equipment, unplug the AC adapter from the wall outlet. Then contact your nearest Korg dealer or the store where the equipment was pur-chased.
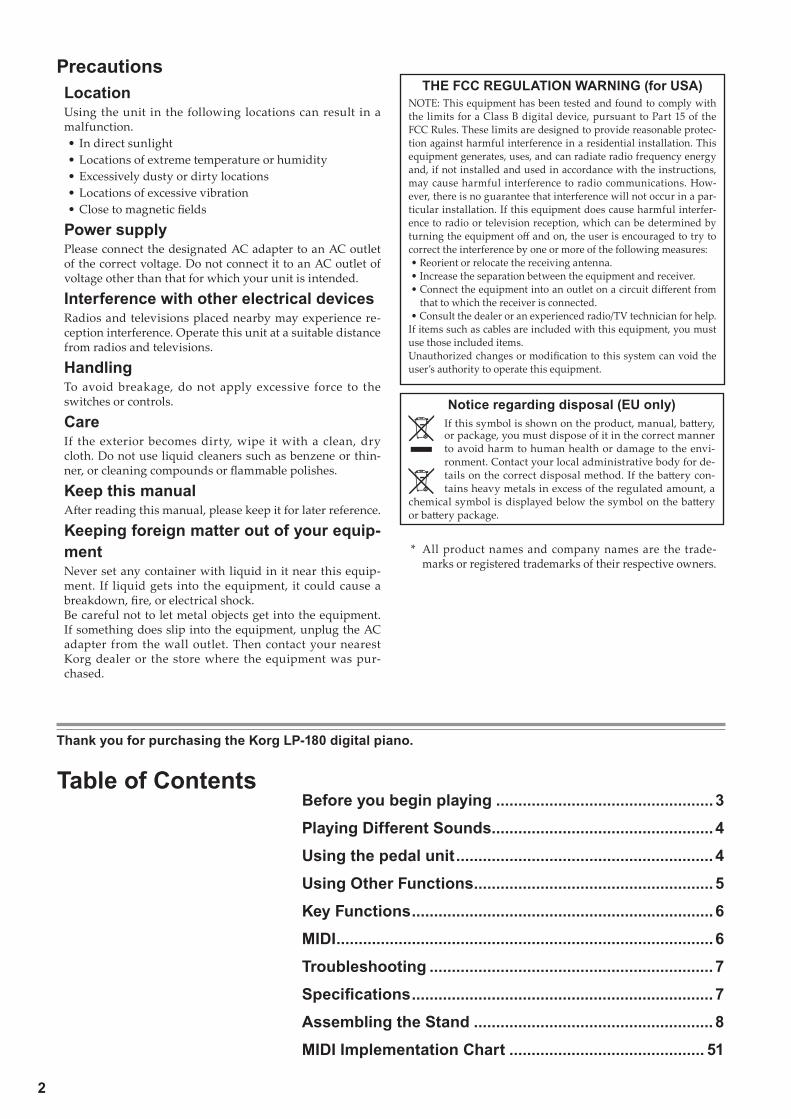
Notice regarding disposal (EU only)If this symbol is shown on the product, manual, battery, or package, you must dispose of it in the correct manner to avoid harm to human health or damage to the envi-ronment. Contact your local administrative body for de-tails on the correct disposal method. If the battery con-tains heavy metals in excess of the regulated amount, a
chemical symbol is displayed below the symbol on the battery or battery package.
THE FCC REGULATION WARNING (for USA)NOTE: This equipment has been tested and found to comply with the limits for a Class B digital device, pursuant to Part 15 of the FCC Rules. These limits are designed to provide reasonable protec-tion against harmful interference in a residential installation. This equipment generates, uses, and can radiate radio frequency energy and, if not installed and used in accordance with the instructions, may cause harmful interference to radio communications. How-ever, there is no guarantee that interference will not occur in a par-ticular installation. If this equipment does cause harmful interfer-ence to radio or television reception, which can be determined by turning the equipment off and on, the user is encouraged to try to correct the interference by one or more of the following measures: • Reorient or relocate the receiving antenna. • Increase the separation between the equipment and receiver. • Connect the equipment into an outlet on a circuit different from
that to which the receiver is connected. • Consult the dealer or an experienced radio/TV technician for help.If items such as cables are included with this equipment, you must use those included items.Unauthorized changes or modification to this system can void the user’s authority to operate this equipment.
Thank you for purchasing the Korg LP-180 digital piano.
Table of ContentsBefore you begin playing ................................................. 3
Playing Different Sounds.................................................. 4
Using the pedal unit .......................................................... 4
Using Other Functions ...................................................... 5
Key Functions ....................................................................6
MIDI .....................................................................................6
Troubleshooting ................................................................ 7
Specifications .................................................................... 7
Assembling the Stand ...................................................... 8
MIDI Implementation Chart ............................................ 51
* All product names and company names are the trade-marks or registered trademarks of their respective owners.

3
Before you begin playing
About the included standThe LP-180 is used with the included stand. Make sure that you read the “Assembling the stand” section that can be found on page 8 before proceeding.
1. Connecting the Power (Figure 1)• Connect the supplied AC adapter to the power cord. Insert the DC plug end into the DC12V
jack on the rear panel of the unit. Next, plug the power cord into an AC outlet.
Pass the AC adapter cord through the cord hook so that the plug won’t be removed from the jack accidentally. When you unhook the cord, don’t pull the cord with force.
Be sure to use the AC adapter that came with your unit. Using other AC adapters may cause the unit to malfunction.
Be sure to plug the unit into an AC outlet of the appropriate voltage.
2. Opening or closing the key cove (Figure 2)Put your fingers on the depressed part “A” on the front panel to slowly open the key cover with your hands.
Be careful not to pinch your fingers or hands when closing the key cover.
3. Turning the LP-180 ON• Press the power button to turn on the LP-180. (Figure 3)
The power LED will light up. (Figure 3)
• Press the power switch again to turn the unit off. The power LED will go dark.
This instrument is automatically turned off when 30 minutes have passed without user input or without a demonstration song played. Press the POWER button to turn the instru-ment on when using it again. In addition, this function cannot be disabled.
4. Adjust the volume• Rotate the VOLUME knob that’s located next to the power switch to the right, toward “MAX”,
to raise the volume level. Rotate it left toward “MIN” to lower the level. (Figure 3)
The VOLUME knob controls the output level of the built-in speakers and the headphone jacks.
Using the music stand• The key cover serves as a convenient music stand. (Figure 4)
When placing open sheet music, do not apply strong pressure onto the key cover.
Using headphonesWhen you plug in headphones, the built-in speakers will be muted. This is useful when you want to play the keyboard without bothering your family or your neighbors. The LP-180 features two headphone jacks so that two people can enjoy playing and listening.
• Insert the stereo headphone plug into the phones jacks ( ) on the lower left side of the unit. (Figure 5)
If your headphones feature a standard-to-mini adapter plug, be sure to hold the adapter plug when you connect or disconnect the headphones.
To protect your hearing, do not listen to loud, high-volume sounds for a long period of time through headphones.
To AC outlet
Figure 1
AC adapter
DC plug
Power cord for the AC adapter
Cord hook
Be careful not to bend this part too much when you insert the power cord.
A
A
Figure 2
Figure 3VOLUME knob
Power LED
Power Button
Figure 4
Figure 5
Phones jacks

4
Connecting audio componentsYou can use the phones jacks ( ) as line-out jacks to connect powered speakers or audio components to the keyboard. For such connections, use commercially-available cables that are appropriate for the components that you’re using.
Before connecting audio components, make sure that you turn off the power to the unit and the audio components. Otherwise, damage to the unit or other components may occur.
Playing Different SoundsThe LP-180 features 10 preset sounds.Pressing the SOUND button repeatedly will change the sound in the following sequence.Piano 1 → Piano 2 → E. Piano 1 → E. Piano 2 → Harpsichord → Clavichord → Vibraphone → P. Organ → E. Organ → StringsAfter Strings, the sound will return to Piano 1. Pressing the PIANO PLAY button will switch any sound to Piano 1.Whenever you turn on the unit, the default preset sound (Piano 1) will be recalled.
Piano 1: Elegant and warm grand pianoPiano 2: Clear and bright grand pianoE. Piano 1: Smooth, authentic electric pianoE. Piano 2: Modern, percussive electric pianoHarpsichord: Classical harpsichordClavichord: Expressive electric clavichordVibraphone: Smooth vibraphoneP. Organ: Pipe organE. Organ: Drawbar electronic organStrings: Ensemble string section
You can also change the sound by pressing one of the keys ranging from C7 to A7 while simulta-neously pressing and holding down the PIANO PLAY and SOUND buttons. (Please refer to “Key Functions” on pages 6 and 7.)
Using the pedal unitConnect the pedal unit (included) to the connector on the underside of the keyboard. Once the pedal unit is connected you can effectively express your performances using the damper, sostenuto and soft functions.
Soft pedalPressing this pedal will make the tone softer. You can control the softness of the tone de-pending on how far down you press the pedal (“half-pedaling”).
Sostenuto pedalPressing this pedal will apply the damper effect only to the notes that are already being held down on the keyboard. Only these notes will be sustained. The damper effect will not be applied to any additional notes that you play while holding down the Sostenuto pedal.
Damper pedalPressing this pedal will sustain the sound, producing a richly resonant decay. In addition, you can change the applied conditions of the damper according to the depth that the tone pedal of piano 1 and 2 is pressed. (“half-pedaling”).
Soft pedal
Sostenuto pedalDamper pedal
PIANO PLAY button
SOUNDbutton

5
Using Other FunctionsThe LP-180 allows you to play back demo songs or adjust various functions by pressing a specific key while also pressing and holding down the PIANO PLAY and SOUND buttons. Please refer to the “MIDI” section on the next page for more information on MIDI channels and program change messages.
While pressing and holding down the PIANO PLAY and SOUND buttons, do not play the key-board. Otherwise, you might get an unexpected result.
For information on the functions that are assigned to the keys, please refer to “Key Functions” on pages 6 and 7.
About the confirmation soundWhen you press a key to adjust settings for a function, you will hear the confirmation sound. To turn this sound off, simultaneously press and hold down the PIANO PLAY and SOUND buttons and press the A#0 key. To turn on the confirmation sound, repeat the previous procedure but press B0 instead of A#0. The confirmation sound is set to On by default (when you turn the unit on).
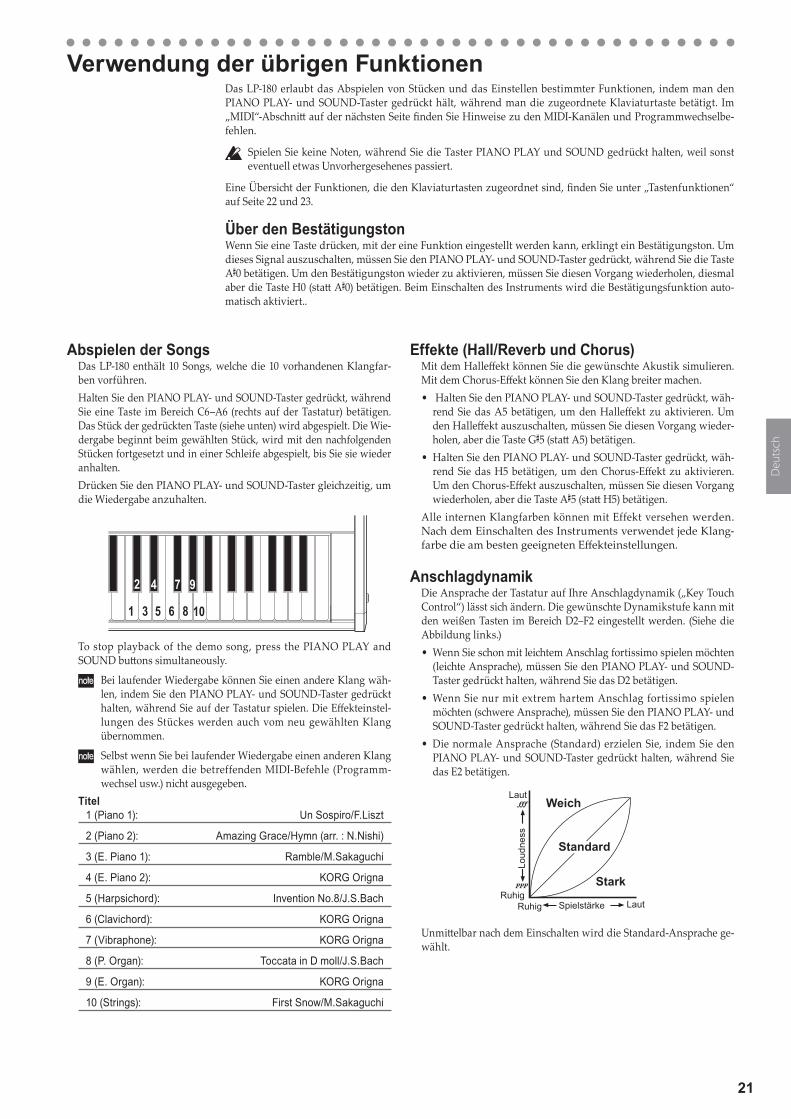
Playing Back SongsThe LP-180 features 10 songs that use 10 preset sounds.While pressing and holding down the PIANO PLAY and SOUND buttons, press one of the keys ranging from C6 to A6 (on the right side of the keyboard). The song assigned to the key that you pressed (as shown below) will start playing. Playback starts from the selected song, then continues and repeats all songs in ascending order until you stop playback.
1
2 4 7 9
3 5 6 8 10
To stop playback, press the PIANO PLAY and SOUND but-tons simultaneously.
During playback of a song, you can switch the sound us-ing the PIANO PLAY and SOUND buttons while playing the keyboard. The effect setting of the song will also be applied to the sound.
Even if you change the sound during playback of a song, the corresponding MIDI data (such as MIDI Program Change messages) will not be output.
Song name
1 (Piano 1): Un Sospiro /F.Liszt
2 (Piano 2): Amazing Grace/Hymn (arr. : N.Nishi)
3 (E. Piano 1): Ramble/M.Sakaguchi
4 (E. Piano 2): KORG Orignal
5 (Harpsichord): Invention No.8/J.S.Bach
6 (Clavichord): KORG Orignal
7 (Vibraphone): KORG Orignal
8 (P. Organ): Toccata in D moll/J.S.Bach
9 (E. Organ): KORG Orignal
10 (Strings): First Snow/M.Sakaguchi
Effects (Reverb and Chorus)You can use a reverb effect to add depth to the sound, and a chorus effect to add width and space.• Simultaneously press and hold down the PIANO PLAY and
SOUND buttons, and then press the A5 key to turn on the reverb effect. To turn off the reverb effect, repeat the previ-ous procedure but press the G#5 key instead of A5.
• Simultaneously press and hold down the PIANO PLAY and SOUND buttons, and then press the B5 key to turn on the chorus effect. To turn off the chorus effect, repeat the previ-ous procedure but press the A#5 key instead of B5.
You can apply effects to each preset sound. When you turn on the power to the unit, the effects will use the optimum settings for each preset sound.
Key Touch Control functionThe Key Touch Control function enables you to change the way that your playing strength will affect the output level. You can set this function by using the white keys in a range from D2 to F2. (See the figure on the left.)• To play fortissimo with soft strokes (Light touch), press and
hold down the PIANO PLAY and SOUND buttons , and then press the D2 key.
• To play fortissimo with very strong strokes (Heavy touch), press and hold down the PIANO PLAY and SOUND but-tons, and then press the F2 key.
• To simulate a normal piano touch (Standard touch), press and hold down the PIANO PLAY and SOUND buttons, and then press the E2 key.
Loud
Loud
ness
QuietQuiet LoudPlaying
strength
Light
Standard
Heavy
The default setting (when you turn on the unit) is Standard touch.

6
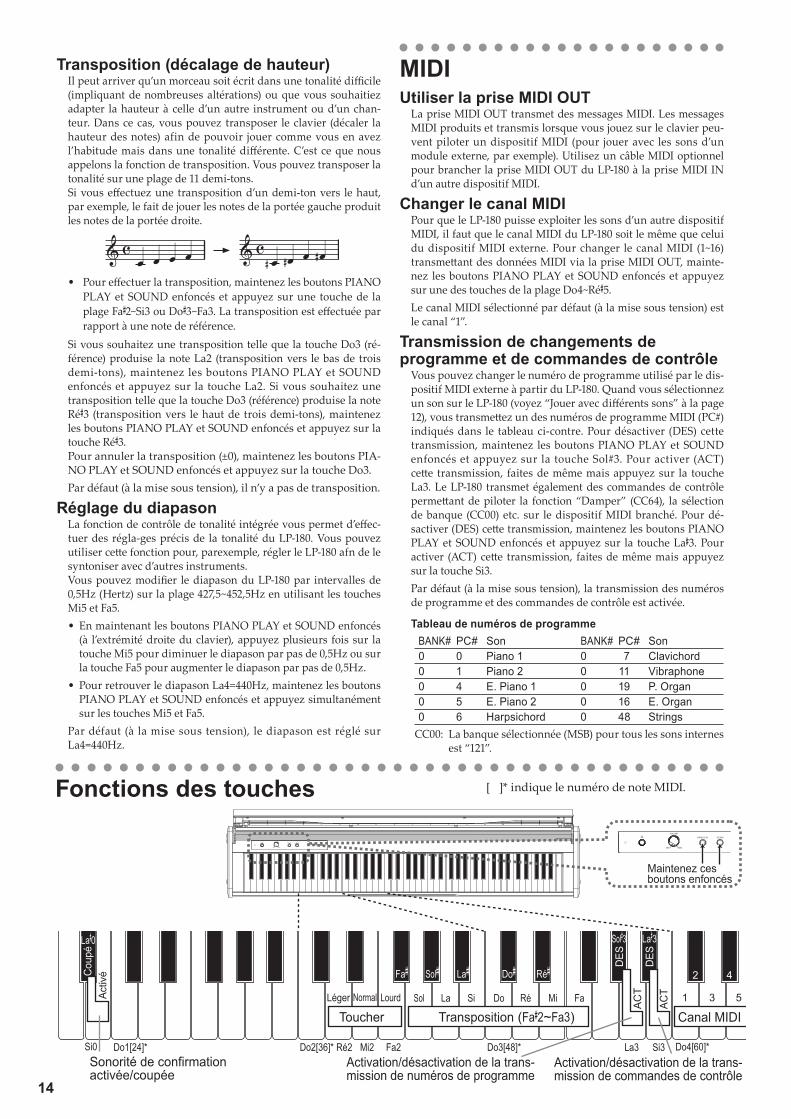
C1[24]* C2[36]* C3[48]* C4[60]* C7[96]* C8[108]*C5[72]* E5 F5B3A3 E5 G5 C6[84]*D2B0 E2 F2
2 4
5
7 9
10 12
14 16 1686
11
13 1531
2 4
5
7 9
108631Down Up
Reverb On/Off Chorus On/OffEnabling/Disabling Program Change transmission
Enabling/Disabling Control Change transmission
Preset Sounds (C7–A7)Demo Songs (C6–A6)Key TouchStd.
Transpose (F�2–F3)Light Heavy
MIDI Pitch
DIS
DIS
EN
A
EN
A
Off
Off
On
On
Pia
no 1
E. P
iano
1
Cla
vVi
brap
hone
P. O
rgan E. O
rgan
Stri
ngsPia
no 2
E. P
iano
2H
arps
iF� G� A� C� D�
G A B C D E F
Off
On
A�5A�0 G�3 A�3 G�5
Press and hold simultaneously
Confirmation sound On/Off
Key Functions [ ]* indicates MIDI Note number.
Transpose function (Shifting the key)In some cases, a song may be written in a difficult key (e.g., using many black keys), or you may wish to shift the key to match another instrument or vocalist. In such cases, you can transpose (shift the key) to use an easier fingering, or to use the same familiar fingering to play in a different key. This is called the Transpose function. You can shift the key in a range of eleven semitones.For example if you transpose upward by one semitone, play-ing the notes shown in the score on the left below will pro-duce the pitch that’s shown in the score on the right.
• To transpose the key, press and hold down the PIANO PLAY and SOUND buttons, and then press a key from F#2 to B3 or from C#3 to F3. The name of the key that you pressed will become the transposed key.
For example, if you wish to use the C3 key to play note A2 (lower by three semitones), press and hold down the PIANO PLAY and SOUND buttons, and press the A2 key. If you wish to use the C3 key to play note D#3 (higher by three semitones), press and hold down the PIANO PLAY and SOUND buttons, and press the D#3 key.To reset the Transpose function to “No Transposition (+/-0),” press and hold down the PIANO PLAY and SOUND buttons, and then press the C3 key.The default setting (when you turn on the unit) is “No Trans-position.”
Pitch Control function (Tuning)When you’re playing together with other instruments, you can use this the Pitch Control function to fix any slight differ-ences in pitch between instruments. You can adjust the tun-ing of the LP-180 in half-step (0.5) Hz intervals over a range of 427.5–452.5 Hz (Hertz) by using the E5 and F5 keys.• Press and hold down the PIANO PLAY and SOUND but-
tons, then press the E5 key to lower the pitch in 0.5Hz steps each time your press it, or press the F5 key repeatedly to raise the pitch in 0.5Hz steps each time you press it.
• To reset the pitch to 440Hz, press and hold down the PIA-NO PLAY and SOUND buttons, and press the E5 and F5 keys simultaneously.
The default setting (when you turn on the unit) is A4=440Hz.
MIDIUsing the MIDI OUT jack
The MIDI OUT jack transmits MIDI messages. When you play the keyboard, the MIDI messages will be output to control (e.g, play the sound of) an external MIDI device. Use an optional MIDI cable to connect the MIDI OUT jack of the LP-180 to the MIDI IN jack of an external MIDI device.
Changing the MIDI channelIf you’re using the LP-180 as a controller to play sounds from a connected MIDI device, the MIDI channel of the LP-180 must match the MIDI channel the external MIDI device.To change the MIDI channel (1–16) that MIDI data is being transmitted from via the MIDI OUT jack on the rear panel, press and hold down the PIANO PLAY and SOUND buttons simultaneously, and press one of the keys ranging from C4 to D#5.The default MIDI channel (when you turn on the unit) is “1.”
Transmitting Program Change and Control Change messages
You can change the program number of the connected MIDI device from the LP-180.When you select a preset sound on the LP-180 (see “Playing Different Sounds” on page 4), it transmits a MIDI Program Change number (PC#) as shown in the table below. To dis-able this transmission (DIS), press and hold down the PIANO PLAY and SOUND buttons simultaneously, and then press the G#3 key. To enable this transmission (ENA), repeat the previous procedure but press the A3 key instead.The LP-180 also transmits Control Change messages to con-trol Damper (CC64), Bank Select (CC00), etc. for the connected MIDI device. To disable this transmission (DIS), press and hold down the PIANO PLAY and SOUND buttons simultane-ously, and then press the A#3 key. To enable this transmission (ENA), repeat the previous procedure but press the B3 key instead.The default setting (when you turn on the unit) is ENA (trans-mitted) for both Program and Control Change messages.Program Change Table
BANK# PC# Sound BANK# PC# Sound0 0 Piano 1 0 7 Clavichord0 1 Piano 2 0 11 Vibraphone0 4 E. Piano 1 0 19 P. Organ0 5 E. Piano 2 0 16 E. Organ0 6 Harpsichord 0 48 Strings
CC00: Bank Select (MSB) for each sound is assigned to 121

7
TroubleshootingIf you perceive any malfunction, check the following sugges-tions. If the problem persists, contact your nearest Korg dis-tributor.
Power does not turn on• Make sure that the AC adapter is properly connected to the
LP-180 and the AC outlet.• Make sure that the power LED is illuminated.
No sound from the speakers• Rotate the VOLUME knob on the rear panel to the right to-
ward MAX.• The speakers will be muted if the headphones are connect-
ed.
Sound is interrupted• The preset sounds of the LP-180 have been created by sam-
pling (recording) sounds of actual musical instruments. When you press a key, some sounds play a single piece of sampled data, while other sounds play two pieces of sampled data. The LP-180 uses two pieces of data for most of its preset sounds. When one of these two-sample sounds is selected (regardless of whether the damper pedal is being pressed), the maximum polyphony is 60 notes. However, Piano 2 sounds, the maximum polyphony is 120 notes. If the maximum polyphony is exceeded, some of the notes will not be sounded.
The pitch or tone of the piano sounds wrong in some key re-gions• The LP-180’s piano sounds replicate the sound of an actual
piano as faithfully as possible. This means that in some re-gions of the keyboard, you may feel that the overtones seem stronger, or that the tone or pitch seems wrong. This is not a malfunction.
Pedal is not effective• Make sure that the pedal cable is properly connected.
Connected MIDI device does not respond to MIDI messages• Make sure that all MIDI cables are properly connected.• Make sure that the LP-180 is transmitting MIDI data on the
same MIDI channel as the connected MIDI device.
SpecificationsKeyboard NH Keyboard: 88 note (A0–C8)
Maximum polyphony 120 notes / 60 notes (Stereo)
Sounds Ten sounds
Jacks Headphones x 2 (also function as outputs), MIDI OUT, Pedal unit connector,
Amp output 11 W × 2
Speakers (16 cm x 8 cm) x 2
Power supply DC 12 V
Power Consumption 13 W
Weight 23.3 kg / 51.37 lbs (including Stand, but excluding pedal unit)
Dimensions (W x D x H: including Stand, including projections)1365 × 274 × 781 mm / 53.74" × 10.79" × 30.75" 1365 × 349 × 914 mm / 53.74" × 13.74" × 35.98" (with the key cover opened)
Included items AC adapter ( ), Stand, Pedal unit, Pedal cord
* Specifications and appearance are subject to change without notice for improvement.
C1[24]* C2[36]* C3[48]* C4[60]* C7[96]* C8[108]*C5[72]* C6[84]*
2 4
5
7 9
10 12
14 16 1686
11
13 1531
2 4
5
7 9
108631Down Up
Reverb On/Off Chorus On/Off
Preset Sounds (C7–A7)Songs (C6–A6)Key TouchStd.
TransposeLight Heavy
MIDI Channel (C4–D�5) Pitch
DIS
DIS
EN
A
EN
A
Off
Off
On
On
Pia
no 1
E. P
iano
1
Cla
vich
ord
Vibr
apho
neP.
Org
an E. O
rgan
Stri
ngsPia
no 2
E. P
iano
2H
arps
icho
rd
F� G� A� C� D�
G A B C D E F
F5E5 A5 B5
G�5 A�5
Press and hold simultaneously
T
8
Assembling the Stand
WarningAt least one other person must help you assemble the stand.
Caution during assemblyIn order to assemble the stand safely, please observe the fol-lowing points.• Make sure that you have the correct part in the correct
orientation, and perform the assembly in the order given.
• The LP-180 may fall when applying force too much to the front side of it before fixing the LP-180 to the stand. You should be careful in handling it.
Other cautionsPlease check the following points after assembly.• Loosenedscrews
The screws may loosen as time passes after assembly. You should periodically check whether any screws have become loose. If you feel that the stand vibrates exces-sively, it is possible that screws have come loose. If so, re-tighten them.
• WhenmovingthedigitalpianotoanotherlocationTo move the assembled stand, remove the AC adapter cord and the pedal cord from the stand, close the key cover, and then move it slowly with at least two people keeping it as level as possible.
• DisassemblyIf you need to disassemble the stand, do so by reversing the steps of the assembly procedure. After disassembly, keep the screws and other parts in a safe place so that they are not lost.
The LP-180 should always be laid down before it’s disassembled.
Assembly procedureYou’ll need a Phillips (+) screwdriver.
1. Puttheprotectivesheet,whichhadcoveredtheLP-180,onaflatfloor,andplacetheLP-180onthatsheetwithitsrearfacingthefloor.
Ensure that the LP-180’s key cover will not to open until the end of the assembly.
Protective sheet
LP-180
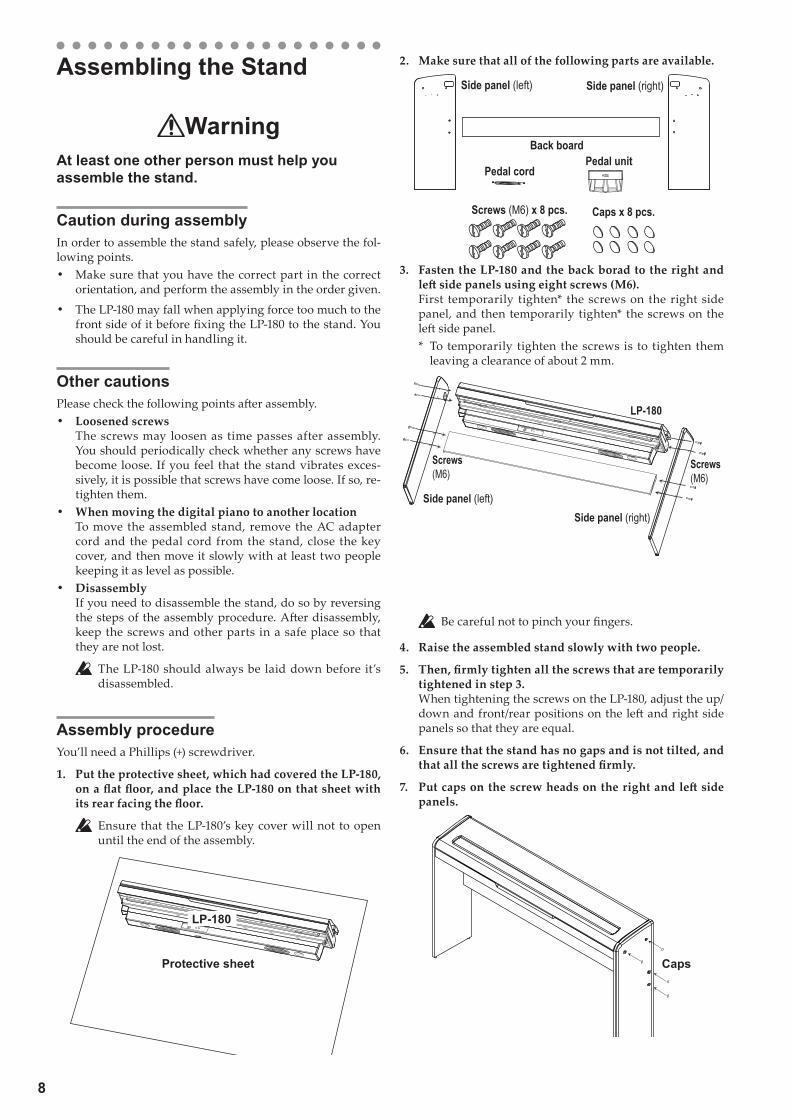
2. Makesurethatallofthefollowingpartsareavailable.
Pedal unitBack board
Side panel (right)Side panel (left)
Pedal cord
Screws (M6) x 8 pcs. Caps x 8 pcs.
3. FastentheLP-180andthebackboradtotherightandleftsidepanelsusingeightscrews(M6).First temporarily tighten* the screws on the right side panel, and then temporarily tighten* the screws on the left side panel.* To temporarily tighten the screws is to tighten them
leaving a clearance of about 2 mm.
LP-180
Screws(M6)
Screws(M6)
Side panel (right)Side panel (left)
Be careful not to pinch your fingers.
4. Raisetheassembledstandslowlywithtwopeople.
5. Then,firmlytightenallthescrewsthataretemporarilytightenedinstep3.When tightening the screws on the LP-180, adjust the up/down and front/rear positions on the left and right side panels so that they are equal.
6. Ensurethatthestandhasnogapsandisnottilted,andthatallthescrewsaretightenedfirmly.
7. Putcapsonthescrewheadsontherightandleftsidepanels.
Caps

9
8. Connecttheattachedpedalcord,observingthecorrectori-entation,totheconnectoronthereversesideofthepedalunit,andthenengageitwithaslotinthepedalunit.The pedal cord can be attached to or detached from the connector with its locking tab held down.
Lockingtab
9. Connectthepedalcordtotheconnectorsonthebot-tomoftheLP-180.When connecting the pedal cord, observe the correct ori-entations of the connectors. In addition, the pedal cord can be attached to or detached from the connector with its locking tab held down.
Cord holder
Pedal cord
Locking tab
10.Usethecordholdernexttotheconnectortoholdthepedalcord.After securing the cord with the cord holder, ensure that excess pressure is not applied to the connectors.
11.ConnectthededicatedcordtotheACadapter.Then,plugtheACadapterintotheDC12Vconnector,andwrapthecordaroundthecordhookofthepiano.Fordetails,referto“1.ConnectingthePower(Figure1)”onpage3.
12.PlacetheLP-180whereyouintendtouseit.Makesuretoplaceitinasafelocationwherethefloorisflatandstable.
When setting the digital piano in place, make sure that the stand does not rest on the AC adapter cable or pedal cable.
Check following assembly□ Areanypartsleftover?
If any parts are left over, carefully review the assembly procedure to see where those parts should have been used.
□ Makesurethatallscrewsaretight.

10
Précautions
EmplacementL’utilisation de cet instrument dans les endroits suivants peut en entraîner le mauvais fonctionnement.• En plein soleil• Endroits très chauds ou très humides• Endroits sales ou fort poussiéreux• Endroits soumis à de fortes vibrations• A proximité de champs magnétiques
AlimentationBranchez l’adaptateur secteur mentionné à une prise sec-teur de tension appropriée. Evitez de brancher l’adaptateur à une prise de courant dont la tension ne correspond pas à celle pour laquelle l’appareil est conçu.
Interférences avec d’autres appareils électriquesLes postes de radio et de télévision situés à proximité peu-vent par conséquent souffrir d’interférences à la réception. Veuillez dès lors faire fonctionner cet appareil à une dis-tance raisonnable de postes de radio et de télévision.
ManiementPour éviter de les endommager, manipulez les commandes et les boutons de cet instrument avec soin.
EntretienLorsque l’instrument se salit, nettoyez-le avec un chiffon propre et sec. Ne vous servez pas d’agents de nettoyage liquides tels que du benzène ou du diluant, voire des pro-duits inflammables.
Note concernant les dispositions (Seulement EU)Si ce symbole apparait sur le produit, le manuel, les piles ou les packs de piles, cela signifie que vous devez le recycler d’une manière correcte afin de prévenir les dommages pour la santé humaine et les dommages potentiels pour l’environnement. Contactez votre administration locale pour de plus
amples renseignements concernant la bonne méthode de recyclage. Si la pile contient des métaux lourds au-delà du seuil réglementé, un symbole chimique est affiché en dessous du symbole de la poubelle barrée d’une croix sur la pile ou le pack de piles.
Conservez ce manuelAprès avoir lu ce manuel, veuillez le conserver soigneuse-ment pour toute référence ultérieure.
Evitez toute intrusion d’objets ou de liquideNe placez jamais de récipient contenant du liquide près de l’instrument. Si le liquide se renverse ou coule, il risque de provoquer des dommages, un court-circuit ou une électro-cution.Veillez à ne pas laisser tomber des objets métalliques dans le boîtier (trombones, par ex.). Si cela se produit, débran-chez l’alimentation de la prise de courant et contactez votre revendeur korg le plus proche ou la surface où vous avez acheté l’instrument.
Table des matièresAvant de commencer à jouer ......................................... 11
Jouer avec différents sons ............................................. 12
Utilisation du pédalier ..................................................... 12
Autres fonctions .............................................................. 13
Fonctions des touches ................................................... 14
MIDI ................................................................................... 14
Dépannage ....................................................................... 15
Spécification .................................................................... 15
Montage du pied .............................................................. 16
Tableau d’équipement MIDI ............................................ 51
Merci d’avoir choisi la piano numérique LP-180 de Korg.
* Tous les noms de produits et de sociétés sont des marques commerciales ou déposées de leur détenteur respectif.
11
Avant de commencer à jouer
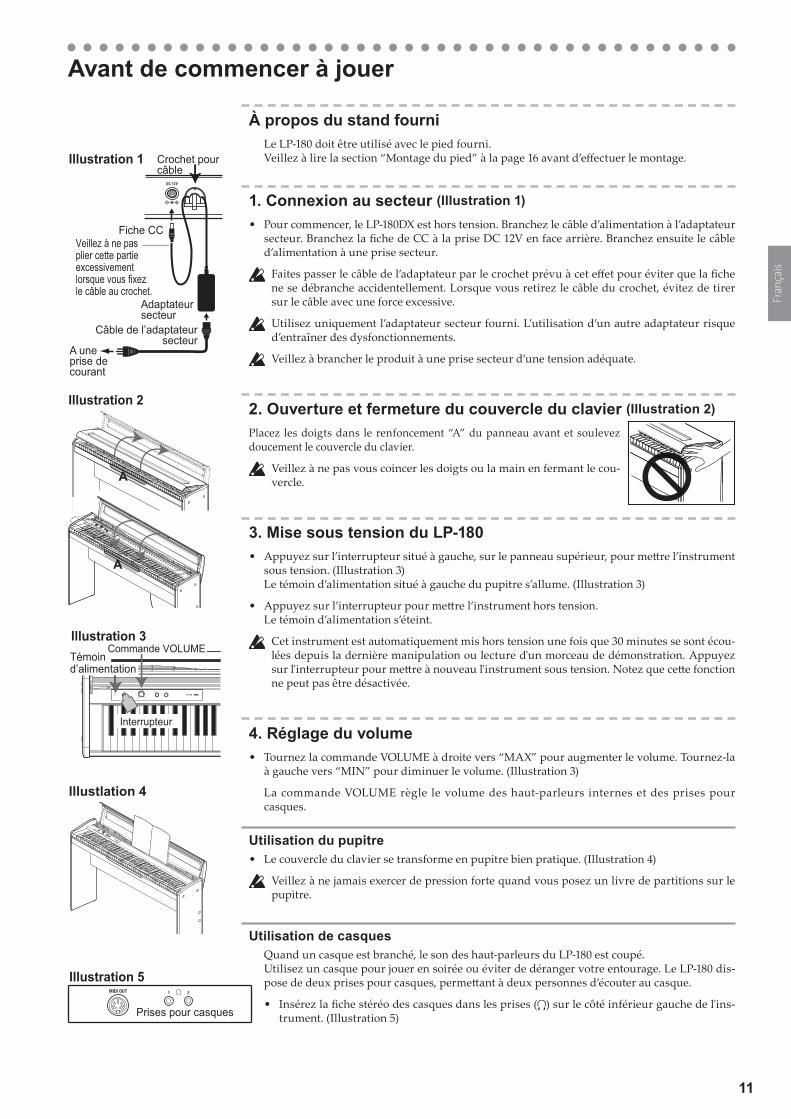
À propos du stand fourniLe LP-180 doit être utilisé avec le pied fourni.Veillez à lire la section “Montage du pied” à la page 16 avant d’effectuer le montage.
1. Connexion au secteur (Illustration 1)
• Pour commencer, le LP-180DX est hors tension. Branchez le câble d’alimentation à l’adaptateur secteur. Branchez la fiche de CC à la prise DC 12V en face arrière. Branchez ensuite le câble d’alimentation à une prise secteur.
Faites passer le câble de l’adaptateur par le crochet prévu à cet effet pour éviter que la fiche ne se débranche accidentellement. Lorsque vous retirez le câble du crochet, évitez de tirer sur le câble avec une force excessive.
Utilisez uniquement l’adaptateur secteur fourni. L’utilisation d’un autre adaptateur risque d’entraîner des dysfonctionnements.
Veillez à brancher le produit à une prise secteur d’une tension adéquate.
2. Ouverture et fermeture du couvercle du clavier (Illustration 2)
Placez les doigts dans le renfoncement “A” du panneau avant et soulevez doucement le couvercle du clavier.
Veillez à ne pas vous coincer les doigts ou la main en fermant le cou-vercle.
3. Mise sous tension du LP-180• Appuyez sur l’interrupteur situé à gauche, sur le panneau supérieur, pour mettre l’instrument
sous tension. (Illustration 3)Le témoin d’alimentation situé à gauche du pupitre s’allume. (Illustration 3)
• Appuyez sur l’interrupteur pour mettre l’instrument hors tension.Le témoin d’alimentation s’éteint.
Cet instrument est automatiquement mis hors tension une fois que 30 minutes se sont écou-lées depuis la dernière manipulation ou lecture d'un morceau de démonstration. Appuyez sur l'interrupteur pour mettre à nouveau l'instrument sous tension. Notez que cette fonction ne peut pas être désactivée.
4. Réglage du volume• Tournez la commande VOLUME à droite vers “MAX” pour augmenter le volume. Tournez-la
à gauche vers “MIN” pour diminuer le volume. (Illustration 3)
La commande VOLUME règle le volume des haut-parleurs internes et des prises pour casques.
Utilisation du pupitre• Le couvercle du clavier se transforme en pupitre bien pratique. (Illustration 4)
Veillez à ne jamais exercer de pression forte quand vous posez un livre de partitions sur le pupitre.
Utilisation de casquesQuand un casque est branché, le son des haut-parleurs du LP-180 est coupé.Utilisez un casque pour jouer en soirée ou éviter de déranger votre entourage. Le LP-180 dis-pose de deux prises pour casques, permettant à deux personnes d’écouter au casque.
• Insérez la fiche stéréo des casques dans les prises ( ) sur le côté inférieur gauche de l'ins-trument. (Illustration 5)
A une prise de courant
Illustration 1
Adaptateur secteur
Fiche CC
Câble de l’adaptateursecteur
Crochet pour câble
Veillez à ne pas plier cette partie excessivement lorsque vous fixez le câble au crochet.
A
A
Illustration 2
Illustration 3
Interrupteur
Témoin d’alimentation
Commande VOLUME
Illustlation 4
Prises pour casques
Illustration 5

12
Si votre casque est doté d’une fiche adaptatrice jack standard/mini-jack, veillez à tenir la fiche adaptatrice lorsque vous branchez ou débranchez le casque.
Pour protéger votre ouïe, évitez une écoute au casque prolongée à volume élevé.
Connexion de périphériques audioVous pouvez utiliser les prises pour casques ( ) comme sorties lignes pour brancher des enceintes actives ou d’autres périphériques audio au clavier. Utilisez pour cela des câbles conçus pour ces périphériques et disponibles dans le commerce.
Avant de brancher des périphériques audio, n’oubliez pas de mettre l’instrument et les périphériques audio hors tension. Faute de quoi, vous risquez d’endommager l’instru-ment ou les périphériques.
Jouer avec différents sonsLe LP-180 propose 10 sons préprogrammés.Appuyez plusieurs fois sur le bouton SOUND pour changer de son selon la séquence suivante:Piano 1 → Piano 2 → E. Piano 1 → E. Piano 2 → Harpsichord → Clavichord → Vibraphone → P. Organ → E. Organ → StringsAprès le son “Strings”, vous revenez au son “Piano 1”. Une pression sur le bouton PIANO PLAY sé-lectionne automatiquement le son “Piano 1”.Quand vous mettez l’instrument sous tension, le son “Piano 1” est sélectionné par défaut.
Piano 1: Piano à queue chaud et richePiano 2: Piano à queue clair et brillantE. Piano 1: Piano électrique authentique et fluideE. Piano 2: Piano électrique moderne et percutantHarpsichord: Clavecin classiqueClavichord: Clavicorde électrique expressifVibraphone: Vibraphone au son veloutéP. Organ: Orgue à tuyauxE. Organ: Orgue électronique à registresStrings: Section de cordes
Vous pouvez aussi changer de son en appuyant sur une des touches de la plage Do7 à La7 tout en maintenant les boutons PIANO PLAY et SOUND enfoncés. (Voyez la section “Fonctions des touches” aux pages 14 et 15.)
Utilisation du pédalierBranchez le pédalier fourni avec le clavier au connecteur sur le dessous de l'instrument.Une fois branché, ce pédalier vous permet d'exploiter toutes les nuances d'expression avec ses pé-dales douce, de soutien et de résonance.
Pédale douce (‘soft’)Appuyez sur cette pédale pour adoucir le son. Vous pouvez contrôler le degré d'atténuation du son en enfonçant plus ou moins la pédale douce (effet “mi-pédale”).
Pédale de soutien (‘sostenuto’)L’effet de soutien s’applique uniquement aux notes dont les touches sont déjà enfoncées au moment où vous appuyez sur la pédale; seules ces notes continuent de résonner tant que la pédale de soutien est enfoncée. L’effet de soutien ne s’applique pas aux notes que vous jouez après l’enfoncement de la pédale de soutien.
Pédale de résonance (‘damper’)L’action de cette pédale soutient le son et produit un estompement des notes plein de réso-nance. Vous pouvez en outre contrôler le degré de résonance des sons de piano 1 et 2 selon la pression que vous exercez sur la pédale (effet “mi-pédale”).
Pédale douce
Pédale de soutien
Pédale de résonance
BoutonPIANO PLAY
BoutonSOUND

13
Autres fonctionsLe LP-180 vous permet de reproduire les morceaux ou de régler divers paramètres en appuyant sur une touche spécifique du clavier tout en maintenant les boutons PIANO PLAY et SOUND enfoncés. Voyez la section “MIDI” à la page suivante pour en savoir plus sur les canaux et les changements de programme MIDI.
Tant que vous maintenez les boutons PIANO PLAY et SOUND enfoncés, ne jouez pas sur le cla-vier. Vous risquez d’obtenir un résultat inattendu.
Pour connaître les fonctions assignées aux touches, voyez la section “Fonctions des touches” aux pages 14 et 15.
Signal de confirmationQuand vous actionnez une touche pour régler un paramètre, vous entendez un signal de confirma-tion. Vous pouvez désactiver ce signal de confirmation en maintenant les boutons PIANO PLAY et SOUND enfoncés et en appuyant sur la touche La#0. Pour activer le signal de confirmation, faites de même mais appuyez sur la touche Si0 au lieu de la touche La#0. Par défaut, à la mise sous tension de l’instrument, le signal de confirmation est activé.
Ecouter les morceauxLe LP-180 propose 10 morceaux exploitant 10 sons préprogram-més. Ecoutez les morceaux pour découvrir toute la richesse et l’expressivité des sons.En maintenant les boutons PIANO PLAY et SOUND enfoncés, appuyez sur une des touches situées entre Do6 et La6 (du côté droit du clavier). La lecture du morceau assigné à la touche actionnée (voyez ci-dessous) démarre. La lecture commence à partir du morceau sélectionné et se poursuit en boucle, par ordre ascendant, jusqu’à ce que vous l’arrêtiez.Pour arrêter la lecture, appuyez simultanément sur les boutons PIANO PLAY et SOUND.
Durant la lecture d’un morceau, vous pouvez changer de son en utilisant les boutons PIANO PLAY et SOUND plus les touches du clavier. Le réglage d’effets du mor-ceau s’applique au son sélectionné.
Quand vous changez de son durant la lecture d’un mor-ceau, aucun message MIDI (de changement de pro-gramme) n’est transmis.
Titre du morceau
1 (Piano 1): Un Sospiro/F.Liszt
2 (Piano 2): Amazing Grace/Hymn (arr. : N.Nishi)
3 (E. Piano 1): Ramble/M.Sakaguchi
4 (E. Piano 2): KORG Orignal
5 (Harpsichord): Invention No.8/J.S.Bach
6 (Clavichord): KORG Orignal
7 (Vibraphone): KORG Orignal
8 (P. Organ): Toccata in D moll/J.S.Bach
9 (E. Organ): KORG Orignal
10 (Strings): First Snow/M.Sakaguchi
Effets (réverbération et chorus)Vous pouvez utiliser un effet de réverbération pour conférer plus de profondeur au son ou un effet chorus pour l’élargir et l’enrichir.• Maintenez les boutons PIANO PLAY et SOUND enfoncés, et
appuyez sur la touche La5 pour activer l’effet de réverbération. Pour couper l’effet de réverbération, faites de même mais ap-puyez sur la touche Sol#5 au lieu de la touche La5.
• En maintenant les boutons PIANO PLAY et SOUND enfoncés simultanément, appuyez sur la touche Si5 pour activer l’effet de chorus. Pour couper l’effet de chorus, faites de même mais appuyez sur la touche La#5 au lieu de Si5.
Vous pouvez ajouter des effets à chacun des sons.
Quand vous mettez l’instrument sous tension, les effets utilisent des réglages optimisés pour chacun des sons préprogrammés.
Réglage de la réponse du clavier selon le toucher
Le réglage de la réponse du clavier vous permet de déterminer le rapport entre la force exercée sur les touches (toucher) et le niveau de sortie du son. Vous pouvez régler ce paramètre avec les touches blanches de la plage Ré2~Fa2. (Voyez l’illustration à gauche.)• Pour jouer fortissimo avec un toucher léger, maintenez les bou-
tons PIANO PLAY et SOUND enfoncés et actionnez la touche Ré2.
• Pour jouer fortissimo avec un toucher lourd, maintenez les touches boutons PIANO PLAY et SOUND enfoncés et action-nez la touche Fa2.
• Pour un toucher normal (standard), maintenez les boutons PIANO PLAY et SOUND enfoncés et actionnez la touche Mi2.
Le toucher normal est le réglage par défaut (à la mise sous tension).
1
2 4 7 9
3 5 6 8 10
Fort
Pui
ssan
ce s
onor
e
CalmeForce du jeu
Léger
Normal
Lourd
Calme Fort
14
Transposition (décalage de hauteur)Il peut arriver qu’un morceau soit écrit dans une tonalité difficile (impliquant de nombreuses altérations) ou que vous souhaitiez adapter la hauteur à celle d’un autre instrument ou d’un chan-teur. Dans ce cas, vous pouvez transposer le clavier (décaler la hauteur des notes) afin de pouvoir jouer comme vous en avez l’habitude mais dans une tonalité différente. C’est ce que nous appelons la fonction de transposition. Vous pouvez transposer la tonalité sur une plage de 11 demi-tons.Si vous effectuez une transposition d’un demi-ton vers le haut, par exemple, le fait de jouer les notes de la portée gauche produit les notes de la portée droite.
• Pour effectuer la transposition, maintenez les boutons PIANO PLAY et SOUND enfoncés et appuyez sur une touche de la plage Fa#2~Si3 ou Do#3~Fa3. La transposition est effectuée par rapport à une note de référence.
Si vous souhaitez une transposition telle que la touche Do3 (ré-férence) produise la note La2 (transposition vers le bas de trois demi-tons), maintenez les boutons PIANO PLAY et SOUND enfoncés et appuyez sur la touche La2. Si vous souhaitez une transposition telle que la touche Do3 (référence) produise la note Ré#3 (transposition vers le haut de trois demi-tons), maintenez les boutons PIANO PLAY et SOUND enfoncés et appuyez sur la touche Ré#3.Pour annuler la transposition (±0), maintenez les boutons PIA-NO PLAY et SOUND enfoncés et appuyez sur la touche Do3.Par défaut (à la mise sous tension), il n’y a pas de transposition.
Réglage du diapasonLa fonction de contrôle de tonalité intégrée vous permet d’effec-tuer des régla-ges précis de la tonalité du LP-180. Vous pouvez utiliser cette fonction pour, parexemple, régler le LP-180 afn de le syntoniser avec d’autres instruments. Vous pouvez modifier le diapason du LP-180 par intervalles de 0,5Hz (Hertz) sur la plage 427,5~452,5Hz en utilisant les touches Mi5 et Fa5.• En maintenant les boutons PIANO PLAY et SOUND enfoncés
(à l’extrémité droite du clavier), appuyez plusieurs fois sur la touche Mi5 pour diminuer le diapason par pas de 0,5Hz ou sur la touche Fa5 pour augmenter le diapason par pas de 0,5Hz.
• Pour retrouver le diapason La4=440Hz, maintenez les boutons PIANO PLAY et SOUND enfoncés et appuyez simultanément sur les touches Mi5 et Fa5.
Par défaut (à la mise sous tension), le diapason est réglé sur La4=440Hz.
MIDIUtiliser la prise MIDI OUT
La prise MIDI OUT transmet des messages MIDI. Les messages MIDI produits et transmis lorsque vous jouez sur le clavier peu-vent piloter un dispositif MIDI (pour jouer avec les sons d’un module externe, par exemple). Utilisez un câble MIDI optionnel pour brancher la prise MIDI OUT du LP-180 à la prise MIDI IN d’un autre dispositif MIDI.
Changer le canal MIDIPour que le LP-180 puisse exploiter les sons d’un autre dispositif MIDI, il faut que le canal MIDI du LP-180 soit le même que celui du dispositif MIDI externe. Pour changer le canal MIDI (1~16) transmettant des données MIDI via la prise MIDI OUT, mainte-nez les boutons PIANO PLAY et SOUND enfoncés et appuyez sur une des touches de la plage Do4~Ré#5. Le canal MIDI sélectionné par défaut (à la mise sous tension) est le canal “1”.
Transmission de changements de programme et de commandes de contrôle
Vous pouvez changer le numéro de programme utilisé par le dis-positif MIDI externe à partir du LP-180. Quand vous sélectionnez un son sur le LP-180 (voyez “Jouer avec différents sons” à la page 12), vous transmettez un des numéros de programme MIDI (PC#) indiqués dans le tableau ci-contre. Pour désactiver (DES) cette transmission, maintenez les boutons PIANO PLAY et SOUND enfoncés et appuyez sur la touche Sol#3. Pour activer (ACT) cette transmission, faites de même mais appuyez sur la touche La3. Le LP-180 transmet également des commandes de contrôle permettant de piloter la fonction “Damper” (CC64), la sélection de banque (CC00) etc. sur le dispositif MIDI branché. Pour dé-sactiver (DES) cette transmission, maintenez les boutons PIANO PLAY et SOUND enfoncés et appuyez sur la touche La#3. Pour activer (ACT) cette transmission, faites de même mais appuyez sur la touche Si3. Par défaut (à la mise sous tension), la transmission des numéros de programme et des commandes de contrôle est activée.
Tableau de numéros de programmeBANK# PC# Son BANK# PC# Son0 0 Piano 1 0 7 Clavichord0 1 Piano 2 0 11 Vibraphone0 4 E. Piano 1 0 19 P. Organ0 5 E. Piano 2 0 16 E. Organ0 6 Harpsichord 0 48 Strings
CC00: La banque sélectionnée (MSB) pour tous les sons internes est “121”.
Do1[24]* Do2[36]* Do3[48]* Do4[60]* Do7[96]* Do8[108]*Do5[72]* Do6[84]*
2 4
5
7 9
10 12
14 16 1686
11
13 1531
2 4
5
7 9
108631
Réverbération activée/coupée Chorus activé/coupéActivation/désactivation de la trans-mission de numéros de programme
Activation/désactivation de la trans-mission de commandes de contrôle
Sons internes MorceauxToucherNormal
Transposition (Fa�2~Fa3)Léger Lourd
Canal MIDI
Pian
o 1
E. P
iano
1
Cla
vVi
brap
hone
P. O
rgan E.
Org
anSt
ringsPi
ano
2
E. P
iano
2H
arps
i
ACT
AC
TD
ES
DES
Sonorité de confirmation activée/coupée
Activ
éCou
pé
Activ
éC
oupé
Activ
éC
oupé
Bas Haut
Hauteur
Maintenez ces boutons enfoncés
Fa� Sol� La� Do� Ré�
Sol La Si Do Ré Mi Fa
Si0 Ré2 Mi2 Fa2 La3 Si3
La�0 La�3Sol�3
Fonctions des touches [ ]* indique le numéro de note MIDI.
15
DépannageSi vous rencontrez le moindre problème, vérifiez les points sui-vants. Si le problème persiste, contactez le service après-vente Korg le plus proche.
L’instrument ne s’allume pas• Vérifiez que l’adaptateur secteur est correctement branché
au LP-180 et à une prise secteur.• Vérifiez que le témoin d’alimentation est allumé.
Les haut-parleurs ne produisent aucun son• Tournez la commande VOLUME située en face arrière vers
la position “MAX”.• Les haut-parleurs sont coupés si un casque est branché.
Il y a des interruptions du son• Les sons internes du LP-180 résultent de l’échantillonnage
(l’enregistrement) de sons d’instruments réels suivi d’une analyse et d’un traitement des échantillons. Certains sons ne sont constitués que d’un échantillon par note alors que d’autres en combinent deux. La plupart des sons internes du LP-180 utilise deux échantillons par note. Quand vous sélec-tionnez un son à deux échantillons par note, la polyphonie maximum est de 60 notes (que la pédale forte soit actionnée ou non). Parmi les sons internes, sons de Piano 2 autorisent une polyphonie de 120 notes. Si vous dépassez la polyphonie maximum, des notes excédentaires sont perdues.
La hauteur tonale ou tonalité du piano semble incor-recte dans certaines zones du clavier• Les sonorités de piano du LP-180 reproduisent aussi fdèle-
ment que pos-sible celles d’un piano réel. Cela signife que dans certaines régions duclavier, il est possible que le son semble plus fort, ou que la tonalité ouhauteur tonale semble incorrecte. C’est un phénomène normal.
La pédale ne fonctionne pas• Vérifiez si le câble de la pédale est branché correctement.
Le dispositif MIDI branché ne réagit pas aux messages MIDI transmis.• Vérifiez si le câble MIDI est branché correctement.• Vérifiez si le LP-180 est bien réglé (et transmet les données
MIDI) sur le même canal que l’autre dispositif MIDI.
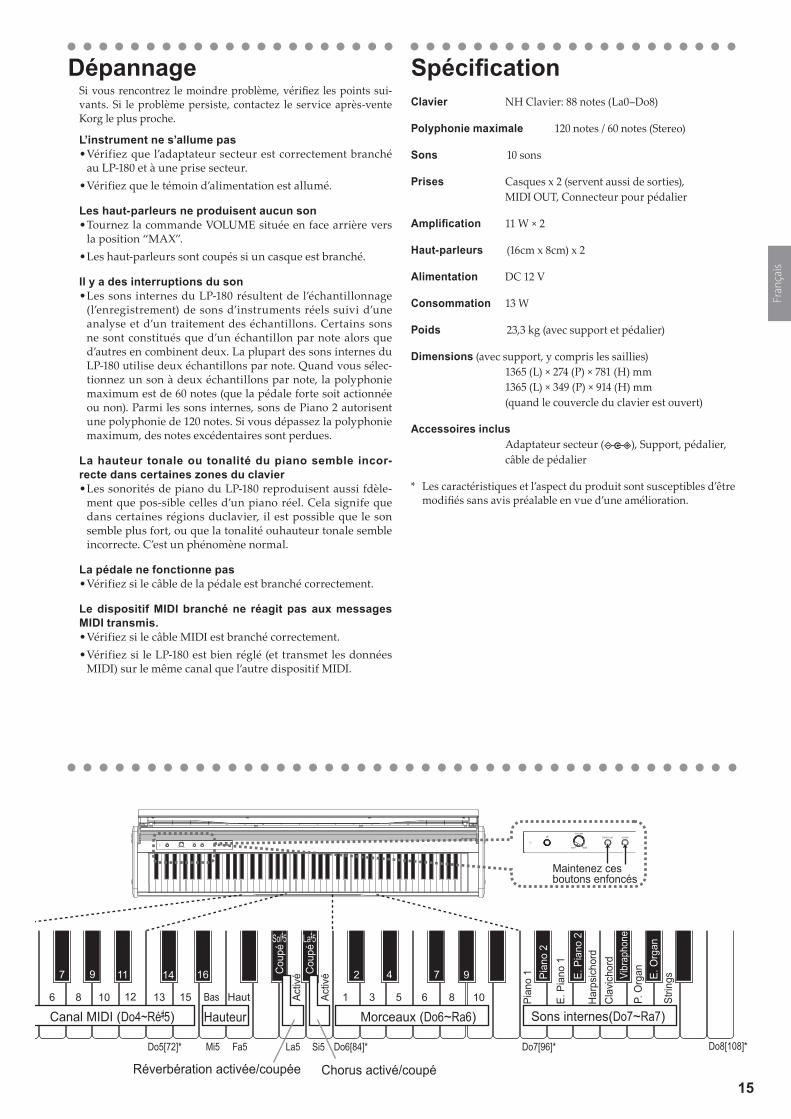
SpécificationClavier NH Clavier: 88 notes (La0–Do8)
Polyphonie maximale 120 notes / 60 notes (Stereo)
Sons 10 sons
Prises Casques x 2 (servent aussi de sorties), MIDI OUT, Connecteur pour pédalier
Amplification 11 W × 2
Haut-parleurs (16cm x 8cm) x 2
Alimentation DC 12 V
Consommation 13 W
Poids 23,3 kg (avec support et pédalier)
Dimensions (avec support, y compris les saillies)1365 (L) × 274 (P) × 781 (H) mm 1365 (L) × 349 (P) × 914 (H) mm (quand le couvercle du clavier est ouvert)
Accessoires inclus Adaptateur secteur ( ), Support, pédalier, câble de pédalier
* Les caractéristiques et l’aspect du produit sont susceptibles d’être modifiés sans avis préalable en vue d’une amélioration.
Do1[24]* Do2[36]* Do3[48]* Do4[60]* Do7[96]* Do8[108]*Do5[72]* Do6[84]*
2 4
5
7 9
10 12
14 16 1686
11
13 1531
2 4
5
7 9
108631Bas HautStd.
Canal MIDI (Do4~Ré�5) Hauteur
Pian
o 1
E. P
iano
1
Cla
vich
ord
Vibr
apho
neP.
Org
an E. O
rgan
Strin
gsPian
o 2
E. P
iano
2H
arps
icho
rd
Fa� Sol� La� Do� Ré�
Sol La Si Do Ré Mi Fa
Réverbération activée/coupée Chorus activé/coupé
Sons internes(Do7~Ra7) Morceaux (Do6~Ra6)Toucher Transposition Léger Lourd
AC
T
AC
TD
ES
DE
S
Act
ivé
Cou
pé
Activ
éCou
pé
Activ
éCou
pé
La5Fa5Mi5 Si5
Sol�5 La�5
Maintenez ces boutons enfoncés
T

16
Montage du pied
AvertissementIl faut au moins une autre personne pour vous aider à monter le pied.
Prudence durant le montageObservez les points suivants pour veiller à la sécurité durant le montage.• Vérifiez que vous tenez toujours la pièce indiquée dans
le bon sens et effectuez le montage selon l’ordre indiqué.
• Le LP-180 risque de tomber si vous appliquez trop de force à l'avant de l'instrument avant qu'il ne soit fixé sur son stand. Manipulez l'instrument avec précaution.
Autres précautionsVérifiez les points suivants après le montage.• Visdesserrées
Les vis peuvent se desserrer avec le temps.Vérifiez régulièrement si des vis se sont dévissées. Si vous avez l’impression que le pied vibre excessivement, il est possible que des vis soient desserrées. Dans ce cas, resserrez-les.
• QuandvousdéplacezlepianonumériqueSi vous devez déplacer le piano monté sur son pied, dé-branchez et retirez le cordon de l'adaptateur secteur et le câble de pédalier du pied, refermez le couvercle du cla-vier et soulevez lentement l'instrument (faites-vous aider d'une personne); déplacez-le en le maintenant aussi droit que possible.
• DémontagePour démonter le pied, inversez les opérations de mon-tage. Après le démontage, conservez les vis et autres pièces dans un endroit sûr pour ne pas les égarer.
Séparez toujours le LP-180 de son pied avant de dé-monter ce dernier.
Procédure de montageIl vous faut un tournevis cruciforme (+).
1. PlacezlecellophanedeprotectionfourniavecleLP-180àplatsurlesoletposezleLP-180surlecellophaneenorientantsafacearrièreverslesol.
Veillez à ce que le couvercle du clavier du LP-180 ne risque pas de s’ouvrir pendant le montage.
LP-180
Cellophane de protection
2. Veillezàcequetouslesélémentssuivantssoientdis-ponibles.
Planche arrièrePédalier
Panneau latéral (droit)Panneau latéral (gauche)
Cordon du pédalier
Vis (M6) x 8 pcs. Capuchons x 8 pcs.
3. FixezleLP-180etlaplanchearrièreauxpanneauxlaté-rauxdroitetgaucheàl'aidedehuitvis(M6).Serrez*d’abord temporairement les vis sur le panneau latéral droit, puis serrez* temporairement celles sur le panneau latéral gauche.* Un “serrage provisoire” signifie que vous serrez les vis
en veillant à garder un jeu d’environ 2 mm.
LP-180
Vis (M6)
Vis (M6)
Panneau latéral (droit)
Panneau latéral (gauche)
Veillez à ne pas vous coincer les doigts.
4. Relevezdoucementl’ensemblepiedetinstrumentenvousfaisantaiderparunepersonne.
5. Serrezfermement toutes lesvisserrées temporaire-mentàl’étape3.Lors du serrage des vis du LP-180, vérifiez que les pan-neaux latéraux gauche et droit sont de niveau et ajustez leur position si nécessaire.
6. Vérifiezànouveauquelepiedestdeniveau,qu’ilnecomportepasdejeuetquetouteslesvissontcorrecte-mentserrées.
7. Couvrezlestêtesdesvisd’uncapuchonsurlespan-neauxlatérauxgaucheetdroit.
Capuchons

17
8. Branchezlecordondupédalierauconnecteursurledosdupédalier,enveillantàorientercorrectementleconnecteur,puisacheminezlecordondanslafentedupédalier.Pour brancher et débrancher le cordon du pédalier, glis-sez son onglet de blocage vers le bas.
Onglet de blocage
9. BranchezlecâbledepédalierauconnecteursurledosduLP-180.Veillez à orienter correctement la fiche du câble de pé-dalier lors du branchement. En outre, pour brancher et débrancher le cordon du pédalier, glissez son onglet de blocage vers le bas.
Support de cordon
Cordon du pédalier
Onglet de blocage
10.Utilisez lesupportdecâbleàcôtéde laprisepourmaintenirlecâbledupédalier.Une fois que le cordon est en place et retenu par le sup-port de cordon, vérifiez qu’il n’y a pas de pression trop forte au niveau des fiches du cordon.
11.Branchezlecordond’alimentationàl’adaptateursec-teur.Branchezensuitel’adaptateursecteuràlapriseDC12Vetenroulez lecâblede l’adaptateurautourducrochetprévuàceteffetsur lepiano.Voyez“1.Connexionausecteur(Illustration1)”àlapage11.
12.PlacezleLP-180àl’endroitoùvousavezl’intentiondel’utiliser.Placez-ledansunendroitsûroùlesolestplatetsolide.
Quand vous installez le piano numérique, vérifiez que le pied n’est pas posé sur le câble de l’adaptateur ou du pédalier.
À vérifier après le montage□ Reste-t-ildespièces?
S’il reste des pièces, relisez soigneusement la procédure de montage pour voir où ces pièces devraient se trouver.
□ Vérifiezquetouteslesvissontbienserrées.

18
VorsichtsmaßnahmenAufstellungsortVermeiden Sie das Aufstellen des Geräts an Orten, an denen• es direkter Sonneneinstrahlung ausgesetzt ist;• hohe Feuchtigkeit oder Extremtemperaturen auftreten können;• Staub oder Schmutz in großen Mengen vorhanden sind;• das Gerät Erschütterungen ausgesetzt sein kann.• in der Nähe eines Magnetfeldes.
StromversorgungSchließen Sie das optionale Netzteil nur an eine geeignete Steck-dose an. Verbinden Sie es niemals mit einer Steckdose einer ande-ren Spannung.
Störeinflüsse auf andere ElektrogeräteDieser kann bei in der Nähe aufgestellten Rund-funkempfängern oder Fernsehgeräten Empfangsstörungen hervorrufen. Betreiben Sie solche Geräte nur in einem geeigneten Abstand von diesem Erzeugnis.
BedienungVermeiden Sie bei der Bedienung von Schaltern und Reglern un-angemessenen Kraftaufwand.
ReinigungBei auftretender Verschmutzung können Sie das Gehäuse mit einem trockenen, sauberen Tuch abwischen. Verwenden Sie kei-nerlei Flüssigreiniger wie beispielsweise Reinigungsbenzin, Ver-dünnungs- oder Spülmittel. Verwenden Sie niemals brennbare Reiniger.
BedienungsanleitungBewahren Sie diese Bedienungsanleitung gut auf, falls Sie sie spä-ter noch einmal benötigen.
Flüssigkeiten und FremdkörperStellen Sie niemals Behältnisse mit Flüssigkeiten in der Nähe des Geräts auf. Wenn Flüssigkeit in das Gerät gelangt, können Beschädigung des Geräts, Feuer oder ein elek-trischer Schlag die Folge sein.Beachten Sie, daß keinerlei Fremdkörper in das Gerät gelangen. Sollte ein Fremdkörper in das Gerät gelangt sein, so trennen Sie es sofort vom Netz. Wenden Sie sich dann an Ihren KORG-Fach-händler.
InhaltBevor Sie mit dem Spielen beginnen ............................ 19
Spielen unterschiedlicher Klänge ................................. 20
Verwendung der Pedaleinheit ........................................ 20
Verwendung der übrigen Funktionen ........................... 21
Tastenfunktionen ............................................................22
MIDI ...................................................................................22
Fehlersuche ..................................................................... 23
Technische Daten ............................................................ 23
Montage des Ständers ....................................................24
MIDI-Implementierungstabelle ....................................... 51
Vielen Dank, dass Sie sich für einen LP-180 digtal-Klavier von Korg entschieden haben.
* Alle Produkt- und Firmennamen sind Warenzeichen oder eingetragene Warenzeichen der betreffenden Eigentümer.
Hinweis zur Entsorgung (Nur EU)Wenn Sie das Symbol mit der „durchgekreuzten Müll-tonne“ auf Ihrem Produkt, der dazugehörigen Bedie-nungsanleitung, der Batterie oder der Verpackung se-hen, müssen Sie das Produkt in der vorgeschriebenen Art und Weise entsorgen um Schäden an der menschli-chen Gesundheit und der Umwelt zu vermeiden. Batte-
rien oder Akkus, die Schadstoffe enthalten, sind auch mit dem Symbol einer durchgekreuzten Mülltonne gekennzeichnet. In der Nähe zum Mülltonnensymbol befindet sich die chemische Bezeichnung des Schadstoffes. Cd oder NiCd steht für Cadmi-um, Pb für Blei und Hg für Quecksilber.

19
Bevor Sie mit dem Spielen beginnen
Hinweise zum beigefügten StänderDas LP-180 wird mit einem Ständer geliefert.Lesen Sie dazu bitte den Abschnitt „Montage des Ständers“ auf Seite 24, bevor sie fortfahren.
1. Anschließen ans Netz (Abbildung 1)• Schalten Sie das LP-180 bei Bedarf AUS. Verbinden Sie das beiliegende Netzteil mit dem Netzkabel. Ver-
binden Sie den kleinen Stecker mit der DC12V-Buchse auf der Rückseite. Verbinden Sie das Netzkabel mit einer Steckdose.
Wickeln Sie das Netzteilkabel um den Kabelhaken, um zu verhindern, dass sich der Netzanschluss aus Versehen löst. Beim Entfernen des Kabels dürfen Sie nie mit Gewalt daran ziehen.
Verwenden Sie nur das beiliegende Netzteil. Bei Verwendung eines anderen Netzteils wird das Gerät eventuell beschädigt.
Verbinden Sie das Instrument ausschließlich mit einer Steckdose der geeigneten Netzspannung.
2. Öffnen und Schließen des Tastaturdeckels (Abbildung 2)Greifen Sie die Vertiefung „A“ auf der Vorderseite und klappen Sie den Tastatur-deckel hoch.
Achten Sie darauf, sich beim Schließen des Deckels nicht die Finger zu klem-men.
3. Einschalten des LP-180• Drücken Sie den Netzschalter links im Bedienfeld, um das Instrument einzuschalten. (Abbildung 3)
Die Netzanzeige links neben dem Notenpult leuchtet. (Abbildung 3)
• Drücken Sie den Netzschalter erneut, um das Instrument wieder auszuschalten.Die Netzanzeige erlischt wieder.
Dieses Instrument wird automatisch ausgeschaltet, nachdem 30 Minuten lang keine Eingabe erfolgt ist oder kein Demo-Song gespielt wurde. Drücken Sie die POWER-Taste, um das Instrument anschlie-ßend wieder einzuschalten. Diese Funktion kann nicht deaktiviert werden.
4. Einstellen der Lautstärke• Drehen Sie den VOLUME-Regler neben dem Netzschalter in Richtung „MAX“, um die Lautstärke anzu-
heben. Drehen Sie ihn nach links (zu „MIN“), um die Lautstärke zu verringern. (Abbildung 3)
Der VOLUME-Regler bestimmt den Pegel der internen Lautsprecher und Kopfhörerbuchsen.
Notenpult aufstellen• Der Tastaturdeckel dient aufgeklappt als praktischer Notenständer (Abbildung 4).
Üben Sie beim Aufstellen von Notenblättern oder Notenheften keinen starken Druck auf den Tasta-turdeckel auf.
KopfhörerbetriebBeim Anschließen eines Kopfhörers werden die internen Lautsprecher stummgeschaltet. Das ist z.B. praktisch, wenn Sie spät abends oder früh morgens üben oder spielen möchten. Das LP-180 ist mit zwei Kopfhörerbuchsen ausgestattet, so dass jeweils zwei Personen spielen und zuhören können.
• Stecken Sie den Stereo-Klinkenstecker des Kopfhörers in die Kopfhörerbuchsen ( ) unten links am Instrument. (Abbildung 5)
Wenn Ihr Kopfhörer mit einem Standard–Miniklinken-Adapter versehen ist, müssen Sie zum Anschlie-ßen oder Lösen der Verbindung jeweils den Adapter festhalten.
Bedenken Sie, dass ein hoher Wiedergabepegel im Kopfhörer schon nach kurzer Zeit zu Hörschä-den führen kann.
Zu einer Steckdose
Abbildung 1
Netzteil
Netzteilbuchse
Netzkabel für das Netzteil
Kabelhaken
Diese Partie darf beim Arretieren des Netzteilkabels nicht zu stark strapaziert werden.
A
A
Abbildung 2
Abbildung 3
Netzanzeige
VOLUME-Regler
Netzschalter
Abbildung 4
Abbildung 5
Kopfhörerbuchsen

20
Anschließen anderer AudiogeräteDie Kopfhörerbuchsen ( ) lassen sich auch als Audio-Ausgänge für Aktivboxen oder andere Audio-geräte nutzen. Für eine solche Verbindung benötigen Sie handelsübliche Kabel mit den für Ihr Gerät geeigneten Steckern.
Vor dem Herstellen von Audioverbindungen müssen Sie das Instrument und die externen Audioge-räte ausschalten. Andernfalls könnten das Instrument und die übrigen Geräte beschädigt werden.
Spielen unterschiedlicher KlängeSpielen unterschiedlicher KlängeBei wiederholtem Drücken des SOUND-Tasters ändert sich die Klangfarbe nach folgendem Muster.Piano 1 → Piano 2 → E. Piano 1 → E. Piano 2 → Harpsichord → Clavichord → Vibraphone → P. Organ → E. Organ → StringsNach Anwahl von „Strings“ springen Sie wieder zurück zu „Piano 1“. Mit dem PIANO PLAY-Taster können Sie jederzeit wieder die Klangfarbe „Piano 1“ aufrufen.Unmittelbar nach dem Einschalten wählt das Instrument jeweils den „Piano 1“-Klang.
Piano 1: Wunderschöner FlügelklangPiano 2: Heller und klarer FlügelklangE. Piano 1: Runder, authentischer E-PianoklangE. Piano 2: Modernes, sehr perkussives E-PianoHarpsichord: Klassisches CembaloClavichord: Expressives elektrisches CembaloVibraphone: Runder VibraphonklangP. Organ: PfeifenorgelE. Organ: Elektrische ZugriegelorgelStrings: Klang einer Streichersektion
Wenn Sie eine Klangfarbe lieber direkt anwählen, müssen Sie den PIANO PLAY- und SOUND-Taster gedrückt halten, während Sie eine Klaviaturtaste im Bereich C7–A7 drücken. (Siehe „Tastenfunktionen“ auf Seite 22 und 23.)
Verwendung der PedaleinheitVerbinden Sie die im Lieferumfang enthaltene Pedaleinheit mit der Buchse an der Unterseite des Geräts. Wenn die Pedaleinheit angeschlossen ist, können Sie Ihrem Spiel mit den Halte-, Sostenuto- und Softfunktionen mehr Ausdruck verleihen.
SoftpedalDurch Betätigen dieses Pedals wird der Ton sanfter. Die Sänfte des Tons hängt davon ab, wie tief das Pedal betätigt wird („Halbpedal“).
SostenutopedalDurch Betätigen dieses Pedals werden nur diejenigen Noten, deren Tasten bereits gedrückt sind, dämpft und gehalten. Bei betätigtem Sostenutopedal zusätzlich gespielte Noten werden nicht ge-dämpft.
HaltepedalBetätigen dieses Pedals hält den Ton an, sodass er satt nachhallend abklingt. Außerdem können Sie die Anwendung des Halteeffekts davon abhängig machen, wie tief das Klangpedal für Piano 1 und 2 betätigt wird. („Halbpedal“)
PIANO PLAY -Taster SOUND-Taster
HaltepedalSostenutopedal
Softpedal
21
Verwendung der übrigen FunktionenDas LP-180 erlaubt das Abspielen von Stücken und das Einstellen bestimmter Funktionen, indem man den PIANO PLAY- und SOUND-Taster gedrückt hält, während man die zugeordnete Klaviaturtaste betätigt. Im „MIDI“-Abschnitt auf der nächsten Seite finden Sie Hinweise zu den MIDI-Kanälen und Programmwechselbe-fehlen.
Spielen Sie keine Noten, während Sie die Taster PIANO PLAY und SOUND gedrückt halten, weil sonst eventuell etwas Unvorhergesehenes passiert.
Eine Übersicht der Funktionen, die den Klaviaturtasten zugeordnet sind, finden Sie unter „Tastenfunktionen“ auf Seite 22 und 23.
Über den BestätigungstonWenn Sie eine Taste drücken, mit der eine Funktion eingestellt werden kann, erklingt ein Bestätigungston. Um dieses Signal auszuschalten, müssen Sie den PIANO PLAY- und SOUND-Taster gedrückt, während Sie die Taste A#0 betätigen. Um den Bestätigungston wieder zu aktivieren, müssen Sie diesen Vorgang wiederholen, diesmal aber die Taste H0 (statt A#0) betätigen. Beim Einschalten des Instruments wird die Bestätigungsfunktion auto-matisch aktiviert..
Abspielen der SongsDas LP-180 enthält 10 Songs, welche die 10 vorhandenen Klangfar-ben vorführen. Halten Sie den PIANO PLAY- und SOUND-Taster gedrückt, während Sie eine Taste im Bereich C6–A6 (rechts auf der Tastatur) betätigen. Das Stück der gedrückten Taste (siehe unten) wird abgespielt. Die Wie-dergabe beginnt beim gewählten Stück, wird mit den nachfolgenden Stücken fortgesetzt und in einer Schleife abgespielt, bis Sie sie wieder anhalten.Drücken Sie den PIANO PLAY- und SOUND-Taster gleichzeitig, um die Wiedergabe anzuhalten.
To stop playback of the demo song, press the PIANO PLAY and SOUND buttons simultaneously.
Bei laufender Wiedergabe können Sie einen andere Klang wäh-len, indem Sie den PIANO PLAY- und SOUND-Taster gedrückt halten, während Sie auf der Tastatur spielen. Die Effekteinstel-lungen des Stückes werden auch vom neu gewählten Klang übernommen.
Selbst wenn Sie bei laufender Wiedergabe einen anderen Klang wählen, werden die betreffenden MIDI-Befehle (Programm-wechsel usw.) nicht ausgegeben.
Titel1 (Piano 1): Un Sospiro/F.Liszt
2 (Piano 2): Amazing Grace/Hymn (arr. : N.Nishi)
3 (E. Piano 1): Ramble/M.Sakaguchi
4 (E. Piano 2): KORG Origna
5 (Harpsichord): Invention No.8/J.S.Bach
6 (Clavichord): KORG Origna
7 (Vibraphone): KORG Origna
8 (P. Organ): Toccata in D moll/J.S.Bach
9 (E. Organ): KORG Origna
10 (Strings): First Snow/M.Sakaguchi
Effekte (Hall/Reverb und Chorus)Mit dem Halleffekt können Sie die gewünschte Akustik simulieren. Mit dem Chorus-Effekt können Sie den Klang breiter machen.• Halten Sie den PIANO PLAY- und SOUND-Taster gedrückt, wäh-
rend Sie das A5 betätigen, um den Halleffekt zu aktivieren. Um den Halleffekt auszuschalten, müssen Sie diesen Vorgang wieder-holen, aber die Taste G#5 (statt A5) betätigen.
• Halten Sie den PIANO PLAY- und SOUND-Taster gedrückt, wäh-rend Sie das H5 betätigen, um den Chorus-Effekt zu aktivieren. Um den Chorus-Effekt auszuschalten, müssen Sie diesen Vorgang wiederholen, aber die Taste A#5 (statt H5) betätigen.
Alle internen Klangfarben können mit Effekt versehen werden. Nach dem Einschalten des Instruments verwendet jede Klang-farbe die am besten geeigneten Effekteinstellungen.
AnschlagdynamikDie Ansprache der Tastatur auf Ihre Anschlagdynamik („Key Touch Control“) lässt sich ändern. Die gewünschte Dynamikstufe kann mit den weißen Tasten im Bereich D2–F2 eingestellt werden. (Siehe die Abbildung links.)• Wenn Sie schon mit leichtem Anschlag fortissimo spielen möchten
(leichte Ansprache), müssen Sie den PIANO PLAY- und SOUND-Taster gedrückt halten, während Sie das D2 betätigen.
• Wenn Sie nur mit extrem hartem Anschlag fortissimo spielen möchten (schwere Ansprache), müssen Sie den PIANO PLAY- und SOUND-Taster gedrückt halten, während Sie das F2 betätigen.
• Die normale Ansprache (Standard) erzielen Sie, indem Sie den PIANO PLAY- und SOUND-Taster gedrückt halten, während Sie das E2 betätigen.
Unmittelbar nach dem Einschalten wird die Standard-Ansprache ge-wählt.
1
2 4 7 9
3 5 6 8 10
Laut
Loud
ness
RuhigRuhig LautSpielstärke
Standard
Weich
Stark

22
Transposition (Spielen in einer anderen Tonart)Bestimmte Stücke verwenden eine schwierige Tonart (mit vielen schwarzen Tasten). Und bestimmte Sänger bestehen auf eine ganz bestimmte Tonart. Statt dann Ihren Fingersatz zu ändern, können Sie die Tastatur „verschieben“, um weiter-hin in der vertrauten Tonart zu spielen und sich nicht um die schwarzen Tasten kümmern zu müssen. Das nennen wir die „Transpositionsfunktion“. Die Tonhöhe kann um 11 Halbton-schritte versetzt werden.Beispiel: Wenn Sie die Tastatur z.B. einen Halbton höher transponie-ren, hören Sie beim Spielen der links abgebildeten Noten die rechts gezeigten Noten.
• Zum Einstellen des gewünschten Transpositionsintervalls müs-sen Sie den PIANO PLAY- und SOUND-Taster gedrückt halten, während Sie eine Taste im Bereich F#2–B3 oder C#3–F3 betätigen. Die Note der gedrückten Taste gibt die neue Tonart vor.
Beispiel: Wenn bei Drücken der Taste C3 die Note „A2“ (drei Halbtö-ne tiefer) erklingen soll, müssen Sie den PIANO PLAY- und SOUND-Tastergedrückt halten, während Sie das A2 betätigen. Wenn bei Drü-cken der Taste C3 die Note „D#3“ (drei Halbtöne höher) erklingen soll, müssen Sie den PIANO PLAY- und SOUND-Taster gedrückt halten, während Sie das D#3 betätigen.Um wieder die normalen Notentonhöhen zu verwenden (±0), müs-sen Sie den PIANO PLAY- und SOUND-Taster gedrückt halten, während Sie das C3 betätigen.Unmittelbar nach dem Einschalten wird die Normaltonhöhe (keine Transposition) gewählt.
Ändern der StimmungMit der integrierten Tonhöhenregelung können Sie die Tonhöhe des LP-180 feineinstellen. Verwenden Sie diese Funktion zum Beispiel, um die Tonhöhe des LP-180 an die Tonhöhe anderer Instrumente an-zupassen. Mit den Tasten E5 und F5 kan n die Gesamtstimmung des LP-180 im Bereich 427,5–452,5Hz (Hertz) in 0,5Hz-Schritten geändert werden.• Halten den PIANO PLAY- und SOUND-Taster gedrückt, während
Sie die Tonhöhe mit der Taste E5 bei jedem Drücken um jeweils 0,5Hz absenken bzw. mit der Taste F5 um jeweils 0,5Hz anheben.
• Um die Kammertonfrequenz wieder auf 440Hz zu stellen, müs-sen Sie den PIANO PLAY- und SOUND-Taster gedrückt halten, während Sie das E5 und F5 gleichzeitig betätigen.
Unmittelbar nach dem Einschalten wird die Stimmung A4=440Hz gewählt.
MIDIVerwendung der MIDI OUT-Buchse
Die MIDI OUT-Buchse überträgt MIDI-Befehle. Wenn Sie auf der Tastatur spielen, sendet das Instrument die entsprechenden MIDI-Befehle. Das externe Instrument empfängt sie und führt sie ebenfalls aus. Verbinden Sie die MIDI OUT-Buchse des LP-180 über ein optiona-les MIDI-Kabel mit der MIDI IN-Buchse des externes MIDI-Geräts.
Einstellen des MIDI-KanalsWenn Sie das LP-180 zum Ansteuern eines externen Instruments oder Geräts verwenden möchten, müssen Sie auf dem LP-180 die-selbe Kanalnummer wählen wie auf dem externen Instrument. Für die Anwahl des MIDI-Kanals (1–16), auf dem die Befehle zur MIDI OUT-Buchse übertragen werden, müssen Sie den PIANO PLAY- und SOUND-Taster gedrückt halten, während Sie die entsprechende Taste im Bereich C4–D#5 betätigen. Die Vorgabe-Einstellung für den MIDI-Kanal ist „1“.
Senden von Programmwechsel- und Steuerbefehlen
Das LP-180 kann auch Programmwechselbefehle zum externen Inst-rument senden. Bei Anwahl einer Klangfarbe auf dem LP-180 (siehe „Spielen unterschiedlicher Klänge“ auf Seite 20), wird die zugehörige MIDI-Programmnummer (PC#) gesendet (siehe die Tabelle links). Diese Übertragung kann auch deaktiviert werden („AUS“): Halten Sie den PIANO PLAY- und SOUND-Taster gedrückt, während Sie das G#3 betätigen. Um die Übertragung danach wieder zu aktivieren („AKT“), müssen Sie diesen Vorgang wiederholen, aber die Taste A3 betätigen. Das LP-180 sendet auch Steuerbefehle: Wenn Sie das Dämpferpedal betätigen wird ein CC64-Befehl gesendet. Auch Bankwechsel (CC00) usw. werden übertragen. Diese Übertragung kann deaktiviert wer-den („AUS“): Halten Sie den PIANO PLAY- und SOUND-Taster ge-drückt, während Sie das A#3 betätigen. Um die Übertragung danach wieder zu aktivieren („AKT“), müssen Sie diesen Vorgang wiederho-len, aber die Taste H3 betätigen. Unmittelbar nach dem Einschalten des Instruments ist die Übertragung von sowohl Programmwechsel- als auch Steuerbefehlen aktiv („AKT“)Programmwechsel-Tabelle
BANK# PC# Klang BANK# PC# Klang0 0 Piano 1 0 7 Clavichord0 1 Piano 2 0 11 Vibraphone0 4 E. Piano 1 0 19 P. Organ0 5 E. Piano 2 0 16 E. Organ0 6 Harpsichord 0 48 Strings
CC00: Die Banknummer (MSB) aller Klänge lautet „121“.
C1[24]* C2[36]* C3[48]* C4[60]* C7[96]* C8[108]*C5[72]* C6[84]*H0 D2 A3 B3E2 F2
2 4
5
7 9
10 12
14 16 1686
11
13 1531
2 4
5
7 9
108631Tiefer Höher
Hall an/aus Chorus an/ausÜbertragung von Programm-wechselbefehlen an/aus
Übertragung von Steuerbefehlen an/aus
Interne Klangfarben SongsAnschlagdynamik
Std.
Transposition (F�2–F3) Leicht Schwer
MIDI-Kanal Tonhöhe
AUS
AUS
AKT
AKT
Aus
Aus
An An Pian
o 1
E. P
iano
1
Clav
Vibr
apho
neP.
Org
an E. O
rgan
Strin
gsPian
o 2
E. P
iano
2Ha
rpsiF� G� A� C� D�
G A H C D E F
Aus
An
A�0 A�3A�0 G�3A�0
Bestätigungston An/Aus
Gemeinsam gedrückt halten
Tastenfunktionen [ ]* vertreten MIDI-Notennummern number.
23
C1[24]* C2[36]* C3[48]* C4[60]* C7[96]* C8[108]*C5[72]* C6[84]*
2 4
5
7 9
10 12
14 16 1686
11
13 1531
2 4
5
7 9
108631 Pian
o 1
E. P
iano
1
Clav
ichor
dVi
brap
hone
P. O
rgan E.
Org
anSt
ringsPi
ano
2
E. P
iano
2Ha
rpsic
hord
F� G� A� C� D�
G A H C D E F Tiefer Höher
Hall an/aus Chorus an/aus
Interne Klangfarben (C7–A7) Songs (C6–A6)Anschlagdynamik Std.
Transposition Leicht Schwer
MIDI-Kanal (C4–D�5) Tonhöhe
AUS
AUS
AKT
AKT
Aus Aus
An
An
Aus
An
A�5G�5
E5 F5 A5 B5
Gemeinsam gedrückt halten
T
FehlersucheWenn Sie den Eindruck haben, dass etwas nicht nach Plan läuft, sollten Sie zunächst folgende Punkte überprüfen. Lässt sich die Stö-rung dadurch nicht beheben, so wenden Sie sich bitte an Ihren Korg-Händler.
Das Instrument kann nicht eingeschaltet werden• Schließen Sie das Netzteil ordnungsgemäß an das LP-180 und die
Steckdose an.• Schauen Sie nach, ob die Netzdiode leuchtet.
Die Lautsprecher bleiben stumm• Drehen Sie den VOLUME-Regler auf der Rückseite in Richtung
„MAX“, um die Lautstärke zu erhöhen.• Wenn Sie einen Kopfhörer anschließen, werden die Laut-
sprecher stummgeschaltet.
Sound is interrupted• Die Klänge des LP-180 beruhen auf Samples (Digital-Aufnahmen
von Natur- und anderen Klängen), die nach der Aufnahme noch bearbeitet wurden. Bestimmte Klänge beruhen auf einem Sample, das beim Drücken der Tasten angesteuert wird. Andere Klänge steuern dagegen zwei Samples an. Die meisten Klangfarben des LP-180 beruhen auf jeweils zwei Samples. Bei Anwahl eines solchen Klangs (und unabhängig davon, ob das Dämpferpedal gedrückt wird), beträgt die Polyphonie noch 60 Noten. Bei Klavierklängen (Piano 2) beträgt die Polyphonie dagegen 120 Noten. Sobald die Polyphonie überschritten wird, fallen die zuerst gespielten Noten weg.
Die Tonlage oder der Ton des Klavies klingt in manchen Tonal-regionen falsch• Die Piano-Sounds des LP-180 replizieren den Sound eines echten Kla-
viers so treu wie möglich. Das bedeutet, dass in manchen Regionen derTastatur das Gefühl entstehen kan, dass die Obertöne stärker erschei-nen oder Ton oder Tonlage falsch wirkt. Dies ist keine Fehl-funktion.
Das Pedal funktioniert nicht• Überprüfen Sie, ob das Pedalkabel ordnungsgemäß angeschlossen
wurde.
Das angeschlossene MIDI-Gerät wertet die gesendeten MIDI-Befehle nicht aus• Überprüfen Sie, ob das MIDI-Kabel ordnungsgemäß angeschlos-
sen wurde.• Sorgen Sie dafür, dass das LP-180 seine Daten auf dem Empfangs-
kanal des externen MIDI-Geräts sendet.
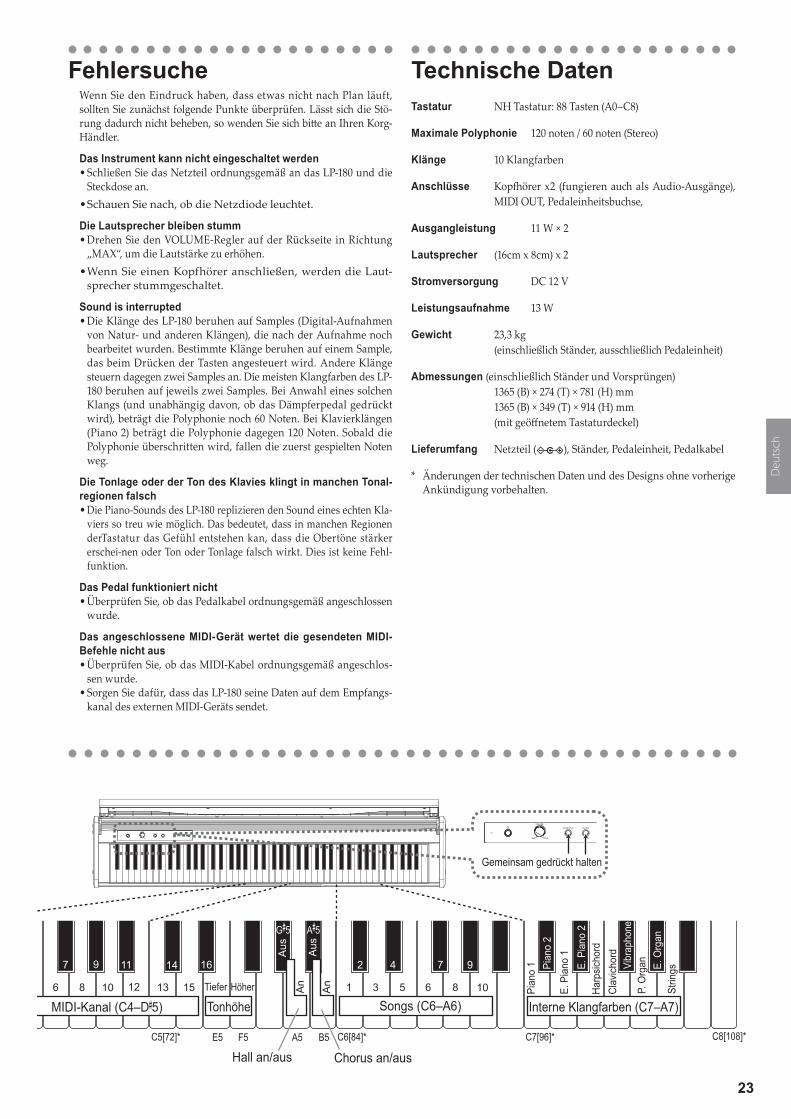
Technische DatenTastatur NH Tastatur: 88 Tasten (A0–C8)
Maximale Polyphonie 120 noten / 60 noten (Stereo)
Klänge 10 Klangfarben
Anschlüsse Kopfhörer x2 (fungieren auch als Audio-Ausgänge), MIDI OUT, Pedaleinheitsbuchse,
Ausgangleistung 11 W × 2
Lautsprecher (16cm x 8cm) x 2
Stromversorgung DC 12 V
Leistungsaufnahme 13 W
Gewicht 23,3 kg (einschließlich Ständer, ausschließlich Pedaleinheit)
Abmessungen (einschließlich Ständer und Vorsprüngen)1365 (B) × 274 (T) × 781 (H) mm 1365 (B) × 349 (T) × 914 (H) mm (mit geöffnetem Tastaturdeckel)
Lieferumfang Netzteil ( ), Ständer, Pedaleinheit, Pedalkabel
* Änderungen der technischen Daten und des Designs ohne vorherige Ankündigung vorbehalten.

24
Montage des Ständers
VorsichtBitten Sie mindestens eine Person, Ihnen bei der Montage des Ständers zu helfen.
Vorsicht beim ZusammenbauIm Sinne eines ordnungsgemäßen und sicheren Zusammen-baus müssen Sie folgende Punkte beachten.• Führen Sie die Montageschritte in der angegebenen Rei-
henfolge aus und sorgen Sie dafür, dass alle Teile richtig herum miteinander verbunden werden.
• Das LP-180 könnte kippen, wenn Sie zu starken Druck auf die Vorderseite ausüben, bevor das LP-180 am Stän-der befestigt ist. Lassen Sie beim Zusammenbau also Vorsicht walten.
Weitere VorsichtsmaßnahmenBitte überprüfen Sie nach dem Zusammenbau folgendes.• LockereSchrauben
Nach und nach löst sich die eine oder andere Schraube eventuell ein wenig.Deshalb sollten Sie regelmäßig überprüfen, ob alle Schrauben noch gut festsitzen. Wenn Sie den Eindruck haben, dass der Ständer wacklig wird, haben sich even-tuell ein paar Schrauben gelöst. Diese müssen Sie dann festdrehen.
• WennSiedasDigitalePianotransportierenwollenUm das Instrument samt Ständer zu transportieren, zie-hen Sie erst das Netzkabel ab und schließen Sie den Tas-taturdeckel. Heben Sie das Instrument nun mindestens zu zweit an und achten sie darauf, es beim Transport möglichst waagrecht zu halten.
• DemontageWenn Sie den Ständer demontieren müssen, verfahren Sie bitte in umgekehrter Reihenfolge wie beim Zusam-menbau. Bewahren Sie alle Schrauben und anderen Teile an einem sicheren Ort auf, um sie nicht zu verlieren.
Legen Sie das LP-180 vor der Demontage des Stän-ders immer auf den Boden.
MontageschritteSie benötigen einen Kreuzschlitzschraubenzieher (+).
1. LegenSiedieSchutzhülle,mitderdasLP-180umhülltwaraufdenBodenundlegenSiedasLP-180mitderRückseiteaufdieHülle.
Achten Sie darauf, dass der Tastaturdeckel des LP-180 sich bei der Montage nicht öffnet.
LP-180
Schutzhülle
2. ÜberprüfenSiezuerst,obfolgendeTeileallevorhan-densind.
RückseitePedaleinheit
Seitenplatte (rechts)Seitenplatte (links)
Pedalkabel
Schrauben (M6): 8 Stück Kappen: 6 Stück
3. BefestigenSiedasLP-180unddieLautsprecherboxmitachtM6-SchraubenandenlinkenundrechtenSeiten-platten..Schrauben Sie nun zuerst die rechte und anschließend die linke Seitenplatte locker an*.* Ziehen Sie die Schrauben nur leicht an und lassen Sie
etwa 2 mm Spiel.
LP-180
Schrauben (M6)
Seitenplatte (rechts)
Seitenplatte (links)
Schrauben (M6)
Achten Sie darauf, sich nicht die Finger zu klemmen.4. StellenSiezuzweitdasInstrumentmitmontiertem
Ständerauf.
5. ZiehenSienunalleinSchritt3nurleichtangezogenenSchraubenfest.Positionieren Sie die linken und rechten Seitenplatten ho-rizontal und vertikal gleich, bevor Sie die Schrauben an Ihrem LP-180 fest anziehen.
6. VergewissernSiesicherneut,dassderStänderpressanliegtundgeradestehtunddassalleSchraubenfestangezogensind.
7. VersehenSiedieSchraubköpfeanderrechtenundlin-kenSeitenplattemitKappen.
Kappen

25
8. SchließenSiedasPedalkabelinderrichtigenPolungandenAnschlussanderUnterseitederPedaleinheitanundklemmenSieesindenSchlitzanderPedalein-heit.Drücken Sie beim Anschließen oder Abziehen den Siche-rungsriegel des Pedalkabelsteckers.
Sicher-ungsriegel
9. VerbindenSiedasPedalkabelmitdenAnschlüssenanderUnterseitedesLP-180.Achten Sie beim Anschluss des Pedalkabels und des Lautsprecherkabels auf die richtige Polung der Stecker. Drücken Sie beim Anschließen oder Abziehen des Kabels den Sicherungsriegel des Pedalkabelsteckers.
Kabelhalter
Pedalkabel
Sicherungsriegel
10.SichernSiedasPedalkabelmitdemKabelhalter.Achten Sie beim Sichern des Kabels am Kabelhalter, dass die Stecker keiner zu hohen Zugbelastung ausgesetzt sind.
11.SchließenSiedasNetzkabelandasNetzteilan.Ver-bindenSiedasNetzteilkabelanschließendmitderDC12V-BuchseundwickelnSiedasKabelumdenKabel-hakenamPiano.Siehe„1.AnschließenansNetz(Ab-bildung1)“aufSeite19.
12.StellenSiedasLP-180andengewünschtenOrt.Wäh-lenSieeinenebenenundstabilenAufstellungsort.
Achten Sie beim Aufstellen des Instruments darauf, dass weder das Netzteilkabel noch das Pedalkabel gequetscht werden.
Überprüfung nach Montage□ Sind bestimmte Teile übrig geblieben?
Wenn noch Dinge übrig sind, müssen Sie nachschauen, an welchen Stellen Sie etwas vergessen haben. Alles Zu-behör muss angebracht werden.
□ Alle Schrauben müssen festgedreht werden.

26
Precauciones
UbicaciónEl uso de la unidad en las siguientes ubicaciones puede dar como resultado un mal funcionamiento:
• Expuesto a la luz directa del sol• Zonas de extremada temperatura o humedad• Zonas con exceso de suciedad o polvo• Zonas con excesiva vibración• Cercano a campos magnéticos
Fuente de alimentaciónPor favor, conecte el adaptador de corriente designado a una toma de corriente con el voltaje adecuado. No lo conecte a una toma de corriente con voltaje diferente al indicado.
Interferencias con otros aparatosLas radios y televisores situados cerca pueden experimentar interferencias en la recepción. Opere este dispositivo a una distancia prudencial de radios y televisores.
ManejoPara evitar una rotura, no aplique excesiva fuerza a los con-mutadores o controles.
CuidadoSi exterior se ensucia, límpiese con un trapo seco. No use líquidos limpiadores como disolvente, ni compuestos infla-mables.
Nota respecto a residuos y deshechos (solo UE)Cuando aparezca el símbolo del cubo de basura tachado sobre un producto, su manual de usuario, la batería, o el embalaje de cualquiera de éstos, significa que cuando quiere tire dichos artículos a la basura, ha de hacerlo en acuerdo con la normativa vigente de la Unión Europea. No debe verter dichos artículos junto con la basura de casa. Verter este producto de manera adecuada ayudará a evitar daños a su salud pública y posibles daños al
medioambiente. Cada país tiene una normativa específica acer-ca de cómo verter productos potencialmente tóxicos, por tanto le rogamos que se ponga en contacto con su oficina o ministerio de medioambiente para más detalles. Si la batería contiene me-tales pesados por encima del límite permitido, habrá un símbolo de un material químico, debajo del símbolo del cubo de basura tachado.
Guarde este manualDespués de leer este manual, guárdelo para futuras consultas.
Mantenga los elementos externos alejados del equipoNunca coloque ningún recipiente con líquido cerca deeste equipo, podría causar un cortocircuito, fuero o descarga eléc-trica. Cuide de que no caiga ningún objeto metálico dentro del equipo.
Gracias por comprar el Korg LP-180 Piano digital.
Tabla de ContenidosAntes de comenzar a tocar ............................................ 27
Reproducción de distintos sonidos .............................. 28
Uso de la unidad de pedales .......................................... 28
Uso de otras funciones ..................................................29
Funciones de teclas. ....................................................... 30
MIDI ...................................................................................30
Solución de problemas ................................................... 31
Especificaciones ............................................................. 31
Ensamblaje del pedestal ................................................ 32
Tabla de implementación MIDI ....................................... 51
* Todos los nombres de productos y compañías son marcas comerciales o marcas registradas de sus respectivos pro-pietarios.

27
Antes de comenzar a tocar
Acerca del pedestal incluidoEl LP-180 se utiliza con el pedestal incluido.Antes de seguir, lea la sección “Ensamblaje del pedestal” que se encuentra en la página 32.
1. Conexión de la alimentación (Fig. 1)• Conecte el adaptador de CA suministrado al cable de alimentación. Inserte el extremo de la
clavija de CC en la toma DC12V del panel posterior de la unidad. Después, conecte el cable de alimentación a una toma de CA.
Para evitar que el cable del adaptador de CA se desenchufe accidentalmente de la toma, páselo a través del gancho para cable (Fig. 1). Cuando desenganche el cable, no tire de él con fuerza.
Cerciórese de utilizar el adaptador de CA que viene con su unidad. El uso de otros adapta-dores de CA podría provocar fallos de funcionamiento u otros acontecimientos imprevistos.
Cerciórese de enchufar la unidad en una toma de CA de la tensión apropiada.
2. Apertura o cierre de la tapa del teclado (Fig. 2)Coloque los dedos en la depresión “A” del panel frontal para abrir lentamente la tapa del teclado con las manos.
Tenga cuidado de no pillarse los dedos o las manos cuando cierre la tapa del teclado.
3. Encendido del LP-180• Pulse el botón de alimentación para encender el LP-180. (Figura 3)
Se iluminará el LED de alimentación. (Figura 3)
• Pulse de nuevo el conmutador de alimentación para apagar la unidad.El LED de alimentación se oscurecerá..
Este instrumento se apaga automáticamente una vez transcurridos 30 minutos sin ac-tuación del usuario o sin reproducción de una canción de demostración. Pulse el botón POWER para encender el instrumento cuando vaya a utilizarlo de nuevo. Además, esta función no se puede desactivar.
4. Ajuste del volumen• Para aumentar el nivel del volumen, gire el mando VOLUME situado junto al interruptor
de alimentación a la derecha, hacia “MAX”. Para reducir el nivel, gírelo a la izquierda, hacia “MIN”. (Figura 3)
El mando VOLUME controla el nivel de salida de los altavoces incorporados y las tomas para auriculares.
Acerca del posapartituras• La tapa del teclado sirve como conveniente posapartituras. (Fig. 4)
Cuando coloque partituras abiertas, no aplique presión fuerte sobre la tapa del teclado.)
Uso de los auricularesAl enchufar los auriculares, los altavoces incorporados se silenciarán. Esta función resulta útil si desea tocar el teclado sin molestar a su familia o vecinos. El LP-180 incluye dos tomas para auriculares para que dos personas puedan disfrutar tocando y escuchando
• Inserte la clavija de auriculares estéreo en las tomas para auriculares ( ) del lado inferior izquierdo de la unidad. (Figura 5)
Si sus auriculares disponen de adaptador de clavija estándar a miniclavija, cerciórese de su-jetar el adaptador de clavija cuando conecte o desconecte los auriculares.
Tenga cuidado de no doblar demasiado esta parte cuando inserte el cable de alimentación.
Fig. 1
a la toma de CA
Adaptador de CA
Cable de alimentación para adaptador de CA
Gancho para cable
Clavija de CC
A
A
Fig. 2
Fig. 3 Mando VOLUMELED de alimentación
Botón de alimentación
Fig. 4
Fig. 5
tomas para auriculares
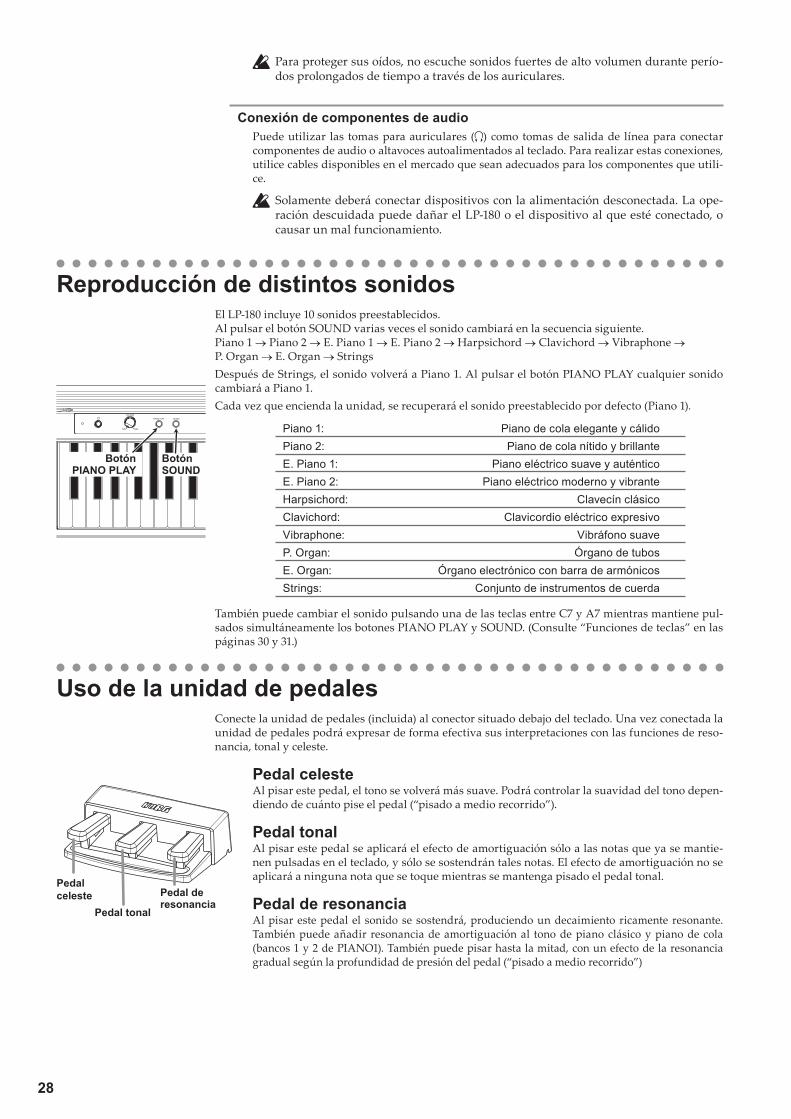
28
Para proteger sus oídos, no escuche sonidos fuertes de alto volumen durante perío-dos prolongados de tiempo a través de los auriculares.
Conexión de componentes de audioPuede utilizar las tomas para auriculares ( ) como tomas de salida de línea para conectar componentes de audio o altavoces autoalimentados al teclado. Para realizar estas conexiones, utilice cables disponibles en el mercado que sean adecuados para los componentes que utili-ce.
Solamente deberá conectar dispositivos con la alimentación desconectada. La ope-ración descuidada puede dañar el LP-180 o el dispositivo al que esté conectado, o causar un mal funcionamiento.
Reproducción de distintos sonidosEl LP-180 incluye 10 sonidos preestablecidos.Al pulsar el botón SOUND varias veces el sonido cambiará en la secuencia siguiente.Piano 1 → Piano 2 → E. Piano 1 → E. Piano 2 → Harpsichord → Clavichord → Vibraphone → P. Organ → E. Organ → StringsDespués de Strings, el sonido volverá a Piano 1. Al pulsar el botón PIANO PLAY cualquier sonido cambiará a Piano 1.Cada vez que encienda la unidad, se recuperará el sonido preestablecido por defecto (Piano 1).
Piano 1: Piano de cola elegante y cálidoPiano 2: Piano de cola nítido y brillanteE. Piano 1: Piano eléctrico suave y auténticoE. Piano 2: Piano eléctrico moderno y vibranteHarpsichord: Clavecín clásicoClavichord: Clavicordio eléctrico expresivoVibraphone: Vibráfono suaveP. Organ: Órgano de tubosE. Organ: Órgano electrónico con barra de armónicosStrings: Conjunto de instrumentos de cuerda
También puede cambiar el sonido pulsando una de las teclas entre C7 y A7 mientras mantiene pul-sados simultáneamente los botones PIANO PLAY y SOUND. (Consulte “Funciones de teclas” en las páginas 30 y 31.)
Uso de la unidad de pedalesConecte la unidad de pedales (incluida) al conector situado debajo del teclado. Una vez conectada la unidad de pedales podrá expresar de forma efectiva sus interpretaciones con las funciones de reso-nancia, tonal y celeste.
Pedal celesteAl pisar este pedal, el tono se volverá más suave. Podrá controlar la suavidad del tono depen-diendo de cuánto pise el pedal (“pisado a medio recorrido”).
Pedal tonalAl pisar este pedal se aplicará el efecto de amortiguación sólo a las notas que ya se mantie-nen pulsadas en el teclado, y sólo se sostendrán tales notas. El efecto de amortiguación no se aplicará a ninguna nota que se toque mientras se mantenga pisado el pedal tonal.
Pedal de resonanciaAl pisar este pedal el sonido se sostendrá, produciendo un decaimiento ricamente resonante. También puede añadir resonancia de amortiguación al tono de piano clásico y piano de cola (bancos 1 y 2 de PIANO1). También puede pisar hasta la mitad, con un efecto de la resonancia gradual según la profundidad de presión del pedal (“pisado a medio recorrido”)
Pedal celeste Pedal de
resonanciaPedal tonal
BotónPIANO PLAY
BotónSOUND

29
Uso de otras funcionesEl LP-180 le permite reproducir canciones de demostración o ajustar distintas funciones pulsando una tecla concreta a la vez que mantiene pulsados los botones PIANO PLAY y SOUND. Consulte la sección “MIDI” en la siguiente página para obtener más información sobre los mensajes de cambio de programa y canales MIDI.
No toque el teclado mientras mantenga pulsados los botones PIANO PLAY y SOUND. De lo contrario, pueden producirse resultados inesperados.
Para obtener información sobre las funciones que están asignadas a las teclas, consulte “Funciones de teclas” en las páginas 30 y 31.
Acerca del sonido de confirmaciónAl pulsar una tecla para ajustar la configuración de una función, oirá el sonido de confirmación. Para desactivar este sonido, mantenga pulsados simultáneamente los botones PIANO PLAY y SOUND y pulse la tecla A#0. Para activar el sonido de confirmación, repita el procedimiento anterior pero pulse B0 en lugar de A#0. El sonido de confirmación está ajustado en activado por defecto (al encender la unidad).
Reproducción de cancionesEl LP-180 incluye 10 canciones que utilizan 10 sonidos prees-tablecidos.Con los botones PIANO PLAY y SOUND pulsados, pulse una de las teclas entre C6 y A6 (en el lado derecho del teclado). La canción asignada a la tecla que haya pulsado (como se mues-tra a continuación) comenzará a reproducirse.La reproducción comenzará en la canción seleccionada y con-tinuará repitiendo todas las canciones en orden ascendente hasta que detenga la reproducción.
1
2 4 7 9
3 5 6 8 10
Para detener la reproducción, pulse los botones PIANO PLAY y SOUND simultáneamente.
Durante la reproducción de una canción, puede cambiar el sonido con los botones PIANO PLAY y SOUND mien-tras toca el teclado. El ajuste de efectos de la canción tam-bién se aplicará al sonido.
Aunque cambie el sonido durante la reproducción de una canción, los datos MIDI correspondientes (como men-sajes de cambio de programa MIDI) no se emitirán.
nombre de canción
1 (Piano 1): Un Sospiro/F.Liszt
2 (Piano 2): Amazing Grace/Hymn (arr. : N.Nishi)
3 (E. Piano 1): Ramble/M.Sakaguchi
4 (E. Piano 2): KORG Orignal
5 (Harpsichord): Invention No.8/J.S.Bach
6 (Clavichord): KORG Orignal
7 (Vibraphone): KORG Orignal
8 (P. Organ): Toccata in D moll/J.S.Bach
9 (E. Organ): KORG Orignal
10 (Strings): First Snow/M.Sakaguchi
Efectos (reverberación y coro)Puede utilizar un efecto de reverberación para añadir profun-didad al sonido, y un efecto de coro para añadir amplitud y espacio.• Mantenga pulsados simultáneamente los botones PIANO
PLAY y SOUND y, a continuación, pulse la tecla A5 para activar el efecto de reverberación. Para desactivar el efecto de reverberación, repita el procedimiento anterior pero pul-se la tecla G#5 en lugar de A5.
• Mantenga pulsados simultáneamente los botones PIANO PLAY y SOUND y, a continuación, pulse la tecla B5 para activar el efecto de coro. Para desactivar el efecto de coro, repita el procedimiento anterior pero pulse la tecla A#5 en lugar de B5.
Puede aplicar efectos a cada sonido preestablecido.Al activar la unidad, los efectos utilizarán los ajustes óptimos para cada sonido preestablecido.
Función de control de toque de teclaLa función de control de toque de tecla le permite cambiar la forma en que su intensidad al tocar afectará al nivel de salida.Puede establecer esta función utilizando las teclas blancas en-tre D2 y F2. (Consulte la figura de la izquierda.)• Para tocar fortissimo con pulsaciones suaves (toque ligero),
mantenga pulsados los botones PIANO PLAY y SOUND y pulse la tecla D2.
• Para tocar fortissimo con pulsaciones muy fuertes (toque pesado), mantenga pulsados los botones PIANO PLAY y SOUND y pulse la tecla F2.
• Para simular un toque de piano normal (toque estándar), mantenga pulsados los botones PIANO PLAY y SOUND y pulse la tecla E2.
Fuerte
Son
orid
ad
Silencioso FuerteIntensidad de toque
Ligero
Normal
PesadoSilencioso
El ajuste por defecto (al encender la unidad) es el toque están-dar.

30
C1[24]* C2[36]* C3[48]* C4[60]* C7[96]* C8[108]*C5[72]* E5 F5B3A3 E5 G5 C6[84]*D2B0 E2 F2
2 4
5
7 9
10 12
14 16 1686
11
13 1531
2 4
5
7 9
108631Down Up
Reverb On/Off Chorus On/OffActivación/desactivación de la transmisión de cambio de programa
Activación/desactivación de la transmisión de cambio de control
Preset Sounds (C7–A7)Demo Songs (C6–A6)Key Touch Transposición (F�2–F3) MIDI Pitch
Des
.
Des
.A
ct.
Act
.
Off
Off
On
On
Pia
no 1
E. P
iano
1
Cla
vVi
brap
hone
P. O
rgan E. O
rgan
Stri
ngsPia
no 2
E. P
iano
2H
arps
iF� G� A� C� D�
G A B C D E F
Des.
Act
.
A�5A�0 G�3 A�3 G�5
Mantener pulsados simultáneamente
Lige
ro
Nor
mal
Pes
ado
Activación/desactivación del sonido de confirmación
Funciones de teclas [ ]* indica el número de nota MIDI.
Función de transposición (desplazamiento de la tecla)
En algunos casos, una canción puede estar escrita en una clave difícil (por ejemplo, muchas teclas negras), o puede que se de-see desplazar la tecla para que coincida con otro instrumento o cantante. En tales casos, puede transponer (desplazar la tecla) para utilizar una digitación más fácil o utilizar la misma digi-tación familiar para tocar en una clave diferente. Esto se deno-mina función de transposición. Puede desplazar la tecla en un intervalo de once semitonos.Por ejemplo, si transpone hacia arriba un semitono, al tocar las notas mostradas en la partitura de la parte inferior izquierda se producirá la tonalidad mostrada en la partitura de la derecha.
• Para transponer la tecla, mantenga pulsados los botones PIANO PLAY y SOUND y, a continuación, pulse una tecla entre F#2 y B3 o entre C#3 y F3. El nombre de la tecla que haya pulsado se convertirá en la tecla transpuesta.
Por ejemplo, si desea utilizar la tecla C3 para reproducir la nota A2 (tres semitonos más baja), mantenga pulsados los botones PIANO PLAY y SOUND y pulse al tecla A2. Si desea utilizar la tecla C3 para reproducir la nota D#3 (tres semito-nos más alta), mantenga pulsados los botones PIANO PLAY y SOUND y pulse al tecla D#3. Para restablecer la función de transposición a “No Transposition (+/-0)”, mantenga pulsados los botones PIANO PLAY y SOUND y pulse la tecla C3.El ajuste por defecto (al encender la unidad) es “No Transpo-sition”.
Función de control de tonalidad (afinación)Cuando toca de forma conjunta con otros instrumentos, pue-de utilizar la función de control de tonalidad para corregir las pequeñas diferencias de tonalidad entre los instrumentos. Puede ajustar la afinación del LP-180 en intervalos de medio paso (0,5 Hz) en un rango de 427,5–452,5 Hz (hercio) utilizan-do las teclas E5 y F5.• Mantenga pulsados los botones PIANO PLAY y SOUND y, a con-
tinuación, pulse la tecla E5 para reducir la tonalidad en pasos de 0,5 Hz con cada pulsación, o bien pulse la tecla F5 varias veces para elevar la tonalidad en pasos de 0,5 Hz con cada pulsación.
• Para restablecer la tonalidad a 440 Hz, mantenga pulsados los botones PIANO PLAY y SOUND y pulse las teclas E5 y F5 simultáneamente.
El ajuste por defecto (al encender la unidad) es A4=440Hz.
MIDIUso de la toma MIDI OUT
La toma MIDI OUT transmite mensajes MIDI. Al tocar el teclado, se emitirán los mensajes MIDI para controlar (p. ej., reproducir el sonido de) un dispositivo MIDI externo. Utilice un cable MIDI opcional para conectar la toma MIDI OUT del LP-180 a la toma MIDI IN de un dispositivo MIDI externo.
Cambio del canal MIDISi utiliza el LP-180 como un controlador para reproducir sonidos desde un dispositivo MIDI conectado, el canal MIDI del LP-180 debe coincidir con el canal MIDI del dispositivo MIDI externo.Para cambiar el canal MIDI (1–16) de los datos MIDI que se transmiten a través de la toma MIDI OUT en el panel posterior, mantenga pulsados los botones PIANO PLAY y SOUND simul-táneamente y pulse una de las teclas entre C4 y D#5.El canal MIDI por defecto (al encender la unidad) es “1”.
Transmisión de los mensajes de cambio de control y cambio de programa
Puede cambiar el número de programa del dispositivo MIDI conec-tado desde el LP-180.Al seleccionar un sonido preestablecido en el LP-180 (consulte “Re-producción de distintos sonidos” en la página 28), se transmite un número de cambio de programa MIDI (PC#) como se muestra en la tabla siguiente. Para desactivar esta transmisión (DIS), mantenga pulsados los botones PIANO PLAY y SOUND simultáneamente y pulse la tecla G#3. Para activar esta transmisión (ENA), repita el pro-cedimiento anterior pero pulse la tecla A3.El LP-180 también transmite mensajes de cambio de control para controlar la resonancia (CC64), la selección de banco (CC00), etc. para el dispositivo MIDI conectado. Para desactivar esta transmisión (DIS), mantenga pulsados los botones PIANO PLAY y SOUND simultá-neamente y pulse la tecla A#3. Para activar esta transmisión (ENA), repita el procedimiento anterior pero pulse la tecla B3.El ajuste por defecto (al encender la unidad) es ENA (transmitido) para los mensajes de cambio de programa y de control.Tabla de números de cambio de programa correspondientes
Banco# PC# Sonido Banco# PC# Sonido0 0 Piano 1 0 7 Clavichord0 1 Piano 2 0 11 Vibraphone0 4 E. Piano 1 0 19 P. Organ0 5 E. Piano 2 0 16 E. Organ0 6 Harpsichord 0 48 Strings
CC0: Bank Select (Selección de banco) (MSB) para todos los sonidos está ajustado a 121.

31
Solución de problemasSi durante el uso se produce alguno de los problemas si-guientes, examine cuidadosamente el instrumento para ver si puede averiguar cuál es el problema y tratar de resolverlo siguiendo las sugerencias indicadas a continuación. Si el ins-trumento sigue sin funcionar adecuadamente, consulte a su proveedor.
El instrumento no se enciende.• Compruebe si el adaptador de CA está correctamente co-
nectado al piano y a la toma de corriente.• Cerciórese de que el LED de alimentación esté iluminado.
Los altavoces no emiten sonido• Gire el mando VOLUME en el panel posterior a la derecha
hacia MAX.• Cerciórese de que no haya ninguna clavija enchufada en
las tomas para auriculares.
El sonido se interrumpe• Los sonidos preestablecidos del LP-180 se han creado mues-
treando (grabando) sonidos de instrumentos musicales rea-les. Al pulsar una tecla, algunos sonidos reproducen un solo elemento de datos muestreados, mientras que otros sonidos reproducen dos elementos de datos muestreados. El LP-180 utiliza dos elementos de datos para la mayoría de sonidos pre-establecidos. Cuando se selecciona uno de estos sonidos de dos muestreos (independientemente de si el pedal de resonancia está presionado), la polifonía máxima es 60 notas. Sin embargo, para sonidos de Piano 2, la polifonía máxima es 120 notas. Si se supera la polifonía máxima, algunas de las notas no sonarán.
La tonalidad o el tono del piano suenan mal en algunas zonas del teclado• Los sonidos de piano del LP-180 reproducen el sonido de
un piano real lo más fielmente posible. Esto significa que en algunas regiones del teclado, usted puede sentir que los armónicos parecen más fuertes, o que la tonalidad o el tono me parecen incorrectos. Esto no significa mal fun-cionamiento.
El pedal no funciona• Asegúrese de que el cable de pedales está conectado correctamen.
El dispositivo MIDI conectado no responde a los mensajes MIDI• Asegúrese de que todos los cables MIDI están correctamen-
te conectados.• Asegúrese de que el LP-180 transmite datos MIDI por el
mismo canal MIDI que el dispositivo MIDI conectado.
EspecificacionesTeclado Teclado NH: 88 notas (A0–C8)
Polifonía máxima 120 notas / 60 notas (estéreo)
Sonidos 10 sonidos
Jacks Headphones x 2 (also function as outputs), MIDI OUT, Pedal unit connector,
Amplificación 11 W × 2
Altavoces (16 cm x 8 cm) x 2
Fuente de alimentación 12 V CC, Adaptador de CA (incluido)
Consumo eléctrico 13 W
Peso 23,3 kg (incluyendo el pedestal, excluyendo el unidad de pedales)
Dimensiones (incluyendo el pedestal, incluyendo proyecciones)1312 (Anch.) × 274 (Prof.) × 781 (Alt.) mm 1312 (Anch.) × 349 (Prof.) × 914 (Alt.) mm (con la tapa del teclado abierta)
Accesorios incluidos Adaptador de CA ( ), pedestal, Cable de pedales, unidad de pedales
* Las especificaciones y el aspecto están sujetas a cambios sin previo aviso por mejora.
C1[24]* C2[36]* C3[48]* C4[60]* C7[96]* C8[108]*C5[72]* C6[84]*
2 4
5
7 9
10 12
14 16 1686
11
13 1531
2 4
5
7 9
108631abajo hasta
Reverberación activada/desactivada Coro activado/desactivado
Sonidos preestablecidos (C7–A7)Canciones (C6–A6)Key TouchStd.
TransposeLight Heavy
Canal MIDI (C4–D�5) Tonalidad
DIS
DIS
EN
A
EN
A
Des
.
Des
.A
ct.
Act
.
Pia
no 1
E. P
iano
1
Cla
vich
ord
Vibr
apho
neP.
Org
an E. O
rgan
Stri
ngsPia
no 2
E. P
iano
2H
arps
icho
rd
F� G� A� C� D�
G A B C D E F
F5E5 A5 B5
G�5 A�5
Mantener pulsados simultáneamente
T

32
Ensamblaje del pedestal
AdvertenciaOtra persona por lo menos deberá ayudarle a ensamblar el pedestal.
Precaución durante el ensamblajePara ensamblar con seguridad el pedestal, tenga en cuenta los puntos siguientes.• Cerciórese de que tiene la pieza correcta en la orientación
correcta, y realice el ensamblaje en el orden indicado.
• El LP-180 puede caerse si se aplica demasiada fuerza en su parte delantera antes de fijar el LP-180 al pedestal. Tenga cuidado al manipularlo.
Otras precaucionesDespués del ensamblaje, tenga en cuenta los puntos siguientes.• Tornillos aflojados
Los tornillos pueden aflojarse con el tiempo después del ensamblaje.Deberá comprobar periódicamente si los tornillos ser han aflojado. Si nota que el pedestal vibra excesivamente, es posible que los tornillos se hayan aflojado.En tal caso, vuelva a apretarlos.
• Traslado del piano digital a otro lugarPara mover el pedestal ensamblado, desenchufe el cable del adaptador de CA y el cable de pedales del pedestal, cierre la tapa del teclado y muévalo lentamente entre dos personas por lo menos manteniéndolo lo más nivelado posible.
• DesmontajeCuando necesite desmontar el pedestal, hágalo invirtien-do los pasos del procedimiento de ensamblaje. Después del desmontaje, guarde los tornillos y demás piezas en un lugar seguro para que no se pierdan.
El LP-180 deberá posarse siempre antes del desmontaje.
Procedimiento de ensamblajeNecesitará un destornillador Phillips (+).
1. Coloque la lámina protectora, que cubría el LP-180, so-bre un suelo plano, y coloque el LP-180 sobre tal lámi-na con su parte posterior encarada hacia el suelo.
Cerciórese de que la tapa del teclado no se abra hasta el fin del ensamblaje.
LP-180
Lámina protectora
2. Cerciórese de que dispone de todas las piezas siguientes.
Tablero posteriorUnidad de pedales
Panel lateral (derecho)Panel lateral (izquierdo)
Cable de pedales
Tornillos (M6) x 8 piezas Tapas x 8 piezas
3. Fije el LP-180 y el tablero posterior a los paneles latera-les izquierdo y derecho utilizando ocho tornillos (M6).En primer lugar, apriete temporalmente* los tornillos del panel lateral derecho, y después apriete temporalmente* los tornillos del panel lateral izquierdo.* Apretar temporalmente los tornillos es dejarlos con
una holgura de unos 2 mm.
LP-180
Tornillos(M6)
Panel lateral (derecho)Panel lateral (izquierdo)
Tornillos(M6)
Tenga cuidado para no pillarse los dedos.4. Levante el pedestal ensamblado lentamente entre dos
personas.
5. Después, apriete firmemente todos los tornillos que había apretado temporalmente en el paso 3.Cuando apriete los tornillos del LP-180, ajuste las posi-ciones de arriba/abajo y frontal/posterior de los paneles laterales izquierdo y derecho de forma que sean iguales.
6. Cerciórese de nuevo de que no haya holguras en el pedestal, de que no esté inclinado, y de que todos los tornillos estén firmemente apretados.
7. Coloque tapas en las cabezas de los tornillos de los pa-neles laterales izquierdo y derecho.
Tapas

33
8. Conecte el cable de pedales fijado, teniendo en cuenta la orientación correcta, al conector del lado opuesto a la unidad de pedales, y después engánchelo en una ranu-ra de la unidad de pedales.El cable de pedales podrá fijarse o desprenderse del co-nector manteniendo presionada su pestaña de bloqueo.
Pestaña de bloqueo
9. Conecte el cable de pedales a los conectores de la parte inferior del LP-180.Cuando conecte el cable de pedales, tenga en cuenta las orientaciones correctas de los conectores. Además, el ca-ble de pedales puede fijarse o desprenderse del conector manteniendo presionada su pestaña de bloqueo.
Abrazadera de cables
Cable de pedales
Pestaña de bloqueo
10. Utilice la abrazadera de cables situada junto al conector para sujetar el cable de pedales.Después de asegurar el cable con la abrazadera de cables, cerciórese de no aplicar excesiva presión a los conectores.
11. Conecte el cable dedicado al adaptador de CA. Des-pués, enchufe el adaptador de CA en el conector DC 12V, y enrolle el cable alrededor del gancho para cable del piano. Con respecto a los detalles, consulte “1. Co-nexión de la alimentación (Fig. 1)” en la página 27.
12. Coloque el LP-180 donde vaya a utilizarlo. Cerciórese de colocarlo en un lugar seguro donde el piso esté ni-velado y sea estable.
Cuando cloque el piano en su lugar, cerciórese de que el pedestal no descanse sobre el cable del adap-tador de CA ni el cable de pedales.
Comprobación después del ensamblaje□ ¿Ha sobrado alguna pieza?
Si ha sobrado alguna pieza, revise cuidadosamente el procedimiento de ensamblaje para ver dónde deben uti-lizarse tales piezas sobrantes.
□ Cerciórese de que todos los tornillos estén apretados.

51
[Digital piano]Model: LP-180 MIDI implementation chart
Function... Transmitted Received Remarks
Basic Channel
Default Change
Default Messages Altered
Mode
Note Number True Voice
Velocity Note On Note Off
Aftertouch
Key’sChannel
Pitch Bend
Control Change
Program Change
System Exclusive
SystemCommon
Song PositionSong SelectTune Request
SystemRealtime
ClockCommand
Local On/OffAll Notes OffActive SenseSystem Reset
Aux Messages
Notes:
11—16
15—113
9n, V=1—127
*1 Transmitted if control changes are enabled.*2 Transmitted if Program changes are enabled.
Mode 1: Omni On, Poly Mode 2: Omni On, MonoMode 3: Omni Off, Poly Mode 4: Omni Off, Mono
: Yes: No
Date: Dec. 18. 2013
Ture Number
07
32646667
121
Bank Select (MSB)VolumeBank Select (LSB)Damper PedalSostenute PedalSoft PedalReset All Control
V=64
0, 1, 4–7, 11, 16, 19, 48
*1*1*1*1*1*1*1
*2
Version: 1.0
Consult your local Korg distributor for more information on MIDI implementation.
