notes on features of a centos 6 desktop - lehigh universitydpm3/documents/linux-desktop.pdf ·...
TRANSCRIPT

Notes on Features of a CentOS 6 Desktop
David Morrisette
November 28, 2012

Contents
1 Initial Setup 31.1 Initial Screen After Logging In . . . . . . . . . . . . . . . . . . . . . . . . . . . . . . . . . . . 31.2 The Terminal . . . . . . . . . . . . . . . . . . . . . . . . . . . . . . . . . . . . . . . . . . . . . 4
2 Matlab 52.1 Matlab Benchmark . . . . . . . . . . . . . . . . . . . . . . . . . . . . . . . . . . . . . . . . . . 5
3 Connecting to the Lehigh Virtual Private Network (VPN) 6
4 Windows 7 from the Lehigh Virtual Public Site 84.1 Running the Lehigh Public Site Virtual Windows 7 . . . . . . . . . . . . . . . . . . . . . . 84.2 Log In and Select Your Virtual Site . . . . . . . . . . . . . . . . . . . . . . . . . . . . . . . . 94.3 Exchanging Data Between the Linux Desktop and the LTS Virtual Windows 7 Machine 11
4.3.1 Your LTS Virtual Microsoft Machine H Drive . . . . . . . . . . . . . . . . . . . . . 114.4 Using Nautilus to Map Your H Drive to Your Linux Desktop . . . . . . . . . . . . . . . . 124.5 How To Print to an ECE Printer . . . . . . . . . . . . . . . . . . . . . . . . . . . . . . . . . 13
4.5.1 Miscellaneous Facts About the Print Servers . . . . . . . . . . . . . . . . . . . . . . 134.6 Using the Point and Click ECE Print Server . . . . . . . . . . . . . . . . . . . . . . . . . . 13
4.6.1 Printer Security . . . . . . . . . . . . . . . . . . . . . . . . . . . . . . . . . . . . . . . 16
5 Multi-Language Input 175.1 Enabling ibus Software . . . . . . . . . . . . . . . . . . . . . . . . . . . . . . . . . . . . . . . 175.2 Adding Input Methods . . . . . . . . . . . . . . . . . . . . . . . . . . . . . . . . . . . . . . . 19
1
Notes on Features of a CentOS 6 Desktop November 28, 2012
IntroductionThis document will provide an overview of capabilities of a linux workstation/desktop machine, and
some background information as to why, for some users, it now will make sense to use linux as theirprimary desktop operating system. This document will also show various ways that a linux desktopmachine integrate itself with other portions of the Lehigh University computer network.
Some students and faculty already run a version of the linux desktop on their computers at work.Many more have an interest in running linux, but because of a need to have access to a MicrosoftWindows system, they have not moved to Linux.
I have not stongly advocated that the general user move to linux until now. I believe that there hasnow been some ”game changing” technology that is being provided by LTS that makes the move tolinux a more reasonable and attractive option. The new technolgy being provided by LTS is a virtualMicrosoft Windows 7 platform, which allows a user to run Windows 7 remotely.
Advantages of the linux setup in this document:
� Linux, by its very nature, is a more secure operating system than Windows in terms of be-ing infected with trojans and viruses. http://http://www.theregister.co.uk/2004/10/22/security_report_windows_vs_linux/
� Linux is faster. I have benchmarked Matlab on many machine under both Microsoft Windows andlinux. Typically, linux shows a difference of being about one third faster on Matlab benchmarking.
� With linux, you have the ability to run jobs that will take a long time in the background.
� The setup described in this document refers to a stand alone machine running linux. With astand alone machine, you can do most of what is in this document on your own, and you donot need the intervention of a Lehigh IT person. You can be the master of you own world, inregards to the running of your operating system, whether on you personal or on a Lehigh ownedmachine if you run a stand alone version of linux on your machine.
Some of the features you will see in this document are available for users running on the AppleMac platforms.
This documentation is written specifically for informational support of linux users within the Elec-trical & Computer Engineering Department at Lehigh University, however any linux user may find theinformation useful.
If there are items that you would like to see in this document, pleas do not hesitate to contact meat [email protected] .
This document is specifically targeted toward users running CentOS 6.0 and CentOS 6.2, whichare derivitives of the linux distribution Red Hat 6 and Red Hat 6.2.
Page No. 2 of 23
Chapter 1
Initial Setup
1.1 Initial Screen After Logging In
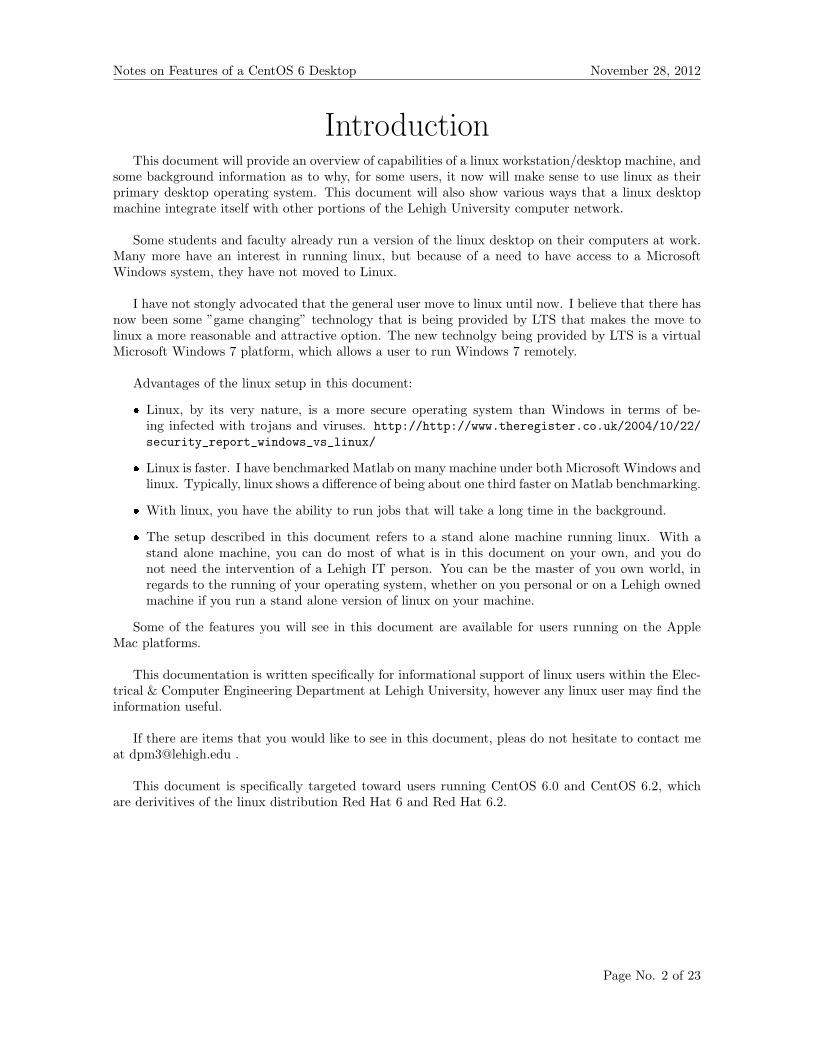
Figure 1.1: After logging in - your initial screen
After you log in, you will see a screen similar the the screen in Figure 1.1. Don’t worry if you donot see all the icons that are present on my desktop. There are a few files that I have saved to mydesktop that you may not see yet on your desktop.
3

Notes on Features of a CentOS 6 Desktop November 28, 2012
1.2 The Terminal
Figure 1.2: An example of how you put a startmenuitem on the panel and/or the desktop
It is probably easiest to start a lot of pro-grams from the command line. The commandline is run from inside the ”terminal”. There-fore, I would recommend that one of the firstthings you do is make the terminal readily avail-able.
You can accomplish making the terminalmore readily available by navigating to Applica-tions → System Tools → Terminal. With yourcursor on top of the text Terminal, do a rightclick and add the Terminal to your panel, and re-peat the procedure and add the terminal to yourdesktop.
Page No. 4 of 23
Chapter 2
Matlab
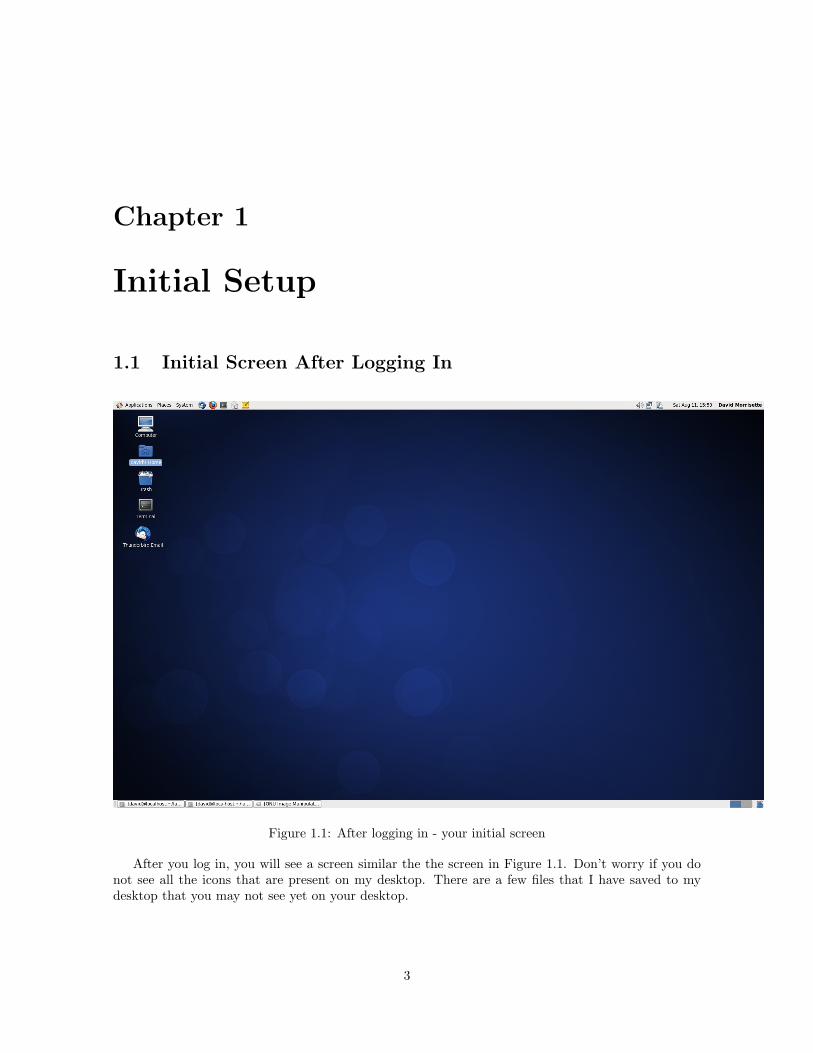
Figure 2.1: Starting Matlab
To start Matlab, type matlab & at the ”$”prompt as shown in Figure ??. Notice that thereis an & after the matlab command. The & putsthe matlab job in the background which permitsa ”$” prompt to return to the terminal screenwhile Matlab is running.
2.1 Matlab Benchmark
Figure 2.2: Running the Matlab benchmark function
After you have typedthe matlab & com-mand as shown in Fig-ure 2.1, you will seeMatlab Graphical UserInterface (GUI) screensas seen in Figure 2.2.Once the Matlab GUIreturns, type in theword bench at theMatlab command prompt,and the benchmarkingprogram will run. Ifyou type the word verin at the Matlab com-mand prompt, you willget a listing of all theavailable Matlab tool-boxes that are present.
5
Chapter 3
Connecting to the Lehigh VirtualPrivate Network (VPN)
In order to do some of the items that are in this manual, you will have to either be physically atLehigh University and be on the Lehigh University network, or you will have to connect into LehighUniversity with the Lehigh VPN. This section will provide directions on how to connect to the LehighVPN.
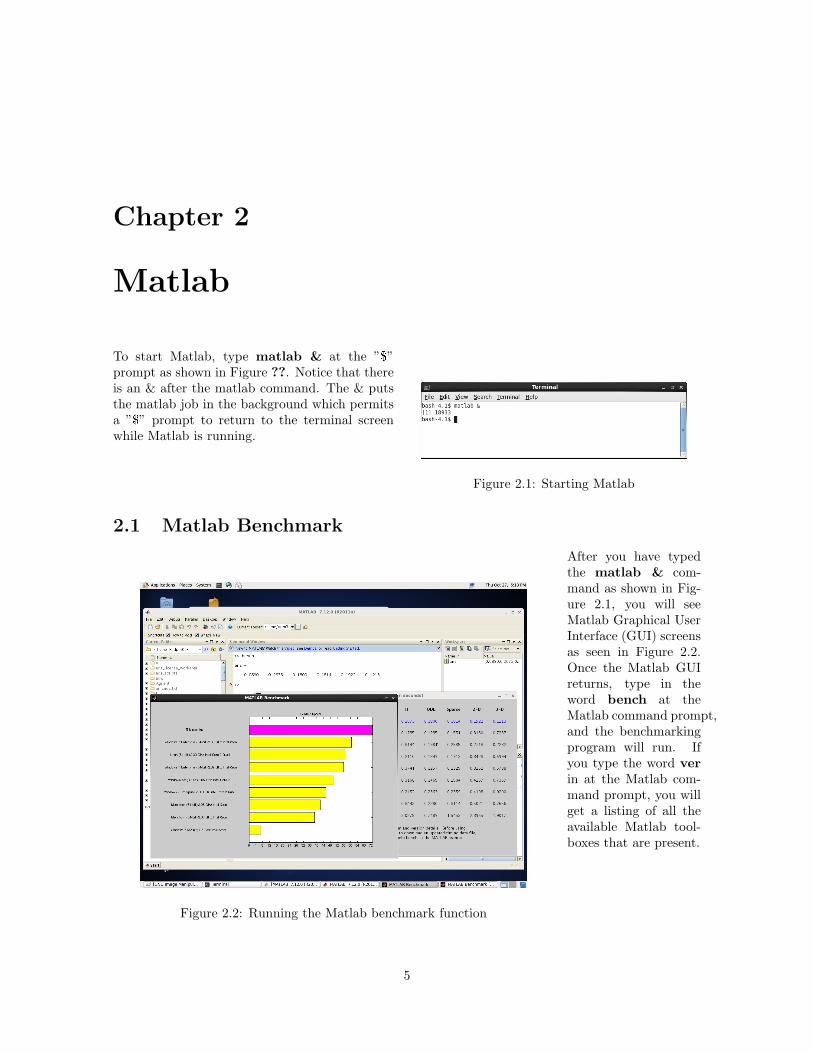
Figure 3.1: Start Menu Selection for Virtual Win-dows 7 Figure 3.2: Identify the View Connection Server
You can navigate to the Lehigh VPN by selecting Applications rightarrow Internet rightarrowCiscoAnyConnect VPN Client. After making the selections as shown in Figure 3.1, you will see adialog box like the one in Figure 3.2. In the text box in Figure 3.2, you will want to enter the textsslvpn.lehigh.edu, and then click the button with the text Connect to proceed.
6

Notes on Features of a CentOS 6 Desktop November 28, 2012
Figure 3.3: Group, Username and Password Dialog Box
In the dialog box, as shown in Fig-ure 3.3, you will indicate what type ofgroup access you want, and you will en-ter your Lehigh University username andpassword.
The Group field has two possible val-ues:
GeneralAccess This is the selectionmost users will probably use. Thisslection will put a user on theLehigh VPN, but does not do thesetup to access various library sys-tems.
LibraryAccess This is the selectionusers who need to access various li-brary systems will make.
Figure 3.4: Determining Success
After you have completed the fieldsas shown in Figure 3.3 you should see anicon appear in the upper right hand cor-ner of your screen, such as the one shownin Figure 3.4. When you see this icon,with the little lock attached to the icon,it is most likely that you have success-fully attached to the Lehigh UniversityVPN.
Figure 3.5: Under The Hood
The next figure is specif-ically for those that want topeek under the hood. InFigure 3.5 you can see a cou-ple of internet addresses. Ifyou see an internet addressunder the device cscotun0which has an address thatstarts with 128.180, suchas 128.180.68.245, this is avery strong indication thatyou are successfully con-nected to the Lehigh VPN.Perhaps an easier way toverify that you are con-nected successfully to theLehigh VPN is to just tryto run something that re-quires Lehigh VPN connec-tivity, and if it works, youare successfully connected.
Page No. 7 of 23

Chapter 4
Windows 7 from the Lehigh VirtualPublic Site
Well, linux is obviously the best platform for just about everything. However, there are still those rareinstances where you may need to run some kind of Windows application. A recent development, theLehigh University Virtual Public Site, makes running Microsoft Windows 7 from you linux worksta-tion a very easy thing to do. One requirement to duplicate what is in this Lehigh Virtual Public sitesection of the document is that you must either be physically at Lehigh on the network, or you mustbe connected to the Lehigh VPN. This section of the document will provide some instructions on howto run the Lehigh University Virtual Public Site.
4.1 Running the Lehigh Public Site Virtual Windows 7
Figure 4.1: Start Menu Selection for Virtual Win-dows 7 Figure 4.2: Identify the View Connection Server
In order to connect to the Lehigh Public Site Virtual Windows 7 machine, the first thing you willwant to do is select the VMware View Open Client. You can navigate to the VMware View OpenClient by selecting Applications → Internet → VMware View Open Client, as seen in Figure 4.1.
After making you selection as shown in Figure 4.1, you will see a dialog box similar to that shown inFigure 4.2. In the text box in the dialog box, type in the name of the View Connection Server, whichis virtualsite.cc.lehigh.edu, and then click on the button with the text Connect to proceed.
8

Notes on Features of a CentOS 6 Desktop November 28, 2012
4.2 Log In and Select Your Virtual Site
Figure 4.3: Log in to access your virtual sites Figure 4.4: Select your virtual site
As shown in Figure 4.3, you will receive an authentication challenge to access the available virtualmachines that you will be able to run. In this dialog box, enter your Lehigh user ID in the Username:field, your Lehigh network password in the Password field, and leave the Domain field as it defaultsto the correct value of AD.
After authenticating, as shown in Figure 4.3, you will see a screen, such as can be seen in Figure4.4, where you can select the virtual machine you wish to run. You can see in Figure 4.4 that thereis only one choise for a virtual machine, which is Lehigh University virtual public site. Anotherthing to take note of is that next to the text Display there is a selecton box. I suggest that you clickon the Display selection and change it from Full Screen to something else like Large Window. I findthe window modes of the virtual machine a bit easier to use than the full screen mode.
Page No. 9 of 23
Notes on Features of a CentOS 6 Desktop November 28, 2012
Figure 4.5: The Lehigh Public Windows 7 Virtual Machine
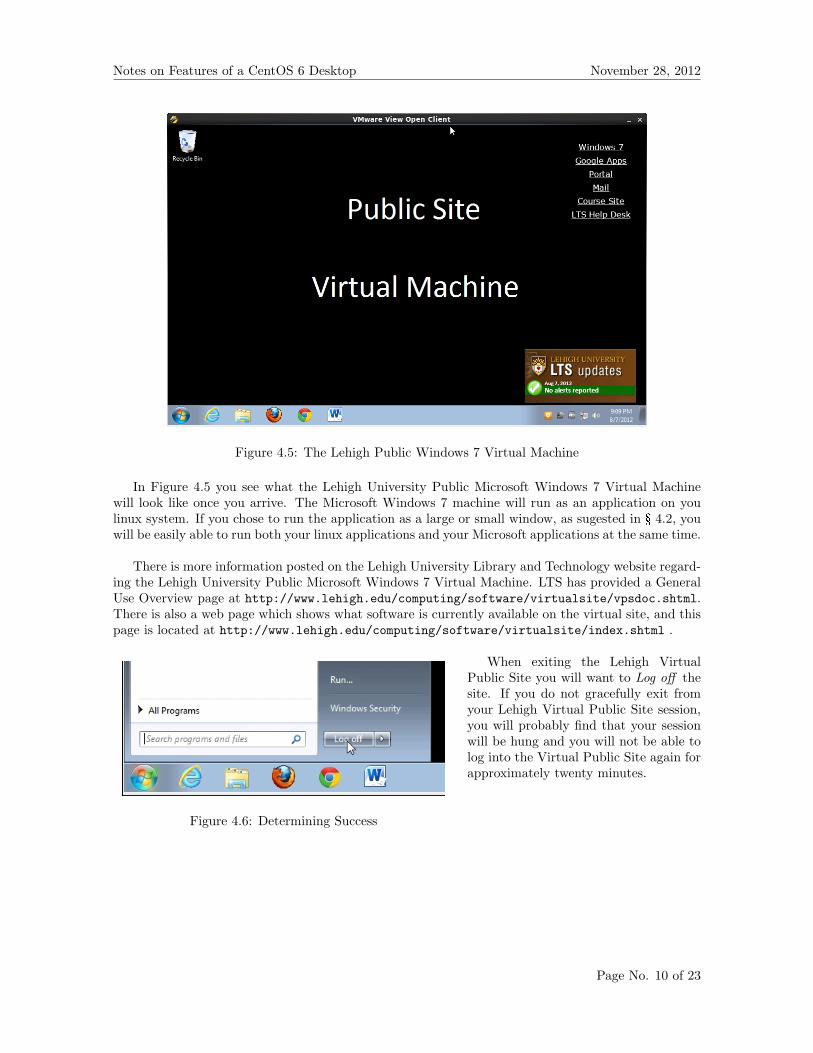
In Figure 4.5 you see what the Lehigh University Public Microsoft Windows 7 Virtual Machinewill look like once you arrive. The Microsoft Windows 7 machine will run as an application on youlinux system. If you chose to run the application as a large or small window, as sugested in § 4.2, youwill be easily able to run both your linux applications and your Microsoft applications at the same time.
There is more information posted on the Lehigh University Library and Technology website regard-ing the Lehigh University Public Microsoft Windows 7 Virtual Machine. LTS has provided a GeneralUse Overview page at http://www.lehigh.edu/computing/software/virtualsite/vpsdoc.shtml.There is also a web page which shows what software is currently available on the virtual site, and thispage is located at http://www.lehigh.edu/computing/software/virtualsite/index.shtml .
Figure 4.6: Determining Success
When exiting the Lehigh VirtualPublic Site you will want to Log off thesite. If you do not gracefully exit fromyour Lehigh Virtual Public Site session,you will probably find that your sessionwill be hung and you will not be able tolog into the Virtual Public Site again forapproximately twenty minutes.
Page No. 10 of 23

Notes on Features of a CentOS 6 Desktop November 28, 2012
4.3 Exchanging Data Between the Linux Desktop and the LTSVirtual Windows 7 Machine
4.3.1 Your LTS Virtual Microsoft Machine H Drive
Figure 4.7: screen000132.jpg
We will examine how you can easilytransfer data from your linux desktopto to a shared drive that the LTS Vir-tual Microsoft Machine can see anduse. You will also be able to movedata easily from your LTS Virtual Mi-crosoft Machine to your linux desk-top.
First we will open Microsoft Windows Explorer on the LTS Virtual Microsoft Machine to take alook at your personal LTS network space, called the H Drive. To see what is on the H Drive, we willdo a right click with our mouse on the Start Bubble, which is in the lower left hand corner of the LTSVirtual Microsoft Machine screen, as seen in Figure 4.7. You will then see a small selection list popup, and then select Open Windows Explorer.
Figure 4.8: Microsoft Windows Explorer
After selecting Open Windows Explorer, as shown in Figure 4.7, you will see your H Drive fileslisted, as shown in Figure 4.8 . Any files you can see in Windows Explorer on your H Drive, you havecomplete access to on the LTS Virtual Microsoft Machine.
Page No. 11 of 23
Notes on Features of a CentOS 6 Desktop November 28, 2012
4.4 Using Nautilus to Map Your H Drive to Your Linux Desk-top
Figure 4.9: Starting the Nautilus File Browser
We will now open the H Drive on the linuxdesktop, and we will look at the same datathat was seen in the previous section, §4.3.1.
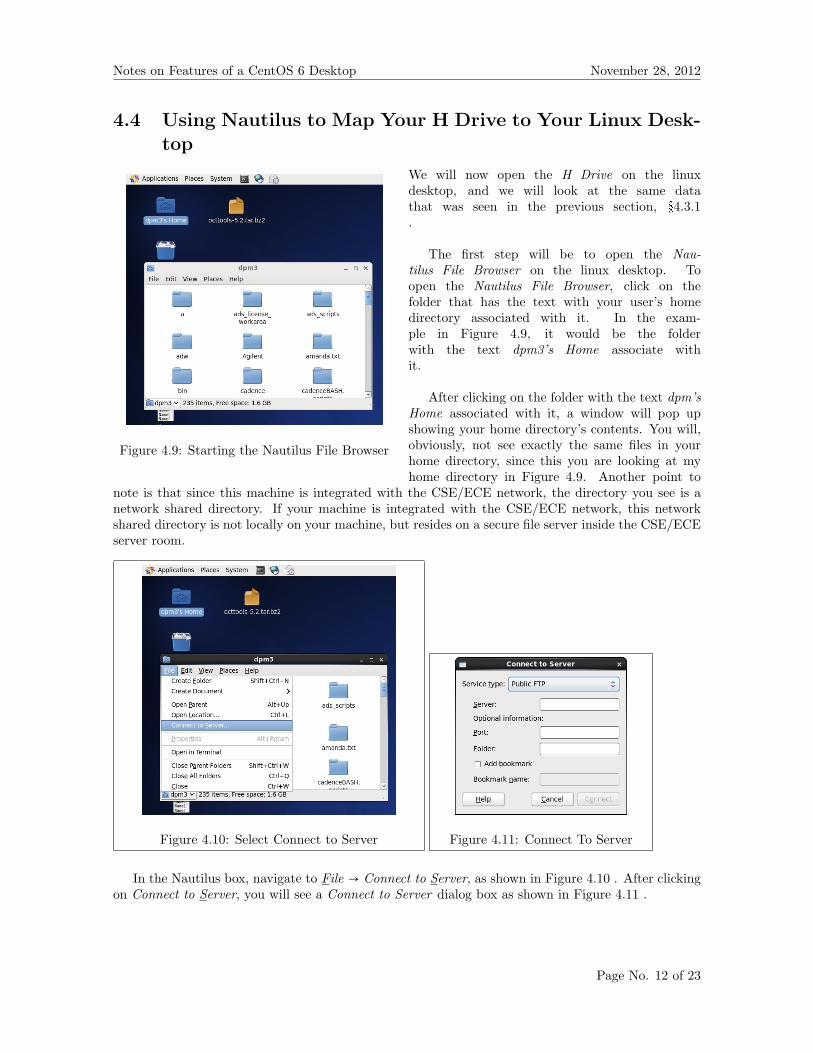
The first step will be to open the Nau-tilus File Browser on the linux desktop. Toopen the Nautilus File Browser, click on thefolder that has the text with your user’s homedirectory associated with it. In the exam-ple in Figure 4.9, it would be the folderwith the text dpm3’s Home associate withit.
After clicking on the folder with the text dpm’sHome associated with it, a window will pop upshowing your home directory’s contents. You will,obviously, not see exactly the same files in yourhome directory, since this you are looking at myhome directory in Figure 4.9. Another point to
note is that since this machine is integrated with the CSE/ECE network, the directory you see is anetwork shared directory. If your machine is integrated with the CSE/ECE network, this networkshared directory is not locally on your machine, but resides on a secure file server inside the CSE/ECEserver room.
Figure 4.10: Select Connect to Server Figure 4.11: Connect To Server
In the Nautilus box, navigate to File → Connect to Server, as shown in Figure 4.10 . After clickingon Connect to Server, you will see a Connect to Server dialog box as shown in Figure 4.11 .
Page No. 12 of 23
Notes on Features of a CentOS 6 Desktop November 28, 2012
4.5 How To Print to an ECE Printer
4.5.1 Miscellaneous Facts About the Print Servers
One of the things that you will want to be able to do from the LTS Windows 7 virtual site is print.We have, in the ECE department, a solution to his need. There is a print server that has been set upthat will allow printing to various printers within the ECE department.
If you need assistance with any items regarding the print server, please contact either David Mor-risette at [email protected] or Ted Bowen at [email protected].
The ECE print server is specifically set up to support printing for the LTS Windows 7 Virtual Site.However, if you are running a PC with the Windows 7 64-bit operating system that is connected tothe Lehigh Network, I expect you can use the functionality provided by the print server. The printserver will currently support only the Windows 7 64-bit operating system.
4.6 Using the Point and Click ECE Print Server
Figure 4.12: Right click the start bubble
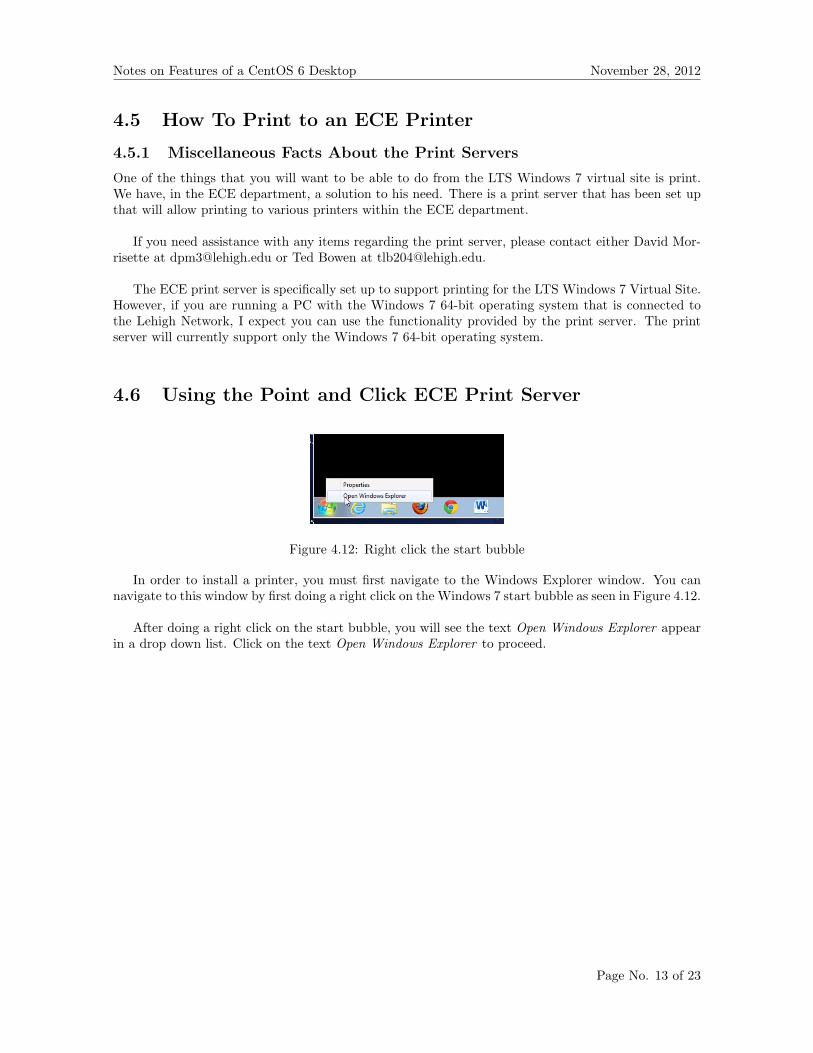
In order to install a printer, you must first navigate to the Windows Explorer window. You cannavigate to this window by first doing a right click on the Windows 7 start bubble as seen in Figure 4.12.
After doing a right click on the start bubble, you will see the text Open Windows Explorer appearin a drop down list. Click on the text Open Windows Explorer to proceed.
Page No. 13 of 23

Notes on Features of a CentOS 6 Desktop November 28, 2012
Figure 4.13: Windows Explorer window
After clicking on the text Open Windows Explorer, a Windows Explorer window will appear, sim-ilar to what you see in Figure 4.13.
Figure 4.14: Enter Printer Server Address in Text Box
To bring up the print server shared printers, you will need to enter the text //eceprint.cc.lehigh.eduas shown in Figure 4.14 and replace the text ▶Libraries▶, as seen in Figure 4.13.
Figure 4.15: List of Currently Available Network Printers
Page No. 14 of 23
Notes on Features of a CentOS 6 Desktop November 28, 2012
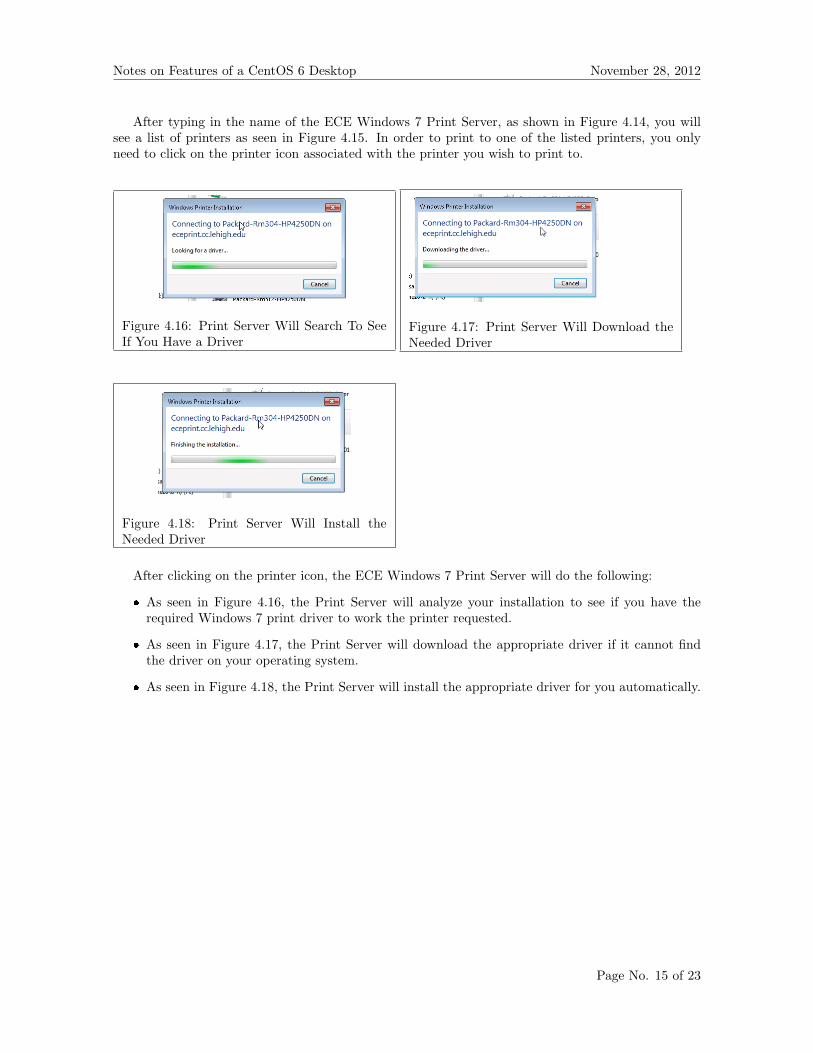
After typing in the name of the ECE Windows 7 Print Server, as shown in Figure 4.14, you willsee a list of printers as seen in Figure 4.15. In order to print to one of the listed printers, you onlyneed to click on the printer icon associated with the printer you wish to print to.
Figure 4.16: Print Server Will Search To SeeIf You Have a Driver
Figure 4.17: Print Server Will Download theNeeded Driver
Figure 4.18: Print Server Will Install theNeeded Driver
After clicking on the printer icon, the ECE Windows 7 Print Server will do the following:
� As seen in Figure 4.16, the Print Server will analyze your installation to see if you have therequired Windows 7 print driver to work the printer requested.
� As seen in Figure 4.17, the Print Server will download the appropriate driver if it cannot findthe driver on your operating system.
� As seen in Figure 4.18, the Print Server will install the appropriate driver for you automatically.
Page No. 15 of 23

Notes on Features of a CentOS 6 Desktop November 28, 2012
Figure 4.19: The Installed Network Printer Can Now Be Used
Once the printer you selected has installed itself, you can now print to the printer from applicationsthat you might run on the LTS Windows 7 Virtual Site.
4.6.1 Printer Security
The printers that are listed when you access the ECE Print Server printer share space will have limitedaccess. In order to print, using the ECE Print Server, to one of the machines listed, the ID of theperson requesting to print will have to be an ID that is in the list of IDs that can access the printer.
Page No. 16 of 23
Chapter 5
Multi-Language Input
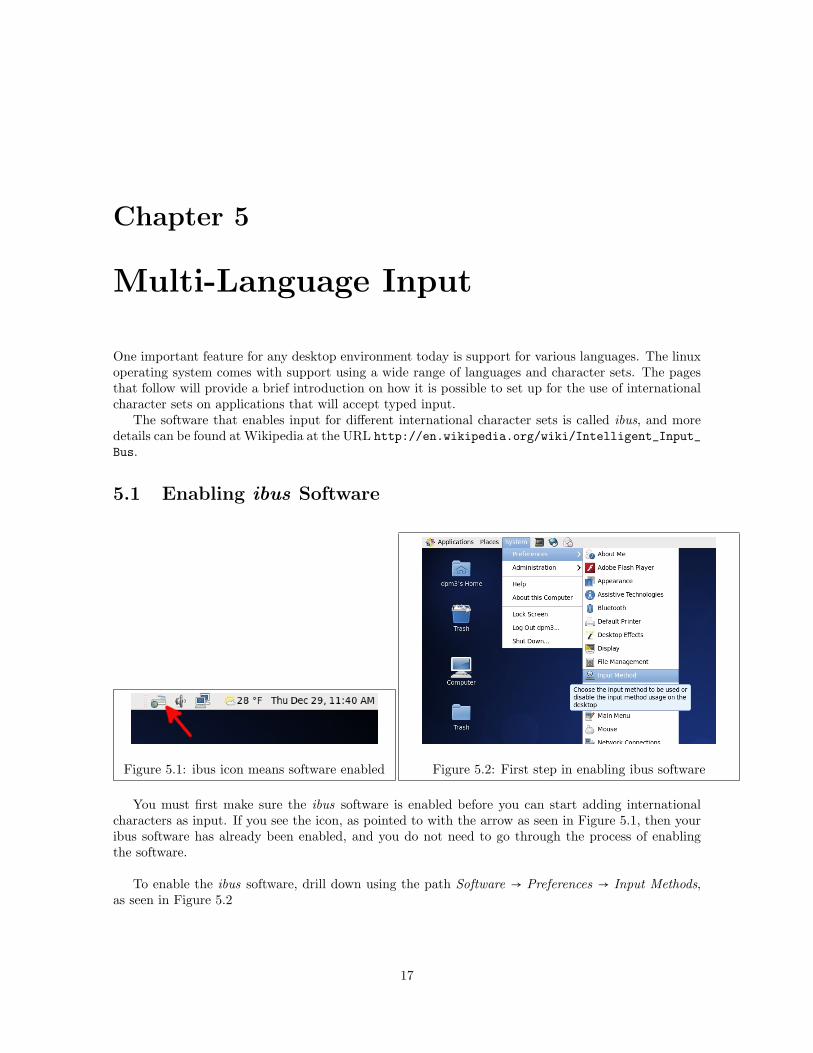
One important feature for any desktop environment today is support for various languages. The linuxoperating system comes with support using a wide range of languages and character sets. The pagesthat follow will provide a brief introduction on how it is possible to set up for the use of internationalcharacter sets on applications that will accept typed input.
The software that enables input for different international character sets is called ibus, and moredetails can be found at Wikipedia at the URL http://en.wikipedia.org/wiki/Intelligent_Input_Bus.
5.1 Enabling ibus Software
Figure 5.1: ibus icon means software enabled Figure 5.2: First step in enabling ibus software
You must first make sure the ibus software is enabled before you can start adding internationalcharacters as input. If you see the icon, as pointed to with the arrow as seen in Figure 5.1, then youribus software has already been enabled, and you do not need to go through the process of enablingthe software.
To enable the ibus software, drill down using the path Software → Preferences → Input Methods,as seen in Figure 5.2
17

Notes on Features of a CentOS 6 Desktop November 28, 2012
Figure 5.3: Not Yet Enabled ibus Software Figure 5.4: Enabled ibus software
After clicking on the text Input Method, as shown in Figure 5.2, you will then see a dialog box asseen in Figure 5.3. When the dialog box comes up, if the check box next to the text Enable inputmethod feature is not checked, check this box and it will enable the ibus software.
After the ibus software is enabled, various options will become active as can be seen in Figure 5.4.You have a couple of options at this point. One option would be to click on the button with the textImput Method Preferences and proceed with setting up the language preferences you desire. Forillustration purposes, we are going to click on the button with the text Close.
Figure 5.5: Nowhere To Insert Text Figure 5.6: No Input Methods Are Yet Activated
After clicking on the button with the text Close in Figure 5.4, you will see a dialog box such asseen in Figure 5.5. You should now see a small icon, the ibus icon, in the right hand corner of yourscreen, such as the icon the little red arrow is pointing to in Figure 5.5.
If you do a right click on the ibus icon, and you do not have focus on an application where you canenter some text, you will get the message No input window.
If you have proceeded with instructions as written in this document, and you have not yet addedany input methods to use with the ibus software, and you have focus on a spot where you can entertext, and you do a right click on the ibus icon, all you will see is a grayed out message that says Turnoff input method. Since we have not yet added any input methods, no input methods will yet be listedwhen we do a right click on the ibus icon.
Page No. 18 of 23
Notes on Features of a CentOS 6 Desktop November 28, 2012
5.2 Adding Input Methods
Figure 5.7: Click Preferences to Begin Setup Figure 5.8: The IBus Preferences Tabs
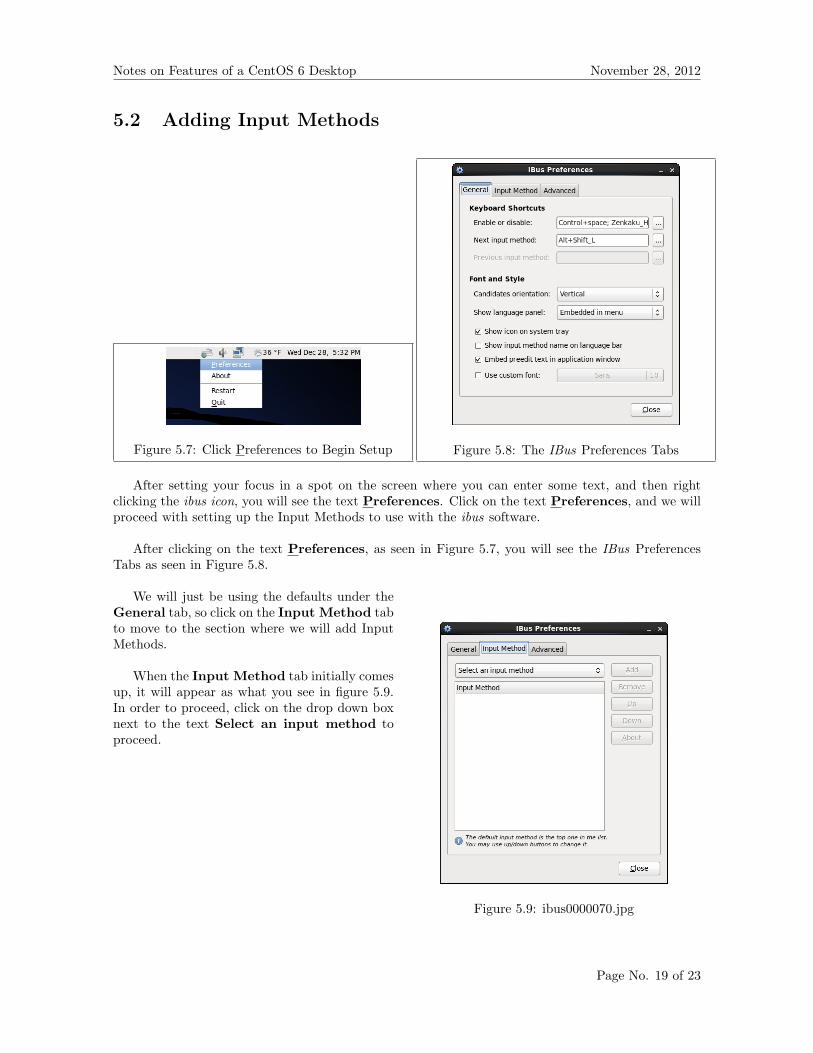
After setting your focus in a spot on the screen where you can enter some text, and then rightclicking the ibus icon, you will see the text Preferences. Click on the text Preferences, and we willproceed with setting up the Input Methods to use with the ibus software.
After clicking on the text Preferences, as seen in Figure 5.7, you will see the IBus PreferencesTabs as seen in Figure 5.8.
Figure 5.9: ibus0000070.jpg
We will just be using the defaults under theGeneral tab, so click on the Input Method tabto move to the section where we will add InputMethods.
When the Input Method tab initially comesup, it will appear as what you see in figure 5.9.In order to proceed, click on the drop down boxnext to the text Select an input method toproceed.
Page No. 19 of 23

Notes on Features of a CentOS 6 Desktop November 28, 2012
Figure 5.10: Languages Available from BasicDesktop Install
Figure 5.11: Additional Languages Beyond BasicInstallation Languages
In Figure 5.10, you can see a snapshot of the various options you have for input methods that comeon the basic desktop install of CentOS 6.0.
There are many more input methods that can be added, and in Figure 5.11 you can see a few. Notonly are there more languages that can be added, but many more features or methods are availabe forthe individual methods. If you need a particular language, and you do not see it available, contact meand I will see if it is possible to install it.
Without comment, I will list a number of various languages and method for their input:
Figure 5.12: Gujarati Figure 5.13: Hindi
Page No. 20 of 23

Notes on Features of a CentOS 6 Desktop November 28, 2012
Figure 5.14: Korean Figure 5.15: Malayalam
Figure 5.16: Punjabk Figure 5.17: Tamil
Figure 5.18: Chinese - Pinyin
I will do a small demonstration with the Chi-nese language using the pinyin method of in-put.
You can see here, as shown in Figure 5.18where I selected the Chinese language and thePinyin method of input. After clicking on thetext for the Pinyin method, proceed on to addthe method.
Page No. 21 of 23

Notes on Features of a CentOS 6 Desktop November 28, 2012
Figure 5.19: Input Method Selected Figure 5.20: Input Method Added
After you have clicked on the text Pinyin, as seen in Figure 5.18, you will arrive at a dialogbox as seen in Figure 5.19. Figure 5.19 shows that an input method has been selected, but becausethe input method is not yet present in the Input Methods box, it has not yet been added. In or-der to add Pinyin input method, click on the button with the text Add, as can be seen in Figure 5.19.
After clicking on the button with the text Add, as seen in Figure 5.19, you will see the text Chi-nese - Pinyin appear in the Input Methods box, as seen in Figure 5.20.
Figure 5.21: Selecting the Chinese Character Input Method for Input
The next step in the process of using an input method, in our demonstration case the Chinese- Pinyin method, is to open an application that takes input. For example, open Open Office.orgWriter, which you can open by going to Applications - Office - OpenOffice.org Writer. After openningOpenOffice.org Writer, set your focus on the portion of the application where you would be typingyour text.
After setting your focus on somewhere you can input, for example clicking inside Open Office.orgWriter, then right click the ibus icon on the task bar, as shown with an arrow pointing to it in Figure??. Then click and choose the type of input method you would like to use. In our case, we are goingto click on the text Chinese - Pinyin.
Page No. 22 of 23
Notes on Features of a CentOS 6 Desktop November 28, 2012
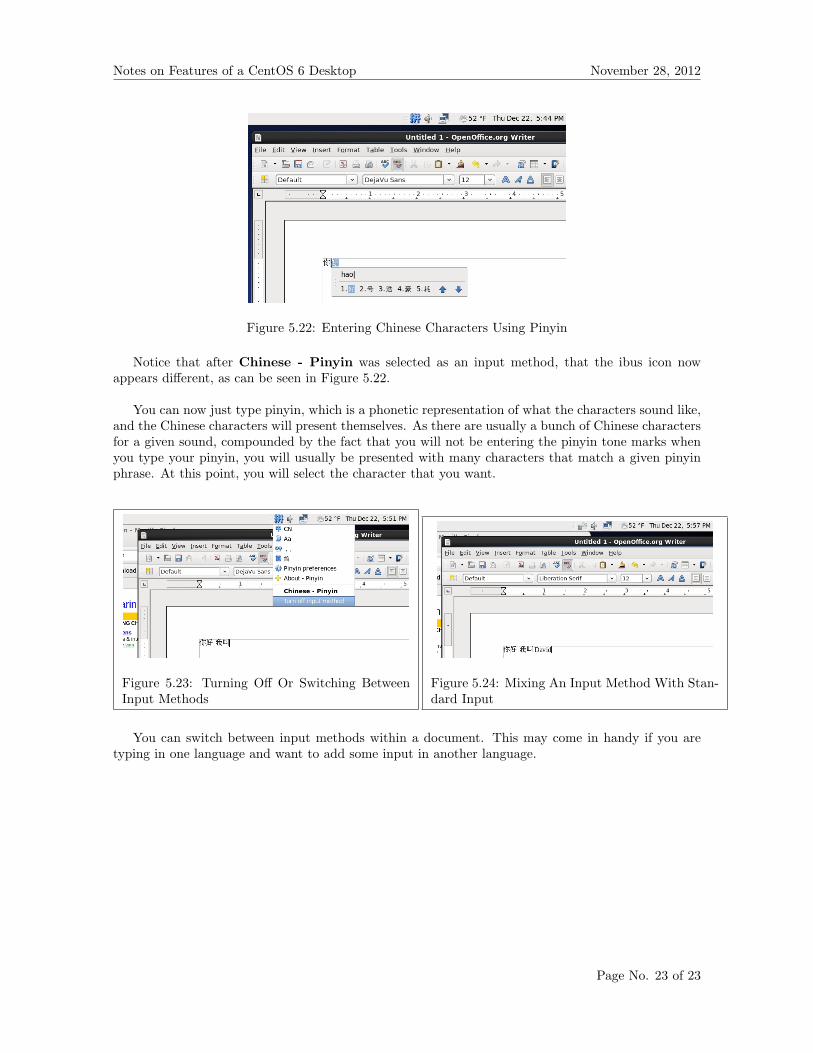
Figure 5.22: Entering Chinese Characters Using Pinyin
Notice that after Chinese - Pinyin was selected as an input method, that the ibus icon nowappears different, as can be seen in Figure 5.22.
You can now just type pinyin, which is a phonetic representation of what the characters sound like,and the Chinese characters will present themselves. As there are usually a bunch of Chinese charactersfor a given sound, compounded by the fact that you will not be entering the pinyin tone marks whenyou type your pinyin, you will usually be presented with many characters that match a given pinyinphrase. At this point, you will select the character that you want.
Figure 5.23: Turning Off Or Switching BetweenInput Methods
Figure 5.24: Mixing An Input Method With Stan-dard Input
You can switch between input methods within a document. This may come in handy if you aretyping in one language and want to add some input in another language.
Page No. 23 of 23