novaclb-screen full-screen calibration system user manual full-screen... · user manual 4...
TRANSCRIPT

www.novastar-led.com1
User Manual NovaCLB-Screen Full-Screen Calibration System
Rev5.0.0 NS140100018

Full-Screen Calibration System
User Manual Contents
http://www.novastar.tech i
Contents
Contents ................................................................................................................................i
1 Introduction .......................................................................................................................1
1.1 Why Pixel Level Calibration ............................................................................................................................1
1.2 Core Advantages of NovaCLB-Screen ...........................................................................................................2
1.3 System Structure ............................................................................................................................................3
2 Authorization Management ..............................................................................................4
3 Calibration Modes .............................................................................................................5
4 Full-Screen Calibration ....................................................................................................6
4.2 Initialization .....................................................................................................................................................8
4.3 Settings ......................................................................................................................................................... 11
4.3.1 Common Settings ...................................................................................................................................... 11
4.3.2 Original Settings ....................................................................................................................................... 14
4.3.3 Targets Settings ........................................................................................................................................ 15
4.4 Camera Settings .......................................................................................................................................... 19
4.5 Partition Mode .............................................................................................................................................. 22
4.6 Camera Parameters .................................................................................................................................... 26
4.7 Partition ........................................................................................................................................................ 29
4.8 Eliminate Boundaries ................................................................................................................................... 35
5 Seam Brightness Calibration ......................................................................................... 37
5.2 Initialization .................................................................................................................................................. 37
5.3 Screen Info .................................................................................................................................................. 38
5.4 Camera Settings .......................................................................................................................................... 39
5.5 Partition Mode .............................................................................................................................................. 40
5.6 Partition ........................................................................................................................................................ 42
6 New Module ..................................................................................................................... 49
6.2 Initialization .................................................................................................................................................. 50
6.3 Module Location .......................................................................................................................................... 50
6.4 Camera Settings .......................................................................................................................................... 54
6.5 Camera Parameters .................................................................................................................................... 55
6.6 Module Calibration ....................................................................................................................................... 57
7 Calibration Interruption (Searching LED position failed) ............................................ 58
8 Evaluate Uniformity ........................................................................................................ 63
8.1 Initialization .................................................................................................................................................. 64
8.2 Camera Settings .......................................................................................................................................... 65
8.3 Camera Parameters .................................................................................................................................... 66

Full-Screen Calibration System
User Manual Contents
http://www.novastar.tech ii
8.4 Uniformity Evaluation ................................................................................................................................... 67
9 Screen Data Merging ...................................................................................................... 68
10 Screen to Cabinet ......................................................................................................... 71
10.1 Operation procedure .................................................................................................................................. 73
10.2 Operation instruction.................................................................................................................................. 73
10.2.1 Import database ...................................................................................................................................... 74
10.2.2 Draw topological graph ........................................................................................................................... 75
10.2.3 Set resolution of each cabinet ................................................................................................................ 75
10.2.4 Number the cabinet ................................................................................................................................ 78
10.2.5 Set target database ................................................................................................................................ 84
10.2.6 File path .................................................................................................................................................. 84
10.2.7 Switch ..................................................................................................................................................... 84
11 Screen Update Targets ................................................................................................. 85
12 Cabinet to Screen ......................................................................................................... 87
13 NovaCLB-Screen Help .................................................................................................. 93
13.1 Network Settings ........................................................................................................................................ 93
13.2 LCT Monitor Settings ................................................................................................................................. 94
13.3 Principle of Brightness and Color Calibration ............................................................................................ 95
13.4 Camera Operating Skills ............................................................................................................................ 97
13.5 Subarea Imaging Operating Skills ............................................................................................................. 98
13.6 Steps to Check Calibration Effects ............................................................................................................ 99
13.7 Water Ripple in Full-Screen Calibration .................................................................................................. 100
14 Release Notes ............................................................................................................. 102

Full-Screen Calibration System
User Manual 1 Introduction
http://www.novastar.tech 1
1 Introduction
1.1 Why Pixel Level Calibration Brightness/Color uniformity is of the most important factors that affect the image quality of a full color LED display. Because of the limitations of manufacturing process, including system structure design, LED lights selection, electronic components welting, system cooling, LED brightness decaying and many others, LED displays suffer the brightness/color uniformity loss, which is also the most serious problem of this field.
Facing this fact, Nova pixel level calibration system does not intervene the manufacturing process of a LED display to reduce its brightness/color uniformity. Instead, it performs brightness/color adjustment to the display after it has been completely produced. By adjusting the brightness/color of each LED light according to the software analytical results from the measured brightness/color values of the LED lights, Nova pixel level calibration system can help the LED display acquiring perfect uniformity.
Figure 1-1 The LED display effects comparison before and after calibration
NovaCLB is applicable for the following two occasions:
Factory single cabinet pixel level calibration (Factory calibration). Correct each cabinet on the production line to ensure good brightness/color uniformity of the cabinets when produced.

Full-Screen Calibration System
User Manual 1 Introduction
http://www.novastar.tech 2
Field LED display pixel level calibration (Full-screen calibration). Perform calibration for a LED display at where it locates to improve its brightness / color uniformity.
Factory calibration is more efficient and lower in cost than Full-screen calibration. But for cabinets of which the LED lights optical axis directions consistency is not well managed, results of factory calibration will not be as good as that of filed calibration. During factory calibration, the matching NovaCLB-Cabinet is needed.
Full-screen calibration requires engineers to be presence and Full-screen installation
of calibration instruments. And what’s more, Full-screen calibration can only be
performed only at night when it’s dark. Despite its complexity and low efficiency
(compared with factory calibration), Full-screen calibration can greatly improve the brightness / color uniformity of a LED display and thus results in amazing image quality of the display. During Full-screen calibration, the matching NovaCLB-Screen is needed.
1.2 Core Advantages of NovaCLB-Screen Camera calibration technology enabling accurate brightness / color
measurement;
performance with brightness variation less than 1% and color variation less than 0.003;
Be capable of eliminating color diversity of LED lights from different manufacturing batches;
Be capable of eliminating brightness / color diversity between subareas or cabinets;
Arc shape and irregular shape LED display calibration supported;
Supporting automatic calibration for the replaced module;
Precise calibration coefficients up to 16bits resulting in outstanding calibration
Close loop intelligent calibration resulting in easy and high efficiency calibration. One LED display, one person; 25 minutes, 600K pixels;
Adopt RGB to begin the collection mechanism and collection-processing mechanism at the same time during the calibration process so as to improve the efficiency;
Support correction to the boundary difference between partitions so as to enable smooth transition between partitions;
No extra power supply required.

Full-Screen Calibration System
User Manual 1 Introduction
http://www.novastar.tech 3
1.3 System Structure
Figure 1-2 System structure (NovaLCT-Mars)

Full-Screen Calibration System
User Manual 2 Authorization Management
http://www.novastar.tech 4
2 Authorization Management
NovaCLB-Screen adopts the management methods of encryption lock and authorized file binding authorization; and every dongle corresponds to one authorized file, which is combined with the file authorization.
Insert dongle to the USB port of the computer; click menus Author on the main
interface; enter to the Authorization manage window, click to import the authorized file (in the disk) corresponding to the dongle.
Multiple authorized file can be imported. Thus, dongles can be replaced directly when there are multiple dongles. It is not necessary to reload authorization file every time when replacing dongles. Plug in dongles and it can be used.
Figure 2-1 Authorization management

Full-Screen Calibration System
User Manual 3 Calibration Modes
http://www.novastar.tech 5
3 Calibration Modes
According to different requirements, Calibration is divided into three modes: full-screen pixel level calibration, Seam Brightness Calibration, new module calibration and uniformity evaluation.

Full-Screen Calibration System
User Manual 4 Full-Screen Calibration
http://www.novastar.tech 6
4 Full-Screen Calibration
Procedures of full-screen pixel level calibration:
Initialization
Online (online calibration with LCT), create new calibration information files, initializing specifications of modules.
Camera Settings
Choose the type of cameras: digital cameras or industrial cameras and click Connect.
Partition Settings
Brightness and chroma of display screen will be collected by camera. The screen need to be partitioned into multiple areas with appropriate size for calibration owing to the limitation of camera resolution.
Camera Parameters
Adjust camera parameters.
Partitions Calibration
Guide customers to perform pixel level calibration on each LED, which signally improve the display uniformity.

Full-Screen Calibration System
User Manual 4 Full-Screen Calibration
http://www.novastar.tech 7
Figure 4-1 Choose calibration mode

Full-Screen Calibration System
User Manual 4 Full-Screen Calibration
http://www.novastar.tech 8
4.2 Initialization
Figure 4-2 Network Settings Interface of Calibration Initialization
1. Control system Connection
The calibration software can work with NovaLCT-Mars to calibrate the screen.
NovaLCT-Mars Connection
Ensure that the NovaCLB-Screen computer can communicate with the NovaLCT-Mars computer well, fill the IP and port (The default is 8080, which can be modified ) from NovaLCT-Mars in the location of IP and port from NovaCLB-Screen, then click Connect button. Fig. 4-3 will pop up and the connection is done.

Full-Screen Calibration System
User Manual 4 Full-Screen Calibration
http://www.novastar.tech 9
Figure 4-3 Prompt message from NovaLCT-Mars when connection is successful
2. Screen Resolution
The screen resolution is the width and height of the display in the pixel level.

Full-Screen Calibration System
User Manual 4 Full-Screen Calibration
http://www.novastar.tech 10
After NovaCLB-Screen is connected to NovaLCT-Mars successfully, the bottom of the interface will show display count and the corresponding resolution of connected NovaLCT-Mars. Users could choose display number as needed, the default value is the first one.
3. Module Size
Check Module size same and set the module width and module height of module if the size of all modules are same. The function of Seam Brightness Calibration will not be supported if the size of module is not same.
4. Calibration Database
A new database or the existing database can be used and the database is used for saving information of calibration coefficient, calibration time, screen size, etc. It shall be kept properly.

Full-Screen Calibration System
User Manual 4 Full-Screen Calibration
http://www.novastar.tech 11
4.3 Settings
4.3.1 Common Settings
1. LED Pixel Arrangement
Pixel Arrangement is the count of every pixel, the common ones are three LEDs arrangement, Virtual pixel of 3 led, four LEDs arrangement, etc.
2. Ambient Brightness
Ambient Brightness is the brightness of surrounding environment while calibrating. In general, darkroom is none and the brightness is low at night. It is High at nightfall or a cloudy day. It is unsuited to calibrate in sunny day.
3. Direction to Identify Led
The Direction can be divided into four diagonal directions which are from four angles of rectangle. It is used when identify LED and the default direction is automatic search. The software will detect from four directions respectively and select the best result. When the LED of top left angle can't display normally,

Full-Screen Calibration System
User Manual 4 Full-Screen Calibration
http://www.novastar.tech 12
please change the direction. For example, users try to identify LED from bottom right when the first row or the first column is covered.
4. Broken LEDs Ratio Allowed
If the LEDs which can't be identified in calibrating zone are greater than the ratio. The calibrating flow will stop and some prompt messages will be presented. Please be sure whether the broken lights are too much or some LED pixels are covered is appeared. If the problem can't be solved, users could turn up this ratio to calibrate forcibly.
5. Calibration process parameters
Enable background off
Background removal is to remove background light. Generally, calibration is required only to be conducted under relatively dark environment. But if background removal is enabled, calibration can be conducted even if the environment is not dark enough.
After Enable background off is selected, the interface shown in Fig. 4-5 is displayed. Users can use the mouse to drag the four vertexes of the quadrangle to select the valid area to be calibrated. The unwanted light around the screen to be calibrated is removed.
Figure 4-4 Screen Area Determination

Full-Screen Calibration System
User Manual 4 Full-Screen Calibration
http://www.novastar.tech 13
Enable gap calibration
This is an option enabled during normal partition calibration. Gap calibration is mainly used for calibration of LED displays with small pixel pitch to solve the bright and dim line caused by cabinet assembly. Note: bright and dim line must be inside Partitions.
Click Normal setting on the main menu to pop up the window below, and then check Enable gap calibration.
Coefficient uploading stably
Coefficient uploading stably means to upload calibration coefficient via serial cable, the speed is slower but stable. Default calibration coefficient uploading route is via DVI cable, the speed is faster. If there is something wrong with DVI cable, serial cable can be used as alternative by selecting coefficient uploading stably.
Save all subareas' pictures(Need more space)
Check Save all subareas’ pictures to save all pictures of subareas. Do not check to only save the pictures of current subarea.
Deal the shade
Enable this option if some subareas are blocked by leaves, wire and so on. Software will detect the blocked subareas automatically and deal with them.
6. Brightness data amendment
You can decide whether it is required to amend brightness data. Module amendment is used when there are difference between modules. Module size refers to the size of the minimum unit module.
7. Calibration Pictures Path
Click to set the position where the collected images are saved during calibration.

Full-Screen Calibration System
User Manual 4 Full-Screen Calibration
http://www.novastar.tech 14
4.3.2 Original Settings
Use colorimeter to measure original values.
Original brightness and chroma is the original brightness and chroma parameters information of the display to be calibrated when calibration is closed.
It’s important to set these parameters correctly for the result of calibration.
The colorimeter here means instruments that can measure LED color, like: light gun, color analyzer, Spectral radiation brightness meter, etc.
Figure 4-5 Original Settings

Full-Screen Calibration System
User Manual 4 Full-Screen Calibration
http://www.novastar.tech 15
4.3.3 Targets Settings
Figure 4-6 Targets Settings
Brightness Calibration
Brightness calibration can only change the brightness of R, G, B, and it will not attenuate the color gamut. But it can't eliminate the difference in color between LEDs.

Full-Screen Calibration System
User Manual 4 Full-Screen Calibration
http://www.novastar.tech 16
Figure 4-7 Brightness Calibration
Adjust the RGB brightness in the figure above or click to adjust in the figure below.

Full-Screen Calibration System
User Manual 4 Full-Screen Calibration
http://www.novastar.tech 17
Figure 4-8 Adjusting brightness by auxiliary tool
Ordinary Chroma Calibration
Brightness and Color calibration can change the brightness of R, G, B, and attenuate the color gamut. But it can uniform brightness and color between LEDs.
Users can adjust target brightness and color value by the on the right, also users can input values in the textbox directly. Recommend using the first method
Figure 4-9 Ordinary Chroma Calibration
After adjustment, click button to look up the current brightness and color value in CIE 1931 Color Diagram.

Full-Screen Calibration System
User Manual 4 Full-Screen Calibration
http://www.novastar.tech 18
Figure 4-10 Measuring and Target Color Gamut in CIE 1931 Color Diagram
The white triangle in the image is corresponding to measuring color gamut, the black triangle is corresponding to target color gamut. To realize the uniformity after calibration, the target color gamut should less than measuring color gamut. From the image above, users can get the attenuation of color gamut. Users can also click the right mouse button in Color Diagram to choose to add the color coordinate to Target Brightness and Color value.
The former method is recommended. Users can also check Color Temperature and directly enter an appropriate color temperature value, or drag the bar to set color temperature value, or click to use the recommended color temperature value, where three commonly used color temperature values are provided: 5000K, 6500K, 9300K.

Full-Screen Calibration System
User Manual 4 Full-Screen Calibration
http://www.novastar.tech 19
Figure 4-11 Expected Color Temperature
Multiple bin Chroma Calibration
Multiple bin chrome calibration is mainly used for adjusting the brightness difference after multi-batch of lamps or lamp panels have been mixed.
The operation steps of multiple bin Chroma Calibration is basically the same as Ordinary Chroma Calibration pattern.
4.4 Camera Settings
During calibration, camera must be connected computer correctly, aimed at the partition and be able to take photos normally. It is required to choose camera type before connecting camera. Digital camera refers to Canon camera and industrial camera is HS1000. After the camera is connected, camera status is as the figure below. Click Next to move on to partition mode to do the relevant camera settings. See details in 13.4 Camera operating skills.

Full-Screen Calibration System
User Manual 4 Full-Screen Calibration
http://www.novastar.tech 20

Full-Screen Calibration System
User Manual 4 Full-Screen Calibration
http://www.novastar.tech 21
Figure 4-12 Connect Camera to NovaLCT

Full-Screen Calibration System
User Manual 4 Full-Screen Calibration
http://www.novastar.tech 22
4.5 Partition Mode Partition here is regarded as a verb-divide. Consider the constraint of the size of camera lens, the screen need to be divided into several proper subareas to calibrate.
Due to the limitation of the camera's resolution, the screen needs to be divided into several proper subareas to be calibrated.
Partition calibration can achieve the specific process of display calibration after the setting of calibration parameters is completed.
Figure 4-13 Partition calibration Flow Diagram

Full-Screen Calibration System
User Manual 4 Full-Screen Calibration
http://www.novastar.tech 23
Figure 4-14 Partition Mode
Click , thus the software will calibrate the proper pixel size of a single partition according to the display size and conduct auto-partition.
Click to set the unit size when adopting customized partition, where columns and rows collected by the camera cannot exceed the default value 224X150, while HS1000 is 256X192. and the partition size (unit columns and rows X columns and rows collected by the camera) is displayed at the bottom of the
interface. After setting is finished, click .

Full-Screen Calibration System
User Manual 4 Full-Screen Calibration
http://www.novastar.tech 24
When finished, you can see the result as shown in Fig 4-15.
Figure 4-15 Topography Graph And Screen Control Window
1. Topography Graph
It is composed of divided subareas. Number these subareas from left to right, from top to bottom.
2. Screen Control
It is used to realize the control of screen color, brightness and division switch.
The right window can move together with the main window, and can shut down if unnecessary. Click Partition Topological Graph And Screen Control on the right page, it will popup.

Full-Screen Calibration System
User Manual 4 Full-Screen Calibration
http://www.novastar.tech 25
If there is binding around the display, it is necessary to check Exsit some leds
obscured and input the columns and rows of boundaries and then click to view the screen. The operation is successful when see the fist rows or columns have on it .
Figure 4-16 Setting the number of rows and columns of boundaries
After division, click Next, enter into Camera Parameters.

Full-Screen Calibration System
User Manual 4 Full-Screen Calibration
http://www.novastar.tech 26
4.6 Camera Parameters
Figure 4-17 Camera Parameters
The figure above is the interface after successfully connecting the camera. Click on
to open Quick Start Guide and view the operating skills of camera.
No matter manual mode or automatic mode is adopted, adjust the saturation till the result reaches Normal, and adjust the image area to Fit. During this process, make sure that the camera faces to the partition.
Notice: If the image area is relatively small when the saturation is normal, the micro focus ring can be adjusted to blur the image. After zooming the camera window, the image seen in camera window is different from the actual image. User can solve the problem by clicking the LED light spot in the image prompted by magnifying glass to separate them.

Full-Screen Calibration System
User Manual 4 Full-Screen Calibration
http://www.novastar.tech 27
Figure 4-18 Camera Settings
Automatic Mode
This mode is the default mode. Under this mode, users just need to click on
button, then the software will automatically analyze and adjust the saturation and finally achieves normal. If failed, please check the calibration environment and parameters, then try again.
Manual Mode
In this mode, users need to manually adjust the Brightness, Exposure and Aperture parameters, so as to adjust the saturation.
The focusing ring, focal length and the intensity of LEDs have great influence on the image area. When the image area is less than 50, adjust the focusing ring to blur the image, and then the image area becomes lager. When the image area of LEDs is greater than 150, adjust the focusing ring to make the image clearer, or adjust the focal length to make the imaging area larger and the image of LEDs sparser, or change the basic unit so that the image area become smaller. If the image area is 0, it indicates the saturation is too low or high. At this time, adjust the saturation to a certain range so that the image area can be calculated. The brightness, exposure and ISO have less influence on image area, which are usually ignored. In general, set the aperture value and adjust the saturation to a certain range first to display the image size. Then, adjust focusing ring, focal length or basic unit to make the image size normal. At last, adjust the calibration brightness, exposure and ISO to make the saturation normal.

Full-Screen Calibration System
User Manual 4 Full-Screen Calibration
http://www.novastar.tech 28
Attention:
The default brightness 50. Automatic analysis is advisable. Manual adjustment can be carried out if experienced. Next step can be taken only if the analysis result is normal. Saturation between 60 and 100 is normal. It is proper to adjust the image area to 50~150.
You can click on the right to view the image obtained after saturation adjustment, in order to help finding problems. When red, green, blue analyses are all completed, click next to enter into the page Partition.

Full-Screen Calibration System
User Manual 4 Full-Screen Calibration
http://www.novastar.tech 29
4.7 Partition
Figure 4-19 Partition

Full-Screen Calibration System
User Manual 4 Full-Screen Calibration
http://www.novastar.tech 30
1. Automatic calibration Mode
Users just need to click Start button, the software can do the following things automatically: analyze red, green and blue led, generate coefficients, upload coefficients, save to hardware and to database. It will make calibration more convenient and efficient. Users may also manage this flow according to their own requirements. Click Customize, you can see Fig. 4-20.
Figure 4-20 Customize Window
2. Manual Calibration Mode
Users can separately operate every step of the calibration process.
For the partition is completed, users can test whether the calibration effect is good through pictures control on the right side of this window.
3. Upload calibration coefficients
Upload calibration coefficients to display.
Coefficients of area without plugging DVI could not be uploaded if the subareas are across two or more screens during calibration.
Select multiple subareas from topological graph after calibration is completed and right click to upload the coefficients.
Note:
Only the subareas with DVI input could be selected and the selected subareas need to form a rectangle
area.

Full-Screen Calibration System
User Manual 4 Full-Screen Calibration
http://www.novastar.tech 31
Figure 4-21 Uploading calibration coefficients via topological graph
4. Pause Calibration
Some emergency situations may happen during the calibration process, such as
sudden appearance of obstruction. User can click to stop calibration
under such condition. When user clicks to continue calibration, the camera will start shooting from the last picture.

Full-Screen Calibration System
User Manual 4 Full-Screen Calibration
http://www.novastar.tech 32
Figure 4-22 Pause Calibration

Full-Screen Calibration System
User Manual 4 Full-Screen Calibration
http://www.novastar.tech 33
5. Change the target value
The user can click to change the target value in target calibration interface if the calibration result is not satisfying after partition calibration. Brightness calibration, ordinary chroma calibration and multiple bin chroma are all supported. Multiple bin chroma calibration supports blue calibration which is mainly used for optimizing blue effect.
The user can input the value manually or modify the target value with auxiliary
tools. Click to view gamut distribution diagram after modification.

Full-Screen Calibration System
User Manual 4 Full-Screen Calibration
http://www.novastar.tech 34
Figure 4-23 Change the target value
Restore: Restore the calibration mode and target value to the value shown when the interface is opened just.
Preview: View the effect on the display after the target value has been modified.
Enable correction: this option to view the effect of the latest correction coefficient on the display.
Click if the corrected target value is satisfying, and thus the system will prompts Whether apply the corrected target value into all partitions? Check Yes, and thus the system will recalculate the corrected correction coefficient of partition and load the new one. Click No, and thus the target value will only be applied into the partition needs correction.

Full-Screen Calibration System
User Manual 4 Full-Screen Calibration
http://www.novastar.tech 35
Click Next Partition to enter into the next partition calibration after partition calibration, and one by one complete all partitions of the screen. When all finished, if still exist difference among these partitions, then start Eliminate the boundaries to eliminate it.
4.8 Eliminate Boundaries Skip this step if no border exists between partitions.
If boundaries are found between partitions, perform the operations by following the order: Eliminate Boundaries > Upload Coefficients > Save to Hardware > Save to Database. The system will automatically eliminate the boundaries, upload coefficients, save the parameters to hardware and save the modified data.
Fig. 4-1 Eliminate Partition Boundaries
Coefficient simulation
Calibration engineers can see the simulation effects (before calibration) on the simulation image. If the measured brightness data have problems, the display defects can be observed on the simulation image.

Full-Screen Calibration System
User Manual 4 Full-Screen Calibration
http://www.novastar.tech 36
Click Coefficient Simulation to enter the coefficient simulation page, as shown in the figure below.
− Draw ID: Paint partition ID on the simulation image.
− Color: Displayed color of the simulation screen.
− Mode: The simulation image has three modes: original color, gray and false color. Simulation image is a colored image. Primary color is the color of the simulation image. Primary color mode means that the color of the simulation image is the same as the primary color. Gray mode means that the color of the simulation image is always grayscale image no matter what the color of the simulation image is. False color mode means that the simulation image appears like a colored image and so it is called false color image because the RGB values of each pixel on the simulation image are assigned according to different calibration coefficients.
If the LED display is evenly blurred before calibration, the calibration coefficients are distributed very evenly and the simulation image also looks very even. If a partition on the simulation image appears brighter or darker, the calibration result of this partition is abnormal.

Full-Screen Calibration System
User Manual 5 Seam Brightness Calibration
http://www.novastar.tech 37
5 Seam Brightness Calibration
The bright/dark line on the display can be adjusted by the function of Seam Brightness Calibration when it is located at the splice between lamp panels or cabinets. The effect can be very remarkable if the operation is proper.
Select Seam Brightness Calibration as calibration mode.
Figure 5-1 The mode of Modify dark or bright lines
5.2 Initialization Setting of Initialization is the same as pixel level calibration. Please refer to 4.2 Initialization.

Full-Screen Calibration System
User Manual 5 Seam Brightness Calibration
http://www.novastar.tech 38
Figure 5-2 Choose Calibration Mode
5.3 Screen Info The operation process varies with the calibration of display and can be divided into without calibration, Screen calibration and Cabinet calibration. The user need to load database and pay attention to the following items in the latter two situations:
1. Screen Calibration, The full-screen calibration must be conducted with NovaCLB-Screen V4.0 or higher version; moreover, the size of module must be identical.
2. Cabinet calibration, the cabinet database must be converted to full-screen database at first.

Full-Screen Calibration System
User Manual 5 Seam Brightness Calibration
http://www.novastar.tech 39
Figure 5-3 Screen Info
Seam Information
Select the position of seams among two types: between cabinets or between modules (it is located between cabinets generally).
Fill in the number of columns and rows of each module.
Click after setting to enter the Partition Mode.
5.4 Camera Settings Camera need to connect normally to computer, face directly toward the subarea and take pictures normally. Camera status is shown in the figure below. Click Next to start partition.

Full-Screen Calibration System
User Manual 5 Seam Brightness Calibration
http://www.novastar.tech 40
Figure 5-4 Camera Settings
5.5 Partition Mode
Start to modify bright and dark lines when the initialization of calibration is completed. The screen need to be divided into multiple areas with appropriate size for calibration due to the limitation of camera resolution.
Please refer to 4.5 Partition Mode Partition Mode for the setting of partition.

Full-Screen Calibration System
User Manual 5 Seam Brightness Calibration
http://www.novastar.tech 41
Figure 5-5 Partition Mode

Full-Screen Calibration System
User Manual 5 Seam Brightness Calibration
http://www.novastar.tech 42
5.6 Partition
Figure 5-6 Modifying bright and dark lines
1. Preparation
Click Common Setting on the main interface before enabling Auto Modify. A window below will pop up. Please set or check the corresponding options and then click OK.

Full-Screen Calibration System
User Manual 5 Seam Brightness Calibration
http://www.novastar.tech 43
Figure 5-7 Common Settings
2. Auto Modify
Click and the interface shown in Fig. 5-8 will be displayed when start modify. Users can use the mouse to drag the four vertexes of the quadrangle to select the valid area to be calibrated. The unwanted light around the screen to be calibrated is removed.

Full-Screen Calibration System
User Manual 5 Seam Brightness Calibration
http://www.novastar.tech 44
Figure 5-8 Confirm area of display screen
3. Manual fine adjustment
The user can conduct manual trim if the modification result is not satisfying after auto-modification.
Click to enter the fine Manual Trim interface of system as shown below:

Full-Screen Calibration System
User Manual 5 Seam Brightness Calibration
http://www.novastar.tech 45
Figure 5-9 Manual trim
Operation steps of manual fine adjustment:
a. Users can select the edge or point requiring fine adjustment by dragging mouse window or clicking the mouse. Yellow means that the whole edge is selected; green means that partial LEDs are selected.
As both directions in the window option are considered as checked in default setting, the edges in the rows and columns can be selected. If only columns is checked in the window option, user can only check the edge in the columns of the window.

Full-Screen Calibration System
User Manual 5 Seam Brightness Calibration
http://www.novastar.tech 46
Figure 5-10 Region option 1
Figure 5-11 Region option 2

Full-Screen Calibration System
User Manual 5 Seam Brightness Calibration
http://www.novastar.tech 47
The edge need trimming can be selected with a single click of the mouse.
Figure 5-12 Clicking the mouse to select the edge to be adjusted
Double-click the edge to pop up the following screen, you can click or select the light spot to be trimmed. Hold Ctrl or shift key to click the mouse to select multiple spots.
Figure 5-13 Select the light spots to be trimmed
After selecting the light spots, green indicates the light spots that have been selected, as shown below.
Full-Screen Calibration System
User Manual 5 Seam Brightness Calibration
http://www.novastar.tech 48
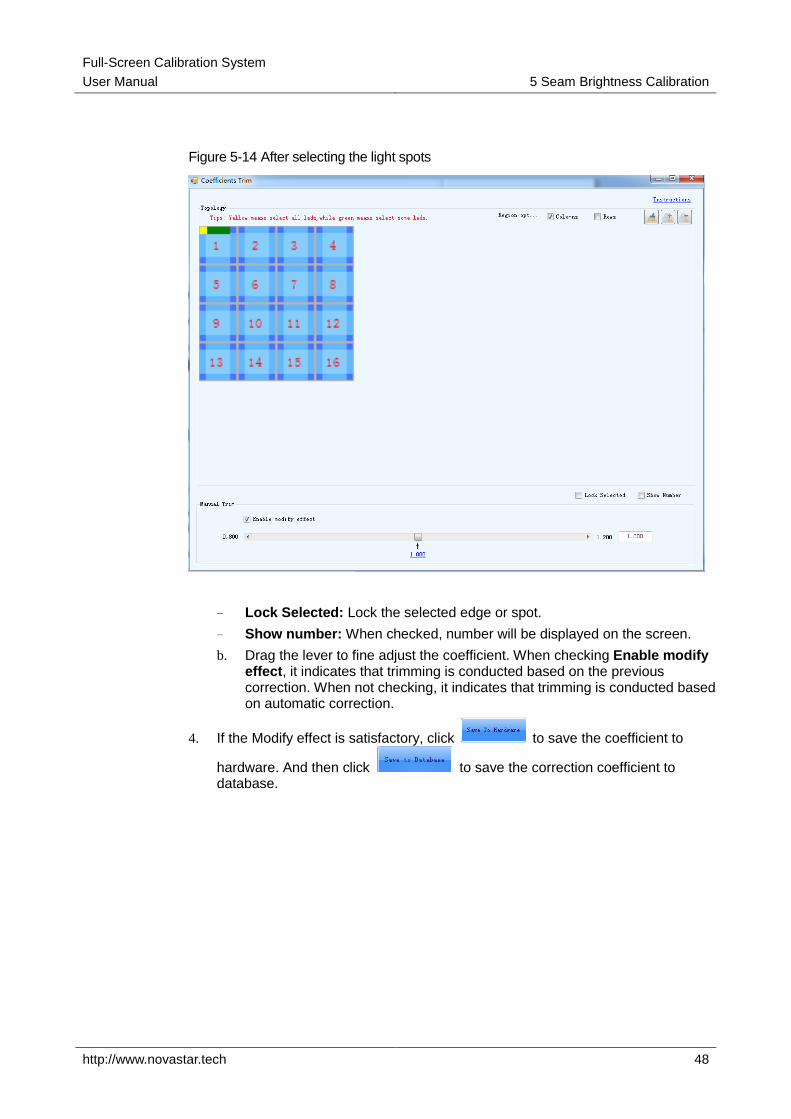
Figure 5-14 After selecting the light spots
− Lock Selected: Lock the selected edge or spot.
− Show number: When checked, number will be displayed on the screen.
b. Drag the lever to fine adjust the coefficient. When checking Enable modify effect, it indicates that trimming is conducted based on the previous correction. When not checking, it indicates that trimming is conducted based on automatic correction.
4. If the Modify effect is satisfactory, click to save the coefficient to
hardware. And then click to save the correction coefficient to database.

Full-Screen Calibration System
User Manual 6 New Module
http://www.novastar.tech 49
6 New Module
Connect control system (NovaLCT-Mars) to start on-line calibration.
Select New Module as calibration mode and click Next to enter the interface of initialization.
Figure 6-1 New Module
Full-Screen Calibration System
User Manual 6 New Module
http://www.novastar.tech 50
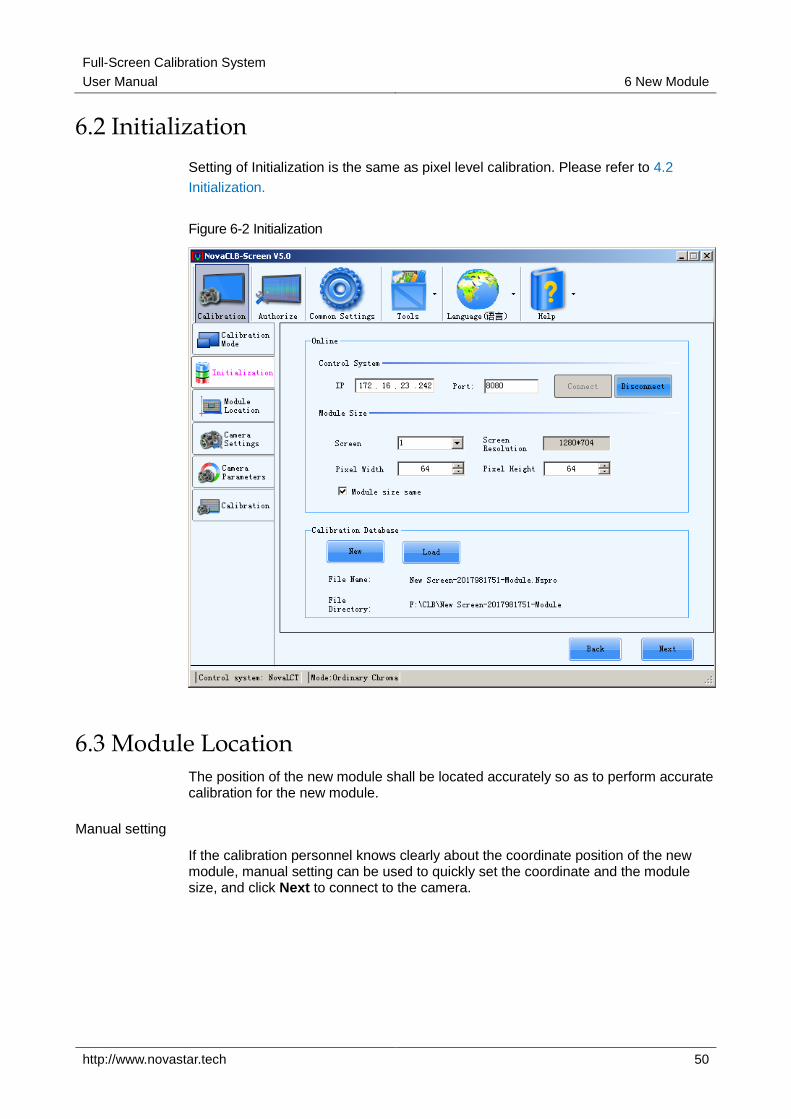
6.2 Initialization
Setting of Initialization is the same as pixel level calibration. Please refer to 4.2
Initialization.
Figure 6-2 Initialization
6.3 Module Location The position of the new module shall be located accurately so as to perform accurate calibration for the new module.
Manual setting
If the calibration personnel knows clearly about the coordinate position of the new module, manual setting can be used to quickly set the coordinate and the module size, and click Next to connect to the camera.

Full-Screen Calibration System
User Manual 6 New Module
http://www.novastar.tech 51
Figure 6-3 Manually set the module position
Auxiliary recognition
If the position of the new module cannot be located accurately, click ; and the following steps are as follows:

Full-Screen Calibration System
User Manual 6 New Module
http://www.novastar.tech 52
Figure 6-4 Auxiliary recognition
Step 1 Set the module size, click Next, and it can be seen that the screen is divided into multiple partitions with numbers (the software defaults to conduct partition as every partition has 4X4 modules).
Figure 6-5 Module Size information
Step 2 Select number of the area where the new module is, then click Next, and the screen displays the partition separately as well as the module number.
User can click Reset the area size to reset the amount of the module in every area, as shown in the following figure; after setting, click Reposition, and click OK, and the screen will display the area division after repositioning.

Full-Screen Calibration System
User Manual 6 New Module
http://www.novastar.tech 53
Figure 6-6 Select Region
Figure 6-7 Re-divide the area
Step 3 Confirm the number of the new module, and click OK.
Figure 6-8 Confirm Module location

Full-Screen Calibration System
User Manual 6 New Module
http://www.novastar.tech 54
6.4 Camera Settings Camera need to connect normally to computer, face directly toward the subarea and take pictures normally. After successfully connecting camera, adjust its parameters.
Figure 6-9 Camera Connection

Full-Screen Calibration System
User Manual 6 New Module
http://www.novastar.tech 55
6.5 Camera Parameters
No matter manual mode or automatic mode is adopted, adjust the saturation till the result reaches Normal, and adjust the image area to Fit.
Please refer to 4.3 Camera Settings for detailed description.
After completing setting, click Next.

Full-Screen Calibration System
User Manual 6 New Module
http://www.novastar.tech 56
Figure 6-10 Camera Settings

Full-Screen Calibration System
User Manual 6 New Module
http://www.novastar.tech 57
6.6 Module Calibration The software defaults to check Automatic mode and click Start, and the software will finish the calibration to the module automatically.
User can cancel checking Automatic mode, and manually complete the module calibration according to the calibration procedures on the right.
Figure 6-11 Module calibration
Full-Screen Calibration System
User Manual
7 Calibration Interruption (Searching LED position
failed)
http://www.novastar.tech 58
7 Calibration Interruption (Searching LED position failed)
No matter full-screen calibration or module calibration, after the calibration is enabled, various problems at the site may cause led position failed leading to calibration interruption, such as screen binding, dead LED or interference light. Generally, artificial location is adopted to help solve these problems, and this section will introduce solutions for several common situation.
Normal binding
Normal binding means that the whole columns or rows at the edge of the screen is wrapped regularly, and the error of search appears as not enough detected columns and rows, as shown in the following figure:
Solution:
Step 1 Check There exists some wrapped LED light, and click Next.
Step 2 The software detects four sides of the screen respectively, and the software defaults Auto switch. User needs to pay attention to the state of the software (namely at which row or column) while observing the lights lighting up at which stage of the screen, then record which state so as to select state at the result and click Next.
Step 3 After the four sides of the screen are detected, the software continues for calibration.

Full-Screen Calibration System
User Manual
7 Calibration Interruption (Searching LED position
failed)
http://www.novastar.tech 59
Figure 7-1 Solution for Normal binding
User considers the binding to be normal and calibration can be forced to continue.
Sometimes, user considers the binding to have a little effect, then checks The error does not affect the calibration, continue, then click Next to continue calibration.
Dead LED is reasonable, continue calibration
The number and location of the Dead LED detected match the actual situation, which means that the screen actually has these Dead LEDs at these positions, and this situation is called normal Dead LED.
Solutions:

Full-Screen Calibration System
User Manual
7 Calibration Interruption (Searching LED position
failed)
http://www.novastar.tech 60
1. Check The error does not affect the calibration, continue and click Next to continue calibrating
2. Check Modify the broken led ratio and turn up the allowable dead light rate.
Figure 7-2 Dead LED is reasonable
Dead LED increased by failure of searching
It is the failure of point location that leads to the increasing number of dead LEDs or the offset of point location.
Solution:
Step 1 Check Searching LED position failed, manually adjust the position, and click Next.

Full-Screen Calibration System
User Manual
7 Calibration Interruption (Searching LED position
failed)
http://www.novastar.tech 61
Figure 7-3 Death light rate is more than the normal range
Step 2 Adjust the first wrong LED point on the searching direction to right position, then click search again.

Full-Screen Calibration System
User Manual
7 Calibration Interruption (Searching LED position
failed)
http://www.novastar.tech 62
Figure 7-4 Search again
Search again: Conduct search again according to the current location direction and initial point;
Step 3 After the searching is successful, continue calibration.
Search result differs a lot from actual situations, calibration abandoned
If the result of search differs a lot from the actual situation, for example, searching result is that there are Dead LEDs at the up side and down side of the screen, but actually, there are Dead LEDs at left and right sides, under this situation, it is suggested to abandon calibration.
The number of rows and columns increases in the detection result
The result of search failed is that the number of rows or columns is greater than actual situation.
Solution: This result is caused by two possibilities: one is interference light which is eliminated as the solution; the other is that the resolution of sending card is inconsistent with that of graphics card, then the resolution of the sending card shall be set on LCT.

Full-Screen Calibration System
User Manual 8 Evaluate Uniformity
http://www.novastar.tech 63
8 Evaluate Uniformity
After the calibration is completed, evaluate the uniformity before and after calibration and you can find the uniformity changes obviously.
Figure 8-1 Choose calibration mode

Full-Screen Calibration System
User Manual 8 Evaluate Uniformity
http://www.novastar.tech 64
8.1 Initialization It is required to connect control system and set evaluation area during initialization. The maximum evaluation area can be up to 224X150.
Figure 8-2 Initialization

Full-Screen Calibration System
User Manual 8 Evaluate Uniformity
http://www.novastar.tech 65
8.2 Camera Settings
During calibration, camera must be connected computer correctly, aimed at the partition and be able to take photos normally. It is required to choose camera type before connecting camera. Digital camera refers to Canon camera and industrial camera is HS1000. After the camera is connected, camera status is as the figure below. Click Next to move on to partition mode to do the relevant camera settings. See details in 13.4 Camera operating skills.

Full-Screen Calibration System
User Manual 8 Evaluate Uniformity
http://www.novastar.tech 66
8.3 Camera Parameters
No matter manual mode or automatic mode is adopted, adjust the saturation till the result reaches Normal, and adjust the image area to Fit.
Please refer to 4.3 Camera Settings for detailed description.
After completing setting, click Next.

Full-Screen Calibration System
User Manual 8 Evaluate Uniformity
http://www.novastar.tech 67
8.4 Uniformity Evaluation
After evaluation, you can see the parameters and visual image change obviously.
Figure 8-3 Evaluate calibration
The closer the uniformity is to 0, the better the uniformity is. The narrower the wave peak of brightness distribution figure is, the better the uniformity is.

Full-Screen Calibration System
User Manual 9 Screen Data Merging
http://www.novastar.tech 68
9 Screen Data Merging
Spot calibration often encounters such situation: a large screen is applied with multiple sending cards for loading, and a video processor and a video stitching device are used between the graphics card and the sending card to connect the frames; at this moment, the display and the large screen are not in point-to-point display, and during calibration, the video process equipment needs to be skipped, and the large screen shall be divided into multiple split screen for respective calibration; and after calibration, unsmooth transition may appear at the adjacent area of the split screens, which is commonly known as layering. The full screen date merging tool is for solving this problem.
At the main interface of the software, click Tools > Full screen data merging; after opening the tool, assume that the full screen has been divided into four regions for calibration, set 2 rows and 2 columns of split screen.

Full-Screen Calibration System
User Manual 9 Screen Data Merging
http://www.novastar.tech 69
Figure 9-1 Full screen region data merging

Full-Screen Calibration System
User Manual 9 Screen Data Merging
http://www.novastar.tech 70
Select one of the regions, click right button of the mouse > Select database, load the corresponding full screen database; After loading successfully, see the information related to the database; and load the full screen database corresponding to all regions according to the same procedures, as shown in the figure below.
Figure 9-2 Loading the database
Click Select to set the storage directory for the database generated after merging.
Pay attention to whether current resolution ratio of all regions are matched to the full screen resolution or not; after confirming they are matched, click Area merger.
If the option Split-screen databases is checked, four databases after merging will be generated; if the option Entire-screen databases is checked, one database will be generated after merging.

Full-Screen Calibration System
User Manual 10 Screen to Cabinet
http://www.novastar.tech 71
10 Screen to Cabinet
Full-screen converting cabinet software can switch the full-screen database into cabinet or module database according to a certain resolution. It can be switched to single database or multiple databases based on different needs.

Full-Screen Calibration System
User Manual 10 Screen to Cabinet
http://www.novastar.tech 72
Figure 10-1 Screen to cabinet

Full-Screen Calibration System
User Manual 10 Screen to Cabinet
http://www.novastar.tech 73
10.1 Operation procedure
10.2 Operation instruction This chapter will illustrate operation steps of all procedures for users in detail.

Full-Screen Calibration System
User Manual 10 Screen to Cabinet
http://www.novastar.tech 74
10.2.1 Import database
Figure 10-2 Import Screen database

Full-Screen Calibration System
User Manual 10 Screen to Cabinet
http://www.novastar.tech 75
10.2.2 Draw topological graph
Set the number of rows and columns of the cabinet, and then click to generate a topological graph in the right window of the software.
Note that the sum of the resolution of all rows and all columns of the cabinet shall be equal to the resolution of the screen. Therefore, under the premise that resolution of each cabinet is known, number of rows and columns of the cabinet shall be calculated accurately.
Figure 10-3 Draw topological
10.2.3 Set resolution of each cabinet
First, select the cabinet which will be set in certain resolution, then set the resolution,
and click .
The cabinets can have different resolution; however, for cabinets on the same row, rows of the resolution shall be the same, and for cabinets on the same column, columns of the resolution shall be the same; when the resolution setting is irrational,
the color will appear; the sum of the resolution of all rows and all columns of the cabinet shall be equal to the resolution of the screen.
Instruction of the right-click menu of the cabinet:
Right-click on the topological graph will show two options in the right-click menu, Partition averagely and Clear settings. Partition averagely: partition the resolution of the display averagely on the drawn topological graph of the cabinet with resolution

Full-Screen Calibration System
User Manual 10 Screen to Cabinet
http://www.novastar.tech 76
of each cabinet being the same. Clear settings: clear the resolution and cabinet name set on the topological graph.
The following methods can be used to select the cabinet:
1. Select the first cabinet, hold down the mouse and drag according to the direction of arrow in the figure; the result is as follows:
2. Press the Ctrl key to conduct multiple selections; the result is as follows.
3. Select one cabinet as the start, press the Shift key, and then select another cabinet as the end. In this way, the rectangular area from the start cabinet to the end cabinet can be selected; the result is as follows.

Full-Screen Calibration System
User Manual 10 Screen to Cabinet
http://www.novastar.tech 77
4. Press Ctrl+A to select all cabinets and the result is as follows:
The topological graph with set resolution is shown as follows.

Full-Screen Calibration System
User Manual 10 Screen to Cabinet
http://www.novastar.tech 78
Figure 10-4 Resolution setting
10.2.4 Number the cabinet
Numbering can be automatic or manual.
Automatic numbering
Check Auto, select numbering method, row/column number, number of digit, and set
fixed digit and initial value, and then click .

Full-Screen Calibration System
User Manual 10 Screen to Cabinet
http://www.novastar.tech 79
Figure 10-5 Select Numbering mode
Numbering method: column direction, row direction, Z-shaped, ∽-shaped,
己-shaped, N-shaped.
Row/column number: When selecting column direction and row direction, it needs to select the first row/column, the second row/column, the third
row/column… the nth row/column, and number them respectively. The following
figure is the topological graph after being numbered.

Full-Screen Calibration System
User Manual 10 Screen to Cabinet
http://www.novastar.tech 80
Figure 10-6 Numbering according to row, column
If Z-shaped, -shaped, -shaped, N-shaped is selected, there is no need to select row/column number every time. The software will number all the cabinets according to the Z-shaped, as shown in the following figure:

Full-Screen Calibration System
User Manual 10 Screen to Cabinet
http://www.novastar.tech 81
Figure 10-7 Z-shaped Numbering
Figure 10-8 -shaped Numbering

Full-Screen Calibration System
User Manual 10 Screen to Cabinet
http://www.novastar.tech 82
Figure 10-9 -shaped Numbering
Figure 10-10 N-shaped Numbering

Full-Screen Calibration System
User Manual 10 Screen to Cabinet
http://www.novastar.tech 83
Fixed digit: fixed numbering character at the beginning of the number which can be set by the user; it can be any character, for example, A-, B-, number-, etc.
Number of digit: number of digit for the number, 1-4 digits; as shown in the following figure, the numbers of the first and second column have 2 digits; the number of the second column has one digit; the fourth column has 4 digits; and the fifth column has 3 digits.
Figure 10-11 Set the number of digit
Initial value: it means the initial value of the digit position in a single numbering process; for example, A-01 to A-08 can be used for the first column, and the initial value of the second column can be set as 9.
Manual numbering
Each time, number shall be entered manually; for example, enter the number A01,
select the first cabinet, and then click to finish the numbering of the first cabinet; then enter A02, select the second cabinet, and then click
to finish the numbering of the second cabinet; and the following can be done in a similar way to finish numbering of all cabinets.

Full-Screen Calibration System
User Manual 10 Screen to Cabinet
http://www.novastar.tech 84
Figure 10-12 Select Manual numbering mode
10.2.5 Set target database
There can be single target database or multiple target databases. For single target database, all cabinets or modules will be saved to one database and one database will be generated. For multiple target databases, single cabinet or module will be saved as one database, and multiple databases will be generated which are named after the number of each cabinet or module.
10.2.6 File path
In the case of saving as one single database, there are two situations. One is to save
the cabinet data to the existing database which requires clicking to open the existing database. The other is to save the cabinet data to a new database,
which requires clicking to create a new database on some path of the computer.
In the case of saving as multiple databases, click to select the saving path of the cabinet database.
10.2.7 Switch
After completion of settings of all the options above, click .

Full-Screen Calibration System
User Manual 11 Screen Update Targets
http://www.novastar.tech 85
11 Screen Update Targets
If the brightness and chroma of the full screen is not satisfactory after the calibration is completed, the full-screen target value can be modified through this function.
The operation is as follows:
Figure 11-1 Screen update targets

Full-Screen Calibration System
User Manual 11 Screen Update Targets
http://www.novastar.tech 86
Click the first to import the original database, and click the second
to set the route of the target database.
Operations of target value modification are the same as 4.3.3 Target Settings.
After the modification is completed, click to save and apply the target value.
Click the first and it can be individually loaded into the database or project. After being individually loaded into the database, the colorimetric correction mode cannot be changed. After being loaded into project, the correction modes can be changed freely. The information of modules also can be modified. Then click the
second to set the path of the target database.
The target value can be changed in the same way as the setting of expected brightness and chroma.
After the change, click to save the target value and apply.

Full-Screen Calibration System
User Manual 12 Cabinet to Screen
http://www.novastar.tech 87
12 Cabinet to Screen
To upload cabinet database, upload one cabinet at a time. For a screen that is composed of many cabinets, it takes a lot of time to upload databases of all cabinets. Now, use the cabinet-to-screen tool NovaCLB-Cabinet-To-Screen to change cabinet database into a screen database, and database uploading can be completed once.
The specific operation is as follows:
Step 1 Load cabinet databases
Figure 12-1 Load Cabinet Databases

Full-Screen Calibration System
User Manual 12 Cabinet to Screen
http://www.novastar.tech 88
Step 2 Topography

Full-Screen Calibration System
User Manual 12 Cabinet to Screen
http://www.novastar.tech 89
Figure 12-2 Topography
Step 3 Setting Cabinet ID
Double click a cabinet on the topology and enter its ID (for viewing onsite). Cabinet ID should be manually entered.
To set a position of the screen black, double-click this position, check set black, and enter the pixel row and column number.

Full-Screen Calibration System
User Manual 12 Cabinet to Screen
http://www.novastar.tech 90
Figure 12-3 Setting Cabinet
Figure 12-4 Set Black

Full-Screen Calibration System
User Manual 12 Cabinet to Screen
http://www.novastar.tech 91
Figure 12-5 Setting back is over
Step 4 Create a target database, that is, a full-screen database.
Figure 12-6 Create a target database

Full-Screen Calibration System
User Manual 12 Cabinet to Screen
http://www.novastar.tech 92
Step 5 Click Convert to convert the cabinet database into a full-screen database.
Figure 12-7 Conversion process
Figure 12-8 Conversion is over

Full-Screen Calibration System
User Manual 13 NovaCLB-Screen Help
http://www.novastar.tech 93
13 NovaCLB-Screen Help
13.1 Network Settings If the distance between the calibration computer and the NovaLCT-Mars control computer is within 100m when performing calibration, Ethernet cables can be used to connect the two computers. Otherwise, wireless routers should be used.
Here TP-LINK WR941N will be taken as an example for illustrating how to configure a wireless router for calibration application:
Figure 13-1 The Wireless router TP-LINK WR941N
Step 1 Connect the wireless router to the control computer through network cable into the yellow interface.
Figure 13-2 Ports for Connection
Figure 13-3 Enable the wireless networking capabilities of calibration computer to connect to wireless router.
Note: whether using network cable or wireless router, you need to set the IP of the two computers and the default IP of wireless router to be within the network segment while calibrating with NovaLCT-Mars.

Full-Screen Calibration System
User Manual 13 NovaCLB-Screen Help
http://www.novastar.tech 94
Figure 13-4 IP Configurations
13.2 LCT Monitor Settings Ensure that network is normal. Then users need to open NovaLCT-Mars, and choose advanced users. The password is admin, as shown in follow.
Figure 13-5 LCT Main Interface
After loading by advanced user, calibration options will appearon NovaLCT-Mars toolbar.Click into the calibration page.

Full-Screen Calibration System
User Manual 13 NovaCLB-Screen Help
http://www.novastar.tech 95
Figure 13-6 Calibration Page
After getting into the calibration page, please check the network settings to make sure network is normal and then click Reconnect. The message of Listening succeed shown in the following message window indicates that calibration service has been activated. If not, please check the network.
Figure 13-7 Enter into Calibration Mode
13.3 Principle of Brightness and Color Calibration Generally speaking, it is recommended that users select brightness and color calibration mode. Higher uniformity can be obtained. For some customers demanding more colorful and brighter, they can choose brightness calibration only.
Brightness calibration: Brightness calibration is to adjust the brightness of LED lights to improve the brightness uniformity. In the brightness calibration, brightness of most lights will be properly lowered. Fig. 13-7 shows an example of brightness adjustment of green LED lights, in which there are two brightness distribution curves corresponding to before and after calibration (adjustment) respectively. Before
calibration, the brightness values of green LED lights are scattered between 2400 –
3300 cd/m2, but after calibration those are concentrated almost at 2500 cd/m2, representing high brightness uniformity.

Full-Screen Calibration System
User Manual 13 NovaCLB-Screen Help
http://www.novastar.tech 96
Figure 13-8 Brightness Values Distribution Before and After Calibration
Brightness and color calibration: Brightness and color calibration is based on the theory of RGB color match. It adjusts the coordinates of LED lights in the RGB color coordinate system to reduce the color diversity. As shown in Fig. 13-8, the large triangle is the gamut of a LED display before calibration , while the small one is the gamut of same LED display after calibration. The R, G and B color coordinates of LED lights scatter in relative large areas when before corrected while those after calibration are concentrated, which represents high color uniformity.
Figure 13-9 Gamut of A LED Display Before and After Calibration
Note: When performing the brightness and color calibration, proper coordinates for R, G and B should be chosen in order to avoid color distortion.

Full-Screen Calibration System
User Manual 13 NovaCLB-Screen Help
http://www.novastar.tech 97
13.4 Camera Operating Skills
Camera Preparation:
Step 1 Use a USB cable to connect the camera to the computer. Set the camera to ON. Click Connect to camera. After Connected is displayed, users can automatically control the camera using the software.
Step 2 Set the mode dial to M (manually) and lens focus to AF (Auto). If the
lens supports the anti-shake function (OS on Sigma cameras), set to OFF.
Step 3 Switchover between eyepiece framing and LCD framing: Enable Live view shoot in
MENU of the camera and press to switch between eyepiece framing and LCD framing.
Tip:
When LCD framing is enabled, users can press to switch among original size, five times the
original size and ten times the original size for images.
Adjustment of the Camera Saturation:
Click Analyze. The software automatically calculates the saturation. Adjust the aperture size, time of exposure and calibration brightness value to enable the saturation to be normal. The saturation value ranging from 60 to 100 is normal, and the area value ranging from 50 to 150 is fit. The adjustment principle is as follows: the adjustment must be conducted in the following order: aperture size > time of exposure > calibration brightness value. Generally, the aperture value is inversely proportional to the saturation, and the time of exposure and brightness are directly proportional to the saturation.
Camera adjustment principles:
In this mode, users need to manually adjust the Brightness, Exposure and Aperture parameters.
The focusing ring, focal length and the intensity of LEDs have great influence on the image area. When the image area is less than 50, adjust the focusing ring to blur the image, and then the image area becomes lager. When the image area of LEDs is greater than 150, adjust the focusing ring to make the image clearer, or adjust the focal length to make the imaging area larger and the image of LEDs sparser, or change the basic unit so that the image area become smaller. If the image area is 0, it indicates the saturation is too low or high. At this time, adjust the saturation to a certain range so that the image area can be calculated. The brightness, exposure and ISO have less influence on image area, which are usually ignored. In general, set the aperture value and adjust the saturation to a certain range first to display the image size. Then, adjust focusing ring, focal length or basic unit to make the image

Full-Screen Calibration System
User Manual 13 NovaCLB-Screen Help
http://www.novastar.tech 98
size normal. At last, adjust the calibration brightness, exposure and ISO to make the saturation normal.
When the area is between 50 and 150, camera adjustment is not required.
Figure 13-10 Camera Parameters Adjustment
13.5 Subarea Imaging Operating Skills Keep the camera face toward the subarea to be calibrated and adjust lens focus length, so that the image of the subarea has a proper view.
Because of the outer part of the lens decreases in imaging quality, the direction of the camera should be adjusted to ensure the subarea image is at the central part of the whole image. And the size of the subarea image should be about 4/5 of the whole image area. That is to leave 1/10 of the whole image at sides, as shown in Fig 13-10.

Full-Screen Calibration System
User Manual 13 NovaCLB-Screen Help
http://www.novastar.tech 99
Figure 13-11 Imaging of A Subarea
(a) Subarea Image Too Small
(b) Subarea Image Too Large
(c) Suitable Subarea Image area
For factory calibration, it is not recommended to use the maximum lens focus length . Because the pixel size is less than the supported maximum subarea size, the suitable focus length is that makes the cabinet view center is at the center of the whole view. Length and width are half of the length and width of imaging ofa subarea, i.e., reserve 1/5 for top, bottom, left and right respectively.
13.6 Steps to Check Calibration Effects
It may occur unsatisfactory calibration effects in some areas of screen after calibration, then troubleshoot according to calibration effect is needed. Before checking, users should know how to check Camera Image Collection.
Click magnifying glass icon in Partition calibration page, then measurement image page appears. First, observe the image resolution and integrity, second, observe whether all led points have been selected. As shown in follow.

Full-Screen Calibration System
User Manual 13 NovaCLB-Screen Help
http://www.novastar.tech 100
Figure 13-12 View of Collection Images
Screen fuzzy phenomenon 1: there appears some bright or dark lines in vertical direction between subareas.
Analysis: Generally speaking, it is because of poor quality of imaging, users may check whether LED image clear or not on Camera Image Collection. Generally both Oversize resolution when partition setting and not clear focus when the imaging may lead poor quality of imaging.
Screen fuzzy phenomenon 2: there appears water ripples in subareas
Analysis: Generally speaking, it is because of inadequate sampling. Show red, green and blue image on LED screen after calibration to find out undesirables color. Slightly adjust the focus or re-focus, then repeat the calibration of the color, you can solve the problem.
Moreover, some scene reasons may also lead unsatisfactory, for example, outside light interference, lens jitter by site windy and imaging fuzzy by rain and snow. In order to reach the most ideal effect, engineers need to avoid these influences of external environment.
13.7 Water Ripple in Full-Screen Calibration Full-screen calibration may appear full screen of a color rendering water ripple, blue share the highest frequency. This is due to that the display resolution is too large, and the relative lack of camera resolution leads the low sampling frequency. It is known as moiré patterns phenomenon in optical imaging.
Try below resolutions to solve this problem, and then collect R/G/B again.

Full-Screen Calibration System
User Manual 13 NovaCLB-Screen Help
http://www.novastar.tech 101
Step 1 Change camera angle. Rotate camera lightly to change its angle to eliminate or reduce the existing moiré patterns.
Step 2 Change camera position. Move camera up or down or left or right to reduce moiré patterns.
Step 3 Change camera focusing. Too clear focus and details may cause moiré patterns, please adjust camera aperture to reduce camera focus Clarity, furthermore to reduce moiré patterns.
Step 4 Change camera lens. Try different focus length to reduce or eliminate moiré patterns.

Full-Screen Calibration System
User Manual 14 Release Notes
http://www.novastar.tech 102
14 Release Notes
Version Release Date
Corresponded Software Version
User Manual of NovaCLB-Screen Full Screen System-V1.0
25/09/2012 First Release
User Manual of NovaCLB-Screen Full Screen System -V2.0
19/12/2012 NovaCLB-Screen V1.9.0
User Manual of NovaCLB-Screen Full Screen System -V2.2
06/09/2013 NovaCLB-Screen V2.0.0
User Manual of NovaCLB-Screen Full Screen System -V3.1.0
07/03/2014 NovaCLB-Screen V3.1.0
User Manual of NovaCLB-Screen Full Screen System -V3.2.0
08/04/2014 NovaCLB-Screen V3.2.0
User Manual of NovaCLB-Screen Full Screen System -V3.3.1
01/26/2015 NovaCLB-Screen V3.3.1
User Manual of NovaCLB-Screen Full Screen System -V3.4.0
04/21/2015 NovaCLB-Screen V3.4.0
User Manual of NovaCLB-Screen Full Screen System -V4.0.0
09/22/2015 NovaCLB-Screen V4.0.0
User Manual of NovaCLB-Screen Full Screen System -V5.0.0
9/10/2017 NovaCLB-Screen V5.0.0