novell cifs administration guide -...
TRANSCRIPT
www.novell.com/documentation
Novell CIFS Administration GuideOpen Enterprise Server 11 SP1
August 28, 2012

Legal Notices
Novell, Inc., makes no representations or warranties with respect to the contents or use of this documentation, and specifically disclaims any express or implied warranties of merchantability or fitness for any particular purpose. Further, Novell, Inc., reserves the right to revise this publication and to make changes to its content, at any time, without obligation to notify any person or entity of such revisions or changes.
Further, Novell, Inc., makes no representations or warranties with respect to any software, and specifically disclaims any express or implied warranties of merchantability or fitness for any particular purpose. Further, Novell, Inc., reserves the right to make changes to any and all parts of Novell software, at any time, without any obligation to notify any person or entity of such changes.
Any products or technical information provided under this Agreement may be subject to U.S. export controls and the trade laws of other countries. You agree to comply with all export control regulations and to obtain any required licenses or classification to export, re-export or import deliverables. You agree not to export or re-export to entities on the current U.S. export exclusion lists or to any embargoed or terrorist countries as specified in the U.S. export laws. You agree to not use deliverables for prohibited nuclear, missile, or chemical biological weaponry end uses. See the Novell International Trade Service Web page (http://www.novell.com/info/exports/) for more information on exporting Novell software. Novell assumes no responsibility for your failure to obtain any necessary export approvals.
Copyright © 2010-2012 Novell, Inc. All rights reserved. No part of this publication may be reproduced, photocopied, stored on a retrieval system, or transmitted without the express written consent of the publisher.
Novell, Inc.1800 South Novell PlaceProvo, UT 84606U.S.A.www.novell.com
Online Documentation: To access the latest online documentation for this and other Novell products, see the Novell Documentation Web site (http://www.novell.com/documentation/).
Novell Trademarks
For Novell trademarks, see the Novell Trademark and Service Mark list (http://www.novell.com/company/legal/trademarks/tmlist.html).
Third-Party Materials
All third-party trademarks are the property of their respective owners.
Contents
About This Guide 7
1 Overview of CIFS 9
1.1 Understanding CIFS. . . . . . . . . . . . . . . . . . . . . . . . . . . . . . . . . . . . . . . . . . . . . . . . . . . . . . . . . . . . . . . 91.2 CIFS and Universal Password . . . . . . . . . . . . . . . . . . . . . . . . . . . . . . . . . . . . . . . . . . . . . . . . . . . . . . 101.3 CIFS Features and Capabilities . . . . . . . . . . . . . . . . . . . . . . . . . . . . . . . . . . . . . . . . . . . . . . . . . . . . . 101.4 Limitations . . . . . . . . . . . . . . . . . . . . . . . . . . . . . . . . . . . . . . . . . . . . . . . . . . . . . . . . . . . . . . . . . . . . . 121.5 What's Next . . . . . . . . . . . . . . . . . . . . . . . . . . . . . . . . . . . . . . . . . . . . . . . . . . . . . . . . . . . . . . . . . . . . 12
2 What’s New or Changed in Novell CIFS 13
2.1 What’s New (OES 11 SP1 September 2012 Patches). . . . . . . . . . . . . . . . . . . . . . . . . . . . . . . . . . . . 132.2 What’s New or Changed in Novell CIFS (OES 11 SP1). . . . . . . . . . . . . . . . . . . . . . . . . . . . . . . . . . . 132.3 What’s New or Changed in Novell CIFS (OES 11) . . . . . . . . . . . . . . . . . . . . . . . . . . . . . . . . . . . . . . 13
3 Planning and Implementing CIFS 15
3.1 Planning for CIFS. . . . . . . . . . . . . . . . . . . . . . . . . . . . . . . . . . . . . . . . . . . . . . . . . . . . . . . . . . . . . . . . 153.2 Preparing for CIFS Installation . . . . . . . . . . . . . . . . . . . . . . . . . . . . . . . . . . . . . . . . . . . . . . . . . . . . . . 15
3.2.1 Prerequisites . . . . . . . . . . . . . . . . . . . . . . . . . . . . . . . . . . . . . . . . . . . . . . . . . . . . . . . . . . . . 153.2.2 Required Rights and Permissions for a CIFS User/Administrator . . . . . . . . . . . . . . . . . . . . 16
3.3 CIFS System Prerequisites . . . . . . . . . . . . . . . . . . . . . . . . . . . . . . . . . . . . . . . . . . . . . . . . . . . . . . . . 173.3.1 Server Operating System Requirements . . . . . . . . . . . . . . . . . . . . . . . . . . . . . . . . . . . . . . . 173.3.2 Server Hardware Requirements . . . . . . . . . . . . . . . . . . . . . . . . . . . . . . . . . . . . . . . . . . . . . 173.3.3 Client Operating System Requirements . . . . . . . . . . . . . . . . . . . . . . . . . . . . . . . . . . . . . . . 173.3.4 Package Dependencies. . . . . . . . . . . . . . . . . . . . . . . . . . . . . . . . . . . . . . . . . . . . . . . . . . . . 17
3.4 Co-existence Issues. . . . . . . . . . . . . . . . . . . . . . . . . . . . . . . . . . . . . . . . . . . . . . . . . . . . . . . . . . . . . . 173.5 What's Next . . . . . . . . . . . . . . . . . . . . . . . . . . . . . . . . . . . . . . . . . . . . . . . . . . . . . . . . . . . . . . . . . . . . 18
4 Installing and Setting Up CIFS 19
4.1 Installing and Configuring a CIFS Server through YaST . . . . . . . . . . . . . . . . . . . . . . . . . . . . . . . . . . 194.2 Installing NMAS . . . . . . . . . . . . . . . . . . . . . . . . . . . . . . . . . . . . . . . . . . . . . . . . . . . . . . . . . . . . . . . . . 244.3 Verifying Installation . . . . . . . . . . . . . . . . . . . . . . . . . . . . . . . . . . . . . . . . . . . . . . . . . . . . . . . . . . . . . . 25
4.3.1 Verifying Files and Folders . . . . . . . . . . . . . . . . . . . . . . . . . . . . . . . . . . . . . . . . . . . . . . . . . 254.3.2 Verifying the File Configuration Information. . . . . . . . . . . . . . . . . . . . . . . . . . . . . . . . . . . . . 264.3.3 Verifying LSM Installation . . . . . . . . . . . . . . . . . . . . . . . . . . . . . . . . . . . . . . . . . . . . . . . . . . 26
4.4 Installing the CIFS iManager Plug-In . . . . . . . . . . . . . . . . . . . . . . . . . . . . . . . . . . . . . . . . . . . . . . . . . 264.5 What's Next . . . . . . . . . . . . . . . . . . . . . . . . . . . . . . . . . . . . . . . . . . . . . . . . . . . . . . . . . . . . . . . . . . . . 26
5 Administering the CIFS Server 27
5.1 Using iManager to Manage CIFS. . . . . . . . . . . . . . . . . . . . . . . . . . . . . . . . . . . . . . . . . . . . . . . . . . . . 275.1.1 Prerequisites . . . . . . . . . . . . . . . . . . . . . . . . . . . . . . . . . . . . . . . . . . . . . . . . . . . . . . . . . . . . 285.1.2 Selecting a Server to Manage . . . . . . . . . . . . . . . . . . . . . . . . . . . . . . . . . . . . . . . . . . . . . . . 285.1.3 Setting the CIFS Server and Authentication Properties. . . . . . . . . . . . . . . . . . . . . . . . . . . . 305.1.4 Managing CIFS Shares . . . . . . . . . . . . . . . . . . . . . . . . . . . . . . . . . . . . . . . . . . . . . . . . . . . 355.1.5 Configuring a CIFS User Context . . . . . . . . . . . . . . . . . . . . . . . . . . . . . . . . . . . . . . . . . . . . 395.1.6 Stopping CIFS . . . . . . . . . . . . . . . . . . . . . . . . . . . . . . . . . . . . . . . . . . . . . . . . . . . . . . . . . . . 41
Contents 3
4 Con
5.2 Using the Command Line to Manage CIFS . . . . . . . . . . . . . . . . . . . . . . . . . . . . . . . . . . . . . . . . . . . . 415.2.1 Starting CIFS . . . . . . . . . . . . . . . . . . . . . . . . . . . . . . . . . . . . . . . . . . . . . . . . . . . . . . . . . . . . 415.2.2 Stopping CIFS . . . . . . . . . . . . . . . . . . . . . . . . . . . . . . . . . . . . . . . . . . . . . . . . . . . . . . . . . . . 415.2.3 Restarting CIFS . . . . . . . . . . . . . . . . . . . . . . . . . . . . . . . . . . . . . . . . . . . . . . . . . . . . . . . . . . 415.2.4 Monitoring CIFS. . . . . . . . . . . . . . . . . . . . . . . . . . . . . . . . . . . . . . . . . . . . . . . . . . . . . . . . . . 425.2.5 Modifying the CIFS Configuration . . . . . . . . . . . . . . . . . . . . . . . . . . . . . . . . . . . . . . . . . . . . 425.2.6 Anonymous Login for CIFS . . . . . . . . . . . . . . . . . . . . . . . . . . . . . . . . . . . . . . . . . . . . . . . . . 425.2.7 Working with CIFS Shares. . . . . . . . . . . . . . . . . . . . . . . . . . . . . . . . . . . . . . . . . . . . . . . . . . 435.2.8 Configuring the CIFS Context Search File. . . . . . . . . . . . . . . . . . . . . . . . . . . . . . . . . . . . . . 44
5.3 Locks Management for CIFS . . . . . . . . . . . . . . . . . . . . . . . . . . . . . . . . . . . . . . . . . . . . . . . . . . . . . . . 445.4 Third-Party Domain Authentication . . . . . . . . . . . . . . . . . . . . . . . . . . . . . . . . . . . . . . . . . . . . . . . . . . 44
5.4.1 Prerequisites . . . . . . . . . . . . . . . . . . . . . . . . . . . . . . . . . . . . . . . . . . . . . . . . . . . . . . . . . . . . 455.4.2 Using iManager to Enable Third-Party Authentication. . . . . . . . . . . . . . . . . . . . . . . . . . . . . 45
5.5 Dynamic Storage Technology for CIFS Server . . . . . . . . . . . . . . . . . . . . . . . . . . . . . . . . . . . . . . . . . 475.6 DFS Junction Support in CIFS Linux . . . . . . . . . . . . . . . . . . . . . . . . . . . . . . . . . . . . . . . . . . . . . . . . . 48
5.6.1 Prerequisites . . . . . . . . . . . . . . . . . . . . . . . . . . . . . . . . . . . . . . . . . . . . . . . . . . . . . . . . . . . . 485.6.2 Enabling DFS Support . . . . . . . . . . . . . . . . . . . . . . . . . . . . . . . . . . . . . . . . . . . . . . . . . . . . . 485.6.3 Limitations . . . . . . . . . . . . . . . . . . . . . . . . . . . . . . . . . . . . . . . . . . . . . . . . . . . . . . . . . . . . . . 495.6.4 Problems Following DFS Junctions with CIFS in Windows 2000/XP Releases . . . . . . . . . 49
5.7 Subtree Search . . . . . . . . . . . . . . . . . . . . . . . . . . . . . . . . . . . . . . . . . . . . . . . . . . . . . . . . . . . . . . . . . 515.7.1 Prerequisites . . . . . . . . . . . . . . . . . . . . . . . . . . . . . . . . . . . . . . . . . . . . . . . . . . . . . . . . . . . . 515.7.2 Enabling a Subtree Search . . . . . . . . . . . . . . . . . . . . . . . . . . . . . . . . . . . . . . . . . . . . . . . . . 515.7.3 Subtree Search in a Cluster Setup . . . . . . . . . . . . . . . . . . . . . . . . . . . . . . . . . . . . . . . . . . . 515.7.4 Subtree Search Persistence . . . . . . . . . . . . . . . . . . . . . . . . . . . . . . . . . . . . . . . . . . . . . . . . 52
5.8 Enabling Offline Files Support . . . . . . . . . . . . . . . . . . . . . . . . . . . . . . . . . . . . . . . . . . . . . . . . . . . . . . 525.9 Directory Cache Management for CIFS Server . . . . . . . . . . . . . . . . . . . . . . . . . . . . . . . . . . . . . . . . . 535.10 What’s Next . . . . . . . . . . . . . . . . . . . . . . . . . . . . . . . . . . . . . . . . . . . . . . . . . . . . . . . . . . . . . . . . . . . . 53
6 Migrating CIFS to OES 11 SP1 55
7 Running CIFS in a Virtualized Environment 57
7.1 What’s Next . . . . . . . . . . . . . . . . . . . . . . . . . . . . . . . . . . . . . . . . . . . . . . . . . . . . . . . . . . . . . . . . . . . . 57
8 Configuring CIFS with Novell Cluster Services for an NSS File System 59
8.1 Benefits of Configuring CIFS for High Availability . . . . . . . . . . . . . . . . . . . . . . . . . . . . . . . . . . . . . . . 598.2 Cluster Terminology . . . . . . . . . . . . . . . . . . . . . . . . . . . . . . . . . . . . . . . . . . . . . . . . . . . . . . . . . . . . . . 598.3 CIFS and Cluster Services. . . . . . . . . . . . . . . . . . . . . . . . . . . . . . . . . . . . . . . . . . . . . . . . . . . . . . . . . 60
8.3.1 Prerequisites . . . . . . . . . . . . . . . . . . . . . . . . . . . . . . . . . . . . . . . . . . . . . . . . . . . . . . . . . . . . 608.3.2 Using CIFS in a Cluster Environment . . . . . . . . . . . . . . . . . . . . . . . . . . . . . . . . . . . . . . . . . 61
8.4 Configuring CIFS in a Cluster . . . . . . . . . . . . . . . . . . . . . . . . . . . . . . . . . . . . . . . . . . . . . . . . . . . . . . 628.4.1 Prerequisites . . . . . . . . . . . . . . . . . . . . . . . . . . . . . . . . . . . . . . . . . . . . . . . . . . . . . . . . . . . . 628.4.2 Creating Shared Pools and Accessing Sharepoints . . . . . . . . . . . . . . . . . . . . . . . . . . . . . . 63
8.5 What's Next . . . . . . . . . . . . . . . . . . . . . . . . . . . . . . . . . . . . . . . . . . . . . . . . . . . . . . . . . . . . . . . . . . . . 63
9 Working with Client Computers 65
9.1 Accessing Files from a Client Computer . . . . . . . . . . . . . . . . . . . . . . . . . . . . . . . . . . . . . . . . . . . . . . 659.1.1 Accessing Files from a Windows Client . . . . . . . . . . . . . . . . . . . . . . . . . . . . . . . . . . . . . . . . 659.1.2 Accessing Files from a Linux Desktop. . . . . . . . . . . . . . . . . . . . . . . . . . . . . . . . . . . . . . . . . 66
9.2 Mapping Drives and Mounting Volumes . . . . . . . . . . . . . . . . . . . . . . . . . . . . . . . . . . . . . . . . . . . . . . 679.2.1 Mapping Drives from a Windows 2000 or XP Client . . . . . . . . . . . . . . . . . . . . . . . . . . . . . . 679.2.2 Mapping Files from a Windows Vista Client . . . . . . . . . . . . . . . . . . . . . . . . . . . . . . . . . . . . 679.2.3 Mounting Volumes from a Linux Client . . . . . . . . . . . . . . . . . . . . . . . . . . . . . . . . . . . . . . . . 67
tents
10 Troubleshooting CIFS 69
10.1 Known issues . . . . . . . . . . . . . . . . . . . . . . . . . . . . . . . . . . . . . . . . . . . . . . . . . . . . . . . . . . . . . . . . . . . 6910.2 CIFS Installation and Configuration Issues . . . . . . . . . . . . . . . . . . . . . . . . . . . . . . . . . . . . . . . . . . . . 69
10.2.1 CIFS is Not Coming Up After Installation. . . . . . . . . . . . . . . . . . . . . . . . . . . . . . . . . . . . . . . 6910.2.2 CIFS Stops After Installation and Throws an Error 669, “schema not extended” . . . . . . . . 6910.2.3 CIFS is Not Running With Samba . . . . . . . . . . . . . . . . . . . . . . . . . . . . . . . . . . . . . . . . . . . . 7010.2.4 CIFS Server Broadcasts the Browser Packets every Twelve Minutes . . . . . . . . . . . . . . . . 70
10.3 CIFS Log In Issues. . . . . . . . . . . . . . . . . . . . . . . . . . . . . . . . . . . . . . . . . . . . . . . . . . . . . . . . . . . . . . . 7010.3.1 CIFS Does Not Log In and Throws “Password has expired” Error in the Log File. . . . . . . . 7010.3.2 Windows Workstation Displays Only Folders Assigned with Public Trustee Rights . . . . . . 70
10.4 CIFS Loading Issues . . . . . . . . . . . . . . . . . . . . . . . . . . . . . . . . . . . . . . . . . . . . . . . . . . . . . . . . . . . . . 7010.4.1 CIFS Is Not Starting. . . . . . . . . . . . . . . . . . . . . . . . . . . . . . . . . . . . . . . . . . . . . . . . . . . . . . . 7110.4.2 Newly Created NSS Volumes Are Not Being Shared in CIFS. . . . . . . . . . . . . . . . . . . . . . . 71
10.5 CIFS Migration Issues . . . . . . . . . . . . . . . . . . . . . . . . . . . . . . . . . . . . . . . . . . . . . . . . . . . . . . . . . . . . 7210.5.1 After Migration, CIFS is Not Running. . . . . . . . . . . . . . . . . . . . . . . . . . . . . . . . . . . . . . . . . . 7210.5.2 Different Tree Migration Is Not Available in the Migration Tool . . . . . . . . . . . . . . . . . . . . . . 7210.5.3 After Migration, CIFS Server Not Coming up on the Target Server by Default.. . . . . . . . . . 72
10.6 CIFS General Issues . . . . . . . . . . . . . . . . . . . . . . . . . . . . . . . . . . . . . . . . . . . . . . . . . . . . . . . . . . . . . 7210.6.1 Junction Target Changes Require DFSUTIL Command Execution to Clear the
Cache . . . . . . . . . . . . . . . . . . . . . . . . . . . . . . . . . . . . . . . . . . . . . . . . . . . . . . . . . . . . . . . . . 7310.6.2 Unable to Access DFS Junctions on a Novell CIFS Share from Windows Client . . . . . . . . 7310.6.3 Temporary Files Created by Windows Office 2010 Are Not Cleared. . . . . . . . . . . . . . . . . . 7310.6.4 Users Created Using UID Qualifier Cannot Access CIFS Shares . . . . . . . . . . . . . . . . . . . 7310.6.5 Authentication Failure Due to Password Mismatch . . . . . . . . . . . . . . . . . . . . . . . . . . . . . . . 73
11 Security Guidelines for CIFS 75
11.1 Using Credentials. . . . . . . . . . . . . . . . . . . . . . . . . . . . . . . . . . . . . . . . . . . . . . . . . . . . . . . . . . . . . . . . 7511.2 Using CASA . . . . . . . . . . . . . . . . . . . . . . . . . . . . . . . . . . . . . . . . . . . . . . . . . . . . . . . . . . . . . . . . . . . . 7511.3 Using VPN Connections. . . . . . . . . . . . . . . . . . . . . . . . . . . . . . . . . . . . . . . . . . . . . . . . . . . . . . . . . . . 7511.4 Using SMB Signing . . . . . . . . . . . . . . . . . . . . . . . . . . . . . . . . . . . . . . . . . . . . . . . . . . . . . . . . . . . . . . 7511.5 Other Security Considerations . . . . . . . . . . . . . . . . . . . . . . . . . . . . . . . . . . . . . . . . . . . . . . . . . . . . . . 75
12 Tuning the Parameters and Settings for a File Server Stack 77
12.1 eDirectory. . . . . . . . . . . . . . . . . . . . . . . . . . . . . . . . . . . . . . . . . . . . . . . . . . . . . . . . . . . . . . . . . . . . . . 7712.1.1 FLAIM Database . . . . . . . . . . . . . . . . . . . . . . . . . . . . . . . . . . . . . . . . . . . . . . . . . . . . . . . . . 7712.1.2 Thread Pool . . . . . . . . . . . . . . . . . . . . . . . . . . . . . . . . . . . . . . . . . . . . . . . . . . . . . . . . . . . . . 77
12.2 NSS . . . . . . . . . . . . . . . . . . . . . . . . . . . . . . . . . . . . . . . . . . . . . . . . . . . . . . . . . . . . . . . . . . . . . . . . . . 7812.2.1 IDCacheSize . . . . . . . . . . . . . . . . . . . . . . . . . . . . . . . . . . . . . . . . . . . . . . . . . . . . . . . . . . . . 7812.2.2 Minimum Buffer Cache . . . . . . . . . . . . . . . . . . . . . . . . . . . . . . . . . . . . . . . . . . . . . . . . . . . . 7912.2.3 Setting the Name Cache Size . . . . . . . . . . . . . . . . . . . . . . . . . . . . . . . . . . . . . . . . . . . . . . . 79
12.3 CIFS . . . . . . . . . . . . . . . . . . . . . . . . . . . . . . . . . . . . . . . . . . . . . . . . . . . . . . . . . . . . . . . . . . . . . . . . . . 7912.3.1 Maximum Cached Subdirectories Per Volume . . . . . . . . . . . . . . . . . . . . . . . . . . . . . . . . . . 8012.3.2 Maximum Cached Files Per Subdirectory . . . . . . . . . . . . . . . . . . . . . . . . . . . . . . . . . . . . . . 8012.3.3 Maximum Cached Files Per Volume . . . . . . . . . . . . . . . . . . . . . . . . . . . . . . . . . . . . . . . . . . 8012.3.4 Subtree Search . . . . . . . . . . . . . . . . . . . . . . . . . . . . . . . . . . . . . . . . . . . . . . . . . . . . . . . . . . 8012.3.5 Information and Debug Logs . . . . . . . . . . . . . . . . . . . . . . . . . . . . . . . . . . . . . . . . . . . . . . . . 8112.3.6 Oplocks . . . . . . . . . . . . . . . . . . . . . . . . . . . . . . . . . . . . . . . . . . . . . . . . . . . . . . . . . . . . . . . . 8112.3.7 Cross Protocol Locks. . . . . . . . . . . . . . . . . . . . . . . . . . . . . . . . . . . . . . . . . . . . . . . . . . . . . . 8112.3.8 SMB Signing . . . . . . . . . . . . . . . . . . . . . . . . . . . . . . . . . . . . . . . . . . . . . . . . . . . . . . . . . . . . 81
12.4 NCP . . . . . . . . . . . . . . . . . . . . . . . . . . . . . . . . . . . . . . . . . . . . . . . . . . . . . . . . . . . . . . . . . . . . . . . . . . 8112.4.1 Thread Pools . . . . . . . . . . . . . . . . . . . . . . . . . . . . . . . . . . . . . . . . . . . . . . . . . . . . . . . . . . . . 8112.4.2 Cache Settings . . . . . . . . . . . . . . . . . . . . . . . . . . . . . . . . . . . . . . . . . . . . . . . . . . . . . . . . . . 82
Contents 5
6 Con
A Command Line Utility for CIFS 83
novcifs . . . . . . . . . . . . . . . . . . . . . . . . . . . . . . . . . . . . . . . . . . . . . . . . . . . . . . . . . . . . . . . . . . . . . . . . 84
B Comparing Novell CIFS and Novell Samba 91
C Comparing CIFS on NetWare and CIFS on Linux 93
D Configuration and Log Files 95
E Documentation Updates 97
E.1 September 2012 (OES 11 SP1). . . . . . . . . . . . . . . . . . . . . . . . . . . . . . . . . . . . . . . . . . . . . . . . . . . . . 97E.1.1 What’s New . . . . . . . . . . . . . . . . . . . . . . . . . . . . . . . . . . . . . . . . . . . . . . . . . . . . . . . . . . . . . 97
E.2 April 2012 (OES 11 SP1) . . . . . . . . . . . . . . . . . . . . . . . . . . . . . . . . . . . . . . . . . . . . . . . . . . . . . . . . . . 97E.2.1 What’s New . . . . . . . . . . . . . . . . . . . . . . . . . . . . . . . . . . . . . . . . . . . . . . . . . . . . . . . . . . . . . 97
tents
About This Guide
This guide contains information on installing, migrating, configuring, administering, managing, and troubleshooting Novell CIFS software specific to Windows CIFS running on Open Enterprise Server (OES) 11 SP1 server.
Chapter 1, “Overview of CIFS,” on page 9 Chapter 2, “What’s New or Changed in Novell CIFS,” on page 13 Chapter 3, “Planning and Implementing CIFS,” on page 15 Chapter 4, “Installing and Setting Up CIFS,” on page 19 Chapter 5, “Administering the CIFS Server,” on page 27 Chapter 6, “Migrating CIFS to OES 11 SP1,” on page 55 Chapter 7, “Running CIFS in a Virtualized Environment,” on page 57 Chapter 8, “Configuring CIFS with Novell Cluster Services for an NSS File System,” on page 59 Chapter 9, “Working with Client Computers,” on page 65 Chapter 10, “Troubleshooting CIFS,” on page 69 Chapter 11, “Security Guidelines for CIFS,” on page 75 Chapter 12, “Tuning the Parameters and Settings for a File Server Stack,” on page 77 Appendix A, “Command Line Utility for CIFS,” on page 83 Appendix B, “Comparing Novell CIFS and Novell Samba,” on page 91 Appendix C, “Comparing CIFS on NetWare and CIFS on Linux,” on page 93 Appendix D, “Configuration and Log Files,” on page 95 Appendix E, “Documentation Updates,” on page 97
Audience
This guide is intended for OES 11 SP1 administrators who want to use and administer the CIFS services and to access shares.
Feedback
We want to hear your comments and suggestions about this manual and the other documentation included with this product. Please use the User Comments feature at the bottom of each page of the online documentation.
Documentation Updates
For the most recent version of the CIFS Guide, visit the OES 11 Documentation Web site (http://www.novell.com/documentation/oes11).
About This Guide 7
Additional Documentation
For documentation on CIFS on NetWare, see the Native File Access Protocols Guide (http://www.novell.com/documentation/nw65/file_afp_cifs_nfs_nw/data/h9izvdye.html#h9izvdye).
8 OES 11 SP1: Novell CIFS for Linux Administration Guide
1 1Overview of CIFS
CIFS (Common Internet File System) is a network file sharing protocol that is based on the SMB (Server Message Block) protocol. File sharing is achieved through this but intertwined with other protocols for service announcement, naming, authentication, and authorization.
Section 1.1, “Understanding CIFS,” on page 9 Section 1.2, “CIFS and Universal Password,” on page 10 Section 1.3, “CIFS Features and Capabilities,” on page 10 Section 1.4, “Limitations,” on page 12 Section 1.5, “What's Next,” on page 12
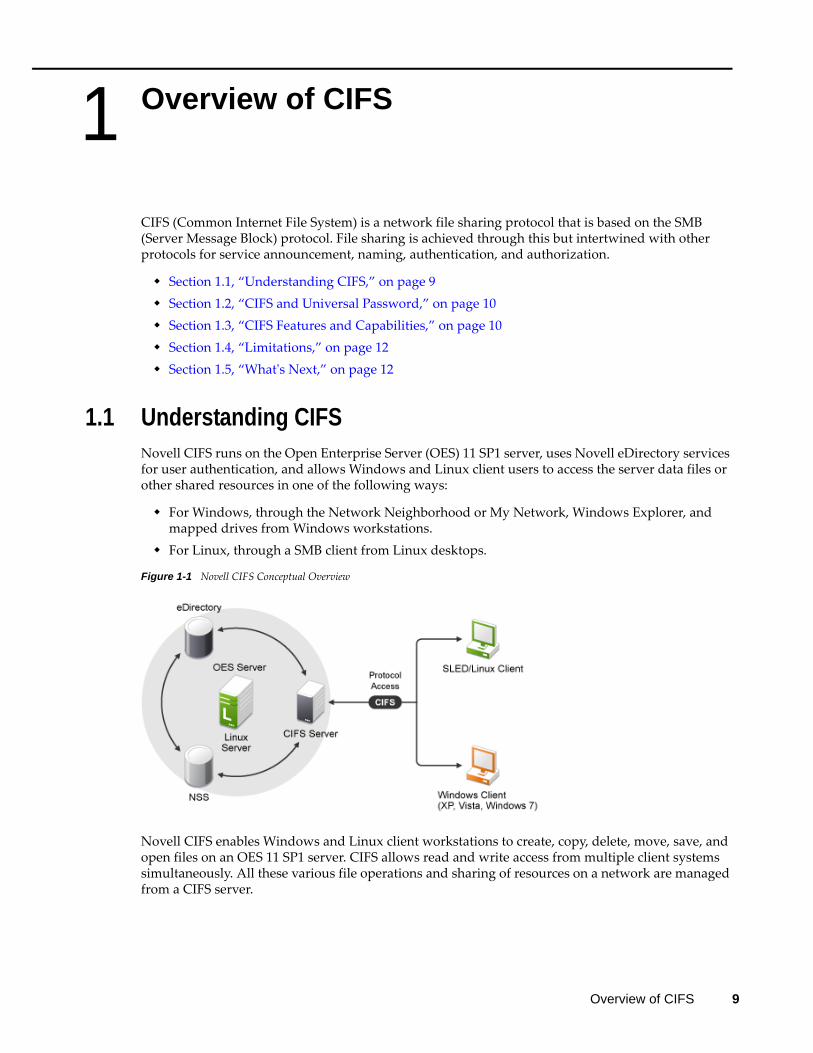
1.1 Understanding CIFSNovell CIFS runs on the Open Enterprise Server (OES) 11 SP1 server, uses Novell eDirectory services for user authentication, and allows Windows and Linux client users to access the server data files or other shared resources in one of the following ways:
For Windows, through the Network Neighborhood or My Network, Windows Explorer, and mapped drives from Windows workstations.
For Linux, through a SMB client from Linux desktops.
Figure 1-1 Novell CIFS Conceptual Overview
Novell CIFS enables Windows and Linux client workstations to create, copy, delete, move, save, and open files on an OES 11 SP1 server. CIFS allows read and write access from multiple client systems simultaneously. All these various file operations and sharing of resources on a network are managed from a CIFS server.
Overview of CIFS 9

The CIFS protocol offers various services, service announcements, user authentication and authorization, and naming services that run on a CIFS server. For achieving the file sharing and other services, a CIFS Server uses NetBIOS over TCP/IP (NBT) and SMB services. CIFS file sharing is achieved by a mechanism called Browsing services or advertising.
1.2 CIFS and Universal PasswordUniversal Password helps in management of password-based authentication schemes. Each CIFS user must be Universal Password enabled in order to be allowed to log in to the CIFS server. The Universal Password is not enabled by default.
To learn more about Universal Password, including how to enable it, see “Novell Password Management” (https://www.netiq.com/documentation/password_management33/pwm_administration/?page=/documentation/password_management33/pwm_administration/data/bookinfo.html) in the Novell Password Administaration Guide (https://www.netiq.com/documentation/password_management33/pwm_administration/?page=/documentation/password_management33/pwm_administration/data/bookinfo.html)
1.3 CIFS Features and CapabilitiesCIFS implementation supports the following features on OES 11 SP1:
10 OES 11 SP1: Novell CIFS for Linux Administration Guide
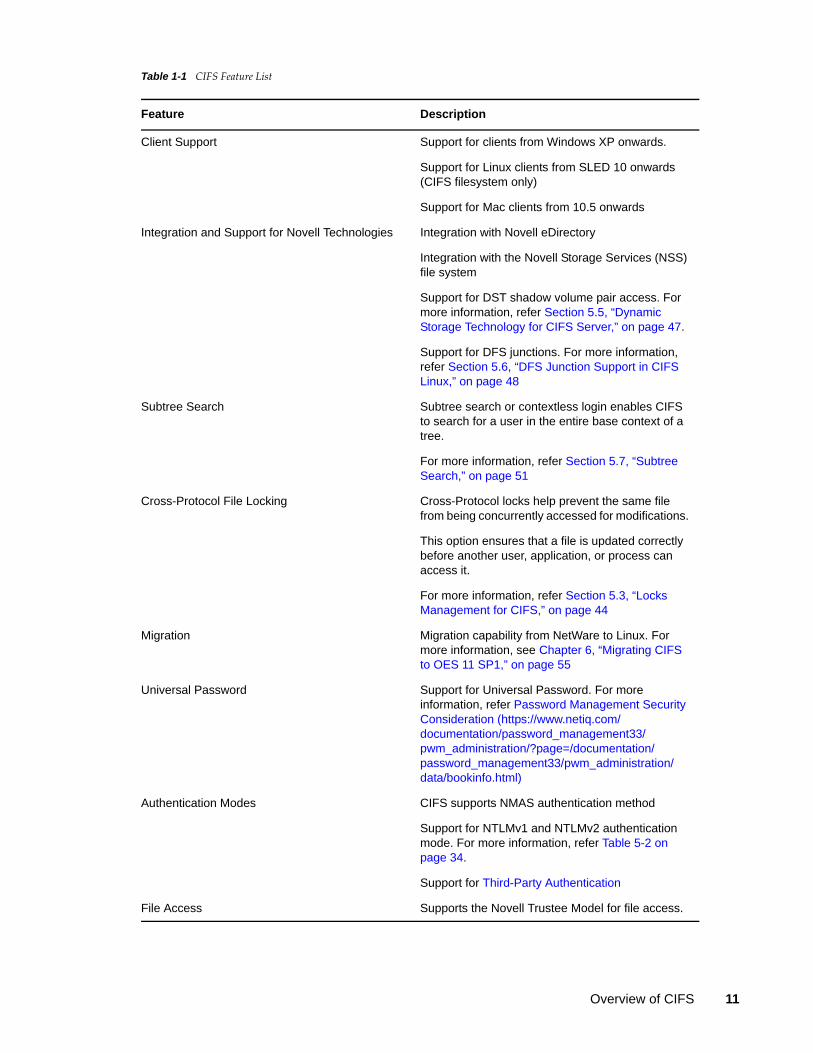
Table 1-1 CIFS Feature List
Feature Description
Client Support Support for clients from Windows XP onwards.
Support for Linux clients from SLED 10 onwards (CIFS filesystem only)
Support for Mac clients from 10.5 onwards
Integration and Support for Novell Technologies Integration with Novell eDirectory
Integration with the Novell Storage Services (NSS) file system
Support for DST shadow volume pair access. For more information, refer Section 5.5, “Dynamic Storage Technology for CIFS Server,” on page 47.
Support for DFS junctions. For more information, refer Section 5.6, “DFS Junction Support in CIFS Linux,” on page 48
Subtree Search Subtree search or contextless login enables CIFS to search for a user in the entire base context of a tree.
For more information, refer Section 5.7, “Subtree Search,” on page 51
Cross-Protocol File Locking Cross-Protocol locks help prevent the same file from being concurrently accessed for modifications.
This option ensures that a file is updated correctly before another user, application, or process can access it.
For more information, refer Section 5.3, “Locks Management for CIFS,” on page 44
Migration Migration capability from NetWare to Linux. For more information, see Chapter 6, “Migrating CIFS to OES 11 SP1,” on page 55
Universal Password Support for Universal Password. For more information, refer Password Management Security Consideration (https://www.netiq.com/documentation/password_management33/pwm_administration/?page=/documentation/password_management33/pwm_administration/data/bookinfo.html)
Authentication Modes CIFS supports NMAS authentication method
Support for NTLMv1 and NTLMv2 authentication mode. For more information, refer Table 5-2 on page 34.
Support for Third-Party Authentication
File Access Supports the Novell Trustee Model for file access.
Overview of CIFS 11
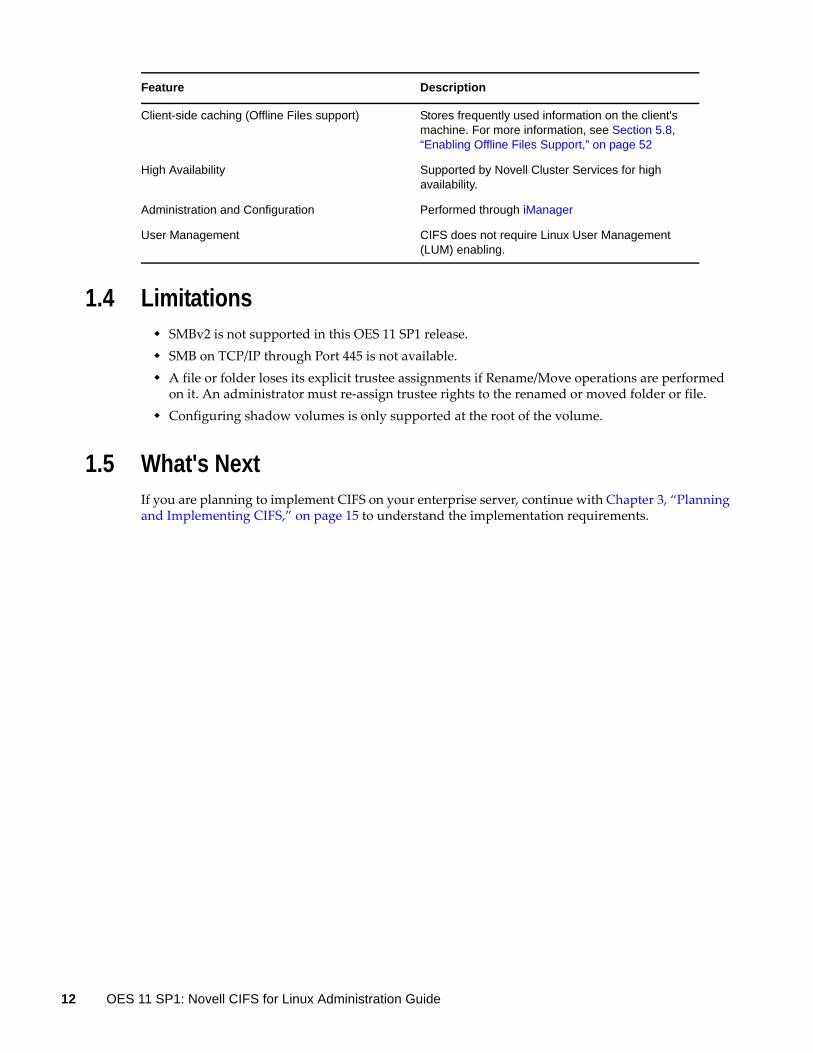
1.4 Limitations SMBv2 is not supported in this OES 11 SP1 release. SMB on TCP/IP through Port 445 is not available. A file or folder loses its explicit trustee assignments if Rename/Move operations are performed
on it. An administrator must re-assign trustee rights to the renamed or moved folder or file. Configuring shadow volumes is only supported at the root of the volume.
1.5 What's NextIf you are planning to implement CIFS on your enterprise server, continue with Chapter 3, “Planning and Implementing CIFS,” on page 15 to understand the implementation requirements.
Client-side caching (Offline Files support) Stores frequently used information on the client's machine. For more information, see Section 5.8, “Enabling Offline Files Support,” on page 52
High Availability Supported by Novell Cluster Services for high availability.
Administration and Configuration Performed through iManager
User Management CIFS does not require Linux User Management (LUM) enabling.
Feature Description
12 OES 11 SP1: Novell CIFS for Linux Administration Guide
2 2What’s New or Changed in Novell CIFS
This section describes enhancements and changes in Novell CIFS since the initial release Novell Open Enterprise Server (OES) 11.
Section 2.1, “What’s New (OES 11 SP1 September 2012 Patches),” on page 13 Section 2.2, “What’s New or Changed in Novell CIFS (OES 11 SP1),” on page 13 Section 2.3, “What’s New or Changed in Novell CIFS (OES 11),” on page 13
2.1 What’s New (OES 11 SP1 September 2012 Patches)CIFS will now be able to cache the invalid user logins for a specific timeout period. Further authentication requests from the same user name will be ignored based on the configured timeout period. For more information, see Enabling Invalid User Section in the OES 11: Novell CIFS for Linux Administration Guide.
2.2 What’s New or Changed in Novell CIFS (OES 11 SP1)Novell CIFS in OES 11 SP1 has been modified to run on 64-bit SUSE Linux Enterprise Server (SLES) 11 SP2. There are no other changes in the OES 11 SP1 release of Novell CIFS.
2.3 What’s New or Changed in Novell CIFS (OES 11)This section describes enhancements and changes to Novell CIFS for Novell Open Enterprise Server (OES) 11.
It is now possible to restart CIFS service in a cluster setup when cluster resources are active. You can now use the monitor command with the rcnovell-cifs script to check the CIFS server
status. When rcnovell-cifs monitor is invoked, it returns the status of CIFS if it is already running otherwise (dead/not running) it starts a new instance and returns the status. For more information, see Configuring CIFS with Novell Cluster Services for an NSS File System in the OES 11: Novell CIFS for Linux Administration Guide.
What’s New or Changed in Novell CIFS 13

14 OES 11 SP1: Novell CIFS for Linux Administration Guide
3 3Planning and Implementing CIFS
Planning and implementing CIFS on an Open Enterprise Server (OES) 11 SP1 server requires you to understand the information and requirements discussed in the following sections:
Section 3.1, “Planning for CIFS,” on page 15 Section 3.2, “Preparing for CIFS Installation,” on page 15 Section 3.3, “CIFS System Prerequisites,” on page 17 Section 3.4, “Co-existence Issues,” on page 17 Section 3.5, “What's Next,” on page 18
3.1 Planning for CIFSThe key factors to consider for implementing and enabling Novell CIFS on your enterprise servers are:
Upgrading from OES 2 SP3 Linux to OES 11 SP1 on your enterprise servers. For details, see “Upgrading to OES 11 SP1 ” in the OES 11 SP1: Installation Guide.
Moving from NetWare to an OES 11 SP1 setup. For details see, Chapter 6, “Migrating CIFS to OES 11 SP1,” on page 55.
3.2 Preparing for CIFS Installation Section 3.2.1, “Prerequisites,” on page 15 Section 3.2.2, “Required Rights and Permissions for a CIFS User/Administrator,” on page 16
3.2.1 Prerequisites
To properly install and configure CIFS, ensure that the following prerequisites are met:
CIFS users must be universal password enabled. For more information, see Deploying Universal Password (https://www.netiq.com/documentation/password_management33/pwm_administration/?page=/documentation/password_management33/pwm_administration/data/bookinfo.html) in the Novell Password Management Administration Guide (https://www.netiq.com/documentation/password_management33/pwm_administration/?page=/documentation/password_management33/pwm_administration/data/bookinfo.html)
The Universal Password includes the ability to create password policies. It also removes the need to maintain two separate passwords for CIFS users.
Planning and Implementing CIFS 15
Stop all the running Samba daemons before installing CIFS. Use the following commands:
/etc/init.d/smb stop
/etc/init.d/nmb stop
3.2.2 Required Rights and Permissions for a CIFS User/Administrator
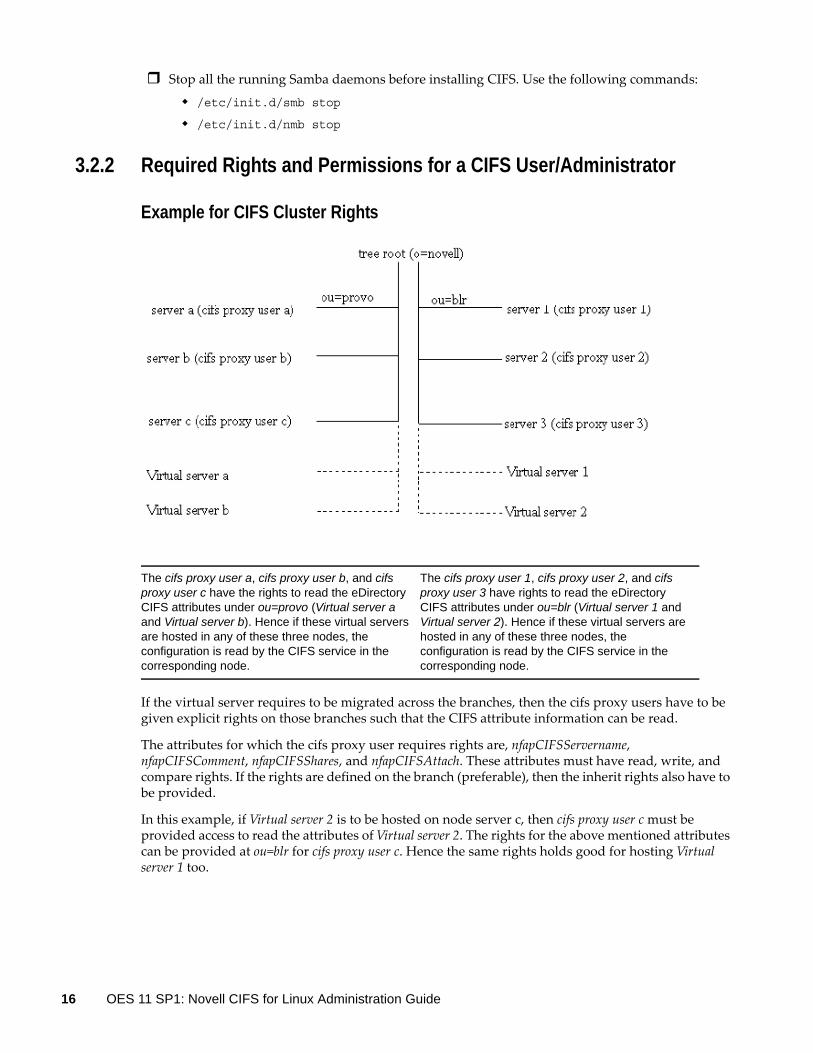
Example for CIFS Cluster Rights
If the virtual server requires to be migrated across the branches, then the cifs proxy users have to be given explicit rights on those branches such that the CIFS attribute information can be read.
The attributes for which the cifs proxy user requires rights are, nfapCIFSServername, nfapCIFSComment, nfapCIFSShares, and nfapCIFSAttach. These attributes must have read, write, and compare rights. If the rights are defined on the branch (preferable), then the inherit rights also have to be provided.
In this example, if Virtual server 2 is to be hosted on node server c, then cifs proxy user c must be provided access to read the attributes of Virtual server 2. The rights for the above mentioned attributes can be provided at ou=blr for cifs proxy user c. Hence the same rights holds good for hosting Virtual server 1 too.
The cifs proxy user a, cifs proxy user b, and cifs proxy user c have the rights to read the eDirectory CIFS attributes under ou=provo (Virtual server a and Virtual server b). Hence if these virtual servers are hosted in any of these three nodes, the configuration is read by the CIFS service in the corresponding node.
The cifs proxy user 1, cifs proxy user 2, and cifs proxy user 3 have rights to read the eDirectory CIFS attributes under ou=blr (Virtual server 1 and Virtual server 2). Hence if these virtual servers are hosted in any of these three nodes, the configuration is read by the CIFS service in the corresponding node.
16 OES 11 SP1: Novell CIFS for Linux Administration Guide
3.3 CIFS System PrerequisitesTo access CIFS servers running on an OES 11 SP1 server ensure you meet the following basic minimum requirements:
Section 3.3.1, “Server Operating System Requirements,” on page 17 Section 3.3.2, “Server Hardware Requirements,” on page 17 Section 3.3.3, “Client Operating System Requirements,” on page 17 Section 3.3.4, “Package Dependencies,” on page 17
3.3.1 Server Operating System Requirements
Novell Open Enterprise Server 2 Support Pack 1 or later.
3.3.2 Server Hardware Requirements
Same as the OES 11 SP1 hardware requirements. For details, see “Meeting All Server Software and Hardware Requirements” in the OES 11 SP1: Installation Guide.
3.3.3 Client Operating System Requirements
Windows XP SP2 and SP3 Windows Vista Windows 7 Windows Vista Business SP1 and 64-bit SP1, Enterprise SP1 and 64-bit SP1, and Ultimate SP1
and 64-bit SP1 Mac Client support from 10.5 onwards SUSE Linux Enterprise Desktop 10 onwards (CIFS file system only)
3.3.4 Package Dependencies
Use the following checklist to verify CIFS dependencies before proceeding:
All Novell CIFS users must be in eDirectory. Linux-only users are not supported.
Novell CIFS supports only Novell Storage Services (NSS) volumes.
NCP should be up and running for Novell CIFS to function properly.
If your eDirectory replica is stored on an eDirectory server earlier than 8.8.3, ensure you upgrade the server using the Security Services 2.0.6 patch (http://download.novell.com/Download?buildid=LYlbZMAom6k~).
3.4 Co-existence IssuesDo not install any of the following service combinations on the same server as Novell CIFS. Although not all of the combinations cause pattern conflict warnings, Novell does not support any of the combinations shown:
File Server (SLES 11 SP1 - Samba).
Planning and Implementing CIFS 17
Novell Domain Services for Windows (DSfW).
Any other Samba implementation.
Xen Virtual Machines on the host.
3.5 What's NextTo proceed with CIFS installation on an OES 11 SP1 server, continue with Chapter 4, “Installing and Setting Up CIFS,” on page 19.
18 OES 11 SP1: Novell CIFS for Linux Administration Guide
4 4Installing and Setting Up CIFS
This section describes how to install and configure Novell CIFS. CIFS should be selected to be installed during OES 11 SP1 installation. This section also provides the CIFS installation requirements and procedures.
Section 4.1, “Installing and Configuring a CIFS Server through YaST,” on page 19 Section 4.2, “Installing NMAS,” on page 24 Section 4.3, “Verifying Installation,” on page 25 Section 4.4, “Installing the CIFS iManager Plug-In,” on page 26 Section 4.5, “What's Next,” on page 26
4.1 Installing and Configuring a CIFS Server through YaSTFollow this procedure to install and configure the CIFS services on an OES 11 SP1 server in either of the following cases:
Installing CIFS with the bundle of products during OES 11 SP1 installation. Installing only the Novell CIFS service and its dependencies on an existing OES 11 SP1 server.
Before you begin, ensure that you have the required eDirectory admin credentials to proceed, if you are installing CIFS after installing OES 11 SP1.
1 Launch YaST, using one of the following methods:From your Desktop: Click Computer > More Applications > System > YaST.orFrom your Terminal: Run the yast2 command on the server console.
2 Click Group > Open Enterprise Server > OES Install and Configuration.3 Select Novell CIFS from the software patterns listed.
Installing and Setting Up CIFS 19
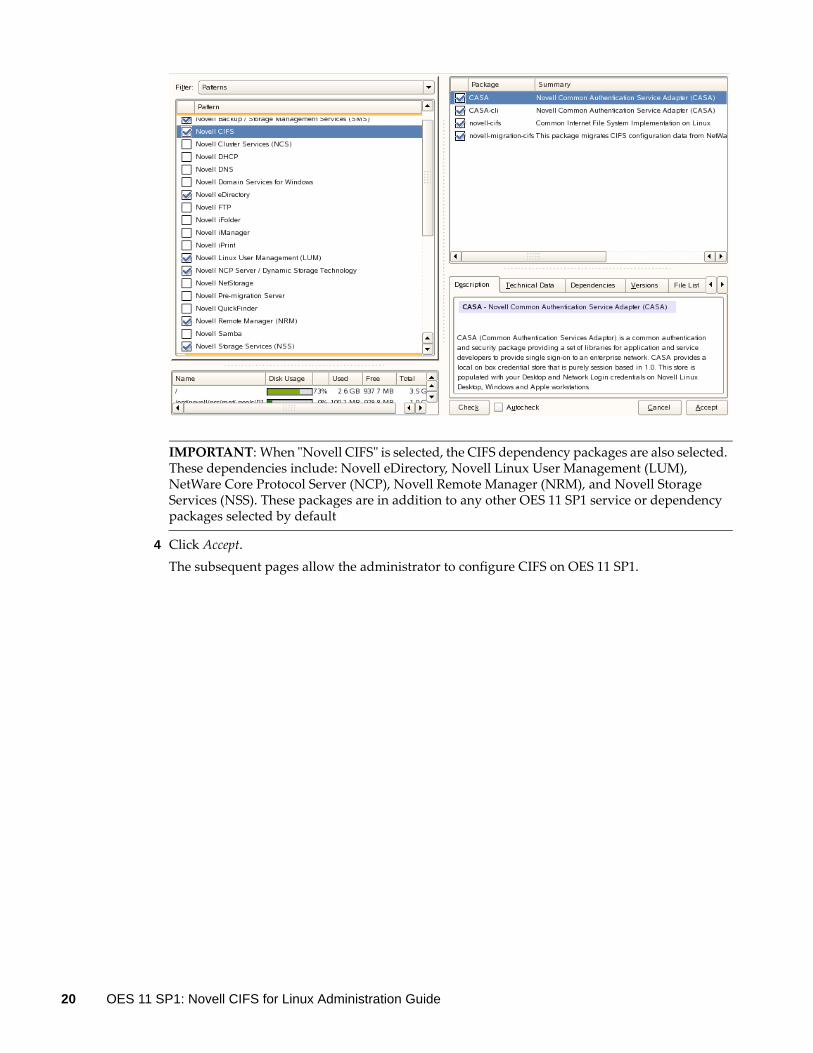
IMPORTANT: When "Novell CIFS" is selected, the CIFS dependency packages are also selected. These dependencies include: Novell eDirectory, Novell Linux User Management (LUM), NetWare Core Protocol Server (NCP), Novell Remote Manager (NRM), and Novell Storage Services (NSS). These packages are in addition to any other OES 11 SP1 service or dependency packages selected by default
4 Click Accept.The subsequent pages allow the administrator to configure CIFS on OES 11 SP1.
20 OES 11 SP1: Novell CIFS for Linux Administration Guide
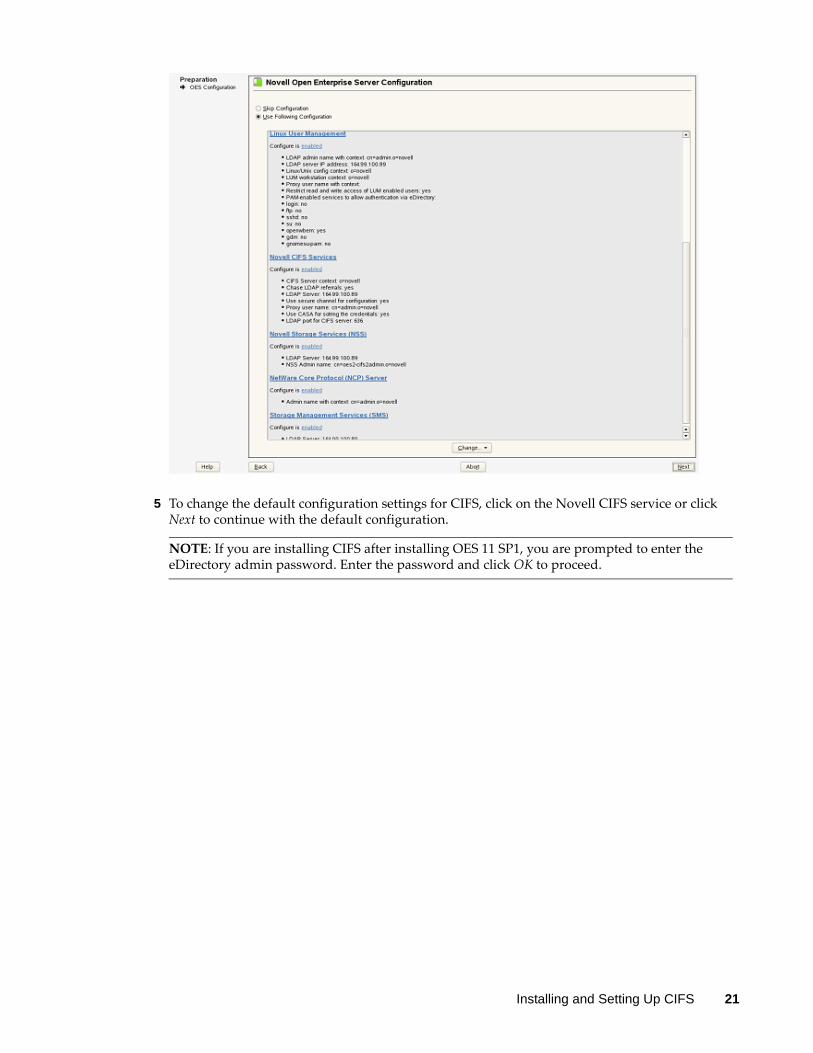
5 To change the default configuration settings for CIFS, click on the Novell CIFS service or click Next to continue with the default configuration.
NOTE: If you are installing CIFS after installing OES 11 SP1, you are prompted to enter the eDirectory admin password. Enter the password and click OK to proceed.
Installing and Setting Up CIFS 21
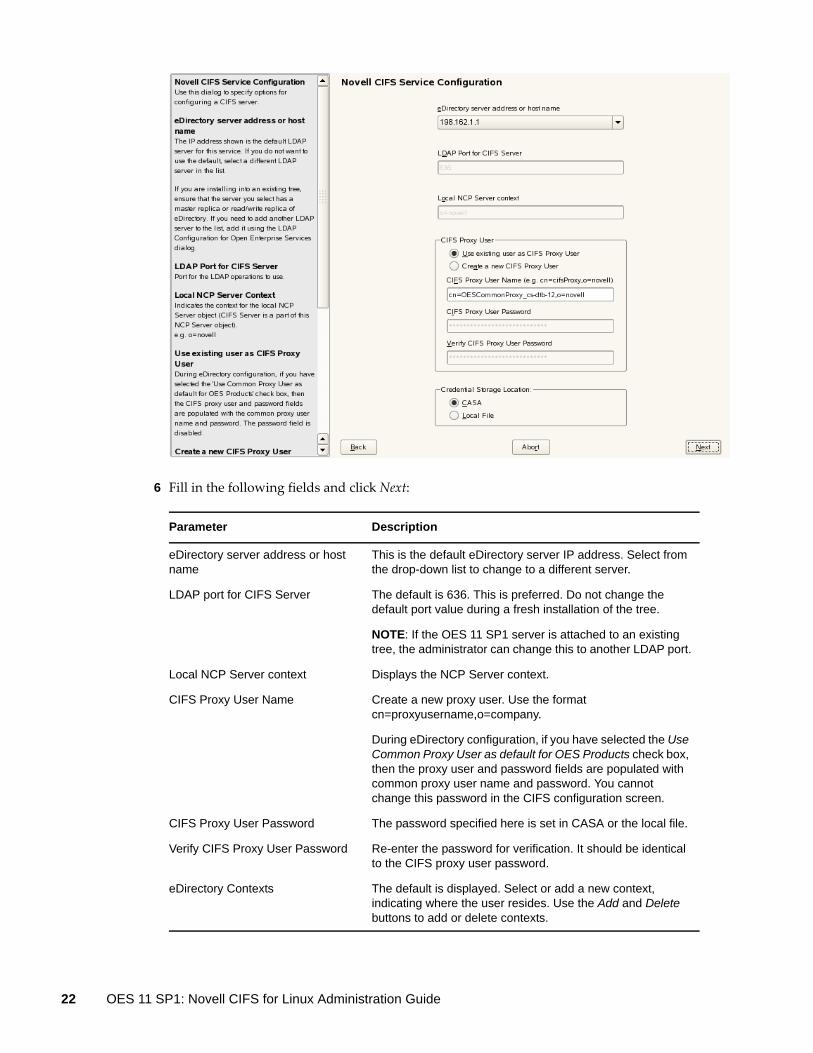
6 Fill in the following fields and click Next:
Parameter Description
eDirectory server address or host name
This is the default eDirectory server IP address. Select from the drop-down list to change to a different server.
LDAP port for CIFS Server The default is 636. This is preferred. Do not change the default port value during a fresh installation of the tree.
NOTE: If the OES 11 SP1 server is attached to an existing tree, the administrator can change this to another LDAP port.
Local NCP Server context Displays the NCP Server context.
CIFS Proxy User Name Create a new proxy user. Use the format cn=proxyusername,o=company.
During eDirectory configuration, if you have selected the Use Common Proxy User as default for OES Products check box, then the proxy user and password fields are populated with common proxy user name and password. You cannot change this password in the CIFS configuration screen.
CIFS Proxy User Password The password specified here is set in CASA or the local file.
Verify CIFS Proxy User Password Re-enter the password for verification. It should be identical to the CIFS proxy user password.
eDirectory Contexts The default is displayed. Select or add a new context, indicating where the user resides. Use the Add and Delete buttons to add or delete contexts.
22 OES 11 SP1: Novell CIFS for Linux Administration Guide
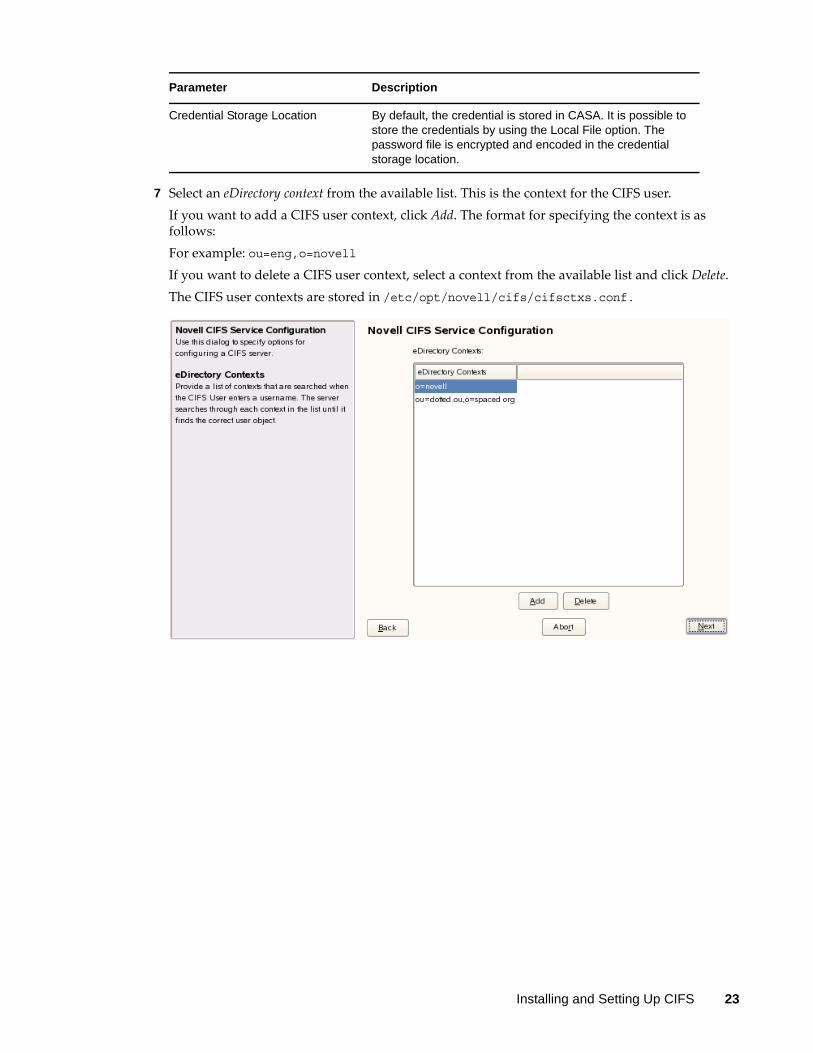
7 Select an eDirectory context from the available list. This is the context for the CIFS user.If you want to add a CIFS user context, click Add. The format for specifying the context is as follows:For example: ou=eng,o=novellIf you want to delete a CIFS user context, select a context from the available list and click Delete.The CIFS user contexts are stored in /etc/opt/novell/cifs/cifsctxs.conf.
Credential Storage Location By default, the credential is stored in CASA. It is possible to store the credentials by using the Local File option. The password file is encrypted and encoded in the credential storage location.
Parameter Description
Installing and Setting Up CIFS 23
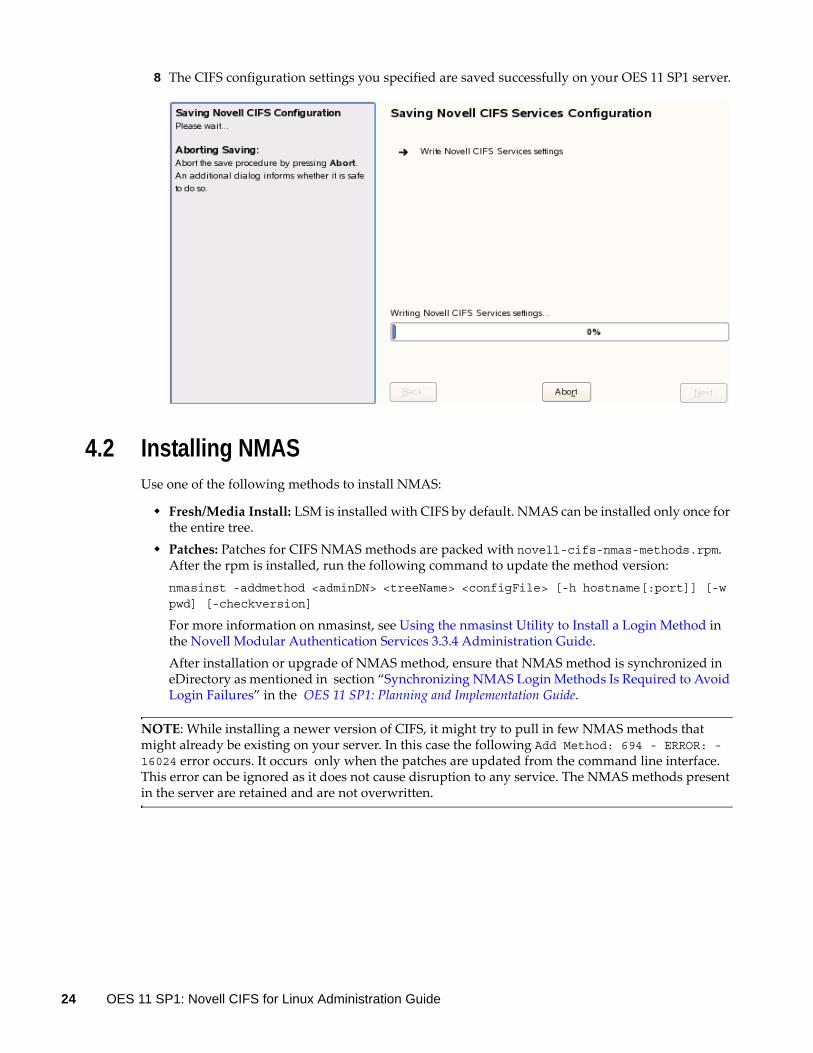
8 The CIFS configuration settings you specified are saved successfully on your OES 11 SP1 server.
4.2 Installing NMASUse one of the following methods to install NMAS:
Fresh/Media Install: LSM is installed with CIFS by default. NMAS can be installed only once for the entire tree.
Patches: Patches for CIFS NMAS methods are packed with novell-cifs-nmas-methods.rpm. After the rpm is installed, run the following command to update the method version:nmasinst -addmethod <adminDN> <treeName> <configFile> [-h hostname[:port]] [-w pwd] [-checkversion]
For more information on nmasinst, see Using the nmasinst Utility to Install a Login Method in the Novell Modular Authentication Services 3.3.4 Administration Guide.After installation or upgrade of NMAS method, ensure that NMAS method is synchronized in eDirectory as mentioned in section “Synchronizing NMAS Login Methods Is Required to Avoid Login Failures” in the OES 11 SP1: Planning and Implementation Guide.
NOTE: While installing a newer version of CIFS, it might try to pull in few NMAS methods that might already be existing on your server. In this case the following Add Method: 694 - ERROR: -16024 error occurs. It occurs only when the patches are updated from the command line interface. This error can be ignored as it does not cause disruption to any service. The NMAS methods present in the server are retained and are not overwritten.
24 OES 11 SP1: Novell CIFS for Linux Administration Guide
4.3 Verifying InstallationPerform the following steps if you want to verify a successful installation. For troubleshooting your installation, see Section 10.2, “CIFS Installation and Configuration Issues,” on page 69.
Section 4.3.1, “Verifying Files and Folders,” on page 25 Section 4.3.2, “Verifying the File Configuration Information,” on page 26 Section 4.3.3, “Verifying LSM Installation,” on page 26
4.3.1 Verifying Files and Folders
Run the following commands on the OES 11 SP1 server console:
1 Run the ls /opt/novell/cifs/ command and verify that the bin, schema, and share folders are present.
2 Run the following commands and verify that the presence of the following files:
3 Run ls /usr/sbin command and verify that the cifsd file is present.4 Run the ls /opt/novell/cifs/schema command and verify that the following files are present:
nfap.ldif
nfap.sch
password-policy.ldif
5 If you selected CASA storage for storing the CIFS proxy user credentials, run the CASAcli -l command to verify if there is an entry for novell-cifs.or
Commands Files
ls /opt/novell/cifs/bin cifs-config.sh
encrypt_password
novcifs
retrive_proxy_cred
getpwpolicies.sh
verify-user.sh
cifs_proxy_rights_assign.sh
cifs_retrieve_proxy_cred.sh
cifs_update_proxy_cred.sh
cifs-lcm.sh
ls /opt/novell/migration/sbin migcifs.sh
migcifs.pl
migCifsS
migCifsC
readCasaC
ls /opt/novell/cifs/bin cifs_create_proxy_user.sh
Installing and Setting Up CIFS 25
If you selected a local file for credential storage, verify the existence of the .cifspwd.enc file by running ls -a /etc/opt/novell/cifs.
6 Check for libcifslcm.so library under /usr/lib64.
4.3.2 Verifying the File Configuration Information
Verify whether the following files are populated with the information you specified while using YaST for configuration during installation:
1 Run cat /etc/opt/novell/cifs/cifs.conf and verify whether the configuration is the same as you specified during installation.
2 Run cat /etc/opt/novell/cifs/cifsctxs.conf and verify whether the context information is the same as you specified during installation.
4.3.3 Verifying LSM Installation
LSM installation can be verified either through iManager or Local File System.
Verifying through iManager
In iManager, click NMAS. Under NMAS Login Methods and NMAS Login Sequences, verify that both cifslinlsm method and cifslinlsm sequence are present.
Verifying through Local File System
Verify that CIFSLINLSM_X64 is present at /var/opt/novell/eDirectory/data/nmas-methods on a 64-bit system.
4.4 Installing the CIFS iManager Plug-InYou must install the iManager plug-in for CIFS in order to access CIFS from iManager.
1 Launch iManager from your Web browser.For more information, see the Novell iManager 2.7.5 Administration Guide.
2 Click Configure and go to Plug-In Module Installation > Available Novell Plug-In Modules. For more information, see the Novell iManager 2.7.5 Administration Guide.
3 Select the CIFS Management plug in from the list and click Install. 4 Exit iManager.5 From OES 11 SP1 server console, run the following commands to complete the plug-in
installation:rcnovell-tomcat6 restart
4.5 What's NextWhen the installation is complete, you can get started with CIFS administration activities. For details, see Chapter 5, “Administering the CIFS Server,” on page 27.
26 OES 11 SP1: Novell CIFS for Linux Administration Guide
5 5Administering the CIFS Server
An administrator can start or stop CIFS and customize network access for CIFS users, enable or disable SMB signing, and perform other configuration and administration activities.
CIFS maintains a configuration file and context search information that is set up during installation. An eDirectory search context is created by default during the OES 11 SP1 installation for all users who require access to the network. These contexts are saved in the context search file. When users specify a username, the CIFS component running on the server searches each context in the list until it finds the correct user object.
CIFS on an Open Enterprise Server (OES) 11 SP1 server can be managed and administered either through iManager 2.7.5 or from the command line.
For details on how to install the CIFS iManager plug-in, see Section 4.4, “Installing the CIFS iManager Plug-In,” on page 26.
For basic information on command line administration, see Section 5.2, “Using the Command Line to Manage CIFS,” on page 41 or for complete details, see Appendix A, “Command Line Utility for CIFS,” on page 83.
Section 5.1, “Using iManager to Manage CIFS,” on page 27 Section 5.2, “Using the Command Line to Manage CIFS,” on page 41 Section 5.3, “Locks Management for CIFS,” on page 44 Section 5.4, “Third-Party Domain Authentication,” on page 44 Section 5.5, “Dynamic Storage Technology for CIFS Server,” on page 47 Section 5.6, “DFS Junction Support in CIFS Linux,” on page 48 Section 5.7, “Subtree Search,” on page 51 Section 5.8, “Enabling Offline Files Support,” on page 52 Section 5.9, “Directory Cache Management for CIFS Server,” on page 53 Section 5.10, “What’s Next,” on page 53
5.1 Using iManager to Manage CIFSYou can manage CIFS services from iManager 2.7.5. The recommended method to configure, manage, and modify CIFS properties and parameters is by using iManager.
NOTE: Admin equivalent/container admin users should be LUM-enabled to manage the CIFS server through CIFS iManager plugin.
Section 5.1.1, “Prerequisites,” on page 28 Section 5.1.2, “Selecting a Server to Manage,” on page 28 Section 5.1.3, “Setting the CIFS Server and Authentication Properties,” on page 30
Administering the CIFS Server 27
Section 5.1.4, “Managing CIFS Shares,” on page 35 Section 5.1.5, “Configuring a CIFS User Context,” on page 39 Section 5.1.6, “Stopping CIFS,” on page 41
5.1.1 Prerequisites
Install the CIFS iManager plug-in. For details, see Section 4.4, “Installing the CIFS iManager Plug-In,” on page 26.
Install CIFS on at least one OES 11 SP1 server. For details on installing CIFS, see Chapter 4, “Installing and Setting Up CIFS,” on page 19.
Ensure that ndsd is running. Use /etc/init.d/ndsd status on the server console to check.
5.1.2 Selecting a Server to Manage
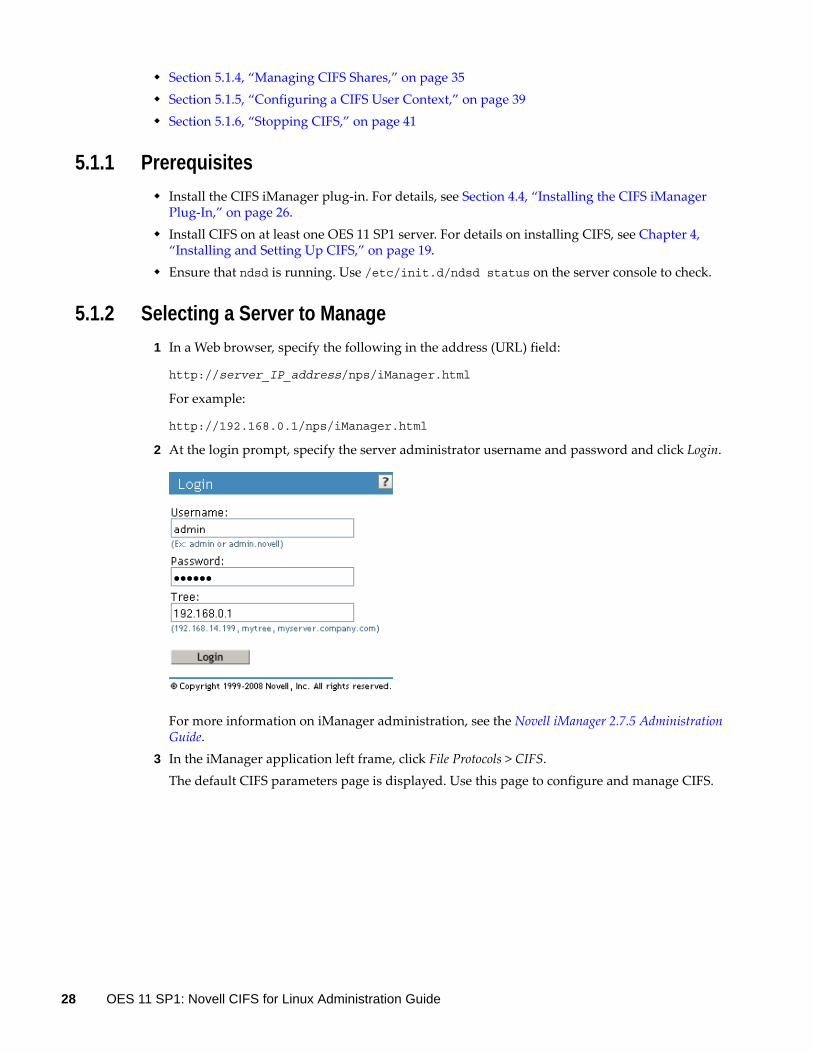
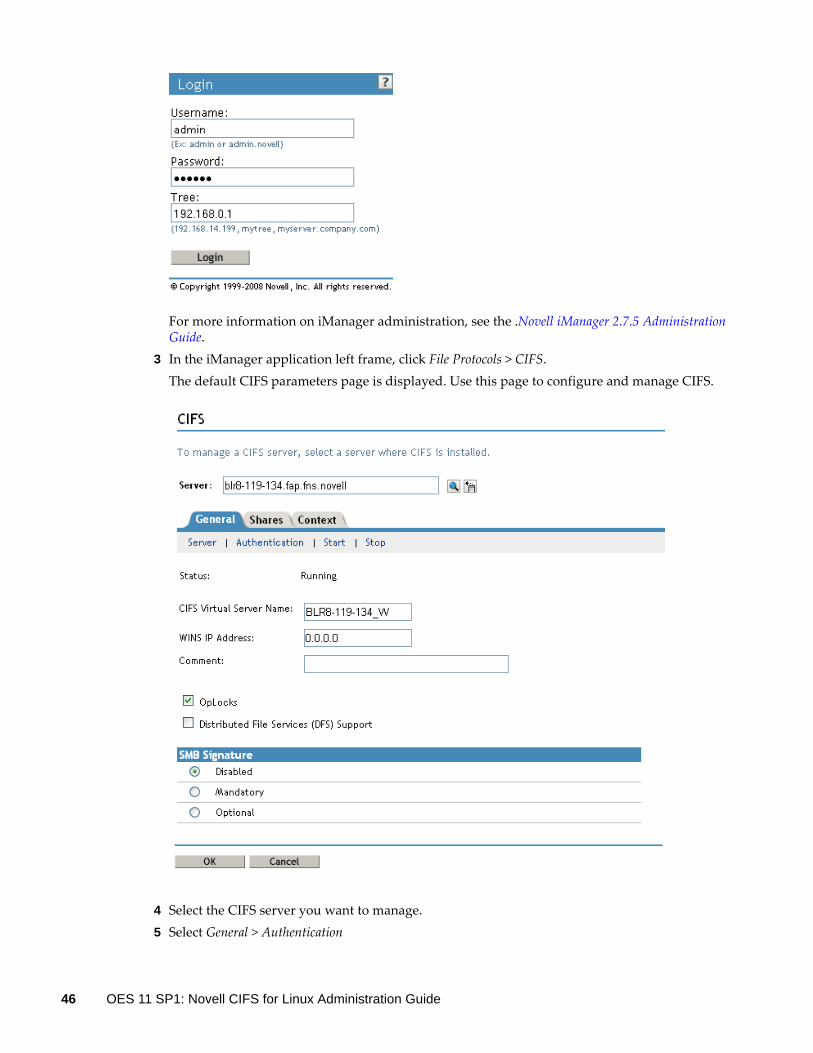
1 In a Web browser, specify the following in the address (URL) field:
http://server_IP_address/nps/iManager.html
For example:
http://192.168.0.1/nps/iManager.html
2 At the login prompt, specify the server administrator username and password and click Login.
For more information on iManager administration, see the Novell iManager 2.7.5 Administration Guide.
3 In the iManager application left frame, click File Protocols > CIFS.The default CIFS parameters page is displayed. Use this page to configure and manage CIFS.
28 OES 11 SP1: Novell CIFS for Linux Administration Guide
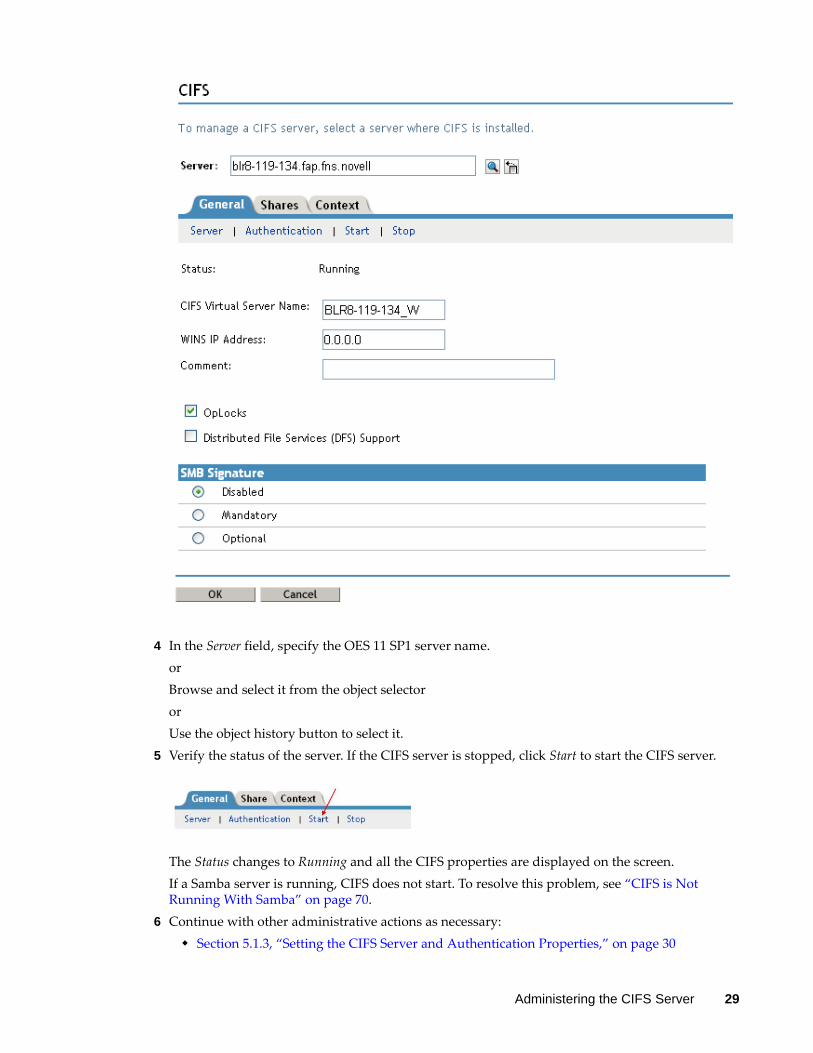
4 In the Server field, specify the OES 11 SP1 server name.orBrowse and select it from the object selectororUse the object history button to select it.
5 Verify the status of the server. If the CIFS server is stopped, click Start to start the CIFS server.
The Status changes to Running and all the CIFS properties are displayed on the screen. If a Samba server is running, CIFS does not start. To resolve this problem, see “CIFS is Not Running With Samba” on page 70.
6 Continue with other administrative actions as necessary: Section 5.1.3, “Setting the CIFS Server and Authentication Properties,” on page 30
Administering the CIFS Server 29
Section 5.1.4, “Managing CIFS Shares,” on page 35 Section 5.1.5, “Configuring a CIFS User Context,” on page 39
5.1.3 Setting the CIFS Server and Authentication Properties
The server and authentication parameters can be set by using the parameters listed under the General and Share tabs on the default CIFS server page in the iManager.
For information on starting iManager and accessing the CIFS server, see Section 5.1.2, “Selecting a Server to Manage,” on page 28.
To change these parameters from command line, see Section 5.2.5, “Modifying the CIFS Configuration,” on page 42
“Setting CIFS General Server Parameters” on page 30 “Enabling and Disabling SMB Signing” on page 32 “Setting CIFS General Authentication Parameters” on page 33
Setting CIFS General Server Parameters
The General page contains the Server and Authentication properties tabs. By default, the Server Properties page is displayed. View or edit the server parameters on this page.
30 OES 11 SP1: Novell CIFS for Linux Administration Guide
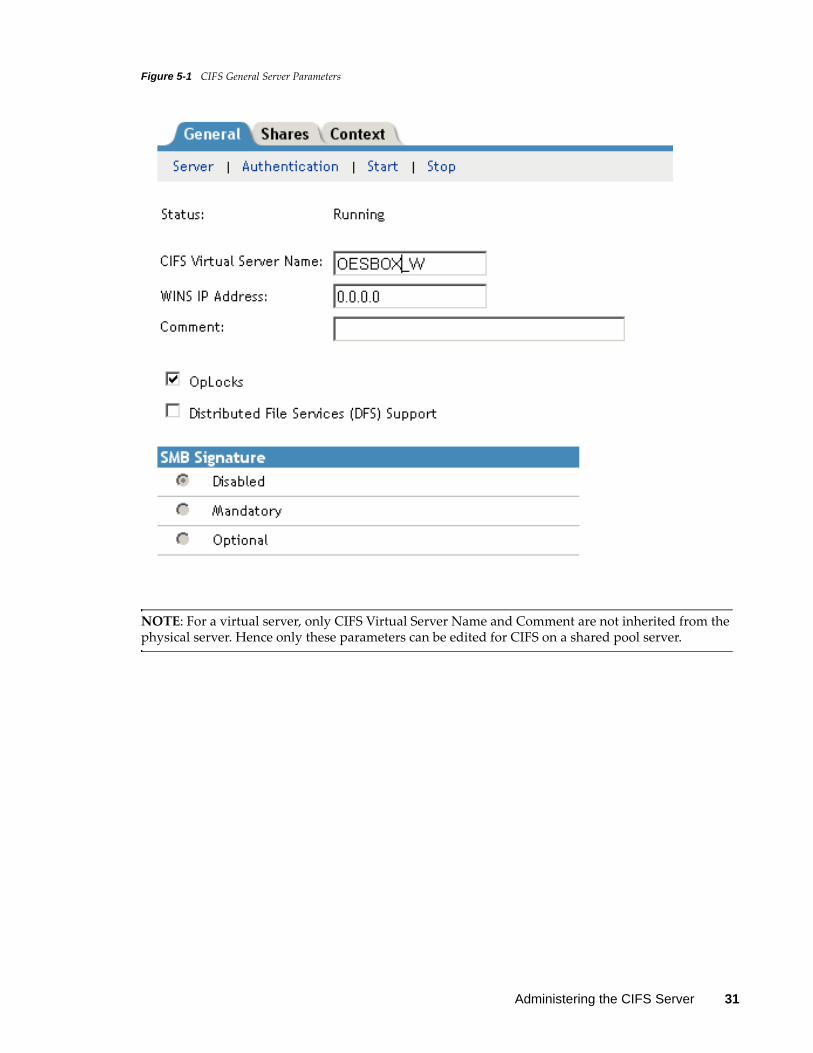
Figure 5-1 CIFS General Server Parameters
NOTE: For a virtual server, only CIFS Virtual Server Name and Comment are not inherited from the physical server. Hence only these parameters can be edited for CIFS on a shared pool server.
Administering the CIFS Server 31
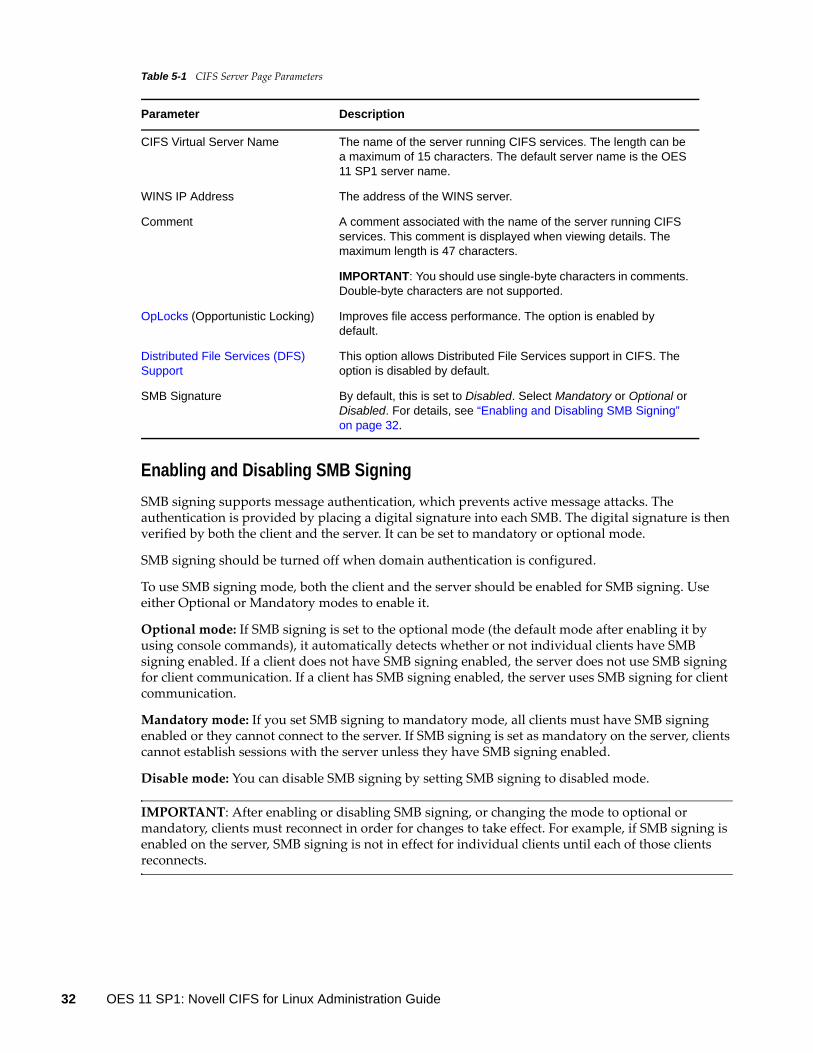
Table 5-1 CIFS Server Page Parameters
Enabling and Disabling SMB Signing
SMB signing supports message authentication, which prevents active message attacks. The authentication is provided by placing a digital signature into each SMB. The digital signature is then verified by both the client and the server. It can be set to mandatory or optional mode.
SMB signing should be turned off when domain authentication is configured.
To use SMB signing mode, both the client and the server should be enabled for SMB signing. Use either Optional or Mandatory modes to enable it.
Optional mode: If SMB signing is set to the optional mode (the default mode after enabling it by using console commands), it automatically detects whether or not individual clients have SMB signing enabled. If a client does not have SMB signing enabled, the server does not use SMB signing for client communication. If a client has SMB signing enabled, the server uses SMB signing for client communication.
Mandatory mode: If you set SMB signing to mandatory mode, all clients must have SMB signing enabled or they cannot connect to the server. If SMB signing is set as mandatory on the server, clients cannot establish sessions with the server unless they have SMB signing enabled.
Disable mode: You can disable SMB signing by setting SMB signing to disabled mode.
IMPORTANT: After enabling or disabling SMB signing, or changing the mode to optional or mandatory, clients must reconnect in order for changes to take effect. For example, if SMB signing is enabled on the server, SMB signing is not in effect for individual clients until each of those clients reconnects.
Parameter Description
CIFS Virtual Server Name The name of the server running CIFS services. The length can be a maximum of 15 characters. The default server name is the OES 11 SP1 server name.
WINS IP Address The address of the WINS server.
Comment A comment associated with the name of the server running CIFS services. This comment is displayed when viewing details. The maximum length is 47 characters.
IMPORTANT: You should use single-byte characters in comments. Double-byte characters are not supported.
OpLocks (Opportunistic Locking) Improves file access performance. The option is enabled by default.
Distributed File Services (DFS) Support
This option allows Distributed File Services support in CIFS. The option is disabled by default.
SMB Signature By default, this is set to Disabled. Select Mandatory or Optional or Disabled. For details, see “Enabling and Disabling SMB Signing” on page 32.
32 OES 11 SP1: Novell CIFS for Linux Administration Guide
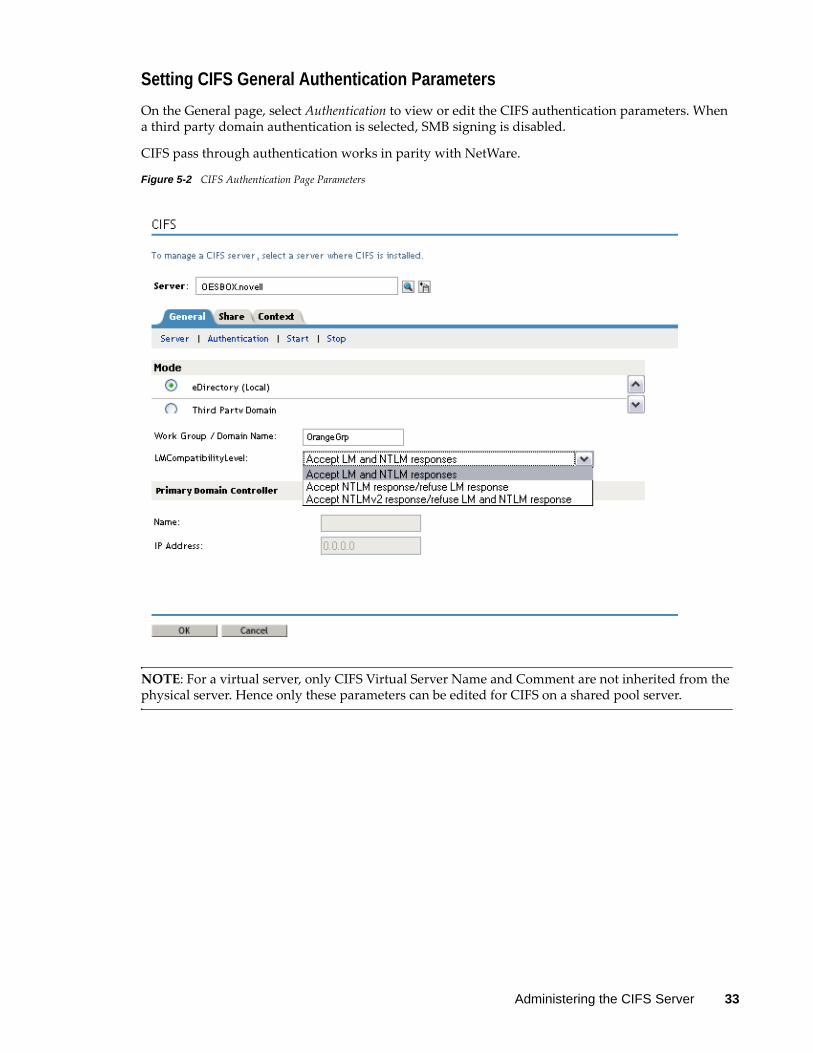
Setting CIFS General Authentication Parameters
On the General page, select Authentication to view or edit the CIFS authentication parameters. When a third party domain authentication is selected, SMB signing is disabled.
CIFS pass through authentication works in parity with NetWare.
Figure 5-2 CIFS Authentication Page Parameters
NOTE: For a virtual server, only CIFS Virtual Server Name and Comment are not inherited from the physical server. Hence only these parameters can be edited for CIFS on a shared pool server.
Administering the CIFS Server 33
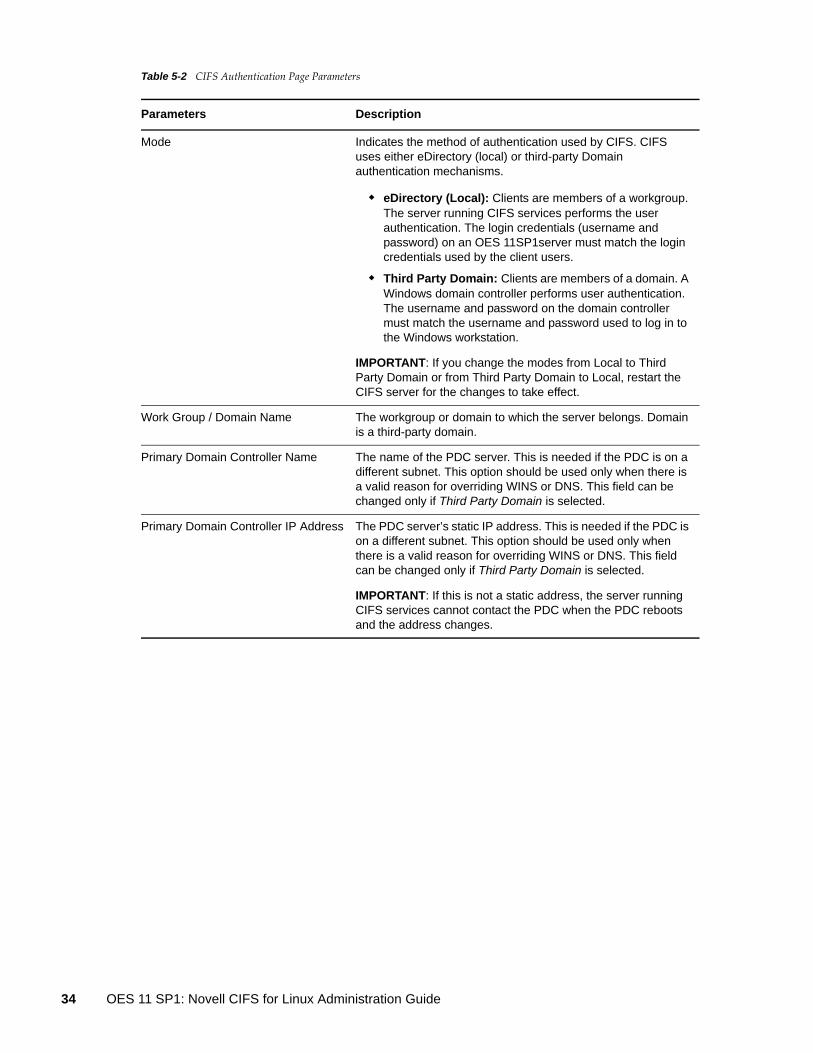
Table 5-2 CIFS Authentication Page Parameters
Parameters Description
Mode Indicates the method of authentication used by CIFS. CIFS uses either eDirectory (local) or third-party Domain authentication mechanisms.
eDirectory (Local): Clients are members of a workgroup. The server running CIFS services performs the user authentication. The login credentials (username and password) on an OES 11SP1server must match the login credentials used by the client users.
Third Party Domain: Clients are members of a domain. A Windows domain controller performs user authentication. The username and password on the domain controller must match the username and password used to log in to the Windows workstation.
IMPORTANT: If you change the modes from Local to Third Party Domain or from Third Party Domain to Local, restart the CIFS server for the changes to take effect.
Work Group / Domain Name The workgroup or domain to which the server belongs. Domain is a third-party domain.
Primary Domain Controller Name The name of the PDC server. This is needed if the PDC is on a different subnet. This option should be used only when there is a valid reason for overriding WINS or DNS. This field can be changed only if Third Party Domain is selected.
Primary Domain Controller IP Address The PDC server’s static IP address. This is needed if the PDC is on a different subnet. This option should be used only when there is a valid reason for overriding WINS or DNS. This field can be changed only if Third Party Domain is selected.
IMPORTANT: If this is not a static address, the server running CIFS services cannot contact the PDC when the PDC reboots and the address changes.
34 OES 11 SP1: Novell CIFS for Linux Administration Guide
5.1.4 Managing CIFS Shares
The Shares tab on the default CIFS server page in iManager displays the CIFS share details. Use the Shares page to add a new share on the server to be specified as a sharepoint and to be accessible via the Network Neighborhood. NSS Volumes are added by default.
For information on starting iManager and accessing the CIFS server, see Section 5.1.2, “Selecting a Server to Manage,” on page 28.
To manage CIFS Shares from command line, see Section 5.2.7, “Working with CIFS Shares,” on page 43.
LMCompatibilityLevel NTLMv2 is an authentication protocol that is cryptographically stronger than NTLMv1. NTLMv2 is not negotiated between the client and the server. The protocol does not determine the challenge or response algorithms, so it must be configured on both the client and the server by setting the LMCompatibilityLevel (the Windows registry key is at HKEY_LOCAL_MACHINE\System\CurrentControlSet\Control\LSA). Novell CIFS currently supports 0, 4, and 5 compatibility levels for NTLMv2.
Select the appropriate LMCompatibilityLevel from the drop-down list.
Accept LM and NTLM responses (Default setting) - Level 0: The server or domain controller compares the client's responses against LM, NTLM, LMv2, and NTLMv2 responses. Any valid response is accepted.
Accept NTLM response/refuse LM response (NTLM authentication) - Level 4: The server or domain controller accepts a valid LM, NTLM, LMv2, or NTLMv2 response.
Accept NTLMv2 response /refuse LM and NTLM response (NTLMv2 required) - Level 5: The server or domain controller compares the client's responses, using only LMv2 and NTLMv2.
NOTE: When the Accept NTLMv2 responses only option is selected and you are attempting to map a share from a Windows 7 workstation, make sure you specify the domain name along with the user name for the mapping to be successful.
Parameters Description
Administering the CIFS Server 35
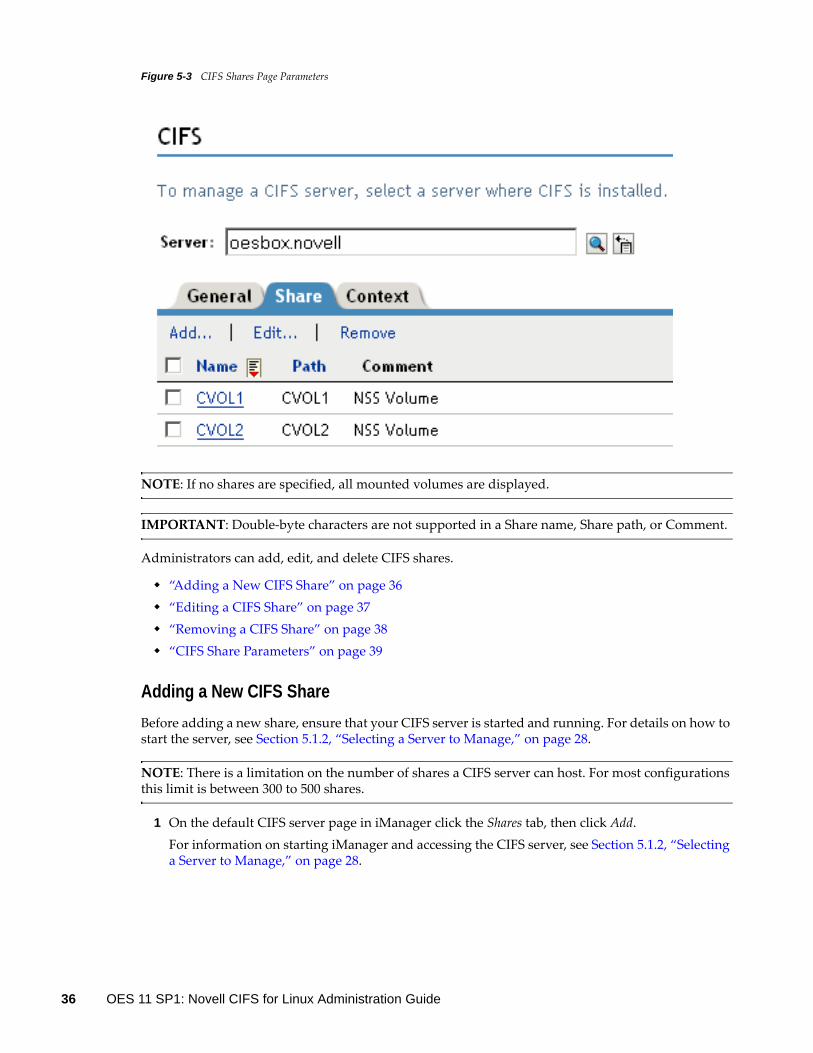
Figure 5-3 CIFS Shares Page Parameters
NOTE: If no shares are specified, all mounted volumes are displayed.
IMPORTANT: Double-byte characters are not supported in a Share name, Share path, or Comment.
Administrators can add, edit, and delete CIFS shares.
“Adding a New CIFS Share” on page 36 “Editing a CIFS Share” on page 37 “Removing a CIFS Share” on page 38 “CIFS Share Parameters” on page 39
Adding a New CIFS Share
Before adding a new share, ensure that your CIFS server is started and running. For details on how to start the server, see Section 5.1.2, “Selecting a Server to Manage,” on page 28.
NOTE: There is a limitation on the number of shares a CIFS server can host. For most configurations this limit is between 300 to 500 shares.
1 On the default CIFS server page in iManager click the Shares tab, then click Add. For information on starting iManager and accessing the CIFS server, see Section 5.1.2, “Selecting a Server to Manage,” on page 28.
36 OES 11 SP1: Novell CIFS for Linux Administration Guide
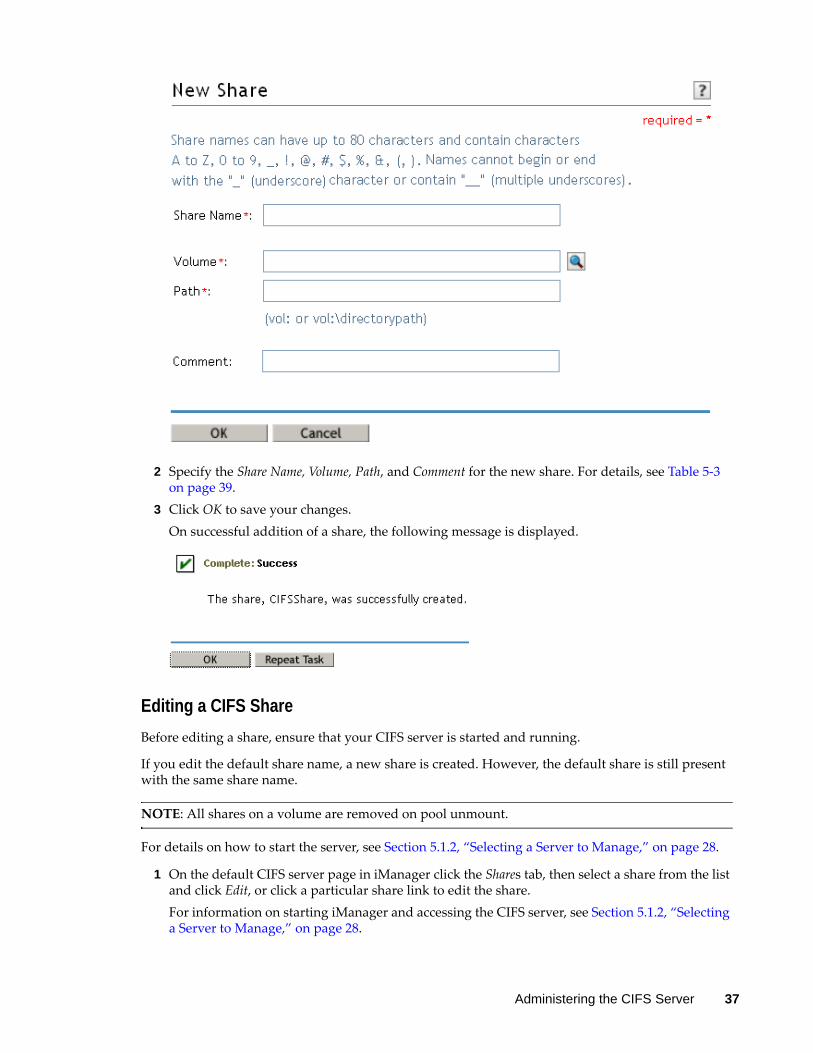
2 Specify the Share Name, Volume, Path, and Comment for the new share. For details, see Table 5-3 on page 39.
3 Click OK to save your changes.On successful addition of a share, the following message is displayed.
Editing a CIFS Share
Before editing a share, ensure that your CIFS server is started and running.
If you edit the default share name, a new share is created. However, the default share is still present with the same share name.
NOTE: All shares on a volume are removed on pool unmount.
For details on how to start the server, see Section 5.1.2, “Selecting a Server to Manage,” on page 28.
1 On the default CIFS server page in iManager click the Shares tab, then select a share from the list and click Edit, or click a particular share link to edit the share. For information on starting iManager and accessing the CIFS server, see Section 5.1.2, “Selecting a Server to Manage,” on page 28.
Administering the CIFS Server 37
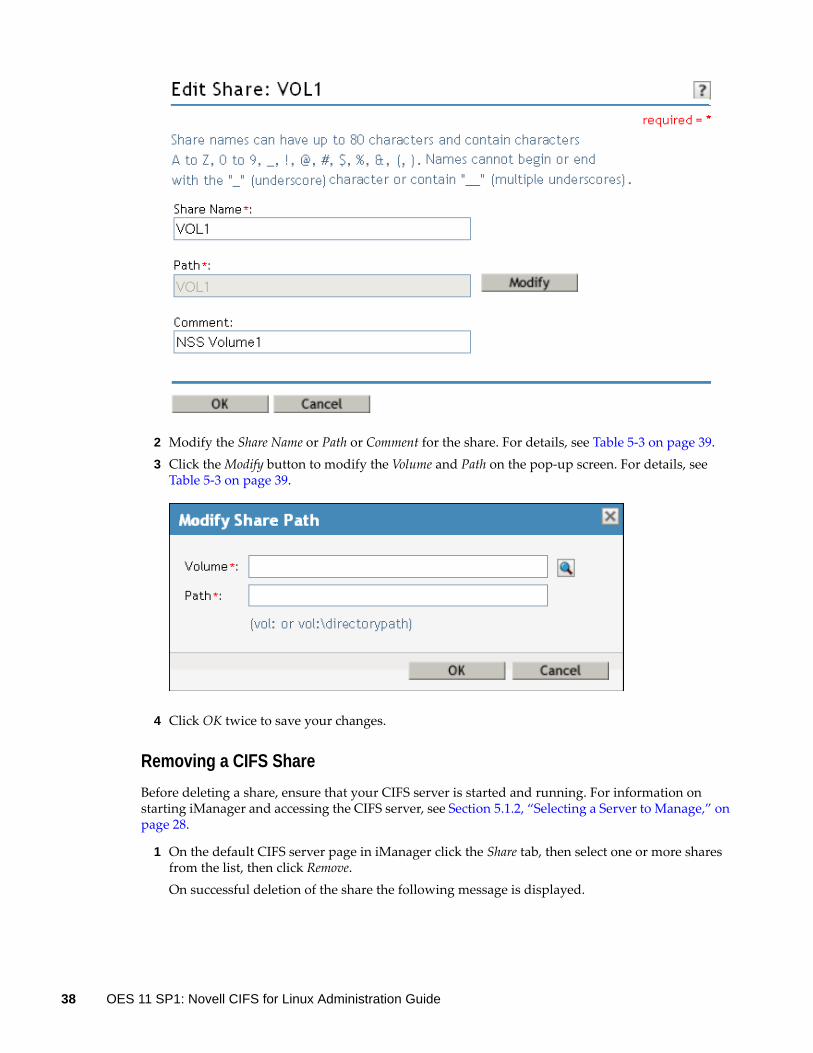
2 Modify the Share Name or Path or Comment for the share. For details, see Table 5-3 on page 39. 3 Click the Modify button to modify the Volume and Path on the pop-up screen. For details, see
Table 5-3 on page 39.
4 Click OK twice to save your changes.
Removing a CIFS Share
Before deleting a share, ensure that your CIFS server is started and running. For information on starting iManager and accessing the CIFS server, see Section 5.1.2, “Selecting a Server to Manage,” on page 28.
1 On the default CIFS server page in iManager click the Share tab, then select one or more shares from the list, then click Remove. On successful deletion of the share the following message is displayed.
38 OES 11 SP1: Novell CIFS for Linux Administration Guide
2 Either click OK to return to the main page or click Repeat Task to delete more shares.
CIFS Share Parameters
Use this table information to create and edit CIFS shares.
Table 5-3 Shares Page Parameters
5.1.5 Configuring a CIFS User Context
On the default CIFS server page in iManager click the Context tab to list, add, and delete the CIFS user contexts.
To configure a context search from the command line, see Section 5.2.8, “Configuring the CIFS Context Search File,” on page 44.
Parameter Description
Name The name that the CIFS share uses for all the CIFS services and for display on Windows computers. For example, if you specify Company Photos as the share name associated with vol1\graphics, then Windows workstations browsing the network see Company Photos instead of vol1\graphics.
A Share name can be up to 80 characters long and can contain any single-byte characters, but should not begin or end with an underscore _ or contain multiple underscores _.
Volume The OES 11 SP1 volume name.
Path The CIFS share path. This is the path to the server volume or directory that becomes the root of the sharepoint. This path may contain single-byte and multi-byte characters.
NOTE: Do not end the path with a backslash (\).
Comment A description for the sharepoint. The description appears in Network Neighborhood or My Network Places. The maximum length is 47 characters. Comment may contain single-byte and multi-byte characters.
Administering the CIFS Server 39
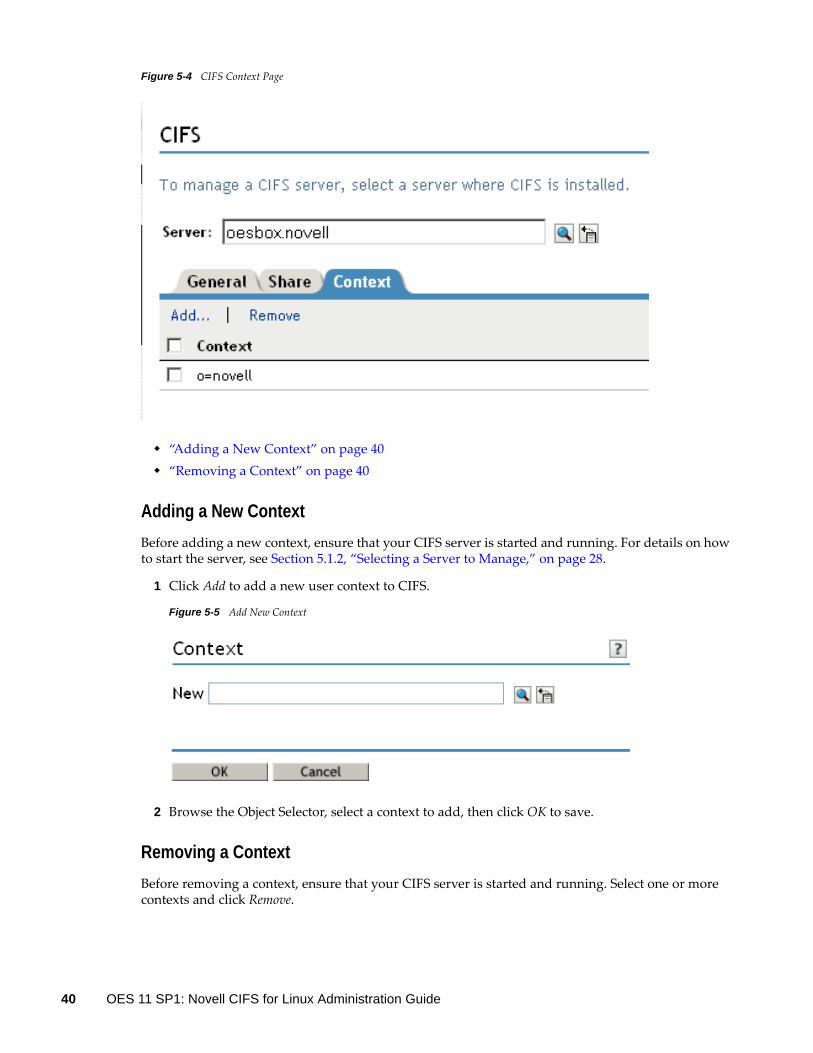
Figure 5-4 CIFS Context Page
“Adding a New Context” on page 40 “Removing a Context” on page 40
Adding a New Context
Before adding a new context, ensure that your CIFS server is started and running. For details on how to start the server, see Section 5.1.2, “Selecting a Server to Manage,” on page 28.
1 Click Add to add a new user context to CIFS.
Figure 5-5 Add New Context
2 Browse the Object Selector, select a context to add, then click OK to save.
Removing a Context
Before removing a context, ensure that your CIFS server is started and running. Select one or more contexts and click Remove.
40 OES 11 SP1: Novell CIFS for Linux Administration Guide
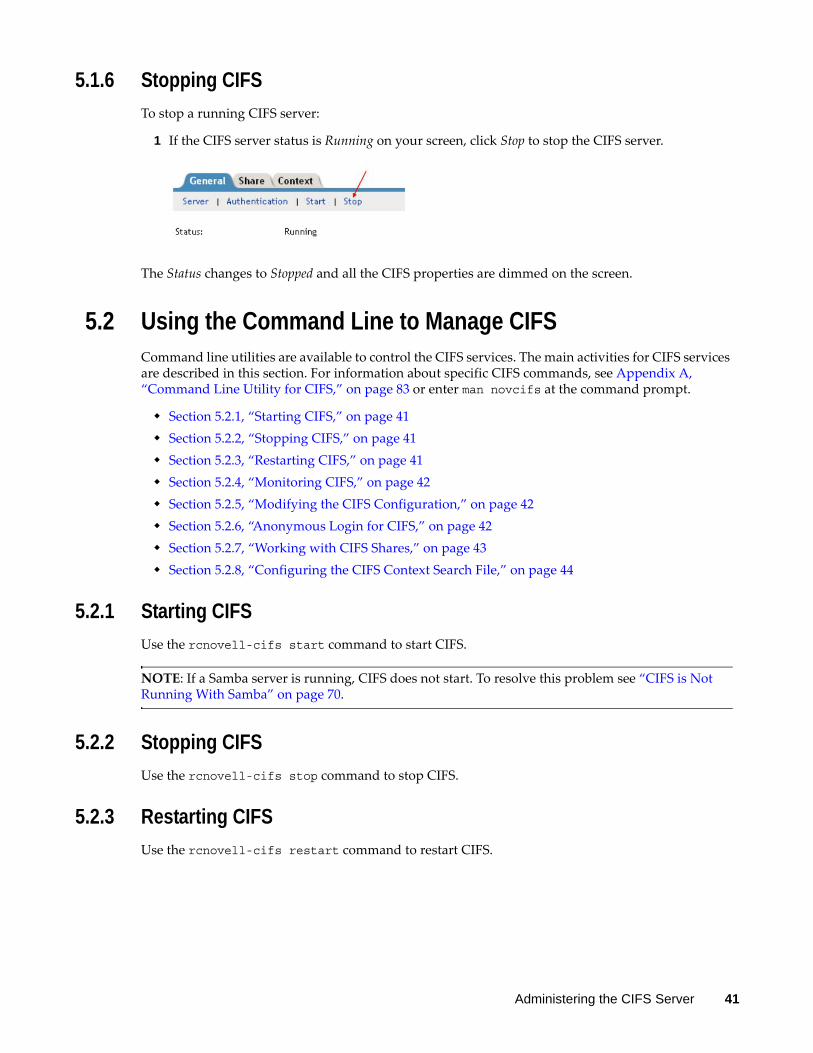
5.1.6 Stopping CIFS
To stop a running CIFS server:
1 If the CIFS server status is Running on your screen, click Stop to stop the CIFS server.
The Status changes to Stopped and all the CIFS properties are dimmed on the screen.
5.2 Using the Command Line to Manage CIFSCommand line utilities are available to control the CIFS services. The main activities for CIFS services are described in this section. For information about specific CIFS commands, see Appendix A, “Command Line Utility for CIFS,” on page 83 or enter man novcifs at the command prompt.
Section 5.2.1, “Starting CIFS,” on page 41 Section 5.2.2, “Stopping CIFS,” on page 41 Section 5.2.3, “Restarting CIFS,” on page 41 Section 5.2.4, “Monitoring CIFS,” on page 42 Section 5.2.5, “Modifying the CIFS Configuration,” on page 42 Section 5.2.6, “Anonymous Login for CIFS,” on page 42 Section 5.2.7, “Working with CIFS Shares,” on page 43 Section 5.2.8, “Configuring the CIFS Context Search File,” on page 44
5.2.1 Starting CIFS
Use the rcnovell-cifs start command to start CIFS.
NOTE: If a Samba server is running, CIFS does not start. To resolve this problem see “CIFS is Not Running With Samba” on page 70.
5.2.2 Stopping CIFS
Use the rcnovell-cifs stop command to stop CIFS.
5.2.3 Restarting CIFS
Use the rcnovell-cifs restart command to restart CIFS.
Administering the CIFS Server 41
5.2.4 Monitoring CIFS
Use the rcnovell-cifs monitor command to monitor the status of the CIFS server.
If the CIFS server is not running, the monitor script starts the CIFS server and returns the status.
5.2.5 Modifying the CIFS Configuration
The configuration settings are taken directly from the CIFS iManager settings. The recommended method to modify CIFS configuration is using iManager. For details, see Section 5.1.3, “Setting the CIFS Server and Authentication Properties,” on page 30.
Use the following steps to edit the CIFS configuration from command line:
1 Use any text editor to open the cifs.conf file from /etc/opt/novell/cifs/ directory.
IMPORTANT: It is recommended to not change the default settings in this file.
2 Use the following information to change the configuration: In the AUTHENT section, set the mode to either local or domain. Local is preferred. For
example, -AUTHENT local.
IMPORTANT: A domain mode is a third-party domain. For this mode, a Windows domain controller performs user authentication. A local mode is an eDirectory mode. For this mode, the server running CIFS services performs the user authentication.
In the COMMENT section, specify an appropriate user comment to associate with the sharepoint.
In the DOMAIN / WORKGROUP section, set the domain to use.
IMPORTANT: For third-party domains, specify the domain name. For the local option, set the workgroup.
Leave the OPLOCKS [yes/no] set to yes. Leave the UNICODE [yes/no] set to yes. In the -PDC [PDC_NAME] [PDC_IP_ADDR] section, specify the PDC name and IP address. In the -WINS [WINS_IP_ADDR] section, specify the WINS IP address. Set this if the PDC
and the server running CIFS are on different subnets. In the -SUBNET [subnet] section, specify the subnet value, if required.
3 Restart the CIFS server by using the rcnovell-cifs restart command for the configuration changes to take effect.
5.2.6 Anonymous Login for CIFS
Anonymous login for CIFS can be used to map to the CIFS share without a username and password.
If a user attempts to login to a CIFS server with a username that does not exist in the eDirectory, he will be logged in an as guest user. The guest user will be granted rights applicable for a Public Trustee.
The anonymous configuration is set at the server level so the anonymous login settings affect all CIFS shares on the server.
42 OES 11 SP1: Novell CIFS for Linux Administration Guide
The anonymous configuration is set at the server level so the anonymous login settings affect all CIFS shares on the server.
“Setting Anonymous Login” on page 43 “Anonymous Login in a Cluster” on page 43
Setting Anonymous Login
To set anonymous login, use the following command:
novcifs -e [yes/no]
The CIFS connections logged in as an anonymous user have privileges on the NSS volumes assigned to the Public trustee. The Public trustee rights can be set on any folder in an NSS volume by using the Novell Client. For more information, see the Novell Client for Linux documentation (http://www.novell.com/documentation/linux_client)
If you don’t have the Novell Client installed, you can use iManager to add Public trustee rights. For more information, see “Viewing, Adding, or Removing File System Trustees” in the OES 11 SP1: File Systems Management Guide.
Anonymous Login in a Cluster
In a cluster setup, anonymous login must be configured on every node and must be set to the same configuration level for consistent behavior across all shares.
This needs to be done for all the CIFS server parameters except for server name, server comment, and shares.
IMPORTANT: When you provide supervisor rights to public objects, it allows access to all secured folders. For security considerations, do not provide supervisor rights to the public objects.
5.2.7 Working with CIFS Shares
CIFS sharepoints can be added, removed, and displayed by using the command line interface or server console. CIFS shares cannot be added to virtual server object using command line (novcifs). If the shares are added on cluster resource using command line, then all the shares are lost if the resource leaves that node.
NOTE: Whenever a CIFS service is restarted on a node (node A) that hosts a cluster resource, the resource must be moved offline. It must then be available online or migrated to another node (node B), then brought back to the original node (node A) such that rebinding occurs.
You can view details about how CIFS shares are listed and configured by using any of the following commands at the server console or prompt:
To manage CIFS shares using iManager, see Section 5.1.4, “Managing CIFS Shares,” on page 35.
To manage CIFS shares using console, see the following sections:
“Adding a New Share Point on a Non-Clustered Volume (Login to the node as root)” on page 85 “Removing a Share Point on a Non-Clustered Volume (Login to the node as root)” on page 85 “Displaying the List of Share Points” on page 85
Administering the CIFS Server 43

“Displaying Details of a Share Point” on page 85 “Enabling or Disabling SMB Signing” on page 87.
5.2.8 Configuring the CIFS Context Search File
The recommended method is to use iManager to configure the search context. For details, see Section 5.1.5, “Configuring a CIFS User Context,” on page 39.
5.3 Locks Management for CIFSCross-Protocol locks help prevent the same file from being concurrently accessed for modifications. This option ensures that a file is updated correctly before another user, application, or process can access it.
Byte-Range Locking: Two types of byte-range locking are used: Exclusive Lock: The locked byte range is read/write for the holder of the lock and deny-all
for all others. A write lock on a byte range is acquired by an application that intends to write data into that byte range, and does not want other applications to be able to read or write to the byte range while it is accessing that byte range. A write lock on a given byte range is exclusive. It is granted to only one requester at a time. A write lock denies other applications the ability to either read or write to the locked byte-range.
Shared Lock: Also called a non-exclusive byte-range lock. The locked byte range is read-only for the holder of the lock and deny-write for all others. A read lock on a byte range is normally acquired by an application that intends to read data from the byte range, and does not want other applications to be able to write to the byte range while it is performing the read operation. A read lock on a given byte range is sharable, which means it is granted to multiple requesters concurrently. However, it is incompatible with a concurrent write lock on the same byte range. A read lock denies other applications the ability to write to the locked byte range. In environments that implement advisory record locking rather than mandatory record locking, a read lock simply advises other applications that they should not write to the locked byte-range, even though they are technically able to do so.
Opportunistic Locking: Opportunistic Locking or Oplocks improves file access performance and is enabled by default. Oplocks must be enabled on the server for Offline files to function correctly on Windows XP, Windows Vista, and Windows 7.
IMPORTANT: If a file is opened with multiple protocols when the migration or failover begins, the file should be closed and reopened after the migration or failover to acquire cross-protocol locks on the new node.
For more information, see “Using Novell Remote Manager for Linux to Configure Cross-Protocol Locks” in the OES 11 SP1: NCP Server for Linux Administration Guide.
5.4 Third-Party Domain AuthenticationFor third-party domain authentication, the clients are members of a third-party domain such as Windows. A Windows domain controller performs the user authentication. The username and password on the domain controller must match the username and password used to log in to the Windows workstation.
Ensure that you understand and meet the following prerequisites before setting up third-party authentication:
44 OES 11 SP1: Novell CIFS for Linux Administration Guide
Section 5.4.1, “Prerequisites,” on page 45 Section 5.4.2, “Using iManager to Enable Third-Party Authentication,” on page 45
5.4.1 Prerequisites
“Prerequisites for the Windows Primary Domain Controller” on page 45 “Prerequisites for the CIFS Server” on page 45
Prerequisites for the Windows Primary Domain Controller
Ensure that the Primary Domain Controller (PDC) is up and reachable by using the NETBIOS name of the PDC from the CIFS server.
For example, WINPDC_W. Disable autodisconnect feature in PDC to avoid resetting connection from PDC to CIFS server.
You can do that by configuring timeout value (in minutes) for idle sessions through autodisconnect parameter. The valid value range is -1 to 65535. Setting the timeout period value to -1 completely disables the auto-disconnect of idle sessions feature. For more information on how to configure timeout period (autodisconnect parameter)“How Autodisconnect Works in Windows NT and Windows 2000”
Disable SMB signing by following the instructions in “Overview of Server Message Block Signing” (http://support.microsoft.com/kb/887429)
The desktop user or the user that has joined the domain must be same as the CIFS user.
NOTE: The Windows client might be required to log in as the same user with the same password to access the CIFS shares when you are using third-party authentication.
Prerequisites for the CIFS Server
Ensure that SMB signing is disabled on the CIFS server. For details, see “Enabling and Disabling SMB Signing” on page 32.
5.4.2 Using iManager to Enable Third-Party Authentication
1 In a Web browser, specify the following in the address (URL) field:
http://server_IP_address/nps/iManager.html
For example:
http://192.168.0.1/nps/iManager.html
2 At the login prompt, specify the server administrator username and password and click Login.
Administering the CIFS Server 45
For more information on iManager administration, see the .Novell iManager 2.7.5 Administration Guide.
3 In the iManager application left frame, click File Protocols > CIFS.The default CIFS parameters page is displayed. Use this page to configure and manage CIFS.
4 Select the CIFS server you want to manage.5 Select General > Authentication
46 OES 11 SP1: Novell CIFS for Linux Administration Guide
6 Select Third party Domain as the mode of authentication.7 Specify the Work Group/Domain Name of the Windows environment.8 Specify the LMCompatibility level. For details, see Table 5-2, “CIFS Authentication Page
Parameters,” on page 34.9 Specify the name of the Primary Domain Controller. Ensure that the name does not exceed 15
characters.10 Specify the IP address of the Primary Domain Controller. 11 Click OK to save the changes in the CIFS properties.
5.5 Dynamic Storage Technology for CIFS ServerDynamic Storage Technology (DST) for Novell Open Enterprise Server (OES) 11 SP1 is an information life-cycle management technology that uses a policy-based approach for relocating data between two Novell Storage Services (NSS) volumes located on different devices, and transparently provides a unified view of the file tree to users. You specify policies that classify data to be moved by its frequency of use, filename, file type, and file size. Policy enforcement is automated with scheduled and on-demand runs of the policies. DST allows you to seamlessly tier storage between high-performance and lower-performance devices.
For example, you can establish policies that keep frequently-used mission-critical data on high-performance devices, and move rarely accessed less-essential data to lower-performance devices. Backup can be performed separately on the two volumes, which allows for different backup schedules.Dynamic Storage Technology enables you to manage data more efficiently for the enterprise and in doing so, the enterprise can potentially realize significant cost savings in storage management.
CIFS server for Linux provides the CIFS services for NSS volumes on Linux. Dynamic Storage Technology is a component of NCP Server.
Enabling DST: DST is automatically enabled when the shadow volume is added to the primary volume.
CIFS DST supports only NSS volumes being used as shadow volumes. If you plan to use DST, you need to install NSS when you install CIFS server and Dynamic Storage Technology. The NSS volumes must meet the “Storage Guidelines for DST Shadow Volume Pairs” in the OES 11 SP1: Dynamic Storage Technology Administration Guide.
DST for CIFS server that allows you to specify a shadow relationship between two volumes, which forms a shadow volume pair. The secondary directory tree structure, or shadow file tree, shadows the primary file tree. For more information, see “Planning for DST Shadow Volume Pairs and Policies” in the OES 11 SP1: Dynamic Storage Technology Administration Guide.
DST presents a unified view to users of the subdirectory trees on each volume. The primary file tree and secondary file tree have the same directory structure so that each subdirectory appears in both locations as data is moved between the two volumes. The primary tree and the secondary tree are overlaid to create one virtual volume tree that is transparently presented to the users. The CIFS users are not aware of the actual physical location of the files. For more information, see “Providing a Merged View for Users” in the OES 11 SP1: Dynamic Storage Technology Administration Guide.
For more information about “Configuring DST Global Policies” see the OES 11 SP1: Dynamic Storage Technology Administration Guide.
Administering the CIFS Server 47
5.6 DFS Junction Support in CIFS LinuxCIFS must be configured to support DFS Junctions. By default, DFS junction support is disabled. You must enable it on host (server that hosts the junction) and target (server that is pointed by the junction) servers in order for the junctions to work. The junctions that point to subdirectories are also supported with CIFS Linux. For more information, see “Managing DFS Junctions” in the OES 11 SP1: Novell Distributed File Services Administration Guide for Linux
Section 5.6.1, “Prerequisites,” on page 48 Section 5.6.2, “Enabling DFS Support,” on page 48 Section 5.6.3, “Limitations,” on page 49 Section 5.6.4, “Problems Following DFS Junctions with CIFS in Windows 2000/XP Releases,” on
page 49
5.6.1 Prerequisites
Unicode must be enabled. DFS must be enabled for CIFS on all the host and target servers. Both host and target CIFS servers must be running. The VLDB server must be running.
IMPORTANT: The CIFS clients accessing DFS junctions must be DFS aware. smbclient on Linux may not work appropriately in case of junctions as it is not DFS aware.
5.6.2 Enabling DFS Support
Use the instructions in this section to enable DFS junction support in CIFS Linux:
1 In iManager, click File Protocols > CIFS.2 Browse to locate and select the server you want to manage.
48 OES 11 SP1: Novell CIFS for Linux Administration Guide

Figure 5-6 Enabling DFS Support
3 Select the check box for Distributed File Services (DFS) Support to enable the DFS support in CIFS Linux.
4 Click OK.
5.6.3 Limitations
Junctions from Linux to NetWare system work only when the junction target is the root of the volume. However if both the source and target is on a Linux system, then junctions to subdirectories also work.
Junctions in NetWare cannot point to volumes in Linux. DFS is available only if Unicode (UTF8 format) is enabled. Only CIFS shares are enabled with DFS support.
5.6.4 Problems Following DFS Junctions with CIFS in Windows 2000/XP Releases
Windows Unable to Resolve the NetBIOS Name of the CIFS Server
Clients using Windows 2000 Service Pack 4 and Windows XP Service Pack 2 might have problems following DFS junctions over CIFS because of a defect in Windows. (This problem exhibits itself in a pure Windows environment.) When using DFS with CIFS, the CIFS server and Windows clients are on different IP subnets. In this case, the client must have a way to resolve the CIFS server name in order for DFS to work. This is a Microsoft/CIFS requirement, not a CIFS Linux requirement.
NOTE: This problem does not affect Windows clients that use the Novell Client.
Administering the CIFS Server 49
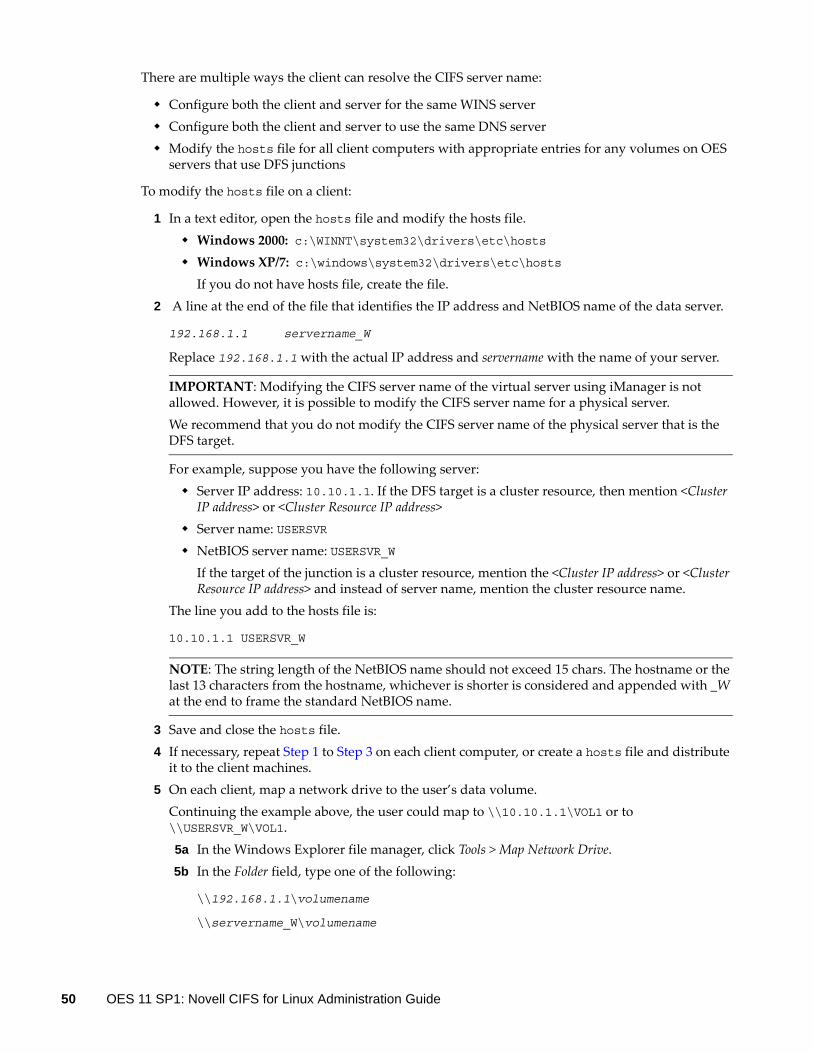
There are multiple ways the client can resolve the CIFS server name:
Configure both the client and server for the same WINS server Configure both the client and server to use the same DNS server Modify the hosts file for all client computers with appropriate entries for any volumes on OES
servers that use DFS junctions
To modify the hosts file on a client:
1 In a text editor, open the hosts file and modify the hosts file. Windows 2000: c:\WINNT\system32\drivers\etc\hosts Windows XP/7: c:\windows\system32\drivers\etc\hosts
If you do not have hosts file, create the file.2 A line at the end of the file that identifies the IP address and NetBIOS name of the data server.
192.168.1.1 servername_W
Replace 192.168.1.1 with the actual IP address and servername with the name of your server.
IMPORTANT: Modifying the CIFS server name of the virtual server using iManager is not allowed. However, it is possible to modify the CIFS server name for a physical server. We recommend that you do not modify the CIFS server name of the physical server that is the DFS target.
For example, suppose you have the following server: Server IP address: 10.10.1.1. If the DFS target is a cluster resource, then mention <Cluster
IP address> or <Cluster Resource IP address> Server name: USERSVR NetBIOS server name: USERSVR_W
If the target of the junction is a cluster resource, mention the <Cluster IP address> or <Cluster Resource IP address> and instead of server name, mention the cluster resource name.
The line you add to the hosts file is:
10.10.1.1 USERSVR_W
NOTE: The string length of the NetBIOS name should not exceed 15 chars. The hostname or the last 13 characters from the hostname, whichever is shorter is considered and appended with _W at the end to frame the standard NetBIOS name.
3 Save and close the hosts file.4 If necessary, repeat Step 1 to Step 3 on each client computer, or create a hosts file and distribute
it to the client machines. 5 On each client, map a network drive to the user’s data volume.
Continuing the example above, the user could map to \\10.10.1.1\VOL1 or to \\USERSVR_W\VOL1. 5a In the Windows Explorer file manager, click Tools > Map Network Drive. 5b In the Folder field, type one of the following:
\\192.168.1.1\volumename
\\servername_W\volumename
50 OES 11 SP1: Novell CIFS for Linux Administration Guide
Replace 192.168.1.1 with the actual IP address or servername with the hostname of your server.
5c Select Reconnect at Logon. 5d Click Finish.
After Modifying the Junction Target, Accessing the Junction Still Leads to the Old Target
Windows does not prompt the server everytime to resolve the junction every time it is accessed. It prompts the server only for the first time and then caches it. When the junction is accessed the next time, Windows does not prompt CIFS server to resolve the junction but it makes use of the target location it received previously.
On restarting the Windows machine, if the same mapping is done, it points to correct location. Because there is no cached value, it prompts the CIFS server to provide the location of the target that the junction points to and gets the latest value from CIFS server.
5.7 Subtree SearchA subtree search login enables CIFS to search for a user in the entire base context of a tree.The subtree search setting that is saved in the cifs.conf file stays persistent even if the system or service is restarted.
Section 5.7.1, “Prerequisites,” on page 51 Section 5.7.2, “Enabling a Subtree Search,” on page 51 Section 5.7.3, “Subtree Search in a Cluster Setup,” on page 51 Section 5.7.4, “Subtree Search Persistence,” on page 52
5.7.1 Prerequisites
To use the subtree search feature, the CIFS proxy user should have read rights for the base context. These rights are assigned automatically from iManager when the context is added.
5.7.2 Enabling a Subtree Search
After you have finished installing CIFS, start the CIFS server and enable the subtree search by using the following command:
novcifs -y yes
To disable the subtree search, use the novcifs -y no command.
You can choose to enable or disable the subtree search before the user starts connecting to the CIFS server.
5.7.3 Subtree Search in a Cluster Setup
A subtree search can be configured only at a physical server or node level. In a cluster setup, each node should be configured with the same configuration level for consistent behavior.
Administering the CIFS Server 51
NOTE: The time taken for the LDAP search to be completed depends on the WAN link and on the number of user replicas in the tree.
5.7.4 Subtree Search Persistence
The subtree search setting is saved in the cifs.conf file and is persistent even after the CIFS server or node is restarted.
5.8 Enabling Offline Files Support Offline Files helps you be more productive. You can use this feature on a portable computer, or on a desktop computer that occasionally connects to your workplace network. For example, this feature is useful if you are working at home on a desktop computer, and need to automatically get files off the network whenever you connect.
The files that you select are automatically downloaded from shared folders on the network and stored on your computer. When you disconnect, the files are available to use. When you reconnect to the network, your changes are added to the files on the network in a process called synchronization. If someone else on the network made changes to the same file, you can save your version, keep the other version, or save both.
You can enable client-side caching by using the following command :
novcifs [--csc= 0|1|2|3]
This feature configures client-side caching feature that can be used to store frequently used information on the client's machine.
0 Enables Windows clients to cache files for offline use. Does not permit automatic file-by-file re-integration. (Default)
1 Enables Windows clients to cache files for offline use. Permits automatic file-by-file reintegration.
2 Enables Windows clients to cache files for offline use. Clients are permitted to work from their local cache even while online.
3 Does not permit Windows client to cache files for offline use.
For information on configuring workstations to use offline files, see Microsoft Support (http://support.microsoft.com/kb/307853).
52 OES 11 SP1: Novell CIFS for Linux Administration Guide
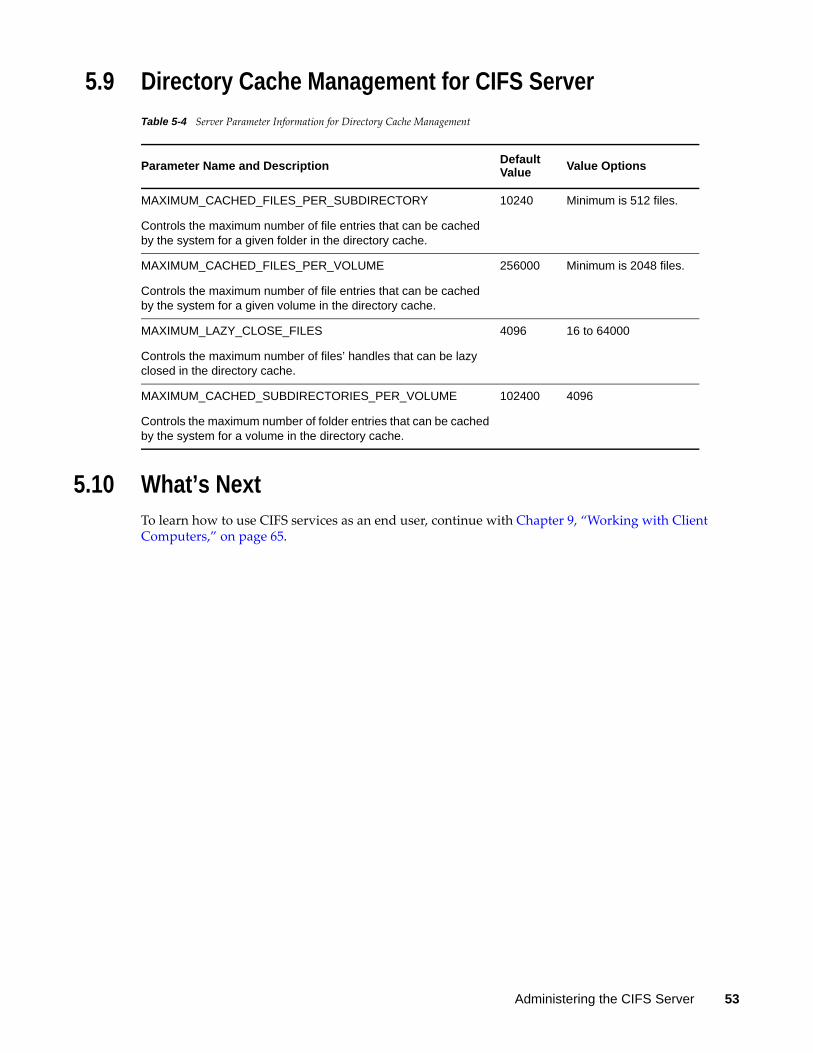
5.9 Directory Cache Management for CIFS Server
Table 5-4 Server Parameter Information for Directory Cache Management
5.10 What’s NextTo learn how to use CIFS services as an end user, continue with Chapter 9, “Working with Client Computers,” on page 65.
Parameter Name and Description Default Value Value Options
MAXIMUM_CACHED_FILES_PER_SUBDIRECTORY
Controls the maximum number of file entries that can be cached by the system for a given folder in the directory cache.
10240 Minimum is 512 files.
MAXIMUM_CACHED_FILES_PER_VOLUME
Controls the maximum number of file entries that can be cached by the system for a given volume in the directory cache.
256000 Minimum is 2048 files.
MAXIMUM_LAZY_CLOSE_FILES
Controls the maximum number of files’ handles that can be lazy closed in the directory cache.
4096 16 to 64000
MAXIMUM_CACHED_SUBDIRECTORIES_PER_VOLUME
Controls the maximum number of folder entries that can be cached by the system for a volume in the directory cache.
102400 4096
Administering the CIFS Server 53

54 OES 11 SP1: Novell CIFS for Linux Administration Guide
6 6Migrating CIFS to OES 11 SP1
The Open Enterprise Server (OES) 11 SP1 Migration Tool has a plug-in architecture that is made up of Linux command line utilities with a GUI wrapper. You can migrate CIFS from a NetWare server to an OES 11 SP1 server either by using the GUI Migration Tool or from the command line. For more information on NetWare CIFS, see the NW 6.5 SP8: AFP, CIFS, and NFS (NFAP) Administration Guide.
To get started with migration, see the OES 11 SP1: Migration Tool Administration Guide.
For more information on migrating CIFS, see “Migrating CIFS to OES 11 SP1” in the OES 11 SP1: Migration Tool Administration Guide.
To access the CIFS migration man page with command information, enter man migCifs at the command prompt. For details on migCifs command options, see “Man Page for Migration” in the OES 11 SP1: Migration Tool Administration Guide.
Migrating CIFS to OES 11 SP1 55

56 OES 11 SP1: Novell CIFS for Linux Administration Guide
7 7Running CIFS in a Virtualized Environment
Novell CIFS runs in a virtualized environment just as it does on a physical NetWare server, or on a physical server running Open Enterprise Server (OES) 11 SP1, and requires no special configuration or other changes.
To get started with Xen virtualization, see the Virtualisation with Xen.
For information on setting up virtualized OES 11 SP1, see “Installing, Upgrading, or Updating OES on a VM” in the OES 11 SP1: Installation Guide guide.
7.1 What’s NextTo learn more about what you can do with CIFS on OES 11 SP1, continue with Chapter 5, “Administering the CIFS Server,” on page 27.
Running CIFS in a Virtualized Environment 57

58 OES 11 SP1: Novell CIFS for Linux Administration Guide
8 8Configuring CIFS with Novell Cluster Services for an NSS File System
Novell Cluster Services for Open Enterprise Server (OES) 11 SP1 provides high availability, scalability, and security for your network while reducing administrative costs associated with managing client workstations.
This section describes how to set up Novell CIFS in a cluster so that Windows and Linux computers can use CIFS to access shared cluster resources on the network even when there is a server failure.
Section 8.1, “Benefits of Configuring CIFS for High Availability,” on page 59 Section 8.2, “Cluster Terminology,” on page 59 Section 8.3, “CIFS and Cluster Services,” on page 60 Section 8.4, “Configuring CIFS in a Cluster,” on page 62 Section 8.5, “What's Next,” on page 63
8.1 Benefits of Configuring CIFS for High AvailabilityWith the OES 11 SP1 cluster configured with CIFS protocols, users receive the following benefits of a clustered environment:
Novell Cluster Services and Novell Storage Services (NSS), which are part of OES 11 SP1, combine with Novell CIFS to facilitate highly available CIFS access for users.
Enabling and disabling CIFS for shared NSS pools has a single point of administration through the browser-based Novell iManager pool configuration or the console-based NSSMU.
The cluster-enabled CIFS share is automatically mounted and dismounted when the shared NSS pool's cluster resource is brought online and offline.
The CIFS sessions of the users continue without interruption when the shared NSS pool is migrated or failed over to a different node in the cluster.
8.2 Cluster TerminologyThe following terminology is used in this section when discussing the cluster environment:
Active node: The cluster server that currently owns the cluster resource and responds to network requests made to shared volumes on that resource.
Passive node: The cluster server that does not currently own the cluster resources but is available if the resource fails over or is migrated to it.
Active/Passive clustering: The cluster includes active nodes and passive nodes. The passive nodes are used if an active node fails.
Configuring CIFS with Novell Cluster Services for an NSS File System 59

Virtual server: A cluster-enabled pool and related services that appears to clients as a physical server but is not associated with a specific server in the cluster. This is the name of the virtual server as it appears to NCP, AFP, and Linux Samba clients.
CIFS virtual server: A cluster-enabled pool and the Novell CIFS service that appear to CIFS clients as a physical server but are not associated with a specific server in the cluster. This is the name of the virtual server as it appears to CIFS clients.
Cluster Resource IP address: Each cluster-enabled NSS pool requires its own static IP address. The IP address is used to provide access and failover capability to the cluster-enabled pool (virtual server). The IP address assigned to the pool remains assigned to the pool regardless of which server in the cluster it is active.
Load script: A file that contains the cluster resource definition and commands that load services and load the NSS pool and its volumes for a given cluster resource. Load scripts are generated by default when you cluster-enable a pool, and are modified by using the Clusters plug-in for Novell Cluster Services.
Monitor script: A file that contains the cluster resource commands that allows Novell Cluster Services to detect when an individual resource on a node has failed independently of its ability to detect node failures. Monitor scripts are generated by default when you cluster-enable a pool, and are modified by using the Clusters plug-in for Novell Cluster Services.
Unload script: A file that contains the cluster resource definition and commands that unload services and dismount the NSS pool and its volumes for a given cluster resource. Unload scripts are generated by default when you cluster-enable a pool, and are modified by using the Clusters plug-in for Novell Cluster Services.
8.3 CIFS and Cluster ServicesNovell Cluster Services can be configured either during or after OES 11 SP1 installation. In a cluster, Novell CIFS for OES 11 SP1, is available only in Active/passive mode, which means that CIFS software runs on all nodes in the cluster. When a server fails, the cluster volumes that were mounted on the failed server fail over to that other node. The following sections give details about using Novell CIFS in a cluster environment:
Section 8.3.1, “Prerequisites,” on page 60 Section 8.3.2, “Using CIFS in a Cluster Environment,” on page 61
8.3.1 Prerequisites
Before setting up Novell CIFS in a cluster environment, ensure that you meet the following prerequisites:
Novell Cluster Services installed on OES 11 SP1 servers
For information on installing Novell Cluster Services, see “Installing and Configuring Novell Cluster Services on OES 11SP1” in the OES 11 SP1: Novell Cluster Services 2.1 for Linux Administration Guide.
For information on managing Novell Cluster Services, see “Managing Clusters” in the OES 11 SP1: Novell Cluster Services 2.1 for Linux Administration Guide.
Novell CIFS is installed on all the nodes in the cluster to provide high availability
Follow the instructions in “Installing and Configuring a CIFS Server through YaST” on page 19.
60 OES 11 SP1: Novell CIFS for Linux Administration Guide
8.3.2 Using CIFS in a Cluster Environment
Keep in mind the following considerations when you prepare to use CIFS in a cluster.
Novell CIFS is not cluster-aware and is not clustered by default. You must install and configure Novell CIFS on every node in the cluster where you plan to give users CIFS access to the shared cluster resource.
Novell CIFS runs on all nodes in the cluster at any given time. Novell CIFS is started at boot time on each node in the cluster. A CIFS command is added to the
load script and unload script for the shared cluster resource. This allows Novell CIFS to provide or not to provide access to the shared resource through Virtual server IP.
NOTE: In CIFS, all the nodes should have similar server configuration, such as contexts and authentication mode.
The following process indicates how CIFS is enabled and used in a cluster environment:
1. Creating Shared Pools: To access the shared resources in the cluster environment through the CIFS protocol, you create the shared pools either by using the NSSMU utility, the iManager tool or the Novell Linux Volume Manager utility.
For requirements and details about configuring shared NSS pools and volumes on Linux, see “Configuring Cluster Resources for Shared NSS Pools and Volumes” in the OES 11 SP1: Novell Cluster Services 2.1 for Linux Administration Guide.
For details on creating a pool using Novell Linux Manager using the nlvm create pool command, see “NLVM Commands” in the OES 11 SP1: NLVM Reference.
2. Creating a Virtual Server: When you cluster-enable an NSS pool, an NCS:NCP Server object is created for the virtual server. This contains the virtual server IP address, the virtual server name, and a comment.
3. Creating a CIFS Virtual Server: When you cluster-enable an NSS pool and enable that pool for CIFS by selecting CIFS as an advertising protocol, a virtual CIFS server is added to eDirectory. This is the name the CIFS clients use to access the virtual server.
4. Configuring Monitor Script: Configure resource monitoring to let the cluster resource failover to the next node in the preferred nodes list. “ When rcnovell-cifs monitor is invoked, it: - returns the status of CIFS, if CIFS is already running - starts a new instance of CIFS and returns status, if CIFS is not running (dead/etc.)" Each time the monitor script detects that the CIFS service is down and starts the service, a message in the following format is logged in /var/log/messages file :
CIFS: Monitor routine, in novell-cifs init script, detected CIFS not running,starting CIFS
For details on Configuring a Monitor Script for the Shared NSS Pool, see “Configuring a Monitor Script for the Shared NSS Pool” in the OES 11 SP1: Novell Cluster Services 2.1 for Linux Administration Guide
IMPORTANT: Set the number of Maximum Local Failures permitted to 0. This ensures that if the CIFS server crashes, cluster services will trigger an immediate failover of the resource.
5. Loading the CIFS Service: When you enable CIFS for a shared NSS pool and when Novell CIFS is started at system boot, the following line is automatically added to the cluster load script for the pool's cluster resource:
Configuring CIFS with Novell Cluster Services for an NSS File System 61
novcifs --add --vserver=virtualserverFDN --ip-addr=virtualserverip
For example, novcifs --add '--vserver=".cn=CL-POOL-SERVER.o=novell.t=VALTREE."' --ip-addr=10.10.10.10
This command is executed when the cluster resource is brought online on an active node. You can view the load script for a cluster resource by using the clusters plug-in for iManager. Do not manually modify the load script.
IMPORTANT: If the cluster resource goes comatose on the Linux server, there might be a timing issue for loading Novell CIFS. Add a sleep command before the novcifs -add command. For example:
sleep 5exit_on_error novcifs --add --vserver=.CN=NCS1_P1_SERVER.O=novell.T=TREE-188. --ip-addr=10.10.10.205
6. Unloading the CIFS Service: When you CIFS-enable for a shared NSS pool, the following line is automatically added to the cluster unload script for the pool's cluster resource:
novcifs --remove --vserver=virtualserverFDN --ip-addr=virtualserverip
For example, novcifs --remove '--vserver=".cn=CL-POOL-SERVER.o=novell.t=VALTREE."' --ip-addr=10.10.10.10
This command is executed when the cluster resource is taken offline on a node. The virtual server is no longer bound to the Novell CIFS service on that node. You can view the unload script for a cluster resource by using the clusters plug-in for iManager. Do not manually modify the unload script.
7. CIFS Attributes for the Virtual Server: When you CIFS-enable a shared NSS pool, the following CIFS attributes are added to the NCS:NCP Server object for the virtual server: nfapCIFSServerName (read access) nfapCIFSAttach (read access) nfapCIFSComment (read access)
The CIFS virtual server uses these attributes. The CIFS server proxy user must have default ACL access rights to these attributes, access rights to the virtual server, and be in the same context as the CIFS virtual server.
NOTE: If the CIFS server proxy user is in a different context, the cluster administrator should give access to these virtual server attributes for the proxy user.
8.4 Configuring CIFS in a ClusterPerform the following tasks to configure or enable CIFS and make it available on a cluster environment:
Section 8.4.1, “Prerequisites,” on page 62 Section 8.4.2, “Creating Shared Pools and Accessing Sharepoints,” on page 63
8.4.1 Prerequisites
The cluster environment is set up and ready All nodes in the cluster are installed and configured for CIFS
62 OES 11 SP1: Novell CIFS for Linux Administration Guide
All nodes in the cluster meet CIFS standalone server setup requirements and CIFS is running The disk you want to use for the pool is configured through the iSCSI or SAN software. It is
marked as Shareable for Clustering by using NSSMU, the Storage plug-in to iManager, or the nlvm share command.
8.4.2 Creating Shared Pools and Accessing Sharepoints
You can configure, enable, and access the CIFS services by using iManager, NSSMU or the NLVM create command.
“Creating Pools Using iManager” on page 63 “Creating Using NSSMU to Create the Pool” on page 63 “Creating Pools Using NLVM” on page 63
Creating Pools Using iManager
For details on creating pools by using iManager, see “Creating a Pool” in the OES 11 SP1: NSS File System Administration Guide for Linux.
NOTE: If the cluster object is created in a container that is in a different than the one in which the nodes are present or is at a higher level than where nodes are present, then the CIFS proxy user must be manually added to the trustee list of cluster server object and required rights must be assigned to it along with the inherited rights.
Creating Using NSSMU to Create the Pool
For details on creating pools by using NSSMU, see “NSS Management Utility (NSSMU) Quick Reference in the OES 11 SP1: NSS File System Administration Guide for Linux”
Creating Pools Using NLVM
For details on creating pools by using NLVM, see “NLVM Commands in the OES 11 SP1: NLVM Reference”.
You can add Novell CIFS as an advertising protocol when you create a cluster-enabled NSS pool. For information, see “Creating Cluster-Enabled Pools and Volumes”.
You can add Novell CIFS as an advertising protocol when you cluster-enable an existing NSS pool. For information, see“Cluster-Enabling an Existing NSS Pool and Its Volumes”.
You can add or remove Novell CIFS as an advertising protocol for an existing cluster-enabled NSS pool. For information, see “Adding Advertising Protocols for NSS Pool Cluster Resources”.
8.5 What's NextFor information about managing the CIFS services by using iManager or the command line interface, see Chapter 5, “Administering the CIFS Server,” on page 27.
For an explanation of how end users access network files from different workstations by using CIFS, see Chapter 9, “Working with Client Computers,” on page 65.
Configuring CIFS with Novell Cluster Services for an NSS File System 63

64 OES 11 SP1: Novell CIFS for Linux Administration Guide
9 9Working with Client Computers
If CIFS is properly configured, the users on your network can perform the following tasks:
Section 9.1, “Accessing Files from a Client Computer,” on page 65 Section 9.2, “Mapping Drives and Mounting Volumes,” on page 67
9.1 Accessing Files from a Client ComputerYou can access files and folders hosted on CIFS server from Windows (XP, Vista, Win7) or Linux clients. Use one of the following methods to access the CIFS server from your clients:
Section 9.1.1, “Accessing Files from a Windows Client,” on page 65 Section 9.1.2, “Accessing Files from a Linux Desktop,” on page 66
9.1.1 Accessing Files from a Windows Client
“Prerequisite” on page 65 “Procedure to Access Files” on page 65
Prerequisite
Accessing files from a Windows computer requires NetBIOS over TCP/IP to be enabled on the Windows computer. If you have disabled NetBIOS over TCP/IP, you will not be able to access files and directories through CIFS.
IMPORTANT: The Search option in Win7 mapped drive does not work as designed. You will see windows client searching for some time. However, it is not searching but the client is waiting for the server's response.
Procedure to Access Files
1 Specify your username (no context) and local password to log in to the computer.2 Access the network by clicking the network icon.
In Windows 2000 and XP, click My Network Places. In Vista and Win 7, click Network.3 Browse to the workgroup or domain specified during the CIFS software installation.4 Select the server running CIFS.
Although it is the same computer, the CIFS server name is not the same as the Open Enterprise Server (OES) 11 SP1 server name. For more information, ask your network administrator.
Working with Client Computers 65
TIP: You can specify the server name or the server IP address in Find Computer to quickly access the server running CIFS software.
5 Browse to the desired folder or file.
NOTE: Windows users can also be managed through a Windows Domain Controller.
9.1.2 Accessing Files from a Linux Desktop
You can access files either by using an IP address or a NETBIOS name. If your Linux client is a SUSE Linux Enterprise Desktop (SLED) desktop, you can also use nautilus to access the files.:
“Using an IP Address to Access Files” on page 66 “Using a NETBIOS Name to Access Files” on page 66 “Using nautilus to Access Files” on page 66
Using an IP Address to Access Files
1 Run this command from the terminal:smbclient://<SERVER_IP_ADDRESS>/<VOLUME_NAME or SHARE_NAME> -U<user_name> -p 139
2 Enter the password when prompted.
For example,
trml-prompt:~ # smbclient //192.168.103.158/V1 -Uari -p 139
session request to 192.168.103.158 failed (Called name not present)
session request to 192 failed (Called name not present)
Password: (enter password here)
OS=[SUSE LINUX 10.1SUSE LINUX 10.1WORKGROUP] Server=[]
smb: \>
Using a NETBIOS Name to Access Files
1 Run this command from the terminal:smb://<SERVER_NAME>/<VOLUME_NAME or SHARE_NAME> -U<user_name> -p 139
2 Enter the password when prompted.
Using nautilus to Access Files
1 Run this command from the nautilus address bar:smb://<SERVER_IP_ADDRESS>/<VOLUME_NAME or SHARE_NAME>
2 Enter the username and password when prompted.
66 OES 11 SP1: Novell CIFS for Linux Administration Guide
9.2 Mapping Drives and Mounting VolumesYou can map drives for accessing the CIFS share names from a Windows, Windows Vista, or Windows 7 client and mount the volumes from a linux client.
Section 9.2.1, “Mapping Drives from a Windows 2000 or XP Client,” on page 67 Section 9.2.2, “Mapping Files from a Windows Vista Client,” on page 67 Section 9.2.3, “Mounting Volumes from a Linux Client,” on page 67
9.2.1 Mapping Drives from a Windows 2000 or XP Client
From a Windows 2000 or XP client computer, you can map drives and create shortcuts that are retained after rebooting.
1 Right click on the My Computer icon.2 Click Map Network Drive.
There are several ways to access Map Network Drive. For example, you can use the Tools menu in Windows Explorer or you can right-click Network Neighborhood.
3 Browse to or specify the following path:\\server_running_Novell_CIFS\<sharepoint | volume> \ directory
4 Select the server running CIFS.Although it is the same computer, the CIFS server name is not the same as the OES 11 SP1 server name. For more information, contact your network administrator.
5 Specify the user name and password to login.6 Click OK to proceed.
9.2.2 Mapping Files from a Windows Vista Client
1 From the Windows explorer, either right click on the Computer icon, from the left-pane or go to the Tools menu.
2 Select Map Network Drive.3 Specify a Drive to map.4 Specify a path or Browse to the desired folder to map to the Drive. In this case, a CIFS share
name, for example \\server_running_Novell_CIFS\<sharepoint | volume> \ directory.5 Click Connect using a different user name link.6 Specify the user name and password to login.7 Click OK to proceed.
9.2.3 Mounting Volumes from a Linux Client
1 Login as a root administrator.2 From your console, enter one of the three commands:
smbmount
smbmount //<ip_address>/<share_name> <mount_point> -ousername=<username>,password=<password>
or
Working with Client Computers 67
mount -t smbfs
NOTE: It is not recommended to use smbfs to mount CIFS shares.
or mount -t cifs
For example, mount -t cifs - ousername=<username>,password=<password> //<ip_address>/<share_name> <mount_point>
68 OES 11 SP1: Novell CIFS for Linux Administration Guide
10 10Troubleshooting CIFS
Section 10.1, “Known issues,” on page 69 Section 10.2, “CIFS Installation and Configuration Issues,” on page 69 Section 10.3, “CIFS Log In Issues,” on page 70 Section 10.4, “CIFS Loading Issues,” on page 70 Section 10.5, “CIFS Migration Issues,” on page 72 Section 10.6, “CIFS General Issues,” on page 72
10.1 Known issues After renaming an NSS volume, both the old and new name of the volumes get listed as shares
in CIFS iManager.
Workaround: Administrator must delete the share for the old volume manually.
Novell plans to address this issue in a future OES release.
10.2 CIFS Installation and Configuration Issues Section 10.2.1, “CIFS is Not Coming Up After Installation,” on page 69 Section 10.2.2, “CIFS Stops After Installation and Throws an Error 669, “schema not extended”,”
on page 69 Section 10.2.3, “CIFS is Not Running With Samba,” on page 70 Section 10.2.4, “CIFS Server Broadcasts the Browser Packets every Twelve Minutes,” on page 70
10.2.1 CIFS is Not Coming Up After Installation
Description: CIFS status is listed as stopped after a successful installation.
Cause: CIFS may be installed as standalone after installing Open Enterprise Server (OES) 11 SP1.
Action: Restart the OES 11 SP1 server for the installation and configuration settings to take effect.
10.2.2 CIFS Stops After Installation and Throws an Error 669, “schema not extended”
Cause: Proxy user credentials in the credential store (file/CASA) are not stored correctly.
Action: Reconfigure CIFS proxy user.
Troubleshooting CIFS 69
10.2.3 CIFS is Not Running With Samba
Description: CIFS server does not come up if the Samba server is running.
Cause: CIFS cannot coexist with samba daemons.
Action: Login to the OES Server as root. Use the following commands to stop the Samba daemons and restart the CIFS server.
rcsmb stop
rcnmb stop
rcnovell-cifs start
10.2.4 CIFS Server Broadcasts the Browser Packets every Twelve Minutes
Cause: It is designed to broadcast every twelve minutes.
Action: An entry with the NetBIOS Name and the respective server IP address in LMHOSTS file must be present on Windows client machine or WINS should be configured for both the server and the client.
10.3 CIFS Log In Issues
10.3.1 CIFS Does Not Log In and Throws “Password has expired” Error in the Log File
Error: Password has expired.
Cause: Password expiry is set for security purposes. The password has expired.
Action: Reset the password and try to log in again.
10.3.2 Windows Workstation Displays Only Folders Assigned with Public Trustee Rights
Error: Only folders assigned with Public Trustee rights are visible.
Cause: If you have logged into a Windows workstation and see folders assigned only with Public Trustee rights, it is either because you have logged in with an incorrect user name or have logged in as a guest user.
Action: Log in with the correct credentials.
10.4 CIFS Loading Issues Section 10.4.1, “CIFS Is Not Starting,” on page 71 Section 10.4.2, “Newly Created NSS Volumes Are Not Being Shared in CIFS,” on page 71
70 OES 11 SP1: Novell CIFS for Linux Administration Guide
10.4.1 CIFS Is Not Starting
Cause: The proxy user password was changed in eDirectory by using iManager or command line interface.
Action: Reconfigure the CIFS services through YaST. Use the same proxy user and the changed password or create a new proxy user.
1 Open YaST.2 Click Open Enterprise Server > OES Install and Configuration. 3 On the Software Selection Page, click Accept.
The status of eDirectory service is displayed as Reconfigure is disabled.4 To reconfigure, click disabled to change the status to enabled.5 Click Novell CIFS Service to access the configuration dialog box.6 Change the password in the CIFS Proxy User Password field.
NOTE: Specify a password that adheres to the password policy restrictions.
7 Retype the password in the Verify CIFS Proxy User Password field.8 Click Next and continue with the remaining configuration steps in Section 4.1, “Installing and
Configuring a CIFS Server through YaST,” on page 19.
10.4.2 Newly Created NSS Volumes Are Not Being Shared in CIFS
Description: When a new volume is created in a cluster/non-cluster environment, the dynamic detection of the NSS share does not happen.
Cause: eDirectory server might be restarted without restarting CIFS.
Action: Restart the CIFS service whenever eDirectory service is restarted.
Or
Description: Cluster resource gets into comatose mode when migrating the cluster resource.
Error: 22101. An invalid path.
Cause: eDirectory server might be restarted without restarting CIFS.
Action: Restart the CIFS service whenever eDirectory service is restarted.
Or
Description: Trustee updation not working in CIFS.
Error: Users are unable to access data for which they have access.
Cause: eDirectory server might be restarted without restarting CIFS.
Action: Restart the CIFS service whenever eDirectory service is restarted.
Troubleshooting CIFS 71
10.5 CIFS Migration Issues Section 10.5.1, “After Migration, CIFS is Not Running,” on page 72 Section 10.5.2, “Different Tree Migration Is Not Available in the Migration Tool,” on page 72 Section 10.5.3, “After Migration, CIFS Server Not Coming up on the Target Server by Default.,”
on page 72
10.5.1 After Migration, CIFS is Not Running
Description: Migration is complete. However, CIFS is not running.
Cause: Configuration settings are not updated on the OES 11 SP1 server.
Action: Restart OES 11 SP1 server on the target server for migration to be effective.
10.5.2 Different Tree Migration Is Not Available in the Migration Tool
Description: The Different Tree scenario is not supported in the Migration Tool.
Action: Use the following workaround:
1 Migrate the File System from the source server to the target server, using the Different Tree scenario. For detailed information see, Migrating Data to a Server in a Different Tree in the OES 11 SP1: Migration Tool Administration Guide.
2 Reconfigure CIFS by using YaST on the target server. For detailed YaST configuration steps, see Section 4.1, “Installing and Configuring a CIFS Server through YaST,” on page 19.
10.5.3 After Migration, CIFS Server Not Coming up on the Target Server by Default.
Cause: CIFS configuration points to the older proxy user available on the older target server, which do not exist after-Transfer-id. CIFS service starts with this proxy user which now does not have rights on the final NCP server object after Transfer- ID.
Action :CIFS server needs to be started manually, so that it reads the latest Proxy user which has proper rights on the NCP server object
10.6 CIFS General Issues Section 10.6.1, “Junction Target Changes Require DFSUTIL Command Execution to Clear the
Cache,” on page 73 Section 10.6.2, “Unable to Access DFS Junctions on a Novell CIFS Share from Windows Client,”
on page 73 Section 10.6.3, “Temporary Files Created by Windows Office 2010 Are Not Cleared,” on page 73 Section 10.6.4, “Users Created Using UID Qualifier Cannot Access CIFS Shares,” on page 73 Section 10.6.5, “Authentication Failure Due to Password Mismatch,” on page 73
72 OES 11 SP1: Novell CIFS for Linux Administration Guide
10.6.1 Junction Target Changes Require DFSUTIL Command Execution to Clear the Cache
Cause: The Windows client caches junction locations when it starts. If you modify the junction target location, the client continues to point to the old junction target path.
Action: To refresh the Windows environment, do the following:
1 Download the DFSUTIL utility from the Microsoft download site.2 Disconnect from the mapped drive and clear the cache using the following DFSUTIL
commands:
DFSUTIL /PKTFLUSHDFSUTIL /SPCFLUSH
3 Map to the drive again.
10.6.2 Unable to Access DFS Junctions on a Novell CIFS Share from Windows Client
Cause: The Windows client and the Novell CIFS server might be on a different subnet.
Action: Add an entry with the CIFS server IP address and the NetBIOS name at C:\WINDOWS\system32\drivers\etc\hosts.
10.6.3 Temporary Files Created by Windows Office 2010 Are Not Cleared
Cause: This happens because the Enable for Editing option is enabled in MS Office 2010.
Action: To ensure the temporary files are not stored in the server, disable the Enable for Editing option in MS Office 2010.
10.6.4 Users Created Using UID Qualifier Cannot Access CIFS Shares
Cause: The users are by default created with the cn qualifier. If you create a user with the uid qualifier, the user cannot access the CIFS shares.
Action: Ensure you create a user with the default cn qualifier.
10.6.5 Authentication Failure Due to Password Mismatch
Error: Authentication failed due to password mismatch for user cn=user1.ou=ou1.o=novell, Err :-1642
Cause: The password is incorrect.
OR
Universal password is not set for the user.
OR
The client and the server have incompatible LMCompatibility level settings.
Action: Provide the correct password.
Troubleshooting CIFS 73

OR
Set the universal password for the user.
OR
Check for the LMComaptibility settings. For more information, refer CIFS LMCompatibility configuration file.
74 OES 11 SP1: Novell CIFS for Linux Administration Guide
11 11Security Guidelines for CIFS
You can use several protection mechanisms to counteract potential security vulnerabilities for CIFS on an Open Enterprise Server (OES) 11 SP1.
Section 11.1, “Using Credentials,” on page 75 Section 11.2, “Using CASA,” on page 75 Section 11.3, “Using VPN Connections,” on page 75 Section 11.4, “Using SMB Signing,” on page 75 Section 11.5, “Other Security Considerations,” on page 75
11.1 Using CredentialsWhen you set the password for the CIFS proxy user during YaST configuration, make sure you choose a password according to password policy restrictions. Choose a password that has combination of alphanumeric characters, capital letters, small letters, and adheres to the password policy restrictions.
11.2 Using CASAWe recommend you to select CASA as the Credential Storage Location during YaST configuration of CIFS.
11.3 Using VPN ConnectionsCIFS packets are not encrypted. Use VPN or other secure connections while accessing confidential CIFS shares through the Internet
11.4 Using SMB SigningFor a secure connection, set the SMB signing option to optional in iManager. For details on how to set it, see “Enabling and Disabling SMB Signing” on page 32.
11.5 Other Security ConsiderationsOES 11 SP1 provides Universal Password security. For details, see Security Considerations (https://www.netiq.com/documentation/password_management33/pwm_administration/?page=/documentation/password_management33/pwm_administration/data/bookinfo.html) in the Novell
Security Guidelines for CIFS 75

Password Management Administration Guide (https://www.netiq.com/documentation/password_management33/pwm_administration/?page=/documentation/password_management33/pwm_administration/data/bookinfo.html).
76 OES 11 SP1: Novell CIFS for Linux Administration Guide
12 12Tuning the Parameters and Settings for a File Server Stack
Following are the list of settings or parameters that can have an impact on the performance of the file server while accessing the data hosted on NSS volumes.
Section 12.1, “eDirectory,” on page 77 Section 12.2, “NSS,” on page 78 Section 12.3, “CIFS,” on page 79 Section 12.4, “NCP,” on page 81
12.1 eDirectory Section 12.1.1, “FLAIM Database,” on page 77 Section 12.1.2, “Thread Pool,” on page 77
12.1.1 FLAIM Database
eDirectory uses FLAIM (Flexible Adaptable Information Manager) as its database. It is used for traditional, volatile, and complex information. It is a highly scalable database engine that supports multiple readers and single writer concurrency model.
Physically, FLAIM organizes data in blocks. Some of the blocks are typically held in memory and they represent the block cache. The entry cache, at times called a record cache, caches logical entries from the database. Entries are constructed from the items in the block cache. FLAIM maintains hash tables for both caches. The hash bucket size is periodically adjusted based on the number of items.
By default eDirectory uses a block of 4 KB. The block cache size for caching the complete DIB is equal to the DIB size, and the size required for the entry cache is about two to four times the DIB size.
12.1.2 Thread Pool
eDirectory is multithreaded for performance reasons. In multithreading, when the system is busy, more threads are created to handle the load, and some threads are terminated to avoid extra overhead. Not every module uses the thread pool. The actual number of threads for the process is more than the number that exists in the thread pool. For example, FLAIM manages its background threads separately.
Use ndstrace -c threads command to know the thread pool statistics.
Here’s an example of a sample thread pool.
Tuning the Parameters and Settings for a File Server Stack 77
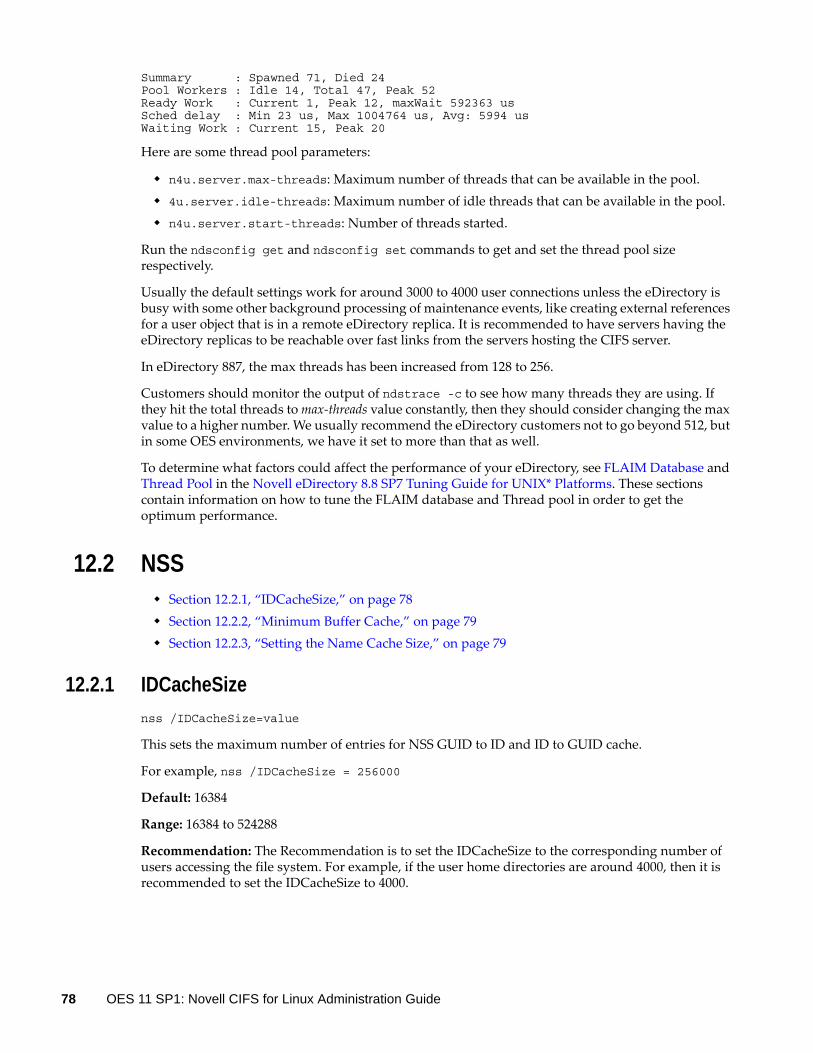
Summary : Spawned 71, Died 24Pool Workers : Idle 14, Total 47, Peak 52Ready Work : Current 1, Peak 12, maxWait 592363 usSched delay : Min 23 us, Max 1004764 us, Avg: 5994 usWaiting Work : Current 15, Peak 20
Here are some thread pool parameters:
n4u.server.max-threads: Maximum number of threads that can be available in the pool. 4u.server.idle-threads: Maximum number of idle threads that can be available in the pool. n4u.server.start-threads: Number of threads started.
Run the ndsconfig get and ndsconfig set commands to get and set the thread pool size respectively.
Usually the default settings work for around 3000 to 4000 user connections unless the eDirectory is busy with some other background processing of maintenance events, like creating external references for a user object that is in a remote eDirectory replica. It is recommended to have servers having the eDirectory replicas to be reachable over fast links from the servers hosting the CIFS server.
In eDirectory 887, the max threads has been increased from 128 to 256.
Customers should monitor the output of ndstrace -c to see how many threads they are using. If they hit the total threads to max-threads value constantly, then they should consider changing the max value to a higher number. We usually recommend the eDirectory customers not to go beyond 512, but in some OES environments, we have it set to more than that as well.
To determine what factors could affect the performance of your eDirectory, see FLAIM Database and Thread Pool in the Novell eDirectory 8.8 SP7 Tuning Guide for UNIX* Platforms. These sections contain information on how to tune the FLAIM database and Thread pool in order to get the optimum performance.
12.2 NSS Section 12.2.1, “IDCacheSize,” on page 78 Section 12.2.2, “Minimum Buffer Cache,” on page 79 Section 12.2.3, “Setting the Name Cache Size,” on page 79
12.2.1 IDCacheSize
nss /IDCacheSize=value
This sets the maximum number of entries for NSS GUID to ID and ID to GUID cache.
For example, nss /IDCacheSize = 256000
Default: 16384
Range: 16384 to 524288
Recommendation: The Recommendation is to set the IDCacheSize to the corresponding number of users accessing the file system. For example, if the user home directories are around 4000, then it is recommended to set the IDCacheSize to 4000.
78 OES 11 SP1: Novell CIFS for Linux Administration Guide
12.2.2 Minimum Buffer Cache
To set the Minimum Number of Cache Buffers to use for the kernel memory:
1. As a root user, open a terminal console. 2. Start nsscon(8). At the console prompt, enternsscon.3. Set the minimum number of cache buffers used by NSS on Linux. In nsscon, enter nss /
MinBufferCacheSize=value, where value is the number of 4-KB buffers to assign for NSS. The default value is 30000. The maximum setting is the amount of memory in KB divided by 4 KB. For a 32-bit machine, the maximum setting is 250000 buffers.
12.2.3 Setting the Name Cache Size
The NSS Name Cache is responsible for caching the Name Tree information. This is the information that is read when you perform any kind of search by file or directory name. The Name Cache maps a name to a ZID (a unique file object ID). Directory listings do not do this as much as normal file opens that must resolve each name in the file path.
Use the NameCacheSize parameter to specify the amount of recently used Name Tree entries for files and directories that NSS caches. Each entry uses about 150 bytes of memory. Increasing the maximum number of Name Cache entries does not necessarily improve the performance for getting directory listing information. This happens because NSS looks up information about the file from a tree or structure outside of the name tree.
If you want to see how your name cache is performing, use the nsscon /NameCacheStats command.
nsscon /NameCacheSize=<value>
Specify the maximum number of recently used Name Tree entries for files and directories to cache. Name cache grows up to the specified limit. Unlike the file system cache, it does not take the maximum amount of memory allocated from the start.
Default: 100000
Range: 17 to 1000000
Apart from the above parameters, for more information on tuning NSS performance on Linux, see Tuning Cache Buffers for NSS on Linux and Configuring or Tuning Group I/O in the OES 2 SP3: NSS File System Administration Guide for Linux.
12.3 CIFS Section 12.3.1, “Maximum Cached Subdirectories Per Volume,” on page 80 Section 12.3.2, “Maximum Cached Files Per Subdirectory,” on page 80 Section 12.3.3, “Maximum Cached Files Per Volume,” on page 80 Section 12.3.4, “Subtree Search,” on page 80 Section 12.3.5, “Information and Debug Logs,” on page 81 Section 12.3.6, “Oplocks,” on page 81 Section 12.3.7, “Cross Protocol Locks,” on page 81 Section 12.3.8, “SMB Signing,” on page 81
Tuning the Parameters and Settings for a File Server Stack 79
12.3.1 Maximum Cached Subdirectories Per Volume
This controls the maximum number of folder entries that can be cached by the system for a volume in the directory cache. The default value is 102400.
Use the following command to the set the Maximum Cached Subdirectories Per Volume.
novcifs –k SDIRCACHE = <value for the Maximum Cached Subdirectories Per Volume>
12.3.2 Maximum Cached Files Per Subdirectory
This controls the maximum number of file entries that can be cached by the system for a given folder in the directory cache. The default value is 10240.
Use the following command to the set the Maximum Cached Files Per Subdirectory.
novcifs –k DIRCACHE = <value for the Maximum Cached Files Per Subdirectory>
12.3.3 Maximum Cached Files Per Volume
This controls the maximum number of file entries that can be cached by the system for a given volume in the directory cache. The default value is 256000.
Use the following command to the set the Maximum Cached Files Per Volume.
novcifs –k FILECACHE = <value for the Maximum Cached Files Per Volume>
NOTE: The above dircache size determines how many files or folders can be opened at a time. Although the total number of files and folders residing in a volume might be substantially lager than this number. This settings caches only the file name and related information, and it does not cache the whole file.
Recommendation: Set this value close to the number of files and folders available in a volume.
12.3.4 Subtree Search
A subtree search or contextless login enables CIFS to search for a user in the entire base context of a tree. The subtree search setting that is saved in the cifs.conf file stays persistent even if the system or service is restarted.
To use the subtree search feature, the CIFS proxy user should have read rights for the base context. These rights are assigned automatically from iManager when the context is added. A subtree search can be configured only at a physical server or at node level. In a cluster setup, each node should be configured with the same configuration level for consistent behavior.
Use following command to enable or disable subtree search.
novcifs -y yes|no
Subtree search performance depends on how the eDirectory replicas are spread over how the eDirectory contexts hierarchy is created.
80 OES 11 SP1: Novell CIFS for Linux Administration Guide

12.3.5 Information and Debug Logs
Please keep the CIFS information and debug logs in a disabled state unless you specifically require the detailed log information.
To enable or disable the Debug Log for Developers, use the following command: novcifs [-b yes|no | --enable-debug=yes|no]
To enable or disable the Info Log, use the following command: novcifs [-f yes|no |--enable-info=yes|no]
12.3.6 Oplocks
The Oplocks or opportunistic locking improves file access performance by caching files at the client side. This option is enabled by default.
Recommendation: For better performance oplock should be enabled (use iManager).
12.3.7 Cross Protocol Locks
The CrossProtocol locks help in using the files in the right way from different clients depending on the type of file accessed. This option is enabled by default.
Recommendation: Option should enabled for data integrity purposes.
12.3.8 SMB Signing
The SMB signing ensures data integrity. Default option is disabled in latest CIFS releases as both client and server are in trusted corporate network and also disabling gives optimal file server performance. The SMB signing should be turned off when domain authentication is configured.
Recommendation: Option is disabled by default.
novcifs –g yes / no / optional / force
Apart from the above parameters, for more information on CIFS parameters that affect the file system performance, see Locks Management for CIFS, Using Offline Files and Directory Cache Management for CIFS Server in the OES 2 SP3: Novell CIFS for Linux Administration Guide.
12.4 NCP Section 12.4.1, “Thread Pools,” on page 81 Section 12.4.2, “Cache Settings,” on page 82
12.4.1 Thread Pools
To manage the thread pools in NCP, see Managing NCP Threads in the OES 2 SP3: NCP Server for Linux Administration Guide.
Tuning the number of asynchronous threads in NCP will help to route the NCP requests to eDirectory.
Tuning the Parameters and Settings for a File Server Stack 81
12.4.2 Cache Settings
To set the directory cache values in NCP, see Directory Cache Management for NCP Server in the OES 2 SP3: NCP Server for Linux Administration Guide.
82 OES 11 SP1: Novell CIFS for Linux Administration Guide
A ACommand Line Utility for CIFS
This section describes the command line utilities that work on an Open Enterprise Server (OES) 11 SP1 server for running the CIFS services.
To access a man page with the command information, enter man novcifs at the command prompt. To run this command, the user must login as root.
Command Line Utility for CIFS 83

novcifs(8)
Name
novcifs - A client interface program that communicates with the cifsd daemon. For novcifs to be running, the user must log in as root.
Syntax
novcifs [options]
[-sl | --share --list]
[-sln SHARENAME | --share --list --name=SHARENAME]
[-sap PATH -n SHARENAME -m CONNECTION-LIMIT -c COMMENT | --share --add --path=PATH --name=SHARENAME --conn-limit=CONNECTION-LIMIT --comment=COMMENT ]
[-srn SHARENAME | --share --remove --name=SHARENAME]
[-sap PATH -n SHARENAME -m CONNECTION-LIMIT -c COMMENT -v VIRTUALSERVERFDN | --share --add --path=PATH --name=SHARENAME --conn-limit=CONNECTION-LIMIT --comment=COMMENT --vserver=VIRTUALSERVERFDN]
[-srn SHARENAME -v VIRTUALSERVERFDN | --share --remove --name=SHARENAME --vserver=VIRTUALSERVERFDN]
[-b yes|no | --enable-debug=yes|no]
[-f yes|no | --enable-info=yes|no]
[-e yes|no | --guest-login=yes|no]
[-a -D "DNSNAME" -I IPADDR | --add --dns-name="DNSNAME" --ip-addr=IPADDR]
[-r -D "DNSNAME" -I IPADDR | --remove --dns-name="DNSNAME" --ip-addr=IPADDR]
[-g yes|no|optional|force | --enable-smbsigning=yes|no|optional|force]
[-e yes|no | --add --dns-name="<DNS_NAME>" --ip-addr=IP_ADDR]
[-C | --conn-count]
[-av VIRTUALSERVERFDN -I VIRTUALSERVERIP | --add --vserver=VIRTUALSERVERFDN --ip-addr=VIRTUALSERVERIP]
[-rv VIRTUALSERVERFDN -I VIRTUALSERVERIP | --remove --vserver=VIRTUALSERVERFDN --ip-addr=VIRTUALSERVERIP]
[-o | --oper-params]
[-g yes|no|optional|force | --enable-smbsigning=yes|no|optional|force]
[-L 0|4|5 | --lm=0|4|5]
[-y [yes|no]]
[-k [SDIRCACHE | DIRCACHE | FILECACHE] = value | --set-cache SDIRCACHE | DIRCACHE | FILECACHE = value]]
[-t [yes|no]]
84 OES 11 SP1: Novell CIFS for Linux Administration Guide
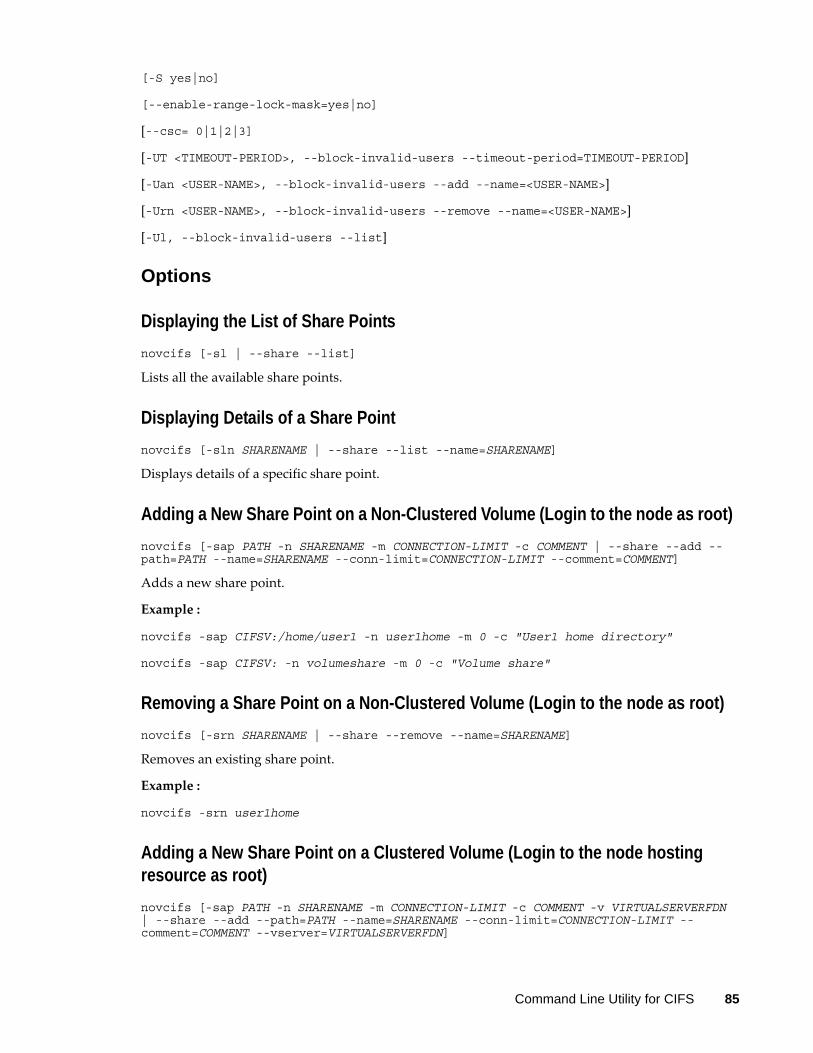
[-S yes|no]
[--enable-range-lock-mask=yes|no]
[--csc= 0|1|2|3]
[-UT <TIMEOUT-PERIOD>, --block-invalid-users --timeout-period=TIMEOUT-PERIOD]
[-Uan <USER-NAME>, --block-invalid-users --add --name=<USER-NAME>]
[-Urn <USER-NAME>, --block-invalid-users --remove --name=<USER-NAME>]
[-Ul, --block-invalid-users --list]
Options
Displaying the List of Share Points
novcifs [-sl | --share --list]
Lists all the available share points.
Displaying Details of a Share Point
novcifs [-sln SHARENAME | --share --list --name=SHARENAME]
Displays details of a specific share point.
Adding a New Share Point on a Non-Clustered Volume (Login to the node as root)
novcifs [-sap PATH -n SHARENAME -m CONNECTION-LIMIT -c COMMENT | --share --add --path=PATH --name=SHARENAME --conn-limit=CONNECTION-LIMIT --comment=COMMENT]
Adds a new share point.
Example :
novcifs -sap CIFSV:/home/user1 -n user1home -m 0 -c "User1 home directory"
novcifs -sap CIFSV: -n volumeshare -m 0 -c "Volume share"
Removing a Share Point on a Non-Clustered Volume (Login to the node as root)
novcifs [-srn SHARENAME | --share --remove --name=SHARENAME]
Removes an existing share point.
Example :
novcifs -srn user1home
Adding a New Share Point on a Clustered Volume (Login to the node hosting resource as root)
novcifs [-sap PATH -n SHARENAME -m CONNECTION-LIMIT -c COMMENT -v VIRTUALSERVERFDN | --share --add --path=PATH --name=SHARENAME --conn-limit=CONNECTION-LIMIT --comment=COMMENT --vserver=VIRTUALSERVERFDN]
Command Line Utility for CIFS 85
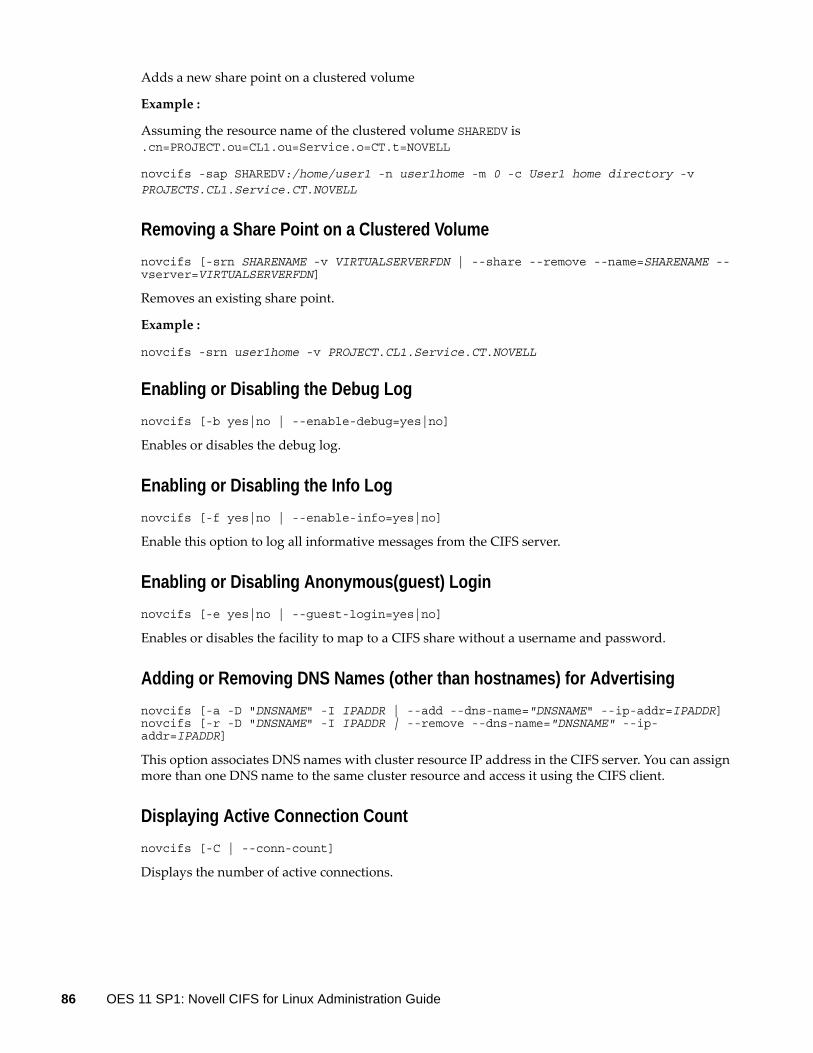
Adds a new share point on a clustered volume
Example :
Assuming the resource name of the clustered volume SHAREDV is .cn=PROJECT.ou=CL1.ou=Service.o=CT.t=NOVELL
novcifs -sap SHAREDV:/home/user1 -n user1home -m 0 -c User1 home directory -v PROJECTS.CL1.Service.CT.NOVELL
Removing a Share Point on a Clustered Volume
novcifs [-srn SHARENAME -v VIRTUALSERVERFDN | --share --remove --name=SHARENAME --vserver=VIRTUALSERVERFDN]
Removes an existing share point.
Example :
novcifs -srn user1home -v PROJECT.CL1.Service.CT.NOVELL
Enabling or Disabling the Debug Log
novcifs [-b yes|no | --enable-debug=yes|no]
Enables or disables the debug log.
Enabling or Disabling the Info Log
novcifs [-f yes|no | --enable-info=yes|no]
Enable this option to log all informative messages from the CIFS server.
Enabling or Disabling Anonymous(guest) Login
novcifs [-e yes|no | --guest-login=yes|no]
Enables or disables the facility to map to a CIFS share without a username and password.
Adding or Removing DNS Names (other than hostnames) for Advertising
novcifs [-a -D "DNSNAME" -I IPADDR | --add --dns-name="DNSNAME" --ip-addr=IPADDR]novcifs [-r -D "DNSNAME" -I IPADDR | --remove --dns-name="DNSNAME" --ip-addr=IPADDR]
This option associates DNS names with cluster resource IP address in the CIFS server. You can assign more than one DNS name to the same cluster resource and access it using the CIFS client.
Displaying Active Connection Count
novcifs [-C | --conn-count]
Displays the number of active connections.
86 OES 11 SP1: Novell CIFS for Linux Administration Guide
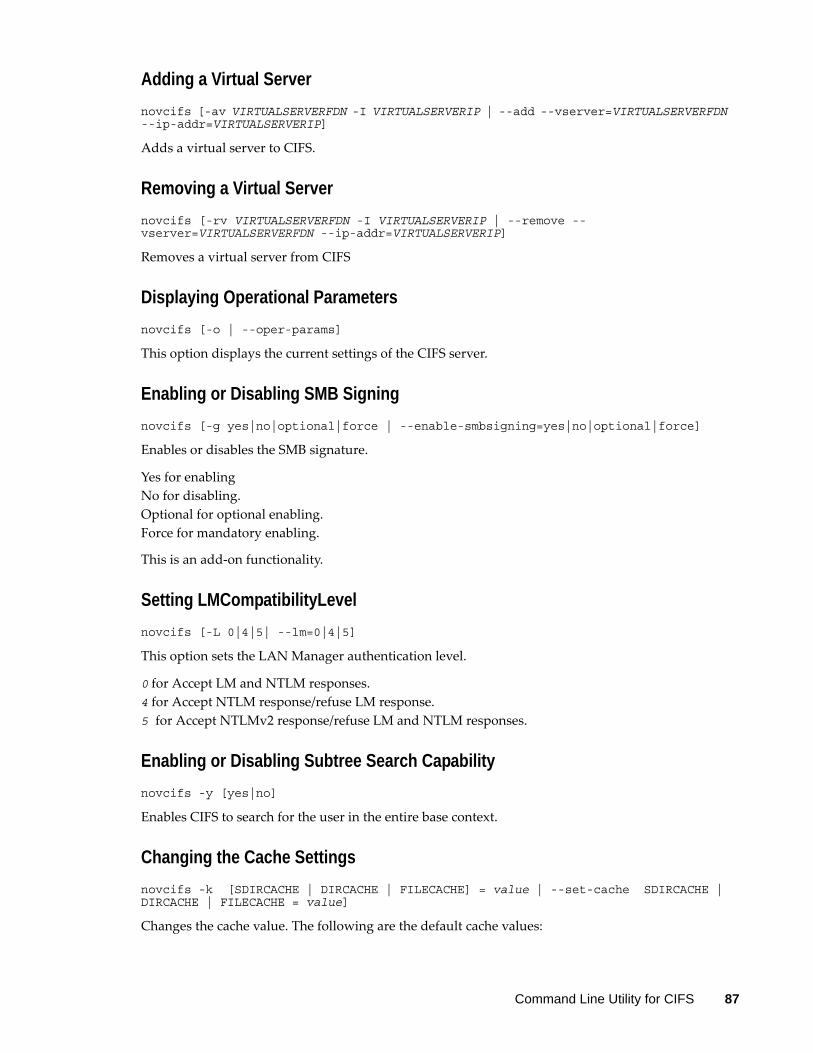
Adding a Virtual Server
novcifs [-av VIRTUALSERVERFDN -I VIRTUALSERVERIP | --add --vserver=VIRTUALSERVERFDN --ip-addr=VIRTUALSERVERIP]
Adds a virtual server to CIFS.
Removing a Virtual Server
novcifs [-rv VIRTUALSERVERFDN -I VIRTUALSERVERIP | --remove --vserver=VIRTUALSERVERFDN --ip-addr=VIRTUALSERVERIP]
Removes a virtual server from CIFS
Displaying Operational Parameters
novcifs [-o | --oper-params]
This option displays the current settings of the CIFS server.
Enabling or Disabling SMB Signing
novcifs [-g yes|no|optional|force | --enable-smbsigning=yes|no|optional|force]
Enables or disables the SMB signature.
Yes for enablingNo for disabling.Optional for optional enabling.Force for mandatory enabling.
This is an add-on functionality.
Setting LMCompatibilityLevel
novcifs [-L 0|4|5| --lm=0|4|5]
This option sets the LAN Manager authentication level.
0 for Accept LM and NTLM responses.4 for Accept NTLM response/refuse LM response.5 for Accept NTLMv2 response/refuse LM and NTLM responses.
Enabling or Disabling Subtree Search Capability
novcifs -y [yes|no]
Enables CIFS to search for the user in the entire base context.
Changing the Cache Settings
novcifs -k [SDIRCACHE | DIRCACHE | FILECACHE] = value | --set-cache SDIRCACHE | DIRCACHE | FILECACHE = value]
Changes the cache value. The following are the default cache values:
Command Line Utility for CIFS 87
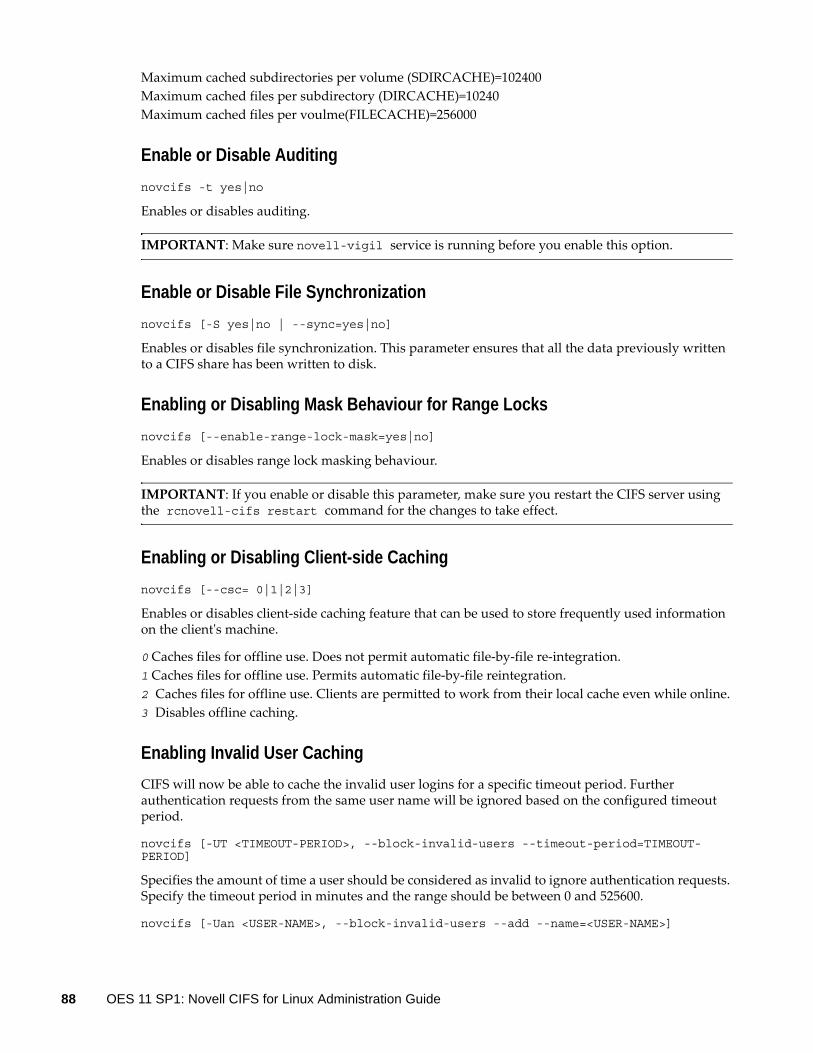
Maximum cached subdirectories per volume (SDIRCACHE)=102400Maximum cached files per subdirectory (DIRCACHE)=10240Maximum cached files per voulme(FILECACHE)=256000
Enable or Disable Auditing
novcifs -t yes|no
Enables or disables auditing.
IMPORTANT: Make sure novell-vigil service is running before you enable this option.
Enable or Disable File Synchronization
novcifs [-S yes|no | --sync=yes|no]
Enables or disables file synchronization. This parameter ensures that all the data previously written to a CIFS share has been written to disk.
Enabling or Disabling Mask Behaviour for Range Locks
novcifs [--enable-range-lock-mask=yes|no]
Enables or disables range lock masking behaviour.
IMPORTANT: If you enable or disable this parameter, make sure you restart the CIFS server using the rcnovell-cifs restart command for the changes to take effect.
Enabling or Disabling Client-side Caching
novcifs [--csc= 0|1|2|3]
Enables or disables client-side caching feature that can be used to store frequently used information on the client's machine.
0 Caches files for offline use. Does not permit automatic file-by-file re-integration.1 Caches files for offline use. Permits automatic file-by-file reintegration.2 Caches files for offline use. Clients are permitted to work from their local cache even while online.3 Disables offline caching.
Enabling Invalid User Caching
CIFS will now be able to cache the invalid user logins for a specific timeout period. Further authentication requests from the same user name will be ignored based on the configured timeout period.
novcifs [-UT <TIMEOUT-PERIOD>, --block-invalid-users --timeout-period=TIMEOUT-PERIOD]
Specifies the amount of time a user should be considered as invalid to ignore authentication requests. Specify the timeout period in minutes and the range should be between 0 and 525600.
novcifs [-Uan <USER-NAME>, --block-invalid-users --add --name=<USER-NAME>]
88 OES 11 SP1: Novell CIFS for Linux Administration Guide

Adds the specified user to the list of default invalid users whose authentication requests needs to be ignored permanently.
novcifs [-Urn <USER-NAME>, --block-invalid-users --remove --name=<USER-NAME>]
Removes the specified user from the list of cached invalid users to start considering authentication requests.
novcifs [-Ul, --block-invalid-users --list]
Lists all the cached invalid users whose authentication requests are currently ignored.
Help Options
-h | --help Displays the help information for CIFS commands, syntax, and exits
-u | --usage Displays the usage information for the commands and exits
Files
/etc/opt/novell/cifs/cifs.conf CIFS configuration file.
/etc/opt/novell/cifs/cifsctxs.conf CIFS context file.
/etc/opt/novell/cifs/.cifspwd.enc Encrypted CIFS proxy user file.
/etc/init.d/novell-cifs Initialization script for CIFS. You should use this script to start and stop CIFS, rather than running it directly.
/var/log/cifs/cifs.log CIFS server log file.
Examples
/etc/init.d/novell-cifs start runs this program in the standard way.
/usr/sbin/novcifs runs the client interface program directly.
VOL1:dir1 or VOL1:/dir1 is a volume-based path.
Command Line Utility for CIFS 89

90 OES 11 SP1: Novell CIFS for Linux Administration Guide
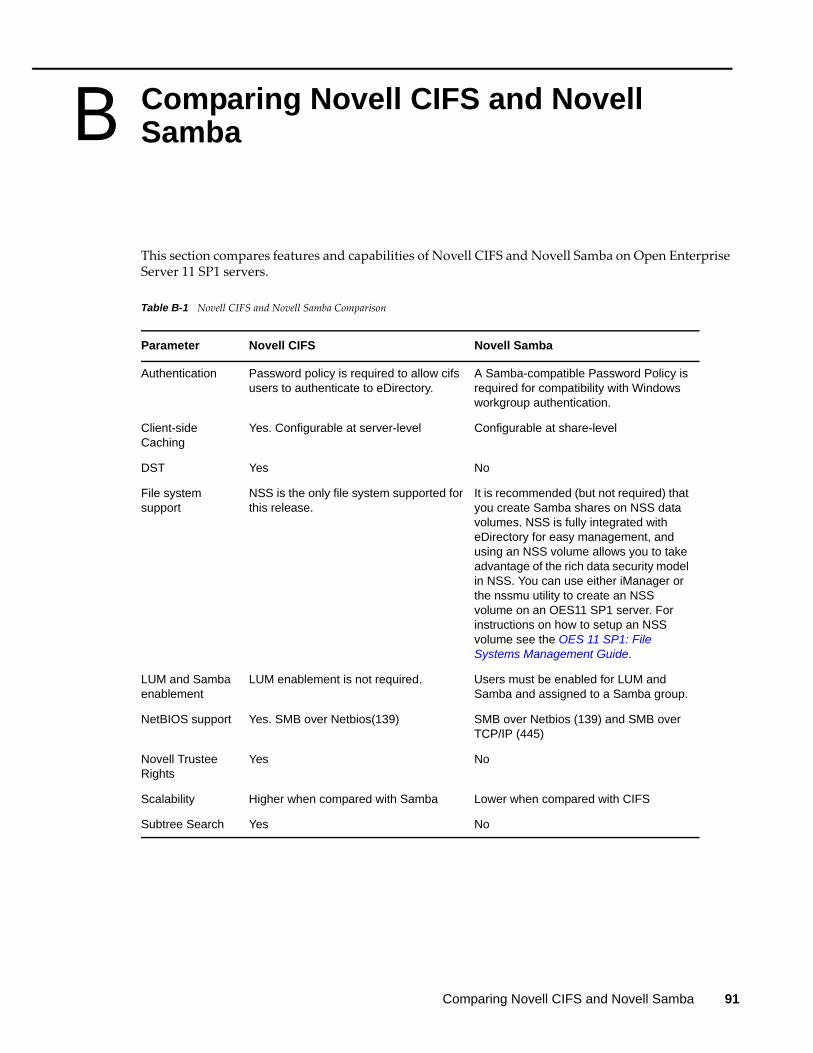
B BComparing Novell CIFS and Novell Samba
This section compares features and capabilities of Novell CIFS and Novell Samba on Open Enterprise Server 11 SP1 servers.
Table B-1 Novell CIFS and Novell Samba Comparison
Parameter Novell CIFS Novell Samba
Authentication Password policy is required to allow cifs users to authenticate to eDirectory.
A Samba-compatible Password Policy is required for compatibility with Windows workgroup authentication.
Client-side Caching
Yes. Configurable at server-level Configurable at share-level
DST Yes No
File system support
NSS is the only file system supported for this release.
It is recommended (but not required) that you create Samba shares on NSS data volumes. NSS is fully integrated with eDirectory for easy management, and using an NSS volume allows you to take advantage of the rich data security model in NSS. You can use either iManager or the nssmu utility to create an NSS volume on an OES11 SP1 server. For instructions on how to setup an NSS volume see the OES 11 SP1: File Systems Management Guide.
LUM and Samba enablement
LUM enablement is not required. Users must be enabled for LUM and Samba and assigned to a Samba group.
NetBIOS support Yes. SMB over Netbios(139) SMB over Netbios (139) and SMB over TCP/IP (445)
Novell Trustee Rights
Yes No
Scalability Higher when compared with Samba Lower when compared with CIFS
Subtree Search Yes No
Comparing Novell CIFS and Novell Samba 91

92 OES 11 SP1: Novell CIFS for Linux Administration Guide
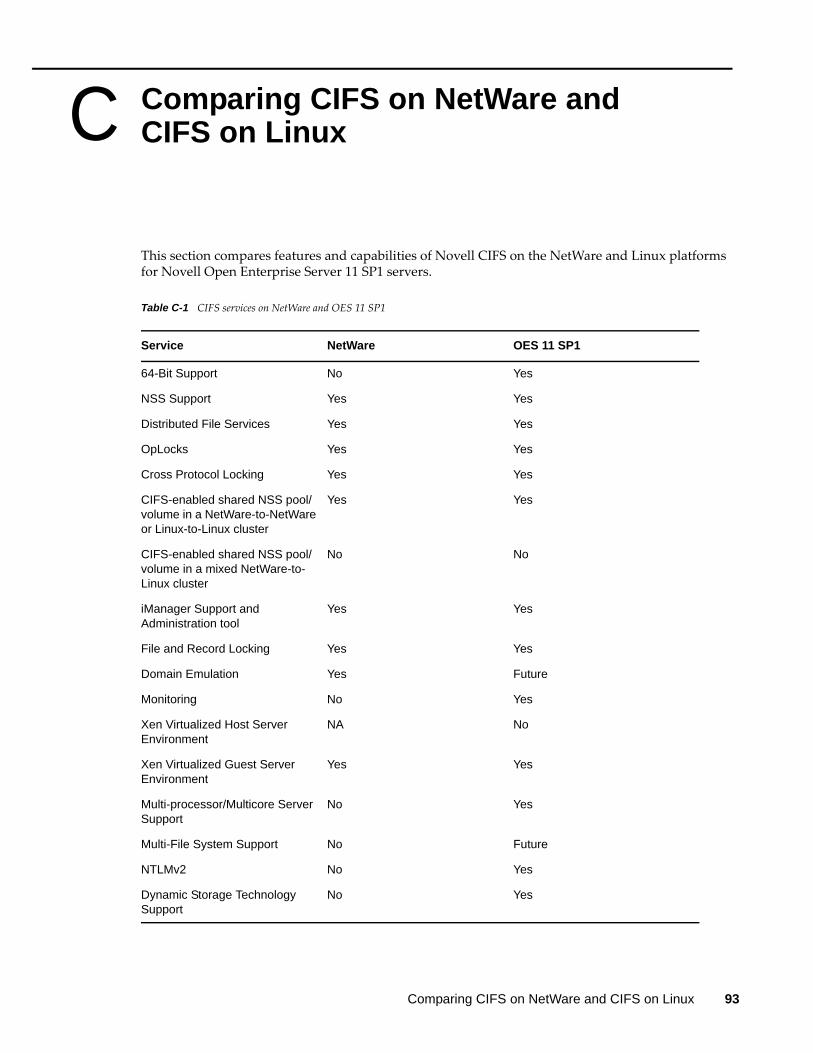
C CComparing CIFS on NetWare and CIFS on Linux
This section compares features and capabilities of Novell CIFS on the NetWare and Linux platforms for Novell Open Enterprise Server 11 SP1 servers.
Table C-1 CIFS services on NetWare and OES 11 SP1
Service NetWare OES 11 SP1
64-Bit Support No Yes
NSS Support Yes Yes
Distributed File Services Yes Yes
OpLocks Yes Yes
Cross Protocol Locking Yes Yes
CIFS-enabled shared NSS pool/volume in a NetWare-to-NetWare or Linux-to-Linux cluster
Yes Yes
CIFS-enabled shared NSS pool/volume in a mixed NetWare-to-Linux cluster
No No
iManager Support and Administration tool
Yes Yes
File and Record Locking Yes Yes
Domain Emulation Yes Future
Monitoring No Yes
Xen Virtualized Host Server Environment
NA No
Xen Virtualized Guest Server Environment
Yes Yes
Multi-processor/Multicore Server Support
No Yes
Multi-File System Support No Future
NTLMv2 No Yes
Dynamic Storage Technology Support
No Yes
Comparing CIFS on NetWare and CIFS on Linux 93

LDAP User (Subtree) Search No Yes
Service NetWare OES 11 SP1
94 OES 11 SP1: Novell CIFS for Linux Administration Guide
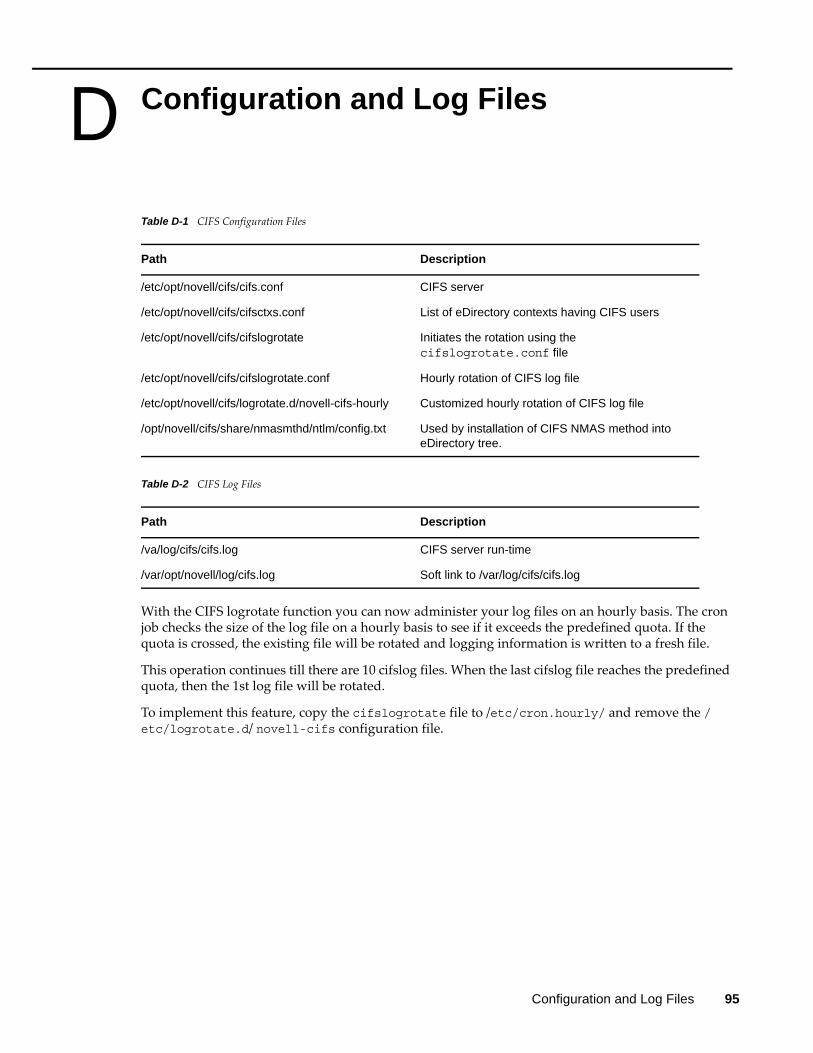
D DConfiguration and Log Files
Table D-1 CIFS Configuration Files
Table D-2 CIFS Log Files
With the CIFS logrotate function you can now administer your log files on an hourly basis. The cron job checks the size of the log file on a hourly basis to see if it exceeds the predefined quota. If the quota is crossed, the existing file will be rotated and logging information is written to a fresh file.
This operation continues till there are 10 cifslog files. When the last cifslog file reaches the predefined quota, then the 1st log file will be rotated.
To implement this feature, copy the cifslogrotate file to /etc/cron.hourly/ and remove the /etc/logrotate.d/ novell-cifs configuration file.
Path Description
/etc/opt/novell/cifs/cifs.conf CIFS server
/etc/opt/novell/cifs/cifsctxs.conf List of eDirectory contexts having CIFS users
/etc/opt/novell/cifs/cifslogrotate Initiates the rotation using the cifslogrotate.conf file
/etc/opt/novell/cifs/cifslogrotate.conf Hourly rotation of CIFS log file
/etc/opt/novell/cifs/logrotate.d/novell-cifs-hourly Customized hourly rotation of CIFS log file
/opt/novell/cifs/share/nmasmthd/ntlm/config.txt Used by installation of CIFS NMAS method into eDirectory tree.
Path Description
/va/log/cifs/cifs.log CIFS server run-time
/var/opt/novell/log/cifs.log Soft link to /var/log/cifs/cifs.log
Configuration and Log Files 95

96 OES 11 SP1: Novell CIFS for Linux Administration Guide
E EDocumentation Updates
This section contains information about documentation content changes made to the Novell CIFS Administration Guide since the initial release of Novell Open Enterprise Server 11 SP1.
This document was updated on the following dates:
Section E.1, “September 2012 (OES 11 SP1),” on page 97 Section E.2, “April 2012 (OES 11 SP1),” on page 97
E.1 September 2012 (OES 11 SP1)Updates were made to the following sections. The changes are explained below.
Section E.1.1, “What’s New,” on page 97
E.1.1 What’s New
E.2 April 2012 (OES 11 SP1)Updates were made to the following sections. The changes are explained below.
Section E.2.1, “What’s New,” on page 97
E.2.1 What’s New
Location Change
“What’s New (OES 11 SP1 September 2012 Patches)” on page 13
This section is new.
“Enabling Invalid User Caching” on page 88
This section is new.
Location Change
Chapter 2, “What’s New or Changed in Novell CIFS,” on page 13
This section is new.
Documentation Updates 97

98 OES 11 SP1: Novell CIFS for Linux Administration Guide