nus wireless network configuration guide for windows vista page 1 of 11 nus wireless network
TRANSCRIPT

NUS Wireless Network Configuration Guide for Windows Vista Page 1 of 11
NUS Wireless Network Configuration Guide for Windows Vista
1. From Windows Start, enter services.msc in the search box and press enter.
2. Locate WLAN AutoConfig and right-click to select Properties.

NUS Wireless Network Configuration Guide for Windows Vista Page 2 of 11
3. Change Startup type to Automatic and click Start. Click OK.
4. From Windows Start, click Control Panel.

NUS Wireless Network Configuration Guide for Windows Vista Page 3 of 11
5. Select Network and Internet.
If you are using the Control Panel classic view, select Network and Sharing Center.

NUS Wireless Network Configuration Guide for Windows Vista Page 4 of 11
6. From the left, click Manage wireless networks.
7. Click Add.

NUS Wireless Network Configuration Guide for Windows Vista Page 5 of 11
8. Click Manually create a network profile.
9. Enter/select the following settings:
Network name: NUS
Security Type: WPA2-Enterprise
Encryption Type: AES
Tick Start this connection automatically
Tick Connect even if the network is not broadcasting
Click Next.

NUS Wireless Network Configuration Guide for Windows Vista Page 6 of 11
10. Click Change connection settings
11. Under Connection tab, tick only the following options:
Connect automatically when this network is in range
Connect even if the network is not broadcasting

NUS Wireless Network Configuration Guide for Windows Vista Page 7 of 11
12. Under Security tab, select the following options:
Security type: WPA2-Enterprise
Encryption type: AES
Tick Cache user information for subsequent connections to this network.
Network authentication method: Microsoft Protected EAP (PEAP)
Click Settings. Note: if you are using a common or shared notebook, you should untick Cache user information for subsequent connections to this network.

NUS Wireless Network Configuration Guide for Windows Vista Page 8 of 11
13. Select only the following settings.
Tick Validate server certificate
Tick Connect to these servers and enter auth01.nw.nus.edu.sg at the field box.
Tick thawte Primary Root CA
Tick Enable Fast Reconnect
Authentication Method: Secured password (EAP-MSCHAP v2)
Click Configure.
14. Untick Automatically use my Windows logon name and password (and domain if any).
Click OK.

NUS Wireless Network Configuration Guide for Windows Vista Page 9 of 11
15. Click OK.
16. Click OK.
NUS Wireless Network Configuration Guide for Windows Vista Page 10 of 11
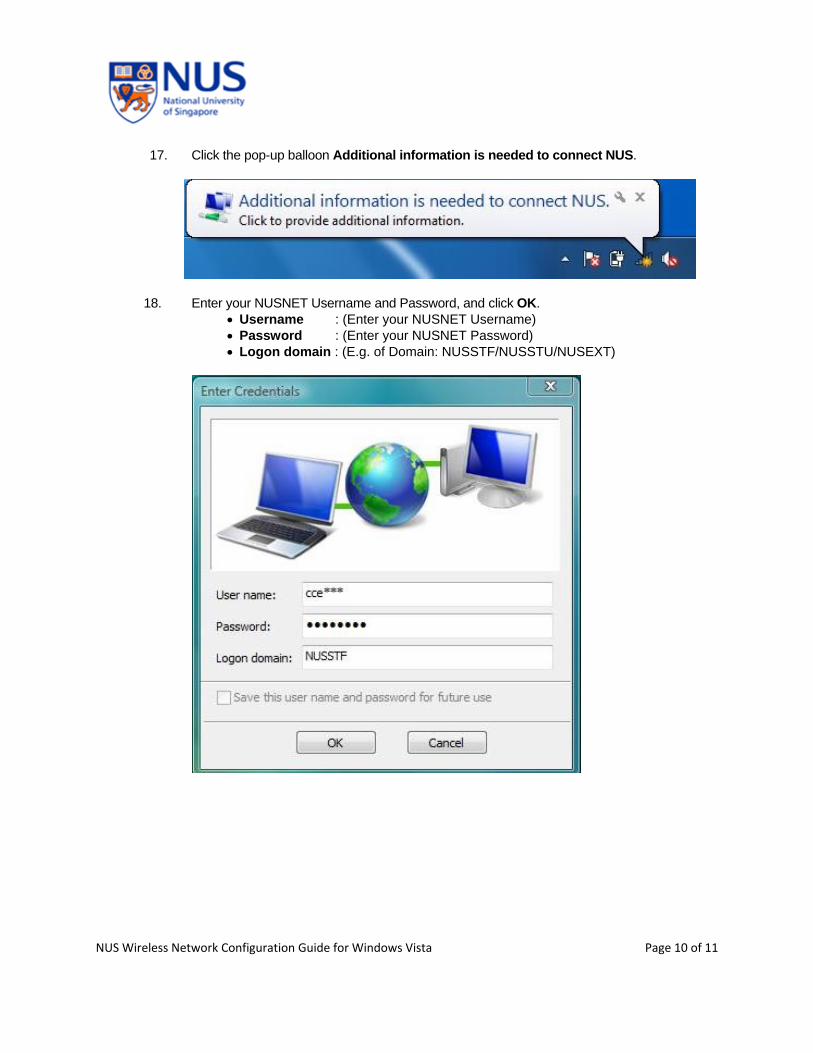
17. Click the pop-up balloon Additional information is needed to connect NUS.
18. Enter your NUSNET Username and Password, and click OK. Username : (Enter your NUSNET Username) Password : (Enter your NUSNET Password) Logon domain : (E.g. of Domain: NUSSTF/NUSSTU/NUSEXT)

NUS Wireless Network Configuration Guide for Windows Vista Page 11 of 11
19. You are now connected to NUS wireless network.