nys division of homeland security and emergency services (dhses)
DESCRIPTION
NYS Division of Homeland Security And Emergency Services (DHSES). Tutorial - Creating a Grant Application. To access DHSES E-Grants you must have a Username and Password. Please contact DHSES at [email protected] if you need to request a username and password. . - PowerPoint PPT PresentationTRANSCRIPT

1
NYS Division of Homeland SecurityNYS Division of Homeland SecurityAnd Emergency Services (DHSES)And Emergency Services (DHSES)
Tutorial - Creating a Grant Application
To access DHSES E-Grants you must have a Username and Password. Please contact DHSES at [email protected] if you need to request a username and password.

22
When you first access the E-Grants System, the Access Notice page will be displayed. This page notifies the user that a secure system is being accessed. Click on the Electronic Submission Notice button to proceed.

33
The Electronic Submission Notice must be read and acknowledged before accessing the system. Once you have read the notice, please click the Accept button and the login screen will appear.
HINT: Since this is a web based system you will be timed out after 30 minutes of inactivity. Hit SAVE often. Also if you have a lot of narrative to enter into E-Grants, type the information into a word file and then copy and paste the verbiage into E-Grants.

44
Enter your Login Name, Password and click on the Submit button.

55
Once you have logged in, the Welcome to E-Grants page will be displayed. Select Project from the left menu frame to open the list of projects that match the access rights of the user or to create a new project.
66
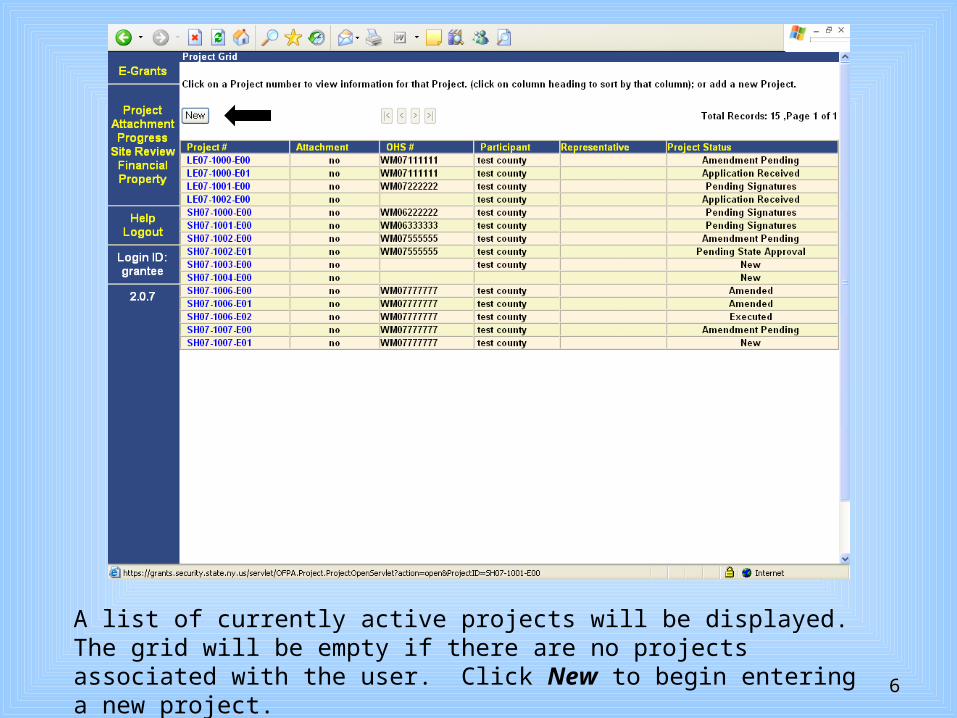
A list of currently active projects will be displayed. The grid will be empty if there are no projects associated with the user. Click New to begin entering a new project.

77
See next two slides for instructions.
It is EXTREMELY IMPORTANT that you select the correct Funding
Program and Funding Year

88Select Homeland Security Non-Profit Grant from the drop down box

99
Select 2013 from the drop down list and click Create Project Button. Click OK in the pop-up box.
1010
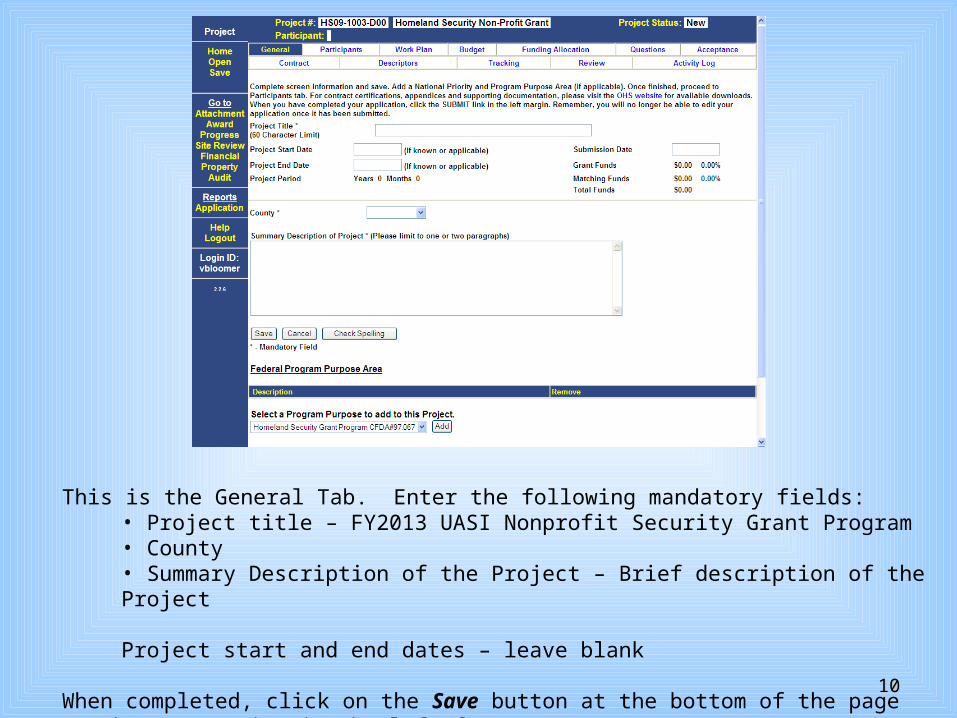
This is the General Tab. Enter the following mandatory fields:• Project title – FY2013 UASI Nonprofit Security Grant Program• County• Summary Description of the Project – Brief description of the Project
Project start and end dates – leave blank
When completed, click on the Save button at the bottom of the page or the Save option in the left frame.

1111
Now click on the Participants tab.
1212
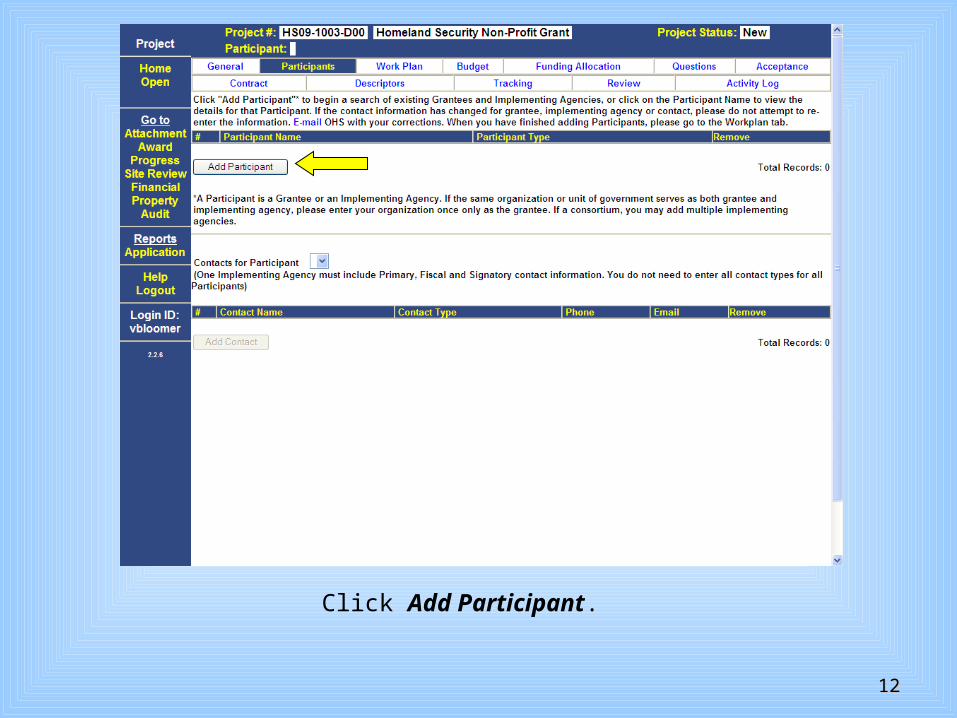
Click Add Participant.

1313
A search screen will open to search for an existing Participant. Enter full or partial name and click OK to search the database. If you previously applied for funding, your organization’s information will be able to be retrieved using the search option.
Hint: This search engine looks for exact matches so don’t be too detailed in your search.

1414
In this example, “Test” was input into the search window providing the above list. Choose the Participant you wish to add from the returned list by clicking on the blue # to the left of the participant name.
If the Participant is not in the database click New to enter a new Participant.
1515
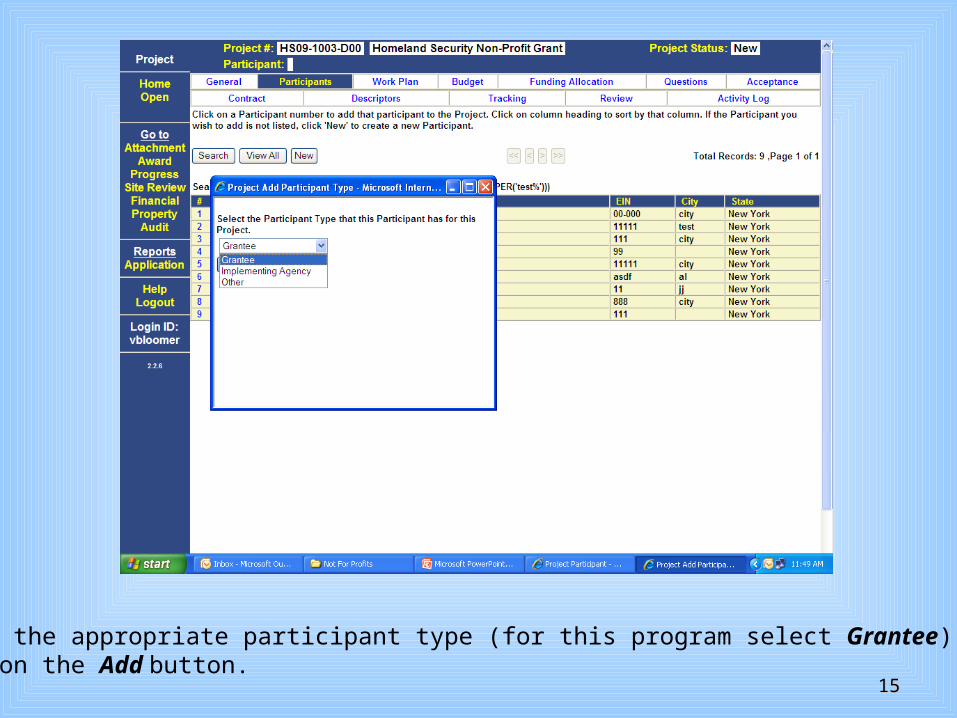
Select the appropriate participant type (for this program select Grantee).Click on the Add button.

1616
The Participant has been added to the Project.
1717
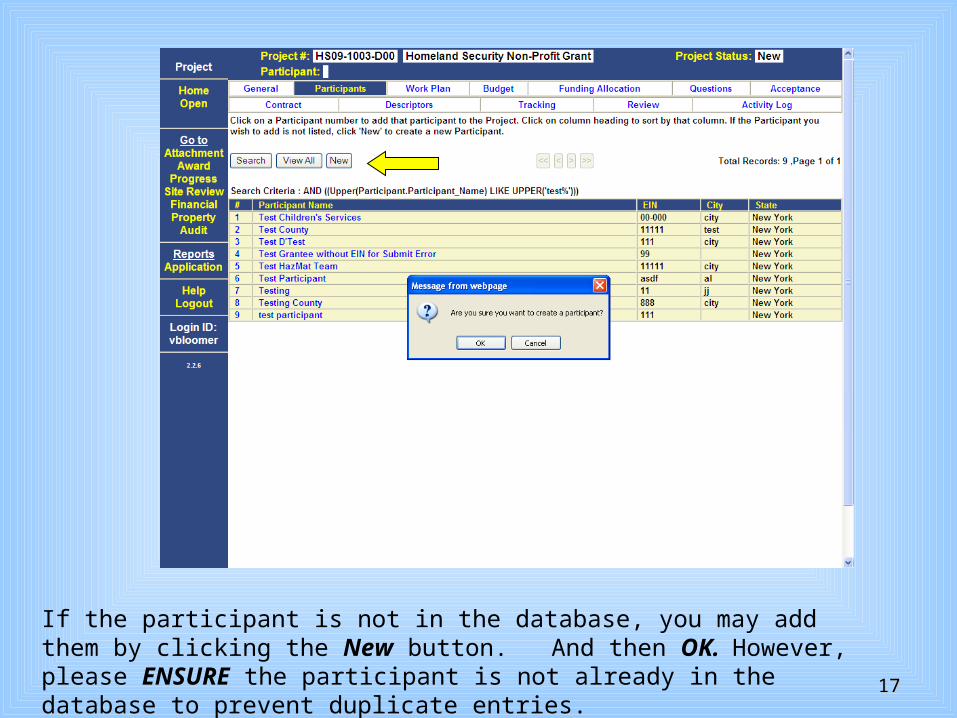
If the participant is not in the database, you may add them by clicking the New button. And then OK. However, please ENSURE the participant is not already in the database to prevent duplicate entries.

1818
Enter the information to add a New Participant. Required fields are: Participant Name, Address, City, State, Zip, County, Employer Identification Number, Charities Registration Number (if applicable), check the Not for Profit and/or Sectarian Entity box (as it applies to your agency) and if exempt from Charities Registration select from the dropdown box the reason for exemption. Click on the Save button. Mandatory data must be entered before the record can be saved.

1919
Next you will add Contacts. E-Grants requires a Primary, Signatory and Fiscal Contact. Both Primary and Signatory Contacts must be registered users of the E-Grants system. Click on Add Contact to button.

2020
A search screen will open to search for an existing contact. Enter partial name and click OK to search the database. Hint: This search engine looks for exact matches so don’t be too detailed in your search.
Again, if you previously applied for funding, your information will be able to be retrieved using the search option.

2121
If your contact is found in the search, click on the blue number next to the last name. A popup box will appear asking to select the Contact Type.

2222
A pop up box will then appear letting you know the contact has been successfully added. Continue selecting and adding contacts until you are finished. Remember a Primary, Signatory and Fiscal contact must be chosen.

2323
REMEMBER - If the Signatory Contact you are trying to add is not a registered user of E-Grants, you will get the above error message and you will not be able to add that person until they are a registered E-Grants user with Signatory Rights. Please contact [email protected] if you need help registering a signatory. You can however continue working on other parts of your application.
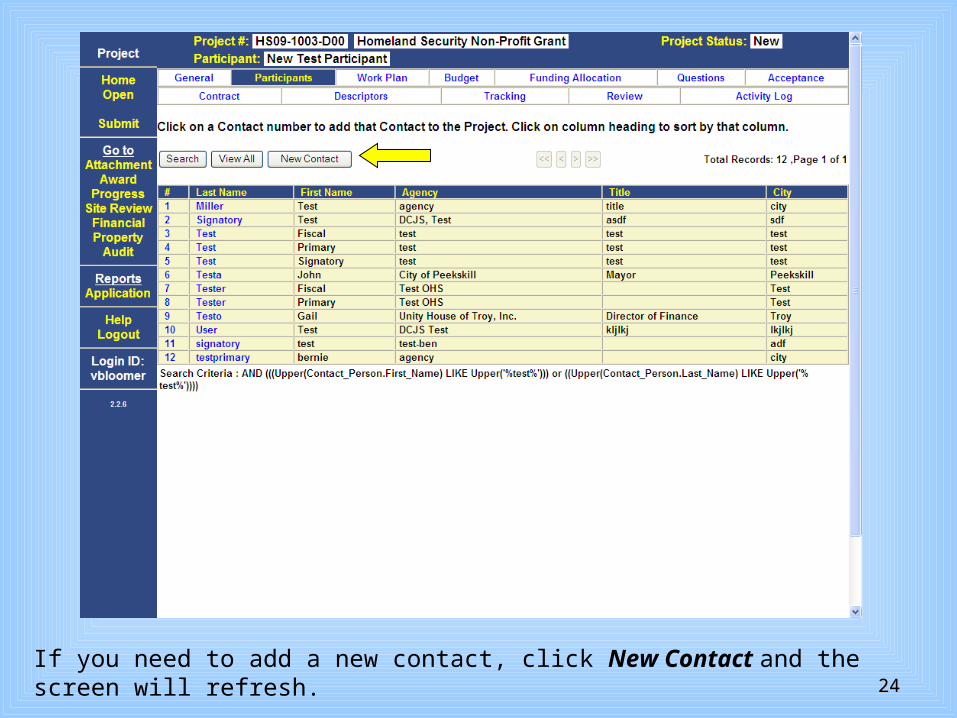
2424If you need to add a new contact, click New Contact and the screen will refresh.

2525
Select the Contact type from the drop down box (circled in red). Required fields are First Name, Last Name, Agency, Address, City, State, Zip, Email and Phone Number. Click on the Save button. Mandatory data must be entered before the record can be saved. Add a new contact only after verifying the person is not already in the system.

2626
This is an example of a completed Participant Tab screen.

2727
Generic Workplan InformationBelow is the generic workplan information that you will use in the E-Grants system. The information is broken down into three categories; 1) purchasing perimeter security equipment or conducting M&A activities #2) conducting training and 3)Continuity of Operations . You may use one or all of these categories.
Project goal - To prevent, prepare for or mitigate the effects of a terrorist attack on Name of your Organization
Category #1 - If you plan on purchasing Equipment or conduct ing M&A activities use the following information: G&T Workplan Code - 39. Homeland Security Assistance for Non ProfitsInvestment Justification – Homeland Security Assistance for Non ProfitsObjective Description – Purchase and install equipment to enhance the security at Name of your Organization that would assist in target hardening the location.Target Capability – Critical Infrastructure Protection
Equipment:Task – Purchase/install perimeter security and/or access control enhancing items of equipment. Train appropriate personnel in the proper use of the equipment and place the equipment into service.Performance Measure #1 – Identify equipment ordered and received. Provide a brief narrative on the training of personnel and the deployment of equipment. Describe how the equipment is enhancing the day to day security of the location. Equipment accountability records are properly maintained.
M&A Activities:Task – Conduct management and administrative activities to ensure all programmatic, fiscal and reporting requirements of the grant are being followed, completed and submitted in a timely manner. Performance Measure #1 – Management and administrative activities conducted. All programmatic, fiscal and reporting requirements completed and submitted in a timely manner.
Category #2 - If you are conducting training use the following information: G&T Workplan Code - 40. Training related to Homeland Security Assistance for Non ProfitsInvestment Justification – Homeland Security Assistance for Non ProfitsObjective Description – Conduct/attend training that addresses a specific threat, vulnerability and/or consequence (requires prior approval by DHSES).Target Capability – Critical Infrastructure ProtectionTask – Conduct training regarding prevention of or reaction to a terrorist threat or action.Performance Measure #1 – Description of the training (requires prior approval by DHSES). Number of staff receiving training,. Copy of agenda or training curriculum and roster of attendees maintained on file. Describe how the training enhanced the prevention of or reaction to a terrorist threat or action.

2828
Generic Workplan Information continuedBelow is the generic workplan information that you will use in the E-Grants system. The information is broken down into two categories; 1) purchasing perimeter security equipment or conducting M&A activities and #2) conducting training . You may use one of both of these categories.
Project goal - To prevent, prepare for or mitigate the effects of a terrorist attack on Name of your Organization
Category #1 - If you plan on purchasing Continuity of Operations Equipment : G&T Workplan Code - 29. Enhance capabilities to recover from all hazards events. Investment Justification – Homeland Security Assistance for Non ProfitsObjective Description – Conduct planning and equipment activities that support continuity of operations in the event of an all hazards event. Target Capability – Critical Infrastructure Protection
Task – Purchase/install physical security enhancements that support continuity of operations during/after any all hazards event affecting the organization/facility. Performance Measure #1 – Identify equipment ordered and received. Provide a brief narrative on the training of personnel and the deployment of equipment. Describe how the equipment is enhancing security operations for the location. Equipment accountability records are properly maintained.

2929
Now click the Work Plan Tab and enter the Project Goal. This year we are using generic information which can be found on the previous slide. Click Save. Click on Create New Objective and OK.
3030
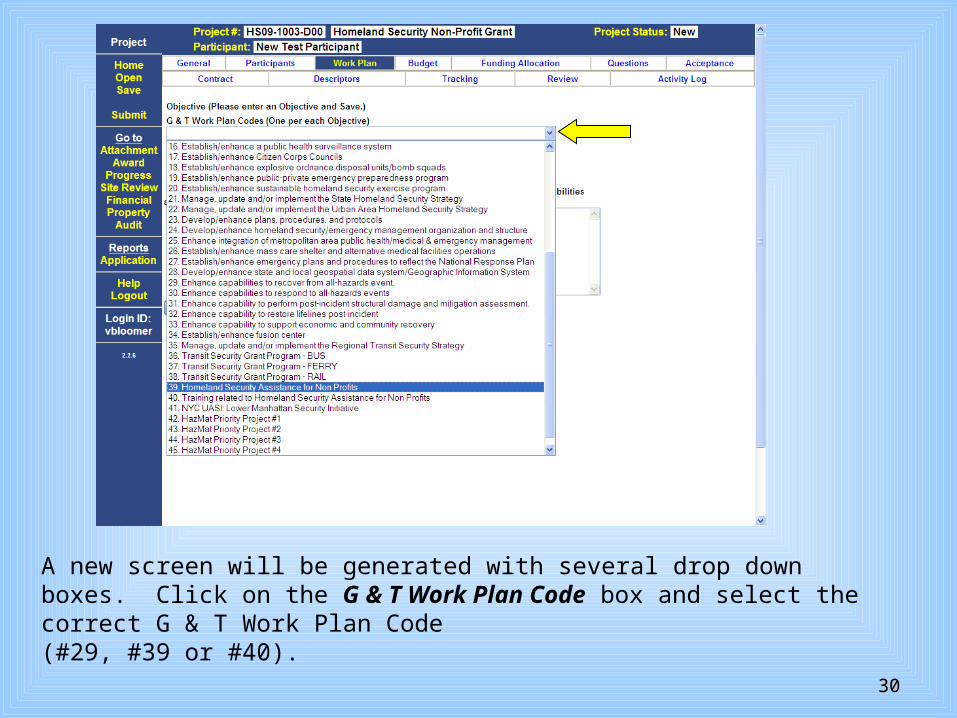
A new screen will be generated with several drop down boxes. Click on the G & T Work Plan Code box and select the correct G & T Work Plan Code (#29, #39 or #40).
3131
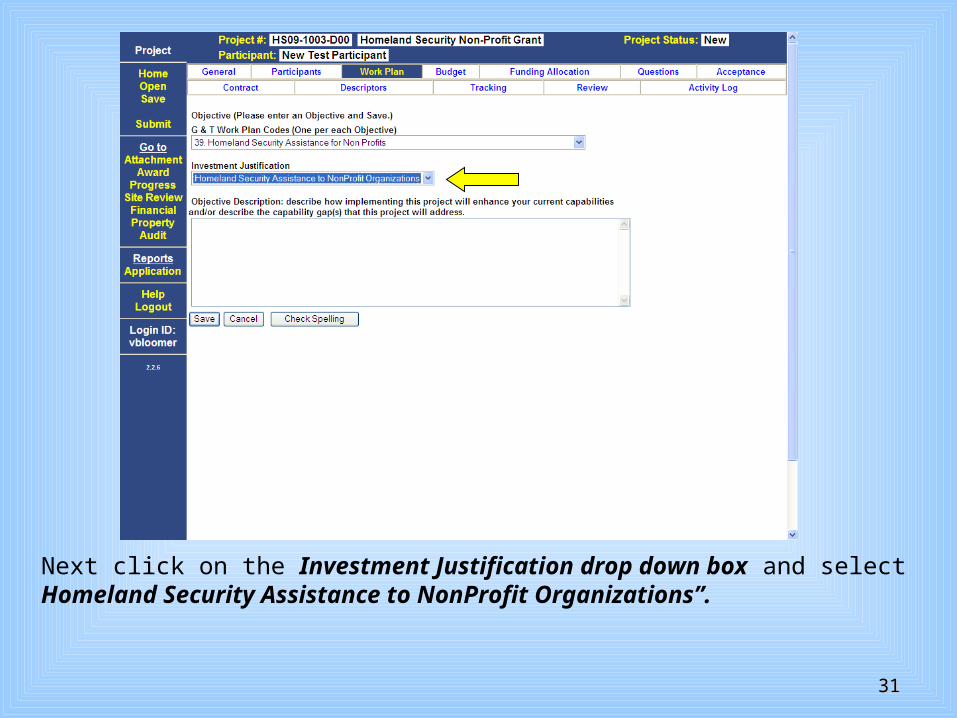
Next click on the Investment Justification drop down box and select Homeland Security Assistance to NonProfit Organizations”.
3232
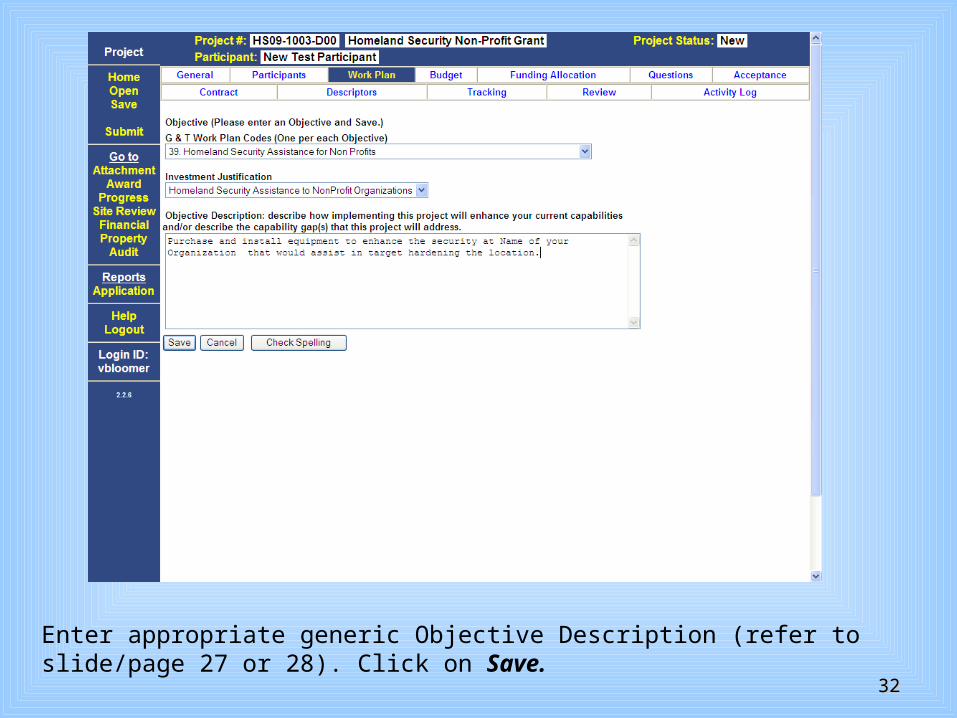
Enter appropriate generic Objective Description (refer to slide/page 27 or 28). Click on Save.

3333
Click Add Primary Target Capability. The screen will refresh with a confirmation message “Are you sure you want to add this Target Capability?” Click OK.
Click on Add Task to this Objective.

3434
The Task(s) need to be added. Enter your generic task from slide/page #27 or 28 and click on Save. The screen will refresh with a confirmation message “Are you sure you want to save?” and click OK.

3535
You need to enter the generic performance measure from slide/page #27 or 28. Click on Add Performance Measure to this Task.

3636
Enter the generic Performance Measure from slide/page #27 or 28 and click on Save. The screen will refresh with a confirmation message “Are you sure you want to save?” and click OK.
3737
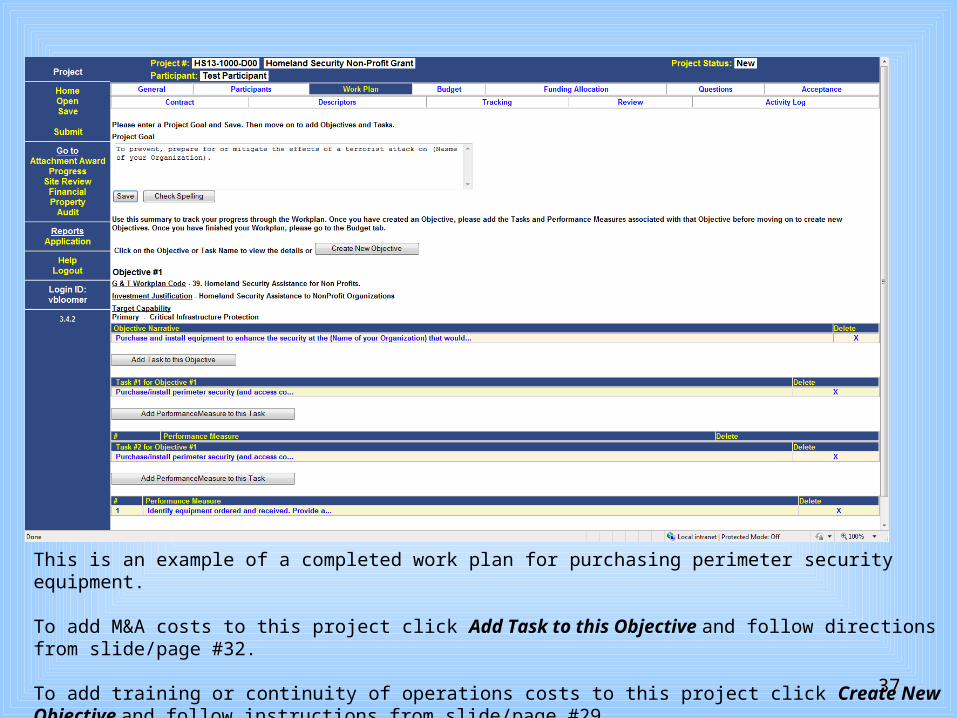
This is an example of a completed work plan for purchasing perimeter security equipment.
To add M&A costs to this project click Add Task to this Objective and follow directions from slide/page #32.
To add training or continuity of operations costs to this project click Create New Objective and follow instructions from slide/page #29.
3838
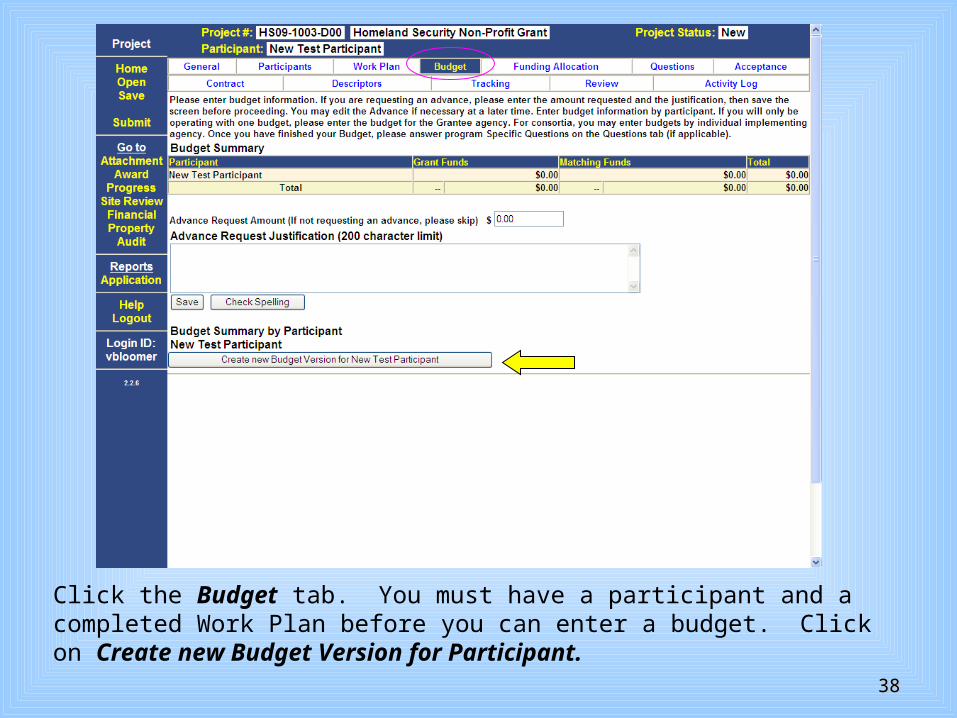
Click the Budget tab. You must have a participant and a completed Work Plan before you can enter a budget. Click on Create new Budget Version for Participant.

3939
Each budget item is entered separately. Choose the category of the budget item you are entering from the drop down box. As you can see there are nine budget categories but only Equipment and All Other Expenses (used for training and M&A) are eligible for Non Profit Grants.
4040
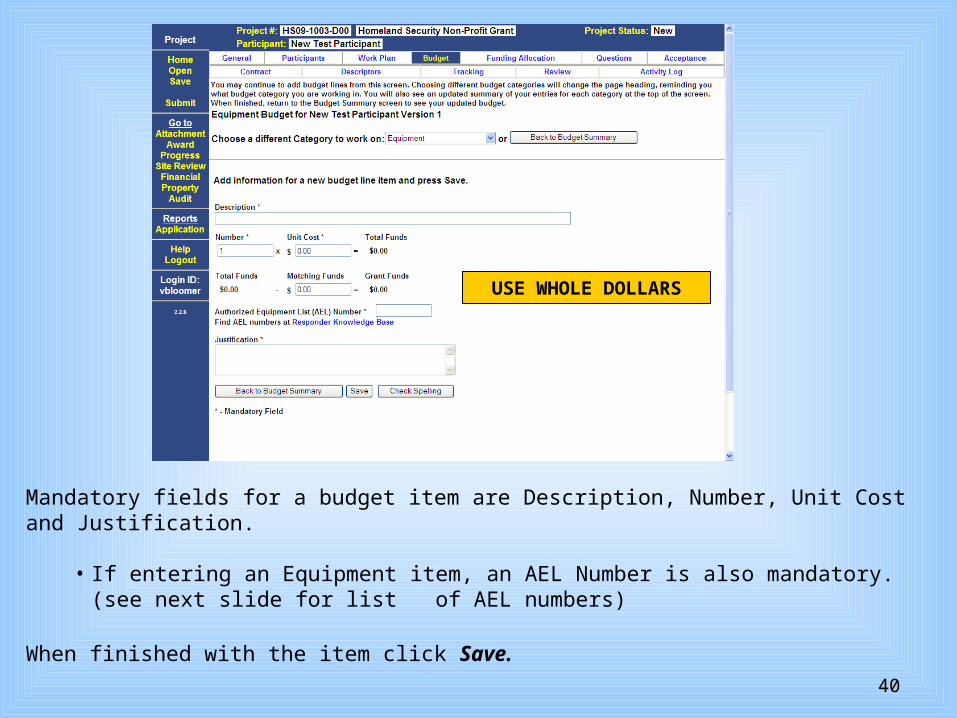
Mandatory fields for a budget item are Description, Number, Unit Cost and Justification.
• If entering an Equipment item, an AEL Number is also mandatory. (see next slide for list of AEL numbers)
When finished with the item click Save.
USE WHOLE DOLLARS

4141
Category AEL/SEL Code Title DescriptionSupport Equipment for Continuation of Critical Infrastructure Operations 14CI-00-COOP
System, Information Technology Contingency Operations
Back-up computer hardw are, operating systems, data storage, and application softw are necessary to provide a w orking environment for contingency operations. May be a purchased remote service or a dedicated alternate operating site.
Explosion Protection 14EX-00-BCAN Receptacles, Trash, Blast-Resistant Blast-resistant trash receptacles.
Explosion Protection 14EX-00-BSIRSystems, Building, Blast/Shock/Impact Resistant
Systems to mitigate damage from blasts, shocks, or impacts, such as column and surface w raps, breakage/shatter resistant glass, w indow w raps, and deflection shields.
Surveillance, Warning, Access/Intrusion Control 14SW-01-ALRM Systems/Sensors, Alarm
Systems and standalone sensors designed to detect access violations or intrusions using sensors such as door/w indow sw itches, motion sensors, acoustic sensors, seismic, and thermal sensors. May also include temperature sensors for critical areas.
Surveillance, Warning, Access/Intrusion Control 14SW-01-DOOR Doors and Gates, Impact Resistant
Reinforced doors and gates w ith increased resistance to external impact for increased physical security.
Surveillance, Warning, Access/Intrusion Control 14SW-01-EXTM System, Fire Extinguisher Monitoring
System for monitoring the presence and inf lation pressure of fixed-location f ire extinguishers to ensure that they are usable and are not stolen for possible misuse.
Surveillance, Warning, Access/Intrusion Control 14SW-01-LITE Lighting, Area, Fixed
Fixed high-intensity lighting systems for improved visibility in areas such as building perimeters and surveillance zones.
Surveillance, Warning, Access/Intrusion Control 14SW-01-PACS System, Physical Access Control Locking devices and entry systems for control of physical access to facilities.Surveillance, Warning, Access/Intrusion Control 14SW-01-SIDP Systems, Personnel Identif ication
Systems for positive identification of personnel as a prerequisite for entering restricted areas or accessing information systems.
Surveillance, Warning, Access/Intrusion Control 14SW-01-SIDV Systems, Vehicle Identif ication
Systems for identif ication of vehicles, ranging from decals to radio frequency identification (RFID) or other transponder devices.
Surveillance, Warning, Access/Intrusion Control 14SW-01-SNSR
Sensors/Alarms, System and Infrastructure Monitoring, Standalone
Standalone sensors/alarms for use on critical systems or infrastructure items (security systems, pow er supplies, etc.) to provide w arning w hen these systems fail or are near failure.
Surveillance, Warning, Access/Intrusion Control 14SW-01-VIDA Systems, Video Assessment, Security Camera-based security systems utilizing standard, low light, or infrared technology.Surveillance, Warning, Access/Intrusion Control 14SW-01-WALL Barriers: Fences; Jersey Walls
Obstacles designed to channel or halt pedestrian or vehicle-borne traff ic in order to protect a physical asset or facility.
Surveillance, Warning, Access/Intrusion Control 14SW-02-HSCN Equipment, Hull Scanning Devices or systems used to scan ship hulls for attached devices.Surveillance, Warning, Access/Intrusion Control 14SW-02-RADR Systems, Radar Scanning systems for detection of objects such as vessels, personnel, and other objects.Surveillance, Warning, Access/Intrusion Control 14SW-02-SONR Systems, Sonar
Includes several different types of underw ater sound w ave imaging - Imaging Sonar, Scanning Sonar, Side Scan Sonar and/or 3-Dimensional Sonar,
Surveillance, Warning, Access/Intrusion Control 14SW-02-VBAR Barriers, Vessel Deployable, modular systems for restricting the movement of vessels.
Inspection Systems 15IN-00-PLSNSystem, Pulsed Neutron Activation, Non-Invasive
Screening system utilizing pulsed neutrons. Non-destructive detection of CWAs in sealed containers.
Inspection Systems 15IN-00-RADR Radar, Ground/Wall Penetrating Radar systems designed to penetrate w alls or ground to allow detection of hidden objects.
Inspection Systems 15IN-00-XRAYSystem, Mobile Search & Inspection; X-Ray Portable X-Ray systems for use in search and screening operations.
Screening Systems 15SC-00-PMON Monitors, Portal
Systems to scan vehicles/cargo for radioactive content. Various sizes for vehicles, packages (large and small) and pedestrians. Does not identify radionuclide.DIQCode: [D,Q]Note: For explosive detection portal, see Item 07ED-03-PORT.
Screening Systems 15SC-00-PPSS Systems, Personnel/Package ScreeningFixed systems such as w alk-through magnetometers and conveyor-belt x-ray systems used to screen personnel and packages for hazardous materials/devices.
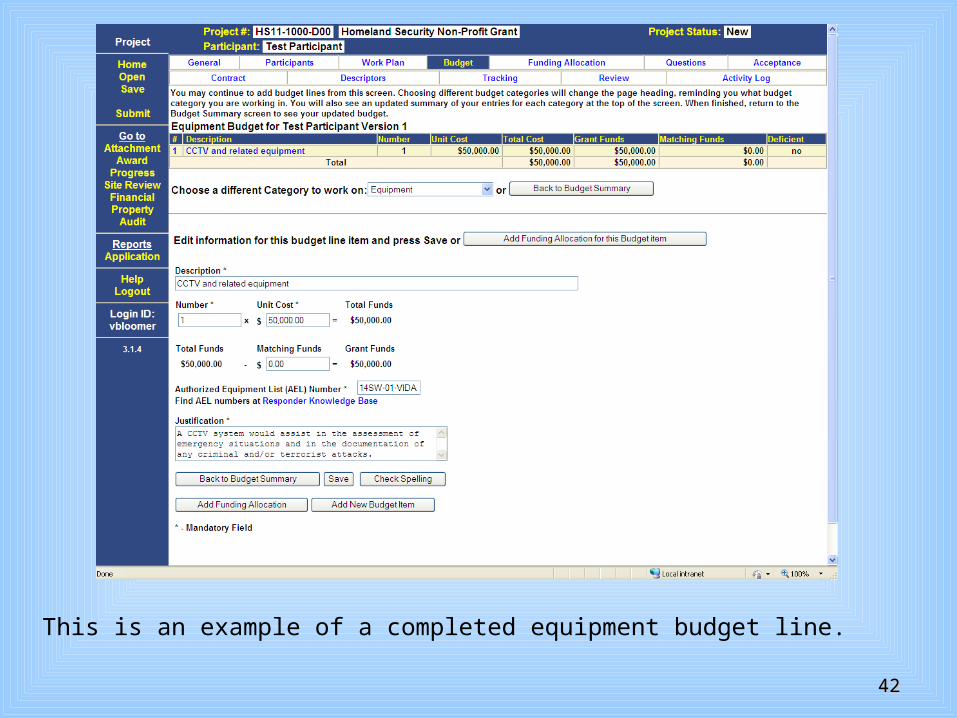
4242
This is an example of a completed equipment budget line.
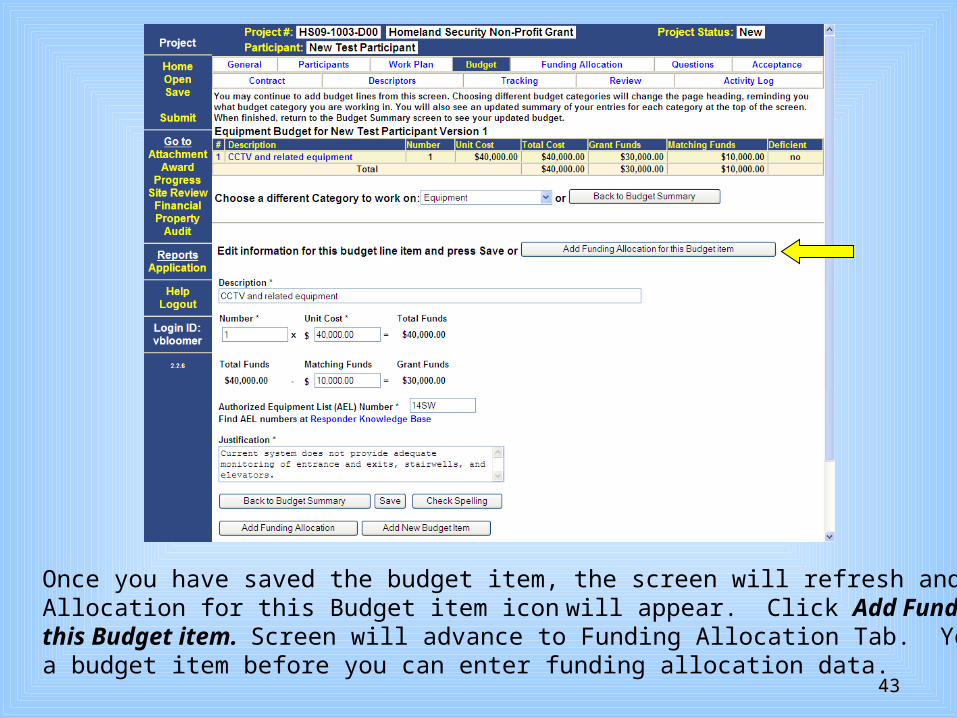
4343
Once you have saved the budget item, the screen will refresh and Add Funding Allocation for this Budget item icon will appear. Click Add Funding Allocation for this Budget item. Screen will advance to Funding Allocation Tab. You must enter a budget item before you can enter funding allocation data.

4444
Click on the drop down box to choose a G&T Work Plan Code that best describesthe budgeted item. Click Add G and T Workplan. The screen will refresh with a confirmation message “Are you sure you want to add this G and T Workplan?” Click OK.
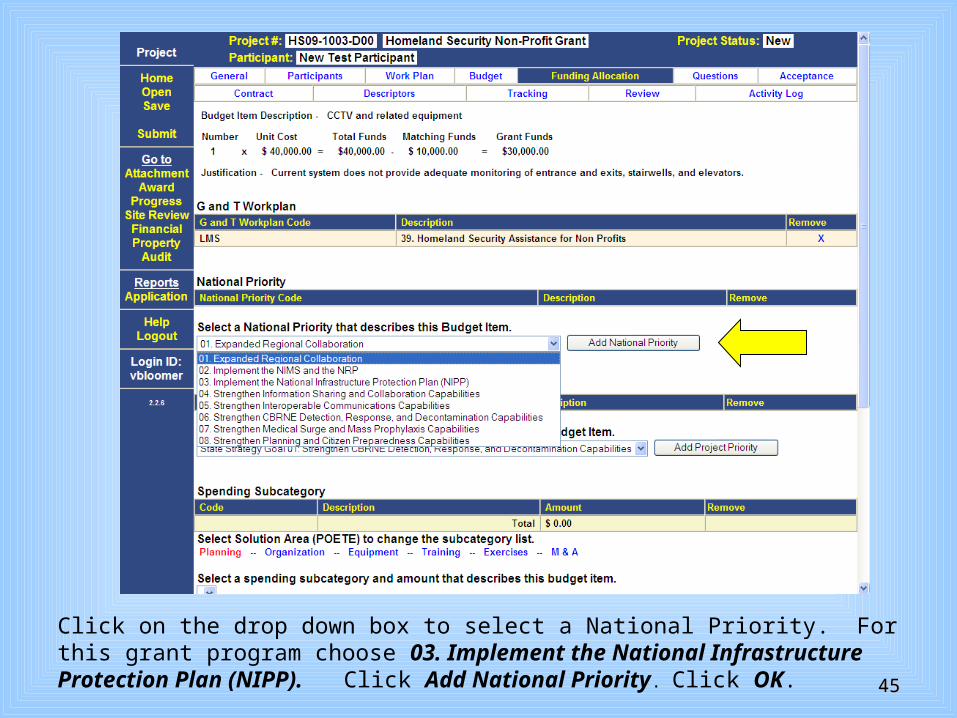
4545
Click on the drop down box to select a National Priority. For this grant program choose 03. Implement the National Infrastructure Protection Plan (NIPP). Click Add National Priority. . Click OK.

4646
Click on the drop-down box to select a Priority Project. Choose State Strategy Goal 02. Protect Critical Infrastructure and Key Resources. Click Add Project Priority. Click OK.

4747
Now you select a Spending Subcategory/Solution Area. Only the Solution Areas that match the Nonprofit funding program will be listed which is Equipment , Training and/or M&A. When you have selected the category the lettering will change from blue to red. In the example above equipment is selected.
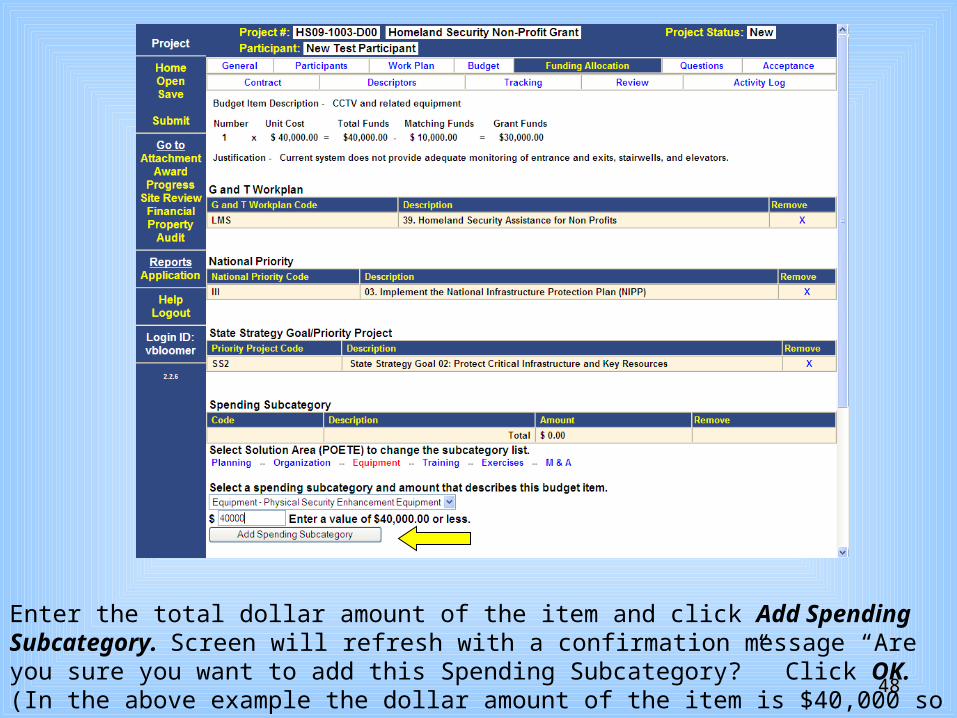
4848
Enter the total dollar amount of the item and click Add Spending Subcategory. Screen will refresh with a confirmation message “Are you sure you want to add this Spending Subcategory?” Click OK. (In the above example the dollar amount of the item is $40,000 so you would enter $40,000 for the value of the Spending Subcategory.)

4949
Now you select a Spending Discipline. Again you are only able to select Equipment , Training and/or M&A. Select the same categories for both Spending Subcategory and Spending Discipline. Enter the total dollar value of the item and click on Add Spending Discipline.

5050
This is how the Funding Discipline tab should look when everything matches. Click on Finished with this item. The screen will refresh back to the budget tab to add additional budget items. You need to complete the Budget and Funding Allocations Tabs for each budget item.
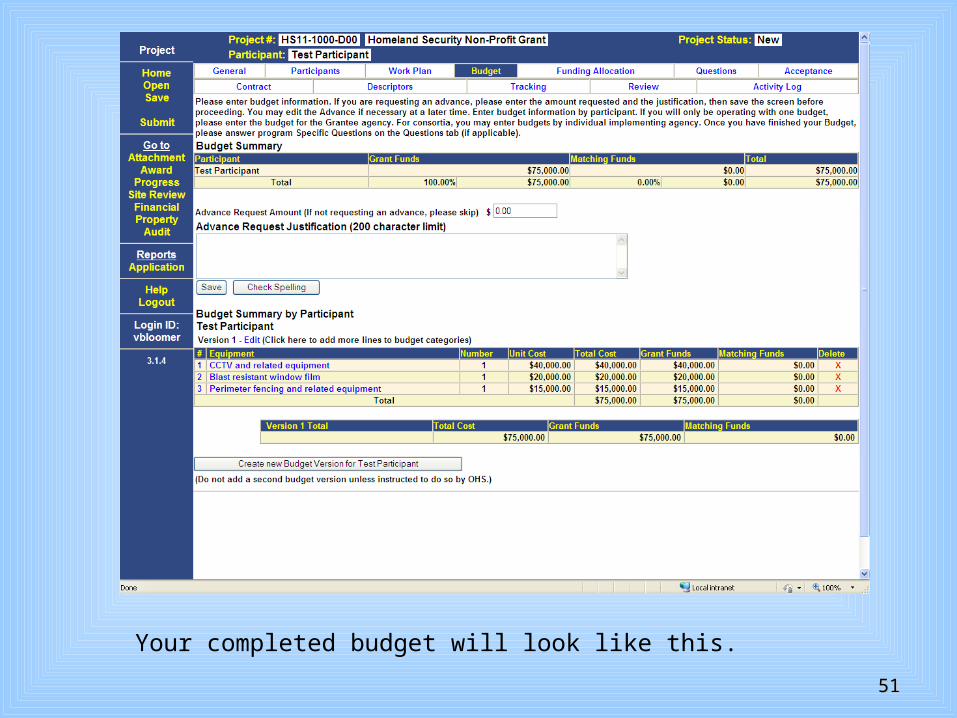
5151
Your completed budget will look like this.

5252
Click the Question tab. Click on each question, enter your answer and click on Save. Some questions serve as a reminder to ensure that you upload the required attachments. You can simply write yes when the question is completed as an internal checklist for you to ensure you haven’t forgotten anything. Question three is asking for your organization’s fiscal year.

5353Click on the Acceptance Tab. Click Assurance #1.

5454
Click the Certify button on the bottom of the screen after you have finished reading the information thoroughly. Screen will refresh with a confirmation message “Are you sure you want to Certify the statement?” Click OK. The screen will refresh again and your name will appear in the Certified by box with the current date.

5555
By certifying the assurance you are NOT submitting your application.
See Slide/page #62 on how to submit your application.

5656
The next step is to attach the required documents (Investment Justification Template and the signed Grantee Responsibility Questionnaire) and any supporting documentation. To add Attachments, click on Attachment on the left side.
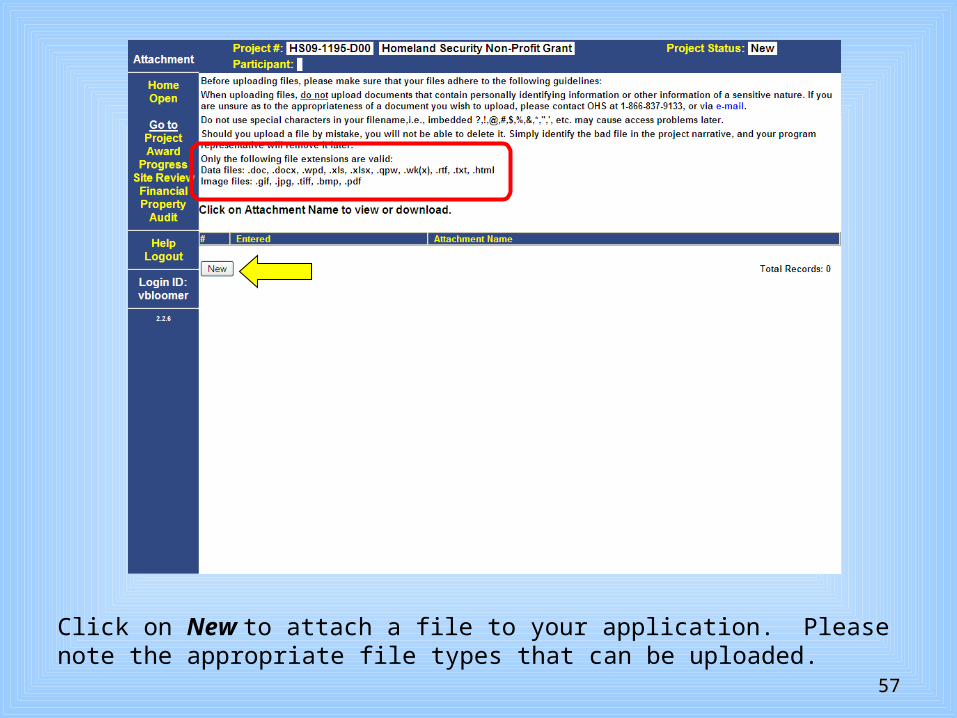
5757
Click on New to attach a file to your application. Please note the appropriate file types that can be uploaded.

5858
Click Browse to navigate to the file location and select the appropriate file. Once the file is selected, click Upload to send the file to E-Grants.
File names cannot have any special characters (# or *) or be more than 65 characters.

5959
When the file has been uploaded you will receive a confirmation. Click Browse to add another file, or click Go Back to List to view the list of files that have been attached to the application.

6060
A list of files that have been attached to the application appears. You may clickon the file name to view the file.

6161
Now you are ready to submit your application. In the left frame click on the word Submit. A pop-up box will appear asking if you are sure you want to submitthis project. Click OK.

6262
If the application fails to submit, E-Grants will generate a printable Required Fields Report (above) to guide you in finishing your application. Return to your application to enter the missing information and submit again.
6363
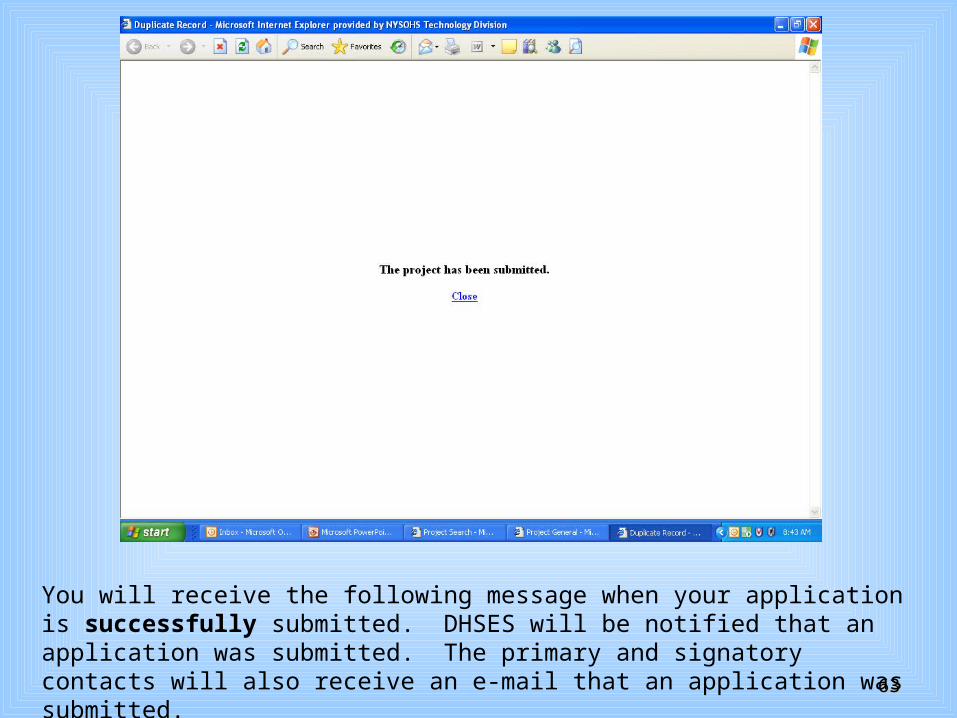
You will receive the following message when your application is successfully submitted. DHSES will be notified that an application was submitted. The primary and signatory contacts will also receive an e-mail that an application was submitted.
6464
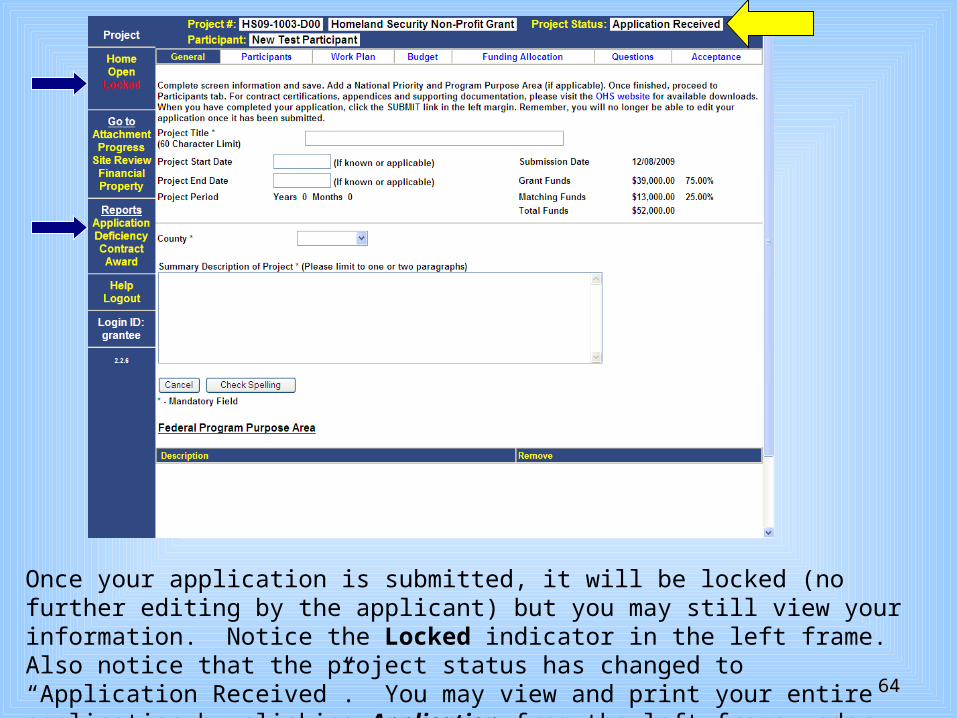
Once your application is submitted, it will be locked (no further editing by the applicant) but you may still view your information. Notice the Locked indicator in the left frame. Also notice that the project status has changed to “Application Received”. You may view and print your entire application by clicking Application from the left frame under Reports.