object base image classifications bangladesh
TRANSCRIPT
8/11/2019 Object Base Image Classifications Bangladesh
http://slidepdf.com/reader/full/object-base-image-classifications-bangladesh 1/58
1
Hands on Exercise Using eCognition Developer

8/11/2019 Object Base Image Classifications Bangladesh
http://slidepdf.com/reader/full/object-base-image-classifications-bangladesh 2/58
2
Hands on Exercise Using eCognition Developer
8/11/2019 Object Base Image Classifications Bangladesh
http://slidepdf.com/reader/full/object-base-image-classifications-bangladesh 3/58
8/11/2019 Object Base Image Classifications Bangladesh
http://slidepdf.com/reader/full/object-base-image-classifications-bangladesh 4/58
4
Hands on Exercise Using eCognition Developer
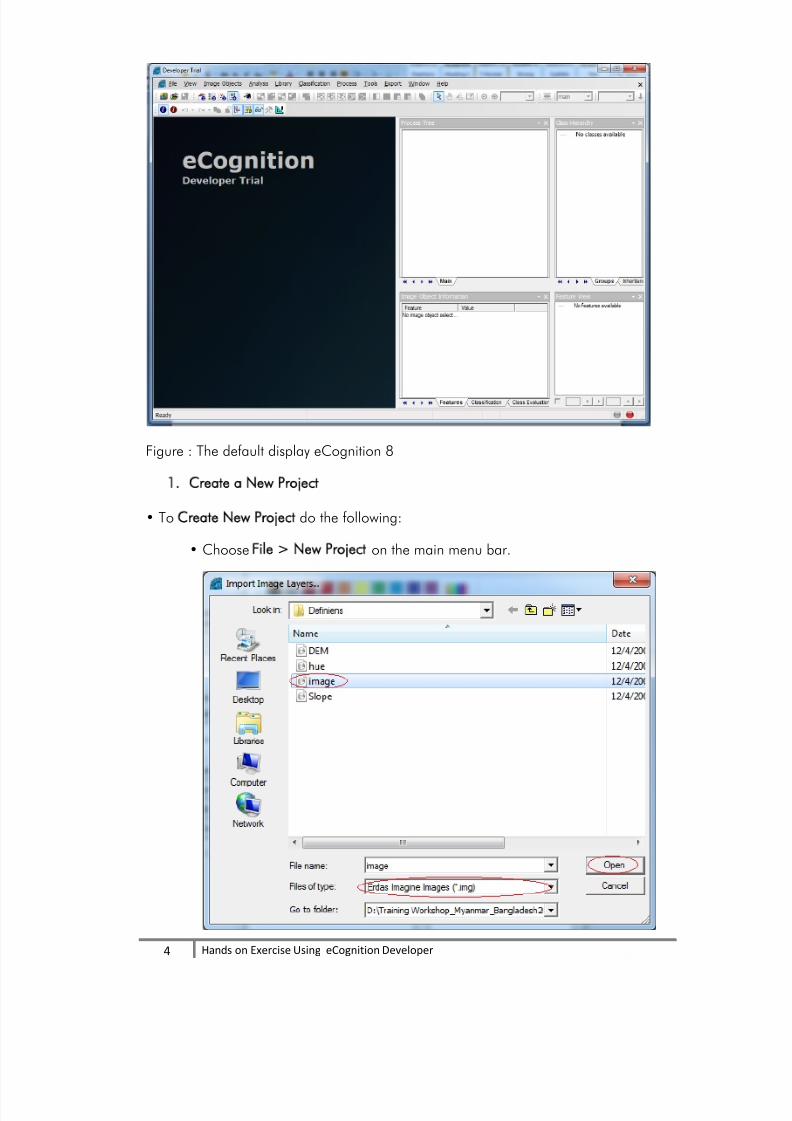
Figure : The default display eCognition 8
1.
Create a New Project
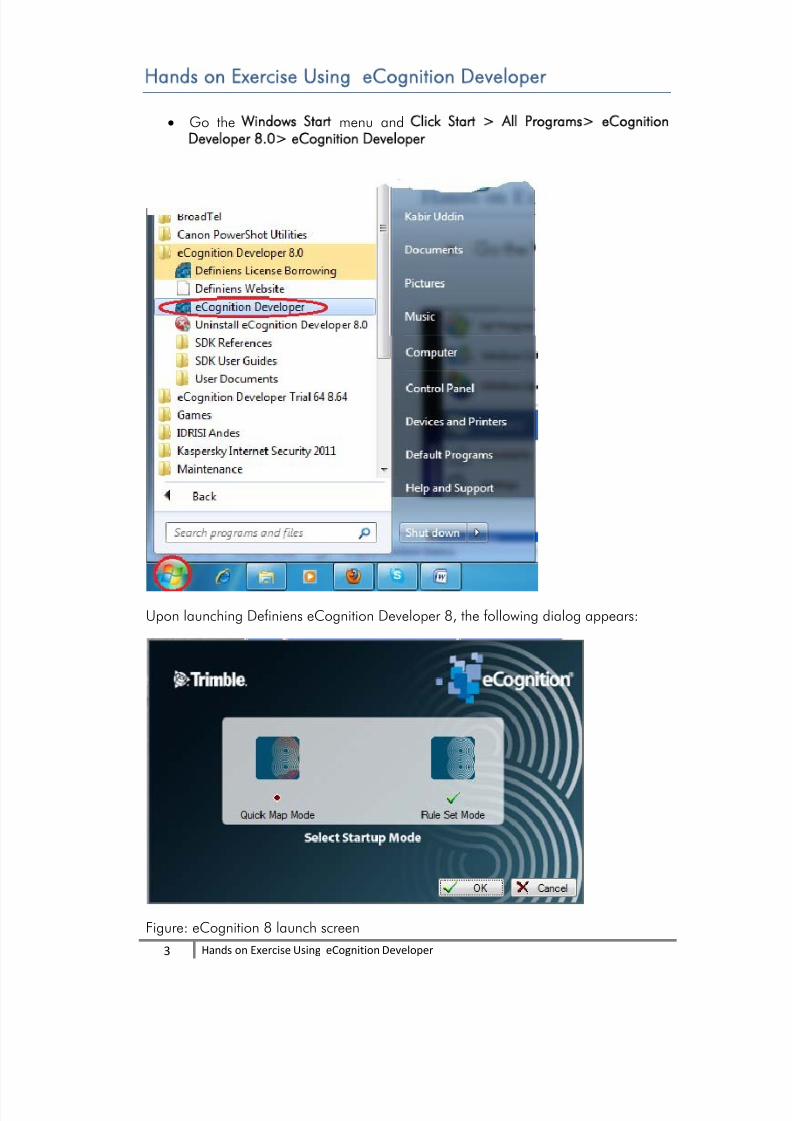
• To Create New Project do the following:
• Choose File > New Project on the main menu bar.
8/11/2019 Object Base Image Classifications Bangladesh
http://slidepdf.com/reader/full/object-base-image-classifications-bangladesh 5/58
5
Hands on Exercise Using eCognition Developer
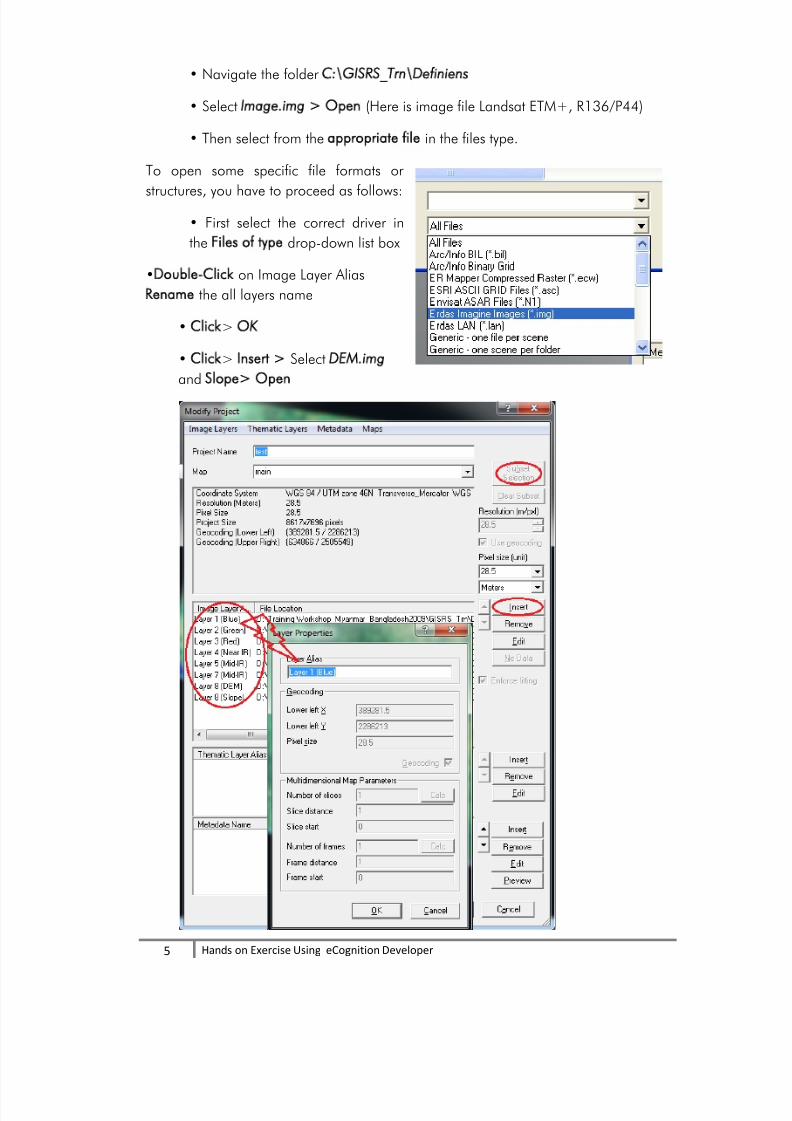
• Navigate the folder C:\GISRS_Trn\Definiens
• Select Image.img > Open(Here is image file Landsat ETM+, R136/P44)
• Then select from the appropriate file in the files type.
To open some specific file formats or
structures, you have to proceed as follows:
• First select the correct driver in
the Files of type drop-down list box
•Double-Click on Image Layer Alias
Rename the all layers name
• Click> OK
• Click> Insert > Select DEM.img
and Slope> Open
8/11/2019 Object Base Image Classifications Bangladesh
http://slidepdf.com/reader/full/object-base-image-classifications-bangladesh 6/58
6
Hands on Exercise Using eCognition Developer
• Double-Click on Layer Alias Rename the all the layers name Layer 1 (Blue),
Layer 2 (Green), Layer 3 (Red), Layer 4 (Near IR), Layer 5 (Mid-IR), Layer 7 (Mid-
IR), Layer 8 (DEM), Layer 8 (Slope)
• Click > File> Save Project > Test.dpr
1.1
Subset Selection
Normally, image files are large in size and difficult to process. So we will be
working with a smaller area to manage easily, which will take less memory and
time. You can crop your image on the fly in the viewer by using Subset option
without changing your original image file. You can create a "subset selection"
when you start a project or during modification.
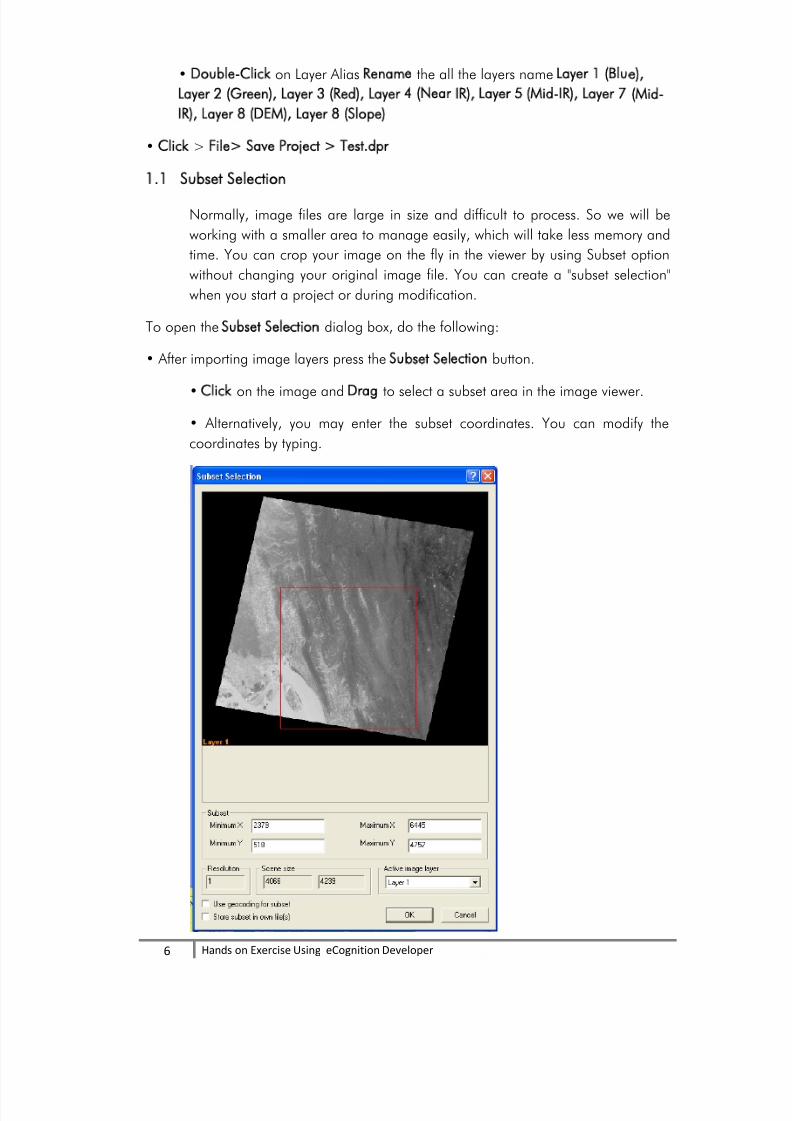
To open the Subset Selection dialog box, do the following:
• After importing image layers press the Subset Selection button.
• Click on the image and Drag to select a subset area in the image viewer.
• Alternatively, you may enter the subset coordinates. You can modify the
coordinates by typing.
8/11/2019 Object Base Image Classifications Bangladesh
http://slidepdf.com/reader/full/object-base-image-classifications-bangladesh 7/58
7
Hands on Exercise Using eCognition Developer
• Confirm with OK to return to the superordinate dialog box.
• You can clear the subset selection by Clicking Clear Subset in the
superordinate dialog box.
1.2
Insert Thematic Layer
Geographic representations are organized in a series of data themes, which areknown as thematic layers. During the image classification with eCognition, you can
insert shape file as a thematic layer and you can also use it in the process of image
classification (if required).
During the new project creating or modifying time, Shape files or other vector files can
be inserted to viewer. To insert a thematic layer, do the followings:
• Click the Insert button
• Choose Thematic Layers > Insert on the menu bar of the dialog box.
• Right-Click inside the thematic layer list and choose Insert from the context
menu.
The Import Thematic Layer dialog box opens, which is similar to the Import Image
Layers dialog box.
1.2.1 Modify a Project
Using Modify a Project you can add/remove more image or thematic layer or you can
rename project. Modify a selected project by exchanging or renaming image layers or
through other operations.
To modify a project, do the following
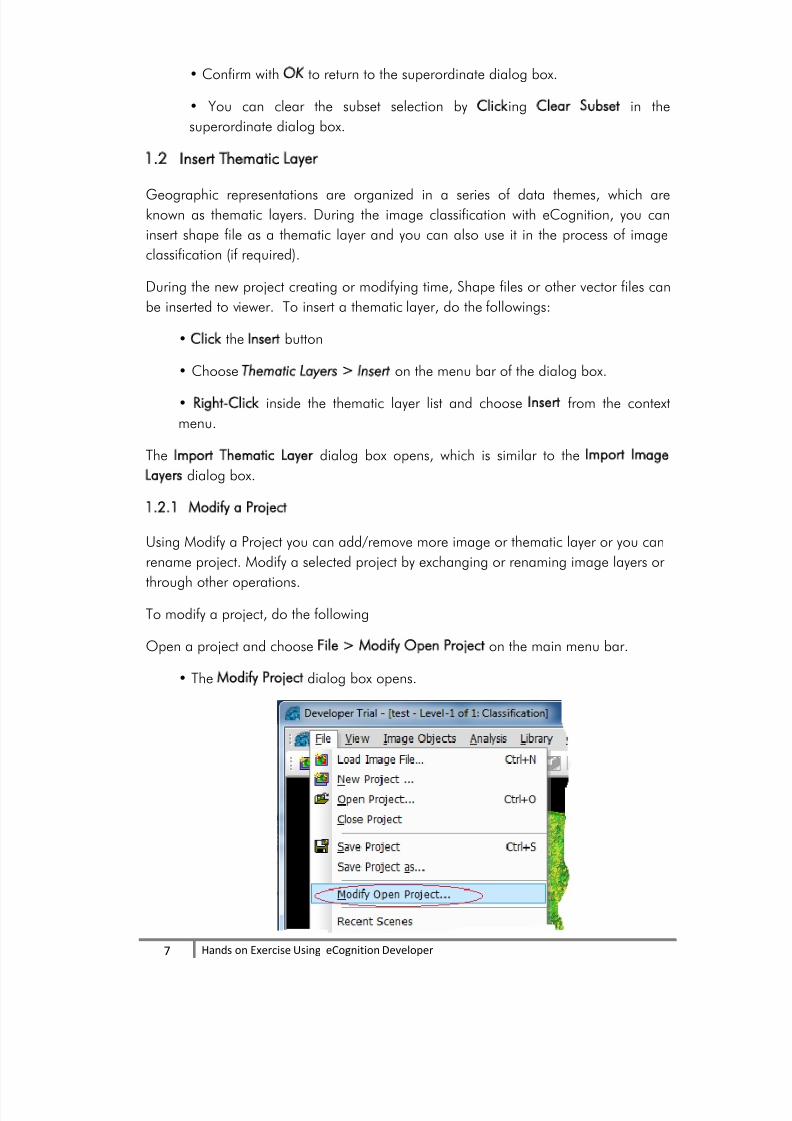
Open a project and choose File > Modify Open Project on the main menu bar.
• The Modify Project dialog box opens.
8/11/2019 Object Base Image Classifications Bangladesh
http://slidepdf.com/reader/full/object-base-image-classifications-bangladesh 8/58
8
Hands on Exercise Using eCognition Developer
• Modify the necessary things
• Click OK to modify the project
• Save a Project
Save the currently open project to a project file (extension .dpr).
To save a project, do the following:
• Choose File > Save Project on the main menu bar.
• Choose File > Save Project As… on the main menu bar. The Save Project dialog
box opens. Select a folder and enter a name for the project file (.dpr). Click the
Save button to store the file.
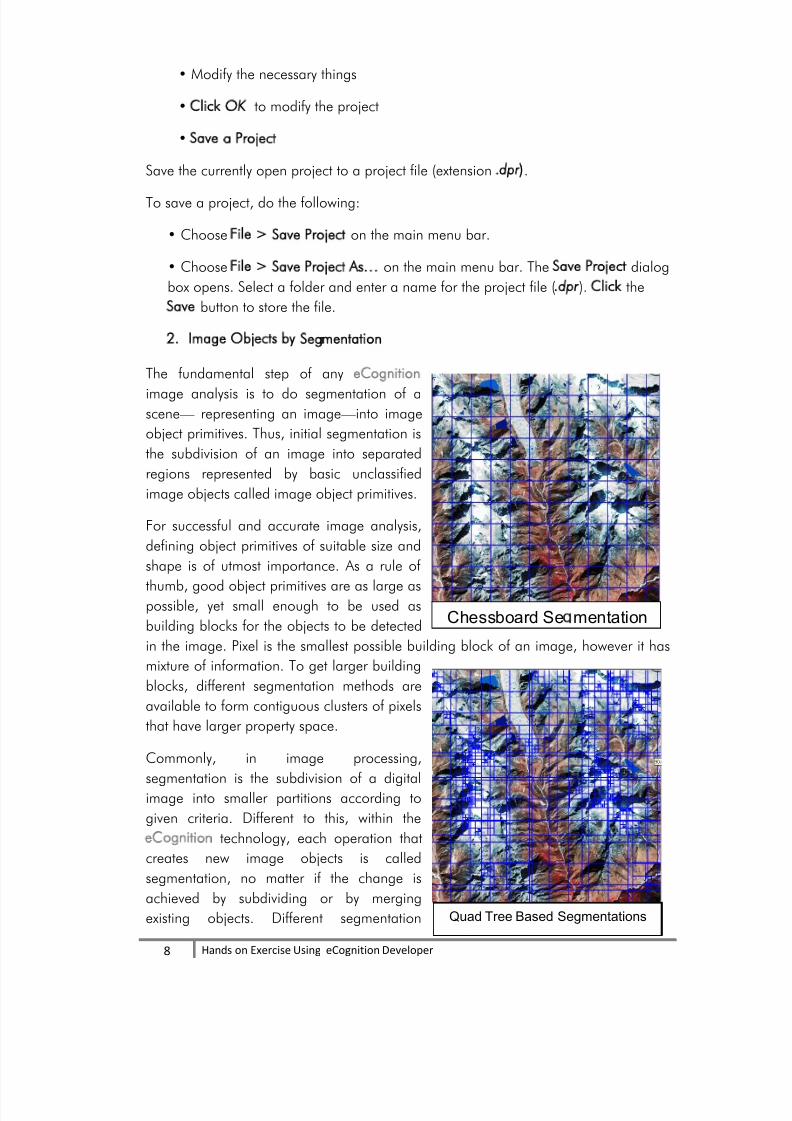
2. Image Objects by Segmentation
The fundamental step of any eCognition
image analysis is to do segmentation of ascene— representing an image—into image
object primitives. Thus, initial segmentation is
the subdivision of an image into separated
regions represented by basic unclassified
image objects called image object primitives.
For successful and accurate image analysis,
defining object primitives of suitable size and
shape is of utmost importance. As a rule of
thumb, good object primitives are as large aspossible, yet small enough to be used as
building blocks for the objects to be detected
in the image. Pixel is the smallest possible building block of an image, however it has
mixture of information. To get larger building
blocks, different segmentation methods are
available to form contiguous clusters of pixels
that have larger property space.
Commonly, in image processing,
segmentation is the subdivision of a digitalimage into smaller partitions according to
given criteria. Different to this, within the
eCognition technology, each operation that
creates new image objects is called
segmentation, no matter if the change is
achieved by subdividing or by merging
existing objects. Different segmentation
Chessboard Se mentation
Quad Tree Based Segmentations
8/11/2019 Object Base Image Classifications Bangladesh
http://slidepdf.com/reader/full/object-base-image-classifications-bangladesh 9/58
9
Hands on Exercise Using eCognition Developer
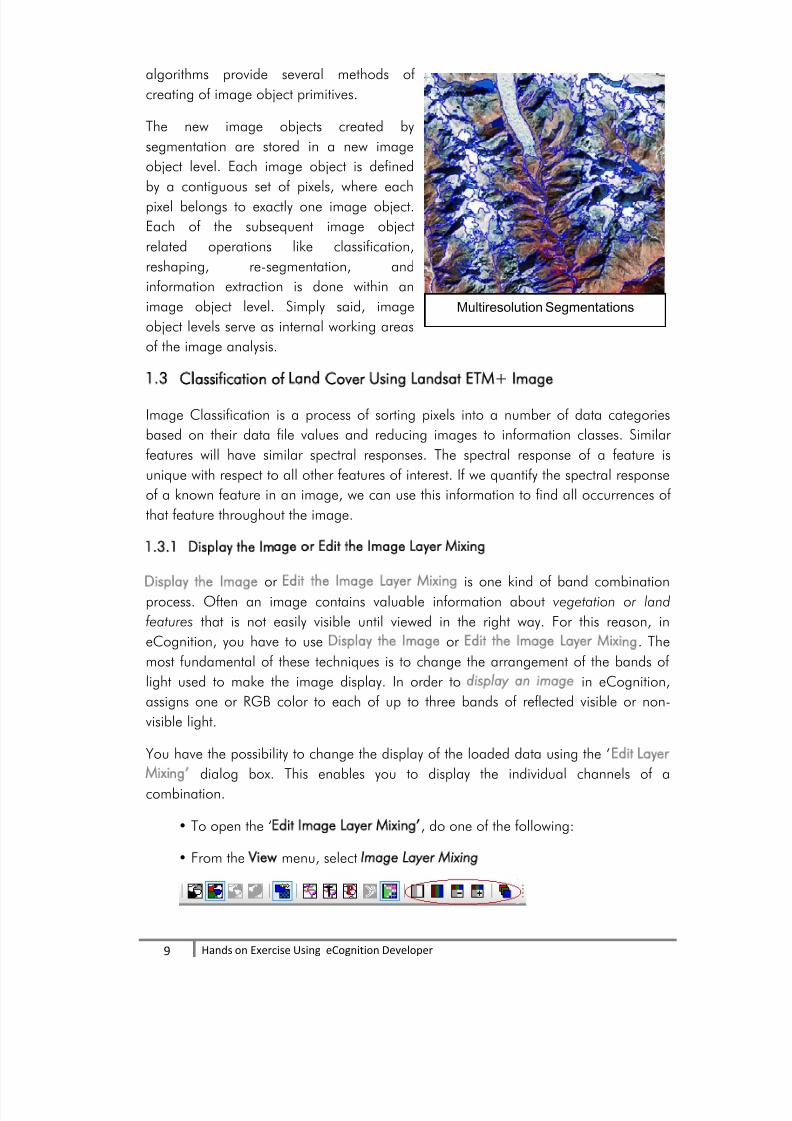
algorithms provide several methods of
creating of image object primitives.
The new image objects created by
segmentation are stored in a new image
object level. Each image object is defined
by a contiguous set of pixels, where each
pixel belongs to exactly one image object.
Each of the subsequent image object
related operations like classification,
reshaping, re-segmentation, and
information extraction is done within an
image object level. Simply said, image
object levels serve as internal working areas
of the image analysis.
1.3
Classification of Land Cover Using Landsat ETM Image
Image Classification is a process of sorting pixels into a number of data categories
based on their data file values and reducing images to information classes. Similar
features will have similar spectral responses. The spectral response of a feature is
unique with respect to all other features of interest. If we quantify the spectral response
of a known feature in an image, we can use this information to find all occurrences of
that feature throughout the image.
1.3.1
Display the Imag e or Edit the Image Layer M ixing
Display the Image or Edit the Image Layer Mixing is one kind of band combinationprocess. Often an image contains valuable information about vegetation or land
features that is not easily visible until viewed in the right way. For this reason, in
eCognition, you have to useDisplay the Image
orEdit the Image Layer Mixing
. The
most fundamental of these techniques is to change the arrangement of the bands of
light used to make the image display. In order to display an image in eCognition,
assigns one or RGB color to each of up to three bands of reflected visible or non-
visible light.
You have the possibility to change the display of the loaded data using the ‘Edit Layer
Mixing’ dialog box. This enables you to display the individual channels of a
combination.
• To open the ‘Edit Image Layer M ixing’, do one of the following:
• From the View menu, select Image Layer Mixing
Multiresolution Segmentations
8/11/2019 Object Base Image Classifications Bangladesh
http://slidepdf.com/reader/full/object-base-image-classifications-bangladesh 10/58
10
Hands on Exercise Using eCognition Developer
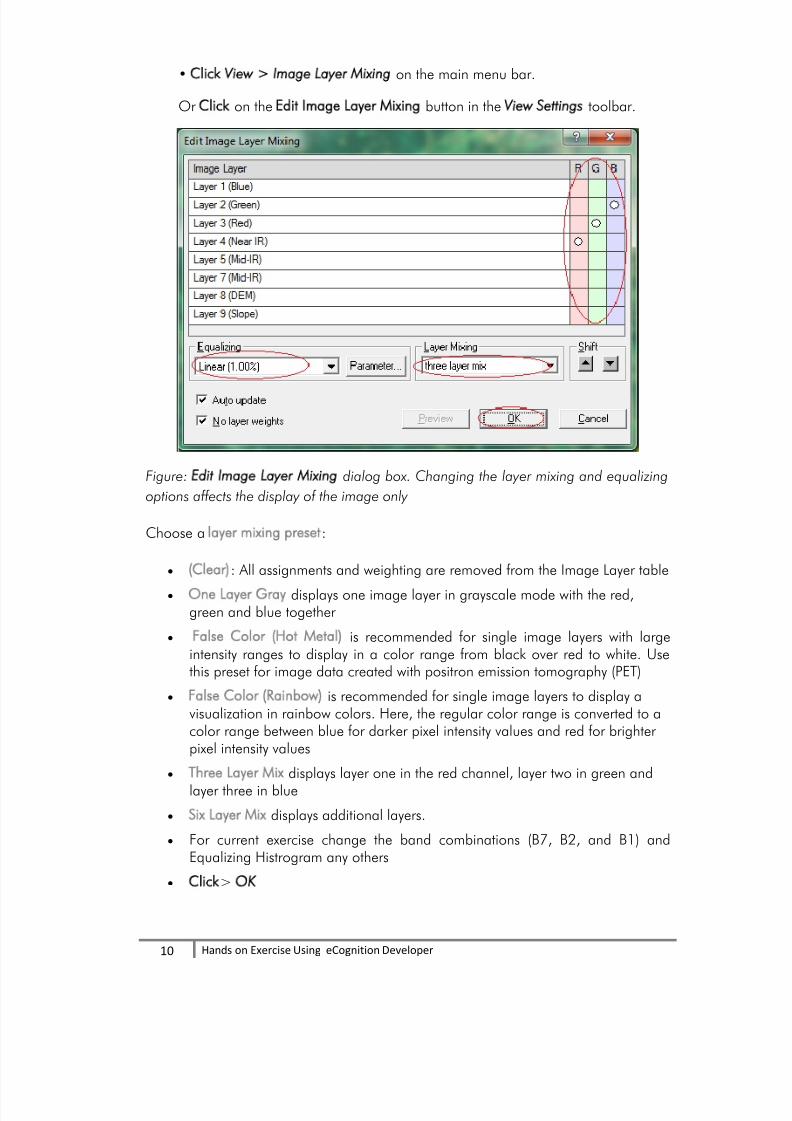
• Click View > Image Layer Mixing on the main menu bar.
Or Click on the Edit Image Layer Mixing button in the View Settings toolbar.
Figure: Edit Image Layer Mixing dialog box. Changing the layer mixing and equalizing
options affects the display of the image only
Choose a layer mixing preset:
(Clear): All assignments and weighting are removed from the Image Layer table
One Layer Gray displays one image layer in grayscale mode with the red,green and blue together
False Color (Hot Metal) is recommended for single image layers with largeintensity ranges to display in a color range from black over red to white. Usethis preset for image data created with positron emission tomography (PET)
False Color (Rainbow) is recommended for single image layers to display avisualization in rainbow colors. Here, the regular color range is converted to acolor range between blue for darker pixel intensity values and red for brighterpixel intensity values
Three Layer Mix displays layer one in the red channel, layer two in green and
layer three in blue
Six Layer Mix displays additional layers.
For current exercise change the band combinations (B7, B2, and B1) andEqualizing Histrogram any others
Click> OK
8/11/2019 Object Base Image Classifications Bangladesh
http://slidepdf.com/reader/full/object-base-image-classifications-bangladesh 11/58
11
Hands on Exercise Using eCognition Developer
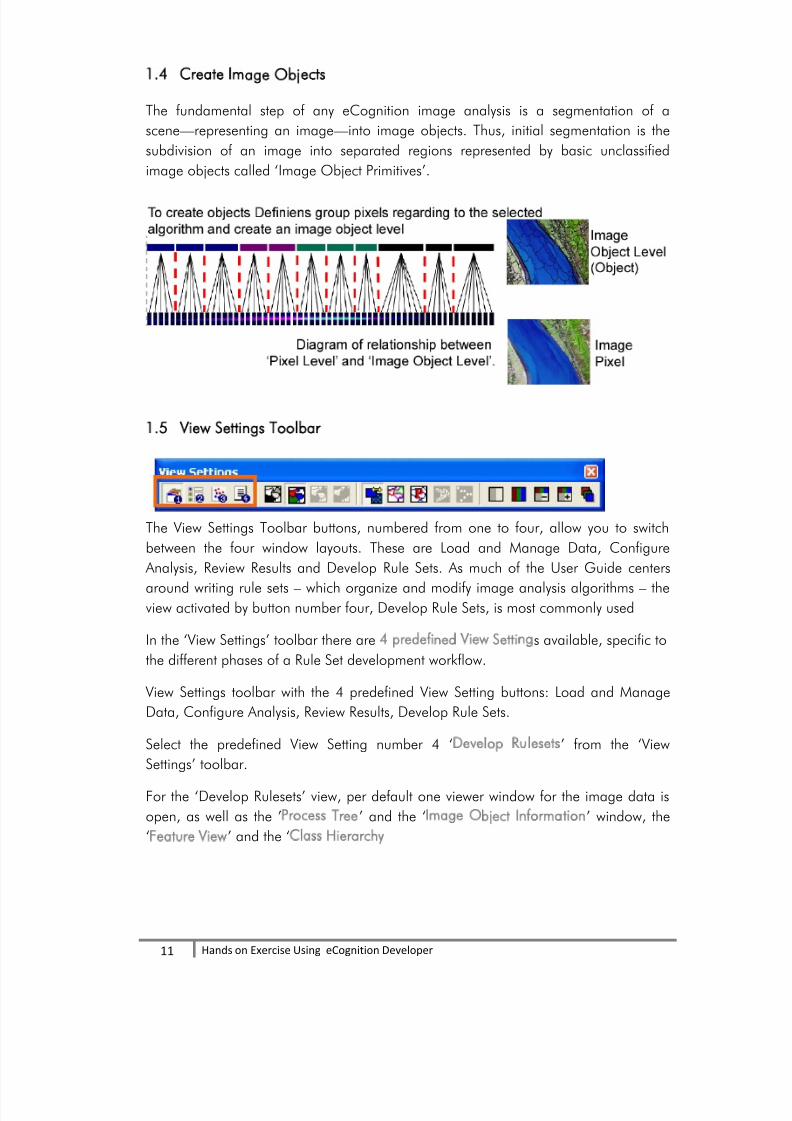
1.4 Create Image Objects
The fundamental step of any eCognition image analysis is a segmentation of a
scene—representing an image—into image objects. Thus, initial segmentation is the
subdivision of an image into separated regions represented by basic unclassified
image objects called ‘Image Object Primitives’.
1.5
View Settings Toolbar
The View Settings Toolbar buttons, numbered from one to four, allow you to switch
between the four window layouts. These are Load and Manage Data, Configure
Analysis, Review Results and Develop Rule Sets. As much of the User Guide centers
around writing rule sets – which organize and modify image analysis algorithms – theview activated by button number four, Develop Rule Sets, is most commonly used
In the ‘View Settings’ toolbar there are 4 predefined View Settings available, specific to
the different phases of a Rule Set development workflow.
View Settings toolbar with the 4 predefined View Setting buttons: Load and Manage
Data, Configure Analysis, Review Results, Develop Rule Sets.
Select the predefined View Setting number 4 ‘Develop Rulesets’ from the ‘View
Settings’ toolbar.
For the ‘Develop Rulesets’ view, per default one viewer window for the image data is
open, as well as the ’Process Tree’ and the ‘Image Object Information’ window, the
‘Feature View
’ and the ‘Class Hierarchy
8/11/2019 Object Base Image Classifications Bangladesh
http://slidepdf.com/reader/full/object-base-image-classifications-bangladesh 12/58
12
Hands on Exercise Using eCognition Developer
1.6 Insert Rule for Object Creation
This is the first step of image classification in eCognition. This is a kind of assigning
condition/s. Based on this, it will create image objects or segments. Within the rule
sets, you can use variables in different ways. While developing rule sets, you
commonly use scene and object variables for storing your dedicated fine-tuning tools
for reuse within similar projects.
1.6.1 Insert a Process
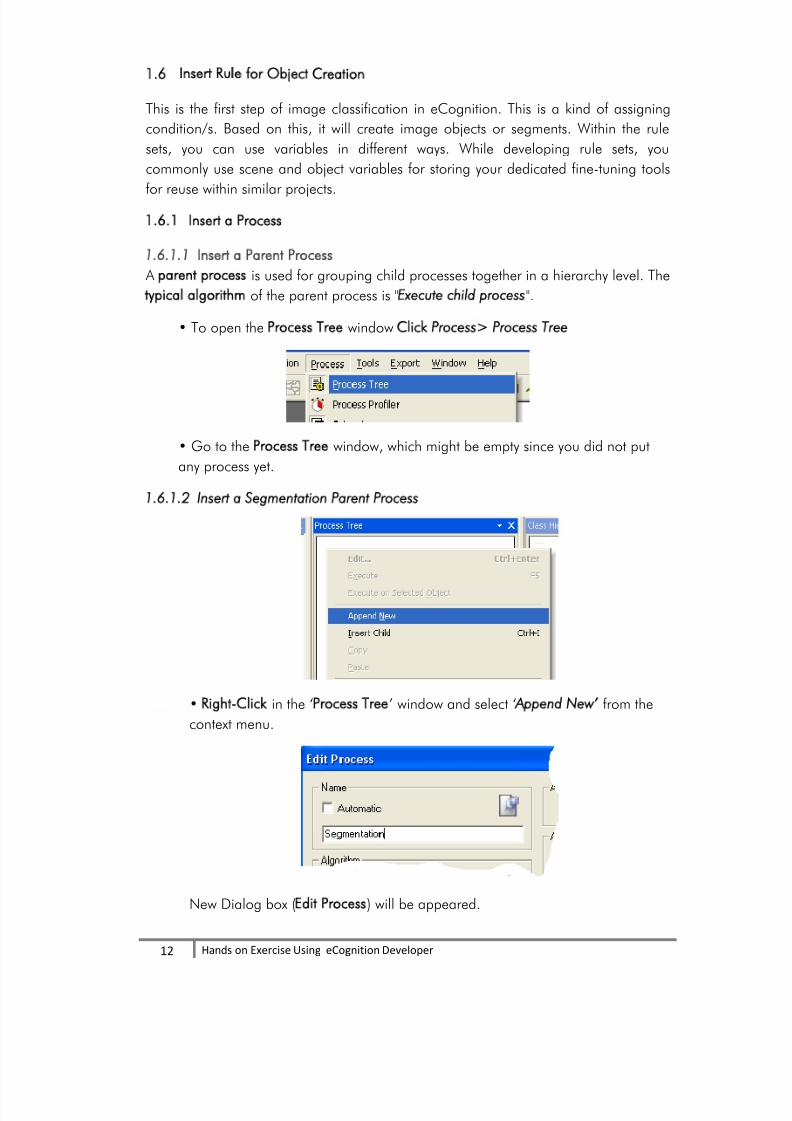
1.6.1.1 Insert a Parent Process
A parent process is used for grouping child processes together in a hierarchy level. The
typical algorithm of the parent process is "Execute child process".
• To open the Process Tree window Click Process> Process Tree
• Go to the Process Tree window, which might be empty since you did not put
any process yet.
1.6.1.2
Insert a Segmentation Parent Process
• Right-Click in the ‘Process Tree’ window and select ‘Append New’ from the
context menu.
New Dialog box (Edit Process) will be appeared.
8/11/2019 Object Base Image Classifications Bangladesh
http://slidepdf.com/reader/full/object-base-image-classifications-bangladesh 13/58
13
Hands on Exercise Using eCognition Developer
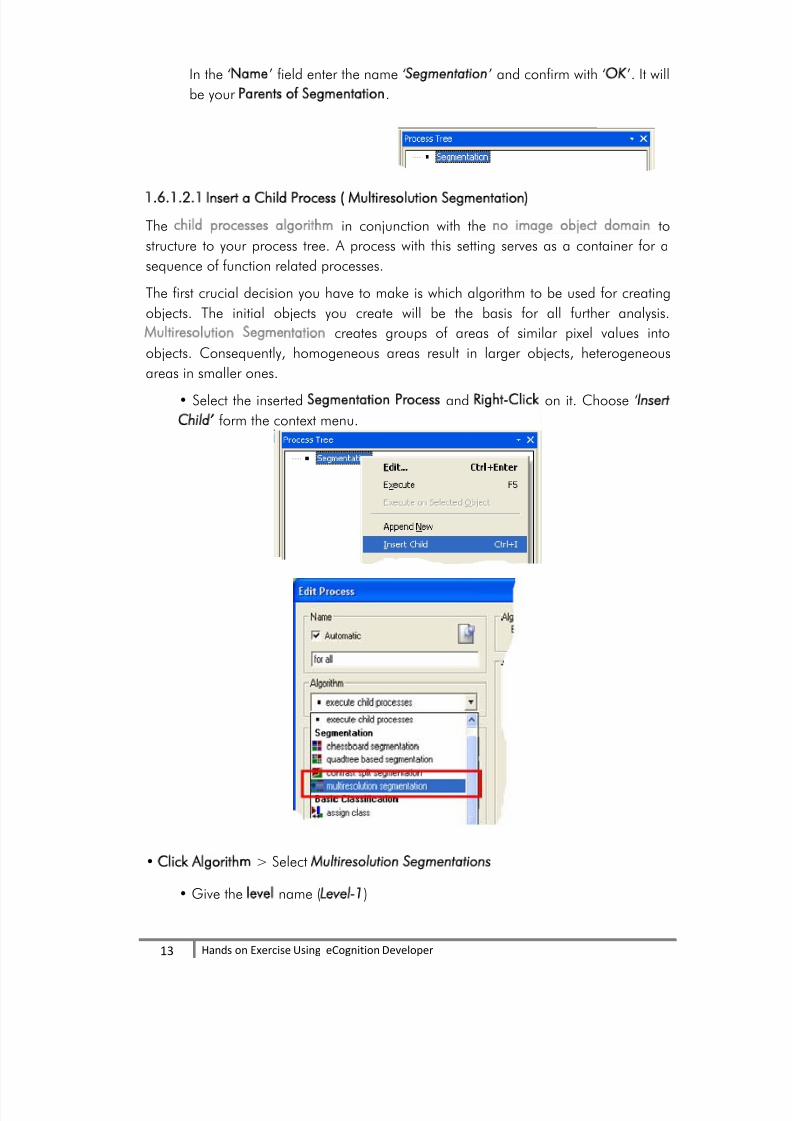
In the ‘Name’ field enter the name ‘Segmentation’ and confirm with ‘OK’. It will
be your Parents of Segmentation.
1.6.1.2.1
Insert a Child Process ( Multiresolution Segmentation)
The child processes algorithm in conjunction with the no image object domain to
structure to your process tree. A process with this setting serves as a container for a
sequence of function related processes.
The first crucial decision you have to make is which algorithm to be used for creating
objects. The initial objects you create will be the basis for all further analysis.
Multiresolution Segmentation creates groups of areas of similar pixel values into
objects. Consequently, homogeneous areas result in larger objects, heterogeneous
areas in smaller ones.
• Select the inserted Segmentation Process and Right-Click on it. Choose ‘Insert
Child’ form the context menu.
• Click Algorithm > Select Multiresolution Segmentations
• Give the level name (Level-1)
8/11/2019 Object Base Image Classifications Bangladesh
http://slidepdf.com/reader/full/object-base-image-classifications-bangladesh 14/58
14
Hands on Exercise Using eCognition Developer
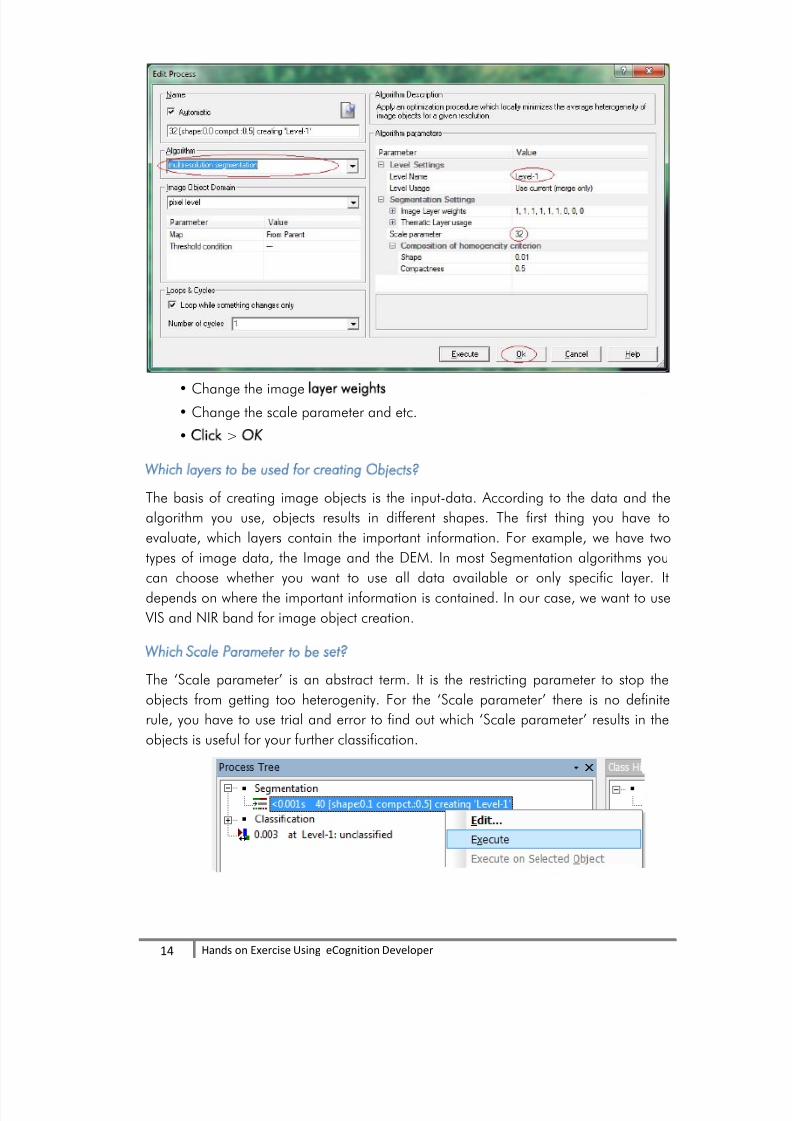
• Change the image layer weights
• Change the scale parameter and etc.
• Click > OK
Which layers to be used for creating Objects?
The basis of creating image objects is the input-data. According to the data and the
algorithm you use, objects results in different shapes. The first thing you have to
evaluate, which layers contain the important information. For example, we have two
types of image data, the Image and the DEM. In most Segmentation algorithms you
can choose whether you want to use all data available or only specific layer. It
depends on where the important information is contained. In our case, we want to use
VIS and NIR band for image object creation.
Which Scale Parameter to be set?
The ‘Scale parameter’ is an abstract term. It is the restricting parameter to stop the
objects from getting too heterogenity. For the ‘Scale parameter’ there is no definite
rule, you have to use trial and error to find out which ‘Scale parameter’ results in the
objects is useful for your further classification.
8/11/2019 Object Base Image Classifications Bangladesh
http://slidepdf.com/reader/full/object-base-image-classifications-bangladesh 15/58
15
Hands on Exercise Using eCognition Developer
• Right-Click one the process and select execute to execute the Multiresolution
Segmentation process.
1.7
Create Relational Feature
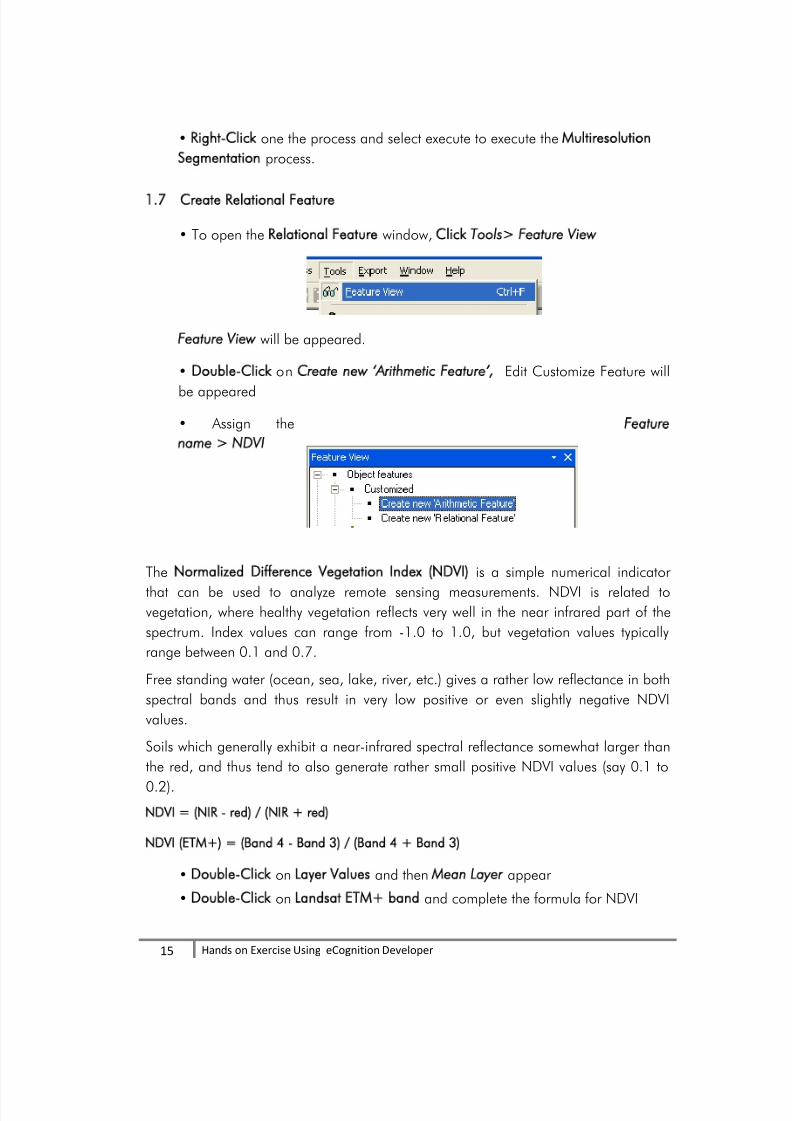
• To open the Relational Feature window, Click Tools> Feature View
Feature View will be appeared.
• Double-Click on Create new ‘Arithmetic Feature’, Edit Customize Feature will
be appeared
• Assign the Feature
name > NDVI
The Normalized Difference Vegetation Index (NDVI) is a simple numerical indicator
that can be used to analyze remote sensing measurements. NDVI is related tovegetation, where healthy vegetation reflects very well in the near infrared part of the
spectrum. Index values can range from -1.0 to 1.0, but vegetation values typically
range between 0.1 and 0.7.
Free standing water (ocean, sea, lake, river, etc.) gives a rather low reflectance in both
spectral bands and thus result in very low positive or even slightly negative NDVI
values.
Soils which generally exhibit a near-infrared spectral reflectance somewhat larger than
the red, and thus tend to also generate rather small positive NDVI values (say 0.1 to
0.2).
NDVI = (NIR - red) / (NIR + red)
NDVI (ETM+) = (Band 4 - Band 3) / (Band 4 + Band 3)
• Double-Click on Layer Values and then Mean Layer appear
• Double-Click on Landsat ETM+ band and complete the formula for NDVI
8/11/2019 Object Base Image Classifications Bangladesh
http://slidepdf.com/reader/full/object-base-image-classifications-bangladesh 16/58
16
Hands on Exercise Using eCognition Developer
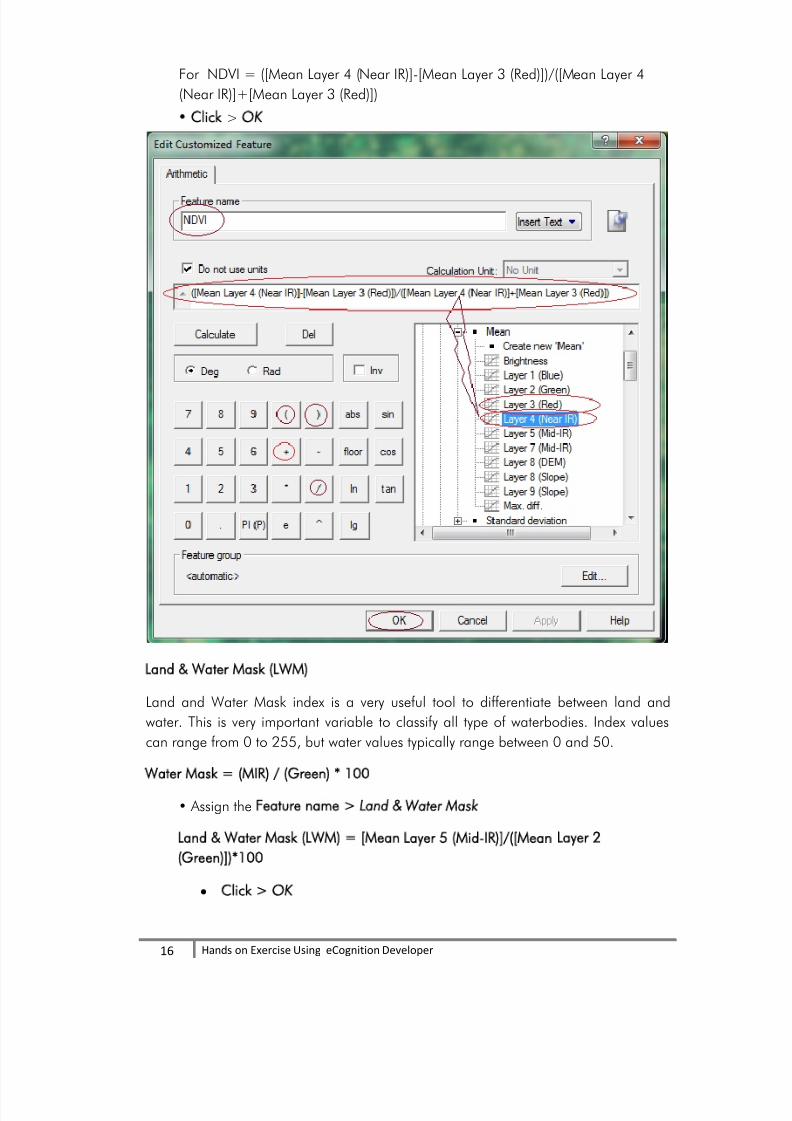
For NDVI = ([Mean Layer 4 (Near IR)]-[Mean Layer 3 (Red)])/([Mean Layer 4
(Near IR)]+[Mean Layer 3 (Red)])
• Click > OK
Land Water Mask (LWM)
Land and Water Mask index is a very useful tool to differentiate between land and
water. This is very important variable to classify all type of waterbodies. Index values
can range from 0 to 255, but water values typically range between 0 and 50.
Water Mask = (MIR) / (Green) * 100
• Assign the Feature name> Land Water Mask
Land Water Mask (LWM) = [Mean Layer 5 (Mid-IR)]/([Mean Layer 2
(Green)])*100
Click > OK
8/11/2019 Object Base Image Classifications Bangladesh
http://slidepdf.com/reader/full/object-base-image-classifications-bangladesh 17/58
17
Hands on Exercise Using eCognition Developer
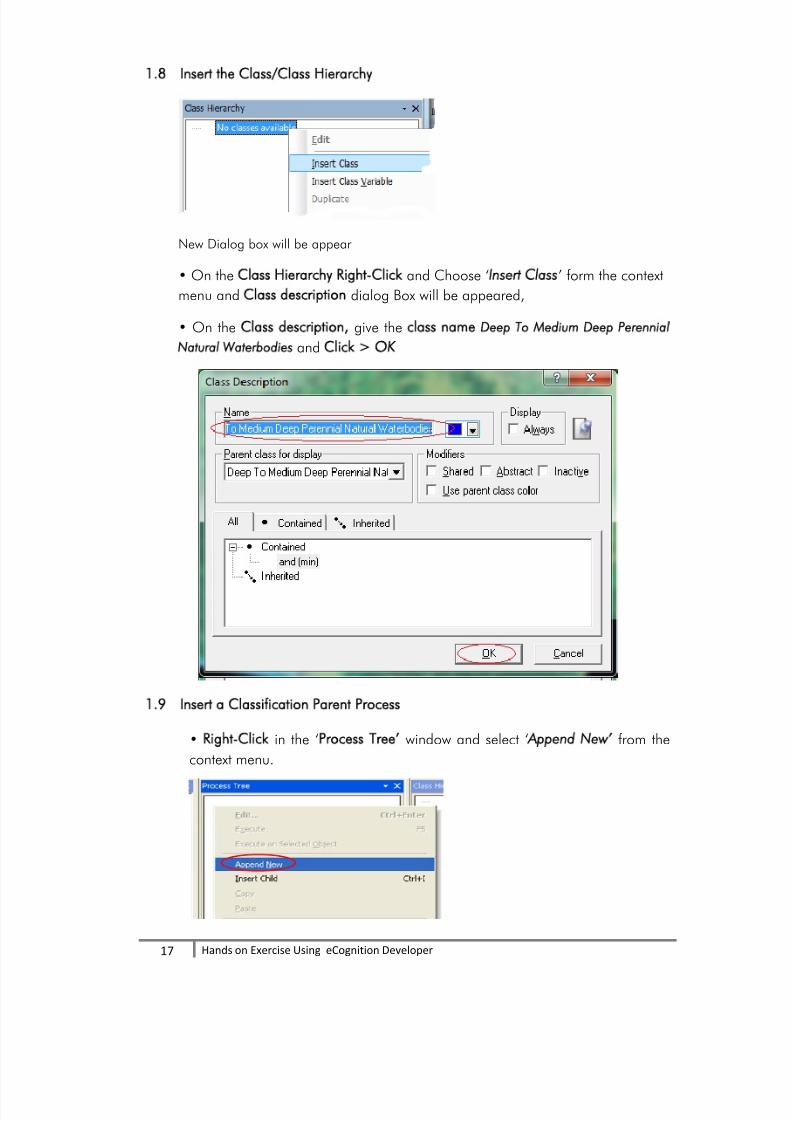
1.8
Insert the Class/Class Hierarchy
New Dialog box will be appear
• On the Class H ierarchy Right-Click and Choose ‘Insert Class’ form the context
menu and Class description dialog Box will be appeared,
• On the Class description, give the class name Deep To Medium Deep Perennial
Natural W aterbodies and Click > OK
1.9
Insert a Classification Parent Process
• Right-Click in the ‘Process Tree’ window and select ‘ ppend New’ from the
context menu.
8/11/2019 Object Base Image Classifications Bangladesh
http://slidepdf.com/reader/full/object-base-image-classifications-bangladesh 18/58
18
Hands on Exercise Using eCognition Developer
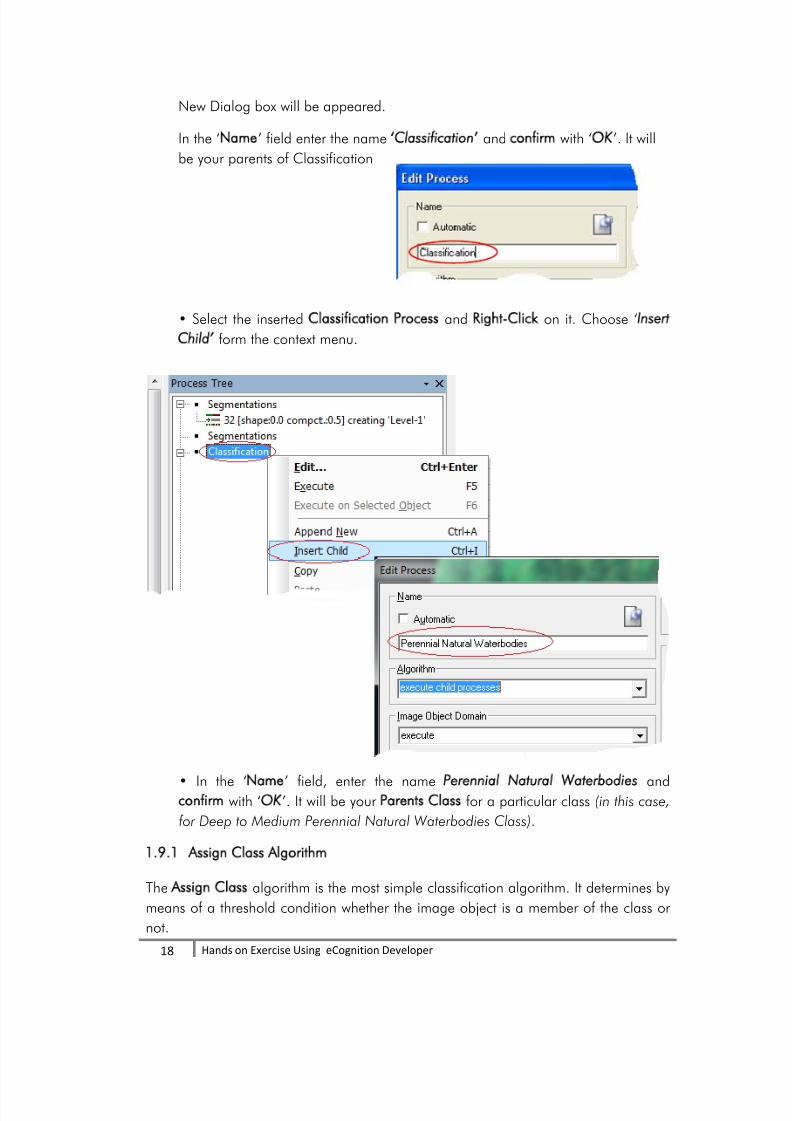
New Dialog box will be appeared.
In the ‘Name’ field enter the name ‘Classification ’ and confirm with ‘OK’. It will
be your parents of Classification
• Select the inserted Classification Process and Right-Click on it. Choose ‘Insert
Child’ form the context menu.
• In the ‘Name’ field, enter the name Perennial Natural Waterbodies andconfirm with ‘OK’. It will be your Parents Class for a particular class (in this case,
for Deep to Medium Perennial Natural Waterbodies Class).
1.9.1
Assign Class Algorithm
The Assign Class algorithm is the most simple classification algorithm. It determines by
means of a threshold condition whether the image object is a member of the class or
not.
8/11/2019 Object Base Image Classifications Bangladesh
http://slidepdf.com/reader/full/object-base-image-classifications-bangladesh 19/58
19
Hands on Exercise Using eCognition Developer
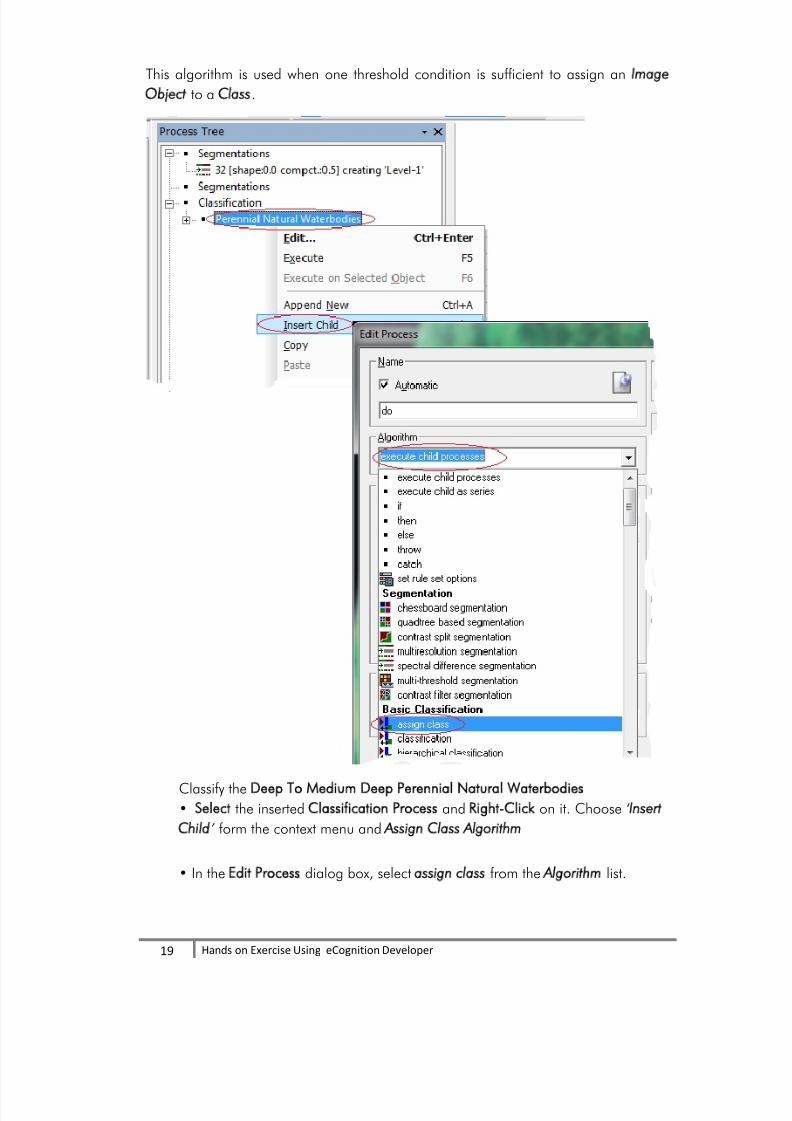
This algorithm is used when one threshold condition is sufficient to assign an Image
Object to a Class.
Classify the Deep To Medium Deep Perennial Natural Waterbodies
• Select the inserted Classification Process and Right-Click on it. Choose ‘Insert
Child’ form the context menu and Assign Class Algorithm
• In the Edit Process dialog box, select assign class from the Algorithm list.

8/11/2019 Object Base Image Classifications Bangladesh
http://slidepdf.com/reader/full/object-base-image-classifications-bangladesh 20/58
20
Hands on Exercise Using eCognition Developer
• In the algorithm parameter Use class, select Deep To Medium Deep
Perennial Natural Waterbodies.
• In the Image Object Domain group Click > Select image object level
• In the Image Object Domain group set the Parameter Click on Level>Select
Level-1
• In the Class Filter dialog box, Select unclassified from the classification list.
8/11/2019 Object Base Image Classifications Bangladesh
http://slidepdf.com/reader/full/object-base-image-classifications-bangladesh 21/58
21
Hands on Exercise Using eCognition Developer
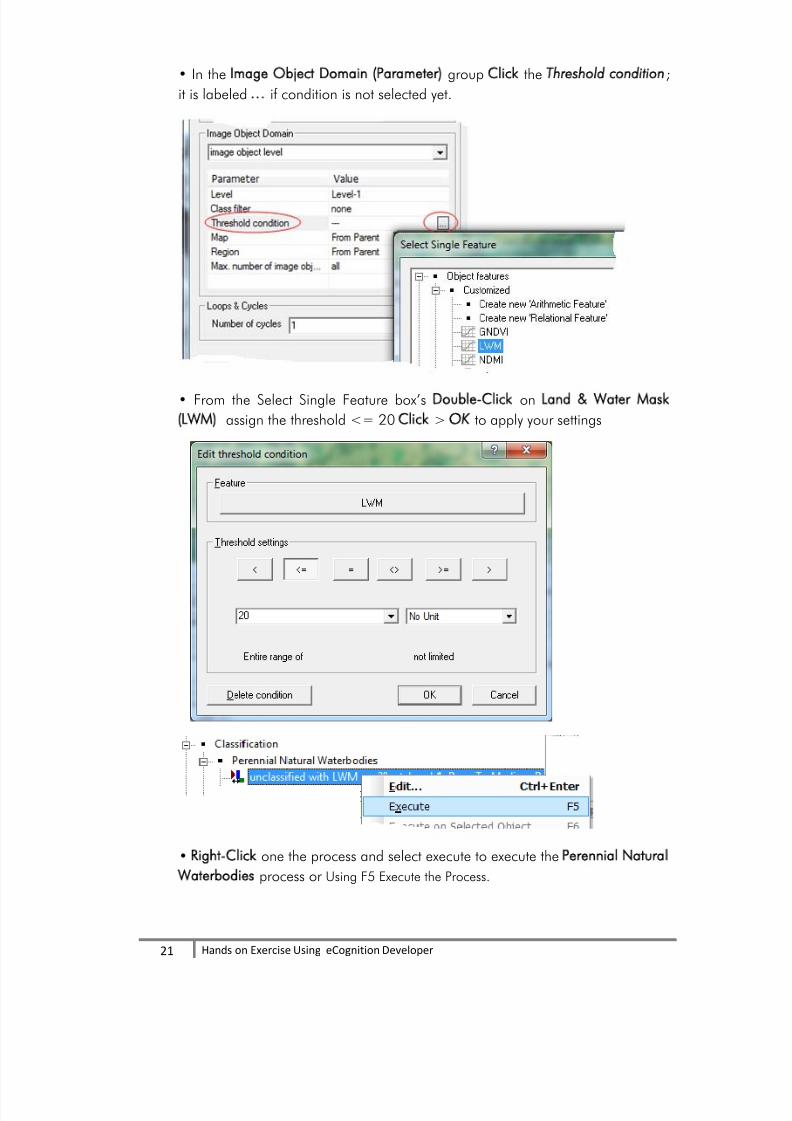
• In the Image Object Domain (Parameter) group Click the Threshold condition;
it is labeled … if condition is not selected yet.
• From the Select Single Feature box’s Double-Click on Land Water Mask
(LWM) assign the threshold <= 20 Click > OK to apply your settings
• Right-Click one the process and select execute to execute the Perennial Natural
Waterbodies process or Using F5 Execute the Process.
8/11/2019 Object Base Image Classifications Bangladesh
http://slidepdf.com/reader/full/object-base-image-classifications-bangladesh 22/58
22
Hands on Exercise Using eCognition Developer
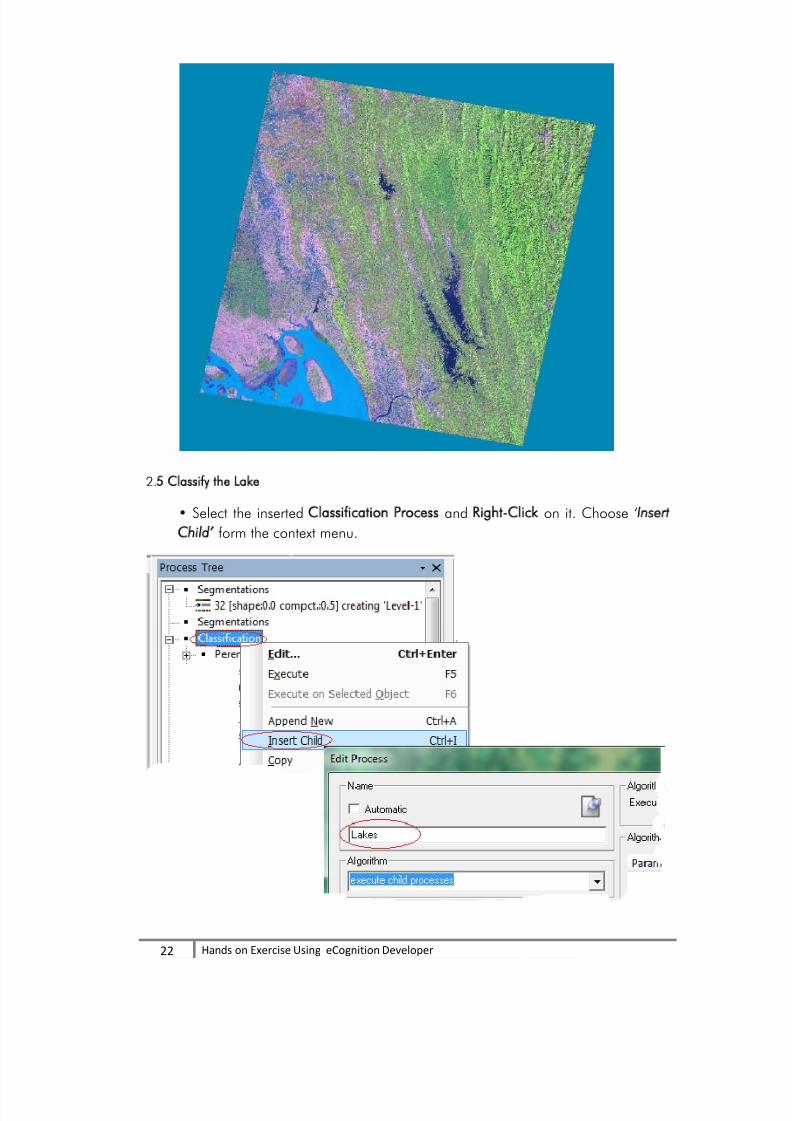
2.5 Classify the Lake
• Select the inserted Classification Process and Right-Click on it. Choose ‘Insert
Child’ form the context menu.
8/11/2019 Object Base Image Classifications Bangladesh
http://slidepdf.com/reader/full/object-base-image-classifications-bangladesh 23/58
23
Hands on Exercise Using eCognition Developer
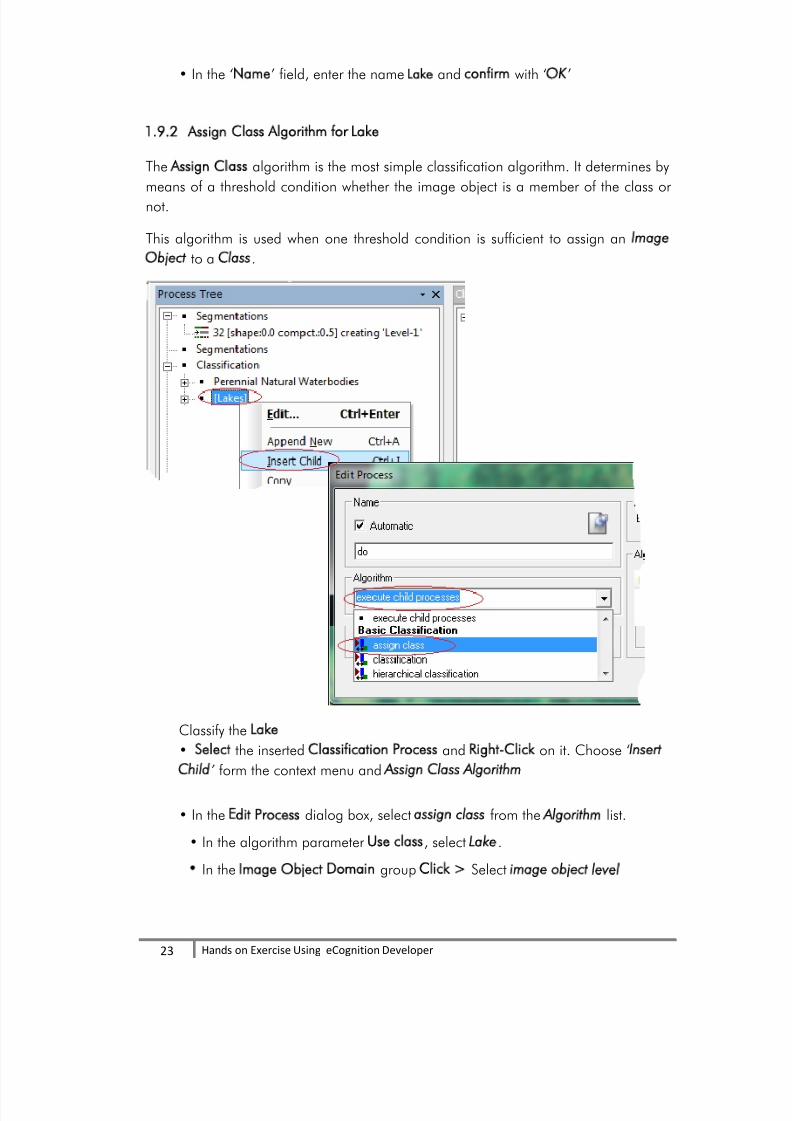
• In the ‘Name’ field, enter the name Lake and confirm with ‘OK’
1.9.2 Assign Class Algorithm for Lake
The Assign Class algorithm is the most simple classification algorithm. It determines by
means of a threshold condition whether the image object is a member of the class or
not.
This algorithm is used when one threshold condition is sufficient to assign an Image
Object to a Class.
Classify the Lake
• Select the inserted Classification Process and Right-Click on it. Choose ‘Insert
Child’ form the context menu and Assign Class Algorithm
• In the Edit Process dialog box, select assign class from the Algorithm list.
• In the algorithm parameter Use class, select Lake.
• In the Image Object Domain group Click > Select image object level
8/11/2019 Object Base Image Classifications Bangladesh
http://slidepdf.com/reader/full/object-base-image-classifications-bangladesh 24/58
24
Hands on Exercise Using eCognition Developer
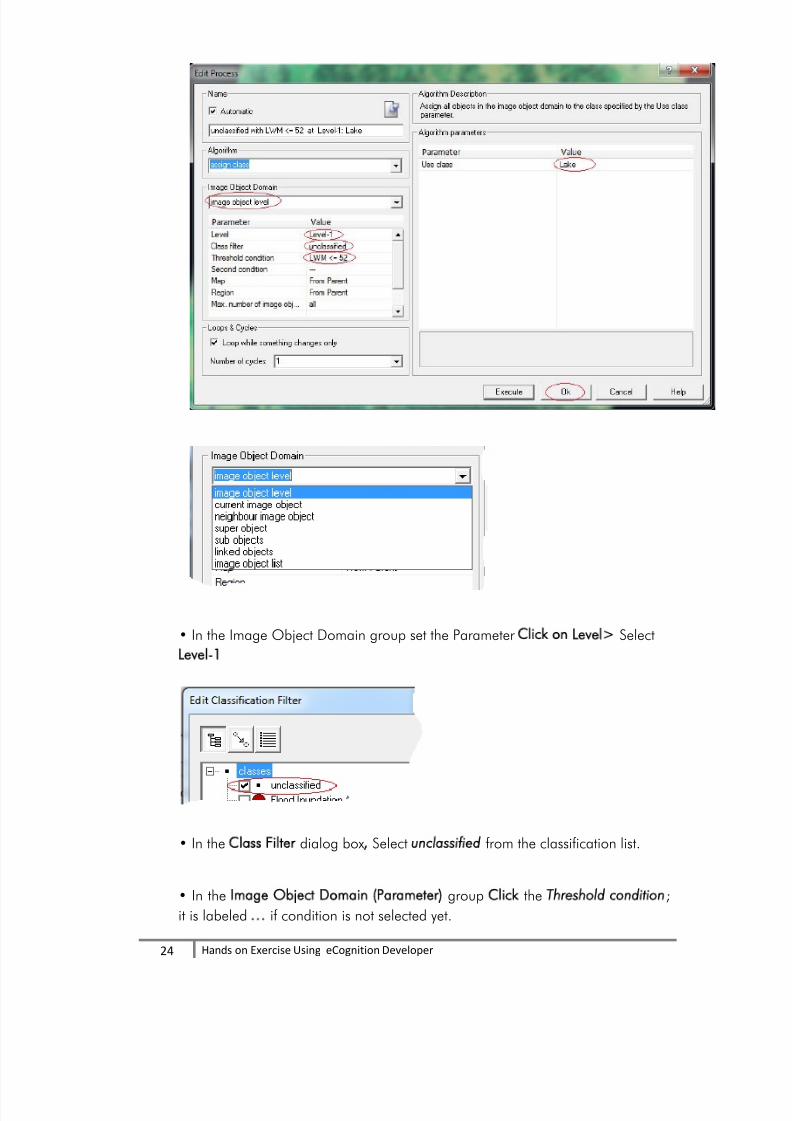
• In the Image Object Domain group set the Parameter Click on Level>Select
Level-1
• In the Class Filter dialog box, Select unclassified from the classification list.
• In the Image Object Domain (Parameter) group Click the Threshold condition;
it is labeled … if condition is not selected yet.
8/11/2019 Object Base Image Classifications Bangladesh
http://slidepdf.com/reader/full/object-base-image-classifications-bangladesh 25/58
25
Hands on Exercise Using eCognition Developer
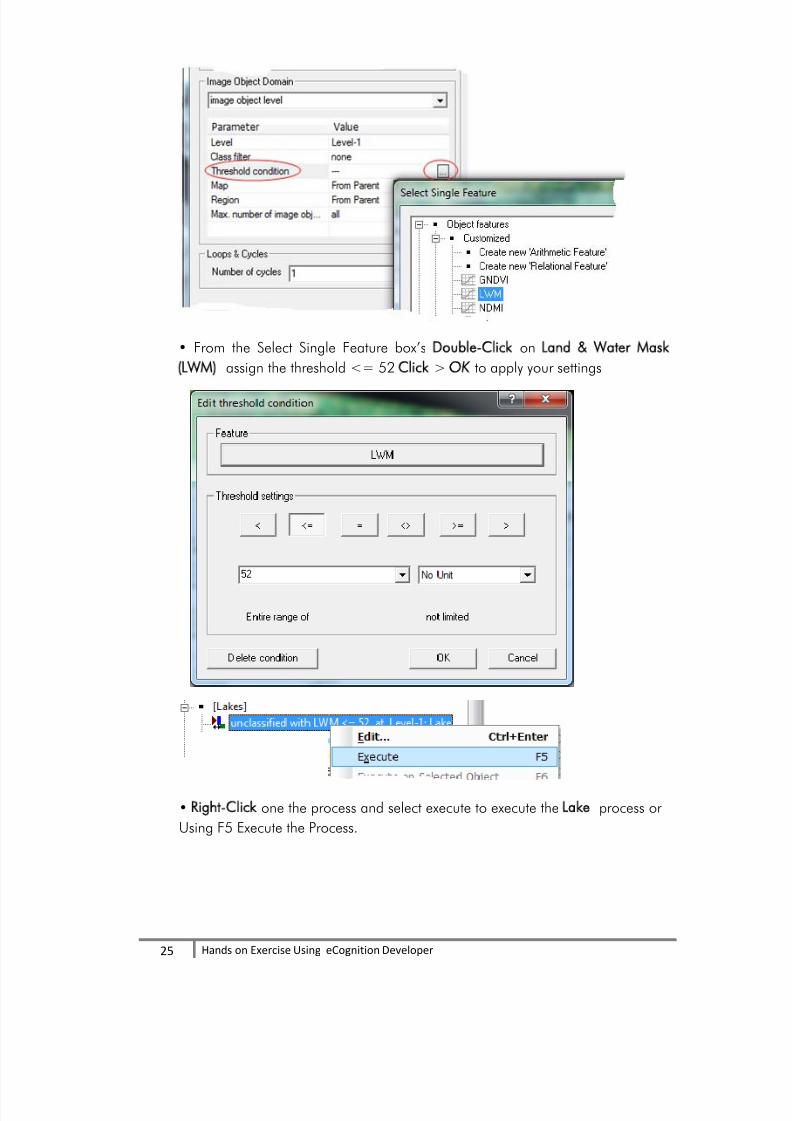
• From the Select Single Feature box’s Double-Click on Land Water Mask
(LWM) assign the threshold <= 52 Click > OK to apply your settings
• Right-Click one the process and select execute to execute the Lake process or
Using F5 Execute the Process.

8/11/2019 Object Base Image Classifications Bangladesh
http://slidepdf.com/reader/full/object-base-image-classifications-bangladesh 26/58
26
Hands on Exercise Using eCognition Developer
*Note: Based on the LWM algorithm others land cover area has been classified as
Lake. So you have to use few more conditions for refining the Lake area.
• In the Edit Process dialog box, select merge region from the Algorithm list and
Fusion super objects Yes
• In the Image Object Domain Select Level-1 and In the Class filter Select >
Lake > OK
• Using F5 Execute the algorithm
• In the Edit Process dialog box, select assign class from the Algorithm list and
Use class unclassified

8/11/2019 Object Base Image Classifications Bangladesh
http://slidepdf.com/reader/full/object-base-image-classifications-bangladesh 27/58
27
Hands on Exercise Using eCognition Developer
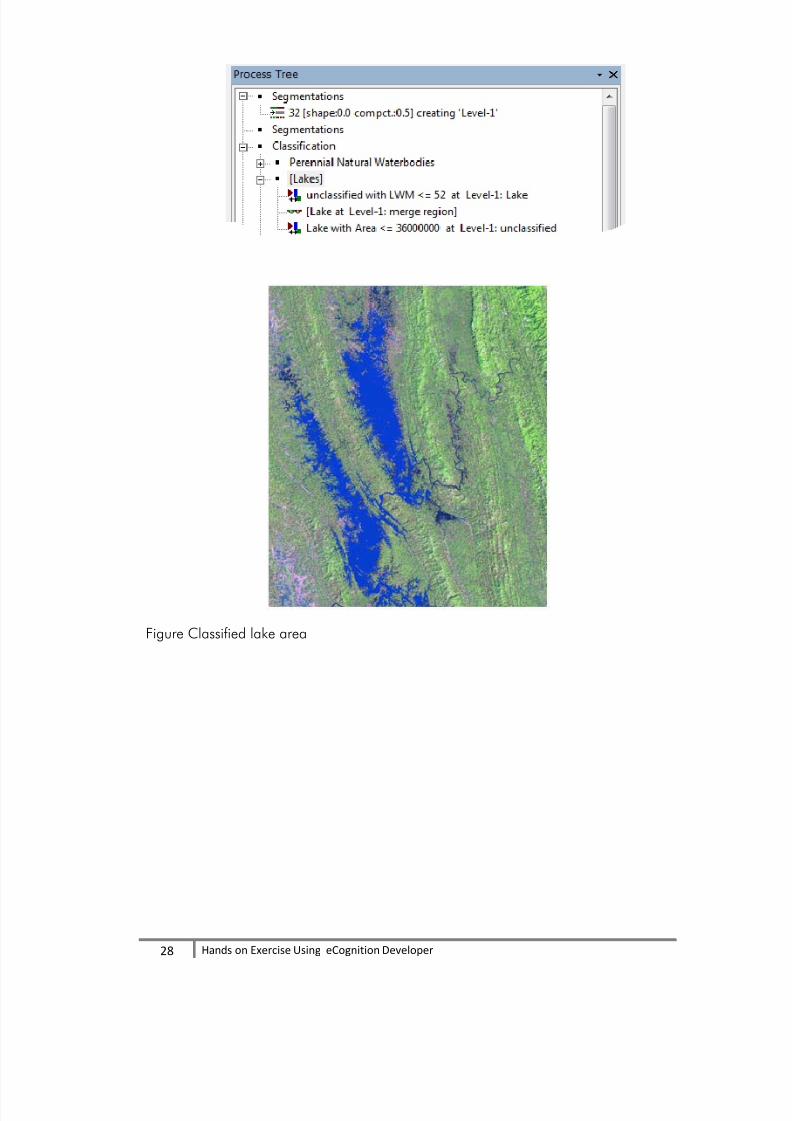
• In the Image Object Domain select image object level and parameter Level
> Level-1, Class> Lake
• In the parameter Click on Threshold condition and to apply your bellow settings
Feature select Area and Threshold <= 3600000
• Using F5 Execute the Lake algorithm
8/11/2019 Object Base Image Classifications Bangladesh
http://slidepdf.com/reader/full/object-base-image-classifications-bangladesh 28/58
28
Hands on Exercise Using eCognition Developer
Figure Classified lake area
8/11/2019 Object Base Image Classifications Bangladesh
http://slidepdf.com/reader/full/object-base-image-classifications-bangladesh 29/58
29
Hands on Exercise Using eCognition Developer
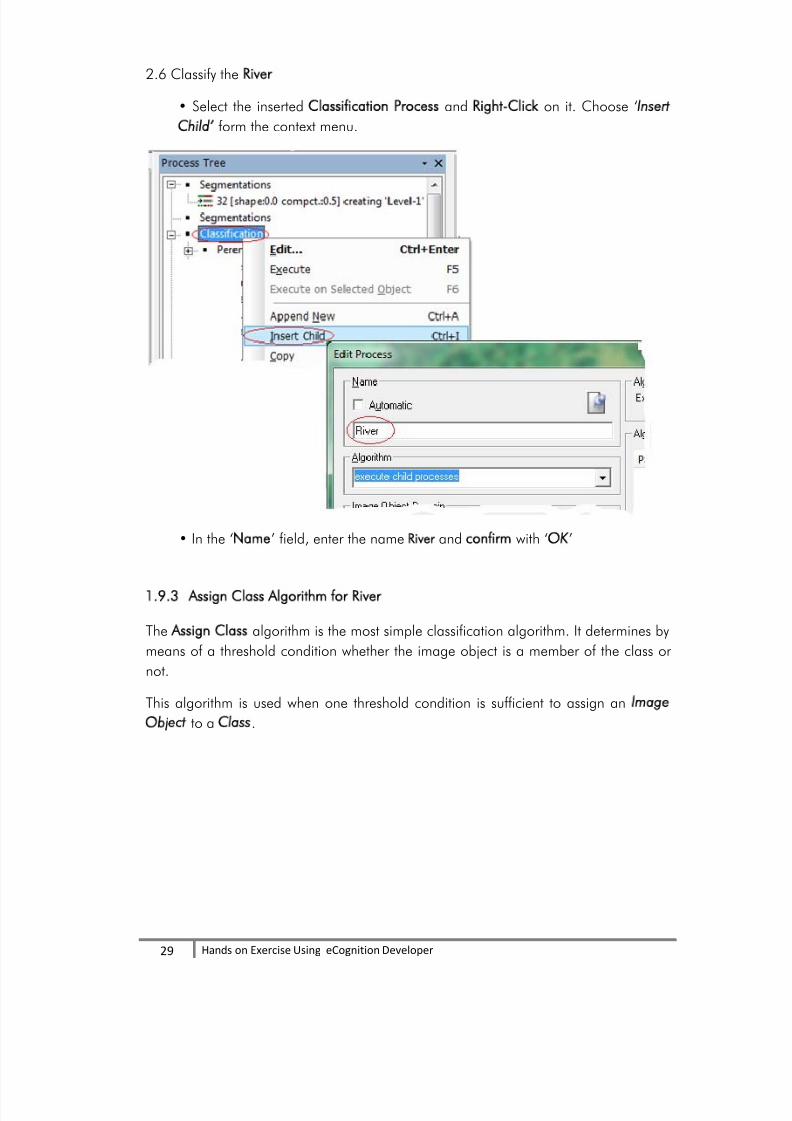
2.6 Classify the River
• Select the inserted Classification Process and Right-Click on it. Choose ‘Insert
Child’ form the context menu.
• In the ‘Name’ field, enter the name River and confirm with ‘OK’
1.9.3
Assign Class Algorithm for River
The Assign Class algorithm is the most simple classification algorithm. It determines by
means of a threshold condition whether the image object is a member of the class or
not.
This algorithm is used when one threshold condition is sufficient to assign an Image
Object to a Class.
8/11/2019 Object Base Image Classifications Bangladesh
http://slidepdf.com/reader/full/object-base-image-classifications-bangladesh 30/58
30
Hands on Exercise Using eCognition Developer
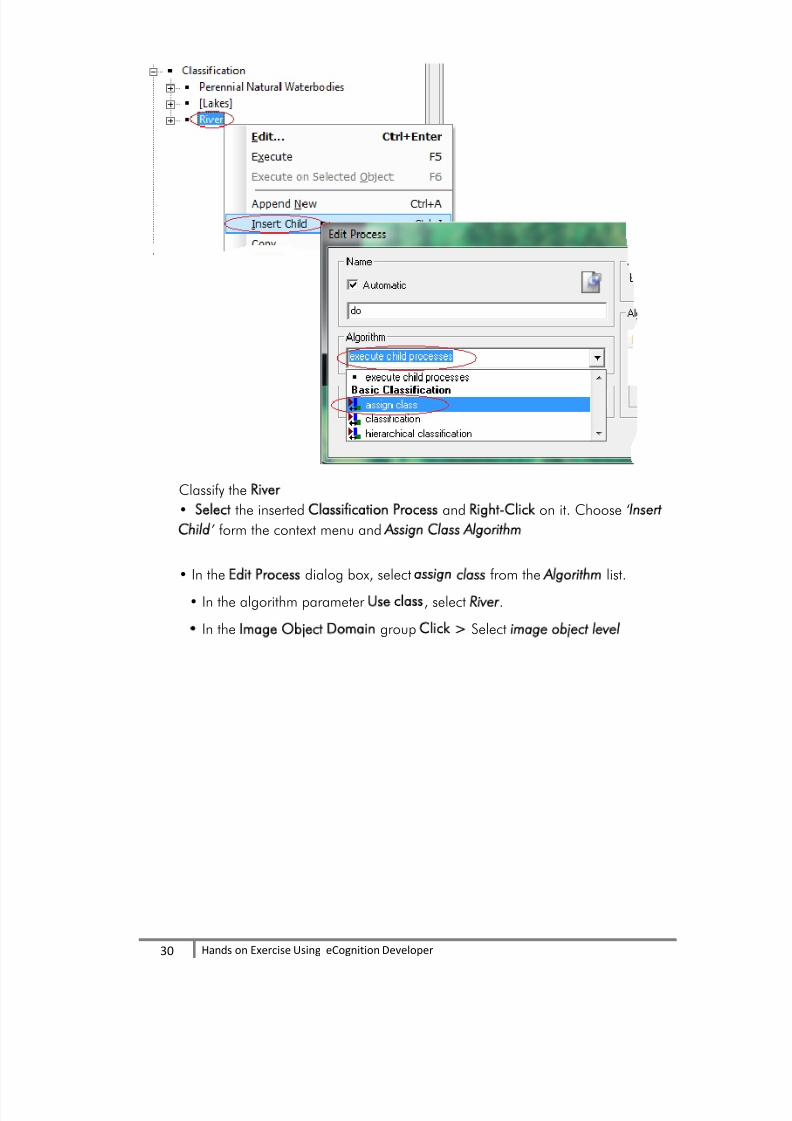
Classify the River
• Select the inserted Classification Process and Right-Click on it. Choose ‘Insert
Child’ form the context menu and Assign Class Algorithm
• In the Edit Process dialog box, select assign class from the Algorithm list.
• In the algorithm parameter Use class, select River.
• In the Image Object Domain group Click > Select image object level
8/11/2019 Object Base Image Classifications Bangladesh
http://slidepdf.com/reader/full/object-base-image-classifications-bangladesh 31/58
31
Hands on Exercise Using eCognition Developer
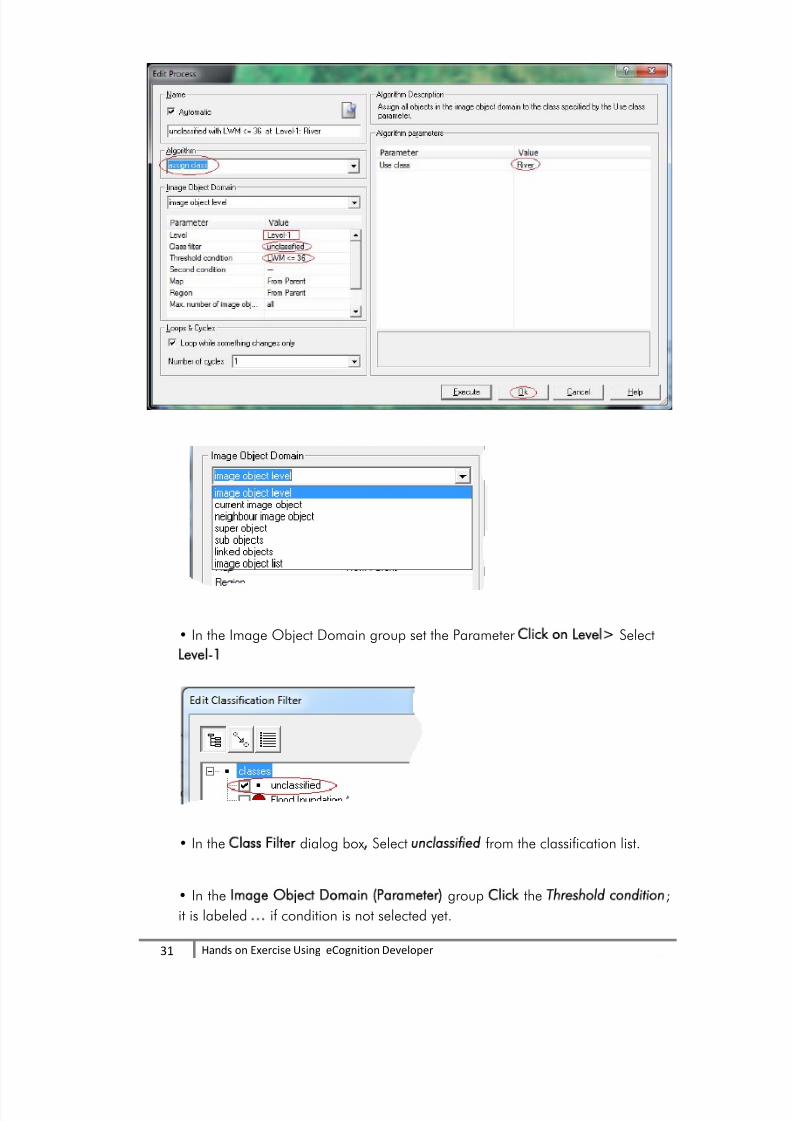
• In the Image Object Domain group set the Parameter Click on Level>Select
Level-1
• In the Class Filter dialog box, Select unclassified from the classification list.
• In the Image Object Domain (Parameter) group Click the Threshold condition;
it is labeled … if condition is not selected yet.
8/11/2019 Object Base Image Classifications Bangladesh
http://slidepdf.com/reader/full/object-base-image-classifications-bangladesh 32/58
32
Hands on Exercise Using eCognition Developer
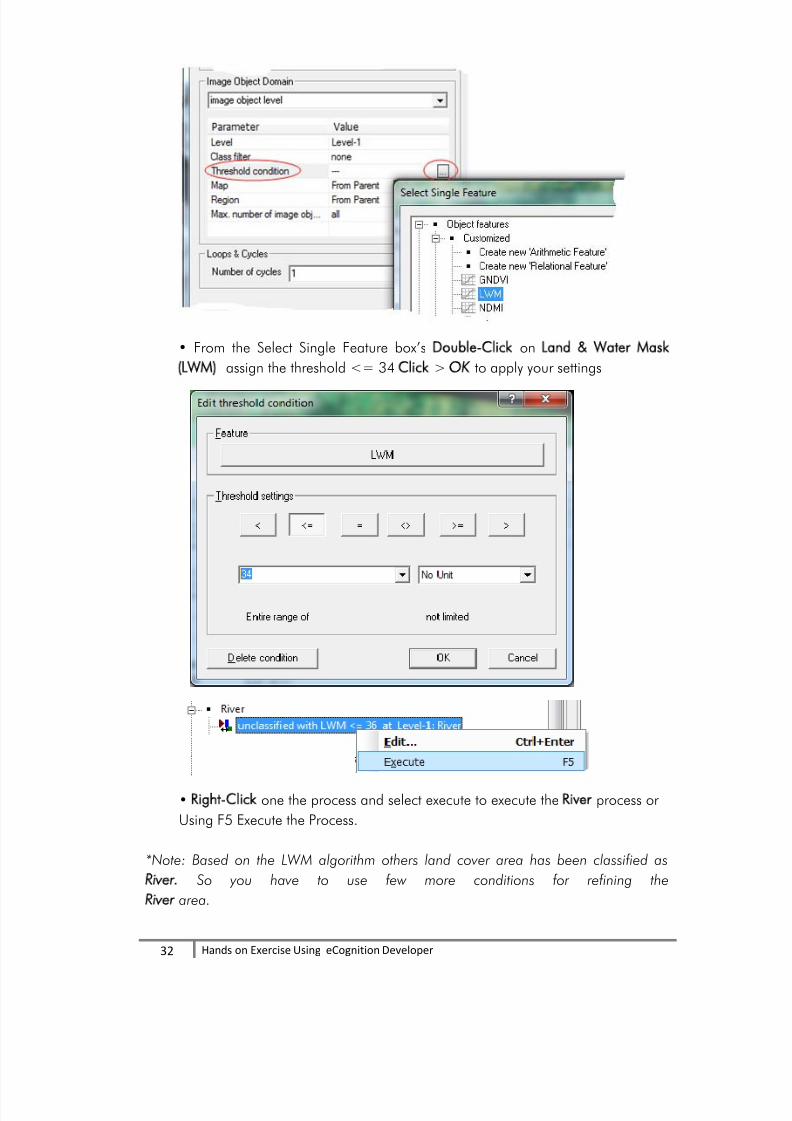
• From the Select Single Feature box’s Double-Click on Land Water Mask
(LWM) assign the threshold <= 34 Click > OK to apply your settings
• Right-Click one the process and select execute to execute the River process or
Using F5 Execute the Process.
*Note: Based on the LWM algorithm others land cover area has been classified as
River. So you have to use few more conditions for refining the
River area.
8/11/2019 Object Base Image Classifications Bangladesh
http://slidepdf.com/reader/full/object-base-image-classifications-bangladesh 33/58
33
Hands on Exercise Using eCognition Developer
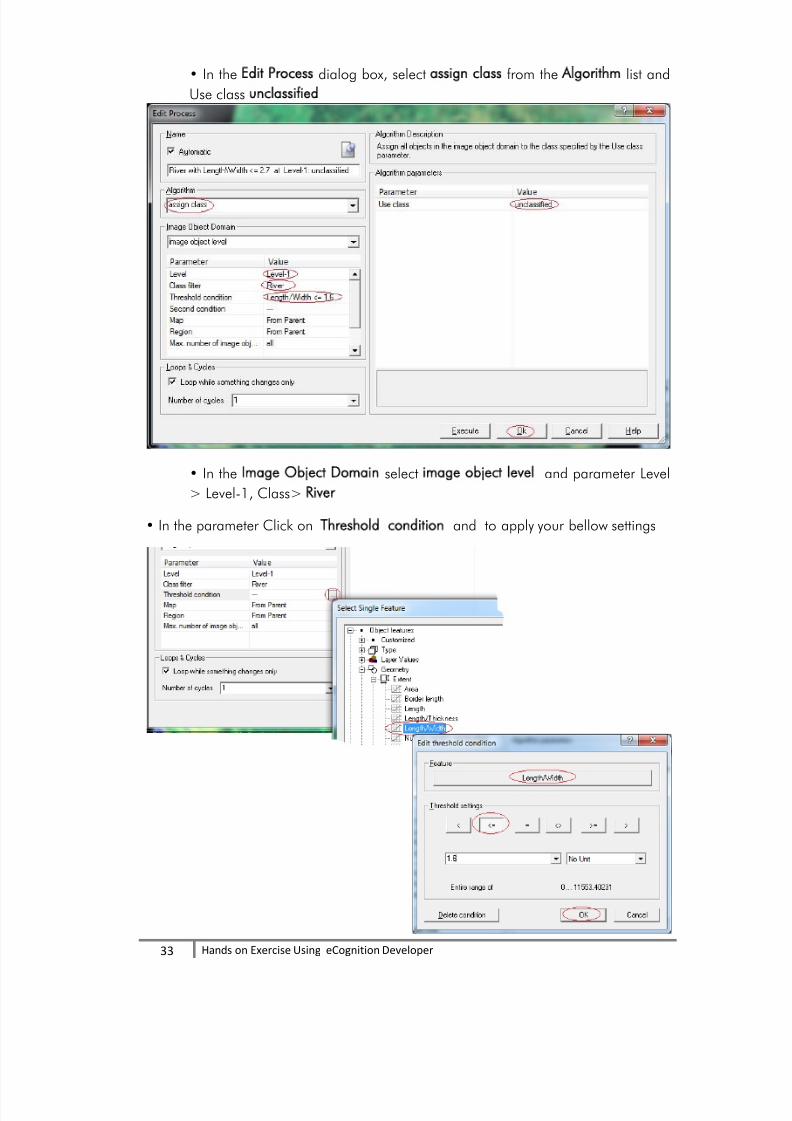
• In the Edit Process dialog box, select assign class from the Algorithm list and
Use class unclassified
• In the Image Object Domain select image object level and parameter Level
> Level-1, Class> River
• In the parameter Click on Threshold condition and to apply your bellow settings
8/11/2019 Object Base Image Classifications Bangladesh
http://slidepdf.com/reader/full/object-base-image-classifications-bangladesh 34/58
34
Hands on Exercise Using eCognition Developer
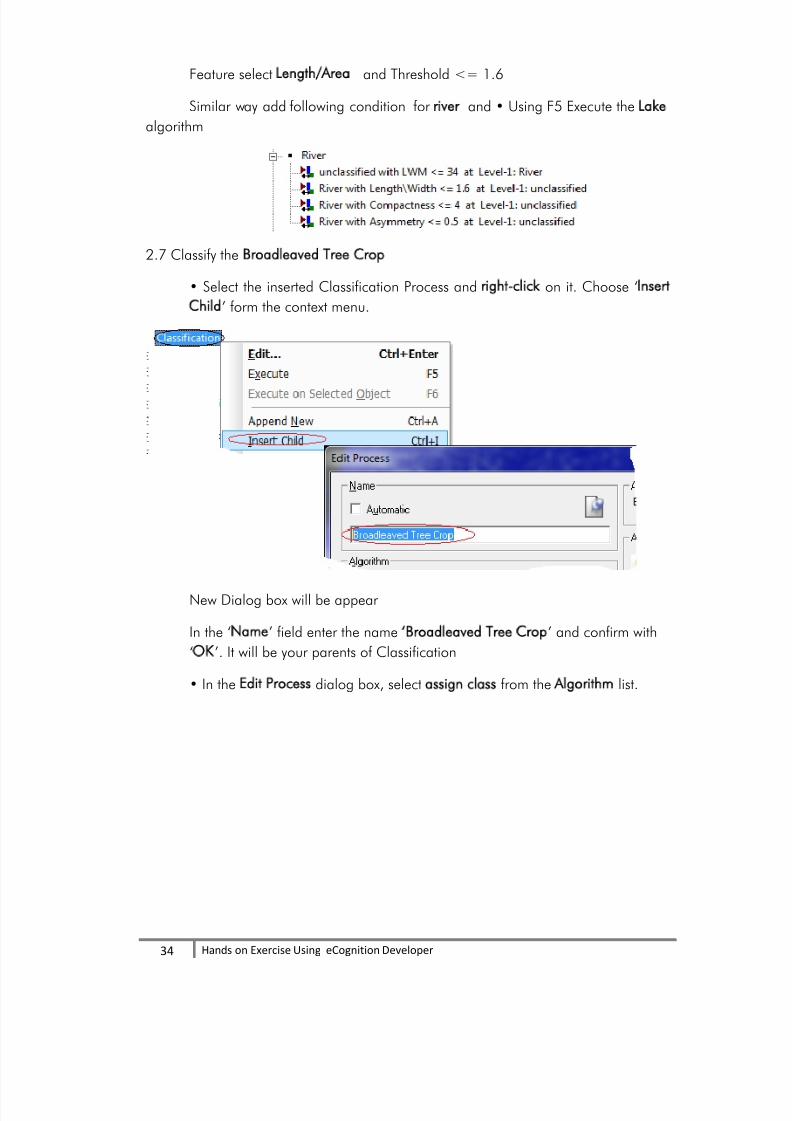
Feature select Length/Area and Threshold <= 1.6
Similar way add following condition for river and • Using F5 Execute the Lake
algorithm
2.7 Classify the Broadleaved Tree Crop
• Select the inserted Classification Process and right-click on it. Choose ‘Insert
Child’ form the context menu.
New Dialog box will be appear
In the ‘Name’ field enter the name ‘Broadleaved Tree Crop’ and confirm with
‘OK’. It will be your parents of Classification
• In the Edit Process dialog box, select assign class from the Algorithm list.
8/11/2019 Object Base Image Classifications Bangladesh
http://slidepdf.com/reader/full/object-base-image-classifications-bangladesh 35/58
35
Hands on Exercise Using eCognition Developer
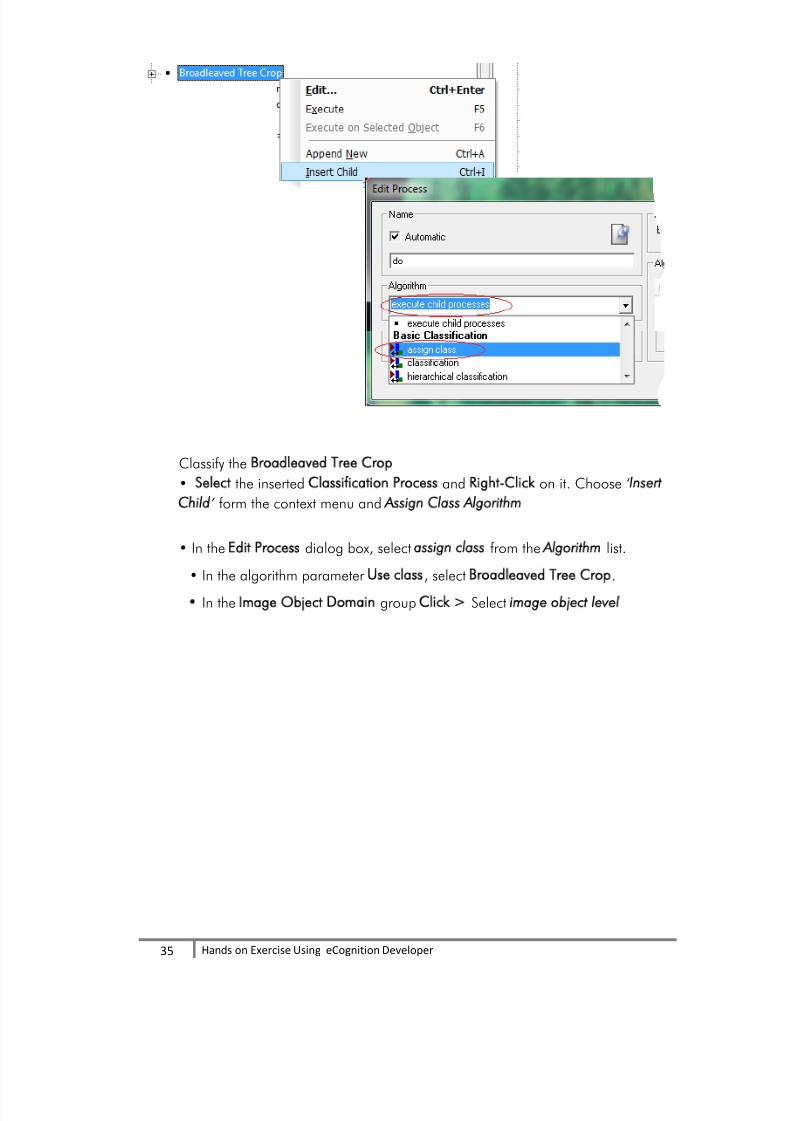
Classify the Broadleaved Tree Crop
• Select the inserted Classification Process and Right-Click on it. Choose ‘Insert
Child’ form the context menu and Assign Class Algorithm
• In the Edit Process dialog box, select assign class from the Algorithm list.
• In the algorithm parameter Use class, select Broadleaved Tree Crop.
• In the Image Object Domain group Click > Select image object level

8/11/2019 Object Base Image Classifications Bangladesh
http://slidepdf.com/reader/full/object-base-image-classifications-bangladesh 36/58
36
Hands on Exercise Using eCognition Developer
• In the Image Object Domain group set the Parameter Click on Level>Select
Level-1
• In the Class Filter dialog box, Select unclassified from the classification list.
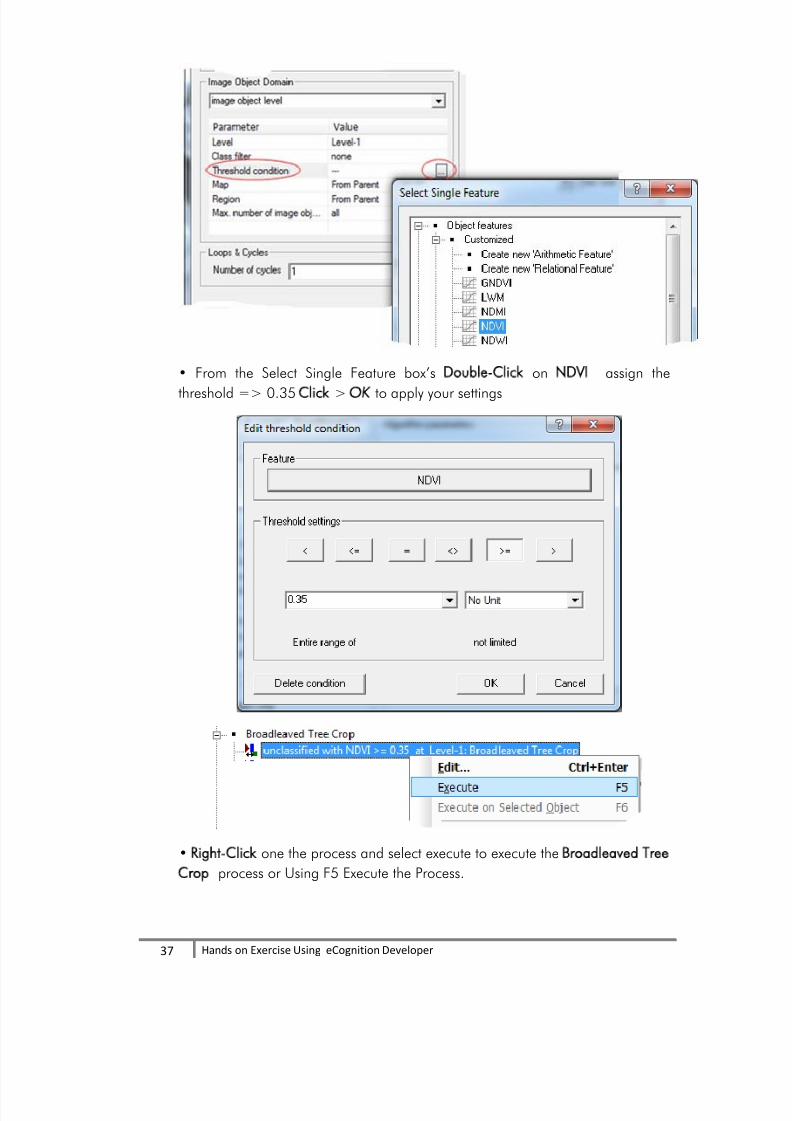
• In the Image Object Domain (Parameter) group Click the Threshold condition;
it is labeled … if condition is not selected yet.
8/11/2019 Object Base Image Classifications Bangladesh
http://slidepdf.com/reader/full/object-base-image-classifications-bangladesh 37/58
37
Hands on Exercise Using eCognition Developer
• From the Select Single Feature box’s Double-Click on NDVI assign the
threshold => 0.35 Click > OK to apply your settings
• Right-Click one the process and select execute to execute the Broadleaved Tree
Crop process or Using F5 Execute the Process.

8/11/2019 Object Base Image Classifications Bangladesh
http://slidepdf.com/reader/full/object-base-image-classifications-bangladesh 38/58
38
Hands on Exercise Using eCognition Developer
*Note: Based on the LWM algorithm others land cover area has been classified as
Broadleaved Tree Crop. So you have to use few more conditions for refining the
Broadleaved Tree Crop area.
Similar way add other condition for Broadleaved Tree Crop and • Using F5 Execute
the Broadleaved Tree Crop algorithm

8/11/2019 Object Base Image Classifications Bangladesh
http://slidepdf.com/reader/full/object-base-image-classifications-bangladesh 39/58
39
Hands on Exercise Using eCognition Developer
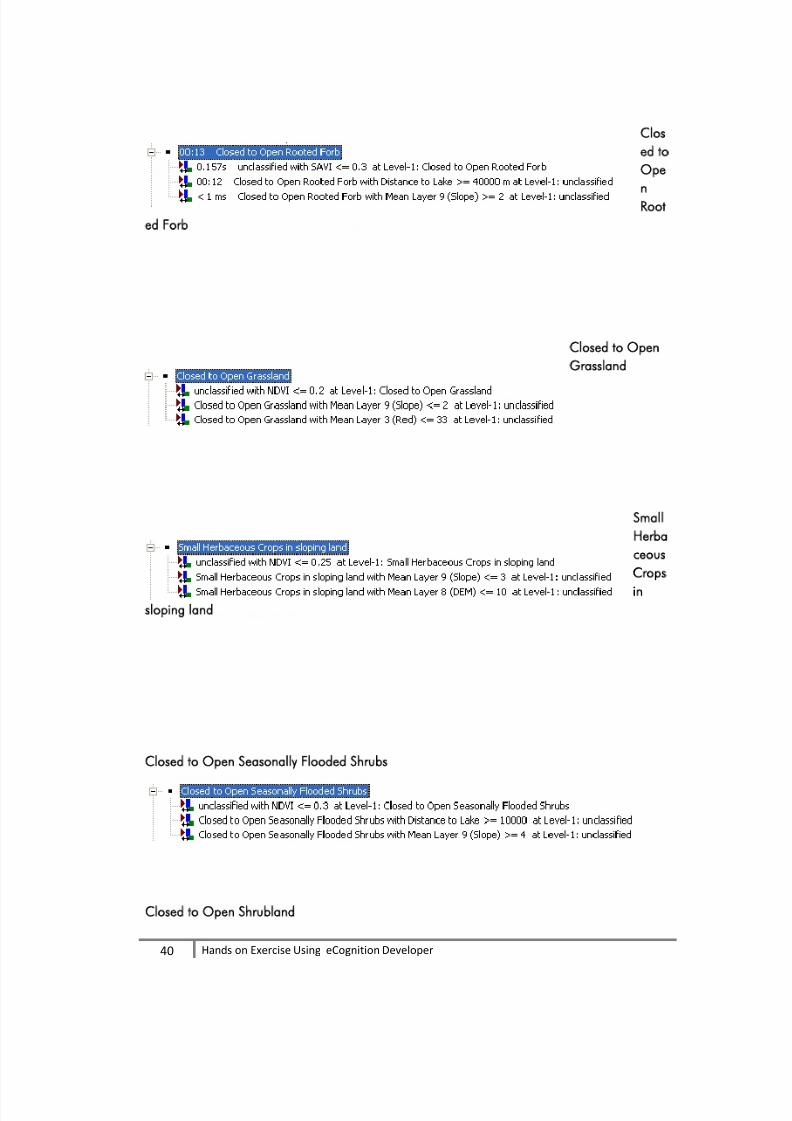
Please set following condition for others land cover
Bare Soil in seasonally flooded area
Bare Soil
Urban and
Industrial Areas
Irrigated Herbaceous Crop
Rainfed Herbaceous Crop
8/11/2019 Object Base Image Classifications Bangladesh
http://slidepdf.com/reader/full/object-base-image-classifications-bangladesh 40/58
40
Hands on Exercise Using eCognition Developer
Clos
ed to
Ope
n
Root
ed Forb
Closed to Open
Grassland
Small
Herba
ceous
Crops
in
sloping land
Closed to Open Seasonally Flooded Shrubs
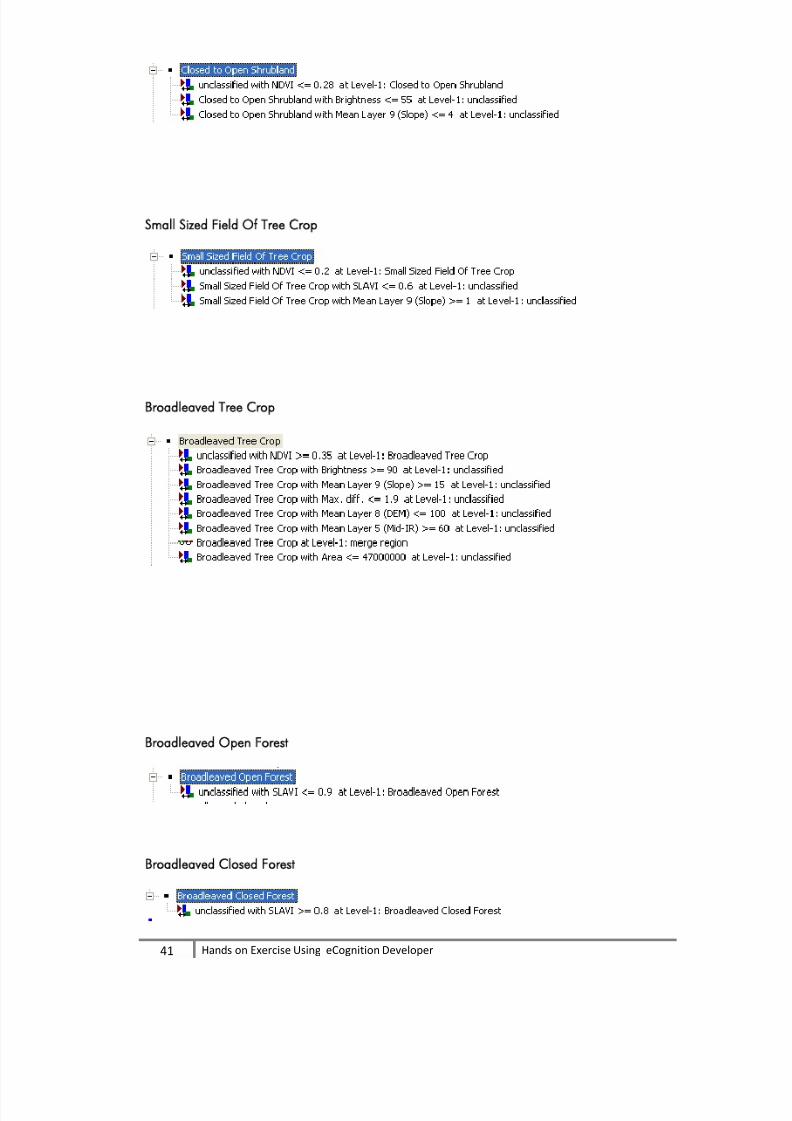
Closed to Open Shrubland
8/11/2019 Object Base Image Classifications Bangladesh
http://slidepdf.com/reader/full/object-base-image-classifications-bangladesh 41/58
41
Hands on Exercise Using eCognition Developer
Small Sized Field Of Tree Crop
Broadleaved Tree Crop
Broadleaved Open Forest
Broadleaved Closed Forest

8/11/2019 Object Base Image Classifications Bangladesh
http://slidepdf.com/reader/full/object-base-image-classifications-bangladesh 42/58
42
Hands on Exercise Using eCognition Developer
8/11/2019 Object Base Image Classifications Bangladesh
http://slidepdf.com/reader/full/object-base-image-classifications-bangladesh 43/58
43
Hands on Exercise Using eCognition Developer
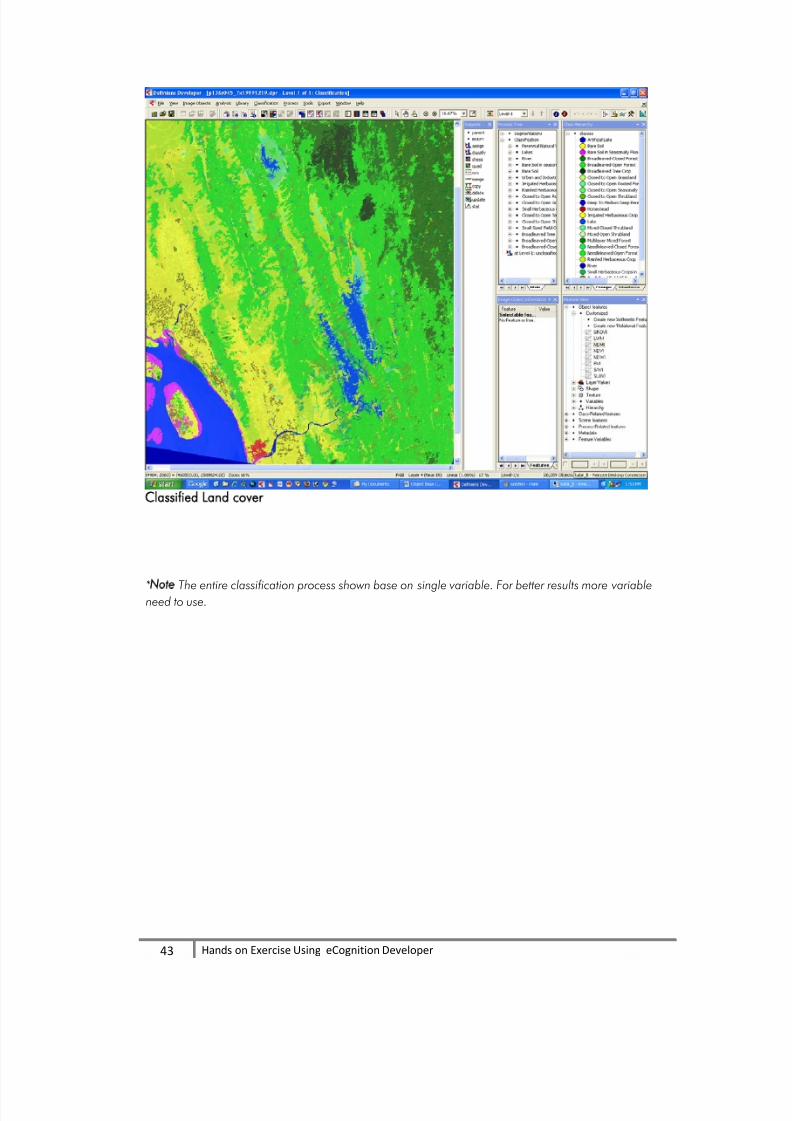
Classified Land cover
*Note The entire classification process shown base on single variable. For better results more variableneed to use.
8/11/2019 Object Base Image Classifications Bangladesh
http://slidepdf.com/reader/full/object-base-image-classifications-bangladesh 44/58
44
Hands on Exercise Using eCognition Developer
2.8 Manual Editing
Manual editing of image objects and thematic objects allows you to manually influence the
result of an image analysis. The main manual editing tools are Merge Objects Manually,
Classify Image Objects Manually and Cut an Object Manually.
While manual editing is not commonly used in automated image analysis, it can be applied to
highlight or reclassify certain objects or to quickly improve the analysis result without adjustingthe applied rule set.
To open the Manual Editing toolbar choose View > Toolbars > Manual Editing on the main
menu.
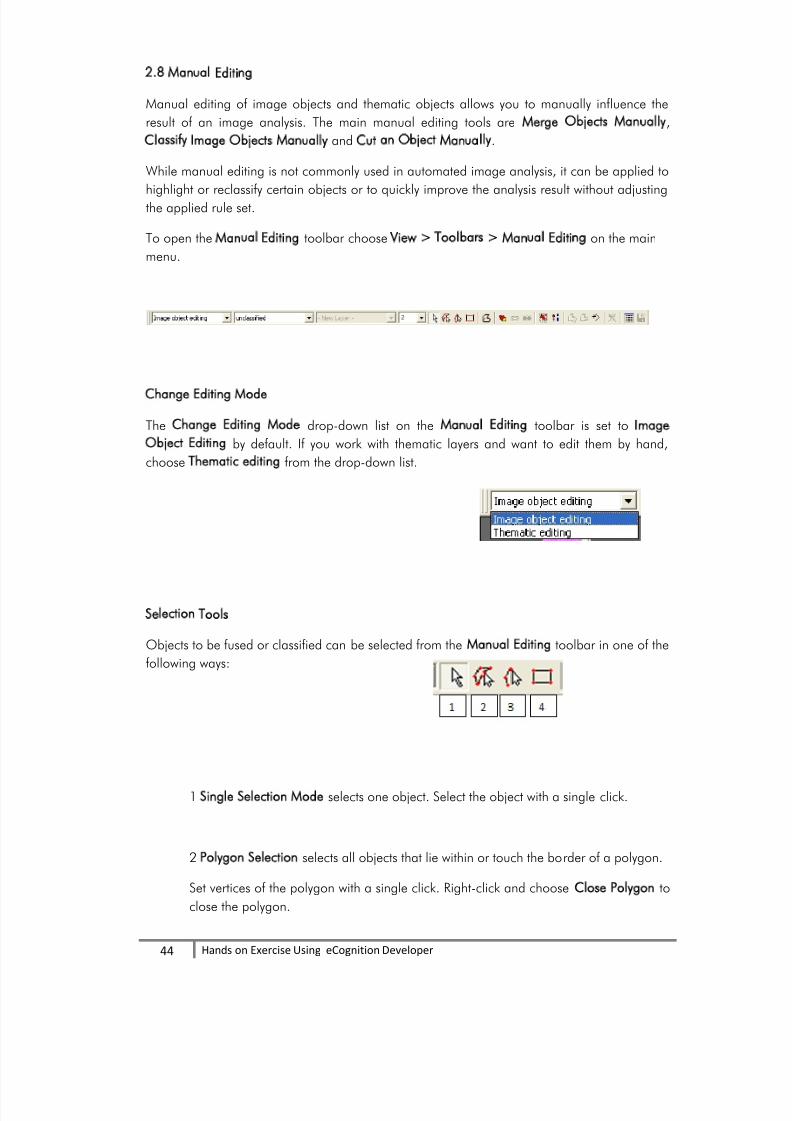
Change Editing Mode
The Change Editing Mode drop-down list on the Manual Editing toolbar is set to Image
Object Editing by default. If you work with thematic layers and want to edit them by hand,
choose Thematic editing from the drop-down list.
Selection Tools
Objects to be fused or classified can be selected from the Manual Editing toolbar in one of the
following ways:
1 Single Selection Mode selects one object. Select the object with a single click.
2 Polygon Selection selects all objects that lie within or touch the border of a polygon.
Set vertices of the polygon with a single click. Right-click and choose Close Polygon to
close the polygon.
8/11/2019 Object Base Image Classifications Bangladesh
http://slidepdf.com/reader/full/object-base-image-classifications-bangladesh 45/58
45
Hands on Exercise Using eCognition Developer
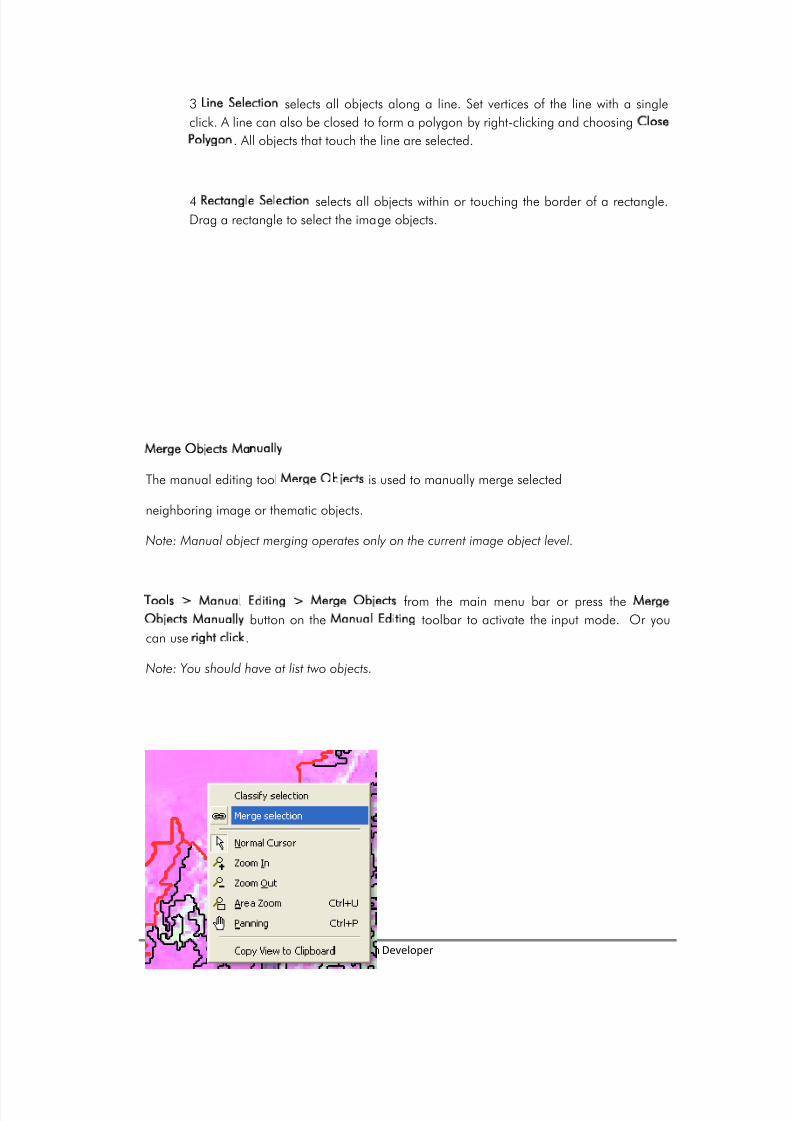
3 Line Selection selects all objects along a line. Set vertices of the line with a single
click. A line can also be closed to form a polygon by right-clicking and choosing Close
Polygon. All objects that touch the line are selected.
4 Rectangle Selection selects all objects within or touching the border of a rectangle.
Drag a rectangle to select the image objects.
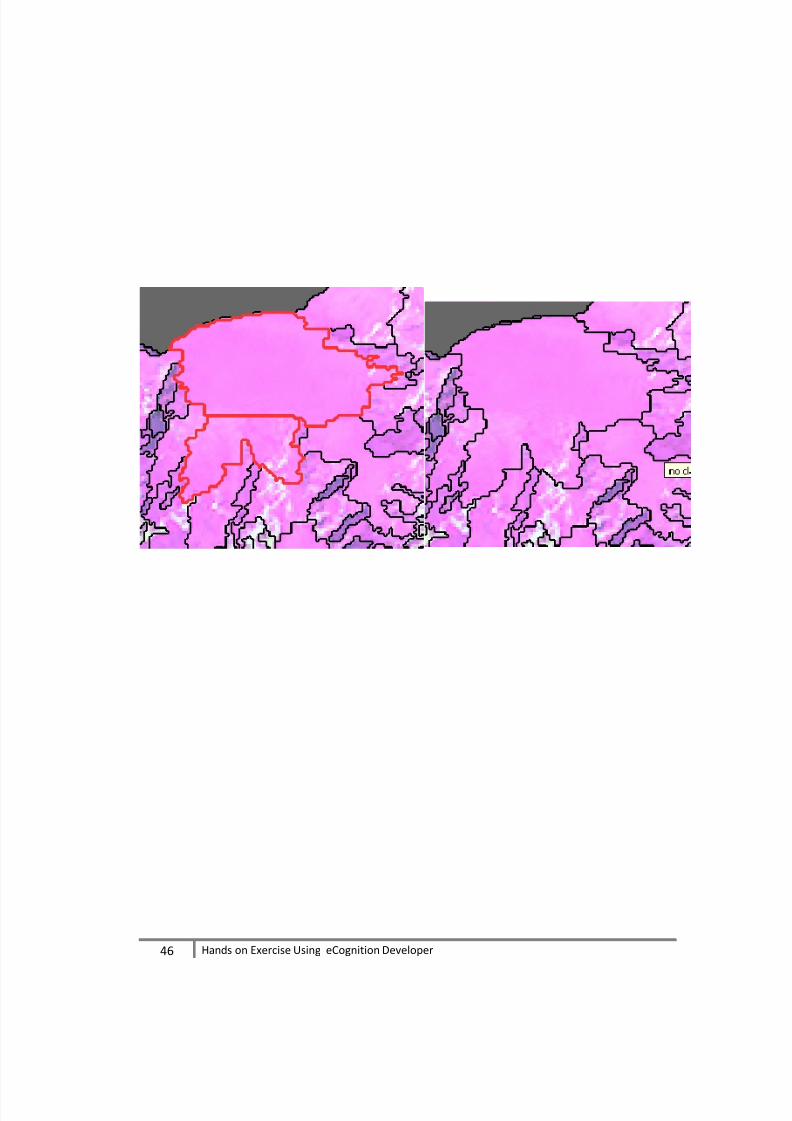
Merge Objects Manually
The manual editing tool Merge Objects is used to manually merge selected
neighboring image or thematic objects.
Note: Manual object merging operates only on the current image object level.
Tools > Manual Editing > Merge Objects from the main menu bar or press the Merge
Objects Manually button on the Manual Editing toolbar to activate the input mode. Or you
can use right click.
Note: You should have at list two objects.
8/11/2019 Object Base Image Classifications Bangladesh
http://slidepdf.com/reader/full/object-base-image-classifications-bangladesh 46/58
46
Hands on Exercise Using eCognition Developer
8/11/2019 Object Base Image Classifications Bangladesh
http://slidepdf.com/reader/full/object-base-image-classifications-bangladesh 47/58
47
Hands on Exercise Using eCognition Developer
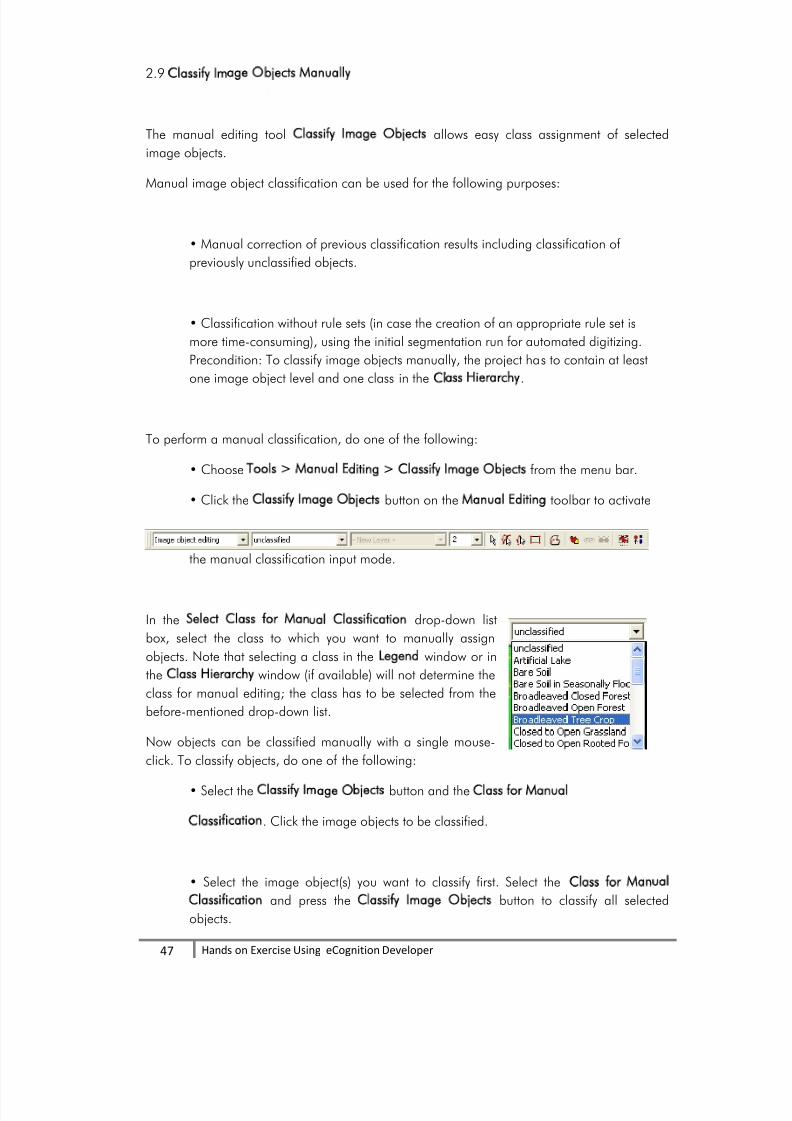
2.9 Classify Image Objects Manually
The manual editing tool Classify Image Objects allows easy class assignment of selected
image objects.
Manual image object classification can be used for the following purposes:
• Manual correction of previous classification results including classification of
previously unclassified objects.
• Classification without rule sets (in case the creation of an appropriate rule set is
more time-consuming), using the initial segmentation run for automated digitizing.
Precondition: To classify image objects manually, the project has to contain at least
one image object level and one class in the Class Hierarchy.
To perform a manual classification, do one of the following:
• Choose Tools > Manual Editing > Classify Image Objects from the menu bar.
• Click the Classify Image Objects button on the Manual Editing toolbar to activate
the manual classification input mode.
In the Select Class for Manual Classification drop-down list
box, select the class to which you want to manually assign
objects. Note that selecting a class in the Legend window or in
the Class Hierarchy window (if available) will not determine the
class for manual editing; the class has to be selected from the
before-mentioned drop-down list.
Now objects can be classified manually with a single mouse-
click. To classify objects, do one of the following:
• Select the Classify Image Objects button and the Class for Manual
Classification. Click the image objects to be classified.
• Select the image object(s) you want to classify first. Select the Class for Manual
Classification and press the Classify Image Objects button to classify all selected
objects.

8/11/2019 Object Base Image Classifications Bangladesh
http://slidepdf.com/reader/full/object-base-image-classifications-bangladesh 48/58
48
Hands on Exercise Using eCognition Developer
• Select one or more image objects, right-click into the image object(s) and select
Classify Selection from the context menu.
When the object is classified, it is painted in the color of the respective class.
If no class is selected, a mouse-click deletes the previous class assignment; the image object
becomes unclassified.
To undo a manual classification on a previously unclassified object, simply click the object a
second time. If the object was previously classified, then clicking again does not restore the
former classification; instead, the object becomes unclassified.
8/11/2019 Object Base Image Classifications Bangladesh
http://slidepdf.com/reader/full/object-base-image-classifications-bangladesh 49/58
49
Hands on Exercise Using eCognition Developer
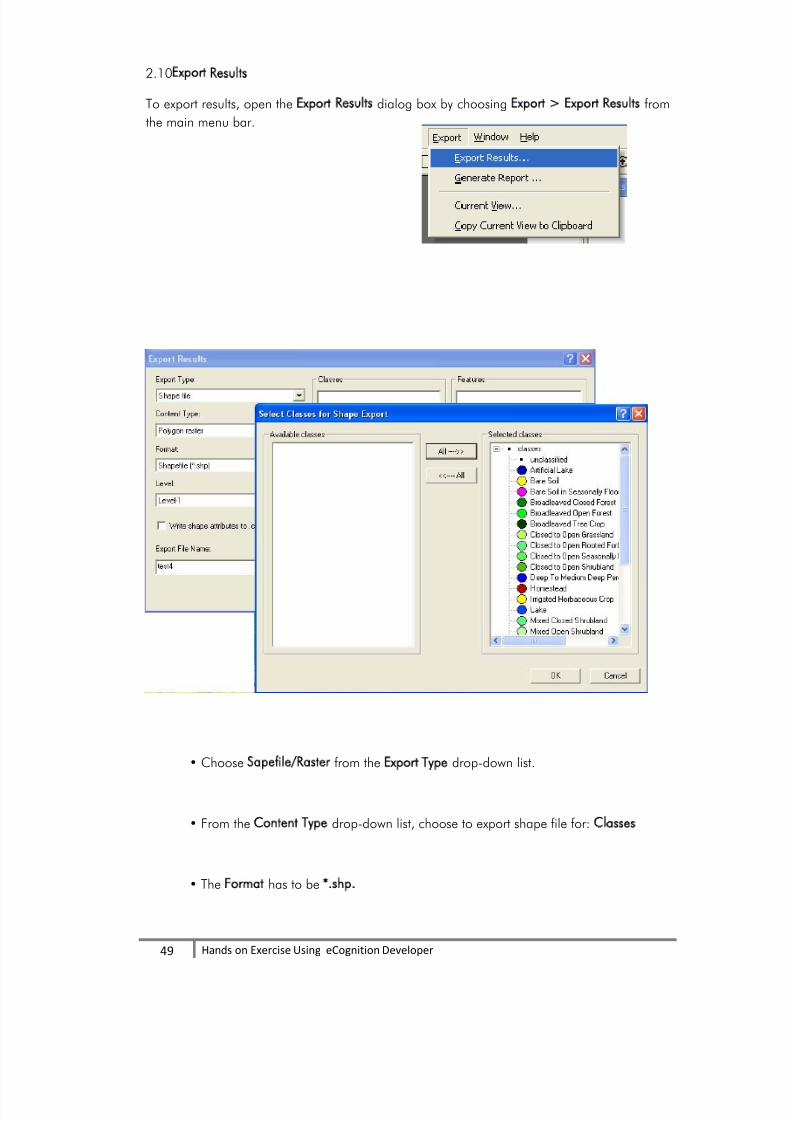
2.10Export Results
To export results, open the Export Results dialog box by choosing Export > Export Results from
the main menu bar.
• Choose Sapefile/Raster from the Export Type drop-down list.
• From the Content Type drop-down list, choose to export shape file for: Classes
• The Format has to be *.shp.
8/11/2019 Object Base Image Classifications Bangladesh
http://slidepdf.com/reader/full/object-base-image-classifications-bangladesh 50/58
50
Hands on Exercise Using eCognition Developer
• Select the image object Level for which you want to export results: Level-1.
• Change the default file name in the Export File Name text field if desired.
• To save the shape file to disk, press Export.
Note: Definiens Trial version cannot export the results
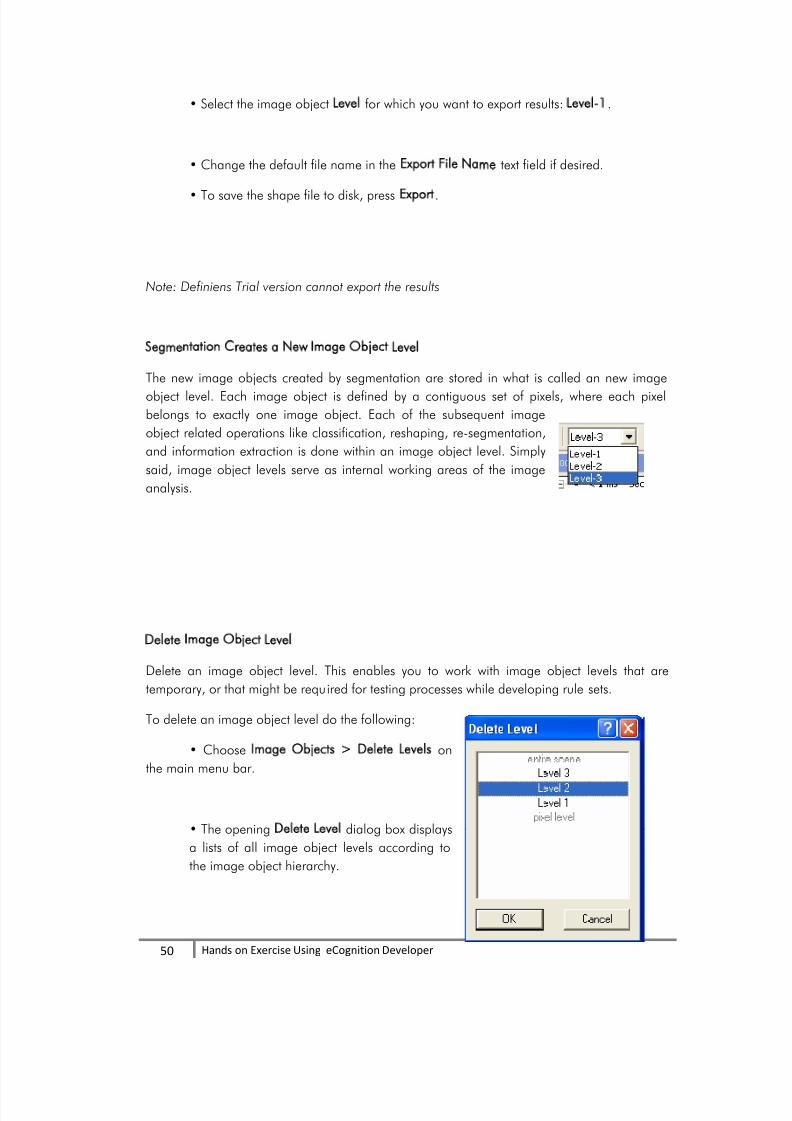
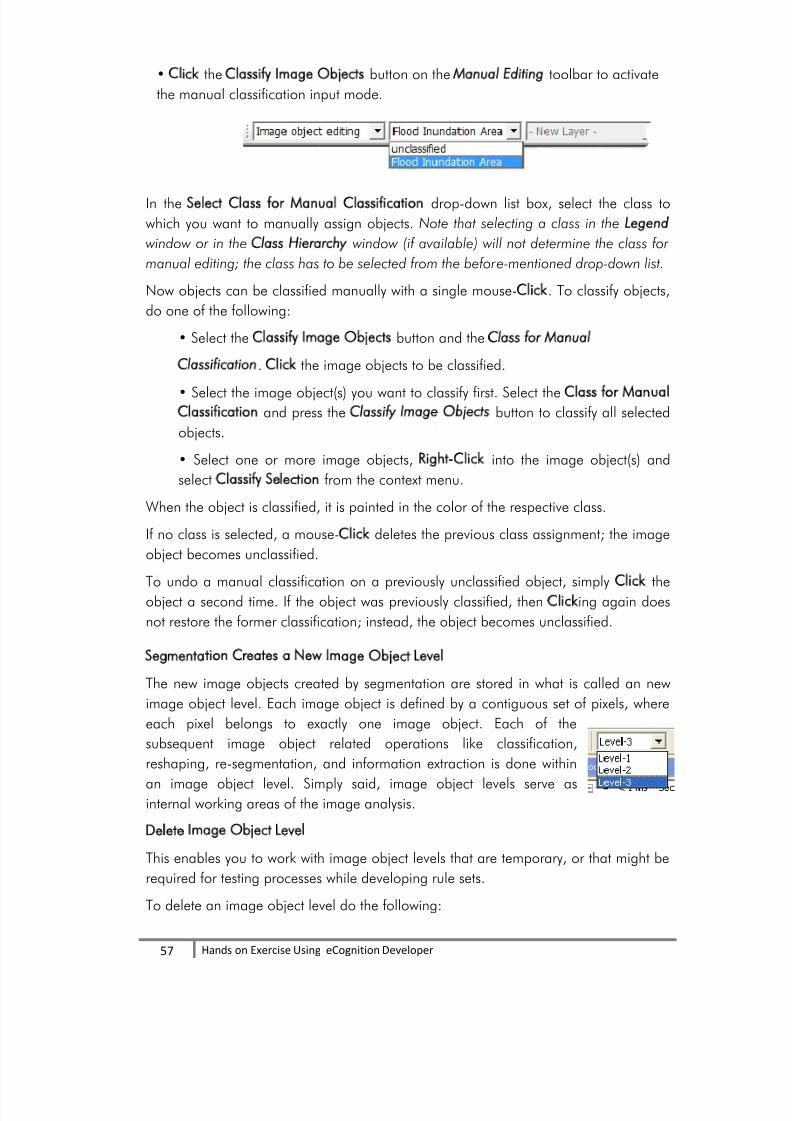
Segmentation Creates a New Image Object Level
The new image objects created by segmentation are stored in what is called an new image
object level. Each image object is defined by a contiguous set of pixels, where each pixelbelongs to exactly one image object. Each of the subsequent image
object related operations like classification, reshaping, re-segmentation,
and information extraction is done within an image object level. Simply
said, image object levels serve as internal working areas of the image
analysis.
Delete Image Object Level
Delete an image object level. This enables you to work with image object levels that are
temporary, or that might be required for testing processes while developing rule sets.
To delete an image object level do the following:
• Choose Image Objects > Delete Levels on
the main menu bar.
• The opening Delete Level dialog box displays
a lists of all image object levels according to
the image object hierarchy.

8/11/2019 Object Base Image Classifications Bangladesh
http://slidepdf.com/reader/full/object-base-image-classifications-bangladesh 51/58
51
Hands on Exercise Using eCognition Developer
• Select the image object level to be deleted
• Confirm with OK. The selected image object levels will be removed from the image
object hierarchy.

8/11/2019 Object Base Image Classifications Bangladesh
http://slidepdf.com/reader/full/object-base-image-classifications-bangladesh 52/58
52
Hands on Exercise Using eCognition Developer
Satellite Sensor Band Resolution
Landsat ETM+ Band 1 0.45 - 0.52 μm (Blue)
Band 2 0.52 - 0.60 μm (Green)
Band 3 0.63 - 0.69 μm (Red)
Band 4 0.75 - 0.90 μm (NIR)
Band 5 1.55 - 1.75 μm (IR)
Band 6 10.4 - 12.50 μm (TIR)
Band 7 2.08 - 2.35 μm (NIR)
Band 8 0.52 - 0.90 μm (Pan)
30 meter
30 meter
30 meter
30 meter
30 meter
60 meter
30 meter
15 meter
Normalized Difference Vegetative Index (NDVI)
NDVI = (NIR - red) / (NIR + red)
(ETM+) NDVI = (Band 4 - Band 3) / (Band 4 + Band 3)
Normalized Difference Snow/Ice Index (NDSII)
NDSII = (green – infra-red) / (green + infra-red)
(ETM+) NDSII = (Band 2 - Band 5) / (Band 2 + Band 5)
Land and Water Masks (LWM)
Water Mask = infra-red) / (green + .0001) * 100
(ETM+) Water Mask = Band 5) / (Band 2 + .0001) * 100
Modification of Normalized Difference Water Index (NDWI)
NDWI=(NIR – IR / (NIR + IR)
(ETM+) NDWI = (Band 4 - Band 5) / (Band 4 + Band 5)
Normalized Burn Ratio
NBR=(NIR – TIR) / (NIR + TIR)
8/11/2019 Object Base Image Classifications Bangladesh
http://slidepdf.com/reader/full/object-base-image-classifications-bangladesh 53/58
53
Hands on Exercise Using eCognition Developer
(ETM+) NBR = (Band 4 - Band 7) / (Band 4 + Band 7)
Ratio vegetation index
RVI=NIR / red
(ETM+) RVI = Band 4 / Band 3
Green normalized difference vegetation index
GNDVI=(NIR - Green) ÷ (NIR + Green)
(ETM+) GNDVI = (Band 4 - Band 2) / (Band 4 + Band 2)
Specific leaf area vegetation index (SLAVI)
SLAVI = NIR ÷ (Red + infra-red)
(ETM+) SLAVI = Band 4 / (Band 3 + Band 5)
Normalized Difference Moisture Index (NDMI)
NDMI = (NIR-IR)/ (NIR+IR)
(ETM+) NDMI = (Band 4 - Band 5) / (Band 4 + Band 5)
8/11/2019 Object Base Image Classifications Bangladesh
http://slidepdf.com/reader/full/object-base-image-classifications-bangladesh 54/58
54
Hands on Exercise Using eCognition Developer
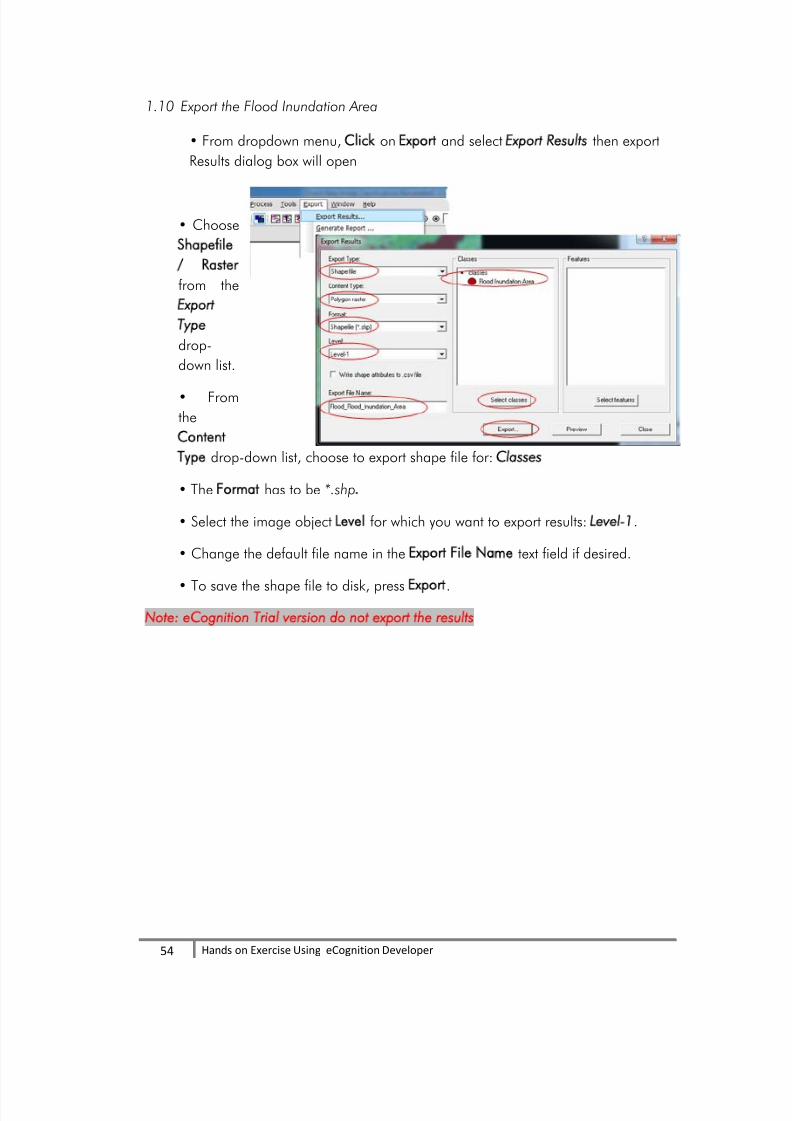
1.10
Export the Flood Inundation Area
• From dropdown menu, Click on Export and select Export Results then export
Results dialog box will open
• Choose
Shapefile
/ Raster
from the
Export
Type
drop-
down list.
• From
the
Content
Type drop-down list, choose to export shape file for: Classes
• The Format has to be *.shp.
• Select the image object Level for which you want to export results: Level-1.
• Change the default file name in the Export File Name text field if desired.
• To save the shape file to disk, press Export.
Note: eCognition Trial version do not export the results
8/11/2019 Object Base Image Classifications Bangladesh
http://slidepdf.com/reader/full/object-base-image-classifications-bangladesh 55/58
55
Hands on Exercise Using eCognition Developer
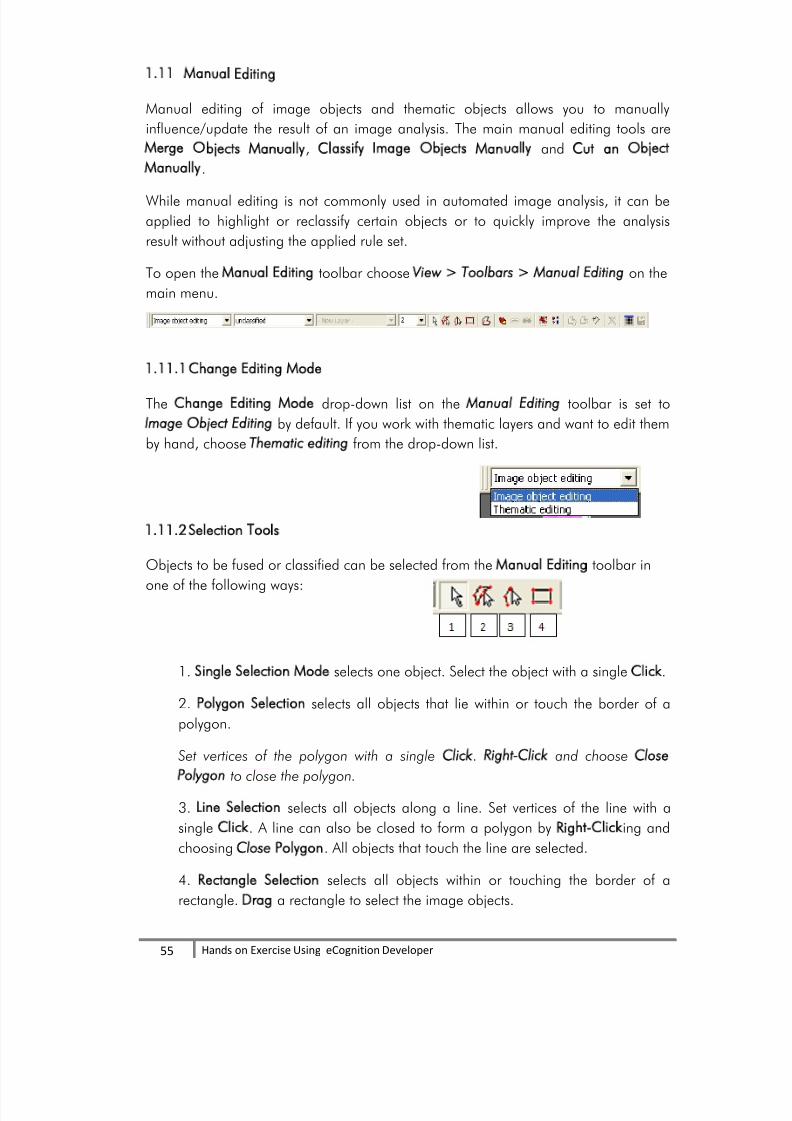
1.11 Manual Editing
Manual editing of image objects and thematic objects allows you to manually
influence/update the result of an image analysis. The main manual editing tools are
Merge Objects Manually, Classify Image Objects Manually and Cut an Object
Manually.
While manual editing is not commonly used in automated image analysis, it can be
applied to highlight or reclassify certain objects or to quickly improve the analysis
result without adjusting the applied rule set.
To open the Manual Editing toolbar choose View > Toolbars > Manual Editing on the
main menu.
1.11.1
Change Editing Mode
The Change Editing Mode drop-down list on the Manual Editing toolbar is set to
Image Object Editing by default. If you work with thematic layers and want to edit them
by hand, choose Thematic editing from the drop-down list.
1.11.2
Selection Tools
Objects to be fused or classified can be selected from the Manual Editing toolbar in
one of the following ways:
1. Single Selection Mode selects one object. Select the object with a single Click.
2. Polygon Selection selects all objects that lie within or touch the border of a
polygon.
Set vertices of the polygon with a single Click. Right-Click and choose Close
Polygon to close the polygon.
3. Line Selection selects all objects along a line. Set vertices of the line with a
single Click. A line can also be closed to form a polygon by Right-Clicking and
choosing Close Polygon. All objects that touch the line are selected.
4. Rectangle Selection selects all objects within or touching the border of a
rectangle. Drag a rectangle to select the image objects.
8/11/2019 Object Base Image Classifications Bangladesh
http://slidepdf.com/reader/full/object-base-image-classifications-bangladesh 56/58
56
Hands on Exercise Using eCognition Developer
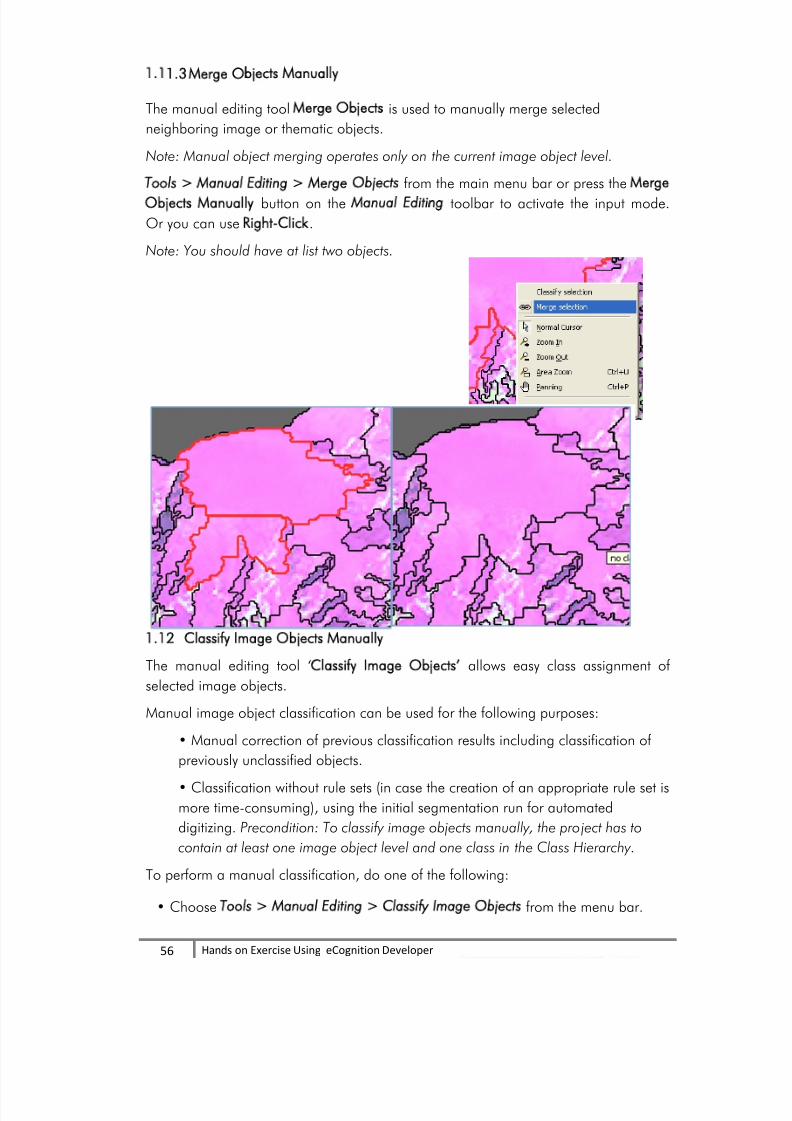
1.11.3 Merge Objects Manually
The manual editing tool Merge Objects is used to manually merge selected
neighboring image or thematic objects.
Note: Manual object merging operates only on the current image object level.
Tools > Manual Editing > Merge Objects from the main menu bar or press the Merge
Objects Manually button on the Manual Editing toolbar to activate the input mode.
Or you can use Right-Click.
Note: You should have at list two objects.
1.12
Classify Image Objects Manually
The manual editing tool ‘Classify Image Objects’ allows easy class assignment of
selected image objects.
Manual image object classification can be used for the following purposes:
• Manual correction of previous classification results including classification of
previously unclassified objects.
• Classification without rule sets (in case the creation of an appropriate rule set ismore time-consuming), using the initial segmentation run for automated
digitizing. Precondition: To classify image objects manually, the project has to
contain at least one image object level and one class in the Class Hierarchy.
To perform a manual classification, do one of the following:
• Choose Tools > Manual Editing > Classify Image Objects from the menu bar.
8/11/2019 Object Base Image Classifications Bangladesh
http://slidepdf.com/reader/full/object-base-image-classifications-bangladesh 57/58
57
Hands on Exercise Using eCognition Developer
• Click the Classify Image Objects button on the Manual Editing toolbar to activate
the manual classification input mode.
In the Select Class for Manual Classification drop-down list box, select the class to
which you want to manually assign objects. Note that selecting a class in the Legend
window or in the Class Hierarchy window (if available) will not determine the class for
manual editing; the class has to be selected from the before-mentioned drop-down list.
Now objects can be classified manually with a single mouse-Click. To classify objects,
do one of the following:
• Select the Classify Image Objects button and the Class for Manual
Classification. Click the image objects to be classified.
• Select the image object(s) you want to classify first. Select the Class for Manual
Classification and press the Classify Image Objects button to classify all selected
objects.
• Select one or more image objects, Right-Click into the image object(s) and
select Classify Selection from the context menu.
When the object is classified, it is painted in the color of the respective class.
If no class is selected, a mouse-Click deletes the previous class assignment; the image
object becomes unclassified.
To undo a manual classification on a previously unclassified object, simply Click theobject a second time. If the object was previously classified, then Clicking again does
not restore the former classification; instead, the object becomes unclassified.
Segmentation Creates a New Image Object Level
The new image objects created by segmentation are stored in what is called an new
image object level. Each image object is defined by a contiguous set of pixels, where
each pixel belongs to exactly one image object. Each of the
subsequent image object related operations like classification,
reshaping, re-segmentation, and information extraction is done within
an image object level. Simply said, image object levels serve asinternal working areas of the image analysis.
Delete Image Object Level
This enables you to work with image object levels that are temporary, or that might be
required for testing processes while developing rule sets.
To delete an image object level do the following:

8/11/2019 Object Base Image Classifications Bangladesh
http://slidepdf.com/reader/full/object-base-image-classifications-bangladesh 58/58
2
References and Useful links
User Guide eCognition Developer www.ecognition.com/
Global
Land
Cover
Facility
http://www.glcf.umd.edu/index.shtml
Global SRTM Datasets http://srtm.csi.cgiar.org/
International Centre for Integrated Mountain Development http://www.icimod.org
Mountain
Geoportal
http://geoportal.icimod.org
Satellite imagery http://edcsns17.cr.usgs.gov/NewEarthExplorer/
Satellite imagery http://glovis.usgs.gov/