object properties 6 - e-learning · pdf filee-learning uncovered: articulate storyline 2 shape...
TRANSCRIPT

CHAPTER
IntroductionYou’ve already learned how to add text boxes and graphics such as photos, shapes, and illustrated characters. In this chapter, you’ll learn about properties that apply to these objects, as well as object types that you’ll learn about in later chapters (such as buttons).
In This Chapter• Managing Objects• Selecting Colors• Formatting Objects• The Timeline• Timing Objects• Alt Text• Animations• Motion Paths
6Object
Properties
This is a free excerpt from E-Learning Uncovered: Articulate Storyline 2, copyright 2014 Alcorn, Ward, & Partners, Inc. This sample chapter may be printed, copied, and distributed in its entirety. All other rights reserved.
For more information about this or other books in the E-Learning Uncovered series, go to:www.elearninguncovered.com.

62 E-Learning Uncovered: Articulate Storyline 2
Notes

63Object Properties
You can select objects either in the slide area or in the timeline.
On the Slide• Select a single object by clicking on it.• Select multiple objects by holding the Ctrl or
Shift key down while clicking on them, or by dragging your mouse around the objects.
In the Timeline• Select a single object by clicking it in the
timeline.• Select multiple objects by holding the Ctrl key
down while clicking on them individually.• Select consecutive items on the timeline by
clicking the first object, holding down the Shift key, and then clicking the last object.
You can cut, copy, and paste objects using the following methods:
• Right-click the object on the slide or the timeline, and select Cut, Copy, or Paste.
• Select the object(s), and use the tools on the Home tab.
• Select the object(s), and press the keyboard shortcut.Cut = Ctrl + XCopy = Ctrl + CPaste = Ctrl + V
• Duplicate an object (copy and paste in the same action) by pressing the Ctrl key while you drag it. You can also duplicate objects by pressing Ctrl + D or clicking the Copy drop-down arrow and selecting Duplicate.
Cut, Copy, Paste, and Duplicate Objects
Select Objects
To delete an object, select it, and press the Delete key on your keyboard.
Delete Objects
TIME SAVERClick anywhere in the slide area and press Ctrl + A to select all objects on a slide.
1st and 3rd items selected using the Ctrl key.
1st and 3rd items selected using the Shift key
64 E-Learning Uncovered: Articulate Storyline 2
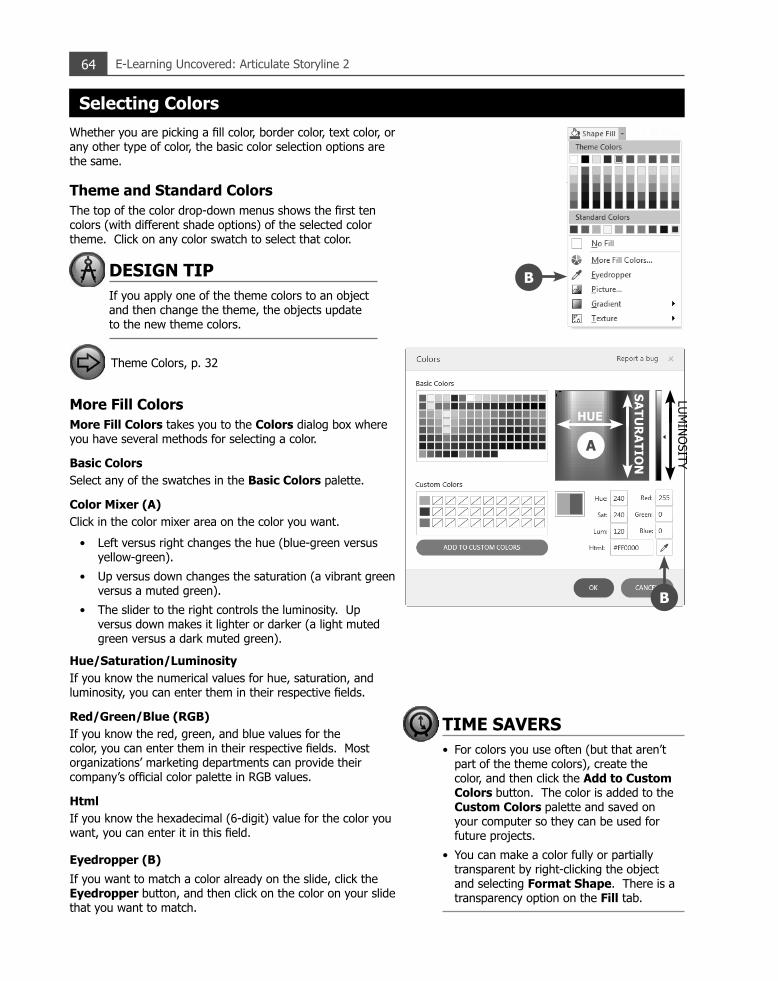
Whether you are picking a fill color, border color, text color, or any other type of color, the basic color selection options are the same.
Theme and Standard ColorsThe top of the color drop-down menus shows the first ten colors (with different shade options) of the selected color theme. Click on any color swatch to select that color.
Theme Colors, p. 32
More Fill ColorsMore Fill Colors takes you to the Colors dialog box where you have several methods for selecting a color.
Basic ColorsSelect any of the swatches in the Basic Colors palette.
Color Mixer (A)Click in the color mixer area on the color you want.
• Left versus right changes the hue (blue-green versus yellow-green).
• Up versus down changes the saturation (a vibrant green versus a muted green).
• The slider to the right controls the luminosity. Up versus down makes it lighter or darker (a light muted green versus a dark muted green).
Hue/Saturation/LuminosityIf you know the numerical values for hue, saturation, and luminosity, you can enter them in their respective fields.
Red/Green/Blue (RGB)If you know the red, green, and blue values for the color, you can enter them in their respective fields. Most organizations’ marketing departments can provide their company’s official color palette in RGB values.
HtmlIf you know the hexadecimal (6-digit) value for the color you want, you can enter it in this field.
Eyedropper (B)If you want to match a color already on the slide, click the Eyedropper button, and then click on the color on your slide that you want to match.
Selecting Colors
DESIGN TIPIf you apply one of the theme colors to an object and then change the theme, the objects update to the new theme colors.
TIME SAVERS• For colors you use often (but that aren’t
part of the theme colors), create the color, and then click the Add to Custom Colors button. The color is added to the Custom Colors palette and saved on your computer so they can be used for future projects.
• You can make a color fully or partially transparent by right-clicking the object and selecting Format Shape. There is a transparency option on the Fill tab.
HUE
SATURATIO
N
LUMINOSITY
A
B
B

65Object Properties
Some color menus, such as fonts, only allow for a solid fill. Other palettes, such as most fill colors, give you a variety of fill options including gradient, picture, texture, or pattern.
To apply a dark or light gradient of the current color:1. Click the color menu for the object you are working
with.2. Select the main color for the gradient, using one of
the options on the previous page.3. Click the color menu again.4. Select Gradient.5. Select the light or dark gradient you want.
To apply a preset gradient:1. Click the color menu.2. Select Gradient.3. Select More Gradients. (A)4. Click the Preset colors drop-down menu. (B)5. Select the gradient pattern you want.6. Select the gradient type you want.7. Select the gradient direction you want.8. Click the Close button.
Fill Options: Gradients
POWER TIPS• You can also create your own custom
gradient in the Format Shapes dialog box. Use the gradient stops (C) to create your own gradient pattern.
• If there is certain formatting (fill, outline, effects, etc.) you expect to use the most, you can set it as the default for that object type (shape, text box, button, etc.) Format the object, right-click it, and select Set as Default. Then, when you add a new object of that type, it uses your default formatting.
B
C
A

66 E-Learning Uncovered: Articulate Storyline 2
Fill Options: TextureTo fill an object with a texture:
1. Click the color menu for the object you want.2. Select Texture.3. Select the texture option you want.
To fill an object with a picture:1. Click the color menu for the object you want.2. Select Picture.3. Find and select the picture you want.4. Click the Open button.
Fill Options: Picture
POWER TIPRight-click a picture-filled object, and select Format Shape for advanced options such as tiling a picture to create a pattern.
Original image
Pattern created from tiling the image

67Object Properties
Outline formats are used for many object types, such as text boxes, pictures, shapes, buttons, lines, and arrows.
ColorsTheme, Standard, and More color options work as described on page 64.
WeightUse the Weight sub-menu to select line thickness, or select More Lines to enter your own weight and other options such as end shape and arrow type.
DashesIf you want a dashed line, select an option from the Dashes sub-menu, or select More Lines for additional options.
Outline Formatting
POWER TIPYou can also right-click a line to get to the Format Shapes dialog box that has the advanced line options. In addition to the Line Style tab, use the Line Color tab to apply gradients or transparency to your lines.

68 E-Learning Uncovered: Articulate Storyline 2
Shape effects, which are also used for pictures, let you apply creative effects.
ShadowUse the sub-menu to pick from a gallery of shadow options, or select Shadow Options at the bottom of the menu to create your own shadow.
ReflectionCreate a reflection using the sub-menu, selecting the size of the reflection and the distance from the object.
GlowUse the gallery to select the size and color of the glow. The color options are based on your color theme.
Soft EdgesUse these effects to create a “fuzzy” edge for your graphic.
Shape Effects
TIME SAVERYou can copy and paste formatting from one object to another. Select the object with the formatting you want to copy. Click the Format Painter button on the Home tab. Click the object you want to paste the formatting to.You can also copy formatting by pressing Shift + Ctrl + C and paste it by pressing Shift + Ctrl + V.

69Object Properties
The Timeline
The Timeline panel at the bottom of the slide view interface has a number of useful features. You can:
• Select: Select objects (covered on page 63).• Play: Play the slide by clicking the Play button at the
bottom.• Show/Hide: Show or hide objects by clicking the
Show/Hide icon for that object. Hiding unneeded objects while you work can be helpful so you can focus on what you do need.
• Lock/Unlock: Lock objects in place by clicking the Lock/Unlock icon for that object. Locking an object can help keep you from accidentally moving, deleting or changing an object. When an object is locked, you can’t even select it.
• Rename: Change the name of an object by double-clicking the name and typing a new name.
• Stacking Order: Adjust the front-to-back stacking order of objects by dragging an object higher (bring forward) or lower (send backwards) on the timeline.
Stacking Order, p. 84
• Time: Adjust the timing (start time, end time, and duration) for objects to appear on the slide (covered on the next page.)
CAUTIONObjects that are hidden on the timeline will not appear on your slide when you preview or publish.
BRIGHT IDEAS• If you have lots of overlapping objects,
it can be much easier to select them in the timeline than on the slide itself.
• Click the icons at the top of the show/hide or lock/unlock column to change that setting for all slide objects at once.
• Giving your objects logical names helps you find what you want more easily, especially if you have to later select one from a drop-down list.
• If you are making an accessible course, the object name for graphics becomes the default alt text for that object.
Alt text, p. 72
Play | Stop | Zoom Timeline
Show/Hide
Lock/Unlock
Object name
Stacking orderDuration
Playhead
End of slide

70 E-Learning Uncovered: Articulate Storyline 2
Adjust Timing of Slide Elements
Timing ObjectsA slide plays like a movie along the timeline. Once your objects are on the slide, you may want to time them to appear in the appropriate sequence and to stay on-screen for the appropriate length of time. For example, you may want to have a montage of images where each image appears as the previous one fades, or you may want to have text boxes appear in time with the audio. On the timeline for each slide, you can quickly adjust the start, duration, and finish of each slide object as well as the length of the slide as a whole.
To adjust timing on the timeline tab, do any of the following:
• Drag the left edge of an item (A) to adjust the start time.
• Drag the right edge of an item to adjust the end time.
• Drag the entire object to move it to a different place on the timeline.
• Right-click the object in the timeline and select one of the timing options.
Align to Playhead: Click this button to start the object wherever you currently have the playhead (B) on the Timeline.Show Until End: “Lock” the end of the object to the end of the slide. If you change the length of the slide, the length of the object is adjusted accordingly.Show Always: “Lock” the start of the object to the start of the slide and the end of the object to the end of the slide.Timing: Select this option to bring up a dialog box that lets you set up the timing numerically.
• Click and drag the End line (C) to shorten or lengthen the overall slide.
ABC
< Right-click menu
71Object Properties
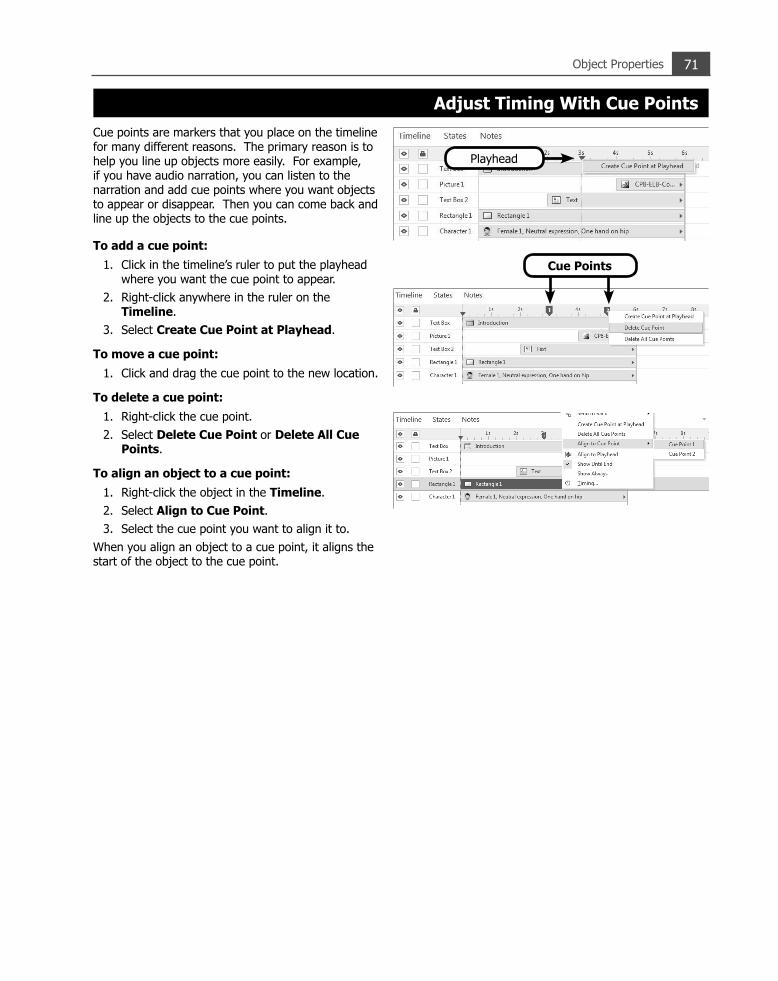
Cue points are markers that you place on the timeline for many different reasons. The primary reason is to help you line up objects more easily. For example, if you have audio narration, you can listen to the narration and add cue points where you want objects to appear or disappear. Then you can come back and line up the objects to the cue points.
To add a cue point:1. Click in the timeline’s ruler to put the playhead
where you want the cue point to appear.2. Right-click anywhere in the ruler on the
Timeline.3. Select Create Cue Point at Playhead.
To move a cue point:1. Click and drag the cue point to the new location.
To delete a cue point:1. Right-click the cue point.2. Select Delete Cue Point or Delete All Cue
Points.
To align an object to a cue point:1. Right-click the object in the Timeline.2. Select Align to Cue Point.3. Select the cue point you want to align it to.
When you align an object to a cue point, it aligns the start of the object to the cue point.
Adjust Timing With Cue Points
Playhead
Cue Points

72 E-Learning Uncovered: Articulate Storyline 2
To change the object name in the timeline:1. Double-click the name in the timeline. (A) 2. Type the new name.
To add detailed alt text:1. Right-click the object on the slide.2. Select Size and Position. (B)3. Click the Alt Text tab. (C)4. Enter your text in the Alternative text field.
To turn off alt text:1. Right-click the object on the slide.2. Select Size and Position. (B)3. Click the Alt Text tab. (C)4. Uncheck the Object is visible to accessibility
tools checkbox.
Customize Alt Text
Alt TextAlt text, or alternative text, is primarily for people needing assistive technology, such as a screen reader, to take your course. For students who cannot see the screen, the screen reader reads the alt text, which should describe the visual elements. For an accessible course, you’ll want to add descriptive alt text to any visual content. (Text boxes do not need alt text, as the text itself is read by the screen reader.) Storyline has three options for alt text:
• Object name: By default, the object name in the timeline is used for alt text. Changing the text here is the quickest option. It works best when the description is short.
• Detailed alt text: When you need more than just a few words to properly describe a visual element (such as a diagram), you can enter additional text in a dialog box.
• No alt text: For visual elements that contain no meaningful content (such as a line separating two parts of a screen), you can turn off the alt text completely so that the screen reader can skip it.
Accessibility/Section 508, p. 251
TIME SAVERYou can also get to the Size and Position dialog box by selecting an object and then clicking Ctrl + Shift + Enter.
C
Good option for object name >
Good option for detailed alt text >
Good option for no alt text >
A
B

73Object Properties
Add an Animation
AnimationsAnimations in Storyline are similar in concept to animations in PowerPoint. Entrance animations occur when an object appears as the timeline plays. Exit animations occur when an object disappears as the Timeline plays or when the slide is over, if the object shows for the rest of the slide. You can apply one entrance animation and one exit animation for each object.
To add an animation to an object:1. Select the object.2. Go to the Animations tab.3. Click the button for an entrance (A) or exit (B)
animation.4. Select the animation you want.5. Adjust the Duration of the animation.6. Select the Effect Options menu.7. Select the direction for the animation.
Options• Some animations include additional effect
options in the Effect Options menu.• You can select more than one object at a time
when you are applying animations. • To remove an animation, select the object, click
the appropriate animation button, and select No Animation.
A B
2NEW!
TIME SAVERYou can copy and paste animations from one object to another. Select the object with the animation you want to copy. Click the Animation Painter button on the Animations tab. Click the object you want to paste the animation to.The animation painter also works with motion paths.
Motion Paths, p. 74
2NEW!
DESIGN TIPIf you apply an animation to a text box or shape with text, you can choose to have the whole object animate at once or to have each paragraph animate individually.From the Effect Options drop-down menu, select As one Object or By Paragraph.When you animate by paragraph, click the Expand icon that appears for that object in the timeline. Each paragraph is now an individual object on the timeline that can be moved independently from the others.
74 E-Learning Uncovered: Articulate Storyline 2
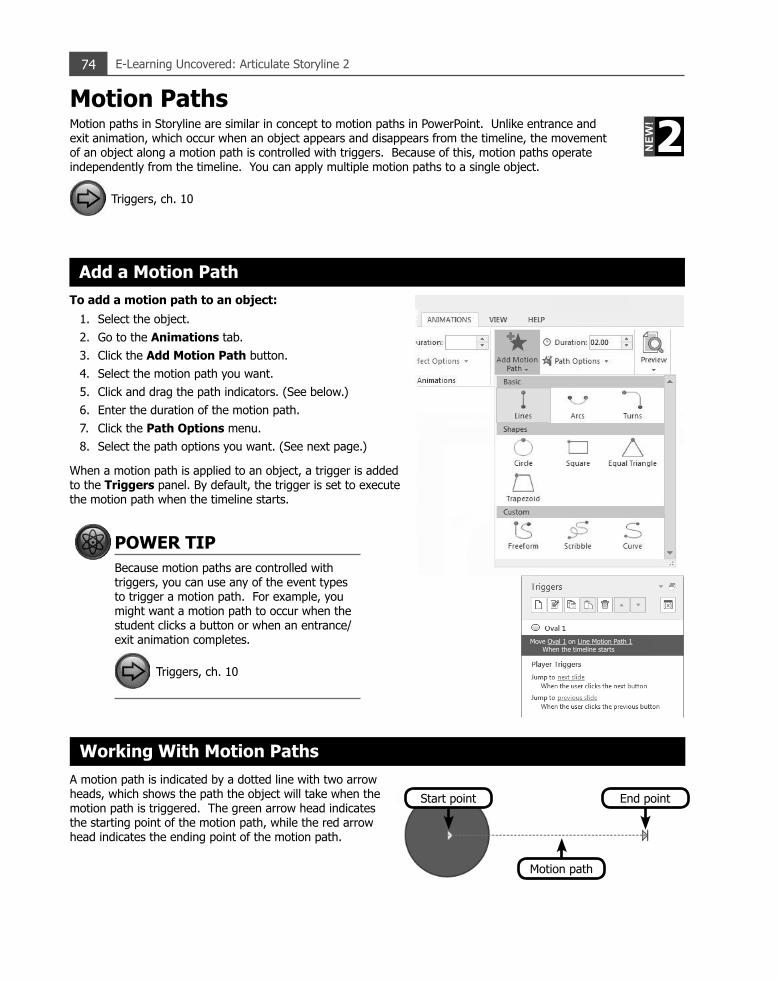
Motion PathsMotion paths in Storyline are similar in concept to motion paths in PowerPoint. Unlike entrance and exit animation, which occur when an object appears and disappears from the timeline, the movement of an object along a motion path is controlled with triggers. Because of this, motion paths operate independently from the timeline. You can apply multiple motion paths to a single object.
Triggers, ch. 10
Add a Motion PathTo add a motion path to an object:
1. Select the object.2. Go to the Animations tab.3. Click the Add Motion Path button.4. Select the motion path you want.5. Click and drag the path indicators. (See below.)6. Enter the duration of the motion path.7. Click the Path Options menu.8. Select the path options you want. (See next page.)
When a motion path is applied to an object, a trigger is added to the Triggers panel. By default, the trigger is set to execute the motion path when the timeline starts.
POWER TIPBecause motion paths are controlled with triggers, you can use any of the event types to trigger a motion path. For example, you might want a motion path to occur when the student clicks a button or when an entrance/exit animation completes.
Triggers, ch. 10
2NEW!
Working With Motion PathsA motion path is indicated by a dotted line with two arrow heads, which shows the path the object will take when the motion path is triggered. The green arrow head indicates the starting point of the motion path, while the red arrow head indicates the ending point of the motion path.
Motion path
Start point End point
Move Oval 1 on Line Motion Path 1 When the timeline starts

75Object Properties
Working With Motion Paths (cont’d)When you click on a motion path, a semi-transparent image of the object appears, showing where the object will end up once the motion path finishes.
To remove a motion path:1. Click the motion path (dotted line) you want to remove.2. Press the Delete key on your keyboard.
CAUTIONWith entrance and exit animations, you can change the effect by going back to the Animations tab and selecting a different option. However, with motion paths, each time you go back to the Animations tab and select a different option, you add an additional motion path to the object. So if you want to change the type of motion path, you must first delete the one you don’t want and then add the one you do want.
Object with motion path unselected
Object with motion path selected
Motion Path OptionsDirectionTo change the direction a motion path:
1. Select the motion path.2. Click the Path Options button.3. Select the direction for the motion path.——— or ——— 1. Select the motion path.2. Click and drag the end point to the location you want.
Origin Locked/UnlockedWhen you lock a motion path, the path stays in the same place even if you move the object somewhere else on the slide. When you do this, the object stays in place until the motion path is triggered. Then, it jumps to the location where the motion path starts and follows the path.
Object with multiple motion paths

76 E-Learning Uncovered: Articulate Storyline 2
Configure Path Options (cont’d)Easing Direction and SpeedEasing refers to the gradual speed at which an object moves at the beginning and end of a motion path. Use these options to control whether the speed of the object eases in, out, or both; as well as the overall speed of the easing effect.
DESIGN TIPEasing can help make the movement of an object along a motion path appear more natural and less abrupt. For example, a falling object or a cannonball accelerates from a standstill (easing into its speed).
Reverse Path DirectionUse this option to reverse the direction of the motion path. When you select this option, the object begins in its normal position on the slide. Then, when the motion path is triggered, the object jumps to the end point of the motion path and works its way back to the original position.
Relative Start PositionIf you have multiple motion paths on an object that trigger at different times, the object goes back to its original position at the start of each motion path trigger. However, you might want to start the new motion path where the last one left off. If you do, then select Relative Start Position from the drop-down menu.
Object with reversed motion path