objective-c versus java for smart phone applications · objective-c versus java for smart phone...
TRANSCRIPT

AC 2012-3338: OBJECTIVE-C VERSUS JAVA FOR SMART PHONE AP-PLICATIONS
Dr. Mohammad Rafiq Muqri, DeVry University, PomonaMr. James R. Lewis, DeVry University, Pomona
c©American Society for Engineering Education, 2012
Objective-C versus Java for Smart Phone Applications
Abstract
Learning and teaching smart phone applications development can engage our students, enhance
their skill-set and challenge their creativity. The language of choice for iPhone development is
Objective-C, while Java is primarily used for developing applications on the Android platform.
Despite the strong and supportive development community many students get overwhelmed with
the abundance of information for Android as well as for Apple. With so many tutorials and
available reference guides, learning a new programming language that targets the smart phone is
more fun to teach in a class room environment. This paper compares Objective-C and java
programming techniques for smart phone applications and attempts to explain the differences in
language, platform, programming model, integrated development environment and the ease of
testing and integration for both Android as well as iPhone applications development. The paper
explains how this early learning and teaching module 2 was instrumental in progressive learning
of the students. It attracted the new high school graduates to our university programs as well as
the study of engineering technology. This paper demonstrates that building smart phone
applications is not just limited to games, but also how students can use it to build applications
that inform and educate which can also expose students to even more topics which are not
traditionally covered by conventional software courses. This paper thereby serves as an
innovative way to expose technology students to this fascinating topic and give them a forum for
creative development which challenges them to enhance their skill-set through active learning.
Introduction
How we communicate usually determines the success with which our message is received or
understood…or even accepted. Many universities are faced with the challenge to attract the new
high school graduates, student retention, getting them engaged, and enhancing their skill-set. Bill
Gates has rightly said, “Our current expectations for what our students should learn in school
were set 50 years ago, to meet the needs of an economy based on manufacturing and agriculture.
We now have an economy based on knowledge and technology.”
For today’s students, classrooms are not the only form of learning space. They are goal oriented,
prefer multitasking, learning in social contexts, and thrive on smart phone app Objective-C is an
elegantly reflective language based on C with added Smalltalk style object oriented concepts
which optimizes Model-view-Controller (MVC) software architecture. It is often used in tandem
with a fixed library of standard objects such as the proprietary Cocoa framework which is
Apple’s native object oriented application programming interface for the MAC OS X or with
GNUstep which features a free cross-platform, object oriented development environment.
The paper explains how this early learning and teaching module 2 was instrumental in
progressive learning of the students. It attracted the new high school graduates to our university
programs as well as the study of engineering technology. We also explain our firsthand
experience teaching this interesting topic to two different set of students and their feedback.
Laboratory Exercises and Background
When students at DeVry University took the course “programming environments and java with
lab”, we had the opportunity to introduce them with Android programming concurrently. As part
of the course work, first two weeks they were introduced to fundamental data types, using
objects, designing and implementing classes, and arrays in java. Week three starts with GUI
development, this is when they were presented with an overview of the technologies and the
architecture used to build smart phone applications.
Android’s Java versus Objective-C
The language of choice for iPhone development is Objective-C, while Java is primarily used on
the Android platform. An Android user interface is composed of hierarchies of objects called
Views. A View is a drawable object used as an element in your UI layout, such as a buttons,
images, text labels etc. In contrast to Apple’s iPhone, Android’s UI builder is fairly inefficient
and probably the only way to get around is to code all of the UIs directly into the XML. However
I noticed that integrated Java-Doc and content seem to truly facilitate the path to learn an
unfamiliar API.
Arrays in Java are data structures consisting of related data items of the same type. Arrays can be
considered as fixed-length entities, although at times an array reference with proper syntax may
be reassigned to a new array of a different length. On the other hand we have dynamic data
structures, 1 such as stacks, queues, trees and lists that can shrink or grow as programs execute.
Android also includes a set of C/C++ libraries used by various components of the Android
system through application framework. One of the key benefit of Android is being open source,
but it also means that when looking at sample code, it is not all organized in the same way.
Both the Android and the iPhone also provide a way of declaring user preferences in XML. Both
platforms provide a default user interface for editing a person’s respective preferences In contrast
to iPhone, an Android ships with a set of core applications including an email client, SMS
program, calendar, maps, browser, contacts, etc., which are written using Java.
Every Android application runs in its own process, with its own instance of the Dalvik Virtual
Machine (VM). The virtual machine is register-based, and runs classes compiled by a Java
language compiler. Android development leverages the JDT tools which tend to be standard with
every Eclipse installation. One of the features worth mentioning is the incremental compiler of
JDT which is quite helpful and provides feedback with errors and warnings as you type.
Emphasizing, how the Android development leverages the JDT tools which tend to be standard
with every Eclipse installation. This seem to blend in very well since they had already used
Eclipse as the integrated development environment (IDE) for beginning java programming
during the first two weeks of the course. In the fourth week, they continued with the GUI
development reinforcing further the java language 9 primarily used when developing Android
applications. Week five and week six continued with traditional topics like inheritance, interfaces
and polymorphism in java.
In the mean time students were demonstrated and explained how to use the Eclipse update
manager to install all available components for the Android Development Tools (ADT),
installing the Android SDK 10
and giving students a brief exposure to Android Virtual Device
(AVD). One of the features worth mentioning is the incremental compiler of JDT which is quite
helpful and provides feedback with errors and warnings as you type.
Students were exposed in week seven, as to how Android allows one to create attributes for
resources, e.g. for strings or colors. These attributes can be used in their UI definition via XML
or in the Java source code. Adding UI elements and editing UI properties was bit of a challenge
as well as fun. Starting week eight they were shown the screen shots of basics of test driving the
Apps, presented with complete code and a detailed “Live Code” walkthrough.
So as to not be overly verbose in our descriptions of Android applications, we shall simply only
tell you our success story. Our university students under faculty supervision were successful in
installing the Android platform, creating an AVD, constructing the UI and running some simple
applications. A number of students even demonstrated how the Android Plug-in for Eclipse can
successfully integrate with the Eclipse debugger.
Since, developing, testing, and integrating both Android and iPhone applications are huge topic,
the rest of the paper will focus mainly on iPhone development. Objective-C is an elegant
reflective language (superset of the ANSI version of C) with added Smalltalk style object
oriented concepts which optimizes Model-view-Controller (MVC) software architecture. Just
like the C code, we define header files and source files so as to separate public declarations from
the code implementation details.
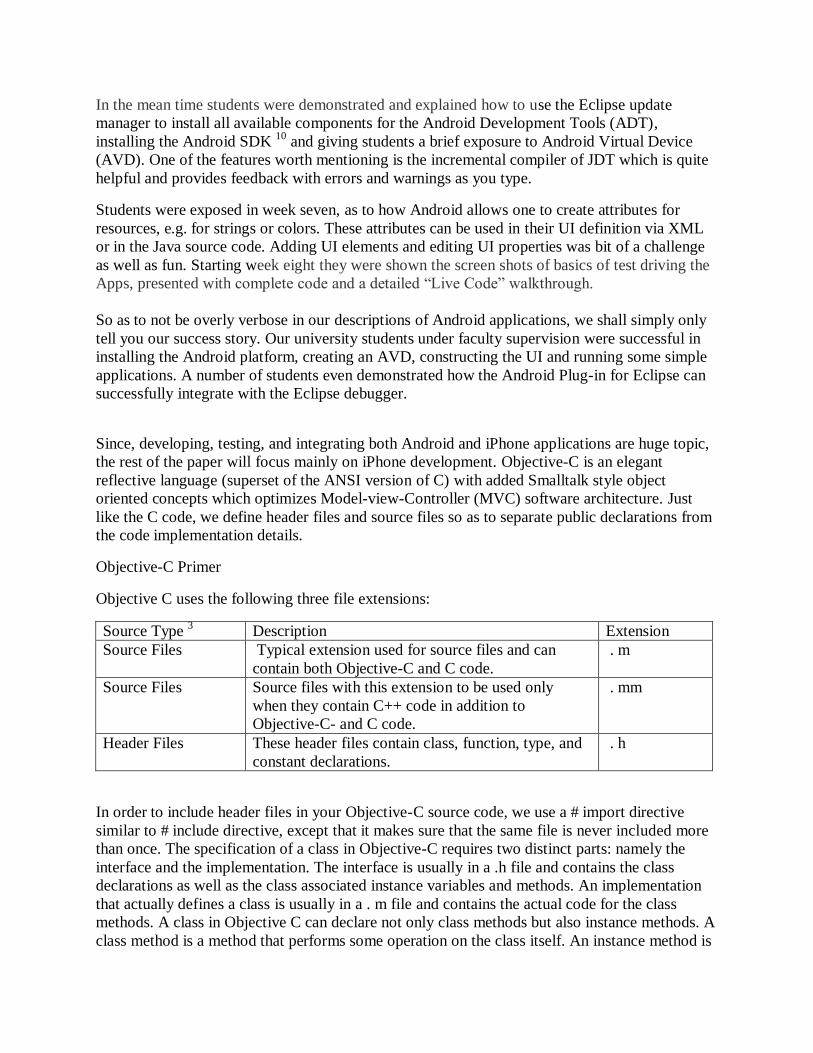
Objective-C Primer
Objective C uses the following three file extensions:
Source Type 3 Description Extension
Source Files Typical extension used for source files and can
contain both Objective-C and C code.
. m
Source Files Source files with this extension to be used only
when they contain C++ code in addition to
Objective-C- and C code.
. mm
Header Files These header files contain class, function, type, and
constant declarations.
. h
In order to include header files in your Objective-C source code, we use a # import directive
similar to # include directive, except that it makes sure that the same file is never included more
than once. The specification of a class in Objective-C requires two distinct parts: namely the
interface and the implementation. The interface is usually in a .h file and contains the class
declarations as well as the class associated instance variables and methods. An implementation
that actually defines a class is usually in a . m file and contains the actual code for the class
methods. A class in Objective C can declare not only class methods but also instance methods. A
class method is a method that performs some operation on the class itself. An instance method is
a method whose execution is scoped to a particular instance of the class. The leading (+) sign
tells the objective-C compiler that the method is a class method. On the other hand, a leading
dash (-) sign indicates an instance method.
The Objective-C declared properties feature provides a simple way to declare and implement an
object’s accessor methods. This feature provides safety and encapsulation for instance variables.
You typically access an object’s properties 4 (in the sense of its attributes and relationships)
through a pair of accessor (getter/setter) methods. By using accessor methods, you adhere to the
principle of encapsulation. A property declaration begins with the keyword @property.
Objective-C also provides a dot syntax for accessing accessor methods which are used to get and
set the state of objects. Why dot notation? Quite simple, Objective-C offers synergy with the
syntax for C structs which look a lot like objects with @propertys except for two differences.
First, we can’t send messages to C structs, because they have no methods. Second, C structs are
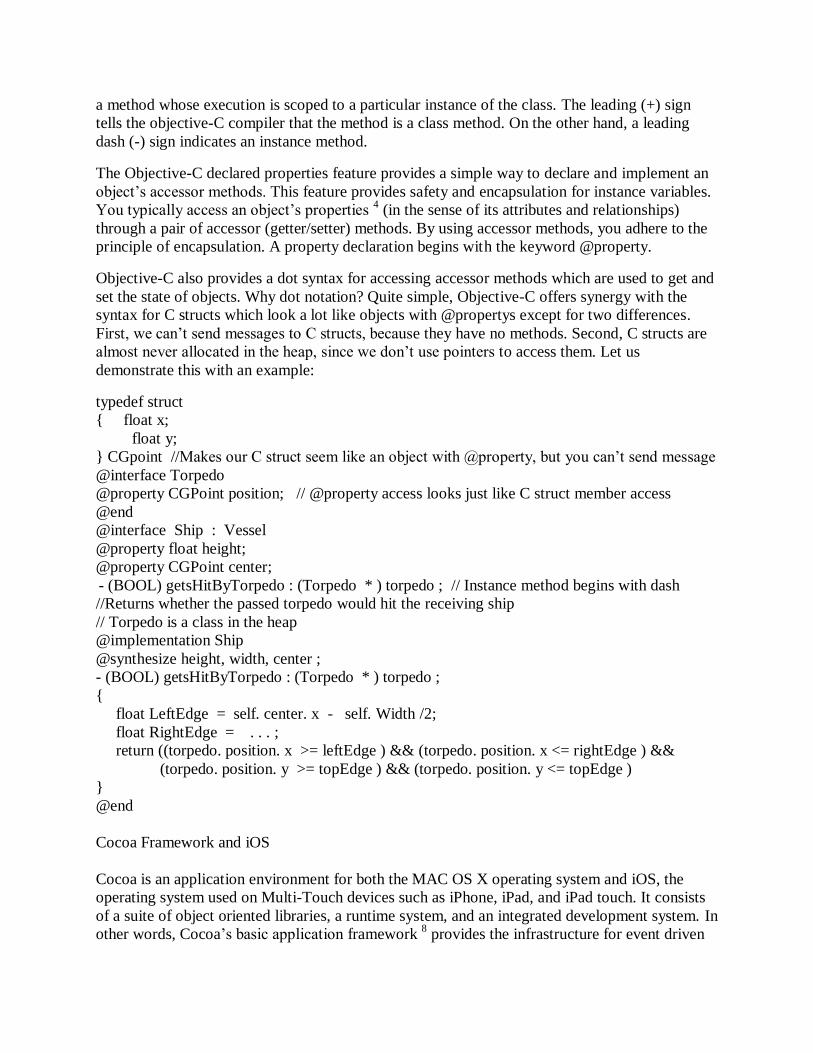
almost never allocated in the heap, since we don’t use pointers to access them. Let us
demonstrate this with an example:
typedef struct
{ float x;
float y;
} CGpoint //Makes our C struct seem like an object with @property, but you can’t send message
@interface Torpedo
@property CGPoint position; // @property access looks just like C struct member access
@end
@interface Ship : Vessel
@property float height;
@property CGPoint center;
- (BOOL) getsHitByTorpedo : (Torpedo * ) torpedo ; // Instance method begins with dash
//Returns whether the passed torpedo would hit the receiving ship
// Torpedo is a class in the heap
@implementation Ship
@synthesize height, width, center ;
- (BOOL) getsHitByTorpedo : (Torpedo * ) torpedo ;
{
float LeftEdge = self. center. x - self. Width /2;
float RightEdge = . . . ;
return ((torpedo. position. x >= leftEdge ) && (torpedo. position. x <= rightEdge ) &&
(torpedo. position. y >= topEdge ) && (torpedo. position. y <= topEdge )
}
@end
Cocoa Framework and iOS
Cocoa is an application environment for both the MAC OS X operating system and iOS, the
operating system used on Multi-Touch devices such as iPhone, iPad, and iPad touch. It consists
of a suite of object oriented libraries, a runtime system, and an integrated development system. In
other words, Cocoa’s basic application framework 8 provides the infrastructure for event driven
behavior and for management of applications, and windows. It also offers for your applications,
a rich collection of ready- made user-interface objects which are available in the interface
builder’s library. Is it not nice to simply drag an object from the library onto the surface of your
interface, configure its attributes, and connect it to other objects.
An object knows how many times it is referenced,5 thanks to its retain count. In order to increase
the retain count of an object, all you have to do is to send the object a retain message, and to
decrease the retain count of an object, you send the object a release message
[anObject retain];
[anObject release];
Here is just a sample of Cocoa’s user-interface objects:
Navigation bars
Page controls
Windows
Text fields
Labels
Image views
Date pickers
Segmented controls
Table views
Progress indicators
Sliders
Buttons
Cocoa provides programmatic support for concurrency, multithreading, lazy loading of
resources, memory management, and run-loop manipulation. It also offers programmatic
interfaces for communicating with servers using standard internet protocols, communicating via
sockets, and of course it supports multimedia, printing, drawing and imaging, data exchange,
undo management, internationalization, scripting, and distributed objects architecture for process
communication.
Cocoa’s software is developed primarily by using two developer applications, namely Xcode and
interface builder, although it is possible to develop Cocoa applications without using these
applications at all. Beginning with Xcode 3.1 and the introduction of iOS, when we create a
software project, we must choose a platform SDK. The platform SDK contains everything that is
required for developing software for a given platform and operating-system release. The SDK for
iOS (like MAC OS X SDK) consists of frameworks, libraries, header files and system tools but
includes a platform-specific compiler and other tools. There is also a separate SDK for iOS
Simulator. All SDKs include build settings and project templates appropriate to their platform.
Xcode and MVC
Xcode is the engine that powers Apple’s integrated development environment (IDE) for Mac OS
X and iOS. It allows us to create and manage projects; and specify platforms, target
requirements, dependencies, and build configurations. Xcode allows us to write source code in
editors with features such as syntax coloring, automatic indenting, navigating and searching
through the components of a project, including header files and documentation. It allows to build

the project, debug it locally, in iOS Simulator, or remotely in a graphical source-level debugger.
Model-view-Controller (MVC) software architecture is often used in tandem with a fixed library
of standard objects such as proprietary Cocoa framework which is Apple’s native object oriented
application programming interface for the MAC OS X or with GNUstep which features a free
cross-platform, object oriented development environment.
Developer’s Perspective
For Cocoa development, when you create a project, X-code sets up your initial development
environment using project templates suited to different Cocoa project types. For compiling
Cocoa software gives several useful options:
GCC - The GNU C compiler (gcc )
Low Level Virtual Machine compiler (LLVM) – In this configuration, GCC is used as the front
end for the LLVM. LLVM thus offers fast optimization times and high-quality code generation.
Clang- A front end specifically designed for the LLVM compiler, and offers fast compile times
and excellent diagnostics.
The second major development application for Cocoa projects is Interface Builder, which is a
graphical tool for creating user interfaces and has been around almost since the inception of
Cocoa as NeXTSTEP. Interface builder is centered around four main design elements:
Nib files - A nib file is a file wrapper (an opaque directory) that contains the objects appearing
on a user interface in an archived form.
Object library – The library window of Interface Builder contains objects ranging from typical
UI objects (for example, windows, controls, menus, text views, and outline views) to controller
objects, custom view objects, and framework-specific objects, such as the Image Kit browser
view.
Inspector for Interface Builder– A window for configuring the objects of a user interface
The inspector in addition to showing the primary attributes and size, also features panes for
animation effects, event handlers, and target-action connections between objects.
Connections Panel – It is a context-sensitive display that shows the current outlet and action
connections for a selected object and lets you manage those connections.
Reusability across the Platforms
On any system there are many Cocoa frameworks, and Apple and third-party vendors are
releasing more frameworks all the time. The Foundation framework defines a base layer of
classes that can be used for any type of Cocoa program. On iOS platform, two of them that stand
out are Foundation and UIKit, while on MAC OS X platform, Foundation and AppKit are used.
The Foundation, AppKit, and UIKit frameworks are essential to Cocoa application development,
and all other frameworks are secondary and elective. Classes, functions, data types, and
constants in Foundation and the AppKit have a prefix of “NS”, while classes, functions, data
types, and constants in UIKit have a prefix of “UI”.
You can select iOS simulator as the platform SDK to build and run the iOS projects. Xcode then
runs Simulator, which presents your application as it would appear on the device (iPhone or
iPad) and allows you to manipulate parts of the user interface. You can use Simulator to help you
debug the application prior to loading it onto the device.
Open Development Process
Some people might want to avoid having to learn Xcode to get started programming with
Objective-C using the terminal application, at least in the beginning. For them, the first step is to
start the Terminal application,6 which is located in the Application folder, stored under Utilities
on the Mac computer.
The Objective-C language enables the user to define a set of ordered data items known as an
array. The purpose of this program (which illustrates the use of character arrays) is to show how
general Objective C programming techniques can be easily introduced at an early stage to
engineering technology students.
First Program in Objective-C
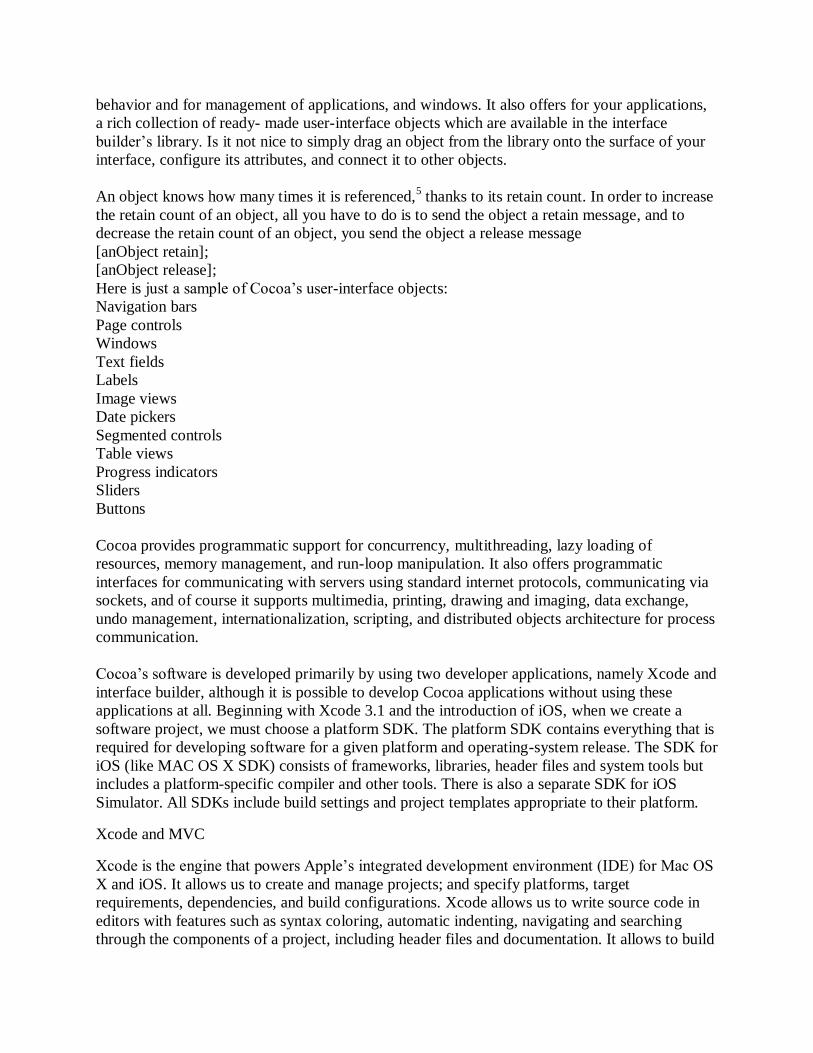
Let us begin by creating a directory to store your program examples. Make a directory called
Aprograms. Next in this directory, using vi editor, type the first Objective C program called
main1.m and follow these steps:
$mkdir Aprograms
$cd APrograms
$vi main1.m
Type <i> to go to INSERT mode, then enter the code snippet as depicted below. After, you
finished typing, you want to save the main1.m program, so now press the <Esc> key to go to
control mode. Typing :wq takes you back to bash shell command prompt ($).
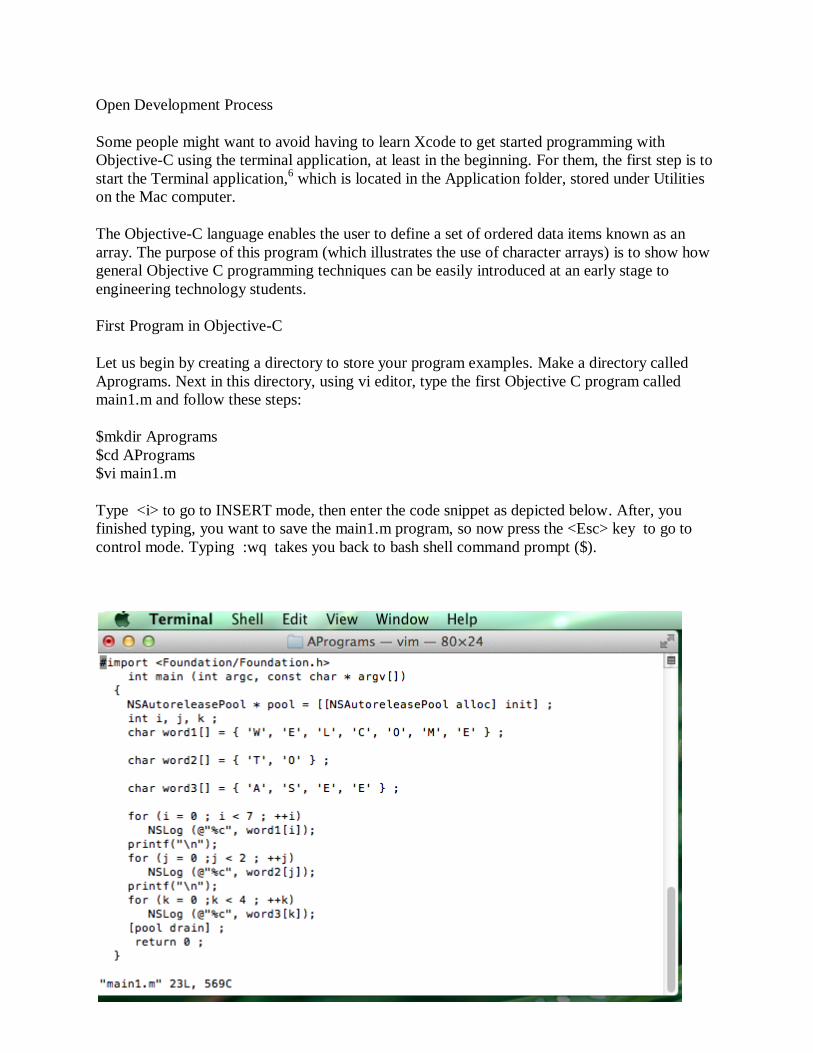
The first line of your Objective-C program tells the compiler to locate and process a system file
(include the information) into the program. Note that, the NS is used for Apple’s classes. It
stands for NeXTStep, NeXTStep being the operating system Mac OS X was based on when
Apple bought NeXT, Inc.
The first statement in our program reads
NSAutoreleasePool * pool = [[NSAutoreleasePool alloc] init] ;
It reserves space in memory for an autorelease pool. Here an alloc short for allocate message is
sent to NSAutoReleasePool class requesting that a new instance be created. The init message
then is sent to the newly created object to get it initialized.
The second last statement in our program reads
[pool drain];
It releases the allocated memory pool and the associated objects.
The command to compile and run main1.m are as follows:
$gcc -framework Foundation main1.m –o pg1
$./pg1 lets you execute (run) your executable file name pg1.
Now that you have seen the output of first Objective-C program, using bash shell terminal
Window utility:
W
E
L
C
O
M
E
T
O
A
S
E
E
The next Objective-C program incorporates the two fundamental pointer operators: the address
operator (&) and the indirection operator (*). Use the following code block inside your second
Objective-C program:
int x;
int count = 10;
int *intPtr ;
intPtr = &count ;
x = *intPtr ;
NSLog (@”count = %i, x = &I, count, x ) ;
Your executable program will show this output:
count = 10, x = 10.
Next we just describe the concept of Structures within Structures, since it demonstrates that
Objective C provides great flexibility in defining structures. In your iOS programs, you will
frequently need to work with rectangles, since rectangles define the size and location of a
window on an iPhone’s screen. There are three basic data types that are used and defined using
typedef:
CGPoint – which describes an (x,y) point
CGsize – which describes width and height
CGRect – which is rectangle that contains an origin (a CGPoint) and a size (a CGsize). Here are
the typedef definition’s from Apple’s CGGeometry.h header file.
/* Points */
struct CGPoint {
CGFloat x ;
CGFloat y ;
};
typedef struct CGPoint CGPoint ;
/* Sizes */
struct CGSize {
CGFloat width ;
CGFloat height ;
};
typedef struct CGSize CGSize ;
/* Rectangles */
struct CGRect {
CGPoint origin ;
CGSize size ;
};
typedef struct CGRect CGRect ;
We may now could write
CGpoint startPt ;
startPt.x = 100 ;
startPt.y = 300 ; // Note startPt is a structure and not an object.
Apple also provides convenience functions for creating CGRect, CGSize, and CGRect structures.
//For example
CGpoint startPt = CGPointMake (100.0, 300.0) ;
CGSize rectSize ;
rectSize.width = 300 ;
rectSize.height = 100 ;
CGSize rectSize = CGSizeMake (300.0, 100.0) ;
//Create a rectangle with given origin and size:
CGrect theFrame ;
theFrame.origin = startPt ;
theFrame.size = rectSize ;
//These are just a few examples of working with these structures.
Lab Exercise using Xcode for iPhone RPN Calculator
Let us now show how to use Xcode for iPhone apps development. We will use the iPhone RPN
Calculator example for this purpose. RPN (Reverse Polish notation) is a mathematical notation
wherein every operator follows all of its operands and this is in contrast to Polish notation, which
puts the operator in the prefix position.With some diligent care and guidance from faculty, any
engineering technology student can quickly learn how to use Xcode, Cocoa framework
Foundation, and UIKit, a subject known as Objective-C programming for iPhone applications
development. It is important to write programs that are understandable and easy to maintain.
Change is the rule rather than the exception.
To create a new project, launch the Xcode. Click on <Create a new Xcode project>.
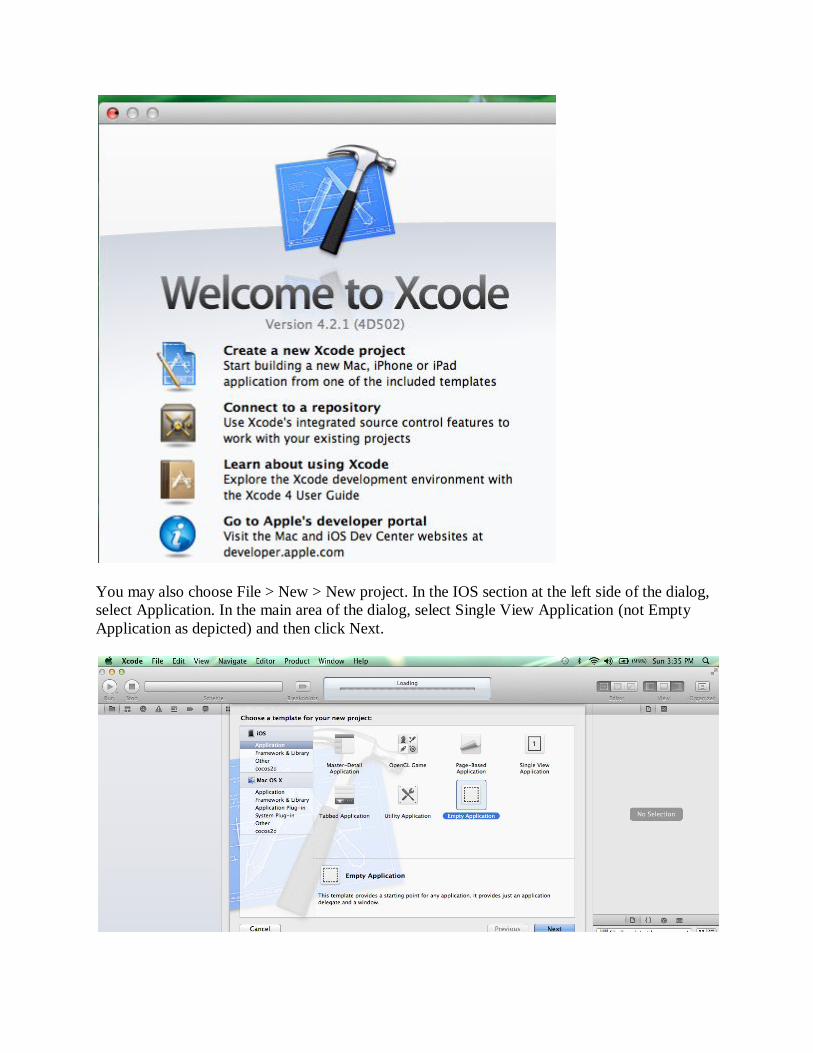
You may also choose File > New > New project. In the IOS section at the left side of the dialog,
select Application. In the main area of the dialog, select Single View Application (not Empty
Application as depicted) and then click Next.
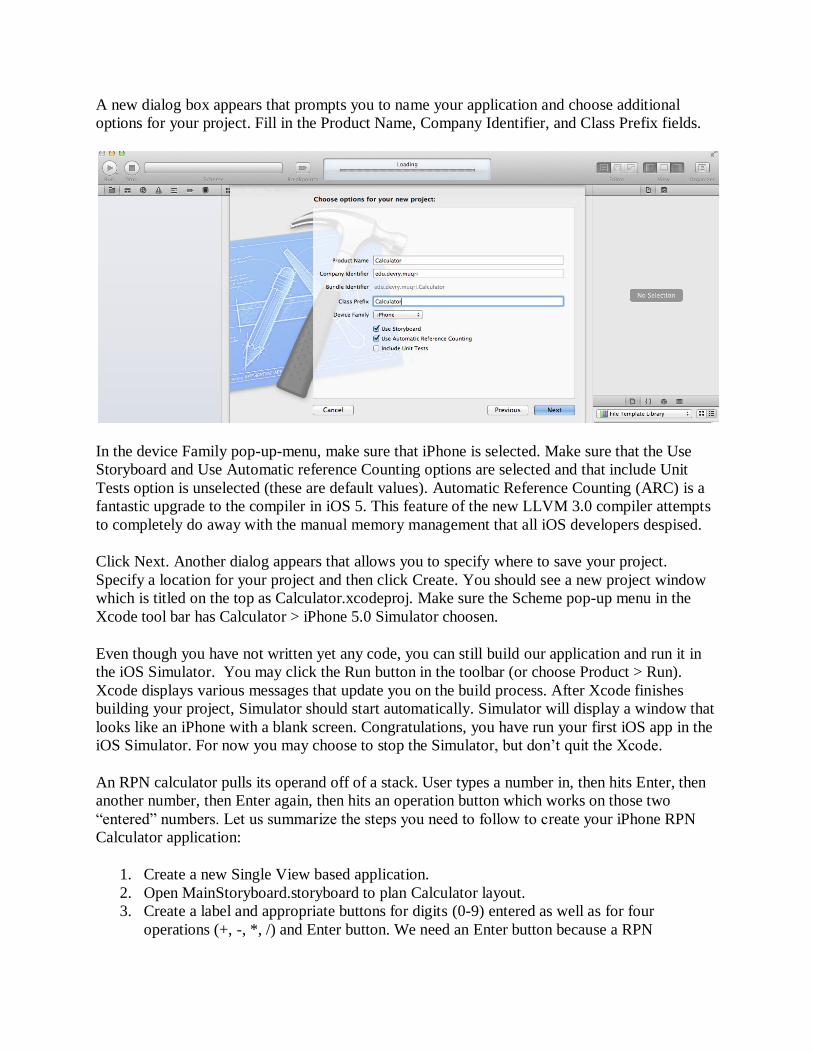
A new dialog box appears that prompts you to name your application and choose additional
options for your project. Fill in the Product Name, Company Identifier, and Class Prefix fields.
In the device Family pop-up-menu, make sure that iPhone is selected. Make sure that the Use
Storyboard and Use Automatic reference Counting options are selected and that include Unit
Tests option is unselected (these are default values). Automatic Reference Counting (ARC) is a
fantastic upgrade to the compiler in iOS 5. This feature of the new LLVM 3.0 compiler attempts
to completely do away with the manual memory management that all iOS developers despised.
Click Next. Another dialog appears that allows you to specify where to save your project.
Specify a location for your project and then click Create. You should see a new project window
which is titled on the top as Calculator.xcodeproj. Make sure the Scheme pop-up menu in the
Xcode tool bar has Calculator > iPhone 5.0 Simulator choosen.
Even though you have not written yet any code, you can still build our application and run it in
the iOS Simulator. You may click the Run button in the toolbar (or choose Product > Run).
Xcode displays various messages that update you on the build process. After Xcode finishes
building your project, Simulator should start automatically. Simulator will display a window that
looks like an iPhone with a blank screen. Congratulations, you have run your first iOS app in the
iOS Simulator. For now you may choose to stop the Simulator, but don’t quit the Xcode.
An RPN calculator pulls its operand off of a stack. User types a number in, then hits Enter, then
another number, then Enter again, then hits an operation button which works on those two
“entered” numbers. Let us summarize the steps you need to follow to create your iPhone RPN
Calculator application:
1. Create a new Single View based application.
2. Open MainStoryboard.storyboard to plan Calculator layout.
3. Create a label and appropriate buttons for digits (0-9) entered as well as for four
operations (+, -, *, /) and Enter button. We need an Enter button because a RPN
calculator puts all of its operands on a stack and then operates on them. Enter is used to
push a number onto the operand stack. For example 3 Enter 4 Enter * results in 12
4. Control-click-drag from the label you created in the View window to the UILabel
IBOutlet property display.
5. Control-click-drag from each button in the View window to the appropriate IBAction
method. For each digit button, you need to select digitPressed Action. For each operation
button, you need to select operationPressed method and for enter button, you need to
select enterPressed Action.
6. Enter your User Interface (UI) code into CalculatorViewController.h and
CalculatorViewController.m files.
7. Time to create Model of our MVC.
8. NSObject is the root superclass of all objects in iOS.
9. Add the CalculatorBrain class to the project. Our Model is going to be a direct subclass
of NSObject. Xcode will create stubs for both the header and implementation of our
MVC’s model.
10. Add @synthesize to create the CalculatorBrain setter and getter.
11. Finishing Touches.
12. Test the calculator app in Simulator
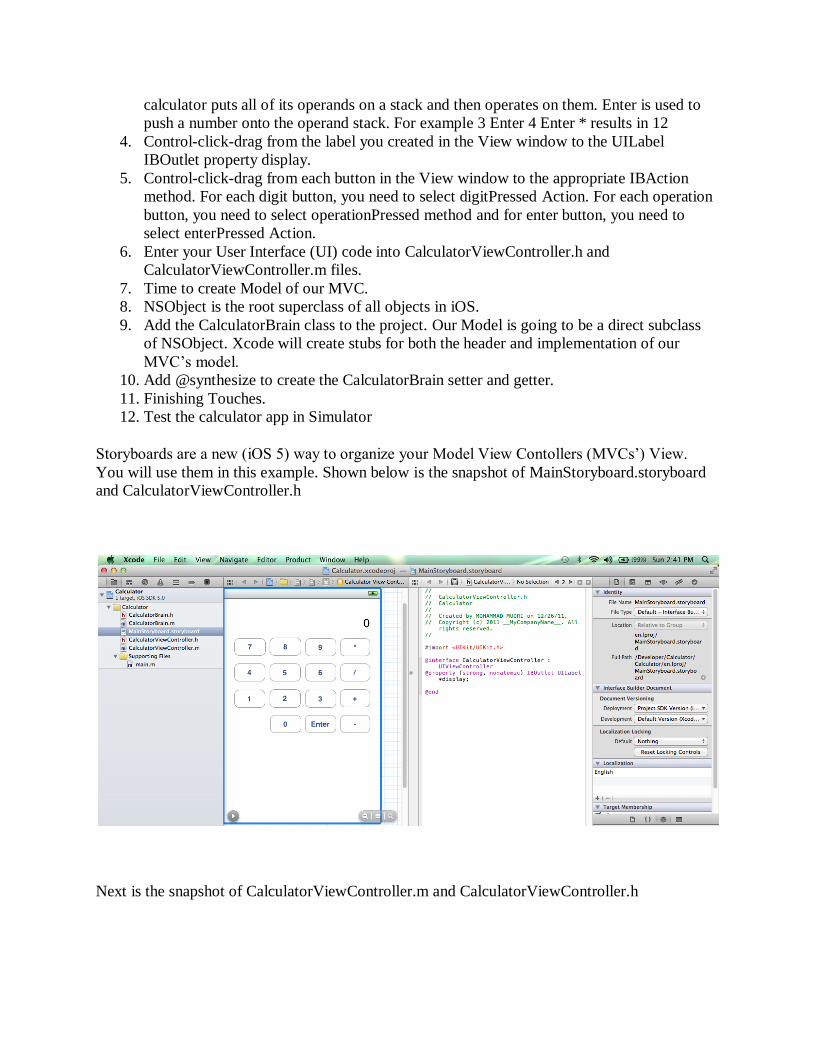
Storyboards are a new (iOS 5) way to organize your Model View Contollers (MVCs’) View.
You will use them in this example. Shown below is the snapshot of MainStoryboard.storyboard
and CalculatorViewController.h
Next is the snapshot of CalculatorViewController.m and CalculatorViewController.h
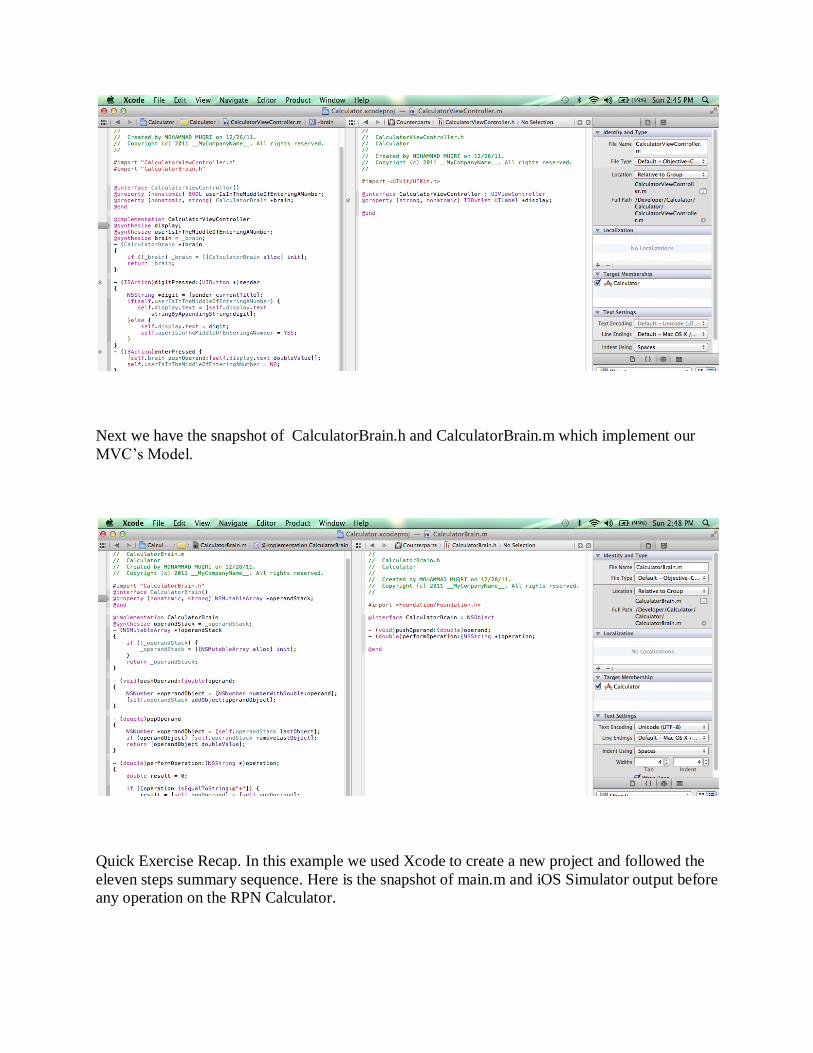
Next we have the snapshot of CalculatorBrain.h and CalculatorBrain.m which implement our
MVC’s Model.
Quick Exercise Recap. In this example we used Xcode to create a new project and followed the
eleven steps summary sequence. Here is the snapshot of main.m and iOS Simulator output before
any operation on the RPN Calculator.
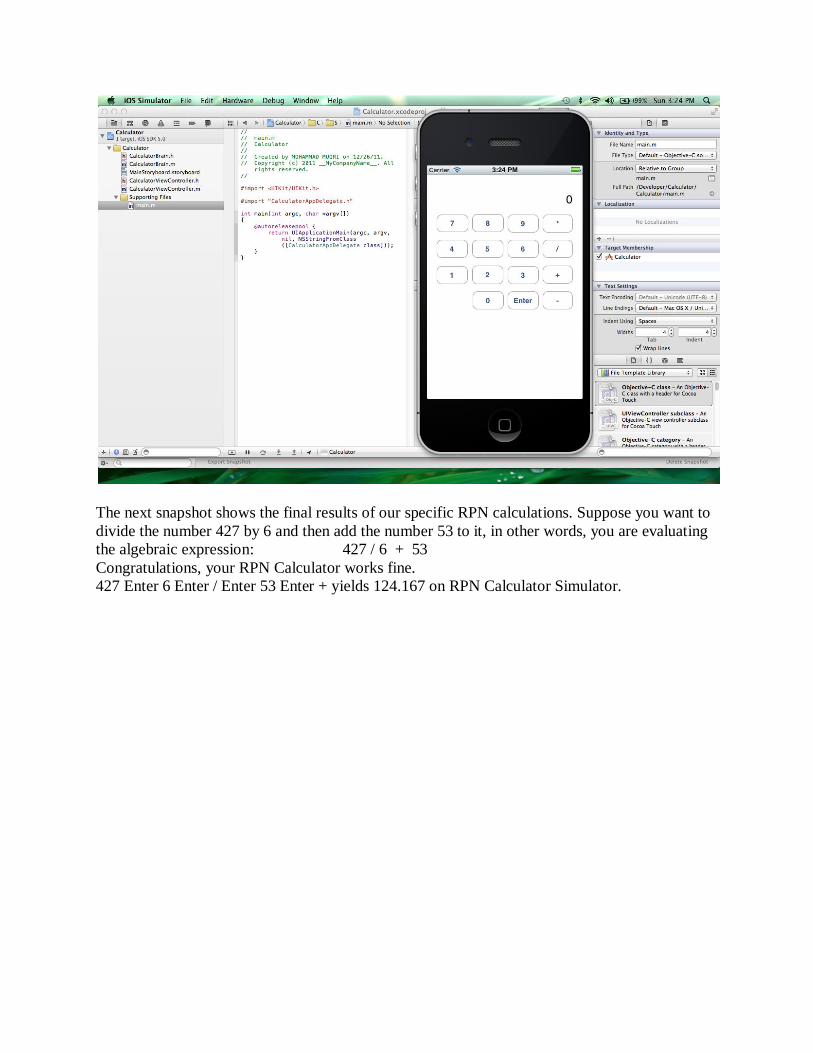
The next snapshot shows the final results of our specific RPN calculations. Suppose you want to
divide the number 427 by 6 and then add the number 53 to it, in other words, you are evaluating
the algebraic expression: 427 / 6 + 53
Congratulations, your RPN Calculator works fine.
427 Enter 6 Enter / Enter 53 Enter + yields 124.167 on RPN Calculator Simulator.
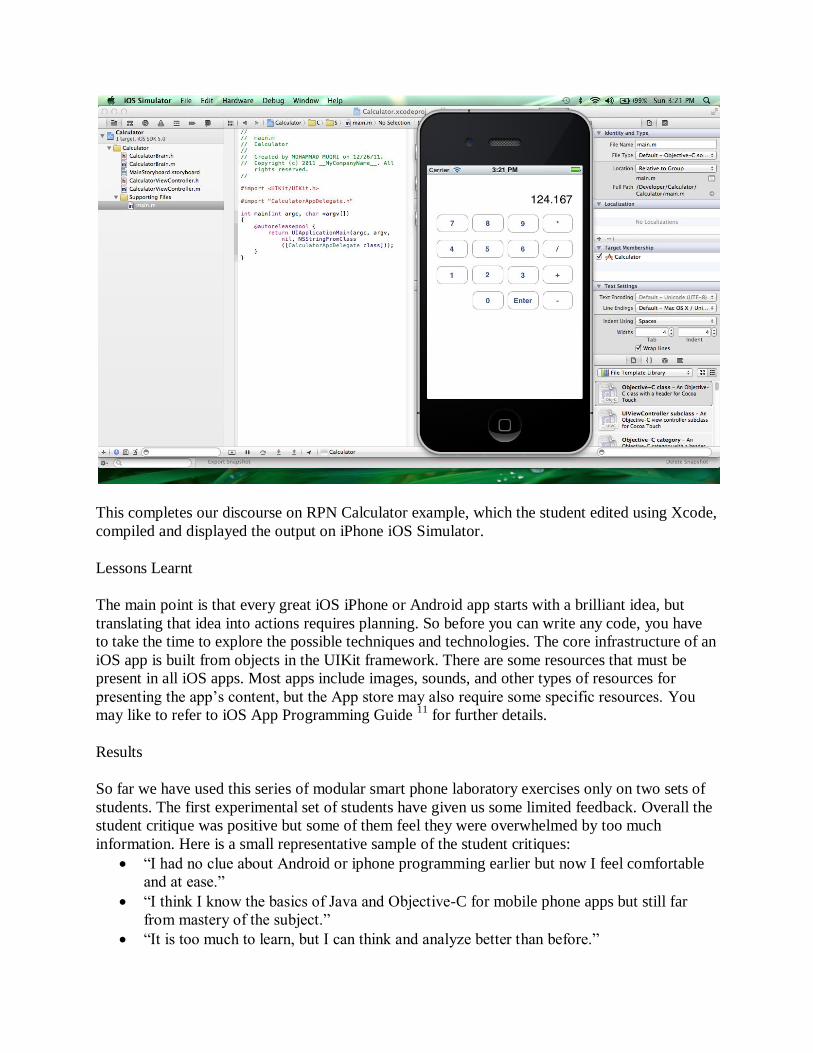
This completes our discourse on RPN Calculator example, which the student edited using Xcode,
compiled and displayed the output on iPhone iOS Simulator.
Lessons Learnt
The main point is that every great iOS iPhone or Android app starts with a brilliant idea, but
translating that idea into actions requires planning. So before you can write any code, you have
to take the time to explore the possible techniques and technologies. The core infrastructure of an
iOS app is built from objects in the UIKit framework. There are some resources that must be
present in all iOS apps. Most apps include images, sounds, and other types of resources for
presenting the app’s content, but the App store may also require some specific resources. You
may like to refer to iOS App Programming Guide 11
for further details.
Results
So far we have used this series of modular smart phone laboratory exercises only on two sets of
students. The first experimental set of students have given us some limited feedback. Overall the
student critique was positive but some of them feel they were overwhelmed by too much
information. Here is a small representative sample of the student critiques:
“I had no clue about Android or iphone programming earlier but now I feel comfortable
and at ease.”
“I think I know the basics of Java and Objective-C for mobile phone apps but still far
from mastery of the subject.”
“It is too much to learn, but I can think and analyze better than before.”
Currently we are in the process of exposing this modular mobile phone programming labs to the
second set of students over a slightly longer period of time rather than cramming up with the
programming environments with java course. We have collected no data to quantify if this
modular course has adequately prepared the first group for capstone senior project, since these
students have just started taking their senior project capstone course sequence.
Concluding Remarks
In conclusion, it can be stated that with proper guidance, monitoring and diligent care, the
technology students can be exposed earlier to Xcode, Cocoa framework, Objective-C design
patterns or Android development platform. This will go a long way in motivating them,1
eliminating their fear, improving their understanding and enhancing their quality of education.
With proper mentoring, capable tutelage, and guidance, these burgeoning and talented young
students will contribute to the best practices in implementing future iPhone apps development.
Bibliography
1. Muqri, M., Shakib, J., A Taste of Java-Discrete and Fast Fourier Transforms, American Society for
Engineering Education, AC 2011-451.
2. Shakib, J., Muqri, M., Leveraging the Power of Java in the Enterprise, American Society for Engineering
Education, AC 2010-1701.
3. Learning Objective-C: A Primer, iOS Developer Library, http://developer.apple.com/devcenter/ios/gettingstarted/docs/objectivecprimer.action
4. The Objective- C Programming Language, February 2003,
http://pj.freefaculty.org/ps905/ObjC.pdf
5. Altenberg, B., Clarke, A., Mougin, P., Become an Xcoder : Start Programming the Mac Using
Objective-C, CocoaLab, 2008, http://www.e-booksdirectory.com/details.php?ebook=3832
6. Kochan, S. G., Programming in Objective-C, Addison-Wesley, August 2011.
7. Green, D., Android vs iPhone Development: A Comparison.html, July 2009,
http://greensopinion.blogspot.com/2009/07/android-versus-iphone-development.html
8. Cocoa Developers Guide, Apple Developer Publications, December 2010,
http://itunes.apple.com/us/book/cocoa-fundamentals-guide/id409921412?mt=11
9. Deitel, H.M., Deitel, P.J., Java How to program, Prentice Hall, 2003
10. Android Developer Resources, Tutorials, http://developer.android.com/index.html.
11. iOS App Programming Guide, iOS Developer Library,
http://developer.apple.com/devcenter/ios/gettingstarted/docs/objectivecprimer.action