oboe art and method - 162.251.163.190
TRANSCRIPT

Oboe Art and Method

This page intentionally left blank

Oboe Art and Method
Martin Schuring
12009

1Oxford University Press, Inc., publishes works that furtherOxford University’s objective of excellencein research, scholarship, and education.
Oxford New YorkAuckland Cape Town Dar es Salaam Hong Kong KarachiKuala Lumpur Madrid Melbourne Mexico City NairobiNew Delhi Shanghai Taipei Toronto
With offices inArgentina Austria Brazil Chile Czech Republic France GreeceGuatemala Hungary Italy Japan Poland Portugal SingaporeSouth Korea Switzerland Thailand Turkey Ukraine Vietnam
Copyright © 2009 by Oxford University Press, Inc.
Published by Oxford University Press, Inc.198 Madison Avenue, New York, New York 10016
www.oup.com
Oxford is a registered trademark of Oxford University Press
All rights reserved. No part of this publication may be reproduced,stored in a retrieval system, or transmitted, in any form or by any means,electronic, mechanical, photocopying, recording, or otherwise,without the prior permission of Oxford University Press.
Library of Congress Cataloging-in-Publication DataSchuring, Martin.Oboe art and method / Martin Schuring.
p. cm.Includes bibliographical references and index.ISBN 978-0-19-537458-2; 978-0-19-537457-5 (pbk.)Oboe—Instruction and study. I. Title.MT360.S38 2009788.5’2193—dc22 2008045311
9 8 7 6 5 4 3 2 1
Printed in the United States of Americaon acid-free paper

Dedicated to the memory of my fatherDieterich J. Schuring
andthe memory of my teacher
John de Lancie

This page intentionally left blank
It has been nearly fifty years since the appearance of the last compre-hensive oboe technique book from a major publisher written by aNorth American author. The world at large, the world of music, and themuch smaller world of oboe playing have all changed in significant wayssince then. Today, almost every university of any size and ambition hasa music school, with many of those institutions offering degrees special-izing in oboe. School music programs, though suffering from inade-quate resources in many places, are nonetheless ubiquitous. There aremany more oboe teachers, oboe players, and oboe students than everbefore. Still, the oboe is not nearly as popular as the flute or the piano,never mind the guitar or the drums, so expert instructors are sometimesdifficult to find outside of urban areas. Although a book can never takethe place of private lessons from a specialist, it can help to guide stu-dents toward organizing their thinking and to enable them to ask in-telligent questions once they find a good teacher.
While much of music making and oboe playing is rooted in a tra-dition at least a century old, today’s demand for the most recent infor-mation makes a new text desirable. The alphabet remains the same, butthe vocabulary has increased, and some of the usage and spelling haschanged.
This book is not an attempt to be a comprehensive resource on theentire world of oboe. Others have written eloquently and comprehen-sively on the history of the oboe, so I refer to it only as it applies to aspecific musical or technical issue. Repertoire lists are obsolete as soon
Preface
as they are printed and can never be complete in any case, so I have notincluded one. Interested readers can find very thorough resources onextended techniques; these are addressed, but in a general rather thanan exhaustively specific way (the bibliography has suggestions for fur-ther reading on all of these topics). Others are much more expert thanI on improvisation and on popular, commercial, jazz, and world music,so these issues are covered only to the extent that they relate to musicmaking on the oboe.
The information in this book is all practical. All of it can be appliedby any student of the oboe (of whatever age and experience) to the craftand the art of making music on the oboe. Much of it can be transferredto performers on any instrument—practicing and phrasing are univer-sal and will not change much whether one is playing the oboe or theeuphonium. The text is liberally supplied with exercises and illustrationsto make sure that the information can be readily absorbed and, if nec-essary, practiced in an organized way.
Much of the book is written in the first and second person. Some-times this makes me sound like a drill sergeant rattling off instructions:“do this, don’t do that.” That isn’t my intention; the intent is to be eco-nomical. Saying, “Put your feet flat on the floor” seems better to methan, “The student should make sure that his or her feet are placed flaton the floor.” So, as you read, remember that all of the instructions arespoken in a kindly tone.
If there is one central concept to all of my thinking about makingmusic on the oboe, it is that of efficiency. The oboe, while not an easy in-strument, can nonetheless be made to sound easy. It can sing and speakeffortlessly. The vexing difficulties of reed making and practicing can bestreamlined to eliminate error and to provide maximum benefit to theplayer. Some of the journeys are necessarily quite laborious, but theyshould never be tortuous or confused. The most important premise inthis book is that successful oboe playing depends on doing the very basic,simple (not easy!) things well. Every suggestion in the book, even themost time consuming, is in fact the short cut to success. Learn it rightthe first time, and then you can move on to learning the next thing.
While the text is all my own, much of the material is, of course, notmy invention. Everything musical (and some nonmusical things) I haveever heard or seen or learned is in some way contained in this book. Ifwhat you read merely confirms what you already know, good. If youteach the same thing yourself, better still. But if you read something youhave never thought of before, or even something you disagree with, giveit a try. It has been tested in a harsh laboratory—up there on the stagein front of lots of audience members. It all works.
viii Preface

Acknowledgments
I am grateful to my oboe students at Arizona State University who readthe entire manuscript and gave very helpful feedback: Carly Aylworth,Katie Mordarski (who also assisted very capably with the photographs),Dane Philipsen, Mary Simon, and Ashley Steves. My wife, Gail Schuring,in addition to taking care of me and making it possible for me to com-plete this project, also read the manuscript and made many importantobservations. I owe special thanks to Elizabeth Buck, whose careful anddetailed reading of the manuscript changed the book very much for thebetter.

This page intentionally left blank
Contents
Part I Fundamentals1. Posture, Breathing, and Support 32. Embouchure and Other Matters of Tone Production 163. Finger Facility 274. Articulation 385. Expression 456. Practice 707. Extended Techniques 93
Part II Reed Making8. Reed Construction 1019. Reed Evaluation and Adjustment 133
Part III Equipment and Its Care10. Instrument Selection, Care, and Adjustment 15311. Selection and Care of Tools and Equipment 170
Part IV Professional and Performance Considerations12. Professional Behavior and Deportment 18513. Career Development 194
Appendix 1. Thoughts for the Complete Beginner 207Appendix 2. Fingering Chart for Oboe and English Horn 209Appendix 3. Trill Fingering Chart for Oboe and English Horn 215
Bibliography 219Index 221

This page intentionally left blank

I
FUNDAMENTALS

This page intentionally left blank

1
Posture, Breathing,and Support
Much of this information will seem obvious (and probably should seemobvious to anyone who has studied the oboe for some time)—“Oh, Iknew that. . . .” But when oboe playing sounds bad or feels bad, theremedy is rarely found in the examination of detail or in the acquisi-tion of tricks. Instead, some basic fundamental technique of playing ei-ther is defective or has been forgotten. There are no tricks. My teacher,John de Lancie, used to say, “You really don’t need to know very manythings to play the oboe.” (Left unsaid was just how long and difficultthe road to this little bit of knowledge would be.) Improvement on theoboe depends on a thorough and constant effort to master the verybasics of playing the instrument—the “simple” things you were meantto learn from your first teacher in your first few lessons. Over time,oboe playing can become so automatic, so habitual, that a periodic self-examination is worthwhile. Often you aren’t doing what you thinkyou are.
In a moment of frustration, after trying for weeks to improve thematter, I once asked a very tense and contorted student, “Doesn’t thatfeel awful?” “No,” came the reply. “It feels like playing the oboe.” So dolook at yourself and your students and make sure that what seems nor-mal and familiar is also efficient.
Efficiency and ease are the key words in this discussion. But theydo not mean that oboe playing should be lazy. Playing the oboe can ac-tually be quite strenuous, and oboe players should work hard, but everymorsel of energy expended should be audible in the musical result.
3
Relaxation and efficiency are the result of using the right muscles to dothe work so that the wrong muscles don’t have to.
Oboists often jump to conclusions. A passage sounds bad, and blameis quickly assigned to the most popular scapegoat: the reed. It may ormay not be the reed, but before concluding anything, read the follow-ing, and make sure that all of the basics are working correctly. Onlythen should the process of diagnosis proceed further.
Goals
Air is the foundation of everything we do on the oboe. Without proper,relaxed tone production, every aspect of playing the instrument suffers.Issues of inappropriate tension, unusual reedmaking styles, even awk-ward technical facility and articulation can usually be traced to inade-quate or unhealthy air supply to the instrument. If the right muscles arenot doing their work, the wrong muscles will have to step in and try.
It is possible to play the oboe without discomfort. Indeed, it’s pos-sible to sing through the oboe with complete ease and freedom while stillmeeting all the technical and dynamic demands of the music. Breath-ing and supporting that breath are the foundations. Our goals are:
· To maintain an erect, stable, posture.· To inhale air to all portions of the lungs.· To support the air firmly with an energy that matches the re-
quirements of the reed (assuming the reed has been adjusted to match the requirements of the player).
Posture
Without excellent posture, the air has no space to occupy, and the mus-cles are unable to perform their proper tasks. Effective posture arrangesthe body in a straight line from the hips all the way to the head, asthough it is suspended by a hook from above. Hold yourself with astraight back, with the shoulders above the hips and the head above theshoulders. Don’t bring your head forward: bring the oboe to you, don’tgo to the oboe. If this posture is difficult to visualize, back up against awall and try to touch the wall at every point between your hips andyour head. It won’t be possible to do it completely, but try to grow astall as you can. The correct posture can be maintained either standingor sitting, although standing is preferable for now—sitting compressesthe abdominal region slightly and makes it easier to cheat the breath-ing and support. If you stand, place your feet about as far apart as yourshoulders, with one foot slightly in front of the other for stability and bal-ance. Don’t lock your knees or hold any tension in your legs. Imaginethat your center of gravity is low—in your thighs—and that your feetare firmly rooted in the ground. Don’t lean forward on your toes or back
4 Fundamentals
on your heels. Shifting weight slightly from side to side is a good ideato help keep your legs relaxed. Stand proudly; don’t collapse your upperchest. You need a posture that is erect, relaxed, and stable. If you sit,keep your upper body in the same arrangement—a straight line fromthe hips to the head—and try to keep the angle of the fold at the hips toa minimum. Put your feet flat on the floor. Don’t cross your legs; don’teven cross your feet.
Once seated or standing comfortably (and straight), introduce theoboe. Hold it at about a 45 degree angle to your body (more about thislater), with your shoulders relaxed (not bunched up around your neck)and your elbows comfortably away from your sides—say, three to sixinches. Don’t clench the elbows tightly to your sides, but don’t let themfly away like bird wings either. Keep your head upright above yourback without leaning forward to reach the oboe; bring the oboe to you.
Breathing
Now that you’re upright, you can take a breath. The goal is to occupyall parts of the lungs with air. The breathing and support mechanismneeds to work like a toothpaste tube—when you squeeze from thebottom, toothpaste should come out the top—so that pressure from theabdomen (this is called “supporting”—more about this in a few para-graphs) will result in air pressure at the reed. There must be air every-where between the abdomen and the reed; it is impossible to supportthe air column otherwise.
Every student has heard, “Breathe from the diaphragm!” withoutreally knowing what that means. Where is the diaphragm? What doesit do? Why is it important to wind playing? The diaphragm is “the par-tition of muscles and tendons between the chest cavity and the abdom-inal cavity.”1 Its muscular action pulls downward when we inhale andrelaxes as we exhale. The diaphragm cannot assist in forcefully expellingair; it merely relaxes during the exhale portion of the cycle. Indeed, allmuscles work in one direction only; when required, they have oppos-ing muscles to accomplish the reverse (for example, the body has botha biceps muscle to lift the arm and a triceps muscle opposite to extendit again).
During quiet breathing, the diaphragm moves only an inch or so;during more demanding applications, it can move up to four inches. Dur-ing quiet exhalation, the diaphragm’s relaxation is sufficient to expel theair; for more athletic situations (playing the oboe is certainly athleticin this regard), the motion of the diaphragm must be assisted by theabdominal muscles (supported). So the inhalation of air is the wholeextent of the diaphragm’s contribution to oboe playing. You cannotsupport from the diaphragm; you cannot vibrate from the diaphragm.
Posture, Breathing, and Support 5
1. Neufeld, Webster’s New World Dictionary of American English, p. 380.
I would honestly prefer to leave the diaphragm out of the breathing dis-cussion altogether—nobody can really visualize or feel their diaphragm,and it wouldn’t help if you could—but the use of the term is so well es-tablished that this much discussion, at least, is unavoidable.
Instead of dwelling on the diaphragm, it is important to begin bybreathing as deeply as possible—all the way to the bottom of the lungs—and to imagine filling to the top from there. Most students are adeptenough at taking a shallow breath, so the first goal is to bring air all theway to the bottom of the lungs. Everyone frequently does this naturallywhen sleeping, laughing, coughing, or gasping—in fact, when doing justabout anything besides playing the oboe. It’s worth trying a few of thesenatural things to observe how they feel. Yawn—a really deep, satisfyingyawn. Feel how the air goes all the way down. Do you feel how yourstomach goes out? Laugh. Feel how your stomach moves? Cough. Feelthe same thing. Gasp as if you’re suddenly scared to death. Pant like adog. All should give the same basic sensation. Not surprisingly, manystudents would rather not gasp and pant in front of their teacher, so wewill use the following exercise, which works flawlessly. I have never hadit fail to bring air to the bottom of the lungs immediately and correctly.
Exercise
To Promote Proper Deep Breathing
Sit on the edge of a chair and fall forward until your handstouch the floor. Relax and inhale. Make sure that the postureis really relaxed and that your body is just hanging forward.Breathe. An observer should see your lower back expand;you should feel your belly expand against your legs. Repeatthe breath a few times, especially if it is a new sensation. Situpright again at intervals—you don’t want to get dizzy. Nowtry it again a few more times. Then, while gradually movingto an upright sitting position, continue to take slow deepbreaths while maintaining the same feeling. Remember totake deep, full breaths. It should be possible to maintain theproper sensation in any posture. If the feeling of breathingdeeply is unfamiliar, you will need to repeat this exercisefrequently to remind yourself of the proper technique.
Your abdomen should expand first, then your chest. The rib cage alsohas muscles that can assist in expanding the lungs, and these should beused second, not first. But they must be used. Many students, under theimpression that they must “breathe from the diaphragm,” never fill upthe chest at all. Remember the toothpaste tube—not filling the chest isas useless as filling only the chest; we must inhale air to all parts of the
6 Fundamentals
lungs. A helper or a teacher should verify this by putting his or herhands on either side of your back just below the armpits. After the ab-domen expands, the upper back should expand also, forcing the observ -er’s hands apart. The idea is to expand the torso—to make it wider, nottaller. If breathing makes you taller, reexamine your posture; it is likelytoo slumped over. Evelyn Rothwell, in her excellent book Oboe Tech-nique,2 describes the correct three-stage breath. First the belly expands;then the chest expands (shown by the upper back expanding also); andfinally the upper chest just below the neck rises. At that point the stom-ach will probably come back in slightly, which is normal and correct.
This is a very large breath—unnecessary and rather uncomfortablefor the oboe. The purpose of taking the large breath is to create expan-sion in the entire upper body, thereby teaching you the proper sensationso you can later take a partial breath with the same correct technique.So, before beginning to play, release a portion of the large breath. Nottoo much—just enough that you feel natural rather than inflated. It isnot important to take a very large breath every time, but it is essentialto take a breath that includes all parts of the lungs, or the support can-not work properly. Eventually, taking a correct partial breath will be easy.The large breath is just for practice. Remember, as with anything thatrequires practice, if you take a breath and it doesn’t feel right, don’t play.Exhale and try again. A new, correct habit can be developed very quicklyif you never do it wrong.
Blowing (Support)
“Support,” along with “diaphragm,” is another word every studentknows, usually without being able to describe it convincingly. Supportis nothing more than firmly pushing inward and slightly upward withthe abdominal muscles. Aim at an imaginary spot about halfway up yourspine. This pushing displaces the internal organs, which in turn displacethe diaphragm upward; the diaphragm pushes against the bottom of thelungs, placing their contents under pressure, and this in turn creates airpressure at the reed. You can see from this description how essential itis to have air filling all parts of the lungs.
When the abdominal muscles are tensed, the entire region ofmuscle will feel activated and tight. But it is possible to identify one par-ticular place where the main focus of the tension is felt: around the beltbuckle, or a few inches below the navel. Pushing from too high createsa lot of tension, but no actual support. Some students have discoveredthat the diaphragm is somewhere around the bottom of the rib cage;armed with this piece of irrelevant information, they try to support fromthere with weak results. Feel the focus of the tension around the beltbuckle or a bit below. Examine your technique very carefully where
Posture, Breathing, and Support 7
2. Rothwell, Oboe Technique, pp. 5–6.
these matters of support placement and direction are concerned—manystudents push in the wrong direction and/or feel the focus of the ten-sion much too high. Push inward and upward while feeling the focusof that tension a few inches below the navel.
Take a moment and read the previous paragraph again. Make surethat when you play, you are tensing the abdominal muscles around thebelt buckle and pushing inward and upward. Any deviation from thistechnique means that the right muscles are prevented from doing theirwork, which forces the wrong muscles to step in and help. I have workedwith very advanced players who were not doing this correctly and suf-fered from mysterious subtle problems they could not diagnose. Theoboe is played with the whole body and can become a very complexpuzzle if this basic technique is not properly learned. So, before pro-ceeding, ask a few questions:
· Is your posture erect, yet relaxed?· Are you breathing in a way that supplies air to every part of the
lungs?· Is your support focused in a spot roughly near your belt buckle?· Are you supporting by tightening the abdominal muscles in an
inward and slightly upward direction?
The tension should be firm, yet elastic—not rigid. The tension willvary to suit the dynamic and phrasing demands of the music. Moresound requires more air; less sound requires less air, in the same waythat speaking softly needs little energy and shouting needs a lot.
It is vital that every sound you make be supported. With a good earand enough experience, it is possible to make an acceptable sound withlittle or no support—the beginning of a slippery slope that ends in un-comfortable playing without life or projection. Think of support like theengine in your car: sometimes it runs under heavy acceleration, some-times it idles, sometimes it cruises on the freeway, but it is always run-ning. Without the engine, the rest of the car is useless, no matter howluxurious the accessories. So tense your abdominal muscles, push in-ward and slightly upward, and make sure that this tension is felt aroundthe belt buckle or slightly below.
Reeds and Resistance
The reed is an essential link in the sound-production chain. If the reedis uncomfortable or reluctant, no effort to produce a free singing tonecan succeed. Our relaxed, ideal way of playing demands a good reedthat vibrates freely and supports the pitch firmly.
The resistance of the reed must be suited to the player’s capacity,allowing the player to play comfortably and naturally. You must be able
8 Fundamentals
to play against the resistance of the reed, not more and not less. If thereed needs, say, five pounds of air pressure to vibrate well, you shouldpush with five pounds of pressure from the abdomen and allow thatenergy to transfer, unrestricted, into five pounds of pressure at the reed.(“Five pounds” is an arbitrarily chosen number.) Instead, many playersare much less efficient than this: they push with ten or fifteen pounds(not real numbers, remember, just examples) and then find all sorts ofways to restrict the excess flow—with tension at the embouchure, inthe throat, and in the upper chest—thereby artificially increasing the re-sistance of the reed. We all know players who work very hard to makevery little sound by trying to regulate a hopeless system of opposingtensions. This has its origin in a very good intention: if X amount of airis good (like two aspirin), then surely 5X amount of air must be better(like ten aspirin?). Overblowing is just as dangerous as underblowing.
Exercise
To Find the Appropriate Amount of Air Pressure
Here’s a simple exercise to find the correct effort: make a veryslow breath attack—don’t start the note with the tongue, justwith the air—on an easy note (the orchestra tuning A is a goodchoice). Set the embouchure neutrally, making no effort tocontrol either the dynamic or the tone color. Start by blowingvery gently—the only sound will be air passing through thereed—and gradually increase the air until the reed speaks,which should occur at around mezzo piano. Adjust your reeduntil it speaks naturally at mezzo piano. If it speaks at a softerdynamic, the reed will feel limited; louder, and the reed willbe too hard.
With the reed now properly adjusted, try the exerciseagain, and after the reed speaks, continue to increase the airuntil the tone firms up to a solid, resonant mezzo forte. Youare now playing against the resistance of the reed. In otherwords, your production of air and the reed’s consumption ofair are correctly matched. With too little air, the sound will belifeless and flat, and you’ll be tempted to artificially supportthe tone with throat and embouchure tension. So, up to apoint, more air is good. But with too much air, the tone willbe coarse and spread, and you’ll be tempted to restrain it withthroat and embouchure tension. Play against the resistance ofthe reed. Blow very hard only to get more intensity, not as amatter of routine. Giving a consistent 150 percent effort isevery bit as dangerous as giving only 50 percent.
Posture, Breathing, and Support 9

The reliability of this exercise depends on a reed that resists yourefforts in a way that is natural and comfortable for you. Hence the im-portance of adjusting the reed until it speaks at mezzo piano for you,not for anyone else. If mezzo piano seems a bit soft, remember that youwill always have to work hard to play loud; if you also have to workhard to play soft, your dynamic range will tend to stay in the middle.So adjust reeds to speak naturally at mezzo piano. We will discuss thisidea more thoroughly when talking about tone concept.
Breathing while Playing
Now that you know how to take a good breath, make sure to do it muchmore often than you need to. Breathing is not merely a chance for air;it provides relaxation. Breathe often. Breathing lets blood back into yourembouchure and relaxes the muscles, provides fresh oxygen and relaxesyou, and allows for improved endurance and tone. On the oboe, youwill never use all the air you inhale with a normal breath; you will al-ways need to exhale to remove the excess air that is sitting in yourlungs losing oxygen and making you feel suffocated. Don’t wait untilyou need a breath to take one. If there is time, disengage the reed fromthe lower lip completely; this will allow blood back into this vital con-tact patch.
Plan your breathing. The most common reason for player exhaus-tion is a failure to plan breathing. Once the plan is settled, mark all ofit in the music and follow it consistently. You cannot produce a consis-tent performance with inconsistent breathing. When planning, considerthese things:
1. Where to breathe. Often, the places are indicated by rests and are completely obvious. When they are not, plan the breathingplaces to cause minimum disruption to the phrasing. Manytimes the breaths can be planned to actually enhance the phras-ing. Listen to any good singer and notice how often he or shebreathes and how little the breathing disturbs the music. If thephrasing is not immediately apparent to you, the “Expression”chapter later in this book should be helpful.
2. What to do when you breathe. On the oboe, you must alwaysexhale first and then inhale. If there is time, complete the fullbreath cycle of exhale/inhale. But there is often not enoughtime. If that is the case, consider what to do—exhale or inhale?If there are two small breathing places relatively close together,you can exhale at one place, play a little longer, and inhale atthe second. If you are uncomfortable arriving at a breathingplace and exhaling, practice this until it is completely natural.Being able to exhale only and continue playing is an essential
10 Fundamentals
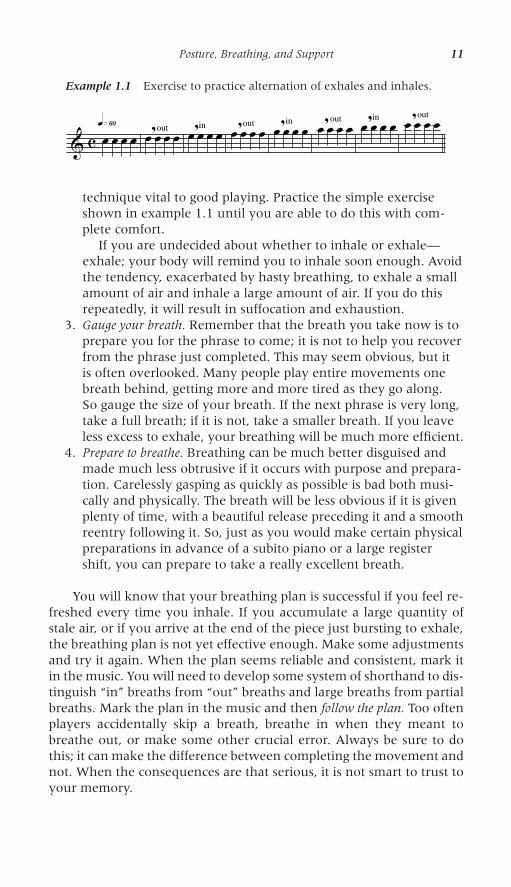
technique vital to good playing. Practice the simple exerciseshown in example 1.1 until you are able to do this with com-plete comfort.
If you are undecided about whether to inhale or exhale—exhale; your body will remind you to inhale soon enough. Avoidthe tendency, exacerbated by hasty breathing, to exhale a smallamount of air and inhale a large amount of air. If you do thisrepeatedly, it will result in suffocation and exhaustion.
3. Gauge your breath. Remember that the breath you take now is toprepare you for the phrase to come; it is not to help you recoverfrom the phrase just completed. This may seem obvious, but it is often overlooked. Many people play entire movements onebreath behind, getting more and more tired as they go along. So gauge the size of your breath. If the next phrase is very long,take a full breath; if it is not, take a smaller breath. If you leaveless excess to exhale, your breathing will be much more efficient.
4. Prepare to breathe. Breathing can be much better disguised andmade much less obtrusive if it occurs with purpose and prepara-tion. Carelessly gasping as quickly as possible is bad both musi-cally and physically. The breath will be less obvious if it is givenplenty of time, with a beautiful release preceding it and a smoothreentry following it. So, just as you would make certain physicalpreparations in advance of a subito piano or a large registershift, you can prepare to take a really excellent breath.
You will know that your breathing plan is successful if you feel re-freshed every time you inhale. If you accumulate a large quantity ofstale air, or if you arrive at the end of the piece just bursting to exhale,the breathing plan is not yet effective enough. Make some adjustmentsand try it again. When the plan seems reliable and consistent, mark itin the music. You will need to develop some system of shorthand to dis-tinguish “in” breaths from “out” breaths and large breaths from partialbreaths. Mark the plan in the music and then follow the plan. Too oftenplayers accidentally skip a breath, breathe in when they meant tobreathe out, or make some other crucial error. Always be sure to dothis; it can make the difference between completing the movement andnot. When the consequences are that serious, it is not smart to trust toyour memory.
Posture, Breathing, and Support 11
Example 1.1 Exercise to practice alternation of exhales and inhales.
& cq»§ºœ œ œ œ outœ,œ œ œ inœ,œ œ œ outœ,œ œ œ inœ,œ œ œ œ, outœ œ œ inœ,œ œ œ outœ,œ œ œ

With enough planning and careful execution, even very taxingpieces will become playable. For the few pieces that remain, you canalways learn to circular breathe.
Circular Breathing for Oboe: A Step-by-Step Guide
Circular breathing is an essential part of oboe technique. Anyone whohas learned to do it will never give it up. But it is not without contro-versy. Laypeople view it as some sort of magic trick—how can air go inand come out at the same time? Of course, glass blowers have beendoing it for centuries, and it was almost surely used while playing somevery ancient instruments. It is in no way a radical, avant-garde tech-nique. Yet circular breathing is still regarded with suspicion by somewho dismiss it as a virtuoso party trick that distorts the natural, humanqualities of music. So it is important never to use it that way. Circularbreathing is not really intended to increase the distance between breath-ing points, which should remain within the realm of comfort (yours andthe listener’s). Rather, it is a wonderful technique to enhance playingand increase comfort. Increased comfort gives increased endurance,more stability, better tone quality, and less tension. It allows players toreach the end of the concert with their power and control still intact.Everyone has sometimes wished for just a little more air (or a little lessair) while playing a phrase. Circular breathing is the answer to thesedilemmas; it can assure almost constant comfort.
Circular breathing can be abused and applied without sensitivity,just like any other technique: we have all heard insensitive tonguing,poor rhythmic discipline, bad intonation, uneven technique, and so on.In each case, it is not the technique that is at fault, but the mastery ofthe technique. An artistic player will play artistically in every case, anda dull one will not. Circular breathing has no effect on this result.
The description that follows is somewhat detailed. Actually, though,circular breathing is not very difficult, and some players are able tolearn it very quickly with only a little guidance. So, if your result feelscorrect and the application of the technique seems effective, feel free toskip steps as you like.
There are two elements to the technique. You must be able to spitair through the reed instead of blowing. And you must be able to breathein and out through your nose while spitting the air in your mouth.“Spitting” means using the cheek muscles and the tongue to force theair inside of your mouth through the reed.
First, we get comfortable spitting. . . .Seal your lips and fill up your cheeks with air. Really puff them out.
Then, using just the cheeks, force the air out of your mouth quickly andaggressively. Make a raspberry noise if you like, do it with enthusiasm,and repeat it until you are comfortable using just the cheeks to expelair through your lips. This is a primitive preliminary exercise to show
12 Fundamentals
that it is possible to expel air stored in the mouth without blowing anyair stored in the lungs.
For a more refined exercise, take a mouthful of water and spit itinto the sink through a coffee straw. A hollow coffee stirrer approxi-mates the resistance of the oboe reed. Practice this until you can spit acontinuous, energetic stream for two or three seconds.
Try the same thing with air. Take the coffee stirrer, submerge it in aglass of water, and see how long you can keep the air bubbles going.Don’t blow air, spit it. You may have to puff your cheeks a fair amount.Observe that a forward movement of the tongue also propels the air.Since the oboe doesn’t need a large quantity of air, that tongue motionwill eventually be all that is needed to push enough air through thereed. The cheek puffing will not be necessary; it is merely a preparatoryexercise to help you isolate the spitting from the blowing.
Initially, separating the spitting from the blowing will be the maindifficulty. We are so used to blowing air and not spitting it that it is easyto revert to blowing without even being aware of it. So return to usingwater and the coffee stirrer as necessary. Continue to puff the cheeks toheighten the awareness that only what is in the mouth is being expelled.
Now try to spit air through a reed. Try to sustain a sound for two orthree seconds. The sound needs to have good energy and intensity andto be around a C in pitch (two octaves above middle C on the piano).Remember to make sure you are spitting air and not blowing air. Prac-tice the spitting until the sound has good duration and intensity. Thismay take a little time. Most initial attempts on the reed sound ratherweak, but they quickly improve with regular practice.
Now try it with the oboe. Adding the oboe to the equation adds someresistance to the picture, but again, you should be able to sustain a soundfor two or three seconds just spitting. Try to use mostly (or entirely) thetongue to push the air through the reed. For now, don’t worry if thesound is unstable or distorted.
Once you’re comfortable spitting, practice breathing in and outwhile doing it. You may want to return to practicing with the coffeestirrer if the oboe’s resistance is too distracting. Then go back to the reedand eventually to the oboe. It is important to practice breathing whilespitting until it works as one motion, not two.
Now comes the tricky part. You want to transition from blowing tospitting to blowing again. Take your time. Most beginners feel like theyhave to do this all in a big rush: do three things at once, and take thebreath in a split second. You don‘t. If you can make a sound for two tothree seconds while spitting, that gives you a lot of time to take yourbreath. Relax.
There will almost always be a small bump in the sound as you makethe transitions. At first, there may be a large bump or even no sound atall. Relax, take your time, and do everything smoothly. It can take time(a year is not too long) before you are confident enough to use circular
Posture, Breathing, and Support 13
breathing in a recital situation. In the meanwhile, practice it duringscales, during long tones, and during loud tutti passages in ensemblerehearsals (Don’t ever waste time in ensembles. You can always dosomething productive to keep your mind occupied, even if nobody canhear a note you play. Think of it as free practice time.) Don’t think ofcircular breathing as a special technique, nor as something particularlydifficult. It is neither. And, as with anything that requires a complexsynchronization of events, do not be troubled by unsuccessful attempts;rather, pay very close attention to the times the technique works beau-tifully, making sure to learn something each time you do it correctly.Think of it like learning to ride a bicycle—very awkward at first, hardto forget later.
Then, after you can do it, pick your spots carefully to keep the smallbumps from being heard. Trills and fast scales are great places to circu-lar breathe. Soft, long, low notes are bad. Some things are very diffi-cult to do while circular breathing. Tonguing while circular breathingrequires an adaptation of the technique—since the tongue is now busyarticulating, the air has to be pushed through the instrument using thecheeks rather than the tongue. This technique can be learned, but itusually isn’t too hard to find an alternate place to circular breathe.
I have never figured out how to create a vibrato while circularbreathing, so expressive exposed passages are not good candidatesunless you learn how to do this. But applied selectively and executedsmoothly, circular breathing can be completely unobtrusive; even yourneighbor onstage might be unaware that you are doing it.
Don’t forget that you can exhale through your nose just as easily asyou can inhale. Often using circular breathing to get rid of a little airis even more refreshing than inhaling.
Now you can enjoy your newfound freedom. For example, the firstlong statement of the Strauss Oboe Concerto has several easy and log-ical places to breathe. Use these to exhale only, and use circular breath-ing to inhale while playing the sixteenth notes. It makes the openingstatement much easier from a physical perspective and leaves youenough energy to actually play fortissimo at the end.
Summary of Chapter 1
Think about breathing and blowing every time you play. Never do itwrong. Remember that if oboe playing sounds bad, it is seldom becauseof some detail. It is almost always because something fundamental wasforgotten. If you don’t sound good, before you embark on any processof correction (often jumping to conclusions), take a little inventory ofthe fundamentals:
· Use good posture.· Take a proper three-stage breath.
14 Fundamentals
· Exhale a portion before playing if the breath was very large(remember that the very large breath is not necessary once youconsistently breathe in a way that brings air to all portions of thelungs equally).
· Support well: elastic, not hard. Feel the focus of the tensionaround the belt buckle, and push inward and upward from there.
· Make sure your reed resists your breath comfortably.· Stay out of your own way. If the right muscles are doing their
work, that should be easy.
If you take care of those few things and have an instrument and areed that function well, you should sound good most of the time withlittle discomfort. Make sure to check yourself (and your students) on aregular basis; these good habits can fall by the wayside as the necessityfor preparing this solo or that audition intrudes. Be vigilant. Until thetechnique of blowing through the instrument is stable, nothing elsecan be.
Posture, Breathing, and Support 15
2
Embouchure andOther Matters ofTone Production
Three factors regulate the quality (dynamic, tone color, etc.) and/or thepitch of the tone: air, reed placement, and embouchure formation. Thebasic ground rules are: the air should be energetic; as little of the reedas is practical should be placed in the mouth; and the embouchure ten-sion should be minimal. After reading the preceding chapter to makesure that the air production is healthy, adjusting the rest of the tone-production chain should be much more effective.
These three factors must work in balance; any deviation in one areawill require compensation by the others. But each element has its pri-mary, though not exclusive, area of responsibility. I assign these dutiesas follows:
· The air is responsible for the dynamic. Just as you exert more energywhen shouting than when whispering, you blow more air for alouder sound and less air for a softer one. Refer to the breathattack exercise described in chapter 1 to make sure that the airenergy is appropriate.
· The embouchure is responsible for the tone color. Of course, this isclosely related to dynamics, since softer playing will want a dullertone color, while louder playing will require a more brilliant one.To find the basically correct embouchure tension, hold the reed(just the reed) in your mouth (no hands) while blowing firmlyand tonguing hard. The reed should bounce only slightly fromthe tonguing, and the pitch of the sound should be C (two oc-
16
taves above middle C on the piano). If the reed bounces and thepitch is lower than C, firm the embouchure (possibly in conjunc-tion with increasing the air) until everything is correct. If thepitch is too high and the reed won’t move no matter how ag -gressively you tongue, the embouchure is too firm.
· The reed placement is responsible for the pitch. More reed in themouth will produce a sharper pitch, while less reed will producea flatter one. It is also necessary to gradually take more reed intothe mouth for higher notes. To find the correct reed placement,start with what you know is too little reed—the sound will be flat and spread. Make sure the air production is healthy and theembouchure has been adjusted as described in the previous para-graph. Then gradually feed in slightly more reed until the soundjust begins to firm up and resonate. In matters of reed place-ment, a millimeter is a large adjustment, so proceed with care.Stop and listen. If the pitch is still slightly low, try to blow thenote into place. Now take in just a tiny bit more reed and noticehow much more shallow the sound becomes. Avoid that place-ment; use the riskier one. In other words, the best place to playis with a reed placement that is just barely not flat.
Of course, these responsibilities inevitably overlap: the reed place-ment will alter the tone color, the embouchure formation will alter thepitch, and the air will alter almost everything. My goal in describingprimary roles for each of these considerations is to encourage the playerto regard air as the chief agent motivating the tone, with everythingelse arranged to support that role. In other words, the air is in charge,not the embouchure nor anything else.
Embouchure Formation
Embouchure formation is difficult to diagram or illustrate, since most ofthe action takes place out of view. Instead, I will discuss a few generalconcepts that will promote an efficient configuration.
The jaw should not be thrust forward. Keep it in a relaxed position,creating the largest possible space inside your mouth. Try this exercise:Place your hand, with the palm facing upward toward the ceiling, onyour chest. Then, without looking down, blow on your hand. The re-sulting jaw position, though slightly exaggerated, is a good starting pointfor forming the embouchure.
The shape of the embouchure is round. Imagine a pucker shape, ora whistle shape turned inward. Imagine you are sucking a very thickmilk shake through a straw, and turn that shape inward. Do not “smile.”
To form the embouchure, place the tip of the reed near the pinkline (the line where the lip meets the skin) on your lower lip. The reedtip should rest a millimeter or two into the red part of your lower lip.
Embouchure and Other Matters of Tone Production 17
Gently roll the lips over the teeth, taking the reed in with them, andclose your mouth. The tip of the reed should extend just beyond thelower lip, allowing the tongue to find it rather easily. When the em-bouchure is formed, the pink line of the lower lip will be exactly evenwith the lower teeth. Players with very full lips may need to start byplacing the reed a little further up on the lower lip—the goal is to haveonly a millimeter or two of reed tip exposed inside the mouth.
This formation will give the reed a fair amount of lip coverage, pre-venting the noisy tip vibrations from being heard too noticeably. Thetip of the reed is the thinnest part, vibrating the most freely and also themost harshly. Some lip coverage of the tip is necessary to muffle andsweeten the sound. Forming the embouchure by placing the reed tiptoo far in will leave too much of the reed’s tip free inside the mouth,giving a harsh sound.
All muscle tension is held at the corners of the mouth. Any tensionin the middle of the mouth where the reed rests should be eliminated.Try saying “mmmmm,” pressing the lips firmly together and creatingmuscle tension in the middle of the lips. If any of that same feeling ispresent while playing, get rid of it. Support the tone with firm corners,energetic air pressure, and proper reed placement—not with biting.
“Biting” is another word most young oboists know, primarily be-cause so many of them are guilty of it. It does not have to mean thatthe jaw or the teeth are doing anything; it is enough if the middle of theembouchure is pinching, even slightly, from above and below the reed.All energy should come from the corners of the mouth, not from aboveand below the reed.
Most young players bite with the best of intentions. Usually theirair production is too weak to support the tone by itself, making the bit-ing almost essential to produce anything tolerable. So simply tellingthe student not to bite is useless: you have to combine that advice withreally effective breathing lessons and active air support.
Forming the embouchure as just described should result in an em-bouchure that leaves none of the red part of the lips exposed. The lipsthemselves have little musculature; the muscles that work the embou -chure surround the lips and are especially felt at the corners of themouth, extending slightly into the cheeks. If there is too little of the lipsinside the mouth, the muscles at the corners of the mouth have noth-ing to act upon, leaving the player little choice but to apply tension tothe reed from above and below. The action of the embouchure shouldcome from the corners of the mouth moving toward the reed. The morepronounced this action is, the more muffled the tone color will be.
It has never worked for me to hold the chin flat. The idea behindthis concept is to free the reed of excess lip coverage, allowing it to vi-brate more freely. For me, the result is that the sound is too shallow andharsh, and I don’t have enough control over the tone color. Many good
18 Fundamentals
players swear by this setup, so if your teacher teaches it, go ahead andfollow it. But, if it feels unnatural to you, you are not alone.
Manipulating Dynamics
Dynamics are regulated primarily with air, with the embouchure join-ing only when the softest sounds require additional support. As muchas possible, control the dynamics with air. Try an experiment: Play adiminuendo using only air. Start mezzo forte and gradually diminish theair (not the support!) until the note quits, sags, or both. The end won’tbe pretty, but that isn’t the point; this is an exercise to find the thresh-old of the reed’s vibration. Try it a few times to get a good feel for thethreshold and the warning signs of its arrival. Adjust your reed if nec-essary; the sound should fade to at least mezzo piano, even piano, be-fore faltering. It is only at this threshold that the embouchure shouldintervene—not before.
Try the diminuendo again, and this time, just before the note beginsto sag, gradually begin to muffle the sound slightly by bringing the cor-ners of your mouth toward the reed. As the embouchure closes, the airwill have to increase slightly to compensate for the artificially increasedresistance of the reed. Continue to bring the embouchure in towardthe reed and continue to blow, with very good attention to support andblowing through the oboe. Do not bite or apply any muscle tension withthe middle of your mouth. (As you bring the corners of your mouth to-ward the middle, the pad in the center of your embouchure, where thereed rests, will become thicker and firmer. That is natural and correctand should not be confused with active muscle participation by themiddle of the mouth. But you must avoid applying any additionalmuscle tension.) Keeping the air and the embouchure balanced shouldpermit you to make a diminuendo to complete silence with little effort.Keep your attention on focusing the air forward and upward, ratherthan on closing the embouchure. Think of using the embouchure tomuffle the tone color. If the note stops before you intended it to, payeven more attention to the air, since the only logical reason for the soundto stop is that there is not enough air. When you practice diminuendosin this way, you will have many failed attempts. Ignore them. Instead,learn from the times when the result is really beautiful and easy.
Reed Placement
It is important to play with as little reed in the mouth as possible. Theadvantages of playing on the tip of the reed are clear. The reed is thin-ner and more pliable there, and thus more easily manipulated with theembouchure. More important, placing too much of the tip of the reedinside the mouth emphasizes the short, brilliant tip vibrations too much.
Embouchure and Other Matters of Tone Production 19
A bit of tip muffling warms up the sound considerably. So play as closeto the tip of the reed as you dare. Arrange your embouchure tensionand reed placement so that if you were to accidentally miss the centerof the note, you would miss flat.
Flat playing is the great fear of oboists. It sounds spread and wild andincompetent. If you play flat, everyone can hear it, and everyone knowsthat something is wrong. Many oboists protect against this embarrass-ment by playing just a little sharp all of the time. That doesn’t soundas bad, but sharp playing is just as out of tune as flat playing is. And byplaying sharp, oboists are depriving themselves of something very valu-able: resonance. The greatest resonance of the oboe, and the finest con-trol, lies in that placement of just-barely-not-flat.
The higher the note, the more reed you need in your mouth. Asyou take in more reed, roll the lips and the reed together. Then, whenyou return to a lower note, the reed can come out of the mouth with-out distorting the embouchure. This movement is controlled by theright thumb; the lips are passive and merely follow the reed.
Always play as near the tip as you can without the pitch sagging.Make sure the air is correct, or nothing can be evaluated with any ac-curacy. If the pitch is a bit low, especially in the upper register, try toblow the note up into place before adjusting anything else.
A Few More Important Things
Rather than worry about the thousands of places in your body thatshould be relaxed, be aware of the two places that require tension: theabdominal muscles around the belt and the facial muscles at the cor-ners of the mouth. Relax everything else.
The interior vowel shape in the mouth should be “awh.” “Oh” and“ah” also work, though not quite as well. Avoid tight sounds like “eh”and especially “ee.” “Awh” works for the range of the oboe up to highE-flat (on the third ledger line above the treble staff). Higher than thatand a tighter vowel shape is needed to voice the notes. Of course, a dif-ferent vowel shape can be used anytime the tone color demands it; butthe “awh” vowel shape is a basic position giving maximum resonanceand fullness. Many players unconsciously close the vowel shape as theygo higher; this can be helpful in keeping the notes focused but shouldnot be done unconsciously. Maintaining an open “awh” vowel shape allthe way to high D or E-flat places an unusual demand on the air supply,something that every player should be able to manage even if they donot use it all the time.
In the extreme high register (high E and above), all bets are off. Toproduce a firm, focused high F or G requires an embouchure firmlystretched over the teeth, lots of air pressure, lots of reed in the mouth,and a tight vowel shape—“ee” works quite well here.
20 Fundamentals
Do not allow any air to puff into the cheeks, nor between the teethand the lips. Even the smallest amount will force the embouchure todistort and weaken.
The tongue, even when not being used for articulation, should bedrawn well back in the mouth. If you imagine your mouth cavity as asphere, the tip of the tongue should be in the exact center of it. Fromthere it will arch upward to nearly meet the roof of your mouth at theback. The tip of the tongue should need only a short motion directlyforward to meet the tip of the reed for tonguing. If the tongue is heldunderneath the reed while playing, articulation will suffer, of course,but so will tone support and stability. If the tip of your tongue is any-where near your lower teeth, draw it back.
Every player has an ideal angle at which he or she holds the oboe.Experiment with raising and lowering the instrument to find your bestspot. The goal is to have the upper and lower lips meet their respectivereed blades at the same spot. The three basic positions could be describedas head up, oboe down; head down, oboe up; and in between. Whilesustaining a good warm forte tone, sweep the oboe up and down untilyou find the most resonant place.
Keep in mind that it is easily possible to overdo all of the recom-mended actions. It is possible to overblow, it is possible to play with toolittle reed in the mouth, and it is certainly possible to play with an em-bouchure that is relaxed to mush. An experienced teacher is essentialfor helping young players find the right balance and maintain steadyprogress toward a healthy tone production.
Tone Concept
The goal of the preceding ideas is to allow players to produce a free,singing tone that comes from the reed and the air doing most of thework. The embouchure should support the reed and support the tone,but it must not interfere with the vibrancy of the reed. It must allow asound as rich in overtones as possible. It is an important characteristicof oboe tone that the overtones are relatively strong compared with thefundamental, which is what gives the oboe its distinctive sound quality.The flute, by comparison, has relatively weak overtones when comparedwith the fundamental, giving it a more pure sound. A brief digressionwill show how to use this information to good purpose.
One of the great difficulties of music making is finding a way to makesubjective things (like tone quality) objective. How do we decide whena tone has quality? If we think about other things of great quality—say,poetry or wine—why are some better than others? Why is a poem byT. S. Eliot better than an advertising jingle? Why are some legendaryvintages better than the everyday glass of wine? It has nothing to dowith what we might like better at that moment—certainly we don’t
Embouchure and Other Matters of Tone Production 21
drink great wine every day, nor do we always read poetry—but there isan intrinsic quality to these things that is just better. What is it? The keyingredient, I think, is density—the poem conveys more information onmore levels using fewer words, while the great wine has more flavorsof greater intensity and longer duration.
Applying this to oboe tone, then, it stands to reason that the mostbeautiful sound on the oboe will be the one with the greatest complexity—in other words, with the greatest saturation of overtones present: “Anyof the attendant higher tones heard with a fundamental tone producedby the vibration of a given string or column of air, having a frequencyof vibration that is an exact multiple of the frequency of the funda-mental.”1 Some of these overtones will be rather brilliant and soundharsh to your ear; do not reject these. Many players, in their effort toproduce a dark sound, will produce a dull one instead. A beautiful soundis not necessarily dark or bright—rather, it is one that contains the mostresonance and complexity without sacrificing control. A truly beautifultone has the entire spectrum of color, ranging from a warm fuzziness atthe bottom to a brilliant, piercing quality at the top. That brilliance orringing in the tone is precisely the ingredient that needs to be encour-aged. It is the most vulnerable part of the tone—any little deviationin reed placement or embouchure action will cause it to disappear. Itspresence is your clue that everything is working properly—that youhave struck the bull’s-eye of the note. It can be very difficult to knowhow you really sound, since the sound in your ear is not the sound inthe listener’s ear. Being alert to the presence of this ringing quality cangive you guidance about when your sound is working well and whenit is not. It is much easier to hear this on some notes than others (upperG and F-sharp at the top of the staff are good places to start), and it ismuch easier to hear it when playing loud rather than soft. Eventually,though, the ringing sound becomes the vehicle that transports yourtone and projects it to the listeners at any dynamic or in any register.
Listen to anyone whose sound you really admire, regardless of theinstrument or voice. Listen as closely as possible, and you will find in-gredients in that sound that on first impression are not noticed. These arewhat propel the sound into even large auditoriums. For a truly fright-ening experience, stand a foot or two away from a really great dramaticopera singer while he or she sings. The impression is deafening, but it isn’tjust loud—there is a brilliant quality to the sound that is almost painfulat close distances. We should cultivate a similar projection in our tone.
While the previous two or three paragraphs may sound like I amencouraging loud playing, that is not at all my point. Resonance is notabout power; it is about focus and placement. A big sound and a loudsound are not the same thing. On the contrary, a big sound results fromthe expansion of a pure compact sound, not from the compression of a
22 Fundamentals
1. Neufeld, Webster’s New World Dictionary of American English, p. 966.
raucous sound. Work to make the most beautiful piano sound possiblewith no effort. Insist that you and your reeds do this. Then, graduallyallow that dolce sonority to grow and expand until your fullest soundstill has that same sweet, focused quality. Until you can play piano withfreedom, projection will be a spotty proposition. When you can playpiano with freedom, you will notice that your sound contains a full spec-trum of variety and color.
Of course, tone concept is formed not just by awareness of yourown sound; it is also formed by awareness of every sound. Listening toplayers and singers of all kinds will help you develop a larger vocabu-lary of the tone elements you want to cultivate; it should also help youdevelop a sense of things you would prefer not to do. Gradually, by ad-dition and subtraction, you will end up with the sound you want. It isreally important not to limit your listening and awareness to oboe toneor to oboe players. Great singers and instrumentalists of all kinds willexpose you to things you will wish you could do.
Every sound concept on the oboe is a balancing act between flexi-bility and agility on the one hand and, for lack of a better word, what wemight call darkness on the other hand. Indeed, this compromise definesthe central tension implicit in reed making: how do we balance the needfor a reed that is vibrant with the need for stability? Again, careful listen-ing and lots of practicing will help each individual find his or her place onthis continuum. Every sound made by every successful player is an artis-tic choice; no one ever sets out to make a tone that spreads or distortsor that others regard as consistently ugly. Every player demands a soundthat complements his or her artistic vision and, as such, deserves respect.
Pitch versus Resonance
On the oboe, pitch and resonance are almost the same thing. The res-onance “bulls-eye” of a note will probably also be its pitch center. Thishelps players in two ways. If you aren’t happy with the tone of a note,determine whether it is flat or sharp. Make the pitch correction, andthe tone will probably improve also. Then, learn to improve your ear bybecoming sensitive to the timbre deviations that accompany out of tuneplaying (thin or shallow for sharpness, weak and whiny for flatness).Most people react more quickly to timbre variations than to minutepitch deviations. All flat notes have a distinct tone quality in common,as do all sharp notes. Use your tuner to learn them, and look for the res-onance center of every note. This topic is discussed further in chapter 6on practicing.
Reeds Again
Without a good reed, none of these ideas will work. The reed needs torespond cleanly and readily at any dynamic; it should play in tune and
Embouchure and Other Matters of Tone Production 23

hold its pitch at any dynamic, any level of air pressure, and any reason -able variation of embouchure tension or reed placement in the mouth.It needs to have a warm, resonant tone that will not flap or spreadwhen pushed, nor die suddenly when diminished; and it needs to havean opening and a resistance that are comfortable. Failure in any of theseareas will cause excess physical tension and result in fatigue and dullplaying.
Vibrato
Perhaps vibrato is a subject more wisely left alone. The eminent Frenchoboist and teacher Pierre Pierlot once said in an interview that he couldsay “nothing sensible about it”2—a sobering caution for someone aboutto say something about it.
Vibrato on the oboe is like a vocal vibrato: it is the natural result ofa mature and efficient tone-production technique. Thus, although itis rare to find a twelve-year-old singer with a decent vibrato, it is justas rare to find a thirty-year-old singer without one. As technique andphysique develop, so does vibrato. The placement of the vibrato—thelong-standing rivalry between “throat” and “diaphragm” vibratos—islargely imaginary. The actual vibrato is created around the larynx, felthigh in the chest. The player may perceive the origin differently, butthat’s where it ends up. Diaphragm vibrato does not exist.
I prefer to teach tone production and let the vibrato come naturally,which it usually does. For those occasions when it doesn’t, a regimenof controlled abdominal thrusts usually gets it started. The followingexercise is likely familiar to anyone who has ever studied the oboe—itis a gradual increase in the speed of abdominal bumps until they reachfour or five per second. At that point, the pulsations will begin to be feltat the bottom of the neck. It is this sympathetic reaction to the abdom-inal thrusts that will become the vibrato we want. Once that is reliable,refinement can begin.
Exercise
To Develop a Natural, Singing Vibrato
Use a metronome setting of 60 as your pulse. Begin by sus-taining a tone (use an easy, free note in the middle of the staff)and “bumping” it very hard from the abdomen once eachpulse. In other words, make a very fast crescendo and dimin-
24 Fundamentals
2. “A Living Legend—Pierre Pierlot: An Interview,” p. 84.
uendo once each second. It needs to be very quick and firm—rather like driving over a speed bump too fast—not just aswelling and a decrease. When the bump is consistent, in-crease the speed to twice per second, then three times, thenfour, up to five. As the speed increases, the bumps will grad -ually become less violent.
At around four pulses per second, the sympathic vibratowill begin to be felt around the larynx. The player will per-ceive it at the base of the neck, where it meets the chest. It isthis vibrato that we want to encourage. The whole point ofthe abdominal pulsing exercise is to create this sympatheticvibrato. Once it does occur, the abdominal pulses can ceaseand the support held steady, while the vibrato takes place inthe upper chest. It will take the student some time to learn to control and refine this, but he or she will eventually gain a beautiful singing vibrato.
Some variation in placement is to be expected. If the result of thepreceding exercise is a pleasing vibrato that feels like it originates aninch higher or lower, this is not important. Indeed, moving the vibratoup or down and altering the perceived expansion of the throat areuseful ways of controlling the speed and the amplitude of the effect.Moving it higher will speed up the vibrato, while a feeling of greaterexpansion—I feel an almost bullfrog-like expansion near the bottom ofmy neck—increases the amplitude.
Vibrato produced in this way is very natural, but rather dependenton air speed: the more air intensity required to produce the tone, thefaster the vibrato tends to be. This helps us in many ways, since highnotes on the oboe sound better with faster vibrato than do low notes onthe English horn. If the air intensity drops too low (which it will whenyou are playing very softly, for instance), the vibrato will cease to occurby itself. However, after enough experience with producing it naturally,the student will also learn to mimic the same mechanism to artificiallyapply vibrato in any situation.
An important musical note on the use of vibrato: it is decoration. Asoboists, we are fortunate that there is no traditional expectation govern-ing our use of vibrato. Flutists use it almost constantly; clarinetists rarelydo. For us, it is not an essential part of the sound, but an expressive de-vice used to help explain the music. Be sure to use it with intelligence.Vibrato used continuously is no more interesting than no vibrato at all.Be sure to use it only after the basic tone and phrase are beautiful.Think of it as painting a piece of furniture. If the piece is ugly or dam-aged, or even merely scratched, paint won’t help it look better. Be veryattentive that you are not using vibrato to hide either an underlyinglack of integrity in your intonation or a lack of intensity in your toneproduction.
Embouchure and Other Matters of Tone Production 25
Exercise
Very Difficult
Play any slow Ferling etude with no vibrato at all. Make all of your dynamic and color changes; play all the nuances andinflections you want, but don’t use any vibrato. Only afteryou can play in tune without vibrato, and play with truepropulsion and intensity in your phrasing with no vibrato,should you allow it back in. Then it will fulfill its true purposeof making your playing more beautiful.
This exercise may prove to be very difficult, and some students re-port that their support and blowing feel different when playing withoutvibrato, an indication that the vibrato is being applied to a sound with-out proper integrity and support.
Conclusion
The oboe is played with your whole body. You shape a note not justwith your mouth or your reed or your breath, but with your whole phys-ical and mental attitude. The oboe is a treacherous instrument; it is en-tirely possible to do everything correctly and still get an unexpectedresult. Do not let this make you cautious. Much unpleasant and tenseoboe playing is merely the result of fear, of an attitude that strives toprevent bad things rather than to create good things. To play where thereal resonance and beauty of the oboe lie, you must take risks—you mustmiss once in a while. If you never miss, you will never know where thelimits are, and you will never approach them. Your playing will feel safe(a desirable goal) and sound dull (a very undesirable one). Work toimprove your ear, your reeds, your technique, and your imagination,so that you become a successful risk taker, not a risk avoider.
26 Fundamentals
3
Finger Facility
The preceding chapters describe a method of sound production thatshould result in a free and easy tone that functions well in all registersand at all dynamic levels. If those techniques are mastered, the onlyremaining aspects of basic playing technique are finger facility and ar-ticulation. Finger facility is discussed in this chapter, articulation in thenext.
Technique is like money: it’s hard to have too much of it. But thelack of technique (or money) is painful, even when the shortfall is onlya few dollars a week. Applied correctly, technique becomes an artistictool—you have so many more possibilities you can exploit and utilize.Moreover, technique is a measure of your devotion to your art and yourcraft. Technique takes work, and work takes persistence and time. Thereare many aspects of playing that improve at an irregular rate: tone qual-ity, intonation, phrasing, reed making—the list goes on. But the morehours you spend on technique, the better it will become. A player witha consistently excellent technique is someone who will be in demand.Orchestral auditions reward those players who can make the right soundat the right time, and playing the right notes is an essential element ofthis competence.
Technique
First, begin by bringing the hands to the oboe in a comfortable, efficientposition. To establish this, stand comfortably straight and let both hands
27
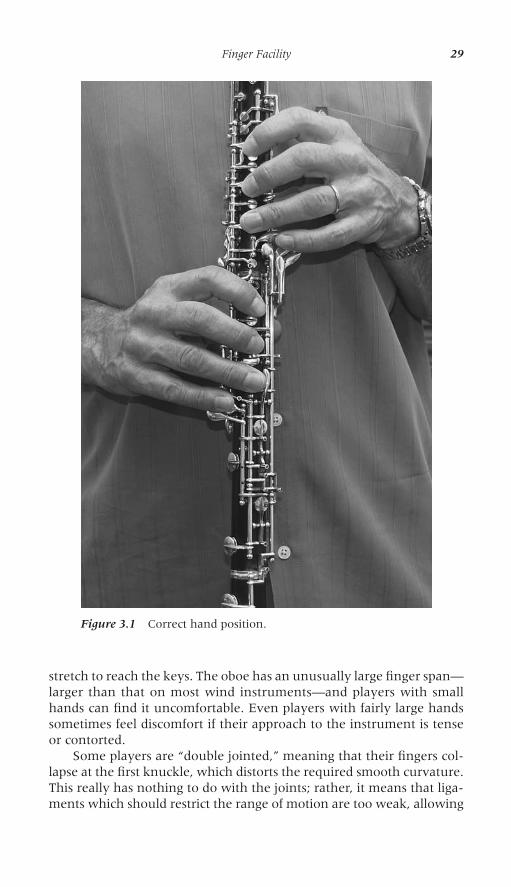
hang easily to your sides. Observe the curvature of the fingers whenthe hands are hanging, relaxed. This same gentle curvature should bepresent when holding and playing the instrument. Set the thumb reston the upper side of the right thumb (in other words, the thumbnailshould face more toward your body than toward the ceiling) betweenthe nail and the knuckle. If done correctly, the weight of the instrumentwill be supported by the limit of the thumb’s range of motion and willnot need the hand muscles to hold it up. Holding the instrument on thetop of the thumb, with the nail facing the ceiling, requires too muchmuscular participation and can cause hand strain. Also, do not allow thethumb rest to stray too close to the end of your thumb (resting abovethe nail rather than between the nail and the knuckle), because thatwill amplify the weight of the instrument. See figure 3.1 for the correcthand position.
Notice that if the instrument is allowed to hang on the right thumbwith no additional support, it will fall forward. Bring it back toward youwith your left hand. The finger pressure created by this motion is all thepressure you should need to close the holes. Do not squeeze the oboe—if you can feel thumb pressure against the wood, you are squeezing.While not advisable, it should be possible to play with the left thumbcompletely off the wood. If more finger pressure is needed to make theoboe cover and play reliably, have it repaired. Technique will be severelycompromised if the fingers are rigid and tense.
Cover the keys with the pads of your fingers. This is the same partof the finger that is often used to hold a pencil or grasp a fork—in otherwords, not the very tip, but rather the softer part just behind. Using thevery tips of your fingers gives an exaggerated, spidery hand position andshould be avoided. Neither should the fingers be completely flat, flailingat the oboe.
Observe your wrists. They should be nearly straight: the hand shouldbe neither higher nor lower than the wrists. It may be necessary to ro-tate the hand slightly away from or toward the oboe, or you might haveto turn the reed slightly to the right or the left to give the hands theproper approach to the oboe. Bent wrists often go hand in hand withincorrect finger orientation: if the player uses the tips of the fingers tocover the keys, the wrists are more likely to be wrong as well. And ifthe elbows are too far from the body, the wrists will again be forced intothe bent position. The elbows should be no more than three or fourinches away from the body.
The knuckles should be parallel to the instrument or slightly raised.The side octave key (on the left hand) and the alternate A-flat key (onthe right hand) should each be felt lightly under the corresponding indexfinger. To get the correct position, place your right index finger on theF-sharp key, put your right little finger on the C-sharp key, and let theother fingers fall naturally into place. At this point you may notice thatthere is nothing especially “natural” about this—that the hand has to
28 Fundamentals
stretch to reach the keys. The oboe has an unusually large finger span—larger than that on most wind instruments—and players with smallhands can find it uncomfortable. Even players with fairly large handssometimes feel discomfort if their approach to the instrument is tenseor contorted.
Some players are “double jointed,” meaning that their fingers col-lapse at the first knuckle, which distorts the required smooth curvature.This really has nothing to do with the joints; rather, it means that liga-ments which should restrict the range of motion are too weak, allowing
Finger Facility 29
Figure 3.1 Correct hand position.
fingers to move in opposing directions. This limitation can be overcomeby building up muscle strength. A simple isometric exercise is usuallyenough to correct the flaw. Place the hand with the palm facing down-ward on a tabletop. Press the affected finger firmly against the table fora few seconds and release. Do not allow the joint to collapse—keep itcurved. Repeat this exercise many times. It can be done almost anywhereat any time to build up the required strength. Of course, too much fin-ger pressure on the keys, which should be corrected before taking anyother measures, can easily cause breaks in the finger curvature.
Keep the fingers as close to the oboe as possible. This is feasible onlyif you use light pressure. If pressure is heavy, you will need to lift thefingers aggressively. Now they will likely be too far away from the in-strument and will need to be re-placed aggressively to arrive on time forthe next note. Tension is the enemy of technique.
Relaxation in technique flows from a relaxed and efficient tone pro-duction. If tension is required to make the sound, the tension will spreadthrough the rest of the body. Habitual tension, combined with hours ofrepetitive activity, can eventually cause discomfort or even injury. Thearms and shoulders are the most commonly afflicted, with the rightarm affected more frequently than the left. I am not a medical expert,so I will not advise on specific maladies or remedies, but I will issue thispractical caution: if you begin to feel pain, stop what you are doing. Themaxim, “no pain, no gain” does not apply to playing a musical instru-ment. If the pain persists after you stop playing, seek advice from yourteacher or a colleague about therapeutic options. Do not try to playthrough it; do not wait for it to get better. Seek help. Regrettably, over-use injury is common enough that finding recommendations for ther-apists or other medical professionals should not be too difficult.
Too many players wait until the symptoms of the injury are un -deniable before trying to find a remedy. By that time, the injury mighthave been months in the making, which means that relief will be monthsaway. Occasional temporary discomfort is normal when playing; painthat persists after the playing stops is not. Do not try to be a hero in thisregard—if you think something is wrong, seek help immediately. It isnot an admission of weakness to be very open and honest about this.Start by having a conversation with your teacher or a trusted colleague;you will not be the first player who has had a complaint. If playinghurts, that is an important clue telling you that something is not work-ing efficiently and needs to be further examined.
Practice technique slowly. You need control and ease. Withoutcontrol and ease, speed cannot be achieved. When you have practicedenough, fast will be exactly the same as slow, just faster. The fingers willstay close to the instrument and move with light motions. Ideally, it willfeel as light and easy as drumming your fingers; an observer sitting morethan a few feet away won’t really be able to see your fingers move.
30 Fundamentals
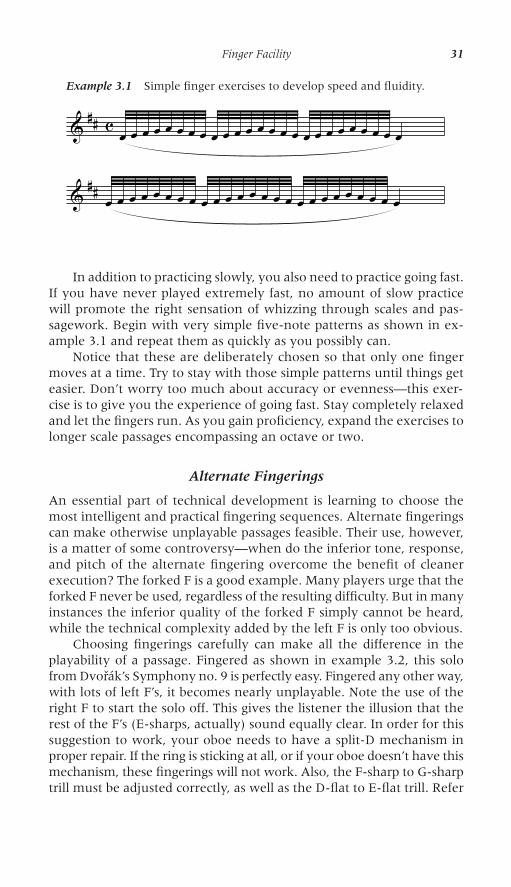
In addition to practicing slowly, you also need to practice going fast.If you have never played extremely fast, no amount of slow practicewill promote the right sensation of whizzing through scales and pas-sagework. Begin with very simple five-note patterns as shown in ex-ample 3.1 and repeat them as quickly as you possibly can.
Notice that these are deliberately chosen so that only one fingermoves at a time. Try to stay with those simple patterns until things geteasier. Don’t worry too much about accuracy or evenness—this exer-cise is to give you the experience of going fast. Stay completely relaxedand let the fingers run. As you gain proficiency, expand the exercises tolonger scale passages encompassing an octave or two.
Alternate Fingerings
An essential part of technical development is learning to choose themost intelligent and practical fingering sequences. Alternate fingeringscan make otherwise unplayable passages feasible. Their use, however,is a matter of some controversy—when do the inferior tone, response,and pitch of the alternate fingering overcome the benefit of cleanerexecution? The forked F is a good example. Many players urge that theforked F never be used, regardless of the resulting difficulty. But in manyinstances the inferior quality of the forked F simply cannot be heard,while the technical complexity added by the left F is only too obvious.
Choosing fingerings carefully can make all the difference in theplayability of a passage. Fingered as shown in example 3.2, this solofrom Dvorák’s Symphony no. 9 is perfectly easy. Fingered any other way,with lots of left F’s, it becomes nearly unplayable. Note the use of theright F to start the solo off. This gives the listener the illusion that therest of the F’s (E-sharps, actually) sound equally clear. In order for thissuggestion to work, your oboe needs to have a split-D mechanism inproper repair. If the ring is sticking at all, or if your oboe doesn’t have thismechanism, these fingerings will not work. Also, the F-sharp to G-sharptrill must be adjusted correctly, as well as the D-flat to E-flat trill. Refer
Finger Facility 31
Example 3.1 Simple finger exercises to develop speed and fluidity.
& ## c œ œ œ œ œ œ œ œ œ œ œ œ œ œ œ œ œ œ œ œ œ œ œ œ œ
& ## œ œ œ œ œ œ œ œ œ œ œ œ œ œ œ œ œ œ œ œ œ œ œ œ œ
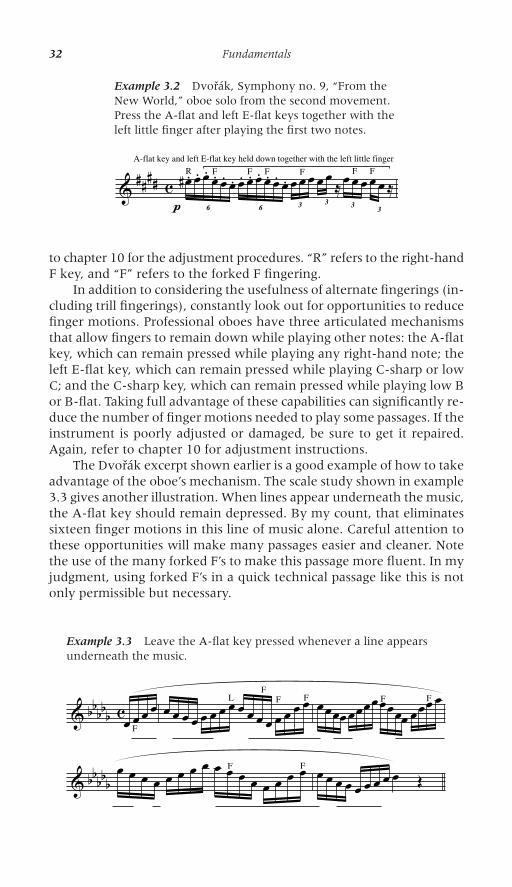
to chapter 10 for the adjustment procedures. “R” refers to the right-handF key, and “F” refers to the forked F fingering.
In addition to considering the usefulness of alternate fingerings (in-cluding trill fingerings), constantly look out for opportunities to reducefinger motions. Professional oboes have three articulated mechanismsthat allow fingers to remain down while playing other notes: the A-flatkey, which can remain pressed while playing any right-hand note; theleft E-flat key, which can remain pressed while playing C-sharp or lowC; and the C-sharp key, which can remain pressed while playing low Bor B-flat. Taking full advantage of these capabilities can significantly re-duce the number of finger motions needed to play some passages. If theinstrument is poorly adjusted or damaged, be sure to get it repaired.Again, refer to chapter 10 for adjustment instructions.
The Dvorák excerpt shown earlier is a good example of how to takeadvantage of the oboe’s mechanism. The scale study shown in example3.3 gives another illustration. When lines appear underneath the music,the A-flat key should remain depressed. By my count, that eliminatessixteen finger motions in this line of music alone. Careful attention tothese opportunities will make many passages easier and cleaner. Notethe use of the many forked F’s to make this passage more fluent. In myjudgment, using forked F’s in a quick technical passage like this is notonly permissible but necessary.
32 Fundamentals
Example 3.2 Dvorák, Symphony no. 9, “From theNew World,” oboe solo from the second movement.Press the A-flat and left E-flat keys together with theleft little finger after playing the first two notes.
& #### cp 6
œ# .R œ. œ. œ.F œ.A-flat key and left E-flat key held down together with the left little finger
œ.6
œ. œ.F œ. œ.F œ. œ.3
œ œF œ3
œ œ ≈3
œ œF œ3
œF œ ≈
Example 3.3 Leave the A-flat key pressed whenever a line appearsunderneath the music.
& bbbbb cFœ œ œœ Lœ œ œ œ œ œ œ œ œ œ œ
F
œ œF œ œ œF œœœœ œœœœ œF œœœ œœœF œ
& bbbbb œ œ œ œ œ œ œ œ œ œF œ œ œ œ œ œF œ œ œ œ œ œ œ œ œ Œ
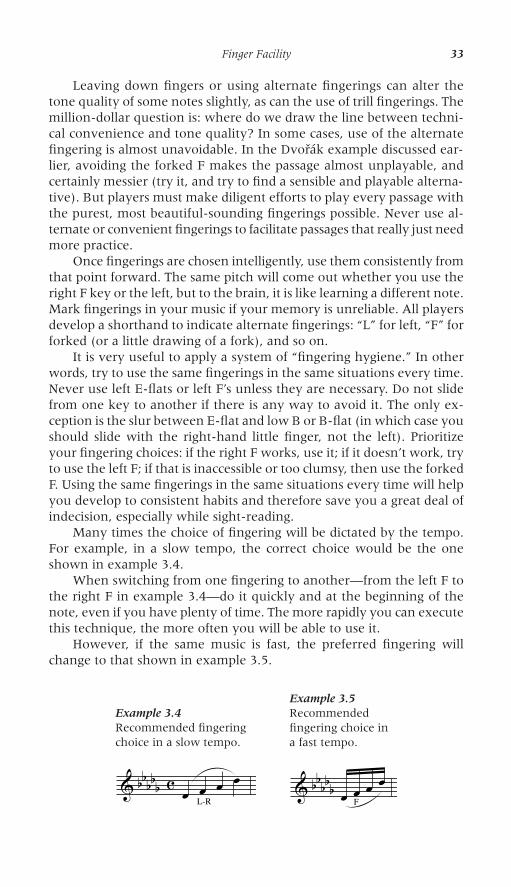
Leaving down fingers or using alternate fingerings can alter thetone quality of some notes slightly, as can the use of trill fingerings. Themillion-dollar question is: where do we draw the line between tech ni-cal convenience and tone quality? In some cases, use of the alternatefingering is almost unavoidable. In the Dvorák example discussed ear-lier, avoiding the forked F makes the passage almost unplayable, andcertainly messier (try it, and try to find a sensible and playable alterna-tive). But players must make diligent efforts to play every passage withthe purest, most beautiful-sounding fingerings possible. Never use al-ternate or convenient fingerings to facilitate passages that really just needmore practice.
Once fingerings are chosen intelligently, use them consistently fromthat point forward. The same pitch will come out whether you use theright F key or the left, but to the brain, it is like learning a different note.Mark fingerings in your music if your memory is unreliable. All playersdevelop a shorthand to indicate alternate fingerings: “L” for left, “F” forforked (or a little drawing of a fork), and so on.
It is very useful to apply a system of “fingering hygiene.” In otherwords, try to use the same fingerings in the same situations every time.Never use left E-flats or left F’s unless they are necessary. Do not slidefrom one key to another if there is any way to avoid it. The only ex-ception is the slur between E-flat and low B or B-flat (in which case youshould slide with the right-hand little finger, not the left). Prioritizeyour fingering choices: if the right F works, use it; if it doesn’t work, tryto use the left F; if that is inaccessible or too clumsy, then use the forkedF. Using the same fingerings in the same situations every time will helpyou develop to consistent habits and therefore save you a great deal ofindecision, especially while sight-reading.
Many times the choice of fingering will be dictated by the tempo.For example, in a slow tempo, the correct choice would be the oneshown in example 3.4.
When switching from one fingering to another—from the left F tothe right F in example 3.4—do it quickly and at the beginning of thenote, even if you have plenty of time. The more rapidly you can executethis technique, the more often you will be able to use it.
However, if the same music is fast, the preferred fingering willchange to that shown in example 3.5.
Finger Facility 33
Example 3.4Recommended fingeringchoice in a slow tempo.
& bbbbb c œ œL-Rœ œ
Example 3.5Recommendedfingering choice ina fast tempo.
& bbbbb œ œF œœ
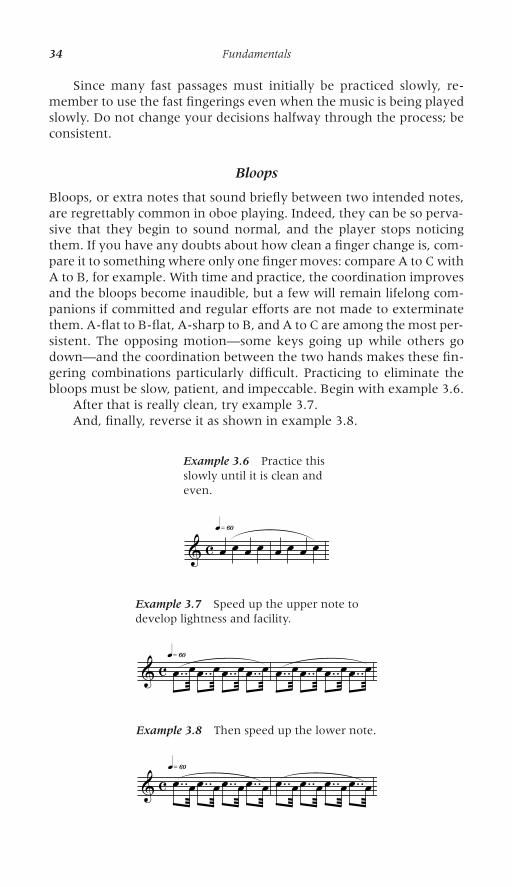
Since many fast passages must initially be practiced slowly, re-member to use the fast fingerings even when the music is being playedslowly. Do not change your decisions halfway through the process; beconsistent.
Bloops
Bloops, or extra notes that sound briefly between two intended notes,are regrettably common in oboe playing. Indeed, they can be so perva-sive that they begin to sound normal, and the player stops noticingthem. If you have any doubts about how clean a finger change is, com-pare it to something where only one finger moves: compare A to C withA to B, for example. With time and practice, the coordination improvesand the bloops become inaudible, but a few will remain lifelong com-panions if committed and regular efforts are not made to exterminatethem. A-flat to B-flat, A-sharp to B, and A to C are among the most per-sistent. The opposing motion—some keys going up while others godown—and the coordination between the two hands makes these fin-gering combinations particularly difficult. Practicing to eliminate thebloops must be slow, patient, and impeccable. Begin with example 3.6.
After that is really clean, try example 3.7.And, finally, reverse it as shown in example 3.8.
34 Fundamentals
Example 3.6 Practice thisslowly until it is clean andeven.
& c œq»§ºœ œ œ œ œ œ œ
Example 3.7 Speed up the upper note todevelop lightness and facility.
& c . .œq»§º œ . .œ œ . .œ œ . .œ œ . .œ œ . .œ œ . .œ œ . .œ œ
Example 3.8 Then speed up the lower note.
& c . .œq»§º œ . .œ œ . .œ œ . .œ œ . .œ œ . .œ œ . .œ œ . .œ œ
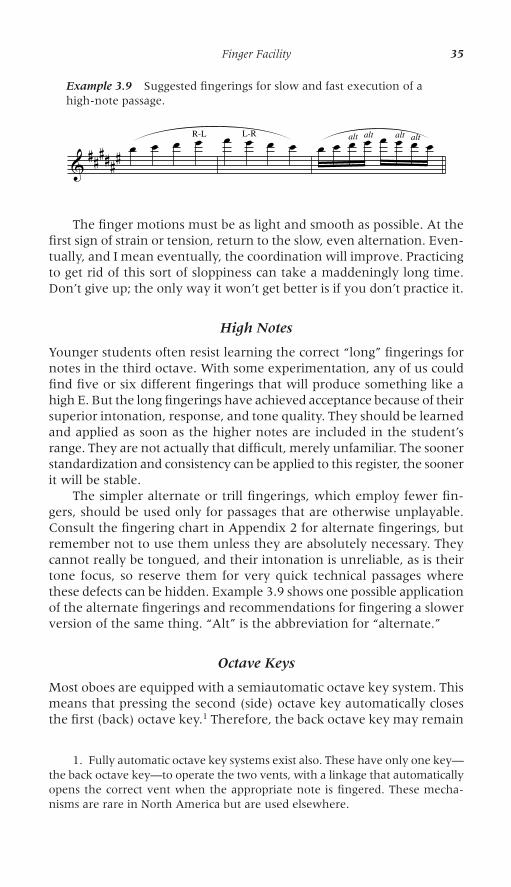
The finger motions must be as light and smooth as possible. At thefirst sign of strain or tension, return to the slow, even alternation. Even-tually, and I mean eventually, the coordination will improve. Practicingto get rid of this sort of sloppiness can take a maddeningly long time.Don’t give up; the only way it won’t get better is if you don’t practice it.
High Notes
Younger students often resist learning the correct “long” fingerings fornotes in the third octave. With some experimentation, any of us couldfind five or six different fingerings that will produce something like ahigh E. But the long fingerings have achieved acceptance because of theirsuperior intonation, response, and tone quality. They should be learnedand applied as soon as the higher notes are included in the student’srange. They are not actually that difficult, merely unfamiliar. The soonerstandardization and consistency can be applied to this register, the soonerit will be stable.
The simpler alternate or trill fingerings, which employ fewer fin-gers, should be used only for passages that are otherwise unplayable.Consult the fingering chart in Appendix 2 for alternate fingerings, butremember not to use them unless they are absolutely necessary. Theycannot really be tongued, and their intonation is unreliable, as is theirtone focus, so reserve them for very quick technical passages wherethese defects can be hidden. Example 3.9 shows one possible applicationof the alternate fingerings and recommendations for fingering a slowerversion of the same thing. “Alt” is the abbreviation for “alternate.”
Octave Keys
Most oboes are equipped with a semiautomatic octave key system. Thismeans that pressing the second (side) octave key automatically closesthe first (back) octave key.1 Therefore, the back octave key may remain
Finger Facility 35
Example 3.9 Suggested fingerings for slow and fast execution of ahigh-note passage.
& ######R-Lœ œ œ œ œ œL-R œ œ altœ œ œ œalt œ œalt œalt œ
1. Fully automatic octave key systems exist also. These have only one key—the back octave key—to operate the two vents, with a linkage that automaticallyopens the correct vent when the appropriate note is fingered. These mecha-nisms are rare in North America but are used elsewhere.
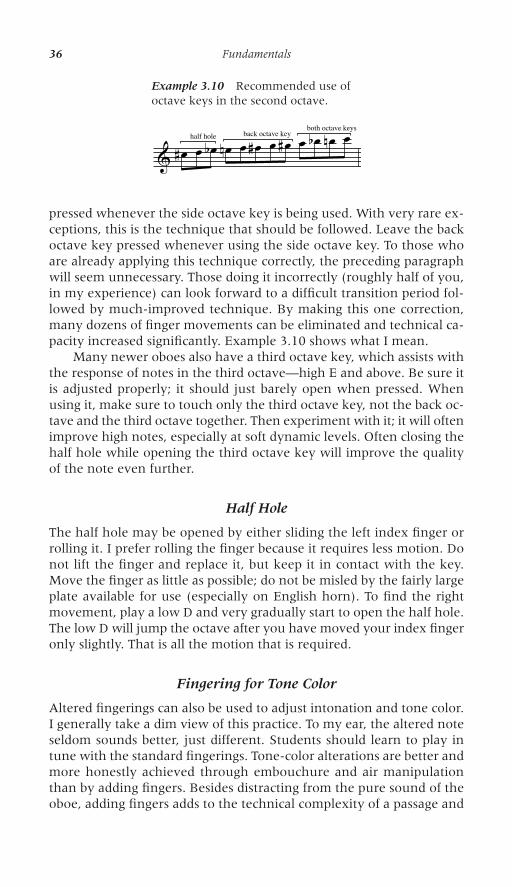
pressed whenever the side octave key is being used. With very rare ex-ceptions, this is the technique that should be followed. Leave the backoctave key pressed whenever using the side octave key. To those whoare already applying this technique correctly, the preceding paragraphwill seem unnecessary. Those doing it incorrectly (roughly half of you,in my experience) can look forward to a difficult transition period fol-lowed by much-improved technique. By making this one correction,many dozens of finger movements can be eliminated and technical ca-pacity increased significantly. Example 3.10 shows what I mean.
Many newer oboes also have a third octave key, which assists withthe response of notes in the third octave—high E and above. Be sure itis adjusted properly; it should just barely open when pressed. Whenusing it, make sure to touch only the third octave key, not the back oc-tave and the third octave together. Then experiment with it; it will oftenimprove high notes, especially at soft dynamic levels. Often closing thehalf hole while opening the third octave key will improve the qualityof the note even further.
Half Hole
The half hole may be opened by either sliding the left index finger orrolling it. I prefer rolling the finger because it requires less motion. Donot lift the finger and replace it, but keep it in contact with the key.Move the finger as little as possible; do not be misled by the fairly largeplate available for use (especially on English horn). To find the rightmovement, play a low D and very gradually start to open the half hole.The low D will jump the octave after you have moved your index fingeronly slightly. That is all the motion that is required.
Fingering for Tone Color
Altered fingerings can also be used to adjust intonation and tone color.I generally take a dim view of this practice. To my ear, the altered noteseldom sounds better, just different. Students should learn to play intune with the standard fingerings. Tone-color alterations are better andmore honestly achieved through embouchure and air manipulationthan by adding fingers. Besides distracting from the pure sound of theoboe, adding fingers adds to the technical complexity of a passage and
36 Fundamentals
Example 3.10 Recommended use ofoctave keys in the second octave.
& œ#half holeœ œb œn back octave keyœ œ# œ œ# œ both octave keysœb œn œ
can easily result in indecision and confusion while one is sight-reading.Try to avoid this practice until you really have some unusual demandthat cannot be met any other way.
English Horn
Hand position on the English horn should be the same as for oboe, butit is complicated by the fact that the instrument is longer, requiring bothhands, especially the right, to be held lower. For players with shortertorsos, this can cause a very cramped position for a hand that has to sup-port the instrument while still fingering notes. A neck strap is a goodremedy—the ones with elastic cords do a fine job of supporting theinstrument while still giving the player some freedom—but even withit, some people may find the English horn too difficult to manage. It isbetter not to force the issue of English horn playing if the player com-plains of tension or pain.
Some players routinely use different fingerings for some Englishhorn notes to help with pitch stability or tone focus. Consult the fin-gering chart in Appendix 2 for the fingerings I find most useful.
Summary for Chapter 3
· Keep fingers relaxed and near the instrument.· Choose fingerings carefully and apply them consistently.· Utilize every opportunity to reduce finger motions.· Learn and use alternate fingerings as appropriate.
Finger Facility 37
4
Articulation
First, verify that the tongue is correctly positioned in the mouth whileplaying. Make your most beautiful sound on an easy note. If we imag-ine the mouth cavity as having a spherical shape, the tip of the tongueshould be in the center of that sphere, gradually arching back towardthe roof of your mouth. From this position, it’s a simple motion forwardto touch the reed. If the tongue does not feel like it is moving forward—directly forward—to strike the reed, it is in the wrong place and mustbe repositioned. Some players hold the tip of the tongue under the tip ofthe reed (some even place the tongue as far forward as the lower teeth),which is incorrect. The correct tongue placement is important for fo-cusing the tone as well as for facility in articulation. It should remain inthis position regardless of whether the music requires tonguing or not.
Once positioned correctly, the tip of the tongue should strike thetip of the reed. A slight bias toward the upper side of the tongue tip strik-ing the lower blade of the reed is permissible. Take note of the word“slight”—imagine a couple of taste buds worth of bias, not any mea sur-able distance.
Do not tongue hard. Touch the reed gently and quickly. Keep thetongue close to the reed and bounce it off the reed tip. The air makesthe tone; the tongue prevents it. Tonguing is often thought of as touch-ing the reed with the tongue, but the tone starts when the tongue isreleased from the reed.
According to my way of playing, it is a rule that the tongue shouldalways start the note and never stop the note. Breath attacks (starting
38
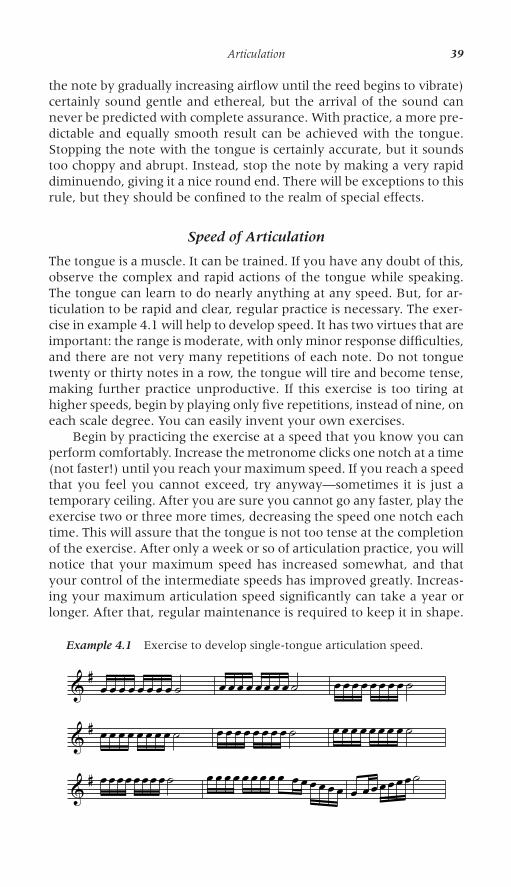
the note by gradually increasing airflow until the reed begins to vibrate)certainly sound gentle and ethereal, but the arrival of the sound cannever be predicted with complete assurance. With practice, a more pre-dictable and equally smooth result can be achieved with the tongue.Stopping the note with the tongue is certainly accurate, but it soundstoo choppy and abrupt. Instead, stop the note by making a very rapiddiminuendo, giving it a nice round end. There will be exceptions to thisrule, but they should be confined to the realm of special effects.
Speed of Articulation
The tongue is a muscle. It can be trained. If you have any doubt of this,observe the complex and rapid actions of the tongue while speaking.The tongue can learn to do nearly anything at any speed. But, for ar-ticulation to be rapid and clear, regular practice is necessary. The exer-cise in example 4.1 will help to develop speed. It has two virtues that areimportant: the range is moderate, with only minor response difficulties,and there are not very many repetitions of each note. Do not tonguetwenty or thirty notes in a row, the tongue will tire and become tense,making further practice unproductive. If this exercise is too tiring athigher speeds, begin by playing only five repetitions, instead of nine, oneach scale degree. You can easily invent your own exercises.
Begin by practicing the exercise at a speed that you know you canperform comfortably. Increase the metronome clicks one notch at a time(not faster!) until you reach your maximum speed. If you reach a speedthat you feel you cannot exceed, try anyway—sometimes it is just atemporary ceiling. After you are sure you cannot go any faster, play theexercise two or three more times, decreasing the speed one notch eachtime. This will assure that the tongue is not too tense at the completionof the exercise. After only a week or so of articulation practice, you willnotice that your maximum speed has increased somewhat, and thatyour control of the intermediate speeds has improved greatly. Increas-ing your maximum articulation speed significantly can take a year orlonger. After that, regular maintenance is required to keep it in shape.
Articulation 39
Example 4.1 Exercise to develop single-tongue articulation speed.
& # œ œ œ œ œ œ œ œ ˙ œ œ œ œ œ œ œ œ ˙ œ œ œ œ œ œ œ œ ˙
& # œ œ œ œ œ œ œ œ ˙ œ œ œ œ œ œ œ œ ˙ œ œ œ œ œ œ œ œ ˙
& # œ œ œ œ œ œ œ œ ˙ œ œ œ œ œ œ œ œ œ œ œ œ œ œ œ œ œ œ œ œ œ œ ˙
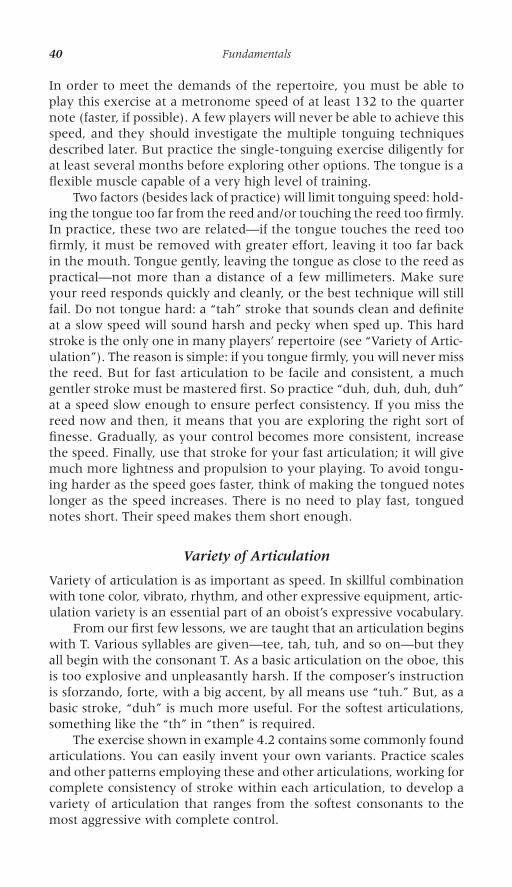
In order to meet the demands of the repertoire, you must be able toplay this exercise at a metronome speed of at least 132 to the quarternote (faster, if possible). A few players will never be able to achieve thisspeed, and they should investigate the multiple tonguing techniquesdescribed later. But practice the single-tonguing exercise diligently forat least several months before exploring other options. The tongue is aflexible muscle capable of a very high level of training.
Two factors (besides lack of practice) will limit tonguing speed: hold-ing the tongue too far from the reed and/or touching the reed too firmly.In practice, these two are related—if the tongue touches the reed toofirmly, it must be removed with greater effort, leaving it too far backin the mouth. Tongue gently, leaving the tongue as close to the reed aspractical—not more than a distance of a few millimeters. Make sureyour reed responds quickly and cleanly, or the best technique will stillfail. Do not tongue hard: a “tah” stroke that sounds clean and definiteat a slow speed will sound harsh and pecky when sped up. This hardstroke is the only one in many players’ repertoire (see “Variety of Artic-ulation”). The reason is simple: if you tongue firmly, you will never missthe reed. But for fast articulation to be facile and consistent, a muchgentler stroke must be mastered first. So practice “duh, duh, duh, duh”at a speed slow enough to ensure perfect consistency. If you miss thereed now and then, it means that you are exploring the right sort offinesse. Gradually, as your control becomes more consistent, increasethe speed. Finally, use that stroke for your fast articulation; it will givemuch more lightness and propulsion to your playing. To avoid tongu-ing harder as the speed goes faster, think of making the tongued noteslonger as the speed increases. There is no need to play fast, tonguednotes short. Their speed makes them short enough.
Variety of Articulation
Variety of articulation is as important as speed. In skillful combinationwith tone color, vibrato, rhythm, and other expressive equipment, artic-ulation variety is an essential part of an oboist’s expressive vocabulary.
From our first few lessons, we are taught that an articulation beginswith T. Various syllables are given—tee, tah, tuh, and so on—but theyall begin with the consonant T. As a basic articulation on the oboe, thisis too explosive and unpleasantly harsh. If the composer’s instructionis sforzando, forte, with a big accent, by all means use “tuh.” But, as abasic stroke, “duh” is much more useful. For the softest articulations,something like the “th” in “then” is required.
The exercise shown in example 4.2 contains some commonly foundarticulations. You can easily invent your own variants. Practice scalesand other patterns employing these and other articulations, working forcomplete consistency of stroke within each articulation, to develop avariety of articulation that ranges from the softest consonants to themost aggressive with complete control.
40 Fundamentals
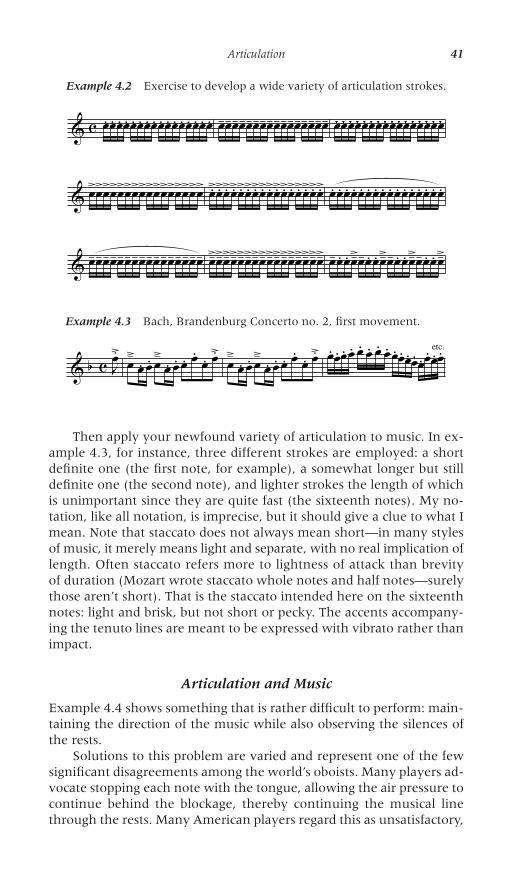
Then apply your newfound variety of articulation to music. In ex-ample 4.3, for instance, three different strokes are employed: a shortdefinite one (the first note, for example), a somewhat longer but stilldefinite one (the second note), and lighter strokes the length of whichis unimportant since they are quite fast (the sixteenth notes). My no-tation, like all notation, is imprecise, but it should give a clue to what Imean. Note that staccato does not always mean short—in many stylesof music, it merely means light and separate, with no real implication oflength. Often staccato refers more to lightness of attack than brevityof duration (Mozart wrote staccato whole notes and half notes—surelythose aren’t short). That is the staccato intended here on the sixteenthnotes: light and brisk, but not short or pecky. The accents accompany-ing the tenuto lines are meant to be expressed with vibrato rather thanimpact.
Articulation and Music
Example 4.4 shows something that is rather difficult to perform: main-taining the direction of the music while also observing the silences ofthe rests.
Solutions to this problem are varied and represent one of the fewsignificant disagreements among the world’s oboists. Many players ad-vocate stopping each note with the tongue, allowing the air pressure tocontinue behind the blockage, thereby continuing the musical linethrough the rests. Many American players regard this as unsatisfactory,
Articulation 41
Example 4.2 Exercise to develop a wide variety of articulation strokes.
& c œ. œ. œ. œ. œ. œ. œ. œ. œ. œ. œ. œ. œ. œ. œ. œ. œ-œ-œ-œ-œ-œ-œ-œ-œ-œ-œ-œ-œ-œ-œ-œ- œÆÆ œÆÆ œÆÆ œÆÆ œÆÆ œÆÆ œÆÆ œÆÆ œÆÆ œÆÆ œÆÆ œÆÆ œÆÆ œÆÆ œÆÆ œÆÆ
& œ>œ>œ>œ>œ>œ>œ>œ>œ>œ>œ>œ>œ>œ>œ>œ> œ.>œ.>œ.>œ.>œ.>œ.>œ.>œ.>œ.>œ.>œ.>œ.>œ.>œ.>œ.>œ.> œ. œ. œ. œ. œ. œ. œ. œ. œ. œ. œ. œ. œ. œ. œ. œ.
& œ-œ-œ-œ-œ-œ-œ-œ-œ-œ-œ-œ-œ-œ-œ-œ- œ->œ->œ->œ->œ->œ->œ->œ->œ->œ->œ->œ->œ->œ->œ->œ-> œ-œ. œ. œ>-œ-œ. œ. œ>- œ-œ. œ. œ>-œ-œ. œ. œ>-
Example 4.3 Bach, Brandenburg Concerto no. 2, first movement.
& b c Jœ œ œ. œ. œ œ. œ. œ. œ. œ. œ œ œ. œ. œ œ. œ. œ. œ. œ. œ œ. œ. œ. œ. œ. œ. œ. œ. œ. œ. œ. œ. œ. œ. etc.œ. œ.
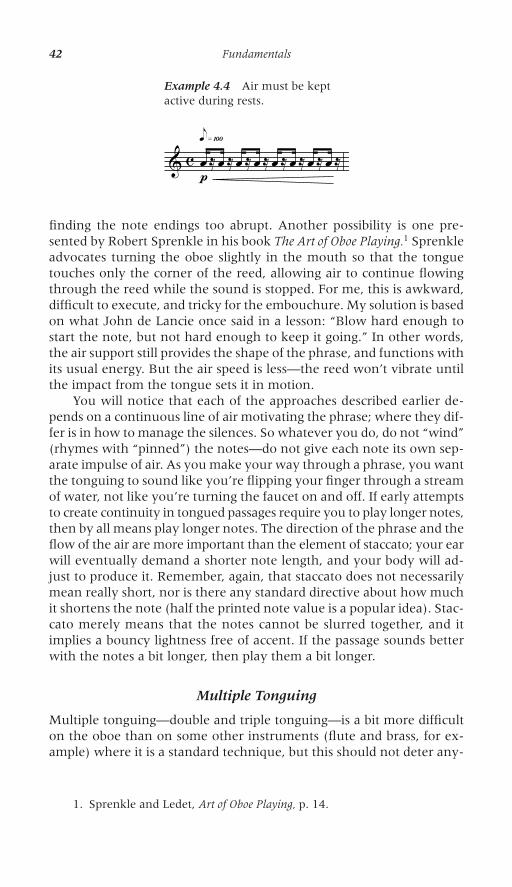
finding the note endings too abrupt. Another possibility is one pre-sented by Robert Sprenkle in his book The Art of Oboe Playing.1 Sprenkleadvocates turning the oboe slightly in the mouth so that the tonguetouches only the corner of the reed, allowing air to continue flowingthrough the reed while the sound is stopped. For me, this is awkward,difficult to execute, and tricky for the embouchure. My solution is basedon what John de Lancie once said in a lesson: “Blow hard enough tostart the note, but not hard enough to keep it going.” In other words,the air support still provides the shape of the phrase, and functions withits usual energy. But the air speed is less—the reed won’t vibrate untilthe impact from the tongue sets it in motion.
You will notice that each of the approaches described earlier de-pends on a continuous line of air motivating the phrase; where they dif-fer is in how to manage the silences. So whatever you do, do not “wind”(rhymes with “pinned”) the notes—do not give each note its own sep-arate impulse of air. As you make your way through a phrase, you wantthe tonguing to sound like you’re flipping your finger through a streamof water, not like you’re turning the faucet on and off. If early attemptsto create continuity in tongued passages require you to play longer notes,then by all means play longer notes. The direction of the phrase and theflow of the air are more important than the element of staccato; your earwill eventually demand a shorter note length, and your body will ad-just to produce it. Remember, again, that staccato does not necessarilymean really short, nor is there any standard directive about how muchit shortens the note (half the printed note value is a popular idea). Stac-cato merely means that the notes cannot be slurred together, and itimplies a bouncy lightness free of accent. If the passage sounds betterwith the notes a bit longer, then play them a bit longer.
Multiple Tonguing
Multiple tonguing—double and triple tonguing—is a bit more difficulton the oboe than on some other instruments (flute and brass, for ex-ample) where it is a standard technique, but this should not deter any-
42 Fundamentals
Example 4.4 Air must be keptactive during rests.
& c œe»¡ººp ≈ œ ≈ œ ≈ œ ≈ œ ≈ œ ≈ œ ≈ œ ≈
1. Sprenkle and Ledet, Art of Oboe Playing, p. 14.
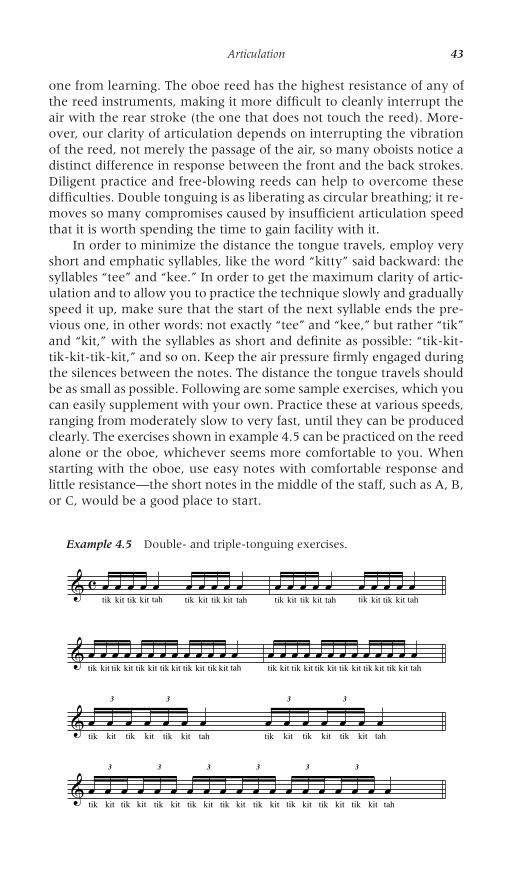
one from learning. The oboe reed has the highest resistance of any ofthe reed instruments, making it more difficult to cleanly interrupt theair with the rear stroke (the one that does not touch the reed). More-over, our clarity of articulation depends on interrupting the vibrationof the reed, not merely the passage of the air, so many oboists notice adistinct difference in response between the front and the back strokes.Diligent practice and free-blowing reeds can help to overcome thesedifficulties. Double tonguing is as liberating as circular breathing; it re-moves so many compromises caused by insufficient articulation speedthat it is worth spending the time to gain facility with it.
In order to minimize the distance the tongue travels, employ veryshort and emphatic syllables, like the word “kitty” said backward: thesyllables “tee” and “kee.” In order to get the maximum clarity of artic-ulation and to allow you to practice the technique slowly and graduallyspeed it up, make sure that the start of the next syllable ends the pre-vious one, in other words: not exactly “tee” and “kee,” but rather “tik”and “kit,” with the syllables as short and definite as possible: “tik-kit-tik-kit-tik-kit,” and so on. Keep the air pressure firmly engaged duringthe silences between the notes. The distance the tongue travels shouldbe as small as possible. Following are some sample exercises, which youcan easily supplement with your own. Practice these at various speeds,ranging from moderately slow to very fast, until they can be producedclearly. The exercises shown in example 4.5 can be practiced on the reedalone or the oboe, whichever seems more comfortable to you. Whenstarting with the oboe, use easy notes with comfortable response andlittle resistance—the short notes in the middle of the staff, such as A, B,or C, would be a good place to start.
Articulation 43
Example 4.5 Double- and triple-tonguing exercises.
& ctik kit tik kit tik kit tik kittah tahœ œ œ œ œ œ œ œ œ œ
tik kit tik kit tik kit tik kittah tahœ œ œ œ œ œ œ œ œ œ
&tik kit tik kit tik kit tik kit tik kit tik kit tahœ œ œ œ œ œ œ œ œ œ œ œ œ
tik kit tik kit tik kit tik kit tik kit tik kit tahœ œ œ œ œ œ œ œ œ œ œ œ œ
&tik kit tik kit tik kit tik kit tik kit tik kittah tah
3
œ œ œ3
œ œ œ œ3
œ œ œ3
œ œ œ œ
&tik kit tik kit tik kit tik kit tik kit tik kit tik kit tik kit tik kit tah
3
œ œ œ3
œ œ œ3
œ œ œ3
œ œ œ3
œ œ œ3
œ œ œ œ

Of course, you will never double tongue slowly, so the slow practiceis only to help you get maximum clarity and definition from each stroke.Once that seems reasonably consistent, increase the speed.
At slower speeds, remember to distinctly stop each syllable with thestart of the next one: “tik-kit.” Be quite definite about this. At fasterspeeds, the distinction will blur: the result we are hoping for is a backstroke (the “kit”) that sounds almost as distinct as the front one.
The next difficulty is changing notes while double tonguing. Chang-ing on the front or “tik” stroke (example 4.6) is not so hard, since wehave been doing that for many years.
Changing on the “kit” stroke, however, will require more practice(example 4.7).
Once these preparatory exercises can be performed with facility, itshould be possible to introduce double tonguing into some carefullychosen real-world situations. At first, avoid extended tongued passagesand places that require frequent pitch changes. Using it for a few notesat a time, mostly on the same pitch, will help build confidence. Brieffanfare flourishes are ideal: “tik-kit-tah.”
Notice that triple tonguing isn’t really “triple” at all—it is merelyrearranged double tonguing: “TIK kit tik KIT tik kit.” Occasionally, forclearer metric emphasis, it may be better to say “TIK kit tit TIK kit tit.”For really complex, tongue-twisting patterns, it will prove very helpfulto just practice speaking the patterns out loud a few times until theyfeel comfortable in the mouth.
With lots of practice and plenty of time, most players are able todevelop a serviceable double tongue. Still, I have only rarely heard some-one double-tonguing on the oboe without its being apparent. The un-even emphasis is usually there, more or less. So for most people, doubletonguing will remain a tutti technique, not a solo technique. Still, it canbe extremely helpful in keeping up with flute and bassoon colleaguesin the orchestra, when the single tongue articulation is that little bit toolabored.
44 Fundamentals
Example 4.6 Changing notes on the front stroke while double tonguing.
&tik kit tik kit tik kit tik kittah tahœ œ œ œ œ œ œ œ œ œ
tik kit tik kit tik kit tik kittah tahœ œ œ œ œ œ œ œ œ œ
Example 4.7 Changing notes on the rear stroke while double tonguing.
&tik kit tik kit tik kit tik kittah tahœ œ œ œ œ œ œ œ œ œ
tik kit tik kit tik kit tik kittah tahœ œ œ œ œ œ œ œ œ œ
5
Expression
Expression is not wholly the result of inspiration. It is also the result ofstudy, practice, and the lifelong acquisition of taste. Many students areconfused by what it means to play “musically.” This chapter is intendedto explain some basic concepts of intelligent musicianship and to pro-vide tools that anyone can use to make his or her playing more expres-sive and convincing.
Begin by studying the music. I don’t mean just play through it; Imean really look at it and figure out what you want to do. You shouldknow the structure of every single phrase and have a plan for everynote in every phrase. You also need a plan for the whole movement, thewhole work, even the whole concert.
Let’s say you’re going on a trip: you get in the car, but you wouldn’tstart driving until you know where you are going and how you meanto get there. Careful drivers might also have a back-up plan in case thepreferred route is blocked or congested. Then, if you want to stop at ascenic overlook, or make a detour through the park, or pick up your drycleaning, it is still part of the big plan, and the trip will be successful.Your musical preparation must be every bit as careful, with about thesame amount of room left for improvising. With practice, this planningbecomes easier and easier until it becomes almost second nature. Butdo not start to play until you know what you want to do. You cannot getwhat you want until you know what you want.
45
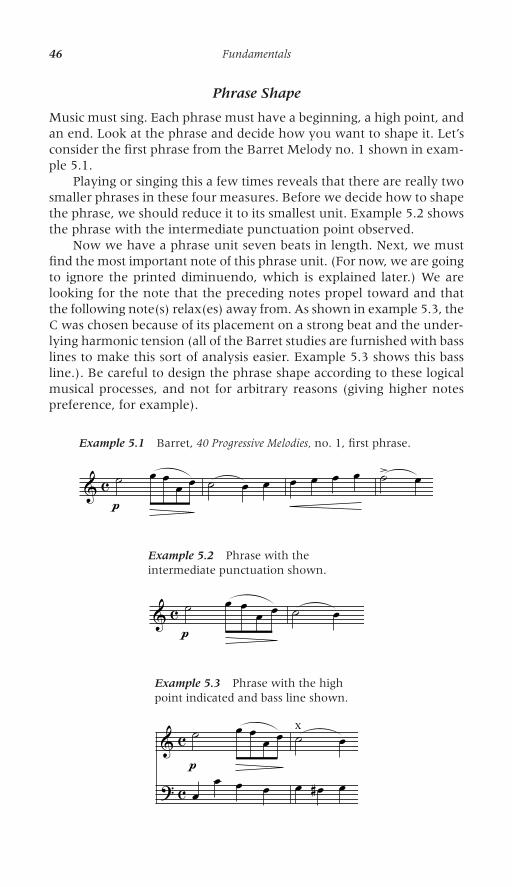
Phrase Shape
Music must sing. Each phrase must have a beginning, a high point, andan end. Look at the phrase and decide how you want to shape it. Let’sconsider the first phrase from the Barret Melody no. 1 shown in exam-ple 5.1.
Playing or singing this a few times reveals that there are really twosmaller phrases in these four measures. Before we decide how to shapethe phrase, we should reduce it to its smallest unit. Example 5.2 showsthe phrase with the intermediate punctuation point observed.
Now we have a phrase unit seven beats in length. Next, we mustfind the most important note of this phrase unit. (For now, we are goingto ignore the printed diminuendo, which is explained later.) We arelooking for the note that the preceding notes propel toward and thatthe following note(s) relax(es) away from. As shown in example 5.3, theC was chosen because of its placement on a strong beat and the under-lying harmonic tension (all of the Barret studies are furnished with basslines to make this sort of analysis easier. Example 5.3 shows this bassline.). Be careful to design the phrase shape according to these logicalmusical processes, and not for arbitrary reasons (giving higher notespreference, for example).
46 Fundamentals
Example 5.1 Barret, 40 Progressive Melodies, no. 1, first phrase.
& c ˙pœ œ œ œ ˙ œ œ œ œ œ œ > œ
Example 5.3 Phrase with the highpoint indicated and bass line shown.
&?ccp˙ œ œ œ œ
œ œ œ œ
X˙ œœ œ# œ
Example 5.2 Phrase with theintermediate punctuation shown.
& c ˙pœ œ œ œ ˙ œ
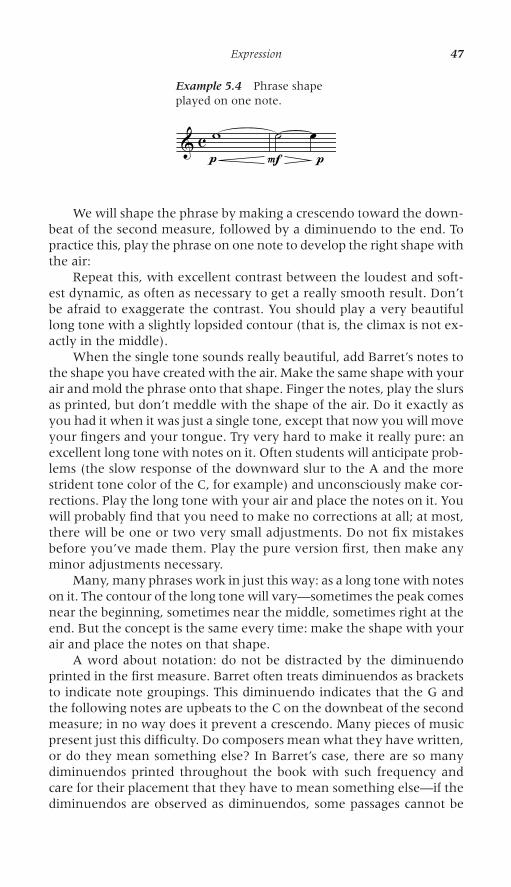
We will shape the phrase by making a crescendo toward the down-beat of the second measure, followed by a diminuendo to the end. Topractice this, play the phrase on one note to develop the right shape withthe air:
Repeat this, with excellent contrast between the loudest and soft-est dynamic, as often as necessary to get a really smooth result. Don’tbe afraid to exaggerate the contrast. You should play a very beautifullong tone with a slightly lopsided contour (that is, the climax is not ex-actly in the middle).
When the single tone sounds really beautiful, add Barret’s notes tothe shape you have created with the air. Make the same shape with yourair and mold the phrase onto that shape. Finger the notes, play the slursas printed, but don’t meddle with the shape of the air. Do it exactly asyou had it when it was just a single tone, except that now you will moveyour fingers and your tongue. Try very hard to make it really pure: anexcellent long tone with notes on it. Often students will anticipate prob-lems (the slow response of the downward slur to the A and the morestrident tone color of the C, for example) and unconsciously make cor-rections. Play the long tone with your air and place the notes on it. Youwill probably find that you need to make no corrections at all; at most,there will be one or two very small adjustments. Do not fix mistakesbefore you’ve made them. Play the pure version first, then make anyminor adjustments necessary.
Many, many phrases work in just this way: as a long tone with noteson it. The contour of the long tone will vary—sometimes the peak comesnear the beginning, sometimes near the middle, sometimes right at theend. But the concept is the same every time: make the shape with yourair and place the notes on that shape.
A word about notation: do not be distracted by the diminuendoprinted in the first measure. Barret often treats diminuendos as bracketsto indicate note groupings. This diminuendo indicates that the G andthe following notes are upbeats to the C on the downbeat of the secondmeasure; in no way does it prevent a crescendo. Many pieces of musicpresent just this difficulty. Do composers mean what they have written,or do they mean something else? In Barret’s case, there are so manydiminuendos printed throughout the book with such frequency andcare for their placement that they have to mean something else—if thediminuendos are observed as diminuendos, some passages cannot be
Expression 47
Example 5.4 Phrase shapeplayed on one note.
& c wp˙F
œp
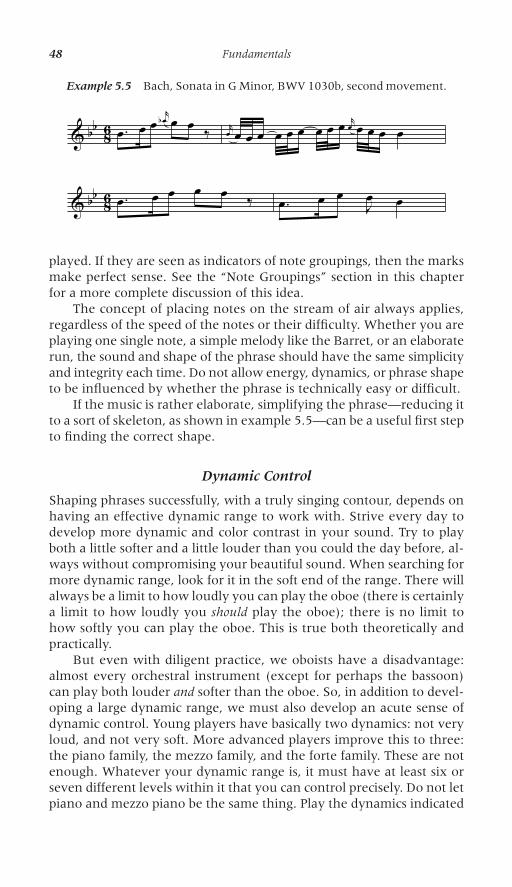
played. If they are seen as indicators of note groupings, then the marksmake perfect sense. See the “Note Groupings” section in this chapterfor a more complete discussion of this idea.
The concept of placing notes on the stream of air always applies,regardless of the speed of the notes or their difficulty. Whether you areplaying one single note, a simple melody like the Barret, or an elaboraterun, the sound and shape of the phrase should have the same simplicityand integrity each time. Do not allow energy, dynamics, or phrase shapeto be influenced by whether the phrase is technically easy or difficult.
If the music is rather elaborate, simplifying the phrase—reducing itto a sort of skeleton, as shown in example 5.5—can be a useful first stepto finding the correct shape.
Dynamic Control
Shaping phrases successfully, with a truly singing contour, depends onhaving an effective dynamic range to work with. Strive every day todevelop more dynamic and color contrast in your sound. Try to playboth a little softer and a little louder than you could the day before, al-ways without compromising your beautiful sound. When searching formore dynamic range, look for it in the soft end of the range. There willalways be a limit to how loudly you can play the oboe (there is certainlya limit to how loudly you should play the oboe); there is no limit tohow softly you can play the oboe. This is true both theoretically andpractically.
But even with diligent practice, we oboists have a disadvantage:almost every orchestral instrument (except for perhaps the bassoon)can play both louder and softer than the oboe. So, in addition to devel-oping a large dynamic range, we must also develop an acute sense ofdynamic control. Young players have basically two dynamics: not veryloud, and not very soft. More advanced players improve this to three:the piano family, the mezzo family, and the forte family. These are notenough. Whatever your dynamic range is, it must have at least six orseven different levels within it that you can control precisely. Do not letpiano and mezzo piano be the same thing. Play the dynamics indicated
48 Fundamentals
Example 5.5 Bach, Sonata in G Minor, BWV 1030b, second movement.
& bb 86 .œ œ œrœb œ œ ‰ rœ œ œ œ œ œ œ œ œ œ rœ œ œ œ œ
& bb 86 .œ œ œ œ œ ‰ .œ œ œ Jœ œ
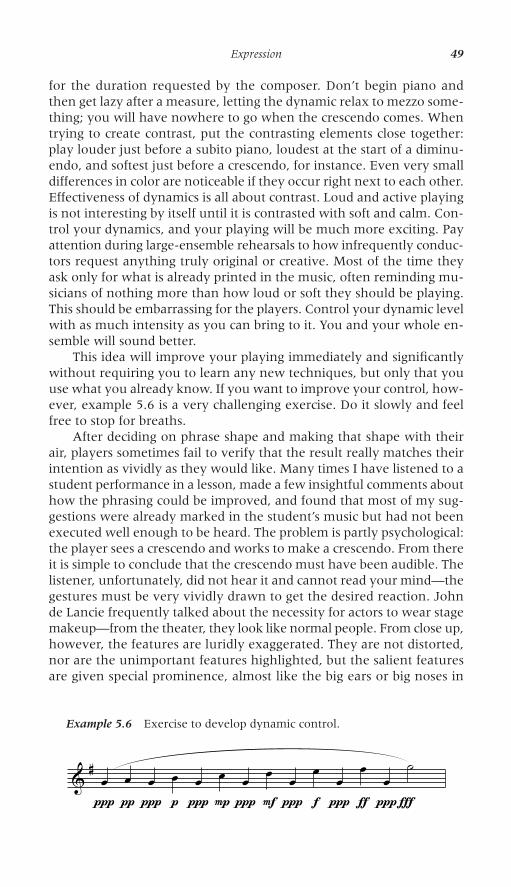
for the duration requested by the composer. Don’t begin piano andthen get lazy after a measure, letting the dynamic relax to mezzo some-thing; you will have nowhere to go when the crescendo comes. Whentrying to create contrast, put the contrasting elements close together:play louder just before a subito piano, loudest at the start of a diminu-endo, and softest just before a crescendo, for instance. Even very smalldifferences in color are noticeable if they occur right next to each other.Effectiveness of dynamics is all about contrast. Loud and active playingis not interesting by itself until it is contrasted with soft and calm. Con-trol your dynamics, and your playing will be much more exciting. Payattention during large-ensemble rehearsals to how infrequently conduc-tors request anything truly original or creative. Most of the time theyask only for what is already printed in the music, often reminding mu-sicians of nothing more than how loud or soft they should be playing.This should be embarrassing for the players. Control your dynamic levelwith as much intensity as you can bring to it. You and your whole en-semble will sound better.
This idea will improve your playing immediately and significantlywithout requiring you to learn any new techniques, but only that youuse what you already know. If you want to improve your control, how-ever, example 5.6 is a very challenging exercise. Do it slowly and feelfree to stop for breaths.
After deciding on phrase shape and making that shape with theirair, players sometimes fail to verify that the result really matches theirintention as vividly as they would like. Many times I have listened to astudent performance in a lesson, made a few insightful comments abouthow the phrasing could be improved, and found that most of my sug-gestions were already marked in the student’s music but had not beenexecuted well enough to be heard. The problem is partly psychological:the player sees a crescendo and works to make a crescendo. From thereit is simple to conclude that the crescendo must have been audible. Thelistener, unfortunately, did not hear it and cannot read your mind—thegestures must be very vividly drawn to get the desired reaction. Johnde Lancie frequently talked about the necessity for actors to wear stagemakeup—from the theater, they look like normal people. From close up,however, the features are luridly exaggerated. They are not distorted,nor are the unimportant features highlighted, but the salient featuresare given special prominence, almost like the big ears or big noses in
Expression 49
Example 5.6 Exercise to develop dynamic control.
& #Ï
œ∏œπœ∏œpœ∏œPœ∏œFœ∏œfœ∏œƒœ∏˙
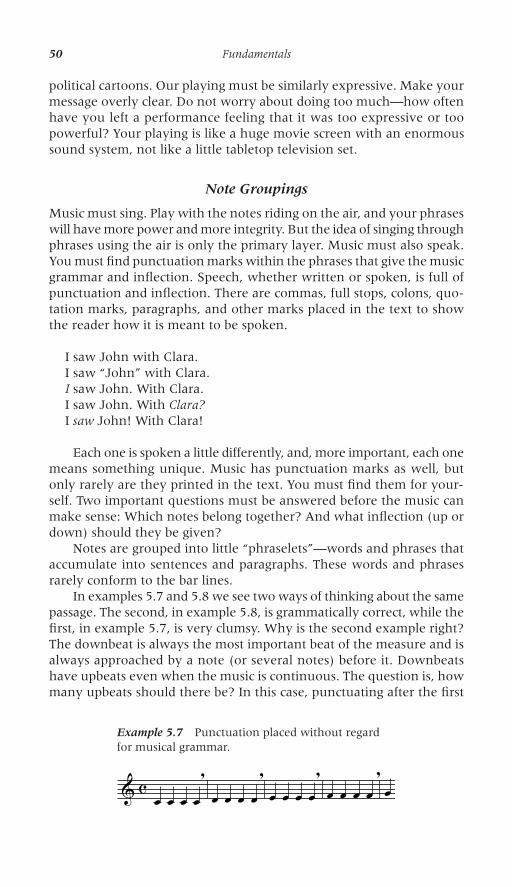
political cartoons. Our playing must be similarly expressive. Make yourmessage overly clear. Do not worry about doing too much—how oftenhave you left a performance feeling that it was too expressive or toopowerful? Your playing is like a huge movie screen with an enormoussound system, not like a little tabletop television set.
Note Groupings
Music must sing. Play with the notes riding on the air, and your phraseswill have more power and more integrity. But the idea of singing throughphrases using the air is only the primary layer. Music must also speak.You must find punctuation marks within the phrases that give the musicgrammar and inflection. Speech, whether written or spoken, is full ofpunctuation and inflection. There are commas, full stops, colons, quo-tation marks, paragraphs, and other marks placed in the text to showthe reader how it is meant to be spoken.
I saw John with Clara.I saw “John” with Clara.I saw John. With Clara.I saw John. With Clara?I saw John! With Clara!
Each one is spoken a little differently, and, more important, each onemeans something unique. Music has punctuation marks as well, butonly rarely are they printed in the text. You must find them for your-self. Two important questions must be answered before the music canmake sense: Which notes belong together? And what inflection (up ordown) should they be given?
Notes are grouped into little “phraselets”—words and phrases thataccumulate into sentences and paragraphs. These words and phrasesrarely conform to the bar lines.
In examples 5.7 and 5.8 we see two ways of thinking about the samepassage. The second, in example 5.8, is grammatically correct, while thefirst, in example 5.7, is very clumsy. Why is the second example right?The downbeat is always the most important beat of the measure and isalways approached by a note (or several notes) before it. Downbeatshave upbeats even when the music is continuous. The question is, howmany upbeats should there be? In this case, punctuating after the first
50 Fundamentals
Example 5.7 Punctuation placed without regardfor musical grammar.
& c œ œ œ œ,œ œ œ œ
,œ œ œ œ
,œ œ œ œ
, œ
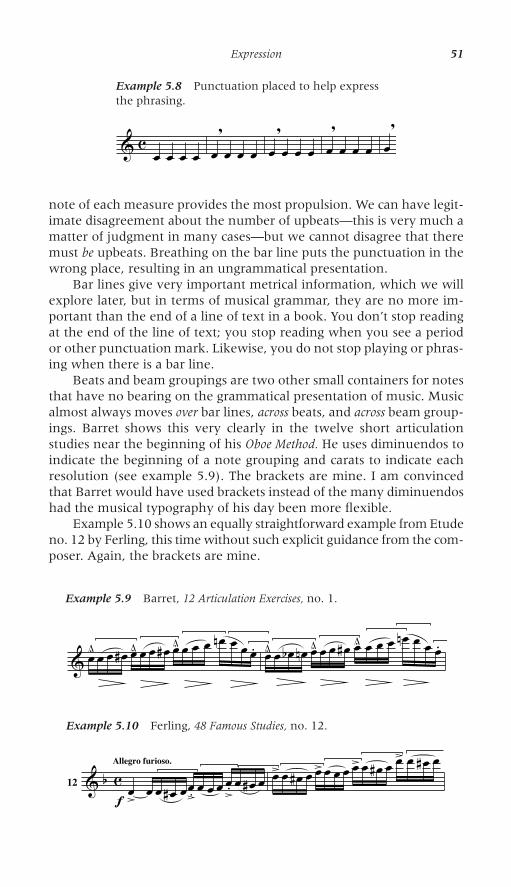
note of each measure provides the most propulsion. We can have legit-imate disagreement about the number of upbeats—this is very much amatter of judgment in many cases—but we cannot disagree that theremust be upbeats. Breathing on the bar line puts the punctuation in thewrong place, resulting in an ungrammatical presentation.
Bar lines give very important metrical information, which we willexplore later, but in terms of musical grammar, they are no more im-portant than the end of a line of text in a book. You don’t stop readingat the end of the line of text; you stop reading when you see a periodor other punctuation mark. Likewise, you do not stop playing or phras-ing when there is a bar line.
Beats and beam groupings are two other small containers for notesthat have no bearing on the grammatical presentation of music. Musicalmost always moves over bar lines, across beats, and across beam group-ings. Barret shows this very clearly in the twelve short articulationstudies near the beginning of his Oboe Method. He uses diminuendos toindicate the beginning of a note grouping and carats to indicate eachresolution (see example 5.9). The brackets are mine. I am convincedthat Barret would have used brackets instead of the many diminuendoshad the musical typography of his day been more flexible.
Example 5.10 shows an equally straightforward example from Etudeno. 12 by Ferling, this time without such explicit guidance from the com-poser. Again, the brackets are mine.
Expression 51
Example 5.8 Punctuation placed to help expressthe phrasing.
& c œ œ œ œ œ,œ œ œ œ
,œ œ œ œ
,œ œ œ œ
,
Example 5.9 Barret, 12 Articulation Exercises, no. 1.
& œ œ œ œ# œ œ œ œ# œ œ œ œœn œ œ œ. œ œ œb œn œ œ œ œ# œ œ œ œ œn œ œ œ.
Example 5.10 Ferling, 48 Famous Studies, no. 12.
& b c12Allegro furioso.
œ>f œ œ œ# œœfl œ œ œ œ.> œ œ# œœ> œ œ# œ œ> œ œ œ œ> œ œ# œ œ
> œ œ# œ
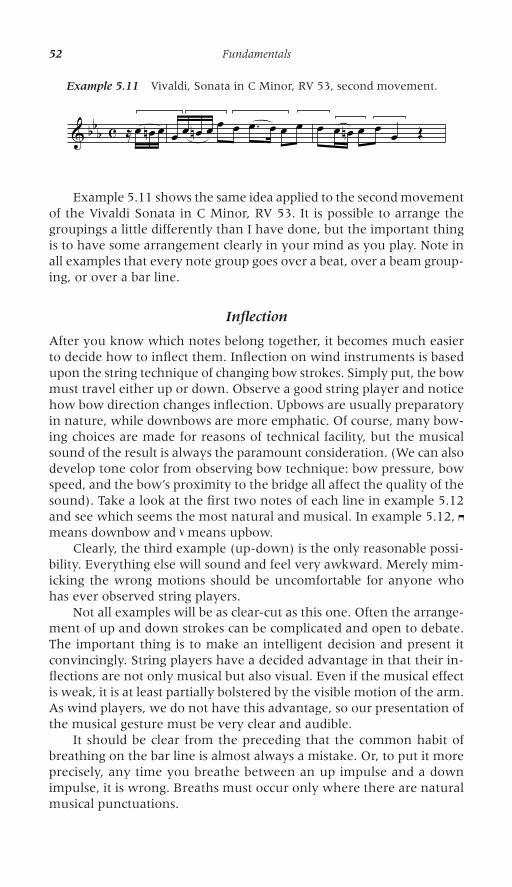
Example 5.11 shows the same idea applied to the second movementof the Vivaldi Sonata in C Minor, RV 53. It is possible to arrange thegroupings a little differently than I have done, but the important thingis to have some arrangement clearly in your mind as you play. Note inall examples that every note group goes over a beat, over a beam group-ing, or over a bar line.
Inflection
After you know which notes belong together, it becomes much easierto decide how to inflect them. Inflection on wind instruments is basedupon the string technique of changing bow strokes. Simply put, the bowmust travel either up or down. Observe a good string player and noticehow bow direction changes inflection. Upbows are usually preparatoryin nature, while downbows are more emphatic. Of course, many bow-ing choices are made for reasons of technical facility, but the musicalsound of the result is always the paramount consideration. (We can alsodevelop tone color from observing bow technique: bow pressure, bowspeed, and the bow’s proximity to the bridge all affect the quality of thesound). Take a look at the first two notes of each line in example 5.12and see which seems the most natural and musical. In example 5.12, �means downbow and � means upbow.
Clearly, the third example (up-down) is the only reasonable possi-bility. Everything else will sound and feel very awkward. Merely mim-icking the wrong motions should be uncomfortable for anyone whohas ever observed string players.
Not all examples will be as clear-cut as this one. Often the arrange-ment of up and down strokes can be complicated and open to debate.The important thing is to make an intelligent decision and present itconvincingly. String players have a decided advantage in that their in-flections are not only musical but also visual. Even if the musical effectis weak, it is at least partially bolstered by the visible motion of the arm.As wind players, we do not have this advantage, so our presentation ofthe musical gesture must be very clear and audible.
It should be clear from the preceding that the common habit ofbreathing on the bar line is almost always a mistake. Or, to put it moreprecisely, any time you breathe between an up impulse and a downimpulse, it is wrong. Breaths must occur only where there are naturalmusical punctuations.
52 Fundamentals
Example 5.11 Vivaldi, Sonata in C Minor, RV 53, second movement.
& bbb c ≈ œ œn œ œ œ œn œ œ œ .œ œ œ œ œ œ œn œ œ œ Œ
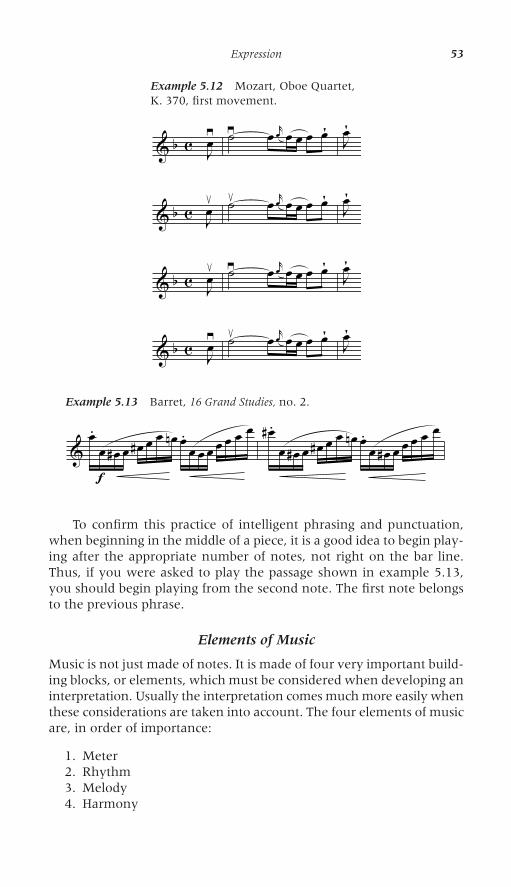
To confirm this practice of intelligent phrasing and punctuation,when beginning in the middle of a piece, it is a good idea to begin play-ing after the appropriate number of notes, not right on the bar line.Thus, if you were asked to play the passage shown in example 5.13,you should begin playing from the second note. The first note belongsto the previous phrase.
Elements of Music
Music is not just made of notes. It is made of four very important build-ing blocks, or elements, which must be considered when developing aninterpretation. Usually the interpretation comes much more easily whenthese considerations are taken into account. The four elements of musicare, in order of importance:
1. Meter2. Rhythm3. Melody4. Harmony
Expression 53
Example 5.12 Mozart, Oboe Quartet,K. 370, first movement.
& b c Jœ≥≥ œ rœ œ œ œ œ Jœ
& b c Jœ≤≤ œ rœ œ œ œ œ Jœ
& b c Jœ≤≥ œ rœ œ œ œ œ Jœ
& b c Jœ≥≤ œ rœ œ œ œ œ Jœ
Example 5.13 Barret, 16 Grand Studies, no. 2.
& œ. œfœ# œ œ# œ œ œn œ. œ œ œ œ œ œ
œ œ# . œ œ# œ œ# œ œ œn œ. œ œ# œ œ œ œœ
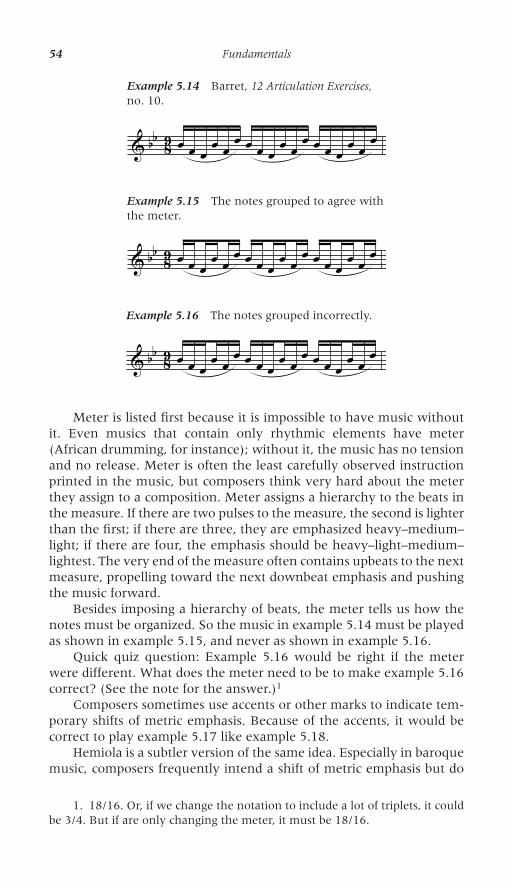
Meter is listed first because it is impossible to have music withoutit. Even musics that contain only rhythmic elements have meter(African drumming, for instance); without it, the music has no tensionand no release. Meter is often the least carefully observed instructionprinted in the music, but composers think very hard about the meterthey assign to a composition. Meter assigns a hierarchy to the beats inthe measure. If there are two pulses to the measure, the second is lighterthan the first; if there are three, they are emphasized heavy–medium–light; if there are four, the emphasis should be heavy–light–medium–lightest. The very end of the measure often contains upbeats to the nextmeasure, propelling toward the next downbeat emphasis and pushingthe music forward.
Besides imposing a hierarchy of beats, the meter tells us how thenotes must be organized. So the music in example 5.14 must be playedas shown in example 5.15, and never as shown in example 5.16.
Quick quiz question: Example 5.16 would be right if the meterwere different. What does the meter need to be to make example 5.16correct? (See the note for the answer.)1
Composers sometimes use accents or other marks to indicate tem-porary shifts of metric emphasis. Because of the accents, it would becorrect to play example 5.17 like example 5.18.
Hemiola is a subtler version of the same idea. Especially in baroquemusic, composers frequently intend a shift of metric emphasis but do
54 Fundamentals
Example 5.14 Barret, 12 Articulation Exercises,no. 10.
& bb 89 œ œ œ œ œ œ œ œ œ œ œ œ œ œ œ œ œ œ
Example 5.15 The notes grouped to agree withthe meter.
& bb 89 œ œ œ œ œ œ œ œ œ œ œ œ œ œ œ œ œ œ
Example 5.16 The notes grouped incorrectly.
& bb 89 œ œ œ œ œ œ œ œ œ œ œ œ œ œ œ œ œ œ
1. 18/16. Or, if we change the notation to include a lot of triplets, it couldbe 3/4. But if are only changing the meter, it must be 18/16.
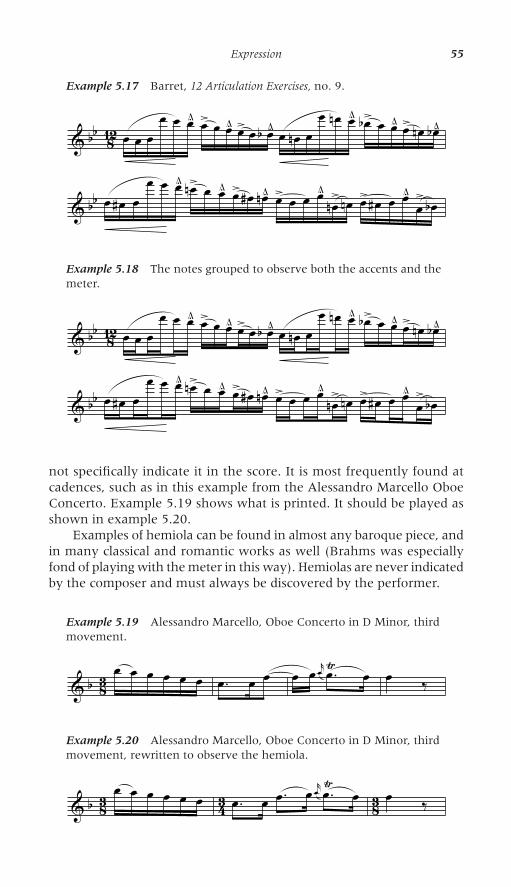
not specifically indicate it in the score. It is most frequently found atcadences, such as in this example from the Alessandro Marcello OboeConcerto. Example 5.19 shows what is printed. It should be played asshown in example 5.20.
Examples of hemiola can be found in almost any baroque piece, andin many classical and romantic works as well (Brahms was especiallyfond of playing with the meter in this way). Hemiolas are never indicatedby the composer and must always be discovered by the performer.
Expression 55
Example 5.18 The notes grouped to observe both the accents and themeter.
& bb 812 œ œ œœ œ œ œ> œ œ œ> œ œb ¨ œ œn œ
œ œn œ œb> œ œ œ> œn œb ¨
& bb œ œ# œœ œ œ œn> œ œ œ> œ# œn ¨ œ> œ œ œ œn> œn œ> œ# œ œ œ> œb
Example 5.17 Barret, 12 Articulation Exercises, no. 9.
& bb 812 œ œ œœ œ œ œ> œ œ œ> œ œb ¨ œ œn œ
œ œn œ œb> œ œ œ> œn œb ¨
& bb œ œ# œœ œ œ œn> œ œ œ> œ# œn ¨ œ> œ œ œ œn> œn œ> œ# œ œ œ> œb
Example 5.19 Alessandro Marcello, Oboe Concerto in D Minor, thirdmovement.
& b 83 œ œ œ œ œ œ .œ œ œ œ œ rœ .œŸ œ œ ‰
Example 5.20 Alessandro Marcello, Oboe Concerto in D Minor, thirdmovement, rewritten to observe the hemiola.
& b 83 43 83œ œ œ œ œ œ .œ œ .œ œ rœ .œŸ œ œ ‰
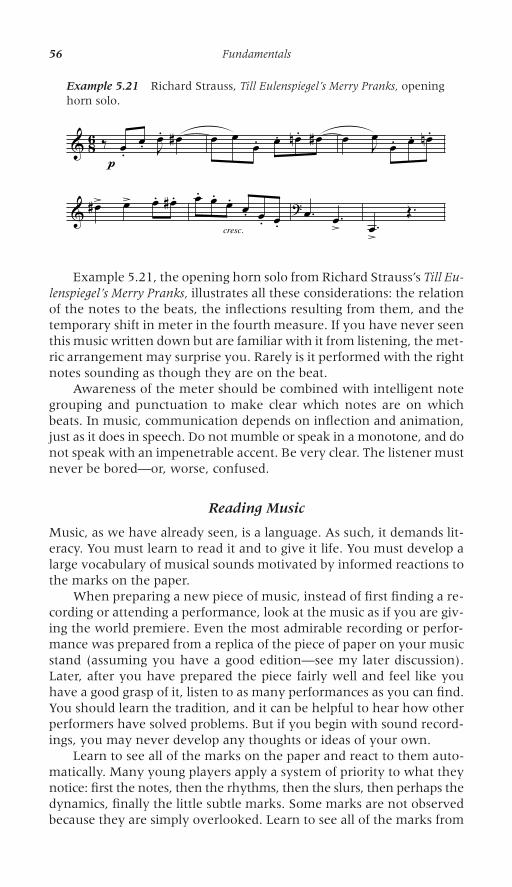
Example 5.21, the opening horn solo from Richard Strauss’s Till Eu-lenspiegel’s Merry Pranks, illustrates all these considerations: the relationof the notes to the beats, the inflections resulting from them, and thetemporary shift in meter in the fourth measure. If you have never seenthis music written down but are familiar with it from listening, the met-ric arrangement may surprise you. Rarely is it performed with the rightnotes sounding as though they are on the beat.
Awareness of the meter should be combined with intelligent notegrouping and punctuation to make clear which notes are on whichbeats. In music, communication depends on inflection and animation,just as it does in speech. Do not mumble or speak in a monotone, and donot speak with an impenetrable accent. Be very clear. The listener mustnever be bored—or, worse, confused.
Reading Music
Music, as we have already seen, is a language. As such, it demands lit-eracy. You must learn to read it and to give it life. You must develop alarge vocabulary of musical sounds motivated by informed reactions tothe marks on the paper.
When preparing a new piece of music, instead of first finding a re -cording or attending a performance, look at the music as if you are giv-ing the world premiere. Even the most admirable recording or perfor-mance was prepared from a replica of the piece of paper on your musicstand (assuming you have a good edition—see my later discussion).Later, after you have prepared the piece fairly well and feel like youhave a good grasp of it, listen to as many performances as you can find.You should learn the tradition, and it can be helpful to hear how otherperformers have solved problems. But if you begin with sound record-ings, you may never develop any thoughts or ideas of your own.
Learn to see all of the marks on the paper and react to them auto-matically. Many young players apply a system of priority to what theynotice: first the notes, then the rhythms, then the slurs, then perhaps thedynamics, finally the little subtle marks. Some marks are not observedbecause they are simply overlooked. Learn to see all of the marks from
56 Fundamentals
Example 5.21 Richard Strauss, Till Eulenspiegel’s Merry Pranks, openinghorn solo.
& 86 p‰ œ. œ. Jœ
. œ# œ œ œ. œ. œn . œ# œ Jœ œ. œ. œn .
& œ#> œ> œ. œ# .cresc.
œ. œ. œ. œ. œ. œ. .œ .œ>? .œ>
Π.
the very beginning. Do not learn one thing at a time (first the notes,then the rhythms . . . ); instead, learn everything all together. Thisrequires slow playing and fast thinking, but it will give you a result inwhich the performance instructions are embedded in your playing, asthey should be.
Sometimes a mark is ignored because the student doesn’t knowwhat it means. Learn to read music. Know what all of the instructionsmean, and have an idea of how they will influence the sound you make.This is especially important with instructions in foreign languages. Donot take these for granted or assume that you know approximately whatthey mean—many foreign words sound like familiar English words butmean something entirely different. For example, in the Barret 40 Pro-gressive Melodies, no. 23 is marked with a tempo of “Allegretto flebile.”What does “flebile” mean? Some English words jump to mind imme-diately. Flexible? Feeble? The real meaning, which changes the inter-pretation of the piece completely, is “mournful.” So if you are not ab-solutely sure—and I mean absolutely sure—look up the word. If yourmusic dictionary doesn’t contain the word, find a French, German, orItalian dictionary. If the French dictionary is no help or gives a confus-ing answer, find a French person. Do not continue preparing the musicuntil you know exactly what the composer wrote. Usually an inexpen-sive pocket music dictionary (which you can carry with you everywhere—it’s much more useful than half of the junk in your oboe bag) willsolve the problem. After a few years of looking up every unfamiliarword, you will develop a good working vocabulary of Italian, French,and German that will cover almost every situation.
Look at every mark with care. Composers think long and hard aboutthe instructions they give to performers. Imagine if you were to writea piece of music: you want it to sound a certain way, with a certain at-mosphere and color and tempo. But you do not have the luxury of meet-ing with the performers and explaining everything to them. You have tocommunicate it all by writing on the page using signs. So the questionof whether to write a dot or a dash, or a dot with a dash, for instance,is of paramount importance. If a passage is marked with dots in oneplace and repeated later with no dots, that discrepancy is worth noting.Should you play it differently the second time? It seems subtle, but it isa crucial clue toward performing what the composer intended.
You need to know the style of the music you are performing—figuratively speaking, what sort of costume should you wear? Earlymusic (on oboe, mostly baroque music) requires the most creative ap-proach: the notes on the page are only an approximate description ofwhat the music is supposed to sound like. Many questions are left to theperformer to determine—tempo, articulation, instrumentation (since“continuo” is an ensemble, not an instrument, it can be performed withvarious instrumentations), even the notes themselves (since ornamentsare common). Music from 1850 onward, on the other hand, usuallyhas careful and deliberate markings that should be observed exactly.
Expression 57
In another example, Mozart typically marks only two dynamics—piano and forte. Does this mean you should play only loud and softwith abrupt transitions between the two? Or does it mean somethingdifferent? You need to learn the style—absorb the performance practiceof the era—and decide for yourself.
As a musician, an interpreter of music, you have two responsibilities.You have to observe every mark on the page, and you have to make itsound good. It is possible to observe an accent, for instance, by makingan explosive start to the note, making it sound quite harsh and un-pleasant. Instead of beginning the note with a bang or just ignoring theaccent, try to find a different way to emphasize the note. Perhaps the ac-cent needs to start after the note has already sounded. Perhaps the accentcan be accomplished with air or vibrato, and not with the tongue. Per-haps the accent means that another, normally stronger note should notreceive an accent. Work hard to find a way to observe the composer’sinstructions that also sounds beautiful. Often, as we learned from Bar-ret’s use of diminuendos, we have to go even a step further and figureout what composers mean. Sometimes, literally observing what they’vewritten doesn’t work.
Marking Music
If the skill of reading music is properly developed, making pencil mark-ings in the music should be largely unnecessary. If there is a dynamicprinted in the music, circling it does not make it any more visible. Learnto see it. Nor should you write little lectures to yourself in the music. Youwon’t have time to read them as you play. If you want to make notes(say, during a lesson or master class), make them on a separate sheet ofpaper or on the title page. Keep the actual music as clean as possible.The goal is that every mark on the page should change your sound. Ifyou need to circle markings just to see them, then you don’t read musicwell enough yet.
Obviously, some personal markings are necessary. Breath marks areessential. So are alternate fingerings, especially in some tricky technicalpassages. Often it is helpful to mark reminder accidentals in some verylong measures. If a conductor asks for a change in dynamic or articula-tion, mark that in as well, sometimes with the conductor’s initials along-side if the request is particularly unusual. But keep your markings toa minimum. A clean page is easier on both the eye and the brain. Onceyou’ve learned to read music properly, a clean page actually lets youthink less, rather than more.
Editions
The more keenly you develop your musical literacy, the more you de-pend on the integrity of the material you read. Buy excellent editions.
58 Fundamentals
As much as possible, you need to know what the composer actuallywrote, not someone else’s reading, however intelligent it might be. Thisis particularly important with baroque and classical music. This musiccertainly requires editing, because the conventions of musical notationhave changed so much over the centuries—the material needs to bemade to conform to modern practice. But you want to be sure that youare making the edition for yourself and not playing someone else’s idea.Broadly speaking, there are three kinds of editions available: scholarly,Urtext, and performing.
Best are the scholarly editions. These are sometimes facsimiles oforiginal manuscripts and sometimes large multivolume collections de-voted to the works of one composer, region, or time period. They areessential references and are usually supplied with supplementary vol-umes containing exhaustive discussion of every editorial decision, nomatter how seemingly insignificant. Frequently the editors work fromseveral primary sources—the composer’s manuscript, the first publica-tion, the parts used at the first performance, and so on. There are oftenminor discrepancies between the sources and determining which shouldtake priority is a tricky business, hence the detailed discussion. Theseeditions are usually large and hardbound and are not supplied with in-dividual parts, so using them for performance is impractical. And, sincethey are large and hardbound, they can be extravagantly expensive toown, so you may need access to a good university library if you wantto refer to them. But if you have a question about a dynamic, an artic-ulation, or a possible wrong note, referring to one of these will get youthe closest answer you can find without access to the primary sourcematerial.
The Urtext editions are the ones recommended for performing use.These are frequently drawn from the scholarly editions and sometimeshave minimal additional editing. If editorial marks are inserted, thensome typographical system (dotted slurs, for example) is used to distin-guish the composer’s marks from the editor’s. Buy these whenever pos-sible. They are usually not much more expensive than the performingeditions discussed in the next paragraph but have superior typographyand legibility.
There are also many performing editions available. A performingedition is one editor’s interpretation of how the piece should be played.Baroque music in particular is not usually supplied with dynamics andarticulation marks by the composer, so the performing editions providethese instructions just like any more modern piece of music. Many ofthem are quite intelligently done by well-known musicians, while someare lamentably bad. I object to them, good or bad, because they giveyou insight into the mind more of the editor than the composer, andbecause they give you no way of knowing which marks are from thecomposer and which are from the editor. Get the clean edition and makeyour own decisions.
Expression 59
Style
Style, as actors say, is knowing what play you are in. You don’t use aBrooklyn accent in Shakespeare; you don’t wear Elizabethan rufflesin a prime-time television police show. Your knowledge of musical stylemust likewise be constantly refined and developed. A forte-piano inMozart sounds different from the same marking in Beethoven or Schu-mann. In Mozart it could be quite light—a sizzling little accent at thebeginning of the note, like flicking a drop of water onto a hot stove. InBeethoven the same marking will be heavier, still applied only to thebeginning of the note but with more weight and duration than theMozart. In Schumann the emphasis might shape the entire note, withthe actual swell somewhere in the middle of the note’s duration.
Likewise, a routine harmonic progression in one composition willbe shocking and radical in another. For example, a fully diminishedsonority is commonplace in Liszt’s music, but in the baroque period itis an expression of great pain or drama. It is your task to know the dif-ference. Developing your knowledge of history and style and applyingit intelligently to your playing requires a lifetime of study, reading, andlistening. Attend as many concerts as possible. Listen to recordings. Don’tlisten exclusively to oboe music, listen to everything: opera, chambermusic, symphonies, violin concertos, song cycles, and so on. If you listento jazz, pop, or other more commercial music, still listen with attention.When something sounds beautiful (or when it doesn’t), try to deter-mine what makes the sounds effective and communicative. Learn therepertoire for as many instruments and voices as possible. Nobody woulddream of playing drums in a rock band without listening to rock androll, but some classical musicians try to play in an orchestra withoutenough listening to music related to what they are playing. We havefour centuries of music to play, not just fifty years of rock and roll.
At first, this effort at information gathering will feel quite un-focused. Since there is so much to learn, where do you begin? As astarting point, refer to David McGill’s book, Sound in Motion, which con-tains a list of his favorite recordings with annotations describing whatto listen for.2 After digesting all of that, you will love some of the music,like some of it, and feel lukewarm about the rest. Follow the paths fromthere: if you love a particular performer, find more of his or her work.If you are inspired by hearing a Schubert symphony, find other reper-toire by Schubert; he wrote hundreds of songs, for instance, and largequantities of chamber music. Gradually the path you’re exploring willdevelop more and more branches as you discover new directions toinvestigate.
60 Fundamentals
2. McGill, Sound in Motion, pp. 303–46. David McGill is principal bassoon-ist with the Chicago Symphony Orchestra.
Do not expect that your teachers will teach you everything youneed to know. No curriculum, no matter how advanced or sophisti-cated, has enough time to cover all of the material necessary to developa literate and informed musician. To become a good musician, it is notenough to be a good student, to “pass the class.” You have to be at thehead of the class, or better still, ahead of the class, to stand a decentchance at professional success. Listen and read constantly.
Musings on Expressive Markings and Music Notation,with Performance Examples
The history of music has seen a sort of continuum in which composersthrough the centuries gradually applied more and more expressive mark-ings, leaving less and less of the decision making to the musician. To alarge extent, the necessity for this grew out of obvious historical factors:for instance, as a performing musician in 1720, you were expected toplay music from your region written during the past few years. Thatwas all. You would have known all of the composers personally, beenintimately acquainted with their style and their preferences, and knownwithout being told how to translate the marks on the page into a pleas-ing performance. Composers then were like jazz composers of today:they provided a framework for what the piece should sound like, but theplayers felt free to improvise many elements, so individual performanceshad the potential to sound quite different from each other. As a com-poser in this circumstance, you would not feel compelled to give detailedinstructions, and most composers did not.
Gradually, three things happened: composers and musicians traveledmore, composers began to insist on greater fidelity to their notation,and music from earlier periods came to be played alongside modernworks. (It is ironic to think, in this age where “new music” is almost afrightening word to audiences, that until the mid-nineteenth century,new music was the only music performed.) So it gradually became nec-essary for composers to include careful instructions in their music, sinceit was likely that sooner or later a performance would take place thatthey could not personally supervise. Today the inclusion of detailed per-formance instructions in the music is a given. Composers for the pasthundred years have dotted every “i” and crossed every “t,” leaving theperformer very little room for improvisation.
The preceding is not meant as a philosophical or aesthetic dilemma,but rather as a problem for students, especially those with little knowl-edge of history and repertoire. One day the teacher is correcting thestudent for not following a subtle dynamic in a piece by Debussy orStravinsky. In the next lesson the teacher is telling the student that heor she need not obey any of the instructions in a heavily edited copyof a Telemann work. And if the student has acquired a good edition of
Expression 61
Telemann, there will be no performance instructions at all, which couldlead to a very dull reading of the piece. How can a student create a mu-sical performance from just a bunch of notes without any additionalhelp from the composer?
The thoughts expressed earlier in this chapter will help enormously:first make a phrase with shape, and group and inflect the notes to pro-pel that shape. Notice the meter: if the meter is 6/8, play strong beat–weak beat; do not play a series of 3/8 measures.
Then reflect on the historical circumstance described earlier. I’m sureit has never occurred to any composer that he or she was providing in-sufficient information to the performers. Composers undoubtedly feltthat they were giving all of the direction that experienced performersfamiliar with the style would require. A few simple rules will help us tocreate an interpretation of music not provided with performance in-structions by the composer.
We begin our process by identifying repetitions of material. I don’tmean large repetitions that help to delineate formal structures such asABA form; rather, I mean short episodes a few notes or a few measuresin length. Composers use some repetitive devices frequently, and recog-nizing these can help shape an interpretation a great deal. Music fromthe baroque and classical eras (precisely the music with the fewest ex-pressive markings) is especially rich in these features.
The first repetitive device is an echo: the same material is repeated atthe same pitch level—the notes are repeated exactly. This is composershorthand for “play me differently.” It is not necessary for the echo tobe literally loud followed by soft. It could be soft followed by loud; itcould even be sharply articulated followed by something gentler; it couldbe plain followed by an ornamented version. In any case, try not to playechoes the same.
The second repetitive device is a sequence: material is repeated ata different pitch level—the music has the same contour and the sametypes of intervals, but each repetition starts on a different note. Whenthis happens, it almost always works to simply follow the direction ofthe sequence with your dynamics. If the sequence goes higher, playeach repetition louder than the one before. If the sequence descends,play each one softer.
Then take note of the harmony. Dissonance is meant to create ten-sion; consonance is meant to resolve it. Complete understanding of thisconcept takes time to learn, since a diminished chord would be a dis-sonance in Telemann and a commonplace sonority in Wagner; but inearlier music, dissonances usually are easily distinguished and shouldbe given extra prominence.
In addition to having few notated dynamics, good editions of earlymusic (for our purposes, “early music” is any music before ca. 1800)rarely provide specified articulations. That is not to say that the music
62 Fundamentals
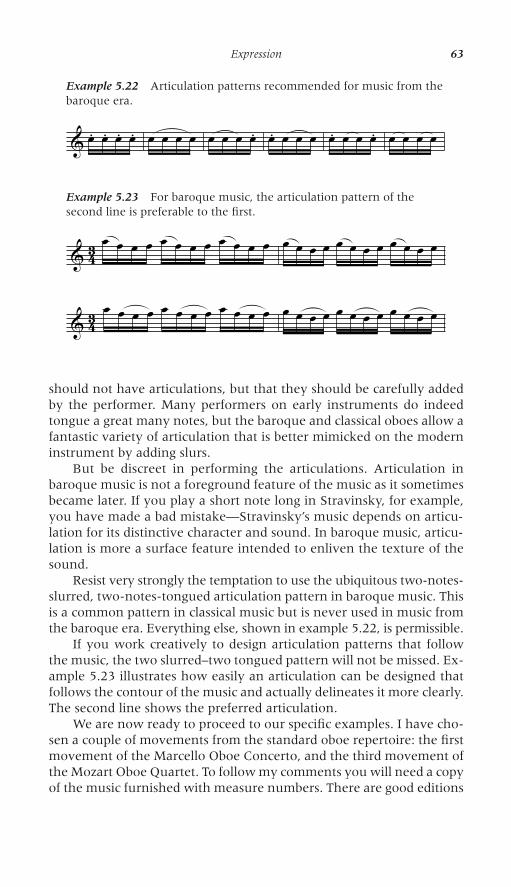
should not have articulations, but that they should be carefully addedby the performer. Many performers on early instruments do indeedtongue a great many notes, but the baroque and classical oboes allow afantastic variety of articulation that is better mimicked on the moderninstrument by adding slurs.
But be discreet in performing the articulations. Articulation inbaroque music is not a foreground feature of the music as it sometimesbecame later. If you play a short note long in Stravinsky, for example,you have made a bad mistake—Stravinsky’s music depends on articu-lation for its distinctive character and sound. In baroque music, articu-lation is more a surface feature intended to enliven the texture of thesound.
Resist very strongly the temptation to use the ubiquitous two-notes-slurred, two-notes-tongued articulation pattern in baroque music. Thisis a common pattern in classical music but is never used in music fromthe baroque era. Everything else, shown in example 5.22, is permissible.
If you work creatively to design articulation patterns that followthe music, the two slurred–two tongued pattern will not be missed. Ex-ample 5.23 illustrates how easily an articulation can be designed thatfollows the contour of the music and actually delineates it more clearly.The second line shows the preferred articulation.
We are now ready to proceed to our specific examples. I have cho-sen a couple of movements from the standard oboe repertoire: the firstmovement of the Marcello Oboe Concerto, and the third movement ofthe Mozart Oboe Quartet. To follow my comments you will need a copyof the music furnished with measure numbers. There are good editions
Expression 63
Example 5.22 Articulation patterns recommended for music from thebaroque era.
& œ. œ. œ. œ. œ œ œ œ œ œ œ œ. œ. œ œ œ œ. œ œ œ. œ œ œ œ
Example 5.23 For baroque music, the articulation pattern of thesecond line is preferable to the first.
& 43 œ œ œ œ œ œ œ œ œ œ œ œ œ œ œ œ œ œ œ œ œ œ œ œ
& 43 œ œ œ œ œ œ œ œ œ œ œ œ œ œ œ œ œ œ œ œ œ œ œ œ
of the Mozart Quartet with only Mozart’s markings; the Bärenreiteredition is easily found.3 There is an edition of the Marcello Concerto inD Minor from Musica Rara that is free of dynamic indications and pre-sents an unornamented version of the second movement.4 The editionin C minor by Richard Lauschmann, originally published by Forbergand reprinted by International Music, Southern Music, and others, isheavily edited but has become ubiquitous.5 If that is the copy you have,start with the assumption that none of the dynamic markings origi-nated with the composer, and that you are therefore free to design yourown dynamic plan.
I do not intend to present these thoughts as the last word on thesubject; other interpretations are certainly possible. But I hope that byoffering them, I can help students to see that they do not need a heavilyedited score—all of the performance instructions are already containedin the music itself when we apply our knowledge of musical style, his-tory, and theory. The repetitions in the Marcello are more obvious, solet’s begin with that.
Alessandro Marcello: Concerto in D Minor,First Movement—Andante e spiccato
The first thing we need to decide is, should this piece be in C minor orD minor? Is one more correct than the other? The work was publishedby Roger in Amsterdam around 1716, with the composer named asAlessandro Marcello and in the key of D minor. Bach made a solo key-board arrangement of it (BWV 974), also in the key of D minor.
In addition, there is a set of manuscript parts (in an anonymoushand) at the library in Schwerin, Germany. These parts name the com-poser as Benedetto Marcello and are in the key of C minor. It was thisversion that was published first, in Richard Lauschmann’s edition, soit gained precedence. However, the D minor version has the weight ofevidence on its side—a publication versus an anonymous manuscript—and should be given preference, no matter how well established thekey of C minor is in the minds of oboists.6
I chose this movement because it is an easy illustration of howcomposers use sequence to build phrase shape. The sequences are plen-tiful and plain to see, linking together in a way that makes for a com-pletely satisfying movement.
64 Fundamentals
3. Mozart, Quartet in F Major, KV 370 (368b) (pl. no. BA4867).4. A. Marcello, Concerto in D Minor (pl. no. MR 1891a).5. B. Marcello, Concerto in C Minor (1923); Concerto in C Minor; and Concerto
in C Minor (n. d.).6. Stolper, “Robert Bloom Collection”; and Ruiz, e-mail to IDRS-L mailing
list, April 20, 2001.
The opening statement in measure 4 is repeated in measure 7, sug-gesting that the echo idea could be applied. Since the second entrancehas an extension, it makes sense to play it more strongly than the first,and perhaps with a little ornamentation. Any printed ornamentation inyour music (grace notes, etc.) is editorial, so we can either delete thoseornaments or elaborate them as desired.
The first sequence occurs in measure 14. The pattern is eight noteslong and is repeated three times, for a total of four statements. The rep-etitions descend, suggesting that the dynamic should gradually get softer.So begin with a nice, warm, rich sound and play each half measure alittle less loud, finishing softly. Now, notice what happens next. Anothersequence begins immediately, but this one ascends, so begin it softlyand gradually play louder. There are two repetitions (three statementsaltogether) with a cadence at the end. The next sequence begins withthe upbeats to measure 26. This one goes higher with each repetition,so begin softly and crescendo until it climaxes halfway through mea-sure 28. The end of this sequential pattern immediately elides into thenext sequence, which descends by half measures to the downbeat ofmeasure 30, where we will arrive rather softly to prepare for the cre -scendo to the cadence. The next oboe entrance is in measure 34, wherethe fifth sequence begins. Start with a full sound so the sequence andyour dynamic can descend. The sequence ends on measure 40, wherewe find a harmonic elaboration of a descending circle of fifths for thenext two measures. The harmonies gradually work their way furtherfrom the home key of D minor (or C minor), so a gradual intensifica-tion to emphasize the growing dissonance is appropriate. The next oboeentrance is the upbeat to measure 47; here the second measure looksat first like it will be an exact repetition of the first, but instead it con-tinues more elaborately (both melodically and harmonically) until half -way through measure 49, after which we can begin to relax toward thecadence. The final phrase of the movement may be similarly shaped:first toward the downbeat of measure 56, then to the third beat of mea-sure 57, then relaxing to the cadence.
So just by observing how the sequences are arranged and taking noteof a few harmonic high points, we can arrive at a whole and completelysatisfying interpretation without any editor to help us. The Mozart quar-tet movement is a little more complicated, but will respond to a verysimilar approach.
Mozart Quartet in F Major, K. 370,Third Movement—Rondeau: Allegro
Throughout this movement, be aware that the meter is 6/8, and be sureto play the second beat a little weaker than the first and then propeltoward the next downbeat. Too much emphasis on too many beats willdeprive the movement of the necessary lightness and momentum.
Expression 65
There is no dynamic indicated at the beginning (indeed, in thismovement Mozart wrote no dynamics in the oboe part at all), but thecheerful mood and brisk tempo suggest something with good energyand lively sonority—perhaps mezzo forte with good, crisp articulationto chase away the nocturnal mood left behind by the second move-ment. Measure 3 should be a little louder than either measure 2 or 4,following the higher contour of the shape.
Measures 5 and 6 are a sequence, so measure 6 should be louderthan 5, with an arrival in measure 7, where the dissonance is found.Measure 8 is the resolution and so is a little softer. The idea of a cadenceas the climactic moment of the entire phrase or movement is a highlyromantic notion that has no place in earlier music. Here, the cadence isa place of repose, with all of the action taking place beforehand.
Note the absence of slurs in measure 8; this does not prevent youfrom adding some. I would suggest slurring the first two notes and tongu-ing the next four—a pattern that can be consistently applied through-out the movement to the many groups of six sixteenth notes.
Enter gently in measure 13; the oboe is not the melody yet. Makea crescendo toward the eighth notes—an idea supported by the risingsequence in the strings. There is a dissonance on the downbeat of mea-sure 15, which is not entirely resolved until the middle of measure 18.The downbeat of that measure is an appoggiatura and so must be em-phasized: that G-sharp should probably be the destination of the wholephrase.
The entrance in measure 23 can be explained with a short digression.Mozart was a very great composer who made a huge contribution toevery genre of music. But he will be most remembered for his mag-nificent operas, an art form he completely transformed. All of his in-strumental works can be better understood and performed if we alsoremember that they have a vocal and theatrical basis. The next oboeentrance, in measure 23, is made much more interesting if we give it adramatic presentation. It is a series of short fragments—each is one tothree measures long—that should be treated like a conversation in whicheach participant has a slightly different point of view. Give each littlefragment a different character—you decide what they are—and makesure that they remain connected, like a conversation, not like a succes-sion of brief monologues.
The music in measures 35–36 and 37–38 is exactly identical. Hereis our first example of an echo. Should the first statement be louder orthe second one? Mozart gives us the answer in measure 39, where a longsequence begins its descent. Since the sequence goes down, it shouldget softer. In order to get softer, measure 39 must start loud, which alsomeans that measure 37 should be louder than measure 35 to preparethe forte in measure 39.
The sequence begun in measure 39 ends in measure 43. Make alittle crescendo to the beautiful harmony in measure 44, saving room
66 Fundamentals
for a larger crescendo to the diminished (dissonant) harmony in mea-sure 48. The trill in measure 50 should begin from the note above, asexplained in the next paragraph.
It is worth including a small digression here on the subject of trills.The proverbial rule book says that trills in the baroque and classical erasshould always start from the note above. First of all, be skeptical when-ever someone says that music must be played only one way and can-not be played any other way, with no exceptions. Music is an art, andthere is no bulletproof solution to every problem. Performance decisionsshould be based on informed, sensible observations of the musical sur-roundings. When looking at a trill, decide what its function is—does itprovide activity or dissonance? Many trills only provide activity—a lit-tle sparkle added to a note—and do not alter the melodic or harmonicprogression. Those trills can start from the main note. Most trills at ca-dences, however, are meant to add dissonance and increase the tensionjust before the relaxation of the cadence itself. This trill in measure 50is a good example. The upper note of the trill, the E, is very much a dis-sonant note, creating a sonority of D, E, and F at the same time, and itis this clash that we want to emphasize. So place the E heavily on thedownbeat, give it some duration—an eighth note or so—and then beginthe trill itself. Don’t rush the Nachschlag (a German word for the finishof a trill) at the end; although it is printed in small grace note–sizednotes, it can be played as two sixteenth notes, allowing a soft landingon the next downbeat.
Measures 511⁄2 through 551⁄2 are exactly the same music as measures551⁄2 to 59. Mozart again answers the question of whether to play the firstrepetition louder or softer. An ascending sequence begins in measure59. This must begin softly or the crescendo is not possible, so it makesmore sense to play the echo loud–soft rather than the other way around.Also, the downbeat of measure 55 is a dotted quarter note, while thedownbeat of measure 59 is only a quarter note, a circumstance that couldargue for making the first repetition more intense than the second.
Build the sequence from measure 59 to the downbeat of measure63, where it turns around and begins a descent, allowing a smooth andelegant return to the rondo theme in measure 65. Measures 63 and 64are unaccompanied and should be played with a little bit of freedom.Whatever you choose to do, be sure that the last five eighth notes be-fore measure 65 are back in tempo or you will confuse your ensemble,which has to enter together on the downbeat of measure 65.
The next rondo theme is not exactly the same as the others—measure 71 is a little different from measure 7. This is not a mistake. InMozart’s manuscript, the alteration is clearly visible. Indeed, the oboepart is the only part Mozart wrote out in this section. The string parts areleft blank, with only the remark “same as the beginning.”
The next new entrance is in measure 89. This introduces the mostextraordinary passage in the piece: the oboe plays in 4/4 while the strings
Expression 67

remain in 6/8. The music beginning in measure 89 is clearly an ascend-ing sequence leading to a diminished harmony in measure 95, whichshould be the peak of the phrase. From there we can gradually relax tothe resolution in measure 102.
In student performances the turns in measure 98 are frequently amess of disorganized tangles. But these turns are really a perfect illus-tration of how an ornament can be given an organized rhythm and thenpracticed like any other technical problem.
We digressed earlier on the subject of trills; now we should discussturns and other ornaments. Many young students initially regard or-naments as optional (some teachers even teach them to omit the orna-ments) and do not learn what the signs mean, nor what pitches to play,nor what rhythm should be assigned to those pitches. Most ornamentsare no more difficult than the material that surrounds them and canbe learned easily by any student advanced enough to learn the piece heor she is studying. The best way to start is to have firmly in mind anorganized picture of how the ornament should sound. Make sure toidentify exactly the pitches, and the order, and the rhythm. Write it outif necessary, and then practice it.
So, in measure 98 (example 5.24), once the rhythm and the pitcheshave been decided upon, the preparation of the passage is accomplishedeasily. Practice it carefully and slowly until it becomes effortless. Do notplay something approximate.
The sixteenth-note passage that follows is quick but not too difficult.The two places that require attention are where the motion changesfrom stepwise to skipwise in measures 104 and 106. Take very good carenot to rush, and get used to counting in two rather than in four; coor-dination with the strings will be much easier if you are already well pre-pared in this way, since the cello is the only instrument you should belistening to during this passage. Even though the passage is fast, theoverwhelming tendency is nonetheless to rush it. Be careful.
When the 6/8 meter resumes, the ascending sequence requires acrescendo to the high D in measure 111, with a relaxation afterward tothe cadence. Measure 113 should again crescendo to the high C on thedownbeat of 114.
The next few measures require a bit of historical explanation. Onthe classical oboe in the 1780s, high F (three ledger lines) was a reallyhigh note. The oboe had only two keys, and neither of them was anoctave key. High notes were accomplished by overblowing lower notes,
68 Fundamentals
Example 5.24 The turns in measure 98 organized rhythmically.
& b c œ#3
œ œ œn œ œ6
œ œ œ œ œ œ6
œ œ œ œ œ œ
which worked quite well up to high D—a note found routinely in allearly oboe music. Notes higher than D were not unheard of before thispiece, but they were certainly unusual (incidentally, the next piece fromthe standard repertoire by a major composer that includes a high F isBeethoven’s only opera, Fidelio, written more than forty years later). Theimportant thing for the modern performer to know is that the high Fcould only be produced strenuously, and quite likely loudly as well. Thatwas the sound Mozart would have heard and the sound that he waswriting. He was not writing the delicate little squeak that has becomesomething of a modern performing tradition. So measures 117 and 118must be loud. Measure 114 must be loud. In between, it is very effec-tive to play the C-sharp and D rather softly and questioningly—an ideasupported by the vague harmony—with the E and F providing an em-phatic answer and launching another repeat of the rondo theme.
By now, my careful measure-by-measure descriptions of sequences,echoes, and harmonies should make it relatively easy to design a plan forthe rest of the movement. I will conclude with just a few more obser-vations. The passage from measures 152 to 155, with its many octaveleaps, is rather tricky; it is also not the melody, which is found in theviolin. Here is a relatively rare example of a place where the secondoctave key (the side octave) should be used by itself and not in combi-nation with the back octave key. The third and fourth measures can bea little louder than the first two to support the rising sequence in theviolin.
The ending of the piece is our last problem. Again, a modern per-forming tradition exists that plays the end very softly, letting the piecesort of evaporate. This is pretty, but it is not what Mozart would haveexpected. We should make a plan that allows the last two measures tobe loud. So measure 172 should be quite soft, beginning in the strings.The strings should play louder in measure 174, and the oboe louder yetto the downbeat of 176. Notice that the downbeat of 176 is a quarternote, while the downbeat of 174 is an eighth note. Again, those detailsargue in favor of an intensification. From 176 to the end there shouldbe an energetic crescendo in all instruments, allowing the piece to endwith a brilliant flourish.
I hope that this little examination has shown that we really don’tneed an editor to decide how our music should sound. It’s much morefun to make your own edition than to play someone else’s. Mozart hasalready told us everything we need; we just need to look through aslightly different lens. All of the various performing editions marked upwith dynamics and articulations and hints are not nearly as valuable astaking a careful look at the score and finding the clues that the composerhas left there for us.
Expression 69
6
Practice
The most important thing to learn is how to practice. If you learn how topractice, you will certainly learn how to play. Many students (and pro-fessionals too, for that matter) don’t like to practice, don’t do it enough,and don’t use their practice time productively. Many students don’t evenknow what to do when they are supposed to be practicing. A lot of doo-dling and messing around masquerades as practicing. We all know play-ers who assert that they practice three or four hours a day, and yet theyare rarely prepared for lessons, much less concerts. This chapter is in-tended to help with these problems. While reading this, some may feelthat the suggestions are excessively strict and that there must surely besome sort of a shortcut. On the contrary, these suggestions are the short-cut. Anything else will take longer and not work as well.
How to Practice
How you practice is the essential point of the entire subject. If you don’tdo it well, it doesn’t matter how much you practice, what you practice,or how often you practice. Practicing is essential to progress, but doneinefficiently, it can actually become a barrier to progress.
For many people, practicing is a process where they take somethingnew, play it badly, and try to improve it through repetition. The reasonthey play it badly is simple: they can’t play it yet. So they begin again,play it badly some more, maybe twenty times more, and quit for theday, having learned little except various ways of playing badly. There is
70
no other process in life that people begin in this way. If I ask you tobuild a bookshelf, you wouldn’t just collect a pile of scrap lumber, nailit together quickly, and then look at it—it’s crooked, isn’t it? Instead,you would likely make a drawing, decide dimensions, buy the correctamount of wood, measure and cut carefully, and so on. Done this way,the assembly of the bookshelf becomes the easiest part of the process,just as the performance should be the reward for careful preparation.Practicing needs to be a process of learning the music—both intellectu-ally and physically—until success is assured.1
Accomplishing this goal is not as difficult as you might imagine.The key is four simple words: NEVER DO IT WRONG. Never do it wrong.Every time you play the oboe, do it right. Of course, you should usegood posture and play with a healthy sound production on a comfort-able reed. But you must also play the right notes in the right place withthe correct fingerings. Every time. The secret lies in repetition—frequent,correct repetition. Both words are important—frequent and correct. Neverdo it wrong, and do it right many, many times. Whenever your braindetects any repetitive physical activity, it begins an acquisition mode:it starts to store the repetitions in anticipation of learning something.Feed it well.
If you play something ten times right and ten times wrong, evenslightly wrong, you’ve just wasted the time it took to do it. Even worse,those ten wrong repetitions are stored in your brain for future retrieval—usually during the concert, when you might be a bit nervous andhave less conscious control over the playing process. Ninety times rightand ten times wrong is much better, but remember that those ten wrongones are still in there lurking. Play it right every single time. You haveonly one chance to play it right in the performance. Knowing this, stu-dents sometimes settle for being able to play something once or twice—“I could play it at home.” But playing it right once in the performancereally means that you must be able to play it right every single time, nomatter what. It means that whichever version of the passage is retrievedfrom the storage unit in your brain, it will still be correct. Never do itwrong.
Playing it right every time is not impossible. Usually, all you haveto do is slow it down. Play at a speed at which your brain can operatefaster than your body and fingers. Anytime you can no longer controleverything coming out of the oboe, you will make mistakes. Use yourmetronome and slow down. Speed up only when you start to feel confi-dent that nothing could cause you to make a mistake. Or, to express theconcept more generally, find a way to reduce the demands on yourself.
Practice 71
1. Jack Nicklaus was asked once if he was nervous before putting on thelast hole with the United States Open Golf Championship on the line. He said(this is a paraphrase), “No. That putt, and that opportunity, are my rewards forall the practicing I’ve done.”
Slowing down is often the best way, but there are other possibilities. Ifthe rhythms are complex, set the oboe down and practice just the rhythmuntil you understand it. If the rhythms are easy but the notes are com-plex, play with no rhythm at all; play each note, but don’t go on to thenext note until you know what it is and how you want to get there. Youcan invent your own exercises to assure correct playing every time.
To understand the process better, we need to learn how the brainfunctions. The brain commands many complex physical actions in a waythat we regard as automatic. Driving a car, tying shoelaces, eating ameal: all are complex actions requiring hundreds or thousands of mus-cular responses, which we can do almost without thinking because wehave repeated them so often. Musical vocabulary must be learned inthe same way. Learn it once; learn it well. The difficulty lies in findingthe patience to repeat the passage (correctly) often enough. It may takea thousand times or more for something really difficult to become se-cure. Worse, with this careful method of working, you will very quicklyrealize just how much work remains—when you are looking at six-teenth notes and playing them as quarter notes, it’s hard not to becomediscouraged. You may lose patience and be tempted to resume the oldsloppy way of working. Don’t do it. With the accurate method of prac-ticing, you will eventually learn the passage. The other way has onlyignorance as its advantage—you will never learn the music well, butyou may not know that until the concert. If you never make a mistake,there is no reason to ever make a mistake. Practice may or may not makeperfect—no sensible musician would ever assert perfection for his or herperformance—but it certainly makes permanent. Whatever is stored willeventually be retrieved.
One reason so many young players suffer from stage fright is thelegitimate possibility—the likelihood, even—of failure. Often, the oddsof negotiating a difficult passage are fifty-fifty; if the music contains twoor three of these passages, the probability of playing the entire pieceaccurately can shrink to 10 percent or less. No professional would acceptthese odds; we’d all be retired on account of overstress. Practice well.Never do it wrong. You only get one chance to play it right.
How Much to Practice
How much to practice depends a great deal on the age of the player andhis or her goals for the instrument. For a twelve-year-old beginner, thirtyor forty minutes a day may well be ample. For a college music major,forty minutes should be the minimum amount of time spent warmingup for a practice regimen of between three and five hours daily. Timespent beyond five hours seems to me to be unproductive—the bodyand mind are too tired. Less than three hours, and improvement slowsproportionately. The tipping point seems to be around ninety minutes,assuming that the work is being done carefully, as described above, and
72 Fundamentals
that a constructive routine is adhered to, as described below. Ninetyminutes is about the right amount of practice time to keep from gettingworse. The further beyond ninety minutes the time can be extended,the more improvement will take place.
In studying the topic of expertise, researchers discovered that trueexperts—champions and geniuses—worked harder for longer periodsof time than anyone else. If there is such a thing as talent, perhaps thisis the talent: the ability to work for long hours on a daily basis for manyyears. Anders Ericsson, a professor of psychology at Florida State Uni-versity, proposes that more than ten thousand hours of solitary prac-tice are required before mastery is achieved: “The critical differencebetween expert musicians differing in the level of attained solo perfor-mance concerned the amounts of time they had spent in solitary prac-tice during their music development, which totaled around 10,000 hoursby age 20 for the best experts, around 5,000 hours for the least accom-plished expert musicians, and only 2,000 hours for serious amateurpianists.”2
A little bit of arithmetic reveals that 10,000 hours equates to fourhours a day, every day, for seven years.
Split the practice time into several sessions during the day. Take abreak of at least ten minutes each hour and go do something else. Talkto friends, read a magazine—but don’t rush off to make a reed. Take abreak. Your body and mind will thank you.
Two other things are as important as practicing enough: practicingcarefully (see above) and practicing every day. In many ways, practic-ing well is just like going on a diet. You cannot go on a diet three daysa week. You cannot go on a diet for just a week or two. After a week ortwo, you have merely experienced all of the discomfort and irritabilityof dieting without seeing any of the reward. But after a year, besideshaving a whole new appearance, you also have a whole new world ofgood habits that will keep you healthy for the rest of your life.
Students who don’t practice enough usually regard practicing asdull work and drudgery. To them, more practice only means more workand more drudgery. Any student who feels this way has never practicedenough to experience the reward. Trust your teacher, do what he orshe says, and do it well. After six months improvement is guaranteed.By then you’ll be enjoying your progress so much that you’ll never goback to muddling through.
After not practicing well for many years, or not practicing enough,many students report that increased practice only makes them soundworse. That can’t possibly be true. Instead, increased familiarity withthe instrument makes them more aware of how their playing sounds.
Practice 73
2. Florida State University Department of Psychology, “Expert Performanceand Deliberate Practice.”
The ear is improving a little faster than the physical playing. After a fewweeks, the imbalance will disappear.
There is no such thing as being too well prepared. You get onechance to play something correctly. At that point, you don’t want a 50percent chance of accuracy; you don’t even want a 99 percent chance.You want it to be right, and you want to give the listener the impres-sion that it was easy. In order for it to sound easy, it must be easy. Thereis no faking this.
We practice for many different reasons with different priorities. Themost common reason is to grasp the material and learn to play it cor-rectly and reliably. That is what the preceding section is meant to helpwith. Of course, we sometimes practice with other goals in mind: to testthe efficacy of our breathing plan or to develop an interpretation, forexample. These kinds of practice require a different sort of attention anda different set of priorities. In these cases, never doing it wrong mightmean that we take each breath in exactly the way we intend, or we pacethe crescendo at precisely the right time.
Sometimes, when drilling a technical passage, tone production andquality can take a back seat to accuracy. Some students almost whisperthrough the instrument when learning passagework. But playing theright notes with a weak tone is not the same as playing the music cor-rectly. Be sure at all times to make a beautiful sound with a healthy pro-duction. Don’t let the practice-room sound take over. Whatever yourimmediate priority is, make sure that tone quality always has an almostequal priority.
What to Practice
Practice time should be divided into three periods. One-third should bespent on warm-ups and scales, one-third on etudes and specific tech-nical exercises, and the last portion on solo pieces, ensemble music, andexcerpts.
Warm-Ups for Tone and Control
Begin with the slow D major scale shown below in example 6.1.There are four goals:
· Each note should have the most beautiful, easy, resonant sound possible.Use minimal embouchure tension and no vibrato—all the con-trol should come from the air.
· Each note should be in tune. Usually, if the sound is beautiful, thepitch will be accurate also. Use the tuner and strive for the reso-nance bull’s-eye of each note.
· Each note should connect to the next with the most perfect legato possible.Move your fingers with great care, keep them close to the oboe,
74 Fundamentals
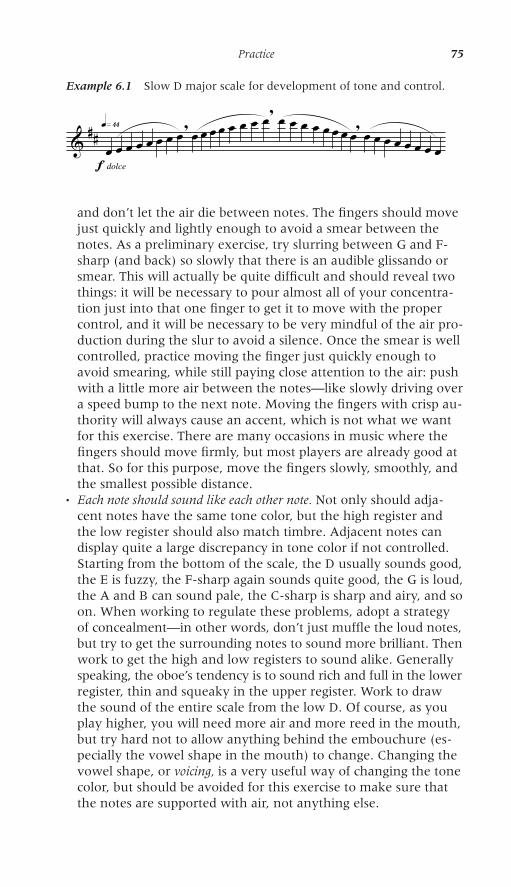
and don’t let the air die between notes. The fingers should movejust quickly and lightly enough to avoid a smear between thenotes. As a preliminary exercise, try slurring between G and F-sharp (and back) so slowly that there is an audible glissando orsmear. This will actually be quite difficult and should reveal twothings: it will be necessary to pour almost all of your concentra-tion just into that one finger to get it to move with the propercontrol, and it will be necessary to be very mindful of the air pro-duction during the slur to avoid a silence. Once the smear is wellcontrolled, practice moving the finger just quickly enough toavoid smearing, while still paying close attention to the air: pushwith a little more air between the notes—like slowly driving overa speed bump to the next note. Moving the fingers with crisp au-thority will always cause an accent, which is not what we wantfor this exercise. There are many occasions in music where thefingers should move firmly, but most players are already good atthat. So for this purpose, move the fingers slowly, smoothly, andthe smallest possible distance.
· Each note should sound like each other note. Not only should adja-cent notes have the same tone color, but the high register andthe low register should also match timbre. Adjacent notes candisplay quite a large discrepancy in tone color if not controlled.Starting from the bottom of the scale, the D usually sounds good,the E is fuzzy, the F-sharp again sounds quite good, the G is loud,the A and B can sound pale, the C-sharp is sharp and airy, and soon. When working to regulate these problems, adopt a strategyof concealment—in other words, don’t just muffle the loud notes,but try to get the surrounding notes to sound more brilliant. Thenwork to get the high and low registers to sound alike. Generallyspeaking, the oboe’s tendency is to sound rich and full in the lowerregister, thin and squeaky in the upper register. Work to drawthe sound of the entire scale from the low D. Of course, as youplay higher, you will need more air and more reed in the mouth,but try hard not to allow anything behind the embouchure (es-pecially the vowel shape in the mouth) to change. Changing thevowel shape, or voicing, is a very useful way of changing the tonecolor, but should be avoided for this exercise to make sure thatthe notes are supported with air, not anything else.
Practice 75
Example 6.1 Slow D major scale for development of tone and control.
& ## œf dolceq»¢¢œ œ œ œ œ œ œ
, œ œ œ œ œ œ œ œ, œ œ œ œ œ œ œ œ, œ œ œ œ œ œ œ œ
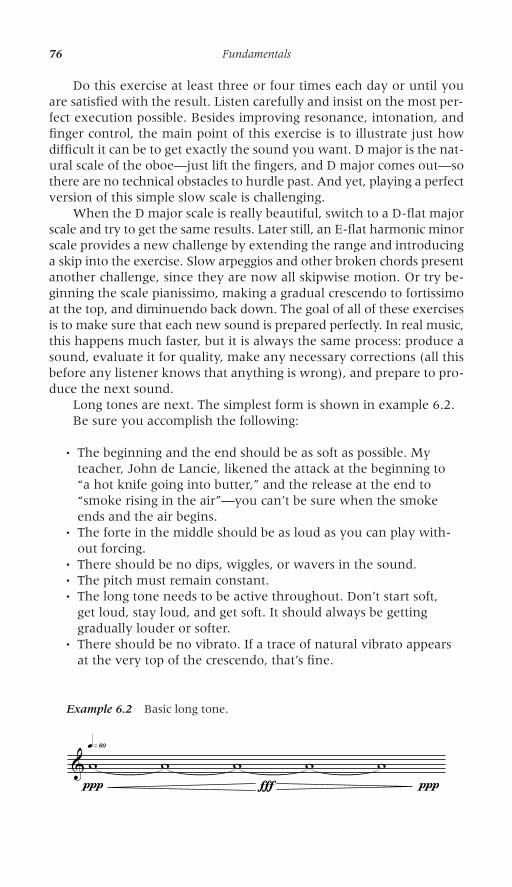
Do this exercise at least three or four times each day or until youare satisfied with the result. Listen carefully and insist on the most per-fect execution possible. Besides improving resonance, intonation, andfinger control, the main point of this exercise is to illustrate just howdifficult it can be to get exactly the sound you want. D major is the nat-ural scale of the oboe—just lift the fingers, and D major comes out—sothere are no technical obstacles to hurdle past. And yet, playing a perfectversion of this simple slow scale is challenging.
When the D major scale is really beautiful, switch to a D-flat majorscale and try to get the same results. Later still, an E-flat harmonic minorscale provides a new challenge by extending the range and introducinga skip into the exercise. Slow arpeggios and other broken chords presentanother challenge, since they are now all skipwise motion. Or try be-ginning the scale pianissimo, making a gradual crescendo to fortissimoat the top, and diminuendo back down. The goal of all of these exercisesis to make sure that each new sound is prepared perfectly. In real music,this happens much faster, but it is always the same process: produce asound, evaluate it for quality, make any necessary corrections (all thisbefore any listener knows that anything is wrong), and prepare to pro-duce the next sound.
Long tones are next. The simplest form is shown in example 6.2.Be sure you accomplish the following:
· The beginning and the end should be as soft as possible. Myteacher, John de Lancie, likened the attack at the beginning to “a hot knife going into butter,” and the release at the end to“smoke rising in the air”—you can’t be sure when the smokeends and the air begins.
· The forte in the middle should be as loud as you can play with-out forcing.
· There should be no dips, wiggles, or wavers in the sound.· The pitch must remain constant.· The long tone needs to be active throughout. Don’t start soft,
get loud, stay loud, and get soft. It should always be gettinggradually louder or softer.
· There should be no vibrato. If a trace of natural vibrato appearsat the very top of the crescendo, that’s fine.
76 Fundamentals
Example 6.2 Basic long tone.
&∏wq»§º w
Ïw w
∏w
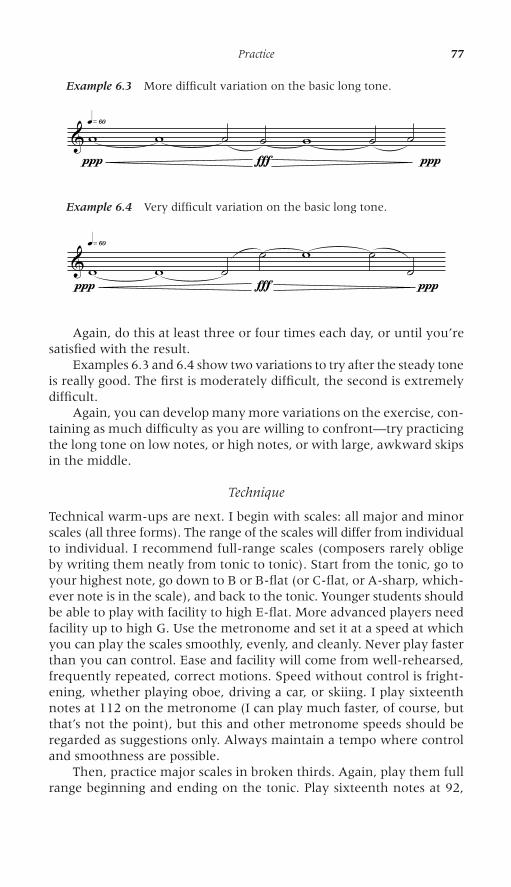
Again, do this at least three or four times each day, or until you’resatisfied with the result.
Examples 6.3 and 6.4 show two variations to try after the steady toneis really good. The first is moderately difficult, the second is extremelydifficult.
Again, you can develop many more variations on the exercise, con-taining as much difficulty as you are willing to confront—try practicingthe long tone on low notes, or high notes, or with large, awkward skipsin the middle.
Technique
Technical warm-ups are next. I begin with scales: all major and minorscales (all three forms). The range of the scales will differ from individualto individual. I recommend full-range scales (composers rarely obligeby writing them neatly from tonic to tonic). Start from the tonic, go toyour highest note, go down to B or B-flat (or C-flat, or A-sharp, which -ever note is in the scale), and back to the tonic. Younger students shouldbe able to play with facility to high E-flat. More advanced players needfacility up to high G. Use the metronome and set it at a speed at whichyou can play the scales smoothly, evenly, and cleanly. Never play fasterthan you can control. Ease and facility will come from well-rehearsed,frequently repeated, correct motions. Speed without control is fright-ening, whether playing oboe, driving a car, or skiing. I play sixteenthnotes at 112 on the metronome (I can play much faster, of course, butthat’s not the point), but this and other metronome speeds should beregarded as suggestions only. Always maintain a tempo where controland smoothness are possible.
Then, practice major scales in broken thirds. Again, play them fullrange beginning and ending on the tonic. Play sixteenth notes at 92,
Practice 77
Example 6.3 More difficult variation on the basic long tone.
& w∏q»§º w ˙ ˙
Ïw
∏˙ ˙
Example 6.4 Very difficult variation on the basic long tone.
&∏wq»§º
w ˙ ˙Ï
w∏
˙ ˙
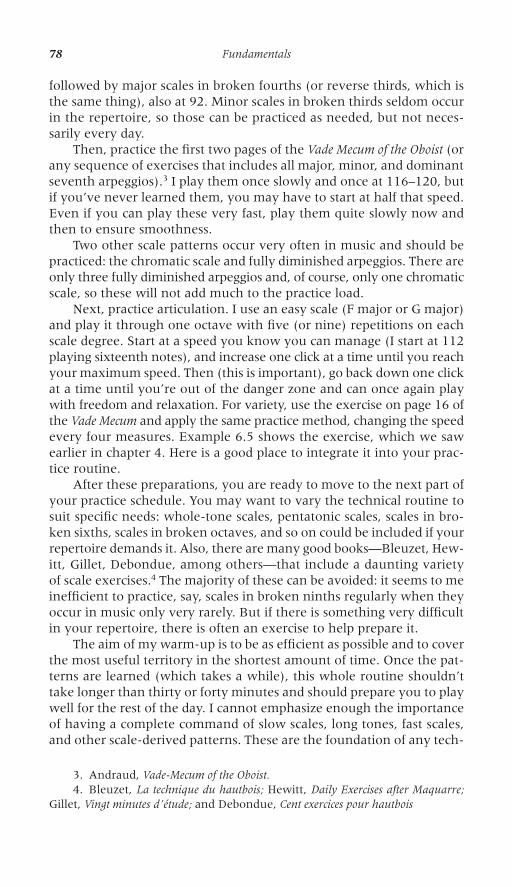
followed by major scales in broken fourths (or reverse thirds, which isthe same thing), also at 92. Minor scales in broken thirds seldom occurin the repertoire, so those can be practiced as needed, but not neces-sarily every day.
Then, practice the first two pages of the Vade Mecum of the Oboist (orany sequence of exercises that includes all major, minor, and dominantseventh arpeggios).3 I play them once slowly and once at 116–120, butif you’ve never learned them, you may have to start at half that speed.Even if you can play these very fast, play them quite slowly now andthen to ensure smoothness.
Two other scale patterns occur very often in music and should bepracticed: the chromatic scale and fully diminished arpeggios. There areonly three fully diminished arpeggios and, of course, only one chromaticscale, so these will not add much to the practice load.
Next, practice articulation. I use an easy scale (F major or G major)and play it through one octave with five (or nine) repetitions on eachscale degree. Start at a speed you know you can manage (I start at 112playing sixteenth notes), and increase one click at a time until you reachyour maximum speed. Then (this is important), go back down one clickat a time until you’re out of the danger zone and can once again playwith freedom and relaxation. For variety, use the exercise on page 16 ofthe Vade Mecum and apply the same practice method, changing the speedevery four measures. Example 6.5 shows the exercise, which we sawearlier in chapter 4. Here is a good place to integrate it into your prac-tice routine.
After these preparations, you are ready to move to the next part ofyour practice schedule. You may want to vary the technical routine tosuit specific needs: whole-tone scales, pentatonic scales, scales in bro-ken sixths, scales in broken octaves, and so on could be included if yourrepertoire demands it. Also, there are many good books—Bleuzet, Hew-itt, Gillet, Debondue, among others—that include a daunting varietyof scale exercises.4 The majority of these can be avoided: it seems to meinefficient to practice, say, scales in broken ninths regularly when theyoccur in music only very rarely. But if there is something very difficultin your repertoire, there is often an exercise to help prepare it.
The aim of my warm-up is to be as efficient as possible and to coverthe most useful territory in the shortest amount of time. Once the pat-terns are learned (which takes a while), this whole routine shouldn’ttake longer than thirty or forty minutes and should prepare you to playwell for the rest of the day. I cannot emphasize enough the importanceof having a complete command of slow scales, long tones, fast scales,and other scale-derived patterns. These are the foundation of any tech-
78 Fundamentals
3. Andraud, Vade-Mecum of the Oboist.4. Bleuzet, La technique du hautbois; Hewitt, Daily Exercises after Maquarre;
Gillet, Vingt minutes d’étude; and Debondue, Cent exercices pour hautbois
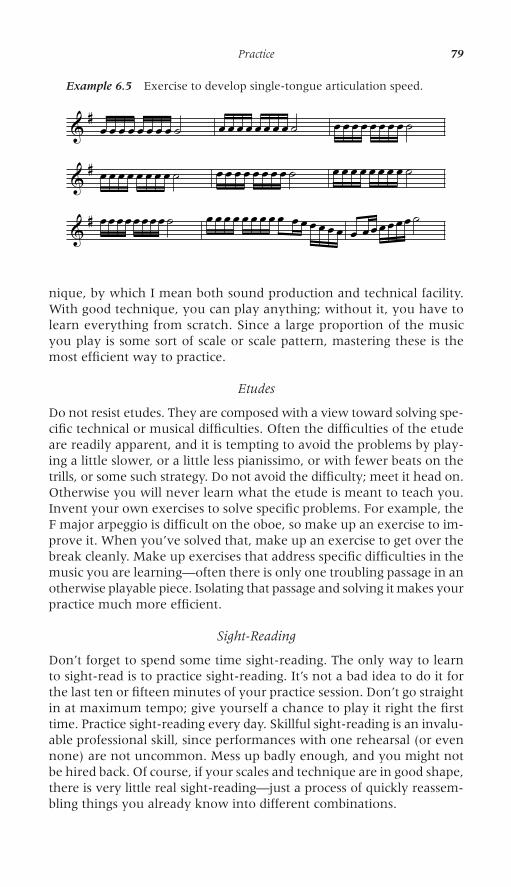
nique, by which I mean both sound production and technical facility.With good technique, you can play anything; without it, you have tolearn everything from scratch. Since a large proportion of the musicyou play is some sort of scale or scale pattern, mastering these is themost efficient way to practice.
Etudes
Do not resist etudes. They are composed with a view toward solving spe-cific technical or musical difficulties. Often the difficulties of the etudeare readily apparent, and it is tempting to avoid the problems by play-ing a little slower, or a little less pianissimo, or with fewer beats on thetrills, or some such strategy. Do not avoid the difficulty; meet it head on.Otherwise you will never learn what the etude is meant to teach you.Invent your own exercises to solve specific problems. For example, theF major arpeggio is difficult on the oboe, so make up an exercise to im-prove it. When you’ve solved that, make up an exercise to get over thebreak cleanly. Make up exercises that address specific difficulties in themusic you are learning—often there is only one troubling passage in anotherwise playable piece. Isolating that passage and solving it makes yourpractice much more efficient.
Sight-Reading
Don’t forget to spend some time sight-reading. The only way to learnto sight-read is to practice sight-reading. It’s not a bad idea to do it forthe last ten or fifteen minutes of your practice session. Don’t go straightin at maximum tempo; give yourself a chance to play it right the firsttime. Practice sight-reading every day. Skillful sight-reading is an invalu-able professional skill, since performances with one rehearsal (or evennone) are not uncommon. Mess up badly enough, and you might notbe hired back. Of course, if your scales and technique are in good shape,there is very little real sight-reading—just a process of quickly reassem-bling things you already know into different combinations.
Practice 79
Example 6.5 Exercise to develop single-tongue articulation speed.
& # œ œ œ œ œ œ œ œ ˙ œ œ œ œ œ œ œ œ ˙ œ œ œ œ œ œ œ œ ˙
& # œ œ œ œ œ œ œ œ ˙ œ œ œ œ œ œ œ œ ˙ œ œ œ œ œ œ œ œ ˙
& # œ œ œ œ œ œ œ œ ˙ œ œ œ œ œ œ œ œ œ œ œ œ œ œ œ œ œ œ œ œ œ œ ˙
“I Could Play It at Home,” or How to Prepare a Successful Performance
You couldn’t play it at home, either. You just weren’t paying attentionat home (or you weren’t nervous, or you weren’t distracted, or some-thing). Most teachers would gladly accept a dollar for every time they’veheard this complaint, usually asserted with great sincerity. But if youare well prepared, you can play anything in any situation, not just athome. In all of your preparation, never lose sight of the fact that youare preparing to perform something. Make the practice session as muchlike the performance as possible. In other words, pay closer attentionduring your practice; that allows you to relax more during your per-formances. Remember that the performance is the reward for havingdone all of that preparation. Prepare so the performance is the easy part.You’ll be a lot less nervous if you know what you’re doing.
When practicing, you must prepare three aspects of playing: youmust prepare the technique, you must prepare your interpretation, andyou must prepare the performance. Typically, people are as careful asthey can be with their technique, somewhat attentive to the interpre-tation, and rather hopeful about the performance. But if the performanceis not successful, the preparation is not successful either, regardless ofhow many hours went into it. It is futile to defend the process if the re-sult is not satisfactory. So let’s spend some time examining how prac-ticing should include the idea of preparing the performance.
Students typically spend ten, twenty, even fifty hours practicing forevery hour spent performing. This lack of performing experience oftenresults in performances that are uncomfortable and stressful, evenamong skilled players. So what is different in a performance?
1. You have an audience.2. You do not choose the starting time.3. You cannot stop.4. You only get one chance to play it right.5. You usually do not choose the physical space where the perfor-
mance is held.
Well, guess what? Every one of these things can be practiced! First of all,performers usually do not fear all five of these situations; often, they onlyfear one or two. Identify what worries you and start overcoming it.
1. You have an audience. They are both listening to you andlooking at you. If they are adjudicators or teachers, they are alsojudging you. Different aspects of this disturb people to varyingdegrees: some don’t like being looked at, some are afraid of beingjudged, some have other concerns. But the actual makeup of theaudience is ultimately unimportant; the reality is that they are
80 Fundamentals
present and you have to play for them. So play for people as oftenas you can. It doesn’t matter who they are. Of course it is morestressful to play for people whose judgment you respect, but it willhelp to play for anyone at all. Family members, friends, fellow mu-sicians, church congregations—all will help you overcome the dis-comfort of being put on display. And really make it a display, evenif it’s only for practice. Practice the whole performance: walk out,smile, bow, and take your place onstage. Yes, you will feel foolishdoing this in front of your friends, but you will feel nervous infront of the real audience, so the same technique of acting confi-dent and relaxed can be learned. Put yourself in stressful situationsas often as possible. Take advantage of any and all performancesthat come along. Play in churches, for retirement homes, for wed-dings. It doesn’t matter what the surrounding is, or even whetherit pays anything; the important thing is to be playing for an audi-ence. Again, it doesn’t matter who they are, since you ultimatelycannot know who they are. Some audiences are more likely thanothers to include musical connoisseurs, but you can never really be sure when the ghost of Tabuteau might be present. Regard allaudiences as equal; don’t decide that playing in church is easywhile playing in a concert hall is challenging. If you are actuallyable to decide that one audience is easy, it should be possible to decide that they are all easy.
2. You do not choose the starting time. At first glance, that seems a trivial issue, but it really means you cannot wait until you “feellike it” to play your recital or ensemble concert. This is one veryimportant difference between professionals and nonprofessionals:professionals sound consistently the same whether they want toplay or not, whether they like their reed or not, whether they arecompletely healthy or miserably sick. There will always be consid-erations that can detract from your energy level or enthusiasmlevel. Perhaps you don’t feel well; perhaps you don’t like this pieceof music; perhaps there is a family issue distracting your focus. Pro-fessionals often arrange concerts months or even years in advance.They cannot predict that six months hence they are definitelygoing to want to play the Mozart Oboe Concerto, but they canpredict that their preparation will carry them through the evening.Again, this can be practiced. You can decide in advance that onThursday at four o’clock you will play your piece once only withoutstopping. You want a true picture of how well your preparation isprogressing, so don’t practice the piece during the minutes beforefour o’clock. Warm up and get physically and mentally ready toplay, but try the piece cold. Make a recording while you’re at it,and before listening to it jot down a few notes with your impres-sions of your performance. Then listen to the recording and com-pare your mental picture of your performance with the reality.
Practice 81

Improvement is sure to result. Remember, you play how you playtoday, not how you would like the playing to be. If the recordingexposes things you don’t like, start to work on them.
3. You cannot stop. You really, really cannot stop. Do not stop!Paradoxically, this problem is caused, to an extent, by practicing. If there are corrections to be made, we have to stop and correctthem. But, after a piece is reasonably well prepared, you shouldalso start to practice it without stopping. At first, “without stop-ping” might mean that even if you make a mistake, you will stay inthe right place no matter what. Skip notes, or beats, or even wholemeasures to achieve this. Eventually, “without stopping” will meana continuous performance with no gaps of any kind. Some playersstop almost reflexively every time something goes even slightlywrong. Sometimes the pauses are very brief and, after a while, noteven noticed. Pauses, or gaps, do allow you to regroup a little, ortake a small breath, or reset your embouchure—none of which canoccur during the performance. If stopping even briefly is a chronichabit of yours, you may need a teacher or helper to call your atten-tion to how often the stops occur. Some younger students neverattempt to play without stopping until the lesson, audition, or con-cert. Needless to say, this is difficult and unreliable. A performanceis a very bad time to try something for the first time.
4. You only get one chance to play it right. This circumstance cancertainly create fear, since many players know they really can’t playit right unless they get lucky, which is regrettably undependable.Here is where all of my previous admonitions about careful prac-tice will help. In order to play it right once, you must be able toplay it right every single time. Every example of the music storedin your brain should be admirable and perfect.
The following is a somewhat silly example, but it is an accurateillustration of how the process works. You are running for your lifeand, to make matters even worse, it is pitch dark, and you have togo to your closet and take out a black jacket. Any other garmentwill spoil your disguise and result in grievous consequences. Howcan you be sure to complete this task successfully? The only way of being absolutely sure that you will get a black jacket every timeis to have a closet filled with only black jackets. You can try to re-member that the black jackets are at the far end, or that they feelsofter than the blue jackets, or that there is only one jacket and all the rest are shirts. But if you are running for your life and youmust find a black jacket immediately without fail, there is no betteroption than having the whole closet filled with them. As youapproach your concerts, the best method is to have your entiremind filled only with correct examples of the music you are about to play.
5. You usually do not choose the physical space where the performanceis held. Indeed, sometimes you don’t even see it until the sound
82 Fundamentals

check an hour before the concert. But you can have a pretty goodidea. It is not difficult to find out the seating capacity, the generallayout, the basic acoustic, and so on. And you can be quite surethat the performing space will be larger than your practice space.This difference in size, and the resulting difference in tone projec-tion, frequently flusters students: the reed worked perfectly anhour ago, and now nobody can hear it. Take every possible oppor-tunity to spend time practicing in large spaces. Arrive at ensemblerehearsals early and practice in the rehearsal room. It’s only a re-hearsal room, not Carnegie Hall, but it’s bigger than your practiceroom. Your school will have an auditorium or other performingvenues; try to use them when they are available. You may have to do this early in the morning or late at night, but it will be timewell spent. Play for the person sitting in the last row. The “practice-room sound” will not work in a performance.
All of these suggestions should help to prepare a more successful per-formance, and all of them are based on the commonsense idea that aperformance is a very bad time to try something for the first time. Asfar as is possible you want to know everything that is going to happenduring the performance, and the only way to know it is to do it manytimes before the performance.
This still may not completely eliminate nerves, or what is more elo-quently described as performance anxiety. Nervousness is a reality, andanyone who declares that he or she no longer gets nervous is not beingcompletely truthful. There is always a different state of awareness dur-ing a performance than at any other time. This reaction is very humanand is rooted in our most primitive instincts. When confronted withdanger, the body reacts by preparing you to respond in an aggressive andforceful manner. Within seconds, you are physically and mentally pre-pared to kill the bear, or slay your opponent, or run from the avalanche.But instead of having a bear to vanquish, we only have a concert toplay. Moreover, the oboe is not a good outlet for pent-up aggression.We need control and calm, not adrenaline and a racing heartbeat.
Other professionals also have to harness this fight-or-flight syndrome—athletes, policemen, soldiers—people who confront very dangeroussituations and must respond instantly and appropriately. They havetwo advantages. The first is that the performance of their duties oftengives them a vigorous physical outlet for their anxiety—just the sort ofthing that adrenaline is meant for. Their second advantage lies in theirtraining. Whenever they train, they are being supervised and coached.They have weight trainers, marksmanship instructors, drill sergeants,pitching coaches—the list could go on for a very long time. Musicianssit in a room by themselves and practice. They do their best, but I won-der how different it would be if an authority were constantly watchingover their shoulder. You have to rely on your training, so be sure that itis very reliable, indeed.
Practice 83
Fortunately, playing concerts is not as dangerous as fighting a bat-tle or making an arrest; indeed, the worst that can happen during aconcert is embarrassment, not injury or death. Many concerts are quitepleasurable; some are thrilling. Even so, some players are so distractedby nerves that they seldom play as well as they can.
A good deal of literature exists to help players with performanceanxiety. Much of it is based on concepts borrowed from sports psychol-ogy, and many of the ideas are extremely helpful to create an optimizedstate of performance. But no matter how many techniques we study andapply to reduce nervousness, the reality will always remain that we mustlearn how to play when we are nervous. Familiarity with the situationand very diligent training are the answers. Make sure that nothing youdo in a performance is being done for the first time. Highlight that pre-vious sentence in big boldface italics and use it.
Even with the physical distractions of nervousness reduced, we stillhave to fight the mental confusion that sometimes takes place duringa performance. Some players think of almost everything except whatthey are trying to do (“Was that exit sign blinking yesterday?”); othersare almost unable to think at all. In either case, it is helpful to have some-thing useful to think about. So, if your mind is betraying you, bring itback on course by insisting that it focus on two things: making a beau-tiful sound and staying present in the music. Even if you think aboutnothing else but these two things, they should help you stay on courseand play beautifully.
“I Can Play it Fast, but I Can’t Play it Slow”
It should not be necessary to say this, but this statement really means,“I can’t play it at all.” You should be able to play it fast, slow, in between,in different rhythms, in different articulations, in little chunks, as part ofthe big picture, and every other way you can think of. That flexibilityis not just a practice tool; it has real professional benefits. In orchestralrehearsals, conductors often make suggestions to the players. Sometimesthe suggestion is something the player had not thought of until thatmoment. You must be prepared to change your performance completelyand immediately if needed. It is a favorite strategy of audition commit-tees to ask applicants to play an excerpt a little differently, just to see ifthe player can do it. Anticipate some possible variations and be prepared.Quick is good. Flexible is good.
Metronomes, Tuners, and Other Tools
Incessant use of the metronome is not recommended; the clicks canactually obscure what you are trying to hear. Nevertheless, the metro -nome, used intelligently, is an essential practice tool. It has two mainuses. Most commonly, it is used to restrain your tempo while preparing
84 Fundamentals
technical passages. Far from being a tool that whips your tempo forward,it usually ends up being a device that insists you play slowly enough.Most people get ahead of the metronome, not behind. When you use it,make sure that you play exactly with the clicks. Many times students whopractice constantly with the metronome find they cannot play withoutit. This shows a failure to play with precision—to play exactly with themetronome. Only when that is achieved can the metronome help totransform the clicks into a physical, internal feeling of pulse stability.
Start with the metronome clicking small subdivisions—let’s sayeighth notes. Be very strict with yourself, and do not allow even thesmallest deviation from perfection. If we were to record your practicesession and slow the recording down to a crawl, the metronome clicksand your beat should still be together. As the small subdivisions becomeeasier to follow, gradually make the clicks further apart and finally asfar apart as possible, leaving you to fill in the gaps. Don’t react to theclick; instead, accurately predict the arrival of the next one—that iswhat good rhythm is all about. At first, trying to play exactly with themetronome can be maddening—it can be very difficult to do it for morethan a few beats. Slow down the tempo, increase the subdivisions, andtry again. Until you can do this, it is irresponsible to proceed.
Once accuracy is established, increase your speed very, very grad-ually. The metronome can be regulated to increase the speed in barelynoticeable increments. The object is to trick your brain into believingthat the speed has not changed, so you must be very patient. If you arepracticing successfully at 72 beats per minute, do not increase the speedto 88; increase it to at most 76. If you have any physical or mental aware-ness of a faster tempo, the benefit is lost. If you make mistakes, or gettense, or need a great deal of conscious thought to keep going, you’regoing too fast. Slow down and take your time. It can be difficult to findthe ideal practice tempo—if you play too slowly, you will get bored, andif you play too quickly, you will make mistakes and become tense. Sofind a tempo that is slow enough to allow you to control everything, butfast enough to require active concentration.
The other use for the metronome is to check any tendency towardwayward tempo. It is useful to play even very familiar pieces with themetronome once in a while. Note where you tend to rush and whereyou tend to drag. Try to identify any consistent tendencies—whether youtend to rush only articulated passages, for example. Remember to bereally vigilant and play exactly with the metronome, or you’ll receive nobenefit. If you wish to push or pull certain passages for artistic effect,that’s wonderful, but you should do it with complete awareness.
Some students complain that the metronome makes everythingmore difficult and distracting. This may well be true, but that is also aclue for them to use it much more. Always practice the things that aredifficult and distracting. Spend as little time as possible doing the thingsthat already work well.
Practice 85
For some repertoire, notably Allegro movements in baroque andclassical Viennese-school music, it can be extremely useful to play withthe metronome clicking the offbeats. For anyone who has never triedthis before, the first half hour will be frustrating, to say the least. Butafter a while, this way of practicing will yield a whole new relationshipto the beat and give much more assurance in tempo stability and rhyth-mic integrity. If you have any tendency to rush during the first move-ment of the Mozart concerto, for instance, a few hours spent this waywill cure the problem forever.
Tuners are useful for tone and pitch development, but not as crit-ical for oboe as they are for other instruments. The oboe changes daily(actually, the reed changes daily)—usually just slightly, but enough tomake things much more complicated than is the case with instrumentsthat stay more or less the same every day. As a result, it is more difficultfor us to rely on physical memory to produce a sound: the notes areusually not in quite the same place as they were yesterday. So use thetuner as a means of discovering your pitch tendencies (is your E alwayssharp?), and especially as a means of learning the relationship betweenpitch and resonance. We discussed this briefly before: awareness of thisrelationship is crucial to improving security of pitch and maximizingresonance.
Flat notes, sharp notes, and in-tune notes all have a particular qual-ity of sound that is consistent regardless of register. Sharp notes soundthin and shallow, flat notes sound flabby, and in-tune notes sound res-onant and focused (your terminology may be different, but the ideas arethe same). Learn to detect these differences in tone color, even minuteones, and your ability to play in tune will be much enhanced. It is eas-ier for most players to hear a small difference in timbre than to hearthat the pitch is slightly sharp or flat. If I play a note, talk for a minute,and repeat the same note very slightly sharper, many people would beunable to say which was higher or lower. But almost everyone would beable to say which example sounded better.
Do not use the tuner as a visual aid—in other words, don’t justtry to get the needle to go straight up and down. That’s an easy trick,possible to accomplish consistently without learning anything. Make adetermination first—are you sharp, flat, or in tune?—and then glanceat the tuner for verification. Observe the change in resonance as youbring the note into tune—this will help you learn the relationship be-tween intonation and tone quality. Pitch and resonance on the oboe arevery nearly the same thing. If the note is in tune, chances are that itsounds about as good as it can; if the tone is resonant and full, chancesare that the note is also in tune.
Recording devices are time-consuming but can be valuable. Manystudents are more perceptive about the playing of others than they areabout their own. Listening to recordings of their own playing can helpto redress this imbalance. If you record every practice session and then
86 Fundamentals
listen to it, you have just doubled your practice time, so that may notbe productive. But twenty minutes here or there will be very helpful.Don’t be afraid to record yourself, fearing that you won’t sound good.Within the limitations of the audio equipment, the recording playbackwill reflect how you play. If you don’t like it, identify what you don’t likeand start working on it.
Further Aspects of Successful Preparation
Advantages of Slow Practice
Apart from the obvious benefit of allowing you to play accurately, slowpractice also allows you to play perfectly. It allows you to include nu-ances and inflections that might be difficult at full speed. It allows youto play really well in tune, with perfect resonance on each note. It al-lows you to seek a really clean technique with no bloops or sloppinessbetween any of the notes. And it allows you to control timbre, vibrato,and tone color to match your interpretation. Slow practice lets youreally play well. Later, when the music is proceeding at full speed, someof this detail will be lost, but remnants of it will still be there, improvingyour performance. Never play slowly and bored; play beautifully.
Self-Diagnosis, or How to Practice Productively
Do you get mad when you practice? Frustrated? Do you sometimesreach the end of a practice session feeling like you have accomplishednothing? It’s your own fault. Remember that while you are practicing,your task is to be your own teacher. You must do exactly what yourteacher does: listen, make a diagnosis, prioritize the problems, and comeup with a plan for improvement. Instead, many players merely judge:it’s bad, it’s pretty bad, it’s ugly, it’s a mess. If you were unfortunateenough to work with a teacher who was constantly negative, abusive,or vague, you would find another teacher. Don’t do the same thing toyourself. Instead, employ a four-step process:
1. Is something wrong? Sometimes nothing is wrong. Do not beafraid to give yourself credit for playing well.
2. What’s wrong? Exactly what’s wrong? The more specific the answer to this question can be, the easier it will be to come up with a solution. If multiple things are wrong, start withthe one that will improve your presentation the most. Fix onething at a time. Don’t get buried under problems; make them go away.
3. How do I fix it? Finding the answer is usually easy if the problemhas been identified with precision.
Practice 87

4. Have my changes and corrections eliminated the problem? If the rem-edy is effective, wonderful. Move to the next problem. If thereis no improvement, make a new plan. But don’t let defects passby without attention.
Many students are only good at the first of these steps—they knowsomething is wrong without knowing exactly what it is. Work hard toget to the second step, which is where all the action is. Don’t allowyourself to use meaningless but judgmental words like “it’s bad” or “Isound ugly.” Learn to identify a specific issue like “my A-flat to B-flatis sloppy,” or “the last four sixteenth notes of this run are uneven,” or“these three high notes are flat.” Learn to hear what is coming fromthe instrument. If all you know is that it sounded bad somewhere onthe second line, you are trapped into playing the second line badly oncemore to try to focus the problem. If, instead, you know that the thirdmeasure has three awkward notes in a row that you tend to rush whenyou don’t miss them outright, you can easily develop a method for im-provement. Once you know exactly what’s wrong, coming up with asolution usually isn’t too difficult. The hard part is figuring out what’swrong. Work very hard to develop this skill.
Finally, persist with your plan until something changes. Until youhave change, you cannot know if the plan was a good one or a bad one.At the end of a practice session conducted in this way, you will haveimproved something. If you improve something every day, you will im-prove over 700 things in just two years. (Imagine what could happen ifyou improve two or three things every day.)
Positive Thinking
Attention during a practice session is usually focused on the eliminationof error—a mindset that is correct and necessary. But often some aspectof your playing works temporarily much better than usual and moreeasily than usual. Every once in a while you will accidentally play re-ally well. One day it might be that your tongue goes faster than normal;another day you might be able to play for hours without tiring; on yetanother day you may find that you are playing with bewildering accu-racy. When this happens, make sure you learn something from the ex-perience. Be as vigilant for really good things as you are for bad things.Be on the lookout for things that feel really easy: that’s how you wantyour playing to be all the time. Many breakthroughs occur after happyaccidents of this kind; don’t miss them.
The opposite of this idea is important, too. If something doesn’t worktoday, move on to something else. We all have days where the tonguedoesn’t work, the tone doesn’t sing, or the fingers feel sluggish. So if youcan’t tongue today, stop trying to force it. Practice something legato. Ifthe tone won’t ring, there are plenty of scales that can still be improved
88 Fundamentals
using your dead tone. Eventually, when your focus has shifted far enoughaway from tone, perhaps it will come and join you anyway.
Mental Practice
You cannot play what you do not understand. For this reason, mentalpractice—in other words, thinking and studying—is very useful. Imag-ine how the phrases will sound in your ideal performance. Try them, inyour head, in all different ways—without the worry of operating theoboe, you can play any way you choose. While you’re at it, study andlearn the other parts as well. The oboe is almost always part of some-thing larger, whether a duo with piano or a full symphony orchestra.Make sure you understand the whole and your part in it. After youhave done all of this work, you can return to physical practicing with amuch clearer idea of what you should work on and how you shouldproceed. Remember that imagination is the source of improvement. Ifyou cannot imagine the music as more beautiful than you are playingit, you will not improve. Mental practice is part of the answer to thisproblem.
Spend as little time as possible being perplexed. If there is a rhythmyou do not understand, put the oboe down and figure it out. If there’sa German word or other foreign term you don’t know, get a translationso you know what it means. Make sure that you understand perfectlyevery single mark on the page and can reproduce it accurately.
Often students prefer practicing fast music to practicing slow music.In preparing fast music, the goal is obvious—learn to play it fast and ac-curately. In slow music, it can be hard to know what to practice. Mentalpractice is the answer here, too. Imagine how the music would sound ifit were sung by a great singer, played by a great violinist, played by anoboist with no expressive limitations. Then go back to the instrument.Now you’ve got work to do.
Speed Reading for Musicians
There is another aspect to mental preparation. Remember, you cannotplay what you do not understand. Your fingers, tongue, and embouchurewill move no faster and no more accurately than your brain commandsthem to do. If you are playing faster than you are thinking, you will makemistakes. Slow practice and fast thinking can make up some of thisdeficit, but at some point it will be impossible to think any faster. Usu-ally the music still needs to be played faster, so we need a better plan.The only possible remedy is to find a way to give yourself less to thinkabout. Recognizing patterns and intervals is the answer. Scale practiceis useful because much of the music we play is made from a scale or somepattern derived from a scale. Thus, the solution has two parts: the playermust be able to execute the scale or pattern, and he or she must be ableto recognize it immediately and retrieve it instantly.
Practice 89
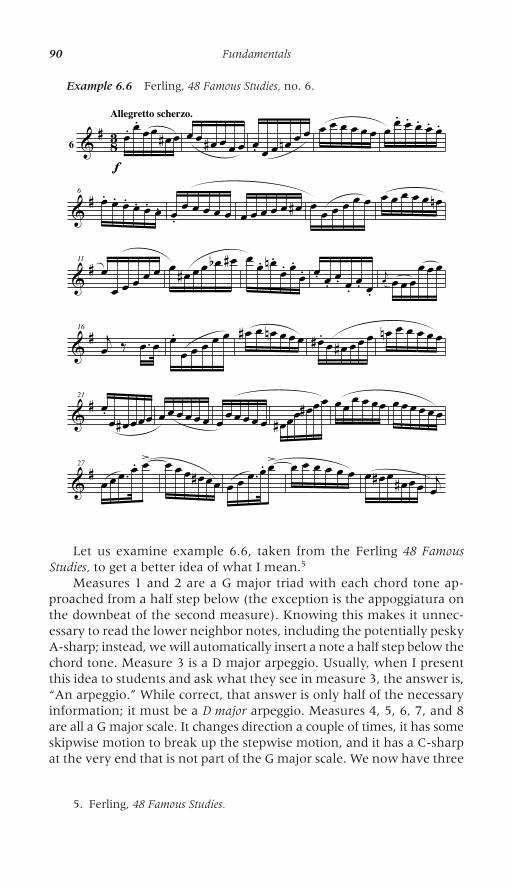
Let us examine example 6.6, taken from the Ferling 48 FamousStudies, to get a better idea of what I mean.5
Measures 1 and 2 are a G major triad with each chord tone ap-proached from a half step below (the exception is the appoggiatura onthe downbeat of the second measure). Knowing this makes it unnec-essary to read the lower neighbor notes, including the potentially peskyA-sharp; instead, we will automatically insert a note a half step below thechord tone. Measure 3 is a D major arpeggio. Usually, when I presentthis idea to students and ask what they see in measure 3, the answer is,“An arpeggio.” While correct, that answer is only half of the necessaryinformation; it must be a D major arpeggio. Measures 4, 5, 6, 7, and 8are all a G major scale. It changes direction a couple of times, it has someskipwise motion to break up the stepwise motion, and it has a C-sharpat the very end that is not part of the G major scale. We now have three
90 Fundamentals
Example 6.6 Ferling, 48 Famous Studies, no. 6.
& # 836
Allegretto scherzo.œ.fœ. œ œ œ# œ œ œ œ# œ œ œ œ. œ œ œn œ œ
œ œ œ œ œ œ œ œ. œ. œ. œ. œ.
& #6 œ. œ. œ. œ. œ. œ. œ. œ œ œ œ œ œ œ œ œ œ œ# œ œ œ œ
œ œ œ œ œ œ œ œn
& #11 œ œ œ œ œ œ
œ œ# œ œ œb œ# œ œ. œn . œ. œ. œ. œ. œ. œ. œ. œ. œ. jœ œ œ œœ œ œ
& #16 jœ ‰ .œ œ œ. œ œ œ œ œ
œ# œ œn œ œ œ œ# . œ œ# œ œ œ œn œ œ œ œ œ
& #21 œ. œ œ# œ œœ œ œ œ œ œ œ œ œ œ œ œ œ œ# œœ œ# œ
œ œ œ œ œ œœ œ œ œ œ œ œ
& #27 œ œ .œ œ. œ
> œ œ œ œ# œœ œ œ .œ œ. œ> œ œ œ œ œ œ œ œ# œ œ# œ œ jœ
5. Ferling, 48 Famous Studies.
or four things to think about in order to play thirty notes, instead ofthirty things. Of course, the other benefit of thinking this way is thatstudents good enough to play this etude should be able to play a G majorscale automatically, so this whole first line can almost be sight-read.Measure 9 is a G major arpeggio with one exception—the F-sharp at theend of the bar. Measure 10 is a C major scale; measure 11 is a C majorarpeggio. Measure 12 is fully diminished; measure 13 is G major again.Measure 14 is the first measure in which we actually have to read allsix of the notes to be sure we have them right. Measure 17 is E minor,measure 18 is B minor, measure 19 is B major, and the next three mea -sures are all E minor.
When analyzing material in this way, make sure to find the exactkey so that the relationships are logical and correct. For example, thenotes in measure 17 could conceivably fit into quite a few keys—it wouldnot be incorrect to infer C major, A minor, G major, E minor, even Dmajor or B minor. But clearly the function is E minor. The next mea-sure (measure 18) has to be B minor because of the altered A-sharp.The only scale that has A-sharp on the way up and A-natural on theway down is B melodic minor. This is confirmed in the next measure,which is in B major. Why? Why couldn’t it be F-sharp major? All thesame notes would fit. I hope you see how your music theory studies arenecessary here. A progression from E minor to B minor to F-sharp majoris not out of the question—in fact, it’s common. However, immediatelyarriving at E minor following the F-sharp major makes little sense. Incontrast, the progression E minor–B minor–B major–B minor (measures20–23) is perfectly smooth and logical.
If you are unused to thinking about music in this way, this analysismay seem like it causes extra headache and trouble. But believe me—every professional player with a good technique looks at music thisway. Many gigs are little more than paid sight-reading; there is no timeto read all of the notes, let alone practice them. Intervals and patternsare all we see. The music theory aspect—expecting certain chord pro-gressions in preference to others—is basic musical literacy. If I begin asentence, “I am going to walk through the . . .,” there are many sen -sible ways to finish it: “door,” “park,” “grocery store,” “house,” and soon. The literate English speaker would expect one of those words orsomething similar, but he or she would also have eliminated manyother words without thinking: “button,” “doughnut,” “reed knife,” andso forth. Cultivate this way of thinking about reading music; it willeventually give you much less to think about. Ultimately, there will belittle real sight-reading, but rather the rapid-fire reassembly of thingswe already know very well.
Transposing well-known material is a good way of gaining facilityin this skill. Take any Barret or Ferling study and transpose it up ordown a half step while looking at the same music. Now intervals andpatterns become essential information, since the process of reading the
Practice 91
note, transposing the note, giving it the right name (E-sharp, not F, forinstance), and playing it correctly is much too difficult. Try it with thisetude—play it a half step lower by changing the key signature to sixflats and reading the music in the way described above. It will be diffi-cult at first, but it should get easier quite quickly.
Summary
· Never do it wrong.· Practice every day for an appropriate length of time.· Adhere to a constructive routine designed to be as efficient as
possible.· Practice performing.· Be your own teacher.· Be alert for good accidents.· Practice away from the instrument.· Learn to recognize and execute common patterns.
92 Fundamentals
7
Extended Techniques
Over the past few decades, music has ventured beyond the traditionalarrangement of notes and rhythms into realms of sound requiring newtechniques of tone production. Books by Peter Veale, Libby Van Cleve,and Bruno Bartolozzi give a comprehensive picture of the possibilities.1
I cannot improve on these, but I can offer a few practical suggestionsfor the novice.
First and foremost, do not regard the special techniques as noise.They should not frighten you, nor should you approach them with theglee of making an amusing sound. Extended techniques are part of acomposer’s carefully calculated sound picture and must be performedwith as much care as any other sound you make. Often, producing thesound or maneuvering from one sound to the next requires a sophisti-cated flexibility of embouchure and air that will improve all aspects ofplaying, whether modern or traditional. So take the time to make surethat you can really play the piece at hand and don’t have to resort tofaking some kind of approximate version. When speaking about newmusic, even serious musicians are sometimes heard to say, “Nobody cantell the difference if we play this right or not.” That is a betrayal of whatit means to be a musician. As music professionals, it is not our job tolike or dislike a piece; it is our job to present it with as much commitment
93
1. Veale, Techniques of Oboe Playing; Van Cleve, Oboe Unbound; and Bar-tolozzi, New Sounds for Woodwind.
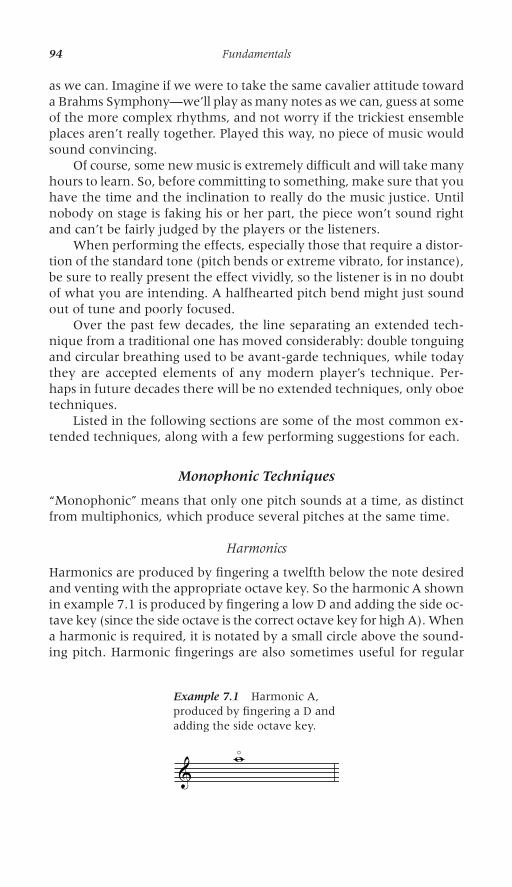
as we can. Imagine if we were to take the same cavalier attitude towarda Brahms Symphony—we’ll play as many notes as we can, guess at someof the more complex rhythms, and not worry if the trickiest ensembleplaces aren’t really together. Played this way, no piece of music wouldsound convincing.
Of course, some new music is extremely difficult and will take manyhours to learn. So, before committing to something, make sure that youhave the time and the inclination to really do the music justice. Untilnobody on stage is faking his or her part, the piece won’t sound rightand can’t be fairly judged by the players or the listeners.
When performing the effects, especially those that require a distor-tion of the standard tone (pitch bends or extreme vibrato, for instance),be sure to really present the effect vividly, so the listener is in no doubtof what you are intending. A halfhearted pitch bend might just soundout of tune and poorly focused.
Over the past few decades, the line separating an extended tech-nique from a traditional one has moved considerably: double tonguingand circular breathing used to be avant-garde techniques, while todaythey are accepted elements of any modern player’s technique. Per-haps in future decades there will be no extended techniques, only oboetechniques.
Listed in the following sections are some of the most common ex-tended techniques, along with a few performing suggestions for each.
Monophonic Techniques
“Monophonic” means that only one pitch sounds at a time, as distinctfrom multiphonics, which produce several pitches at the same time.
Harmonics
Harmonics are produced by fingering a twelfth below the note desiredand venting with the appropriate octave key. So the harmonic A shownin example 7.1 is produced by fingering a low D and adding the side oc-tave key (since the side octave is the correct octave key for high A). Whena harmonic is required, it is notated by a small circle above the sound-ing pitch. Harmonic fingerings are also sometimes useful for regular
94 Fundamentals
Example 7.1 Harmonic A,produced by fingering a D andadding the side octave key.
& wo

playing—for example, when a very soft note is wanted to blend com-pletely into a chord.
Occasionally, composers will place a small circle above a note thatcannot possibly be a harmonic (in other words, a twelfth below thenote is beyond the oboe’s range). In that case, an alternate fingering issubstituted—utilizing an approximate fingering that plays the same pitchbut has a different tone color.
Microtones
Most often, these are quarter tones (pitches halfway between two semi-tones), although eighth tones and others are also possible. Quarter tonesare most reliably produced by using a dedicated fingering. Simply lip-ping a note up or down is not usually secure enough, especially in fasterpassages. Do not regard quarter tones as being out of tune and there-fore free from our constant concern for good intonation. They requiretheir own careful attention to precise intonation so that they can expressthe pitch inflection the composer intended. Fingerings can be found inthe Veale and Van Cleve books or through experimentation, usually byadding fingers lower on the tube of the oboe. Notation is not entirelystandardized, though composers almost always provide a key to showyou what their symbols mean, and the systems are almost always logical.
Tone-Color Fingerings
Composers often request fingerings that produce the same pitch but havea slightly different tone color. In Luciano Berio’s Sequenza VII,2 for ex-ample, six different fingerings are needed for B-natural. Sometimes thefingerings are provided, sometimes they must be found through trial anderror. Sometimes the suggested fingerings won’t work very well andyou’ll have to find something else. Try hard to find something that onlysounds different, not something that audibly raises or lowers the pitch.
Extremely High Notes
Consult the fingering chart in Appendix 2 for suggested fingerings forextremely high notes. With the exception of a few great virtuoso per-formers, most oboe players do not sound good on notes A and higher,though pitches as high as C-sharp and even D (more than three octavesabove middle C) are possible. Many of the fingerings for these notes areproduced by experimentation—the Van Cleve book, Oboe Unbound, forinstance, shows seven fingerings for high A—and many of them requireunusual venting techniques or even the direct application of the teethto the reed.
Extended Techniques 95
2. Berio, Sequenza VII per Oboe Solo.
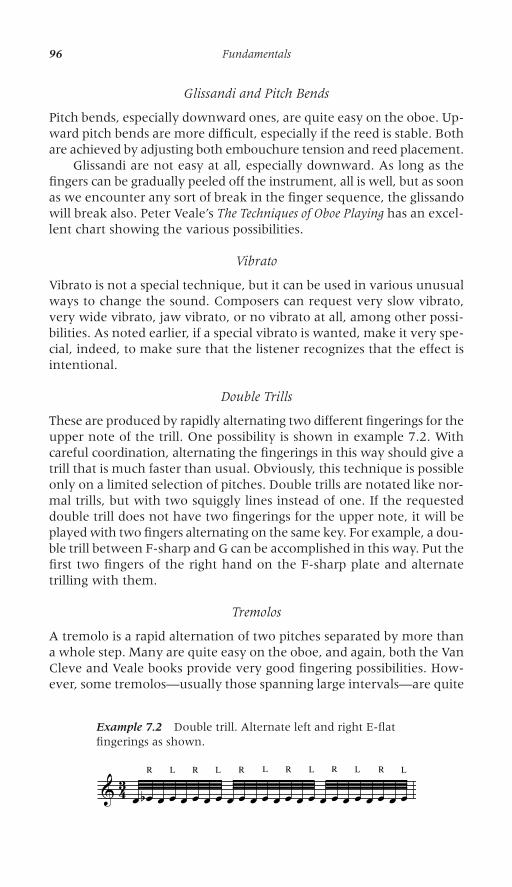
Glissandi and Pitch Bends
Pitch bends, especially downward ones, are quite easy on the oboe. Up-ward pitch bends are more difficult, especially if the reed is stable. Bothare achieved by adjusting both embouchure tension and reed placement.
Glissandi are not easy at all, especially downward. As long as thefingers can be gradually peeled off the instrument, all is well, but as soonas we encounter any sort of break in the finger sequence, the glissandowill break also. Peter Veale’s The Techniques of Oboe Playing has an excel-lent chart showing the various possibilities.
Vibrato
Vibrato is not a special technique, but it can be used in various unusualways to change the sound. Composers can request very slow vibrato,very wide vibrato, jaw vibrato, or no vibrato at all, among other possi-bilities. As noted earlier, if a special vibrato is wanted, make it very spe-cial, indeed, to make sure that the listener recognizes that the effect isintentional.
Double Trills
These are produced by rapidly alternating two different fingerings for theupper note of the trill. One possibility is shown in example 7.2. Withcareful coordination, alternating the fingerings in this way should give atrill that is much faster than usual. Obviously, this technique is possibleonly on a limited selection of pitches. Double trills are notated like nor-mal trills, but with two squiggly lines instead of one. If the requesteddouble trill does not have two fingerings for the upper note, it will beplayed with two fingers alternating on the same key. For example, a dou-ble trill between F-sharp and G can be accomplished in this way. Put thefirst two fingers of the right hand on the F-sharp plate and alternatetrilling with them.
Tremolos
A tremolo is a rapid alternation of two pitches separated by more thana whole step. Many are quite easy on the oboe, and again, both the VanCleve and Veale books provide very good fingering possibilities. How-ever, some tremolos—usually those spanning large intervals—are quite
96 Fundamentals
Example 7.2 Double trill. Alternate left and right E-flatfingerings as shown.
& 43 œ œbR
œ œL
œ œR
œ œL
œ œR
œ œL
œ œR
œ œL
œ œR
œ œL
œ œR
œ œL
difficult, and even the best execution still sounds labored. Composersshould check with an experienced performer before assuming that anytwo notes can be rapidly alternated. Some tremolos can only be pro-duced rather slowly.
Multiphonics
A multiphonic produces several pitches simultaneously. These can benotated in various ways, and no one system is the most widespread.Some composers write the stack of pitches they want to hear, some pro-vide an “X” note head with a corresponding fingering, and some provideonly the fingering. Most composers will choose the pitch classes verycarefully, but different styles of playing and reed making dictate thatthe results may not be completely reliable. A multiphonic that worksperfectly for an Italian player may not work perfectly for an American(sometimes, due to differences in reed construction and/or instrumentdesign, the suggested fingering won’t work at all). So in some cases, itmay be necessary to find a solution that approximates what the com-poser asked for. Again, experimentation and reference to good sourceswill help. Sometimes composers will be satisfied with something rathersimple—each sound should be louder and higher, for instance—butsometimes they are extremely precise. If the composer is available, heor she can be a big help. Before giving up on a fingering provided in themusic, experiment—some multiphonics are very sensitive to reed place-ment and air pressure. You may need to take lots of reed, or hardly any.You may need to bite and blow hard or to vary your technique in someother way. The fingering had to work for someone, or it would not havefound its way into the music.
Other Effects
Flutter Tonguing
Flutter tonguing can be produced by rolling the tongue while playing.For oboe, neither the Italian “rrr” (produced with the tip of the tonguerolling just behind the front teeth) nor the German “rrr” (produced byrolling the back of the tongue against the soft palate) is ideal. The for-mer interferes with the reed, while the latter does not give quite enoughflutter effect. The best result is accomplished by rolling the tongueagainst the roof of the mouth somewhere between the two extremes.Flutter tonguing is notated by multiple slashes through the note stem,or by writing the word “flutter” or “flutter tongue” above the note. TheGerman term Flatterzunge, frequently abbreviated ftz or fltz, means thesame thing.
Extended Techniques 97

“Noise” Effects
Many other effects are possible as well—key clicks, playing the oboewithout a reed, playing the reed without an oboe, singing while playing,buzzing like a brass player, and others. Most of these are quite easilyproduced and clearly understandable. Again, commitment and sincerityare the keys to making the composer’s intentions come to life.
Conclusion
In many cases, the exact sound the composer wants is not completelyapparent. In some cases, it is not really possible exactly as requested.And regrettably, in some cases, it may be something that you personallycannot play. In every case, you should figure out what the composermeans if the literal notation—what the composer says—is not clear.
98 Fundamentals

II
REED MAKING

This page intentionally left blank
8
Reed Construction
Reed making preoccupies oboe players more than players of any otherreed instrument. The complex construction and short life of oboe reedscombine to mandate daily attention to the craft of reed making. The steeplearning curve for reed making frustrates oboists of all levels. The fol-lowing thoughts and comments should help to reduce confusion andopen some new doors. If you have never made a reed, find a teacher.Otherwise, continue reading.
Before we begin, it is most important to understand that reed mak-ing is a craft governed by fairly consistent principles. It is not a black art;it is not swayed by astrological forecasts; it does not require even thesmaller, less severe ritual sacrifices to the reed gods. It is a complex craft,and like anything else that you might wish to master, it will require yearsof careful work and study. But it will eventually become a consistent,logical activity that functions almost completely under your control.
This notion of craft is important when the going gets tough. Don’tgive up in frustration—instead, use what you know. You may not knoweverything; you may not be able to make swift decisions. But even afteronly one year of reed making, you will know quite a bit. Ask the rightquestions, and the right answers will usually come. The various scrapingoperations usually give a similar and predictable result. Think beforeyou scrape, and anticipate the likely result.
Indeed, reed making is the oboist’s advantage. We can construct areed to match our instrument, our embouchure, and our physical ca-pacity. We can even tailor it to the music we’re about to play and to the
101
acoustical situation that surrounds us. Few other instrumentalists havethis degree of control.
Since most oboists begin playing two or three years before learningto make reeds, the reed making will remain a few years behind theoboe playing for some time. Until this disparity is caught up, reed mak-ing will be rather trying for the student. I think it is this uncomfortabletime, which can last for five years or longer, that leads to the lifelongobsession with reeds—“if only I had a good reed, I could play well. . . .”This attitude often persists long after it is no longer necessary.
A better reed does not make you a better player. In the sound-producing chain of player–reed–instrument, you, the player, are by farthe most important link. Without doubt, a better reed will allow you toplay better, just as a Porsche lets you drive faster than a Toyota. But thePorsche does not make you a better driver. To be a better oboe player,you must become a better oboe player. There is no shortcut in thisprocess. Do not neglect the basic concerns of practicing all aspects ofoboe playing: tone production, finger technique, articulation, and soon. Without real skill in all these areas, a better reed will not help youenough. The legendary quote attributed to Marcel Tabuteau—“any damnfool can play on a good reed”—is usually interpreted to mean that wemust learn to make do with inferior reeds. But this quote could alsomean that you must learn how to play, how to really play well. Havinga “perfect” reed could temporarily lull you into thinking that some ofyour playing problems are solved. You must master all aspects of oboeplaying. Then all of your reeds will work better.
Remember that it will take thousands of hours and many years tobecome really proficient at reed making (or anything else, for that mat-ter). Along the way, there will be many days where you spend hoursworking on reeds, only to have nothing useful to show for it. This timeis not wasted. It is another step along the way. You have to spend thetime. You have to do the work. Worry as much about process as you doabout product.
A Few Words of Encouragementfor Beginning Reed Makers
As a beginner, you are not making reeds. You are learning to make reeds.There’s a big difference.
One day, your teacher says, “We’re going to make reeds.” An hourlater, you are wishing you had four hands, wishing you could completeone or two ties without pieces flying in all directions, hoping that thistime the string won’t break. As soon as these goals are achieved, thestandard is raised. The reed is supposed to be straight, of a particularlength, without leaks. The string wraps should go neatly one next to theother, not snarled one on top of the other. Moreover, the reed shouldhave a proper overlap. Too many things to control, all long before the
102 Reed Making
knife goes anywhere near the reed. You are now firmly stuck in thedeep end of the pool, trying not to drown.
The problem is that there are not enough preparatory exercises tohelp you build the skills you need to truly make reeds. The only wayto learn to make reeds is to do it. The analogous situation would be togo to your first oboe lesson and have the teacher say, “Here’s the StraussOboe Concerto. We’re going to learn this.” Possibly, eight years later, youmight make a presentable job of the Strauss, but you can imagine thefrustration of being so unsuccessful with it for so long.
So you’re not making reeds. You’re learning to make reeds. There’sa big difference. The frustration can be reduced considerably if you canbecome much more interested in the process than in the product. Doeach task as well as you possibly can. Know that you will probably makemistakes, or that you will overlook something because you haven’tlearned it yet. If the reed plays, great. It was probably an accident. Don’tget used to it. Don’t think that the battle is won; it isn’t even close. Pon-der the working reed—you must have done something well, and you’dlike to do it every time—then put the working reed aside and start again.Getting a reed is less important than developing skills in knife tech-nique, analysis, and diagnosis.
There is a way to speed up the process and minimize the frustration.Since reed making is something you learn by doing, do it a lot. It willlikely take about one thousand reeds (!) before you feel like you knowwhat you’re doing. If you make two reeds a week, those thousand reedswill take you ten years to finish. Too long, don’t you think? Two reedsa day, and you’re down to a year and a half. Much better. After thosethousand reeds, you will start to feel like you aren’t drowning any more.Then we can proceed to actually swimming.
And there is hope and light at the end of the tunnel. Reed makingis not the oboist’s curse; it is the oboist’s secret weapon. Eventually youwill be able to adjust a reed to suit your situation exactly. You will beable to make different reeds for different halls, different repertoire, dif-ferent size ensembles, and so on. Other instrumentalists need expen-sive additional equipment to make those changes; you can make themin a few seconds with your reed knife. Get to work.
As your playing improves, so will your reeds. You will demand morefunction, more resonance, more control. These musical demands are thebeginning of improvement. If all you demand is a superior reed with-out a musical impulse to support it, you may have a perfectly tidy andfunctional reed, but the soul will be missing. Reed making is only in-teresting because music making demands that you have a reed.
The remainder of this chapter is a step-by-step guide to construct-ing the reed from the most basic raw materials. The next chapter willdescribe how to maximize your reed making time, with lots of generalobservations, helpful adjustment hints, and a guide to common problemswith some suggested solutions.
Reed Construction 103
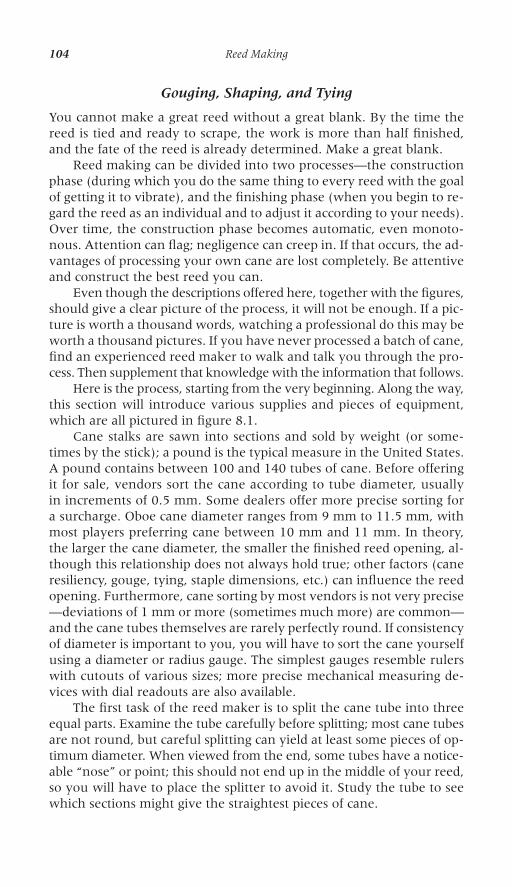
Gouging, Shaping, and Tying
You cannot make a great reed without a great blank. By the time thereed is tied and ready to scrape, the work is more than half finished,and the fate of the reed is already determined. Make a great blank.
Reed making can be divided into two processes—the constructionphase (during which you do the same thing to every reed with the goalof getting it to vibrate), and the finishing phase (when you begin to re-gard the reed as an individual and to adjust it according to your needs).Over time, the construction phase becomes automatic, even monoto-nous. Attention can flag; negligence can creep in. If that occurs, the ad-vantages of processing your own cane are lost completely. Be attentiveand construct the best reed you can.
Even though the descriptions offered here, together with the figures,should give a clear picture of the process, it will not be enough. If a pic-ture is worth a thousand words, watching a professional do this may beworth a thousand pictures. If you have never processed a batch of cane,find an experienced reed maker to walk and talk you through the pro -cess. Then supplement that knowledge with the information that follows.
Here is the process, starting from the very beginning. Along the way,this section will introduce various supplies and pieces of equipment,which are all pictured in figure 8.1.
Cane stalks are sawn into sections and sold by weight (or some-times by the stick); a pound is the typical measure in the United States.A pound contains between 100 and 140 tubes of cane. Before offeringit for sale, vendors sort the cane according to tube diameter, usuallyin increments of 0.5 mm. Some dealers offer more precise sorting fora surcharge. Oboe cane diameter ranges from 9 mm to 11.5 mm, withmost players preferring cane between 10 mm and 11 mm. In theory,the larger the cane diameter, the smaller the finished reed opening, al-though this relationship does not always hold true; other factors (caneresiliency, gouge, tying, staple dimensions, etc.) can influence the reedopening. Furthermore, cane sorting by most vendors is not very precise—deviations of 1 mm or more (sometimes much more) are common—and the cane tubes themselves are rarely perfectly round. If consistencyof diameter is important to you, you will have to sort the cane yourselfusing a diameter or radius gauge. The simplest gauges resemble rulerswith cutouts of various sizes; more precise mechanical measuring de-vices with dial readouts are also available.
The first task of the reed maker is to split the cane tube into threeequal parts. Examine the tube carefully before splitting; most cane tubesare not round, but careful splitting can yield at least some pieces of op-timum diameter. When viewed from the end, some tubes have a notice-able “nose” or point; this should not end up in the middle of your reed,so you will have to place the splitter to avoid it. Study the tube to seewhich sections might give the straightest pieces of cane.
104 Reed Making
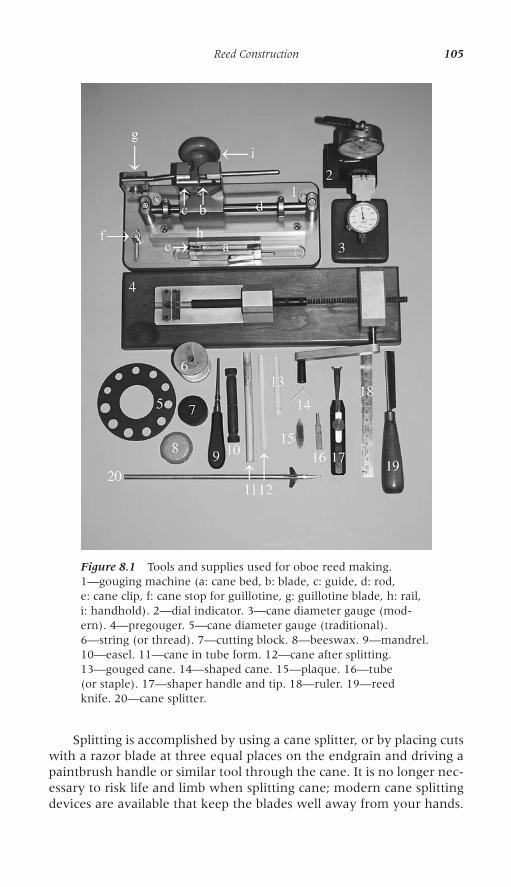
Splitting is accomplished by using a cane splitter, or by placing cutswith a razor blade at three equal places on the endgrain and driving apaintbrush handle or similar tool through the cane. It is no longer nec-essary to risk life and limb when splitting cane; modern cane splittingdevices are available that keep the blades well away from your hands.
Reed Construction 105
Figure 8.1 Tools and supplies used for oboe reed making. 1—gouging machine (a: cane bed, b: blade, c: guide, d: rod, e: cane clip, f: cane stop for guillotine, g: guillotine blade, h: rail, i: handhold). 2—dial indicator. 3—cane diameter gauge (mod-ern). 4—pregouger. 5—cane diameter gauge (traditional). 6—string (or thread). 7—cutting block. 8—beeswax. 9—mandrel.10—easel. 11—cane in tube form. 12—cane after splitting. 13—gouged cane. 14—shaped cane. 15—plaque. 16—tube (or staple). 17—shaper handle and tip. 18—ruler. 19—reed knife. 20—cane splitter.

Splitting is easier and more accurate if the cane is dry, although noharm will result from splitting it wet. Figure 8.2 shows the tool and theprocedure.
Since the cane tubes are rarely round and splitting releases internaltensions, the time to check the diameter is right after splitting. Accuratemeasuring tools are available that will tell you the diameter within atenth of a millimeter. Ideally, the diameter of the cane should matchthe blade and bed of your gouger as closely as possible to allow the ma-chine to function as it was designed. However, it seems to me that caneof really good quality is harder to come by than cane with the right di-
106 Reed Making
Figure 8.2 Cane being split with a cane splitter.
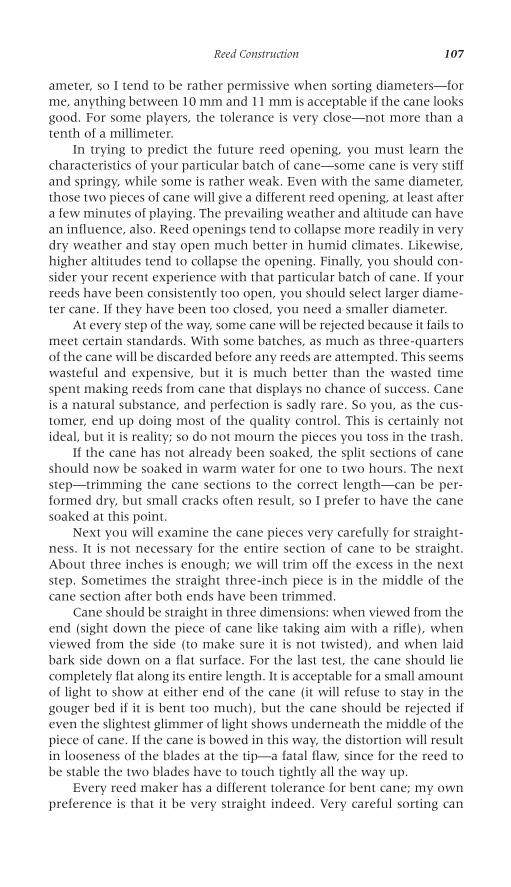
ameter, so I tend to be rather permissive when sorting diameters—forme, anything between 10 mm and 11 mm is acceptable if the cane looksgood. For some players, the tolerance is very close—not more than atenth of a millimeter.
In trying to predict the future reed opening, you must learn thecharacteristics of your particular batch of cane—some cane is very stiffand springy, while some is rather weak. Even with the same diameter,those two pieces of cane will give a different reed opening, at least aftera few minutes of playing. The prevailing weather and altitude can havean influence, also. Reed openings tend to collapse more readily in verydry weather and stay open much better in humid climates. Likewise,higher altitudes tend to collapse the opening. Finally, you should con-sider your recent experience with that particular batch of cane. If yourreeds have been consistently too open, you should select larger diame-ter cane. If they have been too closed, you need a smaller diameter.
At every step of the way, some cane will be rejected because it fails tomeet certain standards. With some batches, as much as three-quartersof the cane will be discarded before any reeds are attempted. This seemswasteful and expensive, but it is much better than the wasted timespent making reeds from cane that displays no chance of success. Caneis a natural substance, and perfection is sadly rare. So you, as the cus-tomer, end up doing most of the quality control. This is certainly notideal, but it is reality; so do not mourn the pieces you toss in the trash.
If the cane has not already been soaked, the split sections of caneshould now be soaked in warm water for one to two hours. The nextstep—trimming the cane sections to the correct length—can be per-formed dry, but small cracks often result, so I prefer to have the canesoaked at this point.
Next you will examine the cane pieces very carefully for straight-ness. It is not necessary for the entire section of cane to be straight.About three inches is enough; we will trim off the excess in the nextstep. Sometimes the straight three-inch piece is in the middle of thecane section after both ends have been trimmed.
Cane should be straight in three dimensions: when viewed from theend (sight down the piece of cane like taking aim with a rifle), whenviewed from the side (to make sure it is not twisted), and when laidbark side down on a flat surface. For the last test, the cane should liecompletely flat along its entire length. It is acceptable for a small amountof light to show at either end of the cane (it will refuse to stay in thegouger bed if it is bent too much), but the cane should be rejected ifeven the slightest glimmer of light shows underneath the middle of thepiece of cane. If the cane is bowed in this way, the distortion will resultin looseness of the blades at the tip—a fatal flaw, since for the reed tobe stable the two blades have to touch tightly all the way up.
Every reed maker has a different tolerance for bent cane; my ownpreference is that it be very straight indeed. Very careful sorting can
Reed Construction 107
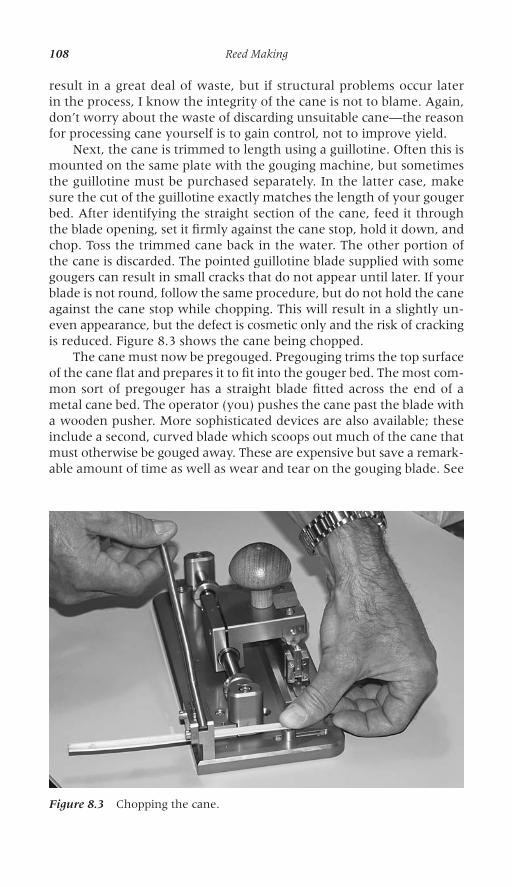
result in a great deal of waste, but if structural problems occur laterin the process, I know the integrity of the cane is not to blame. Again,don’t worry about the waste of discarding unsuitable cane—the reasonfor processing cane yourself is to gain control, not to improve yield.
Next, the cane is trimmed to length using a guillotine. Often this ismounted on the same plate with the gouging machine, but sometimesthe guillotine must be purchased separately. In the latter case, makesure the cut of the guillotine exactly matches the length of your gougerbed. After identifying the straight section of the cane, feed it throughthe blade opening, set it firmly against the cane stop, hold it down, andchop. Toss the trimmed cane back in the water. The other portion ofthe cane is discarded. The pointed guillotine blade supplied with somegougers can result in small cracks that do not appear until later. If yourblade is not round, follow the same procedure, but do not hold the caneagainst the cane stop while chopping. This will result in a slightly un-even appearance, but the defect is cosmetic only and the risk of crackingis reduced. Figure 8.3 shows the cane being chopped.
The cane must now be pregouged. Pregouging trims the top surfaceof the cane flat and prepares it to fit into the gouger bed. The most com-mon sort of pregouger has a straight blade fitted across the end of ametal cane bed. The operator (you) pushes the cane past the blade witha wooden pusher. More sophisticated devices are also available; theseinclude a second, curved blade which scoops out much of the cane thatmust otherwise be gouged away. These are expensive but save a remark-able amount of time as well as wear and tear on the gouging blade. See
108 Reed Making
Figure 8.3 Chopping the cane.
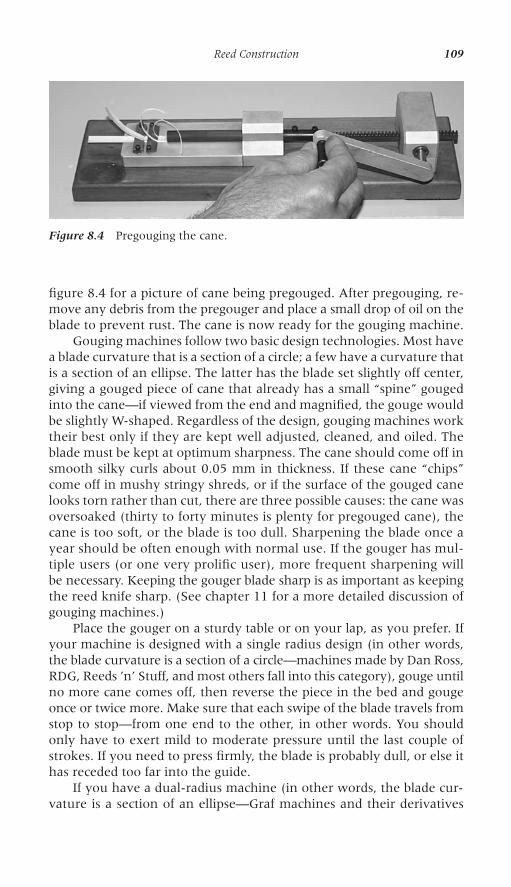
figure 8.4 for a picture of cane being pregouged. After pregouging, re-move any debris from the pregouger and place a small drop of oil on theblade to prevent rust. The cane is now ready for the gouging machine.
Gouging machines follow two basic design technologies. Most havea blade curvature that is a section of a circle; a few have a curvature thatis a section of an ellipse. The latter has the blade set slightly off center,giving a gouged piece of cane that already has a small “spine” gougedinto the cane—if viewed from the end and magnified, the gouge wouldbe slightly W-shaped. Regardless of the design, gouging machines worktheir best only if they are kept well adjusted, cleaned, and oiled. Theblade must be kept at optimum sharpness. The cane should come off insmooth silky curls about 0.05 mm in thickness. If these cane “chips”come off in mushy stringy shreds, or if the surface of the gouged canelooks torn rather than cut, there are three possible causes: the cane wasoversoaked (thirty to forty minutes is plenty for pregouged cane), thecane is too soft, or the blade is too dull. Sharpening the blade once ayear should be often enough with normal use. If the gouger has mul-tiple users (or one very prolific user), more frequent sharpening willbe necessary. Keeping the gouger blade sharp is as important as keepingthe reed knife sharp. (See chapter 11 for a more detailed discussion ofgouging machines.)
Place the gouger on a sturdy table or on your lap, as you prefer. Ifyour machine is designed with a single radius design (in other words,the blade curvature is a section of a circle—machines made by Dan Ross,RDG, Reeds ’n’ Stuff, and most others fall into this category), gouge untilno more cane comes off, then reverse the piece in the bed and gougeonce or twice more. Make sure that each swipe of the blade travels fromstop to stop—from one end to the other, in other words. You shouldonly have to exert mild to moderate pressure until the last couple ofstrokes. If you need to press firmly, the blade is probably dull, or else ithas receded too far into the guide.
If you have a dual-radius machine (in other words, the blade cur-vature is a section of an ellipse—Graf machines and their derivatives
Reed Construction 109
Figure 8.4 Pregouging the cane.
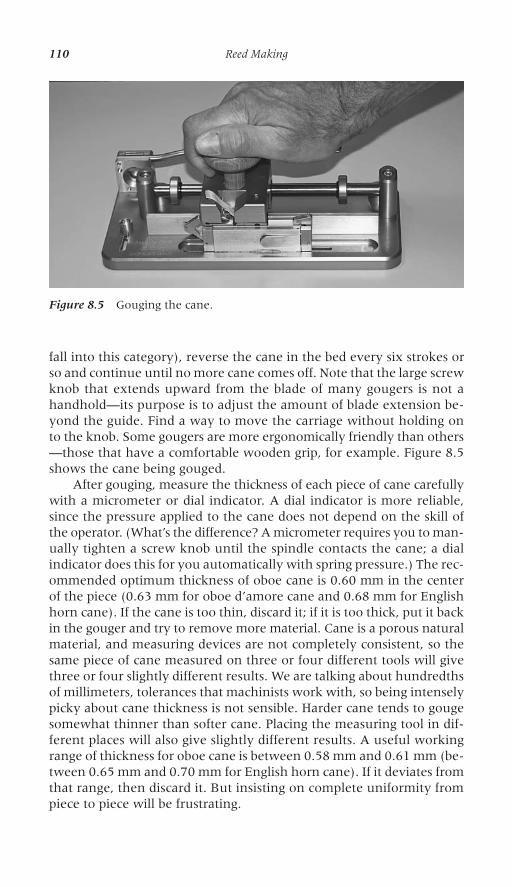
fall into this category), reverse the cane in the bed every six strokes orso and continue until no more cane comes off. Note that the large screwknob that extends upward from the blade of many gougers is not ahandhold—its purpose is to adjust the amount of blade extension be-yond the guide. Find a way to move the carriage without holding onto the knob. Some gougers are more ergonomically friendly than others—those that have a comfortable wooden grip, for example. Figure 8.5shows the cane being gouged.
After gouging, measure the thickness of each piece of cane carefullywith a micrometer or dial indicator. A dial indicator is more reliable,since the pressure applied to the cane does not depend on the skill ofthe operator. (What’s the difference? A micrometer requires you to man-ually tighten a screw knob until the spindle contacts the cane; a dialindicator does this for you automatically with spring pressure.) The rec-ommended optimum thickness of oboe cane is 0.60 mm in the centerof the piece (0.63 mm for oboe d’amore cane and 0.68 mm for Englishhorn cane). If the cane is too thin, discard it; if it is too thick, put it backin the gouger and try to remove more material. Cane is a porous naturalmaterial, and measuring devices are not completely consistent, so thesame piece of cane measured on three or four different tools will givethree or four slightly different results. We are talking about hundredthsof millimeters, tolerances that machinists work with, so being intenselypicky about cane thickness is not sensible. Harder cane tends to gougesomewhat thinner than softer cane. Placing the measuring tool in dif-ferent places will also give slightly different results. A useful workingrange of thickness for oboe cane is between 0.58 mm and 0.61 mm (be-tween 0.65 mm and 0.70 mm for English horn cane). If it deviates fromthat range, then discard it. But insisting on complete uniformity frompiece to piece will be frustrating.
110 Reed Making
Figure 8.5 Gouging the cane.
After measuring the center of the cane, also measure the sides. Theactual side measurement depends on many factors: the diameter ofthe cane (and the relationship of the cane diameter to the diametersof the gouger bed and blade), the cane’s resiliency, and how far to the sideyou place the measuring tool. Measure where you imagine the widestpart of the shape will be—the cane should be about 0.10 to 0.12 mmthinner there than in the center. The actual measurement is not crucial,but it is essential that the two sides be symmetrical. Be careful to mea-sure in exactly the same place on both sides; moving the tool even oneor two grain lines will give a different measurement.
Note that these dimensions are guidelines only: the final test of anysetup is to make reeds from it. Consider also that the point of owninga gouging machine is to add consistency, not complexity, to your reedmaking. If an expert technician set up the machine, and if the reeds areworking reasonably well, leave the machine alone.
After gouging, use a small bristle brush to remove any cane debrisfrom the gouger and put a drop of oil on the blade. When not in use,the gouger should be stored with a small piece of cotton in the cane bedunderneath the blade to protect the blade from direct metal-to-metalcontact. Gouging machines are robust devices, but the blade is made ofvery hard steel and can chip, so it needs to be protected. The rod willalso need to be oiled from time to time. Do this at the first sign of slug-gish movement. Use a paper towel to clean off the old oil before apply-ing the new.
The cane is now gouged. It can be stored in this state almost in-definitely given reasonable conditions. Store it indoors in a cool, darkplace. Make sure the cane is protected from bugs and other pests. Storedcane can last a remarkably long time—twenty years is certainly not toolong, though fifty probably is. However, there is no benefit to aging thecane unless it is clearly immature—too white or too green (see the dis-cussion in the next section). Cane is too old when the interior surfacehas a brownish-orange color and the scrapings feel more like splintersthan shavings, but this takes decades.
Cane Selection
Reed-making yield will increase significantly if careful cane-selectionprocedures are followed. We have already sorted and selected the caneso that it meets certain physical criteria: the correct diameter, accept-able straightness, and so on. Now we will sort it further to weed out thepieces whose texture and resilience are too strong or too weak.
Making a reed from every single piece of cane you own is a wasteof time and effort. Some of the cane will be good, some bad, most inbetween—even within a batch of supposedly consistent quality andorigin. Effective cane selection requires that you discover three things:the qualities that apply to good cane in general, the qualities that apply
Reed Construction 111
to your particular batch of cane, and the qualities that help your ownpersonal reed-making style. It is not necessarily always true that hardcane is better than soft cane—everyone has made bad reeds from hardcane and good reeds from soft cane. So, along with learning the generalprinciples, it is still necessary to observe every characteristic of everypiece of cane in order to maximize your yield. As you read what fol-lows, bear in mind that my recommendations are empirical—the resultof making thousands of reeds over the course of several decades; I donot claim any sort of scientific truth for my statements.
The bark of the cane must be free from physical defects (wormholes,etc.); it should not have dark stains that penetrate through to the cane(superficial mottling is normal, even desirable); it must not be ribbed (likecelery); and it should not be very pale in color. White cane has been toorecently removed from the bleaching effects of the sun (a normal partof preparing and aging the cane for sale) and will not vibrate well yet.This cane is not defective; it will gain normal coloration and quality aftera few months spent in a dark place—a small closed box of some kind.The same is true if the interior of the cane is green. It will not yet makea good reed. Set it aside until the green color fades through aging.
After examining the bark, turn the piece of cane over. On the in -terior surface of the gouged cane, look for even, unbroken lines. Rejectcane with an obvious and excessive grain, especially if it appears softand pulpy. A strong backlight is helpful for seeing the grain clearly. (Note:Since cane is botanically a grass, not a wood, this “grain” actually con-sists of vascular bundles. I will use the term “grain” for the sake ofsimplicity.)
Ideally, the inside surface of the cane will appear almost shiny, itwill be very close grained, and the cane will appear smoothly cut by thegouger blade rather than torn.
While gouging the cane, observe the cane quality. Material shouldcome off in smooth, silky shavings. If the gouger blade is sharp and thecane has not been oversoaked, shreddy, soft shavings mean that thecane is of inferior quality. Pay particular attention to the last one or twoshavings—they will have more or less the same texture as the tip of yourfinished reed.
Mechanical devices to measure cane hardness are available—bassoonplayers use these frequently. They are not yet well suited to oboe canesince they measure hardness by probing the cane and measuring theresulting deflection. Oboe cane is not really thick enough to allow thisto work accurately, so for now we must rely on our observations.
After forming a judgment about the hardness and structure of thecane, examine the elasticity of the cane by twisting the gouged piece. Itshould be springy but not tough. Since this is a “feel” test, experiencewill show what combination of elasticity and hardness works best. Canethat is too springy and stiff can sometimes make a reed with a large open-ing that will not respond to repeated attempts to squeeze it shut. At an
112 Reed Making
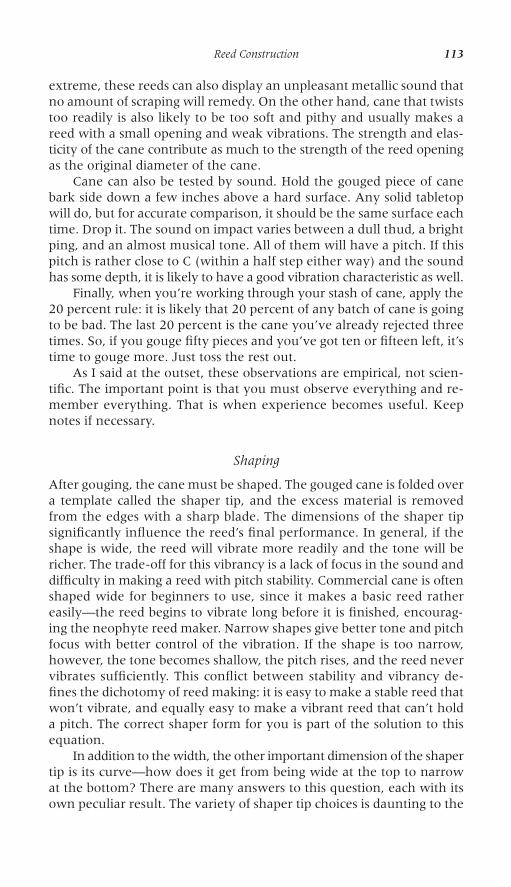
extreme, these reeds can also display an unpleasant metallic sound thatno amount of scraping will remedy. On the other hand, cane that twiststoo readily is also likely to be too soft and pithy and usually makes areed with a small opening and weak vibrations. The strength and elas-ticity of the cane contribute as much to the strength of the reed openingas the original diameter of the cane.
Cane can also be tested by sound. Hold the gouged piece of canebark side down a few inches above a hard surface. Any solid tabletopwill do, but for accurate comparison, it should be the same surface eachtime. Drop it. The sound on impact varies between a dull thud, a brightping, and an almost musical tone. All of them will have a pitch. If thispitch is rather close to C (within a half step either way) and the soundhas some depth, it is likely to have a good vibration characteristic as well.
Finally, when you’re working through your stash of cane, apply the20 percent rule: it is likely that 20 percent of any batch of cane is goingto be bad. The last 20 percent is the cane you’ve already rejected threetimes. So, if you gouge fifty pieces and you’ve got ten or fifteen left, it’stime to gouge more. Just toss the rest out.
As I said at the outset, these observations are empirical, not scien-tific. The important point is that you must observe everything and re-member everything. That is when experience becomes useful. Keepnotes if necessary.
Shaping
After gouging, the cane must be shaped. The gouged cane is folded overa template called the shaper tip, and the excess material is removedfrom the edges with a sharp blade. The dimensions of the shaper tipsignificantly influence the reed’s final performance. In general, if theshape is wide, the reed will vibrate more readily and the tone will bericher. The trade-off for this vibrancy is a lack of focus in the sound anddifficulty in making a reed with pitch stability. Commercial cane is oftenshaped wide for beginners to use, since it makes a basic reed rathereasily—the reed begins to vibrate long before it is finished, encourag-ing the neophyte reed maker. Narrow shapes give better tone and pitchfocus with better control of the vibration. If the shape is too narrow,however, the tone becomes shallow, the pitch rises, and the reed nevervibrates sufficiently. This conflict between stability and vibrancy de-fines the dichotomy of reed making: it is easy to make a stable reed thatwon’t vibrate, and equally easy to make a vibrant reed that can’t holda pitch. The correct shaper form for you is part of the solution to thisequation.
In addition to the width, the other important dimension of the shapertip is its curve—how does it get from being wide at the top to narrowat the bottom? There are many answers to this question, each with itsown peculiar result. The variety of shaper tip choices is daunting to the
Reed Construction 113
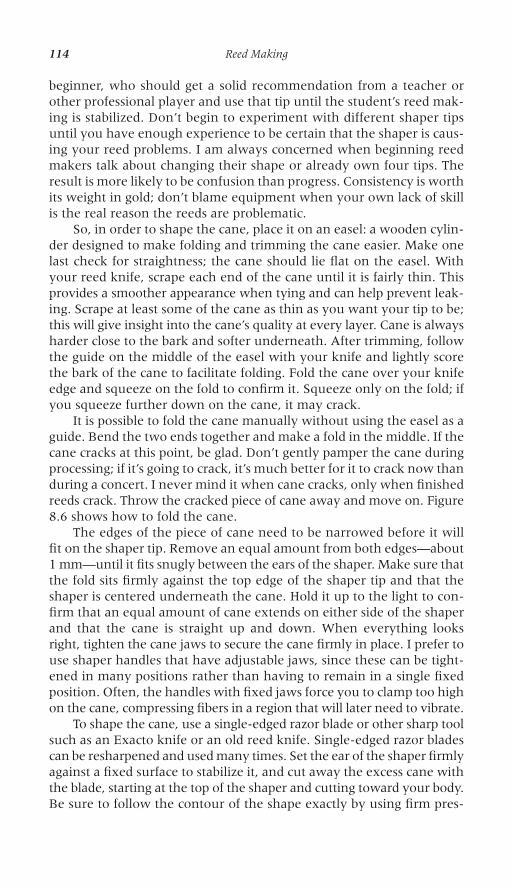
beginner, who should get a solid recommendation from a teacher orother professional player and use that tip until the student’s reed mak-ing is stabilized. Don’t begin to experiment with different shaper tipsuntil you have enough experience to be certain that the shaper is caus-ing your reed problems. I am always concerned when beginning reedmakers talk about changing their shape or already own four tips. Theresult is more likely to be confusion than progress. Consistency is worthits weight in gold; don’t blame equipment when your own lack of skillis the real reason the reeds are problematic.
So, in order to shape the cane, place it on an easel: a wooden cylin-der designed to make folding and trimming the cane easier. Make onelast check for straightness; the cane should lie flat on the easel. Withyour reed knife, scrape each end of the cane until it is fairly thin. Thisprovides a smoother appearance when tying and can help prevent leak-ing. Scrape at least some of the cane as thin as you want your tip to be;this will give insight into the cane’s quality at every layer. Cane is alwaysharder close to the bark and softer underneath. After trimming, followthe guide on the middle of the easel with your knife and lightly scorethe bark of the cane to facilitate folding. Fold the cane over your knifeedge and squeeze on the fold to confirm it. Squeeze only on the fold; ifyou squeeze further down on the cane, it may crack.
It is possible to fold the cane manually without using the easel as aguide. Bend the two ends together and make a fold in the middle. If thecane cracks at this point, be glad. Don’t gently pamper the cane duringprocessing; if it’s going to crack, it’s much better for it to crack now thanduring a concert. I never mind it when cane cracks, only when finishedreeds crack. Throw the cracked piece of cane away and move on. Figure8.6 shows how to fold the cane.
The edges of the piece of cane need to be narrowed before it willfit on the shaper tip. Remove an equal amount from both edges—about1 mm—until it fits snugly between the ears of the shaper. Make sure thatthe fold sits firmly against the top edge of the shaper tip and that theshaper is centered underneath the cane. Hold it up to the light to con-firm that an equal amount of cane extends on either side of the shaperand that the cane is straight up and down. When everything looksright, tighten the cane jaws to secure the cane firmly in place. I prefer touse shaper handles that have adjustable jaws, since these can be tight-ened in many positions rather than having to remain in a single fixedposition. Often, the handles with fixed jaws force you to clamp too highon the cane, compressing fibers in a region that will later need to vibrate.
To shape the cane, use a single-edged razor blade or other sharp toolsuch as an Exacto knife or an old reed knife. Single-edged razor bladescan be resharpened and used many times. Set the ear of the shaper firmlyagainst a fixed surface to stabilize it, and cut away the excess cane withthe blade, starting at the top of the shaper and cutting toward your body.Be sure to follow the contour of the shape exactly by using firm pres-
114 Reed Making
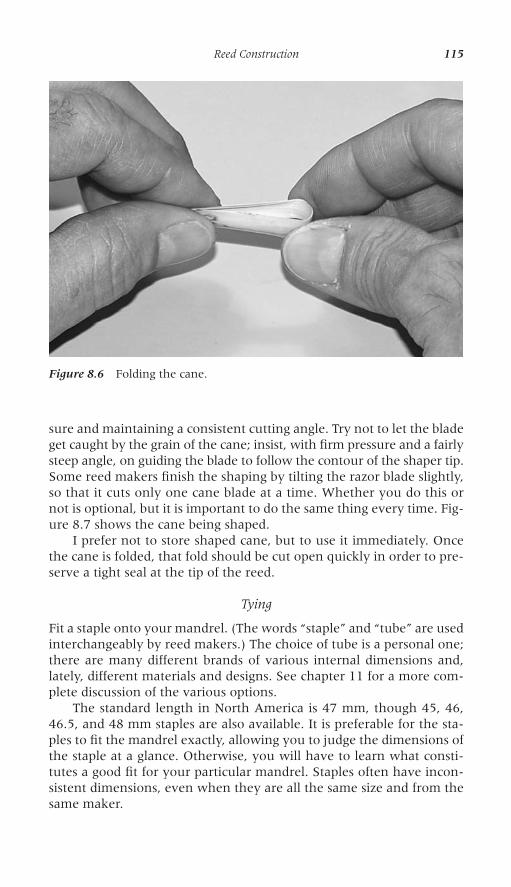
sure and maintaining a consistent cutting angle. Try not to let the bladeget caught by the grain of the cane; insist, with firm pressure and a fairlysteep angle, on guiding the blade to follow the contour of the shaper tip.Some reed makers finish the shaping by tilting the razor blade slightly,so that it cuts only one cane blade at a time. Whether you do this ornot is optional, but it is important to do the same thing every time. Fig-ure 8.7 shows the cane being shaped.
I prefer not to store shaped cane, but to use it immediately. Oncethe cane is folded, that fold should be cut open quickly in order to pre-serve a tight seal at the tip of the reed.
Tying
Fit a staple onto your mandrel. (The words “staple” and “tube” are usedinterchangeably by reed makers.) The choice of tube is a personal one;there are many different brands of various internal dimensions and,lately, different materials and designs. See chapter 11 for a more com-plete discussion of the various options.
The standard length in North America is 47 mm, though 45, 46,46.5, and 48 mm staples are also available. It is preferable for the sta-ples to fit the mandrel exactly, allowing you to judge the dimensions ofthe staple at a glance. Otherwise, you will have to learn what consti-tutes a good fit for your particular mandrel. Staples often have incon-sistent dimensions, even when they are all the same size and from thesame maker.
Reed Construction 115
Figure 8.6 Folding the cane.
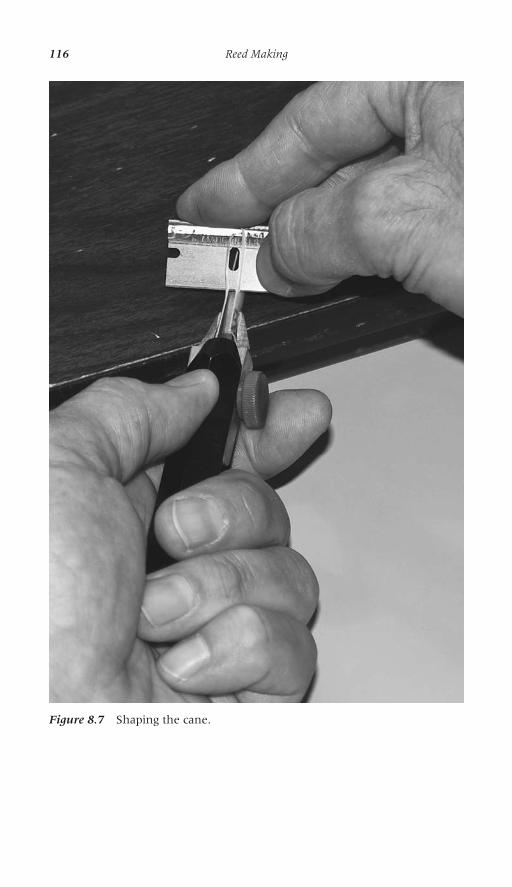
116 Reed Making
Figure 8.7 Shaping the cane.
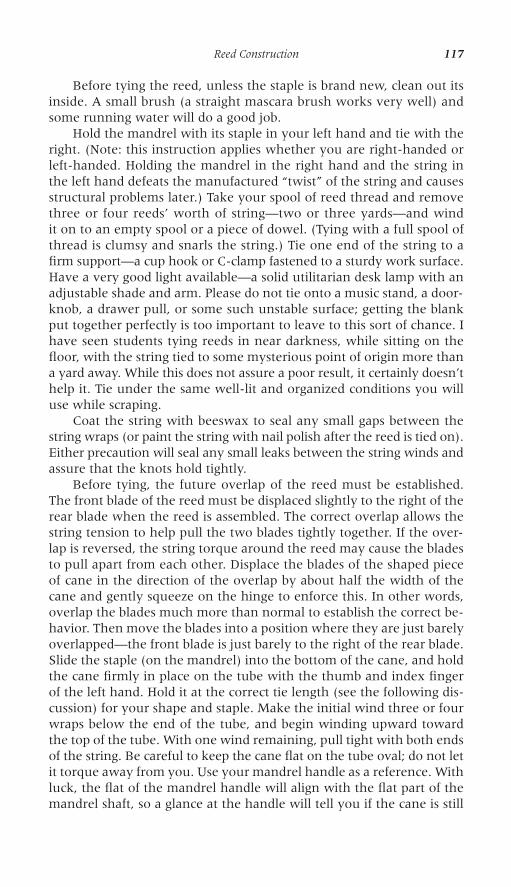
Before tying the reed, unless the staple is brand new, clean out itsinside. A small brush (a straight mascara brush works very well) andsome running water will do a good job.
Hold the mandrel with its staple in your left hand and tie with theright. (Note: this instruction applies whether you are right-handed orleft-handed. Holding the mandrel in the right hand and the string inthe left hand defeats the manufactured “twist” of the string and causesstructural problems later.) Take your spool of reed thread and removethree or four reeds’ worth of string—two or three yards—and windit on to an empty spool or a piece of dowel. (Tying with a full spool ofthread is clumsy and snarls the string.) Tie one end of the string to afirm support—a cup hook or C-clamp fastened to a sturdy work surface.Have a very good light available—a solid utilitarian desk lamp with anadjustable shade and arm. Please do not tie onto a music stand, a door-knob, a drawer pull, or some such unstable surface; getting the blankput together perfectly is too important to leave to this sort of chance. Ihave seen students tying reeds in near darkness, while sitting on thefloor, with the string tied to some mysterious point of origin more thana yard away. While this does not assure a poor result, it certainly doesn’thelp it. Tie under the same well-lit and organized conditions you willuse while scraping.
Coat the string with beeswax to seal any small gaps between thestring wraps (or paint the string with nail polish after the reed is tied on).Either precaution will seal any small leaks between the string winds andassure that the knots hold tightly.
Before tying, the future overlap of the reed must be established.The front blade of the reed must be displaced slightly to the right of therear blade when the reed is assembled. The correct overlap allows thestring tension to help pull the two blades tightly together. If the over-lap is reversed, the string torque around the reed may cause the bladesto pull apart from each other. Displace the blades of the shaped pieceof cane in the direction of the overlap by about half the width of thecane and gently squeeze on the hinge to enforce this. In other words,overlap the blades much more than normal to establish the correct be-havior. Then move the blades into a position where they are just barelyoverlapped—the front blade is just barely to the right of the rear blade.Slide the staple (on the mandrel) into the bottom of the cane, and holdthe cane firmly in place on the tube with the thumb and index fingerof the left hand. Hold it at the correct tie length (see the following dis-cussion) for your shape and staple. Make the initial wind three or fourwraps below the end of the tube, and begin winding upward towardthe top of the tube. With one wind remaining, pull tight with both endsof the string. Be careful to keep the cane flat on the tube oval; do not letit torque away from you. Use your mandrel handle as a reference. Withluck, the flat of the mandrel handle will align with the flat part of themandrel shaft, so a glance at the handle will tell you if the cane is still
Reed Construction 117
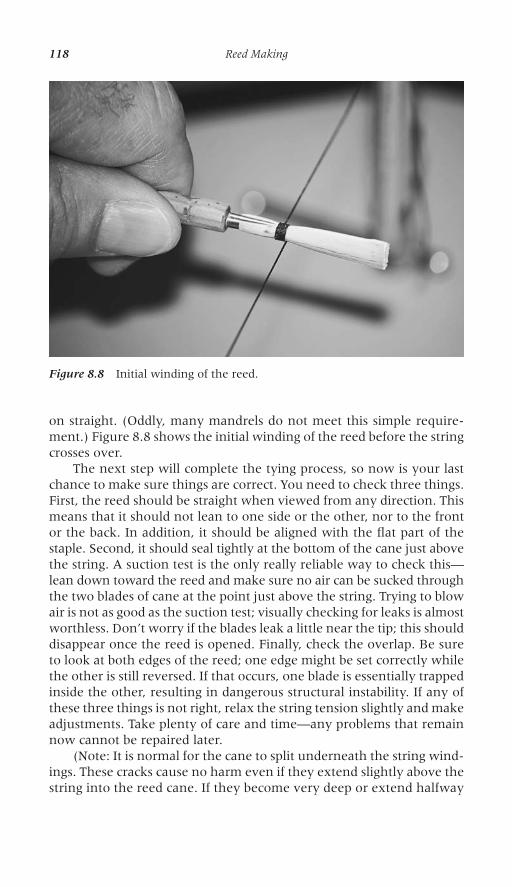
on straight. (Oddly, many mandrels do not meet this simple require-ment.) Figure 8.8 shows the initial winding of the reed before the stringcrosses over.
The next step will complete the tying process, so now is your lastchance to make sure things are correct. You need to check three things.First, the reed should be straight when viewed from any direction. Thismeans that it should not lean to one side or the other, nor to the frontor the back. In addition, it should be aligned with the flat part of thestaple. Second, it should seal tightly at the bottom of the cane just abovethe string. A suction test is the only really reliable way to check this—lean down toward the reed and make sure no air can be sucked throughthe two blades of cane at the point just above the string. Trying to blowair is not as good as the suction test; visually checking for leaks is almostworthless. Don’t worry if the blades leak a little near the tip; this shoulddisappear once the reed is opened. Finally, check the overlap. Be sureto look at both edges of the reed; one edge might be set correctly whilethe other is still reversed. If that occurs, one blade is essentially trappedinside the other, resulting in dangerous structural instability. If any ofthese three things is not right, relax the string tension slightly and makeadjustments. Take plenty of care and time—any problems that remainnow cannot be repaired later.
(Note: It is normal for the cane to split underneath the string wind-ings. These cracks cause no harm even if they extend slightly above thestring into the reed cane. If they become very deep or extend halfway
118 Reed Making
Figure 8.8 Initial winding of the reed.
up the reed, that is cause to discard the reed. Otherwise, only worryabout cracks that originate at the tip of the reed.)
The correct tie length for the reed is not absolute (“tie length” is thetotal length of the reed after tying but before any cane is removed byscraping or clipping). Depending on various factors, the right lengthcould be anywhere between 71 mm and 75 mm (the finished length ofthe reed, however, is always the same at approximately 70 mm). Hereis my rule: the reed should be tied on as long as possible. “As long aspossible” means that there are no leaks just above the string, with onewind still possible before reaching the end of the tube. Whether tomake the last wind or not is a judgment call—sometimes “one wind” isnot exactly 1.0; it might be 0.7 or 1.2. Do not, under any circumstances,wind beyond the end of the staple. Bear in mind that the edge of thereed facing away from you will have the string half a wind higher upthan the edge you are looking at.
The tie length arrived at through this method is the ideal one foryour setup—your shape, your staple, your gouge. If the reed is tied ontoo long, meaning without enough cane on the staple, it will leak. Ifthe reed is tied on too short, the cane will be too wide at the bottomof the reed. That will cause the string to pinch the sides of the cane be-fore the staple can support the tension, causing instability and possiblelooseness at the sides near the tip.
After everything is correct, cross the string over the winds you havealready made and wrap toward the cork, pulling tight after each wind.Before the crossover, you should pull on both ends of the string; aftercrossing over, you can pull only on the length between the reed andyour hand, since the other end is now being wrapped underneath. Keepwinding until space for two or three winds remains. Make a series ofthree knots by twisting a loop of the string and pulling it tight (see fig-ures 8.9, 8.10, and 8.11). Be sure that the knots look tight, and alwaysmake several knots to ensure that the reed does not fall apart.
You are now ready to begin scraping the reed. If the precedingprocess has been followed carefully, and the result is exemplary, the reedis already more than half finished. But before taking a rest, you shouldapply a basic scrape to the reed and cut the tip of the reed open as de-scribed in the next section. Do not store a completely unscraped blank;the fold at the top should be opened immediately after tying to preventany possible spreading of the blades at the tip.
Scraping and Finishing
Carefully trim off the ears remaining from the shaping process. Try toremove them completely, leaving a straight line to the end of the reed.Follow the edge of the reed with your knife until it catches a grain, thenjust split off the ear from there. Do this before beginning to scrape. It is
Reed Construction 119
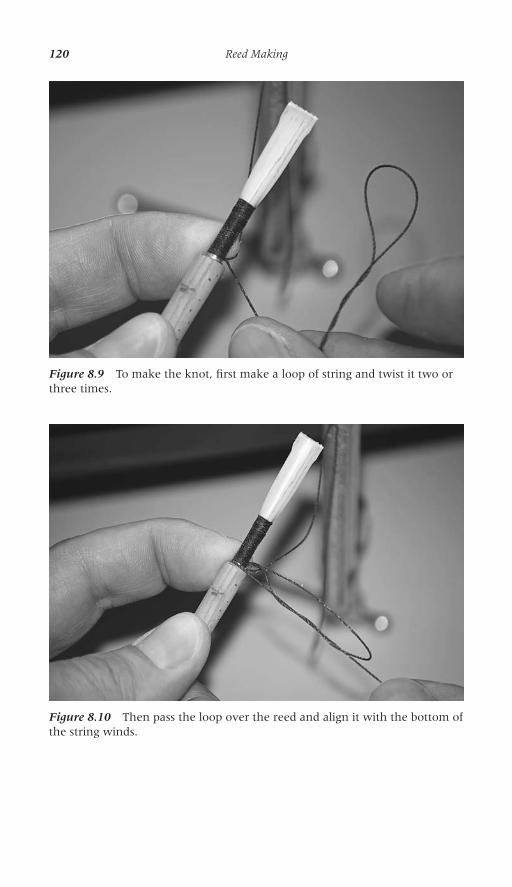
120 Reed Making
Figure 8.10 Then pass the loop over the reed and align it with the bottom ofthe string winds.
Figure 8.9 To make the knot, first make a loop of string and twist it two orthree times.
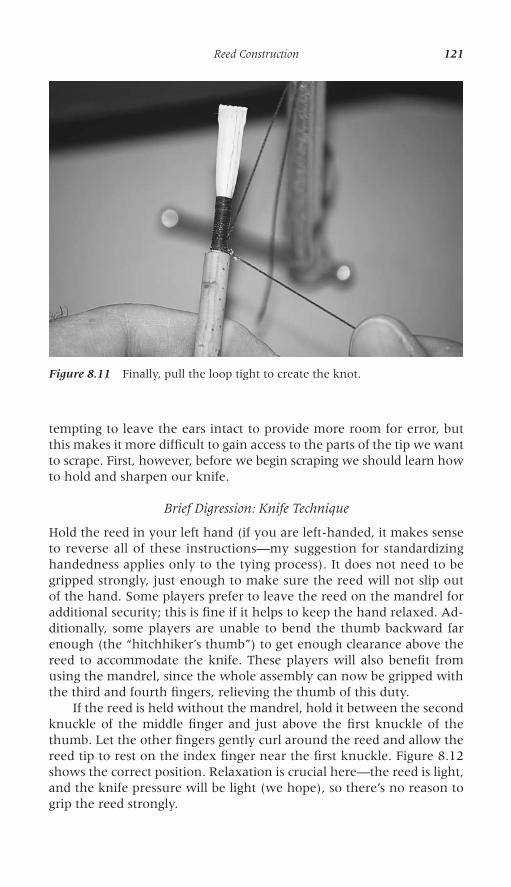
tempting to leave the ears intact to provide more room for error, butthis makes it more difficult to gain access to the parts of the tip we wantto scrape. First, however, before we begin scraping we should learn howto hold and sharpen our knife.
Brief Digression: Knife Technique
Hold the reed in your left hand (if you are left-handed, it makes senseto reverse all of these instructions—my suggestion for standardizinghandedness applies only to the tying process). It does not need to begripped strongly, just enough to make sure the reed will not slip outof the hand. Some players prefer to leave the reed on the mandrel foradditional security; this is fine if it helps to keep the hand relaxed. Ad-ditionally, some players are unable to bend the thumb backward farenough (the “hitchhiker’s thumb”) to get enough clearance above thereed to accommodate the knife. These players will also benefit fromusing the mandrel, since the whole assembly can now be gripped withthe third and fourth fingers, relieving the thumb of this duty.
If the reed is held without the mandrel, hold it between the secondknuckle of the middle finger and just above the first knuckle of thethumb. Let the other fingers gently curl around the reed and allow thereed tip to rest on the index finger near the first knuckle. Figure 8.12shows the correct position. Relaxation is crucial here—the reed is light,and the knife pressure will be light (we hope), so there’s no reason togrip the reed strongly.
Reed Construction 121
Figure 8.11 Finally, pull the loop tight to create the knot.
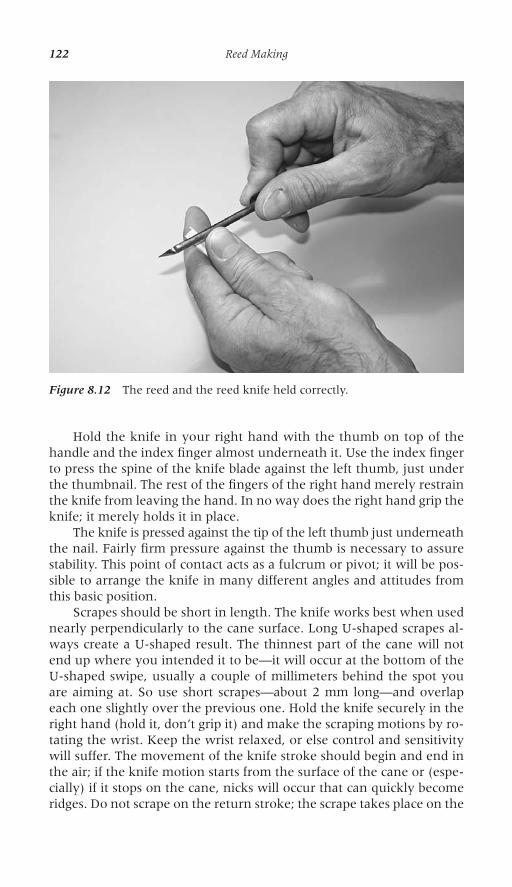
Hold the knife in your right hand with the thumb on top of thehandle and the index finger almost underneath it. Use the index fingerto press the spine of the knife blade against the left thumb, just underthe thumbnail. The rest of the fingers of the right hand merely restrainthe knife from leaving the hand. In no way does the right hand grip theknife; it merely holds it in place.
The knife is pressed against the tip of the left thumb just underneaththe nail. Fairly firm pressure against the thumb is necessary to assurestability. This point of contact acts as a fulcrum or pivot; it will be pos-sible to arrange the knife in many different angles and attitudes fromthis basic position.
Scrapes should be short in length. The knife works best when usednearly perpendicularly to the cane surface. Long U-shaped scrapes al-ways create a U-shaped result. The thinnest part of the cane will notend up where you intended it to be—it will occur at the bottom of theU-shaped swipe, usually a couple of millimeters behind the spot youare aiming at. So use short scrapes—about 2 mm long—and overlapeach one slightly over the previous one. Hold the knife securely in theright hand (hold it, don’t grip it) and make the scraping motions by ro-tating the wrist. Keep the wrist relaxed, or else control and sensitivitywill suffer. The movement of the knife stroke should begin and end inthe air; if the knife motion starts from the surface of the cane or (espe-cially) if it stops on the cane, nicks will occur that can quickly becomeridges. Do not scrape on the return stroke; the scrape takes place on the
122 Reed Making
Figure 8.12 The reed and the reed knife held correctly.
forward stroke only. Try to avoid scraping in the same direction as thecane fibers—in other words, do not scrape straight up and down the reed,but rather at different angles. This will preserve the remaining cane inmuch better condition. The pressure of the knife against the cane shouldbe minimal. If the knife edge is sharp, this pressure can be quite light,again preserving the remaining cane in better condition.
For beginners, judging how much knife pressure to apply to thereed is the most troublesome aspect of knife technique. If the pressureis too light, no cane will come off the reed. If it is too heavy, cane willcome off in unpredictable quantities, and large chunks of tip may dis-appear altogether. Maintain a sharp knife edge, and work with as littledownward pressure as possible.
Second Digression: Knife Sharpening
In chapter 11, I recommend using Japanese water stones in various grits:coarse, medium, and fine (extra-fine and ultra-fine stones are avail-able, too). This is the procedure I use with those stones, though the basicsequence will work on any stone. The crucial element that must becontrolled while sharpening is the angle of the blade to the stone. Theprecise angle is less important than the consistent use of the same angles.
Start with the coarse stone. You will need a cookie sheet or somesort of shallow tray to catch the water and mess made by sharpening.Some water stones require the stone to be soaked for a time beforeuse. The ones I prefer do not require prior soaking; using a water spraybottle, water can be sprayed onto the surface right before sharpening.Additional water should be sprayed onto the stone whenever the sur-face is no longer shiny. Use the whole stone for sharpening and movethe blade backward and forward. Hold the knife with both hands—onehand on the handle, and the thumb and forefinger of the other at thetip of the blade. Pressure should be light—just enough to keep the knifestable on the stone.
Begin with the blade facing away from you (left-handed reed mak-ers will need to reverse these directions). Raise the back of the knife oneclick above the stone (a click is your own physical idea of what a verysmall amount is—not any particular angle, just a very small amount.The memory created in this way is physical, not visual, making it mucheasier to return to the same positions every time). Work the knife backand forth until you can observe a tool mark along the whole blade. Thisstep does not sharpen the knife; it is a maintenance step to create a“relief” and keep the blade thin enough to accept a good edge. Thesame result can be accomplished by leaving the knife flat on the stone,although that will weaken the spine of the knife over time.
Continue with the blade facing away from you. Now raise it two tofour clicks and continue. Sharpen until you see a burr on the side of theblade facing up. You don’t have an edge until you see this. The burr will
Reed Construction 123
be visibly obvious on the coarse stone, less obvious on the medium(though you can still feel it), and very subtle on the fine.
Now turn the blade toward you. Raise it two to four clicks and workuntil the burr is visible on the other side (again, on the side of the bladefacing up).
Turn the blade away from you again and swipe it once at the two-to-four-click angle, or until the burr is back on the other side. These firstfew steps may take very little time on a brand new knife, or ten min-utes on an older knife that has been inconsistently sharpened. Once theproper geometry is established, each subsequent sharpening will takemuch less time.
Repeat the identical steps in the same order on each of the finerstones. Be sure to clean the stone (spray with water and scrub with agood paper towel if necessary) before storing it, and be sure to clean theknife blade when you switch stones, too. Even a little of the coarse griton a finer stone will cause scratches.
When the knife is used, the microscopic burr that scrapes the caneis gradually displaced to the other side of the blade. It has not brokenoff (although it eventually will), so the knife does not need to be sharp-ened yet, but the burr needs to be bent back to the correct side of theblade. A nonabrasive knife steel can be used to accomplish this, extend-ing the intervals between actual sharpenings.
Once the knife has a good edge and the proper geometry has beenestablished, it will not be necessary to start with the coarse stone—startwith the medium and finish with the fine.
Back to Scraping
The configuration of the basic scrape and the order of the steps that fol-low differ from player to player. Everyone has a slightly different orderof operation for removing enough cane to create a vibrating reed. Buteach method has the same goal: it creates a feedback system for reedmakers so they can evaluate and gauge their progress toward the goalof a playing reed. If you have a system that works and that communi-cates the reed’s progress to you along the way, then by all means con-tinue to use it. I follow the system described because I have more thanthirty years experience with it and it is completely familiar to me.
The first scrapes are going to define the future tip. The lower endof the tip should be placed at 65 mm measured up from the bottom ofthe staple. My initial goals are to construct a tip that is clearly definedand completely symmetrical. It should not yet be thin at all—that’s dan-gerous at this stage; we are concerned with symmetry and clear defini-tion. Figure 8.13 shows the reed following this step.
Next, I scrape the bark from the rest of the reed in two narrowchannels. I am careful to leave distinct rails up both sides and a heavyspine down the middle. This structure must be preserved throughout
124 Reed Making
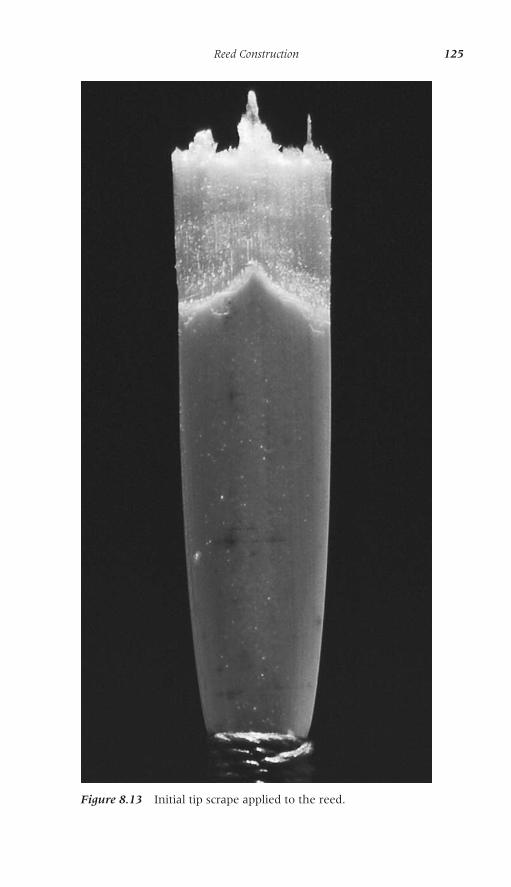
Reed Construction 125
Figure 8.13 Initial tip scrape applied to the reed.
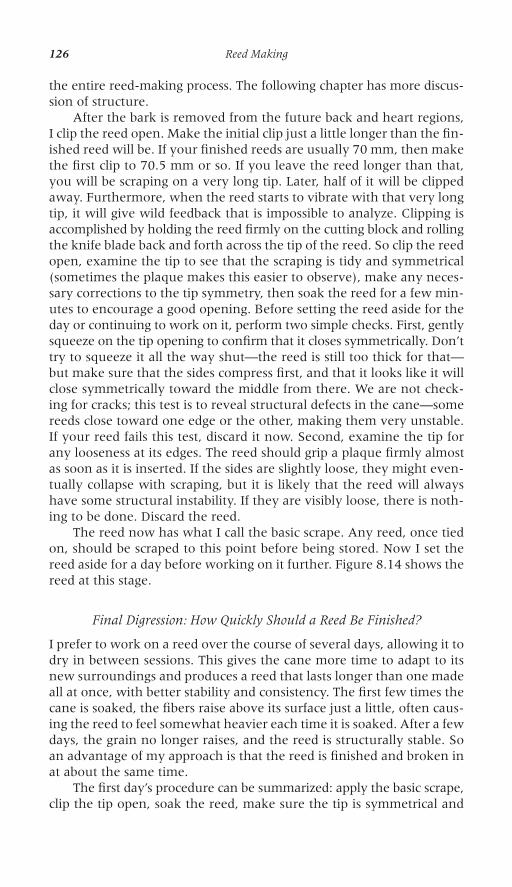
126 Reed Making
the entire reed-making process. The following chapter has more discus-sion of structure.
After the bark is removed from the future back and heart regions,I clip the reed open. Make the initial clip just a little longer than the fin-ished reed will be. If your finished reeds are usually 70 mm, then makethe first clip to 70.5 mm or so. If you leave the reed longer than that,you will be scraping on a very long tip. Later, half of it will be clippedaway. Furthermore, when the reed starts to vibrate with that very longtip, it will give wild feedback that is impossible to analyze. Clipping isaccomplished by holding the reed firmly on the cutting block and rollingthe knife blade back and forth across the tip of the reed. So clip the reedopen, examine the tip to see that the scraping is tidy and symmetrical(sometimes the plaque makes this easier to observe), make any neces-sary corrections to the tip symmetry, then soak the reed for a few min-utes to encourage a good opening. Before setting the reed aside for theday or continuing to work on it, perform two simple checks. First, gentlysqueeze on the tip opening to confirm that it closes symmetrically. Don’ttry to squeeze it all the way shut—the reed is still too thick for that—but make sure that the sides compress first, and that it looks like it willclose symmetrically toward the middle from there. We are not check-ing for cracks; this test is to reveal structural defects in the cane—somereeds close toward one edge or the other, making them very unstable.If your reed fails this test, discard it now. Second, examine the tip forany looseness at its edges. The reed should grip a plaque firmly almostas soon as it is inserted. If the sides are slightly loose, they might even-tually collapse with scraping, but it is likely that the reed will alwayshave some structural instability. If they are visibly loose, there is noth-ing to be done. Discard the reed.
The reed now has what I call the basic scrape. Any reed, once tiedon, should be scraped to this point before being stored. Now I set thereed aside for a day before working on it further. Figure 8.14 shows thereed at this stage.
Final Digression: How Quickly Should a Reed Be Finished?
I prefer to work on a reed over the course of several days, allowing it todry in between sessions. This gives the cane more time to adapt to itsnew surroundings and produces a reed that lasts longer than one madeall at once, with better stability and consistency. The first few times thecane is soaked, the fibers raise above its surface just a little, often caus-ing the reed to feel somewhat heavier each time it is soaked. After a fewdays, the grain no longer raises, and the reed is structurally stable. Soan advantage of my approach is that the reed is finished and broken inat about the same time.
The first day’s procedure can be summarized: apply the basic scrape,clip the tip open, soak the reed, make sure the tip is symmetrical and
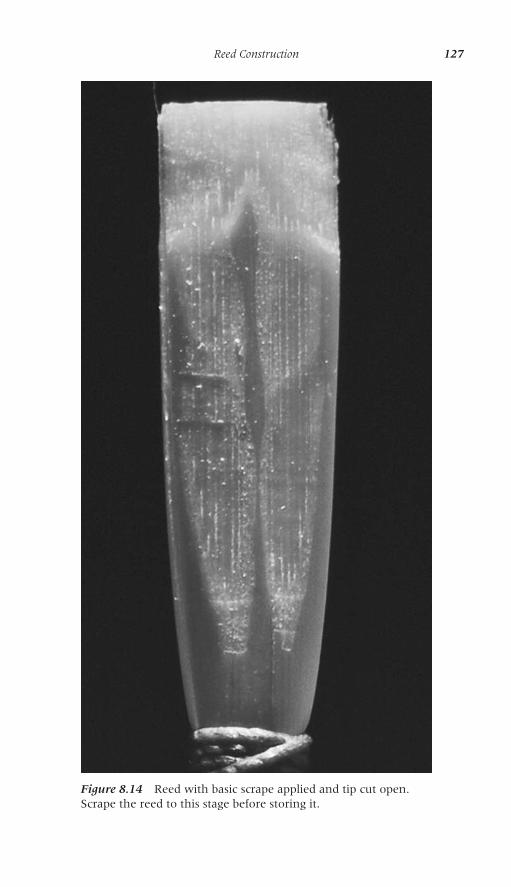
Reed Construction 127
Figure 8.14 Reed with basic scrape applied and tip cut open.Scrape the reed to this stage before storing it.
tight, and set the reed aside. On a second day, scrape the reed until itcrows. On a third day, scrape the reed until it plays somewhat roughly.Then, the following days allow for final adjustments of the reed. Thesessions don’t literally have to be one day apart: “day” in this contextmeans, “Let the reed dry out completely before soaking it again andresuming work.”
It is entirely possible to make a finished reed in one sitting and geta good result, but the inevitable changes in its playing characteristicsduring the first few days often mandate that the reed is only useful fora short time. The next day it must be replaced with another. There isnothing wrong with this—oboists have to work on reeds daily regard-less of the strategy used. I prefer to work slowly because I would ratherhave reeds that have been tested for a length of time—two or three goodpractice sessions and a rehearsal or two—before depending on them fora concert.
More Scraping
The opened reed can be stored in this rough-scraped state, but the open-ing is more stable if the reed is finished within the next few days.
After the basic scrape is applied and the reed clipped open, the backis separated from the heart. Scrape the back starting at the top of it (at61 mm measured up from the bottom of the tube), and with short over-lapping scrapes, work your way down to the bottom. Stop about 5 mmabove the string. The first 4 or 5 mm above the string will remain as bark.Be sure to leave the spine down the middle and the rails up both edgesas strong as you can. I aim my knife blade to scrape just to the inside ofthe rail; this assures that the rail is preserved, and that the spine is notaccidentally scraped off. If this structure is frequently destroyed in yourreed making, a dull knife is to blame. A dull knife will require firmerpressure against the cane; this increased pressure will flatten the arc ofthe cane, which will result in removal of a wider path of material. Re-member that “dull” in this context is a relative term—even if the knifestill seems sharp by household standards, it can be quite unsuitable forreed making. A good knife for reed making has an intensely sharp edgethat is resharpened every few minutes.
After scraping the back, remove about half that amount of canefrom the heart. If any bark remains in the spine region of the heart,remove that as well, but stop scraping as soon as the bark layer is gone.After this step, scraping the heart is the same procedure as scraping theback: avoid the center and avoid the edges. The rails and spine shouldcontinue all the way up to the tip.
Repeat this procedure twice more. Scrape from the back, then scrapeabout half that amount from the heart. Each time the back is revisited,proportionally more cane should be removed from the upper half ofthe back and less from the lower part; the lower part of the back needs
128 Reed Making
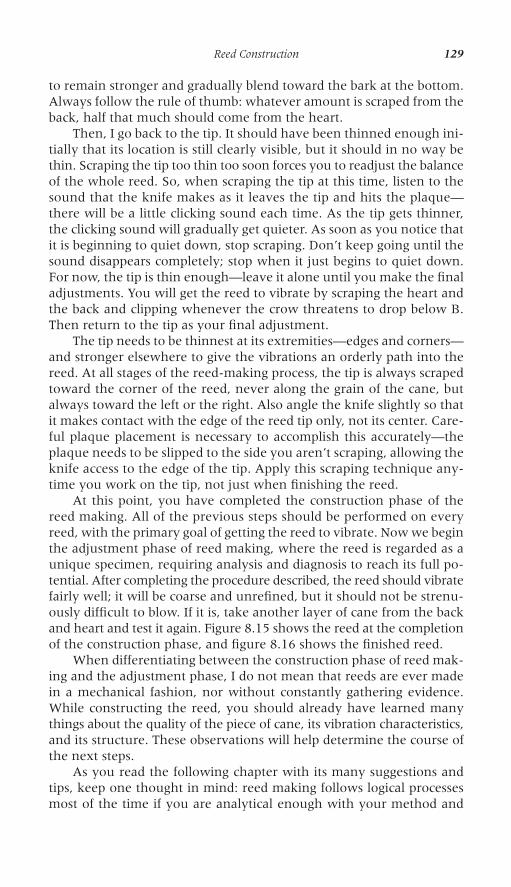
to remain stronger and gradually blend toward the bark at the bottom.Always follow the rule of thumb: whatever amount is scraped from theback, half that much should come from the heart.
Then, I go back to the tip. It should have been thinned enough ini-tially that its location is still clearly visible, but it should in no way bethin. Scraping the tip too thin too soon forces you to readjust the balanceof the whole reed. So, when scraping the tip at this time, listen to thesound that the knife makes as it leaves the tip and hits the plaque—there will be a little clicking sound each time. As the tip gets thinner,the clicking sound will gradually get quieter. As soon as you notice thatit is beginning to quiet down, stop scraping. Don’t keep going until thesound disappears completely; stop when it just begins to quiet down.For now, the tip is thin enough—leave it alone until you make the finaladjustments. You will get the reed to vibrate by scraping the heart andthe back and clipping whenever the crow threatens to drop below B.Then return to the tip as your final adjustment.
The tip needs to be thinnest at its extremities—edges and corners—and stronger elsewhere to give the vibrations an orderly path into thereed. At all stages of the reed-making process, the tip is always scrapedtoward the corner of the reed, never along the grain of the cane, butalways toward the left or the right. Also angle the knife slightly so thatit makes contact with the edge of the reed tip only, not its center. Care-ful plaque placement is necessary to accomplish this accurately—theplaque needs to be slipped to the side you aren’t scraping, allowing theknife access to the edge of the tip. Apply this scraping technique any-time you work on the tip, not just when finishing the reed.
At this point, you have completed the construction phase of thereed making. All of the previous steps should be performed on everyreed, with the primary goal of getting the reed to vibrate. Now we beginthe adjustment phase of reed making, where the reed is regarded as aunique specimen, requiring analysis and diagnosis to reach its full po-tential. After completing the procedure described, the reed should vibratefairly well; it will be coarse and unrefined, but it should not be strenu-ously difficult to blow. If it is, take another layer of cane from the backand heart and test it again. Figure 8.15 shows the reed at the completionof the construction phase, and figure 8.16 shows the finished reed.
When differentiating between the construction phase of reed mak-ing and the adjustment phase, I do not mean that reeds are ever madein a mechanical fashion, nor without constantly gathering evidence.While constructing the reed, you should already have learned manythings about the quality of the piece of cane, its vibration characteristics,and its structure. These observations will help determine the course ofthe next steps.
As you read the following chapter with its many suggestions andtips, keep one thought in mind: reed making follows logical processesmost of the time if you are analytical enough with your method and
Reed Construction 129
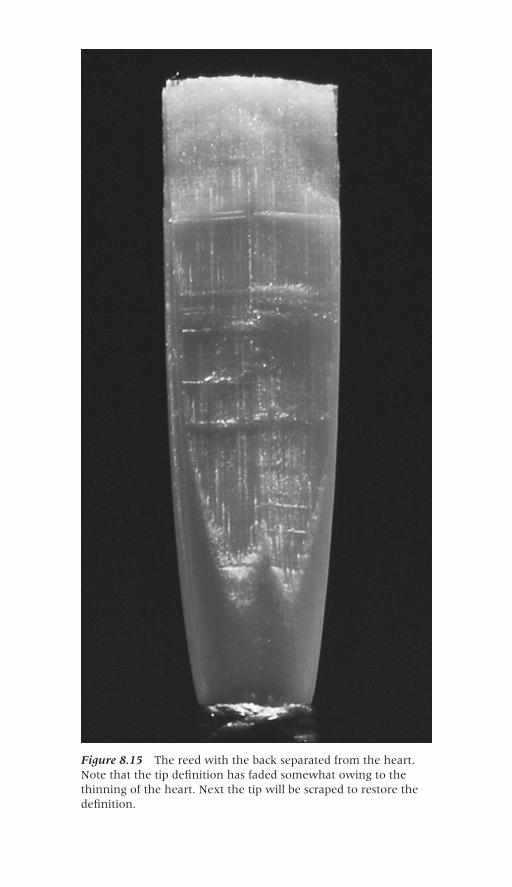
Figure 8.15 The reed with the back separated from the heart.Note that the tip definition has faded somewhat owing to thethinning of the heart. Next the tip will be scraped to restore thedefinition.
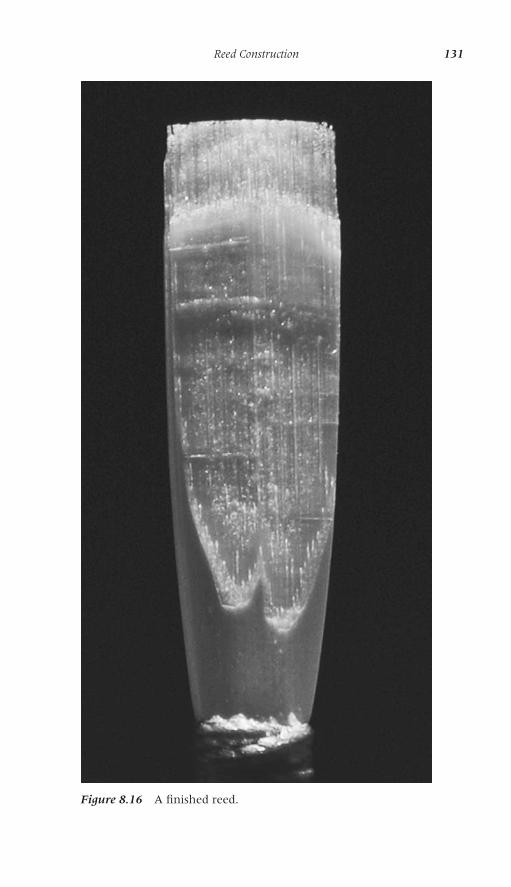
Reed Construction 131
Figure 8.16 A finished reed.
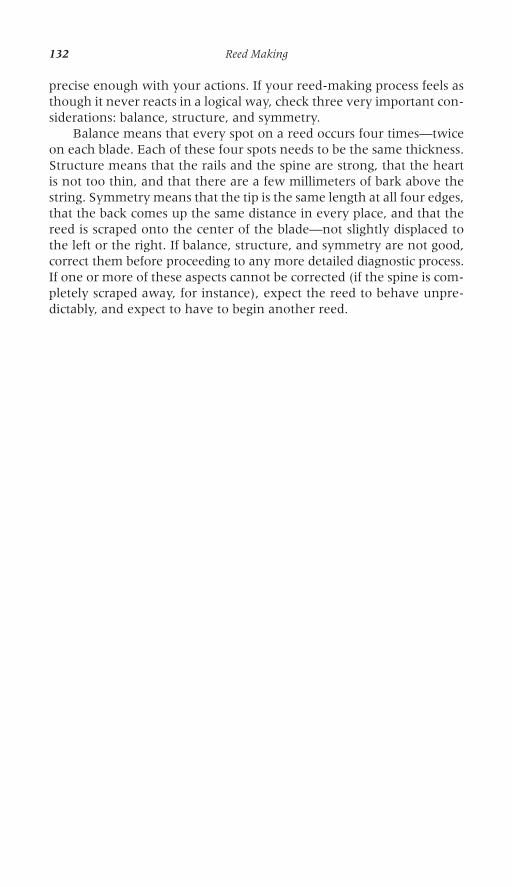
precise enough with your actions. If your reed-making process feels asthough it never reacts in a logical way, check three very important con-siderations: balance, structure, and symmetry.
Balance means that every spot on a reed occurs four times—twiceon each blade. Each of these four spots needs to be the same thickness.Structure means that the rails and the spine are strong, that the heartis not too thin, and that there are a few millimeters of bark above thestring. Symmetry means that the tip is the same length at all four edges,that the back comes up the same distance in every place, and that thereed is scraped onto the center of the blade—not slightly displaced tothe left or the right. If balance, structure, and symmetry are not good,correct them before proceeding to any more detailed diagnostic process.If one or more of these aspects cannot be corrected (if the spine is com-pletely scraped away, for instance), expect the reed to behave unpre-dictably, and expect to have to begin another reed.
132 Reed Making
9
Reed Evaluationand Adjustment
There are at least two, and maybe three, golden rules of oboe reed mak-ing. The two 24-karat ones are: Sharpen your knife. Don’t make anymistakes.
Early in my career, I remember reading a statement by Ray Still as-serting that it takes thirty years to learn how to make reeds.1 Of course,I devoutly hoped he was mistaken—that there was some possible short-cut that he had overlooked—but it turned out that he was nearly cor-rect. After twenty years or so, I started to feel like I could make a reedwhenever I needed one. I could make reeds in the interim, too, but itdid take about twenty years for the process to become reliable and con-sistent. So I reflected: what had I learned? Apart from the experienceof making thousands of reeds, which counts for a lot, the only things Ihad really learned, taken to heart, and become slightly obsessive about(unusual for me), were the two statements listed earlier.
Sharpen your knife. And I mean really sharp. You can still removecane with a dullish knife, just as you can fix your bicycle with a pair ofvise-grip pliers, but it won’t do exactly what you want, and it will ruleout neat and efficient work. If you can’t sharpen your knife, let yourteacher sharpen it. If your teacher can’t sharpen it, get a new one (anew knife, I mean, not a new teacher). Reed making doesn’t have to bea matter of luck—get a good knife and keep it sharp. Chapter 8 includesa detailed discussion of sharpening technique.
133
1. Gorner, “Virtuoso Ray Still.”
Don’t make any mistakes. This suggestion includes serious mistakeslike removing big chunks of the tip or tying past the end of the tube,but it also means that you must avoid doing slightly foolish things inthe hope that they won’t affect the final result. Choose your cane care-fully, gouge it carefully, and shape it carefully. Tie it on with care. Usegood materials. Use good tools in proper repair. Get the overlap right.A well-made blank from decent cane will make a decent reed almostevery time (see the previous chapter). Of course, scrape carefully (withyour sharp knife).
That leaves out the experience factor. But experience is the resultof time, thought, and observation. So while you’re spending time mak-ing reeds, think and observe, and file everything away in your brain (oryour notes) for future reference. Observe everything, from the appear-ance of the cane to the result of a certain scraping operation. Don’t maketwenty reeds in the hope that one will work. Remember that reed mak-ing is not a black art; removing wood from a certain area will usuallygive a predictable result if the reed has structure, balance, and sym-metry. Think about what you are doing, and be able to defend it if ques-tioned. Most students already know enough to make reeds successfullyif they are disciplined, analytical, and methodical in their approach.Experience allows the reed maker to assemble facts and reach a con-clusion quickly, almost automatically, but students should try to assem-ble them, also.
Ultimately, when you finish a reed and it still doesn’t work, poorcane quality should be the only reason it didn’t turn out. With enoughobservation of cane characteristics—choosing what works best for you—even that problem can be minimized.
In addition to the two golden rules already discussed, there is a thirdalmost-golden rule: as early as possible in your reed-making career, tryto introduce complete consistency into your reed-making process. Tryto acquire equipment that works, cane that works, dimensions that arestandardized, a process that is consistent, tools and supplies that work,and so on. Having the same things to work with every time is essentialto consistent success. Only make changes to your equipment or yourtechnique if you are sure that the change is necessary, and then changeonly one thing at a time.
Reed Adjustment Guide
Writing about reed making is similar to writing about food or wine: tenseconds worth of hands-on experience is probably worth more thanten paragraphs of text. Similar difficulties of terminology appear—doeswine really taste of leather or pencil lead, or are these terms arcane ref-erences to experiences only familiar to wine connoisseurs? Some diffi-culty of description is inevitable, but the primary goal of the followingsection is to show how careful, logical thought can be imposed on the
134 Reed Making
process of adjusting reeds. Your specific terminology and desired out-comes may differ from mine; the important idea is that you can expectrelatively consistent results when you apply enough analysis and methodto the diagnosis of problems and the setting of goals.
You must have a goal for the reed that is more specific than justmaking it “better.” You must first determine that you would like to dosomething precisely defined: “I want to improve the response withoutaffecting the stability,” for example, or “I want to increase the resistancewithout changing the response.” With a specific goal, you can devisea specific method. Without a goal, you are left to depend on luck andchance.
Diagnostic Procedure
The performance of a reed can be analyzed by observing four basic char-acteristics. These are, in order of importance, response, stability, resis -tance, and tone quality. It may be a surprise that tone quality is listedlast, but it is the least important consideration when adjusting reedsand its control is the least predictable. We can control the other factors:it is easy to develop a strategy that improves response, makes the reedmore stable, or lightens the resistance. But the sound quality is largelypredetermined by the genetics of the cane and is not readily adjustable.So your priority must be to make a reed that works—one that responds,plays in tune, and feels comfortable for you to blow on. Then the soundquality of that reliable, comfortable, reed will be close to its maximumpotential.
Here is a more detailed consideration of the four main considera-tions when evaluating a reed’s performance.
· Response. Response refers to the readiness of the reed to make asound at the moment the player demands it. The reed shouldspeak freely at all dynamic levels—it should speak easily at thesoftest possible dynamic while maintaining a true sound, and itshould speak cleanly at a loud dynamic without splattering orspreading. These characteristics should be found consistently inall registers. Response is the most essential of the reed’s func-tions. If the tone is beautiful but the note fails to speak on time,then the beautiful sound doesn’t matter. When the conductorpoints at you, he or she wants to hear a sound.
· Stability. Stability refers both to the reed’s overall pitch level—flator sharp—as well as its ability to maintain that pitch. Reeds canmanifest a confusing variety of combinations: flat and stable, flatand wild, sharp and wild, sharp and dull, and so on. Some ofthese problems have no ready solution and should cause you toreject the reed (although really crazy things shouldn’t happen ifthe reed is well structured, has good balance and symmetry, and
Reed Evaluation and Adjustment 135
is made from a good blank). A good reed will play in tune andhold its pitch at any dynamic, any level of air pressure, and anyreasonable variation of embouchure tension or reed placement in the mouth. Again, when the conductor points to you, he orshe wants to hear a sound, and that sound should be in tune. If your response and pitch are consistent and reliable, most con-ductors will already be very pleased with you.
· Resistance. Resistance refers to the amount of air pressure re-quired to make the reed vibrate with a full tone. When you areblowing with your comfortable maximum effort, the reed shouldalso be vibrating fully. Any mismatch here will result in fatigue—if you are blowing as firmly as you want to, but the reed still hasmore capacity, you will get tired. Conversely, if the reed is vibrat-ing as much as it can, yet you can still blow harder without dis-comfort, fatigue will again follow quickly. Having a reed thatmatches your physical capacity is essential to efficient playing.
Here’s a good test to determine the reed’s overall resistancelevel: with the reed in the oboe, blow gently through it with aneutral embouchure—do not try to influence the tone color orthe dynamic—and make a very gentle breath attack. At first, theonly sound should be air passing through the reed. Gradually in-crease the air pressure until the reed speaks by itself. The result-ing dynamic should be mezzo piano or very close to it. If it is tooloud, the reed will require too much embouchure intervention to play quietly; if it is too soft, the reed will feel limited.
In addition, we can describe another aspect of resistance:hardness. This refers to the amount of embouchure tension(preferably minimal) needed to control the reed. Before makinga judgment about the reed’s hardness (and possibly ruining it),confirm that the tip opening is not too large. Before scraping,squeeze the opening to the proper size and test the reed again.
Finally, the last characteristic that falls under this heading isdynamic range. Ideally, the reed will play loudly when you blowwith energy and fade to nothing on demand. Occasionally factorsbeyond your control can cause some deviation from this ideal.Otherwise good reeds may have an opening that is slightly toosmall or too large, or a change in humidity or altitude can alterthe reed’s performance. If this happens, consider that the dynamicrange of the reed probably hasn’t changed; it has just moved to adifferent part of the dynamic spectrum. So if you can’t play veryloudly, chances are that you can play more softly than usual.Conversely, if the reed fails to function at the very softest limit,perhaps it has more capacity at the loud end. If the reed just won’tplay any dynamics at all, then don’t play it in public. You have topractice scales on something.
136 Reed Making
· Tone Quality. The actual timbre of the sound is a personal matterand is not important here. It is important to get a good balancebetween low and high partials, allowing the sound to be as com-plex and rich as possible. A reed that has only the lower partialswill sound dull, lack brilliance, and project poorly. (Do not con-fuse this with a dark sound.) A reed that has only the higherpartials will sound shrill and thin.
I repeat: tone quality should never be the paramount consid -eration in reed adjustment. It is much more important to make a reed that works. If the reed’s function is inferior, even if thesound is beautiful, you may miss attacks, you may play out oftune, and you may tire quickly—playing flaws that any listenercan hear. Response and pitch security are the most importantconsiderations in finishing a reed, since a defect in either of thesewill make you sound incompetent.
Oboists are justly concerned with beauty of sound; the distinc-tive tone of the oboe is what defines the instrument for manylisteners. Reeds must sound beautiful. But it is not worth givingup aspects of function to gain a bit more beauty of tone, which is, after all, a subjective quality. The only listeners who can dis-tinguish your excellent tone from your very good tone are otheroboists. If you doubt this, assess how confident you feel whenevaluating the tone quality of other instrumentalists. Can youreally tell when a clarinet player’s tone is a little less good thanusual? Probably not. Most likely your clarinetist colleague soundsabout the same to you every day, and chances are you soundabout the same to them, too. Unless your reed doesn’t work.
However, anything we do to the reed will also affect the tonequality. So if you know you need to remove wood from some-where but can’t decide quite where, the tone quality can come to your aid. Do you want the reed to vibrate more or vibrateless? Is it too shallow or too noisy? Does the reed need moreflexibility or more stability? Answering these questions can helpguide you to a successful scraping strategy.
Any reed adjustment will change all four of the basic characteristicsdescribed earlier. You will seldom cure one problem without affectinganother. Success in the diagnostic process consists of finding a solutionthat solves the most problems and creates the fewest new ones. Thinkbefore you scrape! Keep notes if necessary. Most young reed makers arequite successful at getting their intended result, but they fail to antici-pate the unintended effects, which cause most of the puzzlement. Reedmaking need not be mysterious if you think it through. Everythingabout a reed—not just the aspect you are trying to change—will be af-fected by anything you do to it.
Reed Evaluation and Adjustment 137
Eventually, the best reed making will feel purely intuitive, and you’lljust know what to do. But that’s only the way it feels. It isn’t really in-tuition, but rapidly compiled and applied knowledge. This knowledgeis the result of experience. That is the best teacher—but the teacher can-not help unless the pupil pays constant and diligent attention.
Common Actions and Their Effects
This section is partly informational, and partly meant to illustrate thatthere are not as many complicated options as beginning reed makersimagine. There are really only about half a dozen operations that cansensibly be performed on a reed in progress. The suggestions presumethat the reed is already mostly finished and that it performs basically cor-rectly. If it is still in the primitive stages, scrape the reed until it vibrates.
Gradually, as reed makers develop more experience and skill, theyprogress to more specific strategies for making small changes in the reed,but these are highly detailed and depend on the entire organic construc-tion of the reed. Do not be tempted to integrate Mr. Smith’s little trickfor making the spine narrower into your reed making without makingMr. Smith’s whole concept of a reed. Start by making a fundamentallycorrect reed before developing your own “tricks.” So, to some, this sec-tion will seem like an oversimplification. But simple is a good place tostart.
Results of Thinning the Whole Surface of the Tip· Easier, faster response.· Slightly lower pitch and decreased stability.· Lower resistance.· Lighter, somewhat shallower, sound.
If the reed is nearly finished, scraping the whole tip is seldom a goodidea. It tends to make the reed chirpy and shrill because it emphasizesthe tip vibrations too much by isolating them from the rest of the reed.In the case of an unvibrant reed, it is usually better to try to get morevibrations some other way—scraping the heart a bit, for instance—andthen finishing the sides and corners of the tip. Scraping the tip will makethe tip vibrate better; it may not necessarily make the reed vibrate bet-ter. If the tip is overscraped, it will make the heart thicker by comparisonand actually cause the reed to feel thicker and stuffier.
Make sure that the tip has a good internal balance. It must be thin -nest at the extremities—the edges and corners—and a little heaviertoward the center and toward the heart. This will give the vibrationsa nice smooth entry into the reed. However, if the reed needs just thatlast little bit of brightening up, scraping lightly from the whole tip ac-complishes that without compromising the reed’s stability very much.
138 Reed Making
Results of Scraping the Extremities (Sides and Corners) of the Tip· Somewhat faster response.· Negligible effect on stability.· Somewhat lower resistance.· More focused, refined sound.
If done carefully, this procedure should improve stability and tonefocus without lowering the pitch. Often, finishing the tip will unify allthe elements of the reed after everything else looks correct. It should beamong the last things you do to a reed, and you should always do itwith your sharpest knife. Work with the lightest possible knife pressure—twenty or more scrapes might be necessary to remove a few wisps ofcane. Your technique should feel like you are gently brushing dust fromthe tip surface, not scraping. Refining the edges and corners of the tipcan also help with a reed that just needs to vibrate ever so slightly morequietly but does not need clipping.
Results of Clipping the Tip· More sluggish response.· Sharper pitch and improved stability.· Higher resistance.· Duller, shallower, less vibrant sound.
Before clipping the tip, be sure it really needs clipping. A good can-didate for clipping will be a reed that is slightly (or noticeably) flat andnoisy. Reeds that are not flat should not be clipped. Don’t clip just tochange the tone! Clipping a bright, sharp reed that doesn’t vibrate wellto make it “darker” won’t help it a bit—it will be even sharper and shal-lower after the clip. Always clip off the tiniest possible amount; it’s bet-ter to clip a reed three times to get what you want than to overclip itonce. Overclipping will require the entire balance of the reed to be re-structured. Before clipping, confirm that the opening is small by squeez-ing it down if necessary. A swollen opening can make a huge change inthe pitch of the crow and cause you to misjudge the amount to clip.Reeds in progress often have openings that are too large, and inatten-tion to this large opening can result in a serious mistake. If the reed isstill too stiff to squeeze, don’t clip yet. Continue with the basic scrapinguntil the reed is pliable enough to allow squeezing down to the propersize of opening.
If a nearly finished reed is a little flat, you must clip it. Clip it to getit in tune, even if you feel you might not like it afterward. It has to bein tune first, before you adjust it to meet the rest of your needs.
Some players clip the reed so that one blade is slightly longer thanthe other. This is said to assist with response, but I have never noticedthat it makes much difference unless you forget which blade to set on
Reed Evaluation and Adjustment 139
top. If you would like to try this, clip in the normal way but do not chopstraight down at the reed—angle the knife blade so that it cuts awayfrom you.
Results of Scraping the Heart· Somewhat improved response.· Noticeably lower pitch and decreased stability.· Lower resistance.· Noisier, more raucous, and more vibrant sound.
This is the cure for a stodgy, wooden reed that refuses to vibratefreely. Stay away from the center and the edges of the heart—scrape itlike the back, with a spine down the center and thin rails up the sides.Think of the heart as a control valve that regulates the passage of thetip vibrations to the rest of the reed. If the heart is too thick, it has theeffect of isolating the tip and preventing the rest of the reed from vibrat-ing enough. The reed will seem shallow, stuffy, and resistant. If the heartis too thin, it has the effect of making the tip longer. There will be plentyof vibrations, but the reed will be wild and noisy. Of all the scrapingoperations, scraping from the heart has by far the most damaging effecton the reed’s stability, so test frequently. But do not be afraid to scrapefrom the heart. Remember the rule of thumb from the previous chap-ter: whatever amount comes off the back, take half that amount fromthe heart until the reed dictates a different approach.
Results of Scraping the Back (Top Half)· Slightly more sluggish response.· Moderately flatter pitch and decreased stability.· Lower resistance.· Warmer, less brilliant sound.
The outcome of this operation depends very much on the balanceof the reed before scraping but will usually give the results listed. It isa useful way of getting deeper vibrations in the reed and a bit morewarmth in the tone. Usually, scraping the back should be followed by afew scrapes from the heart as well, to make sure the whole reed is per-mitted to vibrate. During the adjustment phase of reed making, woodshould mostly be removed from the top of the back, blending into thebark as you get closer to the string. For me, thinning the whole length ofthe back equally weakens the reed too much. Avoid having too much ofa hump between the top of the back and the heart—blend it in smoothly.
Possible Cures for Common Problems
Note that all of these conditions can occur at some stage during thenormal reed-making process. Whether or not they are problems depends
140 Reed Making
on how close the reed is to being finished. If you are observant aboutyour reed and sensitive to early manifestations of these issues, theyshould never become troublesome for you.
Reed Too Flat There are several factors that can cause a reed to soundflat: the opening is too big, the reed is well made but needs clipping, theoverlap is too slight, or too much wood has been removed from thereed. It can also be a combination of these things. In some extremecases, flatness that refuses to improve is a sign of a structural defect.These defects include an asymmetrical tip closure or looseness of thesides near the tip, both mentioned in the previous chapter. Those reedsshould be discarded. Sometimes persistent flatness is caused by the backopening’s being too large—the internal dimension of the reed just abovethe string is too big. There is no remedy for this, so those reeds can bediscarded also.
Flatness in the early stages of reed making is not unusual and canusually be corrected by clipping. The only fatal combination is a reedthat is almost playable, still too hard, and already flat. In that situation,squeeze the opening down and hope for an improvement. If none isforthcoming, discard the reed.
If the opening seems too large, take care of that first by soaking thereed for a few minutes and, with the plaque inserted, squeezing gentlyjust behind the tip, holding the reed between your thumb and indexfinger. If it doesn’t crack, squeeze harder. Then gradually squeeze a lit-tle closer to the string—your fingers should be right on top of the heart.Twist the tube back and forth a little to weaken the reed further. If itcracks now, don’t worry too much; it would have cracked eventually.(Better now than during the concert.) This is the only effective way tomake the opening smaller. Weakening the reed by scraping is not effec-tive enough. The next time you soak the reed, the opening will prob -ably be too large again. Repeat the squeezing procedure, and after a fewdays it should settle down. Reeds that never develop a stable openingare rare. Do not attempt the squeezing procedure until the reed is nearlyplayable. If you use it in the early stages, it will almost certainly causecracking.
If the reed seems to play well but is just a bit flat, it needs to beclipped. Be careful to clip only the tiniest amount at a time and to testthe reed after each clip. Remember to correct the opening before decid-ing how much to clip.
You can raise the pitch slightly by increasing the amount of overlap.Gently slip the blades a little further apart. Note that this will also makethe tone shallower and less vibrant. And this is at best a temporary so-lution. The blades tend to settle back to their original relationship aftera few minutes.
If the reed is flat because too much wood has been removed, it maybe difficult to remake. Usually, this happens if the back or the heart (or
Reed Evaluation and Adjustment 141
both) have been scraped too thin. Try clipping it a little. If the pitch im-proves, try clipping a little more. Eventually, the tip will be so short thatyou will have to abandon further clipping. Be prepared to give up andmake a new reed without making the same mistakes.
Don’t overlook the possibility that you have chosen the wrong tielength or too wide a shape. If the reed has these structural problems—if it is tied too short or shaped too wide—these can be very difficult tocorrect even with skillful scraping.
The general order of operation in the case of a flat but otherwisewell-made reed is to clip it until it crows C, scrape it to free the vibra-tions if necessary, clip again if necessary, and keep repeating the processuntil you get the result you want. The closer you get to an acceptableresult, the smaller the adjustments should be. Test the reed after every(tiny) clip and after every (tiny) scraping procedure. Don’t get caughtin the vicious cycle of scraping too much, then clipping too much, thenscraping too much, and so on. That process will leave you with a tinystub of a reed.
Reed Too Sharp If the reed is sharp it might be that the opening is toosmall, the reed is too short, the overlap is too large, or too much woodhas been left on the reed. Again, structural issues such as a shape thatis too narrow can be a factor, but this is something that novices shouldnot try to work out on their own; reliable input from an experiencedteacher is essential. Sharpness will usually be accompanied by a shal-low, somewhat shrill tone. In the earlier stages of reed making, sharp-ness is actually desirable since removing wood (which you have to doanyway) will usually cure it.
If the opening is too small, there is usually no remedy. Try soakingthe reed for a longer time than usual (fifteen to twenty minutes) andsee if it improves. Squeezing it open gently with your fingers is a tem-porary solution. Some players recommend changing the shape of thetube with pliers to adjust the opening. While this can be effective, itdamages the tube and has imprecise results. If you get consistently smallopenings, try using cane with a smaller diameter and/or a wider shapertip, and take care to select cane with more springiness. Some playersalso recommend modifying the opening by altering the tie length. Whilethis is logical from a geometric point of view (a longer tie length shouldtheoretically give a larger opening), changing the tie length is hazardousto the reed’s basic structure and not something we want to tinker with.
If the reed is clipped too short, it’s probably hopeless. Often, this isthe result of carelessly clipping too much and then scraping too much,clipping, scraping, and so on. Be more careful, and make sure to squeezethe opening before clipping. One of the most dangerous things that canhappen to a reed is one careless too-large clip. Suddenly the whole reedneeds to be made over since everything is now out of balance. It is muchbetter to clip too little five times than too much once. I know I’ve alreadysaid this multiple times, but doing it wrong creates nasty problems.
142 Reed Making
The overlap can be reduced by coaxing the blades, creating a largerresonance chamber. This will also make the tone more vibrant. The re-sult is seldom permanent, but it can be helpful for a few minutes ifyou’re desperate to get through that solo coming up in a few measures.
If the reed is sharp because it’s still too thick, scrape more off. Usu-ally the heart is too heavy, preventing the tip vibrations from reachingthe whole reed. This is normal in the early stages of reed making.
Reed Won’t Vibrate This condition is also normal in the early stages ofscraping the reed. The difficulty comes in determining where to removewood. As we discussed earlier, the tone quality of the reed, while it willbe quite unrefined at this stage, can help you to decide where to scrape.For all of my insistence that tone quality is less important than otherconsiderations, here is a situation where tone quality is very useful as adiagnostic device. You have to scrape somewhere; scraping will changeboth the tone quality and the function of the reed. Why not try to find ascraping procedure that will improve everything? Taking note of the tonequality and selecting a scraping procedure accordingly is good practice.
Reeds that lack vibration will be either dull and wooden or thin andshrill. In both cases, wood should be removed from all areas, but obser-vation of the tone quality will help determine your scraping priority.
If it’s dull and wooden, removing wood from the heart usually fixesthe problem. Note that this will make the reed flatter. If the reed is dulland wooden and flat, it will never work and should be discarded.
If it’s shrill, take more wood from the back. Continue scraping untilthe sound gets a little better, then balance the heart and tip to whatyou’ve done. This will also make it flatter, but most shrill reeds are sharp,so you’re OK. Shrieking reeds that tend toward extreme shrillness rarelyturn out well. Observe the qualities of that particular piece of cane andavoid any others with the same characteristics.
If the sound is basically good (though tough) and the reed crows aC, or close to it, that is a sign that the reed is well balanced but just toothick. Take a layer off the entire reed and try it again.
Reed Vibrates Too Much (Raucous) This is often a good thing in the earlystages, particularly with English horn reeds. Usually the reed is well bal-anced but just not finished. If this is the case, scrape equally from thetip, the heart, and the top of the back and try it again. Sometimes, rau-cousness in a nearly finished reed is the result of the opening’s beingtoo large. If that’s the case, squeeze it down before doing anything else.Usually the reed will play completely differently with the correct open-ing. By “raucous,” I mean a potentially good reed that vibrates with somefirmness in the crow and in the tone. Really trashy, noisy-sounding reedsare usually unstable as well, and difficult to refine.
If the problem is rather slight, refine the edges and corners of thetip and try again. This can also help if the crow contains unwanted extranoise—fourths and fifths instead of the desired octave C’s.
Reed Evaluation and Adjustment 143
When working through the diagnostic process, be sure to have theright goals in mind. Reeds can display superficially similar defects forcompletely different reasons. One reed might be thin and tight and shrill;another might be loud and noisy and shrill. Often the player’s only re-action is “shrill,” with no notice taken of the underlying cause. The tworeeds will require completely different strategies—one needs to vibratemore, the other needs to vibrate less—yet inexperienced reed makersrarely realize that some shrill reeds are not yet vibrating enough. Alwayspay attention to everything, think things through, and take nothing forgranted.
General Observations
What follows are some general thoughts for healthy reed making, in noparticular order of importance. The suggestions presume that the reedis made with the standard American long scrape illustrated in the dia-gram shown at the end of this chapter. The suggestions also assumethat the gouging equipment is working well and that the shape is wellmatched to the gouge dimensions. Players who do not gouge or shapetheir own cane are starting from a significant disadvantage.
· The reed should crow a C. I crow the reed with my lips partly onthe string and partly on the bark with light lip pressure until thereed is nearly finished. For final adjustments, I relax the lip pres-sure. Begin by blowing gently: there should be a single peep of C.Then, as the air pressure increases, the sound will become morecomplex. The additional sounds should be recognizable as fur-ther lower octaves of C, up to a maximum of three. Although thecomplexity of the crow will increase with increased air pressure,it is essential that the pitch remain the same. How much rattlethe crow contains is a matter of personal preference—I preferonly two of the possible three octaves. Experience will teach justhow complex a sound is optimal for you.
Some players are comfortable with a crow slightly lower orhigher than C. These are individual preferences, developed afteryears of experimentation and practice, so the student shouldstart from the standard, which is C. Just because so-and-so‘sreeds crow C-sharp doesn’t mean that yours should.
The pitch of the crow in the construction phase of reed mak-ing is not so important; wait until the adjustment phase beforemonitoring it carefully. After that, do not allow the pitch of thecrow to drop below B, or you may have very serious problemsrecovering the pitch. Remember to confirm that the opening issmall before testing.
· Balance the reed. Every spot on the reed occurs four times—twice on each blade. All four should be exactly the same thick-ness. Do whatever you have to: count scrapes, use a good back-
144 Reed Making
light, measure with a micrometer, and so on. Oboe reeds aresmall. Even small mistakes in symmetry and balance can causeserious problems that will compromise the diagnostic process.
· Gouge and shape your own cane. Even if you know nothingabout the effects of the gouging process on reed quality and mustdepend entirely on professionals to maintain your machine, theresulting consistency in reed quality is well worth it. The vendorwho is selling you shaped cane is interested partly in your cus-tomer satisfaction and partly in selling the maximum number ofpieces per pound. Some inferior cane will slip through that thecareful reed maker would reject.
· Before testing the reed, always confirm that the opening is small.An opening that is too large will give very misleading informa-tion. I know I’ve already said this many times. It’s important.
· When testing reeds, there are two things that are very important.First, do not try to make the reed sound good. Just play it. Eventhough it may be possible for you to sound beautiful on the reedfor ten seconds, or even for ten minutes, that is not why you aretesting it. When testing the reed, you should be much more in-terested in how bad it can sound than how good you can make it sound. If it can sound bad, it eventually will. Getting rid of abad quality in a reed is equivalent to adding a desirable one.
The second important thing when testing is to play at least a few seconds at the reed’s maximum capacity. Many studentsplay the reed at about half power and then determine that it istoo hard and too loud. But they never play it with a completelyfull effort, and thus they don’t learn exactly how much too hardand too loud the reed is. This information is essential to correctadjustment.
· Many students test the reed in the oboe much too early. You mayfind yourself saying, “My reed sounds terrible.” Well, yes, it does,but only because it’s half finished. Learn to work on the reed bytesting the crow (see the earlier discussion) and judging the re-sistance of the reed while crowing. Most students have testedenough decent reeds to know how they feel without the oboe.The reed should be relatively easy to blow through, and it shouldcrow a C. Until the reed you’re working on approaches thosequalities, putting it in the oboe will be disappointing.
· Don’t judge the progress of your reed by how much time youhave invested in it, nor by how much cane you think you havescraped from it, nor by how thin it looks when you hold it againsta backlight. If the reed is too hard, there is still too much cane onit. Simple.
· Don’t be misled by the occasional professional reed you mightsee that looks sloppily made but plays well. It would have playedbetter if it had been carefully made.
Reed Evaluation and Adjustment 145
· Make a reed a day. Every day. More is better; remember the be-ginner’s goal of making a thousand reeds before becoming profi-cient. Reed making responds to the reed maker’s being in shape,just as playing does. You cannot make reeds only once a weekany more than you can practice only once a week.
· Because the American style of reed has wood removed frommost of its surface, it is essential to maintain a skeleton of struc-tural elements to give strength to the reed. We have four struc-tural elements that must be preserved at all costs: the bark at thebottom of the reed, the spine up the center, the rails up the sides,and the heart.
The bark at the bottom should extend for a few millimetersabove the string, perhaps four or five. Too much bark, and thereed is shallow; too little, and the reed can become weak. Thespine must be visible all the way up the reed. It doesn’t have tobe a wall of cane, but it must be present all the way to the top of the reed, including the tip (the spine at the tip might not bevisible, but it should be measurable). The rails should be visibleall the way up to the tip—they don’t have to be very wide, justpresent. The better we can preserve the structure, the more woodwe can remove from the rest of the reed without losing pitch andtone focus. Improved structure always gives improved function,control, and tone. Reeds without spine and rails collapse quickly,making it very difficult to maintain pitch and tone focus.
· Don’t deliberately remove wood from the center of the reed.Enough comes off anyway, no matter how carefully we try toavoid it.
· Try to analyze the tone characteristics of the reed without usingthe words “bright” and “dark.” I think these words are largelymeaningless—people use “dark” to describe a tone they like and“bright” to describe a tone they don’t like. Being more specific(“dull,” “shrill,” “rough,” “stuffy,” “glassy,” etc.) will improveyour ear and your reed-making skill. We have already seen howtwo different reeds, both of which could have been described as“bright,” needed completely different strategies.
· Make the extreme tip (corners and sides) as thin as you can. Mea-surements show that many reeds have tips that are 0.01 milli-meter thick (that’s 0.00039 inch—4⁄10,000 of an inch).
· Learn to anticipate the unintended effects of what you are aboutto do. Most scraping operations will give you the intended effect,along with two or three others you may not have thought about.When less experienced reed makers get into trouble, this is usu-ally the reason. Think before you scrape.
· Try the reed after each operation. Don’t decide you need to scrapethe back, finish the tip, and then clip it. Results are sometimesunpredictable. Do one thing at a time, and always test the reedbefore proceeding.
146 Reed Making
· If you have a plan for improving the reed, persist with that planuntil you note some change. Many times students will scrape alittle, find no difference, and conclude that they had the wrongidea. Scrape until something changes. Otherwise you will neverknow whether you were right or not.
· Almost every scraping operation will cause the pitch to drop,sometimes significantly. Scraping the tip causes the least distur-bance; scraping the heart can drop it dramatically; scraping theback usually drops the pitch moderately. The entire conflict ofreed making is balancing stability with vibrancy. It is easy tomake a stable reed that won’t vibrate, or a vibrant reed that hasno stability. Getting the proper balance between the two is thedifficult part. So every scraping operation has to consider thereed’s stability. Will the reed still be stable enough after I do this?If it loses a little too much pitch, is there enough tip length toallow a clip? It is better to do too little than too much where sta-bility is concerned: scrape a little, clip a little. Sneak up on thefinal result. The cycle of clipping too much and then scraping toomuch is almost always fatal.
· Resist the temptation to completely finish a reed, especially atthe first sitting. The reed will be different tomorrow. Work on thereed until it is reasonably comfortable to blow, and practice on itfor twenty or thirty minutes. Then put it away, let it dry out, andrevisit it the next day. It will require a different strategy from theone you were considering the day before.
· The sides of the reed must hold tightly together all the way tothe tip. If the sides are at all loose, the reed should be discarded.It will not work, and no amount of optimism will be rewarded.The blades of the reed must be tight enough to grip the plaqueeven when it is inserted only a short distance. Some players ad-just loose sides by bending the staple with pliers. This can work ifthe problem is mild, although I do not recommend it—it’s usu-ally better to make a new reed.
Looseness at the tip is most commonly caused by warpedcane—the gouged piece will show space under its middle whenlaid on a flat surface. Other causes can be careless tying—if thereed is tied too short, the string will bite into the cane before thestaple picks up the tension, resulting in a tip that springs open.Likewise, overtying the reed past the end of the tube can causelooseness. Sometimes the reed is loose only on one side, in whichcase it is likely that the cane is not tied in alignment with the flatpart of the tube. Sight through the bottom end of the tube andverify that the reed’s tip opening bisects the oval of the tube.There is no scraping operation that can correct looseness at thetip. Make diligent efforts to minimize the problem. Tie cane im-mediately after shaping it. Apply a basic scrape immediately aftertying the reed and cut the tip open. Before storing the reed, soak
Reed Evaluation and Adjustment 147
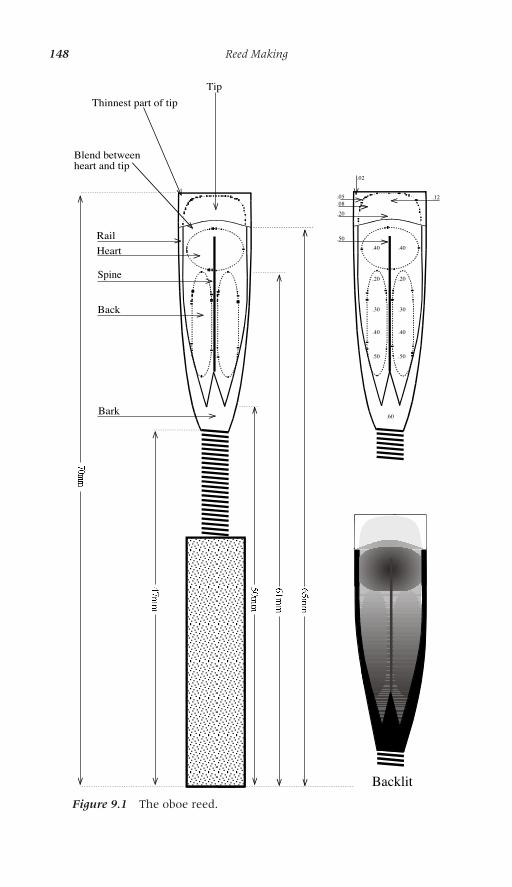
148 Reed Making
Figure 9.1 The oboe reed.
Spine
Tip
Thinnest part of tip
Blend betweenheart and tip
Heart
Back
Bark
Rail.40.40
.20.20
.30.30
.40 .40
.50 .50
.60
.50
.02
.08
.20
.12.05
Backlit
it for a few minutes to stabilize its shape and structure. Do notwork on the reed dry with the plaque jammed down to the string.Soak it frequently and insert the plaque only a short distance.
· Remember the three essentials of reed construction: balance,structure, and symmetry. If you observe a shortcoming in any ofthese, even a small one, make the correction before proceedingto a more detailed diagnosis. Sadly, if the structure is deficient,you may have to make a new reed without the same mistake.
· The diagrams in figure 9.1 show the appearance of my oboe reeds.These are basic reference pictures; individual reeds can and shoulddiffer in response to different circumstances. But when troublestrikes, trying to make a good-looking reed that “looks like thepicture” can be a starting point for fixing problems. If the diag-nostic process yields only problems, not solutions, focusing onmaking a really handsome reed can be the beginning of restoringorder.
English Horn Reeds
English horn reeds differ from oboe reeds in two important ways: theyare not quite as “finished” as oboe reeds, and they generally carry a wire.
Many oboe reeds have extremely thin tips and a rather thin back,especially just below the heart. If you make an English horn reed thisway, it will sound small and dull, and it may well be flat. Instead, forEnglish horn, make a reed that works well and is well balanced but hasless contrast between the three main areas—in other words, slightlythicker tip, slightly thinner heart, and slightly thicker back. In addition,the difference in thickness between the top of the back and the lowerportions is not as pronounced. If you want to think in terms of oboereeds, make a reed that plays well but is not refined.
Many English horn players put wire around the reed near the bot-tom. The wire is not used to control the opening of the reed. If theopening is wrong, the wire may control its size, but the reed will stillhave the problems associated with openings of the wrong size: reeds withsmall basic openings will feel limited, while reeds with large openingswill feel unwieldy. The wire stabilizes and focuses the tone of the notesabove the staff—the range between G and C. Often this allows you toremove more wood from a reed that was sagging slightly before the wire.
I add the wire after the reed begins to vibrate. When the crow be-comes pretty free and rather louder and less controlled than we want,it’s time to add the wire. Or, to say it another way: if you feel that youwill not scrape from the bottom of the back anymore, it’s time to addthe wire. Use #24 gauge brass wire from the hardware store or hobbystore, wound round the reed twice and tightened by twisting with pliers.The stuff called “reed wire” is the same thing, but “reed wire” usuallycosts more than plain “wire.” Don’t twist it on so tightly that it grips all
Reed Evaluation and Adjustment 149
the way around the reed; stop tightening the pliers as soon as you feelthe wire gripping the sides. When it’s tight enough, you will see the tipof the reed start to spread apart a little. Stop twisting and restore thecorrect tip opening by squeezing closed on the wire. Don’t put it up toohigh on the reed—5–6 mm from the string (in other words, just into thebeginning of the scraped area) is high enough. The wire will usually slidearound when the reed is dry but return to its proper position when thereed is soaked.
I am aware that the use of the wire is a matter of some dispute: someplayers insist that reeds should never have a wire, some apply it to theunscraped blank, while some wind it around the bark at the very bot-tom. You can find almost as many opinions about wiring as you canfind English horn players. My use of the wire allows for better supportof the upper notes and a clearer tone focus to correspond with my con-cept of sound. If you do not use wire but feel that it is difficult to makereeds that “sit up” well, try a wire. Conversely, if you use one but feelyour reeds are too shallow and limited, take it off and see what happens.This is very much a matter of doing what works. I use a wire because ithelps me.
English horn cane is gouged to 0.68 mm in the center, with a 0.10–0.12 mm drop-off at the side. Just as for oboe reeds, the “side” is meas-ured at the widest point of the shape. Since cane is a natural material andresults within a hundredth of a millimeter cannot really be expected,any thickness between 0.65 mm and 0.70 mm is acceptable. After shap-ing, the reed is tied on just like an oboe reed—in other words, as longas possible. If that length is more than 59 or 60 mm, consider using anarrower shape. The finished length of the reed should be 55 mm.
English horn reeds should crow a C-sharp. English horn reeds arethe opposite of oboe reeds in this regard: oboe reeds with a crow higherthan C almost never work for me, while English horn reeds with a crowlower than C rarely play.
Summary
· Sharpen your knife.· Make no mistakes.· Be consistent.· Think through what you intend to do.· Adjust function first, not tone.
150 Reed Making

III
EQUIPMENT ANDITS CARE

This page intentionally left blank
10
Instrument Selection,Care, and Adjustment
Buying an oboe or English horn is a little different from making a majordomestic purchase like an appliance, and even a little different frombuying a more popular wind instrument like a saxophone or a clarinet.Before moving to more specific tips for buying an oboe, let me make afew points right at the outset. If you only read the rest of this section,you’ll already do well with your selection and purchase.
Include your teacher in the purchase process. Unless you are anexperienced oboist, you should never buy an instrument without ad-vice from a teacher or professional player. In my experience, every timea young student (or a well-meaning parent buying a Christmas gift) hasbought an instrument without seeking advice, they did not find the bestinstrument at the best price. Include your teacher in the purchase pro -cess. If you don’t have a teacher, get advice from an oboe professional.
Some experienced consumers feel confident in their research capa-bilities and think that they can make a wise oboe purchase based ontheir investigations alone. While this will almost certainly work whenpurchasing an automobile or a television, oboes have a musical com-ponent which only oboists are qualified to evaluate. Find a trustworthyprofessional and then trust his or her advice.
Deal with specialists in double-reed instruments. There might notbe any in your town, but don’t worry. All of them are equipped to dobusiness through the mail with complete efficiency. Most will send youan instrument to try for a week or so if you give them a credit card num-ber. You will also have to pay for shipping, though often the shipping
153
is free if you buy the instrument. Shipping costs can mount quicklywhen trying multiple instruments, so remember to get advice from yourteacher before you waste too much money trying instruments you don’tlike. General music stores are, with rare exceptions, not good places tobuy oboes—they cannot afford to keep a large selection of oboes on hand,and the staff is not usually well trained in double-reed instruments.
You get what you pay for. Good dealers service instruments beforesending them out for trial (even new instruments need service) and willprovide excellent support to you afterward. These services cost money,and they are worth paying for. Good makers will spend money improv-ing the musical qualities of their oboes and may have to economize onproviding extra keys or features. These are considerations that are diffi-cult for the layman to evaluate, hence the need for professional advice.
Why Does It Cost So Much?
Oboes and English horns are expensive. Even the least expensive oboecosts about $1,000 in today’s market; the most expensive can cost nearlyten times that amount. Since oboes sell much more slowly than drumsor guitars, never mind refrigerators or cars, the advantages of mass pro-duction are limited and don’t affect cost. (A caution on pricing: bewareof “list price.” No one ever pays list price, so it can safely be ignored. Donot be impressed by vendors who offer you a big discount from list price;everyone else does, too.)
If you spend more, you get more, but what do you get? Three things:quality of construction, additional keywork, and refinement of tone.The cheapest oboes are made of molded plastic (injected into a moldand left to cool) and supplied with keys made of inexpensive material.These keys can bend rather easily and can even break right off if abused.Moreover, beginner oboes will have fewer keys than more advancedinstruments—enough to play most of the notes (sometimes the low B-flat is left off), but not enough to play the oboe with facility. Intonationand tone quality will range from acceptable to unplayable dependingon the make of the instrument.
Better oboes have more keys, with only one or two trill keys omit-ted; they’re made of better plastic (machined using cutting and drillingtools, not molded); and they have a more sophisticated bore, allowinga more refined tone with better pitch security. This category includesmost of the popular mid-range “student” instruments such as the FoxRenard. These instruments are handmade to a significant extent by ex-perienced craftsmen.
The professional-level oboes are constructed from grenadilla wood(or other rare hardwood such as rosewood or cocobolo) and are suppliedwith a complete assortment of keys made of extremely durable material.The interior construction of the bore will be very complex, resulting inan instrument with a distinct personality. Almost everything on the
154 Equipment and Its Care
instrument will be handmade by master craftsmen and checked by anartist.
Plastic or Wood?
It is not true that all wood oboes are better than all synthetic oboes. Theworld supply of grenadilla wood is shrinking. High-quality wood is ex-pensive. Buying an inexpensive wooden oboe from a budget makeroffers no benefit whatsoever. The wood will be cheap along with the restof the instrument.
The advantages of wood are simple: it sounds a little better and hasa more complex personality. That’s why professional players choose it.The disadvantages of wood are many: it reacts to changes in humidity,it cracks, it wears out. It simply doesn’t make sense to buy a student-quality oboe made of wood. The difference in tone will not be notice-able (at least not until the student’s reeds and playing skill have out-grown the instrument), but the extra maintenance hassles will certainlybe perceived. That’s why schools routinely buy plastic instruments: theydon’t have money to spend on regular professional service. Unless you’rein the market for a professional-quality instrument, or something closeto it, stick to plastic.
This rather definitive statement assumes that you are a youngsterlooking for an instrument to use until you can afford something better.If the student-quality instrument is not a stepping-stone—if it’s the in-strument you want to keep and live with until it wears out—then by allmeans consider a wooden instrument. But in the cheaper price ranges,wood can be more of an image feature than a functional one.
What to Buy?
There are three things to consider: the amount of money the buyer isable to spend, the player’s level of commitment, and the length of timethe instrument is intended to serve. Discuss all of these points withyour teacher to ensure that the money is well spent and the instrumentgives satisfaction.
In making the following suggestions, I have avoided giving exactprices since they are apt to change. The proportions will likely remainthe same, however—it is probable that a sturdy student oboe will alwayscost two to three times as much as the very cheapest instrument avail-able. A professional oboe will probably always cost two or three times asmuch as the student oboe. I have also avoided making specific recom-mendations, since there are many good brands and the market changesfrequently.
Let’s consider the options, starting with the cheapest. I should say“least expensive,” since owning an oboe is never cheap. I’ll make ablanket statement to begin: the very cheapest oboes you can find arenot worth the money. This category includes most rental instruments—
Instrument Selection, Care, and Adjustment 155
they’re acceptable only while a student is deciding whether he or shelikes playing oboe, but they’re not worth buying. Remember, you getwhat you pay for. Resist the encouragement you will receive from themusic store to buy the instrument being rented.
So, instead of buying the very cheapest thing available, look to spendtwo or three times that amount. This will give you a good basic oboewith solid construction that will endure years of use (not abuse) withregular care and maintenance. Some of the better student instrumentsare really advanced amateur instruments and will perform well foralmost all nonprofessional players. If the initial cash outlay seems hardto swallow, you can take comfort in the fact that most well-made oboeshave terrific resale value if they are kept in top condition. It is not un-usual for a player to keep an instrument for several years and then sellit for more than it cost when new. The key considerations are initialquality and regular maintenance.
To keep costs down, some keys or trill mechanisms will have beenomitted on most oboes that are not professional quality. The only mech-anism that is not really essential is the split-D key for the right hand; itgives better intonation to the D-sharp to E trill. You do need a left F key,a forked F resonance key, a low B to C-sharp trill key, and an A-flat toB-flat trill mechanism. You don’t really need a low B-flat resonance keyor a third octave key, though both are useful. An oboe with every keyand trill mechanism will be called “full conservatory.” Mindful of thelure of the word “conservatory,” makers are now providing “modifiedconservatory” or “simple conservatory” oboes. These have keys missing,sometimes rather essential keys. Do not be impressed by the word “con-servatory” unless it is preceded by the word “full.”
If you’re contemplating the purchase of a professional-quality in-strument, you probably don’t need my advice. But recognize that thereare many high-quality brands with excellent musical potential. Expandyour search beyond what everyone else is playing. It is not true that youmust play a certain brand to get a job: an oboe is a small black stick—nobody can tell from a distance who made yours. It is wrong to say thatbrand X is the best and all the others are inferior, although players en -joy having these discussions. Find the oboe that makes your sound andenjoy it. Buy the oboe, not the brand.
Used Instruments
One of the comforting aspects of buying a new oboe is its resale value.If you buy a quality instrument and maintain it well, you probably won’tlose money on it, even after several years. That’s the good news; thebad news is that the price of used instruments rises steadily as new in-struments get more expensive. Still, you can save a meaningful sum ofmoney by buying a used instrument instead of a new one. Since there’snothing like the stereotypical used-car salesman in the oboe business,
156 Equipment and Its Care
you can buy confidently from well-known vendors, who will always ser -vice a used instrument before selling it to make sure it’s in good playingshape. That, again, is the good news. The bad news is that you won’tsave as much as you might hope. Let us say that the cost of a new pro-fessional instrument is $6,000. In that market, a good used instrumentwill be about $5,000. For $3,000, the used professional instrument willbe about twenty-five years old. It may still be a good instrument, but itmay not be as good as a new $3,000 instrument of lesser provenance.As always, get good advice and involve your teacher in the buying pro -cess. For those people who have an old oboe in the garage (not a goodplace to keep it) and wonder how much it might be worth, be awarethat oboes very rarely have any value as antiques. Unless it’s the firstLorée ever made or the oboe that Tabuteau made all his recordings on,the only criterion is the instrument’s playing condition.
Very old oboes have a few adherents in the business. You will findsome vendors selling instruments more than fifty years old, claiming“they don’t make them like they used to.” In my opinion, oboes olderthan ten or fifteen years are no longer suited for top-level playing, oboesolder than twenty or thirty years present a risky repair proposition, andvery old oboes are almost certainly not worth the trouble unless youwant to build an interesting collection. Certainly, makers produced farfewer oboes many years ago, so they were able to select better qualitywood and age it longer. But these advantages are offset by the inherentinstability of wood and the inevitable wear of the mechanism. Mecha-nisms can be restored indefinitely (if parts are still available, which theyfrequently are not) but may or may not be worth it. Professionals usu-ally play new or nearly new instruments, since they require a precisionof sound, response, and technique that older instruments may no longerpossess.
Experts disagree whether oboes “blow out” or not. After years of use,the wood will suffer small dimensional changes from age and wear.(“Old,” to me, is an oboe more than fifteen years old.) A blown-outoboe will have inferior pitch security and distorted tone focus resultingfrom these minute dimensional changes. Some repair technicians havemeasured old oboes, observed no measurable signs of wear, and deter-mined that blown-out oboes are a myth. But those of us who play everyday and need an oboe to make a living can attest that oboes do indeedwear out and need to be replaced regularly. The evidence may not bescientific, but the empirical evidence is convincing. New oboes havesecure intonation, good tone focus, and a precise mechanism that olderinstruments cannot duplicate. Some players change oboes every year,some every two or three years, some a little longer. It is rare to find aprofessional player using an oboe more than ten years old.
What does this mean for students? First, it means that they mightfind a good supply of instruments buying castoffs from professionals—a good five-year-old oboe that’s been well maintained can still serve a
Instrument Selection, Care, and Adjustment 157
student very well. And it means that a brand new second-tier instru-ment is probably a better bet than a twenty-year-old top-quality horn,which will have lost much of its original sound quality.
The recent increase in Internet sales and marketing has given riseto a whole new problem. It’s true that there are no “used-car salesmen”in the oboe trade. But there are still individuals selling inferior instru-ments through online auctions to poorly informed buyers. You can avoidall of this risk by following a simple rule: do not pay any money for any-thing that you haven’t personally inspected and tested. Occasionallyyou may miss out on an apparent bargain by being cautious. But therule “you get what you pay for” continues to apply. If it’s really cheap,there is something wrong with it.
If you have an oboe you want to sell, the usual channels (word ofmouth, newspaper classifieds, etc.) will probably not be very effectiveunless you live in an area teeming with oboists. Your best bet is to workwith one of the many oboe vendors who sell instruments on consign-ment. Typically, you and the vendor will agree on a price for your in-strument in advance, after he or she has inspected it. This is the sumyou will receive, not the amount the vendor will charge the customer.The dealer will add his profit and a reasonable charge for servicing yourinstrument. Expect the selling price to be 10 to 20 percent higher thanwhat you’re getting. Some dealers just charge a straight commission,typically 15 to 20 percent of the sale price. These charges will affectyour bottom line, but you will only have to ship the instrument once,and you will assume none of the financial risk of sending the oboe tostrangers.
When shipping the instrument, make sure that it is secure inside itscase and cannot move around when the case is shaken a little. Fill anygaps with paper towels until the case holds the instrument firmly. Packit in a new cardboard box with 2–3 inches of space all around the in-strument case. Fill that space with packaging material until nothingmoves inside the closed box when it is shaken. Shippers usually requirethat a musical instrument be double boxed for shipment. If the instru-ment is packed in its own hard case, that counts as one of the boxes.Select one of the faster shipping options; you don’t want your oboe tobe sitting in harsh climate conditions waiting for the next leg of thejourney. Insure it for its replacement value unless you already have anall-risk policy covering your instrument against loss or damage.
On the topic of insurance, most household insurance policies do notcover musical instruments used professionally. Professionally in this casemeans that the instrument has been used by an owner who got paid forplaying it. It doesn’t mean that you have to be a full-time professionalmusician. It is best to get specific musical instrument insurance from acompany experienced in this business. They will cover the instrumentagainst nearly any eventuality anywhere in the world for a reasonablepremium. Any musical professional organization such as the Interna-
158 Equipment and Its Care

tional Double Reed Society will have a relationship with one of theseinsurers.
Instrument Maintenance
If you have purchased a new wooden oboe or a wooden instrumentthat has not been played for some time, you will need to break it in.This break-in period acclimates the wood to the stress caused by mois-ture on the inside of the instrument while the outside remains dry.Done carefully, it can help to reduce the chance of cracking. Read thatsentence again: it can help to reduce the chance of cracking. Oboes crack.It’s usually not the player’s fault. And unless the crack is huge, it can berepaired without any damage to the playing characteristics of the in-strument. But to minimize this risk, you should break your instrumentin carefully. At first, play it for a maximum of ten minutes at a time sep-arated by two-hour rest periods. Before each playing session, make surethe instrument has been warmed to near body temperature; this willreduce moisture condensation. After each playing session, swab it outcarefully and make sure all of the tone holes are free of moisture. Checkfor water in keys that you might not have used during that playing ses-sion, such as the third octave key or the C-sharp and D trill keys. Putthe instrument in its case and close it. Increase the playing time by fiveminutes a week until you reach an hour or so. After that, you shouldbe able to use the instrument regularly. If the oboe is going to crack, itwill usually do so within the first year, but maintain careful habits allthe same. Instruments should be stored in very moderate conditions:neither excessive heat nor excessive cold is good for them. If you livein a dry climate, put a little humidifier in your case. If you live in a coldclimate, carry the instrument in an insulated or lined case cover.
Although you should have your instrument professionally servicedevery year or two, there are things you can do to prolong its life. Learnhow to perform your own adjustments. I have provided a basic guide.Then, learn how to take your instrument apart and put it back together.By learning these two things, you will also learn enough about your in-strument to differentiate a genuine repair crisis that requires profes-sional services from something minor you can fix yourself, often in justa few minutes.
Instrument Disassembly and Reassembly
Taking an instrument apart is not as daunting as it sounds. If you havenever done it before, find someone experienced to help you, or keep afully assembled oboe nearby for reference. Do one joint at a time toavoid too much confusion. You will need a supply of paper towels, a sil-ver polishing cloth (nothing abrasive), a screwdriver, a pair of needle-nose pliers to pull the rods out, oil (any oil suitable for sewing machines
Instrument Selection, Care, and Adjustment 159
or clocks will work, though most professionals use Nye’s Clock Oil), afew cotton swabs, and a small brush to remove the dirt and dust fromthe wood. You should also have a container or a system for storing theparts while they are off the oboe. Many of the parts are tiny and will bedifficult to find if dropped on the floor.
While the long rods are easy to distinguish from each other, someof the shorter ones all look about the same length. So, if you have anydoubt, after removing the key, slide the rod back in its place and leaveit there until it is time to reassemble the instrument. After the keys havebeen removed, brush all the dust and dirt from the wood and aroundthe posts. Use a fairly stiff-bristled brush to make sure all the dirt comesoff. Then take a cotton swab and tease it until it comes to a point. Mois-ten it very lightly with a bit of oil and clean out each tone hole. Be sureto remove any oil that stays on the surface of the tone hole—oil willspoil cork pads. Put a very light layer of oil on the springs. Inspect thesprings carefully for any rust. Now, clean the keys. Using a silver pol-ishing cloth, clean any dirt, dust, and tarnish off each key. Be carefulnot to dislodge the small bumper corks. If any of these corks is damagedor missing, replace it. You will need a supply of thin sheet cork (0.40 mm,or approximately 1⁄64 inch). Repair technicians all have a favorite methodfor adhering the cork to the instrument; for our amateur purposes, avery small amount of superglue works just fine.
The bumper corks reduce mechanical noise by preventing directmetal-to-metal contact. Some oboes instead have small Teflon tips onall of the adjustment screws. These are marginally noisier but much morestable in terms of adjustment, since they will not compress over time.
After all the keys are polished, reassembly can begin. Clean the oldoil from each rod with a paper towel, apply a thin layer of fresh oil, andput the instrument back together. You will have no trouble if you thinkabout two things. First, do not force anything. Good oboes have veryfine tolerances, so if a piece will not go back in, it’s because the angle ofapproach is slightly wrong. Try again. When you have it right, the piecewill slide into place very smoothly. Second, refer to your assembledoboe for help with the order of reassembly. For example, on the lowerjoint, the F key has to go on first. If you put anything else back before it,the F key will be blocked and you will have to start again. If you don’thave an assembled oboe to refer to, be prepared to start over a few times.
The springs can be reattached to their little notches either by pick-ing them up with the key while coaxing it back into its position, or bygently pushing the spring back into place with a spring hook or screw-driver after the key has been reattached to the instrument. Be verycareful not to distort the curve of the spring. Never bend it; just returnit to its place. If you have replaced any of the bumper corks, the instru-ment will need to be readjusted.
If you have never done this before, be prepared to spend an entireweekend. With practice, it will take only a few hours and save you
160 Equipment and Its Care

money on repairs while contributing to the longevity and performanceof your instrument.
After the oboe is in top condition, the following routine will keepit that way:
· After each playing session: Wipe the keys with a soft cloth.· Every week: Brush the dust off the wood, especially under the
rods. Small brushes, such as those intended for cleaning cameralenses or electric shavers, work well.
· Every month (or more often if needed): Check the adjustment.· Every three months: Oil the mechanism. Get a needle oiler and
put a small drop of clock oil or sewing machine oil at every jointalong the mechanism (there will be about eighty spots in all).Don’t get any oil on the pads. Wipe off any oil you get on thewood.
· Twice a year: Take the whole thing apart as described earlier,clean everything (including tone holes and octave key inserts),replace bumper corks as needed, oil the mechanism, and put itback together.
Some people recommend oiling the bore, defending the practicequite passionately and stating with emphasis that oil is the lifeblood ofthe wood. I’ve never noticed that this does any good at all, since the oilbarely penetrates the surface and is probably removed the next time youswab. Some instrument makers feel that oiling the wood can actuallyincrease the chance of cracking, since it creates a stress between the sur-face layer, which the oil penetrates, and the rest of the wood, which isdry. So don’t bother. Oil does repel water, however, so if you have per-sistent issues with water gurgling in tone holes, perhaps a thin layer ofoil in the bore can help. If you choose to oil the bore, do so very lightly.Put a drop or two of almond oil inside the bottom of the joint and dis-tribute it with a turkey feather.
Adjustment of the Mechanism
What follows is a practical guide to oboe adjustment. It is not intendedto be exhaustive, nor is it meant as a guide for the budding professionalrepairperson. But it will take care of most day-to-day problems andkeep your oboe working well, assuming there are no structural problemssuch as bent keys, faulty pads, or cracks in the wood. A few notes arenecessary before starting.
· Record the exact position of any adjustment screw before mov-ing it. Look at the slot in the screw head, regard it like youwould a clock face, and assign a time of day to what you see. Ifyour adjustment fails to give the desired result, you can at leastput it back to where it was when you started.
Instrument Selection, Care, and Adjustment 161
· Before beginning the adjustment process, make sure that none ofthe rods—the ones that hold the instrument together—are loose.Tighten these securely, and the instrument will be much morestable mechanically. Be careful to differentiate between the rodsand the adjustment screws. The rods are parallel to the instru-ment body; the adjustment screws face outward.
· When making an adjustment, unless you are very sure of howfar to turn the screw, move it no more than a sixteenth of a turnat a time. Fine adjustments sometimes feel more like you areleaning on the screwdriver than actually turning the screw.
· Take note of any sloppy adjustment screws. Screws should ex-hibit a moderate amount of drag when turning them. Loosescrews will rotate on their own and go out of adjustment con-stantly. If you find a loose screw, adjust it to its correct positionand then hold it in place with a small drop of clear nail polish.The polish will chip off easily the next time you want to movethe screw. A better remedy is to remove the screw entirely, winda little bit of dental floss or plumber’s Teflon tape around it, andreturn it to its housing. Those with more mechanical savvy coulduse a modern threadlocking adhesive like Loctite. Whatever themethod, make sure that all of your adjustment screws are stable.
· By tightening an adjustment screw, you are either loosening orobstructing something else. So, if a little tight is good, very tightwill not be better. Be gentle.
· When one of the main fingered keys is responsible for closinganother key, the nonfingered key should close slightly less tightlythan the main key. For example, pressing the A key (middle fin-ger of the left hand) should close the C vent. The C vent shouldbe slightly less tight than the A key. In any relationship of thiskind, the fingered key (the A key in this example) is referred toas “primary,” while the linked key (the C vent) is referred to as“secondary.”
· Even without detailed instructions, it is relatively simple to de-termine the task of any given adjustment screw by applying akneebone-connects-to-the-thighbone analysis. If you look at thescrew and follow the motion of that piece of keywork to its desti-nation, the function of the screw should be apparent.
· When keys are named, they refer to the lowest key that is pressedwhile that note sounds. Thus, the A key is the key pressed withthe middle finger of the left hand.
· When the instruction says to hold a key closed with your finger,do not use more than the normal finger pressure you wouldapply while playing.
· Only very simple tools are required. You will need a screwdriverof the correct size and with an undamaged blade (the inexpen-sive screwdriver supplied with the instrument will suffice for
162 Equipment and Its Care
most jobs) and a triangle of cigarette paper about 5 cm long and2 mm wide at the narrow end. This will function as your feelergauge.
· The cigarette paper will be placed under the farthest part of eachpad—that is, the point farthest away from the pivot that attachesthe key to the instrument. Place the cigarette paper under the pad,close the key with normal finger pressure, and withdraw thepaper. It will take some practice to learn the appropriate amountof drag for the various keys; have a teacher or other professionalgive you a demonstration. Cork pads are relatively easy to learn;the pads made of skin or leather grip the paper very lightly evenwhen correctly adjusted, requiring much more experience.
· Oboes have different configurations of adjustment screws. Not alloboes will match the illustrations (figures), but I have discussedthe most common adjustments.
Refer to figure 10.1. Screws no. 1 and no. 2 regulate the relativeheights of the octave keys. If you want your octave keys to open fur-ther (or less far), these will do the job. But it is almost never necessaryto move these, and they are best left alone.
Screw no. 3 adjusts the opening height of the third octave key ifyour instrument has one. The third octave key should just barely open.You should be able to see that it moves, but it should not open farenough to slide a piece of cigarette paper underneath.
Screw no. 4 adjusts the opening height of the half-hole plate. Prop-erly adjusted, the plate will open much less than the other two fingeredkeys on the top joint, so don’t be alarmed if it seems rather close to thewood. Turning screw no. 4 clockwise will move the plate closer to thewood; turning it counterclockwise will move it further away. Findingthe correct adjustment requires a playing test. Slur up to high D (twoledger lines), lifting the finger off of the half-hole completely to assistthe slur. As the plate is adjusted closer to the wood, these slurs will im-prove. However, as the plate is adjusted closer to the wood, ascendingslurs to high C-sharp will gradually fail to respond and the sound of theC-sharp will become stuffy. Keep moving the plate closer until the re-sponse and sound of the C-sharp fail, and then back it off just enoughto restore good results. At this point, the plate may be only one or twomillimeters above the wood, which is correct.
Screws no. 5, no. 6, no. 7, and no. 8 should be considered as a group.If there are response issues on the oboe, especially if the low registerfeels tight, this group is almost always one of the culprits. Assemble thelower joint to the top joint before beginning. Begin with screw no. 7.This adjusts the opening height of the B-flat and C vents and controlsthe amount of play felt at the right-hand index finger (the F-sharp key).Turning the screw clockwise increases the amount of play; turning itcounterclockwise reduces it. For best results, adjust the screw so that the
Instrument Selection, Care, and Adjustment 163
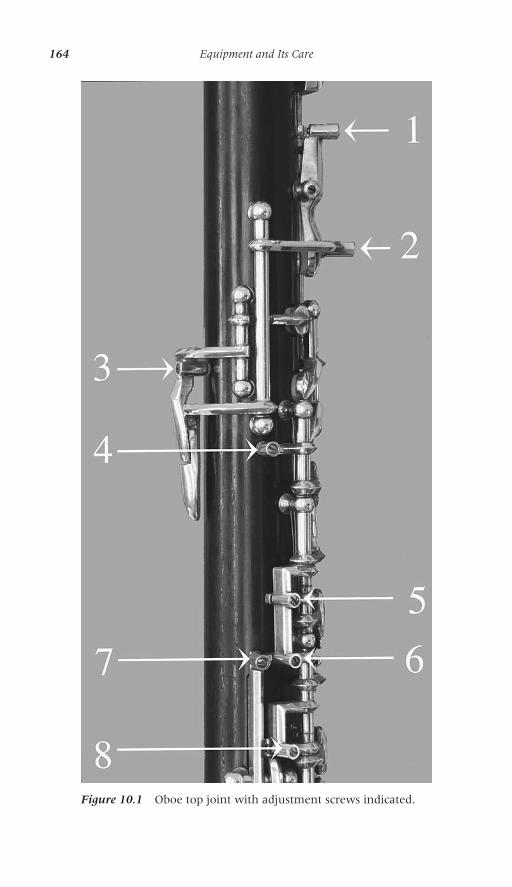
164 Equipment and Its Care
Figure 10.1 Oboe top joint with adjustment screws indicated.
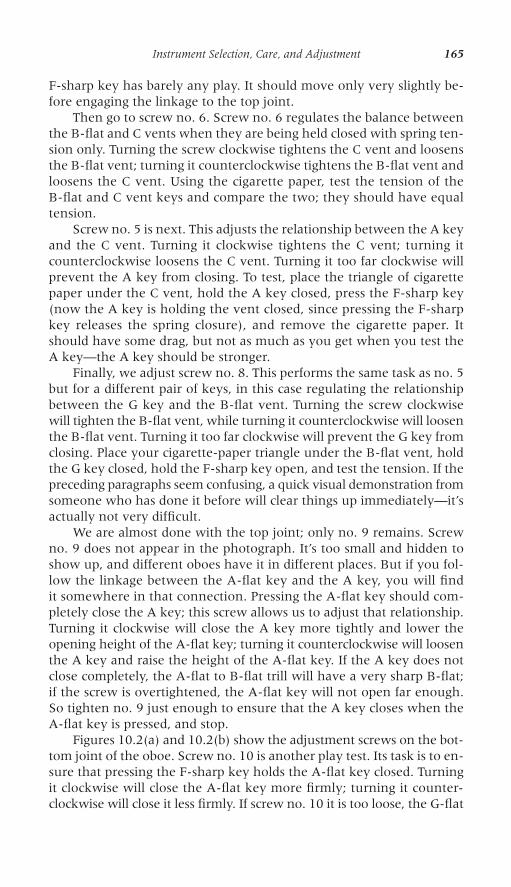
F-sharp key has barely any play. It should move only very slightly be-fore engaging the linkage to the top joint.
Then go to screw no. 6. Screw no. 6 regulates the balance betweenthe B-flat and C vents when they are being held closed with spring ten-sion only. Turning the screw clockwise tightens the C vent and loosensthe B-flat vent; turning it counterclockwise tightens the B-flat vent andloosens the C vent. Using the cigarette paper, test the tension of theB-flat and C vent keys and compare the two; they should have equaltension.
Screw no. 5 is next. This adjusts the relationship between the A keyand the C vent. Turning it clockwise tightens the C vent; turning itcounterclockwise loosens the C vent. Turning it too far clockwise willprevent the A key from closing. To test, place the triangle of cigarettepaper under the C vent, hold the A key closed, press the F-sharp key(now the A key is holding the vent closed, since pressing the F-sharpkey releases the spring closure), and remove the cigarette paper. Itshould have some drag, but not as much as you get when you test theA key—the A key should be stronger.
Finally, we adjust screw no. 8. This performs the same task as no. 5but for a different pair of keys, in this case regulating the relationshipbetween the G key and the B-flat vent. Turning the screw clockwisewill tighten the B-flat vent, while turning it counterclockwise will loosenthe B-flat vent. Turning it too far clockwise will prevent the G key fromclosing. Place your cigarette-paper triangle under the B-flat vent, holdthe G key closed, hold the F-sharp key open, and test the tension. If thepreceding paragraphs seem confusing, a quick visual demonstration fromsomeone who has done it before will clear things up immediately—it’sactually not very difficult.
We are almost done with the top joint; only no. 9 remains. Screwno. 9 does not appear in the photograph. It’s too small and hidden toshow up, and different oboes have it in different places. But if you fol-low the linkage between the A-flat key and the A key, you will findit somewhere in that connection. Pressing the A-flat key should com-pletely close the A key; this screw allows us to adjust that relationship.Turning it clockwise will close the A key more tightly and lower theopening height of the A-flat key; turning it counterclockwise will loosenthe A key and raise the height of the A-flat key. If the A key does notclose completely, the A-flat to B-flat trill will have a very sharp B-flat;if the screw is overtightened, the A-flat key will not open far enough.So tighten no. 9 just enough to ensure that the A key closes when theA-flat key is pressed, and stop.
Figures 10.2(a) and 10.2(b) show the adjustment screws on the bot-tom joint of the oboe. Screw no. 10 is another play test. Its task is to en-sure that pressing the F-sharp key holds the A-flat key closed. Turningit clockwise will close the A-flat key more firmly; turning it counter-clockwise will close it less firmly. If screw no. 10 it is too loose, the G-flat
Instrument Selection, Care, and Adjustment 165
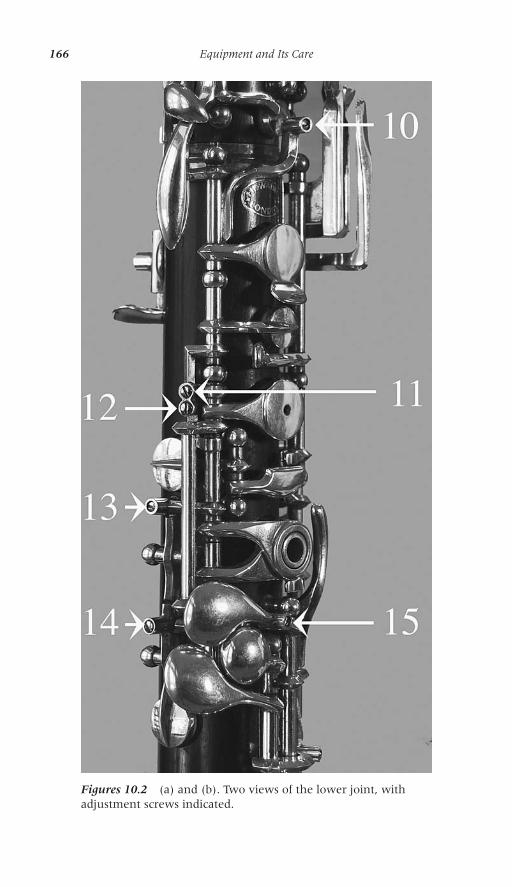
166 Equipment and Its Care
Figures 10.2 (a) and (b). Two views of the lower joint, withadjustment screws indicated.
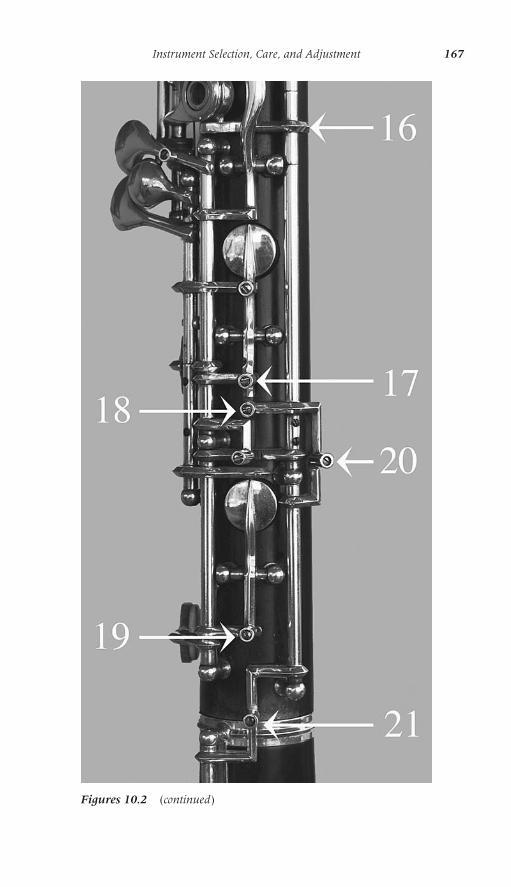
Instrument Selection, Care, and Adjustment 167
Figures 10.2 (continued)
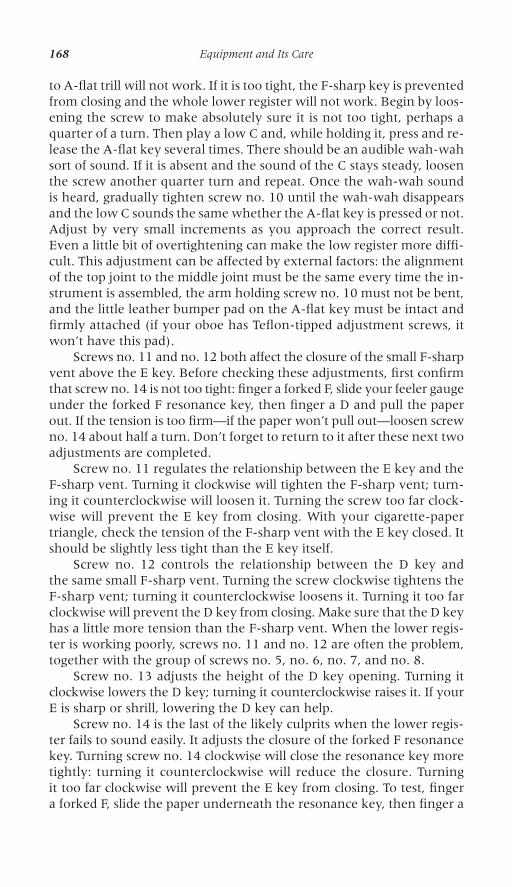
to A-flat trill will not work. If it is too tight, the F-sharp key is preventedfrom closing and the whole lower register will not work. Begin by loos-ening the screw to make absolutely sure it is not too tight, perhaps aquarter of a turn. Then play a low C and, while holding it, press and re-lease the A-flat key several times. There should be an audible wah-wahsort of sound. If it is absent and the sound of the C stays steady, loosenthe screw another quarter turn and repeat. Once the wah-wah soundis heard, gradually tighten screw no. 10 until the wah-wah disappearsand the low C sounds the same whether the A-flat key is pressed or not.Adjust by very small increments as you approach the correct result.Even a little bit of overtightening can make the low register more diffi-cult. This adjustment can be affected by external factors: the alignmentof the top joint to the middle joint must be the same every time the in-strument is assembled, the arm holding screw no. 10 must not be bent,and the little leather bumper pad on the A-flat key must be intact andfirmly attached (if your oboe has Teflon-tipped adjustment screws, itwon’t have this pad).
Screws no. 11 and no. 12 both affect the closure of the small F-sharpvent above the E key. Before checking these adjustments, first confirmthat screw no. 14 is not too tight: finger a forked F, slide your feeler gaugeunder the forked F resonance key, then finger a D and pull the paperout. If the tension is too firm—if the paper won’t pull out—loosen screwno. 14 about half a turn. Don’t forget to return to it after these next twoadjustments are completed.
Screw no. 11 regulates the relationship between the E key and theF-sharp vent. Turning it clockwise will tighten the F-sharp vent; turn-ing it counterclockwise will loosen it. Turning the screw too far clock-wise will prevent the E key from closing. With your cigarette-papertriangle, check the tension of the F-sharp vent with the E key closed. Itshould be slightly less tight than the E key itself.
Screw no. 12 controls the relationship between the D key andthe same small F-sharp vent. Turning the screw clockwise tightens theF-sharp vent; turning it counterclockwise loosens it. Turning it too farclockwise will prevent the D key from closing. Make sure that the D keyhas a little more tension than the F-sharp vent. When the lower regis-ter is working poorly, screws no. 11 and no. 12 are often the problem,together with the group of screws no. 5, no. 6, no. 7, and no. 8.
Screw no. 13 adjusts the height of the D key opening. Turning itclockwise lowers the D key; turning it counterclockwise raises it. If yourE is sharp or shrill, lowering the D key can help.
Screw no. 14 is the last of the likely culprits when the lower regis-ter fails to sound easily. It adjusts the closure of the forked F resonancekey. Turning screw no. 14 clockwise will close the resonance key moretightly: turning it counterclockwise will reduce the closure. Turningit too far clockwise will prevent the E key from closing. To test, fingera forked F, slide the paper underneath the resonance key, then finger a
168 Equipment and Its Care
D. The key will close, and you can withdraw the paper. There shouldbe moderate drag. If it is too light, tighten the screw. If the paper is hardto withdraw, loosen the screw.
Screw no. 15 adjusts the relationship between the low C key andthe E key. Pressing the C key should close the E key completely but nottightly, allowing air to escape only through the small pinhole. If screwno. 15 is too loose, the high C-sharp will be significantly sharp and thescrew should be turned clockwise; if it is too tight, the low C pad willnot close adequately and the screw should be turned counterclockwise.Tighten the screw just enough to close the E key and no further.
Screw no. 16 (not all oboes have this screw) adjusts the closureof the split-D ring when the left E-flat is pressed. Turning the screwclockwise closes the D ring; turning the screw counterclockwise raisesit. Screw no. 16 should be adjusted so that pressing the left E-flat keycloses the split-D ring but no further. If you tighten it further, observethat the height of the E-flat pad gradually lowers. This is the screw toadjust if you hear a difference in pitch between the left and right E-flatfingerings.
Screw no. 17 is another play test. First make sure the screw is nottoo tight by loosening it a quarter turn or so. Play a low C and press andrelease the left E-flat. You will hear the wah-wah sound we encoun-tered earlier with the A-flat trill adjustment. Tighten the screw gentlyuntil the problem goes away.
Screw no. 18 rarely needs to be used unless something is bent. If itis too loose, there will be excessive play when operating the left E-flat.If it is too tight, it may cause the low B-flat vent key (on the bell) tostand open.
Screw no. 19 is the last of our play tests. Again, first loosen it a bitto make sure it is not too tight. Then play a low B-flat and wiggle yourright-hand little finger on and off the C-sharp key. Tighten until the wah-wah sound disappears.
Screws no. 20 and no. 21 both do the same thing—they adjust therelationship between the closure of the low B and that of the low B-flat.Not all oboes have screw no. 21. Turning either screw clockwise willtighten the B-flat key and loosen the B key; turning either screw coun-terclockwise will tighten the B key and loosen the B-flat key. The dragon the cigarette paper should be equal between the B and the B-flatkeys when low B-flat is fingered. Many oboes have skin or leather padson these lower keys, making the drag on the cigarette paper hard tojudge. So a visual check can be helpful to confirm your impressions.Slowly press the B-flat key and watch the two keys close. They shouldboth make contact with the wood at the same time.
Instrument Selection, Care, and Adjustment 169
11
Selection and Care ofTools and Equipment
In this chapter, I will describe basic standards for the oboist’s tool kit,along with some recommendations for care and feeding of these oftenexpensive and fragile items. I will not make recommendations favoringspecific brands; this would be unfair to the many other makers whoalso provide quality items. Nor will I mention specific dollar figures, asthese fluctuate (mostly upward) pretty regularly. Since the oboe marketis small, nobody will sell enough of anything to get rich. And there isno luxury market of oboe goods, where makers justify very high pricesby maintaining a certain prestige for their merchandise. In other words,you almost always get what you pay for. Costlier items are better thancheaper ones. But they may not be better in a way that matters to you,so be smart in your purchases. If you have never made reeds before,buying expensive gold-plated staples individually machined to very closetolerances won’t make any difference to your results yet. I do suggestavoiding the least expensive of anything, not because I think the ven-dor wants to cheat his customers, but because there has to be a reasonfor the very low cost.
Equipment preferences are a fascinating topic of conversation, asubject that occupies oboists quite happily for hours. Most players havedistinct favorites and will often defend these passionately. My view isthat equipment is the least important aspect of playing. It is very rarethat spending money will make you sound better without a similar in-vestment in time and thought. I use the equipment I use because I’maccustomed to it and it works properly. I would rather continue on a
170
consistent path than risk confusion and inconsistency. You will notsound like me, and I will not sound like you, even if we both collect theexact same inventory of tools and instruments.
Of course, less experienced players will have to experiment to findwhat suits them best. But they should consider that consistency is byfar their biggest ally. If they choose to change to a different tool or ma-terial, they should change only one thing at a time and give it time toshow whether it makes an improvement.
Tools and Supplies
Reed-Making Kit
I’ve listed this first because I believe that it is the only thing availablefrom many vendors that is simply not worth the money. The kit alwayshas a discounted price, meaning that it is cheaper than the same itemsbought separately. But the selection of the items is not always what areed maker needs—sometimes the quality is too low, sometimes thequantity is too large or too small (six pieces of shaped cane?), sometimesthey include items just to say they did (a sharpening stone the size ofmy thumb?). The beginner is usually better off buying carefully selectedmaterials individually, even though it may cost two or three times asmuch. There is no reason for a beginning reed maker to buy flimsy itemsthat will need to be replaced a year or two later. Many of the basic reed-making tools can last a very long time—a sharpening stone or a mandrelcan be used for years—so it is worth buying good ones to start with.
Staples
There are many different styles and kinds. Tubes are traditionally madeof heavy sheet metal—either brass or nickel silver—covered with alayer of cork to assure an airtight seal in the oboe’s reed well. The stan-dard length is 47 mm, although other lengths—45, 46, 46.5, and 48 mm—are available. I have never noticed a difference in sound or responsebetween the brass and the nickel silver tubes, so I have always optedfor the cheaper brass tubes. The brass is also softer and therefore bettersuited for players who like to alter the tube with pliers, a practice I donot advocate.
I advise here and with all equipment that you start with somethingstandard and learn to use it. After you are very sure that you need tomake a change, go ahead and make it. But never experiment recklessly,and always make changes based on good reasons. The good reason inthis case is that the staple represents an extension of the oboe bore atthe most crucial point—the very top. So using a staple with a differentdimension can give a noticeably different result. Other materials—gold
Selection and Care of Tools and Equipment 171
and silver plating, for example—are also available. And recently, inves-tigation of the physics of energy transfer has resulted in tubes that arenot covered in the usual cork, but rather transmit the vibration directlythrough the metal with minimum interference. So experimentation iscertainly justified. But, as with all things reed related, try to regain con-sistency as quickly as possible.
Many young reed makers, mindful of expense, scavenge their sta-ples from reeds they have purchased in the past. This collection is oftena motley assortment of reeds from many different sources, most ofwhich were made using the least expensive staple available, with littlethought for its longevity. However, if a few selection criteria are ob-served, some of these can be reused. First, discard any tubes that arephysically damaged—if the cork is chipped at the bottom or if the metalis dented. A little cork damage near the top is only a cosmetic concern.Then, measure each tube to make sure it is 47 mm long and discard theones that are not. Finally, set each tube on your mandrel. The top of thestaple should sit flush with the end of the mandrel. Reject the ones thatdeviate by more than a millimeter and the ones that allow the mandrelto twist freely inside the tube. By now, probably half or more of the tubesare gone, but you can use the rest with confidence until they wear out.“Worn out” means that the cork has crumbled away from the metal orthat the metal itself is dented, even slightly.
Even if you are a beginning reed maker, having fewer than ten or sostaples is frustrating, since old reeds have to be dismantled before newones can be begun. Most professional players have dozens and dozensof tubes and purchase new ones regularly.
String
FF nylon string is standard. “FF” is a designation of thread thickness, andtherefore strength as well. A 200-yard spool of thread lasts a long time,so there is no real reason to have many of these. Still, players like a va-riety of color for decorative reasons or to keep different batches of caneseparate, so most oboists end up with a dozen or more spools of string.Naturally, sellers have not failed to note this, so 50-yard spools are nowavailable as well. Silk string is also usable for oboe reeds, though it tendsto break more easily than nylon. Some see this as a virtue, claiming thatif you break silk string, you are pulling too hard.
Beeswax
Beeswax is used to coat the string before tying the reed. The resultingtackiness fills in any small gaps between the string winds and helps tohold the knots together. Beeswax can be readily purchased from double-reed vendors in small cakes that last a long time. Avoid the product soldin fabric stores, which is too hard for our purposes. As an alternative tobeeswax, some players paint the string with nail polish after the reed is
172 Equipment and Its Care
assembled. Tying the reed without somehow coating the string is notrecommended. The knots will likely come apart—a very frighteningexperience when it happens to your good reed during the concert.
Mandrel
The mandrel holds the staple while tying and, for some players, whilescraping also. The mandrel should match the preferred brand of staple,allowing quick and easy judgment about the dimensions of the stapleitself. Many staples, though carefully made, are not completely consis-tent; seeing how they fit the mandrel allows for quick evaluation of theirsize and shape. The mandrel should also be straight, meaning that the flatpart of the mandrel shaft should align with the flat part of the handle.While that seems a simple requirement, many mandrels do not meet it,so choose carefully.
Easel
An easel is a round, smooth, dowellike piece of wood, usually rosewood.It is used for support while trimming the ends of the gouged piece ofcane, and it provides a guide for scoring the piece of cane for folding.The easel is a convenience, and many players like using it, but it is notan essential piece of equipment. Reeds can be made successfully with-out one.
Cutting Block
This is a small, round block of wood used to support the reed while clip-ping the tip. These are available in different sizes and different materials.It makes sense to get the larger size in the hardest possible material. Theplastic ones are almost useless; rosewood, the most commonly availablematerial, is much better; grenadilla is best of all if you can find one. Withuse, the criss-cross of hundreds of knife marks eventually makes thesurface of the block too uneven to provide a clean cut. At that point,the block could be sanded smooth again or replaced. Do not try to clipthe reed on any other surface: cutting blocks made for oboe reeds aregently domed on top, making a clean cut easy to achieve. A flat surfacewill make precise clipping very difficult.
Knife
A sharp knife is the foundation of every reed-making effort. Without avery sharp knife, great cane, a perfect gouge, and years of experienceare wasted. There are reed knives for every budget and preference.The quality of the steel ranges from very soft indeed to incredibly hard.Blade shapes range from light razorlike blades to large cudgels. Handlesare rounded, square, and everything in between. The cost ranges fromvery reasonable to exorbitantly expensive. As a good starting place, try
Selection and Care of Tools and Equipment 173
a medium-soft steel double-hollow-ground knife in the middle of theprice range. Experience will tell you what you eventually want to use.But this is one place where it is definitely worth spending money toget what you want. High-quality steel is costly, and low-quality steel isdifficult to work with. Time spent working on a reed with a dull knifeis time wasted, so find something that fits your hand comfortably andthat you can sharpen reliably.
Sharpening Stones
A good sharpening stone must be at least two inches by six inches.Larger stones are available, but do not try to use anything smaller. Thestone must be absolutely flat. It should not be too rough, because wewant a polished edge to the knife, not a jagged one, but it must be abra-sive enough to remove metal fairly quickly. This ideal stone doesn’t reallyexist, so it is advisable to have more than one for different purposes.Technology in this area has improved immensely—we can now buysynthetic stones with almost any imaginable grit size held in a com-pletely stable binder. Players of previous generations were limited tonatural stones (quarried from the earth) or synthetic stones that weretoo coarse. For today‘s reed maker, I would suggest three stones: a coarse,a medium, and a fine. The coarse should be quite coarse, indeed—a gritsize of 200–300. Grit size refers to particle size, not particle density. Soa grit size of 1,000 means that 1,000 particles of abrasive could fit into asquare inch, but not necessarily that the stone bears that many parti-cles in each square inch. Particle density is one of the things we pay forwhen purchasing higher quality stones.
The medium stone should have a grit size of 1,000 or 1,500, andthe fine should be around 5,000. Most of the stones sold for all-purposesharpening are in the range of 1,000 to 1,500. This is neither coarseenough to reshape a blade that has been mishandled, nor fine enoughto create the really smooth scratch pattern that we need for ultimatelysharp reed making. So, even though having a selection of stones is ex-pensive, it will pay off in more consistent reed making and more reliabletechnique.
Types of Sharpening Stones· India stone. This is the standard, usually sold with fine grit on
one side and medium on the other. The fine is used to polish theedge, and the medium, to restore it when it has been damaged by poor sharpening. India stones are cleaned with oil, which isthen removed with lighter fluid. Do not use oil on the stone whilesharpening—use it dry, and clean as necessary. In my experience,even the fine side of the India stone is too rough to give a refinededge. Advantage: low cost, easy availability. Disadvantage: toorough for ultimate edge refinement.
174 Equipment and Its Care
· Ceramic stone. Sapphire dust is held in a ceramic binder. Thesestones are offered in a variety of grits; the fine and extra fine aregood for oboe knives. The stone is used dry. Some makers say touse the stone with water, but it doesn’t seem to work any better,and the water is messy. The water does prevent the stone fromloading up with metal as quickly, so make sure to clean it regu-larly. It can be cleaned with any abrasive household scouringpowder like Ajax or Comet and water. The same technology alsoexists in pencil-thin sticks, which are provided with a mountingplatform that holds them at the correct angle in a V shape, makingaccurate sharpening almost easy. Advantage: low cost, relativelylarge size (two inches by eight inches) for the money. Disadvan-tage: sometimes the stones are not completely flat, though thesticks don’t have this problem.
· Diamond stone. Diamond stones are not stones at all; they usuallyconsist of a steel plate coated in diamond dust. The diamond dustis very sharp and cuts very fast, which is both the advantage andthe disadvantage (if you aren’t perfect with maintaining a consis-tent angle). Some diamond stones are made of steel mesh appliedto a plastic base. These are excellent for travel, since the base islight, but it is also delicate. Just a few minor accidents and thetop of the “stone” is no longer true. The fine and the extra fineare suitable for oboe knives. The fine is actually quite coarse andcan remove a lot of material quickly.
· Water stones. There are many brands, many of them made in Japan,and right now these represent the ultimate in knife sharpening.They are available from very coarse (110 grit) up to almost ridicu-lously fine (30,000), with many choices in between. Some needto be soaked in water for a time before using; the best ones canbe used with water sprayed on the surface before sharpening,with no need for prior soaking. The water, and the resulting slurry,makes using these somewhat messy, so you will need to set upsome sort of basin (a cookie sheet works just fine) to catch themess. The cost ranges from quite reasonable for the coarser gritsto unaffordable for the very finest. But a selection of three orfour of these should put an end to anyone’s knife-sharpeningmisery. Advantages: works better than anything else. Disadvan-tages: relatively high cost, messy to use. See chapter 8 for in-structions on knife sharpening.
Plaque
The plaque is used to support the blades of the reed while scraping, par-ticularly on the tip. Plaques are available in steel, wood, or plastic, andcan be purchased either contoured or flat. I prefer the flat blue steel ver-sion with either rounded or pointed ends. They are slim and cheap and
Selection and Care of Tools and Equipment 175
work just fine. I prefer them to the contoured plaques, which spreadthe blades of the reed too far apart, deforming it. However, the contouredplaques will not dull the knife as quickly, since they are made of plasticor wood, not metal. Again, buy a quantity of plaques: half a dozen orso. They tend to get lost with maddening frequency. Make sure not touse them for too long. You can get a very good indication of how tipthickness and contour are coming along by observing the dark blueplaque color shining through the cane. When the plaque loses its darkblue color or becomes unevenly worn, with lots of shiny silver patches,it becomes a much less useful guide.
Something to Seal Leaks in Reeds
Reeds will occasionally leak at the bottom of the cane just above thestring. (If a reed leaks higher up, the cane was warped or carelesslyshaped. Those reeds should be discarded.) The traditional product forsealing leaks in reeds is fishskin, which has nothing to do with fish, butis the lining from a cow’s intestine. It is sold in sheets usually about afoot square that last quite a while. You cut it into narrow strips as needed,moisten it, and wind it around the reed three or four times. It does areasonable job of sealing leaks, especially if it is very thin, but it tendsto float off whenever the reed is soaked. Painting it with nail polish holdsit in place better, but the polish adds a fair amount of mass to the reed.
My preference is to use Teflon tape, also called plumber’s tape. Thisis easy to obtain, easy to use, and stays put indefinitely. Just cut off aninch or so and wind it around the reed. It will look somewhat unsightly—the reed will look bandaged—but it works.
Ruler
You cannot make reeds without an accurate ruler. It should be cali-brated in millimeters, and it should be made of metal. Plastic rulers havethicker lines painted on them and are a bit less precise as a result. I haveseen inaccurate rulers that were wrongly calibrated by as much as fivepercent—a big difference on a 70 mm oboe reed—so it’s probably bet-ter not to buy your ruler from the clearance bin.
Work Light
A good light to make reeds by is almost as essential as a sharp knife. Asimple sturdy desk lamp will do. It needs to have a dark shade in orderto throw a focused beam of light down on to the reed being scraped.Good reeds can only be made with bright lighting.
Gouging Machine
Gouging machines are made by many different vendors in two basic de-signs. A single-radius machine has a blade that is set to travel down the
176 Equipment and Its Care
middle of the cane, removing material equally from both sides. Thecurvature of the blade is a section of a circle (hence the single radius),and the diameter of the circle is larger than the diameter of the cane, en-suring that the sides of the cane will be thinner than the center. The caneis gouged until no more comes off, then flipped once to assure sym-metrical results.
The blade curvature of a dual-radius machine is a section of the nar-rower end of an ellipse (hence the dual radius), and the curve is some-what smaller than the diameter of the cane. This blade is offset slightlyto travel down the side of the cane, requiring the user to flip the caneevery five or six strokes until the gouging is finished. This process leavesa small W in the middle of the cane.
The dual-radius design is traditional in the United States. It allowsthe reed maker more flexibility, since more parameters can be adjusted.It also introduces more variables, most of which cannot be modifiedindependently, so unless the user is very experienced, the adjustmentprocess can quickly disintegrate into a confusing mess of conflicting fac-tors. For this reason, it is more straightforward to work with the single-radius concept. It is true that the dual-radius design leaves a small spinedown the inside of the cane, but whether that spine is on the inside orthe outside of the cane has never made a difference to me. The majorityof machines available follow the single-radius design.
Few topics engross expert oboists more than the design and man-ufacture of gouging machines—“What gouge are you using?” Everyonewho has made reeds for years has had one glorious week where every-thing seemed to function with perfect synchronicity. Reeds made them-selves almost automatically and revealed a depth and ease of sound neverapproached before (or since). This desirable state can be maintained, butat a cost. In order to have a perfect gouging machine, you, the player,must learn an enormous amount about things that have little to do withmusic making and everything to do with machining, geometry, andmaterials. It is one of the wonderful things about oboe playing that itcan engross the player in so many different ways, but most of us wouldprobably agree that we did not become musicians because we like tools.
However, you should learn the most basic adjustments, and youmust know what constitutes normal behavior for the machine. The mostfrequent adjustment is to the thickness of the gouged cane, which isaccomplished quite easily on all machines. Make sure to keep each ad-justment small—as with adjustment screws on the oboe, a sixteenth ofa turn can make a meaningful difference. Have several pieces of sacri-ficial cane ready to gouge, since you will likely have to fine-tune theadjustment a few times. Other adjustments may be necessary: for in-stance, dual-radius machines allow the relationship between the sidesand the center to be altered. All machines allow you to adjust the chipthickness—the thickness of the cane sliver that is removed. It is also veryuseful to be able to remove and reset the blade.
Selection and Care of Tools and Equipment 177

It is perfectly all right if all of these operations frighten you, espe-cially if you have access to a good professional technician who can per-form the adjustments for you. So, if you feel mechanically helpless andunable to service the machine yourself, be prepared to measure yourcane carefully and observe the behavior of the machine closely in casesomething changes. A normal machine will remove material in thin(about 0.05 mm thick) shavings without needing much downward pres-sure; it will yield cane that is 0.58 mm to 0.61 mm in thickness in thecenter of the gouged piece; the sides of the cane will be symmetrical, aswill any measurements from corner to corner; and the cane will stay stillin the gouger bed and not push out to one side or the other. Any devi-ation from this performance, and the machine needs to be serviced.
If you are more mechanically adept, learn to perform the adjust-ments just discussed. If you are a relentless tinkerer and don’t mindhaving four or five machines with only one of them working correctly,that is also fine. Have fun. But you could be practicing.
Reed Case
A reed case is an essential piece of equipment. It should be one of thevery first things that students buy, no matter how young they are. Stor-ing reeds in anything but a purpose-made reed case is dangerous. Itmay be tempting to use the small container the purchased reeds are de-livered in, but those rarely allow air to circulate and often present a riskof physical damage to the reed.
There is a huge variety of cases available. Capacity ranges from threereeds to a hundred or more; materials range from cheap molded plas-tic to exotic woods and leathers; cost ranges from quite reasonable tovery expensive. For a start, a young player should get a case that holdssix or eight reeds. It doesn’t have to be expensive (though no reed casecould be considered cheap), but it does have to meet certain minimumrequirements. Reeds stored next to each other should not be able totouch each other, and whatever mechanism is used to hold the reeds—either small pegs or a ribbon formed to carry reeds—should hold themfirmly and give them little chance to become dislodged during normaltransport. The latch and hinges should look like they will be reasonablydurable. These are the weak part of any case and almost always faileventually, but they should last at least a year or two. Try not to buy acase just because it looks really attractive—it will be much more satis-fying to have something durable and protective. Then, care for it as youwould something rare and precious. It holds your reeds, after all.
Swabs
All swabs have their advantages and disadvantages. The primary consid-erations are: do they remove moisture effectively, do they shed inside
178 Equipment and Its Care
the instrument, and is it possible to get the swab stuck? The main con-tenders for swab champion are:
· Silk pull-through swabs. These do a decent job of absorbing mois-ture and don’t shed very much, but it is very easy for them to getstuck. Before even thinking about using one, pull it through yourfist to feel if there are any knots, even very small ones. Then pullit through slowly. If the swab is whipped through quickly, it candouble back on itself and become knotted while inside the oboe.If you do happen to get one stuck, stop pulling immediately—there isn’t any hope of getting it to go through—none. Then,take it to a repairperson. Most repair people hate silk swabs, but Isuspect it has nothing to do with the quality of the swab; they’rejust tired of removing them. If you really want to be sure that itwill never get stuck, feed the string through the top of the oboeand out the bottom. Some silk swabs have a cord at both ends,allowing you to remove the stuck swab yourself. Silk swabs arevery light and don’t do much to clean the lower joint.
· Cotton swabs. These remove moisture very well, shed moderately,and can’t really get stuck. They will leave lint in the tone holes,and the temptation is to pull them too firmly, risking some borewear. If you have one, use it gently; don’t keep pulling until itfeels tight.
· Feathers. These don’t really remove moisture at all, they shed intothe tone holes, and they can’t possibly get stuck. Feathers spreadthe moisture around rather than removing it. Adherents say thatthis preserves the oboe in a “warmed up” state, rather than re-moving all of the moisture that playing has left there. The littlefeather barbs will break off and lodge in tone holes, requiringregular cleaning.
· Mops of various kinds. These remove moisture very well, don’t getstuck, and will shed. They are usually sized for the joint they aremeant to clean, so they will apply the appropriate amount of pres-sure themselves, relieving you of worrying about using them toohard.
So all swabs have advantages and disadvantages. Use whatever youprefer, but use it carefully.
English Horn Bocals
English horn bocals affect almost every aspect of English horn playing:pitch, response, tone quality, and projection. Some of these matters aresubjective and should be determined by the individual player. But justlike a good reed, a good bocal should work. It should respond, play intune, and create a feeling of resistance that is comfortable for the player.
Selection and Care of Tools and Equipment 179

If you have a high-quality instrument, the bocals supplied with itare probably quite good. If the instrument is newly purchased and yourEnglish horn experience is limited, I recommend that you use the in-cluded bocals for at least the first few months until you are sure that yourplaying would be improved by having something different.
Bocals are supplied in various lengths—the usual designations areno. 1, no. 2, and no. 3, with no. 1 being the shortest and no. 3, the longest.They also come in different bore configurations; these are individual tothe manufacturer, so you will have to rely on his or her descriptions. Inaddition, bocals are made of different materials. The most common aresilver and brass, with some brass bocals carrying silver or gold plating.I have also tried bocals made of copper and other metals. The standardis a no. 2 bocal made of silver or silver-plated brass of a medium bore.Makers will claim certain properties for different bore configurations—one bocal might have a darker sound (who doesn’t want that?), whileanother might have better high-note projection (can’t I have both?).In my experience, these distinctions are overwhelmed by differences ininstruments, players, and reeds. So your task is to find the right bocal foryou and your instrument, not the one recommended to you as “best.”
Besides affecting the subjective matters of tone quality and projec-tion, a good bocal will play with an even sound throughout the registers.It will allow a diminuendo on C (in the middle of the staff) down to si-lence without sagging. A bad bocal will fail this test completely—it willsag no matter what sort of intervention the player exerts. A good bocalwill allow the G-sharp above the staff to sit up firmly in tune. A badbocal will barely sound any different when the G-sharp key is added tothe G. A good bocal will support the tone and pitch of the troublesomenotes above the staff between G and C. A bad one will lack focus andpitch security on most notes, but those in particular.
Bocals also have slightly different curves. This will present the reedto you at somewhat different angles, so it is important to make surethat this relationship is comfortable.
Try a few bocals from different makers to get a general feel for theplaying field, and gradually focus your selection as your preferencesdevelop. Fortunately, bocals are not ruinously expensive and can usu-ally be sold for only a small loss if you change your mind after a fewmonths. Professional English horn players often have a dozen or more(sometimes many more) bocals they have collected over the years.
Conclusion
The oboe is charming in its very low-tech-ness. Look at illustrations ofreed-making tools from the mid-nineteenth century—do they look fa-miliar? How about a photograph of an oboe from 1910? Not much haschanged, has it? Of course, the materials have improved, and the processof manufacture is much more precise; we have computer-guided tools
180 Equipment and Its Care
and very accurate machining working on sturdier materials with bettercapabilities. But the fundamental design has not changed in a hundredyears or more.
Part of this, probably much of it, is due to the natural conservatismof musicians. While many musicians would regard themselves as freespirits and creative people, and while some would be surprised at mycharacterization of them as conservative, where equipment is concernedthis has always been true and remains true today. People are not goingto discard something they have spent a lifetime learning in favor ofsomething new but as yet unproven. This was as true in the nineteenthcentury as it is today. When new oboe systems and key additions beganappearing quickly in the 1820s and 1830s, some older players rejectedalmost all of them and continued to play on the instrument they hadstudied in their youth.
Another issue, probably as important, is the low volume of oboemanufacture. The largest maker of professional-quality oboes in theworld today is the F. Lorée company in France. In a typical year, theymake in the neighborhood of 1,500 instruments. While that is a lot ofprofessional-quality oboes and English horns, it is a tiny number of itemswhen compared with other things in the music industry like microphonecables or drumsticks. When we compare it to televisions and bicycles andsuch, the number fades into insignificance. Limited editions of artworkare produced in greater numbers than oboes. So, since oboe makers havelittle money left over for anything beyond normal business expenses—rent, salaries, insurance, tooling, materials, and so on—research anddevelopment takes place largely as a process of evolution derived fromtrial and error. When applied to something like a gouging machine,which is produced in even smaller quantities, research and develop-ment is usually one person with a bright idea working hard to bring itto reality in his or her small machine shop.
So here is my thought. If the oboe gouging machine were a piece ofmedical equipment, it would cost at least $100,000. It would be as bigas a small car, but by golly, it would work. You would dump a load oftube cane in one end, punch a few entries on the computer touch pad,and go to lunch. Then, when you returned a couple of hours later, aneat pile of perfectly gouged cane would reside in the out tray, alreadysorted according to diameter, hardness, and resilience, with the wastematerial ground up and converted to ethanol.
The difference is stark. With enough economic incentive, huge ad-vances are possible in any field. It is naive (and probably foolish) to hopethat millions of people will decide to play oboe, but I would love to seemore involvement from the scientific community. Surely, cane can bestudied precisely enough for us to know which qualities yield optimumresults. For now, most reed makers find these for themselves. Gougingmachines are made by oboe players with machine-tool experience (orsometimes by machinists with some oboe knowledge). Elite machinists,
Selection and Care of Tools and Equipment 181
for very good business reasons, are not interested in making a fewdozen or a few hundred of something incredibly precise. If we couldorder ten million copies, a dozen companies would already be lined upto submit bids.
So my hope is that some small number of crazy, good-natured peoplecome along and try to find a way to apply all of the enormous recentadvances in technology to the equipment used every day by oboe play-ers. It would require some unusual collaborations: botanists, mathe-maticians, acousticians, machinists, and other scientists and tradespeoplewould have to work together with practicing musicians and business-people to explore the possibilities of making something better. Evenuniversities, the very institutions that are supposed to facilitate this sortof exploration, are not exempt from commercial considerations. The sci-ence professors want grant money, not gratitude from musicians. Themusicians have little scientific training and are soon left behind in anydiscussion of advanced concepts. Businesspeople are interested in fund-ing projects where they can discern a huge future payoff. The bigger thepotential payoff, the bigger the risk they are prepared to take. The oboeis at an obvious disadvantage in all of these scenarios.
So, it is entirely possible that the oboe of a hundred years hencewill still look a lot like the oboe of today (and of a hundred years ago).That is not a terrible thing, of course, since today’s oboe sounds beau-tiful and still meets the needs of today’s music and musicians. But I havelong wondered what form the next generation of oboe will take. Will ittake advantage of all of the latest developments in semiconductors andmicrocircuitry? Will it be programmable in some way? And will theancillary activity of reed making and its related equipment benefit insome way from truly advanced technology?
Or is none of this necessary? Is symphonic music—Western artmusic—satisfactory as a museum piece? Certainly, many people visitart museums and other institutions to experience a profound connec-tion with the culture the world has developed over the past hundredsand thousands of years. But when living, breathing people are involveddaily in the performance of an art, it might be better to find a way forthat art to reflect the life that these people live.
182 Equipment and Its Care

IV
PROFESSIONAL ANDPERFORMANCE
CONSIDERATIONS

This page intentionally left blank
12
Professional Behaviorand Deportment
Music is a difficult business. Many players compete for a small numberof positions. Yet, this circumstance does not and should not deter legionsof young people every year from applying to music schools for study.Each of these young people has a dream—usually to play in a profes-sional symphony orchestra—that will probably not be realized. But itis not such an unlikely dream—it is not like dreaming of walking on themoon; it is like wanting to play major league baseball or to sing onBroadway. These are ambitious goals, but hundreds of people do singon Broadway and hundreds do play in the major leagues. So the dif-ference between the music profession and many other professions isthat the music profession really only has room for good people. Thestudent’s job is to become one of those good people.
When focusing on becoming good, the student usually works on twoaspects of playing—artistry and virtuosity—that they imagine are highlyrewarded in the profession. And certainly these things are rewarded inthe profession, although they may not be within the reach of everyone.However, there are three other things that are also highly rewarded, andthese are accessible to anyone who is prepared to work. The first twoof these can even be done by anyone, immediately and without anyexertion.
Professionalism, Collegiality, and Competence
There is a saying in baseball: “It doesn’t take any talent to hustle.” Andit doesn’t take any talent to do something that is rewarded richly in the
185

music profession, and that is to act professionally. First and foremost,this means that you are always on time for everything, no matter what.Let me provide some emphasis—you are always on time for everything,no matter what. There is no acceptable excuse, short of catastrophe, forbeing late or absent. Everyone else also has alarm clocks that don’t work,traffic hassles, parking problems, sick friends, emergency phone calls,family issues, and so on. If there are eighty people in an orchestra andone oboist is absent, the concert cannot start. Seventy-nine musiciansand hundreds of audience members are inconvenienced. There is no ac-ceptable excuse, short of catastrophe, for being late or absent. Make sureyou have a contact number for the personnel manager or contractor incase you really are involved in a car accident or suffer a mechanical fail-ure. Anticipate the worst. Learn how to change a tire on your car. Havea list of numbers to call if you need help. Perhaps a colleague is travel-ing the same way as you and can take you to the performance. Extendthis fixation for punctuality to your entire life, not just to professionalmusical engagements. Be on time for lessons, classes, medical appoint-ments, everything. Punctuality should be a fixation for all musicians; itis a basic requirement for professional success.
Do not rely on your memory to keep track of your appointments.Get a date book, enter every one of your scheduled events in it, and readit every morning before leaving home. If your schedule is computerbased, keep a regular back-up.
Playing a reed instrument really requires that you arrive at a jobthirty minutes early to allow for enough warm-up time to stabilize yourpitch. Then, when you arrive, you must have all of your equipment:reeds, music, tools, and instruments. This is obvious, but dumb thingshappen easily. Most performers have at least one story to relate aboutarriving at a service with no reeds, or no music, or even no instrument.Perform an idiot check every time you leave home. Ask yourself whatyou need today to do everything on your schedule—clothes, instru-ments, reeds, music, and so on. Look at the schedule one more time tomake sure you haven’t forgotten anything. Do not arrive at the serviceunprepared. It may be the last one you perform for that employer.When musicians are fired (or not rehired), it is rarely because they can-not play well; it is almost always for reasons of unreliability or unpleas-antness. Contractors have no way to impress their employers exceptthrough the quality of the musicians they hire. They have a lot of workto do; they want to call you once and have you show up without failand play well. They cannot afford to have any problems, or it could betheir job security that is affected along with yours. Make their lives easy.
Of course, many musicians have colorful personalities and unusualmeans of self-expression. But the successful ones do not bring this towork; they are able to flip a switch and be completely professional forthe two or three hours required. Think of yourself as a small businesswith yourself as the product. People are buying you—not just your oboe
186 Professional and Performance Considerations
tone, but the whole package. Since many employers are businesspeopleand may be only marginally knowledgeable about oboe, they may noteven be able to judge your oboe tone. But, they can judge whether youare neat, punctual, and easy to be with. They are consumers, and theyhave lots of choices. Make the choice easy. Be professional.
Sadly, there is no room for error in these suggestions. If you are ontime a thousand times, you will be appreciated but not praised. If youare late just a few times, you will not be hired next time. We all knowpeople who have reputations for being eccentric or unreliable, some-times quite endearingly so. If they are still working, they will not con-tinue much longer. And often this reputation was earned with only afew transgressions. There is no excuse for anything short of perfectionin this arena. It’s easy to do it well and very damaging to do it poorly.
The next thing you must do is be nice. In addition to being reliable,you must be collegial. You should be easy to talk to, easy to play with,and easy to work with. You must present a good attitude, and you mustbe considerate and respectful of those you are working with. It is a factof human nature that we are more inclined to help people if we likethem. Some, usually the bad-tempered ones, feel that this is “favoritism”of some kind, that sometimes less qualified people are given opportu-nities. It is usually nothing of the kind. Nobody wants to be around youif you’re miserable, mean, and difficult; a big part of being a profes-sional is being able to get along with the people you work with. This ishard to overstate: be nice. Don’t gossip about colleagues; don’t talk aboutthem behind their backs; and don’t say bad things, especially if theyaren’t true. If you are a student, never say anything bad about any pro-fessional; you don’t know what is involved in being a professional soyou aren’t yet qualified to judge. These suggestions aren’t just for socialreasons; as I said earlier, we help those we like. And some people canhold a grudge for a very long time, so it seldom pays to make anyoneangry with you. Students are particularly at risk in this arena: since youhave no real idea which of your fellow students are going to becomeinfluential and important later, it really doesn’t pay to be unpopular ordifficult.
None of this is to suggest that you should be a pushover. You canbe confident and persuasive without being aggressive or nasty.
The third thing that is richly rewarded in the music profession iscompetence. This is difficult to achieve, but it also does not require anyspecial abilities beyond persistence, diligence, and years of hard work.The word “competent” in this context does not mean merely that youare ordinary and able to carry out duties in a reasonable manner. Itmeans that you can reliably make the right sound at the right time with-out exception. Doing that requires a very high level of skill—a compe-tent player will make entrances consistently, play with good rhythm, playin tune in various situations, not miss notes, play with a pleasing tone,and employ phrasing governed by a high level of musical intelligence.
Professional Behavior and Deportment 187
All of these things are difficult to achieve, but they can be taught, andthey can be learned. To be a competent instrumentalist is a very highdistinction. Indeed, competence is the main criterion for success in or-chestra auditions, and incompetence is the leading reason for rejection.Orchestra auditions reward applicants who play with good rhythm,have good pitch, and sound like they’ve heard the piece before. Evenwith only this bare-minimum standard enforced, the majority of appli-cants to professional orchestras do not measure up. Achieve competence,be professional and agreeable, and you will be in demand.
Early in their careers, musicians are often in the position of havingto freelance; in other words, they have to apply for jobs over and overagain rather than winning a single position. (Be glad you aren’t a singer;many of them have to do this for their whole career.) In this regard, cer-tain personality traits succeed better than others. Quick is better thanslow. High performance is better than low performance. Low mainte-nance is better than high maintenance. A thick skin is better than a thinskin. Strong and healthy is better than fragile and illness-prone. A cheer-ful and even temperament is better than a combative or gloomy one.High energy is better than low energy. Actions speak much louder thanwords. Complainers, of whom there are many, are not really appreci-ated. Enterprise and initiative are much better than apathy and resig-nation. If you don’t feel cheerful or energetic or healthy, fake it. Otherpeople have their own problems.
Orchestral Etiquette
An orchestra is not a democracy. It is a strictly disciplined system witha time-honored chain of command. The conductor is the boss, and what-ever he or she wants to see and hear is what the players should do. Theprincipal players are the conductor’s deputies, responsible for the soundand quality of their individual sections. This system is well establishedand routine in professional orchestras, where everyone has had the samerole for many years, even decades. It is much more problematic in stu-dent ensembles, with less experienced players who may rotate parts fromconcert to concert, or even from piece to piece within the same concert.In this case, the players must be prepared to change roles, chameleon-like, from one piece to the next. The principal player is still in charge ofthe section, but may be the second player an hour later. Personal issuesoften intrude and can overwhelm professional efficiency. Every playermust learn what is expected and perform that role with professionalism,good humor, and competence.
The principal player leads the section in matters of dynamics, notelengths, articulation, and interpretation when the conductor does notmake specific requests. The second player, and the third if there is one,follow these directions. Even better, they listen closely to the principaland copy what they hear without being told. The second player should
188 Professional and Performance Considerations
never play louder or with more presence than the principal unless askedto do so. The principal players consult with each other to ensure una-nimity throughout the woodwind section. When there is a question forthe conductor, it should be raised by a single-part player, or the sectionprincipal when there are multiple players on the part. In no case shouldany musician argue with the conductor or contradict him or her. Thiscan be difficult—conductors are not infallible and do make mistakes.The players need to do what the conductor means, not necessarily whathe or she says. “Oboes, you’re sharp” really means, “Oboes, you are outof tune.” Do not respond, “No, we aren’t. The clarinets are flat.” Just fixthe problem.
Sometimes conductors think they can play your instrument and willmake specific technical suggestions. These are not always quite right, soagain the players must do what the conductor means. Thus, “Timpani,use harder sticks” means, “Timpani, I need more articulation.” Usuallythe timpanist sets down his pair of sticks on the stick tray, picks up theexact same pair of sticks, and plays with more articulation. Everyone ishappy.
If there is a need, as there often is, to have a conversation with theconductor about a point of interpretation, or to have a polite disagree-ment, the time for that is outside of the rehearsal, not in public. Theconductor is the boss and must be allowed to be the boss. Once again:the orchestra is not a democracy.
Just as composers can do nothing more than write their creation ona piece of paper using symbols, conductors are likewise at the mercy ofthe performers. They cannot make a sound; they are limited to con-veying their wishes through facial expressions and gestures. So do theconductor a favor: watch. Maintain eye contact as much as possible. Itmay improve your performance, and it will certainly improve yourstatus with the conductor.
Be agreeable. If the conductor makes a suggestion to you, nod. Agreewith the suggestion even if you haven’t the slightest intention of chang-ing anything about your performance. The conductor will usually moveon to the next item in the rehearsal. Do not discuss, and do not ever ask“Is that better?” or “How did that sound?” Questions of that sort betraypotential weakness, which some conductors are willing to exploit.
It is the job of each individual to do his or her very best to make theensemble sound wonderful. Often the layers of authority in the orches-tra can diminish personal responsibility too much—players, especiallythe nonsoloists, become too passive and think that if nobody is pick-ing on them, they are doing well. This is not true. You should play yoursecond-oboe part as though it were your recital. Bring the same prepa-ration to your technique, your reeds, your listening skill, and your alert-ness, and you will be a good member of the ensemble.
Rehearsals, whether orchestral or chamber music, are not social-ized practice. Do not learn your part in the rehearsal; learn it in advance.
Professional Behavior and Deportment 189
Learn more than your part; learn all of the other parts, too. Study thescore; listen to recordings.
Intonation in the orchestra, while based on an absolute standard,is not absolute. The chord is in tune if it sounds good; it is out of tuneif it doesn’t. Pointing to the tuner as proof of your rightness does notmake you right—in fact, it’s annoying and unprofessional. Use the tunerto establish the pitch at the beginning of the rehearsal, and then useyour ears.
Pitch will generally rise during a rehearsal or a concert, and it ispointless to resist this. But as oboists, it is our responsibility to helpminimize the problem. The principal should make sure to establish aconsistently correct A every time the orchestra tunes. This is worthpracticing; nothing destroys the authority of the oboist quicker thanone or two squeamish-sounding A’s. When pitch rises, oboes often feelit first, since the reed is limited in its capacity to play sharp. It is the jobof the principal oboist or the concertmaster to request a retuning fromthe conductor. Conductors are usually happy to oblige. In the concert,sometimes there is no opportunity for retuning, and the problem canbe more acute. If it is consistently very bad in your orchestra, have alittle conference with the concertmaster and the conductor to find asolution. Perhaps an extra tuning note between movements will helpreestablish the proper pitch. (For those players receiving the A ratherthan giving it, please tune carefully but quickly; do not actually play,just tune.)
The oboists should resolve intonation problems within the oboe sec-tion during rehearsal breaks. The principals are responsible for unifyingthe pitch among the various sections, so rehearsal breaks in profes-sional orchestras always have various duos and trios huddled togetheraround the stage testing treacherous passages. There is not enough re-hearsal time to solve every problem.
In summary, your job is to make the maximum contribution to theensemble while causing a minimum of distraction. If you are not play-ing, sit quietly and listen to the progress of the rehearsal. You will prob-ably learn something. Conductors do not enjoy making a request of theviolins and then telling the oboes the same thing when they have thesame music a page later. Do not talk unless the dialogue is essential tothe progress of the rehearsal. Do not do paperwork. Do not make reedsunless the conductor permits it. Do not sharpen your knife; it makesnoise. Do not read unless you can do so completely unobtrusively. Amagazine on the stand is fine for very long rests; a newspaper on yourlap is not. Never blow water out of your instrument; it is much too loud.Swab it out, blot it up quietly, or strike the oboe against the palm of yourhand to shake it loose. But do not blow it out.
While playing, do not lead with your body unless you are a leader.Do not tap your foot. Do not finger along while the principal plays asolo. Definitely do not warm up on the solo unless you are performing
190 Professional and Performance Considerations
it. Bring a pencil to every service and use it quietly—do not drop it onthe music stand. Do not turn around to look at a player performing asolo. Never wear perfume or after-shave or any other artificial scent on-stage. It makes some people ill.
All of these cautions (and there could be plenty more) are reallyjust common sense. But if you look around your band or orchestra—whether it is a student, amateur, or professional ensemble—you willalways see people who are not doing their best, and some people whoare not even doing their part. Don’t let that affect you. Keep quiet, playwell, lead and follow as appropriate, and be courteous and respectful inyour interactions. It will make you popular with everyone except theslackers.
Small-Ensemble Etiquette
In complete contrast to the orchestra, small ensembles are entirely dem-ocratic. For the ensemble to function successfully, every voice must beheard and every option explored. Everyone must be able to speak with-out causing offense and to hear without taking offense. Everyone mustcontribute. The final result must be a consensus, not the view of theloudest or bossiest individual.
Intonation in the ensemble, as in the orchestra, is relative. Use thetuner only as a reference, never as a means of settling an argument.It can be useful to spend time tuning chords, but persistent intonationproblems will only be solved by improved tone production. Most goodwind players play in tune. Most bad wind players do not. As tone pro-duction and reed making and concept improve, so will intonation.
Every suggestion made by a player must be tested. Even ideas thatseem unworkable might contribute something useful to the finishedproduct. So any suggestion made by a member of the ensemble shouldbe tried. If it doesn’t work the first time, try it a couple more times untilit produces a change in the performance. A consensus will develop asthe effectiveness of the suggestion becomes more (or less) apparent.
Eye contact between members is essential. Even if no cues are given,just looking at someone promotes an awareness of what he or she isdoing. There is no such thing as a good chamber group whose playersdo not look at each other.
Do not be afraid to rehearse slowly. Everyone utilizes slow practicein his or her individual practice sessions. Why not rehearse slowly as agroup? This will give everyone a chance to hear what the piece shouldsound like when it’s perfectly correct.
A chamber-music rehearsal is a professional event. Although onlya few people are involved, it is not a social event. Personal issues areirrelevant during the rehearsal. Whether the players are friends or notshould make no difference. Observations about another’s playing shouldnot be meant personally and should not be taken personally. If someone
Professional Behavior and Deportment 191
says you are sharp, they are hearing a discrepancy, and it is the collec-tive responsibility of the group to make an adjustment. It may not evenmean that you are sharp, only that something is not in tune. In addi-tion, the rehearsal is not an opportunity to catch up on personal matters.Rehearse first, talk later.
Rules of Professional Success
In no particular order, here are three thoughts that will improve yourprofessional success and the enjoyment of your musical life.
1. Do what you say. This is an extension of professional behaviorjust outlined, and it should reach every area of life. Say what youmean and mean what you say. If you say you will call me tomor-row, call me tomorrow. If you say you will be here at eight o’clock,be here. This is not that hard. The corollary is actually much harderto learn—that is, if you don’t want to do something, say no. Onceyou say you will do it, you have to do it.
Musicians have a disease: they fear that if they ever say no toanyone, then everyone will stop calling immediately and perma-nently. That isn’t really true, and people usually understand andrespect “no.” So, before agreeing to something, stop and think: isthis really something I want to be part of? If not, say no. You willbe much happier.
This rule also means that you must be accountable. We allknow people who constantly have terrible things happen to them,without any of it ever being their fault. Agreeing to do one thingoften means that you have agreed to many other things: if youdecide to attend music school, you have also agreed to follow thatschool’s curriculum, some of which may not be to your liking. Ifyou sign a contract for a season, you have agreed to perform everyservice during that season, even the ones that have no apparentlyvalid artistic reason. Do not blame anyone for this; you agreed to it.
Do not blame others for things that are really your fault. Donot blame your reed or your instrument for your failures. Youmade the reed, and you should have maintained or replaced theinstrument. Do not blame colleagues for your mistakes—you alsomake mistakes and sometimes mislead colleagues who mistakenlyfollowed you. You would appreciate their generous sympathy inthat case. Everything that comes out of your instrument is becauseof something you did. Take responsibility for it.
2. Never lower your standards. Your usual job is to play whatsomeone else thinks the audience wants to hear. They may be rightor wrong, and sometimes it isn’t what you want to play. Let’s add a couple more inconveniences. Perhaps the concert is very early inthe morning, perhaps the venue is freezing, perhaps the audience
192 Professional and Performance Considerations
is made up entirely of fourth graders—and it becomes easy to giveup and play less than your best. Never do this. If you begin toallow yourself to play less than your best, you will allow it moreand more often. It is the beginning of a slippery slope toward apa-thy and boredom that ends in a severe erosion of skill, when youcan no longer play well even if you want to. Every professionalorchestra has people like this; when they finally encounter a con-ductor they respect (or fear), or find a piece of music that excitesthem, they spend the first few hours scrambling for little forgottenbits of technique they should never have lost in the first place.
3. Love music. The business of music is exactly that—a business.It is no more and no less pretty than any other kind of business,with the unpleasant difference that there is usually less money in-volved. Naturally, when the scraps are smaller, people tend to fightharder for them. So love music. When everyone else is squabblingabout the temperature onstage, the number of minutes of over-time, or how much the dinner per diem should be, remember thatyou are first and foremost a musician.
Somewhere during many lives, a curious transition takesplace. Musicians begin as starry-eyed dreamers, eager to learn and practice and improve. Every music school has dozens of them.Somehow, thirty years later, too many of these same people arecynical, jaded music robots who hate life, orchestra, and eachother. Somewhere along the way they forgot to love music, theyforgot why they wanted to be part of this profession, and theybecame unhappy. So love music; it will sustain you even when the business of music is hard to love.
Professional Behavior and Deportment 193
13
Career Development
The first step in developing a career is to decide how you will pursueyour advanced study. The first part of this chapter gives advice for theyoung student wishing to be a college music major. Later, we will dis-cuss how the advanced student can prepare for the music profession.Preparing for college can be confusing, stressful, and filled with doubt,especially if the goal is to study oboe. Do you want to find the best lawschool in your state? There are guides to help you. The same applies formany other disciplines, but not oboe. While this section is written for anAmerican high school student wishing to be an oboe major in college,anyone looking for a place to study should find some useful ideas here.
First, prepare yourself. I find that college freshmen are initiallystressed by reed making, by music theory, and by piano. Each of theserequires time to study and practice, and each of these can be learnedin high school. If they are not, they will each require an hour or twoevery day during the first semester of college, making that semester al-most unbearable.
A lot of lesson time in high school is spent preparing the student forthe next concert, audition, or contest. When you are a music major incollege, the emphasis shifts to teaching the student how to play. Thistransition can be difficult and stressful for the unprepared. So here area few hints that will help to get you ready.
· Take piano lessons. It will help your musical development a greatdeal. It is not necessary to be a virtuoso, but a few years of les-
194
sons can help tremendously, since piano shows the spatial aspectof music in a way that oboe cannot. Piano skill improves musicreading and ear training and promotes awareness of harmony.
· Take private oboe lessons from the best teacher you can find. If there isno one in your town, it is worth driving several hours to get les-sons, even if they cannot take place every week. Oboe is veryhard to learn on your own and even harder to unlearn later, whenthe bad habits have to be corrected. The earlier the lessons canbegin, the better.
· As soon as you can afford one, get a good instrument. College musicmajors need to have a professional-quality instrument. If that isnot possible before college, make sure that what you have is ofsolid construction and in good repair.
· If your school offers it, take a music theory class (including ear training)before you graduate from high school. If your school has nothing ofthe kind, ask your piano or oboe instructor for advice. Do notcome to college with no experience in these areas.
· Don’t waste your summers. Find a music camp or festival to attend.Ask your teacher for advice. This can be a valuable way to informyourself about potential teachers and to meet other students.Attend a conference of the International Double Reed Society.
· As you get closer to graduation (your junior year onward), slim downand focus your schedule so you have time to practice. Many high schoolstudents maintain a schedule that is too stressful and too scatteredto be productive. Music schools are more impressed if you playreally well than if you have dozens of extracurricular activities on your résumé. If you have definitely decided that you want topursue oboe, eliminate everything that does not directly improveyour qualifications as an oboist. You can try to be a jack-of-all-trades, but make sure you are a master of one.
· Learn to make reeds before college. They don’t have to be beautiful,but you should have a good command of the basic techniques.Your sophomore year is a good time to start learning.
· Learn your scales and other technical patterns very well. These are thebasis of any good technique and are by far the most efficient wayto acquire good technique.
· Before you start applying to schools, work with your teacher or your parents to develop a really professional presentation for yourself. Puttogether a résumé and print it on good-quality paper. Get aprofessional-sounding e-mail address and reserve your cute onefor your friends. Learn to be confident and intelligent in yourinteractions.
One of the most stressful questions for any high school student is“What do I want to be when I grow up?” I have always felt that highschool students are pressured too intensely in this area; it is better to
Career Development 195
make the right decision late than the wrong decision early. And studentsshould be aware that a music degree is among the most difficult coursesof study. It will involve thousands of hours of work with no certain re-ward at the end. People should be musicians only if they cannot imag-ine being anything else. If music is part of who you are, if you wake upthinking about it and go to sleep thinking about it, and that makes youhappy, then please come and study music. If music is something youlike to do, but you also have an interest in journalism or business ormathematics, then you should probably pursue one of those interests.But if you have decided that music will be the major field of study, itstill remains to decide what degree program to pursue.
At many schools, the various degree programs have pretty muchidentical curricula the first year or two, so if you change your mind therewill be little or no penalty. After that, the different courses become muchmore specialized. Some schools offer all of the degree possibilities listedhere (as well as some others such as music composition, arts adminis-tration, or music technology); other schools will offer only one or two.Almost all schools are better at some of these degrees than others, whichyou will find out during your research. For instance, a department mayhave a strong commitment to music education, with most of their stu-dents following that degree program. If you know you are not interestedin music education, that school will not support your ambitions as wellas you would like, and you should probably eliminate it from considera-tion. Here are the most common types of music degree programs.
· Music performance. Performance degrees have the most emphasison, well, performance. Typically, two degree recitals are required,and advanced music history and theory classes are included inthe curriculum. For the student who really wants to learn to playand who is willing to commit a lifetime of work, this is the rightcourse. Its disadvantage is that it is not a professional degree—inother words, you will not receive any certification; you will haveonly your playing as your representative.
· Music education. This is a professional degree resulting in certifica-tion to teach in the public schools. It has less emphasis on perfor-mance and more emphasis on education classes, and it requires a semester of student teaching. This should not be a refuge formusic students who feel unsure of their performance abilities.Students should sincerely want to teach in the public schools and should have strong performance skills.
· Music therapy. This is another professional program offered bysome schools. Music therapy is more about therapy than music; it would be good for students who have interest in the healingarts as well as music.
· Some kind of liberal arts degree with an emphasis in music. This can becalled a Bachelor of Arts in Music or something similar. Typically,
196 Professional and Performance Considerations
the performance element is less demanding, and the advancedmusic classes are not required. The time thus released from per-formance or education classes is spent taking various liberal artscourses. This could be a good program for a student with a stronginterest in music, but without a strong interest in becoming amusic professional. Upon graduation, the student will not haveany professional credential, but should have a clearer idea of anappropriate specialty to pursue during graduate study.
As I said earlier, none of these options (or any others that someschools may offer) is going to trap you into a lifetime of that pursuitexclusively. Undergraduate degrees from universities are meant to giveyou a good general education with plenty of opportunity to find otherinterests that might possibly fascinate you more than you imagined.The exceptions are some of the conservatories (see the following para-graphs), which can be intensely focused on music performance.
Having decided to study music and chosen a major, you will needto choose the school itself. To find a list of potential colleges, you needinformation. Unfortunately, reliable sources of information can be fewand far between. High school guidance counselors usually cannot help;oboe performance is too specialized. Private oboe teachers can help, butthe quality of their advice depends on their level of experience. Collegeoboe teachers cannot always be relied upon, since some of them willwant you to attend their school and can paint a somewhat biased pic-ture. So start by gathering information. Most of it is carried by word ofmouth, so find lots of mouths. Go to every oboe event you can. Attendsummer festivals. Meet teachers and players and other students. Attendconferences of the International Double Reed Society—many of theteachers you might want to study with will be there. Gradually, youwill form an impression of where you can find good teachers teachingat good institutions. As daunting as the field looks at the outset, it is re-ally quite a small world, and you can gain a fair amount of fluency in areasonable amount of time.
Broadly speaking, there are three kinds of institutions: conservato-ries, large public universities, and smaller regional universities (the eliteprivate universities—Harvard, Princeton, etc.—by and large do not offerundergraduate music performance degrees). Each of these models hasdifferent advantages and disadvantages.
Conservatories offer the most focused music study. Most are in largecities where excellent professional performances take place regularly.Most have fine faculty from the local symphony orchestra. However,that faculty will be largely adjunct, coming to campus only when thereare lessons to teach or recitals to hear. There are some institutionscalling themselves conservatories that don’t fit this model, so do yourresearch. Conservatories also tend to charge the highest tuition (with theexception of the Curtis Institute of Music, which charges no tuition).
Career Development 197
Some conservatories are part of a larger university, while others havea relationship with a nearby university to provide nonmusic resourcesfor students. Conservatories come the closest to being a professionaltrade school for music performers; nonmusic and nonperformance el-ements are given a lower priority.
Large public universities have full-time faculty for all instrumentsin addition to all of the traditional university resources. Some of theseare located in major metropolitan areas; some are not. Most will havemore general studies requirements than conservatories. Some are verylarge, with correspondingly comprehensive resources. These are oftenthe best choice for the average music student (who is, by definition,already above average). Tuition ranges from very moderate to ratherexpensive.
Smaller regional universities have full-time faculty for some instru-ments and not for others. These schools will never have enough oboestudents to require hiring a full-time oboe professor, so either they hirea part-time adjunct oboe teacher, or they hire a full-time oboe teacherand assign multiple duties to him or her. So it is not unusual to find thesame person teaching oboe, saxophone, music theory, and music ap-preciation. It is possible that this hypothetical person is really a musictheorist or a saxophone player, so you must do your research and makesure that he or she is really an oboist. Earning a music performance de-gree with a teacher who is not a specialist in your instrument makesno sense.
While it adds considerably to the expense, some students narrowtheir field of potential schools by visiting them in advance. If this ispossible, it is an excellent idea. The institution will always offer someamenities for these travelers: a tour of the school, a tour of the campus,and a lesson with the instructor are all possible. All you have to do is ask.
I would suggest trying to reduce the field to three or four schools:one aspirational school where you fear you might not get in but wouldgo immediately if accepted, one or two good solid schools with slightlyless stringent admission requirements but with good programs, and oneschool where you know you will be accepted. There really is no point inapplying to more (if you have done the proper research), since you willmost likely just duplicate what you have already done, and the appli-cation fees will start to mount up.
Finally the applications are completed, and it is time to make theaudition tour. First of all, it is very important to visit the campus in per-son. Do not audition by audio or video recording. You will spend fouryears of your life at this place, so visit. If your schedule does not allowattendance at one of the audition days, many schools will be happy tomake alternative arrangements. Bring a parent or two. While there, getas much of a feel for the place as possible. If the auditions are scheduledfor a weekend, try to spend at least part of Friday or Monday on cam-pus when classes are in session. Attend an orchestra or band rehearsal.
198 Professional and Performance Considerations

Talk to oboe students. These things can be arranged easily if you planahead. Remember that the whole experience is a two-way street—theschool is certainly evaluating you, but you are also evaluating the schooland the teacher.
For the audition itself, you should prepare about fifteen minutes ofmaterial. Some schools have very specific requirements and you should,of course, observe those. When they do not, select a program of con-trasting material—something fast, something slow, something tradi-tional, something more modern. It is better to have too much than toolittle. Single movements are fine, as are etudes and orchestral excerpts.The goal is to give the panel a comprehensive look at your playing.That includes tone, intonation, rhythm, articulation, phrasing, fingertechnique, and so on. Make sure that your selected material has ele-ments of all of these things. Be prepared to play a few scales and to sight-read. And be prepared to answer a few questions—usually friendly, get-acquainted sorts of icebreakers. Dress well, as though you were goingto a job interview, but not formally. Business dress is fine. Make sureyour clothes are clean and pressed and your shoes shined. If you areused to expressing yourself through quirky grooming habits, today isprobably not the best day to do that. The panel will be trying to gainan impression of your personal qualities as well as your playing, so actprofessionally.
While on campus, you should get answers to some very importantquestions. You can ask these of the oboe teacher. If he or she does notknow the answer (the teacher should know most of these, though), theteacher can refer you to someone who does. If the audition proceduredoes not allow for a personal visit with the teacher, you can ask thesein writing via e-mail. Often a bit of Internet research or conversationswith oboe students will give good information also. Here are the kindsof things you should ask about:
· What is the size of the oboe studio? This is important. If it’s too small,you will have to play in every ensemble and will never have anytime to practice. While this sounds like fun, it is very damaging to your development as a player. If the studio is too large, youmay not get much large-ensemble playing for your first couple of years. That is a much better situation than the alternative.
· What playing opportunities are there? This is related to the firstquestion. You want to find out how many major ensembles—orchestras and bands—there are. There should be roughly two or three players for each of these. So if you are applying at aschool with three orchestras and three bands and there are fif-teen students in the oboe studio, that is close to perfect. If there is an orchestra and two bands and only three students, that spellstrouble. You do not want to be the best student in the studio theday you arrive there. You are much better off being the worst.
Career Development 199

You do not want to be immediately responsible for leading partsin major ensembles. There needs to be a basic training periodwhere you adjust to new demands and expectations and canmake a few mistakes without penalty.
· What opportunities for financial aid are there? Often music scholar-ships are available outside the university’s financial aid system.The university scholarship office may or may not know muchabout these. If you get the opportunity, make your financial needsknown, but do not be demanding. Even if it is true, do not saythat you cannot attend without a full scholarship.
· What contact will I have with the professor? Some schools have ad-junct oboe faculty—in other words, the teacher comes to campusonly to teach the lessons and is otherwise absent. Asking thisquestion also gives you a good idea of the teacher’s curricularstructure—are there reed-making classes, repertoire classes,studio classes, and the like?
· What degree program are most of the students following? If you areinterested in a performance degree but you would be the onlyperformance major, perhaps this particular situation is not foryou. If you have done good research, you should know the an-swer to this question already.
· What is the ratio of graduate students to undergraduates? Again, thisanswer can help you decide how comfortable you will feel withthe surroundings.
· What facilities support is there for oboe students? Is there a reedroom? Is there gouging and shaping equipment for the studentsto use? Everyone will eventually make reeds at home with theirown tools, but that can be difficult or impossible for a freshmanliving in a dormitory.
In order of importance, here are the things you should take intoaccount when making your choice:
· The quality of the teacher and your rapport with him or her. This onechoice can literally change your life. You will have done yourpreliminary research, so you have narrowed your choices to afew. Confirm that research—make sure you get a lesson, even ifit’s brief, while visiting the campus. Teachers are used to this re-quest, and most will accommodate it. Always offer to pay for thelesson, although some teachers will not charge if the student isapplying to their school.
· The quality of the institution. This will affect you directly and indi-rectly. If you have a fine teacher at a school with poor majorensembles, a starving library, or a lazy academic faculty, yourexperience will not be as rich. Do not be too concerned with the
200 Professional and Performance Considerations
prestige of the institution. Even the most famous schools canhave an uneven faculty. Find the best teacher and support foryou, and you will do well.
· Money. This should come into play only after all other things areequal. This is easy for me to say since it is not my money. But Ifeel that money is really unimportant in this discussion. A bache-lor’s degree is not returnable. It’s worth paying for the best one. It will repay you many times over. Parents have known for yearsthat their child will one day go to college, and while it sometimeshappens that a student gets a huge scholarship to a great school,don’t let that be the only feasible alternative. It is a common myththat oboe students receive more generous scholarship offers. Isometimes speak with parents of young (eleven or twelve yearsold) students who are preparing their children for oboe study“so they can get a scholarship in college.” That is just wrong. It istrue that there are fewer good oboists in high school than thereare, say, flutists. And, every university needs at least a few oboeplayers to play in its ensembles, so sometimes the school willoffer a bit of money for that. But the better schools do not givescholarships on the basis of the instrument you play; they con-sider only how well you play that instrument. So parents, pleaseencourage your children to play oboe if they love the sound, butdon’t expect it to save you money.
· Geographic location. It doesn’t matter whether you spend one houron the airplane or four hours. In some parts of the country it ispossible to find a good program within driving distance, but noteverywhere. Expand your search nationwide. Travel is easy.
· Family considerations. Again, this is easy for me to say, since it isnot my family. But I firmly believe that college should be differ-ent from high school and that one of those differences needs tobe a change of residence for the student. So even if the college is in the same town as the parents, the student should live oncampus and not at home.
Afterward
Now you have applied and auditioned, and you are receiving offers. Pro-fessors appreciate it more than you can imagine if you respond quickly.If I make you a financial offer and it is neither accepted nor refused fora month, I cannot offer that money to anyone else. It’s your moneyuntil the deadline. But when the deadline comes, the next person on mylist has probably already decided to go somewhere else. So if you canrespond quickly, it helps everyone. Don’t be afraid to tell University Athat you have decided to attend University B. You will not cause any hurtfeelings. We all know that any sensible student will apply to multiple
Career Development 201

schools and will only attend one. So don’t be embarrassed; just send apolite communication saying you have decided to attend University B,and thank the professor very much for all of the help and consideration.
Advice for the Advanced StudentWishing to Be a Professional
You need experience to get a job, but you need a job to get experience.This is the conundrum that every young musician struggles with. Mostundergraduate college students preparing a résumé for the first timeare embarrassed to see just how little is there—a couple of gigs, a fewprivate students, the appropriate university ensembles, and that’s aboutit. So the remedy is to build a professional résumé as soon as possible.This is not as difficult as it sounds. There will probably be communityorchestras and bands in your region; some will probably even pay a fewdollars. It is not important for this to be the Philadelphia Orchestra; it isimportant that you be able to audition and compete and win something.Then you can say that you are the second oboist of the XYZ SymphonyOrchestra. If you are interested in a teaching career, you can establisha similar track record with community colleges or independent commu-nity music schools. Again, prestige is unimportant; what is important isthat somebody hired you to do something.
Note that this is different from performing lots of casual “gigs” orteaching lots of private students. The crucial difference is that someonemust officially hire you to do something that pays a salary, even a verymeager one. It documents that someone thought highly enough of youto offer you employment, however humble.
Then observe what professional people do and emulate that. There isa saying in the business world that you should dress for the job you want,not the job you have. So act like the musician you would like to be, notthe one you are right now. Join the appropriate professional organiza-tions, whether it’s the International Double Reed Society or the Amer-ican Federation of Musicians or the College Music Society or all of them.That one step will repay you many times over in information gained.The International Double Reed Society has an annual conference, as doall professional organizations; attend as many of these as possible.
Attend summer festivals. You will probably have a great experienceplaying music, and you may get to study with a fine teacher, but themain point (and the point of attending International Double Reed So-ciety conferences) is to network. It is vastly helpful to your life and yourcareer to have as many friends and acquaintances as possible. Developthis early and work on it often. As I’ve already mentioned, people helpthose they like, but they have to know you first.
Focus your activities to support your professional goals. If youwant to be an orchestra musician, find some orchestras to play in. Ifyou want to be a university professor, observe what professors do: they
202 Professional and Performance Considerations
teach, of course, but they also perform concerts, make recordings, pub-lish research, organize chamber music series, and other activities. Stu-dents can do all of these things—on a lesser scale, but they can do them.You can publish an article or two: there are small music journals ornewsletters of musical societies that will publish most material submit-ted to them. Sometimes you have to join their society, but it is moneywell spent. You can arrange a recital with your trio at a local church or,better, at an out-of-town venue. You can have composer friends writemusic for you and record it on a privately published CD. You can per-form a service to your community: play free concerts in retirementhomes, or hospitals, or in facilities for disadvantaged youth. You canvolunteer to help an appropriate professional organization; again, thecontacts gained in this sort of activity can be invaluable.
The object of all of these suggestions is to build a strong résumé thatdemonstrates your professional potential. When preparing the résumé,do not be shy. This document is going out into the world as your rep-resentative. You can’t accompany it to point out particular achievements,so make sure your résumé does it for you. Annotate each line to ex-plain what it is and why it is noteworthy. Think of the résumé as anadvertisement, not just a fact sheet.
Audition Recordings
The other representative of yourself that is frequently requested bypotential employers is the audition recording. In various professionalcapacities, I have listened to hundreds of recordings that people havesent as their representative. It is my impression that sometimes peopleforget that the recording is their only representative. There can be nobonus points for personality, intelligence, fashion sense, or professionaldemeanor. It either sounds good or it doesn’t.
What follows is a little how-to guide for making a recording thatwill get your message across with a minimum of strain for the listenerand a maximum of benefit to you. Most of my suggestions will seemlike nothing more than common sense. But I would not be mentioninganything if people hadn’t sent me recordings, intended as their bestrepresentation of themselves, that did not include this flaw or that. Insome cases, that are not as rare as you would hope to believe, recordingsare substandard in ways that can hardly be described: unwise micro-phone placement (in the dishwasher, by the sound of things), externalnoises (far-off barnyard sounds of some kind), disturbing and mysteri-ous events (huge thumps about twenty times louder than the music),and other distractions. Anyone who listens to lots of audition recordingswill corroborate these stories and add their own. Don’t be one of theafter-dinner stories; make a great recording.
My first, and most important, recommendation is to use a profes-sional recording engineer. Find someone with good equipment who
Career Development 203
knows how to use it, and who will sit there and listen to playback whileyou are playing. Better yet, also have your teacher or a trusted col-league in the room listening to you and offering advice on how youmight improve your performance (in commercial recordings, this per-son is called the producer). These steps will avoid countless disappoint-ments and spare you the distraction of operating the equipment whilealso playing the music. It will also cost money, so you should apply acost/benefit analysis to this: you are trying to make an impression onsomeone, probably a stranger, with only this recording as your repre-sentative. Yours must be better than the other recordings.
Some recording guidelines are very specific: they might describe ex-actly what repertoire to perform and exactly which order to follow withthe selections; they sometimes even include recommended microphonemakes and models and microphone placements. The goal is only partiallyto make the recordings sound good; it is also to make them sound as uni-form as possible, allowing more precise comparison. So if you are givenexact guidelines, follow them exactly, even if your recording engineerthinks he or she can make it sound better with some other technique.
Most of the time, however, you have a free choice of program, soyou will need to select what you are going to play. Unless you are veryfortunate or have performed very extensively for many years, you willprobably not be able to use most of the live performances you have par-ticipated in. If you want to use something that was recorded live, listento it very critically, and have someone else listen to it very critically withyou. Chances are there will be something wrong. This may have noth-ing at all to do with you: there might be too much audience noise, orthe microphone was too close to the piano, or your friend playing theviolin got lost. Perhaps the quality of the recorded sound is a bit fuzzy;perhaps there is water in your octave key. Throughout all of this, youroboe playing might be absolutely first-rate. But if the performance as awhole is not beautiful, it will be difficult for the listener to notice thatyou, alone, are sounding good. So unless the live material is really con-vincing, consider making a custom-made audition recording.
However, just in case, if you are giving a performance that you knowwill be very well prepared and well rehearsed with good musicians—adegree recital, for example—make sure that a good recording engineerwith professional equipment is there to capture it. It would be a shameto play beautifully with no record whatsoever of the occasion.
If the recording guidelines specify that the recording must be madelive, reconsider what is meant by the word “live.” By asking for live per-formances, they are really asking for unedited recordings; they are notinsisting that you expose yourself to all of the random and strange thingsthat can happen during a real performance. So “live” does not mean thatthere has to be an audience, nor that you cannot play the movementagain if you think you can improve it. It does mean that you can’t sub-stitute an excellent phrase for a not-so-good one. You can’t play three
204 Professional and Performance Considerations
lines, take a break, play two more lines, and edit it all together later. Ofcourse, if the guidelines do not specify “live,” then you may edit to yourheart’s (and your budget’s) content. There is nothing dishonest aboutthis—it is still your playing—but it allows the best possible representa-tion of your playing. Some institutions now require a video recordingof your playing to assure that the material has not been edited. In thiscase, make sure that the audio portion of the recording is of the highestpossible quality. The video is less important.
Speaking of honesty (and, again, I wouldn’t mention this if it hadnever happened), don’t even think about cheating. Cheating, in thiscase, means passing someone else’s recording off as your own. Therecannot be any good outcome to this: you will be exposed either sooneror later. Either scenario reflects very badly on you and may cause last-ing damage to your future.
The audio quality of the recording should be the best you can afford.Use a good acoustic, use a good piano (and a good pianist), and use aprofessional engineer with real equipment. Don’t make it in your liv-ing room, don’t use a friend’s hobby equipment, and certainly don’t justleave your portable recording device in the piano and switch it on for awhile. The quality of personal recording equipment continues to im-prove, while the cost continues to decrease; do not be tempted by theconvenience and economy of this. Professionals still have better stuff andknow how to manipulate it more skillfully. The oboe is difficult to re -cord without distortion, so you need the best possible microphones.
Recording studios are not ideal—they seldom have a really goodpiano, and they deliberately have no acoustic at all, so that some artifi-cial reverberation will need to be added. Use a space in which you wouldbe comfortable performing, and have the engineer bring the equipmentto you. The expense will be considerable, but reasonable if you com-pare it to the cost of traveling somewhere for an audition. The judges,of course, are not primarily listening for brilliant audio quality, but theyshould be able to hear your playing clearly without straining througha fog of boomy echoes and fuzzy distortion. Remember, you want yourrecording to be the best one, not merely acceptable.
Listen to the recording before you send it out. Even if you paid aprofessional good money for it, listen to it carefully for any problems.These include ugly thumps and pops between selections, little bits ofconversation inadvertently recorded, pointless seconds of audienceapplause or audience murmuring, abrupt transitions from applause tosilence, pitch deviations between selections, volume discrepancies be-tween selections, and so on. About half of the recordings I hear cannotpossibly have been listened to. Listen to your recording more than onceon different equipment to make sure that it is compatible with a varietyof playback apparatus.
Unless required by the guidelines, do not make spoken announce-ments on the recording. Do include a neatly printed program.
Career Development 205
Leave plenty of time in advance of the deadline to fix any problems.Don’t rely too much on overnight shipping services.
If the recording repertoire is a list of required pieces or excerpts,which is the case for most competitions and preliminary orchestra audi-tions, be sure that you can play all of the music with accuracy, convic-tion, and a sense of the proper style. It stands to reason that somebodysomewhere will be able to play it really well, so if it’s beyond you, don’tenter.
Use a reed with a really clean sound. Microphones tend to pick uptreble—hiss and junk in the reed especially—so the nice warm orchestralreed you used in your last concert might sound spitty and fuzzy whenrecorded. You’re best off with a clear, compact sound that you can con-trol with a minimum of effort.
The worst microphone placement for the oboe is near the bell. Thebest sound of the oboe doesn’t radiate from the bell, it radiates out ofthe tone holes. A good microphone placement has the microphone afoot or two above the player’s head and several feet in front. The moredistant the microphone is, the higher it should be.
While playing for the recording, don’t be seduced by the fact thatyou can do it over and over. Play the music like it’s a performance. Thereis no good reason why the fiftieth take should be any better than thethird. If you can’t play the piece to your satisfaction after four or fiveattempts, it’s likely you aren’t ready.
206 Professional and Performance Considerations
Appendix 1
Thoughts for theComplete Beginner
You have just returned from the music store, or your school’s storageroom, with your new (or not-so-new, but new to you) oboe. What now?Most new things come with an instruction manual. The rest of thisbook presumes some prior knowledge of and experience with the oboe,but these few paragraphs should help the student who has never playedbefore.
Open the case with care. The handle is usually on the lower part ofthe case, and the lid is usually the half without the handle. Still, justin case you are holding the case upside down, open it gingerly the firsttime to make sure the pieces don’t tumble out. There will be threejoints—the top joint, the middle joint, and the bell—which you haveto assemble before playing. The top joint has the smallest diameter, themiddle joint is a bit larger, and the bell is the short flared part.
Gently twist the bell onto the middle joint. If there is a key on thebell, there will be a bridge key that connects the two joints; be very care-ful that this does not snag while you are putting the joints together.Hold the key on the bell closed (that’s the low B-flat key) while twist-ing the joints together; that will give more clearance. Some studentoboes are missing the low B-flat.
Bridge keys (there are two linking the middle joint to the top joint)are often badly bent on beginner oboes. Be careful. If the joint does nottwist very smoothly on the cork, apply a thin layer of cork grease to thecork and begin again.
207
After the lower half is assembled, add the top joint. Take note of thelocation of the two bridge keys and push the top joint straight downinto the middle joint without allowing the bridge keys to meet. Thengently turn the top joint until the two joints engage. Again, if the piecesdo not join smoothly, apply a thin layer of cork grease.
Set the oboe somewhere safe while you prepare the reed. I oftensee student oboes set in alarmingly precarious situations. If the oboe isgoing to be unattended for more than a few seconds, put it in the case.If you are in an ensemble rehearsal with lots of people moving around,the oboe should be either in your hand or in its case. Never leave it lyingon your unoccupied chair. Don’t leave it unattended on an instrumentpeg, either. Even when those are very sturdy—many aren’t—they canstill be knocked over.
The reed needs to be soaked before it can be used. This is best ac-complished by standing it in a small container—a shot glass or an empty35 mm film canister, if anyone still has those—filled with about half aninch of water. Set the reed in there very gently—the tip of the reed isvery thin and easily damaged. Leave it in the water for at least five min-utes before trying to play. Some players fill the reed tip with saliva andreturn the reed to its case for a few minutes; this works equally well.Do not allow the reed to soak for more than fifteen minutes or so; it willbecome waterlogged and require much more effort to control.
Now put the reed in your mouth and make a sound on it. Whenthat sound is a fairly strong C (two octaves above middle C on thepiano), you are ready to insert the reed into the oboe. After you haveexperimented with the oboe for a few hours, the first few chapters inthis book should be very helpful.
When you have finished playing, disassemble the oboe and care-fully swab out the inside before putting it back in the case. Be carefulswabbing: swabs can get stuck inside the bore if not gently used. Also,make sure that the reed is stored safely and that it is permitted to drycompletely.
If, after a few days or weeks, you find that playing the oboe is funand that you like the sound, then find a teacher. Your enjoyment andyour progress will be greatly enhanced.
208 Appendix 1. Thoughts for the Complete Beginner

Appendix 2
Fingering Chartfor Oboe andEnglish Horn
When more than one fingering is shown for a note, they are shown inorder of preference from left to right.
Experienced players often alter fingerings slightly to adjust pitch ortone quality. For example, many players like to add right-hand fingersto notes in the high-A-to-C range in order to “lengthen the tube” andthereby enrich the sound. Since there are many of these alterations, Ihave included only a few suggestions to show the general idea. Studentsshould first learn to play with the standard fingerings.
With rare exceptions, the back octave key should remain pressedwhen using the side octave key.
Optional fingering alterations are shown in gray. Entirely standardadjustments, like adding the low B key to the upper F-sharp and G, areshown in gray and outlined.
Fingerings marked as “alternate” should only be used to facilitateotherwise unplayable technical passages. They are either awkward toreach (like the “banana” key) or insecure in pitch and/or tone quality,and they should not be used if these problems can be heard. In the ex-treme high register, however, they should make any passage feasible.Be sure to consult the companion trill chart in appendix 3 for morepossibilities.
When choosing fingerings, use common sense. For example, thetonal benefit of using the left F key in a quick passage is sometimeslost because of the audible increase in sloppiness. Listen, and use whatsounds best.
209
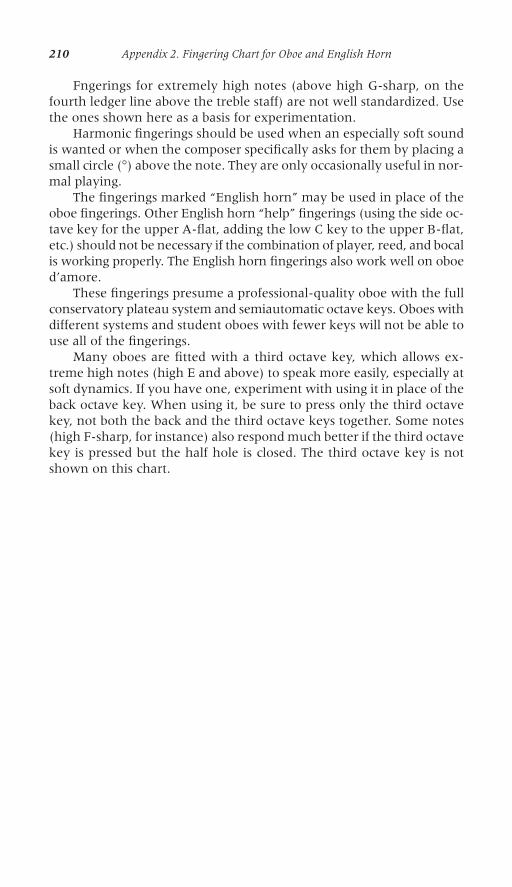
Fngerings for extremely high notes (above high G-sharp, on thefourth ledger line above the treble staff) are not well standardized. Usethe ones shown here as a basis for experimentation.
Harmonic fingerings should be used when an especially soft soundis wanted or when the composer specifically asks for them by placing asmall circle (°) above the note. They are only occasionally useful in nor-mal playing.
The fingerings marked “English horn” may be used in place of theoboe fingerings. Other English horn “help” fingerings (using the side oc-tave key for the upper A-flat, adding the low C key to the upper B-flat,etc.) should not be necessary if the combination of player, reed, and bocalis working properly. The English horn fingerings also work well on oboed’amore.
These fingerings presume a professional-quality oboe with the fullconservatory plateau system and semiautomatic octave keys. Oboes withdifferent systems and student oboes with fewer keys will not be able touse all of the fingerings.
Many oboes are fitted with a third octave key, which allows ex-treme high notes (high E and above) to speak more easily, especially atsoft dynamics. If you have one, experiment with using it in place of theback octave key. When using it, be sure to press only the third octavekey, not both the back and the third octave keys together. Some notes(high F-sharp, for instance) also respond much better if the third octavekey is pressed but the half hole is closed. The third octave key is notshown on this chart.
210 Appendix 2. Fingering Chart for Oboe and English Horn
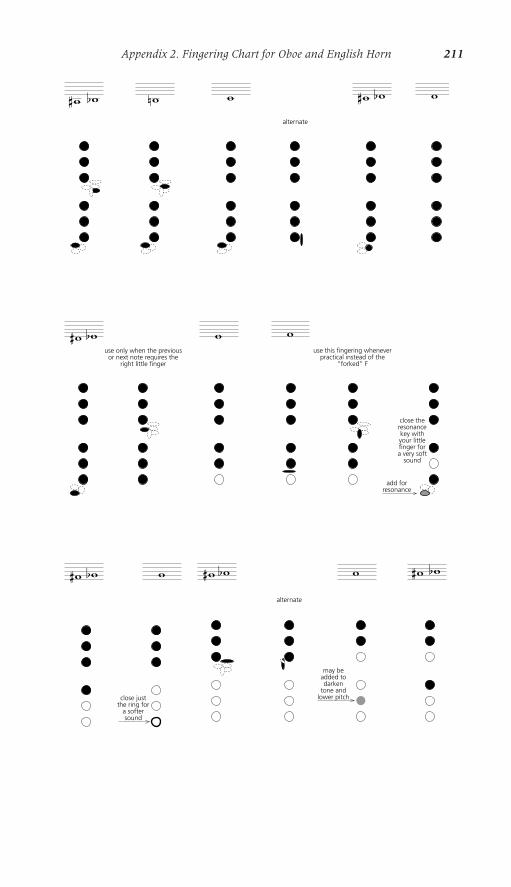
Appendix 2. Fingering Chart for Oboe and English Horn 211
alternate
�� �� �� � �� �� �
close theresonancekey withyour littlefinger fora very soft
sound
add forresonance
�� �� � �use only when the previous
or next note requires theright little finger
use this fingering wheneverpractical instead of the
“forked” F
close justthe ring for
a softersound
�� �� �
may beadded todarken
tone andlower pitch
alternate
��� �� �� ��
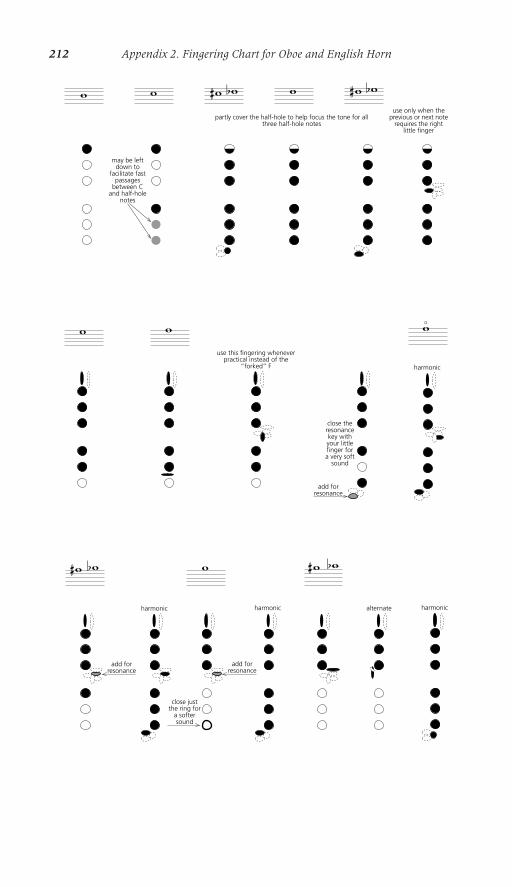
212 Appendix 2. Fingering Chart for Oboe and English Horn
may be leftdown to
facilitate fastpassages
between Cand half-hole
notes
� � �� �� � �� ��
partly cover the half-hole to help focus the tone for allthree half-hole notes
use only when theprevious or next note
requires the rightlittle finger
use this fingering wheneverpractical instead of the
“forked” F
close theresonancekey withyour littlefinger fora very soft
sound
add forresonance
����
harmonic
add forresonance
�� �� �� ��
harmonic harmonic alternate
close justthe ring for
a softersound
�
add forresonance
harmonic
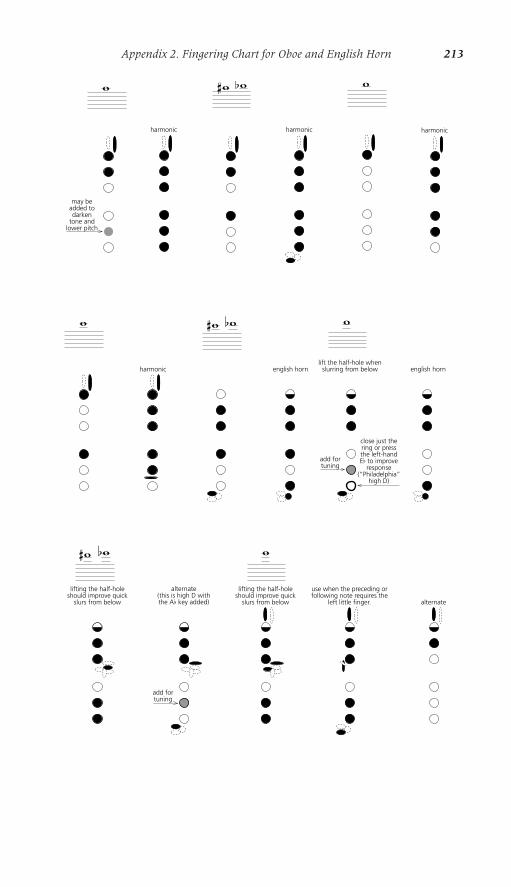
Appendix 2. Fingering Chart for Oboe and English Horn 213
may beadded todarken
tone andlower pitch
�
harmonic
�� ��
harmonic
�
harmonic
english hornenglish horn
�� ��
close just thering or pressthe left-handEf to improve
response(“Philadelphia”
high D)
add fortuning
�
lift the half-hole whenslurring from below
�
harmonic
�� ��
lifting the half-holeshould improve quick
slurs from below
alternate(this is high D withthe Af key added)
add fortuning
�
lifting the half-holeshould improve quick
slurs from below
use when the preceding orfollowing note requires the
left little finger. alternate
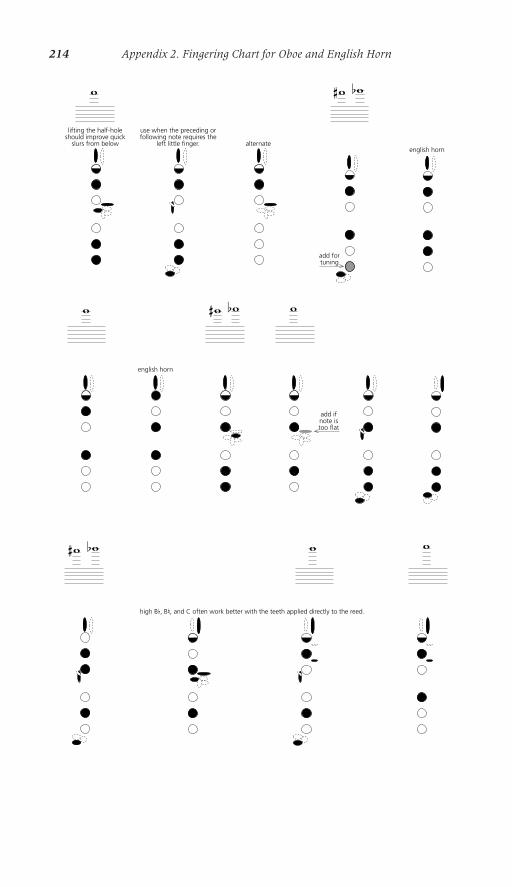
214 Appendix 2. Fingering Chart for Oboe and English Horn
high Bf, Bn, and C often work better with the teeth applied directly to the reed.
�
lifting the half-holeshould improve quick
slurs from below
use when the preceding orfollowing note requires the
left little finger. alternate
add fortuning
�� ��
english horn
english horn
add ifnote istoo flat
� �� �� �
� ��� ��
Appendix 3
Trill Fingering Chartfor Oboe andEnglish Horn
Each fingering shown will produce the lower note of the trill. Alter-nating the key with the arrow pointing to it will produce the trill. Trillsexecuted by alternating two standard fingerings are omitted from thischart.
Some trills will be impossible or out of tune on oboes without thefull conservatory system of keys and articulated mechanisms. Trillingbetween low B-flat and B-natural is impossible.
These trill fingerings can be used in addition to the alternate fin-gerings shown on the fingering chart in appendix 2 to facilitate rapidtechnical passages. Trill fingerings should never be used in slower play-ing or when their inferior tone quality, pitch, and response can be heard.
Some trills in the extreme high register cannot be played by mov-ing only one finger. In these instances, the two keys indicated by arrowsshould be beaten together.
215
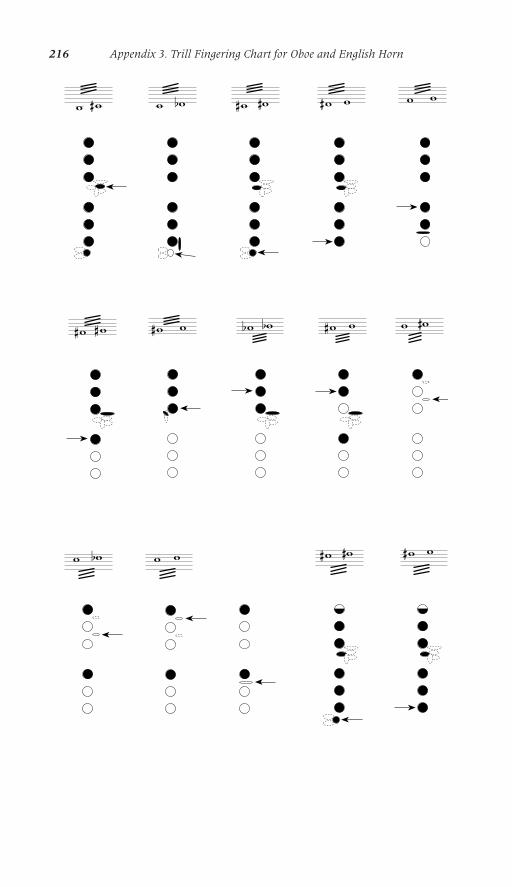
216 Appendix 3. Trill Fingering Chart for Oboe and English Horn
� �� � �� �� �� �� � � �
�� �� �� � �� �� �� � � ��
� �� �� �� �� �� �

Appendix 3. Trill Fingering Chart for Oboe and English Horn 217
� � �� �� �� � �� �� �� �
� �� � � �� ��� ��
� � �� �� �� � ���� �
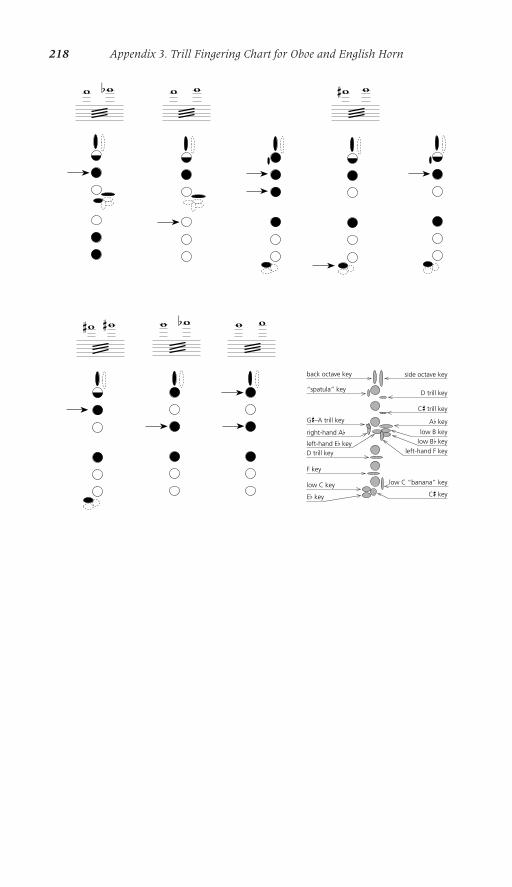
218 Appendix 3. Trill Fingering Chart for Oboe and English Horn
� �� � � �� �
D trill key
Cs trill key
side octave keyback octave key
“spatula” key
Gs–A trill key
right-hand Af
Af key
low B key
low Bf key
left-hand F keyleft-hand Ef key
low C “banana” key
D trill key
F key
low C keyCs keyEf key
� �� ���� ��

Bibliography
“A Living Legend—Pierre Pierlot: An Interview.” The Double Reed 23, no. 1(2000): 83–84.
Andraud, Albert J. Vade-Mecum of the Oboist. 9th ed. San Antonio, TX: SouthernMusic, 1940.
Baines, Anthony. Woodwind Instruments and Their History. Corrected 3rd ed. NewYork: Dover 1991.
Bartolozzi, Bruno. New Sounds for Woodwind. Trans. and ed. by Reginald SmithBrindle. London: Oxford University Press, 1967.
Bate, Philip. The Oboe: An Outline of Its History, Development and Construction. 3rded. New York: W. W. Norton, 1975.
Benade, Arthur. Horns, Strings and Harmony. New York: Doubleday, 1960.Berio, Luciano. Sequenza VII per Oboe Solo. London: Universal Edition, 1971.Berman, Melvin. The Art of Oboe Reed Making. Toronto: Canadian Scholars’ Press,
1988.Bleuzet, Louis. La Technique du Hautbois. 3 vols. Paris: Alphonse Leduc, n.d.Burgess, Geoffrey, and Bruce Haynes. The Oboe. New Haven, CT: Yale Univer-
sity Press, 2004.———. “The Premier Oboist of Europe”: A Portrait of Gustave Vogt. Lanham, MD:
Scarecrow Press, 2003.Debondue, Albert. Cent exercices pour Hautbois. Paris: Alphonse Leduc, n.d.Delaplain, Theresa. My Kingdom for a Reed: Manual for Beginning and Inter-
mediate Reedmakers. Fayetteville, AR: privately printed, 1996.Ferling, W. F. 48 Famous Studies, Op. 31. Rev. Albert J. Andraud. San Antonio,
TX: Southern Music, 1958.Florida State University Department of Psychology. “Expert Performance and
Deliberate Practice: An Updated Excerpt from Ericsson (2000).” www.psy.fsu.edu/faculty/ericsson/ericsson.exp.perf.html (accessed May 9, 2008).
219
Gillet, Fernand. Vingt minutes d’étude: Exercices journaliers pour la technique duhautbois. Paris: Alphonse Leduc, n.d.
Goossens, Léon, and Edwin Roxburgh. Oboe. Yehudi Menuhin Music Guides.New York: Schirmer Books, 1977.
Gorner, Peter. “Virtuoso Ray Still.” Journal of the International Double Reed Society8 (1980). www.idrs.org/publications/Journal/JNL8/still2.html.
Haynes, Bruce. The Eloquent Oboe: A History of the Hautboy 1640–1760. New York:Oxford University Press, 2001.
———. Music for Oboe: 1650–1800. 2nd ed. Fallen Leaf Reference Books in Music16. Berkeley, CA: Fallen Leaf Press, 1992.
Hewitt, Stevens. Daily Exercises after Maquarre. Philadelphia: privately printed,n.d.
———. Method for Oboe. Philadelphia: privately printed, 1973.Joppig, Gunther. Oboe und Faggot: Ihre Geschichte, ihre Nebeninstrumente und ihre
Musik. Bern: Hallwag Verlag, 1981. In English: The Oboe and the Bassoon.Trans. Alfred Clayton. Portland, OR: Amadeus Press, 1988.
Ledet. David A. Oboe Reed Styles: Theory and Practice. Bloomington: Indiana Uni-versity Press, 1981.
Light, Jay. Essays for Oboists. Des Moines, IA: Alborada Publications, 1994.———. The Oboe Reed Book. Des Moines, IA: privately printed, 1983.Marcello, Alessandro. Concerto in D Minor. Monteux: Musica Rara, 1977.Marcello, Benedetto. Concerto in C Minor. Bonn: R. Forberg, 1923.———. Concerto in C Minor. New York: International Music, n.d.———. Concerto in C Minor. San Antonio, TX: Southern Music, n.d.McCall, Bruce D. The Essential Guide to Adjusting Your Oboe. Knoxville, TN: McCall
Woodwinds, 2005.McGill, David. Sound in Motion: A Performer’s Guide to Greater Musical Expression.
Bloomington and Indianapolis: Indiana University Press, 2007.Mozart, Wolfgang Amadeus. Quartet in F Major, KV 370 (368b). Kassel: Bärenreiter,
1987.Neufeld, Victoria, ed.. Webster’s New World Dictionary of American English. 3rd col-
lege ed. New York: Macmillan, 1994.Pear, John, Glyn Brown-Evans, and Sandro Caldini. The Cor Anglais Companion.
2nd ed. Manchester, UK: Ephemerae, 1998.Rothwell, Evelyn. Oboe Technique. 3rd ed. New York: Oxford University Press,
1983.Ruiz, Gonzalo X. Post to IDRS-L mailing list. April 20, 2001.Singer, Lawrence. Metodo per oboe. Trans. Reginald Smith Brindle. Milan: Edizioni
Suvini Zerboni, 1969.Sprenkle, Robert, and David A. Ledet. The Art of Oboe Playing. Princeton, NJ:
Summy-Birchard, 1961.Stolper, Daniel. “The Robert Bloom Collection: Solo Works and Chamber Music
for Oboe.” Notes 58, no. 1 (2001): 186–91.Storch, Laila. Marcel Tabuteau: How Do You Expect to Play the Oboe If You Can’t Peel
a Mushroom? Bloomington and Indianapolis: Indiana University Press, 2008.Van Cleve, Libby. Oboe Unbound: Contemporary Techniques. Lanham, MD: Scare-
crow Press, 2004.Veale, Peter. The Techniques of Oboe Playing: A Compendium with Additional Remarks
on the Whole Oboe Family. Kassel: Bärenreiter, 1998.
220 Bibliography

Index
abdomen, expansion of, 6–7abdominal muscles, 7–8accent, musical, 58accountability, personal, 192adrenaline, 83air. See also breathing; diaphragm;
supportas agent of phrase shape, 47inhalation of, 5–7primary responsibility of, 16 puffing into cheeks, 21
alternate fingerings, 35, 209American Federation of Musicians,
202angle of oboe to body, 5, 21arms, distance from body, 5, 28articulation
multiple tonguing, 42–44patterns for baroque music, 62–63speed development, 39, 78–79stopping notes, 38–39, 41–42technique, 38–40variety of, 40–41
audiences and performance anxiety,80–81
audition recordings, 203–206audition repertoire, 199
Bach, J. S., 41, 48bachelor’s degree in music, 196–197bark of cane, 112Barret, Apollon Marie-Rose, 46,
47–48, 51, 53, 54, 55beeswax, 105, 117, 172Beethoven, Ludwig van, 69biting, 18bloops, elimination of, 34–35blowing. See supportbreath attacks, 9, 38–39breathing
circular, 12–14exercise for, 6physical benefits of, 10planning of, 10–12technique, 5–7
bright sound, 146bumper corks, 160burr on knife blade, 123–124
canediameter of, 104diameter gauge for, 105folding of, 114gouging of, 109–110, 145hardness testers for, 112
221
cane (continued)pregouging, 108–109selection of, 106–113shaping of, 113–115, 116splitting of, 104–105storage conditions for, 111trimming to length, 108
cane splitter, 105ceramic stones, 175chest, expansion of, 6–7circular breathing, 12–14cocobolo wood, 154College Music Society, 202collegiality, importance of, 187competence, instrumental, 187–188conductor, role of, 188–189conservatories of music, 197–198cutting block, 105, 173
dark sound, 22, 146dial indicator, 105, 110de Lancie, John. See Lancie, John dediamond stones, 175diaphragm, 5–6diaphragm vibrato, 5, 24diminuendo, 19dissonance, 62double jointedness, 29–30double tonguing, 42–44double trills, 96Dvorák, Antonin, 32dynamics, 19, 48–50, 136
easel, 105, 114, 173echo (musical device), 62editions, 58–59Eliot, T. S., 21embouchure, 16–19English horn
bocals, 179–180hand position, 37reeds, 149–150special fingerings for, 210
etudes, 79exhaling, 10–11expertise, acquisition of, 73
Ferling, W. F., 26, 51, 90FF nylon string, 172Fidelio, 69
fight-or-flight syndrome, 83financial aid, college, 200, 201fingerings, 31–34, 36, 95, 209fingers, 28–30, 32fishskin, 176flat playing, 20flutter tonguing, 97forked F, 31–33full conservatory key system, 156
glissandi, 96gouge thickness, 110–111gouging cane, 109–110, 145gouging machine, 105, 109–110,
176–178Graf gouging machines, 109grammar, musical, 50–51grenadilla wood, 154
half hole, 36, 163hand position, 27–28harmonics, 94–95, 210hemiola, 54–55high notes, 20, 35, 95
India stones, 174inflection, 52–53instrument insurance, 158International Double Reed Society,
158–159, 195, 197, 202Internet instrument sales, 158interpretation, 58, 61
jaw position, 17
key clicks, 98knife, 105
holding, 122placement on cane, 128pressure, 123sharpening, 123–124, 133selection of, 173–174
knots, tying, 119–121
Lancie, John de, 3, 42, 49, 76larynx, 24–25Lauschmann, Richard, 64legato, 75lip muscles, 18list price, 154
222 Index
Liszt, Franz, 60live recordings for audition purposes,
204–205long tones, 76–77Lorée, F., 157, 181
mandrel, 105, 117, 173Marcello, Alessandro, 55, 63, 64–65Marcello, Benedetto, 64meter, 53–56metronome, 84–86micrometer, 110microtones, 95modified conservatory key system,
156Mozart, W. A., 52–53, 58, 63, 65–69multiphonics, 97music
business of, 193dictionaries, 57education degree, 196foreign words in, 57informed reading of, 56–58therapy degree, 196
notation, 61note groupings, 47–48, 50–52, 56
oboesblown-out, 157bore of, 154breaking in, 159cracking of, 159old, 157plastic, 154, 155second-hand sales of, 158shipping of, 158
octave keys, 35–36, 69, 209oil
for bore, 161for mechanism, 159–160
orchestra auditions, 188ornaments, 68overblowing, 9overlap of cane blades, 117–118, 141overtones, 21–22overuse injury, 30
performance anxiety, 83–84performance degree, 196
performing, preparation for, 80–83phrase shape, 46–48piano lessons, benefit of, 194–195pitch
bends, 96in chamber ensembles, 190in orchestra, 191–192relationship to resonance, 23, 86
plaque, 105, 129, 175–176plumber’s Teflon tape, 176posture, 4–5practice-room sound, 74, 83practice sessions, recording of, 86–87practicing
correct method of, 70–72division of time for, 74ideal amount of, 72mental, 89slowly, 87slowly, for small ensembles, 191for speed development, 31
pregouger, 105, 108–109principal player, role of, 188–189projection, 22–23punctuality, importance of, 186punctuation, musical, 50–52
quarter tones, 95
razor blades for shaping, 114RDG Woodwinds, 109recordings, listening to, 56, 60reed case, 178reed illustrations, 127, 130, 131, 148reed knife. See knifereed making
appropriate age for, 195for beginners, 102–103as craft, 101–102experience as factor in, 134frequency of, 146golden rules for, 133–134mistakes in, 134 stages of, 126–128, 147
reed-making kit, 171reed placement in mouth, 17, 19–20reeds
analyzing tone quality of, 146appropriate resistance for, 8–9, 136back scraping of, 140
Index 223
reeds (continued)balance of, 128–129, 132, 145basic characteristics of, 135–137clipping of, 126, 139–140, 141,
142crowing, 144, 150English horn, 149–150flat, 141heart scraping of, 140leakage, 118opening of, 107, 141, 142, 145resistance of, 8–9, 136response of, 135scraping of, 122–123, 124sharp, 142–143soaking of, 208stability of, 135–136straightness of, 118structure of, 124–126, 128, 132,
146symmetry of, 132testing, 145, 146tip of. See tiptip balance of, 129, 138–139, 143,
146tone quality of, 137tone versus function of, 135, 137vibration characteristics of,
143–144wiring for English horn, 149–150
Reeds ’n’ Stuff gouging machine, 109rehearsal ettiquette, 189–190rental instruments, 155–156resonance
pitch and, 23, 86placement, 22–23
résumé development, 202–203rosewood, 154Ross, Dan, 109Rothwell, Evelyn, 7ruler, 105, 176
scales, 77–78scraping 122–123, 124sequence (musical device), 62, 64–65shaper handle, 105, 114shaper tip, 105, 113–114shaping cane, 113–115, 116sharpening stones, 123–124, 174–175
sight-reading, 79simple conservatory key system, 156speed reading, 89–92Sprenkle, Robert, 42staccato, interpretation of, 41, 42staple, 105, 115, 117, 171–172Strauss, Richard, 56string, 105, 117, 172style, musical, 60–61support, abdominal, 7–8swabs, 178–179
technique, 27, 30Teflon-tipped adjustment screws, 160tension, correct use of, 20third octave key, 36, 163, 210throat vibrato, 24thumbrest, position on thumb, 28tie length, determining, 119timbre, 75tip
balance of, 129, 138–139, 143, 146effect of thinning, 138–139looseness of, 107, 119, 126,
147–148tone concept, 21–23tongue placement, 21, 38tonguing. See articulationtremolos, 96–97trills, 67triple tonguing, 42–44tube. See stapletuner, 86, 190–191tuning A, 190turns, 68
underblowing, 9universities for music study, 198
vibrato, 24–26, 96Vivaldi, Antonio, 52voicing. See vowel shapevowel shape, 20, 75
warming up, 74–77, 186water in keys, 159,190water stones, 123–124, 175work light for reed making, 176wrist position, 28
224 Index