ocularis client lite manual - onssi client user manual . introduction . introduction . ocularis™...
TRANSCRIPT

Ocularis™ Client
User Manual
© 2012 On-Net Surveillance Systems Inc.

On-Net Surveillance Systems, Inc. One Blue Hill Plaza, 7th Floor, PO Box 1555
Pearl River, NY 10965 Phone: (845) 732-7900 | Fax: (845) 732-7999
Web: www.onssi.com
000081312-1107-3.5.0.74
Legal Notice
This product manual is intended for general information purposes only, and due care has been taken in its preparation.
Any risk arising from the use of this information rests with the recipient, and nothing herein should be construed as constituting any kind of warranty.
© 2002-2012 On-Net Surveillance Systems, Inc. All rights reserved. OnSSI and the ‘Eye’ logo are registered trademarks of On-Net Surveillance Systems, Inc. Ocularis, Ocularis Client, Ocularis Client Lite, Ocularis Video Synopsis, NetEVS, NetDVMS, NetDVR, ProSight, NetGuard, NetGuard-EVS, NetSwitcher, NetMatrix, NetCentral, NetTransact, NetPDA and NetCell are trademarks of On-Net Surveillance Systems, Inc. All other trademarks are property of their respective owners.
On-Net Surveillance Systems, Inc. reserves the right to change product specifications without prior notice.
Patents Applied For in the U.S. and Abroad

Ocularis Client User Manual Contents
Table of Contents
INTRODUCTION..............................................................................................................................1
OCULARIS CLIENT MODES ..........................................................................................................2
INSTALLATION AND LOGIN..........................................................................................................3
MINIMUM SYSTEM REQUIREMENTS...................................................................................................3 INSTALLATION..................................................................................................................................3 LOGGING IN TO THE OCULARIS CLIENT .............................................................................................4 OCULARIS CLIENT VERSION .............................................................................................................5 OCULARIS CLIENT INTERFACE..........................................................................................................6
Application Controls...................................................................................................................7
VIEWS..............................................................................................................................................9
VIEWS AND VIEW GROUPS ...............................................................................................................9 View Elements .........................................................................................................................10
SCROLLING MENUS .......................................................................................................................11
LIVE MONITORING WITH QUICK REVIEW.................................................................................12
DISPLAYING VIEWS........................................................................................................................12 QUICK REVIEW AND CAMERA CONTROL DURING LIVE MONITORING .................................................13
View Pane Controls .................................................................................................................13 Quick Review Tools .................................................................................................................18 Two-way audio.........................................................................................................................25
BROWSING (INVESTIGATION MODE)........................................................................................26
SHIFTING BETWEEN LIVE AND BROWSE MODES ...............................................................................26 THE BROWSE (INVESTIGATION) WINDOW........................................................................................26
The Scalable Kinetic Timeline .................................................................................................27 Browse Mode Controls ............................................................................................................28
MOTION DETECTION ......................................................................................................................30 Applying motion detection to recorded video...........................................................................30
THE TIME SLICER ..........................................................................................................................32 Accessing video of an incident using the Time Slicer..............................................................32
THE MOTION SLICER .....................................................................................................................34 Accessing video of an incident using the Motion Slicer...........................................................34
ALERTS.........................................................................................................................................35 Accessing video of an incident using Alerts ............................................................................35
SEQUENCES..................................................................................................................................37 Accessing video of an incident using Sequences....................................................................37
TRIGGERS.....................................................................................................................................39
CLIENT SETUP .............................................................................................................................40
VIDEO TAB ....................................................................................................................................40 SHORTCUTS TAB...........................................................................................................................42
To Configure Custom Keyboard Shortcuts..............................................................................43 To Use a Keyboard Shortcut ...................................................................................................45
JOYSTICK CONTROLS TAB .............................................................................................................46 To Configure Joystick Controls................................................................................................46
VIDEO WALL TAB...........................................................................................................................47 To Configure A Video Wall ......................................................................................................48
On-Net Surveillance Systems, Inc. i

Contents Ocularis Client User Manual
ii On-Net Surveillance Systems, Inc.
EXPORTING EVIDENCE (VIDEO AND STILL IMAGES).............................................................51
Designating a range for exporting video..................................................................................51 Exporting an AVI video clip......................................................................................................52 Exporting a Video Database....................................................................................................56 Viewing an Exported Video Database .....................................................................................57 Exporting Still Images (individual frames) ...............................................................................59 Printing a Still Image Report ....................................................................................................61 Bookmarks ...............................................................................................................................62 Export Progress .......................................................................................................................65
ALERTS .........................................................................................................................................66
BLANK SCREEN MONITORING.........................................................................................................66 Using Blank Screen Monitoring ...............................................................................................67 Alert Counter............................................................................................................................68 Alert Priorities...........................................................................................................................68 Clearing an Alert from a Blank Screen ....................................................................................69
ALERT MANAGER ..........................................................................................................................70 LOCATING ALERTS ON A MAP .........................................................................................................72
Manually Locating Alerts..........................................................................................................72 Automatic Alert Location..........................................................................................................72
STORING AND HANDLING EVENTS...................................................................................................73 Handling Alerts ........................................................................................................................73
ACCESSING STORED (HANDLED) ALERTS .......................................................................................74 Sorting Alerts ...........................................................................................................................75 Viewing Alerts ..........................................................................................................................75 Exporting Alert Video ...............................................................................................................75
OCULARIS MAPS .........................................................................................................................76
VIEWING OCULARIS MAPS .............................................................................................................76 Map Navigation........................................................................................................................76 Image Preview .........................................................................................................................77 Image Arrange .........................................................................................................................78
OCULARIS VIDEO WALLS...........................................................................................................79
OCULARIS VIDEO WALL CONFIGURATION........................................................................................79 USING A VIDEO WALL ....................................................................................................................79
Changing Video Wall Panes ....................................................................................................81 Managing Video in a Video Wall..............................................................................................81
APPENDIX A – OCULARIS CLIENT IN LIMITED MODE ............................................................83
CREATING VIEWS AND VIEW GROUPS.............................................................................................83 POPULATING VIEW PANES .............................................................................................................85
Populating a view pane with a Camera ...................................................................................85 Populating a view pane with a Hotspot....................................................................................86 Populating a view pane with a Carousel..................................................................................86 Populating a view pane with a Web Page or Image................................................................88 Populating a view pane with Push Video.................................................................................88 Saving Changes and Testing the View....................................................................................89
CONTACT INFORMATION ...........................................................................................................90

Ocularis Client User Manual Introduction
Introduction
Ocularis™ Client is a feature-rich IP video client/controller that allows users to:
Monitor live video from an unlimited number of cameras at multiple sites, with instant-investigation
capabilities.
Easily access and investigate alerts, generated by both motion detection and external systems.
Send and receive automated push-live-video of alerts.
Export video clips and still images for further event handling or as court evidence.
These features are available if using Ocularis Client directly with an NVR or with Ocularis Base.
Using Ocularis Base, Ocularis Client features expand to include:
An Alert Manager to handle alerts received to classify and assign to incident cases
Blank Screen Monitoring
Bookmark exported video clips for sharing and easy retrieval
Map displays to visibly manage campus and security environments
Video Wall support
Ocularis Client supports the following languages:
English
Italian
Spanish
Portuguese
French
Arabic
Simplified Chinese1
Russian
Swedish
Finnish
German
Dutch
1 Simplified Chinese is not included in the standard interface. To obtain Ocularis Client in this language, please contact OnSSI Sales.
On-Net Surveillance Systems, Inc. 1

Introduction Ocularis Client User Manual
2 On-Net Surveillance Systems, Inc.
Ocularis Client Modes
The Ocularis Client software application will dynamically change based upon the log in method used. If used
to log into a recording component directly (i.e. use the recording component’s server IP address and port
number in the login screen), the application will behave in a ‘limited’ mode. If Ocularis Client is used to log
into the recording component via Ocularis (and therefore uses the IP address of the Ocularis Base Server in
the login screen), the application will maintain full features as defined by the Ocularis Software License
Code (SLC). These features are documented in this manual.

Ocularis Client User Manual Installation and Login
Installation and Login
Minimum System Requirements
Operating System: Microsoft®
Windows®
XP Professional SP3, Microsoft®
Windows®
Vista
Business, Ultimate or Enterprise (32 & 64 bit), Microsoft®
Windows®
7 Professional, Ultimate or Enterprise (32 & 64 bit)
CPU: Intel® Core 2™ Duo
RAM: 4 GB minimum
Graphics Adapter: PCI-Express, 256 RAM, Direct 3D supported
Guidelines for Video RAM Requirements: 20 simultaneous Video Channels: 512 MB 35 simultaneous Video Channels: 1 GB 50 simultaneous Video Channels: 1.5 GB 64 simultaneous Video Channels: 2 GB
Video RAM requirements are regardless of number of attached monitors. Additional factors may affect video RAM requirements, including megapixel cameras, compression format, as well as video card and other system hardware specifications.
Installation
Typically, you install the Ocularis Client software on each operator machine by accessing an installation web
page on the Ocularis Base machine. The Ocularis Client may be installed on any number of machines as it
is free of charge. Refer to the Ocularis Installation and Licensing Guide for detailed instructions on installing
Ocularis Client.
On-Net Surveillance Systems, Inc. 3

Installation and Login Ocularis Client User Manual
Logging in to the Ocularis Client
The login procedure to gain access to Ocularis Client is very simple.
1. Launch the Ocularis Client application from the desktop icon.
2. Alternatively, you may choose Start All Programs OnSSI Ocularis Client. A login window will appear.
3. Enter your login information, as follows:
The Login Dialog
User Name and Password:
Obtain a user name and password from your system administrator. A user account and
password is required to gain access to system video.
Server:
The Server address entered here depends on your environment. If your organization has
Ocularis Base, you should log in to the Ocularis Base Server directly. If your company does
not use Ocularis Base, log into the recording component directly.
If logging in through Ocularis Base:
Type the IP address of the Ocularis Server (e.g. 192.168.10.123). Including the port
number is not required in most cases (when the port number = 80). Previously entered IP
addresses can be selected from the drop-down list.
If logging in to the recording component (NVR) directly:
Type the host name or IP address of the recording component Image Server, including
port number, as specified by your system administrator (e.g. 192.168.10.123:81).
Previously entered IP addresses can be selected from the drop-down list.
Authentication:
Choose Basic or Windows, as instructed by your system administrator.
4 On-Net Surveillance Systems, Inc.

Ocularis Client User Manual Installation and Login
Store Last Login:
All fields on the login page (User Name, Password, Server IP address and Authentication
method) will be saved to facilitate easy entry upon subsequent logins.
Auto-Login:
When the application is launched, this checkbox allows the system to automatically launch the
Ocularis Client and logs in to the designated server. When logging in with Windows
authentication; checking the ‘Store Last Login’ check box is required.
To disable Auto-Login, once you successfully launch the Ocularis Client, select Shutdown from
the title menu and choose ‘log out’. The login screen will appear; uncheck the Auto-Login box
and log in again. You will be prompted to login the next time the application is started.
Ocularis Client Version
To view the version number of the installed Ocularis Client software, from the main menu,
select Views About Ocularis Client.
Ocularis Client version
On-Net Surveillance Systems, Inc. 5
Installation and Login Ocularis Client User Manual
Ocularis Client Interface
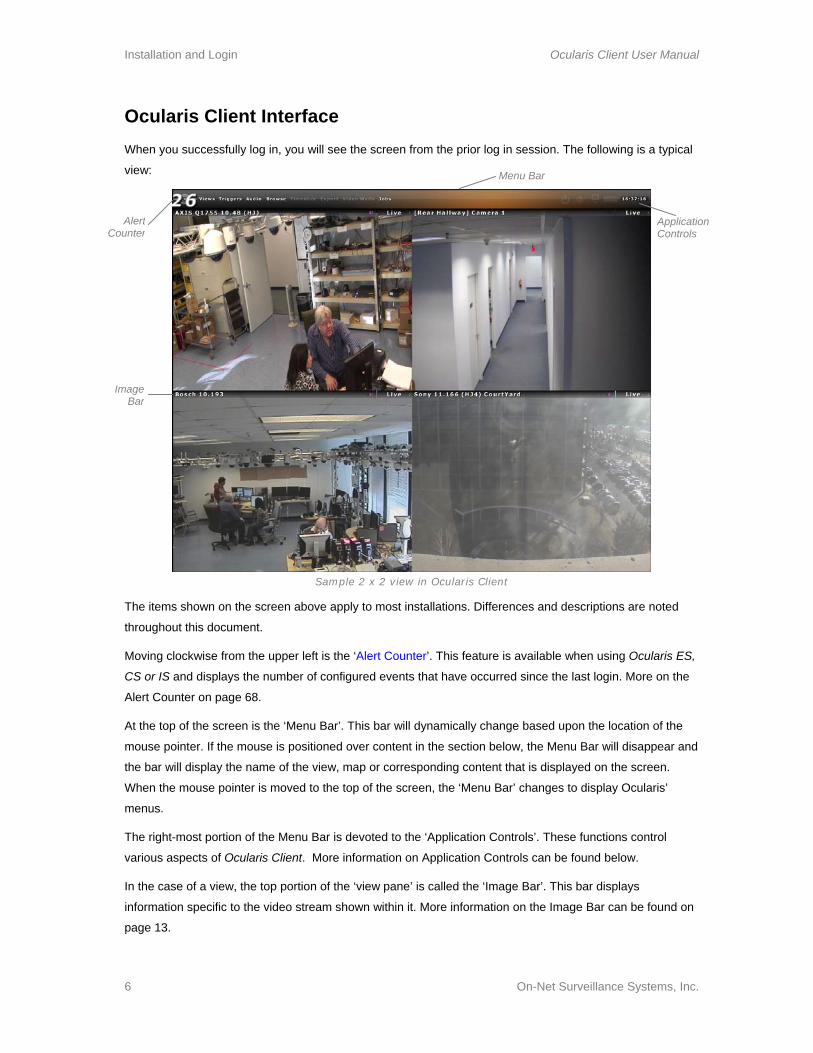
When you successfully log in, you will see the screen from the prior log in session. The following is a typical
view:
Alert Counter
Application Controls
Menu Bar
Image Bar
Sample 2 x 2 view in Ocularis Client
The items shown on the screen above apply to most installations. Differences and descriptions are noted
throughout this document.
Moving clockwise from the upper left is the ‘Alert Counter’. This feature is available when using Ocularis ES,
CS or IS and displays the number of configured events that have occurred since the last login. More on the
Alert Counter on page 68.
At the top of the screen is the ‘Menu Bar’. This bar will dynamically change based upon the location of the
mouse pointer. If the mouse is positioned over content in the section below, the Menu Bar will disappear and
the bar will display the name of the view, map or corresponding content that is displayed on the screen.
When the mouse pointer is moved to the top of the screen, the ‘Menu Bar’ changes to display Ocularis’
menus.
The right-most portion of the Menu Bar is devoted to the ‘Application Controls’. These functions control
various aspects of Ocularis Client. More information on Application Controls can be found below.
In the case of a view, the top portion of the ‘view pane’ is called the ‘Image Bar’. This bar displays
information specific to the video stream shown within it. More information on the Image Bar can be found on
page 13.
6 On-Net Surveillance Systems, Inc.

Ocularis Client User Manual Installation and Login
Application Controls
The upper right portion of the Menu Bar contains functions known as ‘Application Controls’. These functions are defined as follows:
Control Graphic/Icon
Log off; click this icon to log off (switch users) or to Shut Down (Exit) Ocularis Client software.
The ability to log off or shut down is controlled by the system administrator. If you click the Log off icon and this function is disabled for your user account, you will be prompted for Log Off Credentials. Enter user account credentials for a user with the log off privileges and click Submit.
Setup: This icon is only available when logged in directly to the recording component (NVR). Click this icon to enter Setup in Ocularis Client Limited Mode.
Online Help: click this icon to launch the Ocularis Client online help file. You need Adobe Reader to view the file.
Minimize: click this icon to minimize Ocularis Client on the current monitor.
The ability to minimize the application is controlled by the system administrator. If your account does not have the privilege
to minimize, you will see this icon:
Memory Indicator: hover the mouse cursor over this icon to receive a snapshot of the current memory allocation. More details on page 8.
Clock: Current time of the Ocularis Client shown in 24 hour format.
EC Status: if the OnSSI Event Coordinator Service on the Ocularis Base machine stops, an additional icon will appear in the Application Control section on all logged in Ocularis Client screens.
On-Net Surveillance Systems, Inc. 7

Installation and Login Ocularis Client User Manual
8 On-Net Surveillance Systems, Inc.
Memory Indicator
You can determine the amount of memory that Ocularis Client is using by positioning the mouse pointer over
the Memory Indicator icon. For instance, an 8 x 8 view streaming high resolution video will use significantly
more memory than a 2 x 2 view. Items shown are defined as:
Working Set: The amount of RAM memory that is being used by Ocularis Client. A warning message
will appear when 1.5 GB of memory used is reached.
Virtual Memory: The total amount of memory that Ocularis is accessing at the current moment (includes
memory that is shared with other parts of the system). A warning message will appear
when 1.5 GB of memory used is reached.
GPU: Graphical Processing Units or Texture Memory that is left; GPUs are a measure of the
graphics accelerator found on the video card. A warning message will appear when 80%
GPU is reached.
Should a memory warning message appears, click OK. The warning message should remain dormant for at
least 5 minutes to allow you to modify the view. If desired, click the “Do not show this message again”
checkbox to prevent further message notices for the current session.
To modify the upper limits of the working set and GPUs, create an ASCII file on the c: drive called:
c:\onssimem.txt which includes a line with the working set limit following by a comma and then followed
by the GPU limit. For example:
1500,100
where the 1500 represents 1.5 GB limit for the working set memory and 100 represents 100 MB of
Texture Memory.

Ocularis Client User Manual Views
Views
Views and View Groups
In Ocularis Client, cameras are displayed within Views. A view can contain up to 64 cameras. Multiple views
can be configured, and displayed simultaneously across multiple monitors.
When Using Ocularis Client (with Ocularis Base)
Operators have access to views created by an administrator. These views are organized by user group and
are configured in the Ocularis Administrator application.
When Using Ocularis Client directly with an NVR, (without Ocularis Base)
This method of access will result in Ocularis Client in Limited Mode. To access specific views, and to allow
users to personalize their monitoring preferences, operators can access both Shared Views and Private
Views, stored in groups and subgroups:
Shared Views, usually created by the surveillance system administrator and stored on the NVR the
user is logged in to, can be accessed by all users or by a group of users based on authorization.
Private Views can be accessed only by the user that created them.
For more information on operating Ocularis Client in Limited Mode, see Appendix A on page 83.
On-Net Surveillance Systems, Inc. 9

Views Ocularis Client User Manual
View Elements
Different panes within a view can be set to display video in one of the following modes:
Camera panes:
Any camera from a connected image server can be displayed within a camera pane. Upon
interaction, Quick Review controls will appear, including controls for playback and optical and digital
PTZ (when applicable).
Carousel panes:
Cameras can be displayed in sequence, configured by order and dwell time. Carousel views also
display all playback and PTZ controls, as well as controls for previous/next camera and
pause/resume carousel.
Web pages and images:
Web pages and images can be included in views as auxiliary resources.
Push Video panes:
One or more Push Video panes can be configured to allow for peer-to-peer push video.
Blank Screen panes (not shown):
Supported when using Ocularis Base, one or more panes can be configured to receive event driven
alert video.
Hotspot pane (not shown):
Usually configured in a large pane, the hotspot will display cameras by clicking on a camera, alert or
carousel pane. Once sent to the hotspot, the original and the hotspot displays can be controlled
independently. Additional Options
Carousel with Quick Review, optical and
digital PTZ, and carousel controls
Live web page
Push Video Pane, for receiving manual (peer-to-peer) push-live-video
Camera Panes with Quick Review as well as optical and digital PTZ
Push Monitor
Static Image
10 On-Net Surveillance Systems, Inc.

Ocularis Client User Manual Views
On-Net Surveillance Systems, Inc. 11
Scrolling Menus
At any point with the Ocularis Client, if a menu list is longer than available screen real estate, you can scroll
the menu. Use a click and drag motion up or down with the mouse, similar to many touch phone interfaces,
to move the menu list up or down.

Live Monitoring with Quick Review Ocularis Client User Manual
Live Monitoring with Quick Review
Displaying Views
Once views are created, they can be displayed and navigated.
To display a view in Ocularis Client:
1. Click the ‘Views’ menu item.
2. Click the desired View Group / Folder to expand the list of views; continue to expand folders and
subfolders until you reach the desired view.
3. Click the desired view. Depending on your system’s settings, it may take a few seconds until all
panes are populated. A blinking green indicator will indicate a live video stream from the camera.
The Live Monitoring window
12 On-Net Surveillance Systems, Inc.

Ocularis Client User Manual Live Monitoring with Quick Review
Quick Review and Camera Control During Live Monitoring
Ocularis Client provides multiple tools for adjusting the contents of view panes, sending video alerts, and on-
the-fly investigation of the video displayed.
WARNING: If you have trouble seeing the display of video, make sure that the camera name does not have any special characters in it including: < > & ' " \ / : * ? | [ ] See your system administrator to remedy this.
View Pane Controls
Pane vs. full-screen (maximized) display modes
Click on the camera pane Image Bar (which displays the camera name) to toggle between multiple
camera view and full screen display modes.
Image Bar
When viewing Live video, the top of each pane contains the Image Bar.
The camera name appears on the left portion of the Image Bar. This may be the name from the
recorder or the alternate name assigned to the camera in the Ocularis Base.
The recording status of video output is located in the rightmost portion of the image bar.
Click the Image Bar to maximize or restore the size of the pane.
Image Bar
Ocularis Client Image Bar
Ocularis Client video Indicators are defined as follows:
On-Net Surveillance Systems, Inc. 13

Live Monitoring with Quick Review Ocularis Client User Manual
1. Event Indicator: The first square alternates between yellow and black. Yellow indicates that a
recorder event has occurred on that camera.
2. Recording Indicator: The second (center) square alternates between red and black. Red indicates
recording is taking place and will remain on as long as the system is recording the camera’s feed.
3. Motion Indicator: The third square alternates between blue and black. Blue indicates that motion
is occurring on the camera feed.
4. Recording Status: To the right of the Indicators, the recording status of the camera is displayed as
follows:
Live Video – Displays the text “Live” and a pulsing green square icon
Stopped Video – Displays a “!” character
In addition to these indicators, there may be additional content visible in a camera stream in Live or Browse
mode. If a Privacy Mask was configured, a portion or portions of the image may be blocked from view.
Privacy Masks may be set at the camera, recorder or Ocularis level. The image below depicts a rectangular
Privacy Mask positioned over the desk, affording the receptionist some level of privacy.
display camera
description
Privacy Mask
Additionally, if the system administrator adds a detailed description of the camera view, you will see this by
positioning the mouse to the left of the camera name on the image bar. The description appears on the
image as an overlay while the mouse remains in position.
Circular Control Menu
Right-click on a camera view, or left-click (or touch) and hold for one second, to display the ‘Circular
Control’ Menu.
14 On-Net Surveillance Systems, Inc.
Ocularis Client User Manual Live Monitoring with Quick Review
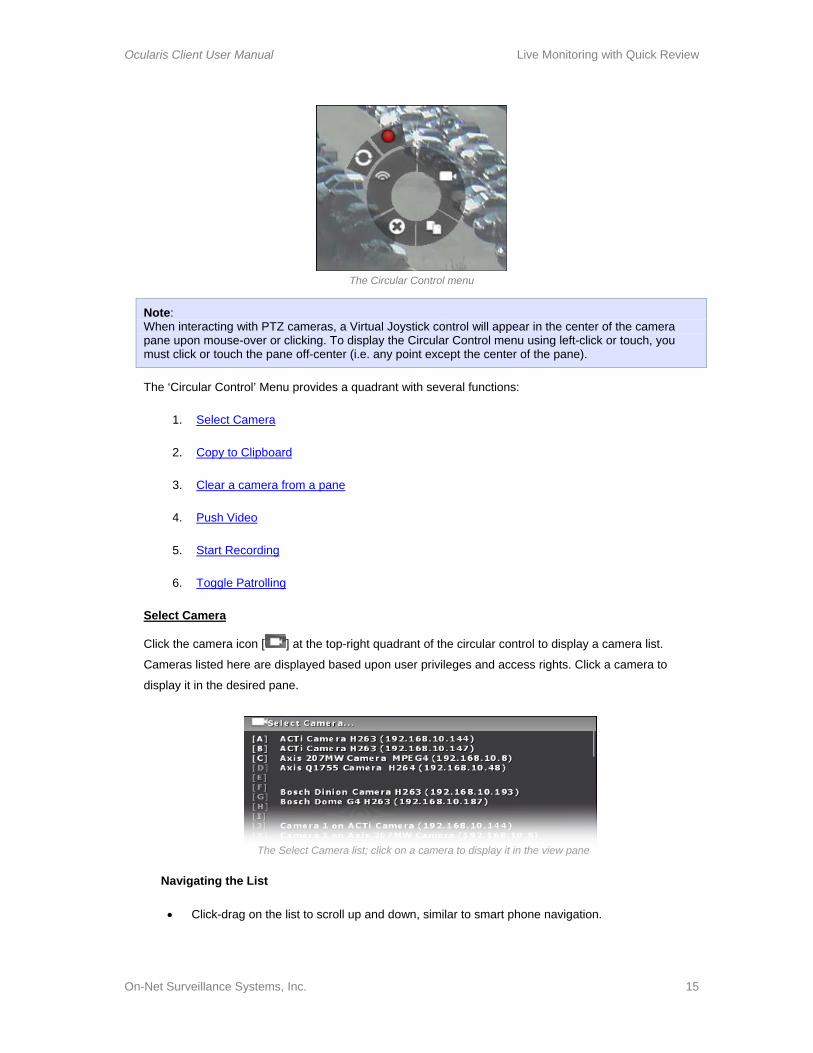
The Circular Control menu
Note: When interacting with PTZ cameras, a Virtual Joystick control will appear in the center of the camera pane upon mouse-over or clicking. To display the Circular Control menu using left-click or touch, you must click or touch the pane off-center (i.e. any point except the center of the pane).
The ‘Circular Control’ Menu provides a quadrant with several functions:
1. Select Camera
2. Copy to Clipboard
3. Clear a camera from a pane
4. Push Video
5. Start Recording
6. Toggle Patrolling
Select Camera
Click the camera icon [ ] at the top-right quadrant of the circular control to display a camera list.
Cameras listed here are displayed based upon user privileges and access rights. Click a camera to
display it in the desired pane.
The Select Camera list; click on a camera to display it in the view pane
Navigating the List
Click-drag on the list to scroll up and down, similar to smart phone navigation.
On-Net Surveillance Systems, Inc. 15

Live Monitoring with Quick Review Ocularis Client User Manual
Click on a Quick-Link (highlighted capital letter) to display the camera names that begin with
that letter.
Type all or a portion of the name or keyword of a camera. For instance:
Example: type portion of name
This example results in displaying cameras containing with ‘Son'
Example: type portion of model number
This example results in displaying any camera containing the text ‘755’
Note that on-the-fly changes are only temporary, and will not affect the saved view.
Copy to Clipboard
Right-click on a camera view, or left-click (or touch) and hold for one second, to display the ‘Circular
Control’ Menu.
Click on the ‘Clipboard’ icon [ ] in the bottom-right quadrant of the circular control menu. This will save
the displayed camera image to the clipboard which can be pasted into different applications for later use.
A “Frame in Clipboard” confirmation message will appear.
Clear a camera from a pane
Right-click on a camera view, or left-click (or touch) and hold for one second, to display the ‘Circular
Control’ Menu.
Click on the ‘Remove Camera’ icon [ ] in the bottom-left quadrant of the circular control menu to
remove the camera from the pane.
16 On-Net Surveillance Systems, Inc.

Ocularis Client User Manual Live Monitoring with Quick Review
Note: Removing a camera from a view pane as described above will only delete it temporarily; permanent removal of a camera from a view can only be done modifying the view.
Push Video
Live video can be pushed manually, as described herein, to other users’ designated Push Video panes
(see ‘Populating a View Pane with Push Video’ in the ‘Configuring Views’ section, page 88.) This feature
is available in Ocularis ES, CS and IS.
To manually send video, right-click on a camera view, or left-click (or touch) and hold for one second, to
display the ‘Circular Control’ Menu.
Click the ’Push Video’ icon [ ] in the top-left quadrant of the circular control menu. This will display the
recipients list.
The list will display all users currently logged in to the Ocularis Base-Server. Or, if logged in directly to an
NVR, the list of configured NetMatrix recipients appears.
Click on a recipient name to send live video; click-drag to scroll up and down the list. The recipient must
have a view with a Push Video pane visible in order to see the video.
Push Live Video recipients list
Note: Please refer to the recorder user manual for NetMatrix Push Video Configuration when logging directly into the recorder.
Start Recording
When viewing live video, you may see activity occurring that you wish to capture. You may manually
start recording the video displayed in the pane. This feature is supported on Ocularis PS, Ocularis IS
and Ocularis CS. To manually initiate recording:
Right-click on a camera view, or left-click (or touch) and hold for one second, to display the ‘Circular
Control’ Menu.
On-Net Surveillance Systems, Inc. 17

Live Monitoring with Quick Review Ocularis Client User Manual
Click the ‘Start Recording’ icon [ ] in the upper-left outer quadrant of the ‘Circular Control’ Menu to
begin recording video from the selected pane.
Video will be recorded for a predetermined time. The default time is 5 minutes. The system
administrator configures this time setting on the recording component. Recording is indicated by the
red center square in the pane’s image bar.
Access to this icon is controlled through either the Ocularis Administrator or the recording component’s
management application. If you do not have access to this icon and you think you should, see your
system administrator
Toggle Patrolling
PTZ cameras may be configured to patrol from a preset position to another preset position. While
viewing video, you may wish to pause the camera at a given preset in order to view video activity taking
place. Click the ‘Toggle Patrolling’ icon in the upper-left outer quadrant of the ‘Circular Control’
Menu to pause the patrol. The PTZ camera will remain at this position, until the user clicks ‘Resume
Patrol’ found in the same position on the ‘Circular Control’ Menu.
Keep in mind that the user who pauses the patrol has control over the PTZ camera. The camera will be
paused in the current position for all users until the initiating user either resumes patrol or logs off
Ocularis Client.
Access to this icon is controlled through either the Ocularis Administrator or the recording component’s
management application. If you do not have access to this icon and you think you should, see your
system administrator
Quick Review Tools
Playing back video
Upon mouse-over, whether in full-screen or pane mode, playback controls will appear in the pane.
Click and hold the ‘Forward’ (right arrow) or ‘Reverse (left arrow) buttons to review video. Releasing the
buttons will pause the video stream. Note that clicking on the ‘Forward’ button while viewing live video
will pause the video stream.
Pause a live video stream by using the ‘Pause’ button. When the video is paused, the pause icon will
change to a heart symbol; to resume live video, click the heart-shaped ‘Live’ [ ] button.
Applying Digital PTZ
18 On-Net Surveillance Systems, Inc.

Ocularis Client User Manual Live Monitoring with Quick Review
Digital PTZ can be applied to video in any mode or pane, live or recorded.
To apply digital PTZ, click-drag or touch-drag a rectangular region within the camera view. The selected
region will expand to the entire size of the camera display. Note that the default for optical PTZ cameras
is optical zoom, therefore the ‘Digital PTZ’ option must be selected prior to drawing a Digital PTZ region.
Digital PTZ in live monitoring mode. Note the PIP window (upper right)
Once a Digital Zoom region is created, a PIP (picture-in-picture) of the entire camera view, indicating the
selected digital PTZ area, will appear in the top right corner of the camera view, for orientation and
navigation. The selected area can be dragged within the PIP, maintaining the same magnification level.
This zoomed image may be copied to the clipboard using the Circular Control Menu.
Click or touch the camera view (outside of the PIP window) to remove the digital PTZ and return to
normal camera view.
Optical PTZ
Ocularis Client offers a number of methods for controlling PTZ-enabled cameras.
1. Click to Center: click on any point within the camera view to center the camera on it.
2. Virtual Joystick: hover over or touch the center of the camera view to display the virtual PTZ
joystick handle, and drag it in any direction for continuous panning and tilting.
The Virtual PTZ Joystick
3. Physical joystick: standard USB joysticks can be used to pan, tilt and zoom the camera view.
This may require configuring the joystick buttons.
4. Click-drag/touch-drag region: draw a region within the camera view to center the camera and
set the zoom level. Zoomed images may be copied to the clipboard using the Circular Control
Menu.
On-Net Surveillance Systems, Inc. 19

Live Monitoring with Quick Review Ocularis Client User Manual
5. Mouse Scroll Wheel: optical zoom in/out can be applied in any mode (including digitally-zoomed
camera views) using a scroll-wheel mouse.
6. Zoom control ribbon: click on any point on the zoom ribbon, or use the [+] and [-] buttons, to
set the zoom level.
The Zoom Control Ribbon
7. Optical PTZ presets: Click on the ‘Presets’ button alongside the playback controls to display the
PTZ presets as configured on the recording component (see the individual recording
component’s user manual for more information). This will display the presets list.
Click on an item on the list to display the PTZ preset, or click-drag up and down to scroll the
available presets.
The Optical PTZ Presets list
8. Toggle between optical and digital PTZ: Click the ‘Optical PTZ’ button to toggle between digital
and optical PTZ.
Note: Not all controls are available in conjunction with every PTZ camera model.
20 On-Net Surveillance Systems, Inc.
Ocularis Client User Manual Live Monitoring with Quick Review
Note:
While users may have the ability to view video from a PTZ camera, they may not have the privilege to control its functions. These privileges may be set for the user within the user settings of the recording component or Ocularis Administrator.
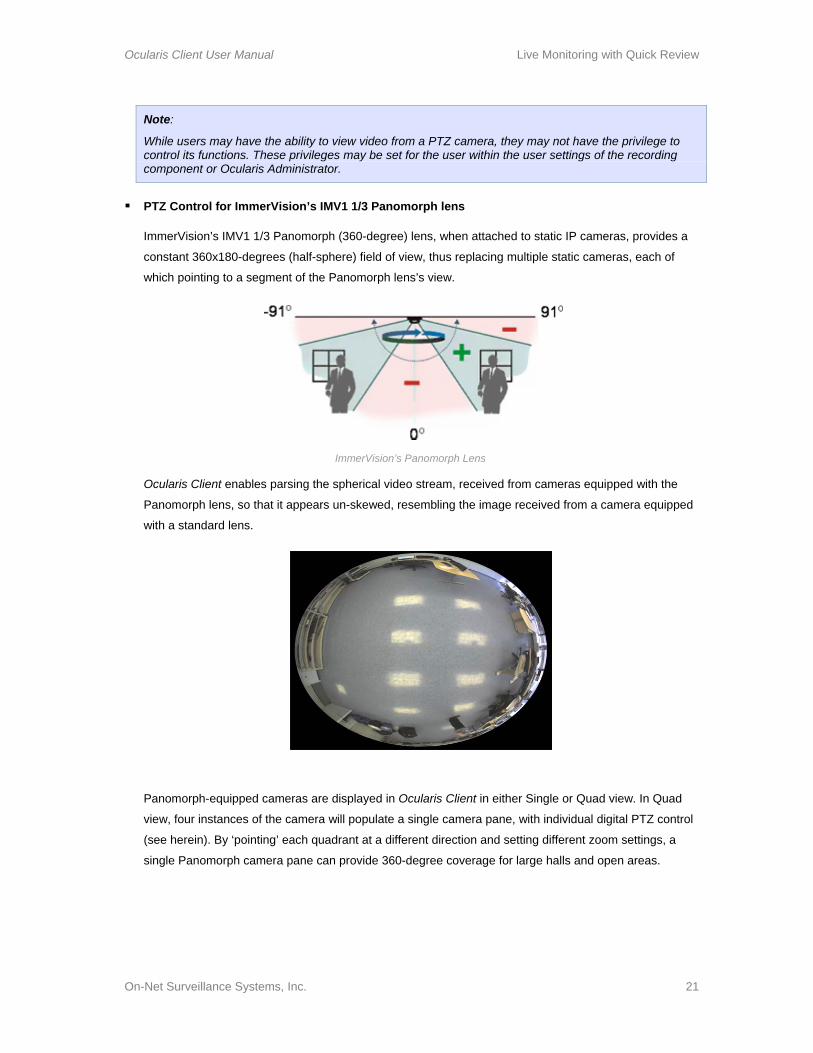
PTZ Control for ImmerVision’s IMV1 1/3 Panomorph lens
ImmerVision’s IMV1 1/3 Panomorph (360-degree) lens, when attached to static IP cameras, provides a
constant 360x180-degrees (half-sphere) field of view, thus replacing multiple static cameras, each of
which pointing to a segment of the Panomorph lens’s view.
ImmerVision’s Panomorph Lens
Ocularis Client enables parsing the spherical video stream, received from cameras equipped with the
Panomorph lens, so that it appears un-skewed, resembling the image received from a camera equipped
with a standard lens.
Panomorph-equipped cameras are displayed in Ocularis Client in either Single or Quad view. In Quad
view, four instances of the camera will populate a single camera pane, with individual digital PTZ control
(see herein). By ‘pointing’ each quadrant at a different direction and setting different zoom settings, a
single Panomorph camera pane can provide 360-degree coverage for large halls and open areas.
On-Net Surveillance Systems, Inc. 21

Live Monitoring with Quick Review Ocularis Client User Manual
Controls for Panomorph lens views include:
Playback controls (standard; forward, back and pause)
Quad-to-Single toggle – click on the [360] button to display the [Single] and [Quad] buttons, which
toggle between a single and a four-quadrant view of the camera. This option is available whether
the Panomorph camera is in a view of its own, or is part of a multi-camera view alongside other
cameras.
Panomorph View Controls
Virtual Joystick – clicking anywhere within the camera view and moving the cursor in any direction
will create a pan/tilt effect, resembling that of an optical PTZ camera.
o Moving the cursor down will, in ceiling-mounted cameras, cause the camera view to face
upward; moving the cursor left and right will move the camera view in the opposite
direction, at a speed relative to the length of the horizontal gesture.
o Clicking on the center of the camera view in single mode, and in the intersection of the
four quadrants in quad mode, will display the Virtual Joystick cursor, which provides a
visual indicator to the PTZ control.
o Zoom In/Out – to zoom in and out, use the Zoom Ribbon on the right side of the screen, or
the mouse wheel if available. At a certain zoom level, the camera view will revert to the
original, pre-parsed 360 view.
o Presets – currently disabled (will be available in subsequent release).
Carousel sequence control
22 On-Net Surveillance Systems, Inc.

Ocularis Client User Manual Live Monitoring with Quick Review
Carousel panes can be controlled just like any other camera pane, for playback, digital PTZ and optical
PTZ.
Carousel navigation icons Standard navigation icons
In addition, Ocularis Client enables skipping to the next and previous camera in the carousel sequence,
as well as pausing the sequence.
Once paused, the carousel will show the current camera indefinitely. To resume the carousel, click on
the pause button again.
Creating a Carousel Dynamically
You may create a carousel on the fly in any pane displaying camera video. In the desired pane, simply
use the ‘Circular Control’ Menu and click the ‘Select Camera’ icon.
Click the ‘+’ next to the camera to add
When the resulting camera list appears, click the ‘+’ symbol next to the desired camera. The camera is
added to the pane, rather than replacing the existing camera.
Carousel indicator of number of
cameras
Carousel playback controls
On-Net Surveillance Systems, Inc. 23

Live Monitoring with Quick Review Ocularis Client User Manual
Adding a Carousel as needed
Hotspot control
Hotspots are typically used when many panes are displayed and the operator needs to enlarge the view
of one camera while still viewing others. Multiple hotspot panes may be configured as well.
To use a hotspot:
1. Open a view which contains a hotspot pane.
2. Click once on the hotspot pane to select it.
3. Click on another pane with camera video (carousels and other hotspots included). This video
should now appear in the hotspot pane.
Populating a hotspot pane
4. Video in the hotspot may be paused and navigated like any other pane.
24 On-Net Surveillance Systems, Inc.

Ocularis Client User Manual Live Monitoring with Quick Review
On-Net Surveillance Systems, Inc. 25
5. When done viewing the video in the hotspot, use the Circular Control Menu to clear the hotspot
pane.
6. Repeat steps 2 and 3 above to select a different camera stream for the hotspot.
Two-way audio
Ocularis Client enables both listening to audio from camera-connected microphones and sending audio
to camera-connected speakers. All camera-connected audio devices are configured in the management
application of the recording component.
Cameras with connected audio equipment display audio icons in the top right corner of the screen, for
listening to camera connected microphone (below left) and sending audio to cameras.
Clicking on either icon will disable the feature, indicated by [ ]. Note that audio icons appear
only upon mouse move, together with all other playback and PTZ controls. Audio controls are also
visible from ‘Audio’ on the menu.

Browsing (Investigation Mode) Ocularis Client User Manual
Browsing (Investigation Mode)
Ocularis Client’s Browse mode includes a variety of tools for quick, easy access to video of incidents,
reviewing the events before, during and after the incident, and for exporting segments of video for
evidence.
Shifting between Live and Browse modes
In the top menu bar, click Browse to shift to Browse mode. Once in Browse mode, the menu item will
change to Live for returning to Live monitoring.
Upon switching between Live and Browse modes, the currently displayed camera view will carry between
the modes. This includes current cameras displayed in full screen, carousel panes, hotspots push-video
panes.
As opposed to the Live Monitoring view, which displays multiple cameras asynchronously (i.e. different
panes can show playback, paused and/or live cameras simultaneously), the Browse mode displays all
cameras synchronously. This provides insight as to the events taking place at different locations at the
time an incident occurred, and allows easily tracking an incident as it moves from camera to camera.
The Browse (Investigation) Window
Current time (may differ from displayed video time)
Camera name and time/date of video
displayed
Kinetic Motion Timeline, with video time stamp and timeline scale
Browse Mode controls
The Browse Window
Ocularis Client’s Browse window offers a number of tools and methods for accessing and enhancing
video of incidents:
26 On-Net Surveillance Systems, Inc.

Ocularis Client User Manual Browsing (Investigation Mode)
The Scalable Kinetic Timeline
The Kinetic Timeline provides a clear overview of recorded motion events over extended periods of time.
It can be used for reviewing video from multiple cameras simultaneously at variable speeds, for quick
access to video of incidents.
Browse Mode
controls
Color-coded zones of recording and detected
motion
Timestamp of video
displayed
Time interval markers
Timeline Scaling controls
The Kinetic Timeline
Timeline Color-Coding
Color-coded segments in the timeline are used to indicate whether video has been recorded at a
certain time, and whether motion was detected during those periods:
Black: no video was recorded
Green: video was recorded, but no motion has been detected
Red: video was recorded, containing motion events
Blue/Purple: indicates the future, starting from the current time
Scaling the timeline
Use the [+] and [-] buttons on the right to scale the timeline, thus extending or contracting the time
period displayed. As the Timeline is scaled, marker line spacing will contract or expand.
Playing video using the timeline
The Kinetic Timeline allows for quickly scanning extended portions of recorded video from one or
multiple cameras. ‘Swiping’ the timeline (rapidly dragging and releasing while still in motion) in either
direction will play the video at a speed proportional to the speed of the swiping motion. The Kinetic
Timeline can also be used for ‘shuttle’-style playback by click-dragging the timeline in a slow,
controlled manner.
Using the timeline in multiple-camera views
In multiple-camera views, the Kinetic Timeline at the bottom of the Browse window refers to the
selected camera (indicated by a blue frame around the camera view pane), while all other cameras
maintain an individual timeline at the bottom of each camera pane. Click on another camera pane to
select it; this will automatically associate the main Timeline with the newly-selected camera.
On-Net Surveillance Systems, Inc. 27

Browsing (Investigation Mode) Ocularis Client User Manual
Browse Mode Controls
Ocularis Client’s Browse Mode Controls allow for precise playback control and access to events by
motion sequence, frame-by-frame playback, normal-speed playback and time/date. This group of
controls also provides access to the motion detection toolbar, and is used to search recorded video for
motion in a defined area of the view.
Frame-by-frame forward/
rewind
Skip to next/previous
sequence
Go to start/end of database
Apply video motion
detection
The Browse Mode
Toolbox
Set start/end of segment for video export
Go to time/date
Normal speed play/reverse
play
Apply Video Motion Detection
Transition to Motion Detection mode (described in the next section)
Frame-by-frame forward/rewind
Review video frame-by-frame in both directions.
Next/previous motion sequence
Motion sequences display the actual starting point of detected motion occurrences.
Go to start/end of database
Access directly the beginning of the video database and the current time.
Normal speed playback
Review recorded video at normal speed, both forward and backward. Click on the timeline to pause.
Note: You may increase the speed of the playback (up to 1024 times) if, after you click the normal speed icon once, you hold the [SHIFT] key and click the icon again. Repeat this to increase the speed of the playback.
Set start/end of bookmark
Graphically set the start and end points of video segments. This is used when exporting video as
evidence (described in the ‘Video Export’ chapter)
28 On-Net Surveillance Systems, Inc.

Ocularis Client User Manual Browsing (Investigation Mode)
Go to Time/Date
Access video from a specific time and date; scroll up and down the time unit rollers to set the exact
time and date.
The time/date utility
Tool Tips
If you are not sure of a tool’s meaning, and the mouse is positioned over the tool, a description of that tool’s function appears.
Tool Tip
On-Net Surveillance Systems, Inc. 29

Browsing (Investigation Mode) Ocularis Client User Manual
Motion Detection
Motion detection enables expediting the event detection process, by eliminating the need to manually
review volumes of video data. Motion can be detected within a defined zone, and the detection process
can be configured to the exact parameters of the targeted behavior or movement.
Applying motion detection to recorded video
1. Click on the Motion Detection button [ ] in the Browse Mode toolbox. This will replace the
Browse Mode controls with the Motion Detection Controls.
Return to Browse Mode
Skip to next/previous motion event
Set time interval for detection
Go to start/end of database
The Motion Detection Toolbox
Set percentage of changed pixels
Set detection sensitivity
Go to time/date
2. Draw a rectangular region in the camera pane. A motion level gauge will appear on the
bottom of the region.
3. Set the motion detection parameters, to match the nature of the targeted movement:
Time Interval (sampling rate)
Set this parameter based on the duration of the motion event. Set a high sampling rate
(e.g., frame-by-frame) for vehicles on a roadway, as they may enter and exit the
detection region within a fraction of a second. On the other hand, large values should be
set for slow moving persons or objects. Available values are frame-by-frame (FBF), 1, 5,
10 and 30 seconds.
Percentage of changed pixels
Set this parameter based on the size or area of the movement, relative to the detection
region. For example, set a high value or detecting a vehicle entering a detection region
the size of a single parking space; this will prevent false detections of persons walking
in the parking lot. Values range from 1% to 99%.
30 On-Net Surveillance Systems, Inc.

Ocularis Client User Manual Browsing (Investigation Mode)
Sensitivity
This parameter defines the amount for pixel color and brightness change. Set this
parameter according to the amount of ‘noise’ caused by ambient lighting, shadows,
reflections from windows, etc.
4. Set the start time for motion detection. Use the ‘Go To Time/Date’ utility, skip to the
beginning or end of the recorded video database, or drag the timeline to the desired time
and date.
5. Click the ‘Skip to Next/Previous Motion Event’ to begin searching, going either back or
ahead in time.
6. Adjust the time interval, pixel change and detection sensitivity parameters if too many or too
few motion events are detected.
7. Click ‘Return to Browse Mode’ to return to the primary Browse Mode view.
On-Net Surveillance Systems, Inc. 31

Browsing (Investigation Mode) Ocularis Client User Manual
The Time Slicer
Ocularis Client’s Time Slicer functionality enables users to easily and quickly access video of an incident
by auto-generating equal-interval thumbnails of a specific camera view. Once the incident is evident in
one of the thumbnails, the user can create sets of thumbnails of increasingly smaller time intervals,
towards accessing the exact moment the incident began or ended.
Time Slicer
Current View pane
Timeslice thumbnails
Mode Selector
Timeslice direction (back/forward in
time); pause slicing
Time Slicing Interval
Kinetic Motion Timeline, with video time stamp and timeline scale
Interchangeable Motion Detection/
Playback Controls
The Time Slicer
Accessing video of an incident using the Time Slicer
1. In Browse Mode, click on the Timeslice menu item.
2. The Time Slicer will generate thumbnails of the currently selected camera view, spaced 10
minutes apart, starting from the currently displayed time-stamp and back in time. The Timeslice
Current View pane displays the camera view at the current time stamp (indicated on the Kinetic
Timeline.)
3. For convenient detection limited to a certain part of the camera view, you may apply digital
zoom by drawing a rectangular region in the Timeslice Current View. This will change the zoom
level in all Timeslice thumbnails.
32 On-Net Surveillance Systems, Inc.

Ocularis Client User Manual Browsing (Investigation Mode)
4. Depending on the nature of the incident searched, you may adjust the initial time interval and
the direction of detection (backward or forward in time).
Use a larger interval to detect significant or semi-permanent changes to the current camera
view, that occurred days before or after the current time stamp (e.g. set the interval to One
Day to detect damage to a building that occurred within the past week.)
Use a smaller interval to detect short-term, transient incidents that occurred within hours or
minutes of the current time-stamp (e.g. use the default 10-minute interval, or even a 1-
minute interval to detect a car that had parked within half an hour of the currently displayed
video.)
5. Click on the Search Back/Forward buttons [ ], depending on the desired direction of
detection, to generate the next set of thumbnails, starting at the time-stamp of the bottom-right
thumbnail.
6. Once a change has been detected between two consecutive thumbnails, indicating that the
incident has occurred in the time between the two frames, click on the first of the two (if
searching back in time; click in the second frame if searching forward in time). The selected
thumbnail will populate the Timeslice Current View pane, and the Timeline will move to the
selected thumbnail’s time stamp.
7. Select a smaller interval and click the Search Back/Forward buttons to generate thumbnails of
smaller intervals, and repeat the process until the exact start or end time of the incident is
accessed.
8. At this point, you can:
Apply motion detection to the Timeslice Current View pane: motion detection can be applied
to the Timeslice Current View pane in the same manner as any Browse Mode pane. See
‘Motion Detection’ (page 29) for more information.
Review the selected camera or the entire camera view at the time of the detected event:
click on the camera’s title bar to expand it to full-view, or click ‘Overview’ in the main title
menu to resume multi-camera browsing.
Export video and/or still images for evidence: see ‘Exporting Evidence’, on page 51.
Note: If no video is recorded at a Timeslice point, the Time Slicer will search for and display the next frame of recorded video (both backward and forward in time.) Time Slicing will resume from that point on at the set interval.
On-Net Surveillance Systems, Inc. 33

Browsing (Investigation Mode) Ocularis Client User Manual
The Motion Slicer
Similar to the Time Slicer, the Motion Slicer enables instant detection of motion events, adjusted for the
duration of the event and level of motion.
Accessing video of an incident using the Motion Slicer
1. Within the Time Slicer, click on ‘Motion’.
2. Set the Motion Slice detection parameters, based on the nature of the motion detected. The
sampling frequency, denoted in intervals ranging from frame-by-frame to 1 minute, complies to
the speed of the object or duration of the event. The percentage of change determines the
minimal number of changed pixels (from within the digitally-zoomed image) for an event to be
detected.
Note: For more information about setting motion detection parameters, see ‘Motion Detection’, page 29.
3. Draw a Motion Detection zone using the motion detection tool [ ] in the Browse Mode toolbox.
4. Click on the Back/Forward buttons [ ], depending on the desired direction of detection,
to generate thumbnails of detected motion events. At any point during the detection process you
may click the pause button [ ] to abort the operation.
5. If needed, adjust the detection parameters and repeat the search. Unless a different thumbnail
from the first is selected, or the timeline is moved, the search will resume from the same point.
6. Once the maximum number of twenty thumbnails per page is reached, the Motion Slice process
will halt. To continue, click on either the Back or Forward buttons to resume detection.
7. Once the desired motion event is accessed, you can:
Apply motion detection to the Motion Slice Current View pane: motion detection can be
applied to the Motion Slice Current View pane in the same manner as any Browse Mode
pane. See ‘Motion Detection’ (page 29) for more information.
Review the selected camera or the entire camera view at the time of the detected event:
click on the camera’s title bar to expand it to full-view, or click ‘Overview’ in the main title
menu to resume multi-camera browsing.
Export video and/or still images for evidence: see ‘Exporting Evidence’ on page 51.
34 On-Net Surveillance Systems, Inc.

Ocularis Client User Manual Browsing (Investigation Mode)
Alerts
Alerts generated by the recording component in response to events such as motion detection instances
or generic events received from external systems (e.g. access control, emergency phones, etc.) may also
be used in Time Slicing.
Note: See the recorder’s user manual for more information about configuring alerts.
The Alerts List
Accessing video of an incident using Alerts
1. Within the Time Slicer, click ‘Alerts’
2. Browse by Server, Camera and Alert and select the desired alert.
3. Starting at any point in the timeline, click on the Back/Forward buttons [ ], depending on
the desired direction of viewing alerts. This will populate the screen with thumbnails of the
camera at the time of each alert. At any point during the detection process you may click the
pause button [ ] to abort the operation.
4. Hover over a thumbnail to enlarge it, or click to set the Timeline and the Currently Displayed
Camera pane to the time stamp of the alert.
5. Once the maximum number of twenty thumbnails per page is reached, the Alerts process will
halt. To continue, click on either the Back or Forward buttons to present the next set of alerts.
On-Net Surveillance Systems, Inc. 35

Browsing (Investigation Mode) Ocularis Client User Manual
Note: The camera associated with the alert can be different from the one currently displayed; in such a case the alert thumbnails will show the displayed camera at the time stamps of the selected alert.
6. Once the desired event is accessed, you can:
Apply digital Zoom to the Currently Displayed Camera pane
Apply motion detection to the Currently Displayed Camera pane: motion detection can be
applied in the same manner as any Browse Mode pane. See ‘Motion Detection’ (page 29) for
more information.
Review the selected camera or the entire camera view at the time of the detected event: click
on the camera’s title bar to expand it to full-view, or click ‘Overview’ in the main title menu to
resume multi-camera browsing.
Export video and/or still images for evidence: see ‘Exporting Evidence’, page 51.
36 On-Net Surveillance Systems, Inc.

Ocularis Client User Manual Browsing (Investigation Mode)
Sequences
Sequences are messages generated by the recording components indicating a sequence of events.
Each sequence may include one or more instances of motion, or alerts received from external sources,
making this method more suitable for accessing complex incidents. The recorder’s motion detection utility
may be configured to include a few seconds of pre- and post-event video.
Note: See the recorder’s user manual for more information about motion detection settings.
Generating Sequences
Accessing video of an incident using Sequences
1. Within the Time Slicer, click on ‘Sequences’
2. Starting at any point in the timeline, click on the Back/Forward buttons [ ], depending on
the desired direction of viewing alerts. This will populate the screen with thumbnails of the
starting point or end point of each sequence (for generating sequences forward and back in
time, respectively). At any point during the detection process you may click the pause button
[ ] to abort the operation.
3. Hover over a thumbnail to enlarge it, or click to set the Timeline and the Currently Displayed
Camera pane to the time stamp of the sequence.
4. Once the maximum number of twenty thumbnails per page is reached, the sequence-generating
process will halt. To continue, click on either the Back or Forward buttons to present the next set
of sequences.
5. Upon accessing the desired sequence, you may:
Apply digital Zoom to the Currently Displayed Camera pane
On-Net Surveillance Systems, Inc. 37

Browsing (Investigation Mode) Ocularis Client User Manual
Apply motion detection to the Currently Displayed Camera pane: motion detection can be
applied in the same manner as any Browse Mode pane. See ‘Motion Detection’ (page 29)
for more information.
Review the selected camera or the entire camera view at the time of the detected event:
click on the camera’s title bar to expand it to full-view, or click ‘Overview’ in the main title
menu to resume multi-camera browsing.
Export video and/or still images for evidence: see ‘Exporting Evidence’ on page 51.
38 On-Net Surveillance Systems, Inc.
Ocularis Client User Manual Browsing (Investigation Mode)
On-Net Surveillance Systems, Inc. 39
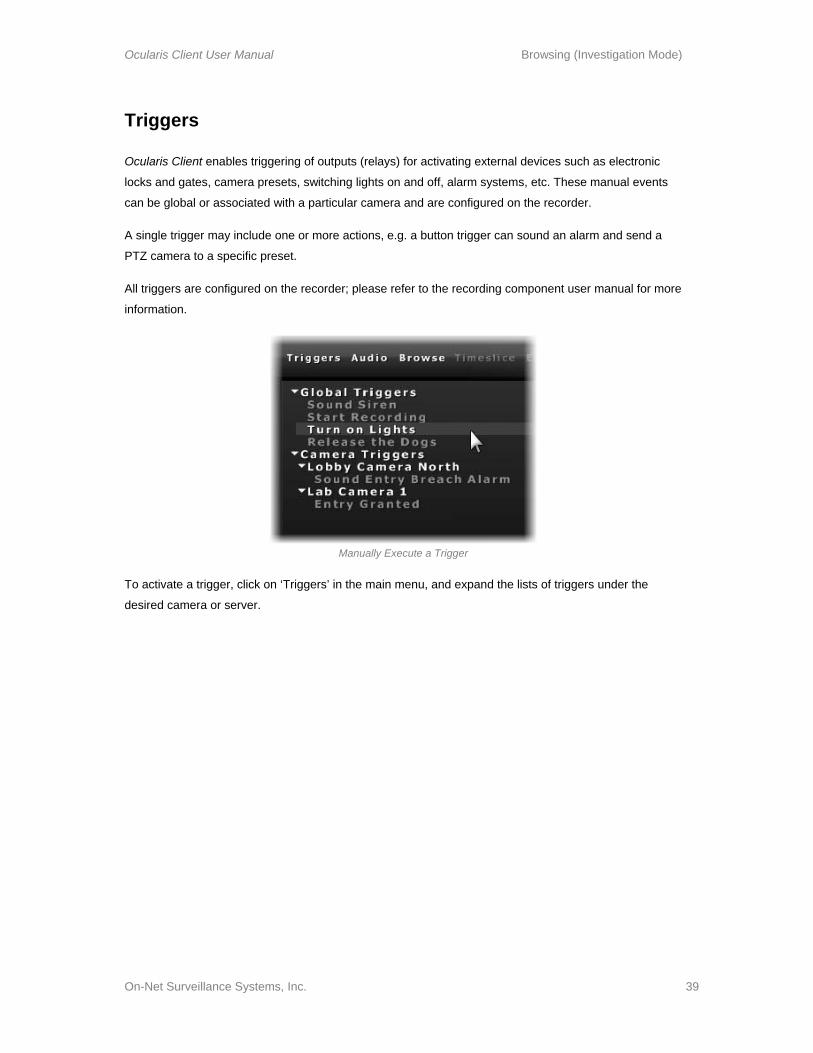
Triggers
Ocularis Client enables triggering of outputs (relays) for activating external devices such as electronic
locks and gates, camera presets, switching lights on and off, alarm systems, etc. These manual events
can be global or associated with a particular camera and are configured on the recorder.
A single trigger may include one or more actions, e.g. a button trigger can sound an alarm and send a
PTZ camera to a specific preset.
All triggers are configured on the recorder; please refer to the recording component user manual for more
information.
Manually Execute a Trigger
To activate a trigger, click on ‘Triggers’ in the main menu, and expand the lists of triggers under the
desired camera or server.

Client Setup Ocularis Client User Manual
Client Setup
The ‘Client Setup’ screen, located by selecting Views…Client Setup allows users to customize their
Ocularis Client experience. Access to this screen is controlled in the Ocularis Base. There are four tabs
which may be visible to the user:
Video Wall Tab
Shortcuts Tab
Joystick Controls Tab
Video Wall Tab
Video Tab
The ‘Video’ tab is visible to all users. The user can control how the software is displayed, the language used
and features related to browsing.
1. To configure settings for Ocularis Client, click the ‘Views’ menu and select ‘Client Setup’.
The Client Setup Video Tab Dialog Box
The Video tab is displayed.
40 On-Net Surveillance Systems, Inc.

Ocularis Client User Manual Client Setup
Screen Configuration
2. The default ‘Screen Configuration’ is to display Ocularis Client in full screen mode on all connected
monitors. If you prefer, you may display the Ocularis Client in a resizable window, by selecting
‘Windowed’ mode.
3. The number of screens detected by the PC’s video card is represented by checkboxes in the
‘Screen Configuration’ section. Check at least one screen or as many as shown on which to display
Ocularis Client. Ocularis Client supports the ability to view up to eight (8) monitors on the same
client machine.
Video Quality:
4. When using H.264 or MPEG compression, you may experience ghosting if packets are lost. The
‘H.264 frame skip’ checkbox under ‘Video Quality’ should be checked in order to alleviate this.
5. If the ‘Maintain Quality in Browse Mode’ box is checked and you select Browse mode, the quality of
the video panes will be the same in Browse mode as it was in Live mode. Left unchecked, the
quality in Browse mode for all panes will be displayed at the highest setting.
6. Use the ‘Joystick Sensitivity’ slider to adjust real (as opposed to virtual) joystick movement. The left
of the slider bar indicates maximum sensitivity; the right side of the slider bar is the least sensitive.
So, for instance, to instruct the smallest of joystick inputs to be passed along as PTZ commands to
the recorder, move the slider to the left on the slider bar.
Browsing:
7. When browsing recorded video, the default is to display the selected pane in full frame rate and all
others in reduced frame rate. This saves on bandwidth and is selected by default. Click ‘Full Frame
Rate’ if you require all view panes to display video with full frame rate during playback of recorded
video.
8. If you wish to change the display language for Ocularis Client, you may do so by selecting it from
the ‘Language’ drop-down menu.
9. Click ‘Save’ to save changes.
The changes made on this screen will not be visible until the user logs off and back in to Ocularis Client. The
language change will not take effect until the user shuts down and restarts the Ocularis Client. The
language setting affects all users of the local PC. All other settings will follow the user account regardless of
the PC used.
On-Net Surveillance Systems, Inc. 41

Client Setup Ocularis Client User Manual
Shortcuts Tab
The Shortcuts tab is visible to all users. This tab allows each user to define custom keyboard shortcuts for
common functions used with Ocularis Client.
Note: Configured keyboard shortcuts may be mapped to work with a USB jog shuttle device such as the Contour Design Shuttle Pro 2. Use the manufacturer’s mapping tool to associate the Ocularis keyboard shortcut configured here.
Available functions for keyboard shortcuts include:
Shortcut Definition
PTZ Up Moves the image from a PTZ camera up.
PTZ Down Moves the image from a PTZ camera down.
PTZ Left Moves the image from a PTZ camera to the left.
PTZ Right Moves the image from a PTZ camera to the right.
PTZ Up Left Moves the image from a PTZ camera up and to the left.
PTZ Up Right Moves the image from a PTZ camera up and to the right.
PTZ Down Left Moves the image from a PTZ camera down and to the left.
PTZ Down Right Moves the image from a PTZ camera down and to the right.
PTZ Zoom In Zooms in one level
PTZ Zoom Out Zooms out one level
Preset 1 Moves the PTZ camera to its preset position #1
Preset 2 Moves the PTZ camera to its preset position #2
Preset 3 Moves the PTZ camera to its preset position #3
Preset 4 Moves the PTZ camera to its preset position #4
Preset 5 Moves the PTZ camera to its preset position #5
Preset 6 Moves the PTZ camera to its preset position #6
Preset 7 Moves the PTZ camera to its preset position #7
Preset 8 Moves the PTZ camera to its preset position #8
Preset 9 Moves the PTZ camera to its preset position #9
Start Recording Manually starts recording on the camera of the selected pane
42 On-Net Surveillance Systems, Inc.

Ocularis Client User Manual Client Setup
Shortcut Definition
Show Live Switches the application to Live mode
Show Browse Switches the application to Browse mode
Next Image Browses to next recorded image
Previous Image Browses to prior recorded image
Playback Initiates playback of recorded video
Minimize/Maximize View Toggle the selected pane between minimize and maximize mode
Minimize Application Minimizes the Ocularis Client application
Log Out Issues a log out command to the Ocularis Client application
Close Application Closes the Ocularis Client Application (equivalent to a ‘Shut Down’)
Show Client Setup Displays the Client Setup configuration screen.
Show Shortcut Keys Displays a list of existing keyboard shortcuts
Copy to Clipboard Takes a snapshot of the current image and sends to the Windows clipboard
Show Camera List Display the list of available cameras in the selected pane.
Play Reverse - Yx In Browse mode, play video ‘Y’ times fast in reverse.
Pause Pause the video.
Play Forward – Yx In Browse mode, play video ‘Y’ times fast in forward
Step Backward (time) In Browse mode, play video in reverse mode but restrict to the time interval shown.
Step Forward (time) In Browse mode, play video in forward mode but restrict to the time interval shown.
Set Start Marker Set the starting point of the video to be exported.
Set Stop Marker Set the ending point of the video to be exported.
To Configure Custom Keyboard Shortcuts
1. To configure settings for custom keyboard shortcuts, click the ‘Views’ menu and select ‘Client
Setup’.
2. Select the ‘Shortcuts’ tab.
On-Net Surveillance Systems, Inc. 43

Client Setup Ocularis Client User Manual
The ‘Client Setup’ Keyboard Shortcuts Dialog Box
A list of configurable functions appears.
3. To configure a function, select the cell adjacent to the function (using the mouse or finger with
touch screen).
4. Enter the desired shortcut. A shortcut is defined by either:
the combination of two keys: a modifier key (SHIFT, CTRL, or ALT) and a second key which
can be a letter, number, arrow or number from the numeric keypad.
a single key found on the keyboard
Hold the desired modifier key and depress the second key to assign this combination to the
function. Or simply depress the single key you wish to assign. Repeat this process for each
function for which you wish to assign a shortcut.
Some special characters are not allowed
Duplicate entries are not allowed and identified in the sample below.
44 On-Net Surveillance Systems, Inc.

Ocularis Client User Manual Client Setup
Sample Keyboard Shortcut Assignments
5. When finished, click the ‘Save’ button.
The changes made on this screen will be available when the user clicks the ‘Save’ button. These settings
will follow the user account regardless of the PC used.
To Use a Keyboard Shortcut
Keyboard shortcuts will only work when the function is applicable. For instance, PTZ shortcuts only work with PTZ cameras, browse shortcuts only work when in Browse mode, etc.
1. If the shortcut applies to a particular camera, click the pane with the camera video to select it.
2. Be sure to be in the appropriate mode (Live or Browse) based on the function to be issued.
3. Execute the shortcut (Hold the modifier key (SHIFT, CTRL or ALT) and press the secondary key or
simply press the single shortcut key). The shortcut function should be invoked.
On-Net Surveillance Systems, Inc. 45

Client Setup Ocularis Client User Manual
Joystick Controls Tab If you have a USB joystick connected to the Ocularis Client PC, you will be able to map Ocularis Client functions to the buttons of the joystick.
To Configure Joystick Controls
1. To configure joystick buttons to correspond to Ocularis Client functions, click the ‘Views’ menu and
select ‘Client Setup’.
2. Select the ‘Joystick Controls’ tab.
A list of buttons appears.
Sample Keyboard Shortcut Assignments
3. Click inside the cell in the Command column to the right of the button you wish to configure.
A drop-down list appears with the list of Ocularis functions that are configurable.
4. Select the Ocularis function you wish to assign to the corresponding button.
5. Repeat for each button you wish to configure.
6. When finished configuring joystick buttons, click the ‘Save’ button.
The changes made on this screen will be available when the user clicks the ‘Save’ button. These settings
will follow the user account regardless of the PC used.
46 On-Net Surveillance Systems, Inc.

Ocularis Client User Manual Client Setup
Video Wall Tab
Video walls are simply a collection of monitors typically posted in a public or other observation area, with no
visible keyboard attached. They are used to display video from preset cameras as well as receive video on
demand, pushed there by operators. Video Walls in Ocularis are defined in the Base using the Ocularis
Administrator. Ocularis Client is used to display the video wall. Remote Video Wall is an optional add-on
component to Ocularis and available with Ocularis ES, Ocularis CS and Ocularis IS.
Local vs. Remote
Local video walls are those on the same station (PC) as the operator. For instance, an operator’s pc may
have 4 monitors attached to it with an appropriate video card. The operator can use one of the monitors to
observe views and maps and the other three monitors as the video wall on which he can post video. Local
video walls are available in all Ocularis feature sets.
Remote video walls are those where the video wall display monitors are not attached to the same pc as the
operator. These monitors may be located in the same room or in another remote location from the operator.
Remote video walls are available in the Ocularis IS, Ocularis CS and Ocularis ES feature sets.
The Video Wall tab in the ‘Client Setup’ screen is visible only in the full Ocularis Client. This tab is only used
on the pc which houses the monitors for a remote video wall. Typical users do not need to configure settings
in this tab. Configure these parameters only when the PC monitor(s) attached to the local Ocularis Client
are to become (all or a part of) a video wall.
The system administrator determines which video wall a user may push video to as well as which video wall
site a user account may be associated with. The video wall in the example shown in the graphic below has
six monitors and two stations. Each station is a separate PC with a unique IP address. Both stations
combined make up the video wall site named ‘Lobby’. Video wall site names are created by the
administrator on the Ocularis Base. Video wall names can be any short label or description about the video
wall. In most cases, where there are dedicated video walls, this is set up only once by the system
administrator on the video wall system (station).
Sample Video Wall
On-Net Surveillance Systems, Inc. 47

Client Setup Ocularis Client User Manual
There is no technical limit to the number of screens/monitors which can encompass a video wall. There is,
however, a limit to the number of screens that each Ocularis Client installation can support. Currently, each
instance of Ocularis Client can support up to eight (8) monitors on a single station (or IP address).
Therefore, if you wanted a video wall comprised of sixteen (16) monitors for instance, you would need at
least two PCs, each with its own instance of Ocularis Client installed.
To Configure A Video Wall
These steps are necessary only when using remote video walls. On the Ocularis PC that is connected to the
video wall monitors:
1. Click the ‘Views’ menu and select ‘Client Setup’.
2. Select the ‘Video Wall’ tab.
Video Wall Tab
3. Check the ‘Enabled’ checkbox.
4. Select the video wall name from the ‘Site Association’ drop-down menu. The video walls listed
here are displayed based on the privileges set up by the system administrator in Ocularis
Administrator.
5. Click the ‘Save’ button.
In most cases, this is all that is required. To use a video wall, see Using a Video Wall on page 79.
48 On-Net Surveillance Systems, Inc.

Ocularis Client User Manual Client Setup
Changing the Position of the Video Wall Representation
If you wish to specify an exact position for the local monitor representation of the remote video wall, the axes
or station offsets need to be defined. Click the ‘Show Advanced Options’ checkbox to enter the station
offsets for the X and Y axis of the monitor positions.
Video Wall Tab
Configuring the X and Y Station Offsets
When configuring the X and Y Station Offsets, you need to know the screen resolutions of all the monitors in
the video wall. Refer to the diagram Sample Video Wall on page 47 as an example:
In the example, Client A has four monitors attached and Client B has two monitors. Each monitor has a
screen resolution of 1024 x 768.
Example 1:
If default station offsets are used (X=0, Y=0), the resulting video wall, when selected, will take the
following shape (assuming that in the Video Wall tab of Client Setup, client A selected the video
wall ‘Lobby’ before Client B selected it or Client A logged in first):
Four screens from Client A and two screens from Client B
The native functionality within Microsoft Windows allows a consecutive organization of the screens
from each station. However, there may be a case where you wish to alter the default position for
the video wall screens.
Example 2:
Assume that you wish a different layout for the video wall for these stations. To obtain the layout,
the following station offsets should be used:
Client A Client B X = 0 Y = 0
X = 0 Y = 769
The calculation for the Y offset in station B is based on the assumption that each of Client A’s
screen is 768 pixels tall. The vertical position (Y), needs to start at least one pixel greater than
On-Net Surveillance Systems, Inc. 49

Client Setup Ocularis Client User Manual
50 On-Net Surveillance Systems, Inc.
Client A (otherwise, there would be overlap). The X offset is 0 to allow the screen to be placed in
the left most position.
Client A
Client B
Four Screens from Client A on top of Two Screens from Client B (left justified)
Example 3:
This last example displays an alternate layout for the monitors from Client A and Client B. To obtain
the layout the following station offsets should be used:
Client A Client B X = 0 Y = 0
X = 2049 Y = 769
The calculation for the Y offset in Client B is based on the assumption that each of Client A’s
screen is 768 pixels tall and 1024 pixels wide. The vertical position (Y), needs to start at least one
pixel greater than Client A (otherwise, there would be overlap). The X offset is 2049 [(1024 x 2)+1]
to display Client B’s screens below and to the right of Client A’s screens.
Client A
Client B
Four Screens from Client A on top of Two Screens from Client B (right justified)

Ocularis Client User Manual Exporting Evidence
Exporting Evidence (Video and Still Images)
Ocularis Client enables exporting video in audio-included AVI format, as a multi-camera video database, or
as a single still image or series of images in JPEG format. The following export topics will be discussed
here:
Designating a range for exporting video
Exporting an AVI video clip
Exporting a Video Database
Exporting Still Images (individual frames)
Printing a Still Image Report
Bookmarks (available only in Ocularis Client)
Export Progress
Designating a range for exporting video
This step must be performed when exporting any video clip. It is not necessary for exporting a single still
image or print reports.
Note: Video export is possible only in Browse mode (including Timeslice, Motion Slice, Alerts and Sequences modes).
1. Make sure the interchangeable motion detection/playback control set is set to playback. Click on
the Playback Mode button [ ] to toggle between the two sets of controls.
2. For .AVI exports, set the zoom level for the camera stream you wish to export. The resulting clip
will display at the desired zoom level.
3. Drag the Timeline to the desired starting point for the exported segment, and click on the Segment
Start button [ ].
4. Drag the Timeline to the end point of the exported segment. The selected segment will turn purple.
Click on the Segment End button [ ].
Designating a range for exporting video
5. You may extend or reduce the segment after it has been designating by setting different start and
end points.
On-Net Surveillance Systems, Inc. 51

Exporting Evidence Ocularis Client User Manual
Exporting an AVI video clip
Audio-included, single-camera AVI clips have relatively small file sizes, allowing for electronic distribution of
evidence across multiple platforms. Each frame in the clip is time-stamped, and an optional preamble
including the time, date, camera ID, operator and operator’s comments will precede the clip. Exporting
video to .avi format is available in all features sets of Ocularis.
1. Once a segment of video has been designated for export, click ‘Export’ in the main menu.
The ‘Export Options’ Dialog Box
2. Select ‘AVI File’.
Exporting to AVI File
3. Enter the full path of the destination folder for the exported clip, or click on Browse Folders [ ] to
select a folder or to create a new folder.
4. Enter a file name for the exported clip.
5. Enter Preamble text to display in the beginning of the video as an introduction.
52 On-Net Surveillance Systems, Inc.

Ocularis Client User Manual Exporting Evidence
By default, exported AVI clips are preceded by a Preamble which displays the time and date,
operator (by username), camera name and the operator’s comments. You may choose whether or
not to append a preamble to the exported clip, and which items to include.
The AVI Video Preamble
6. Enter additional information in the ‘Comment’ text box.
7. The ‘Export Recorded Audio’ checkbox is selected by default. If audio is present on the clip, it will
be included in the export.
8. Click on ‘Setup’ to change the video export Codec and the encoding quality.
A Note About Video Codecs:
A video codec (“compression / decompression”) is required to create .avi files. AVI is not in itself a codec; it is a common container format that many different codecs can use. There are literally hundreds of supported codecs.
Windows ships with the Cinepak codec. The encoding quality of this codec may cause the encoding process to take longer and make the .AVI file size larger than other codecs. Therefore, we recommend other popular codecs such as: DivX, XviD, or MPEG4. These (or any) codecs must be installed locally in order to create the .AVI file and also must be installed on the PC which is to play the exported .AVI file.
The AVI Export Setup Dialog Box
On-Net Surveillance Systems, Inc. 53

Exporting Evidence Ocularis Client User Manual
9. Click the ‘Video Codec’ drop-down menu to see the list of available codecs. These are the codecs
installed locally and detected by Windows. Select the desired codec.
10. Click the ‘Encoding Quality’ drop-down menu to select the quality of the exported video (low,
medium or high).
11. Determine if you wish to include:
a. A ‘Time Stamp’ to appear on the recorded video.
b. The ‘Camera Name’ to appear on the recorded video.
c. Always add the preamble to the beginning of the clip
by clicking the corresponding checkbox.
12. Click ‘OK’ to exit the Setup dialog box.
13. Click ‘Export’ to begin the export process.
14. If you wish to cancel the export while it is still in progress, you may do so by clicking the Cancel
icon in the ‘Jobs’ menu. See Cancelling an Export on page 55 for more details.
Depending on the length of the designated segment of video and on the framerate and resolution of the
video, the encoding process may take a number of minutes. You can follow the encoding progress by
clicking on ‘Jobs’ in the main menu.
Note: You may continue to work with Ocularis Client as usual during the export process, including running multiple video exports simultaneously.
Note: In the event that system memory is low, the resolution of the exported image may be scaled down. The message: “Resolution of exported images will be scaled down due to memory constraints.” will appear. If you do not want to export using this resolution, cancel the export.
54 On-Net Surveillance Systems, Inc.

Ocularis Client User Manual Exporting Evidence
Cancelling an Export
If, after executing an export of any type (AVI video, Database Format video or still images) you decide you
want to abort the export for any reason (e.g., incorrect data selected, wrong codec selected, taking too long,
etc.) you may cancel the export while it is still visible in the Jobs menu.
1. Click ‘Jobs’ on the menu bar.
2. Click the Cancel icon next to the job you wish to cancel.
Cancelling an Export Job
3. A “Do you want to cancel …” message box appears.
4. Click ‘Yes’ to cancel the export.
Viewing an Exported AVI Video Clip
Once a video clip is exported to an .avi file, it can be viewed with any application that supports playing .avi
files such as Windows Media Player or QuickTime.
Additionally, if the export was done in the current session, an .avi export may be played back directly from
the Jobs menu. Click the completed job in the Jobs menu to launch the associated .avi player and view the
video clip.
On-Net Surveillance Systems, Inc. 55
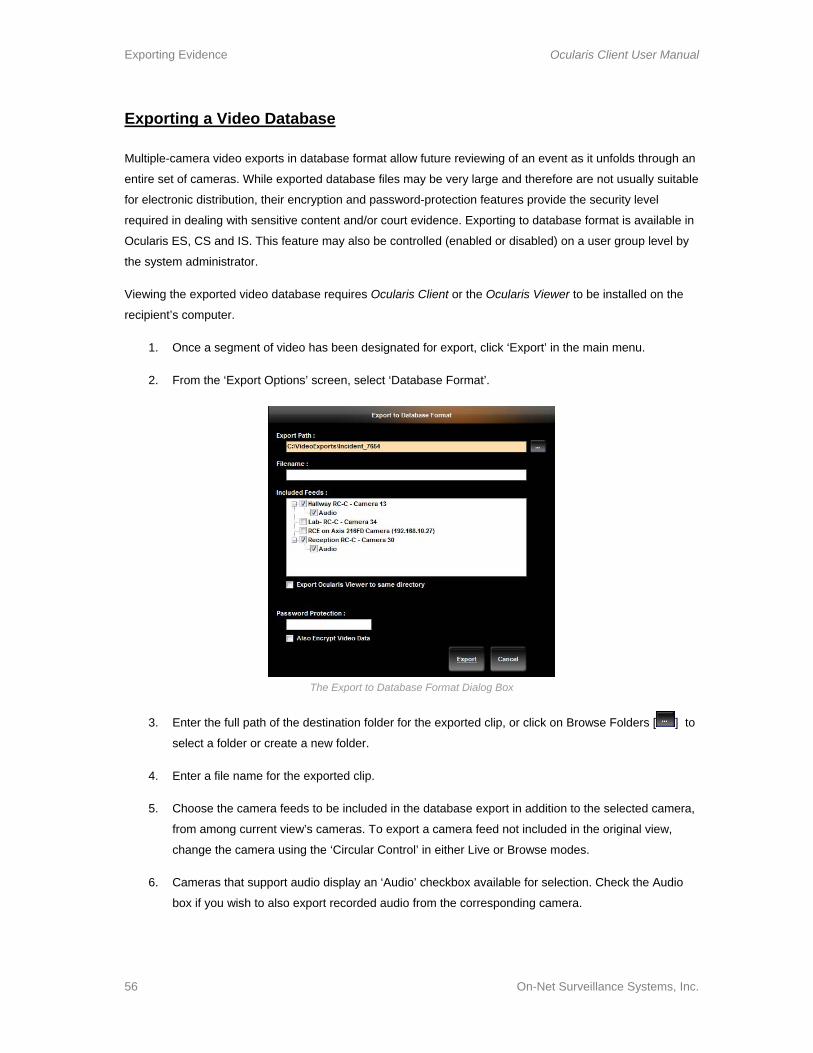
Exporting Evidence Ocularis Client User Manual
Exporting a Video Database
Multiple-camera video exports in database format allow future reviewing of an event as it unfolds through an
entire set of cameras. While exported database files may be very large and therefore are not usually suitable
for electronic distribution, their encryption and password-protection features provide the security level
required in dealing with sensitive content and/or court evidence. Exporting to database format is available in
Ocularis ES, CS and IS. This feature may also be controlled (enabled or disabled) on a user group level by
the system administrator.
Viewing the exported video database requires Ocularis Client or the Ocularis Viewer to be installed on the
recipient’s computer.
1. Once a segment of video has been designated for export, click ‘Export’ in the main menu.
2. From the ‘Export Options’ screen, select ‘Database Format’.
The Export to Database Format Dialog Box
3. Enter the full path of the destination folder for the exported clip, or click on Browse Folders [ ] to
select a folder or create a new folder.
4. Enter a file name for the exported clip.
5. Choose the camera feeds to be included in the database export in addition to the selected camera,
from among current view’s cameras. To export a camera feed not included in the original view,
change the camera using the ‘Circular Control’ in either Live or Browse modes.
6. Cameras that support audio display an ‘Audio’ checkbox available for selection. Check the Audio
box if you wish to also export recorded audio from the corresponding camera.
56 On-Net Surveillance Systems, Inc.

Ocularis Client User Manual Exporting Evidence
7. If the recipient of this video clip does not have Ocularis Client, you should include the Ocularis
Viewer as part of the export. To include the Ocularis Viewer in the destination folder, check the
‘Export Ocularis Viewer to same directory’ checkbox. More information on the Ocularis Viewer is
discussed later in this section.
8. If you want to encrypt the clip, enter a password for opening the database and check the ‘Also
Encrypt Video Data’ checkbox. Encryption requires password protection.
9. Click ‘Export’ to begin the export process.
10. If you wish to cancel the export while it is still in progress, you may do so by clicking the Cancel
icon in the ‘Jobs’ menu. See Cancelling an Export on page 55 for more details.
Depending on the length of the designated segment of video, the framerate and resolution of the video and
whether audio was included, the encoding process may take a number of minutes. You can follow the
encoding progress by clicking on ‘Jobs’ in the main menu.
Note: You may continue to work with Ocularis Client as usual during the export process, including running multiple video exports simultaneously.
Exported Results
Once the export process is finished, the following will be found in the destination folder:
a ‘[filename].oml’ file
a folder named ‘Data’
a folder named ‘Ocularis Viewer’ (if the option to ‘Export Ocularis Viewer to same directory’
checkbox was selected)
The first two items are required to view the exported video in any format. The Ocularis Viewer folder is only
necessary if the recipient does not have Ocularis Client .
To transfer the video export to another user, simply copy the exported items onto a portable hard drive, or
burn them on a CD or DVD using any off-the-shelf burning software.
Viewing an Exported Video Database
Viewing an exported video database can be done by using the Ocularis Client or the Ocularis Viewer.
Viewing Exported Video with Ocularis Client
To view exported video using the Ocularis Client:
1. Select the ‘Load Database from File’ option under the ‘Views’ menu
On-Net Surveillance Systems, Inc. 57

Exporting Evidence Ocularis Client User Manual
2. Select the .oml file in the ‘Open’ dialog and click Open.
The video database will open in Browse mode, allowing for all Browse operations (including motion
detection, Timeslice, Motion Slice, etc.)
Note: It may take a short period for the video database to parse and recorded video to be available for browsing.
Loading a video database in Ocularis Client
Viewing Exported Video with Ocularis Viewer
For occasions when a user does not have the Ocularis Client installed, a stand alone video viewing
application called the Ocularis Viewer is available to view recorded database video.
Note: Be sure to copy the Ocularis Viewer to the PC that will be playing the exported video.
The Ocularis Viewer is installed during the installation of Ocularis Client. It is also exported to a folder when
you export video and select the ‘Export Ocularis Viewer to same directory’ option.
See the Ocularis Viewer User Manual for instructions on how to use the Ocularis Viewer.
58 On-Net Surveillance Systems, Inc.

Ocularis Client User Manual Exporting Evidence
Exporting Still Images (individual frames)
Rather than full-motion video, you may want to export a still image or series of still images from Ocularis
Client. Single-camera still images can be extracted either as single frames or multiple frames, covering the
entire export range.
Exporting Still Frames
To export a Single Frame
1. From Browse mode, select a camera, and set the Timeline to the desired point in time, with the
desired image displayed.
2. Click on ‘Export’ in the main menu and select ‘Individual Frames’.
3. Check the ‘Single Frame’ radio button.
4. Click on ‘Setup’ to set the Still Image export parameters:
Image Export Setup
5. Set the image quality to Original, Medium or Low. Exporting images in ‘Original’ quality will result in
larger file size, while reducing the image quality may cause image degradation.
6. Check the ‘Time Stamp’ and ‘Camera Name’ checkboxes to include camera and timestamp
information in the export.
7. Click ‘OK’ to return to the ‘Export Still Frame’ dialog box, and click on ‘Export’.
You may view the exported .jpg image with any application that supports this file type.
On-Net Surveillance Systems, Inc. 59

Exporting Evidence Ocularis Client User Manual
To export all frames from the selected range
1. From Browse mode, select a camera.
2. On the Timeline, set the start and end points for the exported segment (see ‘Designating a range
for exporting video’, page 51).
3. Click on ‘Export’ in the main title menu and select ‘Individual Frames’.
4. Check the ‘Full Timespan’ radio button.
5. Click on ‘Setup’ to set the Still Image export parameters:
6. Set the image quality to Original, Medium or Low. Exporting images in ‘Original’ quality will result in
larger file size, while reducing the image quality may cause image degradation.
7. Check the ‘Time Stamp’ and ‘Camera Name’ checkboxes to include camera and timestamp
information in the export.
8. Click ‘OK ‘to return to the ‘Export Still Frame’ dialog box, and click on ‘Export’.
You may view the exported .jpg images with any application that supports this file type.
9. If you wish to cancel the export while it is still in progress, you may do so by clicking the Cancel
icon in the ‘Jobs’ menu. See Cancelling an Export on page 55 for more details.
60 On-Net Surveillance Systems, Inc.

Ocularis Client User Manual Exporting Evidence
Printing a Still Image Report
Still Image Reports are one-page reports which include a still image as well as the associated time/date,
camera information, operator and workstation identifiers and operator comments.
To Generate a Print Report
1. From Browse mode, select a camera, and set the Timeline to the desired point in time.
2. Click ‘Export’ in the main menu and select ‘Print’.
3. Enter a report Header, report Footer and Comments.
4. Click ‘Preview’ to view the final report prior to printing.
Still Image Report
5. Click ‘Print’ to print the report, using any local or networked printer.
Note: If you select an area on the video and zoom in, the enlarged image will appear on the print report.
On-Net Surveillance Systems, Inc. 61

Exporting Evidence Ocularis Client User Manual
Bookmarks
A Bookmark is simply an exported video clip that is stored centrally. Bookmarks are a copy of the video data
exported. These clips are maintained in their location indefinitely (or until they are manually deleted).
Therefore, bookmarks exist long after the original video footage has reached its retention time limit. IT
administrators can use any off-the-shelf back up tool to back up bookmarks in their saved location.
Bookmarks may be shared among multiple operators, directly from within Ocularis Client, saving time
needed to create multiple copies of exported evidence.
Bookmarks may be assigned to an incident case and be categorized by classification or tag to facilitate
organization. Like the Database Format export, bookmarks may include multiple cameras (audio and video).
The location of bookmark storage is configurable by the system administrator. The default location is on the
same machine as Ocularis Base but the system administrator may change this location during installation.
The default path for bookmarks is: c:\inetpub\wwwroot\OcularisService\Bookmarks\Data
The ability to create a bookmark is controlled in the Ocularis Administrator application on a camera by
camera basis for each user group. You may have the privileges to bookmark video from Camera A but not
Camera B. Contact your system administrator for assistance.
This feature is available in Ocularis ES or Ocularis CS.
Creating a Bookmark
1. From Browse mode, designate a segment of video for export. See ‘Designating a range for
exporting video’, page 51.
2. Click ‘Export’ in the main menu.
3. Select ‘Create Bookmark’.
If this button is disabled:
Check that you are logged in to the Ocularis Base Server (using Ocularis Client) rather than
directly to the recording component.
You may not have bookmarking privileges. Check with your system administrator.
62 On-Net Surveillance Systems, Inc.

Ocularis Client User Manual Exporting Evidence
The Create Bookmark Dialog Box
If there are expected cameras missing from the resulting list, you may have limited privileges for
bookmarking. Check with your system administrator.
4. Select a Classification to file the bookmark under based on the nature of the clip.
5. Select a Case File for the clip to be assigned. A Case File is an incident case which may contain
multiple bookmarks or alerts related to the same event. Classifications and Case File designations
are created and configured in the Ocularis Administrator.
6. Enter any Tags for the clip. Tags are keywords related to the clip content. Tags are created here
and may be deleted in the Ocularis Administrator.
7. Enter any comments related to the clip or its contents
8. Choose the camera feed(s) to be included in the bookmark export in addition to the selected
camera, from those displayed in the current view.
To include a camera feed not shown in the original view, cancel the ‘Create Bookmark’ dialog and modify one of the view panes to display the desired camera using the ‘Circular Control’. Then, click ‘Export’ and repeat steps above.
To include all cameras displayed, click the ‘Select All’ checkbox.
9. For each camera that has associated audio, an ‘Audio’ checkbox appears beneath the camera name.
If you wish to also include recorded audio in the bookmark, check the Audio checkbox beneath the
corresponding camera.
10. Click ‘Submit’ to create the bookmark.
You may verify the successful creation of the bookmark, by looking at the ‘Status’ column of the
bookmark table. See Viewing a Bookmark on page 64 for more details.
On-Net Surveillance Systems, Inc. 63

Exporting Evidence Ocularis Client User Manual
Viewing a Bookmark
Viewing a bookmark is supported when using Ocularis Client with Ocularis Base.
1. Click ‘Views’ in the main menu.
2. Select ‘Tools’ and then ‘Bookmarks’.
Bookmarks
The resulting screen displays a list of existing bookmarks in the lower half and a 2 x 1 view with
hotspots in the upper half.
3. Sort the list of bookmarks by clicking on the column heading.
4. Click the comment balloon to view bookmark comments.
5. Position the mouse over a Thumbnail to see an enlarged view of the thumbnail image.
6. Click a hotspot pane and then a thumbnail to view video from that Thumbnail.
The hotspot will show a still image of the start of the bookmark video clip.
7. Position the mouse over the pane to see the navigation controls for that pane. Use these controls to
view the video.
The ‘Status’ column of the Bookmarks table indicates whether the video of the bookmark was successfully
created. In the case where audio is included during bookmark creation, there may be an instance where the
video is successfully bookmarked but the audio export is not successful. In this case, a message appears in the
hotspot view pane indicating an error with the audio export.
64 On-Net Surveillance Systems, Inc.

Ocularis Client User Manual Exporting Evidence
On-Net Surveillance Systems, Inc. 65
Export Progress
When you export video clips, images or bookmarks, the export process will take place in the background.
This frees up the interface and allows you to continue to monitor and view video. A list of exported jobs and
their progress is available in the Jobs menu.
Viewing Exported Jobs
1. Click the Jobs menu.
Exported Jobs
Clips are listed in the order in which they were exported. Those jobs which are completed are
labeled with ‘(Done!)’.
Clips that are still being exported are shaded with a progress bar and the percentage complete is
shown.
Clips listed are those which have been exported in the current session. The list is cleared when the
user logs out and is empty upon re-log in.
If you wish to cancel the export, you may do so by clicking the Cancel icon in the ‘Jobs’ menu. See
Cancelling an Export on page 55 for more details.

Alerts Ocularis Client User Manual
Alerts
The Alerts feature is available with Ocularis ES, CS and IS. It encompasses the following features:
Blank screen monitoring
Storing and handling alerts
Access of stored alerts
Visible alert location on a map
Alerts are generated when a configured event occurs. The event can be as simple as motion detected on a
camera to complex composite events that combine multiple events into one (e.g. when there is motion on
camera A and a card swipe is detected from an access control system, generate an alert). Alerts may be
configured on the NVR itself or from the Ocularis Administrator. The Ocularis Administrator, however,
controls the distribution of an alert regardless of where it was configured. When an operator is logged in
through Ocularis Base, alerts are forwarded to the Ocularis Client.
Note: Alert notification is controlled on a distribution group and schedule basis. If you do not see an expected alert it may be because either your user account was not given adequate permission or the time period for which you should receive the alert has passed. See your system administrator for assistance.
Blank Screen Monitoring
Blank Screen monitoring is an effective way to notify an operator when an event occurs. The view pane is
‘blank’ until an event occurs and video from the alert is pushed to the blank screen pane. This eye-catching
method of video display draws the attention of the operator to video where some action is taking place.
Configuring a view pane with a Blank Screen is done in the Ocularis Administrator and therefore, this
function is supported only when using Ocularis Client with Ocularis Base Server. This feature is available in
Ocularis ES, CS and IS. For instructions on Blank Screen configuration in Ocularis Administrator, see the
Ocularis Administrator User Manual.
66 On-Net Surveillance Systems, Inc.

Ocularis Client User Manual Alerts
Using Blank Screen Monitoring
Start by displaying a view that was configured with a Blank Screen pane. Select the ‘Views’ menu and
choose the view containing the Blank Screen.
Blank Screen pane
A View with a Blank Screen pane
When an alert occurs, video will be populated in the Blank Screen pane.
Alert triggered video
A motion alert triggered video on the Blank Screen
If you position the mouse over the Blank Screen pane, navigation controls appear allowing you to play or pause the alert video.
Navigation Controls
On-Net Surveillance Systems, Inc. 67

Alerts Ocularis Client User Manual
Alert Counter
An Alert Counter appears in the upper left corner of the screen to indicate the number of alerts received in
the current session. When you log in, you will be presented with the last 20 alerts directed to your user
account as configured by the system administrator. This feature is available in Ocularis ES, CS and IS.
Alert Counter appears in the upper left corner of Ocularis Client
Alert Priorities
Administrators assign priorities to each alert using the Ocularis Administrator. (See the Ocularis
Administrator User Manual.) Priorities are identified in Ocularis Client by a colored outline displayed around
the Blank Screen pane.
High Priority Alert
The outline color code for alerts is defined as follows:
Green = low priority alerts
Yellow = medium priority alerts
Red = high priority alerts
68 On-Net Surveillance Systems, Inc.

Ocularis Client User Manual Alerts
Low and Medium level alerts remain visible in a Blank Screen pane for about 10 seconds (default dwell time)
and then they are cleared from the screen. These alerts can be retrieved from the Alert Manager. High
priority alerts remain visible on the Blank Screen pane until they are acknowledged by an operator.
An audible sound may be heard when an alert is triggered. The sound may be different for each alert
regardless of priority. Audible alerts are configured in the Ocularis Administrator application.
Alerts go either to the ‘Alert Manager’ or the ‘Handled Alerts’ list and may be investigated and reviewed at a
later time.
Clearing an Alert from a Blank Screen
High Priority Alerts
A High priority alert remains visible until an operator clears it from the Blank Screen pane. Click the
acknowledge button (checkmark icon) above the navigation controls to acknowledge the alert and clear the
pane. You can handle the alert now or at a later time. See Handling Alerts on page 73 for more information.
Acknowledge a high priority alert
Medium and Low Priority Alerts
Since Medium or Low priority alerts display on the blank screen temporarily, there is an option to pin the
video to the pane until such time as it is cleared manually.
Acknowledge, pin or close a low priority alert
Click the ‘Pin’ button when viewing a low or medium priority alert to keep the video displayed.
Click the ‘Close’ button to clear the video from the Blank Screen and move the alert to the Alerts
Manager. It can be reviewed and handled at a later time.
Click the checkmark (acknowledge) to handle the alert now. It will then be moved to the ‘Handled
Alerts’ list.
See Handling Alerts on page 73 for more information.
On-Net Surveillance Systems, Inc. 69

Alerts Ocularis Client User Manual
Alert Manager
The Alert Manager is a component supported by Ocularis Client when used in conjunction with the Ocularis
Base Server on Ocularis ES, CS and IS. The Alert Manager is a list of alerts that have been triggered but
have not yet been handled. You can view, sort, store and review alerts. You can also locate alert locations
on a map.
Launch the Alert Manager by one of the following methods:
1. From the main menu, select: Views Tools Alert Manager.
2. Or click the Alert Counter found in the upper left corner of the screen.
Click the Alert Counter to launch the Alert Manager
The Alert Manager appears.
70 On-Net Surveillance Systems, Inc.

Ocularis Client User Manual Alerts
Alert Manager
The Alert Manager screen contains 4 quadrants. In the lower left quadrant, is an alert list for all received and
‘unhandled’ alerts. The alert list is sorted in priority: highest priority, indicated in red is listed on top. This is
following by the olive shading of the medium priority alerts and green for the lowest priority alerts. When you
click the alert to be displayed, the row is shaded purple. The table may be sorted in order of Priority, Time of
Alert, Sensor or Rule. Click on any of these labels in the column heading to re-sort the list.
From left to right in the row details for the alert, you will see the priority of the alert, date and timestamp
when the alert took place, the Rule name or type of alert (such as “Motion”), and the source or Sensor that
the alert came from (e.g. “Camera 2”). Further to the right, you may see a compass icon and a checkmark
icon.
Above the alert list in the upper left quadrant is a pane displaying recorded video of the alert selected in the
alert list. In the upper right quadrant is live video for the camera found in the alert. In the lower right
quadrant, is a map which displays the camera for the selected alert. The map will display the alternate label
of the camera as defined by the system administrator.
On-Net Surveillance Systems, Inc. 71

Alerts Ocularis Client User Manual
Locating Alerts on a Map
Manually Locating Alerts
While viewing the Alert Manager, you can locate the camera whose event triggered the alert by selecting the
alert from the Alert List and clicking the ‘Locate Alert’ button. This color of this button will
correspond with the priority of the alert.
The map with the selected camera will display, centered on the camera related to the alert.
Automatic Alert Location
While viewing a map (from the Alert Manager or Ocularis Maps), if an alert associated with a displayed
camera is triggered, the corresponding camera icon will pulsate. A color outline corresponding to the alert
priority (red for high, yellow for medium, green for low) appears around the camera.
From the Alert Manager, click the pulsating icon to review the alert for that camera.
Camera icons pulsate to notify that an alert is taking place
72 On-Net Surveillance Systems, Inc.

Ocularis Client User Manual Alerts
Storing and Handling Events
As alerts are received and reviewed, operators can choose to file or store the events for later retrieval. Alerts
in the Alerts List are only sustained for the current Ocularis Client session. Therefore, important alerts
should be saved and categorized (‘Handled’) so that they may be viewed at a later time.
Handling Alerts
1. From the Alert Manager, click the ‘Handle Alert’ icon for the alert you wish to save.
Note that the color of this icon will reflect the color of the priority level.
2. Fill out the fields in the resulting ‘Handle Event’ pop-up window.
Handle Event
3. Select the category for the alert from the ‘Classification’ drop-down list. These Classifications are defined in the Ocularis Administrator by the system administrator.
4. Select an existing incident case file from the ‘Case’ drop-down list. Click the ‘+’ to add a new Case File.
a. In the event you wish to add a new case file on the fly, enter the case name in the ‘Name’ field and any comments specific to this file.
b. Click ‘Submit’.
c. Be sure to select the new case from the ‘Case’ drop-down list.
5. Enter keywords to be used as search tags for the incident in the ‘Tags’ field.
6. Enter specific comments regarding the alert incident in the ‘Comments’ field.
7. Click ‘Submit’.
The alert is removed from the alert list and can be accessed at a later time under ‘Handled Alerts’.
On-Net Surveillance Systems, Inc. 73

Alerts Ocularis Client User Manual
Accessing Stored (Handled) Alerts Once alerts have been handled, they can be accessed at any time.
From the main menu select: Views Tools Handled Alerts. The result is a list of all handled alerts.
Accessing Handled Alerts
Note: The ability to view handled alerts is controlled through the user account. If you have trouble viewing handled alerts, see your system administrator for assistance.
In the lower half of the screen, a table is displayed with each row representing a handled alert. The following
columns are provided in the table:
Refresh
Click the icon to refresh the list and view alerts handled by others while viewing this screen.
Within this column, you may also see a comment icon . This icon appears if there are tags or comments entered for the alert during the handling process. Click the comment icon to expand the row and view the comment text or tags.
Created The date and time stamp the alert was generated.
User The name of the user who handled the alert.
Classification The classification category assigned to the alert.
Handled at The date and time when the alert was handled.
Case The incident case file name to which the alert was assigned.
Case Comments Any comments associated to the case file will display here.
Event The type of event that caused the alert to trigger.
Label
The name of the camera video displayed as a result of the event. It may or may not be the same camera whose event triggered the alert. If the camera has an alternate name, that name will be displayed here.
74 On-Net Surveillance Systems, Inc.

Ocularis Client User Manual Alerts
On-Net Surveillance Systems, Inc. 75
Thumbnail A thumbnail of the video for the alert. Hover the mouse over the thumbnail to view a larger thumbnail image of the alert video.
Sorting Alerts
To locate alerts more easily, click the column heading to sort the list by that column.
Viewing Alerts
To view video from a handled alert:
1. From the ‘Handled Alerts’ screen, click the thumbnail image of the alert you wish to view.
Browse mode is invoked and the upper left pane is populated with the recorded alert video.
2. Use the Kinetic Timeline and its navigation controls to rewind or forward the video recorded at the time
of the alert.
Exporting Alert Video
While viewing handled alerts, you may have a need to export the alert video. Just as you can export video to
.AVI format, database format or bookmarks while browsing, you can export video clips from a handled alert.
To export a video clip from alert video
1. From the ‘Handled Alerts’ screen, click the thumbnail image of the alert you wish to view. You should already be in ‘Browse’ mode.
2. Use the Kinetic Timeline to set the start and end times for the video clip to be exported.
3. Click ‘Export’ from the main menu bar.
4. Choose your method of export from the resulting ‘Export Options’ box.

Ocularis Maps Ocularis Client User Manual
Ocularis Maps
Maps are supported when using Ocularis Client with any feature set of Ocularis. A map is a graphical
representation of the Ocularis environment and is configured in the Ocularis Administrator application. Using
Ocularis Administrator, system administrators import images to be used as maps and icons to represent
cameras and views on those maps. The administrator positions icons on maps, links individual maps to each
other and assigns access to maps on a user group basis.
Viewing maps is done through the Ocularis Client from the Ocularis Maps or Alert Manager functions.
Viewing Ocularis Maps
1. From the main menu select: Views Ocularis Maps.
The names of the installed maps are listed.
2. Select the desired map from the map list.
Map navigationicons
Floating Map Pin
Map link area
Ocularis Maps View
The map is displayed with icons for cameras and views as configured by the system administrator.
Map Navigation
Zoom in on a map in by using the scroll wheel of the mouse or clicking the zoom in icon.
Zoom out of a map in by using the scroll wheel of the mouse or clicking the zoom out icon.
Click a map link area or floating map pin to navigate from one map to another.
Click the back map navigation icon to go back to the previous map.
76 On-Net Surveillance Systems, Inc.

Ocularis Client User Manual Ocularis Maps
Image Preview
For any icon displayed on a map you can open the corresponding video image by clicking and holding the
primary (left) mouse button on the icon. The preview image that appears may be resized or moved on the
screen. If you hover the mouse over the preview image, navigational controls appear which allow you to
review recorded video.
Click & Drag to move preview image Click to close
preview
Navigation controls Click & Drag to
resize preview
Map Preview Image
Views on a map will also generate a preview image.
Map with Multiple Preview Images
You can use the navigation icons within each view pane to navigate recorded video from the view.
On-Net Surveillance Systems, Inc. 77

Ocularis Maps Ocularis Client User Manual
78 On-Net Surveillance Systems, Inc.
Image Arrange
To automatically arrange open preview images, click the Image Arrange Icon.
Preview images are arranged at the bottom of the map.
Map showing arranged preview images

Ocularis Client User Manual Ocularis Video Walls
Ocularis Video Walls
A video wall is a monitor or set of monitors used solely for the purpose of displaying video and can
dynamically accept video pushed to it by system triggered events or by an operator. An Ocularis video wall
is simply a collection of monitors on a dedicated computer (or computers) running an instance of Ocularis
Client. No special monitoring software is needed for a video wall.
Ocularis Video Wall Configuration
Video walls are defined in the Ocularis Administrator. They are controlled by an operator in the Ocularis
Client when viewing a map. On the PC(s) used as a video wall, install and log in to Ocularis Client. Select a
desired video wall as defined in ‘To Configure A Video Wall’ on page 48.
Using a Video Wall
As you are viewing an Ocularis map, you may encounter video from a camera or a view you would like to
display on a video wall.
1. Display the video wall template by selecting ‘Video Walls’ from the main menu.
The Video Walls menu lists all video walls for which you have been granted access.
Note: Access to video walls is restricted based on privileges assigned to the user group in the Ocularis Administrator.
2. Select the desired video wall.
The panes of the selected video wall are graphically displayed.
On-Net Surveillance Systems, Inc. 79

Ocularis Video Walls Ocularis Client User Manual
Virtual Video wall layout panels
3. Drag & Drop a camera from the map to a pane on the virtual video wall.
Drag & Drop a camera onto a Virtual Video Wall pane
The virtual video wall will display the camera name and the actual video wall will display the video
from that camera.
4. Drag & Drop a view from the map to a pane in the virtual video wall to display an entire view on the
video wall.
Tip: If you drop a view that contains a blank screen onto a video wall, the blank screen alerts will also display on the video wall.
80 On-Net Surveillance Systems, Inc.

Ocularis Client User Manual Ocularis Video Walls
Changing Video Wall Panes
From the controller PC, you may change the pane arrangement on the video wall remotely. Using the video
wall icons on the side bar, you can set the virtual video wall to a 1, 4 or 9 pane view.
1. While viewing an Ocularis Map, select the desired video wall from the Video Walls menu.
2. Select the pane which you want to change. The selected pane is displayed in green.
3. Click corresponding video wall icon:
Click: To display a:
1 pane view
4 pane view
9 pane view
4. Now you may populate these panes by dragging & dropping icons from a map to the pane.
Managing Video in a Video Wall
Operators may control the video displayed in a video wall including pausing, rewinding and forwarding
displayed video.
1. With the desired Ocularis Map and virtual video wall displayed, drag & drop camera video or a view to the video wall.
A set of virtual video wall controls appears.
2. Select the pane which you want to control and use the icons on the virtual video wall controls.
Remote Control
If a video wall is visible from the controlling station, the video on the display can be controlled with the
‘Pause’, ‘Play backward/rewind’ and ‘Play Forward’ buttons. However, in cases where the video wall is not
visible from the controlling station (because it is too far away or in another physical location), use the
‘control’ button to open a local preview of what is displayed on the video wall.
Pause
Returns video on video wall to live mode Play
Backward/rewind Play Forward
Opens local controller window
Locate camera video on map
Closes virtual controls & clears remote video wall pane
On-Net Surveillance Systems, Inc. 81

Ocularis Video Walls Ocularis Client User Manual
82 On-Net Surveillance Systems, Inc.
Viewing a video wall pane remotely
Use the navigation controls at the bottom of the preview pane so that you can see what is displaying on the
remote video wall.
Camera Location
While working with an Ocularis map and video wall, you can auto locate the camera icon on the map which
is displaying in the video wall.
1. Click the pane in the virtual video wall with the camera video you would like to locate.
2. Click the ‘Locate Camera Video’ icon.
The Ocularis map repositions with the camera icon centered on the screen.
Clear a Pane in a Video Wall
1. Click the pane in the virtual video wall with the camera video you would like to clear.
2. Click the ‘Clear Video’ icon.

Ocularis Client User Manual Appendix A
Appendix A – Ocularis Client in Limited Mode
This appendix covers the setup and configuration for Ocularis Client when used to log directly into an NVR.
This feature is commonly used on legacy systems as well as for troubleshooting purposes. The features
described here were in what was formerly called ‘Ocularis Client Lite’.
Creating Views and View Groups
When operating Ocularis Client directly with the NVR (not logged in to Ocularis Base), limited mode features
are available. The ‘Setup Utility’ is one such feature and is used to create views.
1. Click the ‘Setup Utility’ icon, located on the right-hand side of the menu bar. The icon will appear
when hovering over it. The Setup icon
Note: Access to the Setup utility can be limited to authorized users by changing their privileges in the NVR’s user management utility.
The View Setup/Editing utility is displayed.
On-Net Surveillance Systems, Inc. 83

Ocularis Video Walls Ocularis Client User Manual
Views are organized within folders or ‘View Groups’. Folders labeled ‘Shared’ are views that can be
accessed by all users. Those labeled ‘Private’ are views that are accessible only by the user who
created them.
The ‘Edit Views’ search box enables easy access to views. Any character (number or letter; not case
sensitive) or combination of characters will filter the views list to only the views containing the character
or string of characters entered, highlighting those characters within the views’ names.
Note: The ability to edit either views can be limited based on the user’s privileges on the NVR Management Application utility.
Shared and private Views
General View controls
Cameras and inputs
Properties for each type of input/element
View Panes
The Setup Utility (1+5 view)
The View Tree structure
84 On-Net Surveillance Systems, Inc.

Ocularis Client User Manual Appendix A
2. To create subfolders, highlight a folder, and click the ‘New Folder’ icon [ ], located on the bottom
left of the Folders/Views pane.
3. To create a view within a folder, click on the ‘Create View’ icon [ ]. This will open a submenu of
view layout templates, for both regular (3:4) and widescreen display aspect ratios.
4. At any point during the View creation process, you can:
Rename [ ], and Delete [ ] Views
Save changes, without closing the editor; [ ]
Populating View Panes
View panes may be populated with cameras, hotspots, carousels, web-pages, images and push video
components. To populate a pane, simply drag and drop the desired element from the Cameras panel into
the pane. If the pane is already populated, the dragged view element will replace the previous element.
Populating a view pane with a Camera
In the Cameras panel in the setup utility, click on the [+] sign beside ‘Cameras’ to expand the list of cameras
available through the NVR server.
The ‘Cameras’ search box enables easy access to cameras by name. Any character (number or letter; not
case sensitive) or combination of characters will filter the cameras list to only the cameras containing the
character or string of characters entered, highlighting those characters within the cameras’ names.
On-Net Surveillance Systems, Inc. 85

Ocularis Video Walls Ocularis Client User Manual
List of cameras connected to an individual NVR server
1. Drag the desired camera into one of the view panes. An image from the camera view, as well as
the camera name, will appear in the pane.
2. To display a different camera or view element, simply drag another camera or view element into the
pane.
Populating a view pane with a Hotspot
Hotspots are usually used in a layout made of one or more large view panes surrounded by smaller panes.
In a view containing hotspots, selecting a hotspot and clicking on any other pane will send the camera
displayed in the pane to the hotspot. This applies only to camera, push-video and carousel panes.
1. From the Cameras panel in the setup utility, drag and drop the ‘Hotspot’ label into the desired View
pane.
2. Set the hotspot display parameters for the quality, framerate and aspect ratio of the video displayed
in the hotspot in the Properties panel.
Properties setup for a Hotspot pane
Populating a view pane with a Carousel
The Carousel mode of viewing enables sequential monitoring of multiple cameras. Ocularis Client provides
full interaction with the carousel pane, including playback, PTZ (optical and digital) and carousel sequence
controls.
1. From the Cameras panel in the setup utility, drag and drop the ‘Carousel’ label into the desired
View pane. This will automatically change the contents of the Properties panel.
86 On-Net Surveillance Systems, Inc.

Ocularis Client User Manual Appendix A
Global properties setup for a Carousel pane
2. Set the global Carousel display properties for framerate, aspect ratio, quality, dwell time and
whether to maintain these settings when the pane is maximized. Adjust these properties based on
the type of camera, amount of bandwidth consumed by the camera and type of movement
displayed.
3. Click on ‘Open Carousel Editor’ to add cameras to the carousel.
4. Expand the cameras list, drag and drop the desired cameras into the carousel list (the area on the
right which initially is blank).
The Carousel cameras list
5. Each camera in the carousel can be configured for placement in the carousel sequence (using the
up and down arrow buttons). To remove a camera from the carousel, click the delete [ ] icon.
6. You may also change the default dwell time on a camera by camera basis.
7. Click on ‘Save and Close Carousel Editor’ in the Properties panel to save the carousel contents
and display parameters. This will display the View with the carousel cameras stacked one above
the other. You can browse through the carousel cameras by clicking on a camera in the stack.
On-Net Surveillance Systems, Inc. 87

Ocularis Video Walls Ocularis Client User Manual
Populating a view pane with a Web Page or Image
Any view pane can display a web page or a static bitmap image (JPEG, BMP, PNG or GIF). Panes with
images or web pages may not be maximized so be sure to use a pane large enough to be worthwhile for the
display of the web page or image.
1. From the Cameras panel in the setup utility, drag and drop the ‘Web’ label onto the desired View
pane. This will automatically change the contents of the Properties panel.
2. In the ‘Url’ Properties text box, enter the local or remote address of the web page or the image to
be displayed, e.g. ‘http://www.onssi.com’ or ‘D:\building_14_floor_plan.png’.
3. Click on ‘Set’ to display the web page or image.
Note: Ocularis Client’s web page utility may not support all navigation and display capabilities of full-fledged web browsers, and thus should not be used as a replacement for a web browser for mission-critical tasks.
Populating a view pane with Push Video
Push Video panes may be configured to display video on-event live video stream alerts as well as peer-to-
peer push video. The NetMatrix push-video utility is required in order for this to work.
1. In the Cameras panel, click and drag the ‘Push Video’ icon to the desired View pane. This will
automatically change the contents of the Properties panel.
Properties setup for Push Video panes
88 On-Net Surveillance Systems, Inc.

Ocularis Client User Manual Appendix A
On-Net Surveillance Systems, Inc. 89
2. Set the display properties for video (framerate, aspect ratio and quality). Adjust these properties
based on the type of cameras in the system, available bandwidth and type of movement to be
displayed. If you want to maintain these video settings when the pane is maximized, click the
‘Keep When Maximized’ checkbox.
3. The ‘Window Index’ field is used when there are more than one Push Video panes in the same
view. In this case, select the display order for the pane. For instance, if there are four Push Video
panes in a single view, you can specify which pane should receive the first push video alert, which
should receive the second, and so on.
4. Enter the (TCP/IP) port and password as defined in NetMatrix (for more information, please refer to
the NetMatrix user manual.) All Push Video panes share the same NetMatrix TCP/IP port number.
5. Click the ‘Save’ icon to complete the push video setup.
Saving Changes and Testing the View
1. Once you’ve completed populating all of the view panes, it is important to save the changes made,
by clicking on the ‘Save’ [ ] icon.
2. To test the view, exit (close) the View Setup utility. The newly-created view will be displayed on the
main Ocularis Client panel.

Contact Information Ocularis Client User Manual
Contact Information
On-Net Surveillance Systems (OnSSI)
One Blue Plaza
7th Floor
P.O. Box 1555
Pearl River, NY 10965
Website: www.onssi.com
General: [email protected] 845.732.7900
Fax: 845.732.7999
Sales Support: [email protected] 845.732.7900 x 1
PreSales Support [email protected] 845.732.7900 x 2
Technical Support: [email protected] 845.732.7900 x 3
Training: [email protected] 845.732.7900 x 4
Marketing: [email protected] 845.732.7900 x 5
90 On-Net Surveillance Systems, Inc.