oh-s7 and oh-t7
TRANSCRIPT

OH-S7OH-T7
Owner’s Manual
OH-S7 and OH-T7.indd 1OH-S7 and OH-T7.indd 1 1/22/08 7:17:23 PM1/22/08 7:17:23 PM

2
SPECIFICATIONS OH-T7 OH-S7
Frequency Response (±3dB)
Frequency Range (-6dB)
Recommended Amplifi er Power
Nominal Impedance
Sensitivity [1 watt (2.83v) at 1m]
Tweeter
Bass Unit
Grille
Dimensions Overall Diameter Mounting Hole Diameter Weight/each
Finish
65Hz–20kHz
55Hz–22kHz
15–85 watts
8 ohms
88dB SPL
3⁄4-inch (19mm) ferro-fl uid-cooled titanium dome tweeter with neodymium magnet structure
61⁄2-inch (165mm) woofer with polypropylene cone
Perforated steel 0.02-inch (0.5mm) thick, painted white
9” (227mm)73⁄4” (197mm)3 lbs (1.4kg)
White (paintable)
60Hz–20kHz
50Hz–22kHz
15–85 watts
8 ohms
89dB SPL
3⁄4-inch (19mm) ferro-fl uid-cooled titanium dome tweeter with neodymium magnet structure
8-inch (203mm) woofer with polypropylene cone
Perforated steel 0.02-inch (0.5mm) thick, painted white
103⁄4” (273mm)91⁄2 - 93⁄4” (241-248mm)4.5 lbs (2.0kg)
White (paintable)
copolymer woofer3/4" ferrofluid cooled tweeter
Waveguide with 20° tilt
High-ordercrossover
OH-S7 and OH-T7.indd 2OH-S7 and OH-T7.indd 2 1/22/08 7:17:23 PM1/22/08 7:17:23 PM
3
PRODUCT DESCRIPTIONThe OH-S7 and OH-T7 in-wall loudspeakers deliver outstanding performance. They incorporate a unique waveguide tweeter that has a large mounting area to extend its response. This allows a lower crossover point which produces a more integrated sound. The painstakingly developed shape and profi le of this waveguide guarantees much smoother and wider response than with post or “eye socket” mounted tweeters. In addition the tweeter is mounted on a 20-degree angle which provides a natural “toe in” to focus the sound when the OH-S7 and OH-T7 are used as front speakers. Alternatively the sound of the tweeters can be directed away from the listening area, producing a more diffuse sound when used as surround speakers. Complex high-order crossovers ensure seamless blending between woofer and tweeter and a perfectly balanced sonic character. In production, Snell’s unique hand tuning of each crossover gives an incredibly tight ±1dB match to the Master Reference. The OH-S7 and OH-T7 are perfect for any application—main speakers, surround use, or background music.
/ 3/4-inch dome ferrofl uid-cooled tweeter provides detailed, articulate sound and wide disper-sion.
/ Waveguide tweeter mounting for smoother high frequency response./ Tweeter and waveguide are angled at 20 degrees for optimum coverage of the listening area./ Copolymer woofer with NBR rubber surround offers smooth, natural performance.
This Package Contains:1 Model OH-S7 or OH-T7 loudspeaker1 White metal grille1 Paint mask1 Hole-cutting template
Examine the contents of the package and confi rm that you have all the items.
INTRODUCTIONNote: This manual is written with the assumption that the installer possesses skill in the proper use of hand and power tools, a knowledge of local fi re and building codes, and a familiarity with the environment behind the surface where the speakers will be installed.
Where to Place Your Speaker SystemsEffects of the Installation LocationThe wall or ceiling into which the OH-S7 or OH-T7 is installed becomes its acoustical enclosure. A large part of the system’s acoustical performance is dependent on that enclosure. Generally, larger volumes will ensure full bass response. Whenever possible, avoid placing the speakers at either end of a long column such as that created between wall studs, the footer, and the header. Placement at the ends of such a tunnel will create a “closed-end tuned pipe” that can adversely effect bass response. Hard surfaces behind the speaker installlation location will cause refl ections that also will adversely effect bass response. To avoid this loosly fi ll the volume behind the speaker with fi berglass or other sound-absorptive material.
/ Be sure the area behind the speaker mounting location is large enough - 0.5 cu. ft. or more./ Avoid installing the speaker near the ends of the chamber behind the mounting that is
formed by 2x4 framing. (Typically at ceiling or fl oor)./ Fill the chamber behind the speaker mounting location with acoustically absorbent material.
Note: A metal fi re-rated back box, the FRB68, is available for the OH-S7. In addition to provid-ing a protected environment for the speaker, the FRB68 meets the requirements of electrical codes throughout the country for fi re and plenum rated enclosures. Such enclosures are often required by building codes in commercial applications and in town homes or condominiums.
OH-S7 and OH-T7.indd 3OH-S7 and OH-T7.indd 3 1/22/08 7:17:23 PM1/22/08 7:17:23 PM
4
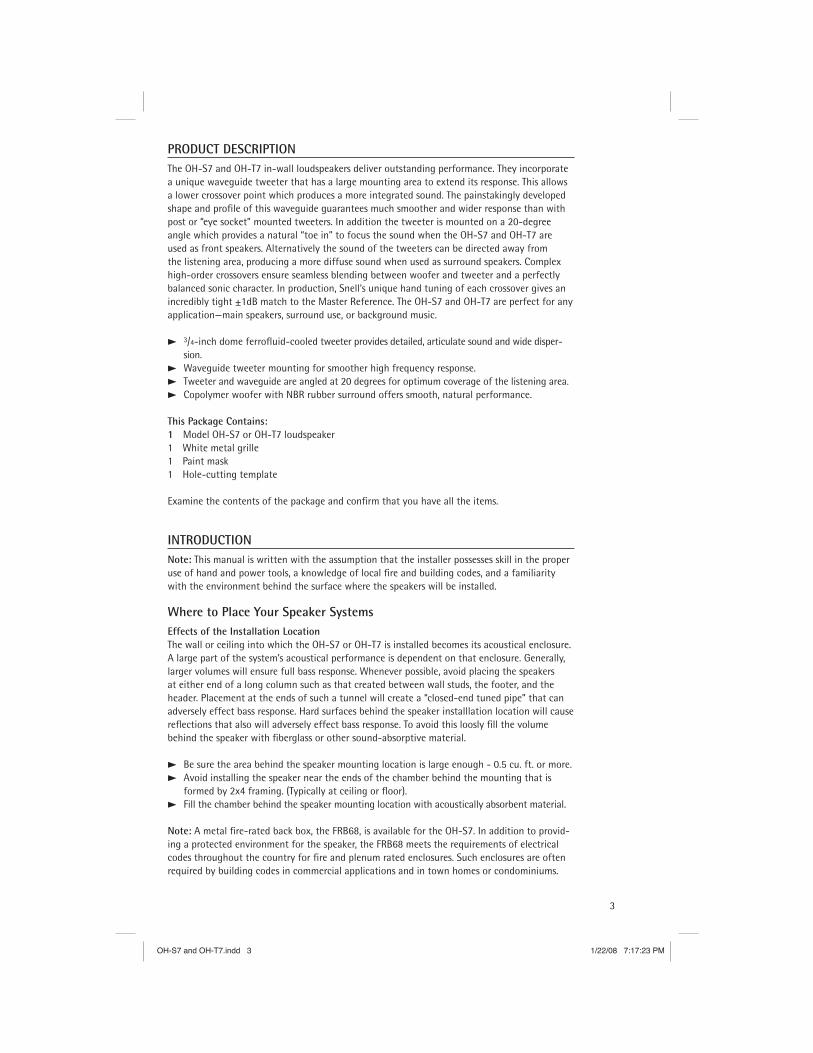
STEREO IMAGEThe distance between the speakers determines the width of the stereo image. If the speakers are placed too close together, the image will be too narrow; too far apart and the blend will suffer, creating a “hole in the middle.”
We recommend an angular separation between 45 degrees and 60 degrees (when viewed from above). This is equivalent to a separation between the speaker systems that is about 75% to 100% of the distance from the listener to either of the speakers.
Creating the illustion of sound coming from the area between the speakers requires careful selection of the speaker instalation locations. The distance from the left speaker to the listener location should equal the distance from the right speaker to the listener loca-tion. Use a tape measure to be sure that the distances from the primary listening position to the speakers are equal. When properly placed, your speakers will create a continuum of “virtual images” from left to right, with a convincing illusion of sound outside, in front, and behind the speaker systems.
/ Separate the speakers by 45 degrees to 60 degrees./ Equalize the distance between each speaker and the listening area.
Aiming the SpeakersFloor-standing and bookshelf speakers are often angled inward to create a more solid stereo image and to broaden the acceptable listening area. Typical wall or ceiling mounted speakers do not provide this fl exibility.
The OH-S7 and OH-T7 address this issue with a tweeter that is angle-mounted at 20 degrees. Our studies show this to be the optimum angling for wall or ceiling mounted speakers. When installing the speakers, they should be oriented such that the tweeters are symmetrically angled toward the central listening area. The exact angle is not crucial, however, because the response of the system is excellent from 0 degrees (straight out on its center line) to about 50 degrees off-axis in the direction of the waveguide.
If the OH-S7 or OH-T7 is used as a wall-mounted center channel speaker, aim the tweeter up or down as appropriate. If its position is above normal seated ear level, orient the system with the waveguide angling downward. Conversely, if the system is centrally mounted just at or below ear level, orient the system to angle the waveguide upward. For use as a surround, see the fol-lowing section.
/ Aim the center of the speaker to your ear level while listening in a seated position.
60°
45°
OH-S7 and OH-T7.indd 4OH-S7 and OH-T7.indd 4 1/22/08 7:17:23 PM1/22/08 7:17:23 PM
5
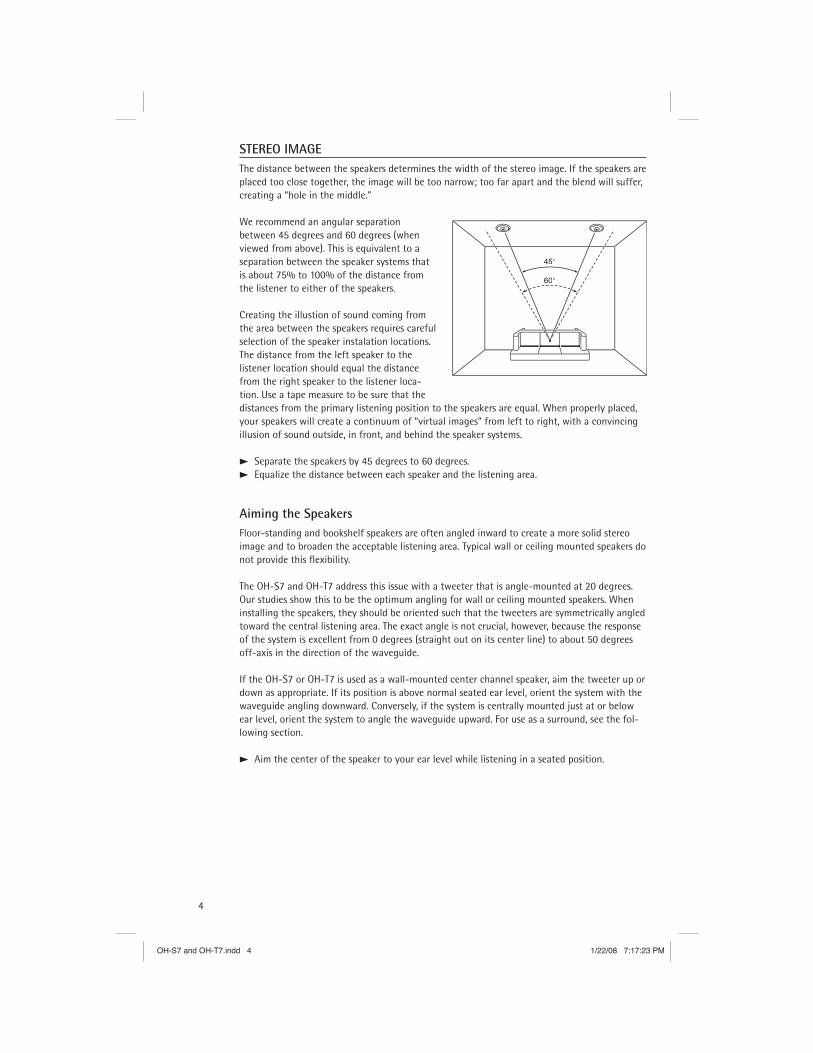
Using As a Surround SpeakerThe compact size and neutral tonal quality of the OH-S7 and OH-T7 make them perfect for the surround channel speakers of a home theater system. Place the speakers toward the back of the room, to the sides of, or behind the listening position.
An indirect sound path from the speakers to the listening position results in a more diffuse and convincing surround sound effect. This can be achieved by taking advantage of the angled waveguide tweeter. Orient (rotate) the speakers so that the tweeters point away from the listening area. Mounting speakers fairly far back, and fairly high, on the side walls, with the tweeter aimed toward the rear wall of the listening area, will give excellent results.
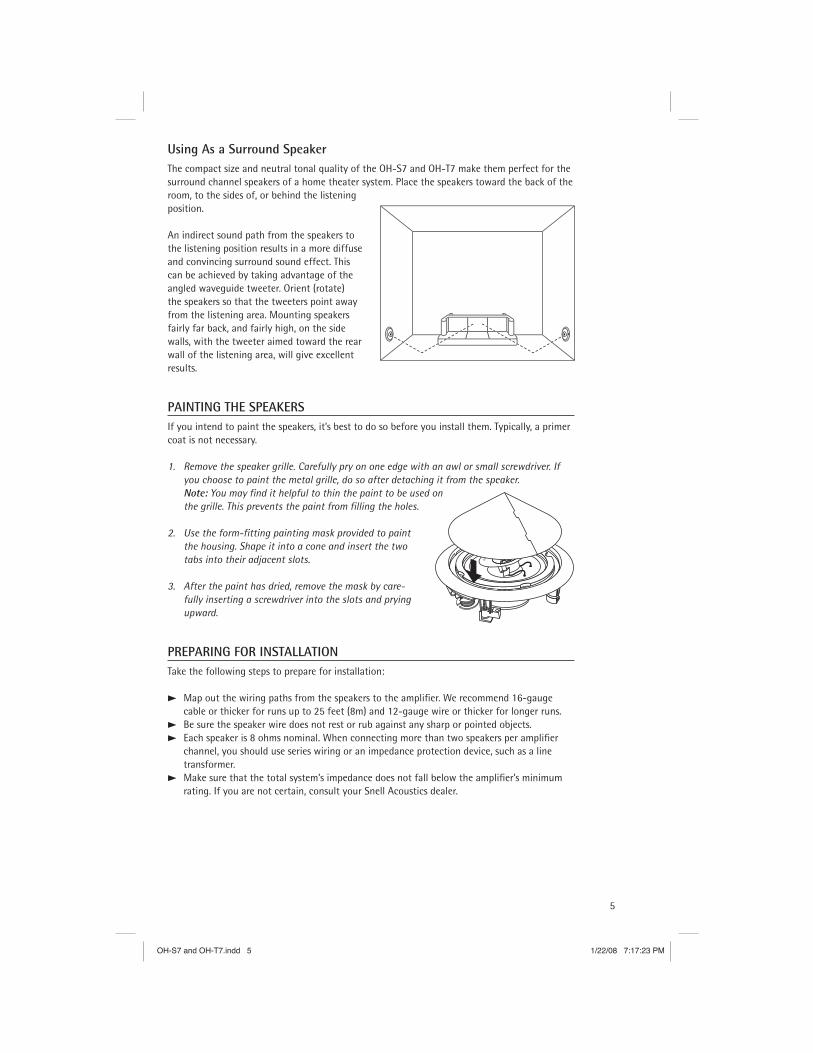
PAINTING THE SPEAKERSIf you intend to paint the speakers, it’s best to do so before you install them. Typically, a primer coat is not necessary.
1. Remove the speaker grille. Carefully pry on one edge with an awl or small screwdriver. If you choose to paint the metal grille, do so after detaching it from the speaker.
Note: You may fi nd it helpful to thin the paint to be used on the grille. This prevents the paint from fi lling the holes.
2. Use the form-fi tting painting mask provided to paint the housing. Shape it into a cone and insert the two tabs into their adjacent slots.
3. After the paint has dried, remove the mask by care-fully inserting a screwdriver into the slots and prying upward.
PREPARING FOR INSTALLATION Take the following steps to prepare for installation:
/ Map out the wiring paths from the speakers to the amplifi er. We recommend 16-gauge cable or thicker for runs up to 25 feet (8m) and 12-gauge wire or thicker for longer runs.
/ Be sure the speaker wire does not rest or rub against any sharp or pointed objects./ Each speaker is 8 ohms nominal. When connecting more than two speakers per amplifi er
channel, you should use series wiring or an impedance protection device, such as a line transformer.
/ Make sure that the total system’s impedance does not fall below the amplifi er’s minimum rating. If you are not certain, consult your Snell Acoustics dealer.
OH-S7 and OH-T7.indd 5OH-S7 and OH-T7.indd 5 1/22/08 7:17:23 PM1/22/08 7:17:23 PM

6
INSTALLATIONNote: The speakers should be mounted on a fl at surface to form a good seal between the speaker fl ange and the mounting surface.
1. Using the supplied template make a 73⁄4-inch (197mm) cutout for the OH-T7 or a 91⁄2-inch (241mm) cutout for the OH-S7. It is not neces-sary to remove fi berglass insulation that may be behind the wall.
2. Run wire from amplifi er to cutout. Allow an extra foot of wire at the cutout.
3. Remove the speaker grille. Carefully pry up one side with an awl or small screwdriver.
The OH-S7 and OH-T7 have heavy-duty spring-loaded push terminals for their input connec-tions. The terminals will accept wire or pins up to 5⁄32-inch in diameter.
4. If connecting with bare wire, strip the wire so that approximately 1⁄2-inch is exposed. Twist the wire into a bundle so that there are no stray strands. Push the end of the terminal to expose the hole in the side of the terminal. Then insert bare wire into the hole and release.
5. The insulation of the wire will have a stripe or ribs on one side. Use this marking to ensure the + (red) terminal of the speaker is connected to the + terminal of the amplifi er and the – terminal of the speaker is connected to the – terminal of the amplifi er.
Warning! To prevent electrical shock, always switch off the amplifi er or receiver when making connections to the speaker system.
6. Place the speaker in the hole. Rotate the speaker until the tweeter waveguide is aimed in the desired direction. Use a Phillips screwdriver to tighten the four pivoting mounting arms. Avoid overtightening, as this could break the mounting arms or damage the ceiling surface.
7. Install the grille. Press fi rmly arund the outer edge of the grille to seat it fi rmly in place.
Wall or Ceiling Material
OH-S7 and OH-T7.indd 6OH-S7 and OH-T7.indd 6 1/22/08 7:17:23 PM1/22/08 7:17:23 PM
7
LISTENING LEVELS AND POWER HANDLINGThe power recommendation for the system assumes you will operate the amplifi er in a way that will not produce distortion. All speakers can be damaged by a modest amplifi er that is producing distortion. If you hear a gritty noise or other signs of strain, turn down the volume. Prolonged or repeated operation of your speakers with a distorted signal can cause damage that is not covered by the warranty.
When turning on the system from a remote location, it is hard to judge how loud the speakers are being driven. Be careful not to overdrive the system.
/ If it sounds strained, turn it down!
HOW TO CARE FOR YOUR SPEAKERS
/ Use a soft cloth slightly dampened with water or a mild detergent. The cloth should be just damp enough to wipe the surface clean without leaving a trail of moisture.
/ Alternatively, vacuum the grille and frame with a vacuum cleaner and brush attachment./ Do not use abrasive cleaners or any cleaner containing chemicals harsher than those found
in glass cleaner.
LIMITED WARRANTYFor fi ve years from the date of purchase, Snell Acoustics will repair for the original owner any defect in materials or workmanship that occurs in normal use of the speaker system, without charge for parts and labor.
Your responsibilities are to use the product according to the instructions supplied, to provide safe and secure transportation to an authorized Snell Acoustics service representative, and to present proof of purchase from an authorized Snell dealer in the form of your sales slip when requesting service.
Excluded from this warranty is damage that results from abuse, misuse, accidents, shipping, repairs, or modifi cations by anyone other than an authorized Snell Acoustics service repre-sentative. This warranty is void if the serial number has been removed or defaced.
This warranty gives you specifi c legal rights, and you may also have other rights that vary from state to state.
If Service Seems NecessaryContact the dealer from whom you purchased the speaker system. If that is not possible, call us at 607-352-2488, or write to: Snell Acoustics 2 Chambers Street Binghamton, NY 13903
We will promptly advise you of what action to take. If it is necessary to return your speaker system to the factory, please ship it prepaid in the original factory packaging. Please note that Snell Acoustics will not be held liable for shipping damage due to improper packaging. After it has been repaired, we will return it freight prepaid in the U.S. or Canada.
For EU Customers OnlyThis symbol found on the product indicates that the product must not be disposed of with household waste. Instead, it may be placed in a separate collection facility for electronic waste or returned to a retailer when purchasing similar product. The producer paid to recycle this product. Doing this contributes to reuse and recycling, minimizes adverse effects on the environment and human health and avoids any fi nes for incorrect disposal.
OH-S7 and OH-T7.indd 7OH-S7 and OH-T7.indd 7 1/22/08 7:17:23 PM1/22/08 7:17:23 PM

2 Chambers StreetBinghamton, NY, NY 13903-2699phone: 607-352-2488 fax: 607-352-2498 email: [email protected]: www.snellacoustics.com
©2010 Snell Acoustics. All Rights Reserved.
Specifi cations are subject to change without notice.
Covered by patents issued and/or pending.
Part #542-1065
OH-S7 and OH-T7.indd 8OH-S7 and OH-T7.indd 8 1/22/08 7:17:27 PM1/22/08 7:17:27 PM