onguard integration user guide v. 17.01 - stonelock · reference the section on “connecting...
TRANSCRIPT

OnGuard Integration User Guide
v. 17.01.30

800.970.6168
www.stonelock.com
2
Table of Contents
Introduction
1- StoneLock Pro Hardware Configuration 2- Installation
2.1- Installing the SLMS and Service Applications 2.2- Configuring for LENEL’s OnGuard Platform
3- Managing StoneLock Pro Devices
3.1- Adding StoneLock Pro Devices 3.2- Editing StoneLock Pro Devices 3.3- Deleting StoneLock Pro Devices 3.4- Enabling TLS Encryption
4- Managing Users
4.1- StoneLock Pro Users in the Database 4.2- Enrolling Users in the StoneLock Pro Device 4.3- Deleting Users from the StoneLock Pro Device 4.4- Setting User Types for StoneLock Pro Users

800.970.6168
www.stonelock.com
3
Introduction Thank you for choosing StoneLock Pro This User Guide provides instructions for using the StoneLock Management System (SLMS) to integrate StoneLock Pro with Lenel’s OnGuard Platform, allowing for integrated functionality between the systems. Instructions are provided for installation of the SLMS, the addition, removal, and configuration of StoneLock Pro devices on the LAN, turning on (or off) TLS encryption of all communications between StoneLock Pro and the LAN, and the addition, configuration/editing and removal of StoneLock Pro users. The StoneLock Management System (SLMS) has been developed exclusively for StoneLock by New Market Solutions (www.newmktsolutions.com). Product-related or other relevant inquiries should be directed to StoneLock, (www.stonelock.com, +1 800 970-6168, [email protected]).

800.970.6168
www.stonelock.com
4
Section 1 – StoneLock Pro Hardware Configuration
1. Reference the section on “Connecting StoneLock Pro to an Access Control System” in the StoneLock Pro User Manual for general hardware installation guidelines for connecting a StoneLock Pro device to a Lenel OnGuard Platform via an access control panel.
2. Set the IP Address, the Subnet Mask, the Gateway, and the DNS on each StoneLock Pro device that is connected to the network. Reference the section on “LAN” in the StoneLock Pro User Manual for instructions.
3. Configure the Wiegand output on each StoneLock Pro device used in the system. Reference the section on “Wiegand Configuration” in the StoneLock Pro User Manual for instructions.
Section 2- Installation Installation of the StoneLock Management System (SLMS) with Lenel’s OnGuard platform involves:
1. Installation and setup of the SLMS. 2. Installation and setup of the StoneLock Pro Service application. The StoneLock Service application is a program that runs in the
background and facilitates communication between the SLMS and the StoneLock Pro devices connected to it 3. Configuration instructions for communicating with LENEL Onguard.
Section 2.1- Installing the SLMS and Service Applications
1. Installation of the SLMS requires the following items: a. The OnGuard license which supports the use of DataConduIT. b. The “NMS_SLMS_v2.X.XXXX.X.msi” installation kit from StoneLock.
2. Before starting:

800.970.6168
www.stonelock.com
5
a. Ensure that the person installing the software has a Windows login which has administration rights to access the SQL Server and is a valid LENEL OnGuard Operator.
b. Create a Windows User Group named “Stone Lock Users”. Ensure all user accounts sning the SLMS are part of the group. As shown in Figure 2.1-1
Figure 2.1-1
c. For server installations, determine from the end user’s IT Department: i. The name of the SQL server ii. The name of the server that OnGuard is running on. iii. The Domain Name (if OnGuard is running on a Domain). iv. The log in User Name for the server that OnGuard is running on. v. The log in Password for the server that OnGuard is running on.
d. For client installations, determine from the end user’s IT Department the computer names for each of the clients. 3. Follow the instructions in the “installation.PDF” document provided by Lenel to properly install a new OnGuard license which
supports the use of DataConduIT.

800.970.6168
www.stonelock.com
6
4. Copy the “NMS_SLMS_v2.X.XXXX.X.msi” installation kit to the server where OnGuard is running and to each client that will be using the SLMS.
Perform steps 5 through 20 for each installation: 5. Run the “NMS_SLMS_v2.X.XXXX.X.msi” installation kit by double clicking on it. The application will take you through the steps
necessary to install the driver needed for the StoneLock Pro device to be used with OnGuard. 6. At the screen shown in Figure 2.1-2, click “Next”
Figure 2.1-2
7. At the “License Agreement: screen shown in Figure 2.1-3, select “I accept the terms in the License Agreement” and click “Next”.

800.970.6168
www.stonelock.com
7
Figure 2.1-3
8. The “Custom Setup” screen shown in Figure 2.1-4 provides setup options for server or single PC installations and for client
installations. a. For Server or Single PC installations insure that the “SLMS Client”, “SLMS Server”, and “PACS Integrations” options DO
NOT have an “X” next to them. b. For Client Installations insure the “SLMS Client” option DOES NOT have an “X” next to it but that the “SLMS Server” and
“PACS Integrations” options DO have an “X” next to them. c. “Location:” indicates where the SLMS will be installed. The default location is “C:Program Files (x86)\New Market
Solutions\StoneLock Management System\”. Click on “Browse…” to select a different location. For Serve or Single PC

800.970.6168
www.stonelock.com
8
installations the SLMS should be installed on the same server that is running the PACS. d. Click the “+” next to PACS Integrations. e. Click drop down menu for the “Honeywell” option. Click on “Entire feature will be unavailable”. That option will then have
a red “X” next to it in the “PACS Integrations” menu option. f. Click “NEXT” to continue.
Figure 2.1-4
9. At the “Ready to install NMS StoneLock Management System” screen shown in Figure 2.1-5 Click “Install” to begin the installation, “Back” to review or change any of the installation settings or “Cancel” to exit the installation program.

800.970.6168
www.stonelock.com
9
Figure 2.1-5
10. The installation process should require no more than a couple of minutes. Once the installation is complete, the following screen shown in Figure 2.1-6 will be displayed.

800.970.6168
www.stonelock.com
10
Figure 2.1-6
11. Click “Finish” to complete the installation process. 12. For each installation (server or client), modify “SLMS.exe.config”
a. Open the Windows “Notepad” utility (commonly found in “Accessories”) as an administrator by right clicking on the program and selecting “Run as administrator”
b. Under “File” left click on “Open” c. In the “Open” screen, set “Notepad” to look at ALL files not just “.txt” files.

800.970.6168
www.stonelock.com
11
NOTE: Depending on the Windows Explorer settings, extensions (such as .txt, .exe, or .config) may NOT be visible in Notepad. Either change your Windows Explorer settings or verify that the “Type” column is visible in the screen. If the “Type” column is NOT visible, right click on the “Name” column at the top of the screen to see a pop up menu and click on “Type” to make the “Type” column visible.
d. Navigate to the location where the SLMS application is installed (example, C:\Program Files (x86)\New Market Solutions\StoneLock Management System).
e. Select “SLMS.exe.config”. The file should be visible in the “File Name:” field. Verify (by looking at the “Type” column) that the selected file is a type “CONFIG File”.
f. Left click on the “Open” button to open the file. g. Determine from the end user’s IT department the name of the SQL server and modify the string containing “Data Source=”
so that the Data Source points to the SQL Server. In the example in Figure 2.1-7 below, “Computer1” is the location that hosts the SQL Server. Therefore, “DataSource=Computer1\SQLEXPRESS”. After editing is complete, left click on “File” then left click on “Save” and exit the file.
Figure 2.1-7
13. For installations on a server, modify “NewMktSolutions.StoneLock.Server.exe.config”.

800.970.6168
www.stonelock.com
12
a. Open the Windows “Notepad” utility (commonly found in “Accessories”) as an administrator by right clicking on the program and selecting “Run as administrator”
b. Under “File” left click on “Open” c. In the “Open” screen, set the “Notepad” to look at ALL files not just the “.txt” files.
NOTE: Depending on the Windows Explorer settings, extensions (such as .txt, .exe, or .config) may NOT be visible in Notepad. Either change your Windows Explorer settings or verify that the “Type” column is visible in the screen. If the “Type” column is NOT visible, right click on the “Name” column at the top of the screen to see a pop up menu and click on “Type: to make the “Type” column visible.
d. Navigate to the location where the SLMS application is installed (example, C:\Program Files (x86)\New market Solutions\StoneLock Management System).
e. Select “NewMktSolutions.StoneLock.Server.exe.config”. The file should be visible in the “File Name:” field. Verify (by looking at the “Type” column) that the selected file is a type “CONFIG File”.
f. Left click on the “Open” button to open the file. g. Determine from the end user’s IT department the name of the SQL Server and modify the string containing “Data
Source=” so that the Data Source points to the SQL Server. In the example in Figure 2.1-8 below, “Computer1” is the location that hosts the SQL Server. Therefore, “Data Source=Computer1\SQLEXPRESS”. After editing is complete, eft click on “File” then left click on “Save” and exit the file.

800.970.6168
www.stonelock.com
13
Figure 2.1-8
14. For installations on a server, use Windows Explorer (commonly found in “Accessories”) to navigate to the location where the application is installed (example, C:\Program Files (x86)\New Market Solutions\StoneLock Management System)
NOTE: Depending on the Windows Explorer settings, extensions (such as .txt, .exe, or .config) may NOT be visible. Either change your Windows Explorer settings or verify that the “Type” column is visible after navigating to that sub directory in Windows explorer. If the “Type” column is NOT visible, right click on the “Name” column at the top of the screen to see a pop up menu and click on “Type” to make the “Type” column visible.
15. Double click on “StoneLockUtilities.exe” to run it. Verify (by looking at the “Type” column) that the selected file is a type “Application”. The “NMS” logo should also be visible on the selected file. See Figure 2.1-9 below.

800.970.6168
www.stonelock.com
14
Figure 2.1-9
16. Confirm that the SQL server is running. Under the “Database Instance Name:”, set the correct path to the SQL Server and left click on the “Connect” button.
17. Once the connection has been made, a message will appear in the window at the bottom indicating that it “successfully connected”. Also, the “SLMS Database Objects” button should now be active. Click on it to add the database objects.
18. Once the database objects have been added, a message will appear in the window at the bottom of the screen indicating that the database was created successfully and that the Stone Lock object tables were created successfully. See Figure 2.1-10 below.

800.970.6168
www.stonelock.com
15
Figure 2.1-10
19. Click the “Validate “Stone Lock Users” Group” button to verify the Stone Lock Users Group was set up correctly. See Figure 2.1-
11

800.970.6168
www.stonelock.com
16
Figure 2.1-11
20. Click on the “Lenel” tab. 21. Click the “Lenel Database Objects” button to add the Lenel database objects. See Figure 2.1-12

800.970.6168
www.stonelock.com
17
Figure 2.1-12
22. Click on the “X” in the upper right corner of the screen to exit the utility.
Section 2.2- Configuring for Lenel’s OnGuard Platform 1. For each installation (server of client) modify the “NewMktSolutions.StoneLock.Lenel.exe” CONFIG File.
a. Open the Windows “Notepad: utility (commonly found in: Accessories”) as an administrator by right clicking on the program and selecting “Run as administrator”
b. Under “File” left click “Open” c. In the “Open” screen, set “Notepad” to look at ALL files and not just “.txt” files.

800.970.6168
www.stonelock.com
18
NOTE: Depending on the Windows Explorer settings, extensions (such as .txt, .exe, or .config) may NOT be visible in Notepad. Either change your Windows Explorer settings or verify that the “Type” column is visible in the screen. If the “Type” column is NOT visible, right click on the “Name” column at the top of the screen to see a pop up menu and click on “Type” to make the “Type” column visible.
d. Navigate to the location where the SLMS application is installed (example, C:\Program Files (x86)\New Market Solutions\StoneLock Management System).
e. Select “NewMktSolutions.StoneLock.Lenel.exe”. The file should be visible in the “File Name:” field. Verify (by looking at the “Type” column) that the selected file is a type “XML Configuration File”
f. Left click on the “Open” button to open the file. g. Determine (by confirming with the end user’s IT department) the name of the SQL server and modify the string containing
“Data Source=” so that the Data Source points to the SQL Server. In the example in Figure 2.2-1 below, “Computer1” is the location that hosts the SQL Server. Therefore, “Data Source=Computer1\SQLEXPRESS”. After editing is complete, left click on “File” then left click on “Save” and exit the file.
Figure 2.2-1
2. Follow the instructions in the “Installation.PDF” document provided by Lenel to properly install a new OnGuard license which supports the use of DataConduIT.

800.970.6168
www.stonelock.com
19
3. Start the Onguard “System Administration” application. Go to “Administration/Cardholder Options...” and left click on it. See Figure 2.2-2 below.
Figure 2.2-2
4. In the “General Cardholder Options” tab, click on the “Modify” button in the lower left corner of the menu. See Figure 2.2-3 below.

800.970.6168
www.stonelock.com
20
Figure 2.2-3 5. Left click on the checkbox next to “Create/save photo thumbnails” in the “Multimedia” area of the menu to select the feature. 6. Left click on the checkbox next to “Use time” in the “Badge activation / deactivation dates” area of the menu to select the feature. 7. Left click on the “OK” button in the lower left corner of the menu to complete the setup.

800.970.6168
www.stonelock.com
21
8. Start the “New Market Solutions – StoneLock Management System”. 9. Left Click on the “PACS Configuration” tab in the main screen of the New Market solutions – StoneLock Management System. 10. Use the PACS dropdown field to select “Lenel”. See Figure 2.2-4.
Figure 2.2-4 11. Fill in the information for the “Server Name”, “Logical Source” (this needs to be the exact same name as the Logical Source set up in
OnGuard). 12. The Configuration Timer is the set time for the SLMS to go into OnGuard to ask for any new Timezone and Access Levels that have
been created in OnGuard. Cardholder and Badge changes are not affected by this time; those are sent automatically via the

800.970.6168
www.stonelock.com
22
dataconduIT. New Timezones and Access Levels are not automatically sent via the dtaconduIT and must be requested by the SLMS. This timer sets how long the SLMS will wait in between each request for new Timezones and Access Levels.
13. The “Last Sync Date Time” option allows you to manually change the date and time that the SLMS will go back to update on. The default date and time will allow the SLMS to pull all the existing Lenel users into the SLMS.
14. If a Card Offset is used for the users’ cards, add the correct offset number and select “add” or “subtract” accordingly. 15. Leave the “Initial” set to True. It will change to False after the first full download from OnGuard. 16. Click the “Enable” button. 17. Left click on the “Save” button. 18. A pop up screen indicating “PACS data Updated” will be displayed. Left click on the “OK” button. 19. Left click on the “Test Connection” button. If the OnGuard Server Properties are set correctly a pop up screen indicating “OnGuard
Connected Successfully” will be displayed. If an error message is displayed double check the data entered in the OnGuard Server Properties fields.
20. Navigate to Windows Services. Set the “Log On” information for the “NMS Stone Lock SLMS Data Interface”, “NMS Stone Lock Lenel Interface”, and “NMS Stone Lock Hardware Interface” using the administrator Username and Password for the computer running the service.Start the services.
NOTE: If operating in Domain and the SLMS is installed on the same server as OnGuard, a local user MUST be set up. This local user needs to have the same username and password as the Domain user that access the SQL database and OnGuard. Without the local user, OnGuard will not allow the domain user credentials to access the database.

800.970.6168
www.stonelock.com
23
Section 3 Managing StoneLock Pro Devices StoneLock Pro devices are managed through the “StoneLock Device” screen which is accessed through the SLMS. This screen provides the functionality to define, setup and manage the network communication with a StoneLock Pro device, as well as manage the User Types for that Device.
Note: The StoneLock Pro device is recognized in OnGuard as standard card reader. To allow OnGuard to communicate with the StoneLock Pro device a reader must be dedicated in OnGuard for the device. Reference the Lenel OnGuard user manual for creating a reader.
Section 3.1- Adding StoneLock Pro Devices Adding a StoneLock Pro device to the SLMS is necessary before any communication with a StoneLock Pro device can occur, and before any users, access levels, or the local time zone can be synchronized with the device.
1. Left click on the “Devices” tab in the main screen of the SLMS. See Figure 3.1-1.

800.970.6168
www.stonelock.com
24
Figure 3.3-1
2. Left click on “Add”. A blank “StoneLock Device” screen will appear. See figure 3.3-1

800.970.6168
www.stonelock.com
25
Figure 3.1-2
3. Fill in the required “Name” field and the optional “Description” field. 4. On the “general” tab, enter the IP Address of an installed Stone Lock Pro device and click the “Enabled” button. Click “Save and
Close” 5. The SLMS will retrieve the Serial Number from the Stone Lock Pro device.
NOTE: Depending on the speed of the network it may take a little time for the device serial number to reach the database. If
800.970.6168
www.stonelock.com
26
the serial number does not appear within 5 minutes, stop the “NMS Stone Lock Hardware Interface” service and restart it. If the serial number still does not appear, check the connection to the device to ensure it is connected to the network.
6. The Serial Number from each device will need to be provided to StoneLock to obtain appropriate License Keys for each installed StoneLock Pro device. Contact: StoneLock .
+1 800 970-6168 ext. 708
7. Once the License Key has been received, type it in the “License Key” field on the “General” tab and click on the “Validate”
button. 8. If the validation was successful, a pop up menu will appear indicating “Device Validated”. Left click on the “OK” button in the pop
up. The “Licensed” check box in the “General” tab should now be checked. 9. In the “PACS Type” drop down menu select “Lenel”. See Figure 3.1-2 10. Click the “…” button to bring up the list of available Lenel OnGuard Readers. Use the dropdown and click on the reader that will
be associated with the StoneLock Pro Device. The reader will be shown in the “Reader” box. 11. Click on “Save and Close” in the upper left corner of the screen to save the information.
Section 3.2 – Editing StoneLock Pro Devices Changes to a device IP Address, reader association, TLS encryption, or enabling and disabling StoneLock Pro devices are achieved through editing the “StoneLock Device” screen corresponding with the desired device.

800.970.6168
www.stonelock.com
27
1. On the “Devices” tab in the main screen of the SLMS, left click on the name of a StoneLock Pro device to highlight it.
Figure 3.2-1
2. Left click on “Edit” to open the “StoneLock Pro Device” screen. 3. Once desired changes are made, click on “Save and Close” in the upper left corner of the screen to save the information or click
on the “X” in the upper right corner of the screen to exit without saving.

800.970.6168
www.stonelock.com
28
Section 3.3—Deleting StoneLock Pro Devices Deleting a StoneLock Pro Device from the main screen of the SLMS eliminates the ability to be connected to that device and keep the user, access level, and time zone information stored in the database synchronized with that device.
1. On the “Devices” tab in the main screen of the SLMS, left click on the name of a StoneLock device to highlight it. Reference Figure 3.2-1.
2. Left click on “Remove” to delete the device.
Section 3.4 – Enabling TLS Encryption StoneLock Pro devices are capable of communicating over a network connection using TLS 1.2 encryption. To use this feature, both the device and the SLMS need to have TLS encryption enabled.
1. On the “Devices” tab in the main screen of the SLMS, left click on the name of a StoneLock device to highlight it. Reference Figure 3.2-1.
2. Left click on “Edit” to open the “StoneLock Device” screen. 3. Left click on the “General” tab in the “StoneLock Device” screen. Reference Figure 3.1-2. 4. Uncheck the “enabled” box to disable to communication between the SLMS and the device.
NOTE: If the StoneLock Pro device is enabled before both the device and the SLMS have both been set for TLS encryption, communications between the two will not be allowed.
5. Go to the physical location of the StoneLock Pro device and enable TLS encryption on the device. Reference the “TLS Encryption” section of the StoneLock Pro User Manual.
6. Left click on the “TLS Encryption” check box to enable it.

800.970.6168
www.stonelock.com
29
7. Check the “Enabled” box to reestablish communication to the device. 8. To exit the “StoneLock Device” screen, click on “Save and Close” in the upper left corner of the screen or click on the “X” in the
upper right corner of the screen.
Section 4 – Managing Users User information, badge numbers, and access levels are all maintained and controlled by OnGuard. As long as a StoneLock Pro device is associated with a Lenel OnGuard reader, see Section 3.1, changes to the following user attributes will automatically be updated on that StoneLock Pro device.
• Granting a user Access • Removing a User’s Access • Changing a User’s First Name • Changing a User’s Last Name • Changing a User’s Card Number • Adding or Changing a User’s Enrollment Photo • Changing a User’s Expiration Date
See the Lenel OnGuard user manual for information on how to change these user attributes. Setting a user’s StoneLock Pro device’s ID, User Type, and enrolling a facial template are all accomplished within the SLMS.

800.970.6168
www.stonelock.com
30
Section 4.1 – StoneLock Pro Users in the Database Every user must have a StoneLock Pro ID, biometric template, and an expiration date (which is not the current date) prior to being added to a StoneLock Pro device in order for that user to attain a successful verification at the device.
If the StoneLock Pro device is directly controlling the lock to a secure area, the successful verification will result in gaining access. However, gaining access to a secure area where the lock is controlled by the access control panel requires that the access control panel recognizes the StoneLock Pro ID or the Card Number sent by the StoneLock Pro device over the Wiegand. The StoneLock Pro device can be configured to send either. Reference the section on “Wiegand Configuration” in the StoneLock Pro User Manual.
Section 4.2 – Enrolling Users in the StoneLock Pro Device
All users in the Lenel OnGuard database are automatically visible in the main user tab of the StoneLock Pro Management System. A StoneLock Pro ID is required to for the StoneLock Pro device to categorize users.
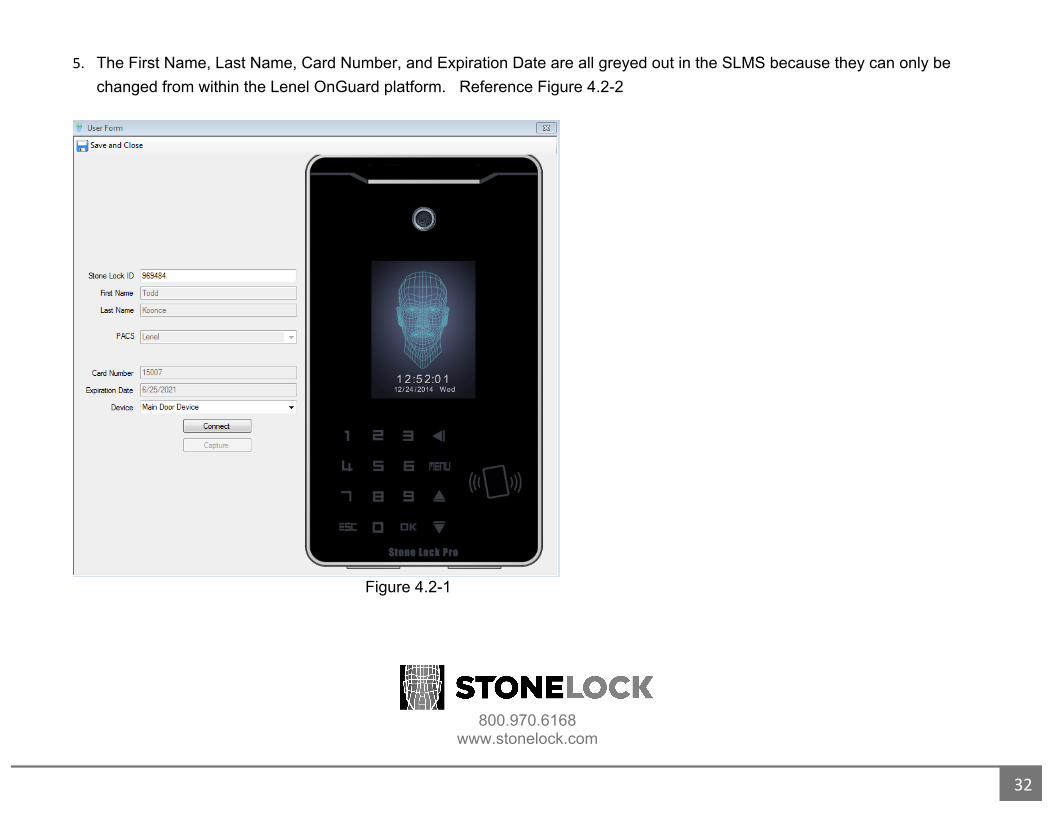
1. Left click on the “Users” tab in the main screen of the SLMS. Reference Figure 4.2-1

800.970.6168
www.stonelock.com
31
Figure 4.2-1
2. Left click on the selected user to highlight the record. 3. Click “Edit” 4. Assign a number to the “StoneLock ID” field.
Note: A StoneLock Pro ID can be any number from 1-18 digits long. The number should be one that the employee can remember in case it is ever needed. Using the user’s employee number is recommend but not mandated.
800.970.6168
www.stonelock.com
32
5. The First Name, Last Name, Card Number, and Expiration Date are all greyed out in the SLMS because they can only be changed from within the Lenel OnGuard platform. Reference Figure 4.2-2
Figure 4.2-1

800.970.6168
www.stonelock.com
33
6. Use the “Device” drop down menu to select one of the StoneLock Pro devices on the network to use as the enrollment device. NOTE: The actual StoneLock Pro device used for enrolling DOES NOT store the biometric template in its memory during the enrollment process. The device only captures the biometric template for storage in the SLMS’s database (along with the rest of the user information).
7. Prior to enrolling a user, review “Preparation for User Enrollment” in the “New User Enrollment” section of the StoneLock Pro User Manual.
8. Left click on the “Connect” button to connect to the intended enrollment device. 9. Once the user is positioned in front of the device selected for enrollment, click the “Capture” button on the StoneLock Pro User
screen to capture the user’s biometric template. The user will be visible in the screen during the enrollment process. 10. Once the capture process is complete, click on “Save and Close” in the upper left corner of the screen to save the information to
the SLMS’s database, or click on the “X” in the upper right corner of the screen to exit
Section 4.3 – Deleting Users from the StoneLock Pro Device Users are pushed to the StoneLock Pro device based on their access levels set within Lenel OnGuard. If a user’s access level for a device is removed, that user will be deleted automatically from the StoneLock Pro device. If a user is deleted from Lenel OnGuard, that user will be automatically deleted from all StoneLock Pro devices with which they were associated.

800.970.6168
www.stonelock.com
34
Section 4.4 – Setting User Type for StoneLock Pro Users 1. On the “Devices” tab in the main screen of the SLMS, left click on the name of a StoneLock Pro device to highlight it. Reference
Figure 3.2-1. 2. Left click on “Edit” to open the “StoneLock Pro Device” screen. 3. Left click on the “User” tab in the “StoneLock Pro Device” screen. Reference Figure 4.4-1.
Figure 4.4-1

800.970.6168
www.stonelock.com
35
4. Left click on the desired user to select and highlight it. 5. Left click on “User Type” or right click on the desired user and select “Change User Type”.
Figure 4.4-2
6. Left Click on the radial button next to the desired user type: User, Admin, S- Admin and left click on the “OK” button. Reference the “Using StoneLock Pro” section of the StoneLock Pro User Manual for the definitions of the user types.
7. The selected User Type should now be visible in the “User Type” column of the selected user. Click on “Save and Close” in the upper left corner of the screen or click on the “X” in the upper right corner of the screen to exit it.

800.970.6168
www.stonelock.com
36
Section 4.5 - Conclusion This concludes the setup instructions for the integration of the StoneLock Management System, along with and related software and hardware configurations to the Lenel OnGuard platform.
If you have any questions regarding these instructions or the performance of your StoneLock products, please contact StoneLock Tech Support at: +1 800 970-6168, or send an email to [email protected].
A StoneLock Publication © 2017 All rights reserved