online application user guide - psconline.psc.gov.nppsconline.psc.gov.np/document/manual.pdf · 4...
TRANSCRIPT
1
ONLINE APPLICATION USER GUIDE
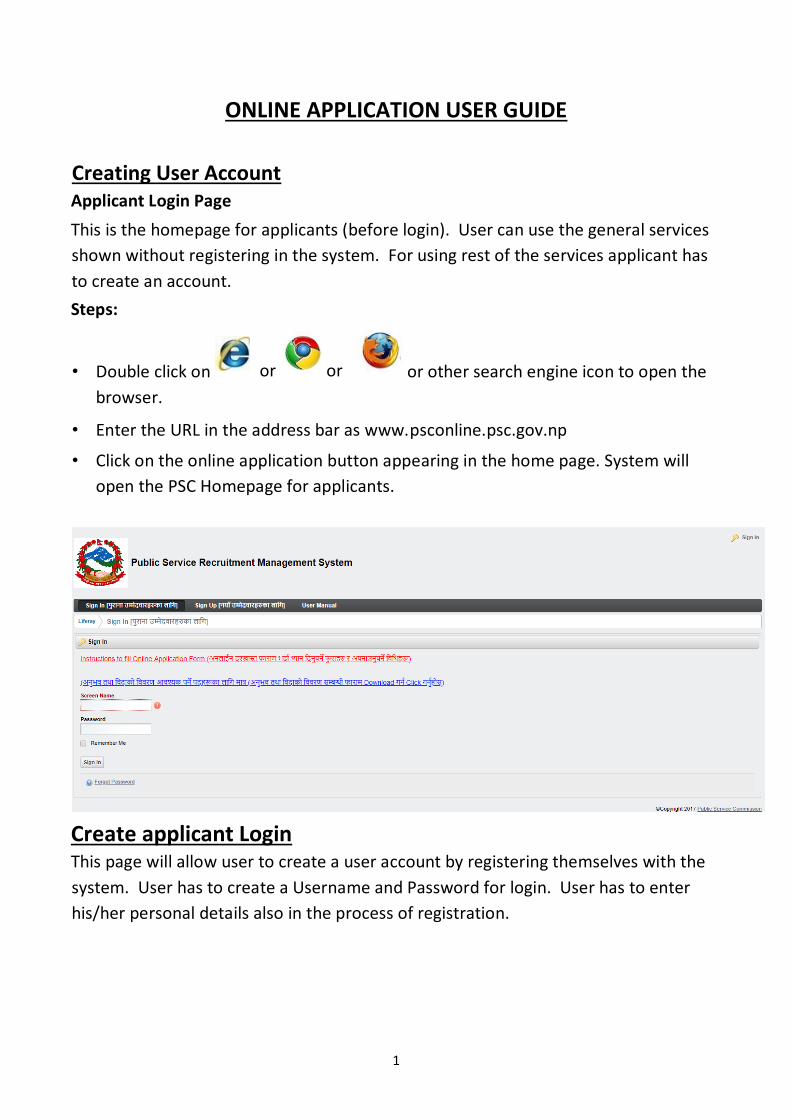
Creating User Account Applicant Login Page
This is the homepage for applicants (before login). User can use the general services
shown without registering in the system. For using rest of the services applicant has
to create an account.
Steps:
• Double click on or other search engine icon to open the
browser.
• Enter the URL in the address bar as www.psconline.psc.gov.np
• Click on the online application button appearing in the home page. System will
open the PSC Homepage for applicants.
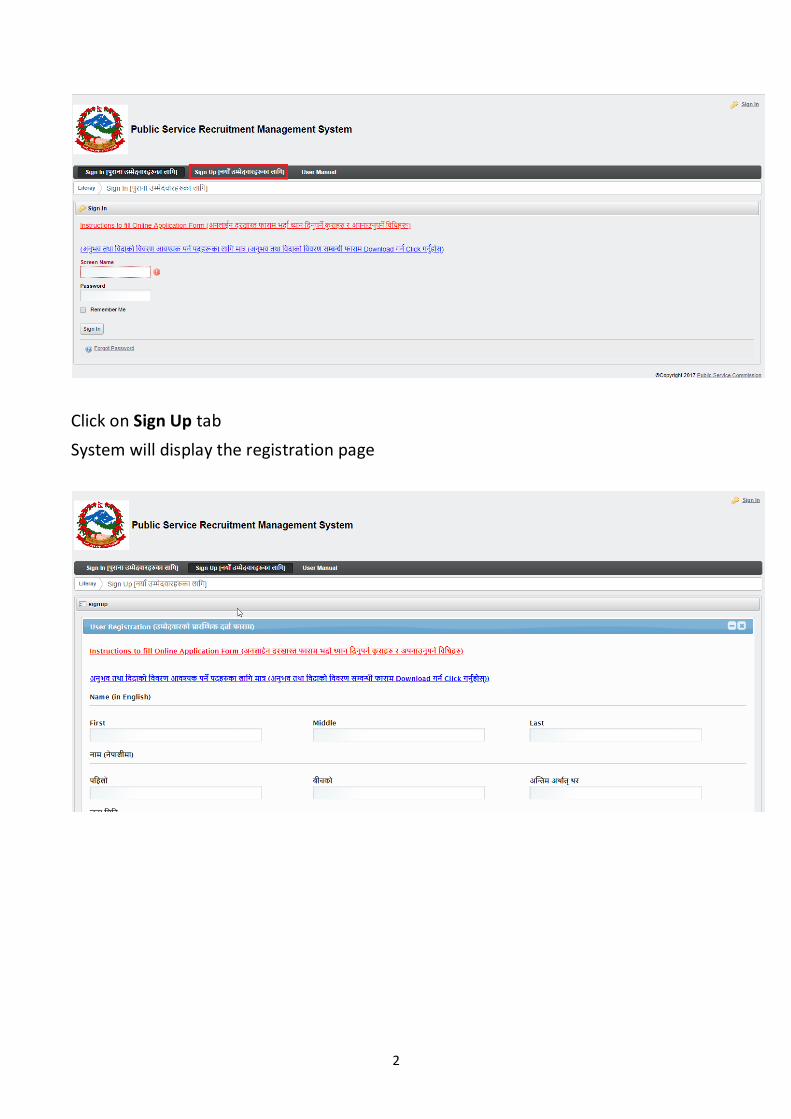
Create applicant Login This page will allow user to create a user account by registering themselves with the
system. User has to create a Username and Password for login. User has to enter
his/her personal details also in the process of registration.
or or
2
Click on Sign Up tab
System will display the registration page
3
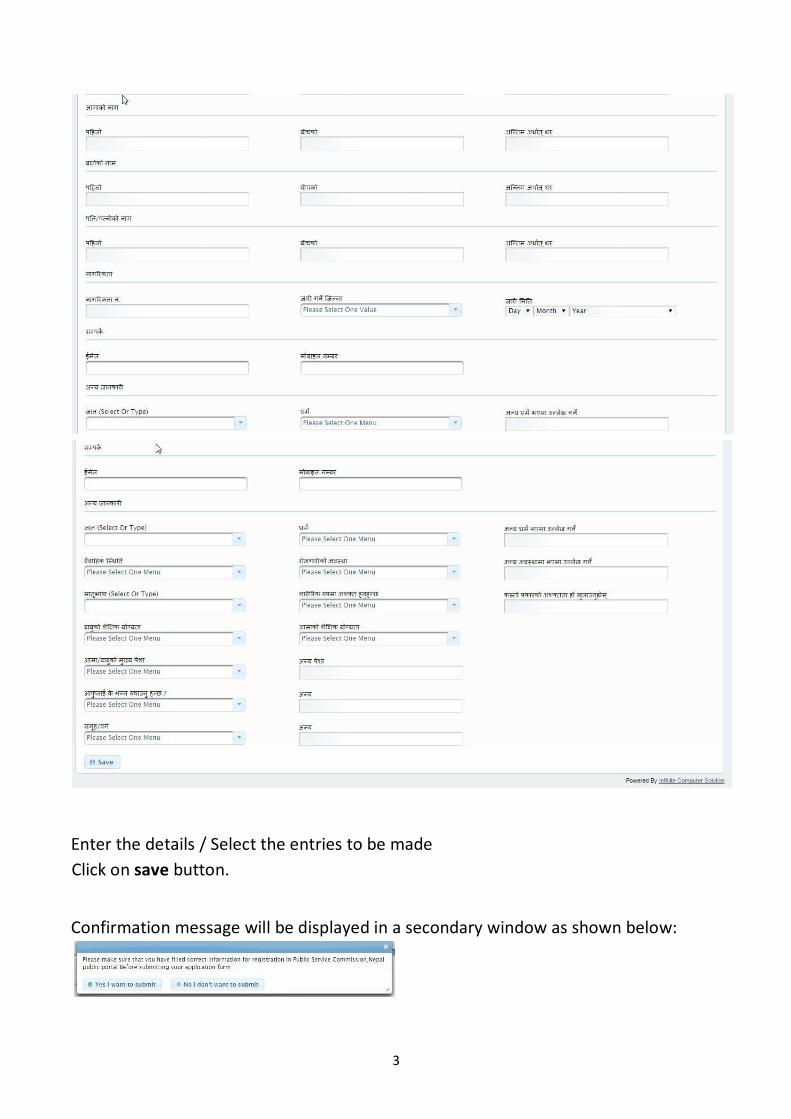
Enter the details / Select the entries to be made
Click on save button.
Confirmation message will be displayed in a secondary window as shown below:
4
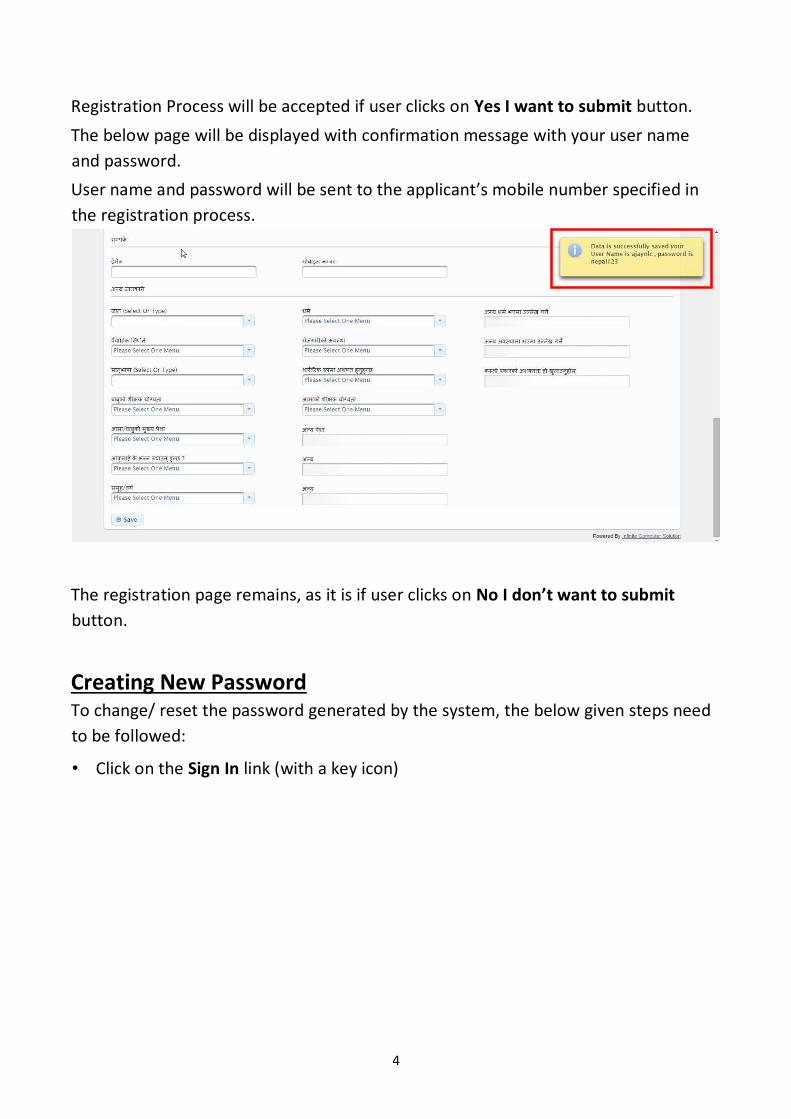
Registration Process will be accepted if user clicks on Yes I want to submit button.
The below page will be displayed with confirmation message with your user name
and password.
User name and password will be sent to the applicant’s mobile number specified in
the registration process.
The registration page remains, as it is if user clicks on No I don’t want to submit
button.
Creating New Password To change/ reset the password generated by the system, the below given steps need
to be followed:
• Click on the Sign In link (with a key icon)
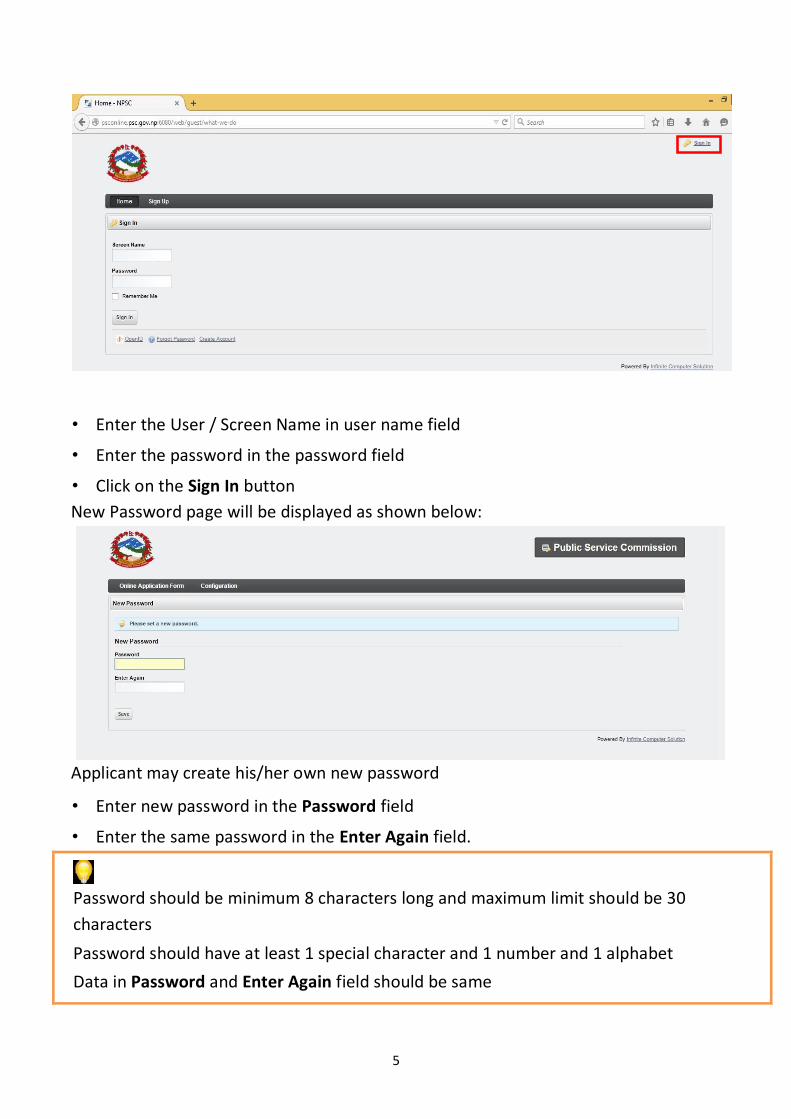
5
• Enter the User / Screen Name in user name field
• Enter the password in the password field
• Click on the Sign In button
New Password page will be displayed as shown below:
Applicant may create his/her own new password
• Enter new password in the Password field
• Enter the same password in the Enter Again field.
Password should be minimum 8 characters long and maximum limit should be 30
characters
Password should have at least 1 special character and 1 number and 1 alphabet
Data in Password and Enter Again field should be same
6
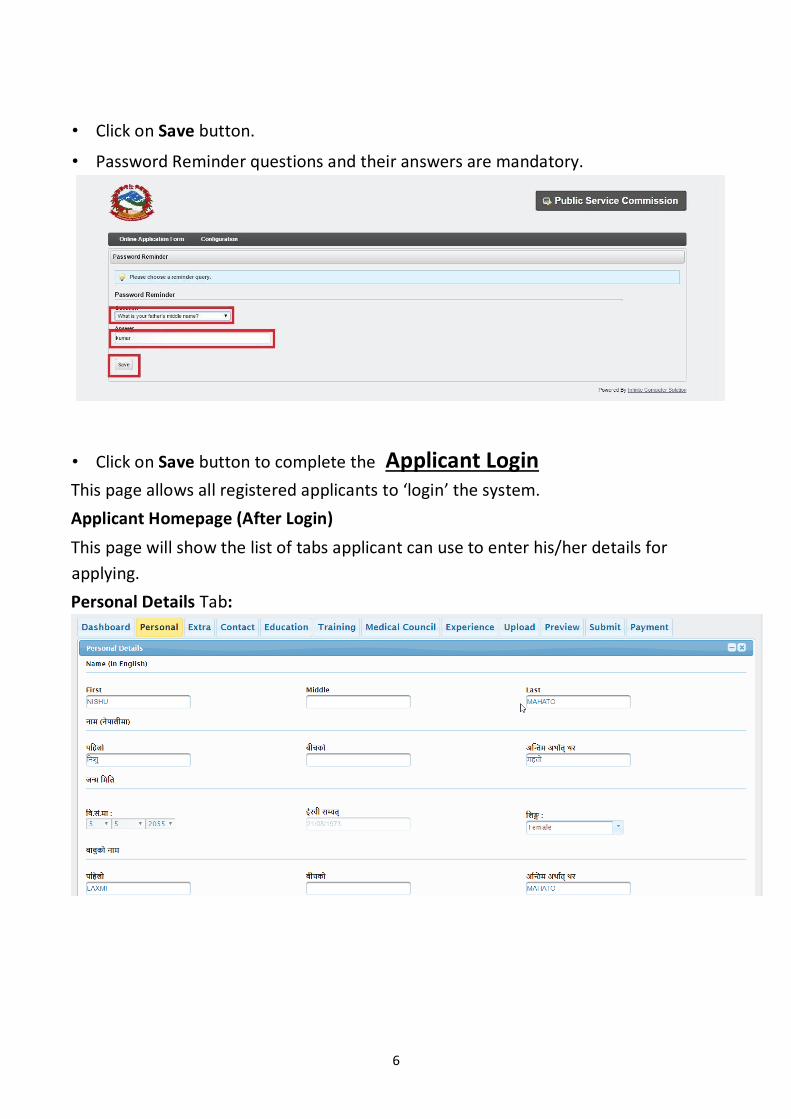
• Click on Save button.
• Password Reminder questions and their answers are mandatory.
• Click on Save button to complete the Applicant Login This page allows all registered applicants to ‘login’ the system.
Applicant Homepage (After Login)
This page will show the list of tabs applicant can use to enter his/her details for
applying.
Personal Details Tab:
7
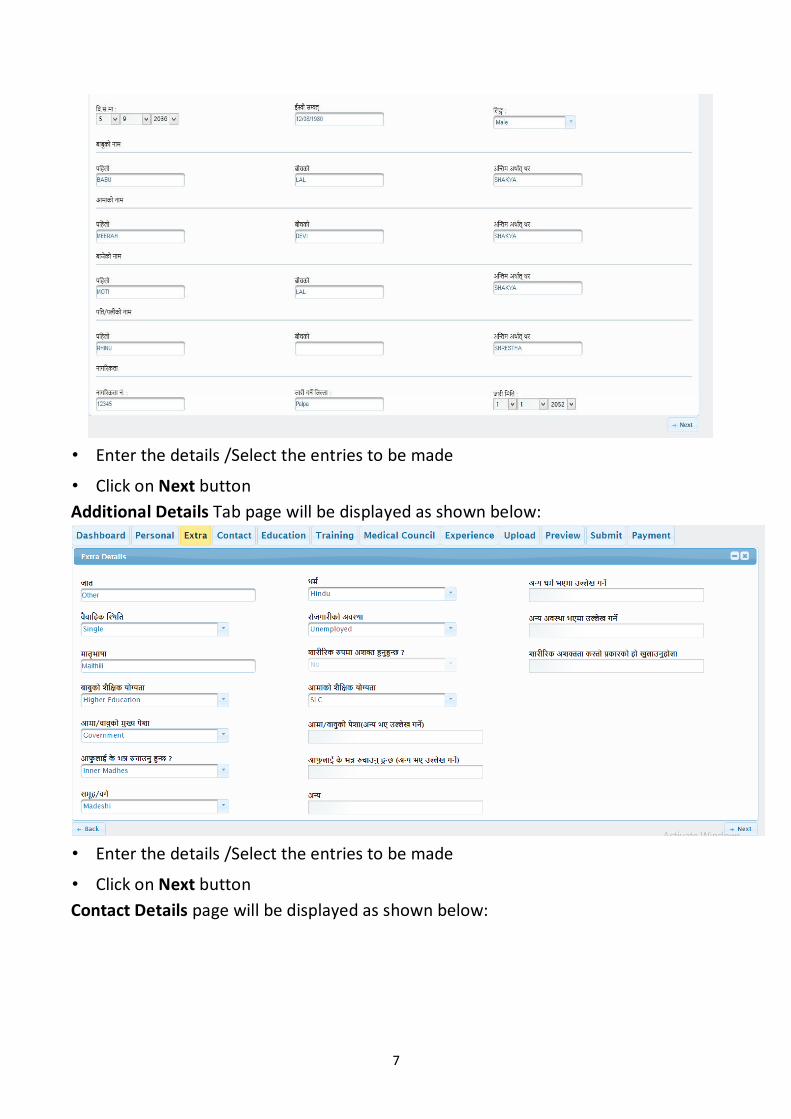
• Enter the details /Select the entries to be made
• Click on Next button
Additional Details Tab page will be displayed as shown below:
• Enter the details /Select the entries to be made
• Click on Next button
Contact Details page will be displayed as shown below:

8
Applicant should fill the Contact Details to go to Next page
• Enter the details /Select the entries to be made
• Click on Next button
Education Details page will be displayed as shown below:
Back button: For updating previous tab details, applicant can click on Back button.
System will take user to previous page for updating details.
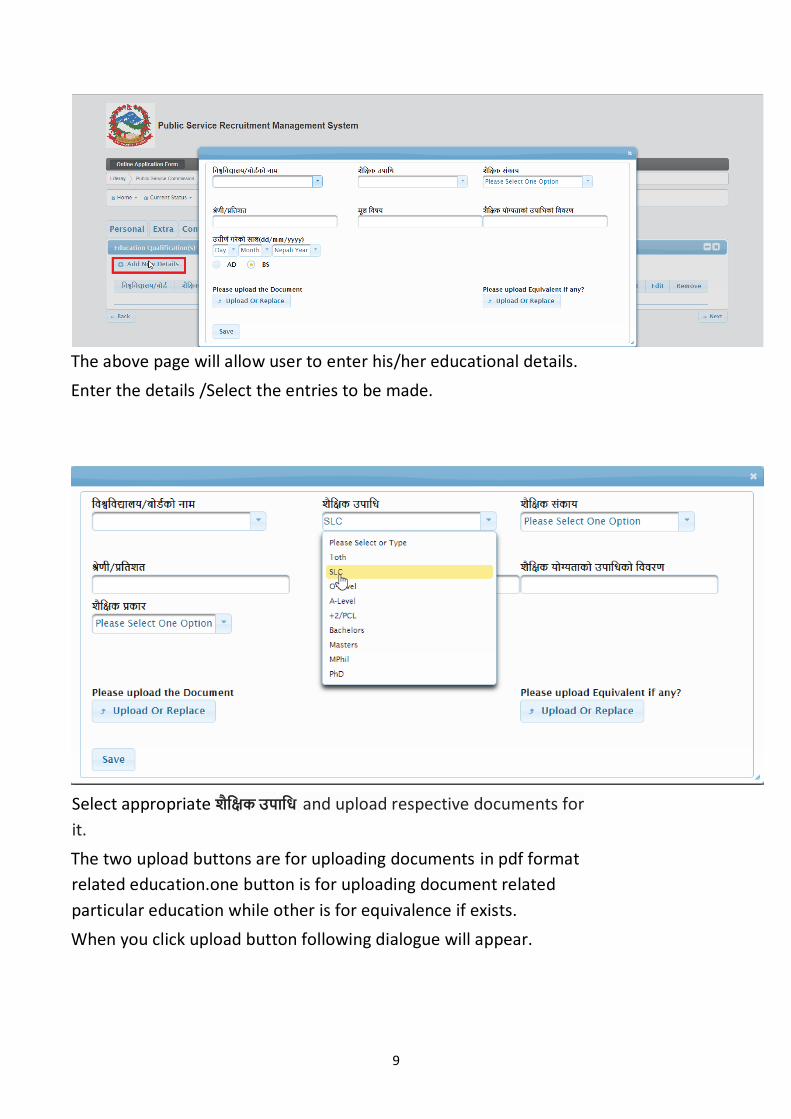
By clicking on Add New Details button, secondary window will be displayed for
entering education details.
The following screen shot shows the education details page in secondary window.
9
The above page will allow user to enter his/her educational details.
Enter the details /Select the entries to be made.
Select appropriate शैक्षिक उपाक्षि and upload respective documents for
it.
The two upload buttons are for uploading documents in pdf format
related education.one button is for uploading document related
particular education while other is for equivalence if exists.
When you click upload button following dialogue will appear.
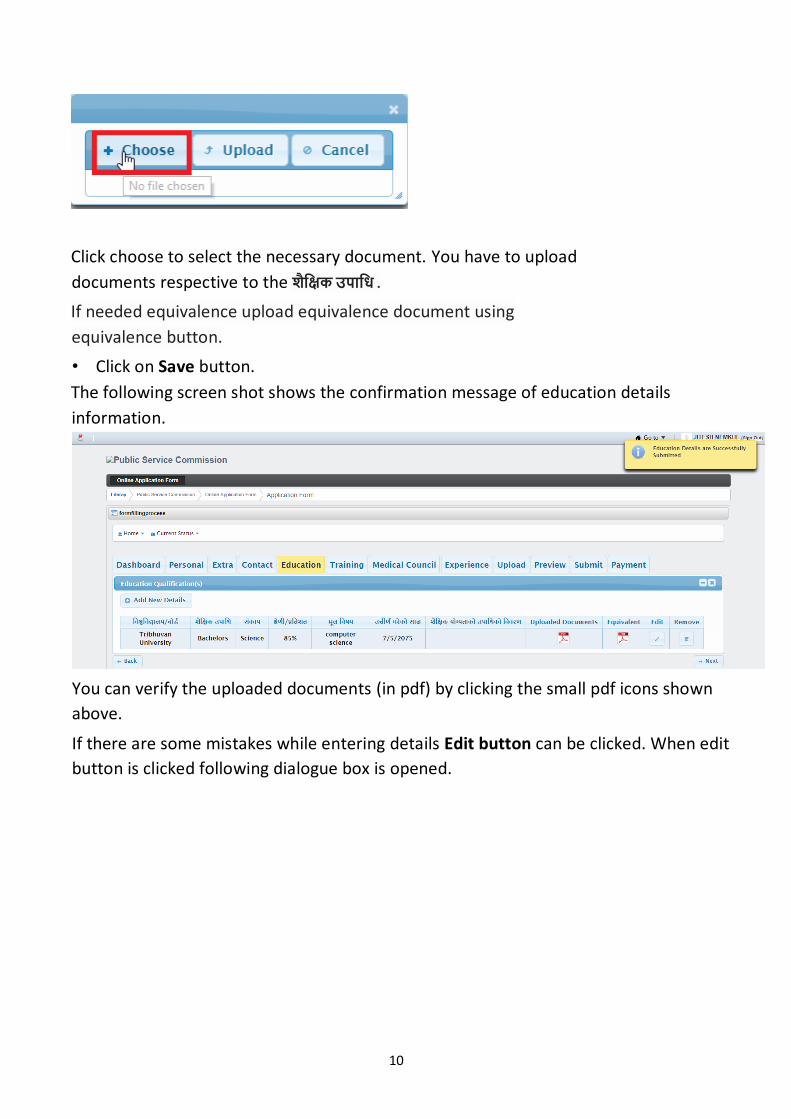
10
Click choose to select the necessary document. You have to upload
documents respective to the शैक्षिक उपाक्षि .
If needed equivalence upload equivalence document using
equivalence button.
• Click on Save button.
The following screen shot shows the confirmation message of education details
information.
You can verify the uploaded documents (in pdf) by clicking the small pdf icons shown
above.
If there are some mistakes while entering details Edit button can be clicked. When edit
button is clicked following dialogue box is opened.
11
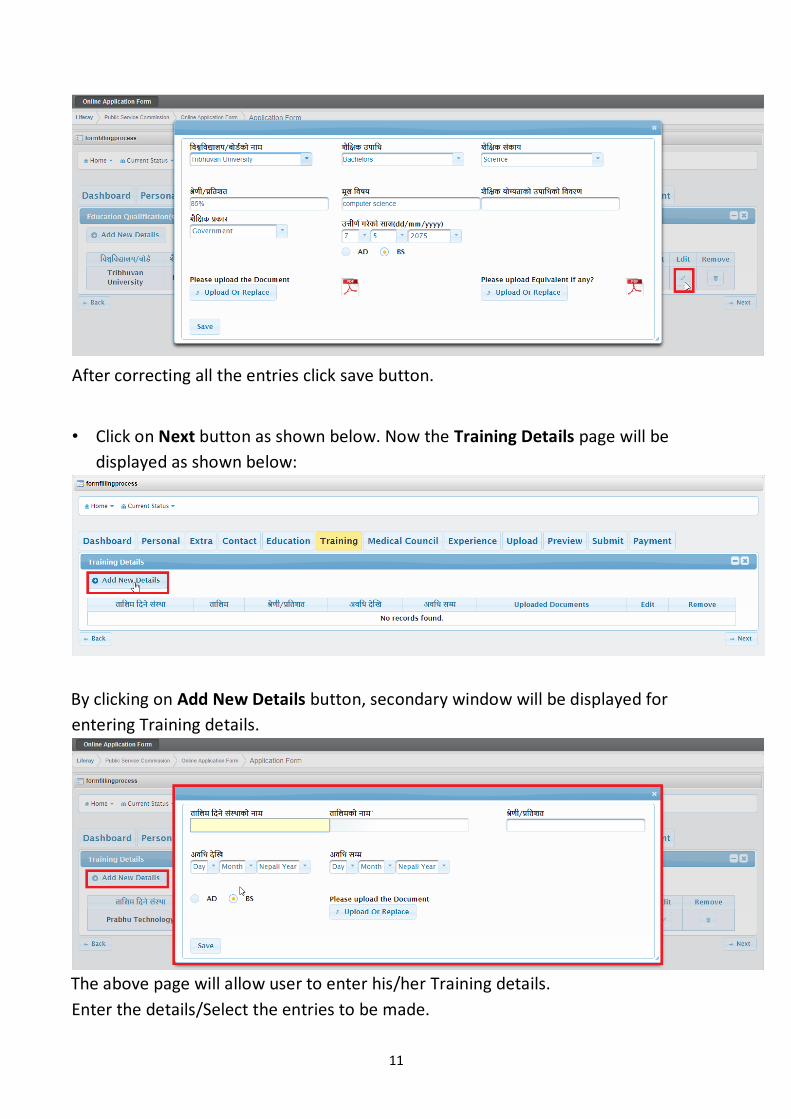
After correcting all the entries click save button.
• Click on Next button as shown below. Now the Training Details page will be
displayed as shown below:
By clicking on Add New Details button, secondary window will be displayed for
entering Training details.
The above page will allow user to enter his/her Training details.
Enter the details/Select the entries to be made.
12
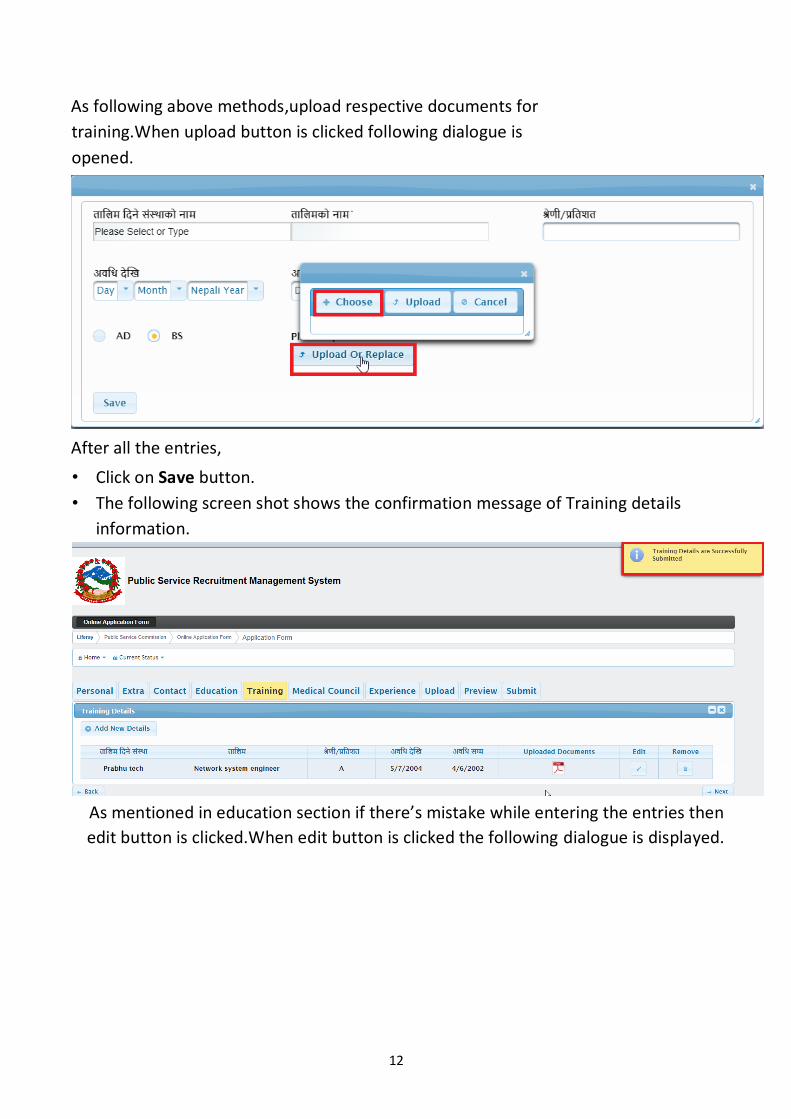
As following above methods,upload respective documents for
training.When upload button is clicked following dialogue is
opened.
After all the entries,
• Click on Save button.
• The following screen shot shows the confirmation message of Training details
information.
As mentioned in education section if there’s mistake while entering the entries then
edit button is clicked.When edit button is clicked the following dialogue is displayed.
13
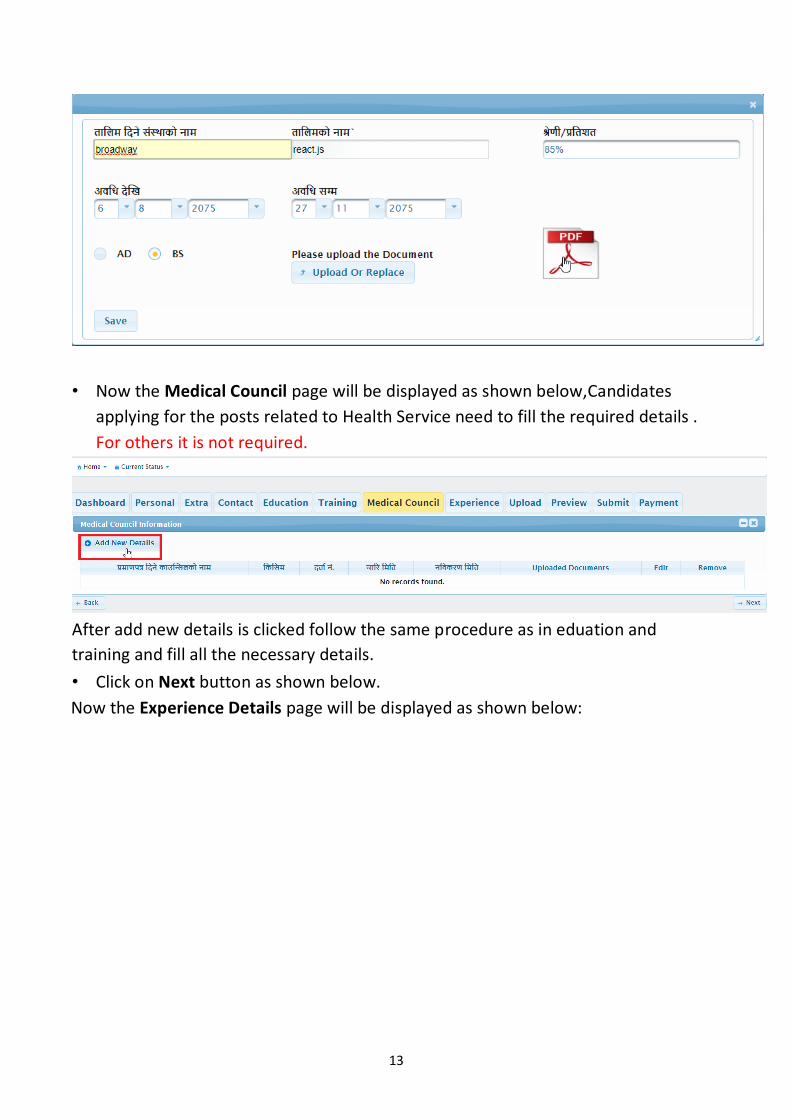
• Now the Medical Council page will be displayed as shown below,Candidates
applying for the posts related to Health Service need to fill the required details .
For others it is not required.
After add new details is clicked follow the same procedure as in eduation and
training and fill all the necessary details.
• Click on Next button as shown below.
Now the Experience Details page will be displayed as shown below:
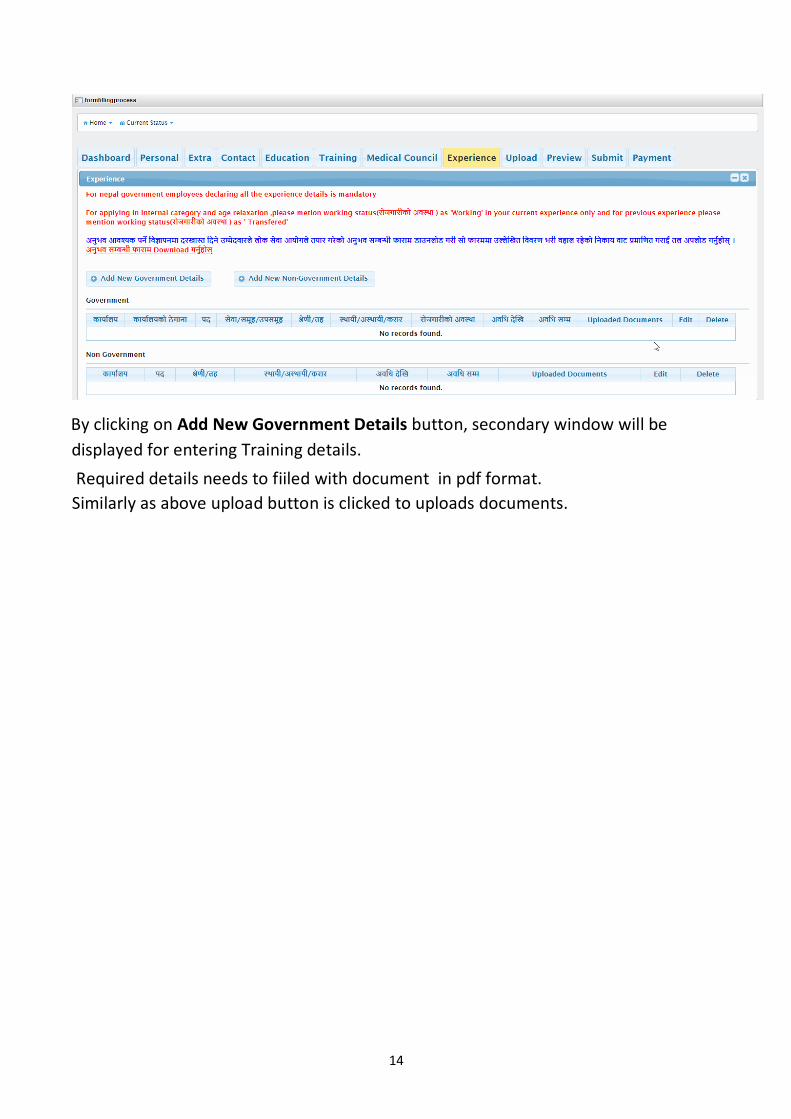
14
By clicking on Add New Government Details button, secondary window will be
displayed for entering Training details.
Required details needs to fiiled with document in pdf format.
Similarly as above upload button is clicked to uploads documents.
15
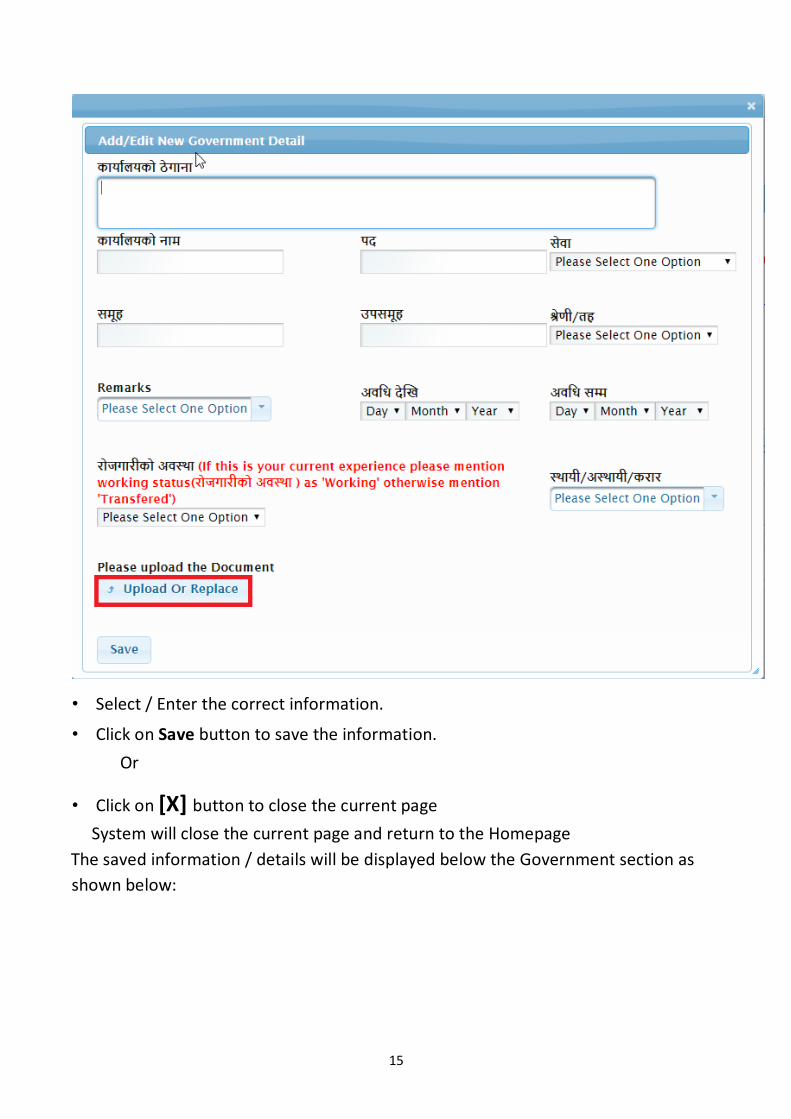
• Select / Enter the correct information.
• Click on Save button to save the information.
Or
• Click on [X] button to close the current page
System will close the current page and return to the Homepage
The saved information / details will be displayed below the Government section as
shown below:
16
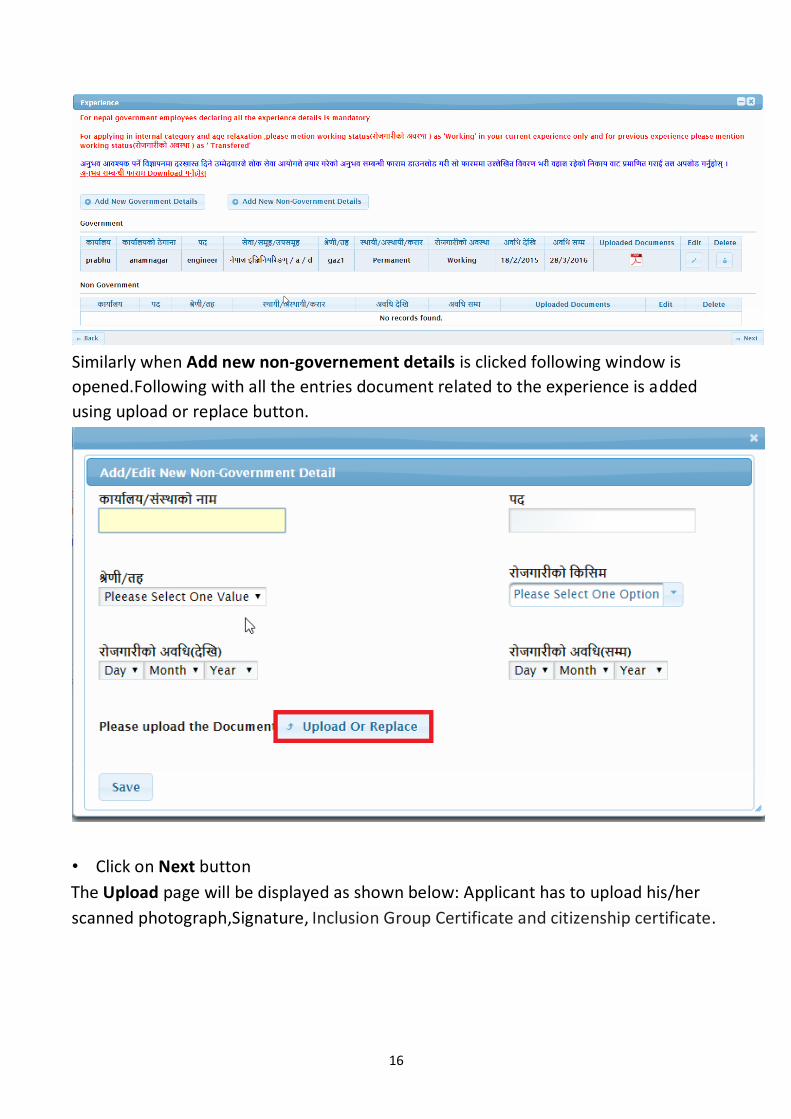
Similarly when Add new non-governement details is clicked following window is
opened.Following with all the entries document related to the experience is added
using upload or replace button.
• Click on Next button
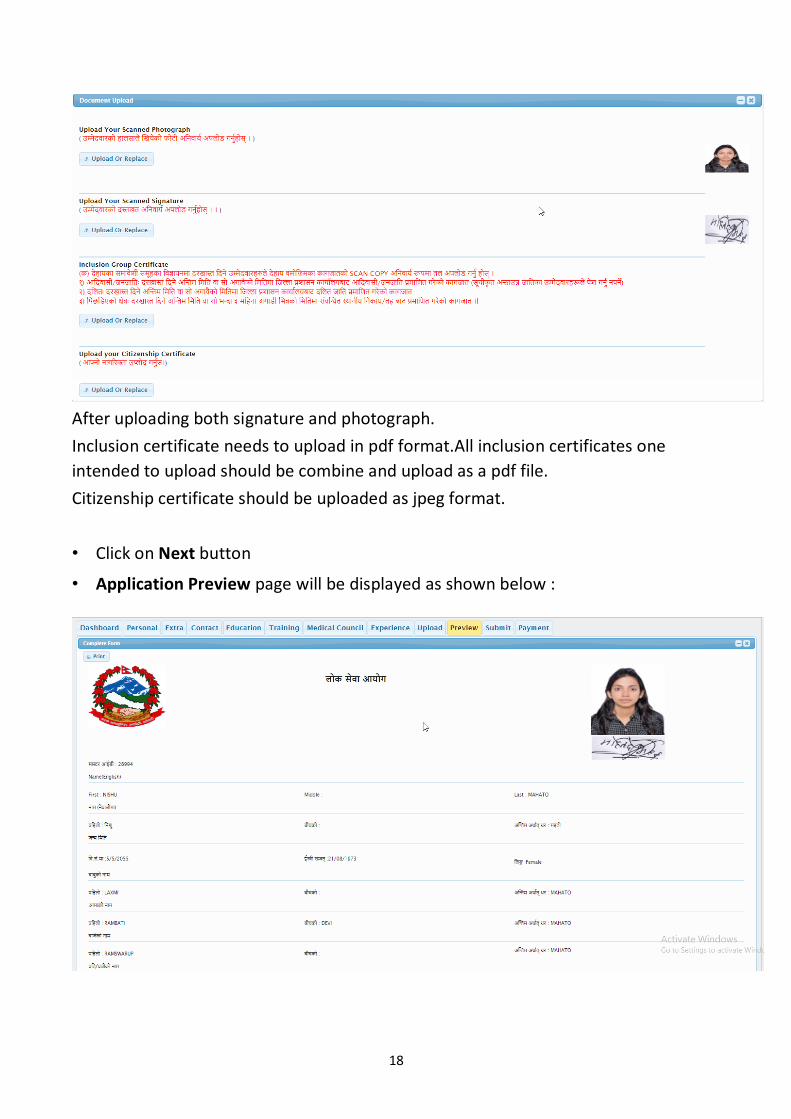
The Upload page will be displayed as shown below: Applicant has to upload his/her
scanned photograph,Signature, Inclusion Group Certificate and citizenship certificate.
17
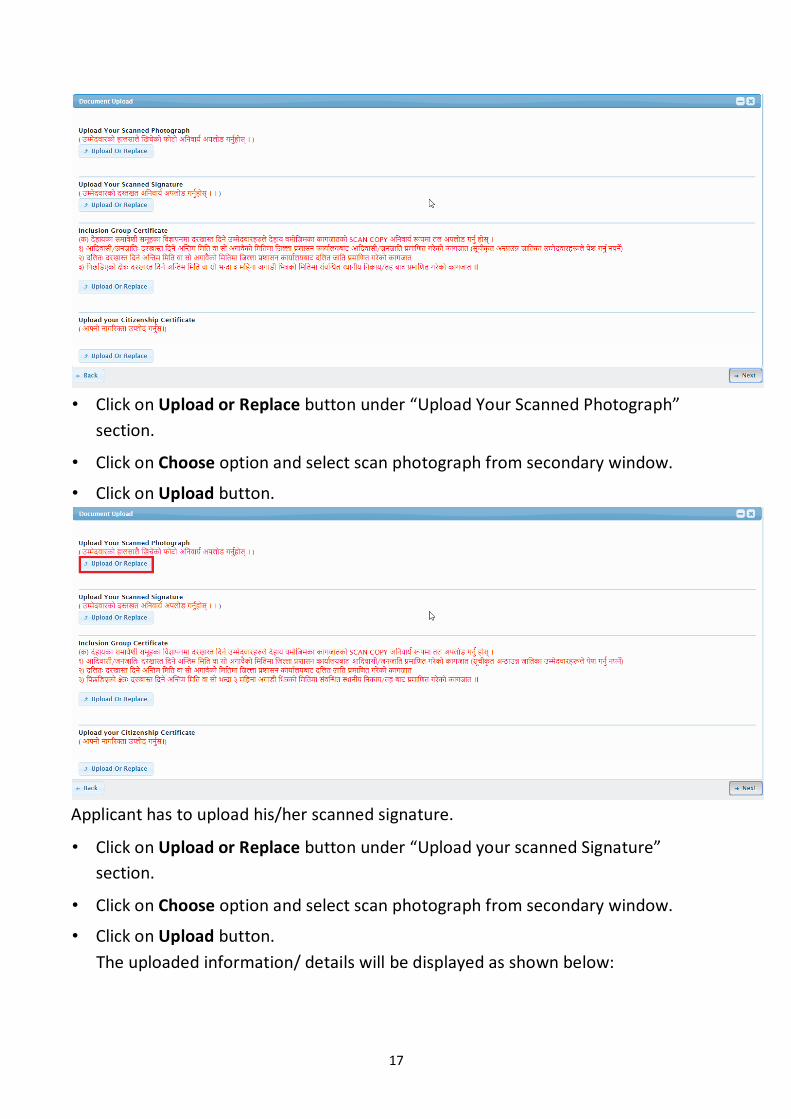
• Click on Upload or Replace button under “Upload Your Scanned Photograph”
section.
• Click on Choose option and select scan photograph from secondary window.
• Click on Upload button.
Applicant has to upload his/her scanned signature.
• Click on Upload or Replace button under “Upload your scanned Signature”
section.
• Click on Choose option and select scan photograph from secondary window.
• Click on Upload button.
The uploaded information/ details will be displayed as shown below:
18
After uploading both signature and photograph.
Inclusion certificate needs to upload in pdf format.All inclusion certificates one
intended to upload should be combine and upload as a pdf file.
Citizenship certificate should be uploaded as jpeg format.
• Click on Next button
• Application Preview page will be displayed as shown below :
19
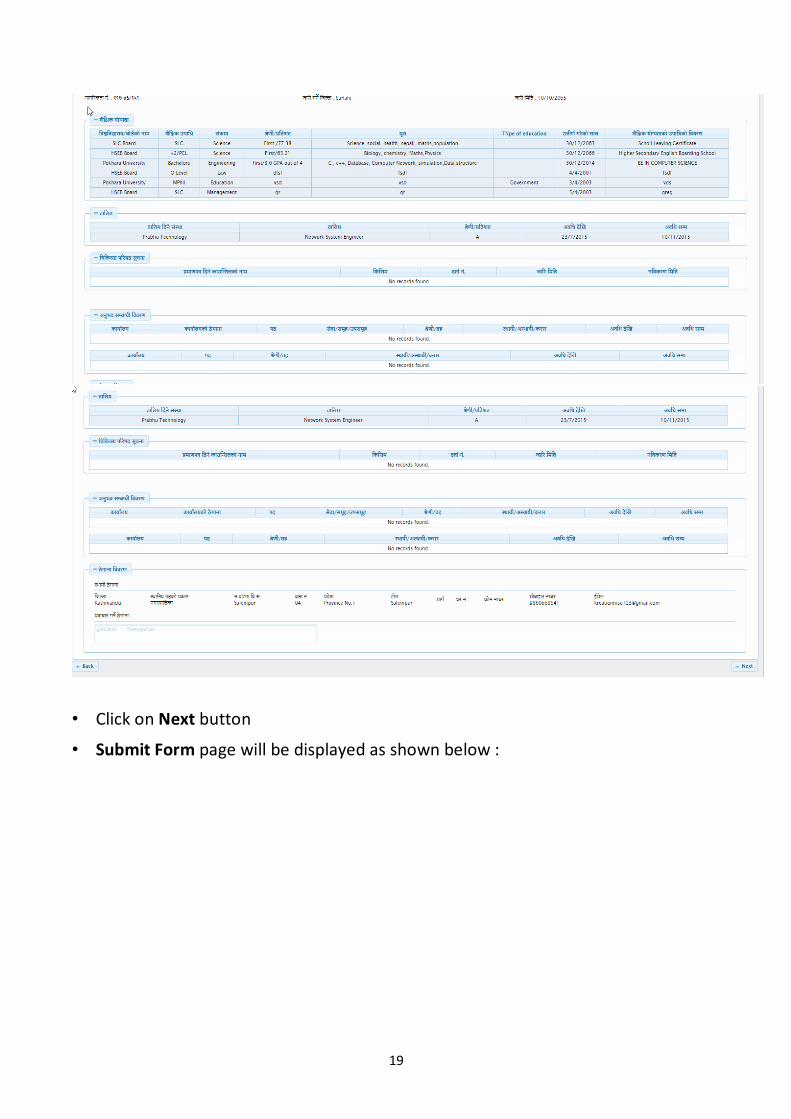
• Click on Next button
• Submit Form page will be displayed as shown below :
20
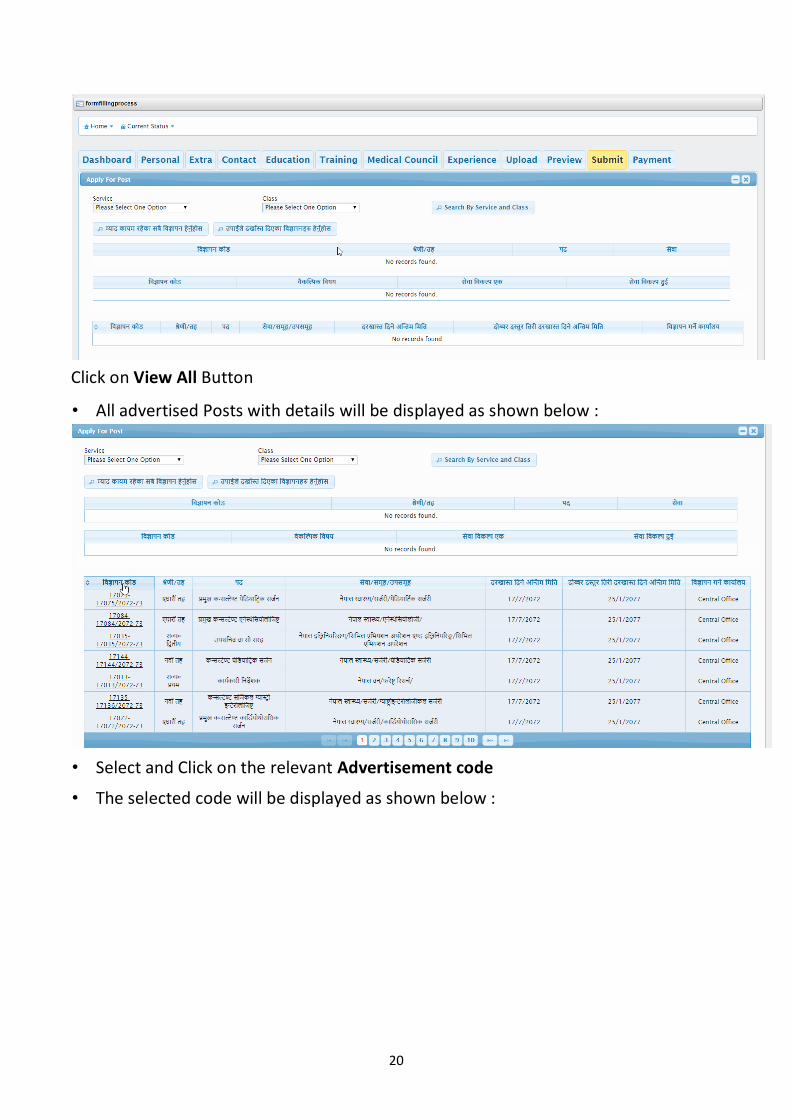
Click on View All Button
• All advertised Posts with details will be displayed as shown below :
• Select and Click on the relevant Advertisement code
• The selected code will be displayed as shown below :
21
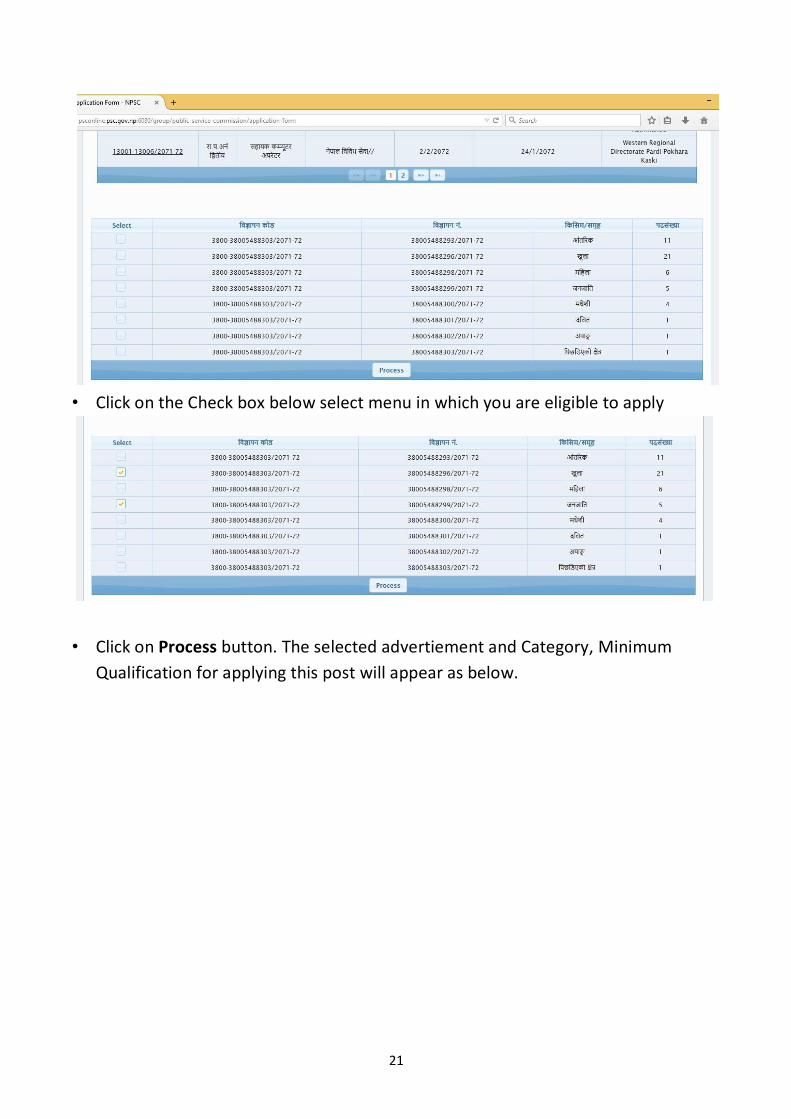
• Click on the Check box below select menu in which you are eligible to apply
• Click on Process button. The selected advertiement and Category, Minimum
Qualification for applying this post will appear as below.
22
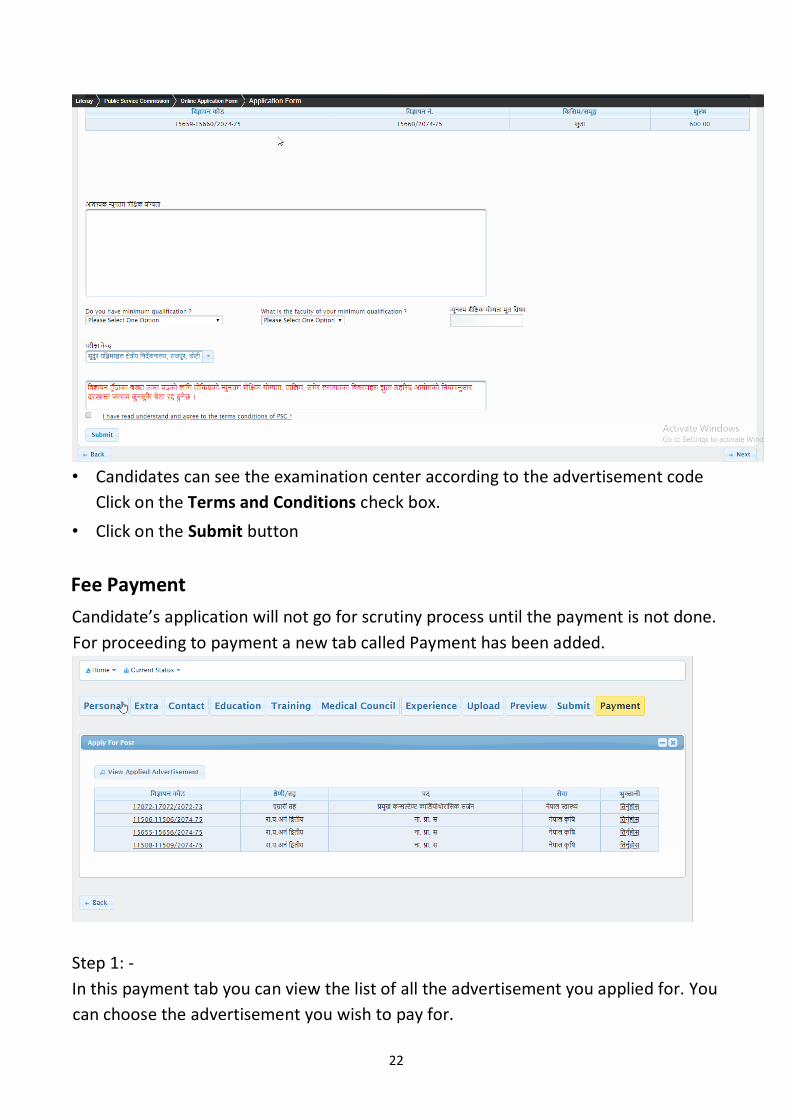
• Candidates can see the examination center according to the advertisement code
Click on the Terms and Conditions check box.
• Click on the Submit button
Fee Payment
Candidate’s application will not go for scrutiny process until the payment is not done.
For proceeding to payment a new tab called Payment has been added.
Step 1: -
In this payment tab you can view the list of all the advertisement you applied for. You
can choose the advertisement you wish to pay for.
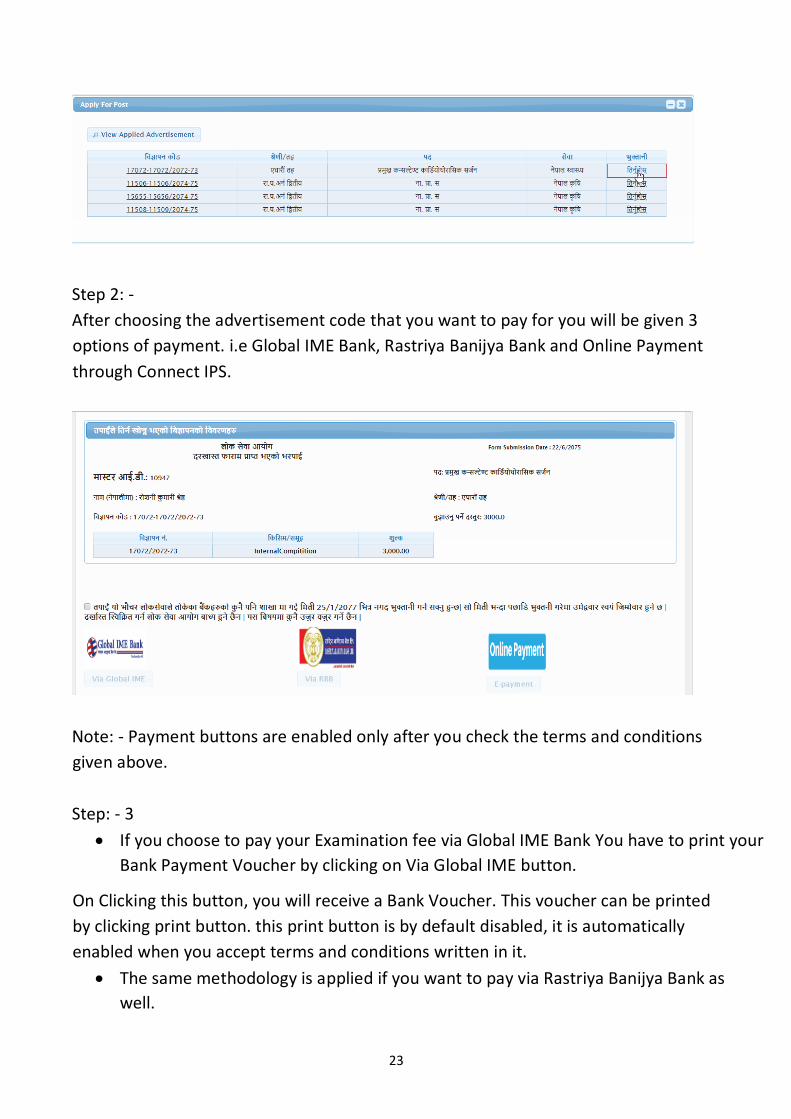
23
Step 2: -
After choosing the advertisement code that you want to pay for you will be given 3
options of payment. i.e Global IME Bank, Rastriya Banijya Bank and Online Payment
through Connect IPS.
Note: - Payment buttons are enabled only after you check the terms and conditions
given above.
Step: - 3
If you choose to pay your Examination fee via Global IME Bank You have to print your
Bank Payment Voucher by clicking on Via Global IME button.
On Clicking this button, you will receive a Bank Voucher. This voucher can be printed
by clicking print button. this print button is by default disabled, it is automatically
enabled when you accept terms and conditions written in it.
The same methodology is applied if you want to pay via Rastriya Banijya Bank as
well.
24
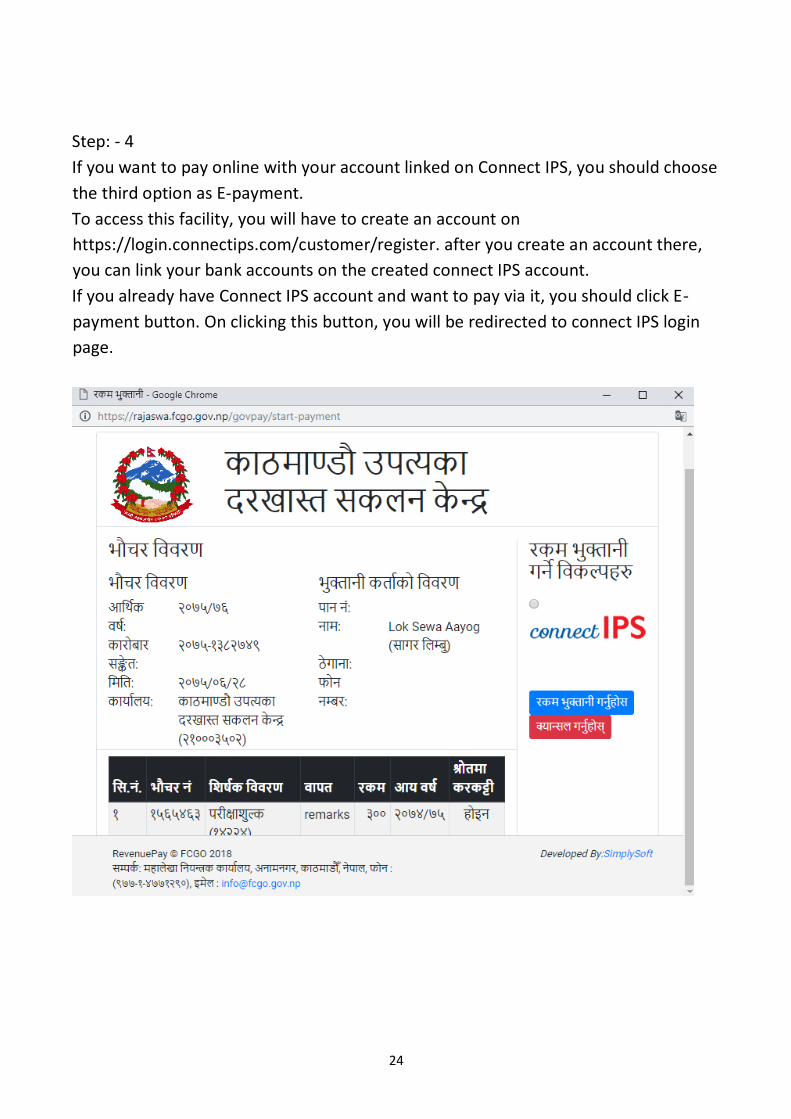
Step: - 4
If you want to pay online with your account linked on Connect IPS, you should choose
the third option as E-payment.
To access this facility, you will have to create an account on
https://login.connectips.com/customer/register. after you create an account there,
you can link your bank accounts on the created connect IPS account.
If you already have Connect IPS account and want to pay via it, you should click E-
payment button. On clicking this button, you will be redirected to connect IPS login
page.
25
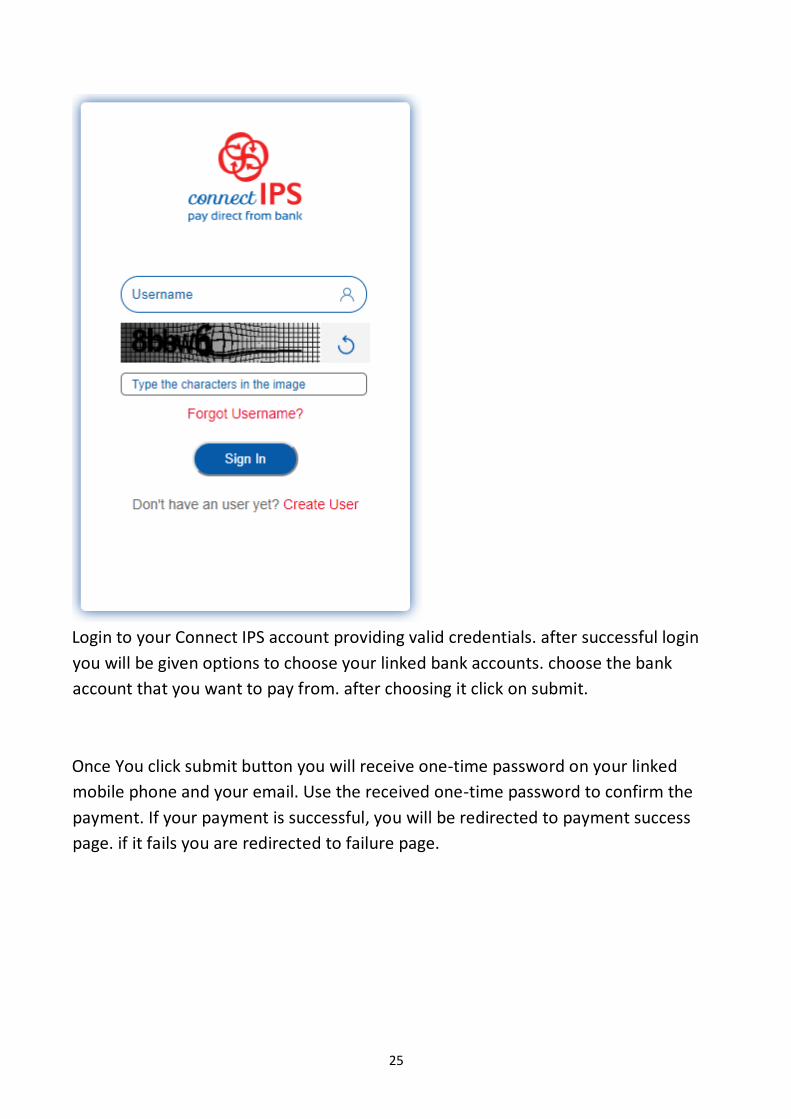
Login to your Connect IPS account providing valid credentials. after successful login
you will be given options to choose your linked bank accounts. choose the bank
account that you want to pay from. after choosing it click on submit.
Once You click submit button you will receive one-time password on your linked
mobile phone and your email. Use the received one-time password to confirm the
payment. If your payment is successful, you will be redirected to payment success
page. if it fails you are redirected to failure page.
26
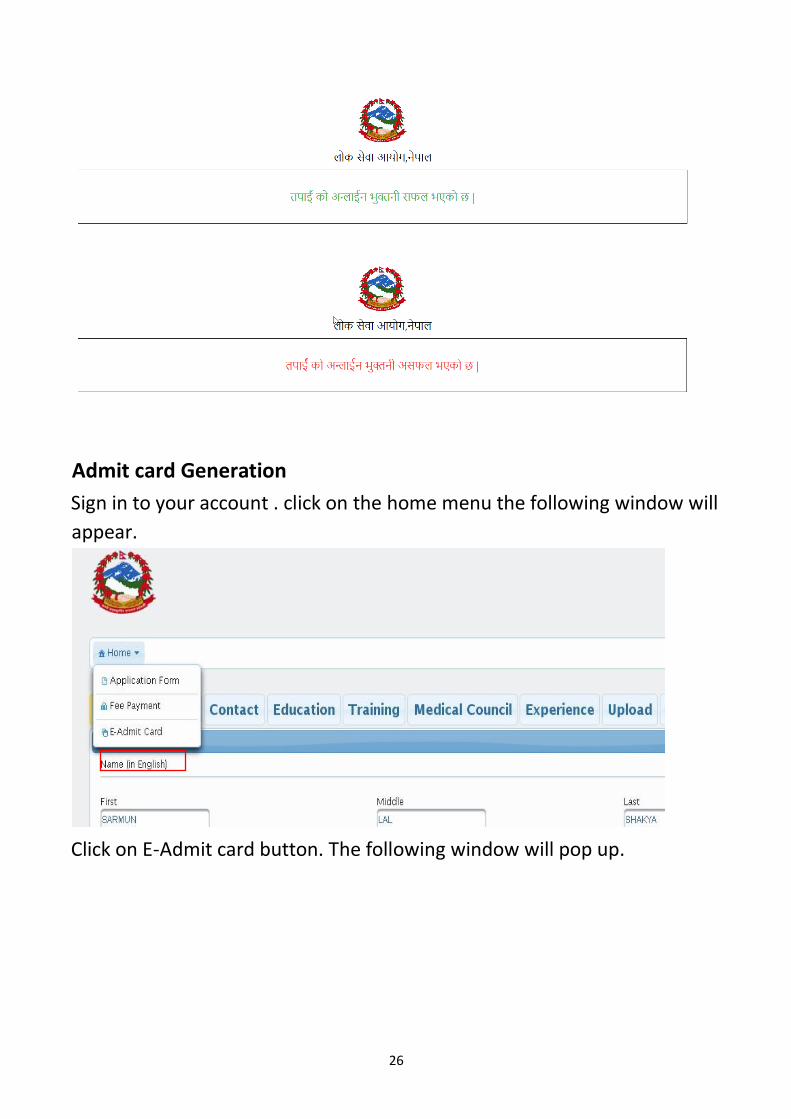
Admit card Generation
Sign in to your account . click on the home menu the following window will
appear.
Click on E-Admit card button. The following window will pop up.
27
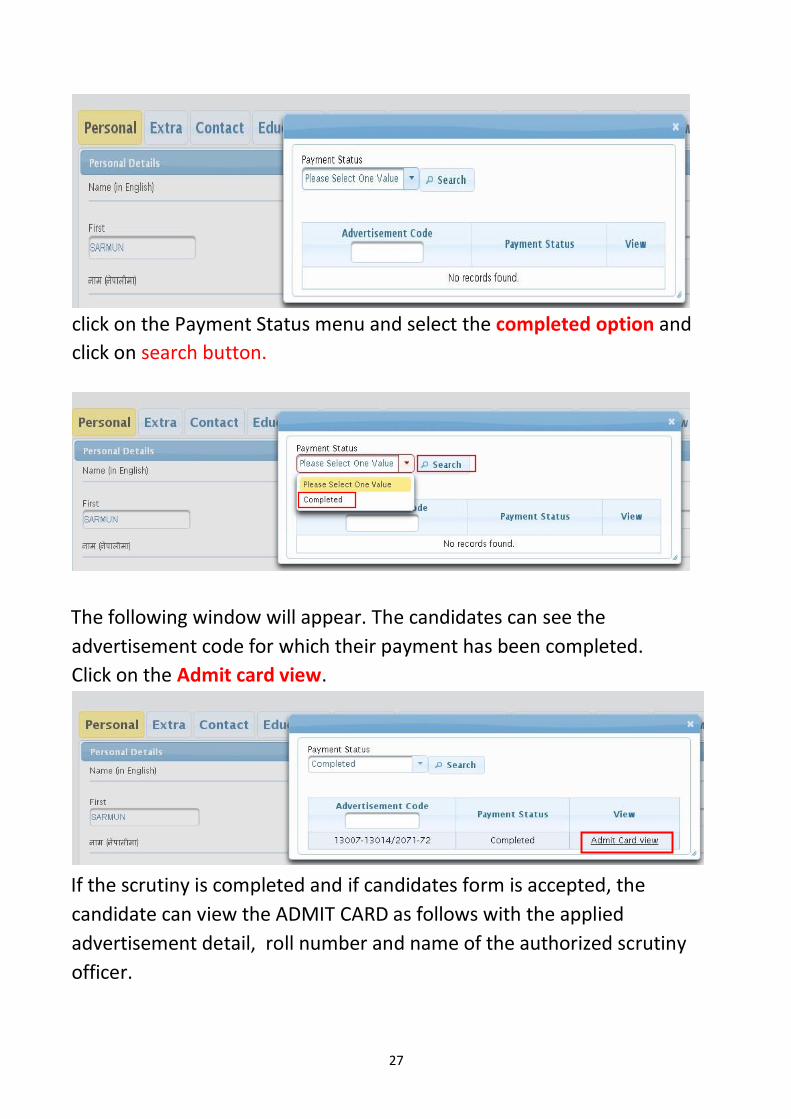
click on the Payment Status menu and select the completed option and
click on search button.
The following window will appear. The candidates can see the
advertisement code for which their payment has been completed.
Click on the Admit card view.
If the scrutiny is completed and if candidates form is accepted, the
candidate can view the ADMIT CARD as follows with the applied
advertisement detail, roll number and name of the authorized scrutiny
officer.
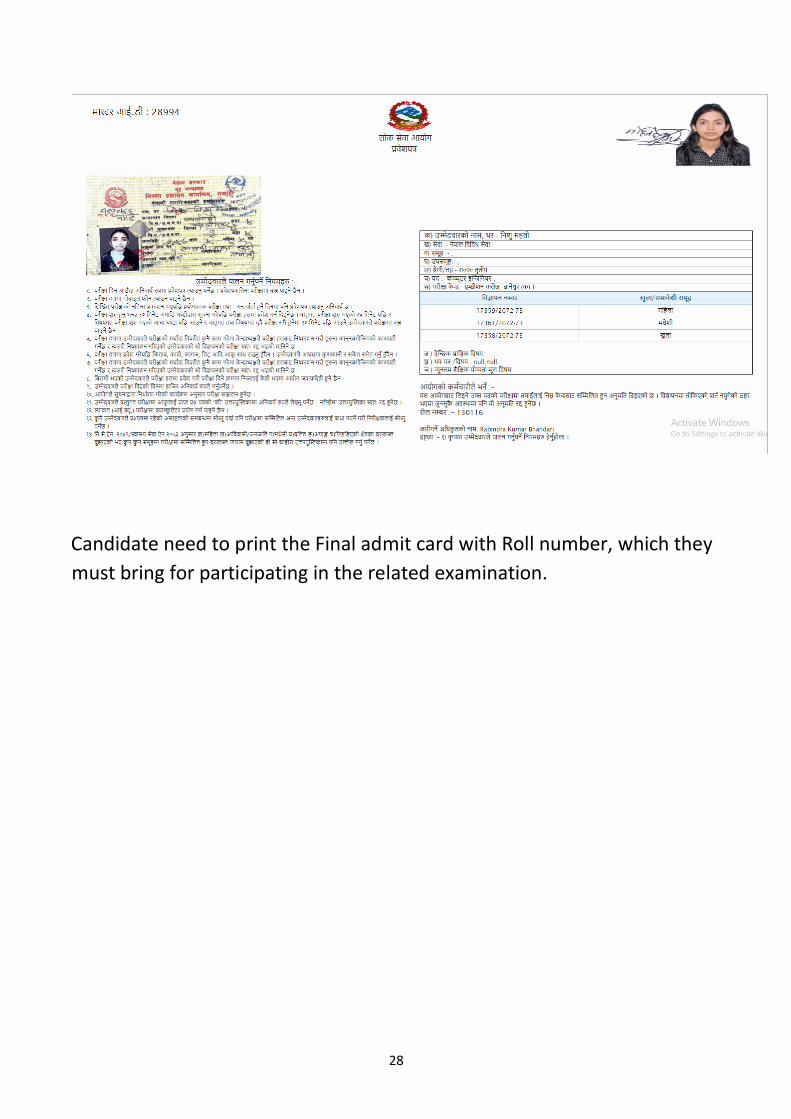
28
Candidate need to print the Final admit card with Roll number, which they
must bring for participating in the related examination.