ontime® group calendar – social for ibm connections
TRANSCRIPT

OnTime Group Calendar – Social for IBM Connections
© IntraVision ApS, 2013 Revision: 001 21-‐02-‐2013
OnTime® Group Calendar – Social for IBM Connections Version 3.1 revision 1

OnTime Group Calendar – Social for IBM Connections
© IntraVision ApS, 2013 Revision: 001 21-‐02-‐2013
The main audience for this manual is the IBM Connections administrator or person used to working with IBM Websphere Application Server and/or IBM Connections. It is therefore expected that the reader of this manual is no stranger to the IBM Connections environment and the IBM Websphere Application Server and know how to configure that application using the Integration Solutions Console and the IBM Connections configuration files.
The manual follows these font conventions: • Bold – Group names • Underlined bold (Hyperlinked) – Section/chapter • [Bold in brackets] – Functions, buttons • Italic – Information, Field • [Italic in brackets] – Checkboxes, access rights
Table of Content
About OnTime Group Calendar – Social ............................................................................................................ 3
About the installation ....................................................................................................................................... 3
Installing the EAR-‐files ....................................................................................................................................... 4
Configure the Profiles widget .......................................................................................................................... 12
Configure the Community widgets ................................................................................................................. 14
Configure the AJAX proxy ................................................................................................................................ 17
Configuring Single Sign-‐On .............................................................................................................................. 18

OnTime Group Calendar – Social for IBM Connections
© IntraVision ApS, 2013 Revision: 001 21-‐02-‐2013
About OnTime Group Calendar – Social OnTime Group Calendar – Social (here after simply “OnTime Social”) are a number of widgets for IBM Connections that can be installed into the IBM Connections Profiles feature (here after simply “Profiles”) and into the IBM Connections Communities feature (here after simply “Communities”). The components are supplied as a series of Java Enterprise Edition applications (EAR-‐files) that must be installed into the IBM Websphere Application Server.
The Profiles component consists of a single widget and the Communities component consists of two widgets. The customer is free to deploy and configure the widgets in any way they please and the approach described in this manual can be thought of inspiration in that regard.
Please note: Do must have a working OnTime Group Calendar installation deployed to successfully install OnTime Social.
About the installation Installing OnTime Group Calendar – Social consists of installing a number of applications (EAR-‐files) onto the Websphere Application Server using the Integrated Solutions Console (ISC). After installing the EAR-‐files the OnTime Group Calendar needs to be configured.
If you are installing the Profiles component you need to install the following 2 EAR-‐files (X.Y.Z indicates a version number):
• OTGCSocialCommon_vX.Y.Z.ear • OTGCSocialProfiles_vX.Y.Z.ear
If you are installing the Communities components you need to install the following 2 EAR-‐files (X.Y.Z indicates a version number):
• OTGCSocialCommon_vX.Y.Z.ear • OTGCSocialCommunities_vX.Y.Z.ear
If you’re installing both the Profiles and the Communities components you need to install the following 3 EAR-‐files (X.Y.Z indicates a version number):
• OTGCSocialCommon_vX.Y.Z.ear • OTGCSocialProfiles_vX.Y.Z.ear • OTGCSocialCommunities_vX.Y.Z.ear

OnTime Group Calendar – Social for IBM Connections
© IntraVision ApS, 2013 Revision: 001 21-‐02-‐2013
Installing the EAR-files 1. Open the Integrated Solutions Console (ISC) and log in 2. From the menu on the left select “Applications/Application Types/Websphere Enterprise
Applications” to navigate to the application list 3. Perform the following steps for each of the EAR-‐files to install
a. Click “Install” b. Make sure “Local file system” is selected and click the button to select a file. Select the
EAR-‐file from the file system.
c. Once the file has been selected click “Next”

OnTime Group Calendar – Social for IBM Connections
© IntraVision ApS, 2013 Revision: 001 21-‐02-‐2013
d. Make sure “Fast path” is selected and click “Next”
e. On the next screen simply click “Next”

OnTime Group Calendar – Social for IBM Connections
© IntraVision ApS, 2013 Revision: 001 21-‐02-‐2013
f. On the next screen map the web module to the web server to use and the Connections cluster. Use the Ctrl-‐key to select the servers in the list of servers on top, put a checkmark next to the web module and click “Apply”. The click “Next”.
g. On the next screen accept the choice of “default_host” for the virtual host unless specific reasons not to. Click “Next” to continue.

OnTime Group Calendar – Social for IBM Connections
© IntraVision ApS, 2013 Revision: 001 21-‐02-‐2013
h. On the install confirmation page click “Finish” to complete the installation.
i. The ISC will now install the application onto the selected Websphere Application Server. Once the installation is done click “Save” to save the settings and then return to the application list to install the other required EAR-‐files.
4. From the menu on the left select “Applications/Application Types/Websphere Enterprise Applications” to go to the application list. Click the “OnTime Group Calendar – Social – Common” application.
5. On the Configuration page for the application click “Initialize parameters for servlets” in the right side column to display the configuration for the application.

OnTime Group Calendar – Social for IBM Connections
© IntraVision ApS, 2013 Revision: 001 21-‐02-‐2013
6. Fill in the top field with the URL to the OnTime Group Calendar API database without a trailing slash. The value should be something like http://calendar.example.com/ontime/ontimegcapi.nsf (substitute ”calendar.example.com” with a value that is applicable to your environment). Click “OK” once you’re done editing.
7. Back on the application configuration page click the “Save” link at the top to save the configuration for the application.

OnTime Group Calendar – Social for IBM Connections
© IntraVision ApS, 2013 Revision: 001 21-‐02-‐2013
8. From the menu on the left select “Servers/Server Types/Web servers” to go to the list of configured web servers.
9. Select the web server(s) you selected during the EAR-‐file installation and click “Generate Plug-‐in” to generate plug-‐in configuration for the selected server(s).
10. Select the web server(s) you selected during the EAR-‐file installation and click “Propagate Plug-‐in” to copy the generated plug-‐in configuration to the selected server(s).

OnTime Group Calendar – Social for IBM Connections
© IntraVision ApS, 2013 Revision: 001 21-‐02-‐2013
11. Select the web server(s) you selected during the EAR-‐file installation and click “Stop” to stop the selected server(s).
12. Select the web server(s) you selected during the EAR-‐file installation and click “Start” to start the selected server(s).

OnTime Group Calendar – Social for IBM Connections
© IntraVision ApS, 2013 Revision: 001 21-‐02-‐2013
13. From the menu on the left select “Applications/Application Types/Websphere Enterprise Applications” to go to the application list. Select the OnTime Group Calendar applications you installed and click “Start” to start the applications.
14. Test the installation by loading the OnTime Group Calendar configuration in a browser by opening the URL to the OnTime Social configuration in a browser. Do this by opening the following URL in a browser: http://<hostname>/ontime/OnTimeAPI.json (the result should look like below). Please note: The URL above is case sensitive and you should replace <hostname> with the URL to the IHS you mapped the OnTime Social to (this is most probably the same as you use for your IBM Connections installation e.g. http://connections.example.com/ontime/OnTime API.json).

OnTime Group Calendar – Social for IBM Connections
© IntraVision ApS, 2013 Revision: 001 21-‐02-‐2013
Configure the Profiles widget 1. Using the wsadmin-‐command check out the widgets-‐config.xml file. For information on how to do
this refer to the IBM Connections product documentation. 2. Open the widgets-‐config.xml file in a text editor. 3. Locate the resource-‐tag with type=”profiles” and insert the XML-‐snippet for the Profiles widget just
below it as shown in the screenshot below.
Copy/paste code: <!-‐-‐ OnTime Group Calendar -‐ Social -‐ Profiles for IBM Connections -‐-‐> <widgetDef defId="ontimeProfilesCalendar" bundleRefId="ontimeProfilesCalendar_res" url="/ontime/profiles/Profiles.xml" modes="view"> </widgetDef>
4. Scroll down to the default profiles layout and add the widget to the layout as shown below. Please note: You are free to place the widget at any supported location. The below screenshot is simply an example.
Copy/paste code: <widgetInstance uiLocation="col3" defIdRef="ontimeProfilesCalendar"/>
5. Save and close the file. 6. Using the wsadmin-‐command check the widgets-‐config.xml file back into Websphere. 7. Configure the AJAX proxy (see the “Configure the AJAX proxy” section below). 8. Using the wsadmin-‐command check out the LotusConnections-‐config.xml file 9. Open the LotusConnections-‐config.xml file in a text editor. 10. Scroll to the bottom of the file and locate the resources-‐tag (it may or may not be empty). Add a
line for the required resource bundle as shown below.

OnTime Group Calendar – Social for IBM Connections
© IntraVision ApS, 2013 Revision: 001 21-‐02-‐2013
Copy/paste code: <resources> <widgetBundle name="com.ontimesuite.gc.social.profiles" prefix="ontimeProfilesCalendar_res"/> </resources>
11. Update the “versionStamp” at the bottom of the file. 12. Save and close the file. 13. Using the wsadmin-‐command check the LotusConnections-‐config.xml file back into Websphere. 14. If automatic synchronization is not enabled between the application servers and the deployment
manager perform synchronization. 15. Navigate to your IBM Connections customization-‐directory. The directory is located in your IBM
Connections folder on a network share or on the local harddisk of the Websphere Application Server depending on your particular installation.
16. Open the “strings” directory and copy the “com.ontimesuite.gc.social.profiles”-‐files from the installation package into this directory. After copying the files the directory will look like below (there may be fewer or more files).
17. Restart the Profiles component for IBM Connections to pick up the configuration.

OnTime Group Calendar – Social for IBM Connections
© IntraVision ApS, 2013 Revision: 001 21-‐02-‐2013
Configure the Community widgets 1. Using the wsadmin-‐command check out the widgets-‐config.xml file. For information on how to do
this refer to the IBM Connections product documentation. 2. Open the widgets-‐config.xml file in a text editor. 3. Locate the resource-‐tag with type=”community” and insert the XML-‐snippet for the Communities
widgets just below it. See the screenshot below
Copy/paste code: <!-‐-‐ OnTime Group Calendar – Socal – Comuntiies for IBM Connections -‐-‐> <widgetDef defId="ontimeCommunitiesAvailability" bundleRefId="ontimeCommunitiesAvailability_res" modes="view" showInPalette="false" uniqueInstance="true" url="/ontime/communities/Availability.xml"> <itemSet> <item name="communitiesCtx" value="{contextRoot}"/> <item name="resourceId" value="{resourceId}"/> </itemSet> </widgetDef> <widgetDef defId="ontimeCommunitiesCalendar" bundleRefId="ontimeCommunitiesCalendar_res" modes="view fullpage" showInPalette="true" uniqueInstance="true" url="/ontime/communities/Calendar.xml"> <itemSet> <item name="communitiesCtx" value="{contextRoot}"/> <item name="resourceId" value="{resourceId}"/> </itemSet> </widgetDef>

OnTime Group Calendar – Social for IBM Connections
© IntraVision ApS, 2013 Revision: 001 21-‐02-‐2013
4. If you wish to automatically add the “Who Is Available” widget to all communities add it to the default layout as indicated below.
Copy/paste code: <widgetInstance uiLocation="col3" defIdRef="ontimeCommunitiesAvailability"/>
5. Save and close the file. 6. Using the wsadmin-‐command check the widgets-‐config.xml file back into Websphere. 7. Configure the AJAX proxy (see the “Configure the AJAX proxy” section below). 8. Using the wsadmin-‐command check out the LotusConnections-‐config.xml file 9. Open the LotusConnections-‐config.xml file in a text editor. 10. Scroll to the bottom of the file and locate the resources-‐tag (it may or may not be empty). Add lines
for the required resource bundles as shown below.
Copy/paste code: <resources> <widgetBundle name="com.ontimesuite.gc.social.communities.availability" prefix="ontimeCommunitiesAvailability_res"/> <widgetBundle name="com.ontimesuite.gc.social.communities.calendar" prefix="ontimeCommunitiesCalendar_res"/> </resources>
11. Update the “versionStamp” at the bottom of the file. 12. Save and close the file. 13. Using the wsadmin-‐command check the LotusConnections-‐config.xml file back into Websphere. 14. If automatic synchronization is not enabled between the application servers and the deployment
manager perform synchronization. 15. Navigate to your IBM Connections customization-‐directory. The directory is located in your IBM
Connections folder on a network share or on the local harddisk of the Websphere Application Server depending on your particular installation.

OnTime Group Calendar – Social for IBM Connections
© IntraVision ApS, 2013 Revision: 001 21-‐02-‐2013
16. Open the “strings” directory and copy the “com.ontimesuite.gc.social.communities”-‐files from the installation package into this directory. After copying the files the directory will look like below (there may be fewer or more files).
17. Restart the Communities component for IBM Connections to pick up the configuration changes.
OnTime Group Calendar – Social for IBM Connections
© IntraVision ApS, 2013 Revision: 001 21-‐02-‐2013
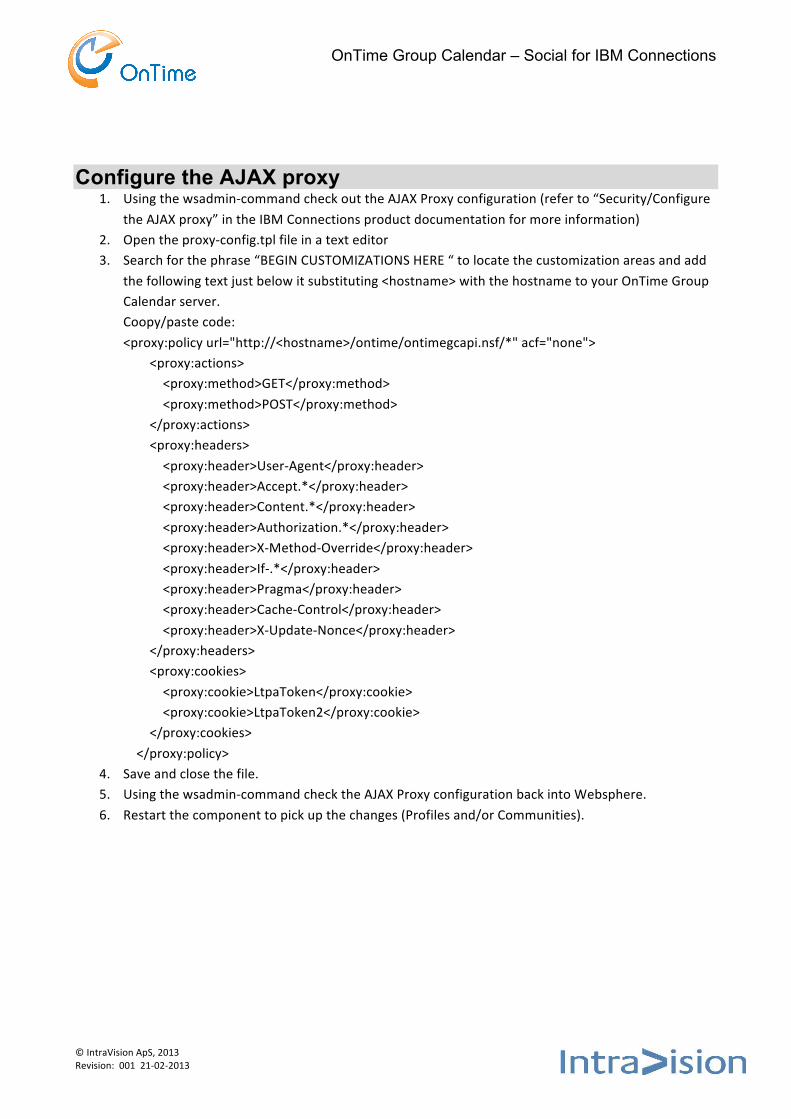
Configure the AJAX proxy 1. Using the wsadmin-‐command check out the AJAX Proxy configuration (refer to “Security/Configure
the AJAX proxy” in the IBM Connections product documentation for more information) 2. Open the proxy-‐config.tpl file in a text editor 3. Search for the phrase “BEGIN CUSTOMIZATIONS HERE “ to locate the customization areas and add
the following text just below it substituting <hostname> with the hostname to your OnTime Group Calendar server. Coopy/paste code: <proxy:policy url="http://<hostname>/ontime/ontimegcapi.nsf/*" acf="none"> <proxy:actions> <proxy:method>GET</proxy:method> <proxy:method>POST</proxy:method> </proxy:actions> <proxy:headers> <proxy:header>User-‐Agent</proxy:header> <proxy:header>Accept.*</proxy:header> <proxy:header>Content.*</proxy:header> <proxy:header>Authorization.*</proxy:header> <proxy:header>X-‐Method-‐Override</proxy:header> <proxy:header>If-‐.*</proxy:header> <proxy:header>Pragma</proxy:header> <proxy:header>Cache-‐Control</proxy:header> <proxy:header>X-‐Update-‐Nonce</proxy:header> </proxy:headers> <proxy:cookies> <proxy:cookie>LtpaToken</proxy:cookie> <proxy:cookie>LtpaToken2</proxy:cookie> </proxy:cookies> </proxy:policy>
4. Save and close the file. 5. Using the wsadmin-‐command check the AJAX Proxy configuration back into Websphere. 6. Restart the component to pick up the changes (Profiles and/or Communities).

OnTime Group Calendar – Social for IBM Connections
© IntraVision ApS, 2013 Revision: 001 21-‐02-‐2013
Configuring Single Sign-On The final step is to make sure, that the IBM Connection server and IBM Lotus Domino Server, on which the OnTimeAPI.nsf database is located, are configured for Single-Sign-On (SSO) that is that credentials generated by one server is accepted by the other and the other way around.
If you know that SSO is properly configured you may skip this section.
For detailed information on how to configure SSO in IBM Lotus Domino refer to the product help.
First log in to the Integrated Solutions Console (ISC) on the WAS Deployment Manager, then expand the “Security” section
on the left and click the “Global Security” link:

OnTime Group Calendar – Social for IBM Connections
© IntraVision ApS, 2013 Revision: 001 21-‐02-‐2013
On the right hand side of the “Global Security” screen click the “LTPA” link and you will be presented with the following screen:
In the “Cross-cell single sign-on” section you have the option to export the keys used for SSO. Specify a filename and a password and click “Export keys”. Please note that any non-fully qualified path is resolved relative to the WAS profile directory.
To import the keys you just exported into IBM Lotus Domino, open the Domino Administrator client and switch to the “Internet Sites” view. Here create a new (or edit an existing) SSO Configuration. On the configuration document expand the “Keys” action menu and select “Import WebSphere LTPA Keys”. Specify the path of the keys you exported above and specify the password to unlock the keys.

OnTime Group Calendar – Social for IBM Connections
© IntraVision ApS, 2013 Revision: 001 21-‐02-‐2013