openam single sign-on - cisco.com ·...
TRANSCRIPT
OpenAM Single Sign-On
• Single Sign-On Setup Task List, on page 1• Single Sign-On Setup Preparation, on page 3• Single Sign-On Setup and Management Tasks, on page 5
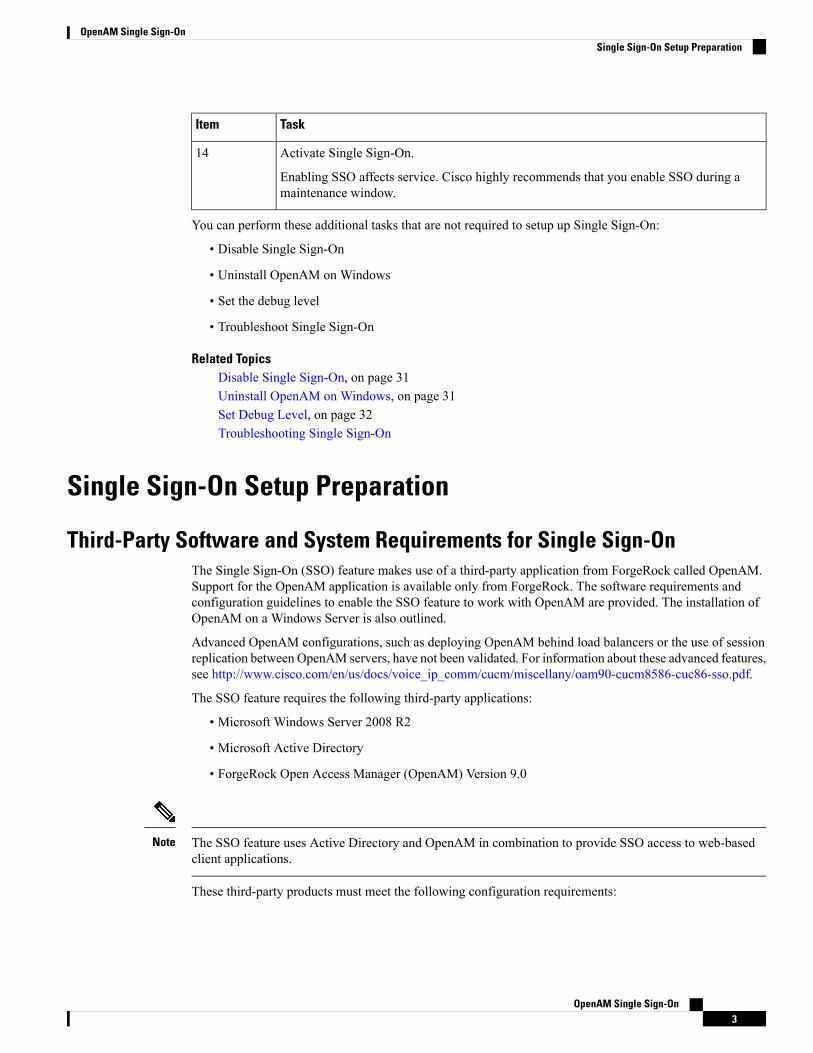
Single Sign-On Setup Task ListThe following figure provides the sequence of tasks that are required to successfully configure SSO. Ciscorecommends that you complete each task outlined in this flow in the order indicated.Figure 1: Task Flow for Single Sign-On setup
The following table lists the tasks to configure Single Sign-On.
OpenAM Single Sign-On1

Table 1: Task List for Single Sign-On Setup
TaskItem
Provision a new user account for the OpenAM server to be used for Single Sign-On on theActive Directory (AD) server.
Ensure theWindows Server 2008 supported tools are installed before proceeding.Note
1
Configure client browsers for Single Sign-On. See topics related to third-party software andsystem requirements for a list of web browsers and supported versions.
2
Configure Microsoft Windows Registry for Real-Time Monitoring Tool (RTMT).3
Install Java Runtime Environment (JRE).
A Java keystore and the associated security certificates are required for secureconnections to the OpenAM server, which runs on an Apache Tomcat. Theprocedure to install Java are different depending if you use self-signed orCertificate Authority (CA) signed security certificates.
Note
4
Import IM and Presence Service certificate into OpenAM. Do this for each IM and PresenceService node that is to use Single Sign-On.
5
Install the Apache Tomcat Web Container on the OpenAMWindows server.6
Deploy OpenAMWar on Apache Tomcat.7
Set up OpenAM using the GUI Configurator. You access the OpenAM web-basedadministration interface using a web browser by entering the FQDN of the OpenAM server.
8
Set up policies on the OpenAM server. You must follow the policy rules that are defined inthe procedure.
You must use the FQDN of the IM and Presence Service node to access the CiscoUnified CM IM and Presence Administration/User interface. Do not use thehostname of the node.
Note
9
Configure SSO module instance. A single module instance can be shared by multiple IMand Presence Service nodes for SSO if the same Active Directory domain is used throughoutthe deployment.
10
Configure J2EE agent profile on OpenAM. You must configure an associated J2EE AgentProfile on the OpenAM server for the J2EE Agent of each IM and Presence Service nodeusing SSO.
11
Set the OpenAM session timeout to a value that is higher than the session timeout parametersetting for the IM and Presence Service node.
12
Import the OpenAM certificate into the tomcat-trust trust store for each IM and PresenceService node using SSO.
13
OpenAM Single Sign-On2
OpenAM Single Sign-OnSingle Sign-On Setup Task List
TaskItem
Activate Single Sign-On.
Enabling SSO affects service. Cisco highly recommends that you enable SSO during amaintenance window.
14
You can perform these additional tasks that are not required to setup up Single Sign-On:
• Disable Single Sign-On
• Uninstall OpenAM on Windows
• Set the debug level
• Troubleshoot Single Sign-On
Related TopicsDisable Single Sign-On, on page 31Uninstall OpenAM on Windows, on page 31Set Debug Level, on page 32Troubleshooting Single Sign-On
Single Sign-On Setup Preparation
Third-Party Software and System Requirements for Single Sign-OnThe Single Sign-On (SSO) feature makes use of a third-party application from ForgeRock called OpenAM.Support for the OpenAM application is available only from ForgeRock. The software requirements andconfiguration guidelines to enable the SSO feature to work with OpenAM are provided. The installation ofOpenAM on a Windows Server is also outlined.
Advanced OpenAM configurations, such as deploying OpenAM behind load balancers or the use of sessionreplication between OpenAM servers, have not been validated. For information about these advanced features,see http://www.cisco.com/en/us/docs/voice_ip_comm/cucm/miscellany/oam90-cucm8586-cuc86-sso.pdf.
The SSO feature requires the following third-party applications:
• Microsoft Windows Server 2008 R2
• Microsoft Active Directory
• ForgeRock Open Access Manager (OpenAM) Version 9.0
The SSO feature uses Active Directory and OpenAM in combination to provide SSO access to web-basedclient applications.
Note
These third-party products must meet the following configuration requirements:
OpenAM Single Sign-On3
OpenAM Single Sign-OnSingle Sign-On Setup Preparation

• Active Directory must be deployed in a Windows domain-based network configuration, not just as anLDAP server.
• The OpenAM server must be accessible on the network to all client systems and the Active Directoryserver.
• The Active Directory (Domain Controller) server, Windows clients, IM and Presence Service nodes, andOpenAM server must be in the same domain.
• DNS must be enabled in the domain.
• The clocks of all the entities participating in SSO must be synchronized.
See the third-party product documentation for more information about those products.
The following table provides a list of the software applications and versions that were used and tested in theprocedures that appear in this chapter. In order for you to receive Cisco support, Cisco recommends that youadhere to these suggested requirements during your configuration.
Table 2: Software Versions
VersionComponent
Windows Server 2008 R2 EnterpriseActive Directory
Windows 7 Professional (SP1)Desktop Operating System for end user clients
OpenAM Release 10.0
http://forgerock.org/openam-archive.html
For more information:
https://wikis.forgerock.org/confluence/display/openam/OpenAM+Release+Documentation
OpenAM
Windows Server 2008 R2 EnterpriseOpenAM underlying Operating System
Tomcat 6.0.2.0, Tomcat 7.0.29
http://archive.apache.org/dist/tomcat/tomcat-7/v7.0.29/bin
Apache Tomcat on which OpenAM is loaded
JDK 7 UpdateJava Development Kit (JDK) of OpenAMunderlyingOperating System
Internet Explorer 8, 9 and Mozilla Firefox 10, 11Web browser
Important Information Before Single Sign-On Setup
From Release 10.0(1) and later, Agent Flow SSO is not compatible with FIPS mode.Note
To help ensure that the configuration of SSO runs as smoothly as possible, Cisco recommends that you gatherthe following information before you configure SSO:
OpenAM Single Sign-On4
OpenAM Single Sign-OnImportant Information Before Single Sign-On Setup
• Ensure that the installed base operating system (such as Windows server) for the OpenAM system isrunning.
• Make a note of the Fully Qualified Domain Name (FQDN) of theWindows Active Directory (AD) serverto which the OpenAM will be integrating.
• Make a note of the FQDN of the Windows server on which OpenAM is to be installed.
• Ensure that the IM and Presence Web Application timeout is set consistently across all IM and Presencenodes in the cluster and make note of that timeout value. You can use the Cisco Unified CM IM andPresence Administration CLI to verify the timeout value by entering the following command: showwebapp session timeout. For more information, see the Command Line Interface Reference Guide forCisco Unified Communications Solutions.
• Ensure that Cisco Unified Communications Manager has been configured to sync users from ActiveDirectory (AD) using “sAMAccountName” as the LDAP Attribute for User ID. For more information,see the “DirSync Service” section in the Cisco Unified Communications Manager System Guide.
Single Sign-On Setup and Management Tasks
Provision Active Directory for Single Sign-On
Before you begin
Ensure that you have Windows Server 2008 support tools installed. Support tools are installed on WindowsServer 2008 by default.
Procedure
Step 1 Log in to the Active Directory (AD) server.Step 2 From the Start menu, choose Programs > Administration Tools and choose Active Directory Users and
Computers.Step 3 Right-click Users and choose New > User.Step 4 In the User logon name field, enter the OpenAM server hostname.
The OpenAM server hostname should not include the domain name.Note
Step 5 Click Next.Step 6 Enter and confirm a password.
This password is required in Step 10.
Step 7 Uncheck the User must change password at next login check box.Step 8 Click Next.Step 9 Click Finish to finish creating the new user account.Step 10 Create a keytab file on the AD server using the following command from the command prompt.
OpenAM Single Sign-On5
OpenAM Single Sign-OnSingle Sign-On Setup and Management Tasks

ktpass -princ HTTP/<hostname>.<domainname>@<DCDOMAIN> -pass <password> -mapuser <userName>-out <hostname>.HTTP.keytab -ptype KRB5_NT_PRINCIPAL -target <DCDOMAIN>
Example:ktpass -princ HTTP/[email protected] -pass cisco!123 -mapuser server1 -outserver1.HTTP.keytab -ptype KRB5_NT_PRINCIPAL -target CISCO.COM
where:
DescriptionParameter
The hostname (not the FQDN) of your OpenAM server. For example, server1hostname
The AD domain name. For example, cisco.com.domainname
The AD domain name, entered in block capitals. In this example,CISCO.COM.
DCDOMAIN
The password value that was specified when you created the user account forthe OpenAM server earlier in this procedure.
password
The AD account name entered in Step 4. This value should be the OpenAMserver hostname. In this example, server1.
userName
Record the -princ value for use in later procedures.Note
Step 11 After successful creation of the keytab file, copy the keytab file to a location on the OpenAM server; this pathwill later be specified in OpenAM configuration. Create a directory under C:\> and copy the above keytabfile. For example, C:/keytab/server1.HTTP.keytab.
Client Browser Setup for Single Sign-OnTo use SSO for a browser-based client application, you must configure the web browser. The followingsections describe how to configure client browsers to use SSO.
Configure Internet Explorer for Single Sign-OnThe SSO feature supports Windows clients running Internet Explorer. Perform the following procedure toconfigure Internet Explorer to use SSO.
For information about supported web browsers, see topics related to third-party software and systemrequirements for Single Sign-On.
Tip
Procedure
Step 1 Choose Tools > Internet Options > Advanced tab.Step 2 Click Enable Integration Windows Authentication.Step 3 Click OK to save the changes.
OpenAM Single Sign-On6
OpenAM Single Sign-OnClient Browser Setup for Single Sign-On
Step 4 Restart Internet Explorer.Step 5 Choose Tools > Internet Options > Security > Local Intranet and click Custom Level.Step 6 Under User Authentication, check Automatic Logon Only in Intranet Zone.Step 7 Click OK.Step 8 Click Sites.Step 9 Check Automatically detect intranet network.Step 10 Click Advanced.Step 11 Fill in the Add this web site to the zone field with the FQDN of the OpenAM server using the following
format: https://OpenAM_FQDN.Step 12 Click Add.Step 13 Click Close.Step 14 Click OK.Step 15 Uncheck Enable Protected Mode.Step 16 Click Apply.Step 17 Click OK.Step 18 Restart Internet Explorer.Step 19 Open the Windows Registry Editor. Perform one of the following actions:
• For Windows XP or Windows 2008, choose Start > Run and type regedit.
• For Windows Vista and Windows 7.0, click Start and type regedit. For Windows Vista, you must clickContinue.
Step 20 Under registry key HKEY_LOCAL_MACHINE\SYSTEM\CurrentControlSet\Control\LSA\, right-click andchoose New > DWORD (32-bit) value and rename it to be SuppressExtendedProtection.
Only an administrator can set the DWORD.
Step 21 Set the following values:
• Base: hexadecimal
• Value data: 002
The newly created DWORD appears in the LSA directory list as follows:
• Name: SuppressExtendedProtection
• Type: REG_DWORD
• Value: 0x00000002 (2)
Related TopicsThird-Party Software and System Requirements for Single Sign-On, on page 3
Configure Firefox for Single Sign-OnThe SSO feature supports Windows clients running Firefox.
OpenAM Single Sign-On7
OpenAM Single Sign-OnConfigure Firefox for Single Sign-On
For a list of supported web browsers, see topics related to third-party software and system requirements forSingle Sign-On.
Tip
Procedure
Step 1 Open Firefox and enter the following URL: about:configStep 2 Scroll down to network.negotiate-auth.trusted-uris, right-click that Preference Name, and chooseModify.Step 3 Set the string value to your domain (for example, cisco.com).Step 4 Click OK.
Related TopicsThird-Party Software and System Requirements for Single Sign-On, on page 3
Configure Windows Registry for the Real-Time Monitoring ToolConfiguring SSO for the Real-Time Monitoring Tool (RTMT) is optional. To achieve this configuration, youmust create a new registry key on your Desktop client (Windows XP or Windows 7).
An administrator must set the allowtgtsessionkey registry key entry for the Desktop client.Note
This new registry key should be stored at either of the locations below, depending on your Operating system:
Procedure
Step 1 Go to either of the following locations, depending on your operating system:
• Windows XP -HKEY_LOCAL_MACHINE\SYSTEM\CurrentControlSet\Control\Lsa\Kerberos
• Windows Vista/Windows 7 -HKEY_LOCAL_MACHINE\SYSTEM\CurrentControlSet\Control\Lsa\Kerberos\Parameters
Step 2 Right-click the folder, choose New > DWORD (32-bit) Value, and rename it to be allowtgtsessionkey.Step 3 Right-click the newly created registry key and chooseModify.Step 4 In the Value data field, enter I.
Install JavaOpenAM requires a Java Runtime Environment (JRE) to operate. The following procedure provides detailsfor installing the JRE on your Windows server, forming the OpenAM base system.
OpenAM Single Sign-On8
OpenAM Single Sign-OnConfigure Windows Registry for the Real-Time Monitoring Tool
Procedure
Step 1 Go to http://www.oracle.com/technetwork/java/archive-139210.html.Step 2 Download the recommended version of the JDK installation file by choosing the executable file that corresponds
to your server architecture (Windows x86 or Windows x64).
For a list of recommended software versions, see topics related to third-party software and systemrequirements for Single Sign-On.
Note
Step 3 Double-click the downloaded file to begin the installation of the JDK and accept the default values providedin the Installation wizard.
Make a note of the installation directory. This value indicates the location of the Java JRE and canbe used to infer the JDK directory path. Example values may be as follows, depending on the JDKvalues that are used:
Note
• jre-path=C:\Program Files\Java\jre7
• jdk-path=C:\Program Files\Java\jdk1.7.0_03
Step 4 A Java keystore and the associated security certificates are required to facilitate secure connections to theOpenAM server, which runs on Apache Tomcat. Perform one of the following actions:
• If you use a self-signed security certificate for OpenAM/Tomcat, proceed to Step 5.
• If you use a Certificate Authority (CA) signed security certificate for OpenAM/Tomcat, proceed to Step11.
Step 5 Create the Java keystore by opening a Windows command prompt on the Windows Server, and executing thefollowing command: C:\>"C:\Program Files\Java\jdkl.7.0_03\bin\keytool.exe" -genkey -alias
tomcat -keyalg RSA -validity 1825 -keystore C:\keystore
This command creates the Java keystore file at the following location: C:\keystore. The keytool commandis located in the <jdk-path>/bin directory, the exact path to the keytool command in the preceding commandmay vary depending on the JDK version used. For information about the keytool command, seehttp://docs.oracle.com/javase/7/docs/technotes/tools/windows/keytool.html.
Step 6 When you are prompted for a keystore password, enter a valid keystore password. For example, "cisco!123".Make a note of the keystore password as it is required to access the keystore.
Do not use example values on the production server; Use a unique password value for the keystore.This password will be visible in plain text in the Apache Tomcat configuration files and utilities.
Note
Step 7 When you are prompted to enter the first name and last name, enter the FQDN (hostname.domainname) ofthe OpenAM server.
You are also prompted to enter your organization unit name, organization name, city or locality, state orprovince, and two-letter country code.
Step 8 When you are prompted for a Tomcat password, press RETURN to use the same keystore password valuefor the Tomcat private key. The Java keystore is created at the location specified in the keytool command.For example, C:\keystore.
Step 9 You can view the Tomcat certificate in the keystore using the following command:
OpenAM Single Sign-On9
OpenAM Single Sign-OnInstall Java
Example:
C:\>"C:\Program Files\Java\jdkl.7.0_03\bin\keytool.exe" -list -v -alias tomcat -keystore
C:\keystore
Step 10 If you chose to use a self-signed security certificate for Tomcat, proceed to the end of this procedure andconsider this task complete.
Step 11 Create a Java keystore to store Certificate Authority (CA)-signed security certificates for OpenAM/Tomcat.Open a command prompt on the Windows Server and execute the following command:
Example:
C:\>"C:\Program Files\Java\jdkl.7.0_03\bin\keytool.exe" -genkey -alias tomcat -keyalg RSA
-validity 1825 -keystore C:\keystore
This command creates the Java keystore file at the following location: C:\keystore. The keytool command islocated in the <jdk-path>/bin directory, the exact path to the keytool command in the example provided abovemay vary depending on the JDK version used. For information about the keytool command, seehttp://docs.oracle.com/javase/7/docs/technotes/tools/windows/keytool.html.
Step 12 When you are prompted for a keystore password, enter a valid keystore password. For example, “cisco!123”.Make a note of the keystore password as it is required to access the keystore.
Do not use example values on the production server; Use a unique password value for the keystore. Thispassword will be visible in plain text in the Apache Tomcat configuration files and utilities.
Step 13 When you are prompted to enter the first name and last name, enter the FQDN (hostname.domainname) ofthe OpenAM server.
You are also prompted to enter your organization unit name, organization name, city or locality, state orprovince, and two-letter country code.
Step 14 When you are prompted for a Tomcat password, press RETURN to use the same keystore password valuefor the Tomcat private key. The Java keystore is created at the location specified in the keytool command.For example, C:\keystore.
Step 15 You can view the Tomcat certificate in the keystore using the following command:
Example:
C:\>"C:\Program Files\Java\jdkl.7.0_03\bin\keytool.exe" -list -v -alias tomcat -keystore
C:\keystore
Step 16 Generate a certificate signing request (CSR) for this OpenAM/Tomcat instance. Open a command prompt onthe Windows Server and execute the following command .
Example:
C:\>"C:\Program Files\Java\jdkl.7.0_03\bin\keytool.exe" -certreq -keyalg RSA -alias tomcat
-file certreq.csr -keystore C:\keystore
Step 17 Submit the CSR to your CA, request the CA to sign the CSR and create a certificate. Obtain and copy thefollowing certificates to the Windows Server that is going to be the OpenAM server:
• CA signing or root certificate• Intermediate signing certificates (if applicable)
• Newly signed OpenAM/Tomcat certificate
Refer to the CA documentation for instructions about completing these tasks.Note
OpenAM Single Sign-On10
OpenAM Single Sign-OnInstall Java

Step 18 Import the CA signing or root certificate into the Java keystore that was created in Step 11. Open a commandprompt on the Windows Server and execute the following command, answering “yes” to the prompt, “Trustthis certificate?”:
Example:
C:\>"C:\Program Files\Java\jdkl.7.0_03\bin\keytool.exe" -import -aliasroot -trustcacerts -file <filename_of_the_CA_root_certificate> -keystoreC:\keystore
Step 19 You can view the CA signing certificate in the keystore using the following command:
Example:
C:\>"C:\Program Files\Java\jdkl.7.0_03\bin\keytool.exe" -list -v -aliasroot -keystore C:\keystore
Step 20 Import any other intermediate signing certificates (if applicable) into the Java keystore that was created inStep 11. Open a command prompt on the Windows Server and execute the following command, answering“yes” to the prompt, “Trust this certificate?”:
Example:
C:\>"C:\Program Files\Java\jdkl.7.0_03\bin\keytool.exe" -import -aliasinter01 -trustcacerts -file<filepath_of_the_intermediate_signing_certificate> -keystore C:\keystore
The -alias option must be updated with a value unique to the Java keystore, otherwise the import operationwill result in an error similar to the following: “Certificate not imported, alias<inter01> already exists.”
Step 21 You can view any of the intermediate signing certificates in the keystore using the following command:
Example:
C:\>"C:\Program Files\Java\jdkl.7.0_03\bin\keytool.exe" -list -v -aliasinter01 C:\keystore
The -alias option must be updated with the corresponding alias value for the intermediate certificates youwish to view. The above example uses a sample alias value of “inter01”.
Step 22 Import the newly signed certificate OpenAM/Tomcat certificate into the Java keystore that was created inStep 11. Open a command prompt on the Windows Server and execute the following command:
Example:
C:\>"C:\Program Files\Java\jdkl.7.0_03\bin\keytool.exe" -import -aliastomcat -file <new_certificate_filepath> -keystore C:\keystore
Step 23 You can view the new OpenAM/Tomcat certificate in the keystore using the following command:
Example:
C:\>"C:\Program Files\Java\jdkl.7.0_03\bin\keytool.exe" -list -v -aliastomcat -keystore C:\keystore
The issuer of this new Tomcat certificate is the CA or one of the intermediate CAs (if applicable).
Related TopicsThird-Party Software and System Requirements for Single Sign-On, on page 3Import OpenAM Certificate Into IM and Presence Service, on page 24
OpenAM Single Sign-On11
OpenAM Single Sign-OnInstall Java

Import IM and Presence Certificates Into OpenAMOpenAMmust communicate with a J2EE Agent component that exists on each IM and Presence Service nodefor which SSO is enabled. This communication is over an encrypted channel and therefore the necessarysecurity certificates must be imported onto OpenAM.
The OpenAM server must trust the security certificate presented by each IM and Presence Service node forthe encrypted communication channel to be established. OpenAM trusts a security certificate by importingthe required security certificates into the OpenAMkeystore. A given IM and Presence Service node can presentone of two types of security certificate:
• Self-signed certificate
• CA-signed certificate
The IM and Presence Service Tomcat certificate and tomcat-trust trust store contain the security certificatesof interest for secure communication with OpenAM. The other IM and Presence Service certificates andassociated trust stores are not relevant for SSO (for example, cup, cup-xmpp, cup-xmpp-s2s or ipsec).
Note
If your SSO-enabled IM and Presence Service deployment is configured to use self-signed certificates, eachof the self-signed certificates must be imported into OpenAM.
If your SSO-enabled IM and Presence Service deployment is configured to use CA-signed certificates, theCA root certificate and any associated intermediate certificates must be imported into OpenAM. If you arealso using a CA-signed certificate for your OpenAM/Tomcat instance, the required CA root and intermediatecertificates may already be imported into the OpenAM keystore.
This procedure provides the details on how to identify the type of security certificate being used by the IMand Presence Service node and how to import the certificates into the OpenAM keystore that was createdwhen you installed Java.
Procedure
Step 1 Sign in to Cisco Unified IM and Presence Operating System Administration for the IM and Presence Servicenode for which SSO is to be enabled.
Step 2 Choose Security > Certificate Management.Step 3 Click Find.Step 4 Locate the entry with Certificate Name of tomcat.Step 5 Examine the Description column of the tomcat certificate.Step 6 If the description states that the tomcat certificate is Self-signed certificate generated by system, this indicates
that the IM and Presence Service node is using a self-signed certificate. If this description is not present, aCA-signed certificate can be assumed.
• If the certificate is self-signed, proceed to Step 7.• If the certificate is CA-signed, proceed to Step 13.
Step 7 Click the tomcat.pem link.Step 8 Click Download to download the tomcat.pem file.
OpenAM Single Sign-On12
OpenAM Single Sign-OnImport IM and Presence Certificates Into OpenAM

Step 9 Copy the tomcat.pem file to the OpenAM server.Step 10 Import the tomcat.pem file as a trusted certificate into the keystore that was created on the OpenAM server
when you installed Java. Open a command prompt on theWindows server (OpenAM) and execute the followingcommand, updating the command with the values for your keytool command path and keystore location asapplicable for your environment, and answerYes to the prompt “Trust this certificate?”:C:\>"C:\ProgramFiles\Java\jdkl.7.0_03\bin\keystool.exe" -import -alias cup01 -trustcacerts-file <full_filepath_of_the_tomcat.pem> -keystore C:\keystore
The -alias option must be updated with a value unique to the Java keystore, otherwise the importoperation will result in an error similar to the following: “Certificate not imported, alias <cup01>already exists.”
Note
Step 11 You can view the tomcat.pem in the keystore using the following command, updating the command withthe values for your keytool command path and keystore location as applicable for your environment:
C:\>"C:\Program Files\Java\jdk1.7.0_03\bin\keystool.exe -list -v -aliascup01 -keystore C:\keystore
The -alias option must match the value used in Step 10, otherwise the keystore entry may not befound.
Note
Step 12 Skip to Step 16.Step 13 Identify the CA root certificates and any intermediate certificates that were used to sign your IM and Presence
Service Tomcat certificate. Download the required certificates (CA root certificates and any intermediatecertificates) from your CA to your OpenAM server.
Step 14 Import these certificates into the keystore on the OpenAM server as trusted certificates. Open a commandprompt on theWindows server (OpenAM) and execute the following command for each downloaded certificate,updating the command with the values for your keytool command path and keystore location as applicablefor your environment, and answer “yes” to the prompt “Trust this certificate?”.
C:\>"C:\Program Files\Java\jdk1.7.0_03\bin\keytool.exe" -import -aliasroot_ca -trustcacerts -file <full_filepath_of_the_certificate> -keystoreC:\keystore
The -alias option must be updated with a value unique to the Java keystore, otherwise the importoperation will result in an error similar to the following: “Certificate not imported, alias <root_ca>already exists.”
Note
Step 15 You can view the certificate in the keystore using the following command, updating the command with thevalues for your keytool command path and keystore location as applicable for your environment:
C:\>"C:\Program Files\Java\jdk1.7.0_03\bin\keystool.exe -list -v -aliasroot_ca -keystore C:\keystore
The -alias option must match the value used in Step 14, otherwise the keystore entry may not befound.
Note
Step 16 Repeat this procedure for each IM and Presence node for which SSO is to be enabled.
OpenAM Single Sign-On13
OpenAM Single Sign-OnImport IM and Presence Certificates Into OpenAM

In the case of CA-signed certificates used on the IM and Presence Service node, it is not necessaryto import the same CA and intermediate certificate into the OpenAM keystore more than once. Ifyou find that an IM and Presence Service node has been signed by the same CA and intermediatecertificate, there is no need to import those certificates into the OpenAM keystore again.
Note
Install TomcatOpenAM requires that the Apache Tomcat Web Container be installed on the OpenAMWindows server basesystem. This procedure provides details on how to install Apache Tomcat on the OpenAMWindows serverbase system. See the following table for descriptions of the variables referred to in this procedure.
Table 3: Variable Descriptions
DescriptionVariable
The file path to the Java keystore used by Javaapplications and Apache Tomcat. Trusted serverpublic certificates are stored in this keystore. See Steps5 or 11 of the following procedure to determine thefile path for the Java keystore.
<certstore-path>
The password used to access the Java keystore locatedat <certstore-path>. See Step 6 or 12 of the followingprocedure to determine the value used for the Javakeystore password:
<certstore-password>
Procedure
Step 1 Download the recommended version of Apache Tomcat to your Windows server that forms the OpenAMbase system. For a list of recommended software and versions, see topics related to third-party software andsystem requirements for Single Sign-On .
Download the 32bit/64bit Windows Service Installer executable file.Note
Step 2 Double-click the downloaded file to begin the installation of Apache Tomcat.Step 3 From the Apache Tomcat Setup wizard, click Next.Step 4 In the License Agreement dialog box, click I Agree.Step 5 In the Choose Components dialog box, chooseMinimum as the type of install and click Next.Step 6 In the Configuration dialog box, accept the default settings and click Next.Step 7 In the Java Virtual Machine dialog box, ensure the installed JRE path is set to the value of jre-path.
If you are using the recommended version of Java, the path will display by default. If you are notusing the recommended version of Java, ensure that the path entered matches the path that was usedwhen you installed Java.
Note
Step 8 Click Next.
OpenAM Single Sign-On14
OpenAM Single Sign-OnInstall Tomcat
Step 9 In the Choose Install Location dialog box, accept the default settings and click Install. Note the Tomcatinstall location, because it is required later
The installation location is referred to as tomcat-dir later in this procedure.Note
Step 10 Click Finish.Step 11 Configure Apache Tomcat to start automatically.
a) Choose Start > All Programs > Apache Tomcat 7.0 Tomcat7 > Configure Tomcat.b) From the General tab, set the Startup type as Automatic.c) Click Apply.d) Click OK.
Step 12 Configure the Apache Tomcat runtime parameters:a) Choose Start > All Programs > Apache Tomcat 7.0 Tomcat7 > Configure Tomcat.b) From the Java tab, add the following Java options:
-Djavax.net.ssl.trustStore=<certstore-path>
-Djavax.net.ssl.trustStorePassword=<certstore-password>
-XX:MaxPermSize=256m
See the parameter table at the beginning of this procedure for variable descriptions.Tip
Example:
-Djavax.net.ssl.trustStore=C:\keystore
-Djavax.net.ssl.trustStorePassword=cisco!123
-XX:MaxPermSize=256m
c) Set the Initial memory pool to 512.d) Set theMaximum memory pool to 1024.e) Click Apply.f) Click OK.
Step 13 Using a Text Editor, open the server.xml file under <tomcat-dir>\conf folder. See Step 9 to determinethe value for <tomcat-dir>.
Example:
Anexample value is"C:\Program Files\Apache Software Foundation\Tomcat 7.0\conf"
Step 14 Comment out the 8080 connector port. Enter the code as follows:
Example:<!-- <Connector port=”8080” protocol=”HTTP/1.1”connectionTimeout=”20000”redirectPort=”8443” /> -->
Step 15 Uncomment the 8443 connector port. Remove the <!- - code at the beginning and - -> at the end of the 8443connector. You must add three more attributes to the connector configuration:
• keystoreFile (location of the keystore file that was created when you installed Java. In this example, itwas created under C:\keystore)
• keystorePass
• keystoreType
OpenAM Single Sign-On15
OpenAM Single Sign-OnInstall Tomcat

Enter the code as follows:
Example:<Connector port=”8443” protocol=”HTTP/1.1” SSLEnabled=”true”maxThreads=”150” scheme=”https” secure=”true”clientAuth=”false” sslProtocol=”TLS”keystoreFile=”<certstore-path>”keystorePass=”<certstore-password>”keystoreType”JKS”/>
See the parameter table at the beginning of this procedure for variable descriptions.Tip
Step 16 Save the server.xml file.Step 17 Start the Tomcat service.
a) Start > All Programs > Apache Tomcat 7.0 Tomcat7 > Configure Tomcatb) From the General tab, click Start. If the Tomcat service was already running, click Stop, then Start.
Step 18 To test the configuration, launch a web browser on the Windows Server that contains the Tomcat instanceand go to https://localhost:8443/tomcat.gif. The web browser may present warning dialogsabout insecure connections because the web browser does not trust the security certificates that are presentedby the Tomcat instance. Either examine the certificates and add them to your local certificate store so that thebrowser trusts them or proceed to the web application (less secure option) using the available browser controls.If the configuration is correct, the Tomcat logo appears in the web browser window.
Step 19 Configure Windows firewall to allow incoming connections to Apache Tomcat.a) Choose Start > Administrative Tools >Windows Firewall and Advanced Security.b) ChooseWindows Firewall and Advanced Security > Inbound Rules.c) Right-click Inbound Rules.d) Click New Rule.e) From theWhat type of rule would you like to create list of options, choose Port.f) Click Next.g) From the Does this rule apply to TCP or UDP? list of options, choose TCP.h) From theDoes this rule apply to all local ports or specific local ports? list of options, choose Specific
local ports.i) Enter 8443 and click Next.j) From theWhat action should be taken when a connection matches the specified conditions? list
of options, choose Allow the connection.k) Click Next.l) From theWhen does the rule apply? list of options, choose Domain only.m) Click Next.n) Enter a name and description of your choosing and click Finish.
Step 20 To test the configuration, log in to another host on the network, launch a web browser on the Windows serverthat contains the Tomcat instance and go to https://<openam-fqdn>:8443/tomcat.gif, where<openam-fqdn> is the Fully Qualified Domain Name of the Windows Server that contains the Tomcatinstance. The web browser may present warning dialogs about insecure connections because the web browserdoes not trust the security certificates that are presented by the Tomcat instance. Either examine the certificatesand add them to your local certificate store so that the browser trusts them or proceed to the web applicationanyway (this is less secure) using the available browser controls. If the configuration is correct, the Tomcatlogo appears loaded into the web browser window.
OpenAM Single Sign-On16
OpenAM Single Sign-OnInstall Tomcat
Deploy OpenAM War On Apache Tomcat
Procedure
Step 1 Download the recommended OpenAM release from the ForgeRock website.
See topics related to third-party software and system requirements for Single Sign-On for details.Tip
Step 2 Extract the .zip file and locate the opensso.war file that is contained within it.Step 3 Copy the WAR file to the Windows server that is to be your OpenAM server. This Windows server should
be running the previously configured Tomcat service.Step 4 Stop the Apache Tomcat service if it is running:
a) Choose Start > All Programs > Apache Tomcat 7.0 Tomcat7 > Configure Tomcat.b) From the General tab, click Stop.
Step 5 Deploy the WAR file on the Windows server that contains the Tomcat instance by copying the WAR file tothe following location: <tomcat-dir>\webapps.
Example:
C:\Program Files\Apache Software Foundation\Tomcat 7.0\webapps
For a description of the <tomcat-dir> variable, see topics related to installing the Tomcat.Note
Step 6 Start the Apache Tomcat service:a) Choose Start > All Programs > Apache Tomcat 7.0 Tomcat7 > Configure Tomcat Tomcat7b) From the General tab, click Start.
TheWAR file will fully deploy within a couple minutes. Under the webapps folder, a new folderis created with the same name as the WAR file but with the .war extension removed.
Note
Step 7 Verify your configuration by launching a web browser and enteringhttps://<openam-fqdn>:8443/<war-file-name>, where <openam-fqdn> is the FQDN ofthe Windows server that contains the OpenAM/Tomcat instance and <war-file-name> is the name ofthe OpenAMWAR file with the .war extension removed. If the configuration is correct, the OpenAMadministration interface should load in the web browser window.
Related TopicsThird-Party Software and System Requirements for Single Sign-On, on page 3
Set Up OpenAM Using GUI ConfiguratorThe following procedure specifies a method of configuring OpenAM. If you have an existing OpenAM serveror a solid understanding of OpenAM, you can configure the server differently.
OpenAM server and J2EE Policy Agents require FQDNs for the hostname of the machines on which you willperform your installations. To avoid problems with installation, configuration, and usage, Cisco highlyrecommends that you avoid using hostnames like “localhost” or numeric IP addresses like “192.168.1.2”.
OpenAM Single Sign-On17
OpenAM Single Sign-OnDeploy OpenAM War On Apache Tomcat

OpenAM provides a web-based administration interface that must be accessed using a web browser, forexampleMozilla Firefox.When accessing OpenAM for the first time, youmust use the FQDN of the OpenAMserver in the URL, for example, https://server1.cisco.com:8443/opensso, where the sampleURL value assumes that the OpenAMWAR file is deployed as opensso.
OpenAM configuration and logging information is typically stored in two directories that can be found in thehome directory of the user running the OpenAM/Tomcat instance, for example:
• C:\opensso (where the folder name matches the deployed URI for the OpenAMWAR file. Forexample, opensso.)
• C:\.openssocfg
If a problem occurs during the configuration, the Configurator displays an error message. If possible, correctthe error and retry the configuration. The following log file directories may provide useful information.
• Tomcat Web Container logs: tomcat-dir\logs
• OpenAM Install log: C:\opensso (where the folder name matches the deployed URI for the OpenAMWAR file. For example, opensso.)
By default, OpenAM is deployed under C:\opensso on Windows platforms.
Procedure
Step 1 Open the web browser and navigate to the OpenAM server using the following URL: https://<fqdnof openam server>:8443/<WAR filename>.
Example:
https://server1.cisco.com:8443/opensso
When you access OpenAM for the first time, you are directed to the Configurator to perform theinitial configuration of the OpenAM. The Configuration Options window appears when you accessthe OpenAM for the first time.
Note
Step 2 Choose Create Default Configuration.
If you encounter an error, repeat steps 1 and 2 on your local machine.Note
Step 3 In the OpenSSO Configurator window, specify and confirm passwords for the OpenAM administrator(amAdmin) and the default policy agent user (UrlAccessAgent). The default policy agent user is not usedlater in this example configuration; amAdmin is used each time you log in to OpenAM to change theconfiguration.
amAdmin is only a suggested value for the OpenAM Administrator.Note
Step 4 Click Create Configuration.
You are notified when the configuration is complete.
Step 5 Choose Proceed to Login.Step 6 Log in to your deployed OpenAM web application using the previously configured username and password
for “amAdmin”.
OpenAM Single Sign-On18
OpenAM Single Sign-OnSet Up OpenAM Using GUI Configurator

Step 7 From the Access Control tab, click /(Top Level Realm).Step 8 From the Authentication tab, click Core.Step 9 Click All Core Settings.Step 10 Set the User Profile to Ignored.Step 11 Click Save to update the profile.Step 12 Log out of the OpenAM GUI.
Set Up Policies On OpenAM ServerSet up policies on the OpenAM server using the policy rules detailed in the following table.
Table 4: Policy Rules
ActionResource NameNameService Type
Enable GET, Value =Allow Enable POST ,Value = Allow
https://<IMPFQDN>/*
<hostname>-01URL Policy Agent (withresource name)
https://<IMPFQDN>/*?*
<hostname>-02
https://<IMPFQDN>/*?*?*
<hostname>-03
https://<IMPFQDN>:8443/*
<hostname>-04
https://<IMPFQDN>:8443/*?*
<hostname>-05
https://<IMPFQDN>:8443/*?*?*
<hostname>-06
When you apply the policy rules as defined in this procedure, the IM and Presence Administration/Userinterfaces can only be accessed with the web browser using the following URL formats:
• https://<IMP FQDN> - For example, https://IMP-Node-01.cisco.com
• https://<IMP FQDN>:8443 - For example https://IMP-Node-01.cisco.com:8443/
It is not possible to access the Cisco Unified CM IM and Presence Administration/User interface using a URLthat only specifies a hostname such as https://<IMP HOSTNAME> (for example,https://IMP-Node-01/).
Procedure
Step 1 Log in to the OpenAM Administration interface.Step 2 From the Access Control tab, choose / (Top Level Realm).Step 3 From the Policies tab, click New Policy.
OpenAM Single Sign-On19
OpenAM Single Sign-OnSet Up Policies On OpenAM Server

Step 4 In the Name field, enter the PolicyName (for example, IMPPolicy) and click OK.
IMPPolicy is only a suggested value. You can use any valid name value. This value is not required later inthis configuration
Step 5 Choose the new policy, IMPPolicy, for editing.Step 6 Click Rules.Step 7 Add the rules in the following order:
a) Under the Rules section, click New.b) Choose Service Type as URL Policy Agent (with resource name)c) Click Next.d) In the Name field, enter the suggested rule Name from the Policy Rules table above, replacing
<hostname> with the actual hostname of the IM and Presence node.e) In the ResourceName field provided, enter the corresponding Resource Name for this rule, replacing
<IMP FQDN> with the actual Fully Qualified Domain Name of the IM and Presence node.f) Check the GET action with a value of Allow.g) Check the POST action with a value of Allow.h) Click Finish to complete the rule update.i) Click Save to save the policy update.j) Repeat this entire step for each rule in the above table, then click Finish.
You must add this set of six rules for each IM and Presence Service node that is enabled for SSO.
Step 8 You must add a single Subject to the policy. Add the Subject as follows:a) Under the Subjects section, click New.b) Choose Authenticated Users as Subject Type.c) Click Next.d) Enter IMPSubject as the Name value.
IMPSubject is only a suggested value. You can use any valid value. This value is not required later in thisconfiguration.
e) Click Finish to complete the Subject update.f) Click Save to save the policy update.
Only a single Subject is required for this policy even if multiple IM and Presence Service nodes are enabledfor Single Sign-On.
Step 9 You must add a single Condition to the policy. Add the Condition as follows:a) Under the Conditions section, click New.b) Choose Active Session Time as Condition Type.c) Click Next.d) Enter IMPTimeOutCondition as the Name value.
IMPTimeOutCondition is only a suggested value. You can use any valid name value. This value requiredlater in this configuration.
e) Enter 120 as theMaximum Session Time (minutes).f) Ensure the Terminate Session field is set to No.g) Click Finish to complete the Subject update.h) Click Save to save the policy update.
OpenAM Single Sign-On20
OpenAM Single Sign-OnSet Up Policies On OpenAM Server
Note that only a single Condition is required for this policy, even if multiple IM and Presence Service nodesare enabled for SSO.
Set Up SSO Module InstanceThis single module instance can be shared by multiple IM and Presence Service nodes that are configured forSSO as long as the same Active Directory domain is used throughout the deployment. Deployment scenariosinvolving more than one Active Directory domain are not covered in this documentation.
Procedure
Step 1 Log in to the OpenAM administration interface.Step 2 From the Access Control tab, click Top Level Realm.Step 3 From the Authentication tab, clickModule Instances.Step 4 In theModule Instances window, click New.Step 5 Enter a name for the new login module instance (for example, IMPKRB) and chooseWindows Desktop SSO
from the Type list.Step 6 Click OK.
This module instance name will be used later when enabling SSO on the IM and Presence node.
Step 7 Click Save.Step 8 In theModule Instances window, choose the name of the new login module (for example, IMPKRB) and
provide the following information:DescriptionParameter
This value should exactly match the value specified that was specified whenyou provisioned the Active Directory for Single Sign-On. For example, -princvalue.
Service Principal
For example,HTTP/[email protected] (using openAMserver name and domain).
This value should be the location of the keytab file that was created whenyou provisioned the Active Directory for Single Sign-On.
Keytab File Name
For example, C:\keytab\server1.HTTP.keytab (on Windowsplatform).
Domain for OpenAM server. For example, CISCO.COM.Kerberos Realm
Provide the FQDN of the AD server. The AD server is normally the KerberosDomain Controller. If multiple Kerberos Domain Controllers exist for failover
Kerberos Server Name(Active Directory)
purposes, all Kerberos Domain Controllers can be set using a colon (:) as theseparator. For example, ad.cisco.com .
For example, 22Authentication Level
OpenAM Single Sign-On21
OpenAM Single Sign-OnSet Up SSO Module Instance

Step 9 Click Save.
The module instance is created and called IMPKRB.
Step 10 Validate that the SSO Module is working correctly by logging in to a Windows Desktop session as a validWindows user (a valid end user that exists in the AD; do not use the Administrator account). Access thefollowing URL:
The browser must be configured for SSO.Note
https://<openam-FQDN>:8443/<war-file-name>/UI/Login?module=<SSO_Module>
Where:
DescriptionParameter
The FQDN of the OpenAM server.<openam-FQDN>
The name of the deployed OpenAMWAR file, for exampleopensso.
<war-file-name>
The name of the WindowsDesktopSSO module.<SSO_Module>
A screen notifies you that login was successful.
Set Up J2EE Agent Profile On OpenAM ServerThe J2EE Agent is an internal component that is instantiated on each IM and Presence Service node with SSOenabled. You must configure an associated J2EE Agent Profile on the OpenAM server for each J2EE Agent.As such, a J2EE Agent Profile is required for every IM and Presence Service node with SSO enabled. Ifmultiple nodes are to be configured for SSO, a J2EE Agent Profile must be created for each additional node.
The following table lists the J2EE profile agent parameters required for the IM and Presence Service node.
Table 5: J2EE Profile Agent Setup Parameter Descriptions
DescriptionParameter
Name of the J2EE Policy Agent. For example, <hostname-j2ee-agent> wherehostname is the hostname of the IM and Presence Service node, for example,impNode01-j2ee-agent.
Name
Password of the J2EE Policy Agent.
The password will be used when you enable SSO on IM and PresenceService.
Note
Password
Controls where the J2EE Policy Agent configuration is stored.
Choose Centralized
Configuration
The complete URL of the OpenAM server.
For example,https://<OpenAM FQDN>:8443/openssowhereopenssois the name of the OpenAMWAR file with the .war extension removed
Server URL
OpenAM Single Sign-On22
OpenAM Single Sign-OnSet Up J2EE Agent Profile On OpenAM Server

DescriptionParameter
The URL of the J2EE Policy Agent to which OpenAM publishes notifications.
For example, https://<IMP FQDN>:8443/agentapp
The value “agentapp” is the key item from the sample URL above.If you use the agentapp value, enter agentapp when you wereprompted to Enter the relative path where the policy agent shouldbe deployed.
Note
Agent URL
The following table lists the login form URIs for each web GUI application on IM and Presence Service.
Table 6: Login Form URIs for Web GUI Applications On IM and Presence Service
Sample valueApplication
/cupadmin/WEB-INF/pages/logon.jspCisco Unified CM IM and Presence Administration
/ccmservice/WEB-INF/pages/logon.jspCisco Unified IM and Presence Serviceability
/cucreports/WEB-INF/pages/logon.jspCisco Unified IM and Presence Reporting
/cmplatform/WEB-INF/pages/logon.jspCisco Unified IM and Presence OS Administration
/drf/WEB-INF/pages/logon.jspIM and Presence Disaster Recovery System
/ast/WEB-INF/pages/logon.jspReal-Time Monitoring Tool (RTMT)
/ssoservlet/WEB-INF/pages/logon.htmlCisco Client Profile Agent
Procedure
Step 1 Log in to OpenAM administration interface.Step 2 From the Access Control tab, click /(Top Level Realm).Step 3 From the Agents tab, choose the J2EE tab.Step 4 In the Agents section, click New.Step 5 Enter the J2EE setup parameters.
Step 6 Click Create.
A J2EE Agent with the name of <hostname-j2ee-agent> is created.
Step 7 Choose the J2EE agent that you created.Step 8 From the Application tab, under the Login Processing section, add the Login Form URIs for each web GUI
application on IM and Presence Service.Step 9 Click Save.Step 10 From the OpenAM Services tab, add OpenSSO Login URL as https://<OpenAM
FQDN>:8443/<war-file-name>/UI/Login?module=<SSO_Module>.
OpenAM Single Sign-On23
OpenAM Single Sign-OnSet Up J2EE Agent Profile On OpenAM Server

The <SSO_Module> value you enter should match the value you entered when you set up theSSO module instance. For example,https://server1.cisco.com:8443/opensso/UI/Login?module=IMPKRB.
Tip
Step 11 In the text area, remove all URLs other than the Login URL. Only the Login URL specified in the previousstep should be listed in the text area.
Step 12 Click Save.Step 13 Click Back to Main Page.Step 14 Repeat Steps 4 through 13 to create a J2EE Profile Agent for every other IM and Presence Service node to
be enabled for SSO.
Set OpenAM Session TimeoutThe OpenAM session timeout must be set to a value that is higher than the session timeout parameter that isset on the IM and Presence Service node. To determine the session timeout value on the IM and PresenceService node, enter the following command using the CLI:
show webapp session timeout
Procedure
Step 1 Log in to the OpenAM Administration interface.Step 2 From the Configuration tab, choose Global.Step 3 Click Session.Step 4 Click Dynamic Attributes.Step 5 Enter a value in theMaximum Idle Time field.Step 6 Click Save.
Import OpenAM Certificate Into IM and Presence ServiceIM and Presence Service nodes with SSO communicate with the OpenAM server over an encrypted channel.Establishing an encrypted communication channel requires each IM and Presence Service node with SSO totrust the security certificate presented by the OpenAM server. An IM and Presence Service node trusts asecurity certificate by importing the required security certificates into the tomcat-trust trust store.
The required procedure is dependent on the security configuration that you used when you created the Javakeystore for the OpenAM Server.
• Use a self-signed security certificate for OpenAM/Tomcat instance
• Use a CA signed security certificate for OpenAM/Tomcat instance
OpenAM Single Sign-On24
OpenAM Single Sign-OnSet OpenAM Session Timeout

Importing OpenAM certificates affects service; Cisco highly recommends that you import the OpenAMcertificates during a maintenance window.
Caution
For information about importing certificates, seeCiscoUnified SystemMaintenanceGuide for IM and Presence.Note
Procedure
Step 1 Sign in to the Cisco Unified CM IM and Presence Administration for the IM and Presence database publishernode that is to be enabled with SSO.
Step 2 Choose System > Security > Certificate Import Tool.Step 3 Choose Tomcat Trust as the Certificate Trust Store.Step 4 Enter the Fully Qualified Domain Name of the OpenAM server as the Peer Server.Step 5 Enter 8443 as the Peer Server Port.Step 6 Click Submit.
The Certificate Import Tool executes two tests:
• Verify reachability of the specified certificate server (pingable) - checks that the OpenAM server isreachable by this IM and Presence node. If this test fails, it may be due to the firewall on the OpenAMbaseWindows system blocking the ping operation. See topics related to importing the OpenAM certificateinto IM and Presence Service to allow a ping through a Windows firewall.
• Verify SSL connectivity to the specified certificate server - checks if this IM and Presence node cansecurely connect to the OpenAM server. If this test fails due to “Missing certificates”, the requiredcertificates are missing and a secure connection can not be established. If this test fails, proceed to thenext step. If this test passes, proceed to Step 15.
If this test fails with the message “The Troubleshooter has encountered an internal error”,troubleshoot the certificate failure before you continue to the next step.
Note
Step 7 Click Configure to open the Certificate Viewer. The Certificate Viewer provides a visual representation ofthe certificate chain presented byOpenAMduring a TLS connection handshake. This indicates which certificatesmust be imported into this IM and Presence Service node.
Step 8 Inspect the certificates in the chain and ensure that you trust the issuers.Step 9 Check Accept Certificate Chain and click Save.
The required certificates from the chain are now imported into the tomcat-trust trust store of this IM andPresence Service node.
Step 10 Click Close.
The Certificate Import Tool reports that the “Certificates verified successfully”.
Step 11 Restart the Cisco Intercluster Sync Agent service on this node using the following CLI command:utils servicerestart Cisco Intercluster Sync Agent.
Step 12 Restart the Tomcat service on this node using the following CLI command: utils service restart Cisco Tomcat
OpenAM Single Sign-On25
OpenAM Single Sign-OnImport OpenAM Certificate Into IM and Presence Service

Step 13 Repeat Steps 11 and 12 for each IM and Presence Service subscriber node in this cluster.Step 14 Verify the secure connection by using the Certificate Import Tool on each subscriber node in this cluster.
a) Sign in to Cisco Unified CM IM and Presence Administration of the IM and Presence Service subscribernode that is being configured for SSO.
b) Choose System > Security > Certificate Import Tool.c) Choose Tomcat Trust as the Certificate Trust Stored) Enter the FQDN of the OpenAM server as the Peer Server.e) Enter 8443 as the Peer Server Port.
Step 15 Repeat this procedure for all IM and Presence Service clusters for which you will be enabling SSO.
Related TopicsImportant Information Before Single Sign-On Setup, on page 4Certificate Failure
Activate Single Sign-OnWhen enabling SSO, you must perform the following tasks in the order indicated.
Enabling SSO affects service; Cisco highly recommends that you enable SSO during a maintenance window.Caution
Configure Access Permissions Before Enable SSOIt is important to understand the user access permissions that should be in place before and after SSO isenabled. Understanding the permissions can help avoid situations in which users have incorrect permissionswhen accessing IM and Presence Service applications.
Table 7: Prerequisites for Enabling Single-Sign On
NotesApplication
OpenAM Single Sign-On26
OpenAM Single Sign-OnActivate Single Sign-On

Before enabling SSO, ensure that an end user who is a memberof the necessary User Groups exists in order to facilitateadministration access.
The default administrator application user that was created atthe time of installation has the following:
Groups:
• Standard Audit Users
• Standard CCM Super Users
Roles:
• Standard AXL API Access
• Standard Admin Rep Tool Admin
• Standard Audit Log Administration
• Standard CCM Admin Users
• Standard CCMADMIN Administration
• Standard CUReporting
• Standard EM Authentication Proxy Rights
• Standard SERVICEABILITY Administration
• Standard SSO Config Admin
Any end user that is a member of the above User Groups withthose Roles will have full access rights to IM and PresenceService, similar to that of the default administrator.
To view the default application user on IM and PresenceService, choose Cisco Unified CM Administration > UserManagement > Application User > Find. Choose the defaultapplication user (that was created during install) to view theirdetails.
To assign an end user to these groups on IM and PresenceService, choose Cisco Unified CM Administration > UserManagement > User Settings > Access Control Group >Find. Choose a group and click Add End Users. Search forthe desired end user, choose the user, and clickAddEndUsersto Group.
Cisco Unified CM IM and PresenceAdministration
• Cisco Unified CM IM and PresenceAdministration
• IM and Presence Serviceability• IM and Presence Reporting
OpenAM Single Sign-On27
OpenAM Single Sign-OnConfigure Access Permissions Before Enable SSO
Normally, the default administrator application user does nothave access to these web applications. These web applicationsare only accessible by the Cisco Unified IM and PresenceOperating System administrator. This administrator has accessto the Administration CLI in addition to these web applications.
After SSO is enabled for these applications, the applicationsare accessible by any end user that has the same permissionsas the default administrator application user.
Cisco Unified IM and Presence OperatingSystem Administration
• IM and Presence Operating SystemAdministration
• IM and Presence Disaster RecoverySystem
Before enabling SSO, ensure that an end user exists that is amember of the necessary user groups to allow administrativeaccess to the Real-Time Monitoring Tool.
Refer to the note for Cisco Unified CM IM and PresenceAdministration above.
Real-Time Monitoring Tool
Enable Single Sign-On Using GUIThis CiscoUnified IM and PresenceOperating SystemAdministration application is split into three components:
• Status
• Server Settings
• Select Applications
Status
A warning message displays indicating that the change in SSO settings causes Tomcat to restart.
The following error messages may display when you enable the SSO application:
• Invalid Open Access Manager (OpenAM) server URL - This error message displays when you enter aninvalid OpenAM server URL.
• Invalid profile credentials - This error message displays when you enter a wrong profile name or wrongprofile password or both.
• Security trust error - This error message displays when this IM and Presence Service node does not trustthe certificate chain presented by the OpenAM server.
If you see any of the above error messages while enabling SSO, then the status changes to that error.Note
Server Settings
You can edit the server settings only when SSO is disabled for all applications.
Select Applications
You can enable or disable SSO on any of the following applications:
• CiscoUnified CM IM and Presence Administration – Enables SSO for CiscoUnified CM IM and PresenceAdministration, Cisco Unified IM and Presence Serviceability, and Cisco Unified IM and PresenceReporting.
OpenAM Single Sign-On28
OpenAM Single Sign-OnEnable Single Sign-On Using GUI

• Cisco Unified IM and Presence Operating System Administration – Enables SSO for Cisco Unified IMand Presence Operating System Administration and Disaster Recovery System.
• RTMT – Enables the web application for the Real-Time Monitoring Tool.
• Cisco UP Client Profile Agent – Enables SSO for the Cisco UP Client Profile Agent service. This optionis only applicable to customers using Common Access Card (CAC) sign-on.
Procedure
Step 1 Choose Cisco Unified IM and Presence Operating System Administration > Security > Single Sign On.Step 2 Enter the URL of the Open Access Manager (OpenAM) server:
Example:
https://server1.cisco.com:8443/opensso
Step 3 Enter the relative path where the policy agent should be deployed. The relative path must be alphanumeric,such as agentapp for example.
Step 4 Enter the name of the profile that is configured for this policy agent, for example " cupnode01-j2ee-agent".Step 5 Enter the password of the profile name.Step 6 Enter the login Module instance name that is configured for Windows Desktop SSO, such as IMPKRB. See
topics related to setting up the SSO module instance for more information..Step 7 Click Save.Step 8 In the Confirmation dialog box, click OK to restart Tomcat.
Related TopicsSet Up J2EE Agent Profile On OpenAM Server, on page 22Set Up SSO Module Instance, on page 21
Deactivate Single Sign-OnIf you choose to disable SSO, you must perform the following tasks in the order indicated.
Configure Access Permissions Before Disable SSOIf SSO is disabled for any IM and Availability web application that supports SSO, all users accessing thatapplication need to provide a username and password. Cisco recommends that if you are an IM and PresenceService administrator intending to disable SSO for any IM and Availability web applications, ensure thatusers can access the application after SSO is disabled. This action is important to avoid inadvertently lockingout the active IM and Presence Service administration account.
Table 8: Prerequisites for Disabling Single Sign-On
NotesApplication
OpenAM Single Sign-On29
OpenAM Single Sign-OnDeactivate Single Sign-On

Before disabling SSO, ensure that an application user exists with aknown username/password and that this user is a member of thenecessary User Groups.
The default administrator application user that was created at thetime of installation has the following:
Groups:
• Standard Audit Users
• Standard CCM Super Users
Roles:
• Standard AXL API Access
• Standard Admin Rep Tool Admin
• Standard Audit Log Administration
• Standard CCM Admin Users
• Standard CCMADMIN Administration
• Standard CUReporting
• Standard EM Authentication Proxy Rights
• Standard SERVICEABILITY Administration
• Standard SSO Config Admin
Any application user that is a member of the above User Groupswith those Roles will have full access rights to IM and PresenceService if SSO is disabled.
To view the application users on IM and Presence, select CiscoUnified CM Administration > User Management > ApplicationUser > Find. Select a user to view their details.
Cisco Unified CM IM and PresenceAdministration (CiscoUnified CM IMand Presence Administration, IM andPresence Serviceability, IM andPresence Reporting)
Before disabling SSO, ensure that an OS Administration user existswith a known username/password and that this user has access tothe CiscoUnified IM and Presence Operating SystemAdministrationCLI. After SSO is disabled, this user has access rights to the CiscoUnified IM and Presence Operating System Administration GUIs.
Cisco Unified IM and PresenceOperating System Administration (IMand Presence Operating SystemAdministration, IM and PresenceDRS)
Before disabling SSO, ensure that an application user with a knownusername/password exists and that this user has the same accessrights as the user specified for Cisco Unified CM IM and PresenceAdministration (Cisco Unified CM IM and Presence Administration,IM and Presence Serviceability, and IM and Presence Reporting).
Real-Time Monitoring Tool
OpenAM Single Sign-On30
OpenAM Single Sign-OnConfigure Access Permissions Before Disable SSO

Disable Single Sign-OnYou can disable SSO using either the GUI, as described in this procedure, or the CLI. For information abouthow to disable SSO using the CLI, see the utils sso disable command in the Command Line Interface Guidefor Cisco Unified Communications Solutions.
Procedure
Step 1 Choose Cisco Unified OS Administration > Security > Single Sign On.Step 2 Deselect all applications that were previously enabled for SSO.Step 3 Click Save.Step 4 In the Confirmation dialog box, click OK to restart Tomcat.
Uninstall OpenAM on Windows
Before you begin
Ensure that you have completed the following tasks before you uninstall OpenAM:
• Configure access permissions before disabling SSO.
• Disable Single Sign-On
Procedure
Step 1 Access the OpenAM server Windows desktop and choose Start > All Programs > Apache Tomcat 7.0Tomcat7 > Configure Tomcat.
This menu path assumes you are using Tomcat 7.Note
Step 2 From the General tab, click Stop to stop the Tomcat service if it is running on the OpenAM server.Step 3 Delete the OpenAM configuration data. This data is typically stored in two directories that can be found in
the home directory of the user running the Tomcat instance. For example, C:\opensso (where the foldername matches the deployed URI for the OpenAMWAR file such as opensso) and C:\.openssocfg.
Step 4 Delete the deployed OpenAMWAR file and the WAR file itself from the following location on theOpenAM/Tomcat instance: tomcat-dir\webapps.
Example:
C:\Program Files\Apache Software Foundation\Tomcat 7\webapps
See topics related to Tomcat installation for a description of the tomcat-dir variable.Tip
Step 5 Access the Windows desktop of the OpenAM server and choose Start > All Programs > Apache Tomcat7.0 Tomcat7 > Configure Tomcat.
OpenAM Single Sign-On31
OpenAM Single Sign-OnDisable Single Sign-On

Step 6 From the General tab, click Start to start the Tomcat service.
Related TopicsConfigure Access Permissions Before Disable SSO, on page 29Disable Single Sign-On, on page 31Install Tomcat, on page 14
Set Debug LevelYou can gather additional debug information the IM and Presence Service node by setting the log level forthe J2EE Policy Agent accordingly. The log level for this component is configured on the OpenAM serveritself. The default log level is Error. You can change the log level to Message to provide additional debuginformation. Cisco recommends that you use the Message log level only for short periods of time, becausethe associated log files can grow quite large.
Procedure
Step 1 Sign in to OpenAM (https://<OpenAM FQDN>:8443/opensso) from your web browser (for example,Mozilla Firefox).
Step 2 From the Access Control menu, choose Top Level Realm > Agents > J2EE.Step 3 Under the General heading, choose Agent Debug Level.Step 4 Under the Agent Debug Level, specify the desired level (Message or Error).Step 5 Click Save.Step 6 On the IM and Presence Service node, restart the Cisco Tomcat service.
a) Access the IM and Presence Administration CLI.b) Execute the following command: utils service restart Cisco Tomcat.
Step 7 Retrieve the logs using Cisco Unified Real Time Monitoring Tool for IM and Presence Service by browsingand downloading the logs for the Cisco SSO component.
If users experience problems while SSO is enabled, you must disable SSO and then re-enable it inorder to access the debug.out logs from Cisco Unified Real Time Monitoring Tool.
Note
OpenAM Single Sign-On32
OpenAM Single Sign-OnSet Debug Level