openclose user manual - santanderwebmortgage.com · all information contained in this document is...
TRANSCRIPT

USER MANUAL

All information contained in this document is confidential and proprietary and may not be reproduced or disclosed to anyone not originally intended without the express written permission of Beanstalk Networks. © Beanstalk Networks. All rights reserved.
Page 2 of 216
OpenClose User’s Guide
Copyright © Beanstalk Networks dba OpenClose. All rights reserved.
Beanstalk Networks makes no representations or warranties with respect to this manual and will not guarantee the accuracy and completeness of any information. Users of this manual do so with the understanding that Beanstalk Networks is not engaged in the practice of law and does not render legal, accounting, or other professional services.
In determining which federal or state forms supplied by Beanstalk Networks should be used in a particular situation, users of this manual should consult with their own legal counsel for advice.
Beanstalk Networks makes no representation that it supplies forms for every state. Beanstalk Networks reserves the right to change this manual without notice. OpenClose is a registered trademark of Beanstalk Networks. All other brand and product names are trademarks of their respective holders.

All information contained in this document is confidential and proprietary and may not be reproduced or disclosed to anyone not originally intended without the express written permission of Beanstalk Networks. © Beanstalk Networks. All rights reserved.
Page 3 of 216
Table of Contents
1 - Introduction ................................................................................................................................... 8 Conventions Used in This Manual ........................................................................................................... 8 Audience .................................................................................................................................................. 9
Which Chapters to Read: ........................................................................................................................................................................ 9 System Requirements .............................................................................................................................. 9
Web Browser .......................................................................................................................................................................................... 9 Screen Resolution ................................................................................................................................................................................... 9 Pop-up Blockers .................................................................................................................................................................................... 10 Cookies ................................................................................................................................................................................................. 11 PDF Files and Adobe® ........................................................................................................................................................................... 11 Internet Toolbars .................................................................................................................................................................................. 11
User Types (Job Functions) .................................................................................................................... 12 Administrators (Lenders Only) ............................................................................................................................................................. 12 Managers (Lenders Only) ..................................................................................................................................................................... 12 Account Executives (Lenders Only) ...................................................................................................................................................... 13 Lender Employees (Lenders Only) ........................................................................................................................................................ 13 Broker Companies ................................................................................................................................................................................ 14 BROKER USER LEVEL 1 (Branch/Broker Managers) .............................................................................................................................. 14 BROKER USER LEVEL 2 (Originators) ..................................................................................................................................................... 14 BROKER USER LEVEL 3 (Processors) ..................................................................................................................................................... 14
Workflow ............................................................................................................................................... 15 Getting Around in OpenClose ................................................................................................................ 17
2 - Managing Your Account ............................................................................................................... 18 Getting Started...................................................................................................................................... 18 Logging In .............................................................................................................................................. 18 Forgotten Passwords ............................................................................................................................ 19
Password criteria .................................................................................................................................................................................. 20 Logging Out ........................................................................................................................................... 20 User Settings ......................................................................................................................................... 20
User Information Tab ........................................................................................................................................................................... 21 Password Tab ....................................................................................................................................................................................... 22 Link Outs Tab ........................................................................................................................................................................................ 22 Site Preferences Tab ............................................................................................................................................................................. 24 Defaults ................................................................................................................................................................................................ 25 Closing Scenarios (Origination Plus Customers Only) ........................................................................................................................... 26 Loan Products (Origination Plus Customers Only) ................................................................................................................................ 30 Document Groups (Origination Plus Customers Only) ......................................................................................................................... 32 Intangible Taxes .................................................................................................................................................................................... 35 Contacts................................................................................................................................................................................................ 36
3 - The e-Doc Manger ........................................................................................................................ 37 Date and Time Stamps ......................................................................................................................................................................... 37 Accessing Documents ........................................................................................................................................................................... 38 Editing Documents ............................................................................................................................................................................... 38

All information contained in this document is confidential and proprietary and may not be reproduced or disclosed to anyone not originally intended without the express written permission of Beanstalk Networks. © Beanstalk Networks. All rights reserved.
Page 4 of 216
Printing and Emailing Documents ........................................................................................................................................................ 38 Document History ................................................................................................................................................................................ 39 Forms – Origination Plus Customers Only ............................................................................................................................................ 40 Uploading Documents – Fax Module Customers Only ......................................................................................................................... 40
4 - Loan Origination .......................................................................................................................... 43 Intended Audience ................................................................................................................................ 43 Creating a Loan ..................................................................................................................................... 43
Upload Loan ......................................................................................................................................................................................... 44 How to Export Files From Calyx Point™ into OpenClose ....................................................................................................................... 44 How to Export Files From Encompass™ into OpenClose ...................................................................................................................... 45 How to Export Files from Contour™ into OpenClose ............................................................................................................................ 47 How to Export Files from Genesis 2000™ into OpenClose .................................................................................................................... 47 How to Export Files from Byte™ into OpenClose .................................................................................................................................. 48
1003 Entry ............................................................................................................................................. 48 Pipeline Summary ................................................................................................................................. 50
Pipeline Statistics .................................................................................................................................................................................. 51 Lender’s Version of the Pipeline Summary........................................................................................................................................... 51 Pipeline Summary Icons ....................................................................................................................................................................... 52 Pipeline Search ..................................................................................................................................................................................... 53
The Loan Action Menu .......................................................................................................................... 54 Loan Actions: ......................................................................................................................................... 56 Loan Snapshot ....................................................................................................................................... 59
Borrower Information .......................................................................................................................................................................... 60 Loan Information .................................................................................................................................................................................. 60 Loan Status ........................................................................................................................................................................................... 61 Closing Request .................................................................................................................................................................................... 62 Action (broker users) ............................................................................................................................................................................ 63 Workflow Locator (lender users) .......................................................................................................................................................... 63
Edit 1003 ............................................................................................................................................... 63 Types & Terms ...................................................................................................................................................................................... 64 Property ............................................................................................................................................................................................... 64 Borrower Info ....................................................................................................................................................................................... 65 Employment ......................................................................................................................................................................................... 66 Income .................................................................................................................................................................................................. 67 Housing Expense .................................................................................................................................................................................. 68 Assets ................................................................................................................................................................................................... 69 Liabilities ............................................................................................................................................................................................... 70 Details ................................................................................................................................................................................................... 71 Declarations ......................................................................................................................................................................................... 72 Agreement ............................................................................................................................................................................................ 72 Fannie Mae ........................................................................................................................................................................................... 72 Government Info .................................................................................................................................................................................. 72 Freddie Mac.......................................................................................................................................................................................... 73
Submit to Processor .............................................................................................................................. 73 View Contacts ....................................................................................................................................... 73 Order Credit........................................................................................................................................... 74 Submit to AU – Automated Underwriting ............................................................................................. 76
Fannie Mae – Desktop Originator (DO) ................................................................................................................................................ 76 Fannie Mae – Desktop Underwriting (DU) ........................................................................................................................................... 79 Freddie Mac - Loanprospector.Com ..................................................................................................................................................... 80
Submitting a Loan to the Lender ........................................................................................................... 81

All information contained in this document is confidential and proprietary and may not be reproduced or disclosed to anyone not originally intended without the express written permission of Beanstalk Networks. © Beanstalk Networks. All rights reserved.
Page 5 of 216
Intended Audience ............................................................................................................................................................................... 81 Using Submit Loan to Lender ............................................................................................................................................................... 81 Loan Validation ..................................................................................................................................................................................... 82
Reviewing a Loan Response .................................................................................................................. 83 Using Update Lender ............................................................................................................................................................................ 85
5 - Processing .................................................................................................................................... 87 Verifications .......................................................................................................................................... 91 Return to Originator .............................................................................................................................. 92
6 - Special Loan Scenarios .................................................................................................................. 93 Linked Loans .......................................................................................................................................... 93
Overview .............................................................................................................................................................................................. 93 Creating a Linked Loan ......................................................................................................................................................................... 93 Other Features of Linked Loans ............................................................................................................................................................ 95 Use Be Originator to create a linked loan as a Lender User ................................................................................................................. 96
Investment Property Ratio Calculations ............................................................................................... 96 Net Rental Income ................................................................................................................................................................................ 96 Scenario 1: Borrower owns investment property with rental income. This home is not the subject property. ................................ 97 Scenario 2: Borrower owns investment property with rental income. This home is the subject property (Investment Refinance). 98
7- Pricing and Registration ............................................................................................................... 102 Pricing and Registering a Loan ........................................................................................................... 102
Pricing and Registering a Loan – (Decision Assist Customers Only) ................................................................................................... 103 Pricing and Registering a Loan – (UniFi Customers Only) ................................................................................................................... 109 Pricing and Registering a Loan – (Without Decision Assist or UniFi) .................................................................................................. 112
Reviewing a Lock Response ................................................................................................................. 113 UniFi Customers Only ......................................................................................................................................................................... 113 Non-UniFi Customers Only ................................................................................................................................................................. 113
8 - Lock Registration Responses ....................................................................................................... 116 Lock/Float Registration Responses ..................................................................................................... 116
Responding to the Float or Lock Request ........................................................................................................................................... 117
9 - Underwriting .............................................................................................................................. 120 Underwriting Loans ............................................................................................................................. 120
Intended Audience ............................................................................................................................................................................. 120 Accessing a Queue .............................................................................................................................................................................. 121 Working on the File ............................................................................................................................................................................ 122 Deleting Conditions ............................................................................................................................................................................ 125 Clearing Conditions ............................................................................................................................................................................ 125
10 - Workflow Functions .................................................................................................................. 127 Working with Submitted Loans ........................................................................................................... 127
Intended Audience ............................................................................................................................................................................. 127 Transferring a Loan ............................................................................................................................................................................. 127 Releasing a Loan ................................................................................................................................................................................. 127 Acquiring a Loan ................................................................................................................................................................................. 128
Work Group Management .................................................................................................................. 129 Intended Audience ............................................................................................................................................................................. 129 Overview ............................................................................................................................................................................................ 129 Using Work Group Management ....................................................................................................................................................... 129 Be Originator ...................................................................................................................................................................................... 130

All information contained in this document is confidential and proprietary and may not be reproduced or disclosed to anyone not originally intended without the express written permission of Beanstalk Networks. © Beanstalk Networks. All rights reserved.
Page 6 of 216
11 - The Message Center ................................................................................................................. 132 Working with Messages ...................................................................................................................... 132
12 - Reporting .................................................................................................................................. 134 Pipeline Reporting ............................................................................................................................... 134
Creating a Pipeline Report .................................................................................................................................................................. 134 Working with Saved Reports .............................................................................................................................................................. 136
13 - InfoCenter ................................................................................................................................ 137 Overview ............................................................................................................................................. 137 Accessing the InfoCenter ..................................................................................................................... 137 Creating Document Sub-Folders ......................................................................................................... 138 Editing Document Sub-Folders ............................................................................................................ 138 Deleting Document Sub-Folders.......................................................................................................... 139 How to Upload a Document ................................................................................................................ 140 How to Update a Document ............................................................................................................... 141 How to Delete a Document ................................................................................................................. 142
14 - Contacts .................................................................................................................................... 143 Contacts .............................................................................................................................................. 143
Creating a Contact .............................................................................................................................................................................. 143 Editing a Contact ................................................................................................................................................................................ 144 View Contacts ..................................................................................................................................................................................... 144
15 - Broker/Branch Company Administration .................................................................................. 146 Company Profile .................................................................................................................................. 146 Groups/Regions ................................................................................................................................... 147 Details ................................................................................................................................................. 147 Users ................................................................................................................................................... 147
Creating a Broker User ....................................................................................................................................................................... 147 Editing a Broker User .......................................................................................................................................................................... 148
Defaults ............................................................................................................................................... 150 Navigation Defaults ............................................................................................................................ 150 Closing Scenarios, Loan Products, Document Groups and Link Outs .................................................. 150 Pipeline Management ......................................................................................................................... 150
16 - Lender Administration .............................................................................................................. 152 Groups and Regions ............................................................................................................................ 152
Adding a Group or Region .................................................................................................................................................................. 153 Editing a Group or Region .................................................................................................................................................................. 153
Creating and Managing Users and Companies .................................................................................. 154 Creating a Lender User ....................................................................................................................................................................... 154 Looking up and Managing Lender Users ............................................................................................................................................ 155 Creating a Broker/Branch Company ................................................................................................................................................... 157 Looking up and Managing a Broker/Branch Company ....................................................................................................................... 159 Creating a Broker User ....................................................................................................................................................................... 159 Looking up and Managing a Broker User ............................................................................................................................................ 160
Pipeline Management ......................................................................................................................... 160 Workflow Maintenance ...................................................................................................................... 161

All information contained in this document is confidential and proprietary and may not be reproduced or disclosed to anyone not originally intended without the express written permission of Beanstalk Networks. © Beanstalk Networks. All rights reserved.
Page 7 of 216
Overview ............................................................................................................................................................................................ 161 Queues ............................................................................................................................................................................................... 162 Work Groups ...................................................................................................................................................................................... 163
Configuring Broker/Branch Workflow ................................................................................................ 164 Overview ............................................................................................................................................................................................ 164 Defining the Submit to Lender Workflow ........................................................................................................................................... 164 Defining the Registration Workflow – Non-UniFi Customers Only ..................................................................................................... 165 Defining the Submit to Closer Workflow ............................................................................................................................................ 166
Defaults and Navigation Defaults ....................................................................................................... 167
17 - Closing Through Accounting ...................................................................................................... 168 The Closing Screen .............................................................................................................................. 168 The Post Closing Screen ...................................................................................................................... 170 The Funding Screen ............................................................................................................................. 172 The Accounting Screen ........................................................................................................................ 175 The Secondary Marketing Screen ....................................................................................................... 176
18 - Defaults .................................................................................................................................... 179 Defaults ............................................................................................................................................... 179
Functionality Overview ....................................................................................................................................................................... 179 Example’s of Using Defaults ............................................................................................................... 181
Managing Your Automated Underwriting Account(s) ........................................................................................................................ 181 Managing Your Credit Accounts ......................................................................................................................................................... 183
Master List of All Defaults ................................................................................................................... 185
19 - Navigation Defaults .................................................................................................................. 207 Navigation Defaults ............................................................................................................................ 207
20 - The Fax Module ....................................................................................................................... 213 Fax Module – (Fax Module Customers Only) ...................................................................................... 213
Faxing Your Document ....................................................................................................................................................................... 213 Viewing Your Faxed Document .......................................................................................................................................................... 214
21 - User Manual Updates ............................................................................................................... 216 This chapter provides a listing of the latest additions to this manual ................................................ 216

All information contained in this document is confidential and proprietary and may not be reproduced or disclosed to anyone not originally intended without the express written permission of Beanstalk Networks. © Beanstalk Networks. All rights reserved.
Page 8 of 216
1
Introduction
Welcome to OpenClose.
OpenClose is a web-based software platform for mortgage banking which allows you to seamlessly handle a loan throughout its entire process… from OPEN to CLOSE!
OpenClose’s modular design allows for web-based originating, processing, and managing of loans with tools for loan upload, digital document management and storage, product and pricing, locking, underwriting, secondary marketing and back office mortgage banking tasks.
OpenClose significantly increases the number of loans that can be originated, processed, and funded while reducing the associated costs.
The purpose of this manual is to provide you with the information you need to be an effective user.
Note: OpenClose is a customizable solution. Your implementation may have slight differences from the information presented in this manual.
Note: This manual assumes that the user has an understanding of the mortgage origination business. It is not meant to instruct a novice in the mortgage industry.
Conventions Used in This Manual
This manual uses certain conventions to help you more easily identify special terms and concepts.
Menu options and screen components look like this:
For example: Add a Loan, Message Center.
Figures and references to figures are in bold.
For example: See Figure 2.3
Text with emphasis is in italics.
For example: you must save your data.
Audience: All

All information contained in this document is confidential and proprietary and may not be reproduced or disclosed to anyone not originally intended without the express written permission of Beanstalk Networks. © Beanstalk Networks. All rights reserved.
Page 9 of 216
Audience
Which Chapters to Read:
This manual contains chapters for all job functions such as originators, processors, lender employees (such as underwriters) and administrators.
To help you identify which chapters and sections are important to you and which sections you may be able to skip, an Audience section is listed at the start of each chapter. For example, if you are an originator and a chapter indicates it is only for lenders only, you know that you can skip that chapter.
System Requirements
OpenClose is a web-based software application which runs over the Internet. You do not need to install any software on your computer in order to use OpenClose other than a web browser. There are a few system requirements, however, that you should be familiar with when accessing the site.
Web Browser
You must use Internet Explorer version 8.0 or higher. Other web browsers such as Firefox and Netscape are not supported.
To find out which version of Internet Explorer you are using, click the Help menu in your web browser and choose About. The version will appear in the window. If you access OpenClose with an incorrect web browser version, you will receive a message and will not be permitted to log in.
To obtain the latest version of IE please go to http://www.microsoft.com/
Figure 1.1 - About Internet Explorer
Screen Resolution
OpenClose is optimized for a screen resolution of 1366x768.

All information contained in this document is confidential and proprietary and may not be reproduced or disclosed to anyone not originally intended without the express written permission of Beanstalk Networks. © Beanstalk Networks. All rights reserved.
Page 10 of 216
Pop-up Blockers
If you have pop-up blocking software installed, it may cause portions of OpenClose to function improperly.
If you have pop-ups blocked, you will receive a warning message when accessing OpenClose letting you know that you must enable pop-ups.
If you click on a function in OpenClose to open a new window and that window does not appear, disable your pop-up blocker.
If you have purchased the Fax Module and the bar code does not display, disable your pop-up blocker.
Hardware Recommendations (PC/Laptop)
Recommend:
Windows XP Pro, Vista or Windows 7
2 gigabyte (GB) RAM (32-bit) or higher
Should have at least 750 MB to 1 GB of free space

All information contained in this document is confidential and proprietary and may not be reproduced or disclosed to anyone not originally intended without the express written permission of Beanstalk Networks. © Beanstalk Networks. All rights reserved.
Page 11 of 216
Cookies
You must have cookies enabled. Cookies are an option that is set on Microsoft Internet Explorer (IE)
If cookies are not enabled you cannot log in.
Note: Cookies are enabled by default so if you have not disabled them you do not need to adjust your settings.
To enable cookies:
Microsoft Internet Explorer Version 7.0+
Select Internet Options from the Tools menu. Click on the Privacy tab. Click the Default button (or manually slide the bar down to Medium) under Settings. Click OK.
Note: No personal information is stored in these cookies.
Note: If you receive a cookies error but your cookies are enabled, you may have the date set incorrectly on your computer. Make sure that your calendar is not set to a date in the future and that the time zone on your computer is correct.
PDF Files and Adobe®
Many documents are posted to the InfoCenter and e-Doc Manager in PDF file format.
If you do not have the free Adobe Acrobat viewer and you wish to view or print a PDF-formatted document, you can download the viewer from the Adobe website directly at http://www.adobe.com.
Internet Toolbars
The Yahoo toolbar must be disabled in order to successfully use the Fax Module.

All information contained in this document is confidential and proprietary and may not be reproduced or disclosed to anyone not originally intended without the express written permission of Beanstalk Networks. © Beanstalk Networks. All rights reserved.
Page 12 of 216
User Types (Job Functions)
Every company that uses OpenClose has its own user hierarchy based on its own unique operations. Figure 1.2 below is a sample. Your company may not use all user types pictured below. Note that each colored band represents a different user level within OpenClose.
Figure 1.2 - Sample OpenClose User Structure
The following are the main user types in OpenClose:
Administrators (Lenders Only)
Administrators are responsible for configuring the system and creating users and companies. They do not participate in loan-level operations though they do have search and reporting tools. Administrators also are responsible for configuring and managing the InfoCenter.
Managers (Lenders Only)
Managers are lender employees who monitor and manage their subordinates’ pipelines. Managers have searching and reporting capabilities, can re-assign loans, and can post documents to the InfoCenter.

All information contained in this document is confidential and proprietary and may not be reproduced or disclosed to anyone not originally intended without the express written permission of Beanstalk Networks. © Beanstalk Networks. All rights reserved.
Page 13 of 216
Account Executives (Lenders Only)
Account Executives are lender employees who have originators assigned to them. An account executive’s pipeline consists of those loans that have been registered or submitted by their originators.
Account Executives can be configured to have write access to loans; however, most administrators prefer to turn off account executives’ write access.
Lender Employees (Lenders Only)
Lender Employees may include:
Underwriters
Closers
Post Closers
Lock Desk Staff
Openers
Secondary Marketing Staff
Funders
Accounting Staff
They have full access to all lender-side loans in the system. Each lender employee can have his or her own pipeline of loans or can search for loans in the system as needed. A lender employee may be part of a Queue and may belong to a Work Group (as explained in Chapter 9).

All information contained in this document is confidential and proprietary and may not be reproduced or disclosed to anyone not originally intended without the express written permission of Beanstalk Networks. © Beanstalk Networks. All rights reserved.
Page 14 of 216
Broker Companies
A Broker/Branch Company can be a wholesale or correspondent Broker/Branch Company or a retail branch-- depending on your company’s operations.
Originators, processors, and broker managers all belong to their assigned Broker/Branch Company.
Note: All broker users are assigned to one of three (3) levels.
BROKER USER LEVEL 1 (Branch/Broker Managers)
Broker User Level 1 users are branch or broker managers.
They can run pipeline reports on all loans within their branch or company and can re-assign loans from originators and processors as needed.
They are responsible for creating and managing their subordinate users (although they may receive assistance from administrators).
They can originate loans and register locks.
A Broker/Branch Company can contain more than one Broker User Level 1.
BROKER USER LEVEL 2 (Originators)
Broker User Level 2 users are loan originators.
They have access to loans in their pipeline only.
They can register loans for locks and floats.
They have the full power of the OpenClose origination system available to them for their loans.
BROKER USER LEVEL 3
Broker User Level 3 users.
They have access to loans in their pipeline only.
They have the full power of the OpenClose origination system available to them for their loans.
They cannot lock loans or submit loans.
The only difference between Broker User Level 2 and Broker User Level 3 is that Broker User Level 3 users cannot lock or submit loans.
All information contained in this document is confidential and proprietary and may not be reproduced or disclosed to anyone not originally intended without the express written permission of Beanstalk Networks. © Beanstalk Networks. All rights reserved.
Page 15 of 216
Workflow
Workflow is the movement of documents and/or tasks in a business process.
Workflow in OpenClose is configurable.
Your company’s workflow diagram will vary from the diagram in Figure 1.3.
There are two sides to the system, and each has a separate copy of the loan file:
Broker/Branch Side
Created when a loan is originated by a broker/branch user.
Lender Side
Created when a broker/branch user submits a lock registration or submits a loan to the lender.
Broker users work on the broker/branch copy of the file and submit changes as applicable (if permitted by the configuration established by your administrators) Lender users work on the lender copy of the loan.

All information contained in this document is confidential and proprietary and may not be reproduced or disclosed to anyone not originally intended without the express written permission of Beanstalk Networks. © Beanstalk Networks. All rights reserved.
Page 16 of 216
Figure 1.3 - Sample OpenClose Workflow Diagram
All information contained in this document is confidential and proprietary and may not be reproduced or disclosed to anyone not originally intended without the express written permission of Beanstalk Networks. © Beanstalk Networks. All rights reserved.
Page 17 of 216
Getting Around in OpenClose
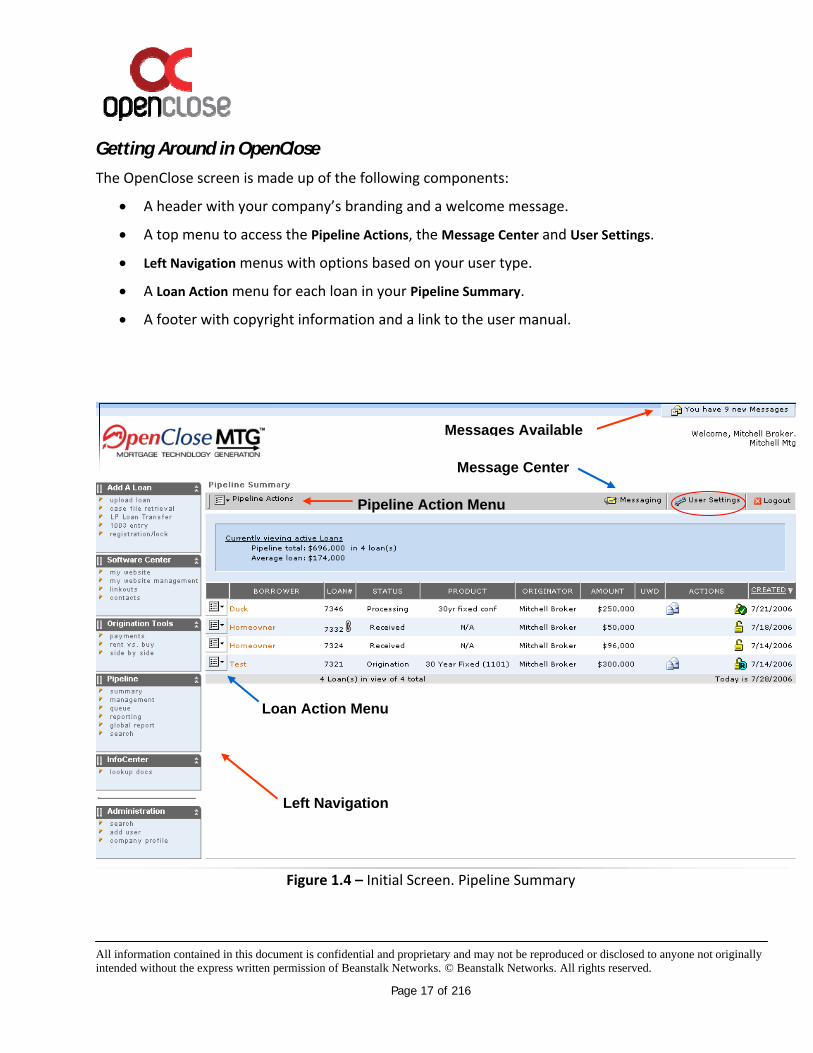
The OpenClose screen is made up of the following components:
A header with your company’s branding and a welcome message.
A top menu to access the Pipeline Actions, the Message Center and User Settings.
Left Navigation menus with options based on your user type.
A Loan Action menu for each loan in your Pipeline Summary.
A footer with copyright information and a link to the user manual.
Figure 1.4 – Initial Screen. Pipeline Summary
Left Navigation
Message Center
Loan Action Menu
Pipeline Action Menu
Messages Available

All information contained in this document is confidential and proprietary and may not be reproduced or disclosed to anyone not originally intended without the express written permission of Beanstalk Networks. © Beanstalk Networks. All rights reserved.
Page 18 of 216
2
Managing Your Account
Getting Started
An administrator or manager will create a login ID for you and give you the URL address to enter in Internet Explorer to reach your login page.
Once your account has been created, you will receive an automated e-mail message with your username and a temporary password. You will need this information to log in for the first time.
Logging In
To log in to your OpenClose account for the first time, you will need the username and temporary password that were e-mailed to you when your account was created.
Note: If this is your first time logging in you will be asked to choose a new password.
Open your Internet Explorer browser while connected to the Internet and go to the address that was provided to you in your account creation e-mail or use the address that was provided to you by your trainer or manager.
Figure 2.1 - OpenClose Login Area
Type your username into the login box and your password in the password box.
Click the Login button.
Audience: All

All information contained in this document is confidential and proprietary and may not be reproduced or disclosed to anyone not originally intended without the express written permission of Beanstalk Networks. © Beanstalk Networks. All rights reserved.
Page 19 of 216
Note: Passwords are case sensitive. A common mistake when logging in is typing the password while the caps lock is on. If you get a password error make sure your caps lock is not on.
Forgotten Passwords
If you forget your password, you may retrieve your password via e-mail. On the login screen below the Login button is a hyperlink to the forgot password screen.
Note: If you forget your password, use this tool! If you try to log in with a bad password three times in a row your account will be locked and an administrator or a Broker User Level 1 will have to reset your account.
Click forgot password (see Figure 2.1.)
This will take you to the reset password screen (see Figure 2.2).
Figure 2.2 - Reset Password Screen
For security purposes a randomly generated temporary password will be emailed to you. You will be required to change this password on your next login.
If the e-mail address associated with your profile is incorrect or your e-mail account is inaccessible you will not be able to retrieve your password via e-mail. Please contact your administrator.
Note: If you don’t see this email and your email has spam/junk filters, be sure to check if the password reset email was diverted by the spam/junk filter.

All information contained in this document is confidential and proprietary and may not be reproduced or disclosed to anyone not originally intended without the express written permission of Beanstalk Networks. © Beanstalk Networks. All rights reserved.
Page 20 of 216
Password criteria
Must be at least eight (8) characters. May not contain either your first or last name. May not be the same as any of your last five (5) passwords. Must meet three of the following criteria:
At least one uppercase character. At least one lowercase character. At least one numeric character. At least one special character (SHIFT-numeric)
Examples of good passwords are: GoodPassW1, goodPass!, Beanopen1
Note: your password will expire based on the settings configured by your administrator. When your password expires you will be asked to provide a new password the next time you log in.
Logging Out
You can end your session by clicking the Logout button located on the far right of the top menu.
If you are idle for twenty (20) minutes your session will end.
Figure 2.3 - Logging Out of OpenClose
Note: If you are editing 1003 data (see Chapter 4) and have not saved your changes and your login is idle for twenty minutes you may lose the changes you made on that page.
User Settings
You can make changes to many aspects of your user profile.
Many of the settings in this section can also be set globally by your system administrator.

All information contained in this document is confidential and proprietary and may not be reproduced or disclosed to anyone not originally intended without the express written permission of Beanstalk Networks. © Beanstalk Networks. All rights reserved.
Page 21 of 216
The settings you set for yourself take precedence over the administrator’s settings. For instance, if the administrator has set the number of messages per page to 10 and you change your individual setting to 20, then you will see 20 messages per page in the Message Center (see Site Preferences).
Click the User Settings button located in the top menu. The User Settings window will pop up (see Figure 2.5).
Figure 2.4 - Changing Your User Settings
Figure 2.5 - User Settings Tabs
User Information Tab
The User Information tab is where you provide your contact information.

All information contained in this document is confidential and proprietary and may not be reproduced or disclosed to anyone not originally intended without the express written permission of Beanstalk Networks. © Beanstalk Networks. All rights reserved.
Page 22 of 216
The most important part of your profile is your e-mail address. If your e-mail address is inaccurate, you will not be able to receive your password information for password resets and other important system notifications.
Password Tab
You can change your password at any time.
To change your password, you must provide your current password (for added security).
Link Outs Tab
Link Outs are hyperlinks to other websites that can be saved in your profile for easy access. The links you set here are available only to you.
Note: Link Outs can also be configured for everyone in the system by an administrator.

All information contained in this document is confidential and proprietary and may not be reproduced or disclosed to anyone not originally intended without the express written permission of Beanstalk Networks. © Beanstalk Networks. All rights reserved.
Page 23 of 216
Figure 2.6 - Link Outs
To use a Link Out, click on its name. The website will open in a new browser window.
For each Link Out you can take three actions by clicking on an action icon (see Figure 2.7).
Edit
Click on the pencil icon to edit the Link Out.
Deactivate
Click on the deactivate icon to deactivate the Link Out.
Delete
Click on the delete icon to delete the Link Out.
Figure 2.7 - Link Outs Action Icons
To create a new Link Out click on the New Link-Out button (see Figure 2.8).
Figure 2.8 - Create a New Link Out

All information contained in this document is confidential and proprietary and may not be reproduced or disclosed to anyone not originally intended without the express written permission of Beanstalk Networks. © Beanstalk Networks. All rights reserved.
Page 24 of 216
Enter a name for the Link Out in the Linkout Name text box.
For example: OpenClose Website
Enter the web address in the Linkout Destination text box.
For example: http://www.openclose.com
Check the Yes radio button under the Is this Link-Out active?
Click the Save Link-Out button at the bottom of the window.
Site Preferences Tab
Under the Site Preferences tab of User Settings you can define how many items show per page (see Figure 2.10).
You can choose between 10 to 50 items per page for loans in a Pipeline Summary or messages in the Message Center.
From the drop-down boxes, select the number of items to appear per page for each type of item.
The checkbox labeled restore default order of the menus allows you to return your left navigation options back to their default order.
You can change the order of the left navigation menus by clicking and dragging a menu section using the two vertical bars (see Figure 2.9).
Figure 2.9 - Click on the Vertical Bars to Move a Menu
The Site Preferences tab also lets you control how documents in your e-Doc Manager are displayed.
See Chapter 3 for details on the e-Doc Manager.
Expand All On Open
To have all e-Doc Manager tree-sections expanded by default.
Sort By Name

All information contained in this document is confidential and proprietary and may not be reproduced or disclosed to anyone not originally intended without the express written permission of Beanstalk Networks. © Beanstalk Networks. All rights reserved.
Page 25 of 216
Sort by Last Modified
You must click the Save Settings button in order for your changes to take effect.
Figure 2.10 - Site Preferences
Defaults
Most Defaults will be set by your administrator.
See Chapter 18 for more information about how to configure Defaults.
Note: The following three sections are for Origination Plus customers only. Origination Plus is an add-on module which provides a comprehensive digital library of forms, disclosures and

All information contained in this document is confidential and proprietary and may not be reproduced or disclosed to anyone not originally intended without the express written permission of Beanstalk Networks. © Beanstalk Networks. All rights reserved.
Page 26 of 216
verifications which are auto-populated with data from a loan and digitally stored in that loan’s e-
Doc Manager.
Closing Scenarios (Origination Plus Customers Only)
Closing costs scenarios are a powerful time-saver for loan originators and processors.
You can create different closing scenarios for common closing costs scenarios.
When you apply a scenario to a loan it auto-populates closing costs into the loan documents including the GFE and TIL (see Applying Closing Scenarios below).
The actions you can take on a closing scenario depend on the following:
Your user type
Who created the scenario
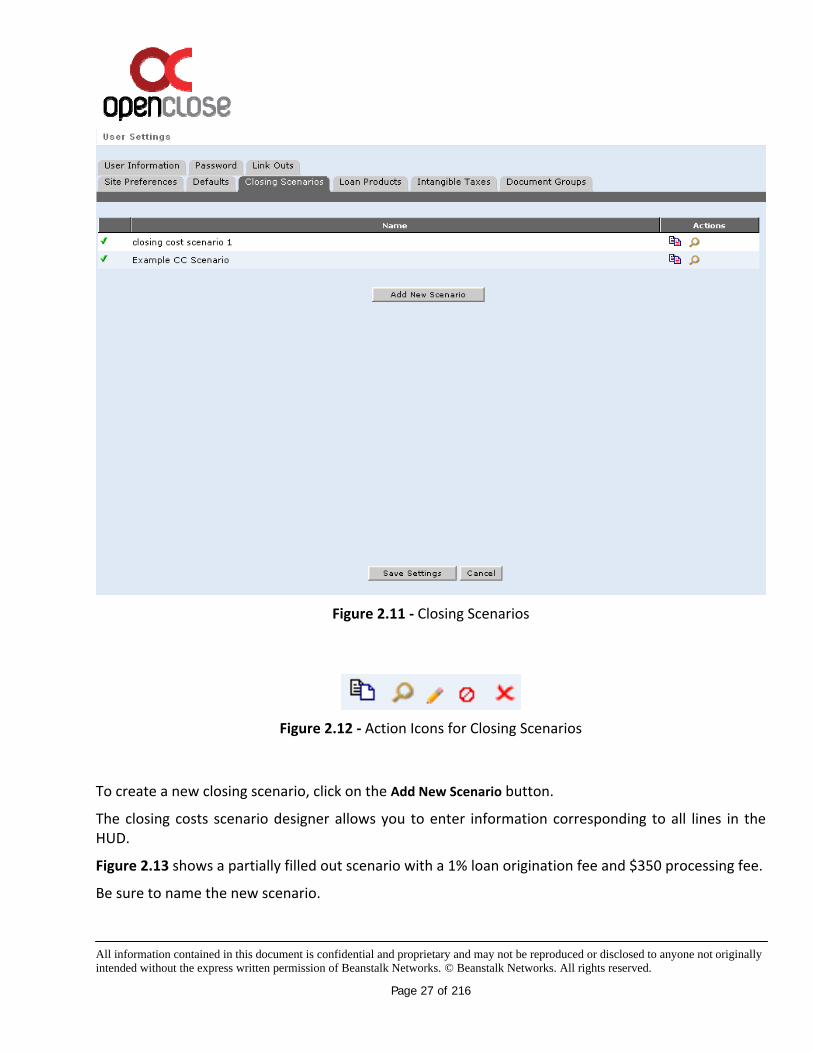
The following actions may be available (see Figure 2.11).
Copy
View
Edit
Deactivate
Delete
All information contained in this document is confidential and proprietary and may not be reproduced or disclosed to anyone not originally intended without the express written permission of Beanstalk Networks. © Beanstalk Networks. All rights reserved.
Page 27 of 216
Figure 2.11 - Closing Scenarios
Figure 2.12 - Action Icons for Closing Scenarios
To create a new closing scenario, click on the Add New Scenario button.
The closing costs scenario designer allows you to enter information corresponding to all lines in the HUD.
Figure 2.13 shows a partially filled out scenario with a 1% loan origination fee and $350 processing fee.
Be sure to name the new scenario.

All information contained in this document is confidential and proprietary and may not be reproduced or disclosed to anyone not originally intended without the express written permission of Beanstalk Networks. © Beanstalk Networks. All rights reserved.
Page 28 of 216
Click Save at the bottom of the screen when you are done and then remember to click Save Settings when finished with all closing scenarios changes.
Figure 2.13 - Creating a New Closing Scenario
APPLYING CLOSING SCENARIOS
To apply a closing scenario to a loan, you must apply a template while editing the loan.
From a loan’s Action Menu choose Edit Loan Info (see Figure 2.14).

All information contained in this document is confidential and proprietary and may not be reproduced or disclosed to anyone not originally intended without the express written permission of Beanstalk Networks. © Beanstalk Networks. All rights reserved.
Page 29 of 216
Figure 2.14 - To Apply a Closing Scenario or Loan Product You Must Edit the Loan
The first section of the Loan Info tab allows you to apply templates (see Figure 2.15).
Click on the magnifying glass icon and choose a closing costs scenario.
The loan will be updated with the information from the scenario.
Figure 2.15 - To Apply a Closing Scenario or Loan Product Click the Icon

All information contained in this document is confidential and proprietary and may not be reproduced or disclosed to anyone not originally intended without the express written permission of Beanstalk Networks. © Beanstalk Networks. All rights reserved.
Page 30 of 216
Loan Products (Origination Plus Customers Only)
The Loan Products tab is a powerful time-saver for loan originators and processors.
This feature is most useful for pre-populating rate caps, index, and margin information for commonly used ARM products. This will save time when creating your TIL forms.
When you apply a Loan Product to a loan, it auto-populates the loan specific information such as rate caps, indexes, and margins into the loan documents such as the TIL (see Applying Loan Products below.)
The actions you can take on a Loan Product depend on the following:
Your user type
Who created the loan product
The following actions may be available:
Copy
View
Edit
Deactivate
Delete
To create a new Loan Product click on the New Loan Product button.
Figure 2.16 - Loan Products
The loan product designer allows you to enter the following information:

All information contained in this document is confidential and proprietary and may not be reproduced or disclosed to anyone not originally intended without the express written permission of Beanstalk Networks. © Beanstalk Networks. All rights reserved.
Page 31 of 216
Loan Term
1st Adjustment Cap
Figure 2.17 shows a partially filled out new 5/1 interest-only ARM loan product with a 5% 1st adjustment cap and a 12 month adjustment period.
Be sure to name the new loan program.
Click Save at the bottom of the screen when you are entering a loan product done.
Click Save Settings when finished with all loan products changes.
Figure 2.17 - Creating a New Loan Product

All information contained in this document is confidential and proprietary and may not be reproduced or disclosed to anyone not originally intended without the express written permission of Beanstalk Networks. © Beanstalk Networks. All rights reserved.
Page 32 of 216
APPLYING LOAN PRODUCTS
To apply a loan product to a loan, you must apply a template while editing the loan.
From a loan’s Action Menu choose Edit Loan Info (see Figure 2.14).
The first section of the Loan Info tab allows you to apply templates (see Figure 2.15).
Click on the magnifying glass icon and choose a loan product.
The loan will be updated with the information from the scenario.
Document Groups (Origination Plus Customers Only)
The Document Groups tab allows you to group together different documents. The documents are auto-populated with data from the loan and can then be printed all at once or transferred to the e-Doc Manager. When sent to the e-Doc Manager, each document is placed in its appropriate folder.

All information contained in this document is confidential and proprietary and may not be reproduced or disclosed to anyone not originally intended without the express written permission of Beanstalk Networks. © Beanstalk Networks. All rights reserved.
Page 33 of 216
Figure 2.18 - Document Groups
USING DOCUMENT GROUPS
To use a Document Group, click on Document Groups from a loan’s Action Menu.
Select an existing Document Group from the dropdown box.
You can now print all of the documents together with the Print Preview button.
To change the order highlight a document in the Selected Documents box and click on the up/down arrows.
You can add all of the documents at once into the loan’s e-Doc Manager by clicking on Add to Folder.

All information contained in this document is confidential and proprietary and may not be reproduced or disclosed to anyone not originally intended without the express written permission of Beanstalk Networks. © Beanstalk Networks. All rights reserved.
Page 34 of 216
When added, the documents will appear in their appropriate folders and sub-folders.
To create a new Document Group, click on the Create a New Document Groups tab.
Enter a name for this new Document Group.
Select all of the documents by either double-clicking or by using the select arrow.
You can un-select documents by either double-clicking the document in the Selected
Documents box or by using the select arrow.
Select the Scope.
The scope determines whether the Document Group will be available for the current user only, or for the entire company.
Figure 2.19 - Using Document Groups

All information contained in this document is confidential and proprietary and may not be reproduced or disclosed to anyone not originally intended without the express written permission of Beanstalk Networks. © Beanstalk Networks. All rights reserved.
Page 35 of 216
Figure 2.20 - Printing Document Groups
Intangible Taxes
The Intangible Taxes tab allows users to create and save intangible tax scenarios for use on lines 1202 and 1203 of the GFE. This feature makes it easy to calculate and populate values for City, State and County taxes.
Click New to create a new Intangible Tax scenario.
Assign a name to the scenario.
Activate the scenario by clicking Yes for the Is this Intangible Tax active? button.
Click to make the scenario available to other users within your company if you desire.
Choose the correct state from the dropdown box. This will then populate the choices for city and county.
Enter the appropriate information for the tax calculations.
Click Save.

All information contained in this document is confidential and proprietary and may not be reproduced or disclosed to anyone not originally intended without the express written permission of Beanstalk Networks. © Beanstalk Networks. All rights reserved.
Page 36 of 216
Figure 2.21 - Using the Intangible Taxes Tab
Contacts
See Chapter 14 for information on contacts.

All information contained in this document is confidential and proprietary and may not be reproduced or disclosed to anyone not originally intended without the express written permission of Beanstalk Networks. © Beanstalk Networks. All rights reserved.
Page 37 of 216
3
The e-Doc Manger
The e-Doc Manager
The e-Doc Manager is the digital document folder for a loan file. All of a loan’s files and documents are digitally stored in the e-Doc Manager.
To access a loan’s e-Doc Manager, choose Loan Snapshot from the loan’s action menu. The e-Doc
Manager is located in the lower, right-hand corner of the Loan Snapshot screen.
Figure 3.1 – The e-Doc Manager
Date and Time Stamps
You will see either a date or a time on the right side of the e-Doc Manager for each document. If the document was created or last updated today, you will see a time stamp. If it was created or last updated on a previous day, you will see the date. All date and time stamps are in Eastern Time.
Audience:
ALL

All information contained in this document is confidential and proprietary and may not be reproduced or disclosed to anyone not originally intended without the express written permission of Beanstalk Networks. © Beanstalk Networks. All rights reserved.
Page 38 of 216
Accessing Documents
The e-Doc Manager is organized in a tree structure. Click the plus icon to expand, and click the minus icon to shrink. Once you have expanded a section of the e-Doc Manager tree, you will see the documents available. Click the magnifying glass icon to view a document. If a document does not have a magnifying glass icon next to it, they you must click the pencil icon to enter the document’s edit mode since calculations are required.
Editing Documents
To edit a document, click the pencil icon. Not all documents are editable.
When editing you can do the following:
Assign individual documents to individual borrowers.
Populate loan information based on calculations. For instance, you can set a loan origination fee of 1% while editing the GFE.
Printing and Emailing Documents
There are two ways to print a document from the e-Doc Manager. You can either view the document individually and print it from the view or edit screen, or you can use the print document icon to flag and print multiple documents.
Documents that do not have the print document icon to the left of their name must be viewed and printed individually. Most of these documents have a print button when in view mode.
To flag and print multiple documents, click on the print document icon so that it changes to a flagged print document icon. The Print link will appear in the top, right corner of the e-Doc
Manager. Click Print to generate the flagged document(s) in PDF file format for printing. The Print link will not appear until you flag at least one document for printing.
You can also email documents by flagging them and clicking on the Email link.
Note: Emailed documents are encrypted and password protected. You can change the password before you send the email, if you like. The default password used is the primary borrower’s social security number.

All information contained in this document is confidential and proprietary and may not be reproduced or disclosed to anyone not originally intended without the express written permission of Beanstalk Networks. © Beanstalk Networks. All rights reserved.
Page 39 of 216
Figure 3.2 - Printing and Emailing in the e-Doc Manager
Document History
Every time a document is saved, a new version is stored in the loan’s e-Doc Manager along with the name of the person who saved it. To access a file’s document history, click the plus sign icon next to the date stamp on the right side of the e-Doc Manager.
Figure 3.3 - Document History for the 1003
Some documents, such as the 1003, allow you to view previous versions. Click the View This
Version button. To revert to a previous version of the document, click the User This Version button.
Reverting to a previous version of a document makes updates the loan data to reflect that version.
You can compare the differences between two versions of a file by checking those versions and then clicking on Compare Versions. The Difference Report generated by this action may also be printed.

All information contained in this document is confidential and proprietary and may not be reproduced or disclosed to anyone not originally intended without the express written permission of Beanstalk Networks. © Beanstalk Networks. All rights reserved.
Page 40 of 216
Forms – Origination Plus Customers Only
Clients who purchase the Origination Plus module gain access to a library of forms including government forms, disclosures, state-specific forms, verifications, and other. When you add a form to a loan file, information from the loan auto-populates onto the form saving you time and reducing the risk of data entry errors.
In the e-Doc Manager section of the Loan Snapshot screen, click the Forms tab.
Figure 3.4 - Origination Plus Forms
Expand the forms options by clicking the plus icon where applicable.
Click one or more documents so that the document icon is checked.
Once you have selected all of the documents that you wish to add, click the Add To Folder
link that appears in the top right corner of the e-Doc Manager. The screen will reload and you will be taken to the Folder tab of the e-Doc Manager where the document(s) you selected will appear. Each form will be in its appropriate folder. For instance, if you add a state disclosure, the file will appear in the State Disclosure folder (which can be found under the General tab).
For data to auto-populate into a form, you must click the pencil icon.
Forms get their initial data from the 1003, TIL, and GFE – However, data entry and changes to these forms DO NOT change or update data on the 1003, TIL, and GFE.
Uploading Documents – Fax Module Customers Only
Customers who have purchased the Fax Module can upload digital documents to loans.
Click the Upload link located in the top right corner of the e-Doc Manager.

All information contained in this document is confidential and proprietary and may not be reproduced or disclosed to anyone not originally intended without the express written permission of Beanstalk Networks. © Beanstalk Networks. All rights reserved.
Page 41 of 216
Figure 3.5 - Upload Feature in the e-Doc Manager
In the Upload Document window that pops up, click the Browse button to locate the file you wish to upload. The supported file types are listed at the bottom of the window. Once you have located the file you wish to upload, double click it to push the file’s path into the textbox.
NOTE: Below are the suggested optimal DPI settings when scanning a document for upload:
When scanning to PDF: Scan your image at 72-150 DPI screen resolution. When scanning to JPG: Scan your image at 150 DPI. You may ZIP a Word or JPG file but not a PDF.
Figure 3.4 - Upload Tool

All information contained in this document is confidential and proprietary and may not be reproduced or disclosed to anyone not originally intended without the express written permission of Beanstalk Networks. © Beanstalk Networks. All rights reserved.
Page 42 of 216
Enter a name in the Enter the name… text box. The name that you provide will be used in the e-Doc Manager to identify the file.
Click the Upload button. Note that it may take several minutes for the file to upload if it is a large file. Once the file has uploaded, you will be taken to the loan’s e-Doc Manager where the file will appear under the Uploads section.
Figure 3.5 - An Uploaded Pay Stub
NOTE: Uploading a document places it in your e-Doc Manager. If you are a broker-side user and want the document to be available to the lender, you must send it using Submit Loan
to Lender (if you have not submitted the file yet) or using Update Lender (if you have already submitted the file).
If you are a lender-side user and want the file to be available to the originator you must check the box, Copy File to Originator (on the Upload Document screen popup screen).
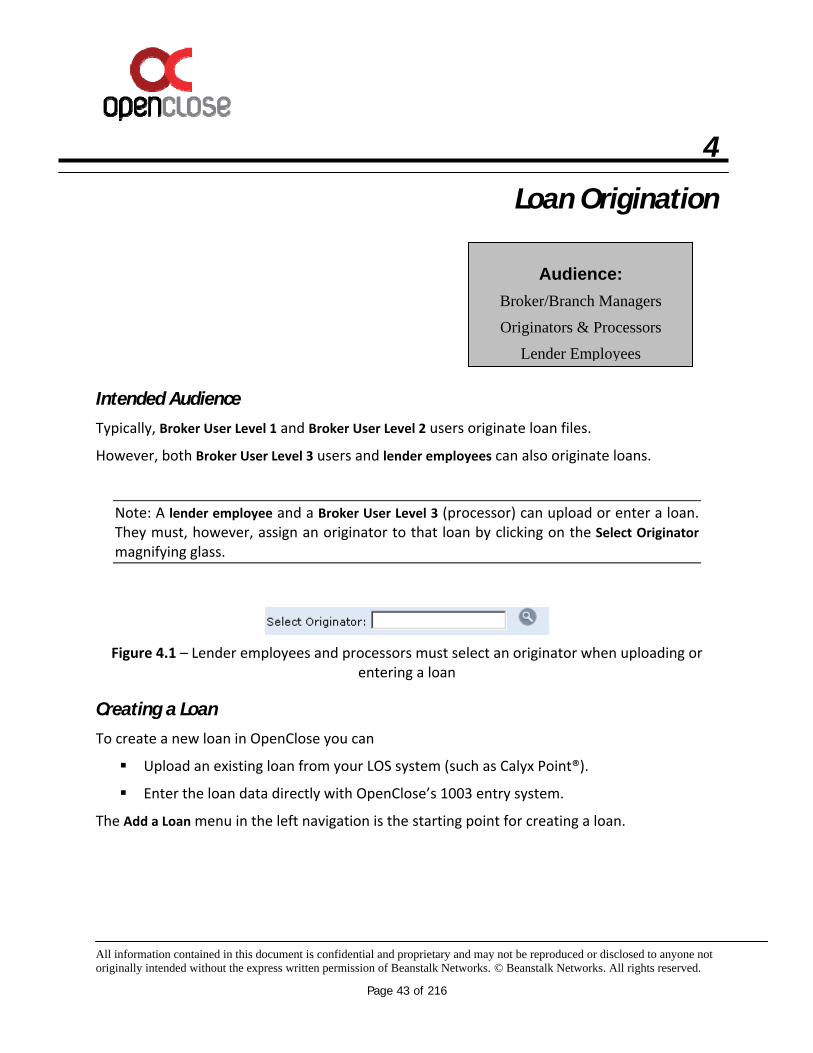
All information contained in this document is confidential and proprietary and may not be reproduced or disclosed to anyone not originally intended without the express written permission of Beanstalk Networks. © Beanstalk Networks. All rights reserved.
Page 43 of 216
4
Loan Origination
Intended Audience
Typically, Broker User Level 1 and Broker User Level 2 users originate loan files.
However, both Broker User Level 3 users and lender employees can also originate loans.
Note: A lender employee and a Broker User Level 3 (processor) can upload or enter a loan. They must, however, assign an originator to that loan by clicking on the Select Originator magnifying glass.
Figure 4.1 – Lender employees and processors must select an originator when uploading or entering a loan
Creating a Loan
To create a new loan in OpenClose you can
Upload an existing loan from your LOS system (such as Calyx Point®).
Enter the loan data directly with OpenClose’s 1003 entry system.
The Add a Loan menu in the left navigation is the starting point for creating a loan.
Audience:
Broker/Branch Managers
Originators & Processors
Lender Employees

All information contained in this document is confidential and proprietary and may not be reproduced or disclosed to anyone not originally intended without the express written permission of Beanstalk Networks. © Beanstalk Networks. All rights reserved.
Page 44 of 216
Figure 4.2 - Add a Loan Menu
Upload Loan
Use the Upload Loan option if you have already created a loan file outside of OpenClose with another loan origination software program.
The loan file should be in the industry standard Fannie Mae format (files ending in .fnm).
All LOS systems allow you to export a loan into the Fannie Mae file format (.fnm)
To upload a loan do the following:
In the Add a Loan menu in the left navigation choose Upload Loan.
Click the Browse button and locate the file on your computer. Double-click the file. You can select up to eight files in total, they will all be uploaded at the same time and assigned different loan numbers.
Click the Upload Loan(s) to Pipeline button. You will be taken to the Pipeline Summary screen where you will see the file(s) that you uploaded.
How to Export Files From Calyx Point™ into OpenClose
Point can convert any borrower or prospect file to a Fannie Mae format.
From Calyx Point:
Open a borrower or prospect file.
Click File->Export To->Fannie Mae 3.2 DO/DU (Local)...
In the Export 1003 data to Fannie Mae DO/DU window, the file name will be POINT.FNM. The location should be C:\Winpoint\Work. You can change the location if you prefer.
Change the first part of the name. For instance, change POINT.FNM to SmithJoe.FNM).

All information contained in this document is confidential and proprietary and may not be reproduced or disclosed to anyone not originally intended without the express written permission of Beanstalk Networks. © Beanstalk Networks. All rights reserved.
Page 45 of 216
Click Save.
A message reading "Exported to Fannie Mae file: " will appear. Click OK.
From OpenClose
In the Add a Loan menu in the left navigation choose Upload Loan.
Click the Browse button and locate the file you just saved. Double-click the file. You can select up to eight files in total, they will all be uploaded at the same time and assigned different loan numbers.
Click the Upload Loan(s) to Pipeline button. You will be taken to the Pipeline
Summary screen where you will see the file(s) that you uploaded.
Figure 4.3 – Calyx Export
How to Export Files From Encompass™ into OpenClose
From Encompass:
On your Pipeline select the loan to be exported.
On the Action Panel, select the My ePASS tab.

All information contained in this document is confidential and proprietary and may not be reproduced or disclosed to anyone not originally intended without the express written permission of Beanstalk Networks. © Beanstalk Networks. All rights reserved.
Page 46 of 216
Click the link to Fannie Mae DO for ePASS.
In the Fannie Mae DO Storefront click the link to Export Loan to Fannie Mae Format.
On the Save As dialog box select the folder in which you want to store the .fnm file.
In the File name field enter a file name for the .fnm formatted file.
From the Save as type list select Fannie Mae Version 3.2.
Click Save.
Click OK in response to the completion message. The exported file is now in the specified folder with the file name you assigned.
From OpenClose
In the Add a Loan menu in the left navigation choose Upload Loan.
Click the Browse button and locate the file you just saved. Double-click the file. You can select up to eight files in total, they will all be uploaded at the same time and assigned different loan numbers.
Click the Upload Loan(s) to Pipeline button. You will be taken to the Pipeline
Summary screen where you will see the file(s) that you uploaded.

All information contained in this document is confidential and proprietary and may not be reproduced or disclosed to anyone not originally intended without the express written permission of Beanstalk Networks. © Beanstalk Networks. All rights reserved.
Page 47 of 216
Figure 4.4 – Encompass Export
How to Export Files from Contour™ into OpenClose
From Contour:
While in the loan file click on the ePASS button.
Select DO Info and Services.
Select Export Loan to Fannie Mae Format.
Select Save As.
Choose a folder to save it to.
Click OK Export. Contour generates the file.
From OpenClose
In the Add a Loan menu in the left navigation choose Upload Loan.
Click the Browse button and locate the file you just saved. Double-click the file. You can select up to eight files in total, they will all be uploaded at the same time and assigned different loan numbers.
Click the Upload Loan(s) to Pipeline button. You will be taken to the Pipeline
Summary screen where you will see the file(s) that you uploaded.
How to Export Files from Genesis 2000™ into OpenClose
From Genesis:
While in the main menu, go to Export.
Select FNMA 3.0/3.2 Link.
Select File mode: Processing.
Go to Pipeline, select Borrower.
Select Save As. Choose a folder to save it to.
The error log will be displayed.
Genesis generates the .fnm file.
From OpenClose
In the Add a Loan menu in the left navigation choose Upload Loan.

All information contained in this document is confidential and proprietary and may not be reproduced or disclosed to anyone not originally intended without the express written permission of Beanstalk Networks. © Beanstalk Networks. All rights reserved.
Page 48 of 216
Click the Browse button and locate the file you just saved. Double-click the file. You can select up to eight files in total, they will all be uploaded at the same time and assigned different loan numbers.
Click the Upload Loan(s) to Pipeline button. You will be taken to the Pipeline
Summary screen where you will see the file(s) that you uploaded.
How to Export Files from Byte™ into OpenClose
From Byte:
While in the loan you want to submit click Communications, Lenders.
Select Interface.
Click Export Fannie Mae File.
Open Interface.
Set the Validation Method to Underwriting Validation.
Set the File Version to Version 3.0.
Click Create File.
If errors are found click Close & Fix Errors.
Supply the required information. Byte will create the Fannie Mae file and display its location.
From OpenClose
In the Add a Loan menu in the left navigation choose Upload Loan.
Click the Browse button and locate the file you just saved. Double-click the file. You can select up to eight files in total, they will all be uploaded at the same time and assigned different loan numbers.
Click the Upload Loan(s) to Pipeline button. You will be taken to the Pipeline
Summary screen where you will see the file(s) that you uploaded.
1003 Entry
You can originate loans in OpenClose without the use of any other loan origination software.
In the Add a Loan menu in the left navigation choose 1003 Entry.

All information contained in this document is confidential and proprietary and may not be reproduced or disclosed to anyone not originally intended without the express written permission of Beanstalk Networks. © Beanstalk Networks. All rights reserved.
Page 49 of 216
Provide information about the primary borrower. Fields marked with an asterisk are required.
Click the Save and Edit Loan button. You will be taken to the Edit 1003 screen where you can provide additional information about the file.
See Edit 1003 later in this chapter for details on the 1003 Entry screens.
Figure 4.5 – Add a Loan
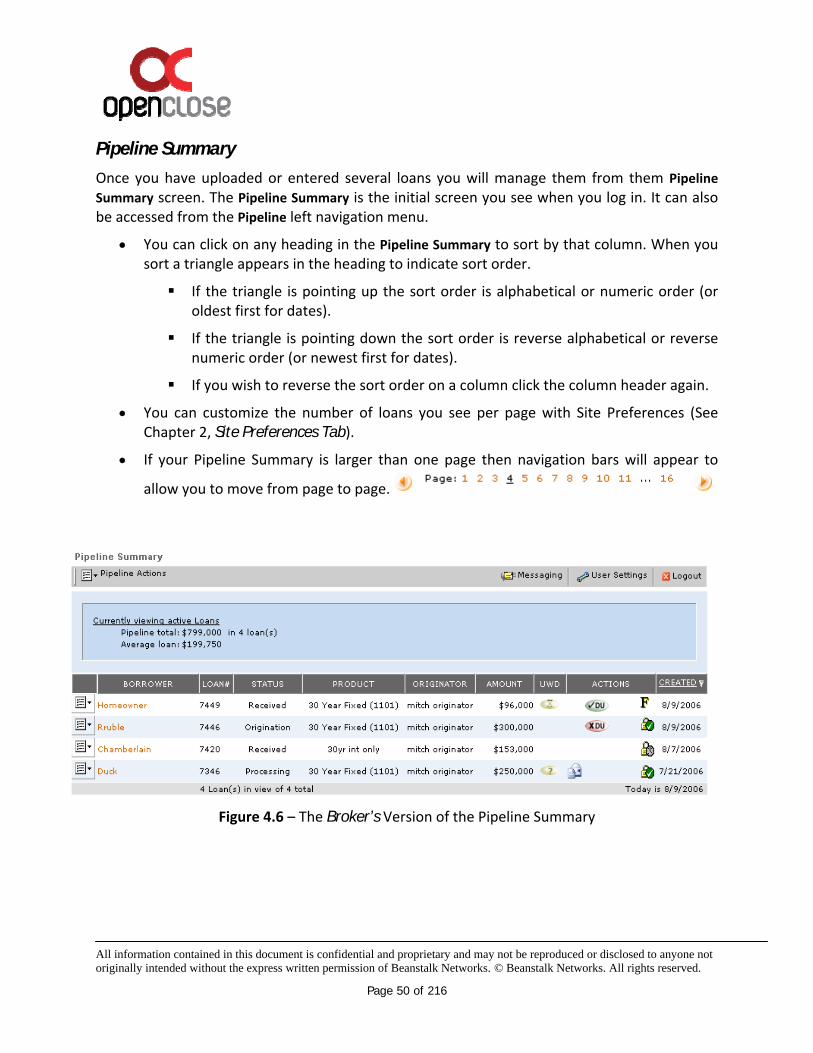
All information contained in this document is confidential and proprietary and may not be reproduced or disclosed to anyone not originally intended without the express written permission of Beanstalk Networks. © Beanstalk Networks. All rights reserved.
Page 50 of 216
Pipeline Summary
Once you have uploaded or entered several loans you will manage them from them Pipeline
Summary screen. The Pipeline Summary is the initial screen you see when you log in. It can also be accessed from the Pipeline left navigation menu.
You can click on any heading in the Pipeline Summary to sort by that column. When you sort a triangle appears in the heading to indicate sort order.
If the triangle is pointing up the sort order is alphabetical or numeric order (or oldest first for dates).
If the triangle is pointing down the sort order is reverse alphabetical or reverse numeric order (or newest first for dates).
If you wish to reverse the sort order on a column click the column header again.
You can customize the number of loans you see per page with Site Preferences (See Chapter 2, Site Preferences Tab).
If your Pipeline Summary is larger than one page then navigation bars will appear to
allow you to move from page to page.
Figure 4.6 – The Broker’s Version of the Pipeline Summary

All information contained in this document is confidential and proprietary and may not be reproduced or disclosed to anyone not originally intended without the express written permission of Beanstalk Networks. © Beanstalk Networks. All rights reserved.
Page 51 of 216
Pipeline Statistics
At the top of the Pipeline Summary screen are pipeline statistics. The default Pipeline Summary view shows active loans only; therefore the statistics comprise figures on active loans only. If you change your Pipeline Summary view the statistics will adjust to calculate based on your selection.
Figure 4.7 - Pipeline Summary Statistics for Active Loans
Lender’s Version of the Pipeline Summary
The Pipeline Summary screen is slightly different for lender users. As you can see from Figure 4.8, if you are a lender user then your Pipeline Summary has two extra columns which are not available to broker users:
The Broker Loan Number column (BR LOAN#).
Remember that there are two copies of a loan; the broker-side and the lender-side. A lender employee has access to both copies from their Pipeline Summary.
The ASSIGNED Column.
The date/time this loan was assigned to you. This may be the time you took this loan off of a Queue or the time the loan was sent directly to you by another user.
Figure 4.8 – The Lender’s Version of the Pipeline Summary
All users other than Administrators have their own pipeline of loans.
By default you always view your active loans only. Active loans are loans that do not have a status of Cancelled or Closed.
You can select a different view option from the Pipeline Action menu if you wish to view prospect, cancelled, or closed loans, however each time you return to the Pipeline Summary screen your view will revert to active loans only.
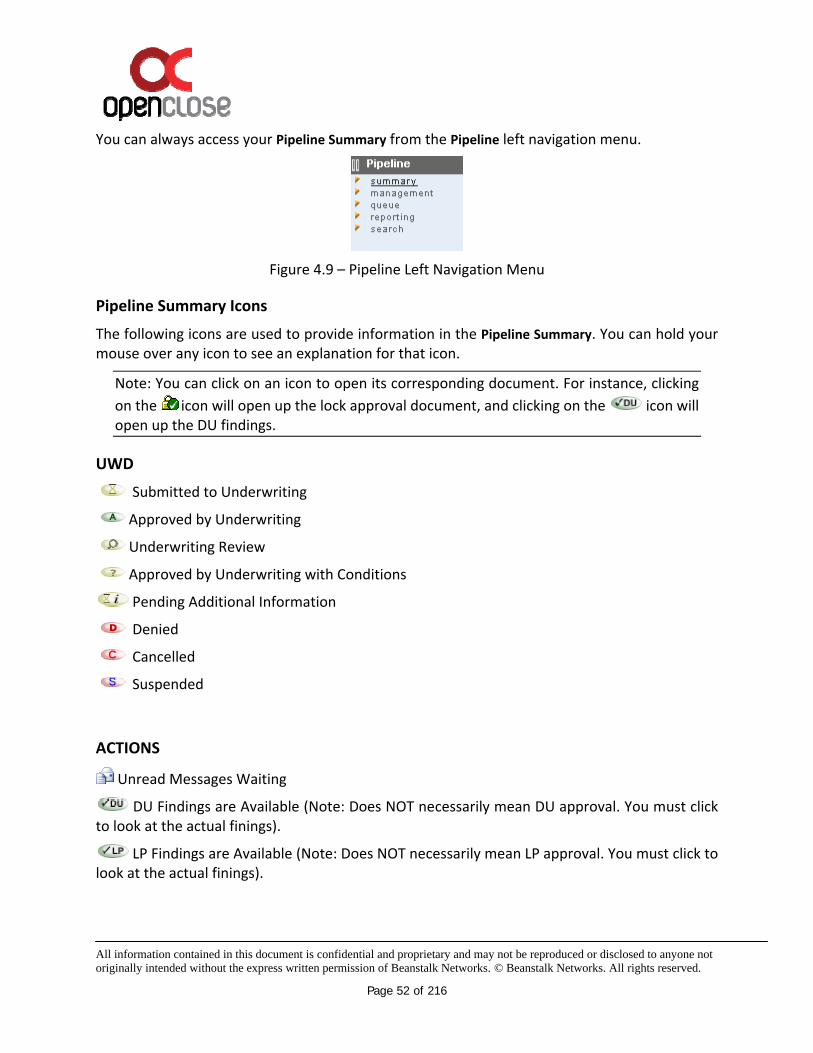
All information contained in this document is confidential and proprietary and may not be reproduced or disclosed to anyone not originally intended without the express written permission of Beanstalk Networks. © Beanstalk Networks. All rights reserved.
Page 52 of 216
You can always access your Pipeline Summary from the Pipeline left navigation menu.
Figure 4.9 – Pipeline Left Navigation Menu
Pipeline Summary Icons
The following icons are used to provide information in the Pipeline Summary. You can hold your mouse over any icon to see an explanation for that icon.
Note: You can click on an icon to open its corresponding document. For instance, clicking
on the icon will open up the lock approval document, and clicking on the icon will open up the DU findings.
UWD
Submitted to Underwriting
Approved by Underwriting
Underwriting Review
Approved by Underwriting with Conditions
Pending Additional Information
Denied
Cancelled
Suspended
ACTIONS
Unread Messages Waiting
DU Findings are Available (Note: Does NOT necessarily mean DU approval. You must click to look at the actual finings).
LP Findings are Available (Note: Does NOT necessarily mean LP approval. You must click to look at the actual finings).

All information contained in this document is confidential and proprietary and may not be reproduced or disclosed to anyone not originally intended without the express written permission of Beanstalk Networks. © Beanstalk Networks. All rights reserved.
Page 53 of 216
DO Findings are Available (Note: Does NOT necessarily mean DO approval. You must click to look at the actual finings).
DU Response Error
LP Response Error
DO Response Error
LOCK REGISTRATION ACTIONS
Pipeline Search
To search choose Search Loans from the Pipeline Actions menu or Search from the Pipeline left navigation menu.
If you are a broker user you can search for loans in your pipeline only.
Not Locked – You have not yet submitted a registration (float or lock) on this file
Float Requested – You have submitted a float request but have not yet received a response
Float Approved As Is – Your float has been accepted without any changes
Float Approved with Changes – Your float has been accepted but with changes; view theLock Response to see the changes highlighted in bold, red text and marked with a red asterisk
Float Referred – Your float request requires additional information; view the Lock Responsefor comments from the lock desk
Float Denied – Your float request has been denied; view the Lock Response for commentsfrom the lock desk
Lock Requested – You have submitted a lock request but have not yet received a response
Lock Approved As Is – Your lock has been accepted without any changes
Lock Approved with Changes – Your lock has been accepted but with changes; view the Lock Response to see the changes highlighted in bold, red text and marked with a red asterisk
Lock Referred – Your lock request requires additional information; view the Lock Responsefor comments from the lock desk
Lock Denied – Your lock request has been denied; view the Lock Response for comments from the lock desk
Lock Expiring – Your lock is due to expire in one week
Lock Expired – Your lock has expired

All information contained in this document is confidential and proprietary and may not be reproduced or disclosed to anyone not originally intended without the express written permission of Beanstalk Networks. © Beanstalk Networks. All rights reserved.
Page 54 of 216
If you are an Account Executive you will be able to search for loans in your pipeline only.
If you are a Lender Employee you will be able to search for any loan.
If you are a Lender Manager you will be able to search for any loan file that belongs to your assigned Account Executives.
If you are an administrator you can search for any loan, any person, and any company (branch) in the system.
Provide a value for at least one of the three search criteria and click the Search button. You can click on a borrower’s name to access the loan file’s Loan Snapshot screen.
Figure 4.10 - Loan Search Criteria
The Loan Action Menu
Each loan in a user’s Pipeline Summary has an action menu located to the left of the primary borrower’s last name. The exact list of actions you see on your menu may differ from those in the figures below due to the fact that your administrator can turn make changes to this through the Navigation Defaults administrator functionality.
When you click the Action Menu icon the action menu will expand.
Figure 4.11 lists a typical set of loan actions for a broker user.
Figure 4.12 lists a typical set of loan actions for a lender employee.
Not all options are available all of the time and may appear grayed out. You may, for instance:
Already be on the referenced page. Since you are already there, it is grayed out.
Have read-only access to the file.
Not be allowed to use the function based on the loan’s position within the workflow.

All information contained in this document is confidential and proprietary and may not be reproduced or disclosed to anyone not originally intended without the express written permission of Beanstalk Networks. © Beanstalk Networks. All rights reserved.
Page 55 of 216
Figure 4.11 - Loan Actions
for Broker Users
Figure 4.12 – Additional Loan Actions for Lender Users

All information contained in this document is confidential and proprietary and may not be reproduced or disclosed to anyone not originally intended without the express written permission of Beanstalk Networks. © Beanstalk Networks. All rights reserved.
Page 56 of 216
Loan Actions:
This section outline the loan actions are available to a user from the loan action menu of a loan.
These loan actions are covered in detail in the remainder of this chapter.
The loan actions available are as follows:
Pipeline Summary A detailed summary of all loans in a user’s pipeline.
Loan Snapshot A snapshot view containing specific details for a loan. Allows access to the e-Doc
Manager. Loan History
The Loan History page is a useful tool for tracking where the file has been, what time changes were made, and who made any changes to the file.
Edit Loan Info This feature is available to Origination Plus customers only. The Loan Info screen tracks a subset of loan information and allows you to apply Closing
Scenario and Loan Product templates to your loan file.
Figure 4.13 – Use Loan Info to Apply Closing Scenarios and Loan Products To select a template, either Closing Cost or Loan Product, click the applicable magnifying
glass icon. In the window that appears, choose an option and click the Select button. Be sure to save your changes by clicking the save loan info icon at the top of the screen or clicking the Save button at the bottom of the screen.
Document Groups This feature is available to Origination Plus customers only. This feature allows you to create groups of commonly used documents, such as the
1003, GFE, TIL and mortgage broker business contract. All documents in a group can be printed together.
Edit 1003 This is the main screen used to enter the loan application data.

All information contained in this document is confidential and proprietary and may not be reproduced or disclosed to anyone not originally intended without the express written permission of Beanstalk Networks. © Beanstalk Networks. All rights reserved.
Page 57 of 216
View 1003 The View 1003 screen is OpenClose allows a user to look at the data in a 1003 without
making changes. This screen is most used by users who have read-only access to a loan file.
Copy Loan The Copy Loan function allows for the creation of a new loan in OpenClose using data
from the source loan’s 1003. Edit GFE
Create and edit the Good Faith Estimate document. Edit TIL
Create and edit the Truth in Lending document. Fee Sheet
Create and edit the Fee Sheet. HMDA
Accesses the HMDA screen to enter data for the Home Mortgage Disclosure Act (HMDA).
HMDA is not a printable form but is rather, a collection of data needed for reporting. Export Loan
To export a loan file from OpenClose, choose the Export Loan option from the loan’s action menu. You can export a loan file in Fannie Mae (version 3.2) format.
Update Loan If you wish to update the 1003 data on a file in OpenClose after you have uploaded or
keyed in the original file, use Update Loan to upload a file in Fannie Mae file format to overwriting the existing 1003 data.
Cancel Loan To change a loan’s status to Canceled or Closed without going to the Loan Snapshot
screen, choose Cancel Loan or Close Loan from the loan’s action menu. These options may be disabled based on the loan’s place in the workflow.
Close Loan To change a loan’s status to Canceled or Closed without going to the Loan Snapshot
screen, choose Cancel Loan or Close Loan from the loan’s action menu. These options may be disabled based on the loan’s place in the workflow.
Submit To Processor Send the file to a broker/branch-side processor. Available to retail businesses only.
Send To Queue Sends the loan to the specified Queue. You will no longer have ownership of this file after sending it to a Queue. The file will no longer appear in your pipeline.
Processing

All information contained in this document is confidential and proprietary and may not be reproduced or disclosed to anyone not originally intended without the express written permission of Beanstalk Networks. © Beanstalk Networks. All rights reserved.
Page 58 of 216
This action takes you to the processing screen where you can perform processing activities such as ordering appraisals.
Loan Contacts This action takes you to the Contacts screen where you can view contacts and assign
them to your loan. Fax Cover
The Fax Module is an add-on module to OpenClose. It allows you to fax documents into the e-Doc Manager where they will become digital documents associated with the loan.
Price/Lock This action allows you to obtain pricing information from either Decision Assist or UniFi,
and to register a loan as a lock or float through those systems. Lock Form
This action allows you to fill out a lock request form and submit the form to the lock desk.
Order Credit This action allows you to interface with credit agencies and to order credit reports from
within OpenClose. Submit Loan To Lender
This action sends the loan file to the lender for underwriting. This action also creates the lender’s copy of the loan.
Submit to AU This action allows you to interface with automated underwriting agencies to order AU
and credit for a loan from within OpenClose. Supported AU systems are DU, DO and LP.
Update Lender Allows the originator to update the lender with any new or changed documents that
reside in the originator’s e-Doc Manager. Merge Liabilities
This action is only available after Order Credit has returned credit findings. This action merges liabilities from the credit report into the loan’s liabilities section.
Lender Users may also see the following (which are covered in detail in Chapters 9, 10 and 17):
Transfer Loan
Once your work on a loan file is complete or if you wish to have another user work on the file you can transfer it to another user.
The loan file will be removed from your pipeline.
Release Loan

All information contained in this document is confidential and proprietary and may not be reproduced or disclosed to anyone not originally intended without the express written permission of Beanstalk Networks. © Beanstalk Networks. All rights reserved.
Page 59 of 216
If you are a Lender Employee with a share on a file you may wish to release your share so that the loan no longer appears in your personal Pipeline Summary screen.
Be Originator
This action allows a lender employee to masquerade as an originator.
Underwriting
This action allows underwriters to underwrite a loan and return an underwriting decision to the originator.
Update Originator
This action allows a lender employee to update an originator with any changes or comments they may have on the originator’s loan file.
Secondary Marketing
This action accesses the Secondary Marketing screen.
Closing
This action accesses the Closing screen.
Post Closing
This action accesses the Post Closing screen.
Funding
This action accesses the Funding screen.
Accounting
This action accesses the Accounting screen.
Lock Response
This action allows the lock desk to issue a lock response to an originator’s lock request.
Loan Snapshot
The Loan Snapshot screen is one of the most useful screens for a loan file.
It contains a snapshot of:
Borrower information.
Loan information.
Loan actions.
The e-Doc Manager.

All information contained in this document is confidential and proprietary and may not be reproduced or disclosed to anyone not originally intended without the express written permission of Beanstalk Networks. © Beanstalk Networks. All rights reserved.
Page 60 of 216
Figure 4.14: Loan Snapshot Screen for a Broker User
Borrower Information
The Borrower Information section of the Loan Snapshot screen gives information about the primary borrower (name, social security number, and phone numbers), as well as the property address taken from the 1003 if it has been provided.
Loan Information
The Loan Information section of the Loan Snapshot screen provides some key information about the loan without having to access the full 1003. The Created field indicates the date that the file was uploaded or keyed into OpenClose. The Application field is a date field that a broker user may complete to indicate when the file became an application. Type the date into the box and click the check icon to save the value.
The AU Decision field shows an icon if automated underwriting has been run on the file. An icon with a green checkmark indicates that the transaction was successful, and an icon with a red X indicates that the transaction failed. The icon does not provide information about the findings themselves. See the Pipeline Summary section above for details on the icons.

All information contained in this document is confidential and proprietary and may not be reproduced or disclosed to anyone not originally intended without the express written permission of Beanstalk Networks. © Beanstalk Networks. All rights reserved.
Page 61 of 216
Loan Amount, Purchase Price, Appraised Value, Interest Rate, Term, Monthly Payment, Loan Purpose, Down Payment, Occupancy, Top, Bottom, LTV, and CLTV all come from the loan’s 1003. The Product field comes from the product that the originator selected during registration.
NOTE: The Interest Rate and Term fields come from the loan’s 1003, not from registration of the loan. Broker users are responsible for making sure that the values in the loan’s 1003 are consistent with the registration information. OpenClose does not synchronize these fields between the registration and the 1003 in order to allow the broker user to run scenarios without affecting the 1003.
Loan Status
Loan Status is the status of the loan file.
While you are originating a loan you can manually change the status. For instance, you may keep a file as a Prospect and then change its status to Active.
Once a loan is submitted to underwriting the status can no longer be manually changed. The system will automatically update the status field as the status of the loan changes. For instance, once the loan is underwritten and approved the status will change to UW-Approved.
Some workflow functions will automatically adjust the status. Some third-party interfaces will adjust the loan status for you. To manually change the status of the loan, select a different option from the drop-down box. The Loan Snapshot screen will refresh, saving your selection. When working with a prospect file, remember to change the status of the loan to Prospect until the loan becomes Active in your pipeline.
STATUSES
Some of the statuses you see in the Status dropdown box are unique to your installation. The following are the standard statuses you will see:
Manual Statuses
Received
Prospect
Processing
Origination
Cancelled
Automated Statuses

All information contained in this document is confidential and proprietary and may not be reproduced or disclosed to anyone not originally intended without the express written permission of Beanstalk Networks. © Beanstalk Networks. All rights reserved.
Page 62 of 216
Status Action Lender Took To Trigger Status
UW-Approved Status upon underwriting response – approved
UW-Suspended Status upon date entered on UW worksheet tab suspended date field
UW-Denied Status upon date entered on UW worksheet tab denied date field
UW-Cancelled Status upon date entered on UW worksheet tab cancelled date field
Docs-Ordered Status upon date entered on Closing form docs ordered date field
Docs-Drawn Status upon date entered on Closing form docs drawn date field
Docs-Sent Status upon date entered on Closing form docs sent date field
Funded Status upon date entered on Funding form funded date field
Purchased Status upon date entered on Accounting form funded date field
Shipped Status upon date entered on Post Closing form Shipped To Investor date field
Reconciled Status upon date entered on Accounting form Reconciliation date field
Closing Request
Figure 4.15 – Closing Request
The Closing field can be used in two different ways depending upon how your administrator has set up your system.
WITHOUT WORKFLOW
The Closing field is a date field that a broker user may complete to indicate the estimated closing date for the loan. Type the date into the box and click the check icon to save the value.
WITH WORKFLOW
If your administrator has configured closing workflow for this feature then this field is used in a different way.
Click on the green checkbox and you will see the send closing request screen. From this screen you can enter closing request information such as the date and contact information for the closing agent.
When you click on Submit, a closing request document will be created. This closing request document will be automatically sent to the closing person or Queue (as determined by the administrator). The document will also be available in the e-Doc Manager under Findings.

All information contained in this document is confidential and proprietary and may not be reproduced or disclosed to anyone not originally intended without the express written permission of Beanstalk Networks. © Beanstalk Networks. All rights reserved.
Page 63 of 216
Action (broker users)
The Action section of the Loan Snapshot screen appears for broker users only and provides a mini checklist of actions that have been taken on the file. The Order Credit bubble will be checked if credit has been ordered on the file. The Submit to AU bubble will be checked if automated underwriting findings have been requested in one of the AU interfaces in OpenClose. The Send to Lender bubble will be checked if the loan has been submitted by the broker user to the lender using Submit Loan to Lender.
Workflow Locator (lender users)
The Workflow Locator section of the Loan Snapshot screen is available to lender users only. It shows where various shares of the lender copy of the file are located. The name under Location for the Lender purpose indicates which user or Queue has the file due to the broker user’s Submit Loan to Lender action.
Note: a share is a lender “copy” of the loan. For instance, there can be an underwriting share and a lock share and an account exec share all on the same loan. But, there can only be one of each share at a time. That is, there can never be two underwriting shares at once. See Chapter 10 for details.
The name under Location for the Lock purpose indicates what user or Queue has the file to the broker user’s registration of the file. Companies who use a third-party system for registration will not see a Lock purpose option.
Figure 4.16 - Workflow Locator for Lender Users
Edit 1003
The OpenClose 1003 is organized into multiple tabs that coincide with the sections of the 1003 plus three extra tabs to store additional information on the loan file.

All information contained in this document is confidential and proprietary and may not be reproduced or disclosed to anyone not originally intended without the express written permission of Beanstalk Networks. © Beanstalk Networks. All rights reserved.
Page 64 of 216
Figure 4.17 - Tabs of the 1003
NOTE: Changes to any area of the 1003 will not be saved unless you click the Save button. If you attempt to change screens using the loan’s action menu while working on the 1003, all items will be grayed out to remind you to save your changes.
Types & Terms
The Types & Terms tab of the OpenClose 1003 coincides with the Types & Terms section of the 1003.
The Top, Bottom, LTV, and CLTV ratios are auto-calculated based on values provided in various areas of the 1003. Auto-calculated values are not editable manually.
If you select a value for Loan Position of Secondary or Other, you will be provided with the Other Mortgages field.
The Interest Only field affects calculations on the 1003 as appropriate.
If the Interest Only field is checked “Yes”, then the PI (principal & interest) calculations will calculate as interest only. The monthly payments will reflect interest only.
If Edit TIL is used to create an interest only loan, then the Interest Only field will no longer appear on the Types & Terms tab.
Property
The Property tab of the 1003 in OpenClose provides fields for information about the property and the purpose of the loan.
If you wish to copy the property address to the real estate section of the 1003, click the Copy
Property Address to Assets REO link near the top of the screen.
When you provide a zip code for the property address and move on to the next field, the city, county, and state will auto-populate. Note that there are many locations in the US where one zip code represents several cities. Should the field not populate with the intended city, you can overwrite the values manually.
If you choose Refinance as your loan purpose, your screen will change to show you fields associated with a refinance. The Purpose of Refinance field provides a list of refinance types. If you will be running automated underwriting on the file, you may need to adjust your Purpose of Refinance selection to work with the AU vendor.

All information contained in this document is confidential and proprietary and may not be reproduced or disclosed to anyone not originally intended without the express written permission of Beanstalk Networks. © Beanstalk Networks. All rights reserved.
Page 65 of 216
If you choose Construction or Construction Other as your loan purpose, your screen will change to show you fields associated with a construction loan.
If you choose Other as your legal description value, you will be presented with a free-form text box to enter the full legal description of the property.
By default, OpenClose provides you with one title holder field for each borrower on the file. To add additional title holder fields, click the plus sign icon next to Add New Title Holder Section(s) near the top of the screen.
Borrower Info
OpenClose supports multiple borrowers on a loan file. Borrowers are stored in borrower and co-borrower pairs. You may have up to eight pairs for a loan.
Figure 4.18 - Borrower Section of the 1003
To add a new borrower/co-borrower pair, click the plus sign icon next to Add New Borrower(s).
You can edit only one borrower/co-borrower pair on the screen at a time. The pair that you are editing is flagged with a green checkmark icon near the top of the screen. To change the borrower/co-borrower pair that you wish to edit, click the name of the other borrower or borrower/co-borrower pair.
To delete a borrower, check the Delete check box and save the 1003.
NOTE: You cannot delete the primary borrower. If the primary borrower has changed, you will need to edit that borrower’s information to reflect the new primary borrower.
When you provide a zip code for a borrower’s address and move the cursor to another field, the city and state will auto-populate. You can change the auto-populated values if you wish.
By default, fields for one address for a borrower are provided. To add one or more addresses for a borrower, click the plus sign icon next to Add New to add another set of address fields.
To copy the borrower’s address and phone to his or her co-borrower click the Copy Address and
Phone to Co-Borrower link.

All information contained in this document is confidential and proprietary and may not be reproduced or disclosed to anyone not originally intended without the express written permission of Beanstalk Networks. © Beanstalk Networks. All rights reserved.
Page 66 of 216
This link will only appear after a social security number has been entered for the co-borrower. If the social security number is removed, the link will also be removed.
To copy the borrower’s address as the subject property click the Copy Address to Property link.
To delete a borrower’s address check the Delete this Address box and save the 1003.
Go to a borrower’s Details tab to access non-address information about the borrower.
Figure 4.19 - Accessing Address, Details, and Identification for a Borrower
To auto-calculate a borrower’s age, provide his or her birth date in the Date of Birth box and move your mouse cursor to another field.
To provide a borrower’s dependants’ ages, provide a value other than 0 in the Number of Dependants box and move your mouse cursor to another field.
To track that you’ve verified a borrower’s identification, access the Identification tab. If you do not see an identification type that you need, contact your Administrator to have it added.
To swap the borrower and co-borrower on the loan file, click on the Swap & Save button; found in the upper left hand corner of the co-borrower section of the Borrower Info tab.
Figure 4.20 – Swap & Save
Employment
The Employment section of the 1003 provides you with the fields you need to track employment information about any of the loan’s borrowers.
To add an employment record, click the plus sign icon next to Add New Employment Section(s). Choose the number of employment records to add in the first drop-down box, and then choose
the borrower for the employment records in the second drop-down box. Click the GO icon to add the employment record fields.

All information contained in this document is confidential and proprietary and may not be reproduced or disclosed to anyone not originally intended without the express written permission of Beanstalk Networks. © Beanstalk Networks. All rights reserved.
Page 67 of 216
Figure 4.21 - Adding Employment Records
After providing the zip code for an employer’s address, move your mouse cursor to another field to auto-populate the city and state. You can change the values of the city and state if you wish.
If the borrower is self-employed, you will be asked to provide the percentage of the business owned.
If the employment record is the borrower’s present employer, you will provide the income information in the Income section of the 1003. For past positions, you will provide the income information along with the employment record.
To delete an employment record, check the Delete box and save the 1003. If the Delete box does not appear, then you have added a record that has not yet been saved.
Origination Plus Customers Only: To create an employment verification for an employment record, check the Create Verification check box then click the Create Selected Verifications link. The verification document will appear in the e-Doc Manager in the loan’s Loan Snapshot screen under Processing Verifications Request for Verification of Employment.
If you do not see the Create Verification check box next to an employment record, save the 1003 first.
Income
The Income section of the 1003 provides you with the fields you need to track income information for any of the loan’s borrowers.
To add an income record, click the plus sign icon next to Add New Income Section(s). Choose the number of income records to add in the first drop-down box, and then choose the borrower
for the income records in the second drop-down box. Click the GO icon to add the income record fields.

All information contained in this document is confidential and proprietary and may not be reproduced or disclosed to anyone not originally intended without the express written permission of Beanstalk Networks. © Beanstalk Networks. All rights reserved.
Page 68 of 216
Figure 4.22 - Adding Income Records
All income amounts should be provided as monthly income.
NOTE: For DTI ratio calculations and for the printed 1003 Loan Application, Net Rental Income items in the Assets section will be summed instead of the amounts for Net Rental Income and Subject Property Net Cash Flow in the Income section.
To provide a borrower’s monthly income from his or her present, full-time position, select Base Employment Income.
To delete an income record, check the Delete check box and save the 1003.
Origination Plus Customers Only: To create an income verification for an income record, check the Create Verification check box then click the Create Selected Verifications link. The verification document will appear in the e-Doc Manager in the loan’s Loan Snapshot screen under Processing Verifications Request for Verification of Benefits. If you do not see the Create Verification check box next to an income record, save the 1003.
NOTE: Verifications are available on income types for military income, pension/retirement income, social security/disability income, trust income, unemployment/welfare income, and VA benefits (non-education) only.
A running total of all monthly income is auto-calculated for each borrower and for all borrowers.
Housing Expense
The Housing Expense section of the 1003 provides you with the fields you need to track housing expense information on a loan for both proposed and present expenses.
Fields for tracking present housing expenses are available for each borrower in the loan’s borrower/co-borrower pair.
Totals at the bottom of each column are auto-calculated for you.

All information contained in this document is confidential and proprietary and may not be reproduced or disclosed to anyone not originally intended without the express written permission of Beanstalk Networks. © Beanstalk Networks. All rights reserved.
Page 69 of 216
Assets
The Assets section of the 1003 provides you with the fields you need to track general assets, automobiles, life insurance, and real estate information on a loan for each borrower.
Asset
Automobile
Life Insurance
Real Estate
To add an asset record, click the plus sign icon next to Add New Section(s). Choose the number of asset records to add in the first drop-down box, choose an asset type in the second drop-down box,
then choose the borrower for the asset record(s) in the second drop-down box. Click the GO icon to add the asset record fields.
Figure 4.23 - Adding Assets
After providing the zip code for an asset address, move your mouse cursor to another field to auto-populate the city and state. You can change the values of the city and state if you wish.
To delete an asset check the Delete check box then save the 1003.
Running totals are tracked throughout the Assets screen. If you add an asset or change an asset’s value save the 1003 to re-calculate your totals.
Note: Remember to click on Save to automatically recalculate the asset totals.
Use the REO Asset ID field for a real estate asset to link it to a real estate liability. Failure to do so may result in incorrect calculations and problems when ordering automated underwriting.

All information contained in this document is confidential and proprietary and may not be reproduced or disclosed to anyone not originally intended without the express written permission of Beanstalk Networks. © Beanstalk Networks. All rights reserved.
Page 70 of 216
There is no significance to this ID. You may choose whatever values you like as long as the numbers match in the Assets and the Liabilities sections.
In the example below notice that the real estate asset is arbitrarily assigned an REO
Asset ID of “1” in the Schedule of Real Estate Owned.
In the Liabilities screen the mortgage for that REO is also assigned the REO Asset ID “1” in the Liabilities section.
Figure 4.24 – REO Asset ID Under Assets
Figure 4.25 – REO Asset ID Under Liabilities
Liabilities
The Liabilities section of the 1003 provides you with the fields you need to track liabilities and other expenses on a loan for each borrower.
If you have “pulled” a credit report from the Order Credit action you can merge the liabilities automatically by clicking on the Merge Liabilities action from the loan’s action menu.

All information contained in this document is confidential and proprietary and may not be reproduced or disclosed to anyone not originally intended without the express written permission of Beanstalk Networks. © Beanstalk Networks. All rights reserved.
Page 71 of 216
Figure 4.26 – Merge Liabilities
To add a liability record, click the plus sign icon next to Add New Section(s). Choose the number of liability records to add in the first drop-down box, choose liability type in the second drop-down box, then choose the borrower for the liability record(s) in the second drop-down
box. Click the GO icon to add the liability record fields.
Be sure to provide the REO Asset ID for mortgage liabilities to match with the real estate entry under the Asset section of the 1003. Failure to do so may result in incorrect calculations and problems when ordering automated underwriting.
To delete a liability check the Delete box and save the 1003. If the Delete check box does not appear then the liability has not yet been added.
To delete all liabilities click the Select all for Delete link in the top right corner and save the 1003.
To flag all liabilities to be omitted click the Select all for Omit link in the top right corner and save the 1003.
To remove liabilities with zero balances (common when merging liabilities from a credit report), click the Select Zero Balance for Delete link in the top right corner and save the 1003.
A running balance of liabilities is presented for each borrower at the end of the borrower’s liabilities section.
Use the Summary of Total Liabilities section to see various liability calculations. You must save the 1003 to see the results of the selected summary amount type.
Details
The Details section of the 1003 enables you to break down the various details of the loan transaction.
Fields D, I, M, O, and P are auto-calculated and cannot be adjusted manually.
To calculate field G, PMI, MIP, Funding Fee, click the MIP button to the right of the field’s text box and complete the requested information.
To calculate field J, Subordinate Financing, click the Calc button to the right of the field’s text box and complete the requested information.
o Chapter 6 explains how to use this button to create a linked loan.

All information contained in this document is confidential and proprietary and may not be reproduced or disclosed to anyone not originally intended without the express written permission of Beanstalk Networks. © Beanstalk Networks. All rights reserved.
Page 72 of 216
Declarations
The Declarations section of the 1003 tracks declarations for each borrower on the file
All Yes/No fields auto-default to “No” except for Field L (Do You Intend To Occupy The Property As Your Primary Residence?).
In OpenClose, fields J and K are merged into a single drop-down box selection.
Agreement
The Agreement section of the 1003 collects government-requested information for each borrower, information about the interviewer, and acknowledgement/agreement information on the loan.
To select multiple values for the Race/Origin field hold the Control key on your keyboard and make multiple selections by clicking on an option in the box.
The information in the Interviewer Information section comes from the profile of the broker user who originated the loan and his or her Broker/Branch Company.
To provide a date in either of the date text boxes you can either type in the date manually or click the Date button to choose a date from the calendar tool.
Fannie Mae
The Fannie Mae section of the OpenClose 1003 collects information that Fannie Mae may request for a DO or DU transaction.
The Institution ID is used to break up DU transactions for billing purposes by branch. It is not required as not all lenders use it.
The values for Lien Type auto-populates from the Loan Position field on the Types & Terms tab.
To provide a date in a date text box you can either type in the date manually or click the Date button to choose a date from the calendar tool.
Government Info
The Government Info section of the OpenClose 1003 collects information relevant to government loans.
The Community Lending section is used when requesting a Community Lending program in a DU transaction.
The MSA code will auto-populate based on the zip code of the property address.

All information contained in this document is confidential and proprietary and may not be reproduced or disclosed to anyone not originally intended without the express written permission of Beanstalk Networks. © Beanstalk Networks. All rights reserved.
Page 73 of 216
Freddie Mac
The Freddie Mac section of the OpenClose 1003 collects information that Freddie Mac may request for an LP transaction.
The LP Key Identifier, LP Transaction Identifier, Credit Report Identifier, and LP Loan Identifier fields will auto-populate when you run an LP transaction.
The value of the Building Status field auto-Defaults to Existing.
The value of the Property Type field auto-Defaults to Detached.
The value of the Planned Unit Development field auto-Defaults to No.
The values in the Asset Totals section will auto-calculate if the necessary values are provided. To manually adjust one of these fields, click on the calculator icon so that it shows a crossed-out calculator icon. This action will enable the associated field to be edited.
Submit to Processor
Note: This functionality is for retail business operations only. It is not used by wholesale brokers.
Once you have completed the 1003 you may wish to pass the file along to a processor.
The Submit to Processor action is used primarily by originators. To submit a file to a processor, choose
Submit to Processor from the loan’s action menu.
Choose a processor from the drop-down box. (If no processors appear in the list, a Broker User
Level 1 or an administrator must adjust your account by assigning you a processor.)
Enter comments in the Comments box.
Click the Send Loan button when complete. The selected processor will receive a Messaging alert and will see the loan in his or her pipeline.
NOTE: Once you have submitted a file to a processor, you will not be allowed to make changes to the file unless he or she returns it to you.
View Contacts
You can assign contacts to a loan file using the Contacts tool. Choose Loan Contacts from the loan’s action menu. By default, you will see all contacts assigned to the selected loan.

All information contained in this document is confidential and proprietary and may not be reproduced or disclosed to anyone not originally intended without the express written permission of Beanstalk Networks. © Beanstalk Networks. All rights reserved.
Page 74 of 216
To add a contact, choose a different option from the Select View drop-down box in order to see all contacts available. When the screen re-loads, click in the flag column next to one or more contacts.
Click the Add Flagged to Folder button. The selected contact(s) are now assigned to the loan.
To remove a contact from a loan, be sure that Loan Contacts is the option selected in the Select View drop-down box.
Click in the flag column next to one or more contacts to flag them, and click the Remove
Flagged from Folder button. The selected contact(s) are no longer assigned to the loan.
See Chapter 14 for more information on Contacts.
Order Credit
The Order Credit function allows you to order credit directly from one of the supported credit vendors in OpenClose:
Credco
CSC
Equifax
LandAmerica.
NOTE: Before you order credit make sure you have provided the borrower’s full name, social security number, and address. If you do not provide this information your credit transaction will fail.
Select one or more borrowers by checking the checkbox to the left of the borrower’s name. If you have already pulled credit, provide the credit reference number in the Credit Reference # box. If you wish to pull joint credit on a borrower/co-borrower pair, check the Joint? Checkbox.

All information contained in this document is confidential and proprietary and may not be reproduced or disclosed to anyone not originally intended without the express written permission of Beanstalk Networks. © Beanstalk Networks. All rights reserved.
Page 75 of 216
Figure 4.27 - Order Credit
NOTE: If you provide a credit reference number make sure that the account information you use to run the transaction is the same account information you used when pulling credit outside of OpenClose. If you try to pull credit with a credit reference number using a different credit vendor account (i.e. login ID) you will receive an error.
Select a credit agency from the Credit Agencies drop-down box. If you do not see one of the supported OpenClose credit vendors contact your Administrator to have it added.
Provide your account number and password if it does not auto-populate.
Be sure to check the Check Yes! checkbox indicating that you are authorized to order credit for the borrower(s). The Order Credit button will be grayed out until you check YES.
NOTE: See Chapter 18 for information on how to have your credit account information auto-populate.

All information contained in this document is confidential and proprietary and may not be reproduced or disclosed to anyone not originally intended without the express written permission of Beanstalk Networks. © Beanstalk Networks. All rights reserved.
Page 76 of 216
Click the Order Credit button at the bottom of the screen. You will be provided with a confirmation message and will have the option to go to your Pipeline Summary screen or to the loan’s Loan
Snapshot screen.
To view the credit findings, go to the loan’s e-Doc Manager in the Loan Snapshot screen, expand Findings, and click the magnifying glass next to the credit document. If you do not see your credit findings they may not have been returned yet. Return to the screen again in 30-60 seconds to retrieve your findings.
To merge liabilities from the credit findings click the Merge Liabilities option in the loan’s action menu.
This option is only available after credit has been ordered.
Submit to AU – Automated Underwriting
OpenClose provides an interface to Fannie Mae and Freddie Mac to order automated underwriting findings.
Fannie Mae – Desktop Originator (DO)
The OpenClose interface with Fannie Mae’s DO service is an interface that sends your loan data to Fannie Mae’s Desktop Originator Web site and allows you to retrieve the findings directly to the loan’s e-Doc Manager.
NOTE: Before you can use the DO interface you must adjust the security settings on your Internet Explorer Web browser to permit the interface to send and receive files.
CONFIGURING YOUR WEB BROWSER TO RUN DO
In the Tools menu of your Internet Explorer Web browser, choose Internet Options.

All information contained in this document is confidential and proprietary and may not be reproduced or disclosed to anyone not originally intended without the express written permission of Beanstalk Networks. © Beanstalk Networks. All rights reserved.
Page 77 of 216
Figure 4.28 - Internet Explorer Tools Menu
Go to the Security tab, click the green Trusted sites icon, then click the Sites… button.
Figure 4.29 - Configuring your Trusted Site
Type the full Web address for your installation of OpenClose, including the https:// at the beginning and click the Add button. Be sure that the Require server verification… checkbox is checked, and click OK.
Figure 4.30 - Defining the Secure Site

All information contained in this document is confidential and proprietary and may not be reproduced or disclosed to anyone not originally intended without the express written permission of Beanstalk Networks. © Beanstalk Networks. All rights reserved.
Page 78 of 216
USING THE DO INTERFACE
In the loan’s action menu choose Submit to AU.
Choose Fannie Mae - Desktop Originator (DO) by clicking the radio button next to this option.
Provide your DO login and password information in the Provider Logon and Provider Password fields respectively.
NOTE: See Chapter 18 for information on how to have your DO account information auto-populate.
Figure 4.31 - Submit to DO
Click the Submit Loan to FNMA button.
A separate window will pop up taking you to the Desktop Originator Web site where you will see your uploaded loan and choose the transaction you wish to run. Use the DO Web site as you normally would.
Once your underwriting status is Complete (see Figure 4.32 below), return to your OpenClose window by minimizing the DO window.
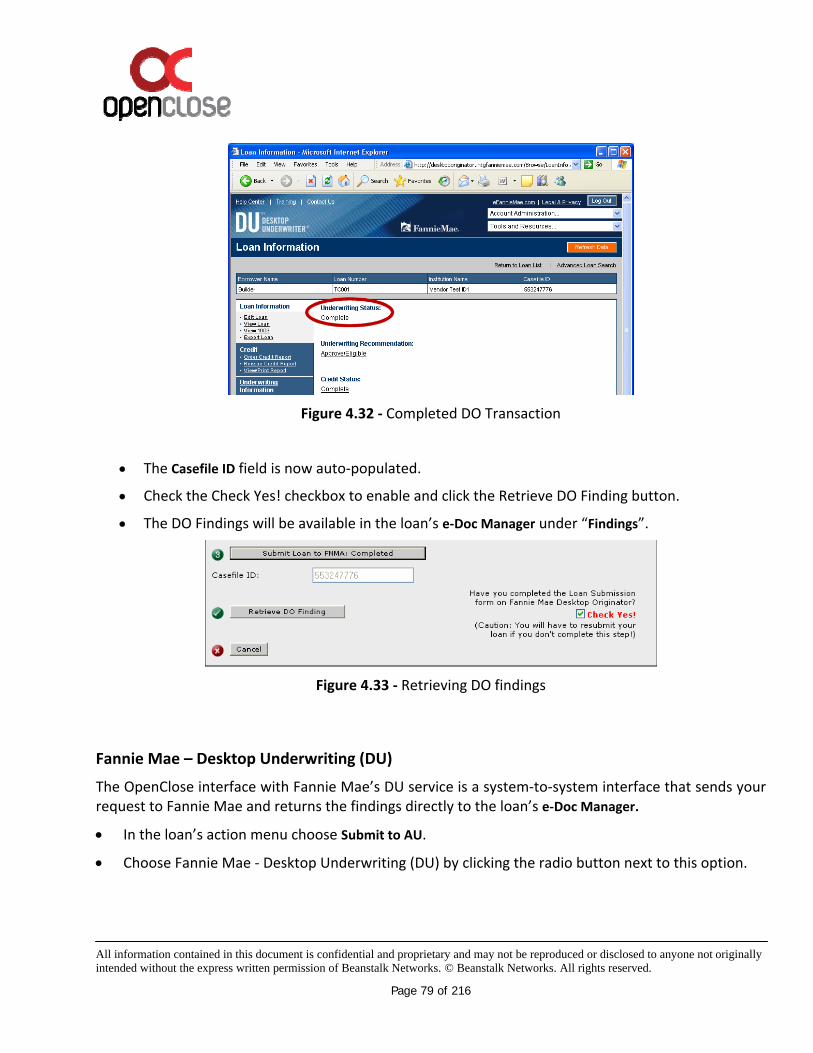
All information contained in this document is confidential and proprietary and may not be reproduced or disclosed to anyone not originally intended without the express written permission of Beanstalk Networks. © Beanstalk Networks. All rights reserved.
Page 79 of 216
Figure 4.32 - Completed DO Transaction
The Casefile ID field is now auto-populated.
Check the Check Yes! checkbox to enable and click the Retrieve DO Finding button.
The DO Findings will be available in the loan’s e-Doc Manager under “Findings”.
Figure 4.33 - Retrieving DO findings
Fannie Mae – Desktop Underwriting (DU)
The OpenClose interface with Fannie Mae’s DU service is a system-to-system interface that sends your request to Fannie Mae and returns the findings directly to the loan’s e-Doc Manager.
In the loan’s action menu choose Submit to AU.
Choose Fannie Mae - Desktop Underwriting (DU) by clicking the radio button next to this option.

All information contained in this document is confidential and proprietary and may not be reproduced or disclosed to anyone not originally intended without the express written permission of Beanstalk Networks. © Beanstalk Networks. All rights reserved.
Page 80 of 216
Provide your account information (Provider Logon and Provider Password) if they did not auto-populate. If the Seller Servicer Number and SW Provider fields did not auto-populate contact your Administrator for assistance.
NOTE: See Chapter 18 for information on how to have your DU account information auto-populate.
Select a credit vendor from the Credit Agencies drop-down box or provide the vendor’s unique MORNET Plus ID. Contact your Administrator if you wish to have a Fannie Mae-supported credit vendor added to the Credit Agencies drop-down box. Provide your account information for the selected credit vendor and check the Check Yes! checkbox indicating that you are authorized to order credit for the borrower(s).
Click the Submit Loan to DU button. If errors are found you will be presented with the Loan Validation screen. Click the Edit 1003 button, correct your errors, and return to Step One.
If no errors are found you will be taken to the confirmation screen where you can choose to move on to the Pipeline Summary screen or access this loan’s Loan Snapshot screen.
To view the credit findings go to the loan’s e-Doc Manager in the Loan Snapshot screen, expand Findings, and click the magnifying glass icon next to the credit document.
To view the AU findings go to the loan’s e-Doc Manager in the Loan Snapshot screen, expand Findings, and click the magnifying glass icon next to the AU document you wish to review. If you do not see your any AU findings, they may not have been returned yet. Return to the screen again in 30-60 seconds to retrieve your findings.
Freddie Mac - Loanprospector.Com
The OpenClose interface with Freddie Mac’s LP service is an interface that sends your loan data to Freddie Mac’s LoanProspector.com web site and allows you to send the findings directly to the loan’s e-Doc Manager.
In the loan’s action menu choose Submit to AU.
Choose Freddie Mac – Loanprospector.Com by clicking the radio button next to this option.
Provide your account information (Provider Logon and Provider Password) if they did not auto-populate. If the Seller Servicer Number and Seller Servicer Password fields did not auto-populate contact your Administrator for assistance.
NOTE: See Chapter 18 for information on how to have your LP account information auto-populate.

All information contained in this document is confidential and proprietary and may not be reproduced or disclosed to anyone not originally intended without the express written permission of Beanstalk Networks. © Beanstalk Networks. All rights reserved.
Page 81 of 216
Click the Submit Loan to LP button. If errors are found you will be presented with the Loan Validation screen. Click the Edit 1003 button, correct your errors, and return to Step One.
Loanprospector.com will ask you for your Freddie Mac username and password. Provide that information. Click OK.
Complete your LP transaction on the Loanprospector.com Web site. When your findings are returned click Send to Your System located in the left menu.
Figure 4.34 - LP - Send to Your System
NOTE: Do not click Return to Your System on the Loanprospector.com web site as that action will take you to the OpenClose login screen rather than sending your findings to OpenClose.
Submitting a Loan to the Lender
Intended Audience
Only broker users have the ability to submit a loan to lender.
Using Submit Loan to Lender
NOTE: If you are using the UniFi interface the Submit Loan to Lender option in the loan action menu may be grayed out until you register the loan. This can be changed by an administrator.

All information contained in this document is confidential and proprietary and may not be reproduced or disclosed to anyone not originally intended without the express written permission of Beanstalk Networks. © Beanstalk Networks. All rights reserved.
Page 82 of 216
Once you have originated and processed your loan you are ready to submit to the lender.
In the loan’s action menu choose Submit Loan to Lender.
Enter any comments you wish to send with the file in the comments box.
Click the Send Loan to Lender button. A copy of your submission will be stored in the loan’s e-Doc
Manager as Lender Loan Request Document.
When you submit a loan to the lender OpenClose’s workflow automatically does the following:
Sends the request to the appropriate lender employee(s) such as the underwriting Queue or loan opener Queue.
The Lender Loan Request document is placed in the loan’s e-Doc Manager.
The Loan Status is automatically changed to UW – Submitted in the e-Doc Manager.
The Send To Lender Action is checked in the e-Doc Manager.
The UWD icon for that loan in the Pipeline Summary is changed to loan submitted .
You can click on loan submitted icon to see a summary of the loan submission.
The entire contents of the loan’s e-Doc Manager becomes available to the lender.
Remember that submitting the loan creates the lender’s copy; a separate copy of the loan file.
Note: It is very important to remember that submitting the loan to the lender creates the lender’s copy of the loan which is a separate copy of everything in the e-Doc Manager.
Figure 4.35 – Send To Lender is Checked
Loan Validation
When you click on Submit Loan To Lender the system runs some validation against the data in your file before sending it to the lender. This step helps to ensure that a complete and accurate file is sent to the lender by pointing out key information that is missing from the file.
For instance, if the appraisal value field is empty or zero then the validation will catch this error (As in Figure 4.36).

All information contained in this document is confidential and proprietary and may not be reproduced or disclosed to anyone not originally intended without the express written permission of Beanstalk Networks. © Beanstalk Networks. All rights reserved.
Page 83 of 216
From the Loan Validation screen you can choose to:
Submit Anyway.
The file will be sent to the lender with the mistakes in place.
Edit 1003.
The 1003 tabs with the errors will be highlighted in red and a popup box will guide you through the errors that need to be fixed.
Correct the error and save the 1003. Once saved, you can resubmit the loan.
Figure 4.36 – The Loan Validation Screen
Figure 4.37 – After Fixing the Validation Error You Can Resubmit the Loan
Reviewing a Loan Response
Your loan submission was routed to a lender employee who will underwrite the loan and issue a loan response.
Once an underwriter has reviewed your loan and issued a response you will:
Receive a Messaging alert with the response.
To access the Messaging alert:
Click the alert icon at the top right corner of the screen as pictured in Figure 4.38.

All information contained in this document is confidential and proprietary and may not be reproduced or disclosed to anyone not originally intended without the express written permission of Beanstalk Networks. © Beanstalk Networks. All rights reserved.
Page 84 of 216
Click the message icon for the loan in the Pipeline Summary.
See the underwriting response in the loan’s e-Doc Manager under Findings.
Receive an email message to the email address setup in your user settings profile (if email notification is set by an administrator.
Figure 4.38 - Messaging Alert
In the Messaging window click the new message to expand it and click the Go To Document icon to view the details of the underwriting response. See Chapter 11 for details on the Message Center.
Note that you can also go to the loan’s e-Doc Manager in the Loan Snapshot screen to view the Lender Loan Response Document located in the Findings section.
Figure 4.39 - Messaging to Access a Loan Response
You will know that you have received an underwriting response because the icon in the UWD column in your Pipeline Summary screen will change. To determine what any of the underwriting icons mean place your mouse cursor over an icon to see a text description or reference the chart below.
UWD
Submitted to Underwriting
Approved by Underwriting
Underwriting Review
Approved by Underwriting with Conditions

All information contained in this document is confidential and proprietary and may not be reproduced or disclosed to anyone not originally intended without the express written permission of Beanstalk Networks. © Beanstalk Networks. All rights reserved.
Page 85 of 216
Pending Additional Information
Denied
Cancelled
Suspended
Using Update Lender
You may wish to send changes or additional documentation to the lender after you have submitted the file. After the lender has sent you a loan response you can use Update Lender to send additional information or changes to the lender.
Note: Remember that since the lender and the originator have distinct, separate copies of the loan the only way you can update the lender’s copy is with the Update Lender and Submit Loan To
Lender commands. If you add or change a document in your e-Doc Manager and do not click on Update Lender then the lender will not see the changes.
In the loan’s action menu choose Update Lender.
If you have made changes to documents or if you have uploaded or faxed documents to the e-Doc
Manager those documents will be available. Check the documents that you wish to send to the lender.
Click the Update Lender button.
NOTE: The faxing of documents into the e-Doc Manager is available only to clients who have purchased the Fax Module.

All information contained in this document is confidential and proprietary and may not be reproduced or disclosed to anyone not originally intended without the express written permission of Beanstalk Networks. © Beanstalk Networks. All rights reserved.
Page 86 of 216
Figure 4.40 - Select Documents to Send with Update lender
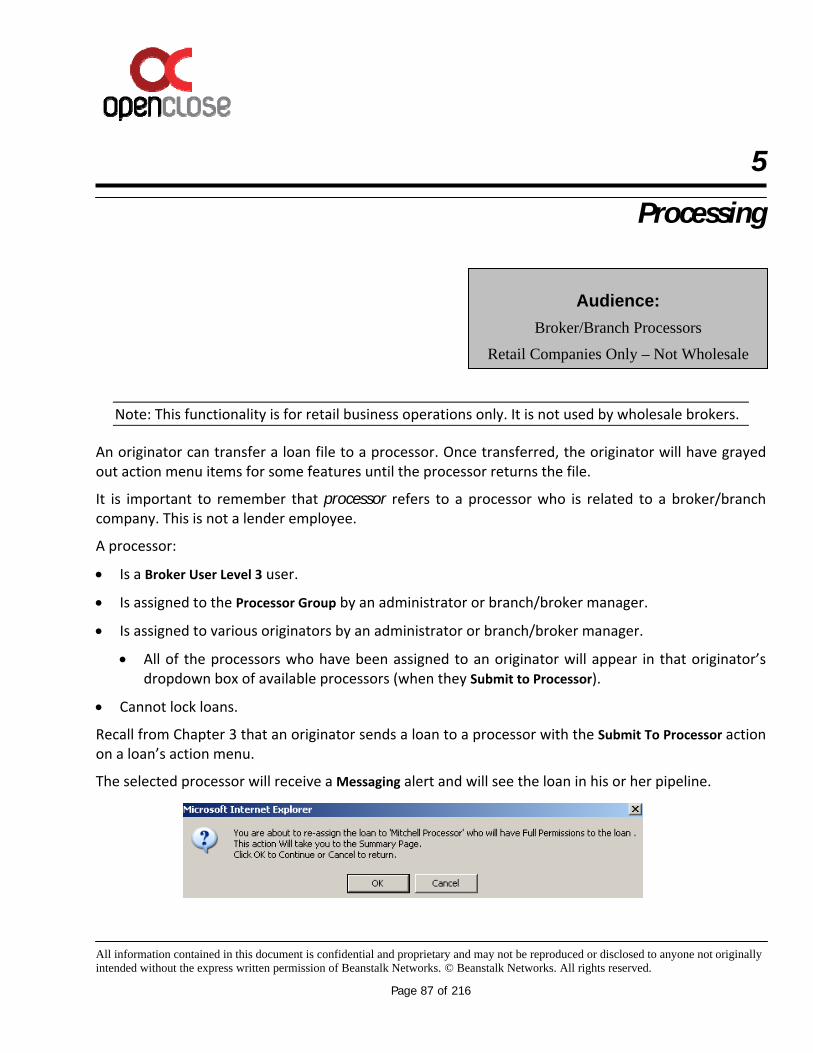
All information contained in this document is confidential and proprietary and may not be reproduced or disclosed to anyone not originally intended without the express written permission of Beanstalk Networks. © Beanstalk Networks. All rights reserved.
Page 87 of 216
5
Processing
Note: This functionality is for retail business operations only. It is not used by wholesale brokers.
An originator can transfer a loan file to a processor. Once transferred, the originator will have grayed out action menu items for some features until the processor returns the file.
It is important to remember that processor refers to a processor who is related to a broker/branch company. This is not a lender employee.
A processor:
Is a Broker User Level 3 user.
Is assigned to the Processor Group by an administrator or branch/broker manager.
Is assigned to various originators by an administrator or branch/broker manager.
All of the processors who have been assigned to an originator will appear in that originator’s dropdown box of available processors (when they Submit to Processor).
Cannot lock loans.
Recall from Chapter 3 that an originator sends a loan to a processor with the Submit To Processor action on a loan’s action menu.
The selected processor will receive a Messaging alert and will see the loan in his or her pipeline.
Audience:
Broker/Branch Processors
Retail Companies Only – Not Wholesale

All information contained in this document is confidential and proprietary and may not be reproduced or disclosed to anyone not originally intended without the express written permission of Beanstalk Networks. © Beanstalk Networks. All rights reserved.
Page 88 of 216
Figure 5.1 – Message to Originator Before Submitting a Loan to the Processor
OpenClose offers a processing screen to allow users to create appraisal, insurance, and title order forms and track the status of these orders. These forms are stored in the e-Doc Manger. This option is available to originator and processor users.
Select Processing from the loan action menu.
Choose an order type from the dropdown menu.
Figure 5.2 – The Processing Screen
Choose a contact to assign and click the Add button (This step is optional).
Figure 5.3 – Assign a Contact to an Order

All information contained in this document is confidential and proprietary and may not be reproduced or disclosed to anyone not originally intended without the express written permission of Beanstalk Networks. © Beanstalk Networks. All rights reserved.
Page 89 of 216

All information contained in this document is confidential and proprietary and may not be reproduced or disclosed to anyone not originally intended without the express written permission of Beanstalk Networks. © Beanstalk Networks. All rights reserved.
Page 90 of 216
Select an action from the dropdown menu.
Figure 5.4 – Processing Actions
The available actions are the following: History – displays the history for the action.
View – displays the order form.
Edit – allows users to edit information on the form.
Email – allows users to email a password-protected copy of the form.
Order – adds the order form to the e-Doc Manager.
Re-order – adds a new order form to the e-Doc Manager.
Received – updates the status of the order on the History screen to received.

All information contained in this document is confidential and proprietary and may not be reproduced or disclosed to anyone not originally intended without the express written permission of Beanstalk Networks. © Beanstalk Networks. All rights reserved.
Page 91 of 216
Verifications
This feature is for Origination Plus Customers Only.
To create a verification for an employment record, check the Create Verification check box then click the Create Selected Verifications link.
The verification document will appear in the e-Doc Manager in the loan’s Loan Snapshot screen under Processing Verifications Request for Verification of Employment.
If you do not see the Create Verification check box next to any record then save the 1003 first.
Figure 5.5 – Create a Verification
Verifications can be created (from their respective tabs of the 1003) for the following:
Employment

All information contained in this document is confidential and proprietary and may not be reproduced or disclosed to anyone not originally intended without the express written permission of Beanstalk Networks. © Beanstalk Networks. All rights reserved.
Page 92 of 216
Income
Assets
Liabilities
Such as rent or mortgage
Return to Originator
Once the processor is ready to return the file to the originator he/she can use the Return To Originator action. The processor and originator can pass the file back and forth several times as needed using the Submit To Processor and Return To Originator actions.
Note: Depending upon your company’s policies and procedures the processor may not need to return the loan to the originator. The processor can submit the loan to the lender directly.
Once you use Return To Originator the file will be removed from your pipeline, the originator will receive a Messaging alert, and the originator will regain write access to the file.
Figure 5.6 – A Messaging Alert To The Originator

All information contained in this document is confidential and proprietary and may not be reproduced or disclosed to anyone not originally intended without the express written permission of Beanstalk Networks. © Beanstalk Networks. All rights reserved.
Page 93 of 216
6
Special Loan Scenarios
This chapter helps originators better understand how to handle special loan scenarios such as subordinate loans and investment properties with net rental income.
Linked Loans
Overview
The term linked loan refers to a subordinate loan that is linked to a borrower’s primary loan. These loans are sometimes called piggyback loans.
Note: This manual assumes that the user has an understanding of the mortgage origination business. It is not meant to instruct a novice in the mortgage industry.
Creating a Linked Loan
NOTE: In order to create a linked loan the primary (or first mortgage) loan must already exist.
To create a linked loan do the following:
From the Loan Action menu select Edit 1003 for the primary mortgage.
Click on the Details tab and then select the Calc button.
This button can be found to the right of the subordinate financing field (line item J).
Audience:
Originators
Some Lender Users (on behalf of an originator)

All information contained in this document is confidential and proprietary and may not be reproduced or disclosed to anyone not originally intended without the express written permission of Beanstalk Networks. © Beanstalk Networks. All rights reserved.
Page 94 of 216
Figure 6.1 – The Calc Button
Once presented with the Subordinate Financing window, enter all pertinent information, check the Create Linked Loan box and then click on Save.
Figure 6.2 – Create Linked Loan

All information contained in this document is confidential and proprietary and may not be reproduced or disclosed to anyone not originally intended without the express written permission of Beanstalk Networks. © Beanstalk Networks. All rights reserved.
Page 95 of 216
OpenClose will create the second (linked) loan and will auto-populate all of the borrower data from the first loan into the second loan.
Other Features of Linked Loans
Once a linked loan is created the Pipeline Summary screen will display a link icon to the right of the loan number. The user may hover over this link to see related first mortgage information.
A new action button entitled Linked Loan found at the top of the 1003 will allow quick navigation between the first and second mortgage loans.
The header at the top of each 1003 page will display the loan position as well as borrower name and loan number for quick identification.
After a linked loan is created it can be refreshed with data from the first mortgage by once again navigating to the 1003 screens, clicking on the Details tab, and then selecting the Calc button. From this window, choose Update Linked Loan at the bottom and save.
Closing costs updated on the linked second loan file automatically merge back into the details section of the 1003 on the first mortgage.
The monthly payments on documents such as the Mortgage Brokerage Business Contract, and the 1008 will reflect both loans.
Figure 6.3 – Pipeline Summary for a Linked Loan
Figure 6.4 – Edit 1003 For a Linked Loan
Note: when you do a transfer on the lender side of a linked loan, the other loan does NOT get transferred. When transferring a linked loan, you must transfer both individually. See Chapter 10 for information on Transfer Loan.

All information contained in this document is confidential and proprietary and may not be reproduced or disclosed to anyone not originally intended without the express written permission of Beanstalk Networks. © Beanstalk Networks. All rights reserved.
Page 96 of 216
Note: To refresh the second mortgage with data from the first mortgage you can click on the Details tab of Edit 1003. Select the Calc button. Choose Update Linked Loan.
Use Be Originator to create a linked loan as a Lender User
Linked loans can only be created by broker users. If a lender user needs to create a linked loan on behave of an originator they must use the Be Originator action.
Click on Be Originator from a loan’s action menu.
Create the loan and the linked loan.
Submit the loan to the Lender.
Click on Log Back In As… to return to your original user type.
Investment Property Ratio Calculations
Net Rental Income
If a property is an investment property then there will be cash flow from this property. This negative or positive cash flow is called Net Rental Income.
Net Rental Income is calculated for all properties in the Real Estate Owned section of the Asset tab that show both an occupancy rate and “Rental” in the Property Status field.
OpenClose automatically calculates Net Rental Income for you, however, it can be useful to understand the calculations.
The following formula is used:
(Occupancy rate % x gross rental income) - (mortgage payment + insurance + maintenance + taxes + miscellaneous) = Net Rental Income
EXAMPLE 1:
Occupancy rate = 100% x $750 (gross rental income) = $750.00
$200 (mortgage payment) + $18 (ins/taxes/misc) = -218.00
Net Rental Income = $532.00

All information contained in this document is confidential and proprietary and may not be reproduced or disclosed to anyone not originally intended without the express written permission of Beanstalk Networks. © Beanstalk Networks. All rights reserved.
Page 97 of 216
EXAMPLE 2:
Occupancy rate = 75% x $800 (gross rental income) = $600
$800 (mortgage payment) + $77 (ins/taxes/misc) = -877
Net Rental Income = -$277
If the combined total net rental income for all properties is positive, it is added to the qualifying income on page two of the loan application in the Net Rent field.
If the total is negative (as in Example 2), it is treated as a liability that appears as a negative cash flow in the Transmittal Summary (1008) and is included in the total expense ratio calculation.
Scenario 1: Borrower owns investment property with rental income. This home is not the subject property.
Since this is a rental property there will be either a positive or negative cash flow. If the unit rents for more money than its expenses (i.e. mortgage and other payments) then there will be a positive cash flow. If the rent does not cover all of the expenses, then there will be a negative cash flow.
IF THE NET RENTAL INCOME OF THIS PROPERTY IS POSITIVE, THEN ADD THIS INCOME AS AN ASSET TO THE BORROWER.
On the Asset tab within the Edit 1003 screens:
Add a Real Estate asset for the borrower(s).
Designate the status as Rental.
Designate Current Residence type as Not Current Residence.
Select “No” for the Subject Property box.
Complete this section by entering values for the mortgage on this home, rental income, and monthly mortgage payments; noticing that the Net Rental Income automatically calculates based on the occupancy rate.
On the Liabilities tab of the Edit 1003 screens:
Be sure to check the box to “Omit Monthly Payment” for this Real Estate Liability since your debt calculation for this property has already been included on the previous tab.
The net rent figure will transfer to the 1008 as positive cash flow.

All information contained in this document is confidential and proprietary and may not be reproduced or disclosed to anyone not originally intended without the express written permission of Beanstalk Networks. © Beanstalk Networks. All rights reserved.
Page 98 of 216
The positive net rent will populate as income in the 1003 income section.
IF THE NET RENTAL CALCULATION IS NEGATIVE, THEN ADD THIS NEGATIVE INCOME FOR THE BORROWER.
On the Asset tab within the Edit 1003 screens:
Add a Real Estate asset for the borrower(s). Designate the status and current residence type in the boxes provided.
Select “No” for the Subject Property box.
Complete this section by entering values for the mortgage on this home, rental income, and monthly mortgage payments; noticing that the Net Rental Income automatically calculates based on the occupancy rate. Note that the Net Rental Income calculation will be a negative number in this scenario.
On the Liabilities tab of the Edit 1003 screens:
Be sure to check the box to “Omit Monthly Payment” for this Real Estate Liability since your debt calculation for this property has already been included on the previous tab.
The net rent figure will transfer to the 1008 as negative cash flow.
Note: Neither of these figures will transfer to the Housing Expense tab of the 1003 because this property is not the borrower’s residence.
Scenario 2: Borrower owns investment property with rental income. This home is the subject property (Investment Refinance).
On the Property tab within the Edit 1003 screens:
Enter Occupancy as Investment.
Enter Loan Purpose as Refinance.
On the Asset tab within the Edit 1003 screens:
Add a Real Estate asset for the borrower(s). Designate the status as Rental

All information contained in this document is confidential and proprietary and may not be reproduced or disclosed to anyone not originally intended without the express written permission of Beanstalk Networks. © Beanstalk Networks. All rights reserved.
Page 99 of 216
Designate the current residence type in the boxes provided, and select “Yes” for the Subject Property box.
Note that selecting “Yes” will enable a proposed net rental income calculator icon to the right of the Net Rental Income Field.
Complete the section at the bottom by entering the current values for the mortgage on this home, rental income, and monthly mortgage payments; noticing that the Present Net Rental Income automatically calculates based on the occupancy rate. This figure will be used as the Net Rent calculation for the 1003.
In order to calculate the correct LTV/CLTV based upon the new mortgage payments however, we also need to calculate the Proposed Net Rental Income. Use the calculator icon to the right of the Net Rental Income Field (in the Asset tab).
The proposed Net Rental Income will show up in the Bottom DTI calculation which can be found in the Type & Terms tab (see Figure 6.5). Click the calculator icon next to the Bottom field to see this value.
On the Liabilities tab of the Edit 1003 screens:
The current mortgage will be listed in the Liabilities section. Be sure to check the box to “Omit Monthly Payment” for this Real Estate Liability since this mortgage will be paid off at closing.
On the 1008 Form:
The net rent figure for the new loan will transfer to the 1008 as either a positive or negative cash flow.

All information contained in this document is confidential and proprietary and may not be reproduced or disclosed to anyone not originally intended without the express written permission of Beanstalk Networks. © Beanstalk Networks. All rights reserved.
Page 100 of 216
Figure 6.5 – Click on Bottom on the Types & Terms Tab
Figure 6.6 – The Net Rental Income Calculator

All information contained in this document is confidential and proprietary and may not be reproduced or disclosed to anyone not originally intended without the express written permission of Beanstalk Networks. © Beanstalk Networks. All rights reserved.
Page 101 of 216

All information contained in this document is confidential and proprietary and may not be reproduced or disclosed to anyone not originally intended without the express written permission of Beanstalk Networks. © Beanstalk Networks. All rights reserved.
Page 102 of 216
7
Pricing and Registration
Pricing and Registering a Loan
You can request pricing for a loan and/or register it as a float or a lock by using the loan’s action menu.
When you lock or float a loan, OpenClose’s workflow automatically does the following:
Sends the request to the appropriate lender employee(s) such as the lock desk Queue.
Places the lock request document in the loan’s e-Doc Manager.
Changes the Action icon for that loan in the Pipeline Summary to lock requested .
There are two ways to price and/or register a loan:
Price/Lock
Used if your company has licensed either the Decision Assist or UniFi pricing engines.
Lock Form
Used if your company does not use Decision Assist or UniFi.
Audience:
Broker User Level 1
Broker User Level 2

All information contained in this document is confidential and proprietary and may not be reproduced or disclosed to anyone not originally intended without the express written permission of Beanstalk Networks. © Beanstalk Networks. All rights reserved.
Page 103 of 216
Figure 7.1 – Pricing and Registering a Loan
Pricing and Registering a Loan – (Decision Assist Customers Only)
Before you can register a loan through OpenClose you must first get pricing for an eligible loan program. Do the following:
Choose Price/Lock from the loan’s action menu.
Complete information about the loan under the Loan, Property, Credit, and Public Records tabs. Note that some information will auto-populate from the loan’s 1003.
Figure 7.2 - Tabs in the Price/Lock Form
Under the Lookup tab flag one or more loan programs by clicking in the column marked with a flag icon. You can flag all programs by clicking the Flag All link or un-flag all programs by clicking the
Unflag All link.

All information contained in this document is confidential and proprietary and may not be reproduced or disclosed to anyone not originally intended without the express written permission of Beanstalk Networks. © Beanstalk Networks. All rights reserved.
Page 104 of 216
Figure 7.3 - Lookup Tab of the Price/Lock Form
Once you have selected the programs you wish to search scroll to the bottom of the screen and click the Search Programs button.
You can review the programs that were returned as ineligible to determine the reason. An ineligible loan program is marked with a red icon. Click the program name to view the failed eligibility conditions.
Click an eligible program (marked with a green checkmark icon). The available products for that program will appear below the selected program in a tree.
To see pricing for a product click the product name to show the pricing grid on the right.

All information contained in this document is confidential and proprietary and may not be reproduced or disclosed to anyone not originally intended without the express written permission of Beanstalk Networks. © Beanstalk Networks. All rights reserved.
Page 105 of 216
Figure 7.4 - Examining Ineligible Products
Figure 7.5 – Pricing Returned with Adjustments Already Factored Into The Price

All information contained in this document is confidential and proprietary and may not be reproduced or disclosed to anyone not originally intended without the express written permission of Beanstalk Networks. © Beanstalk Networks. All rights reserved.
Page 106 of 216
Click on a price point to request that price. For instance, in Figure 7.5, click on -0.500 under the 30 day column to request a 6.5% rate with a .5% rebate.
Scroll to the bottom of the screen and click the Save Product button.
You will be taken to the lock form where information on the file including information selected from the pricing and eligibility results will be auto-populated. Note that information that auto-populates from your selected product will not be editable. Make changes to the lock form values as needed and click either the:
Save and Submit Lock button.
Save and Submit Float button.
You will be taken back to your Pipeline Summary screen.
Figure 7.6 - OpenClose Lock Form

All information contained in this document is confidential and proprietary and may not be reproduced or disclosed to anyone not originally intended without the express written permission of Beanstalk Networks. © Beanstalk Networks. All rights reserved.
Page 107 of 216
Figure 7.7 – The Pricing Request Document in the e-Doc Manager
Figure 7.8 – The Pipeline Summary With Lock Icons

All information contained in this document is confidential and proprietary and may not be reproduced or disclosed to anyone not originally intended without the express written permission of Beanstalk Networks. © Beanstalk Networks. All rights reserved.
Page 108 of 216
The lock icons available are as follows:
Not Locked – You have not yet submitted a registration (float or lock) on this file
Float Requested – You have submitted a float request but have not yet received a response
Float Approved As Is – Your float has been accepted without any changes
Float Approved with Changes – Your float has been accepted but with changes; view theLock Response to see the changes highlighted in bold, red text and marked with a red asterisk
Float Referred – Your float request requires additional information; view the Lock Responsefor comments from the lock desk
Float Denied – Your float request has been denied; view the Lock Response for commentsfrom the lock desk
Lock Requested – You have submitted a lock request but have not yet received a response
Lock Approved As Is – Your lock has been accepted without any changes
Lock Approved with Changes – Your lock has been accepted but with changes; view the Lock Response to see the changes highlighted in bold, red text and marked with a red asterisk
Lock Referred – Your lock request requires additional information; view the Lock Responsefor comments from the lock desk
Lock Denied – Your lock request has been denied; view the Lock Response for comments from the lock desk
Lock Expiring – Your lock is due to expire in one week
Lock Expired – Your lock has expired

All information contained in this document is confidential and proprietary and may not be reproduced or disclosed to anyone not originally intended without the express written permission of Beanstalk Networks. © Beanstalk Networks. All rights reserved.
Page 109 of 216
Pricing and Registering a Loan – (UniFi Customers Only)
OBTAINING PRICING
Before you can register a loan through OpenClose you must first get pricing for an eligible loan program from UniFi.
Choose Price/Lock from the loan’s action menu.
Complete information about the loan under the Borrower, Loan Details, and Terms tabs. Note that some information will auto-populate from the loan’s 1003.
Figure 7.9 - UniFi Pricing Request
Figure 7.10 - UniFi Pricing Received

All information contained in this document is confidential and proprietary and may not be reproduced or disclosed to anyone not originally intended without the express written permission of Beanstalk Networks. © Beanstalk Networks. All rights reserved.
Page 110 of 216
Under the Pricing tab provide your lock term and click the Request Pricing button. If any required fields are missing you will receive an error message in red text near the bottom of the screen. Correct the missing or incorrect information and try again.
Once you have requested pricing you can check the loan’s e-Doc Manager for the UniFi Select Pricing
Response document (see Figure 7.11). You can click on the pencil icon to return to the registration/pricing screen at any time.
When you are ready to register the loan as a lock or float use the pricing grid that appears in the registration/price screen. As in Figure 7.10, choose the price point for the loan in the Adj Rate column. Select Lock or Float at the bottom of the page and then click on Register Loan.
If the pricing grid does not appear you may need to click on Resubmit Pricing Request.
Check the loan’s e-Doc Manager for the UniFi Lock Rate Response document. If you do not see a response, check back in 30-60 seconds. Once you lock or float the loan the UniFi Select Pricing
Response document will no longer appear in the e-Doc Manager.
NOTE: If you have requested pricing for a product that the loan is not eligible for or if there are any other problems with your pricing request you will receive an error document in the loan’s e-
Doc Manager.
Figure 7.11 – UniFi Select Pricing Response
Figure 7.12 - UniFi Lock Rate Response

All information contained in this document is confidential and proprietary and may not be reproduced or disclosed to anyone not originally intended without the express written permission of Beanstalk Networks. © Beanstalk Networks. All rights reserved.
Page 111 of 216
NOTE: If there is a problem with your registration such as the use of expired pricing, you will receive an error document in the loan’s e-Doc Manager.
GETTING UPDATED PRICING
If you have registered a loan as a float you may wish to request updated pricing at a later date. Do the following:
Select Price/Lock from the loan’s action menu and go to the Pricing tab.
You can also click on the pencil icon of the UniFi Select Pricing Response document in the loan’s e-Doc Manager.
Click the Request Updated Pricing button. A confirmation message will appear.
LOCKING A REGISTERED LOAN
If you registered a loan as a float you will need to lock it at a later date.
Choose Price/Lock from the loan’s action menu and go to the Pricing tab.
You must request updated pricing with Request Updated Pricing to ensure you do not use an expired rate or price.
Select a pricing option by clicking the radio button next to the rate and price you wish to register.
Click the Lock Loan button. You will receive a confirmation message that your request has been sent. Confirmation of your lock will appear in the loan’s e-Doc Manager.
NOTE: If there is a problem with your lock such as expired pricing you will receive an error document in the loan’s e-Doc Manager.

All information contained in this document is confidential and proprietary and may not be reproduced or disclosed to anyone not originally intended without the express written permission of Beanstalk Networks. © Beanstalk Networks. All rights reserved.
Page 112 of 216
Pricing and Registering a Loan – (Without Decision Assist or UniFi)
Choose Lock Form from the loan’s action menu.
Complete information about the loan under the Primary Borrower, Loan Details, and Originator Fees tabs. Note that some information will auto-populate from the loan’s 1003.
You must manually enter the rate and price you want for the loan in the Loan Details tab.
Figure 7.13 – Lock Form
Under the Loan Details tab you can assign a Loan Product by clicking on the magnifying glass next to Program. Recall from Chapter 2 that Loan Products are created by an administrator, manager, or individual user and contain loan product details which can be applied to the loan.

All information contained in this document is confidential and proprietary and may not be reproduced or disclosed to anyone not originally intended without the express written permission of Beanstalk Networks. © Beanstalk Networks. All rights reserved.
Page 113 of 216
Figure 7.14 – Assign a Loan Product to the Lock Form
Click on either Register/Lock or Register Float at the bottom of the page.
The Standard Lock Form will be available in the e-Doc Manager.
Reviewing a Lock Response
UniFi Customers Only
The UniFi system will automatically issue the lock/float approval. The UniFi Lock Rate Response will appear in the loan’s e-Doc Manager.
Non-UniFi Customers Only
Your lock/float request was routed to a lock desk lender employee who will issue a lock response.
Once a lock desk user has reviewed your registration and issued a response you will:
Receive a Messaging alert with the response.
To access the Messaging alert:
Click the alert icon at the top right corner of the screen as pictured in Figure 7.15.
Click the message icon for the loan in the Pipeline Summary.
See the lock response in the loan’s e-Doc Manager.
Receive an email message to the email address setup in your user settings profile (if email notification is set by an administrator.

All information contained in this document is confidential and proprietary and may not be reproduced or disclosed to anyone not originally intended without the express written permission of Beanstalk Networks. © Beanstalk Networks. All rights reserved.
Page 114 of 216
Figure 7.15 - Messaging Alert
In the Message Center window click the new message to expand it and click the Go To Document icon to view the details of the lock or float response. See Chapter 11 for details on the Message Center.
Note: that you can also go to the loan’s e-Doc Manager in the Loan Snapshot screen to view the Lender Lock Response Document located in the Findings section.
Figure 7.16 – Message Center With a Lock Response
You will know that you have received a lock or float response because the icon in the Actions column in your Pipeline Summary screen will change. To determine what any of the registration icons mean place your mouse cursor over an icon to see a text description or reference the chart below:

All information contained in this document is confidential and proprietary and may not be reproduced or disclosed to anyone not originally intended without the express written permission of Beanstalk Networks. © Beanstalk Networks. All rights reserved.
Page 115 of 216
Not Locked – You have not yet submitted a registration (float or lock) on this file
Float Requested – You have submitted a float request but have not yet received a response
Float Approved As Is – Your float has been accepted without any changes
Float Approved with Changes – Your float has been accepted but with changes; view theLock Response to see the changes highlighted in bold, red text and marked with a red asterisk
Float Referred – Your float request requires additional information; view the Lock Responsefor comments from the lock desk
Float Denied – Your float request has been denied; view the Lock Response for commentsfrom the lock desk
Lock Requested – You have submitted a lock request but have not yet received a response
Lock Approved As Is – Your lock has been accepted without any changes
Lock Approved with Changes – Your lock has been accepted but with changes; view the Lock Response to see the changes highlighted in bold, red text and marked with a red asterisk
Lock Referred – Your lock request requires additional information; view the Lock Responsefor comments from the lock desk
Lock Denied – Your lock request has been denied; view the Lock Response for comments from the lock desk
Lock Expiring – Your lock is due to expire in one week
Lock Expired – Your lock has expired

All information contained in this document is confidential and proprietary and may not be reproduced or disclosed to anyone not originally intended without the express written permission of Beanstalk Networks. © Beanstalk Networks. All rights reserved.
Page 116 of 216
8
Lock Registration Responses
Lock/Float Registration Responses
When an originator requests registration for a loan (for a float or lock) the lender employee(s) assigned to receive the request will receive the request.
Depending upon how an administrator set up workflow for your business, the registration request will flow to either an individual employee or more likely, to a Queue.
To access a new loan registration request from a Queue perform the following:
Use the Pipeline Summary left navigation menu.
Click on Queue
Chose the appropriate Queue from the dropdown box.
The names of the queues were created by an administrator.
Flag the loan(s) for which you will issue registration responses.
Click the Accept Flagged Loan(s) link.
Those loans will now appear in your Pipeline Summary.
Once you obtain the loan, any lender employee can observe that you have access to the loan from the e-Doc Manager. The upper-right corner of the lender’s version of the e-Doc Manager contains the Workflow Locator. You can see in Figure 8.2 below that both the Account Exec and the Lock Desk have access to this loan right now.
Audience:
Lender Employees
(Typically the Lock Desk)

All information contained in this document is confidential and proprietary and may not be reproduced or disclosed to anyone not originally intended without the express written permission of Beanstalk Networks. © Beanstalk Networks. All rights reserved.
Page 117 of 216
Figure 8.1 – The Contents of the LockDesk Queue
Figure 8.2 – The Workflow Locator
Responding to the Float or Lock Request
Now that the loan resides in your pipeline you can issue a lock or float response.
Choose Lock Response from the loan’s action menu. You will be taken to the Details tab of the Lock Response screen.
The Loan Details Information section of the Lock Response screen is editable. Scroll down to this section and make any necessary changes to the fields directly. Any changes you make will show up in red on the originator’s lock response form. Figure 8.4 shows the Loan Details page.
Figure 8.3 – The Lock Response Loan Action

All information contained in this document is confidential and proprietary and may not be reproduced or disclosed to anyone not originally intended without the express written permission of Beanstalk Networks. © Beanstalk Networks. All rights reserved.
Page 118 of 216
Figure 8.4 - Changing Loan Information on a Lock Response
Click on the Response tab.
If you made changes to any field on the previous screen the Approved As Is option will not be available.
If you did not make changes to any field on the previous screen the Approved With Changes option will not be available.
Choose the response type that is applicable for this float or lock request.
Note that is the registration request was for a float then the response options will be for floats. If the request was for a lock then the response options will be for locks.
Use the Date button (or manually enter a date) to set the expiration date.
The expiration date will automatically be populated with a date calculated by adding the Lock Period to today’s date.
Note: If Holiday Maintenance has been set by an administrator than certain dates have been classified as holidays. Based upon administrator settings, the expiration date will be set to either the business day before or the business day after the holiday.

All information contained in this document is confidential and proprietary and may not be reproduced or disclosed to anyone not originally intended without the express written permission of Beanstalk Networks. © Beanstalk Networks. All rights reserved.
Page 119 of 216
Figure 8.5 - Issuing a Float or Lock Response
Provide comments in the Comments box.
Click the Submit button to save and send your float or lock response to the originator.
All information contained in this document is confidential and proprietary and may not be reproduced or disclosed to anyone not originally intended without the express written permission of Beanstalk Networks. © Beanstalk Networks. All rights reserved.
Page 120 of 216
9
Underwriting
Underwriting Loans
Intended Audience
This section covers features available to Lender Employees in OpenClose to underwrite a loan and return the loan response to the originator.
When an originator submits a loan, the following occurs:
You receive the loan and all of its associated files electronically in the e-Doc Manager.
You have access to a library of conditions which you can assign to the loan.
You can merge the automated underwriting conditions (and their codes) if DU, DO, or LP have been run for the loan.
You can receive and send messages to the originator and pass documents back and forth.
Audience:
Lender Employees
(Typically Underwriters)
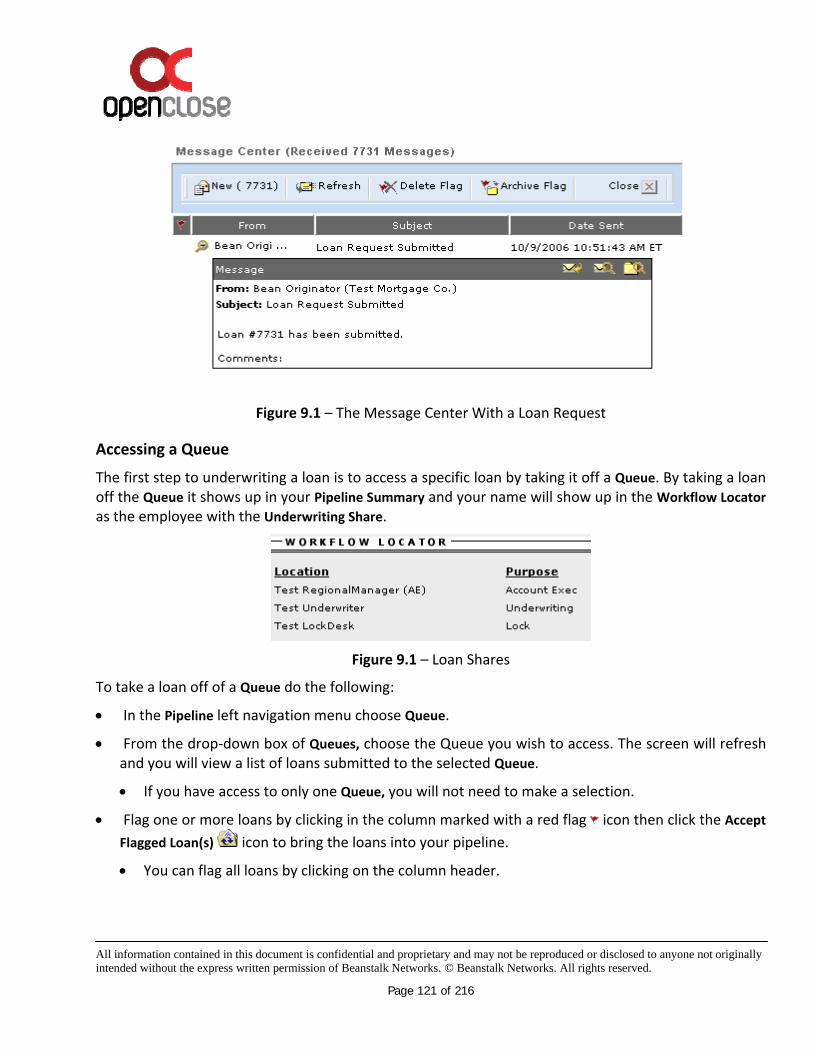
All information contained in this document is confidential and proprietary and may not be reproduced or disclosed to anyone not originally intended without the express written permission of Beanstalk Networks. © Beanstalk Networks. All rights reserved.
Page 121 of 216
Figure 9.1 – The Message Center With a Loan Request
Accessing a Queue
The first step to underwriting a loan is to access a specific loan by taking it off a Queue. By taking a loan off the Queue it shows up in your Pipeline Summary and your name will show up in the Workflow Locator as the employee with the Underwriting Share.
Figure 9.1 – Loan Shares
To take a loan off of a Queue do the following:
In the Pipeline left navigation menu choose Queue.
From the drop-down box of Queues, choose the Queue you wish to access. The screen will refresh and you will view a list of loans submitted to the selected Queue.
If you have access to only one Queue, you will not need to make a selection.
Flag one or more loans by clicking in the column marked with a red flag icon then click the Accept
Flagged Loan(s) icon to bring the loans into your pipeline.
You can flag all loans by clicking on the column header.

All information contained in this document is confidential and proprietary and may not be reproduced or disclosed to anyone not originally intended without the express written permission of Beanstalk Networks. © Beanstalk Networks. All rights reserved.
Page 122 of 216
Working on the File
You can access all of the loan’s documents from the e-Doc Manager available in the Loan Snapshot. Remember that you are looking at the lender’s copy of the loan and any changes you make will not show up in the originator’s copy until you specifically send them with the Update Originator action.
Once you have looked at the documents such as the 1003, 1008, appraisal and credit report you are ready to underwrite the loan. Do the following:
Figure 9.2 – Underwriting Action
Choose Underwriting from the loan’s action menu.
There are four tabs to use in the Underwriting screen (see Figure 9.3).
Review the Details tab. It contains key information on the file. If you wish, you can change the submission date, the product code, the registration date, or the credit score.
Figure 9.3 - Underwriting Screen Tabs
Go to the UW Worksheet tab and enter or change information as needed.
All dates can be entered with the popup calendar.
Contacts such as the appraiser can be entered by clicking on the Lookup button.
Lookup displays information from the Contacts database.
Go to the Conditions tab.
There are three ways you can apply conditions to a loan as follows:
1) Save and Merge from AU (DU, DO, or LP).
If the originator or lender ran an automated underwriting engine from within OpenClose by clicking on the Submit To AU action item, and the AU successfully returned conditions for the loan, then you can access, choose and merge any of those conditions into the loan.

All information contained in this document is confidential and proprietary and may not be reproduced or disclosed to anyone not originally intended without the express written permission of Beanstalk Networks. © Beanstalk Networks. All rights reserved.
Page 123 of 216
For instance, click on Save and Merge from DU to merge some or all of the DU conditions into the loan as illustrated in Figure 9.4.
You can click on the DU icon to look at the entire DU findings if necessary.
Flag whichever conditions you want to add to the loan.
Click the Merge Selected Conditions button once you have flagged your selection(s).
2) Choose Conditions from a standard/custom library of conditions.
Click the Lookup Conditions link in the top left corner of the Conditions tab.
The Select Conditions window will appear. If you wish to apply all conditions click the Flag
All column header. Otherwise, click in the blank area below the Flag All column for each condition you wish to add.
Click the Add Flagged Conditions button once you have flagged your selection(s). The window will close. Select the appropriate Prior To option from the drop-down menu for each condition.
3) Add a Condition Manually.
Click the Add Single Condition link in the top left corner of the Conditions tab.
Type a description for the condition you wish to apply in the Condition text box.
Select the appropriate Prior To option from the drop-down menu for each condition and flag the condition.
At this point you should be ready to make an underwriting decision for the loan and send that decision to the originator.
Note: If you need to transfer the file to another person or department before issuing your response you can transfer the loan to another lender employee, manager, or Queue. See Chapter 10 for details.
Go to the Response tab and choose the appropriate response type.
Loan Approved As Is.
If you added conditions then this option will be grayed out.
Loan Approved With Conditions.
If you did not add conditions then this option will be grayed out.
Loan Is Denied.
Reviewed.

All information contained in this document is confidential and proprietary and may not be reproduced or disclosed to anyone not originally intended without the express written permission of Beanstalk Networks. © Beanstalk Networks. All rights reserved.
Page 124 of 216
Pending Additional Information.
Provide comments in the Comments box and click the Submit button.
Do not forget to click Submit to send the response to the originator. Clicking Save will not send the response.
Clicking Submit will also send an email to the originator. This is separate from the messaging alert that is also sent.
Whether or not an email message is sent to the originator depends upon your system’s configuration. Contact your administrator.
Note to administrators: To activate this feature set the Loan Response Email Default to True.
To set the sent-from email address, enter the email in the Underwriting Response Email Sender Default.
Your conditions will be stored with the loan in the e-Doc Manager under Findings and will be forwarded to the appropriate originator (who will receive a Messaging alert).
You can also access your underwriting response by clicking the icon in the UWD column on the Pipeline Summary screen.
Figure 9.4 – Merging Conditions from DU

All information contained in this document is confidential and proprietary and may not be reproduced or disclosed to anyone not originally intended without the express written permission of Beanstalk Networks. © Beanstalk Networks. All rights reserved.
Page 125 of 216
Deleting Conditions
To delete a condition simply Flag it, and then click on the Delete Flagged Condition(s) link located in the upper right corner of the Conditions tab.
Clearing Conditions
As you work on the loan and you can easily clear conditions and re-send the new approval to the originator. Do the following:
Click on the text of a condition.
You can edit the text of the condition in this mode.
Click on the Date calendar popup to ender the date the condition was cleared.
Set the PriorTo field to the appropriate selection for the condition.
Figure 9.5 – Clearing Conditions.

All information contained in this document is confidential and proprietary and may not be reproduced or disclosed to anyone not originally intended without the express written permission of Beanstalk Networks. © Beanstalk Networks. All rights reserved.
Page 126 of 216
Figure 9.6 - Looking Up and Flagging Conditions
Figure 9.7 - Underwriting Response

All information contained in this document is confidential and proprietary and may not be reproduced or disclosed to anyone not originally intended without the express written permission of Beanstalk Networks. © Beanstalk Networks. All rights reserved.
Page 127 of 216
10
Workflow Functions
Working with Submitted Loans
Intended Audience
This section covers functions that are available to Lender Employees in OpenClose.
Transferring a Loan
Once your work on a loan file is complete or if you wish to have another user work on the file you can transfer it to another user. To transfer a loan, do as follows:
Choose Transfer Loan from the loan’s action menu.
Choose a Work Group from the drop-down box.
Choose a user or Queue from the Select Recipient drop-down box.
Provide comments in the box.
Click the Send Loan button.
The file will be removed from your pipeline and placed in the selected user’s or Queue’s pipeline. If you selected a user to receive the file that user will receive a messaging alert.
Note: when you do a Transfer on the lender side of a linked loan, the other loan does not get transferred. When transferring a linked loan, you must transfer both individually.
Releasing a Loan
If you are a Lender Employee with a share on a file you may wish to release your share so that the loan no longer appears in your personal Pipeline Summary screen.
Audience:
Lender Employees

All information contained in this document is confidential and proprietary and may not be reproduced or disclosed to anyone not originally intended without the express written permission of Beanstalk Networks. © Beanstalk Networks. All rights reserved.
Page 128 of 216
Note: a share is a lender “copy” of the loan. For instance, there can be an underwriting share and a lock share and an account exec share all on the same loan. But, there can only be one of each share at a time. That is, there can never be two underwriting shares at once.
You can see every lender employee with a share on a file in the loan’s e-Doc Manager in the Workflow
Locator section as in Figure 10.1. In this case the account exec, underwriter, and lock desk are all working on this file.
Figure 10.1 – Loan Shares
Another Lender Employee may take the share that you released, such as the underwriting share or the lock share.
A common use of this feature is to allow an originator to resubmit the file and have it automatically re-routed to appropriate workflow location. For example, a lock desk user may wish to release the lock share following a float response so that the file doesn’t stay in the user’s Pipeline Summary screen. When the originator submits a lock request it will be re-routed to the lock desk Queue.
To release a loan do the following:
Choose Release Loan from the loan’s action menu.
Enter comments in the Comments box.
Click the Release Loan button.
Acquiring a Loan
As a Lender Employee you can acquire a share on a loan if that share is not already taken.
On the Pipeline Summary screen choose Search Loans from the Pipeline Action menu.
Enter or adjust your search criteria and click the Search button.
Click a borrower name to access the file’s Loan Snapshot screen.
Look at the Workflow Locator section in the top right corner of the Loan Snapshot screen. You will see which shares are taken on the file and who has each share.

All information contained in this document is confidential and proprietary and may not be reproduced or disclosed to anyone not originally intended without the express written permission of Beanstalk Networks. © Beanstalk Networks. All rights reserved.
Page 129 of 216
From the loan’s action menu choose Acquire Loan.
If you already have a share on this file you will not see this option.
If the lender’s copy of the loan has not been created yet you will not see this option.
In the Select Purpose drop-down box choose a share.
Shares that are already taken will not be available to you.
Enter comments in the comments box.
Click the Acquire Loan button.
Work Group Management
Intended Audience
Work Group management functions are available to Lender Managers only.
Overview
The Administrator has the ability to configure Managers so that they have access to various Work Groups. For example, you may be a manager of underwriting, so the Administrator may set up your account to have access to the Underwriting Work Group. A manager in the secondary marketing department may be configured to have access to the Lock Desk Work Group. Managers can be configured to have access to more than one Work Group.
When you are given access to a Work Group, you can use Work Group Management to see which loans are in your department and reassign loans as needed.
Using Work Group Management
Under the Pipeline menu, choose Work Group management.
In the Work Groups drop-down box, choose a Work Group. If you do not see any Work Groups in the list, contact your Administrator to provide you with the appropriate access.
When the screen reloads, you will see all files that are assigned to the Work Group you selected. The Location column tells you what user or Queue has the share you selected.
Flag one or more files by clicking in the column marked with a flag icon. You can flag all files by clicking the column header.

All information contained in this document is confidential and proprietary and may not be reproduced or disclosed to anyone not originally intended without the express written permission of Beanstalk Networks. © Beanstalk Networks. All rights reserved.
Page 130 of 216
In the Re-Assign Flagged Loan(s) drop-down box, choose a user or Queue in the Work Group you originally selected.
Click the GO button. The Work Group share for the file(s) that you flagged will be reassigned.
Be Originator
Be Originator allows a Lender Employee to masquerade as an originator for a specific loan. To access this functionality, do the following:
Click on Be Originator from a loan’s action menu.
Perform the functions and actions you need to for the loan.
Click on Log Back In As… to return to your original user type.
Lender employees can also upload or add a loan for an originator without using Be Originator.
Lender Employees have the ability to create loans on behalf of an originator. Lender Employees can choose to either upload a loan, or enter a 1003 and select which originator
To enter a new loan on behalf of an originator:
Select Upload loan or 1003 entry from the Add A Loan option in the left menu.
Choose an originator by clicking on the magnifying glass icon next to the “Select Originator” field. A search window will pop up to find an originator.
Enter information to find the appropriate originator and click the Search button. See Figure 10.2.
Select the originator by clicking the Select link in the Actions column.
Complete the loan by either uploading or entering the 1003 data.
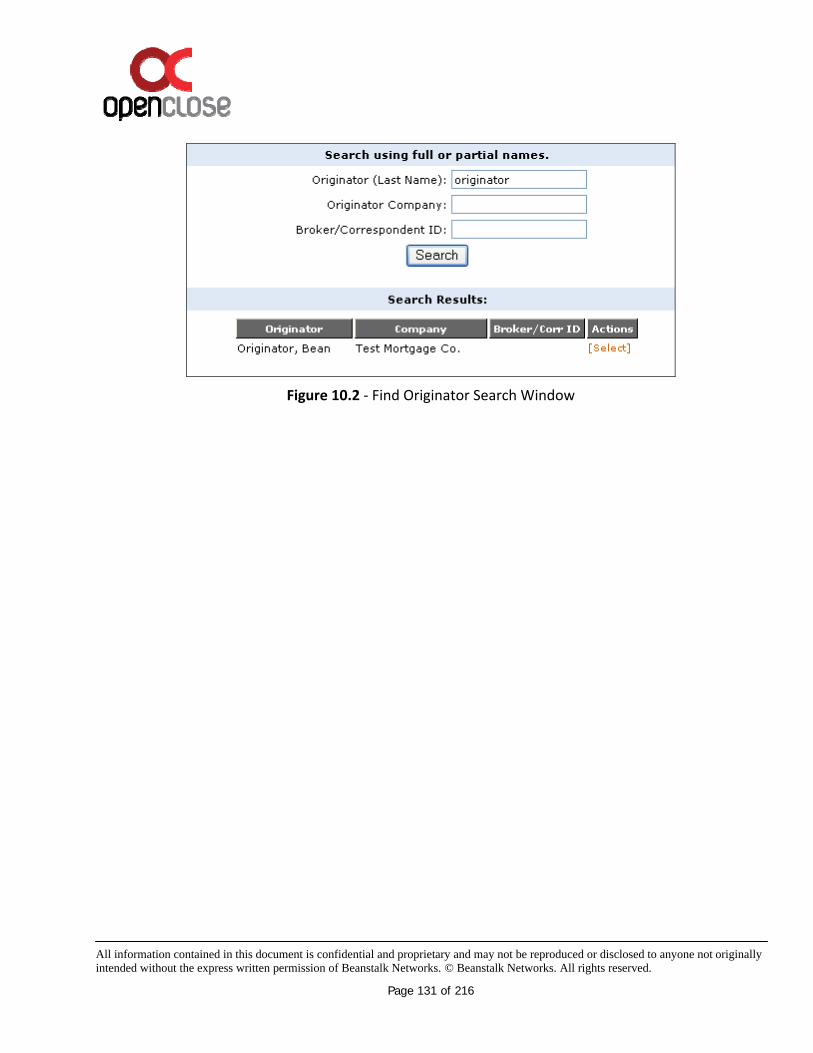
All information contained in this document is confidential and proprietary and may not be reproduced or disclosed to anyone not originally intended without the express written permission of Beanstalk Networks. © Beanstalk Networks. All rights reserved.
Page 131 of 216
Figure 10.2 - Find Originator Search Window

All information contained in this document is confidential and proprietary and may not be reproduced or disclosed to anyone not originally intended without the express written permission of Beanstalk Networks. © Beanstalk Networks. All rights reserved.
Page 132 of 216
11
The Message Center
Working with Messages
In addition to email communication OpenClose contains a secure, internal messaging system which allows for loan-based (Loan Messages) and user-based (Messages) messaging throughout the loan process.
The Message Center is accessed in two ways:
For Messages:
Click the alert icon at the top right corner of the screen
For Loan Messages:
Click the message icon for the loan in the Pipeline Summary.
Figure 11.1 – The Message Center for a Specific Loan
Audience: All

All information contained in this document is confidential and proprietary and may not be reproduced or disclosed to anyone not originally intended without the express written permission of Beanstalk Networks. © Beanstalk Networks. All rights reserved.
Page 133 of 216
Figure 11.2 – The Message Center Up-Close
Under the Site Preferences tab of User Settings you can define how many items show per page (see Figure 2.10).
You can chose between 10 to 50 items per page for loans in a Pipeline Summary or messages in the Message Center.
From the drop-down boxes select the number of items to appear per page for each type of item.
You can use the following icons when using the Message Center:
Reply To Message
View All Messages For This Loan
Go To The Loan
Go To The Document

All information contained in this document is confidential and proprietary and may not be reproduced or disclosed to anyone not originally intended without the express written permission of Beanstalk Networks. © Beanstalk Networks. All rights reserved.
Page 134 of 216
12
Reporting
Pipeline Reporting
Pipeline Reporting is an important tool for reporting on the loans in OpenClose. With reporting, you can create re-usable reports based on any number of fields and criteria.
When creating and using reports, keep in mind the following:
Broker User Level 2 and Broker User Level 3 users can report on loans for which they are the assigned originator only.
Broker User Level 1 users can report on all loans within their Broker/Branch Company.
Account Executives can report on broker and lender copies of loans that belong to their assigned Broker/Branch Companies.
Lender Employees can report on loans on which they have a share.
Manager Level users can report on Broker and Lender copies of loans that below to Broker Companies that report to their assigned Account Executives.
Administrator level users can report on all loans in the system, both Broker and Lender copies.
Creating a Pipeline Report
Choose reporting from the Pipeline menu.
In the Report Criteria tab, double-click any fields that you would like to appear in your report.
To change the sort order, click a field in the Selected report fields box so that it is highlighted then
click the up or down icon to move it up or down in the list, respectively.
(Lender Users Only): Indicate if you wish to run the report on the Lender copy of loan files, the Broker copy, or both.
Create one or two filters if you wish. You can only sort or criteria that you have included in your search.
Note that if you choose to provide two criteria, both must be true on a loan file in order for it to be returned.
Audience: All

All information contained in this document is confidential and proprietary and may not be reproduced or disclosed to anyone not originally intended without the express written permission of Beanstalk Networks. © Beanstalk Networks. All rights reserved.
Page 135 of 216
Provide a title for your report.
Click the Generate Report button. You will be taken to the Reports tab where your report is being processed.
Figure 12.1 - The Reports Tab
If you wish to wait for your report to process, click the Refresh button until the text in the Last Updated column changes from Processing… to today’s date. If you do not wish to wait, you can come back to the Reports tab at a later time.
Click the magnifying glass icon to view your report. It will pop up in a separate window.
If you wish to export the results, choose an export option from the Open/Export report to drop-down box and click the Export Report button.
Figure 12.2 - Export a Report

All information contained in this document is confidential and proprietary and may not be reproduced or disclosed to anyone not originally intended without the express written permission of Beanstalk Networks. © Beanstalk Networks. All rights reserved.
Page 136 of 216
Working with Saved Reports
Choose reporting from the Pipeline menu.
Go to the Reports tab.
Take one of the following actions:
To delete a report, click next to the report in the flag column to toggle it. Next, click the Delete
Flagged Reports link in the Flagged Item Actions box. Note that you can click one or more reports to delete.
To view a report’s results from the last time it was run, click the magnifying glass icon. The report results will appear in a separate window.
To edit a report’s criteria, click the pencil icon, make your changes, and click the Generate Report button at the bottom of the screen.
To get updated results from a report, click the Run Report icon.
When the report finishes running you can view the report with the updated results.
To create a new report using an existing report’s criteria, click the copy icon, enter a new name for the report, and click the Copy Report button. You can edit the report once it is created to make the relevant changes.

All information contained in this document is confidential and proprietary and may not be reproduced or disclosed to anyone not originally intended without the express written permission of Beanstalk Networks. © Beanstalk Networks. All rights reserved.
Page 137 of 216
13
InfoCenter
Overview
The InfoCenter is a tool for your company to publish documents to all of your corporate staff and to select brokers or branches. You will use Groups and Regions to control which brokers or branches have access to select files.
Administrators have full control over the InfoCenter.
Lender Managers have the ability to post documents to the InfoCenter.
All other users have read-only access to the InfoCenter and will only see documents which belong to their Group or Region.
Accessing the InfoCenter
To access the InfoCenter, choose lookup docs from the InfoCenter left navigation menu.
Figure 13.1 – Non-administrator’s InfoCenter Menu
Figure 13.2 – Administrator’s InfoCenter Menu
Audience: All

All information contained in this document is confidential and proprietary and may not be reproduced or disclosed to anyone not originally intended without the express written permission of Beanstalk Networks. © Beanstalk Networks. All rights reserved.
Page 138 of 216
Creating Document Sub-Folders
Click on the name of the folder you wish to add a sub-folder.
Type the name of the new sub-folder in the Create Sub-Folder text field.
Click the Create button.
Figure 13.3 – Create a Sub-Folder
Editing Document Sub-Folders
Click on the name of the folder you wish to edit.
Type the new name.
Click the Update button.

All information contained in this document is confidential and proprietary and may not be reproduced or disclosed to anyone not originally intended without the express written permission of Beanstalk Networks. © Beanstalk Networks. All rights reserved.
Page 139 of 216
Figure 13.4 – Update a Folder
Deleting Document Sub-Folders
Click on the name of the folder you wish to delete.
Click the Update button.
Note that all sub-folders and documents residing under the folder you are about to delete will also be deleted.
Figure 13.5 – Delete a Folder

All information contained in this document is confidential and proprietary and may not be reproduced or disclosed to anyone not originally intended without the express written permission of Beanstalk Networks. © Beanstalk Networks. All rights reserved.
Page 140 of 216
How to Upload a Document
Click on the name of the folder you wish to add a document.
Type the name of the document in the File Description text field.
Click the Browse button, locate the file on your computer, and double-click it. The path to the selected file will appear in the File Path textbox.
To send email notification of the newly uploaded document to the broker users who have permission to view the document, check the email notification checkbox.
Choose at least one Group or Region to designate which Broker Users will have access to this document.
Click the Upload Document button.

All information contained in this document is confidential and proprietary and may not be reproduced or disclosed to anyone not originally intended without the express written permission of Beanstalk Networks. © Beanstalk Networks. All rights reserved.
Page 141 of 216
Figure 13.6 – Upload a Document
How to Update a Document
NOTE: Updating an InfoCenter document allows you to update the document itself, but does not allow you to change the display name of the document.
Click on the name of the folder in which the document is located.
Find the name of the document in the list and click the pencil icon under the Actions column.
Click the Browse button, locate the file on your computer, and double-click it. The path to the selected file will appear in the File Path textbox.

All information contained in this document is confidential and proprietary and may not be reproduced or disclosed to anyone not originally intended without the express written permission of Beanstalk Networks. © Beanstalk Networks. All rights reserved.
Page 142 of 216
How to Delete a Document
Click on the name of the folder in which the document is located.
Find the name of the document in the list and click the delete icon under the Actions column.

All information contained in this document is confidential and proprietary and may not be reproduced or disclosed to anyone not originally intended without the express written permission of Beanstalk Networks. © Beanstalk Networks. All rights reserved.
Page 143 of 216
14
Contacts
Contacts
The Contacts tool is a listing of contact information for third-parties that may or may not be tied to loans. Contacts can be configured by a user for him- or herself, for all users in the Broker/Branch Company, or globally for all users in the system.
Creating a Contact
Click on contacts under Software Center in the left navigation.
Click the New Contact button near the top of the screen.
Provide name and contact information about the contact you are adding.
In the Contact Type drop-down box, select the type of contact you are creating.
The available contact type are as follows:
Appraiser
Attorney
Builder
Contract Processor
Contract Underwriter
Home Dealer
Home Inspector
Home Manufacturer
Insurance
Investor
LPO
A limited practice officer, or LPO, is a person certified as a closing officer.
Audience: All

All information contained in this document is confidential and proprietary and may not be reproduced or disclosed to anyone not originally intended without the express written permission of Beanstalk Networks. © Beanstalk Networks. All rights reserved.
Page 144 of 216
Mortgage Insurance
MI Insurer
Other
Realtor
Settlement Agent
Title Company
Warehouse Bank
In the Scope drop-down box, the options available to you depend on who you are.
If you are a broker user level 2 or 3, Account Executive, or Lender Employee, this option will not be available.
If you are a Broker User Level 1, you can set the contact to be available to you only by choosing My Contact. If you’d like all users within your Broker/Branch Company to have access to this contact, choose Company.
If you are a Manager, you can set the contact to be available to you only by choosing My Contact. If you’d like the contact to be available to Lender users only, choose Lender Side.
If you are an Administrator, you can set the contact to be available to you only by choosing My
Contact. If you’d like the contact to be available to Lender users only, choose Lender Side. Finally, if you’d like all users in OpenClose to have access to this contact, choose Global.
Click the Save to Contacts button when complete.
Editing a Contact
Click on contacts under Software Center in the left navigation.
Click the name of the contact you wish to edit.
Make any changes you wish, and click the Save to Contacts button.
View Contacts
You can assign contacts to a loan file using the Contacts tool. Choose Loan Contacts from the loan’s action menu. By default, you will see all contacts assigned to the selected loan.
To add a contact, choose a different option from the Select View drop-down box in order to see all contacts available. When the screen re-loads, click in the flag column next to one or more contacts.

All information contained in this document is confidential and proprietary and may not be reproduced or disclosed to anyone not originally intended without the express written permission of Beanstalk Networks. © Beanstalk Networks. All rights reserved.
Page 145 of 216
Click the Add Flagged to Folder button. The selected contact(s) are now assigned to the loan.
To remove a contact from a loan, be sure that Loan Contacts is the option selected in the Select
View drop-down box.
Click in the flag column next to one or more contacts to flag them, and click the Remove Flagged from Folder button. The selected contact(s) are no longer assigned to the loan.
Figure 14.1 – Add a Contact to a Loan

All information contained in this document is confidential and proprietary and may not be reproduced or disclosed to anyone not originally intended without the express written permission of Beanstalk Networks. © Beanstalk Networks. All rights reserved.
Page 146 of 216
15
Broker/Branch Company Administration
Intended Audience
This chapter outlines the functions available to Broker User Level 1 users to manage their Broker/Branch Company. Broker User Level 2 users and Broker User Level 3 users do not have the functions outlined in this section.
As a Broker User Level 1 you have available to you the Administration menu. Click company profile to access your broker/branch company profile.
Figure 15.1 - Broker/Branch Company Administration Menu
Figure 15.2 - Broker/Branch Company Profile Tabs
Company Profile
Under the Company tab you can make changes to your Broker/Branch Company contact information. Be sure to click the Save Company Profile button at the bottom of the screen to save your changes. The address, phone, and e-mail information provided here will auto-populate into the profiles of new broker users that you create.
Note that this section may have been locked down by an Administrator, in which case fields will be grayed out or unavailable to edit.
Audience:
Branch/Broker Mangers
(Broker User Level 1)

All information contained in this document is confidential and proprietary and may not be reproduced or disclosed to anyone not originally intended without the express written permission of Beanstalk Networks. © Beanstalk Networks. All rights reserved.
Page 147 of 216
Groups/Regions
There are no actions for you to take on this tab. What you see here are the Groups and Regions that the Administrator has assigned to your Broker/Branch Company. These are the Groups and Regions that you, in turn, will be able to assign to your users.
Details
You can edit your tax identification number here, though it is not required.
Users
One of the main responsibilities of a Broker User Level 1 is to create and manage originators and processors within the Broker/Branch Company.
Creating a Broker User
Recall from Chapter 1 that Broker User Level 2 users are loan originators and Broker User Level 3 users are processors. To create new users do the following:
Copy an existing user.
In the Users tab of your company profile click the copy user icon in the Actions column next to a user you wish to copy.
Create a new user.
In the Administration menu in the left navigation choose Add User.
Complete the fields under the User Information tab. Fields marked with an asterisk are required. Most of the information will auto-populate. That information comes from your Broker/Branch Company profile.
NOTE: No two users in your company may share the same username. If you attempt to create a username that has already been used by another user you will receive an error when you try to save the new user.
Under the Permissions tab select the user level you wish to apply to this user. Place your mouse cursor over a user level to see a description in the area below.
If your company uses processors in its workflow, and this user is an originator, be sure to assign a processor to this user by moving a processor over from the Available Processors box to the Assigned Processors box.
Under the Groups/Regions tab select at least one Group or Region for the user by double-clicking the Group or Region in the boxes on the left side.
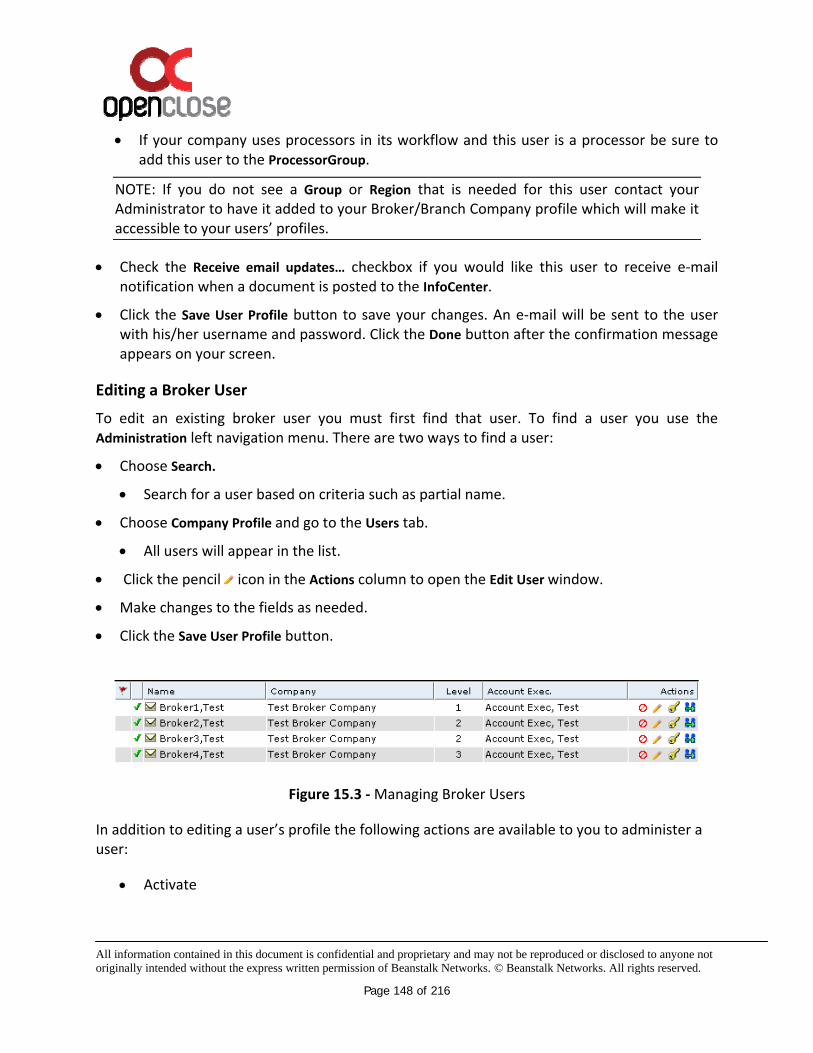
All information contained in this document is confidential and proprietary and may not be reproduced or disclosed to anyone not originally intended without the express written permission of Beanstalk Networks. © Beanstalk Networks. All rights reserved.
Page 148 of 216
If your company uses processors in its workflow and this user is a processor be sure to add this user to the ProcessorGroup.
NOTE: If you do not see a Group or Region that is needed for this user contact your Administrator to have it added to your Broker/Branch Company profile which will make it accessible to your users’ profiles.
Check the Receive email updates… checkbox if you would like this user to receive e-mail notification when a document is posted to the InfoCenter.
Click the Save User Profile button to save your changes. An e-mail will be sent to the user with his/her username and password. Click the Done button after the confirmation message appears on your screen.
Editing a Broker User
To edit an existing broker user you must first find that user. To find a user you use the Administration left navigation menu. There are two ways to find a user:
Choose Search.
Search for a user based on criteria such as partial name.
Choose Company Profile and go to the Users tab.
All users will appear in the list.
Click the pencil icon in the Actions column to open the Edit User window.
Make changes to the fields as needed.
Click the Save User Profile button.
Figure 15.3 - Managing Broker Users
In addition to editing a user’s profile the following actions are available to you to administer a user:
Activate

All information contained in this document is confidential and proprietary and may not be reproduced or disclosed to anyone not originally intended without the express written permission of Beanstalk Networks. © Beanstalk Networks. All rights reserved.
Page 149 of 216
If a user has been deactivated click on the activate icon to activate a user.
Deactivate
If you need to deactivate a user click on the deactivate icon
Edit
Click on the edit icon to edit a user’s profile
Toggle Flag
You can flag a user from within a group of users in order to perform the same action on several users at the same time. You flag a user by clicking in the far left column of the user list. Click a second time to toggle the flag off.
Reset Password
You can reset a user’s password by clicking on the reset password icon. A temporary password will be emailed to the user.
You can email a user by clicking on the email icon.
Copy User
You can copy a user’s profile and use it to create a new, similar user by clicking on the copy user icon.
Figure: 15.4 – Actions to Manage a User
NOTE: Deactivating a broker user restricts the user from logging into OpenClose. It does not affect the user’s loans in any way.

All information contained in this document is confidential and proprietary and may not be reproduced or disclosed to anyone not originally intended without the express written permission of Beanstalk Networks. © Beanstalk Networks. All rights reserved.
Page 150 of 216
NOTE: Users may accidentally deactivate their account by attempting to log in with an incorrect password three times in a row.
Defaults
Defaults are covered in detail in Chapter 18. Remember that Defaults can also be set at the individual user level and at the lender system administrator level.
If you wish to configure Defaults to affect all broker users in your branch or company make changes under the Defaults tab after clicking on Company Profile from the Administration menu.
NOTE: Generally, the only Defaults that a Broker User Level 1 would wish to configure are those for third-party accounts such as automated underwriting and credit.
Any values you assign will apply to all of your broker users. However, a broker user’s own settings will overwrite any values you have assigned to the Broker/Branch Company. See Chapter 18 for information on how to configure Defaults.
Navigation Defaults
If you wish to configure Navigation Defaults for your Broker/Branch Company, make changes under the Navigation Defaults tab. See Chapter 19 for information on how to configure Navigation Defaults.
Closing Scenarios, Loan Products, Document Groups and Link Outs
These topics were covered in detail in Chapter 2.
The only difference to remember is that when you create or edit these features from the Company Profile menu you are affecting all users in your company.
If you create a Closing Scenario, Loan Product, Document Group, or Link Out from the Company Profile menu then the users who use them cannot delete or edit them. Only a Broker User Level 1 will be able to delete or edit them.
Pipeline Management
Pipeline Management is available only to Broker User Level 1 users, Lender Managers, and Lender Administrators. Pipeline Management is used by management to reassign loans.

All information contained in this document is confidential and proprietary and may not be reproduced or disclosed to anyone not originally intended without the express written permission of Beanstalk Networks. © Beanstalk Networks. All rights reserved.
Page 151 of 216
NOTE: Do not use Pipeline Management for workflow purposes. Pipeline Management or Work Group Management should only be used for changing the owner of the file.
On the Broker/Branch side of the system, use Pipeline Management if the loan’s originator must be changed.
On the Lender side of the system, use Pipeline Management if the loan’s assigned account executive has changed.
Using Pipeline Management for other purposes will cause problems in the loan’s workflow.
To access Pipeline Management, choose management from the Pipeline left navigation menu.
By default you will only view active loans (loans that are not cancelled or closed). To view cancelled or closed loans change your view from the Pipeline Action Menu. See Chapter 3 for more information.
NOTE: To change the sort order of the loans on the Pipeline Management screen, click a column header. Click the column header again to reverse the sort order.
To re-assign a loan:
Flag one or more loans for reassignment by checking in the first column, the column marked with a flag icon. Click the column header to flag all loans.
Choose a user from the Re-Assign Flagged Loan(s) drop-down box and click the Go button.
Figure 15.5 - Reassigning Flagged Loans with Pipeline Management

All information contained in this document is confidential and proprietary and may not be reproduced or disclosed to anyone not originally intended without the express written permission of Beanstalk Networks. © Beanstalk Networks. All rights reserved.
Page 152 of 216
16
Lender Administration
Intended Audience
This chapter covers functionality available to lender-side Administrators only.
Groups and Regions
Only Administrators have the ability to manage Groups and Regions.
One of the first tasks for a lender administrator is to setup Groups and Regions.
The primary function of Groups and Regions is to control broker users’ access to documents that are posted to the InfoCenter. For instance, you may have different rate sheets for different geographic areas or for top producing brokers. In these cases you would create a group, and assign those users to that group. Whenever a document is added it is assigned to various groups. Only those users in the group will have access to the document.
Example of Groups:
• Top Producers Group
• Northeast Region
Note: You do not need to use Regions in addition to Groups. You can create a Group which is based on what you might consider a Region. For instance, you can create a Group called Northeast, and use it for all brokers located in the Northeast.
Audience:
Lender Administrators Only

All information contained in this document is confidential and proprietary and may not be reproduced or disclosed to anyone not originally intended without the express written permission of Beanstalk Networks. © Beanstalk Networks. All rights reserved.
Page 153 of 216
Figure 16.1 – Add a Group
Adding a Group or Region
To add a new Group or Region, do as follows:
Choose add Group or add Region from the InfoCenter left navigation menu.
Enter a short name and a long name for the Group or Region in the appropriate text boxes.
Click the Save Information button.
Editing a Group or Region
Choose Lookup Groups or Lookup Regions from the InfoCenter left navigation menu.
Search for the Group or Region based on criteria such as Name.
You can take any of the following actions on a Group or Region:
To delete one or more Groups or Regions click in the flag column to flag the selected Group or Region. Next, click the Delete Flagged Items link at the top of the screen.
To deactivate a Group or Region, click the deactivate icon under the Actions column for the Group or Region you wish to deactivate.
To activate a Group or Region, click the checkmark icon under the Actions column for the Group or Region you wish to activate.
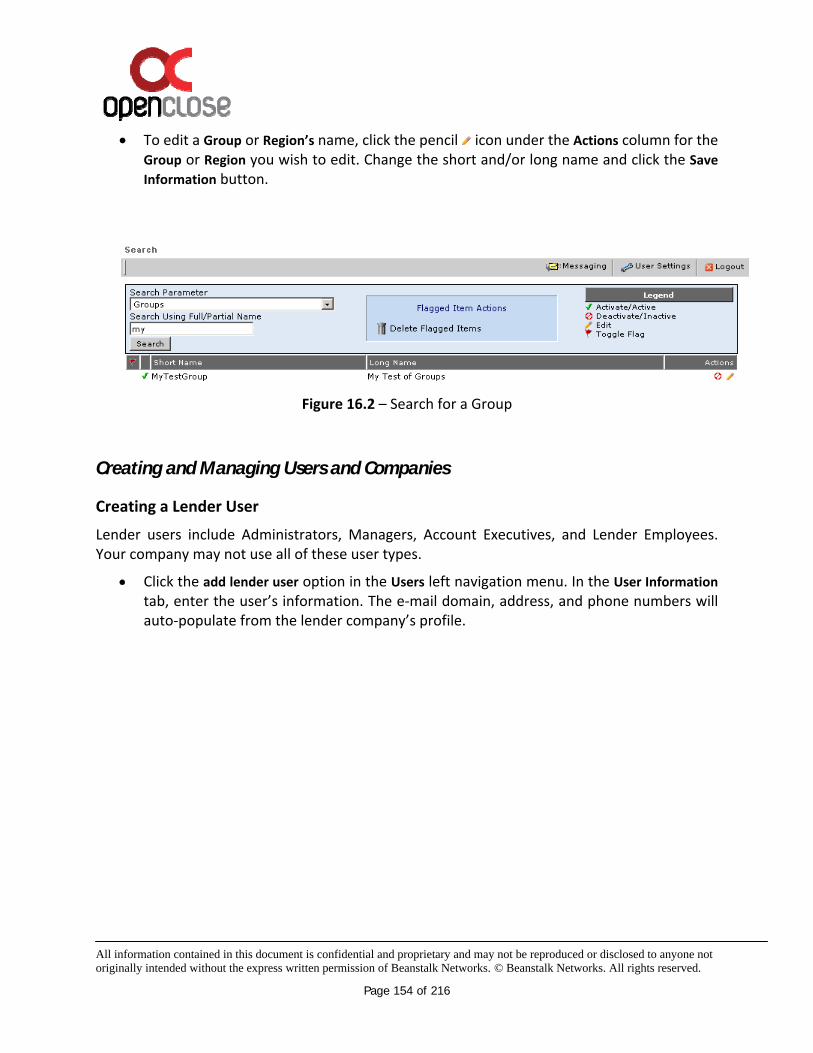
All information contained in this document is confidential and proprietary and may not be reproduced or disclosed to anyone not originally intended without the express written permission of Beanstalk Networks. © Beanstalk Networks. All rights reserved.
Page 154 of 216
To edit a Group or Region’s name, click the pencil icon under the Actions column for the Group or Region you wish to edit. Change the short and/or long name and click the Save
Information button.
Figure 16.2 – Search for a Group
Creating and Managing Users and Companies
Creating a Lender User
Lender users include Administrators, Managers, Account Executives, and Lender Employees. Your company may not use all of these user types.
Click the add lender user option in the Users left navigation menu. In the User Information tab, enter the user’s information. The e-mail domain, address, and phone numbers will auto-populate from the lender company’s profile.

All information contained in this document is confidential and proprietary and may not be reproduced or disclosed to anyone not originally intended without the express written permission of Beanstalk Networks. © Beanstalk Networks. All rights reserved.
Page 155 of 216
Figure 16.3 – Add a Lender User
In the Permissions tab choose the appropriate permission level for this user. If you are creating an Account Executive or Lender Employee you must select a manager from the Manager assignment drop-down box.
In the Details tab you can enter two additional email addresses where notification will be sent when an originator submits a loan to this user. This can be left blank.
In the Group tab you can assign the new user to various Groups.
Click the Save User Profile button at the bottom of the screen. An e-mail will be sent to the user’s e-mail address with his or her username and temporary password.
Looking up and Managing Lender Users
You can use the Users left navigation menu to search for lender users. Once you are on the search screen you can change your search criteria. You can search for the flowing lender types by clicking the appropriate choice in the menu:
Admins
Managers
Account Execs

All information contained in this document is confidential and proprietary and may not be reproduced or disclosed to anyone not originally intended without the express written permission of Beanstalk Networks. © Beanstalk Networks. All rights reserved.
Page 156 of 216
Lender Employees
Originators
Figure 16.4 - The Users Menu
When you select one of the lookup types from the Users menu you will be taken to the search tool with the user type you selected automatically chosen in the Search Parameter drop-down box.
If there are more users in the results than you can see on your screen you can narrow down your search. Enter part of the user’s last name in the second text box and click Search.
Figure 16.5 – Search Parameters
When your search results are returned you can take some actions on the users. Note that you cannot make changes to other Administrators. You can do the following:
Activate

All information contained in this document is confidential and proprietary and may not be reproduced or disclosed to anyone not originally intended without the express written permission of Beanstalk Networks. © Beanstalk Networks. All rights reserved.
Page 157 of 216
If a user has been deactivated click on the activate icon to activate a user.
Deactivate
If you need to deactivate a user click on the deactivate icon
Edit
Click on the edit icon to edit a user’s profile
Toggle Flag
You can flag a user from within a group of users in order to perform the same action on several users at the same time. You flag a user by clicking in the far left column of the user list. Click a second time to toggle the flag off.
Reset Password
You can reset a user’s password by clicking on the reset password icon. A temporary password will be emailed to the user.
You can email a user by clicking on the email icon.
Copy User
You can copy a user’s profile and use it to create a new, similar user by clicking on the copy user icon.
Creating a Broker/Branch Company
Before you can create a broker user you must create a Broker/Branch Company in which to place the user. Do the following:
Click the add company option in the Company left navigation menu.
In the Company tab of the Add Company screen complete the fields. Fields marked with a red asterisk are required. The address, phone, and e-mail domain information that you provide for this Broker/Branch Company will auto-populate into the profiles of the broker users you create in the company.

All information contained in this document is confidential and proprietary and may not be reproduced or disclosed to anyone not originally intended without the express written permission of Beanstalk Networks. © Beanstalk Networks. All rights reserved.
Page 158 of 216
If you do not want Broker User Level 1 users to be able to change information on the Company tab when they manage their own profile then check the Broker user level one
may not edit this page check box.
If you do not want Broker User Level 1 users to be able to create additional users then check the Disallow user level one from creating additional users check box.
Figure 16.6 - Creating a Broker/Branch Company
In the Groups/Regions tab select one or more Groups or Regions.
You must select at least one. Choose any Group or Region that any broker user in this Broker/Branch Company may need to belong to.
If there will be processors in this Broker/Branch Company make sure that the ProcessorGroup is selected.
In the Details tab provide the Broker/Branch Company’s approved date.
If your business does not track the approved date then enter today’s date to track the date that the Broker/Branch Company was created in OpenClose.
You must select an Account Executive to which this Broker/Branch Company will be assigned. Be sure to click the Save Company Profile button when complete.

All information contained in this document is confidential and proprietary and may not be reproduced or disclosed to anyone not originally intended without the express written permission of Beanstalk Networks. © Beanstalk Networks. All rights reserved.
Page 159 of 216
In the Licenses tab you can select all of the states for which this company is licensed.
You can choose to have the system prevent users from accessing automated underwriting if the loan’s property address is not in a state for which they are licensed. Simply click the Validate AU Submissions to activate this feature.
Looking up and Managing a Broker/Branch Company
To manage an existing company you must first search for it.
Choose lookup companies from the Company left navigation menu. Enter a name or the first few characters of a name for a Broker/Branch Company and click the Search button. There are several actions that you can take on a Broker/Branch Company.
To deactivate a Broker/Branch Company so that none of that company’s users can log in click the deactivate icon.
To activate a deactivated Broker/Branch Company click the activate icon.
To edit a Broker/Branch Company click the pencil icon.
To add a user to a Broker/Branch Company click the add user icon.
Creating a Broker User
The first step in creating a broker user is to select the Broker/Branch Company that this user will be a part of. To create a broker user do the following:
Choose lookup companies from the Company left navigation menu. If you do not see the Broker/Branch Company you are looking for type they name of the company in the search text box and click Search.
Click the add user icon from the Actions column for the relevant Broker/Branch Company.
Complete the fields in the User Information tab.
The fields marked with a red asterisk are required. Note that the address, phone, and e-mail domain information auto-populates form the Broker/Branch Company profile. In the
In the Permissions tab select the appropriate user level.
In the Groups/Regions tab select at least one Group or Region. Note that you can only choose from the Groups and Regions that were assigned to this user’s Broker/Branch Company.

All information contained in this document is confidential and proprietary and may not be reproduced or disclosed to anyone not originally intended without the express written permission of Beanstalk Networks. © Beanstalk Networks. All rights reserved.
Page 160 of 216
When you have completed the fields click the Save User Profile button. An e-mail will be sent to the new user’s e-mail address containing his or her username and temporary password.
Looking up and Managing a Broker User
To look up a broker user by name choose lookup brokers from the Users left navigation menu.
To look up a broker user by Broker/Branch Company, find the Broker/Branch Company using lookup companies in the Company menu and then click the pencil icon for the Broker/Branch Company and go to the Users tab.
The following are several actions you can take on a broker user:
To deactivate a broker user so that he or she cannot log in click the deactivate icon.
To activate a deactivated broker user click the activate icon.
To edit a broker user click the pencil icon.
To reset a broker user’s password, click the key icon. An e-mail will be sent to the user with his or her newly-created temporary password.
To copy a broker user in order to create a new one, click the copy user icon.
To assign a processor to a broker user, click the pencil icon and go to the Permissions tab. Double-click a processor in the Available Processors box, and click Save User Profile.
To designate a broker user as a processor, click the pencil icon and go to the Groups/Regions tab. Double-click the ProcessorGroup Group in the top left box.
If the ProcessorGroup Group does not appear in either of the top boxes you must add it to the broker user’s Broker/Branch Company.
Pipeline Management
Pipeline Management is available only to Broker User Level 1 users, Lender Managers, and Lender Administrators. Pipeline Management is used by management to reassign loans.
NOTE: Do not use Pipeline Management for workflow purposes. Pipeline Management or Work Group Management should only be used for changing the owner of the file.
On the Broker/Branch side of the system, use Pipeline Management if the loan’s originator must be changed.

All information contained in this document is confidential and proprietary and may not be reproduced or disclosed to anyone not originally intended without the express written permission of Beanstalk Networks. © Beanstalk Networks. All rights reserved.
Page 161 of 216
On the Lender side of the system, use Pipeline Management if the loan’s assigned account executive has changed.
Using Pipeline Management for other purposes will cause problems in the loan’s workflow.
To access Pipeline Management choose management from the Pipeline left navigation menu.
By default you will only view active loans (loans that are not cancelled or closed). To view cancelled or closed loans change your view from the Pipeline Action Menu. See Chapter 3 for more information.
NOTE: To change the sort order of the loans on the Pipeline Management screen, click a column header. Click the column header again to reverse the sort order.
To re-assign a loan, do the following:
Flag one or more loans for reassignment by checking in the first column, the column marked with a flag icon. Click the column header to flag all loans.
Choose a user from the Re-Assign Flagged Loan(s) drop-down box and click the Go button.
Figure 16.7 - Reassigning Flagged Loans with Pipeline Management
Workflow Maintenance
Overview
OpenClose allows you to control several aspects of your company’s workflow. For example, you can define where a file is routed when a broker user submits a loan to the lender for underwriting, and you can control which users are part of your underwriting Work Group.
Recall from Chapter 2 that there is a Broker copy and a Lender copy of a loan file. When a broker user submits a lock form or submits a file to the lender, the Lender copy of the file is created. Both versions of the file have their own loan number.

All information contained in this document is confidential and proprietary and may not be reproduced or disclosed to anyone not originally intended without the express written permission of Beanstalk Networks. © Beanstalk Networks. All rights reserved.
Page 162 of 216
Remember that since the lender and the originator have distinct, separate copies of the loan, the only way an originator can update the lender’s copy is with the Update Lender and Submit Loan To Lender commands.
The only way an underwriter can update the originator’s copy is with the Update
Originator and Loan Response (Underwriting) commands.
Queues
Queues control where files go and who has access to them. One way to think of a Queue is the analogy of a fax machine. A few originators may fax a few loans to a specific fax machine which resides in a specific location in the lender’s office. Once the documents have arrived, various lender employees such as several underwriters can take one or more of the loans off of the fax machine and bring it over to their desk to work on the loan.
Queues can receive files that are submitted by a broker user and Queues can have files transferred to them by lender users. By using Queues you allow your staff to access and take ownership of files from a particular area rather than searching the entire system.
An administrator will setup various Queues (such as an underwriting Queue, a lock Queue, etc.).
A Queue is typically a lender-side Queue, but you can also create an originator-side Queue.
For instance, a Queue for branch/broker processors.
To add a new Queue click workflow maintenance from the left navigation Administration menu.
Click the Add New Queue link in the top left area of the screen.
Name the Queue.
Choose Lender or Originator in the Type drop-down box.
Click Save Queue(s) at the bottom of the screen.
To delete a Queue, check its Delete check box and click Save Queue(s).
To add a user to a Queue, either double-click his/her name in the left box, or highlight
the name, and then click on the right-arrow .

All information contained in this document is confidential and proprietary and may not be reproduced or disclosed to anyone not originally intended without the express written permission of Beanstalk Networks. © Beanstalk Networks. All rights reserved.
Page 163 of 216
To remove a user from a Queue, either double-click his/her name in the right box or
highlight the name, and then click on the left arrow
Click the Save Queue(s) button when your changes are complete.
In Figure 16.8, we have created a new lender-side Queue called “ALockDeskRequests”, and assigned Mitchell Powers as a user who has access to this Queue. Since he is the only member of this Queue right now, he will be the only employee who can remove a loan file from that particular Queue.
Note: Other users can still send files to the Queue, they just cannot remove files from the Queue.
Figure 16.8 - A New Queue
Work Groups
Work Groups are used to define which Lender Employees and Managers belong to various departments within your company.
The available Work Groups in OpenClose are as follows:
Lock Desk
Compliance
Underwriting
Loan Setup
Closing
An underwriting user, for example, should be part of the Underwriting Work Group, and any Queues for your underwriting department should be part of the Underwriting Work Group.
Work Groups are used by Lender Employees and Managers when transferring loans throughout the loan’s workflow. When a Lender Employee transfers a loan or a Manager reassigns a loan,

All information contained in this document is confidential and proprietary and may not be reproduced or disclosed to anyone not originally intended without the express written permission of Beanstalk Networks. © Beanstalk Networks. All rights reserved.
Page 164 of 216
he or she must first choose a Work Group. After the user has selected a Work Group, he or she can choose from a list of users and Queues that belong to the selected Work Group. This process enables Lender Employees and Managers to more easily find the user or Queue they are looking for and helps to track where in the workflow the loan resides.
To configure the users and Queues in your Work Groups, do the following:
Choose workflow maintenance from the left navigation Administration menu.
Click the Work Groups tab.
To add a Lender Employee, Managers, or Queue to a Work Group, double-click the name
in the left box or highlight the name, and then click on the right-arrow .
To remove a user or Queue from a Work Group, double-click the name in the right box or
highlight the name, and then click on the left arrow
Click the Submit Changes button when complete.
Configuring Broker/Branch Workflow
Overview
As an Administrator you are responsible for configuring workflow for your Broker/Branch Companies. There are three functions that broker users perform that trigger workflow with your Lender users. They are as follows:
Submitting a file for underwriting.
Submitting a registration (float or lock).
Submitting a closing request.
Defining the Submit to Lender Workflow
Once you have configured your Queues and Work Groups, it is time to define where a file will go when a broker user clicks Submit Loan to Lender. The user or Queue who receives a file on a Submit Loan to Lender is called the Loan Opener.
You can configure where a file goes when a broker user clicks Submit Loan to Lender so that it is the same for all broker users, or you can configure it differently for each individual Broker/Branch Company.
To configure a Loan Opener for all broker users, choose edit lender profile from the left navigation and go to the Defaults tab.
To configure a Loan Opener for a particular Broker/Branch Company, look up the Broker/Branch Company by choosing lookup companies from the left navigation Company menu.

All information contained in this document is confidential and proprietary and may not be reproduced or disclosed to anyone not originally intended without the express written permission of Beanstalk Networks. © Beanstalk Networks. All rights reserved.
Page 165 of 216
Click the pencil icon in the Action column for the relevant company and go to the Defaults tab.
Figure 16.9 - Configuring the Loan Opener
Expand the SubmitLoanToLender Default and drill down to LoanOpener. In the Detail Value drop-down box select a user or Queue and click the Save button.
Note: You can create a choice of possible destinations for the loan opener workflow. This will cause a dropdown box to appear when a user clicks to Submit Loan to Lender. See the Default named Destinations (found under SubmitLoanToLender) in Chapter 18 for more information.
Defining the Registration Workflow – Non-UniFi Customers Only
Note: UniFi customers do not need to configure this feature.
Once you have configured your Queues and Work Groups, it is time to define where a file will go when a broker user submits a registration. The user or Queue who receives the lock form submission is called the Lock Opener.
You can configure where a file goes when a broker user submits a registration so that it is the same for all broker users, or you can configure it differently for each individual Broker/Branch Company.
To configure a Lock Opener for all broker users, choose edit lender profile from the left navigation and go to the Defaults tab.
To configure a Lock Opener for a particular Broker/Branch Company, look up the Broker/Branch Company by choosing lookup companies from the left navigation Company menu.
o Click the pencil icon in the Action column for the relevant company and go to the Defaults tab.

All information contained in this document is confidential and proprietary and may not be reproduced or disclosed to anyone not originally intended without the express written permission of Beanstalk Networks. © Beanstalk Networks. All rights reserved.
Page 166 of 216
Figure 16.10 - Configuring the Lock Opener
Expand the LockForm Default and drill down to Lock Opener. In the Detail Value drop-down box, select a user or Queue and click the Save button.
Defining the Submit to Closer Workflow
You can also configure the closing workflow. Closing workflow allows an originator to fill out a closing request form and have it routed to a closing Queue or user. The Default to set for this workflow is called Closing Submission and can be set from the Closing Default.
To configure Closing Submission for all broker users, choose edit lender profile from the left navigation and go to the Defaults tab.
To configure Closing Submission for a particular Broker/Branch Company, look up the Broker/Branch Company by choosing lookup companies from the left navigation Company menu.
o Click the pencil icon in the Action column for the relevant company and go to the Defaults tab.
An originator can request a closing from a loan’s Loan Snapshot. On the bottom right of the Loan
Information section click on the Closing icon . Fill out the closing information such as date and contacts and click Submit. The closing request will be automatically routed to the employee or Queue as set in the Closing Submission Default.
The Closing Request document will appear in the e-Doc Manager under Findings.

All information contained in this document is confidential and proprietary and may not be reproduced or disclosed to anyone not originally intended without the express written permission of Beanstalk Networks. © Beanstalk Networks. All rights reserved.
Page 167 of 216
Figure 16.11 – Create a Closing Request by Clicking Next to “Closing”
Figure 16.12 – The Closing Request
Defaults and Navigation Defaults
As an administrator, you may also need to configure Defaults and Navigation Defaults. These topics are covered in detail in Chapters 18 and 19 respectively.

All information contained in this document is confidential and proprietary and may not be reproduced or disclosed to anyone not originally intended without the express written permission of Beanstalk Networks. © Beanstalk Networks. All rights reserved.
Page 168 of 216
17
Closing Through Accounting
The Closing Screen
OpenClose offers a closing screen to allow users to track closing document information and closing conditions. This feature is available to Lender Employee users.
The Closing Form tab allows users to track closing document information. Adding dates to specific fields on the Closing Form will automatically update that loan’s status. The status of the loan will change to Docs-Ordered when a date is entered in the Docs Ordered date field. The status will change to Docs-Drawn when a date is entered in the Docs Drawn date field, and the status will change to Docs-Sent when a date is entered in the Docs Sent date field.
Users can click on the calendar icon to enter dates and the contact icon to enter the names of users.
Audience:
Lender Users Only

All information contained in this document is confidential and proprietary and may not be reproduced or disclosed to anyone not originally intended without the express written permission of Beanstalk Networks. © Beanstalk Networks. All rights reserved.
Page 169 of 216
Figure 17.1 - Closing Form tab
The Conditions tab allows users to add conditions and track when they have been cleared. Conditions can be added to the file by either of the following:
Clicking the Lookup Conditions link and choosing a condition from a list.
Clicking the Add Single Condition link and entering a condition.
Users can select the prior to condition from a drop down list.

All information contained in this document is confidential and proprietary and may not be reproduced or disclosed to anyone not originally intended without the express written permission of Beanstalk Networks. © Beanstalk Networks. All rights reserved.
Page 170 of 216
Users can clear conditions by clicking on the Date button in the cleared column and selecting a date.
Figure 17.2 - Conditions tab
The Post Closing Screen
OpenClose offers a post closing screen to allow users to track final document information and post closing conditions. This feature is available to Lender Employee users.
The Post Closing Form tab allows users to track final document information.
Users can click on the calendar icon to enter dates and the contact icon to enter the names of users.

All information contained in this document is confidential and proprietary and may not be reproduced or disclosed to anyone not originally intended without the express written permission of Beanstalk Networks. © Beanstalk Networks. All rights reserved.
Page 171 of 216
Figure 17.3 - Post Closing Forms tab

All information contained in this document is confidential and proprietary and may not be reproduced or disclosed to anyone not originally intended without the express written permission of Beanstalk Networks. © Beanstalk Networks. All rights reserved.
Page 172 of 216
The Conditions tab allows users to add conditions and track when they have been cleared. Conditions can be added to the file by either of the following:
Clicking the Lookup Conditions link and choosing a condition from a list.
Clicking the Add Single Condition link and entering a condition.
Users can select the prior to status from a drop down list.
Users can clear conditions by clicking on the Date button in the cleared column and selecting a date.
Figure 17.4 - Post Closing Conditions tab
The Funding Screen
OpenClose offers a funding screen to allow users to track funding information and conditions. This feature is available to Lender Employee users.
Adding the funding date on the Funding Form will automatically update that loan’s status displayed in the Loan Snapshot and the Pipeline Summary.
The status of the loan will change to Funded when a date is entered in the funded date field.
Note: Validation requires the Funding Source and Funding Type fields to be completed prior to filling in the Funded date.

All information contained in this document is confidential and proprietary and may not be reproduced or disclosed to anyone not originally intended without the express written permission of Beanstalk Networks. © Beanstalk Networks. All rights reserved.
Page 173 of 216
The Funding Form tab allows users to track funding information, disbursement information, and wire information.
Users can click on the calendar icon to enter dates and the contact icon to enter the names of users.
Figure 17.5 - Funding Form tab

All information contained in this document is confidential and proprietary and may not be reproduced or disclosed to anyone not originally intended without the express written permission of Beanstalk Networks. © Beanstalk Networks. All rights reserved.
Page 174 of 216
Figure 17.6 - Funding Form tab
The Conditions tab allows users to add conditions and track when they have been cleared.
Conditions can be added to the file by either of the following:
Clicking the Lookup Conditions link and choosing a condition from a list.
Clicking the Add Single Condition link and entering a condition.
Users can select the prior to status from a drop down list.
Users can clear conditions by clicking on the Date button in the cleared column and selecting a date.

All information contained in this document is confidential and proprietary and may not be reproduced or disclosed to anyone not originally intended without the express written permission of Beanstalk Networks. © Beanstalk Networks. All rights reserved.
Page 175 of 216
Figure 17.7 - Conditions tab
The Accounting Screen
OpenClose offers an accounting screen to allow users to track reconciliation information. This feature is available to Lender Employee users.
Users can click on the calendar icon to enter dates and the contact icon to enter the names of users.

All information contained in this document is confidential and proprietary and may not be reproduced or disclosed to anyone not originally intended without the express written permission of Beanstalk Networks. © Beanstalk Networks. All rights reserved.
Page 176 of 216
Figure 17.8 - Accounting Form
The Secondary Marketing Screen
OpenClose offers a secondary marketing screen to allow users to track securities and investor pricing information. This feature is available to Lender Employee users.
Note: This screen is unavailable until a lock response has been issued.
Users can click on the calendar icon to enter dates and the contact icon to enter the names of users.

All information contained in this document is confidential and proprietary and may not be reproduced or disclosed to anyone not originally intended without the express written permission of Beanstalk Networks. © Beanstalk Networks. All rights reserved.
Page 177 of 216
Figure 17.9 - Secondary Marketing Form

All information contained in this document is confidential and proprietary and may not be reproduced or disclosed to anyone not originally intended without the express written permission of Beanstalk Networks. © Beanstalk Networks. All rights reserved.
Page 178 of 216
Figure 17.10 - Secondary Marketing Form

All information contained in this document is confidential and proprietary and may not be reproduced or disclosed to anyone not originally intended without the express written permission of Beanstalk Networks. © Beanstalk Networks. All rights reserved.
Page 179 of 216
18
Defaults
Defaults
The Defaults utility allows users at different levels in the OpenClose platform to configure various aspects of the system. The Administrator configures most of the applicable Defaults for your company’s installation of OpenClose.
If you are an originator or processor, your Broker/Branch Company manager may choose to configure various Defaults for your company. You can use Defaults to control your accounts with third-party vendors such as automated underwriting agencies or credit vendors.
Functionality Overview
Figure 18.1 - Defaults Tree Structure
Audience:
Administrators
Broker User Level 1

All information contained in this document is confidential and proprietary and may not be reproduced or disclosed to anyone not originally intended without the express written permission of Beanstalk Networks. © Beanstalk Networks. All rights reserved.
Page 180 of 216
As pictured in Figure 18.1, the Defaults utility is structured similarly to Windows Explorer with a
folder/file tree. To navigate the tree, click on the plus sign next a folder icon to expand it, or click on the minus sign to shrink it.
Defaults with the folder value icon have configurable values. If they cannot be expanded, their value has not yet been assigned. If they can be expanded, then you can see their value(s)
next to the value icon(s).
To add a value to a Default do the following:
Click the element name next to the folder value icon to display the Add Detail window to the right.
Enter a value in the Detail Value text box, and click Save. The value will appear below the
Default with a value icon.
Figure 18.2 - Adding a Value to a Default
To edit the value of a Default, do the following:
Click the element name next to the value icon to display the Edit Default Detail window.
Change the text in the Detail Value box and click Save.
To delete a value, click the Delete button.

All information contained in this document is confidential and proprietary and may not be reproduced or disclosed to anyone not originally intended without the express written permission of Beanstalk Networks. © Beanstalk Networks. All rights reserved.
Page 181 of 216
Figure 18.3 – Editing the Value of a Default
Note: Defaults can be configured at three different levels: user-specific, Broker/Branch Company, or Lender Profile. Defaults are applied at the user level first, Broker/Branch Company level if none are applied at the user level, and finally Lender Profile level if none are applied at the user or Broker/Branch Company level.
Example’s of Using Defaults
Managing Your Automated Underwriting Account(s)
For Fannie Mae’s DU service, expand the Defaults AU FNMA AU Parameters DUparameters. Adjust the values for ProviderLogon and ProviderPassword. If your company uses an institution ID to manage branches, adjust it under the InstitutionID Default.

All information contained in this document is confidential and proprietary and may not be reproduced or disclosed to anyone not originally intended without the express written permission of Beanstalk Networks. © Beanstalk Networks. All rights reserved.
Page 182 of 216
Figure 18.4 - Managing Your DU Account
For Fannie Mae’s DO service, expand the Defaults AU FNMA AU Parameters DOparameters. Adjust the values for ProviderLogon and ProviderPassword.
Figure 18.5 - Managing Your DO Account
For Freddie Mac’s LP service, expand the Defaults AU FHLMC AU Parameters. Adjust the values for ProviderLogon and ProviderPassword.

All information contained in this document is confidential and proprietary and may not be reproduced or disclosed to anyone not originally intended without the express written permission of Beanstalk Networks. © Beanstalk Networks. All rights reserved.
Page 183 of 216
Figure 108.6 - Managing Your LP Account
Managing Your Credit Accounts
Credit can be run either directly with the credit vendor or through an automated underwriting service (DU, DO, or LP). OpenClose supports a direct credit interface (outside of automated underwriting) with Credco, CSC, Equifax, and LandAmerica. You may use any AU-supported credit vendor when ordering credit through Fannie Mae or Freddie Mac’s automated underwriting services.
NOTE: If you do not see your desired credit vendor when running a DU transaction, contact your Administrator to have the vendor added to the drop-down box.
To access a credit vendor’s Defaults, expand CreditAgencies, then the credit vendor in question.
Provide your username and password using the AccountName and Password Defaults, respectively.
Some credit vendors such as LandAmerica may require additional information such as a branch or client identifier.

All information contained in this document is confidential and proprietary and may not be reproduced or disclosed to anyone not originally intended without the express written permission of Beanstalk Networks. © Beanstalk Networks. All rights reserved.
Page 184 of 216
Figure 18.7 - Managing Your Credit Accounts
Use Table 18.1 to determine the values for you need to set up your credit account. For instance, you can determine the values necessary for Equifax as follows:
ShowOrderCredit: A value of True adds the selected credit vendor to the list of vendors on the Order Credit screen. No value or a value of False forces the credit vendor not to be an option when ordering credit only. Note that credit vendors to which OpenClose does not have a direct interface will not be available on the Order Credit screen even if this value has been set to True.
ShowSubmitToDU: A value of True adds the selected credit vendor to the list of available credit vendors when submitting a loan to DU through OpenClose. No value or a value of False keeps the credit vendor from appearing in the list of available credit vendors when ordering DU.

Master List of All Defaults
The following table (Table 18.1) contains a listing of all Defaults.
Table 18.1 – Master List of All Defaults
Default Folder Default
SubFolder Default Sub-
SubFolder
Default Sub-Sub-
SubFolder Default Name
Feature Default Controls
Description
General Add User Options Receive Email Updates
Will determine default behavior on add user page.
This default determines if new users will receive email notification of their username and password. Values are True or False.
General AE View Only
determines if the AE has view-only control of loans they own.
This default determines if the account executive has view only permission to loans submitted to lender. Values are True or False.
General Allow Multi Submit to Lender
allow resubmits of sub to lender
This default determines if broker users can submit to lender mulitple times. Values are True or False.
General Days per year
Determines the number of days for calculation of per diem
This default determines the number of days used for calculation of per diem costs. Values are 300 or 365.
General Document Upload Email Sender
Determines the sender email address of the email that is triggered when a document is uploaded.
This default determines the sender's email address displayed for email sent upon document upload in InfoCenter. Value is the email address the client would like displayed - e.g. [email protected].
General Document Upload Message
Message will be sent with document upload email notifications.
This default is the message sent via email upon document upload in InfoCenter. Value is the message the client would like displayed.
General Lender Employee Advanced Loan Search
When set to true, the search will allow broker and lender side searches.
This default determines if loan searches can be done on both the broker and lender side of the system. Values

All information contained in this document is confidential and proprietary and may not be reproduced or disclosed to anyone not originally intended without the express written permission of Beanstalk Networks. © Beanstalk Networks. All rights reserved.
Page 186 of 216
Default Folder Default
SubFolder Default Sub-
SubFolder
Default Sub-Sub-
SubFolder Default Name
Feature Default Controls
Description
are True or False.
General Password Expiration - Time Period
Enter the number of days for which a password will be valid.
This default determines the number of days a user's password is valid. Value is determined by the client.
General Real Estate Occupancy Rate
Sets the default value for the field of the same name on the Assets tab of the 1003.
This default determines the Real Estate Occupancy Rate on the Assets tab of the 1003. Value is a number determined by the client.
General SystemName
Set the System Name for Infocenter Messaging.
This default determines the system name displayed in email sent upon document upload in InfoCenter. Value is the name of the client's system - e.g. OpenClose.
Action Menu Masks Registration-Lock Allow When Processing
When set to true, originator can do std lock form or DA pricing/lock after submitted to processor.
This default determines if an originator can submit a lock form when the loan is assigned to a processor. Values are True or False.
Action Menu Masks SubmitToLender HideAU
Hide Action Menu Submit to AU Item After Submit to Lender. Set the value to 'Yes' or 'No'.
This default determines if a broker user can submit a loan to AU after it has been submitted to the lender. Values are Yes or No.
Action Menu Masks SubmitToLender HideCredit
Hide Action Menu Order Credit Item After Submit to Lender.
This default determines if a broker user can order credit on a loan after it has been submitted to the lender. Values are Yes or No.

All information contained in this document is confidential and proprietary and may not be reproduced or disclosed to anyone not originally intended without the express written permission of Beanstalk Networks. © Beanstalk Networks. All rights reserved.
Page 187 of 216
Default Folder Default
SubFolder Default Sub-
SubFolder
Default Sub-Sub-
SubFolder Default Name
Feature Default Controls
Description
Action Menu Masks SubmitToLender Require Registration
'True' value will limit Submit to Lender and Update Lender features to folders that have been registered.
This default determines if a loan must be registered prior to submit to lender or update lender. Values are True or False.
Action Menu Masks Orig Edit While Processing
will allow the originator to perform some edit functions(1003,gfe) when the loan is submitted for processing.
This default determines if an originator can edit the 1003 and GFE when the loan is assigned to a processor. Values are
AU FHLMC AU Parameters LP S2S IsAvailableToBrokers
Sets the availability of LP system to system in the Order AU options.
This default determines if LP system to system is available as an option in Submit to AU. Values are True or False.
AU FHLMC AU Parameters FHA LenderID
Prefill for the "FHA Lender ID" field on the Freddie Mac tab of the 1003.
AU FHLMC AU Parameters FHA SponsorID
Prefill for the "FHA Sponsor ID" field on the Freddie Mac tab of the 1003.
AU FHLMC AU Parameters IsAvailableToBrokers
Sets the availability of LP.com in the Order AU options.
This default determines if LP.com is available as an option in Submit to AU. Values are True or False.
AU FHLMC AU Parameters LenderBranchNumber
This default allows clients to break out Freddie Mac LP bills by branch numbers. This is an optional default with values determined by the client.
AU FHLMC AU Parameters LenderRegistrationID
Some lenders use this number to track loans
This default allows clients to track loans. This is an optional default with values determined by the client.
AU FHLMC AU Parameters NOTPNumber
NOTP Number: Contract underwriter’s number

All information contained in this document is confidential and proprietary and may not be reproduced or disclosed to anyone not originally intended without the express written permission of Beanstalk Networks. © Beanstalk Networks. All rights reserved.
Page 188 of 216
Default Folder Default
SubFolder Default Sub-
SubFolder
Default Sub-Sub-
SubFolder Default Name
Feature Default Controls
Description
AU FHLMC AU Parameters ProviderLogon
This default stores the login required to access LP.
AU FHLMC AU Parameters ProviderPassword
This default stores the password required to login to LP.
AU FHLMC AU Parameters SellerServicerNumber
Lender’s number with Freddie Mac or generic value of 121555
This default stores the client's unique seller servicer number provided by Freddie Mac.
AU FHLMC AU Parameters SellerServicerPassword
Lender’s number with Freddie Mac or generic value of 121555
AU FHLMC AU Parameters TPONumber
Broker (third party originator)
AU FNMA AU Parameters DOparameters InstitutionID
AU FNMA AU Parameters DOparameters IsAvailableToBrokers
This default determines if DO is available as an option in Submit to AU. Values are True or False.
AU FNMA AU Parameters DOparameters ProviderLogon
This default stores the login required to access DO.
AU FNMA AU Parameters DOparameters ProviderPassword
This default stores the password required to login to DO.
AU FNMA AU Parameters DOparameters SellerServicerNumber
AU FNMA AU Parameters DUparameters InstitutionID
AU FNMA AU Parameters DUparameters IsAvailableToBrokers
This default determines if DU is available as an option in Submit to AU. Values are True or False.
AU FNMA AU Parameters DUparameters ProviderLogon
This default stores the login required to access DU.
AU FNMA AU Parameters DUparameters ProviderPassword
This default stores the password required to login to DU.
AU FNMA AU Parameters DUparameters SellerServicerNumber

All information contained in this document is confidential and proprietary and may not be reproduced or disclosed to anyone not originally intended without the express written permission of Beanstalk Networks. © Beanstalk Networks. All rights reserved.
Page 189 of 216
Default Folder Default
SubFolder Default Sub-
SubFolder
Default Sub-Sub-
SubFolder Default Name
Feature Default Controls
Description
AU FNMA Export Parameters LenderID
AU FNMA Export Parameters SponsorID
Closing DSI Documents CustomerID Required for DocMagic Login
Closing DSI Documents Password Required for DocMagic Login
Closing DSI Documents UserName Required for DocMagic Login
Closing Closing Submission
User that get a share on closing request.
CreditAgencies
Name of Credit Agency will appear here (such as Equifax) Account Name
The login name for this accouunt
CreditAgencies
Name of Credit Agency will appear here (such as Equifax) MORNETPlusID
The MORNETPlus ID for this account
CreditAgencies
Name of Credit Agency will appear here (such as Equifax) Password
The password for this account
CreditAgencies
Name of Credit Agency will appear here (such as Equifax) ShowOrderCredit
A value of True adds the selected credit vendor to the list of vendors on the Order Credit screen. No value or a value of False forces the credit vendor not to be an option when ordering credit only.

All information contained in this document is confidential and proprietary and may not be reproduced or disclosed to anyone not originally intended without the express written permission of Beanstalk Networks. © Beanstalk Networks. All rights reserved.
Page 190 of 216
Default Folder Default
SubFolder Default Sub-
SubFolder
Default Sub-Sub-
SubFolder Default Name
Feature Default Controls
Description
CreditAgencies
Name of Credit Agency will appear here (such as Equifax) ShowSubmitToDU
A value of True adds the selected credit vendor to the list of available credit vendors when submitting a loan to DU through OpenClose. No value or a value of False keeps the credit vendor from appearing in the list of available credit vendors when ordering DU.
DataTrac Loan Filters Application Date
True/False value determines whether Submit to DataTrac Loan Search excludes folders with no application date.
eDocManager Filter Licensed State Documents
Fax Cover Document List
Holds a list of the documents the user has available to check in the Fax Cover page.
This default determines the list of documents available on the Fax Cover page. Values are determined by the client.
Fax Cover Fax Number
Set the fax number displayed on the Fax Cover page.
This default determines the fax number displayed on the Fax Cover page.
Interfaces Unifi Construction Construction Add-on Self GC Retail
Interfaces Unifi Construction Construction Add-on Self GC Wholesale
Interfaces Unifi Construction Construction Add-on True Self Retail
Interfaces Unifi Construction Construction Add-on True Self Wholesale

All information contained in this document is confidential and proprietary and may not be reproduced or disclosed to anyone not originally intended without the express written permission of Beanstalk Networks. © Beanstalk Networks. All rights reserved.
Page 191 of 216
Default Folder Default
SubFolder Default Sub-
SubFolder
Default Sub-Sub-
SubFolder Default Name
Feature Default Controls
Description
Interfaces Unifi Construction Construction Rate Floor Retail
Interfaces Unifi Construction Construction Rate Floor Wholesale
Interfaces Unifi Construction Construction Rate Retail
Interfaces Unifi Construction Construction Rate Retail Varying High
Interfaces Unifi Construction Construction Rate Retail Varying Low
Interfaces Unifi Construction Construction Rate Wholesale
Interfaces Unifi Construction Construction Rate Wholesale Varying High
Interfaces Unifi Construction Construction Rate Wholesale Varying Low
Interfaces Unifi Construction Prime Construction Increment
Interfaces Unifi Construction Prime Construction Rate
Interfaces Unifi Formatting Adjusted Price Discount
This default determines the way pricing is displayed. Values are Base ), Base 100, or both Base 100 - Base 0.
Lock Form Required Fields Amortization Term
Determines if the field is required to submit lock request to lender
This default determines if the Amortization Term field on the lock form must be populated prior to submitting the lock

All information contained in this document is confidential and proprietary and may not be reproduced or disclosed to anyone not originally intended without the express written permission of Beanstalk Networks. © Beanstalk Networks. All rights reserved.
Page 192 of 216
Default Folder Default
SubFolder Default Sub-
SubFolder
Default Sub-Sub-
SubFolder Default Name
Feature Default Controls
Description
request to the lender. Values are True or False.
Lock Form Required Fields Application Source
Determines if the field is required to submit lock request to lender
This default determines if the Application Source field on the lock form must be populated prior to submitting the lock request to the lender. Values are True or False.
Lock Form Required Fields Appraised Value
Determines if the field is required to submit lock request to lender
This default determines if the Appraised Value field on the lock form must be populated prior to submitting the lock request to the lender. Values are True or False.
Lock Form Required Fields Cash Out Amount
Determines if the field is required to submit lock request to lender
This default determines if the Cash Out Amount field on the lock form must be populated prior to submitting the lock request to the lender. Values are True or False.
Lock Form Required Fields CLTV
Determines if the field is required to submit lock request to lender
This default determines if the CLTV field on the lock form must be populated prior to submitting the lock request to the lender. Values are True or False.
Lock Form Required Fields Comments
Determines if the field is required to submit lock request to lender
This default determines if the Comments field on the lock form must be populated prior to submitting the lock request to the lender. Values are True or False.

All information contained in this document is confidential and proprietary and may not be reproduced or disclosed to anyone not originally intended without the express written permission of Beanstalk Networks. © Beanstalk Networks. All rights reserved.
Page 193 of 216
Default Folder Default
SubFolder Default Sub-
SubFolder
Default Sub-Sub-
SubFolder Default Name
Feature Default Controls
Description
Lock Form Required Fields Company Address
Determines if the field is required to submit lock request to lender
This default determines if the Company Address field on the lock form must be populated prior to submitting the lock request to the lender. Values are True or False.
Lock Form Required Fields Company City
Determines if the field is required to submit lock request to lender
This default determines if the Company City field on the lock form must be populated prior to submitting the lock request to the lender. Values are True or False.
Lock Form Required Fields Company Name
Determines if the field is required to submit lock request to lender
This default determines if the Company Name field on the lock form must be populated prior to submitting the lock request to the lender. Values are True or False.
Lock Form Required Fields Company State
Determines if the field is required to submit lock request to lender
This default determines if the Company State field on the lock form must be populated prior to submitting the lock request to the lender. Values are True or False.
Lock Form Required Fields Company Zip
Determines if the field is required to submit lock request to lender
This default determines if the Company Zip field on the lock form must be populated prior to submitting the lock request to the lender. Values are True or False.
Lock Form Required Fields Contact #
Determines if the field is required to submit lock request to lender
This default determines if the Contact # field on the lock form must be populated prior to submitting the lock request to the lender. Values are True or False.

All information contained in this document is confidential and proprietary and may not be reproduced or disclosed to anyone not originally intended without the express written permission of Beanstalk Networks. © Beanstalk Networks. All rights reserved.
Page 194 of 216
Default Folder Default
SubFolder Default Sub-
SubFolder
Default Sub-Sub-
SubFolder Default Name
Feature Default Controls
Description
Lock Form Required Fields Current Address
Determines if the field is required to submit lock request to lender
This default determines if the Current Address field on the lock form must be populated prior to submitting the lock request to the lender. Values are True or False.
Lock Form Required Fields Current City
Determines if the field is required to submit lock request to lender
This default determines if the Current City field on the lock form must be populated prior to submitting the lock request to the lender. Values are True or False.
Lock Form Required Fields Current State
Determines if the field is required to submit lock request to lender
This default determines if the Current State field on the lock form must be populated prior to submitting the lock request to the lender. Values are True or False.
Lock Form Required Fields Current Zip
Determines if the field is required to submit lock request to lender
This default determines if the Current Zip field on the lock form must be populated prior to submitting the lock request to the lender. Values are True or False.
Lock Form Required Fields Date Registered
Determines if the field is required to submit lock request to lender
This default determines if the Date Registered field on the lock form must be populated prior to submitting the lock request to the lender. Values are True or False.
Lock Form Required Fields Doc Type
Determines if the field is required to submit lock request to lender
This default determines if the Doc Type field on the lock form must be populated prior to submitting the lock request to the lender. Values are True or False.

All information contained in this document is confidential and proprietary and may not be reproduced or disclosed to anyone not originally intended without the express written permission of Beanstalk Networks. © Beanstalk Networks. All rights reserved.
Page 195 of 216
Default Folder Default
SubFolder Default Sub-
SubFolder
Default Sub-Sub-
SubFolder Default Name
Feature Default Controls
Description
Lock Form Required Fields Fax #
Determines if the field is required to submit lock request to lender
This default determines if the Fax # field on the lock form must be populated prior to submitting the lock request to the lender. Values are True or False.
Lock Form Required Fields Index Type
Determines if the field is required to submit lock request to lender
This default determines if the Index Type field on the lock form must be populated prior to submitting the lock request to the lender. Values are True or False.
Lock Form Required Fields Index Value
Determines if the field is required to submit lock request to lender
This default determines if the Index Value field on the lock form must be populated prior to submitting the lock request to the lender. Values are True or False.
Lock Form Required Fields Interest Rate
Determines if the field is required to submit lock request to lender
This default determines if the Interest Rate field on the lock form must be populated prior to submitting the lock request to the lender. Values are True or False.
Lock Form Required Fields Investor
Determines if the field is required to submit lock request to lender
This default determines if the Investor field on the lock form must be populated prior to submitting the lock request to the lender. Values are True or False.
Lock Form Required Fields Investor Reference #
Determines if the field is required to submit lock request to lender
This default determines if the Investor Reference # field on the lock form must be populated prior to submitting the lock request to the lender. Values are True or False.

All information contained in this document is confidential and proprietary and may not be reproduced or disclosed to anyone not originally intended without the express written permission of Beanstalk Networks. © Beanstalk Networks. All rights reserved.
Page 196 of 216
Default Folder Default
SubFolder Default Sub-
SubFolder
Default Sub-Sub-
SubFolder Default Name
Feature Default Controls
Description
Lock Form Required Fields Loan Amount
Determines if the field is required to submit lock request to lender
This default determines if the Loan Amount field on the lock form must be populated prior to submitting the lock request to the lender. Values are True or False.
Lock Form Required Fields Loan Position
Determines if the field is required to submit lock request to lender
This default determines if the Loan Position field on the lock form must be populated prior to submitting the lock request to the lender. Values are True or False.
Lock Form Required Fields Loan to Value
Determines if the field is required to submit lock request to lender
This default determines if the Loan to Value field on the lock form must be populated prior to submitting the lock request to the lender. Values are True or False.
Lock Form Required Fields Lock Period
Determines if the field is required to submit lock request to lender
This default determines if the Lock Period field on the lock form must be populated prior to submitting the lock request to the lender. Values are True or False.
Lock Form Required Fields Lock Requested By
Determines if the field is required to submit lock request to lender
This default determines if the Lock Requested By field on the lock form must be populated prior to submitting the lock request to the lender. Values are True or False.
Lock Form Required Fields Margin
Determines if the field is required to submit lock request to lender
This default determines if the Margin field on the lock form must be populated prior to submitting the lock request to the lender. Values are True or False.

All information contained in this document is confidential and proprietary and may not be reproduced or disclosed to anyone not originally intended without the express written permission of Beanstalk Networks. © Beanstalk Networks. All rights reserved.
Page 197 of 216
Default Folder Default
SubFolder Default Sub-
SubFolder
Default Sub-Sub-
SubFolder Default Name
Feature Default Controls
Description
Lock Form Required Fields Number of Units
Determines if the field is required to submit lock request to lender
This default determines if the Number of Units field on the lock form must be populated prior to submitting the lock request to the lender. Values are True or False.
Lock Form Required Fields Occupancy
Determines if the field is required to submit lock request to lender
This default determines if the Occupancy field on the lock form must be populated prior to submitting the lock request to the lender. Values are True or False.
Lock Form Required Fields Originator Approval Code
Determines if the field is required to submit lock request to lender
This default determines if the Originator Approval Code field on the lock form must be populated prior to submitting the lock request to the lender. Values are True or False.
Lock Form Required Fields Originator Loan Number
Determines if the field is required to submit lock request to lender
This default determines if the Originator Loan Number field on the lock form must be populated prior to submitting the lock request to the lender. Values are True or False.
Lock Form Required Fields Periodic and Life CAPS
Determines if the field is required to submit lock request to lender
This default determines if the Periodic and Life CAPS field on the lock form must be populated prior to submitting the lock request to the lender. Values are True or False.
Lock Form Required Fields Price
Determines if the field is required to submit lock request to lender
This default determines if the Price field on the lock form must be populated prior to submitting the lock request to the lender. Values are True or

All information contained in this document is confidential and proprietary and may not be reproduced or disclosed to anyone not originally intended without the express written permission of Beanstalk Networks. © Beanstalk Networks. All rights reserved.
Page 198 of 216
Default Folder Default
SubFolder Default Sub-
SubFolder
Default Sub-Sub-
SubFolder Default Name
Feature Default Controls
Description
False.
Lock Form Required Fields Primary Borrower
Determines if the field is required to submit lock request to lender
This default determines if the Primary Borrower field on the lock form must be populated prior to submitting the lock request to the lender. Values are True or False.
Lock Form Required Fields Product
Determines if the field is required to submit lock request to lender
This default determines if the Product field on the lock form must be populated prior to submitting the lock request to the lender. Values are True or False.
Lock Form Required Fields Product Code
Determines if the field is required to submit lock request to lender
This default determines if the Product Code field on the lock form must be populated prior to submitting the lock request to the lender. Values are True or False.
Lock Form Required Fields Property Address
Determines if the field is required to submit lock request to lender
This default determines if the Property Address field on the lock form must be populated prior to submitting the lock request to the lender. Values are True or False.
Lock Form Required Fields Property City
Determines if the field is required to submit lock request to lender
This default determines if the Property City field on the lock form must be populated prior to submitting the lock request to the lender. Values are True or False.

All information contained in this document is confidential and proprietary and may not be reproduced or disclosed to anyone not originally intended without the express written permission of Beanstalk Networks. © Beanstalk Networks. All rights reserved.
Page 199 of 216
Default Folder Default
SubFolder Default Sub-
SubFolder
Default Sub-Sub-
SubFolder Default Name
Feature Default Controls
Description
Lock Form Required Fields Property County
Determines if the field is required to submit lock request to lender
This default determines if the Property County field on the lock form must be populated prior to submitting the lock request to the lender. Values are True or False.
Lock Form Required Fields Property State
Determines if the field is required to submit lock request to lender
This default determines if the Property State field on the lock form must be populated prior to submitting the lock request to the lender. Values are True or False.
Lock Form Required Fields Property Type
Determines if the field is required to submit lock request to lender
This default determines if the Property Type field on the lock form must be populated prior to submitting the lock request to the lender. Values are True or False.
Lock Form Required Fields Property Zip
Determines if the field is required to submit lock request to lender
This default determines if the Property Zip field on the lock form must be populated prior to submitting the lock request to the lender. Values are True or False.
Lock Form Required Fields Purpose
Determines if the field is required to submit lock request to lender
This default determines if the Purpose field on the lock form must be populated prior to submitting the lock request to the lender. Values are True or False.
Lock Form Required Fields Purpose of Refinance
Determines if the field is required to submit lock request to lender
This default determines if the Purpose of Refinance field on the lock form must be populated prior to submitting the lock request to the lender. Values are True or False.

All information contained in this document is confidential and proprietary and may not be reproduced or disclosed to anyone not originally intended without the express written permission of Beanstalk Networks. © Beanstalk Networks. All rights reserved.
Page 200 of 216
Default Folder Default
SubFolder Default Sub-
SubFolder
Default Sub-Sub-
SubFolder Default Name
Feature Default Controls
Description
Lock Form Required Fields Qualifying Credit Score
Determines if the field is required to submit lock request to lender
This default determines if the Qualifying Credit Score field on the lock form must be populated prior to submitting the lock request to the lender. Values are True or False.
Lock Form Required Fields Rate Date
Determines if the field is required to submit lock request to lender
This default determines if the Rate Date field on the lock form must be populated prior to submitting the lock request to the lender. Values are True or False.
Lock Form Required Fields Residence Status
Determines if the field is required to submit lock request to lender
This default determines if the Residence Status field on the lock form must be populated prior to submitting the lock request to the lender. Values are True or False.
Lock Form Required Fields Sales Price
Determines if the field is required to submit lock request to lender
This default determines if the Sales Price field on the lock form must be populated prior to submitting the lock request to the lender. Values are True or False.
Lock Form Required Fields Self Employed Indicator
Determines if the field is required to submit lock request to lender
This default determines if the Self Employed Indicator field on the lock form must be populated prior to submitting the lock request to the lender. Values are True or False.
Lock Form Required Fields Subordinate Financing
Determines if the field is required to submit lock request to lender
This default determines if the Subordinate Financing field on the lock form must be populated prior to submitting the lock request to the lender. Values are True or

All information contained in this document is confidential and proprietary and may not be reproduced or disclosed to anyone not originally intended without the express written permission of Beanstalk Networks. © Beanstalk Networks. All rights reserved.
Page 201 of 216
Default Folder Default
SubFolder Default Sub-
SubFolder
Default Sub-Sub-
SubFolder Default Name
Feature Default Controls
Description
False.
Lock Form Base 100 Pricing Display
When set to True, will display pricing to broker or originator in base 100 format, otherwise will use base 0.
This default determines if base 100 format pricing is displayed on the lock form. Values are True or False.
Lock Form Blackout Exempt Lender
will use lenders groups instead of brokers when lender runs pricelock.
Lock Form Blackout Message
message appears on price and/or lock during a blackout period.
This default is the message displayed on the Price/Lock or lock form during a defined blackout period. Value is the message client would like displayed.
Lock Form BrokerFeesDisplay
Valid values for this field are "True" or "False". This toggles whether or not the Broker Fees tab is displayed on the Lock Form.
This default determines if the Broker Fees tab is available on the lock form. Values are True or False.
Lock Form Custom Fields
This default adds custom fields to the Custom tab of the lock form. Values are determined by the client.
Lock Form DocTypes
Details appear in the Doc Type select list on the Lock Form. Separate display and value with a | (Full|F)
This default determines the doc types available in the dropdown menu on the lock form. Values are the name of the documentation type and the database value that will be stored in Decision Assist separated by |. For example, Full

All information contained in this document is confidential and proprietary and may not be reproduced or disclosed to anyone not originally intended without the express written permission of Beanstalk Networks. © Beanstalk Networks. All rights reserved.
Page 202 of 216
Default Folder Default
SubFolder Default Sub-
SubFolder
Default Sub-Sub-
SubFolder Default Name
Feature Default Controls
Description
documentation type could be entered as: Full|F.
Lock Form FloatAvail
Determines wether the float workflow is available when set to True.
This default determines if the Float option is available for lock requests. Values are True or False.
Lock Form Lock Expiration
Values for this default are "before" or "after". The default Lock Expiration Date set according to the Lock Period will be put on the first business day before or after the Lock Period ends based on the setting in this default.
This default determines if the lock expiration date will be the first business day before or after the actual lock expiration date when the expiration date falls on a weekend or holiday. Values are before or after.
Lock Form Lock Opener
This default determines where the lock will be sent upon submit lock request. Value is selected from a dropdown menu.
Lock Form Lock Period
This default determines the number of days available in the lock period dropdown menu on the Loan Details tab of the standard lock form. Values are numeric determined by the client.
Lock Form Lock Share Approve
Determines if only the lock share user can approve a lock request.

All information contained in this document is confidential and proprietary and may not be reproduced or disclosed to anyone not originally intended without the express written permission of Beanstalk Networks. © Beanstalk Networks. All rights reserved.
Page 203 of 216
Default Folder Default
SubFolder Default Sub-
SubFolder
Default Sub-Sub-
SubFolder Default Name
Feature Default Controls
Description
Lock Form Message
Message header on LockForm Screen.
This default is the message displayed on the lock form screen. Value is the message client would like displayed.
Lookups 1003 Estate Will Be Held In
List of possible values for this item.
This default determines the list of options for the "Estate Will Be Held In" field on the Property tab of the 1003. Values are determined by the client.
Lookups 1003 Identification
List of possible values for this item.
This default determines the list of options for the Identification Type field on the Borrower Info tab of the 1003. Values are determined by the client.
Lookups 1003 Manner in which title will be held
List of possible values for this item.
This default determines the list of options for the "Manner in which title will be held" field on the Property tab of the 1003. Values are determined by the client.
Lookups Loan Info Application Source Broker side application source
This default determines the list of application source types available on the Originator Information tab of the lock form. Values are determined by the client.
Pricing No Rates Returned Message
This message will appear if pricing returns no rate information.
This default determines the message displayed for price/lock if there is no pricing information for a product. Value is the message the client would like displayed.
Reporting Originator eDoc Reporting
This default determines if eDoc Reporting is available to broker users. Values are True or False.

All information contained in this document is confidential and proprietary and may not be reproduced or disclosed to anyone not originally intended without the express written permission of Beanstalk Networks. © Beanstalk Networks. All rights reserved.
Page 204 of 216
Default Folder Default
SubFolder Default Sub-
SubFolder
Default Sub-Sub-
SubFolder Default Name
Feature Default Controls
Description
Scrub SubmitToLender Allow Submit Anyway
This default determines if a user can ignore scrub validation and submit a file without editing the validation errors. Values are True or False.
SiteDesign Skin
Select a "Design Template" from the list to cusomize the look and feel of this website.
This default determines the skin design used for the system. Values are selected from a dropdown menu.
SubmitLoanToLender LoanOpener
This default determines where the loan will be sent upon submit to lender. Value is selected from a dropdown menu.
Underwriting Loan Response Email
E-mail default used to send underwriting response
This default determines the sender's email address displayed on the Underwriting response email sent. Value is the email address the client would like displayed.
Underwriting Underwriting Response Author
Values are "Actual Author" or "AE". (Will default to "Actual Author" functionality if no value is set.)
This default determines who is displayed as the author of the Underwriting response. Values are Actual Author or AE. If actual author is selected, the name of the user who provided the response will be displayed. If AE is selected, the name of the AE will be displayed regardless of who provided the response.
Underwriting Underwriting Response Email Sender
Used to hold address of the email sender
This default determines the sender's email address displayed on the Underwriting response email sent. Value is the email address the client would like displayed.

All information contained in this document is confidential and proprietary and may not be reproduced or disclosed to anyone not originally intended without the express written permission of Beanstalk Networks. © Beanstalk Networks. All rights reserved.
Page 205 of 216
Default Folder Default
SubFolder Default Sub-
SubFolder
Default Sub-Sub-
SubFolder Default Name
Feature Default Controls
Description
WorkFlow Queue Submit Notification
Valid values are "Yes" or "No". This sets whether or not to send a message to members of a queue when a loan is submitted to that queue.
This default determines if an email message is sent to users with permission to a queue when a loan is received in the queue. Values are Yes or No.
CancelScrub Check Document type
Indicates to cancel the loan if the TypeId(DocID) exists for that loan(Folder)--- enter TypeId in details.
Interfaces BrokerBuddy Company
Interfaces BrokerBuddy Email
Interfaces BrokerBuddy FullName
Interfaces BrokerBuddy Key
Interfaces BrokerBuddy Password
Interfaces BrokerBuddy URL
Interfaces BrokerBuddy UserName
The requested username for BrokerBuddy login
Interfaces DISSCO ClientID
Interfaces DISSCO Password
Interfaces First American Flood InternalAccountIdentifier
Interfaces First American Flood LoginAccountIdentifier
Interfaces First American Flood LoginAccountPassword
Interfaces First American Flood TestMode
If set to True, the request will be sent to the test URL
Interfaces MortgageWare Auth Code
Auth code as set in the SaveFile web service.
Interfaces MortgageWare File Path
The directory where to save the ocl files on the mortgageware server. include trailing backslash.

All information contained in this document is confidential and proprietary and may not be reproduced or disclosed to anyone not originally intended without the express written permission of Beanstalk Networks. © Beanstalk Networks. All rights reserved.
Page 206 of 216
Default Folder Default
SubFolder Default Sub-
SubFolder
Default Sub-Sub-
SubFolder Default Name
Feature Default Controls
Description
Interfaces MortgageWare Server
The server that has the SaveFile web service
Interfaces Unifi Loan Import PrincipalID
Authenication Credential - PrincipalID
Interfaces Unifi Loan Import PrincipalPWD
Authenication Credential - PrincipalPWD
Interfaces Unifi Enforce Group Permissions
Determines if the product groups will be cross-erferenced against the company.
Loan Programs Enforce Lookup
When enabled will force product to be driven by the loan program.
Lock Form LockForm Discount Edit
Lock Form LockForm LockPeriod Edit
Lock Form LockFormConf
Lock Form LockFormEmail

19
Navigation Defaults
Navigation Defaults
Navigation Defaults allow an Administrator or branch manager (Broker User Level 1) to control which options are available in the loan action menu and in the left navigation menus. Most administrators do not allow Broker User Level 1 users to make changes to Navigation Defaults.
Where you go in OpenClose to configure Navigation Defaults depends on your user type and at which level you wish to configure the Navigation Default.
If you are a Broker User Level 1, go to company profile under the Administration menu. Then go to the Navigation Defaults tab.
If you are an Administrator and you wish to configure Navigation Defaults for a particular Broker/Branch Company, choose lookup company under the Company menu on the left. Find the Broker/Branch Company and go to the company’s Navigation Defaults tab after clicking the pencil icon.
If you are an Administrator and you wish to configure Navigation Defaults for all users in the system, click edit lender profile under the Company menu on the left and go to the Navigation
Defaults tab.
In the Choose a Default Group drop-down box, make a selection and wait for the screen to re-load.
Note: You must wait for the screen to re-load. This may take a few seconds.
Action Menu refers to options in the loan action menu, as well as the pipeline action menu.
Left Navigation refers to the left navigation menus on the left side of the screen.
Audience:
Administrators
Broker User Level 1

All information contained in this document is confidential and proprietary and may not be reproduced or disclosed to anyone not originally intended without the express written permission of Beanstalk Networks. © Beanstalk Networks. All rights reserved.
Page 208 of 216
Choose a value from the Choose a Default drop-down box. If there are no values available here, then the Administrator has locked Navigation Defaults down to be configured globally for all users by Administrators only. You cannot continue with the next steps.
If there is a value in the Available Default Values box, double-click it, make changes in the Default
Value Add/Edit text box, and click the Add/Edit button. If there are no values in the Available Default
Values box, enter a value in the Default Value Add/Edit text box and click the Add/Edit button.
If you wish to delete a value, double-click it in the Available Default Values box and click the Delete button.
The following two tables explain the features which are controlled by a particular Navigation Default.
Table 19.1 is for Loan Actions.
Table 19.2 is for Left Menus.
Table 19.1 – Loan Actions
Nav. Default Name Feature the Default Controls
Accounting Turns the Accounting screen on/off in the loan action menu
Acquire Loan - Lender side Turns the Aquire Loan option on/off in the loan action menu
Be Originator Turns the Be Orginator opion on/off in the loan action menu
Cancel Loan Turns the Cancel Loan option on/off in the loan action menu
Check In Turns the Check In option on/off in the loan action menu
Check Out Turns the Check Out option on/off in the loan action menu
Close Loan Turns the Close Loan option on/off in the loan action menu
Copy Loan Turns the Copy Loan option on/off in the loan action menu
Delete Loan Turns the Delete Loan option on/off in the loan action menu
Document Groups Turns the Document Groups option on/off in the loan action menu
Edit 1003 Turns the Edit 1003 option on/off in the loan action menu
Edit GFE Turns the Edit GFE option on/off in the loan action menu
Edit TIL Turns the Edit TIL option on/off in the loan action menu
Export Loan Turns the Export Loan option on/off in the loan action menu
Fax Cover Turns the Fax Cover option on/off in the loan action menu
Fee Sheet Turns the Fee Sheet option on/off in the loan action menu
Flood Certification Turns the Flood Certification option on/off in the loan action menu
Fraud Filter Turns the Fraud Filter option on/off in the loan action menu
Funding Turns the Funding option on/off in the loan action menu
HMDA Turns the HMDA option on/off in the loan action menu
Loan History Turns the Loan History option on/off in the loan action menu
Loan Info Turns the Loan Info option on/off in the loan action menu
Loan Response Turns the Loan Responsee option on/off in the loan action menu
Loan Snapshot Turns the Loan Snapshot option on/off in the loan action menu

All information contained in this document is confidential and proprietary and may not be reproduced or disclosed to anyone not originally intended without the express written permission of Beanstalk Networks. © Beanstalk Networks. All rights reserved.
Page 209 of 216
Nav. Default Name Feature the Default Controls
Lock Response Turns the Lock Response option on/off in the loan action menu
Merge Liabilities Turns the Merge Liabilities option on/off in the loan action menu
Order Credit Turns the Order Credit option on/off in the loan action menu
Pipeline Summary Turns the Pipeline Summary option on/off in the loan action menu
Post Closing Turns the Post Closing option on/off in the loan action menu
Product and Pricing Turns the Price/Lock option on/off in the loan action menu
Processing Turns the Processing option on/off in the loan action menu
Release loan - lender side Turns the Release Loan option on/off in the loan action menu
Retrive DataTrac Status Turns the Retrive DataTrac Status on/off in the loan action menu
Return To Broker Turns the Return To Broker option on/off in the loan action menu
Secondary Marketing Turns the Secondary Marketing option on/off in the loan action menu
Send To DataTrac Turns the Send to DataTrac option on/off in the loan action menu
Send to MortgageWare Turns the Send to MortgageWare option on/off in the loan action menu
Send to Queue Turns the Send to Queue option on/off in the loan action menu
Send To Unifi Turns the Send To Unifi option on/off in the loan action menu
Separator Turns the separator bar in the loan action menu on/off
Lock Form Std Turns the Standard Lock Form option on/off in the loan action menu
Submit to Lender Turns the Submit Loan To Lender option on/off in the loan action menu
Automated Underwriting Turns the Submit to AU option on/off in the loan action menu
Submit To Processor Turns the Submit to Processor option on/off in the loan action menu
Transfer loan - lender side Turns the Transfer Loan option on/off in the loan action menu
Underwriter Response Turns the Underwriting Response option on/off in the loan action menu
Unifi Loan Export Turns the Unifi Loan Export option on/off in the loan action menu
Unifi Register Lock Turns the Unifi Register Lock option on/off in the loan action menu
Update Broker Turns the Update Broker option on/off in the loan action menu
Update Lender Turns the Update Lender option on/off in the loan action menu
Update Loan Turns the Update Loan option on/off in the loan action menu
View 1003 Turns the View 1003 option on/off in the loan action menu
View Active Loans Only Turns the View Active Loans Only option on/off in the top menu
Folder Milestones Turns the View Milestones option on/off in the loan action menu
Table 19.2 – Left Menus
Nav. Default Name Feature the Default Controls
Blackout Maintenance Turns on the Blackout Maintenance option in the left navigation menu
Enter Loan Turns the 1003 Entry option on/off in the left navigation menu
Add Company Turns the Add Company option on/off in the left navigation menu
Add Group Turns the Add Group option on/off in the left navigation menu
Lender User Add Turns the Add Lender User option on/off in the left navigation menu
Add Region Turns the Add Region option on/off in the left navigation menu
Add User Turns the Add User option on/off in the left navigation menu
Hosted Applications Turns the Applications option on/off in the left navigation menu

All information contained in this document is confidential and proprietary and may not be reproduced or disclosed to anyone not originally intended without the express written permission of Beanstalk Networks. © Beanstalk Networks. All rights reserved.
Page 210 of 216
Cond Maintenance Turns the Conditions Maintenance option on/off in the left navigation menu
Contacts Turns the Contacts option on/off in the left navigation menu
Contacts Turns the Contacts option on/off in the left navigation menu
Edit Company Turns the Edit Company option on/off in the left navigation menu
Edit Lender Company Profile Turns the Edit Lender Company Profile option on/off in the left navigation menu
FHA Maint Turns the Fannie / FHA Setup option on/off in the left navigation menu
Freddie Mac Turns the Freddie Mac LP option on/off in the left navigation menu
Global Pipeline Report Turns the Global Report option on/off in the left navigation menu
Holiday Maintenance Turns the Holiday Maintenance option on/off in the left navigation menu
Linkout Maint Turns the Linkout Maintenance option on/off in the left navigation menu
Lookup Lender Admin Turns the Lookup Admin option on/off in the left navigation menu
Lookup Client Company Turns the Lookup Broker Company option on/off in the left navigation menu
Lookup Broker User Turns the Lookup Broker User option on/off in the left navigation menu
Lookup Broker User Turns the Lookup Broker User option on/off in the left navigation menu
Lookup Lender Admin Crsp Turns the Lookup Correspondent Admin option on/off in the left navigation menu
Lookup Lender User Crsp Turns the Lookup Correspondent Lender Employee option on/off in the left navigation menu
Lookup Lender Mgr Crsp Turns the Lookup Correspondent Manager option on/off in the left navigation menu
Lookup Documents Turns the Lookup Documents option on/off in the left navigation menu
Lookup Group Turns the Lookup Groups option on/off in the left navigation menu
Lookup Lender Employee Turns the Lookup Lender Employees option on/off in the left navigation menu
Lookup Lender Mgr Turns the Lookup Managers option on/off in the left navigation menu
Lookup Region Turns the Lookup Regions option on/off in the left navigation menu
Case File Request Turns the LP case file retrieval option on/off in the left navigation menu
My Link Outs Turns the My Link Outs option on/off in the left navigation menu
My Web Site Turns the My Web Site option on/off in the left navigation menu
OpenClose HelpDesk Turns the OpenClose HelpDesk option on/off in the left navigation menu
Outlook Turns the Outlook option on/off in the left navigation menu
Broker Pipeline Admin Turns the Pipeline Administration option on/off in the left navigation menu
Pipeline Reporting Turns the Pipeline Reporting option on/off in the left navigation menu
Pipeline Summary Turns the Pipeline Summary option on/off in the left navigation menu
Product and Pricing Admin Turns the Product & Pricing (Decision Assist user interface access) on/off in the left navigation menu
Queue Turns the Queue option on/off in the left navigation menu
Search Turns the Search option on/off in the left navigation menu
Upload New Turns the Upload Loan option on/off in the left navigation menu
Workflow Maintenance Turns the Workflow Maintenance option on/off in the left menu

All information contained in this document is confidential and proprietary and may not be reproduced or disclosed to anyone not originally intended without the express written permission of Beanstalk Networks. © Beanstalk Networks. All rights reserved.
Page 211 of 216

All information contained in this document is confidential and proprietary and may not be reproduced or disclosed to anyone not originally intended without the express written permission of Beanstalk Networks. © Beanstalk Networks. All rights reserved.
Page 212 of 216

20
The Fax Module
Fax Module – (Fax Module Customers Only)
The Fax Module allows you to convert a paper document into a digital document and store it in a loan’s e-Doc Manager. If you have paper documents such as pay stubs you can fax it to a special number with a special cover sheet and the document will be digitally stored in the e-Doc Manager.
You must place a cover sheet printed from OpenClose on your document when faxing it because it contains a special bar code that enables OpenClose to route it to the proper loan.
Faxing Your Document
Choose Fax Cover from the loan’s action menu.
Enter the number of pages including cover sheet in the Total No. of Pages Including Cover text box. The value you provide here will print on the cover sheet but will not affect the routing of the file.
(Lender users only): The CC Originator checkbox will auto-populate. If you do not want the broker to receive a copy of the faxed document then you must un-check the CC Originator checkbox.
Choose one or more document types by checking the associated checkbox. If you check the box for Other, provide a value in the text box.
Click the Print Form checkbox. A cover sheet window will pop up for each document you selected. Print each one.
NOTE: You can fax multiple documents in a single fax. As long as each document has its associated cover sheet on top of the document OpenClose will route each document individually.
Audience:
All
Fax Module Customers Only

All information contained in this document is confidential and proprietary and may not be reproduced or disclosed to anyone not originally intended without the express written permission of Beanstalk Networks. © Beanstalk Networks. All rights reserved.
Page 214 of 216
Figure 20.1 – The Bar Code Used to Route Faxed Documents To The e-Doc Manager
Viewing Your Faxed Document
As with all loan documents in OpenClose, your faxed document will appear in the loan’s e-Doc Manager once it has been processed and routed. It may take several minutes to appear under the Faxes section in the e-Doc Manager.

All information contained in this document is confidential and proprietary and may not be reproduced or disclosed to anyone not originally intended without the express written permission of Beanstalk Networks. © Beanstalk Networks. All rights reserved.
Page 215 of 216
Figure 20.2 - e-Doc Manager with a Faxed Document
NOTE: Faxing a document places it in your e-Doc Manager.
If you are a broker-side user and want the faxed document to be available to the lender you must send it using:
Submit Loan to Lender (if you have not submitted the file yet).
Update Lender (if you have already submitted the file).
If you are a lender-side user and want the file to be available to the broker you must check the CC
Originator box when generating the fax cover sheet.

All information contained in this document is confidential and proprietary and may not be reproduced or disclosed to anyone not originally intended without the express written permission of Beanstalk Networks. © Beanstalk Networks. All rights reserved.
Page 216 of 216
21
User Manual Updates
This chapter provides a listing of the latest additions to this manual