operating instructions 48 dual fuel range … instructions 48" dual fuel range (convection...
TRANSCRIPT

Operating Instructions48" Dual Fuel Range(Convection Oven)
To prevent accidents and damage to the range, you must read allinstructions supplied before installing or using the appliance.
en-US, CA M.-Nr. 09 898 081

IMPORTANT SAFETY INSTRUCTIONS
2
WARNINGChildren and adults can tip over the range if has not been secured.This may lead to fatal injuries.
This range must be secured and connected using the anti-tipdevice according to the installation instructions.
If you have moved the range, slide the locking latch onto the anti-tip device until you feel it lock into place.
Do not use the range if the anti-tip device has not been properlyinstalled and engaged.
Failure to observe the information contained in the installationinstructions can lead to serious or fatal injuries for children andadults.
All ranges can tip
Injury to persons could result
Install anti-tip devices packed with range
See installation instructions
WARNING

Contents
3
IMPORTANT SAFETY INSTRUCTIONS ................................................................ 2
IMPORTANT SAFETY INSTRUCTIONS ................................................................ 8
Guide to the range............................................................................................... 20HR 1954 ................................................................................................................ 20HR 1955, HR 1956 ................................................................................................ 20
Control panel ....................................................................................................... 22HR 1954 ................................................................................................................ 22HR 1955, HR 1956 ................................................................................................ 22Sensor buttons ...................................................................................................... 23M Touch display .................................................................................................... 24
Symbols............................................................................................................ 25Basic operation ..................................................................................................... 25
Features................................................................................................................ 27Model numbers .................................................................................................... 27Data plate ............................................................................................................. 27Items included with this range............................................................................... 27Standard and optional accessories....................................................................... 27
Shelf runners .................................................................................................... 28Universal tray and wire oven rack with safety notches .................................... 28FlexiClip telescopic runners HFC 92 ................................................................ 29Rotisserie HDGR 30+ ....................................................................................... 32
Oven controls ....................................................................................................... 33Oven safety features ............................................................................................. 33
System lock for the oven ............................................................................. 33Safety shut-off.................................................................................................. 33Cooling fan ....................................................................................................... 33Vented oven door ............................................................................................. 33Safety Door Lock for Self Clean ....................................................................... 33
PerfectClean surfaces ........................................................................................... 34Self Clean ready accessories ................................................................................ 34
Before using for the first time ............................................................................ 35Before using for the first time................................................................................ 35Heating up the oven for the first time and rinsing the steam injection system ..... 37
Operating the oven.............................................................................................. 39Energy saving tips ................................................................................................. 39Quick Guide........................................................................................................... 40Cooling fan ........................................................................................................... 40

Contents
4
Settings ................................................................................................................ 41Accessing the "Settings" menu............................................................................. 41
Changing and saving settings .......................................................................... 41Settings overview .................................................................................................. 42Language ........................................................................................................... 44Time of day............................................................................................................ 44
Display.............................................................................................................. 44Clock Type........................................................................................................ 44Clock Format .................................................................................................... 44Set .................................................................................................................... 44
Date ....................................................................................................................... 45Lighting.................................................................................................................. 45Start screen ........................................................................................................... 45Brightness ............................................................................................................. 45Volume................................................................................................................... 46
Buzzer tones..................................................................................................... 46Keypad tone ..................................................................................................... 46Welcome melody.............................................................................................. 46
Units of measurement ........................................................................................... 46Weight .............................................................................................................. 46Temperature ..................................................................................................... 46
Cooling fan ............................................................................................................ 47Default temperatures............................................................................................. 47Self Clean .............................................................................................................. 48Safety .................................................................................................................... 48
System lock ................................................................................................. 48Sensor lock ...................................................................................................... 48
Catalyzer................................................................................................................ 49Voltage................................................................................................................... 49Sensor group......................................................................................................... 49Calibrate temperature............................................................................................ 50Showroom Program .............................................................................................. 50
Demo Mode...................................................................................................... 50Factory default....................................................................................................... 51Lift panel................................................................................................................ 51
MyMiele ................................................................................................................ 52To add an entry...................................................................................................... 52Editing MyMiele..................................................................................................... 53
Deleting entries................................................................................................. 53Sorting entries .................................................................................................. 53

Contents
5
Alarm + Timer ...................................................................................................... 54Using the Alarm ................................................................................................ 54
Setting the alarm .............................................................................................. 54Changing an alarm ........................................................................................... 54Deleting an alarm ............................................................................................. 54
Using the Timer ................................................................................................. 55Setting the timer ............................................................................................... 55Resetting the timer ........................................................................................... 56Canceling the timer .......................................................................................... 56
Guide to the modes ............................................................................................. 57
Additional functions ............................................................................................ 60Changing the temperature..................................................................................... 60Rapid PreHeat ....................................................................................................... 61
Rapid PreHeat .................................................................................................. 61Using the Crisp function (Moisture Reduction) ..................................................... 62Changing the oven mode ...................................................................................... 62Setting additional durations .................................................................................. 63
Turning off automatically .................................................................................. 64Turning on and off automatically ...................................................................... 64Sequence of a cooking program that turns on and off automatically .............. 65Changing the set time ...................................................................................... 65Canceling cooking............................................................................................ 65
Moisture Plus ................................................................................................ 66Cooking with the Moisture Plus function........................................................ 67
Setting the temperature.................................................................................... 67Setting the number of steam bursts................................................................. 67Timing the bursts of steam............................................................................... 67Changing the type of heating ........................................................................... 68Injecting bursts of steam.................................................................................. 69Automatic burst of steam................................................................................. 691, 2 or 3 Bursts of steam.................................................................................. 69
Evaporating residual moisture ............................................................................... 70Starting residual water evaporation immediately ............................................. 71Skipping residual moisture evaporation ........................................................... 71
Gourmet Center ................................................................................................... 72List of food types................................................................................................... 72MasterChef Plus.................................................................................................... 72Using MasterChef and MasterChef Plus programs............................................... 73
Notes on using these programs ....................................................................... 73Search ................................................................................................................... 74

Contents
6
MasterChef Plus Recipes...................................................................................... 74Baguette ........................................................................................................... 75Banana Bread................................................................................................... 76Brioche ............................................................................................................. 77Ciabatta ............................................................................................................ 78Cinnamon Raisin Bread.................................................................................... 79French Bread .................................................................................................... 80Italian Bread ..................................................................................................... 81Jalapeño Cheese Bread ................................................................................... 82Multigrain Bread ............................................................................................... 83Rolls.................................................................................................................. 84Rye Bread......................................................................................................... 85San Francisco Sourdough ................................................................................ 86Walnut Bread.................................................................................................... 87White Bread...................................................................................................... 88Whole Grain Bread ........................................................................................... 89
Favorites ............................................................................................................... 90Creating a Favorite ................................................................................................ 90Starting a Favorite ................................................................................................. 91Changing Favorites................................................................................................ 92
Changing cooking stages................................................................................. 92Changing the name .......................................................................................... 93
Deleting a Favorite................................................................................................. 93
Bake ...................................................................................................................... 94
Roast .................................................................................................................... 96Wireless roast probe.............................................................................................. 97
How it works..................................................................................................... 97When to use the wireless roast probe.............................................................. 98Important notes on using the wireless roast probe.......................................... 98Using the wireless roast probe....................................................................... 100Time left display ............................................................................................. 101Using residual heat......................................................................................... 102
Slow Roasting.................................................................................................... 103Using the Slow Roasting function ....................................................................... 104Adjusting the Slow Roasting temperature........................................................... 105
Broil..................................................................................................................... 106
Special Modes ................................................................................................... 110Defrost................................................................................................................. 111

Contents
7
Dehydrate ............................................................................................................ 112Reheat ................................................................................................................. 113Warm-up Cookware ............................................................................................ 113Proof .................................................................................................................... 114Pizza .................................................................................................................... 114Sabbath Program ................................................................................................ 115Gentle Bake......................................................................................................... 116Canning ............................................................................................................... 117Frozen food.......................................................................................................... 118
Cleaning and care ............................................................................................. 119Unsuitable cleaning agents ................................................................................. 119Tips...................................................................................................................... 120Normal soiling...................................................................................................... 120
Wireless Roast Probe ..................................................................................... 120Stubborn soiling .................................................................................................. 121Cleaning the oven interior with Self Clean .................................................... 122
Preparing for the Self Clean program............................................................. 122Starting the Self Clean program..................................................................... 123Starting the Self Clean program..................................................................... 123Delaying the start of the Self Clean program ................................................. 123At the end of the Self Clean program............................................................. 124The Self Clean program is canceled .............................................................. 125
Removing the door.............................................................................................. 126Reinstalling the door ........................................................................................... 127Removing the shelf runners................................................................................. 128
Frequently asked questions ............................................................................. 129
Technical Service............................................................................................... 134
Copyright and licenses ..................................................................................... 135

IMPORTANT SAFETY INSTRUCTIONS
8
When using the appliance, follow basic safety precautions, including thefollowing:
Read all instructions before installation and use of the range to preventaccidents and machine damage.
This appliance complies with current safety requirements.Improper use of the appliance can lead to personal injury andmaterial damage.
Read all instructions before installing or using the oven for the firsttime. Only use the appliance for its intended purpose.
Keep these operating instructions in a safe place and pass themon to any future user.
Use
This appliance is intended for residential use only. Use only asdescribed in these operating instructions.
This appliance is not intended for outdoor use.
Only use this oven for residential cooking, and the purposesdescribed in this manual.Other uses are not permitted and can be dangerous.
Risk of Fire! Do not use this oven to store or dry flammablematerials.
Persons who lack physical, sensory or mental abilities, orexperience with the appliance should not use it without supervisionor instruction by a responsible person.

IMPORTANT SAFETY INSTRUCTIONS
9
Children
As with any appliance, close supervision is necessary when theoven is used by children.
Do not leave children unattended: Children should not be alone orunsupervised in the area where the appliance is installed. Do notallow them to sit or stand on the appliance.
As with any appliance, close supervision is necessary when usedby children.
Children 8 years and older may only use the oven unsupervised ifthey have been shown how to use it safely and recognize andunderstand the consequences of incorrect operation.
Children must not be allowed to clean or maintain the applianceunsupervised.
Children should not be left alone or unattended in an area wherean oven is in use. Never allow children to operate, sit or stand on anypart of the oven. Caution: Do not store items of interest to childrenin cabinets above an oven. Children climbing on the oven to reachthese items could be injured.
Danger of burns. The oven gets hot at the oven door glass, thevapor vent, the handle and the operating controls. Do not allowchildren to touch or play in, on or near the oven.
Danger of burns. Children's skin is more sensitive to high temperatures than that ofadults. The oven becomes hotter during self-cleaning than it does innormal use. Do not let children touch the oven while the Self Cleanprogram is running.
Burn Hazard - Do not allow children to use the oven. Failure to doso can result in severe burns or serious injury.
Danger of suffocation! Ensure that any plastic wrappings, bags,etc. are disposed of safely and kept out of the reach of children.

IMPORTANT SAFETY INSTRUCTIONS
10
Burn hazard! Keep the spaces above and behind the range clear of any items thatcould draw the attention of children. Otherwise, they can be temptedinto climbing onto the appliance.
Danger of injury. Never allow children to hang or lean on any partof the appliance.

IMPORTANT SAFETY INSTRUCTIONS
11
Technical safety
Installation, repair and maintenance work should be performed bya Miele authorized service technician in accordance with nationaland local safety regulations and the provided installationinstructions. Contact Miele’s Technical Service Department forexamination, repair or adjustment. Repairs and other work byunauthorized persons could be dangerous and may void thewarranty.
Do not carry or lift the range by the oven door handle or thecontrol panel!
Maintenance by the user: Never repair or replace any part of theappliance unless the instructions specifically recommend doing so.Service work may only be performed by a qualified technician.
Changes or modifications not expressly approved by Miele mayvoid the user's authority to operate the oven.
A damaged range can be dangerous. Always check for visiblesigns of damage. Never use a damaged appliance.
Reliable and safe operation of the range can only be guaranteed ifit is connected to the public power supply.
The electrical safety of the range can only be guaranteed when itis properly grounded. Compliance with this essential safetyrequirement is absolutely mandatory. If in any doubt, please have thebuilding's wiring system inspected by a qualified electrician.
Proper installation: Make sure that your appliance has beeninstalled correctly and that it has been grounded by a qualifiedtechnician.
The oven is not to be operated until it has been properly installedwithin cabinetry.

IMPORTANT SAFETY INSTRUCTIONS
12
To avoid damaging the range, make sure that the connection data(voltage and frequency) on the data plate correspond to thebuilding's power supply before connecting the appliance.When in doubt, consult a qualified electrician.
Do not use a power strip or extension cord to connect the rangeto electricity. These are a fire hazard and do not guarantee therequired level of appliance safety.
This appliance must not be installed and operated in mobileinstallations (e.g. on a ship).
Danger of electric shock!Under no circumstances open the outer casing of the appliance.
Do not repair or replace any part of the appliance unlessspecifically recommended in the operating instructions. All otherservicing should be referred to a qualified technician.
Defective components should be replaced by Miele original partsonly. Only with these parts can the manufacturer guarantee thesafety of the appliance.
During installation, maintenance and repair work, e.g. if the ovenlighting is broken (see "Frequently asked questions"), the range mustbe completely disconnected from the household electricity supply.The gas supply must be shut off. Ensure that this is the case by:
– removing the fuse,
– "tripping" the circuit breaker, or
– unplugging the unit. Pull the plug not the cord.
– Shut off the gas supply and, if necessary, disconnect the rangefrom the gas line. Installation and maintenance of the gasconnection must be performed by qualified installers, serviceagencies or gas providers.

IMPORTANT SAFETY INSTRUCTIONS
13
If the range is installed behind a cabinet door, do not close thedoor while the appliance is in operation. Heat and moisture can buildup behind the closed door and cause damage to the range and tothe surrounding cabinets and flooring. Do not close the door until theappliance has completely cooled down.
Do not install kitchen cabinets above the range, since reachingover a hot stovetop to access the cabinets can result in burns. If it isnecessary to install cabinets, you can reduce the risk of burns byinstalling a range hood that extends at least 4 3/4" (12 cm) past thebottom of the cabinets.
The water shutoff valve must be accessible after the range hasbeen installed.
The protective sleeve of the water intake hose must not bedamaged or become kinked. This will cause it to leak.
The integrated Waterproof System offers protection against waterdamage if the following conditions are met:
– The range is properly installed (connected to electric and watersupply).
– The range is repaired immediately whenever damage is detected.
– The water supply is shut off during extended periods of non-use(e.g. vacation).
Hard water, water containing minerals and water from reverseosmosis filtering systems can damage the range. Only use filtered,softened and demineralized water from the building's plumbing tosupply the range.

IMPORTANT SAFETY INSTRUCTIONS
14
Proper use
The oven becomes very hot while in use. Use caution toensure that you are not burned on the heating elements or interiorsurfaces of the oven. Use pot holders when placing food in theoven, adjusting the racks, etc. in a hot oven.
Caution: Heating elements may be hot even though they are notglowing. Interior surfaces of an oven become hot enough to causeburns. External parts of the oven such as the door glass, vents, andthe control panel can become hot. During and after use, do nottouch, or let clothing or other flammable materials come into contactwith heating elements or interior surfaces of the oven until they havehad sufficient time to cool.
Do not let food sit in the oven for more than one hour before orafter cooking. Doing so can result in food poisoning or sickness.
Use only dry, heat-resistant potholders. Moist or damp potholdersused on hot surfaces may result in steam burns. Do not letpotholders come in contact with oil or grease. Do not substitute dishtowels or other bulky items for potholders. Do not let potholderstouch hot heating elements.
Loose fitting or hanging garments present a fire hazard. Wearproper apparel while operating the appliance.
Do not heat unopened containers of food in the oven, pressuremay cause the containers to burst and result in injury.
Never pour cold water onto hot surfaces in a hot oven.The steam created could cause serious burns or scalding and thesudden change in temperature can damage the enamel in the oven.
To prevent burns, always place oven racks at their desired heightwhile the oven is cool. If the rack must be moved while the oven ishot, do not let pot holders touch hot heating elements.

IMPORTANT SAFETY INSTRUCTIONS
15
Open the door carefully to allow hot air or steam to escape beforeplacing or removing food.
To prevent burns, allow the heating elements to cool beforecleaning by hand.
Do not leave the oven door open unnecessarily as someone maytrip over it or be injured by it.
Never leave the appliance unattended when cooking with oil orfat. They can ignite if overheated. Do not use water on greasefires.Turn off the oven immediately and suffocate the flames bykeeping the oven door closed.
Smother the fire or flames, or use a dry chemical extinguishingagent or foam fire extinguisher.
Never store flammable liquids and materials in, above or under anoven, or near cooking surfaces.
Do not use the oven to heat the room. The high temperaturesradiated could cause objects near the oven to catch fire.
WARNINGNEVER use this appliance as a space heater to heat or warm theroom. Doing so may result in carbon monoxide poisoning andoverheating of the oven.
WARNINGNEVER use this appliance as storage space. Doing so may resultin carbon monoxide poisoning and overheating of the oven.
WARNINGNEVER cover any slots, holes or passages in the oven bottom orcover an entire rack with materials such as aluminum foil. Doing soblocks air flow through the oven and may cause carbon monoxidepoisoning. Aluminum foil linings may also trap heat, causing a firehazard.

IMPORTANT SAFETY INSTRUCTIONS
16
Broiling food for an excessively long time can cause it to dry outand may result in the food catching fire.Do not exceed recommended broiling times.
Some foods dry out very quickly and can be ignited by highbroiling temperatures. Do not use broiling modes for crisping rolls orbread, or to dry flowers or herbs. Instead use the Convection Bake or Surround modes.
Use caution when using alcohol in your recipes. Alcoholevaporates at high temperatures but may, in rare circumstances,combust on the hot heating elements.
Plastic containers, which are not heat-resistant, melt and mayignite at high temperatures and can damage the oven. Use onlyplastic containers that are indicated by the manufacturer as beingsuitable for use in ovens.
When residual heat is used to keep food warm, the high level ofhumidity and condensation can cause damage in the oven. Thecontrol panel, countertop or cabinetry may also be damaged.Do not switch the oven off completely while food is inside it, butselect the lowest possible temperature for the oven mode you areusing. This will ensure the fan will automatically continue to run.
It is recommended to cover all cooked food that is left in the ovento be kept warm. This will prevent moisture from condensing on theinterior of the oven.
To avoid damage, do not place aluminum foil, pots, pans orbaking sheets directly on the oven floor. This can cause a build up ofheat that will damage the oven floor.
Do not slide pots or pans on the oven floor. This could scratchand damage the surface.

IMPORTANT SAFETY INSTRUCTIONS
17
The door can support a maximum weight of 33 lbs (15 kg). Do notsit on or lean against an open door, and do not place heavy objectson it. Also make sure that nothing can get trapped between the doorand the oven cavity. The oven could get damaged.
This oven must only be used for cooking food. Fumes, vapors orheat given off by glues, plastics or flammable liquids and materialscould be hazardous. Do not use it as a dryer, kiln, dehumidifier, etc.
Do not obstruct the flow of combustion and ventilation air.
Do not let metal objects (aluminum foil, pans) come in contactwith the heating element.
Make certain that the power cords of small appliances do notcome in contact with or get caught in the oven door.
When baking frozen pizzas or pies, place them on the wire racklined with parchment paper. Do not use the baking tray or theroasting pan for frozen foods with a large surface area. The tray orpan could become warped and difficult to remove from the ovenwhen hot. Frozen foods like french fries, chicken nuggets, etc. canbe baked on the baking tray.

IMPORTANT SAFETY INSTRUCTIONS
18
Cleaning and care
Do not use a steam cleaner to clean this oven.Steam could penetrate electrical components and cause a shortcircuit.
Only clean parts listed in these Operating and InstallationInstructions.
Scratches on the door glass can cause the glass to break.Do not use abrasive cleaners, hard sponges, brushes or sharp metaltools to clean the door glass.
The shelf runners can be removed for cleaning purposes (see"Cleaning and care"). Ensure they are correctly fitted after cleaningand never operate the oven without the shelf runners inserted.
There is a seal around the oven interior which seals the inside ofthe door. Take care not to rub, damage or move the gasket.
Do not use oven cleaners. Commercial oven cleaners or ovenliners of any kind should not be used in or around any part of theoven.
Debris should be removed before running the Self Clean program.If not removed this debris can smoke causing the self-cleaningprogram to turn itself off.

IMPORTANT SAFETY INSTRUCTIONS
19
Accessories
Use only genuine original Miele parts. If parts or accessories fromother manufacturers are used, the warranty will become void.
Only use the Miele roast probe supplied with this oven. If it isfaulty, it must only be replaced with a Miele genuine roast probe.
The plastic on the roast probe can melt at very high temperatures.Do not use the roast probe when using the broil functions (exception:Convection Broil ). Do not store the roast probe in the oven if it isnot in use.
This oven complies with Industry Canada licence-exempt RSSstandard(s) and part 15 of the FCC Rules. Operation is subject to thefollowing two conditions: (1) This device may not cause harmfulinterference, and (2) this device must accept any interferencereceived, including interference that may cause undesired operation.
The high temperatures used during self-cleaning will damageaccessories that are not designed for cleaning in the Self Cleanprogram. Please remove these accessories from the oven beforestarting the Self Clean program. This also applies to accessoriespurchased separately (see "Cleaning and care").
Preparing your appliance for an extended vacation
If you elect to turn off the water to your home for an extendedperiod of time, please note that this may not be enough to reducethe risk of a leak. To be completely safe, you must turn off the watersupply to each individual appliance.
SAVE THESE INSTRUCTIONS AND REVIEW THEM PERIODICALLY

Guide to the range
20
HR 1954
HR 1955, HR 1956

Guide to the range
21
a Controls for Speed Oven, oven and cooktop
b Door lock with contact switch for Self CleanThis switch ensures that the heating elements and convection fans turn offwhen the door is opened during use.
c Browning/Broiling element
d Oven interior lighting
e Rotisserie motor
f TwinPower convection fan with heating element
g Shelf runners with 5 levels
h Door
i Storage for the wireless roast probe for the ovenStorage sleeve for the wireless roast probe on the front right of the WarmingDrawer.
j Data plateThe data plate is located behind the toe kick.
k Warming Drawer
l Speed Oven

Control panel
22
HR 1954
HR 1955, HR 1956
a Sensor button for lift panelTo lift up the control panel
b On / Off button in the cut-outTo turn the appliance on and off
c DisplayTo display time of day andinformation for operation
d "Back" sensor buttonTo go back one step at a time
e "Light" sensor buttonTo turn the oven cavity lighting onand off
f "Timer" sensor buttonTo set the timer
g Optical interface(for service technician use only)
Control panel
23
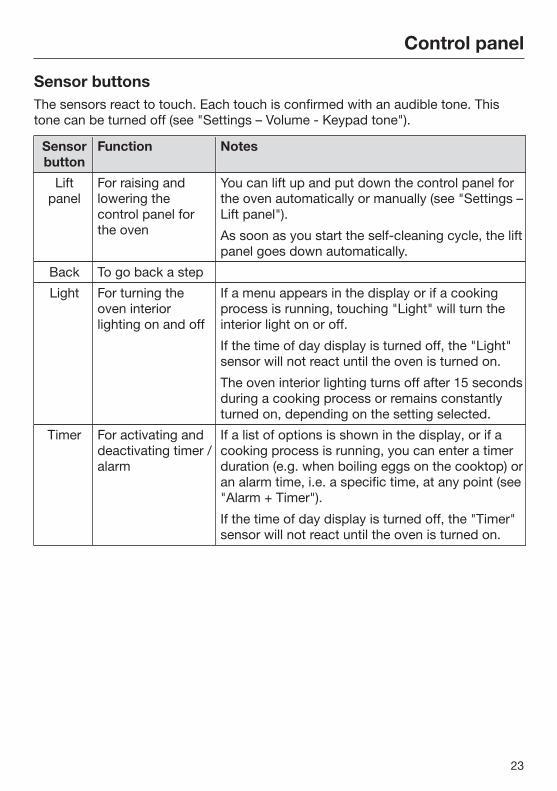
Sensor buttonsThe sensors react to touch. Each touch is confirmed with an audible tone. Thistone can be turned off (see "Settings – Volume - Keypad tone").
Sensorbutton
Function Notes
Liftpanel
For raising andlowering thecontrol panel forthe oven
You can lift up and put down the control panel forthe oven automatically or manually (see "Settings –Lift panel").
As soon as you start the self-cleaning cycle, the liftpanel goes down automatically.
Back To go back a step
Light For turning theoven interiorlighting on and off
If a menu appears in the display or if a cookingprocess is running, touching "Light" will turn theinterior light on or off.
If the time of day display is turned off, the "Light"sensor will not react until the oven is turned on.
The oven interior lighting turns off after 15 secondsduring a cooking process or remains constantlyturned on, depending on the setting selected.
Timer For activating anddeactivating timer /alarm
If a list of options is shown in the display, or if acooking process is running, you can enter a timerduration (e.g. when boiling eggs on the cooktop) oran alarm time, i.e. a specific time, at any point (see"Alarm + Timer").
If the time of day display is turned off, the "Timer"sensor will not react until the oven is turned on.

Control panel
24
M Touch display
The touch screen can be scratched by hard objects, e.g. pens and pencils.Only touch the display with your fingers.
Touching the display with your finger emits a small electrical charge, which in turntriggers an electrical pulse that is detected by the surface of the touch display.
The display is divided into three sections:
MyMiele
OperatingModes
Gourmet Center
SpecialModes
Favorites
12:00Main MenuMain Menu 12:00
The top line shows what menu level you are currently in. Options within a menu areseparated by a vertical line. If there is not enough space to show the whole path,additional options are indicated by … . The Time of Day, Alarm and Timer are shown in the top right-hand corner of the display.
The middle row shows the current menu and options. You can scroll to the right orleft by swiping your finger across the display.
The and arrows at the bottom of the screen are used for scrolling to the left orright. The number of small squares between the arrows indicates the number ofpages available and your position within the current menu.

Control panel
25
Symbols
The following symbols may appear in the display:
Symbol Description Some settings, e.g. display brightness and buzzer volume, are
selected using a bar chart. This symbol indicates that there is additional information and
advice about using the oven. Select OK to access theinformation.
The system lock or sensor lock is active (see "Settings - SystemLock "). The oven cannot be operated.
Alarm Timer
Core temperature when using the roast probe
Basic operationEach time you touch a possible option the relevant field will light up orange.
To select or open a menu
Touch the desired field to select it.
Scrolling
You can scroll left or right.
Swipe the screen, i.e., place your finger on the touch display and move it in thedesired direction.
Or: Using your finger you can tap the and arrows to scroll left or right.
Exiting a menu
Touch "Back", select an option in the menu path at the top of the screen, ortouch … .
Depending on the current menu, this will take you back one level or return you tothe Main Menu.
Help function
With some functions and options Help appears.
Select the function.
Helpful information will then appear in text and pictures.

Control panel
26
Entering numbers
You can enter numbers by scrolling through and touching the roller, or by using thenumerical keypad.
To enter numbers using the roller:
Swipe the roller up or down to select the desired number.
To enter numbers using the numerical keypad:
Touch in the bottom right of the input field.
The numerical keypad appears.
Touch the required numbers.
Once you have entered a valid value, the OK sensor will light up green.The last figure entered can be deleted using the arrow.
Touch "OK".
Entering letters
Enter a name using a keyboard. Try to use short, concise names.
Select the required letters or characters.
Touch Save.

Features
27
Model numbersA list of the ovens described in theseoperating instructions can be found onthe back page.
Data plateThe data plate is behind the toe-kick.The toe-kick cover is attached to thebase of the range by magnets so it canbe removed and put back again easily.
There you can find the model number,the serial number and the connectiondata (voltage/frequency/maximum ratedload) for your range.
Have this information available whencontacting Miele Technical Service.
Items included with this rangeThe following items are included withthis appliance:
– Installation instructions for the range
– The operating instructions for therange:
– Gas Top Part
– Convection Oven
– Speed Oven
– Warming Drawer
– An anti-tip device, including screwsfor fastening the range
– Various accessories
Standard and optionalaccessories
Accessories vary depending onmodel. All ovens are supplied withshelf runners, a universal tray and awire oven rack. Depending on themodel, your oven may also come withthe additional accessories listed.
All accessories and cleaning and careproducts in these instructions aredesigned to be used with Miele ovens.
They can be ordered from theMieleusa.com website or Miele.
When ordering, please have ready themodel number of your oven and of thedesired accessories.

Features
28
Shelf runners
The shelf runners are located on theright and left sides of the oven interiorand provide the levels for insertingaccessories.
The shelf level numbers are indicatedon the front of the oven frame.
Each shelf level has two rails, oneabove the other:
– Slide the accessories (e.g. wire ovenrack) into the oven between the rails.
– Attach the telescopic runners andwire oven rack (if available) to thebottom rail.
The shelf runners can be removed forcleaning purposes. (See "Cleaning andcare".)
Universal tray and wire oven rackwith safety notches
Universal tray HUBB 30-1:
Wire oven rack HBBR 48-2:
These accessories are inserted into theoven between the two rails of a siderunner.
Safety notches are located on theshorter sides of the wire oven rack.These catches prevent the rack frombeing fully pulled out of the side runnerswhen you only wish to pull it outpartway.
Always slide the wire oven rack into therails on the shelf runner with thecatches facing down.

Features
29
FlexiClip telescopic runners HFC 92
The FlexiClip telescopic runners can beattached to any shelf level.
Push the FlexiClip telescopic runnersall the way into the oven beforeplacing accessories on them.The accessories will thenautomatically sit securely in betweenthe stoppers at either end of eachrunner and be prevented from slidingoff.
The FlexiClip runners can support amaximum load of 33 lbs (15 kg).
Installing and removing the FlexiCliptelescopic runners
Danger of burns! Make sure theheating elements are turned off andthat the oven cavity is cool.
The FlexiClip telescopic runners areinserted in between the two rails thatmake up a shelf level.
The telescopic runner with the Mielelogo must be inserted on the right.
When inserting or removing thetelescopic runners, do not extendthem.
Hook the FlexiClip runner onto thefront of the lower rail of a side runner(1.) and then push it along the rail intothe oven compartment (2.).

Features
30
Then secure the FlexiClip runner tothe bottom of the two rails asillustrated (3).
If the telescopic runners are difficultto pull out after inserting, you mayneed to pull firmly to release them.
To remove a FlexiClip telescopic runner:
Push the FlexiClip runner in all theway.
Remove the FlexiClip telescopicrunner by raising it at the front (1)then pulling it forwards along the railand out (2).
Perforated baking tray HBBL 71
The perforated baking tray has beenspecially developed for the preparationof baked goods.The tiny perforations assist in browningthe underside of baked goods.The tray can also be used fordehydrating or drying food.
The surface has been treated withPerfectClean enamel for easy cleaning.
The perforated baking tray can beplaced on the rack.
Grilling and Roasting insertHGBB 30-1
The grilling and roasting insert is placedin the universal tray.The drippings from the meat or poultryare collected under the insert reducingspattering in the oven. The drippingscan then be used for gravy and sauces.
The surface has been treated withPerfectClean enamel for easy cleaning.

Features
31
Round baking form HBF 27-1
This circular form is suitable for cookingfresh or frozen pizzas, flat cakes, tartsand baked goods.
The surface has been treated withPerfectClean enamel.
Gourmet Baking Stone HBS 60
The baking stone is ideal for bakingdishes with a crisp bottom such aspizza and bread.The baking stone is made from a heatretaining stone and is glazed. Place thestone directly on the wire rack.A wooden peel is supplied with it forplacing food on and off the stone.
Gourmet Casserole Dishes HUB andLids HBD
Miele Gourmet Casserole Dishes can beplaced directly on the wire oven rack.They have an anti-stick coating.
The oven dishes have depths of8 1/2" (22 cm) or 13 3/4" (35 cm). Theyhave the same width and height.
Matching lids are also availableseparately.
Depth:8 1/2" (22 cm)
Depth:13 3/4" (35 cm)
HUB 61-22 HUB 61-35
HBD 60-22 HBD 60-35

Features
32
Wireless Roast Probe
The wireless roast probe allows you toaccurately monitor the food's internaltemperature during the cooking process(see "Roast - Wireless roast probe").
If you are not using the wireless roastprobe do not keep it in the oven duringcooking. Always put it back into thestorage sleeve on the front right of theCup & Plate Warming Drawer (see the"Guide to the oven" chapter).
Rotisserie HDGR 30+
The rotisserie is ideal for broiled foodssuch as rolled roasts or poultry. Thefood browns evenly on all sides as itrotates (see "Broiling - Using therotisserie to broil").
The rotisserie is placed on the universaltray and connected to the motors in theback wall of the oven.
The rotisserie can support a maximumweight of 11 lbs (5 kg).
Use of kebab device as well as meatclamps possible.
Opener
The opener allows you to open thecover of the over light.
Miele Oven Cleaner
Miele oven cleaner is suitable forremoving stubborn soiling. It is notnecessary to preheat the oven beforeuse.

Features
33
Oven controlsThe oven controls allow you to use thevarious cooking modes to bake, roastand broil.
It also allows you to access:
– the time of day display,
– a timer,
– a timer to automatically turn cookingprograms on and off,
– Moisture Plus cooking,
– the MasterChef programs,
– the MasterChef Plus programs,
– the creating of a Favorite program,
– settings that can be customized.
Oven safety features
System lock for the oven
The system lock prevents the oven frombeing used unintentionally (see "Systemlock ").
The system lock will remain activatedeven after a power failure.
Safety shut-off
The oven automatically turns itself off ifit is used for an exceedingly longperiod. The length of time depends onthe oven mode being used.
Cooling fan
The cooling fan comes on automaticallywhen a cooking program is started. Thecooling fan mixes hot air from the ovencavity with cool room air before ventingit out into the kitchen through ventslocated between the appliance doorand the control panel.
The cooling fan will continue to run for awhile after a program is complete toprevent moisture from building up in theoven, on the control panel orsurrounding cabinetry.
When the temperature in the oven hasfallen sufficiently, the cooling fan willturn off automatically.
Vented oven door
The oven door is made of glass panesthat have a heat-reflective coating onpart of their surface.
During operation, air is also circulatedthrough the door to keep the outerpanel cool.
The door can be removed anddisassembled for cleaning purposes(see "Cleaning and care").
Safety Door Lock for Self Clean
For safety reasons, the door is lockedas soon as the Self Clean program isstarted. After the self-cleaning programhas finished, the door will remain lockeduntil the temperature in the oven hasfallen below 535°F (280°C).

Features
34
PerfectClean surfacesThe revolutionary PerfectClean finish isa smooth, non-stick surface that isexceptionally easy to clean.
Food and grime from baking or roastingare easily removed.
Do not use ceramic knives, as thesewill scratch the PerfectClean surface.
Follow the instructions in the "Cleaningand Care" section of this manual so theanti-stick and easy cleaning propertiesare retained.
The following have all been treated withPerfectClean:
– Universal tray
– Grilling and Roasting insert
– Perforated baking tray
– Round baking form
Self Clean ready accessoriesThe following accessories can be left inthe oven during the Self Clean program.
– Shelf runners
– FlexiClip telescopic runners
– Wire oven rack
See "Cleaning and care" for moreinformation.
Before using for the first time
35
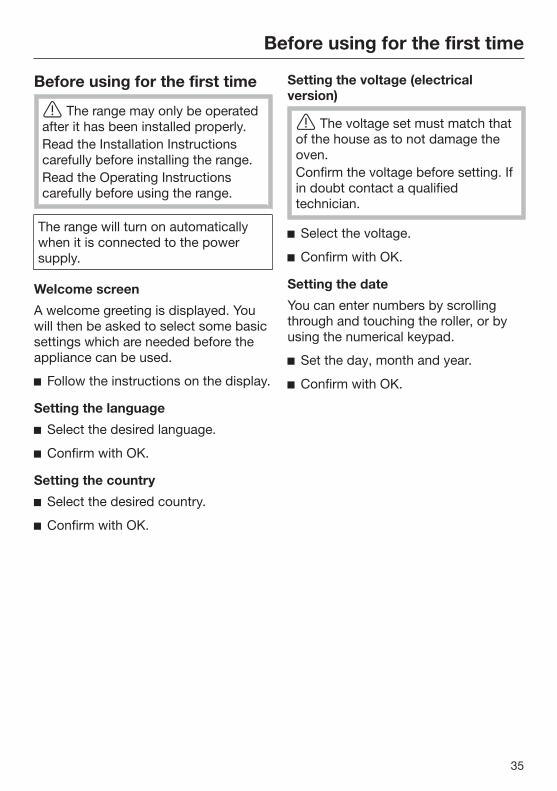
Before using for the first time
The range may only be operatedafter it has been installed properly.Read the Installation Instructionscarefully before installing the range.Read the Operating Instructionscarefully before using the range.
The range will turn on automaticallywhen it is connected to the powersupply.
Welcome screen
A welcome greeting is displayed. Youwill then be asked to select some basicsettings which are needed before theappliance can be used.
Follow the instructions on the display.
Setting the language
Select the desired language.
Confirm with OK.
Setting the country
Select the desired country.
Confirm with OK.
Setting the voltage (electricalversion)
The voltage set must match thatof the house as to not damage theoven.Confirm the voltage before setting. Ifin doubt contact a qualifiedtechnician.
Select the voltage.
Confirm with OK.
Setting the date
You can enter numbers by scrollingthrough and touching the roller, or byusing the numerical keypad.
Set the day, month and year.
Confirm with OK.

Before using for the first time
36
Set the time of day
You can enter numbers by scrollingthrough and touching the roller, or byusing the numerical keypad.
Set the time of day in hours andminutes.
Confirm with OK.
The time of day can be displayed in a12 hour or 24 hour format (see"Settings - Time of day - Clockformat").
Time of day display
You will then be asked when you wantthe time of day to show in the displaywhen the oven is turned off (see"Settings - Time - Display"):
– On
The time is always visible in thedisplay.
– Off
The display appears dark to saveenergy. Some modes are limited.
– Night Dimming
The time only shows in the displaybetween 5:00 am and 11:00 pm. Itturns off at night to save energy.
Select the desired option.
Confirm with OK.
Information regarding energyconsumption will appear in the display.
Confirm with OK.
Follow further instructions in thedisplay.
Set-up Successfully Completed isdisplayed.
Confirm with OK.
The oven is now ready to use.
If you accidentally select the wronglanguage, follow the instructionsdescribed in "Settings - Language ".

Before using for the first time
37
Heating up the oven for thefirst time and rinsing the steaminjection systemNew ovens can give off an unpleasantodor on first use. Heating up the ovenfor at least 1 hour with nothing in it willget rid of this smell. It is a good idea torinse the steam injection system at thesame time.
Ensure that the kitchen is wellventilated while the appliance isbeing heated up for the first time.Close doors to other rooms toprevent the smell spreadingthroughout the house.
Remove any protective wrapping andsticky labels from the oven.
Before heating the oven up, wipe theinterior with a damp cloth to removeany dust or bits of packaging thatmay have accumulated in the ovencavity during storage and unpacking.
Insert the FlexiClips with wire rack(available to order) to the shelfrunners and insert all trays and therack.
Turn on the oven.
The main menu will appear.
Select Operating Modes .
Select Moisture Plus .
The default temperature is displayed(350 °F/160 °C).
The oven heating, lighting and coolingfan will turn on.
Set the highest possible temperature(475 °F/250 °C).
Confirm with OK.
Select Automatic burst of steam.
After a short time, a burst of steam isinjected automatically.
Risk of injury!Steam can cause scalding.Do not open the door during a steamburst.
Heat up the oven for at least an hour.
After at least one hour:
Turn the oven off.

Before using for the first time
38
After heating up for the first time
Danger of burns! Allow the ovento cool before cleaning.
Turn on the oven.
Select Light to turn on the oven light.
Take all accessories out of the ovenand clean them by hand (see"Cleaning and care").
Clean the oven interior with warmwater and liquid dish soap, appliedwith a soft sponge or cloth.
Dry all surfaces with a soft cloth.
Turn the lighting and the oven off.
Leave the oven door open until theoven interior is completely dry.

Operating the oven
39
Energy saving tips– Remove any accessories from the
oven that you do not require forcooking.
– Try not to open the door whencooking.
– If a temperature range is given, it isbest to select the lower temperatureand check the food after the shortestcooking time given.
– The default setting for the Time ofDay display Time - Display - Off willconsume the least amount of energy.
– With the factory default settingLighting - On for 15 seconds the oveninterior lighting turns off automaticallyafter 15 seconds. It can be turned onagain at any time by touching "Light".
– When cooking with automatic shut-off or the wireless roast probe, theoven heating will turn offautomatically shortly before the endof cooking. The residual heat issufficient to finish the cookingprocess. Energy Save will appear inthe display. The cooling fan or hot airfan (depending on mode used) willremain on.
– The oven turns off automatically if abutton is not pressed to save power.The amount of time before the oventurns off depends on the selectedsettings, e.g. mode, temperature,cooking duration, etc.

Operating the oven
40
Quick Guide Turn on the oven.
The main menu will appear.
Place the food in the oven.
Select Operating Modes.
Select the desired mode.
The oven mode and default temperaturewill appear.
The oven heating, lighting and coolingfan will turn on.
Adjust the default temperature ifnecessary.
The default temperature will beautomatically accepted within a fewseconds. If necessary, select Changeto go back to the temperature setting(see "Additional functions - Changingthe temperature").
Confirm with OK.
The required and the actualtemperatures will appear.
You will see the temperature rising inthe display. A buzzer will sound whenthe oven temperature is reached if thisoption is selected (see "Settings -Volume - Buzzer tone").
After the cooking process:
Take the food out of the oven.
Turn the oven off.
Cooling fanAfter the cooking process the coolingfan will continue to run for a while aftera program is complete to preventmoisture from building up in the oven,on the control panel or surroundingcabinetry.
When the temperature in the oven hasfallen sufficiently the cooling fan willturn off automatically.
The default setting can be changed ifdesired (see "Settings - Cooling Fan").
Settings
41
Accessing the "Settings" menuFrom the main menu:
Select Settings.
They can be checked and changed, ifneeded.
Settings cannot be altered while acooking program is in progress.
Changing and saving settings
Select Settings.
Swipe across the screen until thedesired setting appears, then touch itto select.
The settings which are currentlyselected will have a colored framearound them.
Swipe across the screen until thedesired option appears, then touch itto select it.
Confirm with OK.
The setting is now saved.

Settings
42
Settings overview
Option Available settingsLanguage ... / deutsch / english / ...
CountryTime Display
On / Off * / Night DimmingClock Type
Analog * / DigitalClock Format
24 h / 12 h (am/pm) *Set
DateLighting On / On for 15 seconds *Start Screen Main Menu
Operating ModesGourmet CenterSpecial ModesMyMieleFavorites
Brightness Volume Buzzer tones
Keypad toneWelcome Melody
Units of Measurement Weightg * / lb / lb/oz
Temperature°C * / °F
Cooling Fan Temperature Controlled *Time Controlled
* Factory default

Settings
43
Option Available settingsSelf Clean With reminder
Without reminder *Default temperaturesSafety System Lock
On / Off *Sensor Lock
On / Off *Catalyzer Electrical Version 208V / 60Hz
220V / 60Hz240V / 60Hz
Sensor group Sensor group 0 – 9Calibrate Temperature Showroom Program Demo Mode
On / Off *Factory default Settings
FavoritesDefault temperaturesMyMiele
Lift-up control panel AutomaticallyManual *
* Factory default

Settings
44
Language The desired country and language canbe set.
After selecting and confirming yourchoice, the language selected willappear in the display.
Tip: If you accidentally select alanguage you do not understand, select Settings and use the symbol toreturn to the Language submenu.
Time of day
Display
Select how you would like the time ofday to appear in the display when theoven is turned off:
– On
The time of day will always appearsin the display. To turn the "Light" onand off or use the "Timer" touch therelevant sensor.
– Off
The display is turned off to saveenergy. The oven has be to be turnedon before you can use it. This alsoapplies when using the Alarm +Timer and the oven light.
– Night Dimming
To save energy, the time is onlyvisible in the display between 5:00am and 11:00 pm. The rest of thetime it is not visible.
Clock Type
You can choose from an analogue clockface or a digital (h:min) display.
The date will also appear in the digitalclock display.
Clock Format
You can select the clock format for thetime of day:
– 24 h
The time of day is shown in a 24 hourclock format.
– 12 h (am/pm)
The time of day is shown in a 12 hourclock format.
Set
Set the hours and the minutes.
If there is a power failure, the currenttime of day will reappear once thepower has been restored. The time isstored in memory for about 200 hours.

Settings
45
DateSet the date.
When the oven is turned off, the dateonly appears if the oven is set to"Time – Clock Type – Digital".
Lighting– On
The interior lighting is turned onduring the entire cooking period.
– On for 15 seconds
The oven lighting turns off 15seconds after a program starts.Touching "Light" turns it on foranother 15 seconds.
Start screenThe main menu will appear in thedisplay when the oven is turned on. Youcan change this default setting so that,for instance, the oven modes orMyMiele settings appear in the display.
BrightnessThe display brightness is representedby a bar with seven segments.
Select Darker or Lighter, to change the
brightness of the display.

Settings
46
Volume
Buzzer tones
The volume is represented by a bar withseven segments.
Maximum volume is selected when allsegments are filled. If none of thesegments are filled, the volume isturned off.
Select Quieter or Louder, to adjust thevolume.
Select On or Off to turn the buzzertones on or off.
Keypad tone
The volume is represented by a bar withseven segments.
Maximum volume is selected when allsegments are filled. If none of thesegments are filled, the volume isturned off.
Select Quieter or Louder, to adjust thevolume.
Select On or Off, to turn the keypadtone on or off.
Welcome melody
You can turn the welcome melody on oroff. It sounds when the On / Off button is touched.
Units of measurement
Weight
– g
The weight of food in MasterChefprograms is shown in grams.
– lb
The weight of food in MasterChefprograms is shown in pounds.
– lb/oz
The weight of food in MasterChefprograms is shown in pounds andounces.
Temperature
– °C
The temperature is displayed inCelsius.
– °F
The temperature is displayed inFahrenheit.

Settings
47
Cooling fanThe cooling fan will continue to run forsome time after the oven has beenturned off to prevent humidity frombuilding up in the oven, on the controlpanel or in the surrounding cabinetry.
– Temperature Controlled
The cooling fan turns off when thetemperature in the oven drops below160°F (70°C).
– Time Controlled
The cooling fan will turn off afterapprox. 25 minutes.
Condensation can cause thecabinetry and the countertop to bedamaged. This could lead tocorrosion of the appliance.When keeping food warm in theoven, increases to the Time Controlledsetting can lead to condensation ofthe control panel, moisture on thecountertop and on the cabinetry.Do not adjust the Time Controlledsetting and try not to leave food inthe warm oven.
Default temperaturesIf you often cook with temperatures thatdiffer from the default, it makes senseto change the default temperatures.
After selecting this option, a list of ovenmodes will appear in the display.
Select the desired mode.
The default temperature is displayedalong with the available temperaturerange.
Change the default temperature.
Confirm with OK.

Settings
48
Self Clean– With reminder
A reminder to run the Self Programprogram will appear in the display.
– Without reminder
You will not be reminded to run theSelf Clean program.
Safety
System lock
The system lock prevents the ovenbeing turned on inadvertently.
The system lock will remain activatedeven after a power failure.
Select On to activate the system lock.
The alarm and timer functions can stillbe used when the system lock isactive.
– On
The system lock is now active. If youwant to use the oven, touch for atleast 6 seconds.
– Off
The system lock is not active. Theoven can be used as normal.
Sensor lock
The sensor button lock prevents youfrom accidently turning the oven off orchanging a cooking program.
– On
Before you can use a mode, touch for at least 6 seconds.
– Off
The buttons respond immediately toa finger touch.

Settings
49
CatalyzerThe level of odor reduction isrepresented by a bar with sevensegments.
Maximum odor reduction is selectedwhen all segments are filled. If none ofthe segments are filled the catalyzer isturned off.
Select Minimum or Maximum to changethe level of odor reduction.
Select On or Off to turn the catalyzeron and off.
VoltageSetting the voltage (electrical version)
Select the desired voltage andcorresponding frequency.
Confirm with OK.
Sensor groupYour oven was set at the factory toautomatically detect the wireless roastprobe supplied. If you have purchaseda new Miele roast probe, you will needto reset the sensor group (e.g. to P1-D01-0000001).
Select the sensor group that isprinted on the metal tip of thewireless roast probe.
The sensor group is the second digitof the twelve-digit code (P0 – P9).
Confirm with OK.

Settings
50
Calibrate temperatureUsing temperature calibration thetemperature can be modified, in allmodes and Gourmet Center (oven) andMasterChef (speed oven) programs, sothat it is slightly higher or lower thanshown.
The temperature calibration isrepresented by a bar with sevensegments.
If all of the segments are filled the oventemperature is much higher thanindicated in the display. If no segment isfilled the oven temperature is muchlower than indicated.
Select or , to adjust thetemperature calibration.
Confirm with OK.
Showroom ProgramThis mode enables the oven to bedemonstrated in showrooms withoutheating up. It should not be set fordomestic use.
Demo Mode
If you have demo mode activatedDemo Mode is active. The appliance willnot heat up will appear when you turnon the oven.
– On
Touch OK for at least 4 seconds toactivate demo mode.
– Off
Touch for at least 4 seconds todeactivate demo mode. The ovencan then be used as normal.

Settings
51
Factory default– Settings
Any settings that have been alteredwill be reset to the factory defaultsetting.
– Favorites
All Favorites will be deleted.
– Default temperatures
Any default temperatures that havebeen changed will reset to the factorydefault settings.
– MyMiele
All MyMiele entries will be deleted.
Lift panel
Regardless of the setting selected, assoon as you start the self-cleaningcycle, the lift panel goes downautomatically.
– Automatically
The lift panel lifts up automatically assoon as you switch the oven on.
The lift panel goes downautomatically as soon as you switchthe oven off.
– Manual
Touch the lift panel sensor button tolift the control panel up and put itdown.

MyMiele
52
You can personalize your oven usingthe MyMiele function by inputtingfrequently used processes.
It is particularly useful with GourmetCenter (oven) and MasterChef (speedoven) programs as you do not need towork through every screen in order tostart your program.
You can also set processes that youhave entered into MyMiele to appear inthe Start screen (see "Settings – Startscreen").
To add an entryYou can add up to 20 entries.
Select MyMiele.
Select Add entry.
You can select options from thefollowing categories:
– Operating Modes
– Gourmet Center
– Special Modes
– Favorites
Confirm by touching OK.
The option selected appears in the listtogether with the correspondingsymbol.
Proceed as described above for anyother entries. You will only be able tochoose from options which have notalready been selected.

MyMiele
53
Editing MyMieleAfter selecting Edit you can
– add entries as long as MyMielecontains fewer than 20 entries,
– delete entries,
– sort entries as long as MyMielecontains more than 4 entries.
Deleting entries
Select MyMiele.
Select Edit.
Select Delete entry.
Select the entry that you want todelete.
Confirm with OK.
The entry will then be removed from thelist.
Sorting entries
The order can be rearranged as long asthere are more than 4 entries.
Select MyMiele.
Select Edit.
Select Sort entry.
Select the entry.
Select the position you want to moveit to.
Confirm with OK.
The entry will now appear in theposition selected.

Alarm + Timer
54
Using "Timer", you can set an alarm fora specific time or set the timer durationto time an activity in the kitchen e.g.boiling eggs.
Two alarms can be set simultaneously,two timer durations or an alarm and akitchen timer duration.
Using the Alarm The alarm can be used to set a specifictime at which the oven buzzer willsound.
Setting the alarm
If the setting Time - Display - Off isselected, you will need to turn theoven off before setting the alarm. Thealarm time will then appear in thedisplay when the oven is turned off.
Select "Timer".
Select New Alarm.
Set the time for the alarm.
Confirm with OK.
When the oven is switched off, thealarm time and will appear instead ofthe time of day.
If you are cooking at the same time or ifyou are in a different menu, the alarmtime and will appear in the top right-hand corner of the display.
At the set alarm time
– the Alarm symbol will flash next tothe time in the display.
– a buzzer will sound if turned on (see"Settings - Volume - Buzzer tones").
Select "Timer" or the alarm in theupper right of the display.
The buzzer will turn off and the symbolsin the display will go out.
Changing an alarm
Select the alarm in the upper right ofthe display or select "Timer" and thedesired alarm.
The alarm selected appears.
Set the new time for the alarm.
Confirm with OK.
The adjusted alarm time is now savedand will appear in the display.
Deleting an alarm
Select the alarm in the upper right ofthe display or select "Timer" and thedesired alarm.
The alarm selected appears.
Select Reset.
The alarm will be deleted.

Alarm + Timer
55
Using the Timer The timer can be used to time anyactivity in the kitchen, e.g. boiling eggs.
The timer can also be used at the sametime as a cooking program if a start andfinish time have been set, e.g. areminder to stir the dish or addseasoning.
A maximum timer duration of 9 hours,59 minutes and 59 seconds can be set.
Tip: Use the timer in Moisture Plus to remind you to inject the bursts ofsteam at the desired time.
Setting the timer
When the setting Time - Display - Off isset the oven must be turned on to setthe timer. The timer can then be seencounting down in the display when theoven is turned off.
Example: Boiling eggs and setting thetimer for 6 minutes and 20 seconds
Select "Timer".
Select New Timer Time.
Set the timer for the required time.
Confirm with OK.
When the oven is turned off, the timerduration counts down in the display and appears instead of the time of day.
If you are cooking at the same time or ifyou are in a different menu, the timerduration and will appear in the topright-hand corner of the display.

Alarm + Timer
56
At the end of the timer
– the Timer symbol flashes,
– the time starts counting upwards,
– A buzzer will sound if turned on (see"Settings - Volume - Buzzer tones").
Select "Timer" or the timer in theupper right of the display.
The buzzer will turn off and the symbolsin the display will go out.
Resetting the timer
Select the timer in the upper right ofthe display, or select "Timer" and thedesired timer.
The time previously set appears.
Set a new timer duration.
Confirm with OK.
The changed time is saved and willcount down in seconds.
Canceling the timer
Select the timer in the upper right ofthe display, or select "Timer" and thedesired time.
The time previously set appears.
Select Reset.
The timer has been canceled.

Guide to the modes
57
The oven has a wide range of modes for preparing a variety of foods.
Due to country-specific preferences for preparation of food, default temperaturesand temperature ranges in °F and °C do not correspond. The temperature valueshave been defined as given in the chart.
Mode Defaulttemperature
Temperaturerange
Convection Bake
Use this mode for baking and roasting on severallevels at the same time. You can cook at lowertemperatures than with the Surround modebecause the fan distributes the heat evenlythroughout the cavity for a consistent bakingtemperature.
350 °F (160 °C) 75–475 °F(30–250 °C)
Surround
This premium baking mode uses heat from theupper and lower elements to create perfect resultson all baking recipes.
350 °F (180 °C) 75–525 °F(30–280 °C)
Moisture Plus
Infuse up to 3 bursts of moisture, either manuallyor time driven, throughout the cooking program toensure a soft, moist interior with a crispy crust.MasterChef Plus programs use Moisture Plusduring the cooking/baking process.
350 °F (160 °C) 275–475 °F(130–250 °C)
Intensive
This mode gently circulates heated air from thelower heating element using the fan to create abrick oven environment. Ideal for baking pizza,focaccia, pies and tarts that require a crisp baseand moist toppings.
400 °F (170 °C) 125–475 °F(50–250 °C)
Auto Roast
For a premium result, the meat is seared at a hightemperature keeping meat tender and juicy.
375 °F (160 °C) 200–450 °F(100–230 °C)

Guide to the modes
58
Mode Defaulttemperature
Temperaturerange
Surround Roast
For roasting traditional recipes, e.g. pot roast, andbraising or cooking at low temperatures.
400 °F (180 °C) 75–525 °F(30–280 °C)
Convection Roast
This mode uses the convection fan to circulateheated air throughout the oven. Ideal for cookingdelicate cuts of meat, fish and crispy poultry.
375 °F (160 °C) 75–475 °F(30–250 °C)
Bake
This mode uses traditional baking techniques toperfect pies and biscuits.
375 °F (190 °C) 200–525 °F(100–280 °C)
Browning
For a perfectly browned topping, for examplewhen making a gratin or browning the top of acasserole.
350 °F (190 °C) 200–475 °F(100–250 °C)
Maxi Broil
For broiling meats e.g. steak, chops, kebabs, etc.The entire Browning / Broiling element will glowred to produce the required heat.
500 °F (240 °C) 400–575 °F(200–300 °C)
Broil
For grilling smaller quantities of steak, chops,kebabs, etc.
500 °F (240 °C) 400–575 °F(200–300 °C)
Guide to the modes
59
Mode Defaulttemperature
Temperaturerange
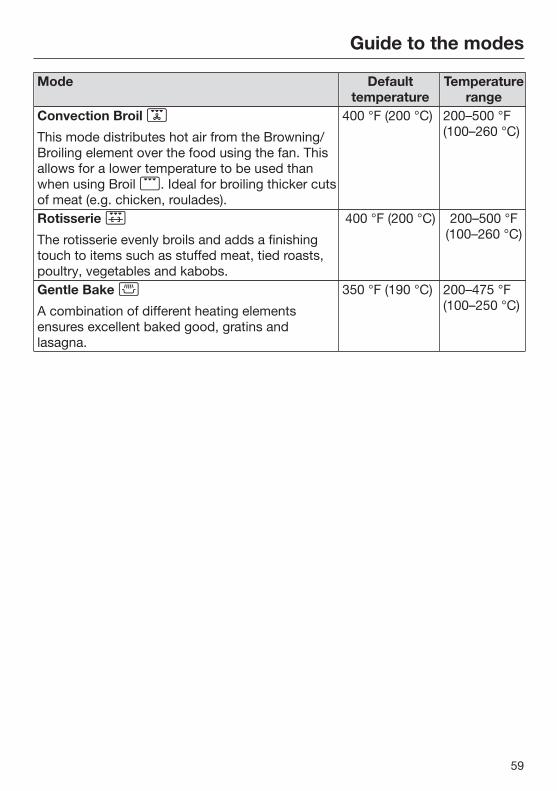
Convection Broil
This mode distributes hot air from the Browning/Broiling element over the food using the fan. Thisallows for a lower temperature to be used thanwhen using Broil . Ideal for broiling thicker cutsof meat (e.g. chicken, roulades).
400 °F (200 °C) 200–500 °F(100–260 °C)
Rotisserie
The rotisserie evenly broils and adds a finishingtouch to items such as stuffed meat, tied roasts,poultry, vegetables and kabobs.
400 °F (200 °C) 200–500 °F(100–260 °C)
Gentle Bake
A combination of different heating elementsensures excellent baked good, gratins andlasagna.
350 °F (190 °C) 200–475 °F(100–250 °C)

Additional functions
60
You have placed the food in the oven,selected a mode and set thetemperature.
By selecting Additional Settings you canadjust cooking times and adjustadditional settings.
Select Change.
Select Additional Settings.
Additional options will appear in thedisplay for you to select for change ifdesired.
– Duration
– Core temperature (This will onlyappear if you are using the wirelessroast probe. You cannot set acooking duration when using theroast probe.)
– Ready at
– Start at (This will appear if a Durationor Ready at time has been set.)
– Rapid PreHeat (This only appears if atemperature of more than 210°F(100°C) has been set for ConvectionBake / Convection Roast , AutoRoast , Surround / SurroundRoast or Moisture Plus ).
– Crisp function (This moisturereduction feature will allow surfacesto crisp on the outside.)
– Change type of heating (This optionwill only appear with Moisture Plus. You can combine bursts ofsteam with another type of heating.)
– Change Operating Mode (You canchange the cooking mode duringoperation.)
Changing the temperatureAs soon as a cooking mode is selected,a default temperature will appear in thedisplay together with its possible range(see "Guide to the modes").
If the default temperature is suitablefor your recipe, confirm it with "OK".
If it is not suitable for your recipe, youcan change it for this particularcooking program.
You can also permanently reset thedefault temperature to suit yourpersonal cooking habits (See"Settings - Default temperatures").
Example: You have selected ConvectionBake and 350°F (170°C) and cansee the temperature increasing.
You want to reduce the targettemperature to 310°F (155°C).
Select Change.
Change the temperature.
Confirm with OK.
The adjusted target temperature issaved. The target and actualtemperatures are displayed.

Additional functions
61
Rapid PreHeatRapid PreHeat can be used to speed upthe preheating phase.
The Rapid heat-up function switches onautomatically if you set a temperature ofmore than 212°F (100°C) for ConvectionBake / Convection Roast , AutoRoast , Surround Roast / Surround and Moisture Plus .
You can turn-off Rapid PreHeat for arelevant cooking process.
Rapid PreHeat
– On
The Browning / Broiling andconvection heating elements turn ontogether with the fan to enable theoven to reach the requiredtemperature as quickly as possible.
– Off
Only the heating elements associatedwith the cooking program are turnedon.
To turn the Rapid PreHeat function off:
Select Change.
Select Additional Settings.
Select Rapid PreHeat.
In Rapid PreHeat, Off will appear.
Confirm with OK.
Rapid PreHeat has been deactivated.
Instead of Rapid PreHeat, Preheating willappear in the display.
Select the required oven mode andtemperature.
Wait for the preheating phase tocomplete.
A buzzer will sound when the settemperature is reached, if the buzzer isset (see "Settings").
Place the food in the oven.

Additional functions
62
Using the Crisp function(Moisture Reduction)It is a good idea to use this functionwhen cooking items which are moist onthe inside but which should be crispyon the outside, e.g. french fries.
It is also suitable for fruit cakes, such asapple cake.
You have placed the food in the oven,selected a mode and set thetemperature.
You can activate the "Crisp function"with any oven mode. It must beactivated separately for a cookingprocess. For best results, activate it atthe beginning of the cooking process.
Select Change.
Select Additional Settings.
Select Crisp function.
In Crisp function, On will appear.
Confirm with OK.
Moisture reduction is now activated.
Changing the oven modeYou can change the oven mode duringoperation.
Select Change.
Select Additional Settings.
Select Change Operating Mode.
Select the desired mode.
The new mode will appear in the displaytogether with its default temperature.
Change the temperature, ifnecessary.
Confirm with OK.
The oven mode has been changed.
The times entered will be kept.
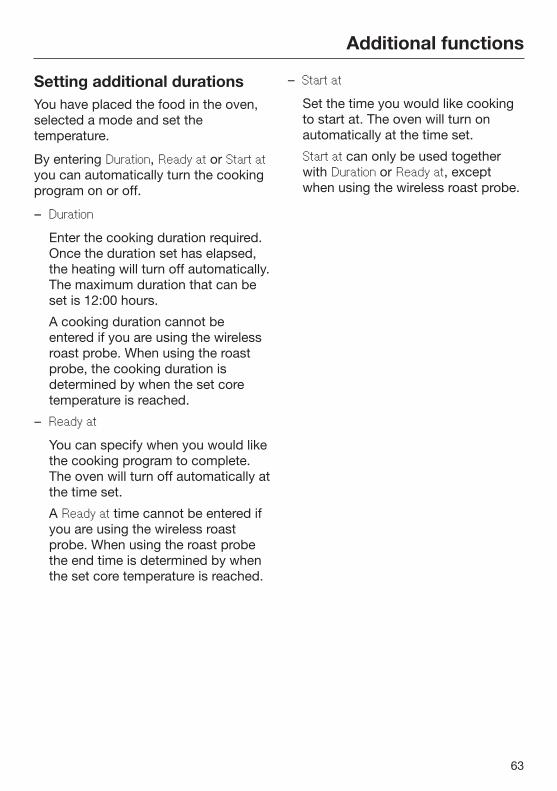
Additional functions
63
Setting additional durationsYou have placed the food in the oven,selected a mode and set thetemperature.
By entering Duration, Ready at or Start atyou can automatically turn the cookingprogram on or off.
– Duration
Enter the cooking duration required.Once the duration set has elapsed,the heating will turn off automatically.The maximum duration that can beset is 12:00 hours.
A cooking duration cannot beentered if you are using the wirelessroast probe. When using the roastprobe, the cooking duration isdetermined by when the set coretemperature is reached.
– Ready at
You can specify when you would likethe cooking program to complete.The oven will turn off automatically atthe time set.
A Ready at time cannot be entered ifyou are using the wireless roastprobe. When using the roast probethe end time is determined by whenthe set core temperature is reached.
– Start at
Set the time you would like cookingto start at. The oven will turn onautomatically at the time set.
Start at can only be used togetherwith Duration or Ready at, exceptwhen using the wireless roast probe.

Additional functions
64
Turning off automatically
It is now 11:45. The food takes 30minutes to cook and should be ready at12:15.
Select Duration and set 00:30 h or selectReady at and set the time for 12:15.
The oven will turn off automatically afterthis duration has elapsed or the time sethas been reached.
Setting the duration
Select Change.
Select Additional Settings.
Set the cooking duration.
Confirm with OK.
Setting the "Ready at" time
Select Change.
Select Additional Settings.
In the Ready at field, set the time atwhich the food should be ready.
Confirm with OK.
Turning on and off automatically
It is recommended to use theautomatic On/Off feature whenroasting. Do not delay the start of theprogram for too long when baking.Cake mixtures and doughs will dryout, and the leavening agents will losetheir effectiveness.
To turn a cooking program on and offautomatically, you have a choice of howto enter the time parameters:
– Duration and Ready at
– Duration and Start at
– Ready at and Start at
It is now 11:30. The food takes 30minutes to cook and should be ready at12:30.
Select Change.
Select Additional Settings.
In the Duration field, set 0:30 h.
In the Ready at field, set 12:30 h.
Confirm with OK.
The Start at time will be automaticallycalculated. Start at 12:00 will appear inthe display.
The oven will turn on automaticallywhen this time is reached.
Additional functions
65
Sequence of a cooking program thatturns on and off automatically
Up until the start time the mode, theselected temperature, Start at and thestart time will appear in the display.
After the program has started youcan follow the preheating phase in thedisplay until the required temperaturehas been reached.
Once this temperature is reached, abuzzer will sound if turned on (see"Settings - Volume - Buzzer tone").
After the preheating phase theremaining time will appear in thedisplay.
The time will count down in the display.The last minute counts down inseconds.
At the end of the cooking process abuzzer will sound if turned on (see"Settings - Volume - Buzzer tones").
The oven heating and lighting areturned on. Program Finished appears inthe display.
You have the option to save theprogram as a Favorite (see "Favorites")or to increase the cooking durationusing Change.
During the cooling down phase thecooling fan will continue to run.
Changing the set time
Select Change.
All options that can be changed willappear.
Change the desired time.
Confirm with OK.
These settings will be deleted in theevent of a power failure.
Canceling cooking
Touch "Back" twice.
Cancel Cooking? appears in the display.
Select Yes.
The oven heating and lighting will turnoff, and any durations set will bedeleted.

Moisture Plus
66
Your oven is equipped with a steaminjection system for cooking withmoisture. Baking, roasting and cookingwith Moisture Plus guaranteesoptimized steam and air conduction forexcellent cooking and browning results.
After selecting Moisture Plus youneed to set the temperature and thenumber of bursts of steam.
Available options are:
– Automatic burst of steamThis requires enough water for oneburst of steam. The burst of steamwill be injected into the ovenautomatically after the heating-upphase.
– 1 Burst of steam2 Bursts of steam3 Bursts of steamYou have to release the bursts ofsteam yourself.
The steam bursts are injected into theoven cavity during the cookingprogram. The steam inlet is located onthe ceiling of the oven interior in therear left corner.
One burst of steam takes approx. 5–8minutes. The number of bursts of steamand when they are injected will dependon the type of food being cooked:
– Yeast doughs will rise better if steamis injected at the beginning of theprogram.
– Bread and rolls will also rise better ifexposed to steam at the start.Injecting a burst of steam at the endof the program will give the breadand rolls a shiny crust.
– When roasting meat with a high fatcontent, injecting steam at thebeginning of roasting will help renderthe fat.
Moisture Plus is not suitable formixtures which contain a lot ofmoisture, such as meringues, as theaddition of steam does not allow themto dry out sufficiently.

Moisture Plus
67
Cooking with the Moisture Plus function
It is normal for condensation to formon the inside of the door during steaminjection. This will dissipate during thecourse of the cooking program.
Prepare the food and place in theoven if no preheating is required.
Select Operating Modes.
Select Moisture Plus .
The default temperature (350°F/160°C)is displayed
The oven heating, lighting and coolingfan will turn on.
Setting the temperature
Set the required temperature.
Confirm with OK.
Setting the number of steam bursts
The oven will draw in waterautomatically from the water supplyand then release the steam at thespecified times. You will hear somepumping noises during the waterintake process.
If you would like a burst of steam tobe automatically injected into theoven after the heating-up phase,select Automatic burst of steam.
If you would like to inject one or morebursts of steam manually at specifictimes, select 1 Burst of steam, 2 Burstsof steam or 3 Bursts of steam.
Timing the bursts of steam
This option will only appear in thedisplay after you have selected 1, 2 or3 bursts of steam.
Tip: If you have selected more than oneburst of steam, the second burst shouldbe released at least 10 minutes afterstarting the program.
Manual bursts of steam
To inject the bursts of steam yourself,select Manual.
Time-controlled steam
If you want to set a time for injectingthe bursts of steam, select TimeControlled.
Set the desired time for each burst ofsteam. The oven will then release thesteam at the specified times. Thetime begins counting down when theprogram is started.
Confirm by touching OK.

Moisture Plus
68
Changing the type of heating
All four modes (Convection Bake,Surround, Intensive and Auto Roast) areavailable to use with Moisture Plus ,however Convection Bake is set as thedefault mode. You can combineMoisture Plus with four different heatingtypes (Convection Bake, Surround,Intensive and Auto Roast). The defaultsetting is Convection Bake.
Select Change.
Select Change type of heating.
Select the desired mode.
Confirm with OK.
The cooking program will then continueusing the different type of heatingselected.
Moisture Plus
69
Injecting bursts of steam
Steam can cause scalding.Do not open the door during burstsof steam. Also, condensation on thesensors will cause then to have aslow reaction time.
Automatic burst of steam
Automatic burst of steam appears in thedisplay.
Once the preheating phase has beencompleted, the automatic burst ofsteam is injected.
The water will vaporize in the oven whilesteam is being released and Burst ofsteam active will appear in the display.
After the burst of steam Burst of steam,completed will appear in the display.
Continue cooking until the end of thecooking duration.
1, 2 or 3 Bursts of steam
Manual bursts of steam
When Manual has been selected, youcan trigger bursts of steam once StartManual burst of steam appears.
Please wait until the preheating phaseis completed to allow the steam to bedistributed evenly by the warm air inthe oven.
Tip: Set the "Timer" as a reminder.
Select Start Manual burst of steam.
The burst of steam will be released andBurst of steam active will appear in thedisplay.
Proceed as described to inject furtherbursts of steam.
Burst of steam, completed will appear inthe display after each burst of steam.
Continue cooking until the end of thecooking duration.
Time-controlled steam
The oven will release the steam afterthe specified amount of time.

Moisture Plus
70
Evaporating residual moistureWhen cooking with added moisture, thewater will be equally distributedbetween the number of steam burstsand completely used up, as long as theprogram is not interrupted.
However, if a program that uses addedmoisture is interrupted (either manuallyor due to a loss of power) before all thebursts of steam have been injected, theunused water will remain in theevaporation system.
The next time the Moisture Plus mode or a MasterChef Plus program isused, Evaporate Residual Moisture? willappear in the display with the optionsSkip and Yes.
It is best to start the residual waterevaporation right away so that onlyfresh water is steamed onto the foodduring the next cooking program.
The residual moisture evaporationprocess
The oven will heat up and the residualwater in the oven compartment willevaporate.
Depending on the amount of water, thiscan take up to approximately 30minutes.
Steam can cause scalding.Do not open the door.
The moisture will condense on thedoor and in the oven compartmentand needs to be wiped off after theoven has cooled down.

Moisture Plus
71
Starting residual water evaporationimmediately
Steam can cause scalding.Do not open the door while theresidual water is being evaporated.
Select the Moisture Plus mode ora MasterChef Plus program.
Evaporate Residual Moisture? will appearin the display.
Select Yes.
Evaporate Residual Moisture and a timethen appear in the display.
The evaporation process will start. Youcan monitor the remaining time in thedisplay.
The time displayed depends on theamount of water in the evaporationsystem. This time may be correctedduring the evaporation process toreflect the actual amount of water left inthe system.
At the end of the residual waterevaporation process, Program Finishedappears in the display.
Touch the "Back" sensor.
A cooking process using Moisture Plus or a MasterChef Plus program cannow be carried out.
During residual water evaporation,moisture will condense on the doorand in the oven interior. Be sure towipe away the condensation once theinterior has cooled down.
Skipping residual moistureevaporation
Skipping the residual moistureevaporation process can causewater to overflow into the ovencavity.Do not cancel the evaporationprocess.
Select the Moisture Plus functionor a MasterChef Plus program.
Evaporate Residual Moisture? appears.
Select Skip.
A cooking process using Moisture Plus or a MasterChef Plus program cannow be carried out.
You will be prompted to carry out theevaporation of the residual moistureprocess the next time you select theMoisture Plus function or aMasterChef Plus program and whenyou turn the oven off.

Gourmet Center
72
Your oven has a wide range ofMasterChef, and MasterChef Plusprograms that enable you to achieveexcellent cooking results with ease.Simply select the appropriate programfor the type of food you are cookingand follow the instructions in thedisplay.
In the Gourmet Center you will find:
– MasterChef programs for thepreparation of cakes, meats, fishdishes, desserts, etc.
– MasterChef Plus program for thepreparation of bread with MoisturePlus.
List of food typesThe MasterChef programs can be foundunder Gourmet Center – MasterChef.
– Baked Goods
– Fish
– Meat
– Pizza
– Potatoes
– Poultry
MasterChef PlusIn MasterChef Plus a variety of breadprograms are available. TheseMasterChef programs work withMoisture Plus.

Gourmet Center
73
Using MasterChef andMasterChef Plus programsFrom the Main Menu:
Select Gourmet Center.
Select MasterChef or MasterChef Plus.
A list of food types will appear in thedisplay.
Select the desired type (there is onlyone type for MasterChef Plus).
The MasterChef or MasterChef Plusprograms available for the food typeselected will then appear.
Select the desired MasterChef orMasterChef Plus program.
The individual steps that must becompleted before starting the programappear as a list in the display.
Depending on the program selected,the following information or instructionwill appear in the display:
– Type of cookware
– Shelf level
– Use of the wireless roast probe
– Cooking time
Follow the instructions on the display
Notes on using these programs
– The oven interior should be at roomtemperature before starting aMasterChef program.
– Some programs require a preheatingphase before food is placed in theoven. A prompt will appear to tell youwhen to add the food.
– The duration quoted for MasterChefprograms is an estimate. It mayincrease or decrease depending onthe program. When using the roastprobe, the duration will bedetermined by when the coretemperature is reached. The duration,in particular with meat, will varydepending on the initial temperatureof the food.

Gourmet Center
74
SearchYou can search the Gourmet Center bythe name of the food type andMasterChef program.
This search is a full-text search and canalso be used to search for parts ofwords.
From the Main Menu:
Select Gourmet Center.
A list of food types will appear in thedisplay.
Select Search.
Use the keyboard to enter the desiredsearch text, e.g. "bread".
The number of hits will be shown in thebottom right of the display.
If no match is found, or if there aremore than 40 matches, the hits fieldwill be deactivated and you will needto modify the search text.
Select hits.
The matching food types and programswill then appear.
Select the desired program, or selectthe food type and then the desiredprogram.
The program will begin.
Follow the instructions on the display.
MasterChef Plus RecipesOn the following pages you will findsome bread recipes for the MasterChefplus programs.

Gourmet Center
75
Baguette
Yields: 3 Loaves
Ingredients26 oz. Bread Flour (approx. 5 cups plus1 tablespoon)2 cups lukewarm water (16 oz)4 teaspoons instant yeast3 teaspoons salt
Method
In a mixing bowl of a stand up mixer,whisk together the bread flour, yeastand salt. Make sure that the salt andyeast do not come into direct contact.With a paddle attachment, slowly addthe water. Then switch to a dough hookand knead for 8 minutes.
Turn the dough out onto a lightly flour-dusted countertop. Shape into a ball.Cover with plastic wrap. Let rest for30 minutes.
Knead the dough by hand for1-3 minutes. Cover the dough and letrest 1½ hours.
Decompress the dough by gentlyindenting with fingers into the center ofthe dough. Stretch and fold the dough.Working along the length of the dough,start from the upper edge of the dough,pull forward, away from you and thenbring it to the center. Pull the bottom ofthe dough backwards (towardsyourself) and fold to the center. Do thesame for the left and right side of thedough. Flip the dough over and coverwith plastic wrap. Let rest 1 hour.
Divide the dough into three equalportions
Shape the dough into 6" cylinders.Working with one piece of dough at atime, (keeping the other covered inplastic wrap), shape into a rectangle.Working along the length of the dough,press with three fingers gently makingseveral indentations into the dough.Repeat the process; roll the dough overonto itself three times until the upperedge meets the lower edge and createsa deep seam. Sealing each turn withyour fingers. Pinch the seam tight andlet rest for about 5 minutes (or when thedough is relaxed enough to roll) with theseam facing up. Cover with a towel.
Roll and shape the baguettes to fit theuniversal tray. Place on universal tray,seam side down, and let rest for about5 minutes covered with a towel.
Score each baguette 5 times and placedirectly into oven. Select theMasterChef Plus program for Baguettes.
Follow the directions on the display.
SettingsGourmet Center \ MasterChef plus \ Bread\ BaguettesLevel: see displayBaking time: approx. 70 minutes

Gourmet Center
76
Banana Bread
Yields: 1 Loaf
Ingredients1 cup walnuts, coarsely chopped1 3/4 cups bread flour3/4 cup granulated white sugar1 teaspoon baking powder1/4 teaspoon baking soda1/4 teaspoon salt1 teaspoon ground cinnamon2 large eggs, lightly beaten1/2 cup unsalted butter, melted andcooled3 ripe large bananas, mashed well1 teaspoon pure vanilla extract
Method
In a large mixing bowl, whisk thewalnuts, flour, sugar, baking powder,baking soda, salt, and cinnamon; setaside. Mix the butter, mashed bananas,eggs and vanilla with a wooden spoonin a medium bowl. Fold the wet bananamixture into the dry ingredients with arubber spatula just until combined. Becareful not to over mix.
Pour batter into a prepared loaf panthat has been greased and dusted withflour.
Place loaf pan into oven and select theMasterChef Program for Banana Bread.
Follow the directions in the display.
SettingsGourmet Center \ MasterChef plus \ Bread\ Banana BreadLevel: see displayBaking time: approx. 70 minutes

Gourmet Center
77
Brioche
Yields: 8 Brioches
Ingredients for dough15.2 oz. bread flour (approx.,2 3/4 cups plus 3 tablespoons)1 1/2 teaspoon osmotolerant yeast2 tablespoons plus 1 1/4 teaspoonsugar3/4 teaspoon salt1/4 cup water4 large eggs19 tablespoons butter
Ingredients for egg wash1 egg whiskedPinch of salt1/2 teaspoon milk
Method
Cut butter into ½ inch pieces and placeon a plate. Let butter sit at roomtemperature until softened. In the bowlof a stand mixer, add flour, yeast, sugarand salt. Whisk to combine. Make sureyeast and salt do not come into directcontact.
With the paddle attachment, add thewater and eggs until well combined.Switch to a dough hook and knead forabout 10 minutes.
When dough is soft and elastic,gradually add the softened butter onepiece at a time until well incorporated.(If butter is not thoroughly incorporated,it will be difficult to roll out the dough.)
Transfer dough to a large greased bowland cover with plastic wrap. Place thebowl into refrigerator for about15 hours.
Remove the dough from the refrigeratorand turn out onto a flour-dustedcountertop. Divide the dough into4 equal squares. Roll the dough intocylinders. Visually mark the doughcylinder into thirds. Place the edge ofyour hand on the top third and make asawing/rolling motion.
With the flat part of your hand, patdown the thicker sides to 1½ inchthickness. Take your thumb and poke ahole about a ½ inch from the bottom.
Take the top third and loop it throughthe bottom hole.
Shape the brioche. Set each piece intoa greased mold with the larger (base)part on the bottom.
Repeat steps for the 8 brioches.
Place brioches on the perforatedbaking tray. Brush with egg wash.
Place in oven and select MasterChefPlus Program for Brioche.
Follow the directions in the display.
SettingsGourmet Center \ MasterChef plus \ Bread\ BriocheLevel: see displayBaking time: approx. 47 minutes
Gourmet Center
78
Ciabatta
Yields: 2 Loaves
Ingredients for Sponge16 oz. 00 flour or Italian-style flour(approx. 3 1/4 cups).3 oz. instant yeast (2 teaspoons)17 oz. water, lukewarm (2 1/4 cups).8 oz. olive oil (2 tablespoons)
Ingredients for Final Dough.5 oz. salt (1 3/4 teaspoons)9 oz. 00 flour or Italian-style flour(approx. 1 cup plus 3 tablespoons)
Method
In the bowl of a stand mixer, add in theflour and the yeast and whisk together.
With a paddle attachment, add the wetingredients until a soft, smooth spongeis formed. Loosely cover with plasticwrap and let proof for 1 hour in themixing bowl.
After proofing slowly, add theingredients for the final dough with thepaddle attachment. Mix the dough forabout 2 minutes maximum. The doughshould feel sticky to the touch.
Grease a baking sheet with olive oil.Transfer the dough to the baking panand cover with lightly oiled plastic wrap.Shape the dough into a rectangle andlet rise at room temperature for20 minutes.
Stretch and fold the dough. Fold theshort end of the rectangle over eachother (away from you) then fold it to thecenter.
Then fold the bottom of the doughdown (towards you) and fold to thecenter. Do the same for the left andright side of the dough. Turn the doughover seam side down gently and coverwith plastic wrap. Let the dough rest for20 minutes and repeat the procedurethree more times.
During the last 20 minute rest select theMasterChef Plus program for Ciabatta.Follow the directions in the display.(Oven will Preheat). Once the lasttwenty-minutes has past, transfer theCiabatta to a flour-dusted universaltray. Dust the top of the dough withflour. Using a dough cutter, cut thedough lengthwise to create two longloaves. Shape the loaves evenly. Usingyour first three fingers gently makeabout five rows of indentations in thedough about ¼" deep.
Once the oven has preheated place theCiabatta in the oven.
SettingsGourmet Center \ MasterChef plus \ Bread\ CiabattaLevel: see displayBaking time: approx. 52 minutes

Gourmet Center
79
Cinnamon Raisin Bread
Yields: 1 Loaf
Ingredients for dough3 1/2 cups (18.6 oz.) Bread Flour3 T + 2 t (2 oz.) Granulated Sugar1 t (0.3 oz.) Salt1 1/4 t (0.2 oz.) Osmotolerant Yeast2 T + 1/2 t (1 oz) Vegetable Oil2 Large Eggs2 Large Egg Yolks, reserve whites andwhisk until frothy3/4 to 1 cup Water1/4 t (0.2 oz) Cinnamon1 cup (6 oz) Baking Raisins
Ingredients for cinnamon sugar (fordusting)1/4 cup Sugar1 T Cinnamon
Method
Mix wet and dry ingredients separately(excluding the raisins and the cinnamonsugar).
While using a stand-up mixer with apaddle attachment, slowly add the wetto the dry and mix until incorporated.
Switch to a dough hook and knead atlow speed for about 6 minutes. In thelast two minutes add raisins.
When raisins are thoroughlyincorporated into the dough, removeand shape into ball. Place the doughball into greased bowl. Cover withplastic wrap and let rise for 1 hour.
Next, on a lightly floured surface, kneaddough for 2 minutes. Place back intothe greased bowl and proof for 1 hour.
Roll dough into a rectangle about1/2 inch thick, sprinkle heavily withcinnamon sugar. Roll like a jelly roll to fitthe length of a loaf pan. Pinch off anyseams. Place into a well-greased loafpan.
Egg wash the loaf with reserved eggwhites and cover with plastic wrap andproof for 60 minutes.
Egg wash again and dust withcinnamon sugar to taste.
Place in oven and select MasterChefPlus Program for Cinnamon Raisin Bread.
Follow the directions in the display.
SettingsGourmet Center \ MasterChef plus \ Bread\ Cinnamon Raisin BreadLevel: see displayBaking time: approx. 82 minutes

Gourmet Center
80
French Bread
Yields: 2 Loaves
Ingredients26 oz. French Style Flour (approx.5 cups plus 1 tablespoon)2 cups lukewarm water (16 oz)4 teaspoons instant yeast3 teaspoons salt
Method
In a mixing bowl of a stand mixer, whisktogether the French flour, yeast andsalt. Make sure that the salt and yeastdo not come into direct contact. With apaddle attachment, slowly pour inwater. Then switch to a dough hookand knead for 8 minutes.
Transfer dough to a lightly flour-dustedwork surface. Shape the dough into aball. Cover with plastic wrap. Let restfor 30 minutes.
Knead dough for 5 minutes by hand.Cover the dough and let rest 1½ hours.
Stretch and fold the dough. Start fromthe top of the dough pull forwards(away from you) then bring it to themiddle. Then pull bottom of the doughbackwards (towards yourself) and foldto the middle. Do the same for the leftand right side of the dough. Flip thedough over and cover with plasticwrap. Let rest 1 hour.
Divide the dough in half and shape intoloaves that are about 10" long and2" wide and tapered at the ends.
Place on perforated baking tray. Coverwith a towel and rest for 20 minutes.
Score the loaves three times and placedirectly into the oven and select theMasterChef Plus program for FrenchBread.
Follow the directions on the display.
SettingsGourmet Center \ MasterChef plus \ Bread\ French BreadLevel: see displayBaking time: approx. 65 minutes

Gourmet Center
81
Italian Bread
Yields: 2 Loaves
Ingredients25.4 oz. bread flour (approx. 4 3/4 cupsplus 3 tablespoons)6 oz. extra fancy (fine grain) semolinaflour (approx. 1 cup)1 tablespoon sugar1 tablespoon instant yeast1 tablespoon salt1 pound lukewarm water (approx.2 cups)1/4 cup extra virgin olive oilUntoasted sesame seeds
Method
Mix the bread flour, semolina flour,sugar, yeast and salt together in thebowl of a stand mixer. Make sure yeastand salt do not come into directcontact. With a paddle attachment,slowly add the wet ingredients untilcombined.
Switch to a dough hook and knead forabout 10 minutes.
Turn dough out onto a lightly flouredwork surface. Shape the dough into aball, cover with plastic wrap and prooffor 1½ hours
Divide the dough into equal two pieces.
Shape into two loafs that are about a14" long by 2" wide and taper at bothends. Place dough on perforatedbaking tray and cover with plastic wrap.Proof for another 20 minutes.
Score dough 3 times, lightly brush withwater and sprinkle with sesame seedsimmediately.
Place in oven and select theMasterChef Plus program for ItalianBread.
Follow the directions on the display.
SettingsGourmet Center \ MasterChef plus \ Bread\ Italian BreadLevel: see displayBaking time: approx. 58 minutes

Gourmet Center
82
Jalapeño Cheese Bread
Yields: 2 Loaves
Ingredients2 cups hot water.2 ounces instant yeast2 teaspoons sugar2 tablespoons olive oil5 cups unbleached all-purpose flour9 ounces cheddar cheese, grated4 ounces fresh jalapeños, finelychopped2 tablespoons salt3 tablespoons garlic powder (or totaste)Extra grated cheddar cheese, to coverloaves
Method
In a measuring cup add the water,yeast and 1 teaspoon of sugar. Mixtogether until incorporated. Let rest for10 minutes or until foamy.
Add the olive oil to the water and yeastmixture.
In the bowl of a stand mixer, add all ofthe dry ingredients except for the garlicpowder. Make sure the cheddar andjalapeños are coated with flour.
With a dough hook attachment, slowlyadd the wet ingredients to the dry.
Mix about 5 minutes or until wellincorporated. During the last minuteadd in the garlic powder.
Transfer the dough into a well-greasedlarge bowl and cover. Proof for about1 hour.
Then shape into loaves, place into awell-greased tea loaf pan and cover.Proof for another 1 hour.
Grate extra cheddar to cover the top ofthe loaves as desired.
Place the loaves in the oven and selectthe MasterChef Plus program forJalapeño Cheese Bread.
Follow the directions on the display.
SettingsGourmet Center \ MasterChef plus \ Bread\ Jalapeño Cheese BreadLevel: see displayBaking time: approx. 77 minutes

Gourmet Center
83
Multigrain Bread
Yields: 2 Loaves
Ingredients15 oz. nine grain flour blend (approx.3 cups plus 2 tablespoons)16.5 oz. bread flour (approx. 3 cupsplus 3 tablespoons)16.5 oz. bread flour (approx. 3 cupsplus 3 tablespoons)1 1/3 cups harvest grains mix3 teaspoons salt4 teaspoons instant yeast1 tablespoon light brown sugar1 tablespoon honey4 tablespoons vegetable oil3 cups water
Method
In the bowl of a stand mixer, add thedry ingredients and whisk together.Make sure the yeast does not comeinto contact with salt.
In a small bowl, combine honey,vegetable and water. With the paddleattachment, slowly incorporate the wetingredients into the dry.
Switch to a dough hook and knead forabout 8 minutes.
Turn the dough out onto a work surfaceand shape the dough into a ball.
Place the dough into an oiled bowl,cover with plastic wrap and proof for1 hour.
Divide dough and shape into two roundloaves and place on perforated bakingtray.
Place into oven immediately and selectthe MasterChef plus program forMultigrain Bread.
Follow the directions on the display.
SettingsGourmet Center \ MasterChef plus \ Bread\ Multigrain BreadLevel: see displayBaking time: approx. 70 minutes

Gourmet Center
84
Rolls
Yields: 8 Rolls
Ingredients21.2 oz. unbleached bread flour(approx. 4 cups plus 1 tablespoon)2 teaspoons instant yeast2 1/2 teaspoons salt8 ounces sourdough starter (approx.1 cup)13.4 oz. water (approx. 1 3/4 cups)
Method
In the bowl of a stand mixer, combineflour, yeast and salt. Mix together with awhisk. With the paddle attachment mixin sourdough starter until coated withthe dry ingredients. Slowly incorporatewater, mix until combined. Switch tothe dough hook and knead for15 minutes.
Dust countertop lightly with flour.Transfer dough to countertop andknead by hand for 5 minutes. Thedough will be slightly sticky. Dustdough very lightly with flour as needed.
Shape the dough into a ball and coverwith plastic wrap, let rest for 2 hours oncountertop
Divide dough into 8 equal portions andshape into rolls. Cover with plastic wrapand let rest for 30 minutes.
Place dough on the perforated bakingtray.
Score dough and make one quick slicedown the center of the roll.
Immediately place rolls in oven andselect MasterChef Plus program forRolls.
Follow the directions on the display
SettingsGourmet Center \ MasterChef plus \ Bread\ RollsLevel: see displayBaking time: approx. 38 minutes

Gourmet Center
85
Rye Bread
Yields: 2 Loaves
Ingredients for Preferment5.6 oz. bread flour (approx.1 cup plus2 tablespoons).02 oz. instant yeast (approx.1/8 teaspoon).2 oz. salt (approx. 3/4 teaspoon)5.4 oz. water (approx. 3/4 cup)
Ingredients for Final Dough14 ounces bread flour (approx.2 3/4 cup)11 oz. medium rye flour (approx.2 1/2 cups plus 1 tablespoon).2 oz. instant yeast(approx.1 1/2 teaspoons).375 oz. salt (approx.1 1/2 teaspoons)14 oz. water (approx. 3/4 cup)2 oz. caraway seeds (1 1/2 teaspoons)
Method
In the bowl of a stand mixer, combineflour, yeast and salt for the preferment.Then add 5.4 ounces of lukewarmwater. Mix until thoroughlyincorporated. Cover with plastic wrapand let rise for 1 hour or up to 15 hoursat room temperature.
In the bowl of a stand mixer, combineall of the dry ingredients for the finaldough together except for the carawayseeds. Add dry ingredients topreferment. With the paddleattachment, slowly drizzle in the14 ounces of lukewarm water. Switch toa dough hook. Knead for about6 minutes. Add the caraway seedsduring the last two minutes of mixing.
Remove dough from the bowl andshape into a ball. Cover the dough andproof for 1½ hours.
Divide dough in half. Shape into twoloaves. Start by patting the dough intoa rectangle about the length of the tealoaf pan (12") and about 6" wide. Foldthe dough into thirds; repeat this twomore times until you have a log. Pinchthe ends and the long seam to seal.
Place into ceramic tea loaf pans. Coverand let rest for 35 minutes.
Place into oven and select theMasterChef Plus program for Rye Bread.
Follow the directions on the display.
SettingsGourmet Center \ MasterChef plus \ Bread\ Rye BreadLevel: see displayBaking time: approx. 73 minutes

Gourmet Center
86
San Francisco Sourdough
Yields: 2 Loaves
Ingredients27.5 oz. bread flour (approx. 5 1/4 cupsplus 2 tablespoons).03 oz. instant (approx.2 1/2 teaspoons).7 oz. salt (approx. 2 1/2 teaspoons)10.5 sour dough starter (approx.1 1/4 cups)2 cups water (1 pound)
Method
Add bread flour, yeast and salt in thebowl of a stand mixer. Mix togetherwith a whisk. Add the sourdoughstarter, mix until coated with the dryingredients. Slowly incorporate water.Mix until combined. Switch to a doughhook and knead for 15 minutes.
Dust a work surface lightly with flour.Turn the dough onto the work surfaceand knead by hand for 3-5 minutes.The dough will be slightly sticky. Dustthe dough very lightly with flour asneeded.
Shape into a ball and cover with plasticwrap, proof for 2 hours on countertop
Divide dough into 2 equal portions andshape into a boule (round loaf). Placeloaves on perforated baking tray. Coverloosely with plastic wrap and let rest for20 minutes.
Score the dough with 4 strokes to forma square design with a lame (doubleedge blade) or a very sharp paringknife.
Immediately place in oven and selectthe MasterChef Plus Program forSourdough Bread.
Follow the directions in the display.
SettingsGourmet Center \ MasterChef plus \ Bread\ Sourdough BreadLevel: see displayBaking time: approx. 50 minutes

Gourmet Center
87
Walnut Bread
Yields: 2 Loaves
Ingredients26 oz. French Style Flour (approx.5 cups plus 1 tablespoon)2 cups lukewarm water (16 oz)4 teaspoons instant yeast3 teaspoons salt2/3 cups walnuts2/3 cup dried cherries
Method
In a mixing bowl of a stand mixer, whisktogether the French flour, yeast andsalt. Make sure that the salt and yeastdo not come into direct contact. With apaddle attachment, slowly pour inwater. Then switch to a dough hookand knead for 8 minutes. During thelast two minutes add in the cherries andthe walnuts.
Transfer dough to a lightly flour-dustedwork surface. Shape the dough into aball. Cover with plastic wrap. Let restfor 30 minutes.
Knead dough for 5 minutes by hand.Cover the dough and let rest 1½ hours.
Stretch and fold the dough. Start fromthe top of the dough pull forwards(away from you) then bring it to themiddle. Then pull bottom of the doughbackwards (towards yourself) and foldto the middle. Do the same for the leftand right side of the dough. Flip thedough over and cover with plasticwrap. Let rest 1 hour.
Divide the dough in half and shape intoround loaves.
Place on perforated baking tray. Coverwith a towel and rest for 20 minutes.
Score the loaves three times and placedirectly into the oven and select theMasterChef Plus program for WalnutBread.
Follow the directions on the display.
SettingsGourmet Center \ MasterChef plus \ Bread\ Walnut BreadLevel: see displayBaking time: approx. 72 minutes

Gourmet Center
88
White Bread
Yields: 2 Loaves
Ingredients26 oz. Bread Flour (approx. 5 cups plus1 tablespoon)2 cups lukewarm water (16 oz)4 teaspoons instant yeast3 teaspoons salt
Method
In a mixing bowl of a stand mixer, whisktogether the French flour, yeast andsalt. Make sure that the salt and yeastdo not come into direct contact. With apaddle attachment, slowly pour inwater. Then switch to a dough hookand knead for 8 minutes.
Transfer dough to a lightly flour-dustedwork surface. Shape the dough into aball. Cover with plastic wrap. Let restfor 30 minutes.
Knead dough for 5 minutes by hand.Cover the dough and let rest 1½ hours.
Stretch and fold the dough. Start fromthe top of the dough pull forwards(away from you) then bring it to themiddle. Then pull bottom of the doughbackwards (towards yourself) and foldto the middle. Do the same for the leftand right side of the dough. Flip thedough over and cover with plasticwrap. Let rest 1 hour.
Divide the dough in half and shape intoloaves that are about 10" long and2" wide and tapered at the ends.
Place on perforated baking tray. Coverwith a towel and rest for 20 minutes.
Score the loaves three times and placedirectly into the oven and select theMasterChef Plus program for WhiteBread.
Follow the directions on the display.
SettingsGourmet Center \ MasterChef plus \ Bread\ White BreadLevel: see displayBaking time: approx. 53 minutes

Gourmet Center
89
Whole Grain Bread
Yields: 2 Loaves
Ingredients29.3 oz. bread flour (approx. 5 cupsplus 2 tablespoons)14.6 oz. whole wheat flour (approx.3 cups plus 2 tablespoons)1 tablespoon salt1 tablespoon instant yeast4 oz. sour dough starter (approx.1/2 cup)11/3 cup whole grains (your favoriteblend)29.2 oz. water (approx. 3 3/4 cups)
Method
In the bowl of a stand mixer combine allthe ingredients except for the waterwith the paddle attachment. Slowlydrizzle in water until combined. Switchto the dough hook attachment andknead for about 4 minutes.
Turn the dough out to a lightly dustedwork surface. Shape the dough into aball. Cover with plastic wrap. Let restfor 30 minutes.
Knead the dough by hand for oneminute. Cover the dough and let rest1½ hours.
Stretch and fold the dough; start fromthe top of the dough, stretch up (awayfrom you) then bring it to the center.Then stretch the bottom of the doughup (towards you) and fold in the middle.Do the same for the left and right sidesof the dough. Turn the dough over,seam side down and cover with plasticwrap. Let rest 1 hour.
Divide the dough into 2 portions. Shapeeach portion into a rectangle; start bytaking one of the dough portions andshape into a rectangle, roughly thedimension of a loaf pan. With your firstthree fingers gently make severalindentations into the dough. Next, rollthe dough over three times. Sealingeach turn with your hand. Pinch theseam tightly and place seam side downinto well-greased loaf pans.
Cover and let rest for 35-40 minutes.
Place into oven and select theMasterChef Plus program for WholeGrain Bread.
Follow the directions on the display.
SettingsGourmet Center \ MasterChef plus \ Bread\ Whole Grain BreadLevel: see displayBaking time: approx. 75 minutes
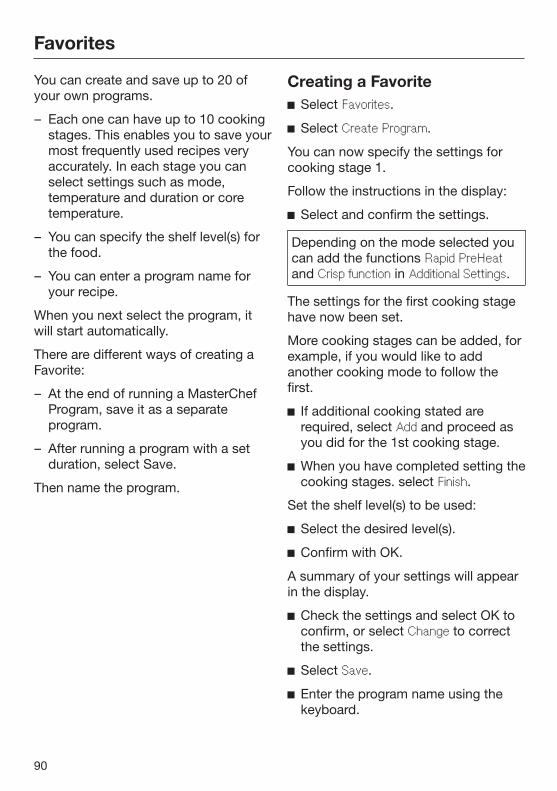
Favorites
90
You can create and save up to 20 ofyour own programs.
– Each one can have up to 10 cookingstages. This enables you to save yourmost frequently used recipes veryaccurately. In each stage you canselect settings such as mode,temperature and duration or coretemperature.
– You can specify the shelf level(s) forthe food.
– You can enter a program name foryour recipe.
When you next select the program, itwill start automatically.
There are different ways of creating aFavorite:
– At the end of running a MasterChefProgram, save it as a separateprogram.
– After running a program with a setduration, select Save.
Then name the program.
Creating a Favorite Select Favorites.
Select Create Program.
You can now specify the settings forcooking stage 1.
Follow the instructions in the display:
Select and confirm the settings.
Depending on the mode selected youcan add the functions Rapid PreHeatand Crisp function in Additional Settings.
The settings for the first cooking stagehave now been set.
More cooking stages can be added, forexample, if you would like to addanother cooking mode to follow thefirst.
If additional cooking stated arerequired, select Add and proceed asyou did for the 1st cooking stage.
When you have completed setting thecooking stages. select Finish.
Set the shelf level(s) to be used:
Select the desired level(s).
Confirm with OK.
A summary of your settings will appearin the display.
Check the settings and select OK toconfirm, or select Change to correctthe settings.
Select Save.
Enter the program name using thekeyboard.

Favorites
91
You can add a line break for longerprogram names using the symbol.
Once you have entered the programname select Save.
A message will appear in the displayconfirming that the name has beensaved.
Confirm with OK.
You can start the saved programimmediately, delay the start or changethe cooking stages.
More information regarding ChangeCooking Stages can be found in"Changing favorites".
Starting a Favorite Place the food in the oven.
Select Favorites.
The program names will appear in thedisplay.
Select the desired program.
You can start the saved programimmediately, delay the start or show thecooking stages.
– Start Now
The program will start right away andthe oven heating will turn on.
– Start Later
This option will only appear if you areusing the wireless roast probe. Youcan specify when you would like theprogram to start. The oven heatingwill turn on automatically at the timeset.
– Ready at
You can specify when you would likethe cooking program to complete.The oven will turn off automatically atthe time set.
– Start at
You can specify when you want theprogram to start. The oven heatingwill turn on automatically at the timeyou set.

Favorites
92
– Display Stages
A summary of your settings willappear in this display. You can adjustthe setting under Change (see"Changing Favorites").
Select the desired menu item.
Confirm the message regardingwhich shelf level to use with OK.
The selected program will beginautomatically right away or at the timeset.
Changing Favorites
Changing cooking stages
Cooking stages in a MasterChefprogram that have been saved under adifferent name cannot be changed.
Select Favorites.
The program names will appear in thedisplay.
Select Edit.
Select Change Program.
Select the desired program.
Select Change Cooking Stages.
The setting specified for a cookingstage can be changed or more cookingstages can be added to the program.
Change the program as desired (see"Creating a Favorite").
Check the settings and select OK toconfirm.
Select Save.
The changes made to the program willbe saved.

Favorites
93
Changing the name
Select Favorites.
The program names will appear in thedisplay.
Select Edit.
Select Change Program.
Select the desired program.
Select Change name.
Change the name (see "Creating aFavorite") and select Save.
A message will appear in the displayconfirming that the name has beensaved.
Confirm with OK.
The new program name will be saved.
Deleting a Favorite Select Favorites.
The program names will appear in thedisplay.
Select Edit.
Select Delete Program.
Select the desired program.
Select OK.
The program is deleted.
You can delete all of your Favorites atthe same time (see "Settings - FactoryDefault - Favorites").
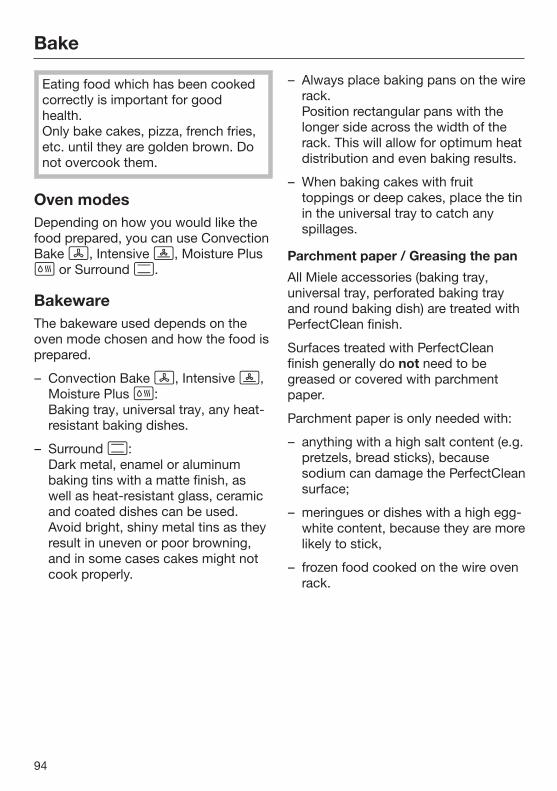
Bake
94
Eating food which has been cookedcorrectly is important for goodhealth.Only bake cakes, pizza, french fries,etc. until they are golden brown. Donot overcook them.
Oven modesDepending on how you would like thefood prepared, you can use ConvectionBake , Intensive , Moisture Plus or Surround .
BakewareThe bakeware used depends on theoven mode chosen and how the food isprepared.
– Convection Bake , Intensive ,Moisture Plus :Baking tray, universal tray, any heat-resistant baking dishes.
– Surround :Dark metal, enamel or aluminumbaking tins with a matte finish, aswell as heat-resistant glass, ceramicand coated dishes can be used.Avoid bright, shiny metal tins as theyresult in uneven or poor browning,and in some cases cakes might notcook properly.
– Always place baking pans on the wirerack.Position rectangular pans with thelonger side across the width of therack. This will allow for optimum heatdistribution and even baking results.
– When baking cakes with fruittoppings or deep cakes, place the tinin the universal tray to catch anyspillages.
Parchment paper / Greasing the pan
All Miele accessories (baking tray,universal tray, perforated baking trayand round baking dish) are treated withPerfectClean finish.
Surfaces treated with PerfectCleanfinish generally do not need to begreased or covered with parchmentpaper.
Parchment paper is only needed with:
– anything with a high salt content (e.g.pretzels, bread sticks), becausesodium can damage the PerfectCleansurface;
– meringues or dishes with a high egg-white content, because they are morelikely to stick,
– frozen food cooked on the wire ovenrack.

Bake
95
Temperature As a general rule, select the lowertemperature given in the chart.
Choosing a baking temperature higherthan those recommended may reducethe cooking time, but will lead touneven browning, and unsatisfactorycooking results.
Baking duration Check if the food is cooked at the endof the shortest duration quoted. Tocheck if a cake is ready insert a woodenskewer or toothpick into the center, itshould come out clean.
Shelf levels The shelf level on which you place yourfood to bake will depend on the ovenmode and the number of trays beingused.
– Convection Bake 1 tray: level 22 trays: levels 1+3 / 2+43 trays: levels 1+3+5
– Moisture Plus 1 tray: level 2
– Intensive 1 tray: level 1 or 2
– Surround 1 tray: level 1 or 2
If using both the universal tray andother baking trays to simultaneouslybake on multiple levels, position theuniversal tray below the baking trays.
Bake moist baked goods and cakes/pies on no more than two levels at thesame time.

Roast
96
Always follow USDA guidelines onfood safety.
Oven modesDepending on how you would like thefood cooked, you can use ConvectionBake / Convection Roast , MoisturePlus , Auto Roast , Surround /Surround Roast or a MasterChefprogram.
CookwareAny heat-resistant cookware can beused:
Wire oven rack, grilling and roastinginsert (if available) on the universal tray,roasting pans, heat-resistant glass/earthen/cast iron dishes, roasting bags
Temperature Select the suggested temperature ifpossible.If higher temperatures are used, themeat will brown on the outside, but willnot be properly cooked through.
When cooking with Convection Bake /Convection Roast , Moisture Plus or Auto Roast , select atemperature that is approx. 25°F (20°C)lower than the temperature forSurround / Surround Roast .
Shelf level As a general rule, use level 2.
Tips– Resting time: At the end of the
program, take the roast out of theoven, cover with aluminum foil and letstand for about 10 minutes. Thishelps retain the juices when the meatis sliced.
– The larger the cut of meat, the lowerthe temperature setting should be.
– Use a roast probe for accuratecooking temperatures and bestresults.

Roast
97
Wireless roast probe
The wireless roast probe allows you toaccurately monitor the food's internaltemperature during the cookingprocess. It is dishwasher safe.
How it works
The metal part of the wireless roastprobe is inserted into the food. There isa temperature sensor in the metal tipwhich measures the core temperatureof the food during cooking.
The temperature sensor is locatedapprox. 3/4" (2 cm) from the tip. Insertthe metal part so that the temperaturesensor is positioned in the middle ofthe food (see "Important notes onusing the wireless roast probe").
The maximum core temperature settingis 210°F (99°C). Please refer to theroasting chart and the "Slow roasting"section for information about the typesof meat and the corresponding coretemperatures.
The core temperature value is sent viaradio signal from the transmitter in thehandle of the wireless roast probe viathe antenna in the back wall of the ovento the electronic module of theappliance as soon as the food is put inthe oven with the roast probe inserted.
Uninterrupted transmission of the radiosignal is only possible when the door isclosed. If the oven door is openedduring the cooking program, e.g., tobaste the meat, the radio signal will beinterrupted. It will only resume after thedoor has been closed. It will take a fewseconds for the current coretemperature to once again appear in thedisplay.
The temperature sensor will bedestroyed at temperatures above212°F (100°C). As long as itremains inserted in the food, thereis no risk of damage, since themaximum core temperaturesetting is 210°F (99°C).If you are not using the wireless roastprobe do not keep it in the ovenduring cooking. Always put it backinto the storage sleeve on the frontright of the Cup & Plate WarmingDrawer (see the "Guide to the oven"chapter).

Roast
98
When to use the wireless roast probe
Apart from MasterChef programs,Special Modes and Favorites, thewireless roast probe can be used withthe following functions:
– Auto Roast
– Convection Bake
– Intensive
– Surround
– Moisture Plus
– Convection Broil
Important notes on using thewireless roast probe
To ensure that the probe workscorrectly, please observe theinstructions below.
– Do not use deep, narrow cookingcontainers made of metal, as thesewill weaken the radio signal.
– Do not place any metal objects, suchas lids or aluminum foil, above thewireless roast probe. Do not use thewire oven rack and universal tray on ashelf level above the food containingthe roast probe. Glass lids may beused.
– Do not use another standard metalcooking thermometer when using thewireless roast probe.
– Do not allow the handle of thewireless roast probe to sit in anysauce or cooking liquid, or to rest onthe food or the edge of the cookingcontainer.
Risk of breakage!Do not use the wireless roast probeto lift or carry the food.

Roast
99
Please also note the followinginformation:
– The meat can be placed in a pot oron the universal tray and wire ovenrack.
– The metal part of the wireless roastprobe must be fully inserted into thecenter of the food. The handle shouldbe angled upwards. Make sure thatthe handle is not horizontal, facingthe door or the corners of the oveninterior.
– When cooking poultry, insert themetal part into the thickest part of thebreast. You can find the thickest partof the breast by pressing the areawith your thumb and index finger.
– Do not let the metal part touch anybones, and do not insert it into aparticularly fatty area of the meat.The oven may turn off too early if thetip comes into contact with theprobe.
– If the meat contains heavy marbling,select the highest core temperaturestated in the roasting chart.
– When using roasting bags oraluminum foil, insert the probethrough the bag or foil into the centerof the meat. You can also place meatinside the bag/foil with the probealready inserted. Be sure to follow theinstructions provided by themanufacturer of the roasting bag /aluminum foil.
– The wireless roast probe can only beinserted horizontally into flat foods,such as fish. Therefore, place flatfood in glass or ceramic cookingcontainers, since the walls of a metalcontainer will interfere with the radiosignals.
If the wireless roast probe is no longerrecognized during cooking, a messagewill appear in the display. Change theposition of the probe in the food.

Roast
100
Using the wireless roast probe
When cooking in the oven, use thewireless roast probe. It is located in the storage sleeve onthe front right of the Cup & PlateWarming Drawer (see the "Guide tothe oven" chapter).
Remove the wireless roast probefrom the storage sleeve.
Insert the metal part of the wirelessroast probe fully into the food. Makesure that the handle is angledupwards.
Put the food in the oven.
Close the door.
Select an oven mode or MasterChefprogram.
The message Continue cooking with roastprobe? will appear.
Select Yes.
Adjust the default temperature ifnecessary.
Change the default core temperatureif necessary.
The core temperatures cannot bechanged for the MasterChefprograms.
You can also start the process at a latertime. Select Additional Settings and set atime in the Start at field.
Duration and Ready at cannot be setbecause the total time depends on howlong it takes for the core temperature tobe reached.

Roast
101
Time left display
If you have set a cooking temperatureabove 275°F (140°C), the estimatedduration of the cooking processremaining (time left) will appear on thedisplay.
The time left is calculated from thecooking temperature selected, the setcore temperature, and the pattern of theincreasing core temperature.
The time left first shown is an estimate.As the cooking process continues, thetime is revised continuously, and amore accurate figure is shown.
The time left will be deleted if thecooking or core temperature is changedor if a different mode is selected. If thedoor is opened for a longer time, thetime left will be recalculated.
Displaying the core temperature
As soon as the time remaining appears,you can also display the actual coretemperature.
Select Change.
Select Display core temperature.
Select On.
Confirm with OK.
The actual core temperature will alsoappear in the display.

Roast
102
Using residual heat
Shortly before the end of the cookingprogram the oven heating will turn off.The residual heat in the oven issufficient to complete the cookingprocess.
Using the residual heat in the ovensaves energy.
Energy Save Phase will appear in thedisplay to show that the oven is inenergy save mode. The measured coretemperature is no longer visible.
The cooling fan and hot air fan (if turnedon) will continue to run.
When the selected core temperaturehas been reached,
– Program Finished appears in thedisplay,
– A buzzer will sound if turned on (see"Settings - Volume - Buzzer tones").
Tip: If the food is not sufficientlycooked, insert the probe into anotherplace and repeat the program.

Slow Roasting
103
This cooking method is ideal forcooking beef, pork, veal or lamb when atender result is desired.
First, using a cooktop sear the meat onall sides to seal in the juices.
Then place the meat in a preheatedoven. It will be cooked at a lowtemperature for an extended timeallowing the meat to become verytender.
The meat will rest and the juices start tocirculate evenly throughout.This gives the meat a very tender andjuicy result.
Tips
– Use fresh, lean meat that has beentrimmed. Remove the bones beforecooking.
– When searing, use a suitable cookingoil or fat that can withstand hightemperatures (e.g. clarified butter,vegetable oil).
– Do not cover the meat duringcooking.
Cooking will take approx. 2-4 hours,depending on the size and weight ofthe meat, as well as the desireddegree of doneness and browning.
Cooking time / Coretemperatures
Always observe USDA food safetyguidelines.
Meat [min]
°F / °C
Beef Tenderloin 80–100 138/59Sirloin– rare
– medium
– well done
50–70
100–130
160–190
118/48
135/57
156/69
Pork tenderloin 80–100 145/63Smoked porkchop *
140–170 154/68
Filet of veal 80–100 140/60Veal loin * 100–130 145/63Saddle of lamb * 50–80 140/60
* boneless
After cooking:Because the cooking temperatures arevery low:
– The meat can be carved immediately.No resting time is required.
– The cooking result will not beaffected if the meat is left in the ovenafter the program is complete. It canbe kept warm until you serve it.
– The meat is at an ideal temperatureto be eaten right away. Serve on pre-warmed plates with a hot sauce orgravy to keep warm.

Slow Roasting
104
Using the Slow Roastingfunction Select Special Modes .
Select Slow Roasting.
Set the required temperature.
Set the core temperature.
Follow the instructions in the display.Let the wire oven rack and universaltray preheat in the oven.
While the oven is preheating, sear themeat on all sides on the cooktop.
Burn hazard!When the oven is hot use pot holdersto insert, remove or turn the food, orwhen adjusting the oven shelves,etc.
Once Use the roast probe appears inthe display, place the seared meat onthe rack and insert the roast probe,so that the metal tip is fully in thecenter of the meat.
For more information, see "Roast -Roast probe."
Use Caution!The Browning / Broiling element willbe hot. Danger of burns!
Close the door.
When the program is completed Program Finished will appear in thedisplay and a buzzer will sound, ifturned on (see Settings - Volume -Buzzer tone").
If the meat is not cooked to yoursatisfaction, you can extend thecooking time.
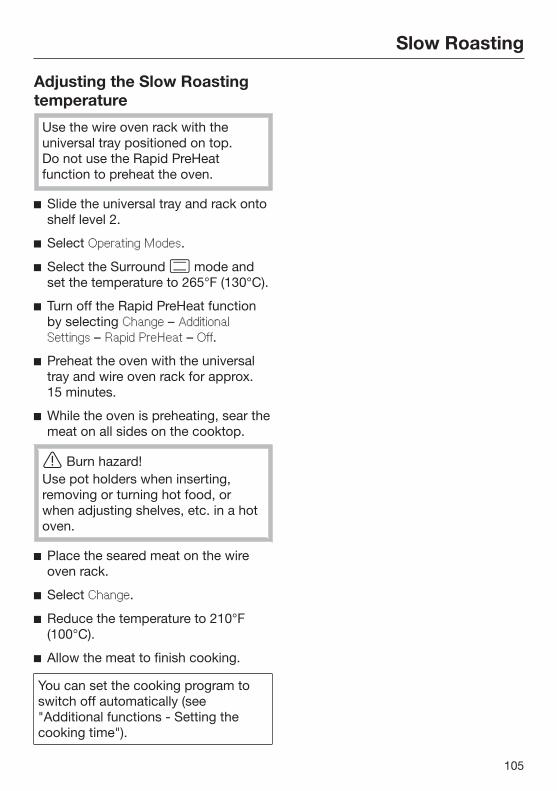
Slow Roasting
105
Adjusting the Slow Roastingtemperature
Use the wire oven rack with theuniversal tray positioned on top.Do not use the Rapid PreHeatfunction to preheat the oven.
Slide the universal tray and rack ontoshelf level 2.
Select Operating Modes.
Select the Surround mode andset the temperature to 265°F (130°C).
Turn off the Rapid PreHeat functionby selecting Change – AdditionalSettings – Rapid PreHeat – Off.
Preheat the oven with the universaltray and wire oven rack for approx.15 minutes.
While the oven is preheating, sear themeat on all sides on the cooktop.
Burn hazard!Use pot holders when inserting,removing or turning hot food, orwhen adjusting shelves, etc. in a hotoven.
Place the seared meat on the wireoven rack.
Select Change.
Reduce the temperature to 210°F(100°C).
Allow the meat to finish cooking.
You can set the cooking program toswitch off automatically (see"Additional functions - Setting thecooking time").

Broil
106
Danger of burns!Broil with the oven door closed. Ifyou broil with the door open the hotair will escape from the oven beforeit has been cooled by the coolingfan.The controls will get hot.
Oven modes
Maxi Broil
This mode delivers excellent browningand broiling results when cooking largeramounts of food. Use to broil chops,ribs and large quantities of meat and forbrowning large dishes.
The entire Browning/Broiling elementwill become red hot to produce thenecessary heat.
Broil
This mode delivers excellent browningand broiling results when cookingsmaller amounts of food. Use to broilchops, ribs and small quantities of meatand for browning small dishes.
Only the center of the Browning/Broilingelement will become red hot to producethe necessary heat.
Convection Broil
For broiling thicker items, e.g. poultry orLondon broil.
The Browning/Broiling element and thefan switch on in alternating phases.
Cookware
Use the universal tray with the grillingand roasting insert (if available), andplace the tray in the oven. The insertprevents any collected meat juices fromburning, allowing them to be used forgravy and sauces.
Temperature As a general rule, select the defaulttemperature.If higher temperatures are used, themeat will brown on the outside, but willnot be properly cooked through.
PreheatingAlways preheat the oven for about5 minutes with the door closed beforeBroiling.

Broil
107
Shelf levels Select the shelf level according to thethickness of the food.
– Thin cuts: Shelf level 3 or 4
– Thick cuts: Shelf level 1 or 2
Broiling time Flat pieces of fish and meat usually take6–8 minutes per side.When broiling thicker pieces, each sidewill take a bit longer. Make sure that thepieces have roughly the same thicknessso that their broiling times do not varytoo greatly.
Testing doneness
Always observe USDA food safetyguidelines.
Preparing food for broilingRinse the meat under cold water andpat dry. Do not season the meat withsalt before broiling, this will draw outthe juices.
Brush the meat with oil, if necessary.Do not use other types of fat as theycan easily burn and cause smoke.
Clean fish as usual. To enhance theflavor, salt or lemon can be added.

Broil
108
Broil Place the grilling and roasting insert
(if available) in the universal tray.
Place the food on top.
Select the required oven mode andtemperature.
Preheat the Browning/Broilingelement for approx. 5 minutes withthe door closed.
Danger of burns!When the oven is hot use pot holdersto insert, remove or turn the food, orwhen adjusting the oven shelves,etc.
Place the food on the appropriateshelf level (see the "Broiling chart").
Close the door.
Turn the food halfway throughcooking.

Broil
109
Using the rotisserie to broil
The rotisserie is an optional accessoryfor use with the Rotisserie mode.
The rotisserie can support a maximumweight of 11 lbs (5 kg).
Slide the wire oven rack or theFlexiClips and wire rack onto level 1.
Slide the latches on the rotisserie intothe notches of the universal tray.
Secure the meat at the middle of therotisserie spit using clips.
Insert the pointed end of the spit intothe rotisserie (1) and place the rollerin the holder (2) as illustrated.
Slide the universal tray and rotisserieonto the wire oven rack or onto theFlexiClips and wire oven rack. Insertthe drive shaft for the rotisserie motorinto the slot at the back of the oven.
Close the door.
Select the Rotisserie mode.
Set the temperature and cookingtime.
The rotisserie motor will switch on aftera slight delay. The rotation browns thefood evenly on all sides.
After cooking:
Remove the food from the oven.
Turn the oven off.

Special Modes
110
In addition to the MasterChef programsyour oven has a variety of SpecialModes.
Select Special Modes.
The following Special Modes areavailable:
– Defrost
– Dehydrate
– Reheat(to reheat plated meals)
– Warm-up Cookware
– Proof
– Slow RoastingSee "Slow Roasting" for moreinformation.
– Pizza
– Sabbath Program
This section also gives information onthe following applications:
– Gentle Bake
– Canning
– Frozen food
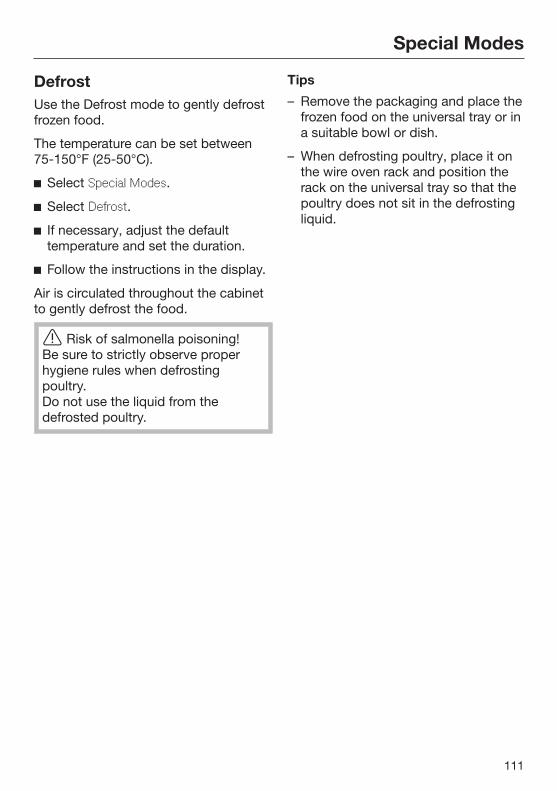
Special Modes
111
DefrostUse the Defrost mode to gently defrostfrozen food.
The temperature can be set between75-150°F (25-50°C).
Select Special Modes.
Select Defrost.
If necessary, adjust the defaulttemperature and set the duration.
Follow the instructions in the display.
Air is circulated throughout the cabinetto gently defrost the food.
Risk of salmonella poisoning!Be sure to strictly observe properhygiene rules when defrostingpoultry.Do not use the liquid from thedefrosted poultry.
Tips
– Remove the packaging and place thefrozen food on the universal tray or ina suitable bowl or dish.
– When defrosting poultry, place it onthe wire oven rack and position therack on the universal tray so that thepoultry does not sit in the defrostingliquid.

Special Modes
112
DehydrateThis program is designed for traditionaldrying of food to preserve it.
The temperature can be set between175-250°F (80-100°C).
It is important that fruit and vegetablesare ripe and not bruised before they aredehydrated.
Prepare the food for dehydrating.
– Peel and core apples, and cut intoslices 1/4" (.5 cm) thick.
– Core plums if necessary.
– Peel, core and cut pears into wedges.
– Peel and slice bananas.
– Clean mushrooms, then either halveor slice them.
– Remove parsley and dill from thestem.
Distribute the food evenly over theroasting pan.
You could also use the rack orperforated baking tray, if available.
Select Special Modes.
Select Dehydrate.
If necessary, adjust the defaulttemperature and set the duration.
Follow the instructions in the display.
Food Approx. dehydratingtime
Fruit 2–8 hours
Vegetables 3–8 hours
Herbs* 50–60 minutes
* Because this program uses the fan, it isrecommended that you use Surround with a temperature of 175-250°F(80-100°C) for drying herbs.
Reduce the temperature ifcondensation begins to form in theoven.
Danger of burns!Use pot holders when removing thedehydrated food from the oven.
Allow the fruit or vegetables to cooldown after dehydrating.
Dried fruit must be completely dry, butalso soft and elastic. Juice should notescape when cut.
Store in sealed glass jars or tins.

Special Modes
113
ReheatThis program is designed for reheatingplated meals and uses added moisture.
The available options are:
– Pizza
– Large roasting pan
– Bakes
Use heat-resistant cookware.
Place the food to be reheated in adish on the rack. Do not cover.
Select Special Modes .
Select Reheat.
Select the desired dish and adjust thepower level.
Follow the instructions on the display
Burn hazard!Use pot holders when removingdishes from the oven. Condensationmay accumulate on the bottom ofthe dish.
Warm-up CookwareThis program is designed to warm yourcookware.
The temperature can be set between75-175°F (50-80°C).
Use heat-resistant cookware.
Place the rack on shelf level 2 andplace the cookware to be heated onit.
Select Special Modes.
Select Warm-up Cookware.
If necessary, adjust the defaulttemperature and set the duration.
Follow the instructions in the display.
Danger of burns!Use pot holders when removingdishes from the oven. Condensationmay accumulate on the bottom ofthe dish.

Special Modes
114
ProofThis program was designed to proofdough without humidity.
The temperature can be set between75-125°F (30-50°C).
Select Special Modes.
Select Proof.
If necessary, adjust the defaulttemperature and set the duration.
Follow the instructions in the display.
If you would like to proof dough withthe addition of moisture, select theappropriate MasterChef program.
PizzaThis program is designed specificallyfor baking pizza.
The temperature can be set between300-475°F (160-250°C).
Select Special Modes.
Select Pizza.
If necessary, adjust the defaulttemperature and set the duration.
Follow the instructions in the display.

Special Modes
115
Sabbath ProgramThis program is designed for religiousobservance.
Select the Sabbath Program and thenselect the oven mode and temperature.
The program will only start once thedoor is opened and closed:
– The cooking process will start afterabout 5 minutes using Surround or Bake .
– The oven will heat up to thetemperature you have set and willmaintain this temperature for amaximum of 72 hours.
– The interior lighting does not comeon, even when the door is opened.
If Settings - Lighting - On has beenselected, the lighting will remainturned on throughout the program.
– Sabbath Program appears in thedisplay constantly.
– The time of day is turned off.
Once the Sabbath Program has startedit cannot be changed or saved as aFavorites.
Using the Sabbath Program
The program can only be canceled byturnng the oven off.
Select Special Modes.
Select Sabbath Program.
Select the desired mode.
The Sabbath Program cannot bestarted if the timer is being used.
Set the required temperature.
Confirm with OK.
The oven is now ready for use.
Sabbath Program and thetemperature set will appear.
Open the door to start the program.
Place the food in the oven.
Close the door.
The oven heating will turn on after 5minutes.
To end the program early:
Turn the oven off.

Special Modes
116
Gentle BakeThe Gentle Bake mode is ideal forcasseroles and gratins.
You can select a temperature settingfrom 200-475°F (100-250°C).
Select Operating Modes .
Select Gentle Bake and change thedefault temperature if necessary.
Follow the instructions on the display.

Special Modes
117
Canning
Always observe USDA food safetyguidelines.
Canning containers
Danger of injury!Do not use the appliance to heat upor can food in sealed jars orcontainers. Pressure will build upinside them and they can explodecausing damage to the appliance, aswell as the risk of injury and scalding.
Only use jars designed for canning:
– Canning jars,
– Jars with twist-off lids.
Canning fruit and vegetables
We recommend using the ConvectionBake mode.
The instructions below are for 6 one-liter glass jars.
Slide the universal tray onto shelflevel 2. Place the jars on the tray.
Select the Convection Bake mode and a temperature of300-340°F (150–170 °C).
Wait until bubbles rise evenly in thejars.
Then reduce the temperature toavoid a boil-over.
Fruit / Cucumbers
As soon as bubbles begin to riseevenly in the jars, reduce thetemperature to the lowest setting.Then, leave the jars in the warm ovenfor an additional 25-30 minutes.
Vegetables
Reduce the temperature to 210°F(100°C) as soon as bubbles begin torise evenly in the jars.
After the canning time has finished,reduce the temperature to the lowestsetting and leave the jars in the ovenfor an additional 25-30 minutes.
After canning
Danger of burns!Use pot holders when removing thejars from the oven.
Take the jars out of the oven.
Cover the jars with a towel and leaveto set for approx. 24 hours.
Make sure all jars are closed properlywhen storing them.

Special Modes
118
Frozen food
Tips for pizza, French fries,croquettes and other similar items
Cakes, pies, pizza, baguettes
– Bake frozen pizza on parchmentpaper placed on the wire oven rack.
– Cook smaller frozen food items onparchment paper placed on a bakingtray or the universal tray.
– For smaller frozen food items, use thelowest temperature recommended onthe packaging.
– Turn small frozen food items severaltimes during cooking.
Preparation
Handling food carefully will helpprotect your health.
Select the oven mode andtemperatures recommended on thefood's packaging.
Preheat the oven.
Place the food in the preheated ovenon the shelf level recommended onthe packaging.
Check the food at the end of theshortest time recommended on thepackaging.

Cleaning and care
119
Danger of burns!Make sure the heating elements areturned off and allowed to coolcompletely.
Danger of injury! The steam froma steam cleaner could reachelectrical components and cause ashort circuit.Do not use a steam cleaner to cleanthis appliance.
All surfaces can discolor or bedamaged if unsuitable cleaningagents are used. The front of theoven, in particular, will be damagedby oven cleaners and descalers.All surfaces are susceptible toscratches. Scratches on glasssurfaces could cause a breakage.Remove any cleaning agent residuesimmediately.
Unsuitable cleaning agentsTo avoid damaging surfaces whencleaning, do not use:
– Cleaners containing soda, ammonia,acids or chlorides
– Lime removers on the front of theovens
– Abrasive cleaning agents, such asscouring powder, scouring cream,pumice stones
– Solvent-based cleaners
– Stainless steel cleaners
– Dishwasher cleaners
– Glass cleaners
– Ceramic cooktop cleaners
– Hard, abrasive sponges and brushes,such as pot scrubbers or usedsponges that still contain traces ofabrasive cleaner
– Eraser sponges
– Sharp metal scrapers
– Steel wool
– Spot cleaners
– Oven cleaners*
– Stainless steel scouring pads*
* Can be used to remove very heavysoiling from PerfectClean surfaces.

Cleaning and care
120
If stains and food residues areallowed to remain on surfaces for alonger period of time, it may nolonger be possible to remove them.Continued use without cleaning willmake the oven much harder to clean.
Remove any soiling immediately.
The accessories are not dishwasher-safe, with the exception of the wirelessroast probe.
Tips– Soiling caused by spilt juices and
cake mixtures is best removed whilethe oven is still warm. Use cautionand make sure the oven is not too hot- Danger of burns.
– To make cleaning easier, you candismantle the oven door and removethe side runners.
Normal soiling
There is a seal around the oveninterior which seals the inside of thedoor.Take care not to rub, damage ormove the gasket.
Remove normal soiling immediatelyusing a clean sponge with warmwater and liquid dish soap appliedwith a clean, damp microfiber cloth.
After cleaning, ensure that anydetergent residue is removed withclean water.This is particularly important whencleaning surfaces treated withPerfectClean enamel as detergentresidue can impair the non-stickproperties.
After cleaning, dry the surfaces with asoft cloth.
Wireless Roast Probe
The wireless roast probe can becleaned in the dishwasher.

Cleaning and care
121
Stubborn soiling
Spilt fruit and roasting juices maypermanently discolor surfaces of theoven. This discoloration is permanentbut will not affect the performance ofthe oven. Do not use force to removethese stains. Clean using theinstructions in this manual.
Baked on deposits can be removedwith a glass scraper or a non-abrasive stainless steel scrubbingpad.
Stubborn soiling on PerfectCleansurfaces can be cleaned using MieleOven Cleaner. It must only be appliedto cold surfaces in accordance withthe instructions on the packaging.
Non-Miele oven spray must only beused in a cold oven and for no longerthan 10 minutes.
If necessary, the rough side of a dishsponge can be used to remove thesoiling.
After cleaning, remove all ovencleaning agent residues thoroughlywith clean water, and dry with a softcloth.

Cleaning and care
122
Cleaning the oven interior withSelf Clean Instead of cleaning the oven by hand,you can use the Self Clean program.
Any grime that has accumulated will bebroken down and burnt to ash as aresult of the high temperatures.
This oven has three Self Clean levels,each with a different duration:
– Level 1 for light soiling
– Level 2 for heavier soiling
– Level 3 for very heavy soiling
Once the Self Clean program hasstarted, the door will lock automatically.It cannot be opened again until theprogram has ended.
You can also set a delayed start time forthe Self Clean program, in order to takeadvantage of off-peak electricity rates,for example.
At the end of the Self Clean program,any remaining residues (e.g., ash) canbe easily wiped away.
Once you start the Self Cleanprogram, the grill and the griddle willbe turned off.
During the Self Clean program, thegrill and the griddle cannot be turnedon.
Preparing for the Self Clean program
The high temperatures used duringself cleaning will damageaccessories that are not designed forcleaning in the Self Clean program.Please remove these accessoriesfrom the oven before starting the SelfClean program. This also applies toaccessories purchased separately.
The following accessories are suitablefor cleaning during the Self Cleanprogram and can remain in the oven:
– Shelf runners
– FlexiClip telescopic runnersHFC 92
– Wire oven rackHBBR 48-2
Take all accessories that are not "SelfClean safe" out of the oven.
Slide the wire oven rack into the topshelf level.
If not removed, coarse soiling cansmoke and cause the Self Cleanprogram to turn itself off.
Remove any coarse soiling beforerunning the Self Clean program.

Cleaning and care
123
Starting the Self Clean program
Danger of burns!When Self Cleaning the front of theoven becomes hotter than withnormal oven use.Prevent children from touching theoven during the Self Clean program.
Select Maintenance.
Select Self Clean.
Select the level required according tothe level of soiling.
Confirm with OK.
Follow the instructions in the display.
Confirm with OK.
Starting the Self Clean program
To start the Self Clean programimmediately, select Start Now.
Confirm by touching OK.
The Self Clean program will then start.
The door locks automatically. The ovenheating and cooling fan functions arethen automatically activated.
The oven light does not come on duringthe Self Clean program.
The time remaining for the Self Cleanprogram appears in the display. Thistime cannot be changed.
You can use the timer while the SelfClean program is running. When the settime has elapsed, the buzzer will soundand will flash. The time will thencontinue to increase in the display.
The buzzer will stop and the visualindicators will go out after you touch the"Timer" sensor.
Delaying the start of the Self Cleanprogram
To delay the start of the Self Cleanprogram, select Start Later.
Set the desired time for starting theSelf Clean program.
Confirm by touching OK.
The door will lock automatically. Start atand the set start time appear in thedisplay.
Up until the start time you can alter thestart and end time with Change.
As soon as the start time has beenreached, the oven heating and thecooling fan will turn on automatically.The duration remaining will appear inthe display.

Cleaning and care
124
At the end of the Self Clean program
When the duration remaining reaches00:00 h, a message will appear in thedisplay to tell you that the door isunlocking.
When the door lock has beendeactivated:
– Program Finished appears in thedisplay,
– A buzzer will sound if turned on (see"Settings - Volume - Buzzer tones").
Turn the oven off.
Acoustic and visual signals are turnedoff.
Burn hazard!Danger of burns! Wait until the ovenhas cooled down before removingany residual soiling left in the ovencompartment from the Self Cleanprogram.
Wipe any residues (e.g., ash) leftbehind after the Self Clean programout of the oven compartment and offof any accessories. The amount ofash will vary depending on how dirtythe oven was.
Most soiling can be easily removedusing a clean, soft sponge and a mildsolution of warm water and liquid dishsoap.
Depending on the degree of soilingbefore cleaning, there may be a visiblelayer of soiling across the inner glasspane on the door. This should beremoved using the scouring side of adish sponge or with a stainless steelspiral sponge and liquid dish soap.
Extend and retract the FlexiCliptelescopic runners several times afterrunning the Self Clean cleaningprogram.
Please note:
– There is a seal around the oveninterior which seals the inside of thedoor. Take care not to rub, damageor move the gasket.
– After the Self Clean program, theFlexiClip telescopic runners mayappear discolored or have a lightercolor in some places. This will notaffect the functioning of the runnersin any way.
– Spilt fruit juices may cause lastingdiscoloration to enameled surfaces.This discoloration is permanent butwill not affect the efficiency of theenamel. Do not attempt to removethese marks.

Cleaning and care
125
The Self Clean program is canceled
If the Self Clean program is canceledthe oven door will remain locked untilthe temperature inside the oven dropsto below 535°F (280°C).
The following will cause the Self Cleanprogram to cancel:
– Turning the oven off.
– A power failure.
If you turn the oven off the display stillshow Turn appliance off?.
If you would like to cancel the SelfClean program, select Yes.
The door will unlock once thetemperature in the oven has droppedbelow 535°F (280°C) and the oven isturned off.
If you would like to continue runningthe Self Clean program, select No.
The Self Clean program will continue.
Once the power returns after a powerfailure, Program Canceled Cooling Downwill appear in the display.
The door will unlock once thetemperature in the oven has droppedbelow 535°F (280°C) and the oven isturned off.
A buzzer will sound if turned on (see"Settings - Volume - Buzzer tones").
Program Finished appears in the display.
Select "Back".
Start the Self Clean program again.

Cleaning and care
126
Removing the door
The door is connected with brackets oneach door hinge.Before the door can be removed thehinges must first be unlocked.
Open the door fully.
Release the locking clamps byturning them as far as they will go.
Do not attempt to take the door offthe brackets when it is in thehorizontal position, the brackets willspring back against the oven.
Do not use the handle to pull thedoor off the brackets, the handlecould break.
Close the door until it rests partiallyopen.
Holding the door securely at bothsides, lift it straight upwards.

Cleaning and care
127
Reinstalling the door
Hold both sides of the door securelyand carefully fit it onto the brackets ofthe hinges.Make sure that the door goes onstraight.
Open the door fully.
If the locking clamps are not locked,the door can easily becomedetached from the brackets and bedamaged.You must make sure that the lockingclamps are locked again.
To relock the locking clamps, turnthem back up to the horizontalposition as far as they will go.

Cleaning and care
128
Removing the shelf runners
Danger of injury!Do not use the oven without the shelfrunners correctly inserted.
You can remove the shelf runnerstogether with the FlexiClip telescopicrunners (if present). If you wish toremove the FlexiClip telescopic runnersseparately in advance, follow theinstructions in "Features – Inserting andremoving the FlexiClip telescopicrunners."
Burn hazard!Make sure that the heating elementsare switched off and that the oveninterior has cooled down completely.
Pull the front of the shelf runners outof the holder (1.) and remove therunners from the oven (2.).
The runners can be installed in thereverse order.
Use care when installing the parts inthe oven.

Frequently asked questions
129
The following faults can be corrected without contacting the Miele ServiceDepartment. If in doubt, please contact Miele.
Danger of injury! Repairs should only be carried out by a qualified andtrained professional in accordance with local and national safety regulations.Unauthorized repairs could cause personal injury or machine damage.
Problem Possible cause and solution
This display is dark. The time of day display is deactivated. When theappliance is turned off, the time of day display isturned off. As soon as the oven is turned on, the time of day
will appear. If you want it to be displayedcontinuously, the setting to turn the time of daydisplay back on must be changed (see "Settings –Time of day - Display").
There is no power to the appliance. Check if the circuit breaker has tripped.
System Lock appearsin the display when theoven is turned on.
The system lock is On. You can unlock the oven to start a cooking
program by pressing for at least 6 seconds. To permanently deactivate the lock, see "Settings -
System Lock ".

Frequently asked questions
130
Problem Possible cause and solution
The oven does not heatup.
Demo mode is activated.The oven can be operated but will not heat up. Deactivate Demo mode (see "Settings –
Showroom Program").
Power Failure - ProgramCanceled appears in thedisplay.
There has been a power failure which has caused thecurrent cooking process to stop. Turn the oven off and then back on again. Restart the cooking process.
12:00 appears in thedisplay.
The power supply was interrupted for longer than 200hours. Reset the date and time.
Maximum operatingduration reached appearsin the display.
The oven was operated for an unusually long periodof time. The Safety cut-out feature has beenactivated. Confirm with OK. Clear the message Program
Finished by selecting "Back".
The oven is now ready to use.
Fault XX appears inthe display.
A fault has occurred that you cannot resolve. Contact Miele Technical Service.
Door not locked appearsin the display.
The Self Cleaning program door lock is not locking. Turn the oven off and then back on again. Then
restart the Self Clean program. If the message appears again, contact Miele
Technical Service.
Door not released appears in the display.
The door lock for the Self Clean program will notdeactivate. Turn the oven off and then back on again. If the door lock still does not deactivate itself,
contact Miele.
No signal to roast probe.Reposition roast probe in theoven. appears in thedisplay.
The wireless roast probe is not recognized. Reposition the probe in the food.
If the oven still does not recognize the wireless roastprobe, it may be faulty. A replacement roast probecan be ordered from Miele.

Frequently asked questions
131
Problem Possible cause and solution
Fault with moisture control -the MasterChef programswill operate without moistureappears in the displayafter a MasterChef Plushas been selected.
The evaporation system is faulty. Contact Miele Service.
In the meantime, you can run a program that doesnot use added moisture.
Fault with moisture control- Moisture Plus program notavailable appears in thedisplay after selectingMoisture Plus .
The steam injection system is faulty. Contact Miele Technical Service. Use the Convection Bake program instead of
Moisture Plus .
A noise is heard afterthe cooking process iscomplete.
The fan remains turned on after a cooking program(see "Settings - Cooling fan").
The oven has turneditself off.
The oven turns off automatically if a button is notpressed after a certain amount of time or after acooking program has ended to save power. Turn the oven back on.
Baked goods are notcooked properly afterfollowing the timesgiven in the chart.
A different temperature than that given in the recipewas used. Select the temperature required for the recipe.
The ingredient quantities are different from thosegiven in the recipe. Double check the recipe. The addition of more
liquid or more eggs will make a wetter mixturewhich will take longer to cook.

Frequently asked questions
132
Problem Possible cause and solution
The browning isuneven.
The wrong temperature or shelf level was selected. There will always be a slight unevenness. If the
unevenness is great, check whether the correcttemperature and shelf level were selected.
That material or color of the bakeware is not suitablefor the oven mode selected. When using Surround use matte, dark colored
pans. Light colored, shiny pans will not produce asdesirable results.
The catalyzer has been set at too high a level. Thiscan lead to an uneven browning result on moredelicate food such as sponge cakes. Set the odor reduction catalyzer to a lower level or
turn it off (see "Settings - Catalyzer").
The oven lighting turnsoff after a short time.
The oven is factory set to turn off automatically after15 seconds. This setting can be changed (see"Settings - Lighting").
The oven lighting doesnot turn on.
The halogen bulb needs to be replaced.
Danger of burns!Make sure the heating elements are turned off andallowed to cool completely.
The lamp cover may be damaged if it falls.When removing the cover hold it firmly so that itdoes not fall. Place a towel on the oven floor andopen door to avoid damage.
Disconnect the appliance from the power supply. Loosen the bulb cover with the tool supplied at the
back of the frame. Do not touch the halogen bulb with bare fingers.
Observe the manufacturer's instructions.Remove the halogen bulb.
Replace it with a new halogen bulb (Sylvania66740, 120 V, 40 W, G9, FS1).
Press the bulb cover back into place. Reconnect the oven to the electrical supply.

Frequently asked questions
133
Problem Possible cause and solution
There is soiling in theover after the Self Cleanprogram.
The Self Clean program burns off soiling in the ovenand leaves it as ash. Using a soft sponge, warm water and liquid dish
soap remove the ashes.If coarse soiling remains, start the Self Cleanprogram again with a longer duration.
Grill and griddle areturned off/cannot beturned on
Once you start the self cleaning program, grill andgriddle will be turned off.This is not an error. The Safety cut-out feature hasbeen activated.At 1-minute intervals, a maximum of 5 ignition testswill be performed.
Turn the grill and griddle control knob to the rightuntil it reaches the "Off" position.At the end of the self clean program, you can turnrill and griddle on again.
During the self cleaning program, grill and griddlecannot be turned on.This is not an error. The Safety cut-out feature hasbeen activated.At 1-minute intervals, a maximum of 5 ignition testswill be performed.
Turn the grill and griddle control knob to the rightuntil it reaches the "Off" position.At the end of the self clean program, you can turngrill and griddle on again.
The rack and otheraccessories make anoise when beingpushed into or pulledout of the oven.
The heat resistant surface of the shelf runners createsfriction when accessories are taken in and out of theoven. To reduce the friction, lubricate the runners with a
few drops of cooking oil applied with a papertowel. Repeat this process after each Self Cleanprogram.

Technical Service
134
After sales serviceIn the event of a fault which you cannoteasily correct yourself, please contact:
– your Miele dealer, or
– the Miele Technical ServiceDepartment.
See back cover for contact details.
Please quote the model and serialnumber of your appliance whencontacting Miele.
You will find this information on the dataplate, which is behind the toe-kickcover.
WarrantyFor further information, please refer toyour warranty booklet.

Copyright and licenses
135
Miele uses software to operate and control the appliance.
The copyright authorization from Miele and other relevant software suppliers (e.g.Adobe) must be respected.
Miele and their suppliers reserve the rights to the software components.
In particular the following are prohibited:
– copying and distribution,
– modifications and derivations,
– decompilation, reverse engineering, disassembling and other such reductions ofsoftware.
This product contains Adobe® Flash® Player Software under licence from AdobeSystems Incorporated, Adobe Macromedia Software LLC. Adobe and Flash areregistered trademarks of Adobe Systems Incorporated.
Components which fall under GNU General Public Licence and further OpenSource licenses are integrated into the software.
An overview of the integrated Open Source components and a copy of the currentlicence can be obtained at http://www.miele.com/device-software-licenses. You willneed to enter the specific product name.
Miele will provide the source code for all components of software licensed underthe GNU General Public License and comparable Open Source licenses.
For source code requests, please email [email protected].


9 Independence WayPrinceton, NJ 08540Phone:Fax:www.mieleusa.com
U.S.A.Miele, Inc.
National Headquarters
Please have the model and serial numberof your appliance available before contacting Technical Service.
CanadaImporterMiele Limited
Headquarters and Miele Centre
800-843-7231609-419-4298
Technical Service & SupportNationwidePhone:Fax:[email protected]
161 Four Valley DriveVaughan, ON L4K 4V8www.miele.ca
800-999-1360888-586-8056
Customer Care CentrePhone:
800-565-6435905-532-2272
GermanyManufacturerMiele & Cie. KGCarl-Miele-Straße 2933332 Gütersloh

M.-Nr. 09 898 081 / 02en-US, CA
HR1954; HR1955; HR1956