operating instructions - motion control systems · compax-m / compax-s subject to technical change....
TRANSCRIPT
COMPAX-M / COMPAX-S
Subject to technical change. Data based on the technical prior art at the time of printing. 06.07.99 192-040046 N3
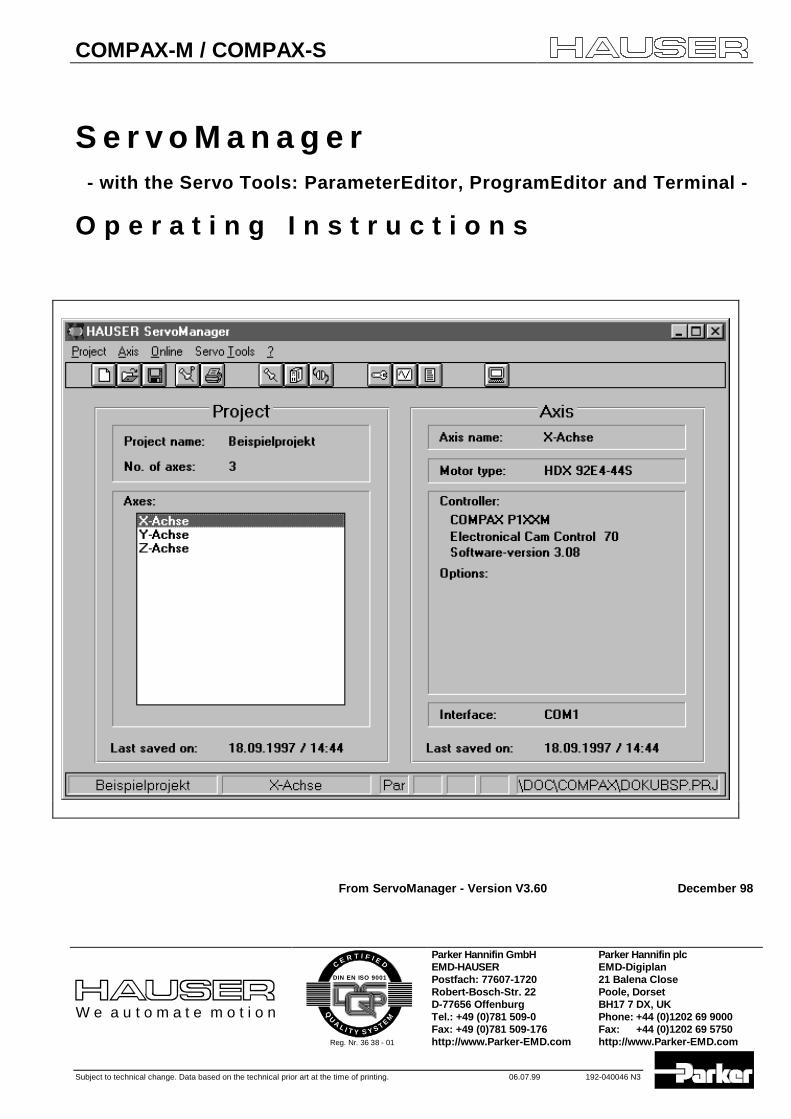
S e r v o M a n a g e r - with the Servo Tools: ParameterEditor, ProgramEditor and Terminal -
O p e r a t i n g I n s t r u c t i o n s
From ServoManager - Version V3.60 December 98
W e a u t o m a t e m o t i o n
DIN EN ISO 9001
C
E R T I F I E D
QU
A L I T Y S Y S T E
M
Reg. Nr. 36 38 - 01
Parker Hannifin GmbHEMD-HAUSERPostfach: 77607-1720Robert-Bosch-Str. 22D-77656 OffenburgTel.: +49 (0)781 509-0Fax: +49 (0)781 509-176http://www.Parker-EMD.com
Parker Hannifin plcEMD-Digiplan21 Balena ClosePoole, DorsetBH17 7 DX, UKPhone: +44 (0)1202 69 9000Fax: +44 (0)1202 69 5750http://www.Parker-EMD.com

COMPAX
2
Contents
1. Device a llocation: ................................................ 4
2. Overview .............................................................. 5
2.1 PC requirements ...................................... 5
2.2 Supported hardw are interfaces .............. 5
2.3 Installation of the S ervoManager ........... 5
2.4 Compatibility ........................................... 52.4.1 Windows 3.1 / 3.11 ................................. 52.4.2 Windows 95 ............................................ 5
2.5 Structure.................................................. 62.5.1 Program structure ................................... 62.5.2 Data management .................................. 72.5.3 Windowing.............................................. 7
2.6 Menu overview ServoManagerand ParameterEditor ....................................... 82.6.1 Window content of ServoManager ........ 102.6.2 Window content of
ParameterEditor.................................... 112.6.3 Keyboard operations............................. 112.6.4 Transfer parameter in program
start 11
3. ServoManager menuss ...................................... 12
3.1 Project.................................................... 123.1.1 Project: New ......................................... 123.1.2 Project: Open........................................ 123.1.3 Project: Close ....................................... 123.1.4 Project: Delete ...................................... 123.1.5 Project: Save ........................................ 123.1.6 Project: Save as ................................... 123.1.7 Project: Project Info .............................. 123.1.8 Project: Print ......................................... 123.1.9 Project: List of previously selected
projects................................................. 133.1.10Project: Quit.......................................... 13
3.2 Axis ........................................................ 133.2.1 Axis: Insert............................................ 133.2.2 Axis: Delete .......................................... 133.2.3 Axis: Axis-Info....................................... 133.2.4 Axis: Controller/Options ........................ 133.2.5 Axis: PC interface ................................. 13
3.3 Online .................................................... 143.3.1 Online: Terminal ................................... 143.3.2 Online: Upload from controller. ............. 143.3.3 Online: Download to controller. ............. 14
3.4Servo T ools .................................................... 143.4.1 Servo Tools: ParameterEditor ................. 143.4.2 Servo Tools: CamEditor......................... 143.4.3 Servo Tools: ProgramEditor................... 143.4.4 Servo Tools: Dialogue language ............ 14
4. ParameterEditor menus .....................................15
4.1 Axis.........................................................154.1.1 Axis: Open ............................................154.1.2 Axis: Close............................................154.1.3 Axis: Change current axis......................154.1.4 Axis: Save all parameters / axis
data 154.1.5 Axis: Parameter Info..............................154.1.6 Axis: Load parameter from the
project ...................................................154.1.7 Axis: Save parameters / axis data .........154.1.8 Axis: Print parameters...........................154.1.9 Axis: Quit ..............................................15
4.2 Configuration........................................164.2.1 Guided configuration .............................164.2.2 Motor.....................................................164.2.3 Drive type..............................................174.2.4 Reference system / Initiators .................174.2.5 Encoder input ........................................184.2.6 Encoder simulation................................18
4.3 Parameters .............................................194.3.1 Guided parametrization .........................194.3.2 Set point generator................................194.3.3 Limitations.............................................194.3.4 COMPAX interfaces .............................204.3.5 Application parameters..........................204.3.6 Controller ..............................................204.3.7 I/O parameters ......................................204.3.8 Monitor..................................................204.3.9 Error handling........................................214.3.10Parameter lists ......................................214.3.11Check parameters .................................214.3.12Set default values .................................21
4.4 Online.....................................................224.4.1 Terminal................................................224.4.2 Command .............................................224.4.3 Parameter .............................................224.4.4 Status....................................................234.4.5 Upload ..................................................244.4.6 Download ..............................................244.4.7 Duplicate...............................................244.4.8 Compare ...............................................244.4.9 Errors ....................................................244.4.10Download option identification...............25
4.5 Window ..................................................254.5.1 Arrange horizontally ..............................254.5.2 Arrange vertically ..................................254.5.3 Cascading .............................................254.5.4 User Defined .........................................25
4.6 Servo T ools............................................25
4.7 Help ........................................................254.7.1 Info ......................................................25

3
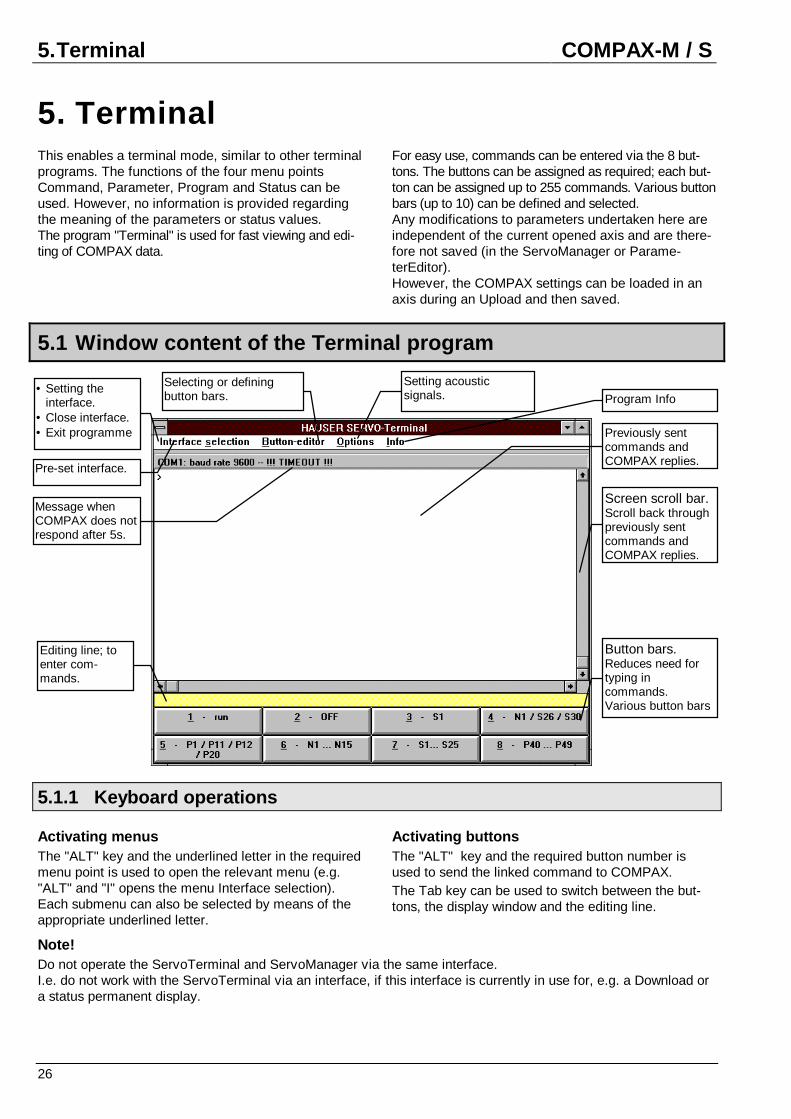
5. Terminal ............................................................. 26
5.1 Window content of the T erminalprogram......................................................... 265.1.1 Keyboard operations ............................. 26
5.2 COMPAX commands via theTerminal ........................................................ 27
5.3 Definition of button bars....................... 275.3.1 Window structure of the
ButtonEditor .......................................... 27
6. ProgramEditor ................................................... 28
6.1 Compatibility ......................................... 286.1.1 Old DOS block editor programs............. 28
6.2 ProgramEditor desktop ......................... 296.2.1 Menu overview of the
ProgramEditor....................................... 296.2.2 Window content of the
ProgramEditor....................................... 306.2.3 Window content of the editing
window "Program"................................. 31
7. ProgramEditor menus ....................................... 32
7.1 Axis ........................................................ 327.1.1 Axis: Open ............................................ 327.1.2 Axis: Close............................................ 327.1.3 Axis: Change current axis....................... 327.1.4 Axis: Save all programs ........................ 327.1.5 Axis: Program Info ................................ 327.1.6 Axis: Load program from project ........... 327.1.7 Axis: Save program .............................. 327.1.8 Axis: Print program ............................... 337.1.9 Axis: Quit .............................................. 33
7.2 Edit ......................................................... 337.2.1 Cut 337.2.2 Copy ..................................................... 337.2.3 Insert..................................................... 337.2.4 Delete ................................................... 337.2.5 Search for errors ................................... 33
7.3 Define..................................................... 347.3.1 Variables............................................... 347.3.2 Display lists........................................... 35
7.4 Online..................................................... 357.4.1 Terminal ............................................... 357.4.2 Upload (from controller) ........................ 357.4.3 Download (to the controller) .................. 36
7.5 Window .................................................. 367.5.1 Arrange horizontally .............................. 367.5.2 Arrange vertically .................................. 367.5.3 Cascading............................................. 367.5.4 User Defined......................................... 36
7.6 Servo T ools ........................................... 36
7.7 ? ................................................................. 367.7.1 Info ...................................................... 36
COMPAX
4
1. Device allocation:This documentation applies for the ServoManager, with the program modules
ParameterEditor, ProgramEditor and the Terminal.
The ServoManager can be used to edit the parameters and programs of the following de-
vices:
�� COMPAX 25XXS COMPAX 2500S, ... 2530S, ... 2550S, ... 2560S, ... 2570S
�� COMPAX 45XXS COMPAX 4500S, ... 4530S, ... 4550S, ... 4560S, ... 4570S
�� COMPAX 85XXS COMPAX 8500S, ... 8530S, ... 8550S, ... 8560S, ... 8570S
�� COMPAX P1XXM COMPAX P100M, ... P130M, ... P150M, ... P160M, ... P170M
�� COMPAX 02XXM COMPAX 0200M, ... 0230M, ... 0250M, ... 0260M, ... 0270M
�� COMPAX 05XXM COMPAX 0500M, ... 0530M, ... 0550M, ... 0560M, ... 0570M
�� COMPAX 15XXM COMPAX 1500M, ... 1530M, ... 1550M, ... 1560M, ... 1570M
�� COMPAX 35XXM COMPAX 3500M, ... 3530M, ... 3550M, ... 3560M, ... 3570M
Software version V2.0 or higher
Ordering Key
e.g..: COMPAX 0260M:
COMPAX: Name02: Power class60: Variant e.g. "00": Standard device
"50": Synchro-controller"60": Electronic drive"70": Cam controller
M: Model type/construction "M": Multi-axis model"S": Single-axis model
...
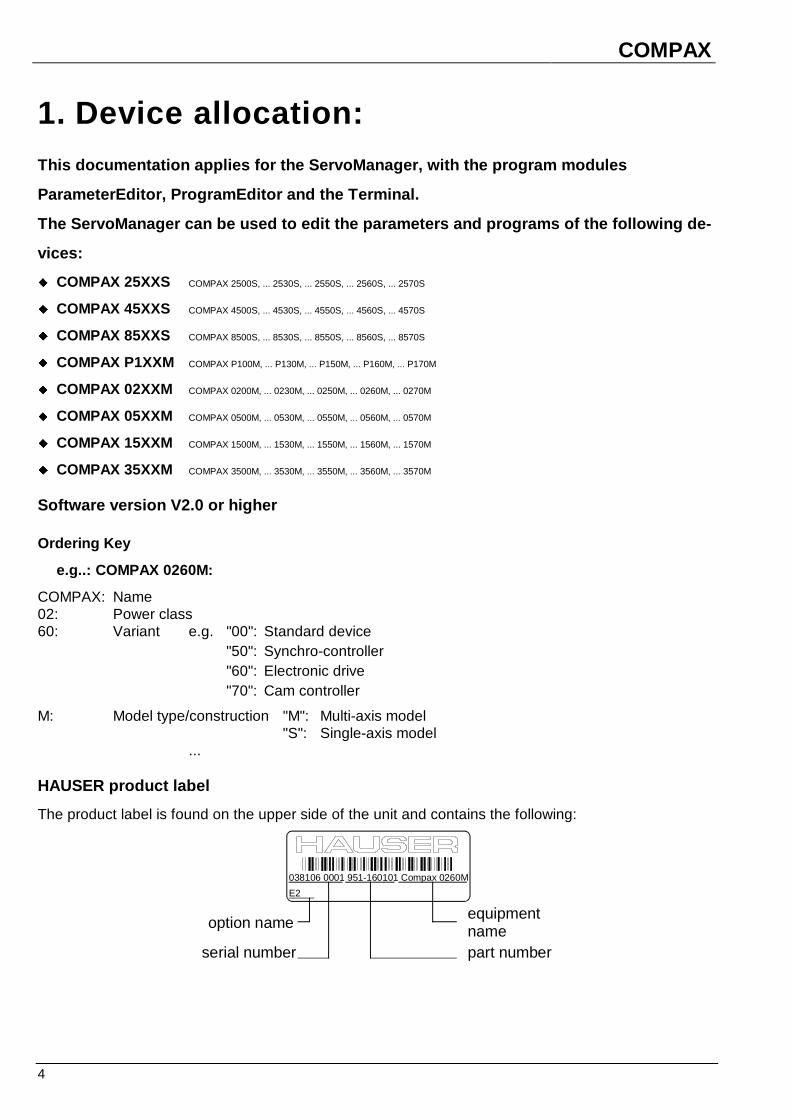
HAUSER product label
The product label is found on the upper side of the unit and contains the following:
equipment namepart numberserial number
option name
038106 0001 951-160101 Compax 0260M
E2

5
2. Overview
2.1 PC requirements
Operating system
�MSDOS operating system with Windows V3.1 orhigher and appropriate PC.(Minimum requirements: 486, 4MB working memory)
2.2 Supported hardware inter-faces
��RS232Standard: PC-COM 1
PC-COM 2PC-COM 3PC-COM 4
Plug-in card: PC-COM4-ISA-FIFO
Problems with FIFO modulesIn Windows, there are problems with FIFO modules(see also Windows manual); e.g. data can be lost. Inthis case, the UART buffer in the file SYSTEM.INImust be modified to the following settings:COM1FIFO=FALSECOM2FIFO=FALSECOM3FIFO=FALSECOM4FIFO=FALSE
2.3 Installation of the Servo-Manager
PreparationClose all programs.Before installation, deactivate the following programs:
• Any virus detection software.
• The Miro-Pinboard in Miro graphics cards.Following installation, the virus software can be reacti-vated.Problems can also occur during program executionwith the Miro Pinboard.
InstallationStart the "Setup.exe" program on disk 1. Installation isthen menu guided.Following the installation, a Windows program groupwill appear containing the ServoManager and the Ter-minal.The current status of the software, error rectificationand other current information can be found in the filereadsrv.txt, which can be selected in the programgroup via the icon "Read me ServoManager".
Win95:Already present older installations are notautomatically displayed, but can be updated bychanging the path (path of previously installedversion).
2.4 Compatibility
2.4.1 Windows 3.1 / 3.11
The ProgramEditor was designed for Windows 3.1 /3.11.The ProgramEditor is started from the ServoManager(using Buttons or Servo Tools menu).You can change between the Tools using ALT + Tab,using the corresponding Buttons or using the ServoTools menu.
2.4.2 Windows 95
The ProgramEditor was designed for Windows 3.1 /3.11 but can also run under Windows 95.The ProgramEditor is started from the ServoManager(using Buttons or Servo Tools menu).You can change between the Tools using ALT + Tabor the Task bar.The change between the Tools using the correspond-ing buttons or the Servo Tools menu does not functionunder Windows 95.
COMPAX
6
2.5 Structure
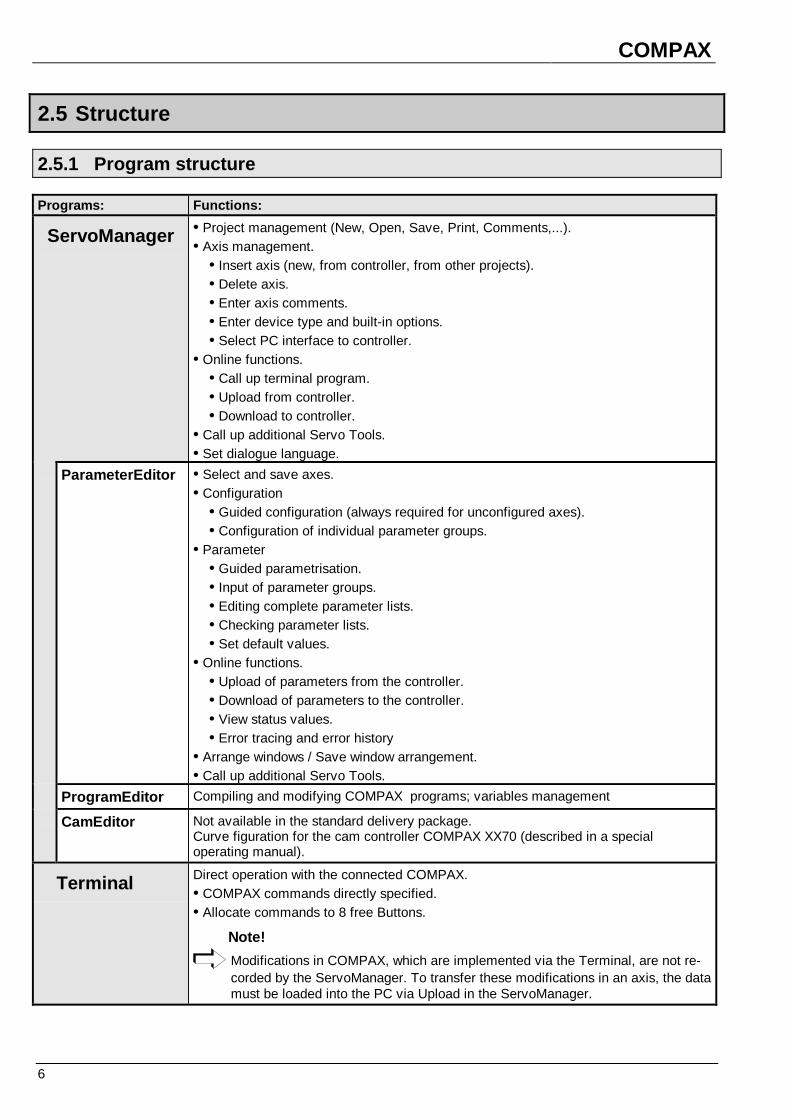
2.5.1 Program structure
Programs: Functions:
ServoManager • Project management (New, Open, Save, Print, Comments,...).• Axis management.
• Insert axis (new, from controller, from other projects).• Delete axis.• Enter axis comments.• Enter device type and built-in options.• Select PC interface to controller.
• Online functions.• Call up terminal program.• Upload from controller.• Download to controller.
• Call up additional Servo Tools.• Set dialogue language.
ParameterEditor • Select and save axes.• Configuration
• Guided configuration (always required for unconfigured axes).• Configuration of individual parameter groups.
• Parameter• Guided parametrisation.• Input of parameter groups.• Editing complete parameter lists.• Checking parameter lists.• Set default values.
• Online functions.• Upload of parameters from the controller.• Download of parameters to the controller.• View status values.• Error tracing and error history
• Arrange windows / Save window arrangement.• Call up additional Servo Tools.
ProgramEditor Compiling and modifying COMPAX programs; variables management
CamEditor Not available in the standard delivery package.Curve figuration for the cam controller COMPAX XX70 (described in a specialoperating manual).
Terminal Direct operation with the connected COMPAX.• COMPAX commands directly specified.• Allocate commands to 8 free Buttons.
Note!
Modifications in COMPAX, which are implemented via the Terminal, are not re-corded by the ServoManager. To transfer these modifications in an axis, the datamust be loaded into the PC via Upload in the ServoManager.

7
2.5.2 Data management
All project data (parameters of individual axes, cam data, program,..) are saved in the project file: this file has theextension prj.
2.5.3 Windowing
The programs work, as is usual in Windows, with vari-ous input and display windows. There are 2 ba-sic window types:
1. Windows with exclusively active status.These are entry windows, which can only be quittedby closing them; i.e. the data must either be con-firmed with "OK" or cancelled with "Cancel".
2. Windows with active and inactive status.These are windows (entry and display windows),which can be quitted without having to close them.The windows are then in an inactive status. Variousother program windows can then be edited. Mouseclicking on the inactive application reactivates thewindow so that it can be edited again.
The ServoManager does not have this type of win-dow, but the main window with the project data andthe axis characteristics of the current axis is alwaysin the background.The ParameterEditor has the following windows ofthis type:
• The parameter list from the menu "Parameter" forediting the current axis parameters.
• The parameter list from the menu "Online" forediting the COMPAX parameters.
• The status list from the menu "Online".
• The results list after the function "Compare" fromthe menu "Online".
• The command window from the menu "Online".
All other windows only have an active status.
As normal in Windows, all windows can be changed insize and positioned freely within the screen.
Example: Arrangement of 2 parameter lists
The program "Terminal" is an independent program and not a ServoManager or ParameterEditor window. TheTerminal window can therefore not be positioned within this program.The column width and column order of the tables (parameter lists, status lists) can be modified using themouse.
Project File
To change the size of awindow, drag on theseframes.
Parameter axis 4
com. lines axis 4Parameter axis 3
com. lines axis 2cam data axis 3Parameter axis 2
Parameter axis 1 com. lines axis 1cam data axis 1
Click in this field to movethe window.
Project name and comment
The selected window is the activewindow.Note!When activating a window, thecurrent axis is also changed.
COMPAX-M / COMPAX-S 2.Overview
8
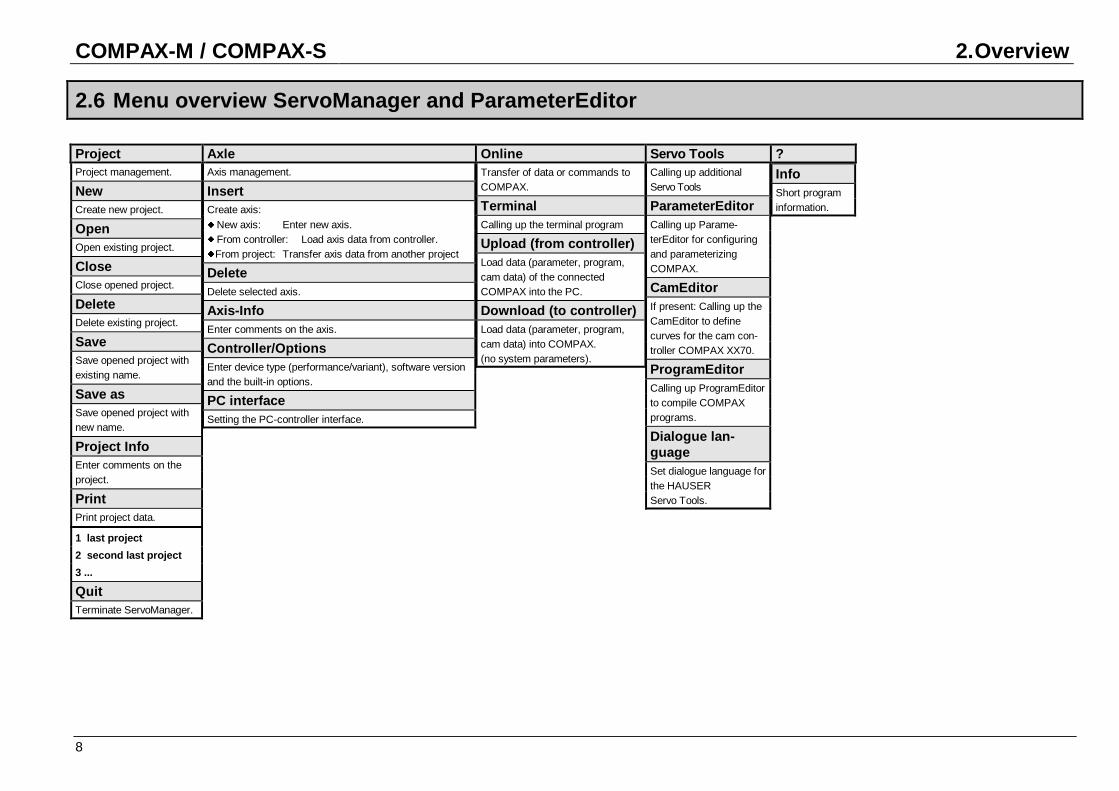
2.6 Menu overview ServoManager and ParameterEditor
Project Axle Online Servo T ools ?Project management.
NewCreate new project.
OpenOpen existing project.
CloseClose opened project.
DeleteDelete existing project.
SaveSave opened project withexisting name.
Save asSave opened project withnew name.
Project InfoEnter comments on theproject.
PrintPrint project data.
1 last project
2 second last project
3 ...
QuitTerminate ServoManager.
Axis management.
InsertCreate axis:�New axis: Enter new axis.�From controller: Load axis data from controller.�From project: Transfer axis data from another project
DeleteDelete selected axis.
Axis-InfoEnter comments on the axis.
Controller/OptionsEnter device type (performance/variant), software versionand the built-in options.
PC interfaceSetting the PC-controller interface.
Transfer of data or commands toCOMPAX.
TerminalCalling up the terminal program
Upload (from controller)Load data (parameter, program,cam data) of the connectedCOMPAX into the PC.
Download (to controller)Load data (parameter, program,cam data) into COMPAX.(no system parameters).
Calling up additionalServo Tools
ParameterEditorCalling up Parame-terEditor for configuringand parameterizingCOMPAX.
CamEditorIf present: Calling up theCamEditor to definecurves for the cam con-troller COMPAX XX70.
ProgramEditorCalling up ProgramEditorto compile COMPAXprograms.
Dialogue lan-guageSet dialogue language forthe HAUSERServo Tools.
InfoShort programinformation.

2.Overview
9
Axis Configuration Parameter Online Window ServoTools
?
Axis management.Exit programme
OpenSelect and load an axis (maximumof 4 open axes).
CloseClose selected axis.
Change currentaxisChange between open axes.
Save all parameters /axis dataSave changed parameters. Theopened axes can be selectedindividually for saving.
Parameter InfoEnter comments on the pa-rameters.
Load parameter fromthe projectLoad axis parameter from anotherproject.
Save parameters / axisdataSave the parameters of the cur-rent axis.
Print parametersPrint the parameters of the cur-rent axis.
Quit Ctrl+QExit programme
Configuring COMPAX -guided or manual.
Guided configura-tionEnter all configuration pa-rameters in guided manner.
MotorSelect motor from a list orenter motor data.
Drive typeSet drive type.� Spindle� Rack and pinion/timing belt� Universal drive
or others in accordance withthe pre-set device variants
Reference system/InitiatorsDefine sense of direction.Set real zero and softwareend limits and select initiatorsystem.Enable absolute valuesensor
Encoder inputSet encoder input.(menu point only when relevant op-tion is available).
Encoder simulationDefine resolution.(menu point only when relevant op-tion is available).
Parametrizing COMPAX - guided or manual.
Guided p arametrisat ion.Enter all parameters in guided manner.
Set point gen eratorSet alternate values for: Rates, ramp data and adjustmentfactors.
LimitationsSet limit values: Tracking errors, positioning zones, speedlimits, torque limits.
InterfacesSetting the existing COMPAX interfaces:� PLC data interface/Fast start.� RS232 interface.� HEDA interface.� RS485 interface; Profibus; CAN-Bus
Application p arametersSettings (Variant dependent).
ControllerSet optimizing parameters: Stiffness; damping; pre-controlvalues; configuring moment of inertia / monitor / structuralvariants of the controller (from V3.60).
I/O parametersTeach-In functions; Mask inputs and outputs.
MonitorSetting source and gain of the analogue output channels.Define contents of Status S15.Set optimizing display.
Error HandlingDisabling error E57; 2. Emergency stop on COMPAX-M
Parameter listEdit all parameters.
Check parametersCheck all parameters for value range.
Set default values.Set parameters to default values.
Transfer of data or commands toCOMPAX.
TerminalCalling up the terminal program
CommandSend direct commands to COMPAX.
ParameterRead and edit COMPAX parameters.
StatusSelect and display status values.
Upload (from controller)Load parameters (including systemparameters) of the connectedCOMPAX into the PC.
Download (to controller)Load pre-set parameter list intoCOMPAX.
DuplicateDownload with system parameters
CompareComparison of parameters betweenthe current file and connectedCOMPAX.
ErrorError tracing and error history.
Download option identifi-cationEnter updated options (passwordprotected)
Select and ar-range the openwindows.
ArrangehorizontallyArrange openwindows hori-zontally.
Arrange ver-ticallyArrange openwindows verti-cally.
CascadeArrange openwindows behindone another.
UserdefinedLoad windowsetting or savecurrent windowsetting.
...
Select an openwindow.
Switch to otherexistingHAUSERServo Tools
Servo-ManagerReturn toServoManager
CamEditorCalling up theCamEditor.
Program-EditorCalling up Pro-gramEditor tocompileCOMPAX pro-grams.
InfoShort pro-gram in-formation.
2.Overview COMPAX-M / S
10
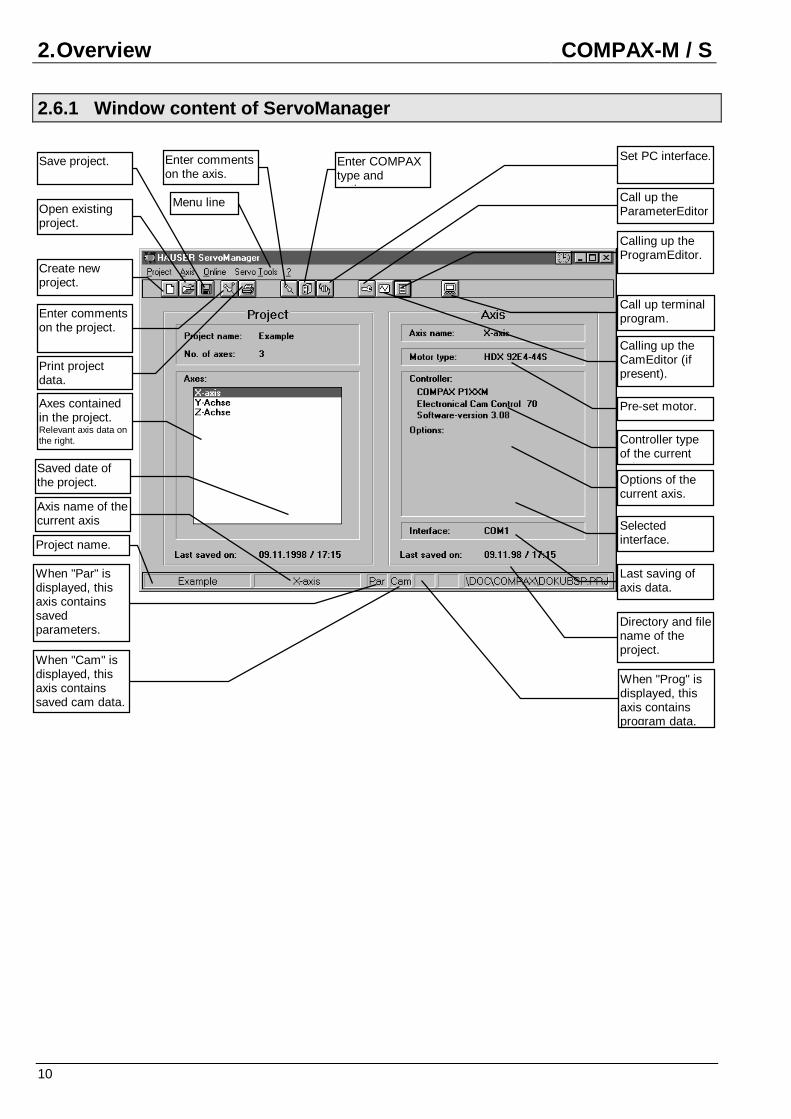
2.6.1 Window content of ServoManager
Create newproject.
Save project.
Open existingproject.
Enter commentson the project.
Print projectdata.
Enter commentson the axis.
Enter COMPAXtype and
ti
Set PC interface.
Calling up theProgramEditor.
Call up terminalprogram.
Calling up theCamEditor (ifpresent).
Call up theParameterEditor
Pre-set motor.
Controller typeof the current
iOptions of thecurrent axis.
Selectedinterface.
Last saving ofaxis data.
Directory and filename of theproject.
Axes containedin the project.Relevant axis data onthe right.
When "Cam" isdisplayed, thisaxis containssaved cam data.
Saved date ofthe project.
Axis name of thecurrent axis
Project name.
When "Par" isdisplayed, thisaxis containssavedparameters.
When "Prog" isdisplayed, thisaxis containsprogram data.
Menu line

2.6 Menu overview ServoManager and ParameterEditor
11
2.6.2 Window content of ParameterEditor
2.6.3 Keyboard operations
Program user interface
• Call up the menu line using the "Alt" key.The 1st menu is selected (indicated by highlighting).
• Call up the desired menu using the letter underlinedin the menu text.The "pull down" menu will open.
• Call up the desired window in the same way usingthe letter underlined in the menu text.
Entry windowUsing the Tab key ( ), switch between the individualentry positions within the entry window and theexisting buttons (if the buttons are selected, they canbe activated using the Enter key (↵).Additional keyboard functions:
• Buttons can be activated using the ALT key and theunderlined letter (pressed simultaneously).
• Enter (↵) is used to accept the window contents andclose the window (not in Online and Info windows).
• In those entry fields, which are displayed as selectionwindows, individual setting options are selected withthe arrow keys (↑,↓).
Window change in the case of several openwindowsIn addition to using the menu (Alt+f "Windownumber"), it is possible to switch to the next windowusing Ctrl+F6.
Setting the scanning rate for status values(menu "Online: Status" in the Parameter-Editor)Select bars with the Tab key ( ) and adjust with thearrow keys (↑,↓).Fast adjusting with "Figure ↑" and "Figure ↓"."Pos1" and "End" can be used to approach the small-est and largest values.
Cancelling functionsUse the Esc key to cancel functions such as Upload,Download, Save.
2.6.4 Transfer parameter in pro-gram start
Program start settings can be selected by enteringspecial data in the command line (this can be found inthe properties of the program icon).
Select languageCommand line: "...\srvman.exe /Sdeutsch"
Call up projectCommand line: "...\srvman.exe /PProjectdirectory"Ex.: "...\srvman.exe /PC:\srvtools\verpack"
Print theparameters ofthe current axis.
Save theparameters ofthe current axis.
Open an axis.
Call up terminalprogram.
Axis name of thecurrent axis
Project name.
Last date ofsaving the axisparameters.
PC interfacesset.
COMPAXvariants of thecurrent axis
Area for entryand informationwindows.Return to
ServoManager
Switch toProgramEditor.

3.ServoManager menuss COMPAX-M / S
12
3. ServoManager menuss
3.1 Project
Project management. All functions that concern the whole project are listed under this menu point.To start you must�either create a new project or�open an existing project.
Note! Only one project at a time can be opened.
3.1.1 Project: New
Create a new project. The project name andcomments are requested here.
3.1.2 Project: Open
In this window, the disk drive, directory and file nameare selected.
3.1.3 Project: Close
Closes the current opened project. If you have carriedout changes and these are not yet saved, a request foryou to state which axes are to be saved appears.In principle, all changed axes are selected.
3.1.4 Project: Delete
Deletes a saved project; the current opened projectcannot be deleted.
3.1.5 Project: Save
Saves the current opened project. If you have carriedout changes and these are not yet saved, a request foryou to state which axes are to be saved appears.In principle, all changed axes are selected.
3.1.6 Project: Save as
Saves the current opened project under a new name.
3.1.7 Project: Project Info
Each project can be assigned a symbolic name(maximum 16 characters) and a comment (maximum32 000 characters).
3.1.8 Project: Print
Prints the axis data.
The printout header contains the file name, commentsand the data from the status line.The parameters are printed with the number, value,description and any value meanings.

3.2 Axis
13
3.1.9 Project: List of previouslyselected projects
The last 4 projects can be called up directly from here.
3.1.10 Project: Quit
Closes the program and the current opened project. Ifyou have carried out changes and these are not yetsaved, a request for you to state which axes are to besaved appears.In principle, all changed axes are selected.
3.2 Axis
Once a project is opened, the main axis data of thecurrent axis can be entered or changed (the currentaxis is highlighted in the window "Axes").
3.2.1 Axis: Insert
There are 3 methods of entering an axis:
1. New.A new axis is entered into the project.The menu points "Axis Info" and "Control-ler/Options"are called up.
2. From the controller.A request is made regarding which data should beloaded.A new axis with the axis data (parameters, programand cam data, if available) of the connectedCOMPAX is entered into the project.The PC interface must first be pre-set (see below).NoteIf parameters alone are to be loaded from theCOMPAX, this can be done in the ParameterEditorusing the menu "Online: Upload".
3. From the project.A new axis with the axis data of another project isentered into the project.
3.2.2 Axis: Delete
Deletes the current axis.This change is only implemented during the next pro-ject save.
3.2.3 Axis: Axis-Info
Enter the axis name and an axis comment.
3.2.4 Axis: Controller/Options
Requests the precise COMPAX type and the optionsincluded.Entry window:
3.2.5 Axis: PC interface
Setting the PC interface to which the current axis isconnected.This PC interface is then linked to the specific axis.Entry window:

3.ServoManager menuss COMPAX-M / S
14
3.3 Online
Direct communication with the connected axis.The commands, parameters and status values that areavailable depend on the actual device variants and theexisting options.
Note regarding Upload / DownloadIf there are differences in the controller type, the ver-sion, the device variants or the options, an Upload /Download procedure is interrupted.
3.3.1 Online: Terminal
This enables a terminal mode, similar to other terminalprograms. The functions of the four menu pointsCommand, Parameter, Program and Status can beused. However, no information is provided regardingthe meaning of the parameters or status values.The terminal is used for rapid viewing and editing.
Any modifications to parameters undertaken here areindependent of the current opened axis and are notsaved in the PC.
3.3.2 Online: Upload from control-ler.
The selected axis data (parameters, program and, ifpresent, cam data) are uploaded from the device. Asafety question is asked if data that is not saved wouldbe overwritten.
3.3.3 Online: Download to control-ler.
The selected axis data (parameters, program and, ifpresent, cam data) of the current axis are downloadedto the device.Finally, the parameters are set to valid with VC andVP.
3.4 Servo Tools
3.4.1 Servo Tools: ParameterEditor
Calling up the ParameterEditor.The first call up also opens the current axis.If the ParameterEditor is already open, then the set-tings are kept, i. e. the current axes of both programsare independent of each other.
3.4.2 Servo Tools: CamEditor
Calling up the CamEditor; if present.
3.4.3 Servo Tools: ProgramEditor
Calling up the ProgramEditor.
3.4.4 Servo Tools: Dial ogue lan-guage
A choice can be made between German, English andFrench (other languages on request). The languageselection is made as follows:
�Permanent dialogue language.The selected language is saved. At the next programstart, the program will automatically be shown with thislanguage.�Temporary dialogue language.In the temporary setting, the selected language is onlyused during the current program work and is notsaved.Entry window:
4.1 Axis
15
4. ParameterEditor menus
4.1 Axis
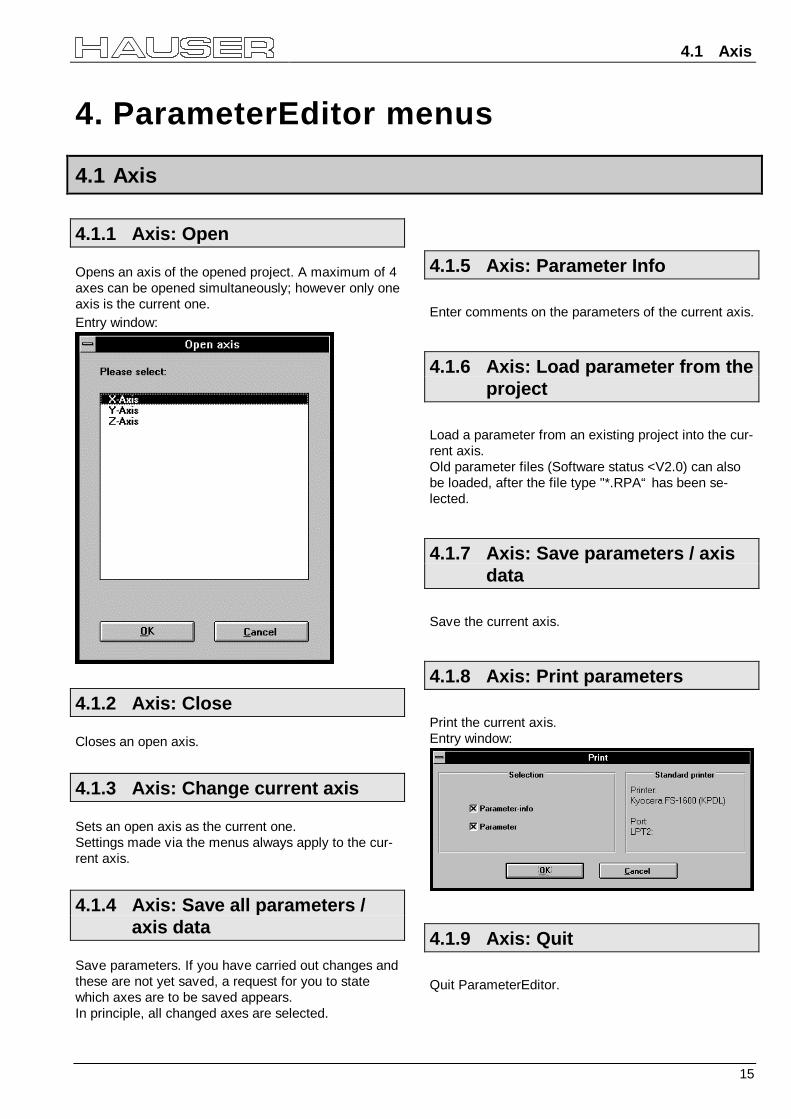
4.1.1 Axis: Open
Opens an axis of the opened project. A maximum of 4axes can be opened simultaneously; however only oneaxis is the current one.Entry window:
4.1.2 Axis: Close
Closes an open axis.
4.1.3 Axis: Change current axis
Sets an open axis as the current one.Settings made via the menus always apply to the cur-rent axis.
4.1.4 Axis: Save all parameters /axis data
Save parameters. If you have carried out changes andthese are not yet saved, a request for you to statewhich axes are to be saved appears.In principle, all changed axes are selected.
4.1.5 Axis: Parameter Info
Enter comments on the parameters of the current axis.
4.1.6 Axis: Load parameter from theproject
Load a parameter from an existing project into the cur-rent axis.Old parameter files (Software status <V2.0) can alsobe loaded, after the file type "*.RPA“ has been se-lected.
4.1.7 Axis: Save parameters / axisdata
Save the current axis.
4.1.8 Axis: Print parameters
Print the current axis.Entry window:
4.1.9 Axis: Quit
Quit ParameterEditor.

4.ParameterEditor menus COMPAX-M / S
16
4.2 Configuration
The configuration parameters can be�entered via guided menus or� logically linked configuration parameters via
individual menus.The first configuration of an axis must always be proc-essed in a guided manner so that all important settingsare made.
4.2.1 Guided configuration
Depending on the device variant and the availability ofoptions (e.g. encoder input or encoder simulation), theuser is guided through all relevant parameter windows.With a new axis, only guided configuration is possible.
4.2.2 Motor
A selection must be made from:�HBMR motor,�HDX motor,�HDSM motor or�a client motor; i.e. a motor supplied by the user.A selection must then be made from:
• the existing standard motors (HBMR, HDX andHDSM motors), or
• the list of existing client motors.This list can be expanded by using "Add". This callsup the window for entering the motor parameters.Note:If a similar motor was selected previously, then themotor parameters are pre-set with that data.
Entry window:
Entry window for HDX motor list:

4.2 Configuration
17
4.2.3 Drive type
Following the selection of the drive type (selection isbased on the drive types available for the selectedCOMPAX variant), parameters must be entered ac-cording to the configuration and device variants.Entry window:
Entry window for spindle:
Entry window for rack and pinion/timing belt:
Entry window for universal drive:
4.2.4 Reference system / Initiators
Data is entered here concerning
• the sense of direction� the machine datum mode,� the limit switch mode with the position of the limit
switch,� the machine datum direction and� the software end limits.� If present: activate the option "Absolute value sensor
input".Entry window:

4.ParameterEditor menus COMPAX-M / S
18
The possible machine datum modes are device de-pendent (COMPAX software variants).
4.2.5 Encoder input
Configuration of the encoder inputs:
4.2.6 Encoder simulation
Defining the resolution of the encoder simulation.
4.3 Parameters
19
4.3 Parameters
The device parameters can be:�entered via guided menus or
or� logically linked parameters entered via individual
menus.
NoteAll parameter menus that have already been pro-cessed are indicated by a check mark (√).
4.3.1 Guided parametrization
Guided parameter entry; dependent on the devicevariants and the options used, all parameters in thismenu point (except the configuration parameters ofthe menu "Configuration") are called up.
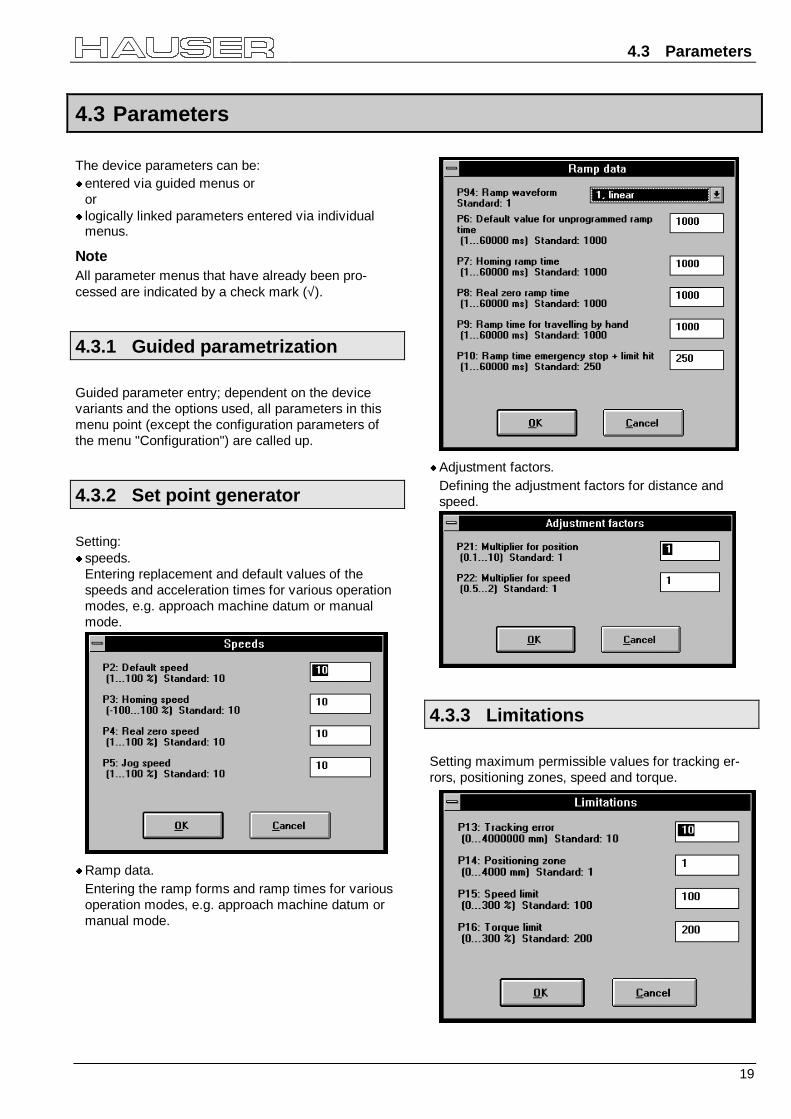
4.3.2 Set point generator
Setting:�speeds.
Entering replacement and default values of thespeeds and acceleration times for various operationmodes, e.g. approach machine datum or manualmode.
�Ramp data.Entering the ramp forms and ramp times for variousoperation modes, e.g. approach machine datum ormanual mode.
�Adjustment factors.Defining the adjustment factors for distance andspeed.
4.3.3 Limitations
Setting maximum permissible values for tracking er-rors, positioning zones, speed and torque.
4.ParameterEditor menus COMPAX-M / S
20
4.3.4 COMPAX interfaces
Setting paramters for built-in interfaces such as:�PLC data interface;� Input "Fast start"�RS232;
and, if present:�RS485; (Option F1/F5)�Profibus (Option F3)�CAN - Bus (Option F4)�HEDA (Option A1)...
4.3.5 Application parameters
Depending on the device variants, special parametersare entered here (e.g. label reference parameters).
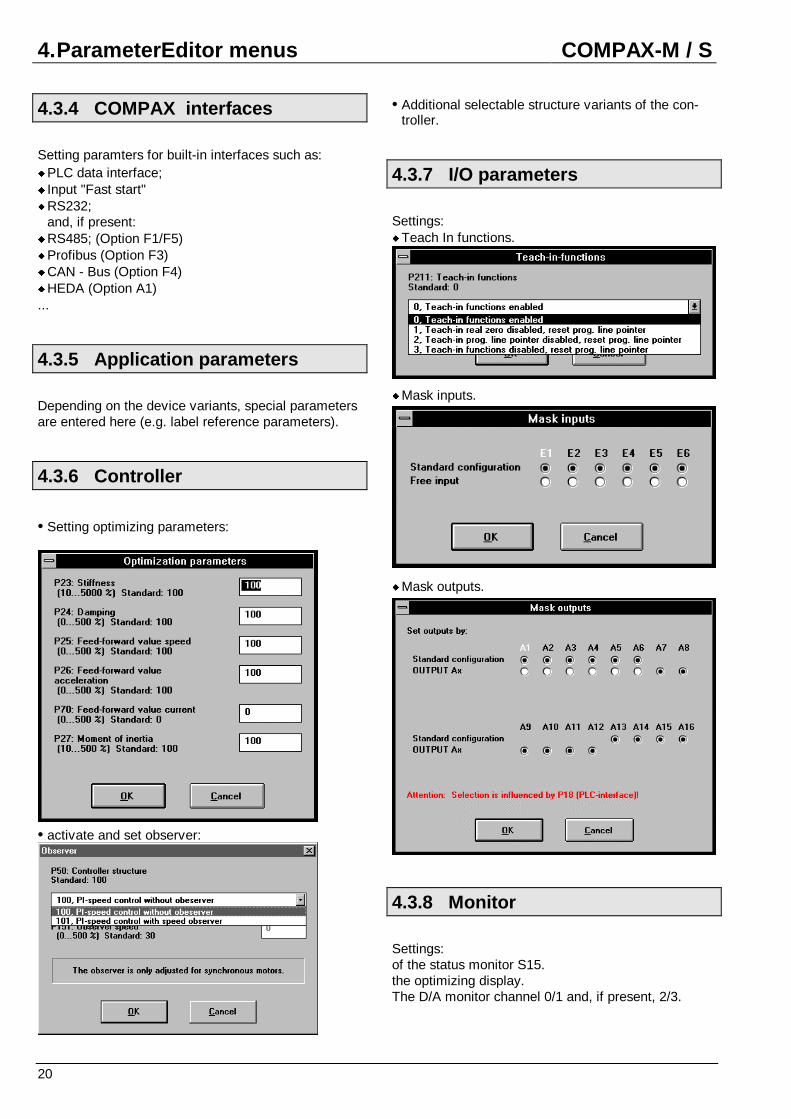
4.3.6 Controller
• Setting optimizing parameters:
• activate and set observer:
• Additional selectable structure variants of the con-troller.
4.3.7 I/O parameters
Settings:�Teach In functions.
�Mask inputs.
�Mask outputs.
4.3.8 Monitor
Settings:of the status monitor S15.the optimizing display.The D/A monitor channel 0/1 and, if present, 2/3.
4.3 Parameters
21
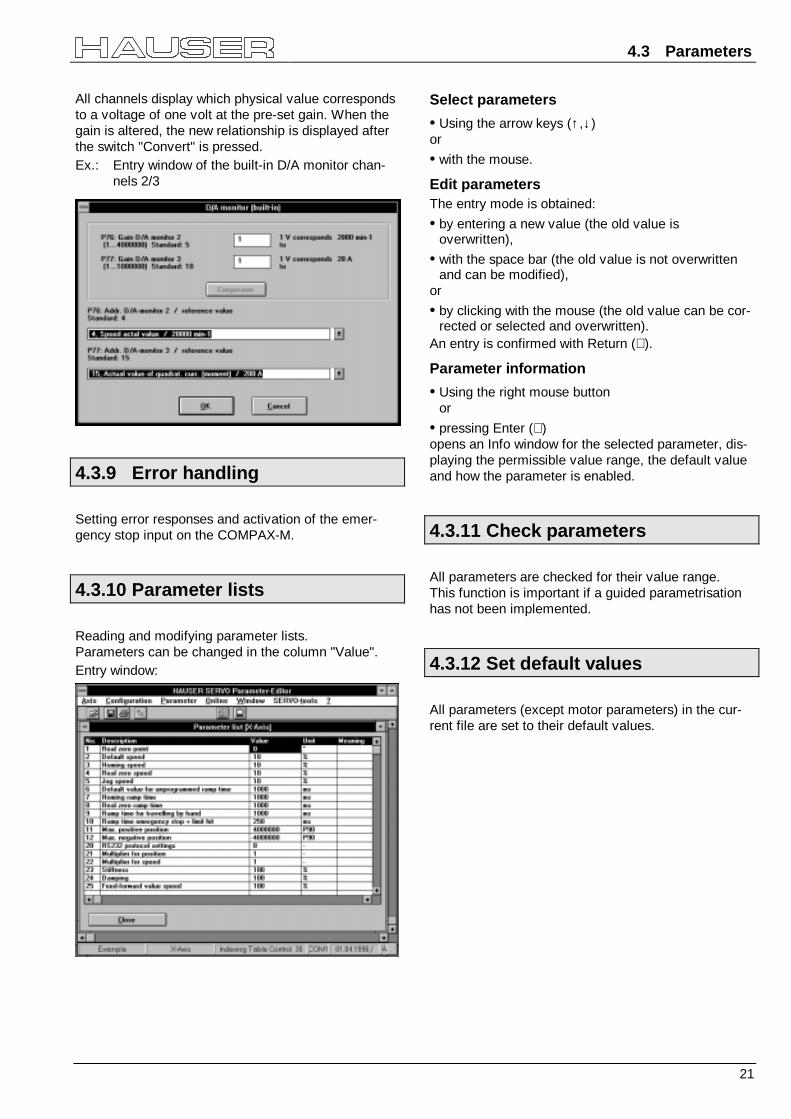
All channels display which physical value correspondsto a voltage of one volt at the pre-set gain. When thegain is altered, the new relationship is displayed afterthe switch "Convert" is pressed.Ex.: Entry window of the built-in D/A monitor chan-
nels 2/3
4.3.9 Error handling
Setting error responses and activation of the emer-gency stop input on the COMPAX-M.
4.3.10 Parameter lists
Reading and modifying parameter lists.Parameters can be changed in the column "Value".Entry window:
Select parameters
• Using the arrow keys (↑,↓)or
• with the mouse.
Edit parametersThe entry mode is obtained:
• by entering a new value (the old value isoverwritten),
• with the space bar (the old value is not overwrittenand can be modified),
or
• by clicking with the mouse (the old value can be cor-rected or selected and overwritten).
An entry is confirmed with Return (↵).
Parameter information
• Using the right mouse buttonor
• pressing Enter (↵)opens an Info window for the selected parameter, dis-playing the permissible value range, the default valueand how the parameter is enabled.
4.3.11 Check parameters
All parameters are checked for their value range.This function is important if a guided parametrisationhas not been implemented.
4.3.12 Set default values
All parameters (except motor parameters) in the cur-rent file are set to their default values.
4.ParameterEditor menus COMPAX-M / S
22
4.4 Online
Direct communication with the connected controller.The commands, parameters and status values that areavailable depend on the actual device variants and theexisting options.To avoid "Download" into an incorrect axis, the axis se-rial number is checked.
Note regarding Upload / DownloadIf there are differences in the controller type, theversion or the options, the data is corrected in theproject.If there are different variants, the process isinterrupted.
4.4.1 Terminal
Calling up the terminal program
4.4.2 Command
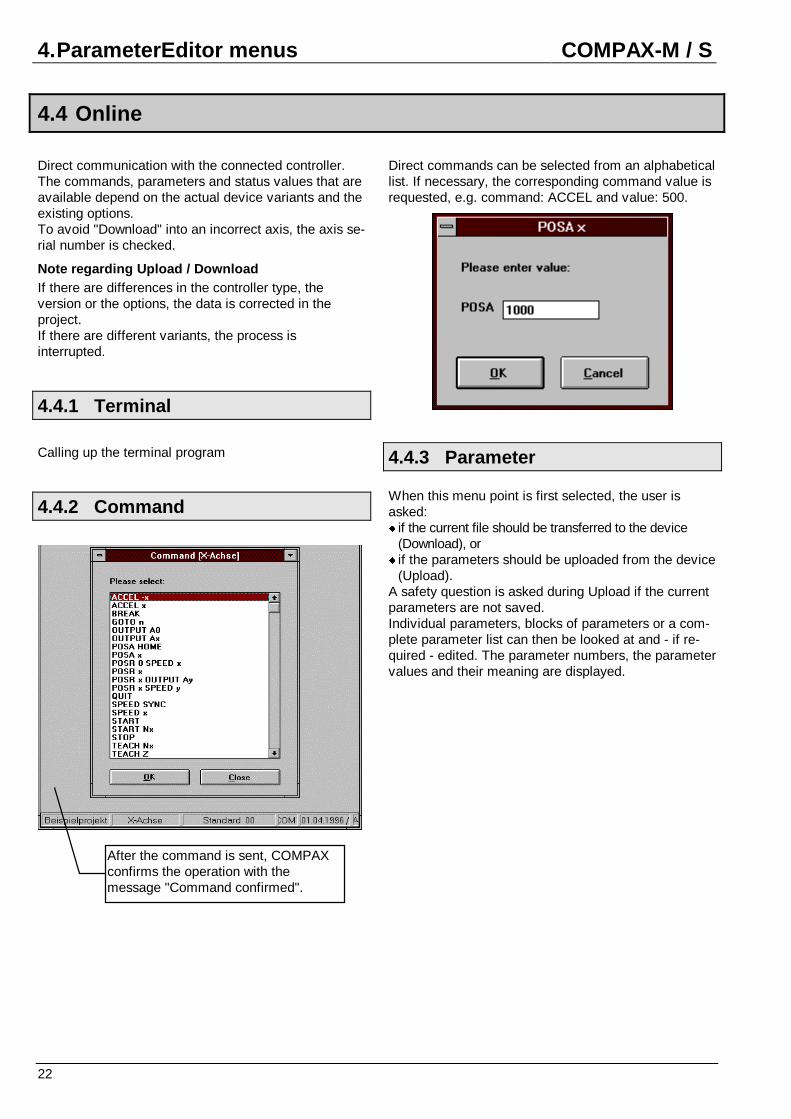
Direct commands can be selected from an alphabeticallist. If necessary, the corresponding command value isrequested, e.g. command: ACCEL and value: 500.
4.4.3 Parameter
When this menu point is first selected, the user isasked:� if the current file should be transferred to the device
(Download), or� if the parameters should be uploaded from the device
(Upload).A safety question is asked during Upload if the currentparameters are not saved.Individual parameters, blocks of parameters or a com-plete parameter list can then be looked at and - if re-quired - edited. The parameter numbers, the parametervalues and their meaning are displayed.
After the command is sent, COMPAXconfirms the operation with themessage "Command confirmed".
4.4 Online
23
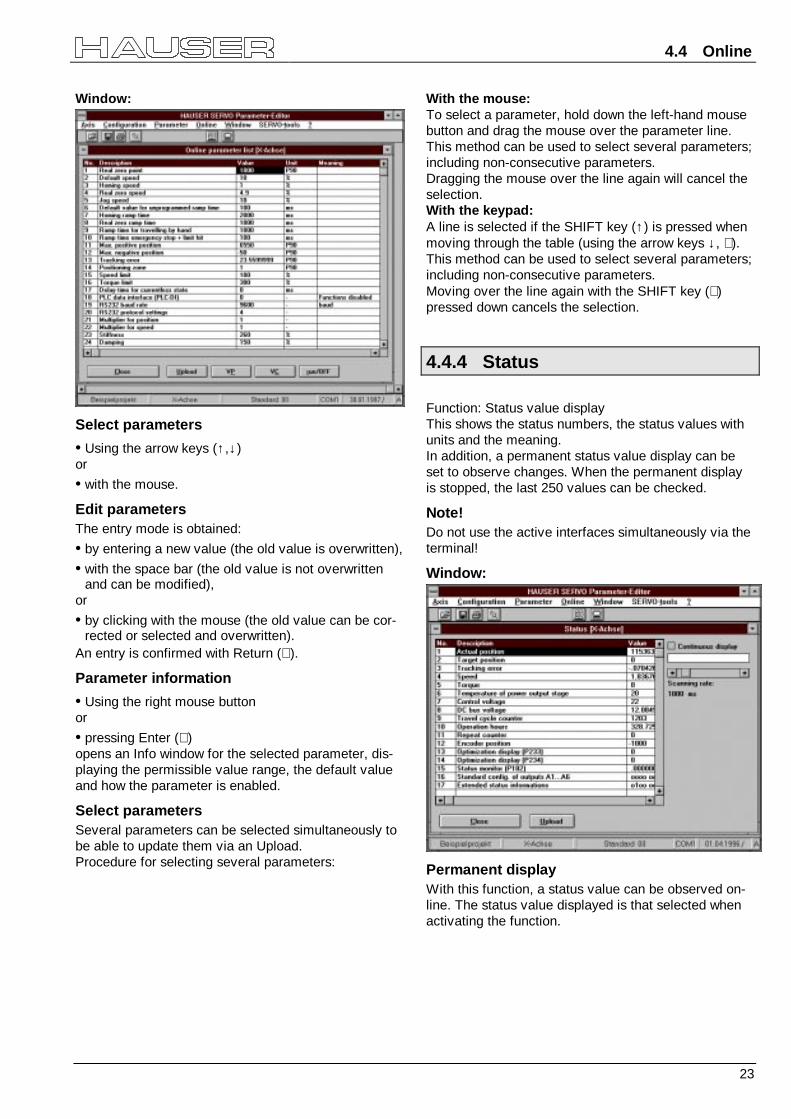
Window:
Select parameters
• Using the arrow keys (↑,↓)or
• with the mouse.
Edit parametersThe entry mode is obtained:
• by entering a new value (the old value is overwritten),
• with the space bar (the old value is not overwrittenand can be modified),
or
• by clicking with the mouse (the old value can be cor-rected or selected and overwritten).
An entry is confirmed with Return (↵).
Parameter information
• Using the right mouse buttonor
• pressing Enter (↵)opens an Info window for the selected parameter, dis-playing the permissible value range, the default valueand how the parameter is enabled.
Select parametersSeveral parameters can be selected simultaneously tobe able to update them via an Upload.Procedure for selecting several parameters:
With the mouse:To select a parameter, hold down the left-hand mousebutton and drag the mouse over the parameter line.This method can be used to select several parameters;including non-consecutive parameters.Dragging the mouse over the line again will cancel theselection.With the keypad:A line is selected if the SHIFT key (↑) is pressed whenmoving through the table (using the arrow keys ↓, ⇑).This method can be used to select several parameters;including non-consecutive parameters.Moving over the line again with the SHIFT key (⇑)pressed down cancels the selection.
4.4.4 Status
Function: Status value displayThis shows the status numbers, the status values withunits and the meaning.In addition, a permanent status value display can beset to observe changes. When the permanent displayis stopped, the last 250 values can be checked.
Note!Do not use the active interfaces simultaneously via theterminal!
Window:
Permanent displayWith this function, a status value can be observed on-line. The status value displayed is that selected whenactivating the function.

4.ParameterEditor menus COMPAX-M / S
24
Before activating the permanent display, the actualisa-tion time can be set (scanning rate).Note!Do not use the active interfaces simultaneously via theterminal!The permanent display loads the interface to the con-troller, therefore additional online functions are re-stricted.Meaning: The scanning rate decreases as the interfaceis increasingly loaded.
Selecting statusSeveral statuses can be selected simultaneously to beable to update them via an Upload.Procedure for selecting several statuses:With the mouse:To select a status, hold down the left-hand mouse but-ton and drag the mouse over the status line. Thismethod can be used to select several statuses; includ-ing non-consecutive status.Dragging the mouse over the line again will cancel theselection.With the keypad:A line is selected if the SHIFT key (↑) is pressed whenmoving through the table (using the arrow keys ↓, ⇑).This method can be used to select several statuses; in-cluding non-consecutive status.Moving over the line again with the SHIFT key (⇑)pressed down cancels the selection.
4.4.5 Upload
The complete parameter list is uploaded from the de-vice. A safety question is asked if parameters that arenot saved would be overwritten.If there are differences in the controller type, theversion or the options, the data is corrected in theproject.If there are different variants, the process isinterrupted.
4.4.6 Download
The entered parameter list (current file) is loaded intothe device.Finally, the parameters are set to valid with VC andVP.If there are differences in the controller type, theversion or the options, the data is corrected in theproject.If there are different variants, the process isinterrupted.
4.4.7 Duplicate
Function:Download with additional transfer of internalsystem parameters.The system parameters are loaded into thePC with Upload: they are not reloaded intothe connected COMPAX with Download. Thisprevents the system settings from beingoverwritten.
Application: If a device fails, Duplicate can be used totransfer the complete settings (parametersand system settings) into a replacementdevice.
Use the menu "Download" for normal transfers,otherwise there is a danger that internal systemsettings are overwritten.
4.4.8 Compare
Compares the parameter values in the Editor - and there-fore in the current opened file - with the parameters inCOMPAX.Result:Deviating parameters are listed in a window with thecorresponding settings. A message indicates if the pa-rameter sets agree.
4.4.9 Errors
Error tracingIn the normal ParameterEditor mode, errors are onlyindicated during activities via the interface.During active error tracing, any sporadically occuringerror is recorded with the time of appearance. Thismeans that the interface is permanently occupied; theother functions of the ParameterEditor are no longeravailable.The errors can be called up via the error history.With the function "Error tracing", the COMPAX can bemonitored in operation over a long period.
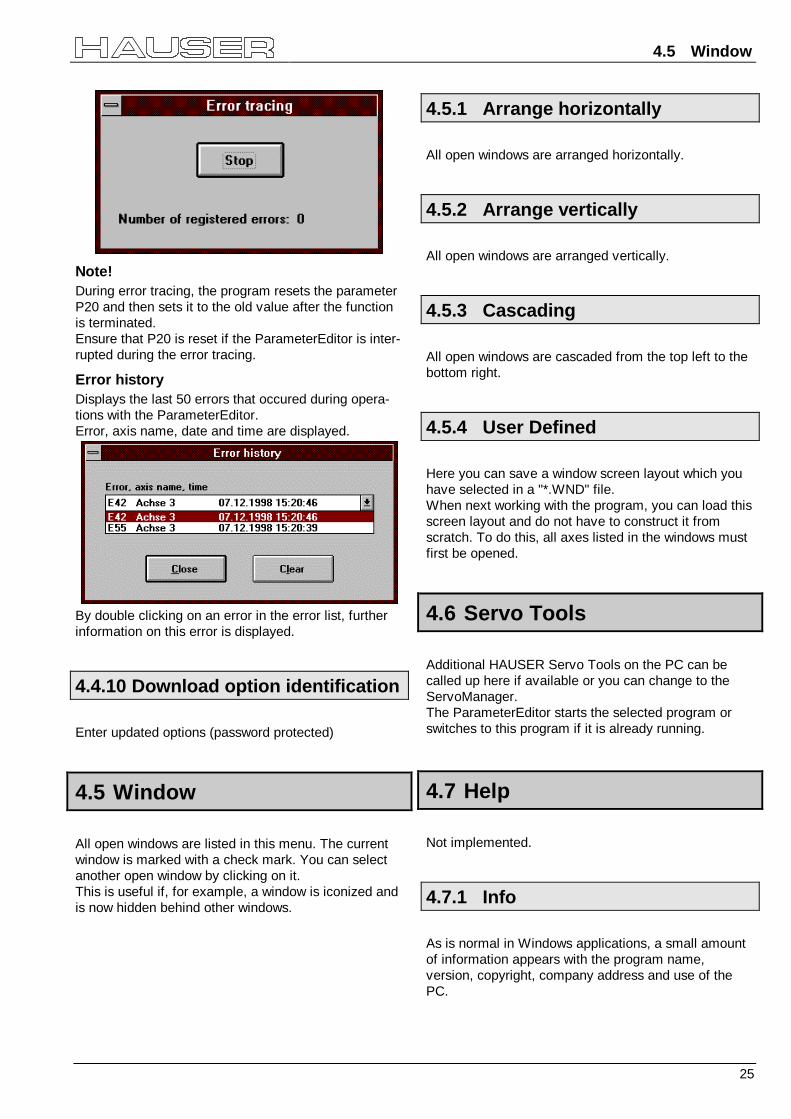
4.5 Window
25
Note!During error tracing, the program resets the parameterP20 and then sets it to the old value after the functionis terminated.Ensure that P20 is reset if the ParameterEditor is inter-rupted during the error tracing.
Error historyDisplays the last 50 errors that occured during opera-tions with the ParameterEditor.Error, axis name, date and time are displayed.
By double clicking on an error in the error list, furtherinformation on this error is displayed.
4.4.10 Download option identification
Enter updated options (password protected)
4.5 Window
All open windows are listed in this menu. The currentwindow is marked with a check mark. You can selectanother open window by clicking on it.This is useful if, for example, a window is iconized andis now hidden behind other windows.
4.5.1 Arrange horizontally
All open windows are arranged horizontally.
4.5.2 Arrange vertically
All open windows are arranged vertically.
4.5.3 Cascading
All open windows are cascaded from the top left to thebottom right.
4.5.4 User Defined
Here you can save a window screen layout which youhave selected in a "*.WND" file.When next working with the program, you can load thisscreen layout and do not have to construct it fromscratch. To do this, all axes listed in the windows mustfirst be opened.
4.6 Servo Tools
Additional HAUSER Servo Tools on the PC can becalled up here if available or you can change to theServoManager.The ParameterEditor starts the selected program orswitches to this program if it is already running.
4.7 Help
Not implemented.
4.7.1 Info
As is normal in Windows applications, a small amountof information appears with the program name,version, copyright, company address and use of thePC.
5.Terminal COMPAX-M / S
26
5. TerminalThis enables a terminal mode, similar to other terminalprograms. The functions of the four menu pointsCommand, Parameter, Program and Status can beused. However, no information is provided regardingthe meaning of the parameters or status values.The program "Terminal" is used for fast viewing and edi-ting of COMPAX data.
For easy use, commands can be entered via the 8 but-tons. The buttons can be assigned as required; each but-ton can be assigned up to 255 commands. Various buttonbars (up to 10) can be defined and selected.Any modifications to parameters undertaken here areindependent of the current opened axis and are there-fore not saved (in the ServoManager or Parame-terEditor).However, the COMPAX settings can be loaded in anaxis during an Upload and then saved.
5.1 Window content of the Terminal program
5.1.1 Keyboard operations
Activating menusThe "ALT" key and the underlined letter in the requiredmenu point is used to open the relevant menu (e.g."ALT" and "I" opens the menu Interface selection).Each submenu can also be selected by means of theappropriate underlined letter.
Activating buttonsThe "ALT" key and the required button number isused to send the linked command to COMPAX.The Tab key can be used to switch between the but-tons, the display window and the editing line.
Note!Do not operate the ServoTerminal and ServoManager via the same interface.I.e. do not work with the ServoTerminal via an interface, if this interface is currently in use for, e.g. a Download ora status permanent display.
• Setting theinterface.
• Close interface.• Exit programme
Selecting or definingbutton bars. Program Info
Pre-set interface.
Previously sentcommands andCOMPAX replies.
Editing line; toenter com-mands.
Button bars.Reduces need fortyping incommands.Various button bars
b d fi d
Screen scroll bar.Scroll back throughpreviously sentcommands andCOMPAX replies.
Message whenCOMPAX does notrespond after 5s.
Setting acousticsignals.

5.2 COMPAX commands via the Terminal
27
5.2 COMPAX commands via the Terminal
Function range:
• All COMPAX commands,
• changing parameters,
• status interrogattions or
• entering programs in the program memory.The precise structure of the individual functions andcommands can be found in the Chapter "Operationsvia the serial interface" in the User Guide.
5.3 Definition of button bars
5.3.1 Window structure of the ButtonEditor
Defining a button
• Select button.• Select entry field• Enter button designation.• Accept with "Change".• Switch to the command entry field.• Enter the command.• Accept with "Insert".
The same procedure applies for changing a button.
Keyboard operationsAll buttons can be activated with the ALT key and therelevant underlined letter.Use the Tab key to switch between the following entrypoints:
• The entry/ selection line of the button group to• select a group with the arrow keys (↑, ↓) or
• enter a new name.
• The entry line for the button designation,the line can now be:• processed or• the required button can be selected using the key
"ESC" and subsequently the arrow keys.
• The entry line for the command,the line can now be:• processed or• an existing command can be selected using the key
"ESC" and subsequently the arrow keys.
• The button "Save file" (the button is activated withEnter (↵) ).
• The button "Quit" (the button is activated with Enter (↵)).
Selecting thebutton group.Inserting names.
Delete theselected buttongroup.
Acceptance of achanged name.
Create a newbutton group.
Opens the groupwindow to select anexisting group.
Entry line for thebutton designation,
Current buttondesignations.Selecting a buttonto change thedesignation andthe linkedcommand.
Commands whichshould be sent toCOMPAX with theselected button.
Delete selecteddesignation andlinked command.
Accept changeddesignation.
Delete selectedcommand.
Insert command in theentry field into thecommand list.
Entry field forcommands.
Replace selectedcommand with thecontents of the entryfield.
Save inserted /changed groups.
Close window.If not saved, any changes only apply to the currentoperation and are lost when the program is terminated.
6.ProgramEditor COMPAX-M / S
28
6. ProgramEditor
6.1 Compatibility
6.1.1 Old DOS block editor programs
Programs which you have created using the DOS block editor can be loaded into the ProgramEditor as follows:Load the program into COMPAX using the DOS block editor.Starting the ServoManager.
• Applying a new project or opening an existing project.
• Activate the desired axis or insert an axis: new (manual) or by controller.
To insert an axis from the contr oller
• After "Insert: Axis: from controller" (program activated), in addition to the parameters the program in which thecurrent axes are loaded in the ServoManager are also loaded.
To insert a new axis or to overwrite an exist ing axis
• In the case of a new axis or an axis which already exists in the project: Start ProgramEditor.• Using Upload, load the COMPAX - program into the ProgramEditor.

29
6.2 ProgramEditor desktop
6.2.1 Menu overview of the ProgramEditor
Axis Edit Defining Online Window Servo T ools ?Axis management.Exit programme
OpenSelect and load an axis (up to 4 axes can beopened).
CloseClose selected axis.
Change current axisChange between open axes.
Save all programsSave changed programs. The opened axescan be selected individually for saving.
Program InfoEnter comments on the program.
Load program from the projectLoad axis program from another project.
Save programSave the program of the current axis.
Print programPrint the program of the current axis.
Quit Ctrl+QQuit tool.
Work with the clipboard.
Syntax check
CutDelete and accept themarked program lines ontothe clipboard.
CopyAccept the marked programlines onto the clipboard.
InsertInsert clipboard at cursorposition.
Delete areaDelete the marked programlines.
Search for errorsSyntax check of the currentprogram.
Define variables andactivate / deactivate listwindow.
VariablesDefine COMPAX - vari-ables P40...P49 andV1...V39.
Display listsList windows with theregisters:
• Variables, parameters• labels,• commands.display or hide.
Transfer of data and com-mands to COMPAX.
TerminalCalling up the Terminalprogram
Upload (from con-troller)Load the program of theconnected COMPAX into thePC.
Download (to con-troller)Load current program intoCOMPAX.
Select and arrange the openwindows.
Arrange horizontallyArrange open windows hori-zontally.
Arrange verticallyArrange open windows verti-cally.
CascadeArrange open windows offsetbehind one another.
User DefinedLoad a window setting or savethe current window setting.
...
Select an open window.
Switch to additionalexisting HAUSERServo Tools
ServoManagerReturn to ServoManager
ParameterEditorChange to Parame-terEditor
CamEditorChange to CamEditor(only if installed)
InfoShortprogram in-formation.
6.ProgramEditor COMPAX-M / S
30
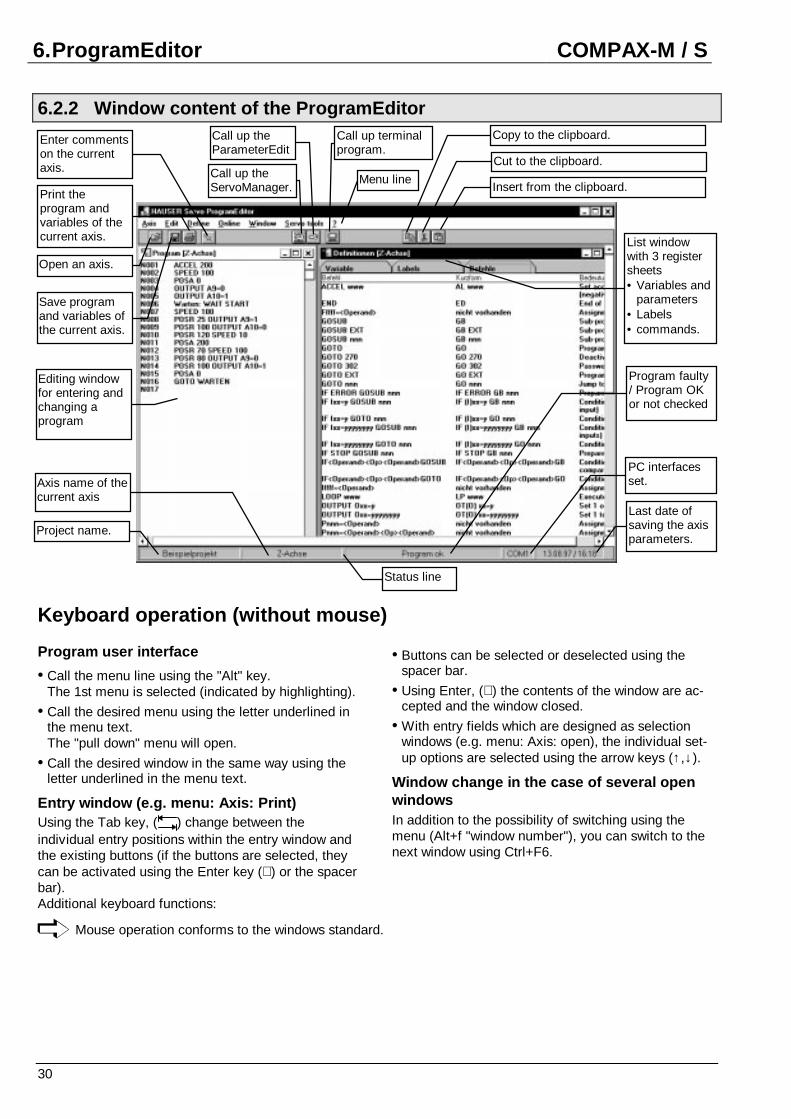
6.2.2 Window content of the ProgramEditor
Keyboard operation (without mouse)
Program user interface
• Call the menu line using the "Alt" key.The 1st menu is selected (indicated by highlighting).
• Call the desired menu using the letter underlined inthe menu text.The "pull down" menu will open.
• Call the desired window in the same way using theletter underlined in the menu text.
Entry window (e.g. menu: Axis: Print)Using the Tab key, ( ) change between theindividual entry positions within the entry window andthe existing buttons (if the buttons are selected, theycan be activated using the Enter key (↵) or the spacerbar).Additional keyboard functions:
• Buttons can be selected or deselected using thespacer bar.
• Using Enter, (↵) the contents of the window are ac-cepted and the window closed.
• With entry fields which are designed as selectionwindows (e.g. menu: Axis: open), the individual set-up options are selected using the arrow keys (↑,↓).
Window change in the case of several openwindowsIn addition to the possibility of switching using themenu (Alt+f "window number"), you can switch to thenext window using Ctrl+F6.
Mouse operation conforms to the windows standard.
Menu linePrint theprogram andvariables of thecurrent axis.
Save programand variables ofthe current axis.
Open an axis.
Call up terminalprogram.
Axis name of thecurrent axis
Project name.
Last date ofsaving the axisparameters.
PC interfacesset.
Program faulty/ Program OKor not checked
List windowwith 3 registersheets• Variables and
parameters• Labels• commands.
Editing windowfor entering andchanging aprogram
Enter commentson the currentaxis. Call up the
ServoManager. Insert from the clipboard.
Cut to the clipboard.
Copy to the clipboard.
Status line
Call up theParameterEdit

6.2 ProgramEditor desktop
31
6.2.3 Window content of the editing window "Program"
Editing rules in the program• The program window is always in insert mode.
• Even marked parts are not overwritten.
• Marked parts can be deleted (using the "Delete"key).
• Using Return, (↵) a new program line is applied.
• To move within the program, use the arrow keys (←,↑,→, ↓).
• Program lines can be copied or moved using theclipboard (see Chapter "7.2 Edit", Page 33).
• Comments are identified by a initial semi-colon ";",where the following applies:• Comments can be entered after the command or• can be on their own on a line.• Comments can be set at the desired position within
the line using tabs.
• A syntax check is carried out• with Return (↵) and• when leaving the line using an arrow key (↑, ↓).• The syntax check result is immediately displayed in
the status line (3rd field from the left).The following applies: Errors in the program:
Message: Faulty programNo errors in program:Message: Program OKor "not checked".
• Using the menu: "Edit: Search for errors", a syntaxcheck of the whole program is carried out and, incase of errors, an error list with corresponding linenumbers is displayed.
• The maximum line number is 250.
Label conditions
• Maximum of 16 characters.
• They are always placed at the start of the line (a sub-sequent command is allowed but not necessary).
• Indicated by a subsequent colon (":"); e.g. "Label1:"
• No differentiation made between upper and lowercase letters.
• The first character must be a letter, excluding um-lauts (ä,ö,ü) and ß.
• Characters allowed: Letters (except those with um-lauts and ß), underscore "_", numbers.
• The line numbers can also be jump labels; the fol-lowing applies:• On inserting or deleting lines, the jump destinations
are automatically corrected.
• When the jump destination line is deleted, all jumplabels displayed on the deleted lines are convertedinto a label:e.g. N012 becomes @N012.This label must then be manually adapted: by de-fining a new label or by correcting the destinationline.
Comments;starting with ";"
7.ProgramEditor menus COMPAX-M / S
32
7. ProgramEditor menus
7.1 Axis
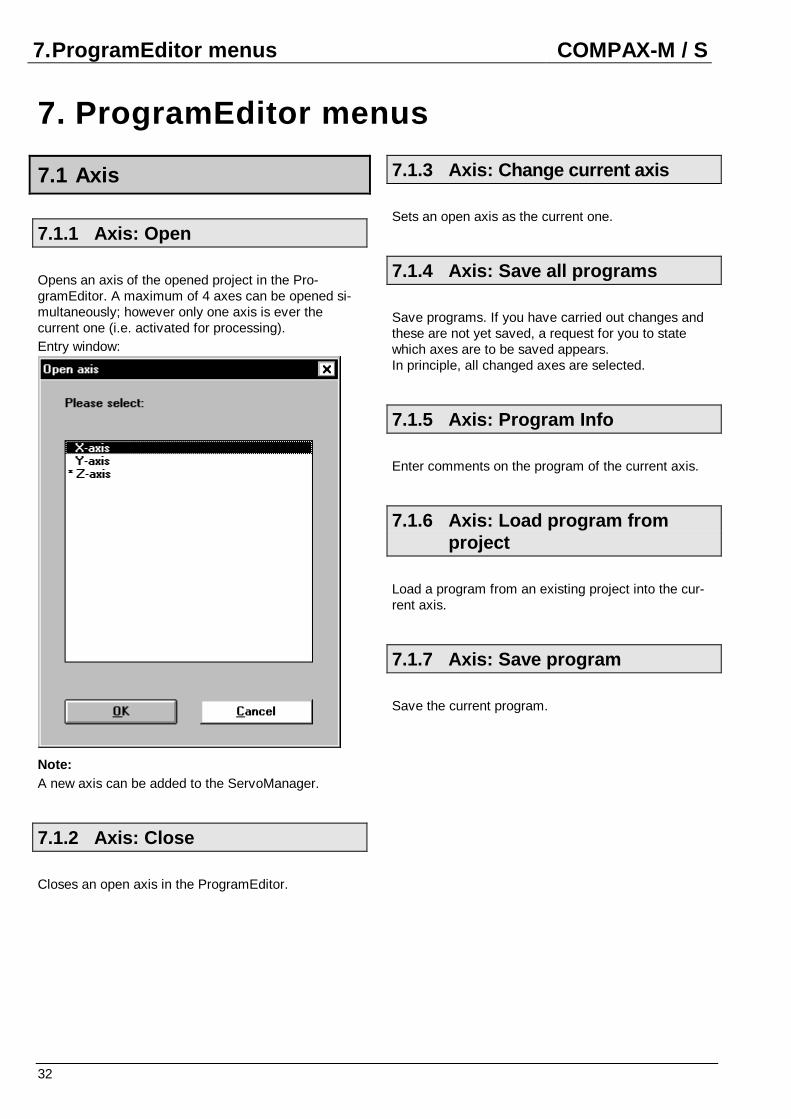
7.1.1 Axis: Open
Opens an axis of the opened project in the Pro-gramEditor. A maximum of 4 axes can be opened si-multaneously; however only one axis is ever thecurrent one (i.e. activated for processing).Entry window:
Note:A new axis can be added to the ServoManager.
7.1.2 Axis: Close
Closes an open axis in the ProgramEditor.
7.1.3 Axis: Change current axis
Sets an open axis as the current one.
7.1.4 Axis: Save all programs
Save programs. If you have carried out changes andthese are not yet saved, a request for you to statewhich axes are to be saved appears.In principle, all changed axes are selected.
7.1.5 Axis: Program Info
Enter comments on the program of the current axis.
7.1.6 Axis: Load program fromproject
Load a program from an existing project into the cur-rent axis.
7.1.7 Axis: Save program
Save the current program.

33
7.1.8 Axis: Print program
Prints the current program.Entry window:
Information which you do not want printed can be de-selected.
7.1.9 Axis: Quit
Close current axis.
7.2 Edit
7.2.1 Cut
The marked lines of the program are deleted and ac-cepted onto the clipboard and are available for inser-ting.
7.2.2 Copy
The marked lines of the program remain, are copiedonto the clipboard and are available for inserting.
7.2.3 Insert
The content of the clipboard is inserted into the pro-gram from the cursor position.
7.2.4 Delete
The marked lines of the program are deleted.
7.2.5 Search for errors
Syntax check of the current program.The ProgramEditor checks the syntax in the currentprogram with regard to:
• the software variant of the COMPAX axisi.e. are the existing commands possible in theCOMPAX variant1?
and
• the software version of the COMPAX axis.i.e. are the existing commands possible in theCOMPAX software version (software version set inthe current ProgramEditor axis)?
If errors are found, a window with an error list isopened.By double-clicking on a window, the cursor will jump tothe faulty line of the program.
1 COMPAX - variants are: COMPAX XX00, COMPAX XX30,
COMPAX XX50, COMPAX XX60, COMPAX XX70.

7.ProgramEditor menus COMPAX-M / S
34
7.3 Define
7.3.1 Variables
This menu point calls up the list window with the vari-able list.The following functions are available:1. Symbolic names for variables V1 to V39 and the
operating parameters P40 to P49 are allocated.Name allocation:• Maximum of 16 characters.• The first character must be a letter, excluding um-
lauts (ä,ö,ü) and ß.• Characters allowed: Letters (except those with um-
lauts and ß), underscore "_", numbers.• No differentiation made between upper and lower
case letters.
2. Comments for variables V1 to V39 and the operatingparameters P40 to P49 are allocated.Characters allowed• Maximum of 50 characters.• Any character
3. Pre-assign numerical values for variables V1 to V39and operating parameters P40 to P49.Format:• Maximum of 10 characters (incl. signs with "-", full-
stop, places in front of the comma, places after thecomma)
• Maximum of 7 places in front of the comma• Maximum of 7 places after the comma• Example: 1234567.89; -1.2345678• Range of values: -8388607.999 ... +8388608.999
Variable window
maximum 50characters for thecomments.
max. 16 characters for avariable name

7.4 Online
35
Editing rules in the variable list
Mouse operationMouse operation conforms to Windows standards.
Keyboard operation
• Use "Tab" to change between list selection (vari-ables, labels, commands) and the list selected (e.g.variable list).
List selection
• Using the arrow keys, (→, ←) a list (variables, labelsor commands) is selected.
Variable window
• The entry size is selected using arrow keys (←, ↑,→,↓).• The current content is overwritten with a new entry
(without spacer bar).• The entry size for editing is opened using the
spacer bar.• Using the arrow keys (→, ←) the entry position is
selected.• Entering generally occurs in entry mode (not
overwrite mode); marked parts are overwritten.
• Use the "Esc" key or the arrow keys to leave the fieldwithout making any changes.
• The entry / change is accepted using the "Return"key (↵); with an additional "Return" (↵), the entryposition changes to the next field.
7.3.2 Display lists
By clicking on the menu: "Define: Display lists", the listwindow will be displayed or removed.The list window contains the following register sheets:
• Variable (see above)
• labels,• Overview of the labels in the current program.• This list is updated after each syntax check.
• Commands.• Lists all COMPAX commands with the short form of
the command and a short explanation.An open window is identified by a check mark.If the window is open but not visible, you can selectthe desired window from all the open windows in the"Window" menu.
7.4 Online
Communication with the connected controller.
Which commands are possible in the program dependon the respective device variants and the status of thesoftware.A comparison of the file software status and softwarevariant (current axis in an open project) and the con-troller is carried out.
Different device variants of files and devices.(Example: curent axis in an open project = COMPAX4560S; connected COMPAX 4500S)
• In the case of different software variants, no Uploador Download is carried out.
• The software variants of the current axis must be tai-lored in advance in the ServoManager of the con-nected COMPAX.This means that additional tailoring may be neces-sary; e.g. changing the existing options, programcommands, parameter settings ...
Different software status of files and devices
Download
• In the case of a different software status, a syntaxcheck of the current program is carried out duringDownload.
• A check is made to see if the software status of theconnected COMPAX can process all the commands.
• In the case of errors, the corresponding commandsmust be changed or removed before a Download.
Upload
• Uploads can be carried out even if the softwarestatuses differ. However, note that the current axis isoverwritten during Upload.
7.4.1 Terminal
Calling up the terminal program
7.4.2 Upload (from controller)
The complete program is uploaded from the device. Asafety question is asked if a program which is notsaved (the current program) would be overwritten.Then you have the possibility of overwriting thecurrent program using "Axis: Save program", or toreject the loaded program.
NoteSaving the program of the connected COMPAX as anew axis:1. Create new axis in the ServoManager.2. Switch to ProgramEditor.3. Open new axis (under Open axis).
7.ProgramEditor menus COMPAX-M / S
36
4. Carry out an Upload.
7.4.3 Download (to the controller)
The current program is loaded into the device.Make sure that the version currently in the window istransferred to COMPAX and not the saved program ofthe current axis, i.e. even program changes whichhave not yet been saved are transferred intoCOMPAX.A syntax check will be carried out first (see above).
7.5 Window
All open windows are listed in this menu. The currentwindow is marked with a check mark. You can selectanother open window by clicking on it.This is useful if, for example, a window is iconized andis now hidden behind other windows.
7.5.1 Arrange horizontally
All open windows are arranged horizontally. The activewindow is arranged at the top.
7.5.2 Arrange vertically
All open windows are arranged vertically. The activewindow is arranged on the left.
7.5.3 Cascading
All open windows are cascaded from the top left to thebottom right. The active window is arranged at the top.
7.5.4 User Defined
You can save a window screen layout which you haveselected in a "*.WNS" file.When next working with the program, you can loadthis screen layout and do not have to construct it fromscratch. To do this, all axes listed in the windows mustfirst be opened.
7.6 Servo Tools
Additional HAUSER Servo Tools (ParameterEditor) onthe PC can be called up here or you can change to theServoManager.The ProgramEditor starts the selected program orswitches to that program if it is already running (not inWindows 95; see Page 5).
7.7 ?
7.7.1 Info
As is normal in Windows applications, a small amountof information appears with the program name, ver-sion, copyright, company address and use of the PC.