operating instructions process pump of plastic material
TRANSCRIPT

Englisch Originalbetriebsanleitung
Original instructions
2012-01
Operating instructions Process pump of plastic material Type series SP
WERNERT-PUMPEN GMBH · Postfach 10 21 53 · 45421 Mülheim an der Ruhr · B. R. Deutschland · GermanyE-Mail: [email protected] · Internet: www.wernert.de · Tel. +49-2 08-37 58-0 · Telefax +49-2 08-40 74 72


SP series 0. Table of contents Page 0. Table of contents
0. Table of contents 0.1
1. General 1.1 1.1 Application of the pump 1.1 1.2 Validity of the operating instructions 1.1 1.3 Declarations 1.1
1.3.1 Declaration of conformity for pumps in accordance with Directive 2006/42/EC for machinery 1.1
1.4 Technical design 1.2 1.5 Type description 1.2 1.6 Type plate 1.2 1.7 Liability 1.2
2. Safety 2.1 2.1 Marking of hints in the operation manual 2.1 2.2 Personnel qualification and training 2.2 2.3 Dangers in case of non-compliance with the safety hints 2.2 2.4 Responsible working 2.2 2.5 Safety hints for the user/operator 2.2 2.6 Safety hints for maintenance, inspection and mounting operations 2.3 2.7 Unauthorized conversion and spare parts production 2.3 2.8 Inadmissible modes of operation 2.3
3. Transport and intermediate storage 3.1 3.1 Transport of pumps and pump aggregates 3.1 3.2 Storage 3.2
3.2.1 Intermediate storage under normal environmental conditions 3.2 3.2.2 Intermediate storage under special environmental conditions 3.2 3.2.3 Longer-term storage 3.2
4. Description of product and accessories 4.1 4.1 General description 4.1 4.2 Application limits 4.1
4.2.1 Maximum permissible testing pressure 4.1 4.2.2 Maximum admissible temperature of the liquid pumped 4.1 4.2.3 Admissible temperature range of the environment 4.1 4.2.4 Volume flow of the liquid pumped 4.2 4.2.5 Maximum admissible gas portion of the liquid pumped 4.2 4.2.6 Maximum dimensions of sporadic solid matters in the liquid pumped 4.2 4.2.7 Maximum admissible supply pressure for WERNERT bellows-type mechanical seal4.2 4.2.8 Maximum permissible operating pressure 4.2 4.2.9 Maximum speeds 4.2 4.2.10 Type of protection 4.2
4.3 Construction 4.3 4.3.1 Pump casing 4.3 4.3.2 Impeller 4.3 4.3.3 Shaft and bearing 4.3 4.3.4 Sealing the pump 4.3
4.4 Sectional drawing with part designation 4.4 4.5 Designs of mechanical seals 4.6
Page 0.1

SP series 0. Table of contents Page
4.5.1 Single WERNERT-elastomere-bellows-mechanical seal (MS) 4.6 4.5.2 Single WERNERT-PTFE-bellows-mechanical seal 4.8 4.5.3 Stationary double acting mechanical seal 4.10 4.5.4 General information about double acting mechanical seals 4.10
4.6 Special tools 4.11 4.6.1 Mounting tool for the impeller 4.11 4.6.2 Mounting tool for the cap 4.11
4.7 Noise emission values 4.11 4.8 Accessories 4.12 4.9 Dimensions and weights 4.12
5. Erection 5.1 5.1 General 5.1 5.2 Erection of pumps mounted on base frames 5.1
5.2.1 Aligning the base frame 5.1 5.2.2 Connecting the pipes 5.2 5.2.3 Aligning the drive 5.2
5.3 Pipes 5.3 5.3.1 General 5.3 5.3.2 Notes on laying pipes 5.3 5.3.3 Suction pipe 5.4 5.3.4 Self-priming by means of liquid reservoir (suction tank). 5.4 5.3.5 Supply line 5.5 5.3.6 Discharge line 5.5 5.3.7 Check valve 5.5
5.4 Additional connections 5.6 5.5 Coupling protection 5.6 5.6 Final inspection and testing 5.6 5.7 Electric connection 5.6
6. Starting up / Operation / Shutting down 6.1 6.1 Measures to be taken before starting up 6.1
6.1.1 Cleaning and hydraulic pressure test of pipes 6.1 6.1.2 Ensure bearing lubrication 6.1 6.1.3 Checking the direction of rotation 6.1 6.1.4 Tightening the WERNERT-bellows 6.2 6.1.5 Safety devices for the protection of people 6.2
6.2 Starting up the pump 6.2 6.3 Operating the pump 6.3 6.4 Switching the pump off for a short period of time 6.4 6.5 Shutting the pump down permanently 6.4
7. Maintenance / Repairs 7.1 7.1 Monitoring and maintaining the shaft bearing 7.1
7.1.1 Oil lubrication 7.1 7.2 Supply of mechanical seals 7.2
7.2.1 Single mechanical seal 7.2 7.2.2 Stationary double acting mechanical seals 7.3
7.3 Disassembly and assembly of the pump 7.3 7.3.1 Disassembly of the pump 7.3 7.3.2 Assembly of the pump 7.4
7.4 Spare parts 7.5
Page 0.2

SP series 0. Table of contents Page
Page 0.3
8. Faults; causes and remedies 8.1 8.1 Pump not pumping even though motor is working. 8.1 8.2 Flow and / or delivery head to low. 8.1 8.3 Motor is overloaded. 8.2 8.4 WERNERT-Elastomere-bellows-mechanical seal leaks immediately after starting up. 8.2 8.5 Mechanical seal leaks after longer period of operation. 8.2 8.6 Single mechanical seal is destroyed spontaneously and therefore leaks. 8.3 8.7 Massive leaks 8.4 8.8 Pump is destroyed because it was rotating in wrong direction. 8.4 8.9 Increased bearing temperature. 8.4 8.10 Uneven running (noises, vibrations) 8.4 8.11 Leakage from the quench seal 8.5 8.12 Leakage from the double-acting mechanical seal 8.5
9. Associated documentation 9.1
10. Annex A: Name Plate 10.1 10.1 Design of the name plate 10.1 10.2 WERNERT mechanical seal code (WGC) 10.2 10.3 Mechanical seal materials 10.3
11. Annex B: Admissible Nozzle Loads, weight 11.1
12. Annex C: Tightening Torques 12.1


SP series 1. General
1. General
1.1 Application of the pump
WERNERT process pumps of the SP series are horizontally positioned machines to pump liquids. They are always and only intended to be installed in a suitable system. As the liquids being pumped are usually dangerous (poisonous, flammable, caustic), it is very important that the safety instructions contained within these operating instructions are adhered to.
1.2 Validity of the operating instructions
These operating instructions only apply to pumps of the SP series in the standard designs. We reserve the right to make technical changes. In the case of special constructions and designs, the documentation specific to the order must be taken note of. If in doubt, please contact the manufacturer.
1.3 Declarations
1.3.1 Declaration of conformity for pumps in accordance with Directive 2006/42/EC for machinery Sample of the contents
Declaration of Conformity Manufacturer: WERNERT-PUMPEN GMBH Oberhausener Str. 67-79 45476 Mülheim an der Ruhr – Deutschland - Germany
Designation: Type: Serial No.:
Herewith we declare that the pump unit fulfils all the relevant provisions of the Directive 2006/42/EC relating to machinery of 17 May 2006. In the event of maintenance or servicing, the pump and the aggregate must be inspected by the manufacturer or by the operating company and such inspection must be documented in order to ensure conformity with Directive 2006/42/EC. Applied harmonized standards: DIN EN ISO 12100:2011-03, DIN EN 809:2011-01, DIN EN ISO 13857:2008-06, DIN EN 12162:2010-05 Person authorized to compile technical documentation: Mr Christian Wallrodt, Kolpingstr. 21a, 47647 Kerken, Germany Mülheim an der Ruhr, 30.06.2008 ppa. Christian Wallrodt Engineering and Sales Manager WERNERT-PUMPEN GMBH
Page 1.1
SP series 1. General
Page 1.2
1.4 Technical design
The pumps of the SP series are horizontal centrifugal pumps with axial entry PN 16 (models SP 350/400 and larger PN 10). A mechanical seal (MS) is installed as shaft seal.
1.5 Type description
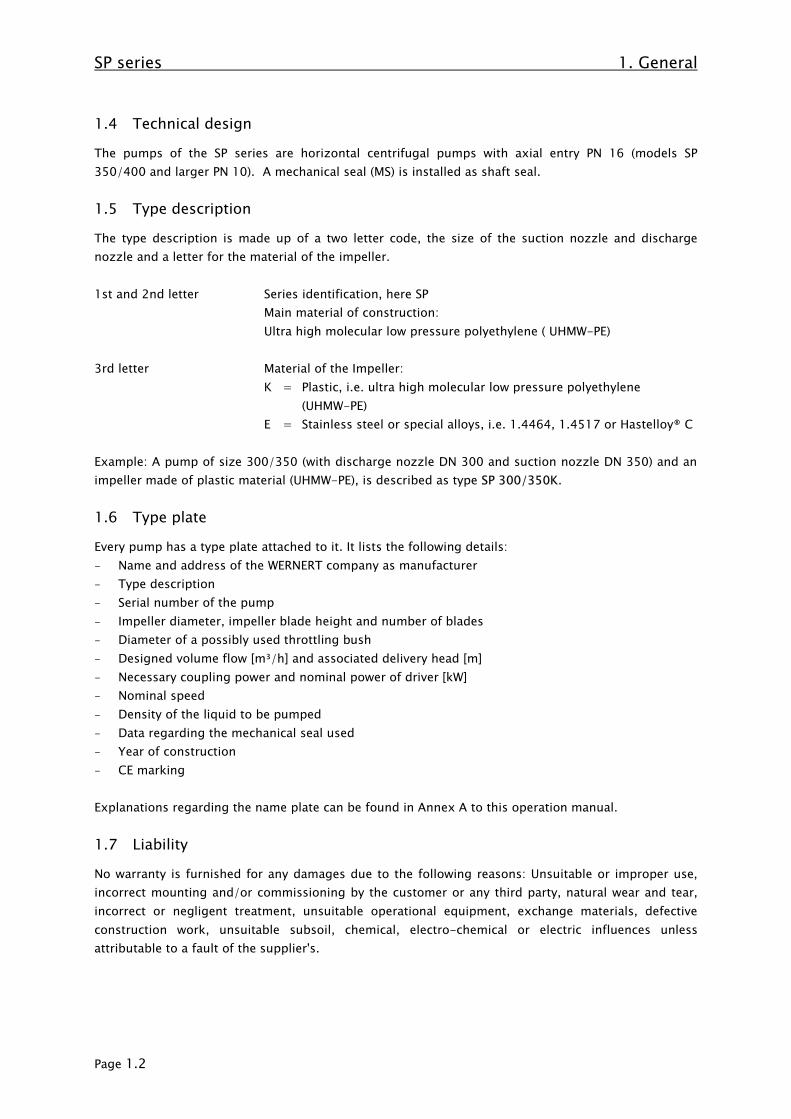
The type description is made up of a two letter code, the size of the suction nozzle and discharge nozzle and a letter for the material of the impeller. 1st and 2nd letter Series identification, here SP Main material of construction: Ultra high molecular low pressure polyethylene ( UHMW-PE) 3rd letter Material of the Impeller: K = Plastic, i.e. ultra high molecular low pressure polyethylene (UHMW-PE) E = Stainless steel or special alloys, i.e. 1.4464, 1.4517 or Hastelloy® C Example: A pump of size 300/350 (with discharge nozzle DN 300 and suction nozzle DN 350) and an impeller made of plastic material (UHMW-PE), is described as type SP 300/350K.
1.6 Type plate
Every pump has a type plate attached to it. It lists the following details: - Name and address of the WERNERT company as manufacturer - Type description - Serial number of the pump - Impeller diameter, impeller blade height and number of blades - Diameter of a possibly used throttling bush - Designed volume flow [m³/h] and associated delivery head [m] - Necessary coupling power and nominal power of driver [kW] - Nominal speed - Density of the liquid to be pumped - Data regarding the mechanical seal used - Year of construction - CE marking Explanations regarding the name plate can be found in Annex A to this operation manual.
1.7 Liability
No warranty is furnished for any damages due to the following reasons: Unsuitable or improper use, incorrect mounting and/or commissioning by the customer or any third party, natural wear and tear, incorrect or negligent treatment, unsuitable operational equipment, exchange materials, defective construction work, unsuitable subsoil, chemical, electro-chemical or electric influences unless attributable to a fault of the supplier's.
SP series 2. Safety
2. Safety This operation manual contains basic hints to be observed during installation, operation and maintenance. Therefore, prior to mounting and commissioning, this operation manual must by all means be read by the fitter as well as the responsible expert personnel/user and must always be available at the place of installation of the machine/plant. Not only are the general safety hints listed under this Section "Safety" to be observed, but also the special safety hints added to the other sections.
2.1 Marking of hints in the operation manual
The safety hints contained in this operation manual which, in case of non-compliance, may cause danger to personnel, are particularly marked with the general danger symbol
Safety sign according to DIN 4844-2
in case of warning against electric voltage with
Safety sign according to DIN 4844-2. For safety hints, with which non-compliance may cause danger to the machine and its functions, the word ATTENTION! is added. Hints directly attached to the machine such as - rotation arrow - sign for fluid connections must by all means be observed and maintained in completely legible condition.
Page 2.1

SP series 2. Safety
2.2 Personnel qualification and training
The personnel for operation, maintenance, inspection and mounting must have the corresponding qualification for these operations. Range of liability, competence and the supervision of the personnel must be exactly defined by the user. If the personnel do not have the required knowledge, same must be trained and instructed. If required, this may be effected by the manufacturer/supplier on behalf of the machine user. In addition, it must be ensured by the user that the contents of this operation manual and the operation manuals of the plant are fully understood by the personnel.
2.3 Dangers in case of non-compliance with the safety hints
Non-compliance with the safety hints may result not only in danger to personnel, but also to environment and machine. Non-compliance with the safety hints may lead to the loss of any claims for damages. In detail, non-compliance may, for example, entail the following dangers: - Failure of important functions of the machine/plant - Failure of specified methods for maintenance and servicing - Danger to personnel by electrical, mechanical, magnetic, thermal or chemical influences - Danger to the environment by leakage of dangerous substances
2.4 Responsible working
The safety hints mentioned in this operation manual, the current national rules for the prevention of accidents as well as any internal working, operating and safety regulations of the user must be observed.
2.5 Safety hints for the user/operator
If hot or cold machine parts lead to dangers, these parts must be protected by the user against accidental contact at the site according to DIN EN 13857. Protection against accidental contact with moving parts (e.g. coupling) must not be removed when the machine is in operation. Leakages (e.g. of the shaft seal) of dangerous substances to be pumped (e.g. explosive, toxic, hot) must be discharged so as not to result in danger to personnel and the environment. Legal stipulations are to be observed. Dangers by electrical energy are to be excluded (for details with regard hereto, please refer e.g. to the VDE regulations and the local energy supply associations). If the pumps are used in potentially explosive atmospheres, any operating conditions must be avoided which may raise the surface temperature of the pump to an unacceptable degree or lead to sparking.
If safety devices, such as the guard to prevent accidental contact, have to be removed precautions must be taken to ensure that the motor cannot be started prior and during the
assembly work.
Page 2.2

SP series 2. Safety
Page 2.3
2.6 Safety hints for maintenance, inspection and mounting operations
The user has to assure that all maintenance, inspection and mounting operations are performed by authorized and qualified expert personnel who have sufficiently informed themselves by thoroughly studying the operation manual. The pump must have taken ambient temperature and be depressurized and emptied. Pumps pumping media injurious to health must be decontaminated. Basically, operations at the machine may be performed during standstill only. The procedure for stopping the machines described in the operation manual must by all means be observed. Immediately upon completion of the operations, all safety and protective devices must be mounted and/or made operational again. Prior to restarting, the items listed in Section "Initial operation" must be observed.
2.7 Unauthorized conversion and spare parts production
Conversion of or changes to the machine are only admissible on consultation with the manufacturer. Original spare parts and accessories authorized by the manufacturer serve safety purposes. The use of other parts may cancel the liability for the consequences resulting therefrom.
2.8 Inadmissible modes of operation
Safe working conditions of the machine supplied is ensured only in case of intended use in line with this operation manual. The service limits specified in order-related documents and under Item 4.2 below must by no means be exceeded or fallen below. Order-related documents shall prevail.

SP series 3. Transport and intermediate storage
3. Transport and intermediate storage
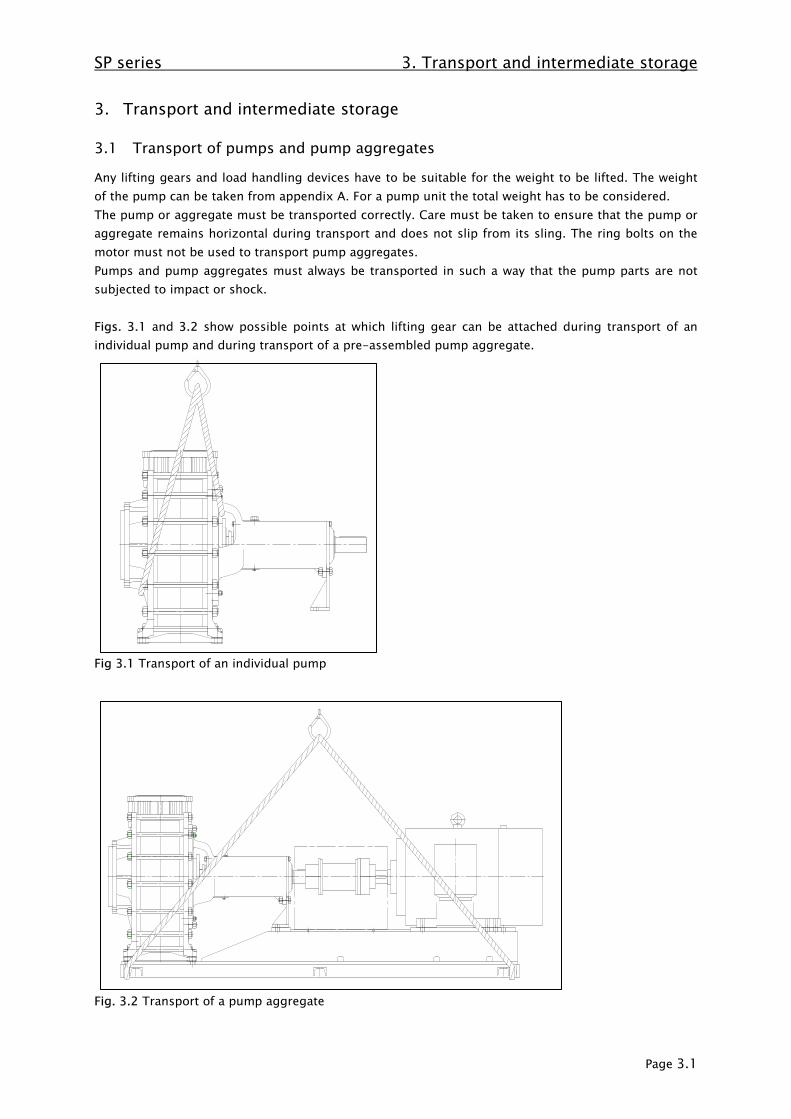
3.1 Transport of pumps and pump aggregates
Any lifting gears and load handling devices have to be suitable for the weight to be lifted. The weight of the pump can be taken from appendix A. For a pump unit the total weight has to be considered. The pump or aggregate must be transported correctly. Care must be taken to ensure that the pump or aggregate remains horizontal during transport and does not slip from its sling. The ring bolts on the motor must not be used to transport pump aggregates. Pumps and pump aggregates must always be transported in such a way that the pump parts are not subjected to impact or shock. Figs. 3.1 and 3.2 show possible points at which lifting gear can be attached during transport of an individual pump and during transport of a pre-assembled pump aggregate.
Fig 3.1 Transport of an individual pump
Fig. 3.2 Transport of a pump aggregate
Page 3.1

SP series 3. Transport and intermediate storage
3.2 Storage
The stability of the pump must be assured at all times during temporary or long-term storage. The pump is set down on its support feet. If the support foot at the bearing bracket does not reach down to the ground or has not been fitted, the bearing bracket must be suitably and durably supported in order to ensure adequate stability. The aggregate (pump with motor on base frame) is stored horizontally.
3.2.1 Intermediate storage under normal environmental conditions Under normal environmental conditions, i.e. within a temperature range of –10 °C to +40 °C, special provisions need not be made for an intermediate storage. By closing the pump openings with sealing caps or dummy flanges, it must be assured that pollutions or foreign bodies in lumps are prevented from getting into the pump housing. The pumps must be placed in an intermediate storage so as not to be exposed to any shock or impact stresses. If this cannot be excluded, the pumps should be protected by means of solid wooden packings. The pumps should likewise not be exposed to any extraordinary weather and environmental influences. Plastic pumps need not be filled with liquid preservatives. Acid or lye residues must not remain in the pumps as these crystallize out and lead to damages to the mechanical seal. Water must likewise not remain in the machines. Danger of freezing up.
3.2.2 Intermediate storage under special environmental conditions Particular environmental conditions are as follows: - Ambient temperatures below –10 °C or above +40 °C. - Intermediate storage or installation in the open. - Particularly high or very low air humidity (e.g. tropical or desert atmosphere). - Intermediate storage in an environment with corrosive parts in the atmosphere
(e.g. sea air or corrosive gases and aerosols) The following are to be provided as protective measures: - Special protection by solid wooden packing against impact and shock influences. - Storage in areas not directly exposed to atmospheric influences. If necessary, provide protective
roofs. - Separate packing of the pumps with protective films and use of moisture binding agents. - Anti-corrosive coatings of uncovered metallic parts exposed to the atmosphere. - Sealing of the suction and delivery-side pump openings. In each individual case, please contact the manufacturer for any measures to be taken regarding an intermediate storage under special environmental conditions.
3.2.3 Longer-term storage In case of storage periods of more than one year make sure that the protection against mechanical and climatic stresses is sufficient. The suction and delivery-side pump openings must be kept closed The condition of the packing (wooden box, packing film and the like) must be checked regularly, at least once a year, and repaired as required. When using moisture-binding agents, these must be exchanged at least once a year. Uncovered pump components such as shaft and coupling must be provided with an anti-corrosive paint. Prior to starting any pumps which have been stored for an extended period of time, the condition of the bearing oil must be checked. After a storage period of two years, the lubricant of the bearing must be generally exchanged.
Page 3.2

SP series 3. Transport and intermediate storage
Page 3.3
Under climatic conditions of a low humidity, the elastic properties of bellows and sealing elements of elastomer materials may be reduced. The replacement of these parts after several years of storage is then required. If the pump remains out of operation for a minimum period of six months, the pump shaft must be turned into a different position every three months by several manual rotations so as to avoid any pressure marks on the rolling bearings. The mechanical seal has to be checked after two years.


SP series 4. Description of product and accessories
4. Description of product and accessories
4.1 General description
Pumps of the SP series are horizontal centrifugal pumps using the process design. This makes it possible to quickly remove or exchange the complete bearing bracket with running gear and mechanical seal without having to disassemble the pipeline connections and the motor. The parts which will be covered with liquid are made of plastic materials or other suitable materials, the respective chemical, thermal and mechanical stresses were decisive in their selection. All statical parts made of plastic materials have been surrounded in metal or are supported by metal. The standard version is equipped with a closed impeller (with covering disc), the special version can also be equipped with a semi-open impeller (without covering disc). Usually a WERNERT-bellows-mechanical seal is used as a shaft seal. For special applications, mechanical seals by other manufacturers can also be used.
4.2 Application limits
4.2.1 Maximum permissible testing pressure Static pressure is determined according to ISO 2858/ DIN EN 22858 as 1.3 to 1.5 times the maximum delivery pressure, and can be used up to the temperature stated in section 4.2.2. The admissible testing pressure depends on the version of the mechanical seal, for that reason the manufacturer should be consulted to define the testing pressure.
4.2.2 Maximum admissible temperature of the liquid pumped The maximum admissible temperature of the liquid pumped depends on the materials of the pump housing and bellows (for WERNERT bellows-type mechanical seal). In exceptional cases, it may be exceeded on consultation with the manufacturer. Pump housing material
Maximum temperature
UHMW-PE 90 °C PVDF 115 °C
For the employment of other mechanical seals, the corresponding data in the order confirmation and data sheet are decisive.
For WERNERT bellows-type mechanical seal only: Bellows material
Maximum temperature
EPDM 80 °C FPM 100 °C PTFE 115 °C CSM 80 °C
4.2.3 Admissible temperature range of the environment The admissible range of the ambient temperature is –10 °C to +40 °C.
Page 4.1

SP series 4. Description of product and accessories
4.2.4 Volume flow of the liquid pumped Unless specified otherwise in the characteristic curves or the documentation, the following shall apply: Qmin = 0.1 x Qopt for short-time operation (approx. 5 min.) Qmin = 0.15 x Qopt for continuous operation, Qmax = according to characteristic diagram, nominal motor output must not be exceeded Qopt = Volume flow in the optimum efficiency of the characteristic pump curve In case of a deviating working point, please contact the manufacturer.
4.2.5 Maximum admissible gas portion of the liquid pumped Gas portions in the liquid pumped are only permissible after consulting the manufacturer. Gas portions in the liquid pumped reduce the capacity and the delivery head of the pump.
4.2.6 Maximum dimensions of sporadic solid matters in the liquid pumped The dimensions of sporadic solid matters in the liquid pumped must not exceed the dimension of 20 mm.
4.2.7 Maximum admissible supply pressure for WERNERT bellows-type mechanical seal The maximum admissible gauge pressure at the suction nozzle of the pump with a WERNERT bellows-type mechanical seal depends on the material of the bellows and the speed of the pump.
Bellows material Speed up to 1500 1/min
EPDM 2,5 bar FPM 2,5 bar PTFE 3 bar CSM 2,5 bar
4.2.8 Maximum permissible operating pressure The maximum permissible operating pressure of 10 bar is reached at a maximum temperature of 90 °C of the liquid pumped. The permissible operating pressure for liquids over 90 °C is reduced to 6 bar. Any Operating conditions which differ from the above mentioned must be specifically agreed with the manufacturer.
4.2.9 Maximum speeds The maximum admissible speed must not be exceeded by mechanical transmission ratios or the employment of a frequency converter. The max. permissible rotation is 1500 rpm.
4.2.10 Type of protection The pump complies with type of protection IP 23. Type of protection for contact against accidental contact and impurities (1st digit) Digit Protection against accidental contact Protection against impurities 2 Protected against insertion of a finger Protected against solid impurities (diameter
over 12.5 mm) Type of protection against water (2nd digit) Digit Protection against water 3 Protection against spray water falling at an angle of up to 60° from the vertical The pump must not be cleaned with a water jet, nor with a high-pressure or steam cleaner.
Page 4.2

SP series 4. Description of product and accessories
4.3 Construction
Fig 4.1 shows a pump of the NE series in section, which is representative for all sizes. The naming of the individual parts and the numbering comply with DIN 24250.
4.3.1 Pump casing The solid pump casing is made of plastic and consists of two casing halfs (part 105.1 and 105.2) and is completely enclosed by a metal suction cover (part 141) and an adapter (part 145). The suction nozzle (part 153) is fixed by a two parted retaining ring (part 506.2). The discharge nozzle (diffuser) (part 149) is sticked in the flange transition piece (part 722). The pump can be designed with a drainage outlet in the area underneath the suction nozzle. This is either closed with a cap or equipped with a valve.
4.3.2 Impeller Closed impellers are used as impellers (part 232). These impellers are also suitable for transporting media containing solids. The material used is solid plastic or metal. The torque of the shaft is taken up by a metal hub pressed into the impeller. The axial fixing is done by the shaft (part 210).
4.3.3 Shaft and bearing The impeller is connected with the metal shaft (part 210) via two keys. In the sealed area, the shaft is protected by a shaft wearing sleeve (part 524) which is either made of carbon or a ceramic material. This shaft wearing sleeve is tensioned with the rotating seal ring (part 475) via a spanner (part 552.2) which is situated between thrower (part 507) and loose collar (part 505). The shaft's torque is taken up by a feather key connection. The shaft is supported outside the liquid wetted area in the bearing housing (part 350). The rolling bearing can consist of oil lubrication and is protected by a bearing cover and bearing end cover (parts 360 and 361) with inserted radial shaft seal rings (parts 421). The level of the oil filling is adjusted by a constant level oiler (part 633) which is installed aside of the bearing housing.
4.3.4 Sealing the pump The two casing halfs are sealed by a round section seal (part 413.01). The shaft is sealed using a mechanical seal (MS). Depending on the application, a number of seals are used. These are described in more detail in section 4.5. The mechanical seal is taken up in every case by the seal insert (part 443) which also seals the pump casing (stuffing box side) via the O-rings (parts 412.04 and 412.041). The discharge nozzle is sealed as well via O-rings (parts 412.01 and 412.02). As well the suction nozzle via the O-rings (parts 412.03 and 412.17). Starting with size SP 300/350 the branches should be sealed to the pipes by means of gaskets which must be provided by the costumer. Additional static seals are installed in the area of the mechanical seal and depend on its design. Usually FPM is used for the O-rings, depending on the application other materials are available..
Page 4.3

SP series 4. Description of product and accessories
4.4 Sectional drawing with part designation
Fig 4.1 Section of a pump of the SP series in process design with single WERNERT-bellows mechanical seal.
Page 4.4

SP series 4. Description of product and accessories
Part No. Description Part No. Description 105.1 Pump casing half, suction side 481 Bellows 105.2 Pump casing half, stuffing box side 482 Bellows seat
141 Outer pump mantle 505 Loose collar
145 Adapter 506.1 Retaining ring (seal insert)
149 Diffuser 506.2 Retaining ring (suction nozzle)
153 Suction nozzle 507 Thrower
154 Intermediate plate 524 Shaft wearing sleeve 183 Support foot 550.1 Disc
210 Shaft 552 Spanner
232 Clockwise impeller 557 Retaining washer
260 Impeller hub cap 562 Parallel pin
321 Radial ball bearing 633 Oiler (Constant-Level-Oiler)
350 Bearing housing 722 Taper piece flanged 360 Bearing cover 892 Pump foot pad
361 Bearing end cover 904 Grub screw
412.01-.17 O-ring 905 Tie bolt
413.01 Round section seal 921/931 Shaft nut with lockwasher
421 Radial shaft seal ring 922 Impeller nut
443 Seal insert 940.1 Key (Shaft driver shaft) 471 Seal cover 940.2 Key (Shaft impeller side)
472 Stationary seal ring 940.3 Key (Pump casing)
475 Rotating seal ring 940.4 Key (Pump casing) Fig. 4.1 Section of a pump of the SP series with single WERNERT-elastomere-bellows mechanical seal.
Page 4.5

SP series 4. Description of product and accessories
4.5 Designs of mechanical seals
4.5.1 Single WERNERT-elastomere-bellows-mechanical seal (MS) Usually the pumps are designed using the single WERNERT-elastomere-bellows-mechanical seal. The different designs of this are shown in Fig. 4.2. The stationary seal ring (part 472) is positioned in the bellows (part 481) made of EPDM or FPM and pressed against the rotating seal ring (part 475) using elastic pretension - supported by the pumping pressure. The static seal of the sealing area is also achieved using the elastic bellows which is positioned between the bellows seat (part 482) and the seal insert (part 443). a) Interior rinsing - API plan 01 (Fig. 4.2a) The model with interior rinsing (product rinsing) is suitable for non-critical applications. Rinsing holes in the impeller and the conical shape of the seal insert in the area of the stationary seal ring, the MS is rinsed with fresh, cool liquid to be pumped (product). b) Interior rinsing and Quench - API Plan 62 (Fig. 4.2b) In this model a radial shaft ring (part 421.2) is built into the bellows seat (part 482) on the atmospheric side. Together with the rotating seal ring on the product side, this creates an area which is supplied with so-called quench liquid which is not under pressure. Usually clean, filtered water, sometimes under higher temperatures or completely desalinated water is used. The quenching liquid is mean to prevent crystals being formed on the atmospheric side of the MS when pumping media which can form crystals is being used. This could lead to increased abrasion or if crystals grow, the MS can become increasingly leaky. In the case of pressure between 0.7 and 8.5 bar (gauge), the flow of quenching liquid is limited to 30 litres per hour by an built-in flow limiter. The quenching device can provide a certain amount of protection against the rotating seal rings overheating in the case of a vacuum in the shaft seal space. This vacuum can be caused by high suction losses or suction heights. ATTENTION! The quench liquid should drain off freely. If it is drained off through a pipe, the pressure built up in the quench chamber must not exceed 0.5 barg. Too high a counter-pressure will destroy the shaft seal ring. Another quench type is the stationary quench where the supply is ensured via a quench tank with connected hose lines to the mechanical seal of the pump. The temperature difference between supply and return line of the stationary quench tank results in different liquid densities. The liquid columns of different heights resulting therefrom lead to a circulation of the quench liquid. The stationary quench tank should be filled to three quarters. The filling level must be checked regularly.
Page 4.6

SP series 4. Description of product and accessories
Part No. Description Part No. Description 400.07 Gasket 504 Spacer ring 412.05 (O-ring) 505 Loose collar 412.06 (O-ring) 507 Thrower 412.09 (O-ring) 524 Shaft wearing sleeve 421.1 Radial 550.1 Disc 421.2 Radial 550.2 Disc 443 Seal insert 552 Spanner 471 Seal cover 723.2 Flange 472 Stationary seal ring 739.2 Hose 475 Rotating seal ring 739.3 Hose 481 Bellows 902.18 Stud 482 Bellows seat 920.18 Hexagon Nut 500 Ring Fig 4.2 Representation of single WERNERT-elastomere-bellows-mechanical seal a) with interior rinsing ( product rinsing ) of mechanical seal ( API Plan 01 ) b) with interior rinsing ( product rinsing ) and quench ( API Plan 62 ) c) with rinsing connection and labyrinth seal (continuous rinsing) ( API Plan 32 ) d) with rinsing connection without labyrinth seal for rinsing after use (stationary rinsing)
Page 4.7

SP series 4. Description of product and accessories
c) Continuous rinsing – API Plan 32 (Fig.4.2c) Pumps to pump polluted liquids can be equipped with a rinsing connection (continuous rinsing) in order to rinse the mechanical seal with clean liquid - usually water - and to keep contaminants away. To limit the flow of rinsing liquid, the shaft sealing space is equipped with a labyrinth seal towards the inside of the pump. Depending on the size of the pump and the contamination of the liquid to be pumped, 400 l/h are used for rinsing. The flushing quantity is indicated by the manufacturer in the order confirmation. For the recommended flushing quantities, please also refer to Annex D. If for technical reasons, the recommended flushing quantities must be deviated from, please contact the manufacturer. The installation of a liquid quantity meter (rotameter) in the flushing liquid line is recommended for the correct quantity to be set. For the regulation of the flushing liquid flow, a valve must be installed. d) Rinsing after use (Fig. 4.2d) Rinsing after use is equivalent to continuous rinsing, the only difference being that there is no labyrinth seal. Stationary rinsing is to be used in those cases where contaminated liquids are to be pumped but where it is not possible to install the continuous flow of rinsing liquid due to system or process constraints. It is used to rinse the pump immediately after it has been switched off. Stationary rinsing is meant to prevent sedimentation and crystallisation processes in the interior of the pump - especially in the area of the mechanical seal, as during longer standing periods the rotating seal ring and the stationary seal ring can stick together. Rinsing volume is 160 l for a rinsing period of 5 minutes (minimum). Normal industrial water can be used for rinsing.
4.5.2 Single WERNERT-PTFE-bellows-mechanical seal If the fluid excludes the use of bellows made of elastomeres, PTFE bellows-mechanical seals can be used. Fig. 4.3 shows WERNERT-PTFE-bellows-mechanical seals which can be used in place of elastomere bellows without any constructional changes being made to the seal insert. The function and action of the models shown in Figs. 4.3a to d are equivalent to the single WERNERT-elastomere-bellows-mechanical seals shown in Fig. 4.2 and described in section 4.5.1.
Page 4.8

SP series 4. Description of product and accessories
In preparation
In preparation In preparation
Part no. Description Part no. Description 400.07 Gasket 504 Spacer ring 412.05-23 O-ring 505 Loose collar 421.1+2 Radial shaft seal ring 507 Thrower 443 Seal insert 524 Shaft wearing sleeve 471 Seal cover 550.1 Disc 472 Stationary seal ring 550.2 Disc 474 Thrust ring 552 Spanner 475 Rotating seal ring 723.2 Flange 477 Spring 739.2 Hose 481 Bellows 739.3 Hose 482 Bellows seat 902.18 Stud 500 Ring 920.18 Hexagon Nut
Fig 4.3 Representation of single WERNERT-PTFE-bellows-mechanical seal a) with interior rinsing (product rinsing) of mechanical seal (API Plan 01) b) with interior rinsing (product rinsing) and quench (API Plan 62) c) with rinsing connection and labyrinth seal (continuous rinsing) (API Plan 32) d) with rinsing connection without labyrinth seal for rinsing after use (stationary rinsing)
Page 4.9

SP series 4. Description of product and accessories
4.5.3 Stationary double acting mechanical seal Stationary double acting mechanical seals are usually used for "problematical” liquid to be pumped - which have a medium to high solid content - which contain a high proportion of gas or air - which endanger health, water or the environment - which would vaporise if the temperature increased only slightly or if the pressure was reduced - which tend toward crystallisation. This type of mechanical seal (frequently also referred to as REA design), supports, by means of centrifugal forces, the movement of the sealing liquid from the sealing chamber into the shaft sealing space which in turn is very large and easy to rinse. This design avoids tight gaps and solids being deposited. Two types are used as standard: BURGMANN HRZ 13 PACIFIC Allpac N 2132 These models are also available as single acting seals or single acting seals with quench. For further information about double acting mechanical seals please refer to section 4.5.4.
4.5.4 General information about double acting mechanical seals Double acting mechanical seals must always be impinged with a suitable sealing fluid which is suited to be mixed with the liquid to be pumped. The sealing liquid can also - if the currently valid regulations permit this - be the cleaned fluid which might have to be cooled, but which can only be used if the metal elements within the sealing chamber do not corrode. The sealing liquid must continuously circulate between the two mechanical seals and is removed via an outlet on the opposite side. The sealing fluid must have a pressure of 1 to 1.5 bar above the pressure on the shaft sealing space. However, it must not exceed the pressure limit of the seal on the atmospheric side. The maximum pressure in the shaft sealing space, which is immediately behind the impeller, is approx. 25% of the maximum differential pressure which can be achieved in the pump (with decreasing pumping flow) plus the supply pressure (pressure at the pump suction nozzle). If the pump is not working, it must be ensured that the pressure of the sealing liquid is higher than the interior pressure of the pump so that no liquid to be pumped reaches the sealing chamber. If the sealing chamber is equipped with its own sealing aggregate with limited sealing liquid volume, the sealing liquid must be forcibly cooled and circulated. In this case the circulation of the sealing liquid flow is supported by a pumping thread in the mechanical seal. If the sealing chamber is supplied with sealing liquid with the appropriate excess pressure and if the sealing liquid can flow freely from the sealing chamber, the liquid flowing off must be throttled in order to maintain the excess pressure in the sealing chamber.
Page 4.10
SP series 4. Description of product and accessories
4.6 Special tools
The special tools described below are available from the manufacturer.
4.6.1 Mounting tool for the impeller For dismantling of the impellers of plastic material we recommend to use a mounting tool (part no. 054).
4.6.2 Mounting tool for the cap For mounting and dismantling of the impellers of metallic material we recommend to use a mounting tool for the cap (part no. 054), wrench size 46.
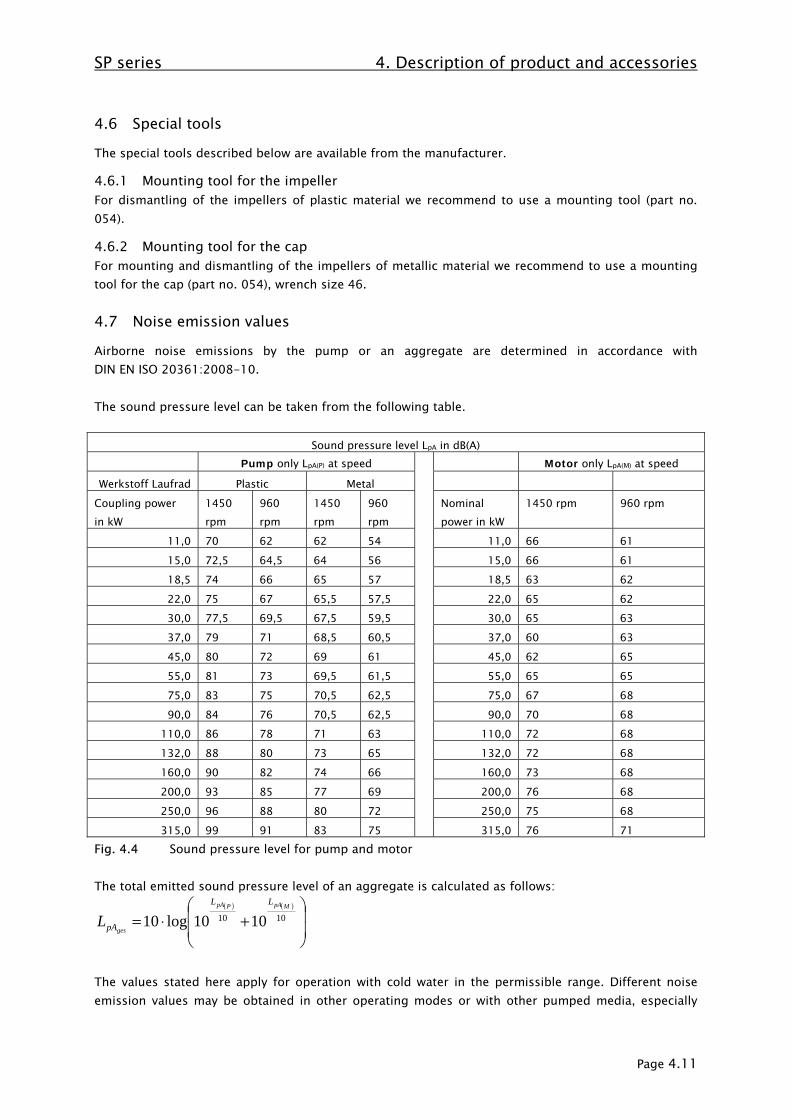
4.7 Noise emission values
Airborne noise emissions by the pump or an aggregate are determined in accordance with DIN EN ISO 20361:2008-10. The sound pressure level can be taken from the following table.
Sound pressure level LpA in dB(A) Pump only LpA(P) at speed Motor only LpA(M) at speed
Werkstoff Laufrad Plastic Metal
Coupling power in kW
1450 rpm
960 rpm
1450 rpm
960 rpm
Nominal power in kW
1450 rpm 960 rpm
11,0 70 62 62 54 11,0 66 61
15,0 72,5 64,5 64 56 15,0 66 61
18,5 74 66 65 57 18,5 63 62
22,0 75 67 65,5 57,5 22,0 65 62 30,0 77,5 69,5 67,5 59,5 30,0 65 63
37,0 79 71 68,5 60,5 37,0 60 63
45,0 80 72 69 61 45,0 62 65
55,0 81 73 69,5 61,5 55,0 65 65
75,0 83 75 70,5 62,5 75,0 67 68
90,0 84 76 70,5 62,5 90,0 70 68 110,0 86 78 71 63 110,0 72 68
132,0 88 80 73 65 132,0 72 68
160,0 90 82 74 66 160,0 73 68
200,0 93 85 77 69 200,0 76 68
250,0 96 88 80 72 250,0 75 68
315,0 99 91 83 75 315,0 76 71 Fig. 4.4 Sound pressure level for pump and motor The total emitted sound pressure level of an aggregate is calculated as follows:
( ) ( )
⎟⎟
⎠
⎞
⎜⎜
⎝
⎛+⋅= 1010 1010log10
MpAPpA
ges
LL
pAL
The values stated here apply for operation with cold water in the permissible range. Different noise emission values may be obtained in other operating modes or with other pumped media, especially
Page 4.11

SP series 4. Description of product and accessories
Page 4.12
when pumping media containing solids. If the values stated in order-related documents differ from those indicated here, the order-related documents shall prevail. The emitted sound pressure level of the motor may differ from that stated here, depending on model and make. The sound pressure level of motors increases by +4 dB in 60 Hz operation.
4.8 Accessories
- Coupling: Flexible coupling with intermediate coupling sleeve - Protection against accidental contact for coupling - Base frame, welded steel - Foundation fastening and/or installation: Levelling elements, stone bolts, shear connectors - Special accessories, according to order
4.9 Dimensions and weights
For the data on dimensions and weights, please refer to the dimensional drawing and/or installation plan of the pump.

SP series 5. Erection
5. Erection
5.1 General
A careful and proper installation is the prerequisite to a subsequent trouble-free operation. Installation errors may cause personal injuries and property damages as well as a premature wear of the pump. In case of work not done by the manufacturer, any liability for improper installation and for the consequences of non-compliance with safety-technical hints is excluded.
5.2 Erection of pumps mounted on base frames
5.2.1 Aligning the base frame Before delivery, the pump is aligned with the base frame and fixed. If, due to rough transport, the position of the pump to the base frame has changed, then the original position must be attained again by referring to the dimensional drawings. Furthermore, the pump is aligned to the plant merely by positioning the base frame. When installing in the plant, the base plates must be aligned so that 1) the level of the discharge nozzle is horizontal in every direction. For example, this can be checked
with a machine spirit level. 2) Suction and discharge pipelines must be connected with the pump nozzles in such a way that the
admissible nozzle loads are not exceeded. The admissible nozzle loads are listed in Appendix B. The base frame is aligned according to the means of fixing selected for this aggregate. There are three ways of fixing possible: 1) Simple fixing to the foundations
The base frame is fixed to the foundations by means of stone bolts or shear connectors which have been anchored into the foundation beforehand and which project through the corresponding holes in the base frame. Before these are tightened, the base frame must be aligned using spacers and thin pieces of metal. The base frame is aligned in such a way that it is supported by three aligning spacers. Each spacer is positioned on the left and right longitudinal side in the area of the drive, the third spacer is positioned in the area of the pump on the short side. If the base frame is longer than 1600 mm, more spacers might be necessary. The exact height should be achieved using pieces of thin metal of different thicknesses.
2) Fixing on foundations with subsequent casting The base frame is fixed to the foundations by means of stone bolts or shear connectors which have been anchored into the foundation beforehand and which project through the corresponding holes in the base frame. Before casting, the base frame must be aligned using spacers and thin pieces of metal (as described in 1.). The foundation screws are tightened once the casting mass has hardened.
3) Erection on levelling elements without foundation The position of the base frame is adjusted using levelling elements. The pump aggregate is supported above the floor on oscillation absorbers. No foundation screws are necessary.
Page 5.1

SP series 5. Erection
Pumps of Type NE supplied on base plates are in principle suited for all three fastening types mentioned above.
If the pump aggregate is installed isolated, as is the case, for example, with the foundation-free installation, a separate earthing is to be provided in order to avoid
potential differences.
5.2.2 Connecting the pipes Before aligning the drive, the pump must be connected to the pipes making sure that the pipes do not twist the pump. The admissible nozzle loads listed in Appendix B must not be exceeded! Section 5.3 lists suggestions on the design of the pipeline layout. If subsidiary pipeline connections have been intended, e.g. for sealing, rinsing or quench media, the necessary pipeline attachments and connections must be made.
5.2.3 Aligning the drive ATTENTION! The manufacturer's alignment of the drive to the pump must be checked under all circumstances and if necessary it must be corrected. Please refer to the operating instructions for the coupling.
The position of the drive shaft to the pump shaft is measured via the coupling.
straight-edge
Usually, intermediate sleeve couplings are used for pumps of the NE series. Fig. 5.1 shows this type of coupling, the intermediate sleeve can be removed after loosening the connecting screws. Distance S2 between pin and packet part of the coupling must be 6+1 mm all around the circumference for couplings size 200 and 225 and for couplings size 250 and larger 8+1mm and it can be determined using a feeler gauge. feeler gauge
Fig. 5.1 Intermediate sleeve coupling, measurement using feeler gauge and straight-edge. After checking and if necessary creating this gap by aligning the drive in an axial direction, the angle and height of the drive must be checked. Three procedures are usual here, measurement with a straight-edge, measurement with a dial gauge and measurement with the help of a laser beam. All procedures give correct results. In every case the data regarding the alignment accuracy can be found in the operating instructions for the coupling. The angle and height of the drive depends on the aggregate supplied and can be adjusted with the help of thin pieces of material or regulating screws. After aligning it, the drive must be fixed.
Page 5.2

SP series 5. Erection
5.3 Pipes
5.3.1 General The pipe diameter and the layout of the pipes have usually been determined during the planning stage. The recommendations for pipeline layout can only be basic considering that the final laying of the pipes will have to take the specific local situation, which the pump manufacturer is usually not aware of, into consideration.
5.3.2 Notes on laying pipes Make sure that the forces and moments of the pipelines acting on the pump branches do not exceed the admissible branch loads according to Annex B. This applies to both, the standstill of the plant and its operation. The pumps must in particular not serve as a fixed support within the pipeline system. If necessary, the pipelines must be supported by mounts so that they can neither distort the pump nor vibrate it during operation. Any expansions of the pipelines caused by temperature differences and process-conditioned impacts must be compensated for by taking suitable measures. The installation of compensators in front of the suction and discharge nozzles of the pump is recommended. For any increased flow resistances to be avoided, compensators should have the nominal diameter of the respective pipeline.
If the permissible pipeline forces are exceeded, leaks may be caused at the pump resulting in the releasing of the medium pumped. Danger of life in case of toxic or
hot media pumped. Inadmissible deformations may furthermore result in problems at the mechanical seal. Tightening connection screws on the pump flanges may not cause any twisting. Up to and including DN 125, the torque should be approx. 35 Nm and above that up to and including DN 250, approx. 70 Nm for each screw. When laying and connecting the pipes care must be taken that seals do not project into the clear diameter, Fig. 5.2. correct incorrect Fig. 5.2 Connection of pipelines ATTENTION! The alignment of the drive to the pump must be checked, and if necessary corrected, after the pipes have been connected and before starting up.
Page 5.3

SP series 5. Erection
5.3.3 Suction pipe The suction pipe should be as short as possible and its diameter should never be smaller than that of the suction nozzle. If the suction pipe is larger, an eccentric transition with synchronous upper edge which prevents the formation of air sacs, must be used. Fig. 5.3.
Fig. 5.3 Transition between suction pipe and pump suction nozzle The diameter of the suction pipe must be selected so that a flow velocity of 2 m/s of water or of liquids of the same viscosity, is not exceeded. Greater losses in pressure due to long pipe lengths or baffles must be avoided. The pipe must be completely leak-proof (pressure test) and must not contain any air sacs. Horizontal pieces of pipes should have an ascending gradient of at least 1% in the direction of the pump. Sharp corners and bends must be avoided in the pipes, as is "suctioning over the mountain". In the case of self-priming pumps, the suction pipe is easier to evacuate if the pump is switched on when the highest possible level of liquid is in the pump sump. Gassing liquids should not be pumped in suction operation. If in doubt, ask the manufacturer.
5.3.4 Self-priming by means of liquid reservoir (suction tank). By attaching a liquid reservoir system (suction tank) to the pump suction nozzle, a normal centrifugal pump can evacuate the suction pipe. The useful volume of the storage container (between bottom edge - supply nozzle and top edge - outlet nozzle) must be at least 50 % larger than the volume of the suction pipe. Standard storage containers are allocated to the pump models for the following suction ratios: - Overall length (stretched length) of suction pipe 5 m - Nominal width of suction pipe according to nominal width of the suction nozzle - Maximum geodesic suction height 3 m - Density of the watery liquid about 1,05 kg/l. If the volume of the suction pipe, density of the liquid and / or the geodesic suction height is larger than the above figures, the suction tank must be adapted to suit the suction conditions.
Page 5.4

SP series 5. Erection
Storage containers, which are supplied by WERNERT-PUMPEN are usually suitable up to an overpressure of 0.5 bar(g). They are not suitable as pressure containers and therefore not
subject to the directive 97/23/EC for pressure containers. The operator must ensure that the inner-pressure is below the a.m. value. If the admissible pressure is exceeded, the storage container will be damaged beyond repair. When suctioning via the suction tank, the pump should be equipped with a reflux valve (refer to 5.3.7 below) on the discharge side in order to avoid the pump and tank emptying by siphon effect once the pump has been switched off. Prior to initial start-up or after draining, the attachment tank must be filled up with liquid at the filling opening. Thereafter, the filling opening must be closed, gas-tight. In addition, it must be assured that the suction line is sufficiently vacuum-resistant. Pipes which are to be connected to the attached suction tank must be secured without tension. They must be supported by brackets or retainers. The pipes must not apply any forces or moments to the tank and connectors. The attached suction tank must be connected as close to the pump as possible. If possible, pump and attached suction tank should be mounted on a common base frame. If the attached suction tank is not placed on the base frame, care must be taken to ensure that the bottom of the attached suction tank rests fully on a level surface and is properly secured.
5.3.5 Supply line The supply line is to be laid with a constant inclination towards the pump suction branch and should never be smaller than the suction branch of the pump. The cross section of the supply line must be selected so that a flow speed of 2.5 m/s in case of water or liquids of the same viscosity is not exceeded. For repair purposes, the installation of a shut-off valve at a sufficient distance to the suction branch (approx. 2 to 3 times the pipeline diameter) is recommended which must be completely opened during the operation of the pump. The shut-off devices in the supply and/or suction line are to be arranged so that according to the valve design, no air pockets may be formed. The control of the flow rate may only be effected by control instruments in the discharge line. To avoid increased flow resistances, additional instruments which must be installed should have the nominal diameter of the supply line. Sharp edges and bends are to be avoided.
5.3.6 Discharge line The discharge line should not be smaller than the discharge nozzle of the pump. In addition, the diameter depends on economic aspects, however, the flow velocity should not be selected above 5 m/s. A shut-off and/or control instrument is to be installed as close as possible to the pump.
5.3.7 Check valve A check valve –if to be used- must be arranged so far above the outlet of the pump so that during commissioning, the pump is safely filled with the medium pumped even if an air cushion is formed in front of the check valve.
Page 5.5

SP series 5. Erection
Page 5.6
5.4 Additional connections
For the dimensions and position of the additional connections required for the pump (sealing liquid, flushing liquid etc.), please refer to the installation plan. ATTENTION! These connections are decisive for the function and must therefore be properly attached. The required volume flows and pressures are to be set (please refer to 7.2 below).
5.5 Coupling protection
The pump may only be operated with a suitable coupling protection. Due to its strength, distance to the coupling and material, a coupling protection contained in the scope of supply of an aggregate corresponds to the employment in a potentially explosive atmosphere.
5.6 Final inspection and testing
The alignment according to Item 5.2 above as well as the proper distance of coupling and coupling protection are to be checked. At the coupling, the shaft must be capable of being turned by hand.
5.7 Electric connection
The electric connection may only be made by an electrical expert. The suitability of the motor for the available mains voltage is to be checked against the data on the name plate. A suitable circuit is to be selected. The employment of a protective
motor device is recommended.

SP series 6. Starting up / Operation / Shutting down
6. Starting up / Operation / Shutting down
6.1 Measures to be taken before starting up
6.1.1 Cleaning and hydraulic pressure test of pipes Before starting the pump up for the first time, all foreign bodies which might be left in the pipes from the installation of the pump, must be removed (screws, forging scales, welding drops etc.). Then the pipes are checked for leaks. Suction and discharge pipes must be hydraulically tested in accordance with the respective safety instructions. Before starting up the pump again after repairs have been made to the pump, all broken parts of any kind - especially duroplastic or ceramic parts - must be removed from the pipelines. These broken parts can be created when the mechanical seal is broken or if components break suddenly due to overload or the action of foreign bodies. ATTENTION! Broken parts or foreign bodies remaining in the pipeline system can cause disastrous damage to the pump or other parts of the plant.
6.1.2 Ensure bearing lubrication Oil-lubricated bearings ATTENTION! Before starting up the system, the bearing housing must be filled with oil! Filling with oil is effected as described in Section 7.1.2 below.
6.1.3 Checking the direction of rotation Pump aggregates with intermediate sleeves are supplied in an uncoupled state. To do this, the cam plate of the coupling is unscrewed, but still projects into the packet part of the coupling. The screws are on the inside of the intermediate sleeve which must be removed before the direction of rotation is checked.
Only check that the direction of rotation of the motor is identical to the direction of rotation of the pump in an uncoupled state.
ATTENTION! Please ensure that the motor has been cut off from the electricity supply when the intermediate sleeve is being removed and re-installed. Each pump has been given an arrow to indicate the direction of rotation on the top of the bearing housing (part 350) by the factory. ATTENTION! Even if the pump runs in the wrong direction for only a short time, it can be damaged!
Page 6.1

SP series 6. Starting up / Operation / Shutting down
6.1.4 Tightening the WERNERT-bellows The serial shaft seal is a patented WERNERT bellows-type mechanical seal with the bellows made of elastomer (CSM or FPM) or PTFE. When using an elastomer bellows, the bellows seat (Part 482) acc. to Figure 7.59 is to be tightened only to such a degree that the space between bellows and neck of the sealing insert is sealed. A torque of approx. 7.5 Nm is specified as reference value. The WERNERT PTFE bellows is pretensioned with a tightening torque of approx. 15 Nm before delivery and must not be retensioned before starting. Check that the PTFE bellows is pretensioned before starting. By means of screws, the hoods removed (Part 683) are to be fixed again to the bearing block. ATTENTION! If leaks occur due to advanced wear of the seal rings, the bellows seat should not be tightened. If a different shaft seal design has been intended, tightening is not possible anyway. ONLY FOR WERNERT-ELASTOMERE-BELLOWS: The pump is supplied with a relaxed elastomere bellows so that the pre-tension due to longer periods of storage are not decreased. For this reason the elastomere bellows must be pretensioned before starting up by tightening the bellows seat.
6.1.5 Safety devices for the protection of people Please ensure that before starting up, rotating parts of the pump are not freely accessible.
Make sure that the protective device to prevent machinery being touched, must be attached above the coupling, as must the spray protection on the bearing housing. If the pump is driven using belts, all respective safety devices must be fixed above the discs and the belts. Electrical motors and other devices must be installed in accordance with the currently valid safety regulations (refer to 5.7).
6.2 Starting up the pump
When starting up the pump, please follow the following procedures: 1) If a flushing or sealing liquid supply is provided, same must first be started with the required
pressure and volume flow (refer to 7.2). 2) The supply and suction line as well as the pump body must be filled with liquid. A complete
ventilation of the pump body sufficient in time must be ensured. ATTENTION! The pump must not run dry. 3.) Valves on the suction side must be completely opened. Discharge-side shut-off valves should
preferably be slightly opened so that the pump is not operated against a closed valve, i.e. operation at zero delivery. However, if due to the plant conditions, the pump must be started against closed shut-off valves, this may result in an inadmissible heating of the pump.
ATTENTION! The pump may be operated against a closed shut-off valve only during starting and only for one minute at the most.
The manufacturer's consent is required if it is to be operated with closed shut-down fittings for longer periods of time. The pump may be started against a closed check valve.
4.) The drive is started up. 5.) Regulators on the discharge side must be opened so far so that nominal flow is achieved. If during operation it is expected that the shut-down fittings on the discharge side will be closed down, then a bypass must be installed in front of these and returned to the suction tank (not to the suction nozzle!). This is the only way in which overheating of the pump can be avoided. If the pump is being switched continuously (i.e. more than 3 switching on processes per hour) an auxiliary start-up device should be installed (star- triangle-switch, electronic smooth start up device,
Page 6.2

SP series 6. Starting up / Operation / Shutting down
hydraulic clutch or similar) in order to reduce mechanical strain. The use of this type of device depends on the utilisation factor of the machine (coupling performance, speed, switching frequency) and should be discussed with the manufacturer.
6.3 Operating the pump
During operation see to it that due to changes no inadmissible operating conditions may occur. These are in particular: - Discharge-side modifications, for example by opening or closing valves. In this context, see to it
that the required minimum volume flow (please refer to 4.2.4) is maintained. ATTENTION! In this state, there is a danger that after a short time already, the medium pumped takes inadmissible temperatures and the maximum admissible temperature of the surface is exceeded.
- Suction-side modifications, for example by closing valves, pollution of filters, pipelines, valves or in the medium as such lead to the reduction of the supply pressure. The result hereof may be insufficient lubrication or even dry running of the mechanical seal. ATTENTION! Under these conditions, the mechanical seal can be destroyed.
- The required pressure and volume flow at additional connections such as sealing, flushing liquid etc. must be ensured by the user (refer to 5.4 and 7.2). This applies in particular to quenching and sealing liquid. Here, a sufficient cooling and lubrication of the radial shaft ring and/or mechanical seal must be ensured. ATTENTION! Insufficient lubrication or dry operation results in the destruction of the parts to be lubricated.
- When using a suction tank, it must be ensured by the user that the tank is always sufficiently filled. Here, there is also a danger of dry running.
- The bearing must be controlled and maintained (please refer to 7.1 below). The application limits mentioned under Section 4.2 above are to be observed.
Page 6.3

SP series 6. Starting up / Operation / Shutting down
Page 6.4
6.4 Switching the pump off for a short period of time
The following procedure is to be performed if the pump is to be switched off for a short period of time: 1) The shut-down fitting on the discharge side must be closed or reduced to minimum flow (close
completely after the motor has been stopped). 2) The drive machine is switched off.
ATTENTION! Flushing and sealing liquid supply must continue even after the drive machine has been switched off.
3) If there is the danger of freezing, the liquid to be pumped must be removed from the pump.
6.5 Shutting the pump down permanently
The following steps must be carried out if the pump is to be shut down permanently: 1) The shut-down fitting on the discharge side is to be closed or turned to minimum volume (after
the motor has been switched off, it must be closed completely). 2) The drive is shut down. 3) The entire plant systems, including the pump, must be relaxed and emptied. 4) The rinsing and sealing liquid supply must be turned off. 5) If the liquid to be pumped tends to crystallise, the pump must be rinsed with clean water.
SP series 7. Maintenance / Repairs
Page 7.1
7. Maintenance / Repairs
7.1 Monitoring and maintaining the shaft bearing
The pumps are equipped with roller bearings. ATTENTION! The bearing temperature can exceed the environment temperature by up to 60°C in case of permanent use. The bearings must be checked and/or controlled regularly. The bearings are suitable for a nominal lifespan of 16.000 operating hours. After this period, a vibration test should be carried out, which must be repeated from time to time depending on the working conditions of the roller bearings. The vibration values according to DIN ISO 10816-7 should be respected. At the end of the nominal lifetime, latest after 3 years, the bearings must be checked and replaced if necessary. In case of vibration speeds according to DIN ISO 10816-7, zone C or D, the bearings should be exchanged at short notice respectively immediately. In critical operation cases we recommend continuous vibration control. The nominal lifespan is based on continuous operation. In case of any deviation from the operation, as described above, the lifespan of the bearings may be seriously reduced. ATTENTION! Negligence of lubrication can lead to a non acceptable increase of temperature. It may also reduce the lifespan of the bearings due to increased wear, and finally may destroy them.
7.1.1 Oil lubrication Ex factory, the pumps are delivered without oil filling. In case of oil-lubricated bearings, the bearing housing, prior to commissioning, must be filled in via the filling port S1 until the oil appears in the screw-in element of the tilted oil regulator. ATTENTION! The oil level of the bearing housing must not exceed this level as otherwise oil leaks at the ventilation channel of the constant level oiler. Then the tilted constant level oiler is filled in accordance with Fig. 7.1 and turned back into its vertical position. As long as the constant level oiler contains oil in this position, there is sufficient oil in the bearing housing. Please take great care to ensure that the cork seal under the glass container of the constant level oiler is exactly central under the edge of the glass and that the glass container is screwed on tight. Do not screw it too tight, as this will cause the cork seal to slip and this in turn will cause oil to leak. The glass container should also never be removed from its holder. A visual inspection must be performed at regular intervals. The oil level being too low, oil must be refilled. An oil change should be performed annually, at least, however, after 10,000 operating hours. The lubricating oils are to be selected according to the ambient temperature. In case of ambient temperatures between 0°C and 40°C, C-LP oils of viscosity class ISO VG 68-100, DIN 51517 part III, are used (SAE 20-30). For ambient temperatures deviating herefrom, the required lubricating oil qualities must in each individual case be agreed with the manufacturer. The volumes of oil required are listed below: Size of pumpe Volumes of oil in Litres SP 250/300 approx. 2,5 SP 300/350 approx. 9,0 SP 350/400 approx. 9,0

SP series 7. Maintenance / Repairs
Page 7.2
Legend to Fig. 7.1 a) Oil level b) Fill oil here c) never fill in here S1 fill, de-air S2 refill S3 drain off
Fig. 7.1 Oil lubrication and constant level oiler
7.2 Supply of mechanical seals
The appropriate rinsing and sealing liquid volumes and pressures have been listed below. Section 4.5 contains detailed descriptions about the different types of mechanical seals. In every case the information on the order confirmation or the data sheets is decisive as the values listed below are for guidance only. When selecting quench, rinsing and sealing media, compatibility with the fluid to be pumped must be ensured. Rinsing liquid requirements for the mechanical seal: The liquid has to be selected in accordance to the expected environment-temperature in order to prevent freezing of the fluid. The chemical resistance of the sealing-liquid-system against the sealing liquid must be taken into consideration. The operator must ensure that the sealing medium is compatible with the pumped medium. Since small quantities of sealing medium are also entrained into the pumped medium, chemical compatibility and possibly food compatibility must also be assured.
7.2.1 Single mechanical seal as defined by section 4.5.1, 4.5.2
a) Interior rinsing: No exterior supply necessary b) Interior rinsing with quench: Medium : usually, clean, filtered water Gauge pressure: 0.7 to 8.5 bar before flow regulator Volume: 30 litres per hour (will adjust itself) c) Continuous rinsing: Medium : usually clean, filtered water Volume : approx. 400 litres per hour (LPH) depending on the size of the pump
≤ 200 LPH possible for SSIC/SSIC mechanical seal arrangement. In this case the sealing-area is not rinsed completely.
d) Stationary flushing: Medium : usually industrial water Volume : approx. 132 litres for a flushing period of 5 minutes (minimum)
S1 fill, de-air S2 refill S3 drain off
a)
b)c)

SP series 7. Maintenance / Repairs
Page 7.3
7.2.2 Stationary double acting mechanical seals as defined by section 4.5.3
Medium : usually clean, filtered water Gauge pressure: 0,75 x suction pressure + 0,25 x max. final pressure + 1,5 bar (suction and discharge pressure measures at pump nozzle) Volume : 120 litres per hour
7.3 Disassembly and assembly of the pump
Disassembly and assembly of the pump is explained below on a single WERNERT-elastomere- bellow-mechanical seal with a detailed listing. If you are disassembling or assembling a pump with different shaft seals, please refer to the drawings in these operating instructions. The manufacturer also provides suitable product training upon request. Fig. 4.1 shows a cross section drawing of an SP pump in process design, which is characteristic for all sizes of this pump.
7.3.1 Disassembly of the pump Any work on the machine may on principle be done only with the electric junctions disconnected. The pump aggregate must be protected from unintended starting. The
operating manual of the motor should be respected. ATTENTION! Prior to being dismounted, the pump must be decontaminated and neutralized. Always wear suitable protective clothing! Contact with the liquid being
pumped must be avoided under all circumstances! When draining the medium pumped make sure to avoid any danger to personnel and environment. Statutory provisions must be complied with. ATTENTION! For the complete pump casing, including foot plate (part 892) we recommend a revision in our factory. Because of needed power data caused by the size of the pump, an exact treatment and adjustment is only possible in our work shop. Steps for disassembly for the back pull-out unit (1-17):
1.) Disconnect electric motor from power supply. Remove safety guard. 2.) Disassemble spacer coupling (between electric motor and pump) by loosening cylinder screws.
Remove intermediate sleeve of disassembled coupling. 3.) Loosen hexagon screws at support foot (part 183). 4.) Loosen the hexagon nuts (920.04) to remove the pull-out-unit from the pump casing. 5.) Remove pull-out-unit from pump casing by means of removal screws (M20). Depending on the
pumped media measurements for personnel protection should be taken. 6.) Loosen the impeller cap (part 260) in sense of rotation of the pump by using a strap wrench.
Take away the o-ring (part 412.10). Fix shaft before hand. 7.) Loosen the grub screw (part 904) and loosen the impeller nut (922) in sense of rotation of the
pump with an open jawed spanner (SW65). Take away the disc (Part 550) from the Hub. Fix shaft beforehand.
8.) Pull off the impeller (part 232) by using a removal device. Take away the O-ring (part 412.06). Remove the keys (part 940.2) from the shaft. Fix shaft before hand. Pull off the rotating seal ring (part 475).
9.) Loosen the hexagon nut to separate seal insert from baring housing. 10.) Remove O-ring (part 412.04) from the seal insert. Loosen the hexagon nut (part 920.12). Take
away seal cover (part 471), bellows seat (part 482), bellows (part 481) and stationary seal ring (part 472) from the seal insert.
11.) Remove the grub screws (part 902.12) from the intermediate plate as well as retaining ring from seal insert. Separate intermediate plate and seal insert.

SP series 7. Maintenance / Repairs
Page 7.4
12.) Pull off the shaft sleeve (part 524) with O-ring (part 412.05) and locking disc system, consisting of loose collar (part 505), thrower (part 507) and spanner (part 552), from the shaft.
13.) Pull off part of the coupling from the pump shaft. Loose lock screw before hand. Remove key (part 940.1).
14.) Remove hexagon crews (part 901.13). Dismount bearing housing cover (part 360) with shaft seal ring (part 421) and final bearing housing cover (part 361) with shaft seal ring (part 421).
15.) Removal of the shaft nut (part 921) with lock washer (part 931). 16.) Drive the pump shaft with the radial ball bearing on pump side by hitting with a plastic
hammer on the face of coupling out of the bearing housing (part 350). Pull off the radial ball bearing with help of a removal tool.
17.) Take out the radial ball bearing on coupling side.
7.3.2 Assembly of the pump The assembly has to be carried out in the reverse order of the disassembly.

SP series 7. Maintenance / Repairs
Page 7.5
7.4 Spare parts
On principle, replacement parts should only be ordered according to a parts list belonging to the pump stating the identification number of the part and / or the serial number of the pump. On principle, every individual part can be supplied. Standard parts are always in stock at the manufacturer's or his representatives and this guarantees short delivery periods. However, we recommend that the client should also keep the parts listed below in his stores. All parts of the mechanical seal, i.e. for the single WERNERT-elastomere-bellows-mechanical seal, which come into contact with liquid are wear parts for one year of operation (9,000 operating hours) of the pump: - Part 472 Stationary seal ring - Part 475 Rotating seal ring - Part 481 Bellows The following O-rings should also be replaced regularly: - Part 412.04 O-ring (casing seal) - Part 412.041 O-ring (casing seal) - Part 412.05 O-ring (shaft wearing sleeve) - Part 412.06 O-ring (impeller) For the single WERNERT-elastomere-bellows-mechanical seal, the following parts are regarded as replacement parts after two years of operation of the pump: - Part 153 Suction nozzle - Part 210 Shaft - Part 232 Clockwise impeller - Part 260 Impeller hub cap - Part 321 Radial ball bearing (2 pieces) - Part 322 Radial roller bearing - Part 400.01 Gasket - Part 412.01 O-ring (discharge nozzle) - Part 412.02 O-ring (diffuser) - Part 412.03 O-ring (suction nozzle) - Part 412.10 O-ring (impeller cap) - Part 412.17 O-ring (suction nozzle) - Part 413.01 Round section seal (casing gasket) - Part 421 Radial shaft seal (on bearing cover) - Part 443 Seal insert - Part 471 Seal cover - Part 482 Bellows seat - Part 505 Loose collar - Part 506.1 Retaining ring - Part 506.2 Retaining ring - Part 507 Thrower - Part 524 Shaft wearing sleeve - Part 552 Spanner (in locking system for shaft wearing sleeve) - Part 940.1 Key (shaft coupling connection) - Part 940.2 Key (2 pieces, shaft impeller connection) The manufacturer can at any time - if the serial number of pump is stated - provide an offer for the replacement parts required for the pump in question.


SP series 8. Faults; causes and remedies
8. Faults; causes and remedies Non-conforming use may give rise to faults during operation. These are listed below. Depending on the pumped medium, faults causing leaks in the pump can in particular cause considerable bodily injury and/or damage to the machine and the environment. Such faults are highlighted in particular.
Fault Possible cause Rectification Pump not filled sufficiently before starting up.
8.1 Pump not pumping even though motor is working.
8.1.1 Refill again and de-air.
8.1.2 Suction tank empty or liquid level below inlet nozzle of suction line, therefore no liquid is flowing.
Install automatic monitoring device. Train personnel.
8.1.3 Suction height too great leads to stall.
Position pump lower, and / or position liquid level higher.
8.1.4 Pump sucking in additional air leads to stall.
Check suction pipe and shaft seal for leaks.
8.1.5 Air sack formation in the pipes leads to stall.
Lay pipes correctly. Check position of armatures. If necessary fit de-airing devices.
8.1.6 The overall delivery head is greater than that stated.
Adapt plant to suit pump or vice versa, otherwise use different pump.
8.1.7 Impeller melted open in the hub region or has been destroyed due to faults as described in 8.6, 8.7.1-8.7.3 or 8.8.
Repair pump, check operational conditions. Train personnel.
8.1.8 Shaft broken in the pump. Repair pump, check operational conditions, train personnel.
8.2 Flow and / or delivery head to low.
8.2.1 Direction of rotation of pump is incorrect.
Change direction of rotation of motor to ensure pump rotates in the right direction. Check pump for damage before starting up again.
8.2.2 Plant conditions do not agree with pump design.
Adapt plant to suit pump or vice versa, if necessary use a different pump.
8.2.3 High pressure losses in unfavourably laid pipes.
Increase diameter of pipes and fittings, avoid bends, create favourable transitions.
8.2.4 Pipes or pump blocked. Clean sieve, filter, pipes, fittings and pump. 8.2.5 High pressure loss in suction
pipe, therefore cavitation. Clean suction basket or suction pipe, possibly increase diameter of suction pipe. Check foot valve to see if it opens fully.
8.2.6 Suction height too great, therefore cavitation.
Position pump lower and / or position level of liquid higher.
8.2.7 Temperature of liquid to be pumped too high, therefore cavitation.
Reduce temperature of liquid to be pumped and / or increase suction pressure.
8.2.8 High proportion of gas in liquid to be pumped.
Calm liquid to be pumped. Prevent liquid vortex using guide crosses. Lengthen circulation times. Make gassing out possible.
8.2.9 Viscosity of liquid to be pumped higher than originally assumed.
Adapt pump, if necessary use a different pump. Alternative: Dilute or heat liquid to be pumped.
8.2.10 Impeller worn due to abrasion. Replace impeller.
Page 8.1

SP series 8. Faults; causes and remedies
Fault Possible cause Rectification 8.3 Motor is overloaded.
8.3.1 Pump cannot generate intended pressure due to system design. Actual operating point is reached at a higher flow than was intended with original design. This leads to increased power requirement.
Throttle valves on discharge side until intended pressure achieved. If no regulators have been fitted, pump must be adapted to suit actual system (Impeller correction, adjusting speed, install throttle bush).
8.3.2 Only if speed regulation: no. of revs. too high.
Reduce no. of revs. Remove causes which led to increased speed (e.g. clean filter, remove deposits in pipes ).
8.3.3 Density of liquid to be pumped greater than originally assumed.
Fit motor with greater power.
8.3.4 Viscosity of liquid to be pumped greater than originally assumed.
Fit motor with more power. Alternatively dilute liquid or preheat liquid to be pumped.
8.3.5 Increased friction in double acting mechanical seal.
Check sealing pressure and if possible reduce it. Otherwise check seal for correct installation or wear and tear.
8.3.6 Damage to pump. Therefore increased friction.
Repair pump.
8.4 WERNERT-Elastomere-bellows-mechanical seal leaks immediately after starting up.
8.4.1 WERNERT-Elastomere-bellows not tightened before starting up.
Tighten bellows according to section 6.1.4 and Fig. 7.59.
8.5 Mechanical seal leaks after longer period of operation.
8.5.1 Rotating seal ring, stationary seal ring , bellows and / or seal elements worn, slightly damaged or attacked by chemicals.
Mechanical seals are wearing parts! Install spare parts. If necessary, plane surface on impeller for rotating seal ring (0.1 - 0.2 mm). If chemical attack, check material used.
8.5.2 Pump not running evenly. Shaft banging.
Check shaft for roundness and check rolling bearings.
8.5.3 Only exterior PTFE-bellows-MS: leak between clamping point of seal and shaft sleeve due to creeping of PTFE.
Slightly tighten screws of clamping ring.
Page 8.2

SP series 8. Faults; causes and remedies
Fault Possible cause Rectification 8.6 Single mechanical seal is destroyed spontaneously and therefore leaks.
8.6.1 The pump has run dry, i.e. there is no liquid in the entire pump. Hence the sliding faces overheat and they are thermally / mechanically destroyed plus frequently plastic parts nearby such as impeller and bellows are destroyed by the heat (so-called running hot).
Running dry is a typical operating error. The pump must be filled completely and de-aired before it is started up. Armatures on the suction side must be completely open. Train personnel accordingly. Repair pump.
8.6.2 Semi- running -dry in case of stall, i.e. even though a liquid ring is rotating with the impeller, it does not reach the interior sliding faces. Therefore the seal runs hot.
Take measures to prevent flow being interrupted. Install automatic monitoring device. Train personnel. Repair pump. Equip single mechanical seal with continuous rinsing or if necessary install double acting mechanical seal.
8.6.3 Due to increased gas particles in liquid being pumped, a gas ring is formed around the rotating and stationary seal rings. This gas is pressed through the sliding surfaces by the overatmospheric pressure in the pump. Therefore the seal runs hot.
Calm liquid being pumped. Prevent liquid vortex by using guiding crosses. Lengthen circulating times. Make de-gassing possible. Repair pump. Equip single mechanical seal with continuous rinsing or if necessary equip with double acting mechanical seal.
8.6.4 The liquid is virtually being pumped at boiling temperature. Due to the increase in temperature in the seal gap, due to friction and simultaneous decrease in pressure, the liquid being pumped evaporates in the seal gap. Possible crystals in the liquid might crystallise out. Therefore the seal runs hot.
Repair pump. Equip single mechanical seal with continuos rinsing or possibly equip with double acting mechanical seal.
8.6.5 High pressure losses on the suction side due to blockage or throttled valves cause a low pressure at the mechanical seal. Air is sucked from the atmosphere through the sliding surfaces. Seal runs hot.
Minimise losses on suction side. Train personnel accordingly. Possibly decrease diameter of impellers back-vanes. Equip single mechanical seal with quench or possibly equip with double acting mechanical seal.
Due to pressure losses on the suction side due to increased flow with simultaneous pressure decrease at discharge nozzle causes low pressure in the area of the mechanical seal. Air is sucked from the atmosphere through the sliding areas. Seal runs hot.
Throttle valves on discharge side in order to get into the admissible operational range. Train personnel accordingly. Repair pump. Possibly decrease diameter of impellers back-vanes. Equip single mechanical seal with quench or possibly equip with double acting mechanical seal.
8.6.6
Page 8.3

SP series 8. Faults; causes and remedies
Fault Possible cause Rectification 8.7 Massive leaks
8.7.1 Pump running "in its own juice", i.e. drive power is completely transformed into increased pump temperatures if liquid cannot be exchanged properly. This occurs if valves on pressure side remain closed after pump has been started up...
After starting up pump open valves on pressure side at least so far that the minimum pumping volume is achieved. Train personnel accordingly. If necessary install automatic device. Repair pump.
8.7.2 or the pipe lines are blocked... Clean pipelines, repair pump. 8.7.3 or the static head of the system
is not achieved by the pump. Adapt system to suit pump or vice versa, possibly use different pump.
8.7.4 Wear: the casing may be penetrated.
Worn parts must be replaced. Specify suitable intervals for checking and replacing parts.
8.7.5 Chemical corrosion: cracks may form.
Check the chemical resistance of the parts in contact with the pumped liquid and replace any corroded parts. Specify suitable intervals for checking and replacing parts.
8.8 Pump is destroyed because it was rotating in wrong direction.
8.8.1 Pump rotating in the wrong direction. (Impeller in contact with casing, bearing cover destroyed, liquid no longer being pumped.)
Change poles on motor in order to achieve correct direction of rotation for the pump. Repair pump.
8.9 Increased bearing temperature.
8.9.1 Motor aligned badly (Coupling halves are displaced in an axial, radial, angled direction).
Realign motor. The alignment has to be made according to the operating instructions of the coupling. Ensure axial coupling distance. For coupling type N-Eupex applies: 6 - 8 mm.
8.9.2 Increased axial and / or radial forces because pump is being operated with flows which are too low or too high.
Operate pump with permissible flow.
8.9.3 Pump body is twisted by pipes. Change position of pipes or position of pump to remove tension. Then align motor. Possibly position aggregate freely.
8.9.4 Not sufficient oil. Correct this situation. 8.9.5 The lifespan of the radial ball
bearings has been exceeded. Replace the radial ball bearings and adhere to the intervals according to 7.1.
8.10 Uneven running (noises, vibrations)
8.10.1 Motor aligned badly (Coupling halves are displaced in an axial, radial, angled direction).
Realign motor. The alignment has to be made according to the operating instructions of the coupling. Ensure axial coupling distance. For coupling type N-Eupex applies: 6 - 8 mm.
8.10.2 Coupling packets worn. Replace coupling packets. 8.10.3 Bearing is damaged. Replace roller bearings and shaft seal rings. 8.10.4 Not fixed tightly to foundation. Tighten fixing screws and anchors. 8.10.5 Cavitation. Take measure to avoid cavitation:
- reduce flow being pumped - increase suction pressure - reduce losses on suction side
Page 8.4

SP series 8. Faults; causes and remedies
Page 8.5
Fault Possible cause Rectification 8.11 Leakage from the quench seal
8.11.1 Quench container insufficiently filled or frozen.
Repair quench seal, check mechanical seal. Select suitable quench medium. Specify suitable interval for inspection.
8.11.2 Radial shaft seal ring 421.2 is damaged.
Replace radial seal shaft ring, check mechanical seal. Specify suitable interval for inspection / replacement.
8.12 Leakage from the double-acting mechanical seal
8.12.1 Pressure or amount of sealing liquid not set in accordance with operating instructions.
Check mechanical seal and replace damaged parts. Set suitable pressure and quantity for sealing liquid.
8.12.2 Unsuitable sealing liquid. Check mechanical seal and replace damaged parts. Select sealing liquid in accordance with 7.2.
8.12.3 Vibrations Check mechanical seal and replace damaged parts. Identify and eliminate cause of vibrations. Check alignment of motor in relation to pump and correct it if necessary.

SP series 9. Associated documentation
Page 9.1
9. Associated documentation Each pump of the SP series is supplied with these operating instructions. Other documentation which describes the pump is not included in delivery as standard. The scope of the documentation to be delivered is agreed for each order separately.


SP series 10. Annex A: Name Plate
10. Annex A: Name Plate
10.1 Design of the name plate
The design of the name plate is explained by means of code letters a – q.
Figure A.1 Name plate with code letters Figure A.2 Exemplary name plate Field a = Type designation Field b = Serial number Field c = Impeller: Diameter (front / main / back–vanes) in mm Field d = Impeller: Blade height in mm Field e = Impeller: Number of blades Field f = If applicable throttling bush: Diameter in mm Field g = Nominal flow rate Q in m³/h Field h = Nominal delivery head H in m Field i = Nominal speed in 1/min Field k = Coupling power with density as per Field l / nominal drive power, each in kW Field l = Liquid density in kg/dm³ Field m = WERNERT mechanical seal code (WGC), please also refer to Section 10.2 Field n = Mechanical seal materials, product-side, please also refer to Section 10.3 Field o = Material of the shaft sleeve, product-side, please also refer to Section 10.3 Feld p = Year of construction Feld q = Weight of pump
Page 10.1

SP series 10. Annex A: Name Plate
10.2 WERNERT mechanical seal code (WGC)
In the field m of the name plate, the design of the mechanical seal is entered by means of a code which always consists of three capital letters. The first letter encrypts the general design: C = Cartridge sealing according to EN 12756, metal-free design within the liquid area D = Double seal according to EN 12756 (back-to-back), design K, shape UU E = Single-acting mechanical seal with stationary spring suspension and secondary O-ring seal F = Single-acting external mechanical seal with rotating PTFE bellows K = Single-acting mechanical seal with rotating tapered ring R = Single-acting mechanical seal with rotating spring suspension and secondary O-ring seal S = Stationary double seal W = WERNERT bellows-type mechanical seals X = Special design The second letter encrypts the manufacturer of the mechanical seal: B = Burgmann C = Crane D = Durametallic E = WERNERT-EPDM- bellows H = WERNERT-CSM bellows M = Merkel P = Pacific T = WERNERT-PTFE bellows V = WERNERT-FPM bellows The third letter then distinguishes the special designs. More detailed information is available from the manufacturer. The following codes apply to WERNERT bellows-type mechanical seals: WERNERT EPDM
bellows WERNERT FPM
bellows WERNERT PTFE
bellows WERNERT CSM bellows
Internal rinsing WEN WVN WTN WHN Permanent rinsing WED WVD WTD WHD Rinsing after use WES WVS WTS WHS Quench WEQ WVQ WTQ WHQ Quench, continuous rinsing WEP WVP WTP WHP Quench, rinsing after use WER WVR WTR WHR Stationary quench WEA WVA WTA WHA Stationary quench, continuous rinsing
WEB WVB WTB WHB
Stationary quench, rinsing after use
WEC WVC WTC WHC
Page 10.2

SP series 10. Annex A: Name Plate
Page 10.3
10.3 Mechanical seal materials
The mechanical seal materials are coded according to the material code in EN 12756. In field n, 5 materials must be indicated: 1st figure: Material of the spring-suspended seal ring 2nd figure: Material of the not spring-suspended seal ring 3rd figure: Material of the auxiliary gaskets (any additional material in parentheses) 4th figure: Material of the spring (if available) 5th figure: Material of the other structural parts Field o: Material of the shaft sleeve The following materials are used for WERNERT bellows-type mechanical seals: 1st/2nd figure: B = Carbon (synthetic-resin impregnated) C = Special carbon Q1 = SSiC (Silicon carbide, pressureless sintered) V = Aluminum oxide ceramics Y1 = PTFE, glass-reinforced Y2 = PTFE, carbon-reinforced 3rd figure: E = EPDM H = CSM T = PTFE V = FPM 4th figure: - = Spring not available in case of WERNERT elastomer bellows T = 1.1200 / HALAR® (other materials according to standard), in case of WERNERT PTFE bellows 5th figure: - = Other structural parts not available Field o: B = Carbon (synthetic-resin impregnated) C = Special carbon G = 1.4571 M1 = Hastelloy® B M2 = Hastelloy® C Q1 = SSiC (Silicon carbide, pressureless sintered) Ti = Titanium V = Aluminum oxide ceramics For further material identifications, please refer to Standard EN 12756.


SP series 11. Annex B: Admissible Nozzle Loads, weight
Page 11.1
11. Annex B: Admissible Nozzle Loads, weight The admissible nozzle loads listed in Table B.1 are in line with API 610. The x axis is coaxial to the pump shaft, the y axis is the vertical line, and the z axis the horizontal line. The forces and moments listed can be taken up irrespective of their direction.
Vertical forces Horizontal forces Moments Type series SP Suction
nozzle Delivery nozzle
Suction nozzle
Delivery nozzle
Suction nz./
Delivery nz. Suction nz./
Delivery nz.
Suction nz /
Delivery nz.
Size Fy [N] Fy [N] Fx/Fz [N] Fx/Fz [N] Mx [Nm] My [Nm] Mz [Nm]250/300
± 5340 ± 6675 8010 / 6675
5340 / 4450
6105 / 5020
4613 / 3799
2985 / 2442
300/350 ± 5785 ± 8010 8900 / 7120
6675 / 5340
6376 / 6105
4749 / 4613
3120 / 2985
350/400
± 6675 ± 8900 10235 / 8456
7120 / 5785
7326 / 6376
5427 / 4749
3663 / 3120
Table B.1 Admissible nozzle loads for Type SP weight Size kg 250/300 K 870 300/350 K 1230 300/350 E 1300 350/400 K 1280 350/400 E 1350 Table B.2 weight of pump


SP series 12. Annex C: Tightening Torques
Page 12.1
12. Annex C: Tightening Torques Thread size Strength class Tightening torque [Nm] min. max. M10 8.8 30 46 M12 8.8 50 79 M14 8.8 90 125 M16 8.8 150 195 M18 8.8 225 280 M20 8.8 320 390 M22 8.8 440 530 M24 8.8 550 670 M27 8.8 810 1000 M30 8.8 1090 1350 Thread size Strength class Tightening torque [Nm] min. max. M10 A2/A4 70 20 30 M12 A2/A4 70 33 50 M14 A2/A4 70 57 87 M16 A2/A4 70 84 120 M18 A2/A4 70 115 196 M20 A2/A4 70 190 275 M22 A2/A4 70 260 370 M24 A2/A4 70 330 476 M27 A2/A4 70 460 680 M30 A2/A4 70 650 930 Table C.1 Tightening torques for screw connections Tightening torques of the impeller nut (part 922): 300 Nm.
The following applies to the variant with drainage: The screws for fastening the flange, Part 723 and the cap, Part 580 must be tightened with a tightening torque of 15 Nm.