operations guide: touch screens with roomview ... - crestron · at-a-glance view of the...
TRANSCRIPT

Crestron Touch Screens with RoomView®
Scheduling for Crestron Fusion® Operations Guide

Crestron product development software is licensed to Crestron dealers and Crestron Service Providers (CSPs) under a limited non-exclusive, non-transferable Software Development Tools License Agreement. Crestron product operating system software is licensed to Crestron dealers, CSPs, and end-users under a separate End-User License Agreement. Both of these Agreements can be found on the Crestron website at www.crestron.com/legal/software_license_agreement. The product warranty can be found at www.crestron.com/warranty. The specific patents that cover Crestron products are listed at patents.crestron.com. Certain Crestron products contain open source software. For specific information, please visit www.crestron.com/opensource. Crestron, the Crestron logo, Crestron Fusion, Crestron RoomView, Crestron Toolbox, and RoomView are either trademarks or registered trademarks of Crestron Electronics, Inc. in the United States and/or other countries. Other trademarks, registered trademarks, and trade names may be used in this document to refer to either the entities claiming the marks and names or their products. Crestron disclaims any proprietary interest in the marks and names of others. Crestron is not responsible for errors in typography or photography. This document was written by the Technical Publications department at Crestron. ©2016 Crestron Electronics, Inc.

Crestron Touch Screens with RoomView Scheduling for Crestron Fusion
Operations Guide – DOC. 7552F Contents • i
Contents
Touch Screens with RoomView Scheduling for Crestron Fusion 1
Introduction ............................................................................................................................... 1 Touch Screen Overview............................................................................................................. 2 Touch Screen Setup ................................................................................................................... 3 Updating the Crestron RoomView Scheduling Project ............................................................. 6 Configuration ............................................................................................................................. 7
Room Configuration .................................................................................................... 9 Automation ................................................................................................................ 11 Display ...................................................................................................................... 14 Schedule .................................................................................................................... 15 Reservation ................................................................................................................ 16 Broadcast ................................................................................................................... 18 Diagnostics ................................................................................................................ 19
Custom Properties .................................................................................................................... 20 Adding Custom Properties ........................................................................................ 20 Setting Custom Properties for a Touch Screen .......................................................... 21 Room Configuration Settings .................................................................................... 22 Automation Settings .................................................................................................. 24 Display Settings ......................................................................................................... 26 Schedule Settings ...................................................................................................... 27 Reservation Settings .................................................................................................. 28 Broadcast Settings ..................................................................................................... 29


Crestron Touch Screens with RoomView Scheduling for Crestron Fusion
Operations Guide – DOC. 7552F Touch Screens with RoomView Scheduling for Crestron Fusion • 1
Touch Screens with RoomView Scheduling for Crestron Fusion
Introduction Crestron® touch screens with RoomView® scheduling work directly with the Crestron Fusion® Enterprise Management Platform to provide powerful enterprise-wide room scheduling solutions. Installed outside the entrance to every meeting room, the touch screen provides an immediate view of each room’s availability with the ability to look up the calendar for any room on the network and even book the room right on the spot. The dual color interface and buttons give a clear indication of a room’s status at a glance, lighting green when the room is available and red when it is booked. The touch screen’s contoured shape ensures that even when mounted in a narrow hallway the buttons remain clearly visible at a distance from either side.
Different touch screen models have different features. The amount of buttons varies with different models. Some have a built-in proximity sensor, and others can have occupancy sensors attached. For more information, consult the guide that came with the touch screen. Guides are available at www.crestron.com/manuals.
For more information on the Crestron Fusion interface, refer to the Touch Screens with RoomView Scheduling for Crestron Fusion User Guide (Doc. 7553) at www.crestron.com/manuals.
For more information on Crestron Fusion, refer to the Crestron Fusion Getting Started Guide (Doc. 7502) at www.crestron.com/manuals.
NOTE: This document references RoomView Scheduling software version 2.1 or later.
Touch Screens with RoomView Scheduling for Crestron Fusion Crestron
2 • Touch Screens with RoomView Scheduling for Crestron Fusion Operations Guide – DOC. 7552F
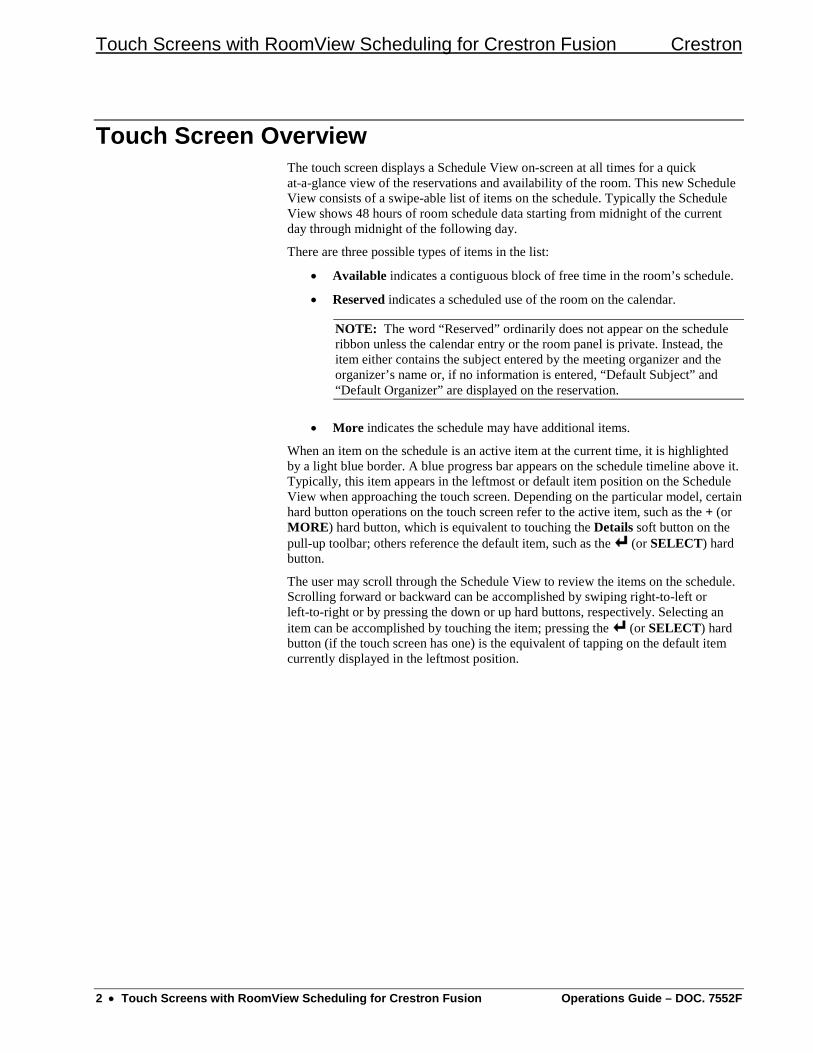
Touch Screen Overview The touch screen displays a Schedule View on-screen at all times for a quick at-a-glance view of the reservations and availability of the room. This new Schedule View consists of a swipe-able list of items on the schedule. Typically the Schedule View shows 48 hours of room schedule data starting from midnight of the current day through midnight of the following day.
There are three possible types of items in the list:
• Available indicates a contiguous block of free time in the room’s schedule.
• Reserved indicates a scheduled use of the room on the calendar.
NOTE: The word “Reserved” ordinarily does not appear on the schedule ribbon unless the calendar entry or the room panel is private. Instead, the item either contains the subject entered by the meeting organizer and the organizer’s name or, if no information is entered, “Default Subject” and “Default Organizer” are displayed on the reservation.
• More indicates the schedule may have additional items.
When an item on the schedule is an active item at the current time, it is highlighted by a light blue border. A blue progress bar appears on the schedule timeline above it. Typically, this item appears in the leftmost or default item position on the Schedule View when approaching the touch screen. Depending on the particular model, certain hard button operations on the touch screen refer to the active item, such as the + (or MORE) hard button, which is equivalent to touching the Details soft button on the pull-up toolbar; others reference the default item, such as the (or SELECT) hard button.
The user may scroll through the Schedule View to review the items on the schedule. Scrolling forward or backward can be accomplished by swiping right-to-left or left-to-right or by pressing the down or up hard buttons, respectively. Selecting an item can be accomplished by touching the item; pressing the (or SELECT) hard button (if the touch screen has one) is the equivalent of tapping on the default item currently displayed in the leftmost position.

Crestron Touch Screens with RoomView Scheduling for Crestron Fusion
Operations Guide – DOC. 7552F Touch Screens with RoomView Scheduling for Crestron Fusion • 3
Touch Screen Setup The touch screen supports a direct connection to Crestron Fusion. To establish this connection, Crestron Fusion needs the device’s IP address and certain other settings have to be made. To determine the device’s IP address, the touch screen must be put into Setup mode.
1. Enter Setup mode either by touching the screen while booting the unit or, if the touch screen is already running, by pressing the first four hard buttons on touch screen in sequence twice (i.e., 1, 2, 3, 4, 1, 2, 3, 4) within five seconds. (On touch screens with buttons on the left and right sides of the display, press the first four hard buttons on the left side.)
NOTE: For details on the setup options for the touch screen, refer to its configuration guide (Doc. 7414) at www.crestron.com/manuals.
NOTE: Set the touch screen to User Project Mode Off to load the Crestron RoomView® Scheduling display project installed with the firmware. Updates to the firmware OS may also upgrade the built-in scheduling project. If another project is loaded to the touch screen, touch User Project Mode Off to change the mode to On. Additionally, the touch screen must not have any IP table entries from an old project, as unresolved connections may keep RoomView Scheduling offline (even though Crestron Fusion will show the scheduling touch screen asset as online).
2. Note the IP address listed on the setup screen.
NOTE: DHCP is enabled by default. The network assigns an IP address as soon as it detects the device. However, static IP addressing is recommended for permanent installations.
3. Touch Save & Exit to exit Setup mode and start the device.
4. After the touch screen reboots, the screen displays “Offline” as shown in the following illustration.
Offline Screen

Touch Screens with RoomView Scheduling for Crestron Fusion Crestron
4 • Touch Screens with RoomView Scheduling for Crestron Fusion Operations Guide – DOC. 7552F
5. Using a web browser, navigate to the facility’s Crestron Fusion website to add the touch screen to Crestron Fusion.
6. Log in to Crestron Fusion using the username and password provided by the local system administrator.
7. Navigate to the Setup screen. When the Setup screen loads, the Rooms tab at the bottom of the tree view is selected by default, as is the root node of the tree.
8. In the room tree, find the room to associate with the touch screen.
9. Touch the desired room name to highlight it, and then click Add Asset. When the Add Asset window opens, the Asset Details tab is open by default.
10. Enter a name in the Name field and select Touchpanel from the Type drop-down menu.
Add Asset Window
11. Click the … button adjacent to the Make field. The Pick make and model window opens.
Pick Make and Model Window

Crestron Touch Screens with RoomView Scheduling for Crestron Fusion
Operations Guide – DOC. 7552F Touch Screens with RoomView Scheduling for Crestron Fusion • 5
NOTE: If the touch screen is not shown, download and install the driver file. In Crestron Fusion setup, under Objects/Asset Types, check Touchpanel and choose Edit. Select the Drivers tab and choose Add Driver. Browse to the driver file and choose Upload. Click Save & Close. The touch screen appears in the Pick make and model window.
12. Select the touch screen model being used and click OK. The Make and Model fields are filled in and grayed out.
NOTE: For best results, choose the driver that best matches the version of RoomView Scheduling software loaded on the touch screen. If it is not already installed in the version of Fusion being used, the latest driver can be downloaded from the Crestron website. Log in to the website and refer to the Resources tab on the product page for the model being used. In the Setup section of the web client, under Objects > Asset Types, select the touch screen and choose Edit. Then, select the Drivers tab and choose Add Driver. Brose to the downloaded driver file and choose Upload.
13. Select Network from the Connection Type drop-down menu.
14. Enter the IP address noted in step 2 in the IP Address/Hostname field.
15. Click Save & Close to commit the changes or Close to abandon them.
NOTE: For more information regarding adding an asset during the process of adding a room to Crestron Fusion, refer to the “Add/Edit/Delete a Room” topic in the Crestron Fusion online help.

Touch Screens with RoomView Scheduling for Crestron Fusion Crestron
6 • Touch Screens with RoomView Scheduling for Crestron Fusion Operations Guide – DOC. 7552F
Updating the Crestron RoomView Scheduling Project Periodically, updates to the touch screen’s Crestron RoomView Scheduling project and firmware are posted to the Crestron website. These updates must be installed according to the following procedure.
1. Download the latest supported .puf file from www.crestron.com/software.
2. Run the update procedure as described in the Crestron Toolbox™ help file.
3. Once the .puf file has been processed, enter Setup mode as described in step 1 of “Touch Screen Setup” on page 3.
4. Ensure that the User Project mode is set to Off.
5. Touch Save & Exit. The Crestron RoomView Scheduling project loads.
6. Confirm the version number when the Offline screen is displayed.

Crestron Touch Screens with RoomView Scheduling for Crestron Fusion
Operations Guide – DOC. 7552F Touch Screens with RoomView Scheduling for Crestron Fusion • 7
Configuration Configure the features of the touch screen user interface using a series of hidden settings screens. To access these screens, touch and hold the lower right corner of the toolbar in the area where the gear icon is shown in the following image. After 5 seconds, the gear icon appears and must be pressed quickly in order to access the settings screens.
Schedule View (Pull-up Toolbar Showing the Gear Icon)
The pull-up toolbar at the bottom of the display provides access to all of the touch screen’s configuration settings. (Crestron Fusion also offers the option to set the toolbar so it is always visible.) Touch an icon to display its associated screen. Touch the hard button for “close” or touch the “x” in the upper right corner to exit the configuration screens and toolbar.
Schedule View (Always-Visible Toolbar Showing the Gear Icon)
NOTE: If the number of settings icons does not fit on the touch screen, use the < and > arrows to navigate through the icons for the complete list.

Touch Screens with RoomView Scheduling for Crestron Fusion Crestron
8 • Touch Screens with RoomView Scheduling for Crestron Fusion Operations Guide – DOC. 7552F
NOTE: The user interface might look different depending on the settings.
Room Configuration Screen (Showing the Toolbar)
Before exiting the settings screens, touch Save to save changes. If a setting is changed that is also a custom property defined in Crestron Fusion, a warning is displayed to indicate that one or more of the changes entered was overwritten by the settings received from Crestron Fusion. If the settings screen is exited, either by pressing the hard button for “close” or after an inactivity timeout, unsaved settings are still remembered by the touch screen unless it is rebooted. Upon re-entering the toolbar, touch Save to save the changes previously made.
The following sections indicate the settings available on each of the settings screens. The accompanying images show the defaults for each setting. The “Custom Property” columns in the tables that follow correspond to the tables found in “Custom Properties” on page 20. Refer to those tables for additional details on the setting values.

Crestron Touch Screens with RoomView Scheduling for Crestron Fusion
Operations Guide – DOC. 7552F Touch Screens with RoomView Scheduling for Crestron Fusion • 9
Room Configuration The following image shows the default room configuration settings.
Room Configuration Screen
The following table explains the function of the Room Configuration screen controls.
Room Configuration Screen Controls
CONTROL FUNCTION CUSTOM PROPERTY
Panel Language
Select one of the installed languages. Languages currently available are Chinese (Simplified and Traditional), Danish, Dutch, English (US), English (UK), French, German, Hebrew, Italian, Japanese, Korean, Norwegian, Portuguese (Brazil and Portugal dialects), Russian, Spanish, and Swedish.
DisplayLanguage
Date Format Set the displayed date format. DateFormat Time Format Display the time in either 12 or 24 hour format. TimeFormat
Privacy Level
Privacy settings allow the user to control how much information is displayed on the touch screen for each meeting. Privacy is a touch screen-wide setting and affects how all meetings are displayed. The privacy feature includes four levels: public, semi-private, fully-private, and custom. When set to Public, the touch screen shows the reservation subject and the organizer. When set to Semi-Private, the touch screen shows the organizer but the subject and attendees are not shown. When set to Private, the touch screen does not display the subject or organizer. Custom allows Crestron Fusion to set custom properties that individually specify whether to show or hide the subject, organizer and attendees from the schedule ribbon/details screen.
RoomPrivacyLevel
(Continued on following page)

Touch Screens with RoomView Scheduling for Crestron Fusion Crestron
10 • Touch Screens with RoomView Scheduling for Crestron Fusion Operations Guide – DOC. 7552F
Room Configuration Screen Controls (Continued)
CONTROL FUNCTION CUSTOM PROPERTY
Panel Security
Select Anonymous, which allows anyone to access all touch screen features, or Touch screen PIN, which restricts touch screen features to only those users entering the proper PIN.
PanelSecurityLevel
Set Panel PIN
Open the Enter a 4-Digit PIN screen to select a Personal Identification Number for access to the touch screen.
PanelPin
Enable Push Model
Allow schedule updates to be "pushed" from Crestron Fusion to the scheduling touch screen, so the schedule is updated in near real time.
EnPushModel
Availability Threshold
Define a period of time to make an available room appear to be reserved prior to the start of a reservation. When set to Full, the room is considered reserved starting at the availability threshold time in advance of the meeting’s scheduled start time. The touch screen cannot be reserved within this availability threshold time period. When set to Off, the availability threshold is disabled. The availability is determined by the start of the next reservation.
AvailabilityThresholdRoomState
Availability Threshold
(min)
Set the time period within which the room cannot be reserved or listed as available in a room search in advance of a reservation start time. Each touch of the - and + buttons reduces or advances time period by 1 minute.
AvailabilityThresholdMin
*The following table correlates the date format with the required integer.

Crestron Touch Screens with RoomView Scheduling for Crestron Fusion
Operations Guide – DOC. 7552F Touch Screens with RoomView Scheduling for Crestron Fusion • 11
Automation The following image shows the default automation settings.
Automation Screen
The following table explains the function of the Automation screen controls.
Automation Screen Controls
CONTROL FUNCTION CUSTOM PROPERTY
Motion Sensor Type
The touch screen has connectors that allow a motion sensor to be physically wired to the touch screen.1 Motion sensor settings on this screen specify how motion is detected and managed by the device. There are two sensor types: basic and intelligent. A basic sensor detects when motion occurs in a room and when motion no longer occurs. Every time motion is detected in the room, the sensor sends a signal to the touch screen. As soon as motion is no longer detected, the sensor sends a signal to the touch screen. The touch screen tracks the occupied state of the room based on receiving a motion or no-motion signal from the sensor. A basic sensor has no internal timeout, so the touch screen provides a timeout factor for use with a basic sensor. The touch screen will hold the occupancy state for the specified timeout value regardless of how many motion or no-motion signals are detected during the time interval. When no motion has been detected for the entire duration of the timeout period, the occupancy state will revert to unoccupied. An intelligent sensor also sends motion and no-motion signals to the touch screen. With an intelligent sensor, the timeout for determining when to switch from occupied to unoccupied is contained within the sensor instead of originating in a signal from the touch screen.
MotionSensorType
(Continued on following page)

Touch Screens with RoomView Scheduling for Crestron Fusion Crestron
12 • Touch Screens with RoomView Scheduling for Crestron Fusion Operations Guide – DOC. 7552F
Automation Screen Controls (Continued)
CONTROL FUNCTION CUSTOM PROPERTY
Motion Sensor Type
(Continued)
Therefore, the timeout value specified in the touch screen is not used with an intelligent sensor. An intelligent sensor will simply signal the touch screen once when motion is detected, causing the touch screen to set its state to occupied. The sensor will signal the touch screen once when motion is no longer detected, causing the touch screen to set its state to unoccupied. No additional touch screen logic is used. Set Crestron occupancy sensors to Intelligent and Normally Open.
MotionSensorType
Motion Sensor Output
The two choices on this drop-down, Normally Open and Normally Closed, indicate the initial state of the motion sensor.1 When the motion sensor is set to Normally Open, the sensor indicates motion by a basic contact closure. When the sensor is set to Normally Closed, the senor indicates motion by opening. Refer to the documentation that came with the sensor.
MotionSensorOutput
Motion Sensor
Connection
The options are Local2 and Crestron Fusion. When Local is selected, the motion sensor1 is physically attached to the touch screen. When Crestron Fusion is selected, the sensor is attached to another device, such as a control processor, and the touch screen is receiving occupancy information through Creston Fusion.
MotionSensorConnection
Require Check-In
Toggle the check-in feature on the touch screen. When viewing reservation information, an attendee must access the reservation details screen and touch the Check In button before the reservation to confirm the booking.
ForceOrgCheckIn
Check-In Time (min)
Set the time before the meeting in which an attendee can check-in to a reservation. Each touch of the - and + buttons reduces or advances time period by 5 minutes.
ForceOrgCheckInMin
Check-In End (min)
If the organizer does not check in before the Check-In End time period is up, the reservation is declined. Each touch of the - and + buttons reduces or advances time period by 5 minutes.
ForceOrgCheckInEndMin
Enable Start Button
Enable the Start Now button on the pull-up toolbar or the reservation details screen. EnStartMeeting
Decline For No Show
When enabled, the reservation is declined if the organizer does not check in before the booking or during a preset grace period.
EnDeclineForNoShow
Allow Start Before (min)
Set the number of minutes before a reservation when the reservation can be started. This disables the Decline for No Show occupancy for that meeting, normally accessed by using the Start button on the pull-up toolbar or the reservation details screen. Each touch of the - and + buttons reduces or advances time period by 5 minutes.
StartMeetingBtnBeforeStart
(Continued on following page)

Crestron Touch Screens with RoomView Scheduling for Crestron Fusion
Operations Guide – DOC. 7552F Touch Screens with RoomView Scheduling for Crestron Fusion • 13
Automation Screen Controls (Continued)
CONTROL FUNCTION CUSTOM PROPERTY
Allow Start After (min)
Set the number of minutes after a reservation has begun when the Start button (allowing the reservation to be started late) is enabled on the pull-up toolbar or the reservation details screen. Each touch of the - and + buttons reduces or advances time period by 5 minutes.
StartMeetingBtnAfterStart
Decline reservations up to (min)
Limit Decline for No Show to meetings up to and including the specified duration in minutes. Each touch of the - and + buttons reduces or advances time period by 5 minutes.
DeclineForNoShowAppliesDur
1. If available in hardware (not all touch screen models have this feature). 2. Option not available if the occupancy sensor is utilized.
NOTE: When reserving another room through the touch screen, it is possible to lose the reservation if Decline for No Show is enabled and the Check-in Time is set to 0 minutes or Require Check-in is enabled and Check-in Time is set to 0 minutes. As a result, the touch screen at the remote room may get the meeting and immediately decline/expire the new reservation, perceiving it as a no show or a failed check-in.

Touch Screens with RoomView Scheduling for Crestron Fusion Crestron
14 • Touch Screens with RoomView Scheduling for Crestron Fusion Operations Guide – DOC. 7552F
Display The following image shows the default display settings.
Display Screen
The following table explains the function of the Display screen controls.
Display Screen Controls
CONTROL FUNCTION CUSTOM PROPERTY Enable LEDs
Enable and disable the LEDs on either side of the touch screen. LEDEnable
Backlight Timeout
(min)
Control the amount of time (in minutes) until the touch screen display is put into standby without user input. Each touch of the - and + buttons reduces or advances the time period by 5 minutes.
BacklightTimeout
NOTE: The touch screen’s Standby Timeout setting in the setup project or firmware will be overridden by the Backlight Timeout setting. Set this value using the Display screen controls of the RoomView Scheduling software, not at the setup project or firmware level.

Crestron Touch Screens with RoomView Scheduling for Crestron Fusion
Operations Guide – DOC. 7552F Touch Screens with RoomView Scheduling for Crestron Fusion • 15
Schedule The following image shows the default schedule settings.
Schedule Screen
The following table explains the function of the Schedule screen controls.
Schedule Screen Controls
CONTROL FUNCTION CUSTOM PROPERTY
Tap To View Info
When enabled, a reserved item can be viewed by touching it on the Schedule View. When disabled, a reserved item does not respond to touch and can be viewed by pressing the Details button, unless disabled by another setting.
MenuDayViewEnInfo
Tap To Reserve
Item
When enabled, an available item can be reserved by touching it on the Schedule View. When disabled, the Reserve button can still be used to reserve the room, unless it is disabled by another setting.
MenuDayViewEnReserve
Custom Reserve
Time
When disabled, the Custom button is not displayed on the Reserve screen and only the preset times can be selected.
ReserveCustomEn
Enable Find Button
When disabled, the Find button is not displayed on the pull-up toolbar at the bottom of the display. FindBtnEnable
Enable Reserve Button
When disabled, the Reserve button on the pull-up toolbar is not displayed. MenuShowReserveNow

Touch Screens with RoomView Scheduling for Crestron Fusion Crestron
16 • Touch Screens with RoomView Scheduling for Crestron Fusion Operations Guide – DOC. 7552F
Reservation The following image shows the default reservation settings.
Reservation Screen
The following table explains the function of the Reservation screen controls.
Reservation Screen Controls
CONTROL FUNCTION CUSTOM PROPERTY Reservation
Enable Toggle the ability to reserve a room. ReservationEnable
Max Reservation Length (min)
The number selected in this field limits the number of minutes that the room can be reserved from the touch screen. It also influences the buttons displayed on the Reservation Length section of the Reserve screen. For example, if 15 minutes is selected, only the 15 button is displayed on the Reserve screen. Each touch of the - and + buttons reduces or advances time period by 5 minutes.
ReserveNowMaxDur
Reserve Even End
Time
Change the Reservation Length section of the Reserve screen from buttons displaying 15-minute intervals (i.e., 15, 30, 45, 60) to buttons displaying actual times in 15-minute intervals (i.e., 11:15, 11:30, 11:45, etc.) for a period of up to two hours from the current time.
ReserveNowEvenEndTime
Enable End Early
Three options are offered: Off, which disables the End Early feature; Minutes, which enables the End Now button on the pull-up toolbar when the number of minutes specified by the Minutes Before End Early control has passed; and Percentage, which enables the End Now button when the percentage specified by the Percent Before End Early control has passed.
EnFreeUpRoom FreeUpRoomEnUseMin FreeUpRoomEnUsePer
Minutes before End
Early
Determine the number of minutes that must pass before the End Early button on the pull-up toolbar can be used to end the current reservation. Each touch of the - and + buttons reduces or advances time period by 5 minutes.
FreeUpRoomEnMin
(Continued on following page)

Crestron Touch Screens with RoomView Scheduling for Crestron Fusion
Operations Guide – DOC. 7552F Touch Screens with RoomView Scheduling for Crestron Fusion • 17
Reservation Screen Controls (Continued)
CONTROL FUNCTION CUSTOM PROPERTY
Percent before End
Early
Determine the percent of the total reservation time that must pass before the End Early button on the pull-up toolbar can be used to end the current reservation. Each touch of the - and + buttons reduces or advances time period by 1 minute.
FreeUpRoomEnPer
Extend Reservation
Toggle the ability to extend a reservation. When this control is enabled, the Extend button on the pull-up toolbar is enabled according to additional settings on this screen.
ExtendReservationEnable
Extend Reservation
(Value)
Allow Minutes or Percentage to be selected to determine how much time must pass before a reservation can be extended. Selecting Minutes ties extending a reservation to the value of the Extend Reservation (min) control. Selecting Percentage ties extending a reservation to the value of the Extend Reservation (%) control.
ExtendReservationType
Extend Reservation
(min)
Determine the number of minutes a reservation can be extended. Each touch of the - and + buttons reduces or advances time period by 5 minutes.
ExtendReservationMin
Extend After (min)
Determine when a reservation can be extended (i.e., how many minutes) after the end of that reservation. Each touch of the - and + buttons reduces or advances time period by 5 minutes.
ExtendReservationMinAfter
Extend Reservation
(%)
Determine the percentage of time that must pass on an active reservation before the reservation can be extended. Each touch of the - and + buttons reduces or advances time period by 1 percent.
ExtendReservationPer

Touch Screens with RoomView Scheduling for Crestron Fusion Crestron
18 • Touch Screens with RoomView Scheduling for Crestron Fusion Operations Guide – DOC. 7552F
Broadcast The following image shows the default broadcast settings.
Broadcast Screen
The following table explains the function of the Broadcast screen controls.
Broadcast Screen Controls
CONTROL FUNCTION CUSTOM PROPERTY
Broadcast Timeout
Toggle the use of the settable custom property value for automatic timeout of broadcast messages after receipt.
BroadcastTimeOutEnable
Silence Button
Toggle ability to touch a hard button to silence the emergency alert. BroadcastSilenceBtnEnable

Crestron Touch Screens with RoomView Scheduling for Crestron Fusion
Operations Guide – DOC. 7552F Touch Screens with RoomView Scheduling for Crestron Fusion • 19
Diagnostics The following image shows the default diagnostics settings.
Diagnostics Screen
The following table explains the function of the Diagnostics screen controls.
Diagnostics Screen Controls
CONTROL FUNCTION
Update Force the Schedule View to update from Crestron Fusion.
Restore Return the touch screen settings to their default values. Crestron Fusion Status
Green indicates a connection to Crestron Fusion. Red indicates no connection.
Push Registered
Green indicates the touch screen has registered with Crestron Fusion for Push service.
Push Capable
Green indicates the touch screen is enabled for Push service.
Occupancy Sensor* Indicate the current state of the occupancy sensor.
* If available in hardware (not all touch screen models have this feature).
NOTE: The detected touch screen model is displayed next to the scheduling software version number.
NOTE: When there is no connection to Crestron Fusion, Demo mode allows the touch screen to be demonstrated by using an XML answer file loaded to the touch screen. Demo mode may be enabled when the touch screen is in the offline state. The touch screen will remain in Demo mode even after power is cycled until it is disabled in the touch screen settings or a connection to Crestron Fusion is established. Refer to the “Demo Mode Release Notes” document for details.

Touch Screens with RoomView Scheduling for Crestron Fusion Crestron
20 • Touch Screens with RoomView Scheduling for Crestron Fusion Operations Guide – DOC. 7552F
Custom Properties Custom properties expand the functionality of the touch screen. An example of this is passing properties to the touch screen to display and announce an emergency alert generated by Crestron Fusion. In this way, custom properties provide information that is important to the user and that can be included in the description of the room.
Custom properties that communicate settings to the touch screen are defined for each room and are set through the Crestron Fusion Setup web client.
NOTE: Once a custom property is set via Crestron Fusion, it cannot be changed on the touch screen. After a custom property is defined in Crestron Fusion, the touch screen will pick up a zero/false/null value the next day if the property was not set for the room. Therefore, when defining a new custom property, it must be configured for each room if the default value is not to be applied to scheduling touch screens in every room.
NOTE: When a custom property is deleted from Crestron Fusion, the last value sent to the touch screen remains until the setting is overridden (if the setting is exposed in the touch screen configuration screens) or the Restore Default Settings button on the “Diagnostics” screen is touched.
In addition to the custom properties already discussed in this document, additional properties are available. Refer to the tables on the following pages for information on these additional custom properties.
Adding Custom Properties Use the following to add a custom property to a room:
1. Use a web browser to log in to Crestron Fusion to access the setup pages.
2. In the lower left part of the screen, click the Objects tab.
3. On the left side of the screen, click the + next to Custom Properties to expand the option, and then click on Rooms.
4. In the middle of the screen, near the top, click Add to open the Add – Custom Property (Room) window.
5. Enter the ID, name, and type for the custom property to be added. The entry in the ID field should match the custom property exactly as listed in this document. The entry in the Name field can be any descriptive name.

Crestron Touch Screens with RoomView Scheduling for Crestron Fusion
Operations Guide – DOC. 7552F Touch Screens with RoomView Scheduling for Crestron Fusion • 21
ID, Name, and Type
6. Click Save & Close to complete the addition of the new property.
Setting Custom Properties for a Touch Screen To apply a custom property after it has been added, it must be enabled on a touch screen within a given room. Use the following procedure to enable a custom property in Crestron Fusion:
1. Use a web browser to log in to Crestron Fusion to access the setup pages.
2. On the left side of the screen, click the Rooms tab if it is not already selected, and then click the + next to Root to expand the directory tree.
3. Double-click on the desired room to open the Edit – Room window.
4. Click the Custom Properties tab to view the available custom properties.
Edit – Room (Custom Properties Tab)
5. To enable a custom property, either add a value to the appropriate text box or check the appropriate check box.
6. Click Save & Close to complete the application of the new property.

Touch Screens with RoomView Scheduling for Crestron Fusion Crestron
22 • Touch Screens with RoomView Scheduling for Crestron Fusion Operations Guide – DOC. 7552F
Room Configuration Settings Custom Properties (Room Configuration Settings)
CUSTOM PROPERTY TYPE AND SUPPORTED VALUE DESCRIPTION DEFAULT
VALUE NOTES
DisplayLanguage1 String1 On-screen display language en-US
SecondaryLanguage1 String1 Add a user-selectable second language to the toolbar <empty>
Empty string disables the feature
HomeLayout Integer [0,1] Main screen 0 0=Time prominent
(legacy 2.0)
DateFormat2 Integer [0-9]2 Date format 0
TimeFormat1 Boolean True=12hr, False=24hr Time format TRUE
RoomPrivacyLevel1
Integer 0=Public,1=Semi-Private, 2=Private, 3=Custom
Room privacy setting 0
PanelSecurityLevel1 Integer 0=Disabled/Anonymous 1=Touch screen PIN
Set the touch screen’s security level 0
PanelPin1 String 0000-9999 The touch screen's secure PIN # 1234
EnPushModel1 Boolean Allow push communication with Crestron Fusion TRUE
AvailabilityThresholdRoomState1 Integer 0=Disabled, 1=Full
If room is available, show as reserved during threshold period before next meeting
0
AvailabilityThresholdMin1 Integer [1-120] minutes Size of threshold period 10
RoomFriendlyName String [1-40 chars] or <empty> Room friendly name <empty> <empty>=use
Fusion room name
PrivateSubjectOverrideEn Boolean Allow viewing subject of a private meeting FALSE
PrivateOrgOverrideEn Boolean Allow viewing organizer of a private meeting FALSE
EnPrivateOverrideSecurity Boolean Allow override of private meeting after touch screen login FALSE
ShowSubject Boolean Show subject on schedule ribbon and details screen TRUE
Only applies when Room Privacy is set to Custom
ShowOrg Boolean Show organizer on schedule ribbon and details screen TRUE
Only applies when Room Privacy is set to Custom
ShowAttendees Boolean Show attendees on details screen TRUE
Only applies when Room Privacy is set to Custom
StatusEn Boolean Shows status on main page TRUE
ToolbarVisible Boolean Enable the toolbar buttons to be always visible FALSE
EnToolsMenu Boolean Enable press and hold settings access on the toolbar TRUE
For touch screen configuration access
SubjectEntryEnable Boolean Allow manual subject entry TRUE
Supported only on TSS-752 when left-to-right language selected
(Continued on following page)

Crestron Touch Screens with RoomView Scheduling for Crestron Fusion
Operations Guide – DOC. 7552F Touch Screens with RoomView Scheduling for Crestron Fusion • 23
Custom Properties (Room Configuration Settings – Continued)
CUSTOM PROPERTY TYPE AND SUPPORTED VALUE DESCRIPTION DEFAULT
VALUE NOTES
OrganizerEntryEnable Boolean Allow manual organizer entry TRUE
Supported only on TSS-752 when left-to-right language selected
PollTime Integer [1-15] minutes Fusion polling interval 5
This setting may impair schedule provider performance
EnToolsMenu Boolean Allow access to touch screen settings TRUE
1. The following table correlates the language setting with the required string values (case sensitive).
LANGUAGE PROPERTY
Chinese (Simplified)* DisplayLanguage=zh_CN Chinese (Traditional)* DisplayLanguage=zh_TW
Danish DisplayLanguage-da Dutch (Netherlands) DisplayLanguage=nl
English (US) DisplayLanguage=en_US English (UK) DisplayLanguage=en_UK
French DisplayLanguage=fr German DisplayLanguage=de Hebrew* DisplayLanguage=he
Italian DisplayLanguage=it Japanese* DisplayLanguage=ja Korean* DisplayLanguage=ko
Norwegian DisplayLanguage=no Portuguese (Brazil) DisplayLanguage=pt_BR
Portuguese (Portugal) DisplayLanguiage=pt_PT Russian* DisplayLanguage=ru Spanish DisplayLanguage=es Swedish DisplayLanguage=sv
* These languages are not supported on the TPMC-4SM.
2. The following table correlates the date format with the required integer.
FORMAT DEFINITION EXAMPLE PROPERTY
WMDY Day of week, Month Day, Year Tuesday, May 21, 2013 DateFormat=0
WDMY Day of week, Day-Month-Year Tuesday, 21-May-2013 DateFormat=1
WMD Day of week, Month Day Tuesday, May 21 DateFormat=2
WDM Day of week, Day-Month Tuesday, 21-May DateFormat=3
MDY Month Day, Year May 21, 2013 DateFormat=4
DMY Day-Month-Year 21-May-2013 DateFormat=5
M.DY Month.Day Year May.21 2013 DateFormat=6
D.MY Day.Month Year 21.May 2013 DateFormat=7
WYMD Day of week, Year-Month-Day (ISO format) Tuesday,2013-May-21 DateFormat=8
YMD Year-Month-Day (ISO format) 2013-May-21 DateFormat=9

Touch Screens with RoomView Scheduling for Crestron Fusion Crestron
24 • Touch Screens with RoomView Scheduling for Crestron Fusion Operations Guide – DOC. 7552F
Automation Settings Custom Properties (Automation Settings)
CUSTOM PROPERTY TYPE AND SUPPORTED VALUE DESCRIPTION DEFAULT
VALUE NOTES
MotionSensorType1, 2 Integer 0=Intelligent, 1=Basic Motion sensor type 0
MotionSensorOutput1, 2 Integer 0=NO, 1 =NC
Motion sensor output signal type 0
MotionSensorConnection1, 2 Integer 0=Locally wired, 1=Remote via Fusion
Motion sensor connection type 0
ForceOrgCheckIn1 Boolean Require reservation check-in FALSE
ForceOrgCheckInMin1 Integer [0-2880] minutes
Starting period before reservation from which check-in is allowed
480
ForceOrgCheckInEndMin1 Integer [-120 thru +30] minutes
Expiration of check-in threshold relative to reservation start 10
Crestron Fusion version dependency – see Release Notes
EnStartMeeting1 Boolean Enable Start Now button manual decline override TRUE
EnDeclineForNoShow1 Boolean Enable Decline for No Show FALSE
StartMeetingBtnBeforeStart1 Integer [5-30] minutes
Show Start Now before start of reservation 10
StartMeetingBtnAfterStart1 Integer [0-30] minutes
Minutes into reservation to show Start Now 10
DeclineForNoShowMin Integer [1-120] or 0
Minutes into reservation at which a decline can occur 15 0=use percent
DeclineForNoShowAppliesMin Integer [2-480]
Minimum length of meetings in minutes that are eligible for decline.
2
Must be less than DeclineFoNo-ShowAppliesDur or DeclineForNo- ShowAppliesMin will be evaluated as DeclineForNo- ShowAppliesDur minus 1
DeclineForNoShowAppliesDur1 Integer [30-480]
Meetings of up to minutes length that are eligible for decline
120
Must be greater than DeclineFor-NoShowApplies-Min or Decline-ForNoShow-Applies-Min will be evaluated as DeclineForNo-ShowAppliesDur minus 1
DeclineForNoShowPer Integer [1-100]
Percentage of reservation past which a decline can occur 10
DeclineForNoShowEnCheckAtExactMin Boolean Check at the exact minute if
occupied, then decline FALSE
(Continued on following page)

Crestron Touch Screens with RoomView Scheduling for Crestron Fusion
Operations Guide – DOC. 7552F Touch Screens with RoomView Scheduling for Crestron Fusion • 25
Custom Properties (Automation Settings – Continued)
CUSTOM PROPERTY TYPE AND SUPPORTED VALUE DESCRIPTION DEFAULT
VALUE NOTES
DeclineForNoShowRecurCount Integer [0 or 3]
Setting to 0 will disable the “third strike” meeting decline (deletion) and Crestron Fusion will contrinue to send meeting warning (“second strike”) notices only
MotionSensorTimeout2 Integer [2-60] minutes Motion sensor timeout 15
EnForceOrgCheckInSecurity Boolean Enable security for check in FALSE
1. Settings are available via the touch screen’s configuration pages. 2. If available in hardware (not all touch screen models have this feature).

Touch Screens with RoomView Scheduling for Crestron Fusion Crestron
26 • Touch Screens with RoomView Scheduling for Crestron Fusion Operations Guide – DOC. 7552F
Display Settings Custom Properties (Display Settings)
CUSTOM PROPERTY TYPE AND SUPPORTED VALUE DESCRIPTION DEFAULT
VALUE NOTES
LEDEnable1 Boolean Activate LEDs on touch screen TRUE Touch screen model dependent
BacklightTimeout1 Integer [0-60] minutes
2 0=no timeout
MotionSensorLEDSTrack2 Boolean Activate LEDs track motion sensor when room is in In Use state
TRUE False=LEDs reflect Available state
LEDAvailableState Integer 0=Off, 1=Green, 2=Green-Blink
Define LED color for Available state 1 Touch screen
model dependent
LEDAvailAndOccupiedState Integer 0=Off, 2=Green-Blink, 4=Red, 5=Red-Blink
Define LED color for In Use state 4 Touch screen model dependent
LEDReservedState Integer 0=Off, 4=Red, 5=Red-Blink
Define LED color for Reserved state 4 Touch screen
model dependent
LEDBroadcastEmgState
Integer 0=Off, 4=Red, 5=Red-Blink 6=Red-Alternating
Define LED color when emergency broadcast is active 5 Touch screen
model dependent
LEDBroadcastNonEmgState
Integer 0=Off, 4=Red, 5=Red-Blink 6=Red-Alternating
Define LED color while non-emergency broadcast is active 0 Touch screen
model dependent
LEDAvailThreshState
Integer 0=Off, 1=Green, 2=Green-Blink, 4=Red, 5=Red-Blink
Define LED color during availability threshold 4 Touch screen
model dependent
BackgroundAvailable String <http://url> image file
Custom 800x480 JPG or PNG image for Available state <empty>
If any one of the URLs returns an error, all 4 revert to the default state. This properly is not supported on the TPMC-4SM.
BackgroundReserved String <http://url> image file
Custom 800x480 JPG or PNG image for Reserved state <empty>
This properly is not supported on the TPMC-4SM.
BackgroundOffline String <http://url> image file
Custom 800x480 JPG or PNG image for Offline state <empty>
This properly is not supported on the TPMC-4SM.
BackgroundConfig String <http://url> image file
Custom 800x480 JPG or PNG image for settings/dialogs <empty>
This properly is not supported on the TPMC-4SM.
ForceBacklightAvailability Threshold Boolean Force backlight on during
availability threshold TRUE
ForceBacklightBeforeRes Integer [0-10] minutes
Force backlight on before start of reservation 5
ForceBacklightDuringRes Integer [0-1440] minutes
Force backlight on after start of reservation 5
Setting to 1440 will ensure the screen is always turned on during meetings on touch screens that have no proximity sensor.
1. Settings are available via the touch screen’s configuration pages. 2. If available in hardware (not all touch screen models have this feature).

Crestron Touch Screens with RoomView Scheduling for Crestron Fusion
Operations Guide – DOC. 7552F Touch Screens with RoomView Scheduling for Crestron Fusion • 27
Schedule Settings Custom Properties (Schedule Settings)
CUSTOM PROPERTY TYPE AND SUPPORTED VALUE DESCRIPTION DEFAULT
VALUE NOTES
MenuDayViewEnInfo* Boolean Enable tapping on reserved list item to view details TRUE
MenuDayViewEnReserve* Boolean Enable tapping on available list item to reserve TRUE
Requires Reservation Enable set to on
ReserveCustomEn* Boolean Allow user entry of reservation duration TRUE
FindBtnEnable* Boolean Enable Find function to reserve another available room TRUE
MenuShowReserveNow Boolean Show Reserve Now button on pull-up menu TRUE
MenuShowMeetingTimes Boolean Show meeting duration on schedule ribbon TRUE
MenuShowAvailableTime Boolean Show status duration TRUE
MenuShowMeetingInfo Boolean Show Details button on pull-up menu TRUE
MenuShowSearchWizard Boolean Show Find button on pull-up menu TRUE
ListTimeOut Integer [5-30] seconds
Return schedule ribbon back to active meeting after inactivity 15
AllowPrivateFreeBusyUpdate Boolean
Enable reservation of a Find from another touch screen when room privacy is set to Private or Semi-Private
FALSE
OfflineExpiry* Integer [0-24] hours
Number of hours to display cached schedule upon loss of connection
12
A value of 0 will show offline screen immediately upon loss of connection.
* Settings are available via the touch screen’s configuration pages.
Touch Screens with RoomView Scheduling for Crestron Fusion Crestron
28 • Touch Screens with RoomView Scheduling for Crestron Fusion Operations Guide – DOC. 7552F
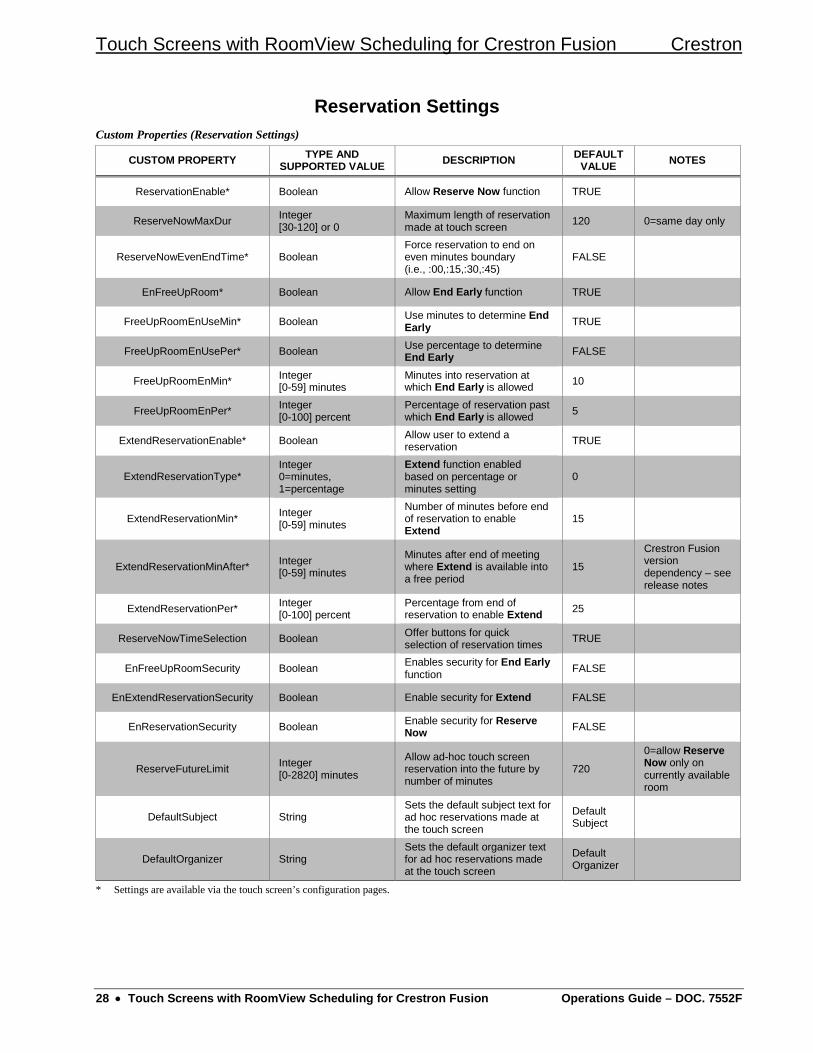
Reservation Settings Custom Properties (Reservation Settings)
CUSTOM PROPERTY TYPE AND SUPPORTED VALUE DESCRIPTION DEFAULT
VALUE NOTES
ReservationEnable* Boolean Allow Reserve Now function TRUE
ReserveNowMaxDur Integer [30-120] or 0
Maximum length of reservation made at touch screen 120 0=same day only
ReserveNowEvenEndTime* Boolean Force reservation to end on even minutes boundary (i.e., :00,:15,:30,:45)
FALSE
EnFreeUpRoom* Boolean Allow End Early function TRUE
FreeUpRoomEnUseMin* Boolean Use minutes to determine End Early TRUE
FreeUpRoomEnUsePer* Boolean Use percentage to determine End Early FALSE
FreeUpRoomEnMin* Integer [0-59] minutes
Minutes into reservation at which End Early is allowed 10
FreeUpRoomEnPer* Integer [0-100] percent
Percentage of reservation past which End Early is allowed 5
ExtendReservationEnable* Boolean Allow user to extend a reservation TRUE
ExtendReservationType* Integer 0=minutes, 1=percentage
Extend function enabled based on percentage or minutes setting
0
ExtendReservationMin* Integer [0-59] minutes
Number of minutes before end of reservation to enable Extend
15
ExtendReservationMinAfter* Integer [0-59] minutes
Minutes after end of meeting where Extend is available into a free period
15
Crestron Fusion version dependency – see release notes
ExtendReservationPer* Integer [0-100] percent
Percentage from end of reservation to enable Extend 25
ReserveNowTimeSelection Boolean Offer buttons for quick selection of reservation times TRUE
EnFreeUpRoomSecurity Boolean Enables security for End Early function FALSE
EnExtendReservationSecurity Boolean Enable security for Extend FALSE
EnReservationSecurity Boolean Enable security for Reserve Now FALSE
ReserveFutureLimit Integer [0-2820] minutes
Allow ad-hoc touch screen reservation into the future by number of minutes
720
0=allow Reserve Now only on currently available room
DefaultSubject String Sets the default subject text for ad hoc reservations made at the touch screen
Default Subject
DefaultOrganizer String Sets the default organizer text for ad hoc reservations made at the touch screen
Default Organizer
* Settings are available via the touch screen’s configuration pages.

Crestron Touch Screens with RoomView Scheduling for Crestron Fusion
Operations Guide – DOC. 7552F Touch Screens with RoomView Scheduling for Crestron Fusion • 29
Broadcast Settings Custom Properties (Broadcast Settings)
CUSTOM PROPERTY TYPE AND SUPPORTED VALUE DESCRIPTION DEFAULT
VALUE NOTES
BroadcastTimeOutEnable* Boolean Allow broadcast messages to be auto-cleared FALSE
BroadcastSilenceBtnEnable Boolean
Allow broadcast messages to be silenced TRUE
EnBroadcastMessage Boolean Allow broadcast message display TRUE
NonEmgBroadcastStyle Integer 0=partial, 1=full-screen
Format non-emergency message on status screen or display full-screen (as emergency broadcast)
0
BroadcastSounder Integer 0=Off, 1=On
Enable audio feedback on emergency broadcast events 1
BroadcastEmgTimeOut Integer [10-90] minutes, or 0 Sets timeout interval 90 0=No timeout
BroadcastNonEmgTimeOut Integer [10-720] minutes, or 0
Sets timeout interval 720 0=No timeout
BroadcastEmgScheduleEnable Boolean Allow access to room schedule during active emergency broadcast
FALSE
* Settings are available via the touch screen’s configuration pages.

Crestron Electronics, Inc. Operations Guide – DOC. 7552F 15 Volvo Drive Rockleigh, NJ 07647 (2036915) Tel: 888.CRESTRON 03.16 Fax: 201.767.7576 Specifications subject to www.crestron.com change without notice.