operators manual for the telxon ptc 610 and ptc … manual dw.pdfoperators manual for the telxon ptc...
TRANSCRIPT

Operators Manual for the TELXON PTC 610 and PTC 510
Order Entry System ROM Version 1.3
Please note that each Telxon unit has custom software created by whoever gave you the handheld unit, and this manual was written specifically for Dowling’s Inc. customers that have our software. If you are not a customer of ours, and you are experiencing issues with your Telxon unit, you should contact the company that provided you with the unit.

Table of Contents
Topic Page Introduction 1 Keypad Reference 2 Maintenance 3 Partitions 4 Delivery Codes 4 Order Entry 5 Keying Guide 5 Unique Pricing 6 Inventory 7 Transmissions 8 Transmission Helpful Hints 9 Wands 10 Contact Us 11

1
Introduction
The Telxon PTC-510 order entry system was designed with you, the customer, in mind. We strongly recommend that you read this manual fully before you attempt to use your new Telxon. There are three sections, called partitions, in the Telxon. Each is setup for a particular purpose: Order Entry, Unique Pricing, and Inventory. This partitioning allows you to work in all three areas at one time without losing any data. Each Telxon unit will be setup here at Dowlings Inc. with your Account number prior to you receiving it. As a double check, we recommend that to start familiarizing yourself with this unit you verify that your correct customer account number is setup within it.
***Please note that if you are having trouble locating the correct keys on the keypad; please see the next page which lists the key’s color, location, and function. ***
1. The first thing you will need to do is to turn on the unit via the ON/OFF key.
2. Now press the MENU key. You will be prompted for a Yes/No response to which Partition you wish to be in.
3. The screen will read “ORDER ENTRY ?” Press the YES key.
4. You will now be prompted with “Enter Delivery”. Press the number keys 01 followed by the
ENTER key.
5. Now press the key twice to step back through the partition.
Your correct account number should be located under the words “ENTER CUST #”. If this is not
your number, or you are not sure, please contact me.
To exit from the above area in your Telxon unit, please press EXIT, then END, then YES, then ENTER. Wait for the unit to transmit. Then press NO, NO, YES, YES.
Thank you, Grant Steffens [email protected] 802-893-5100 ext 239

2
Keypad Reference Left Middle Right Top
Center
Bottom
Key
Color
Location
Function
ON/OFF Blue Top-Left Turn unit on or off
MENU White Top-Left Choose entry partition
EXIT White Top-Left Return to previous
REVIEW White Top-Center Go to start of entry partition
YES
White
Center-Left
Answer yes to a question
NO White Center-Right Answer no to a question
END
Blue
Top-Right
End this data input session
Blue Bottom-Right Step through, to left
Blue
Bottom-Right
Step through, to right
CLEAR Blue Center-Right Clear last number, prior to pressing ENTER
ENTER
Red
Bottom-Right
Accept this data
0-9 Gray Bottom Input numeric values
SEARCH
White
Center-Middle
Allows you to search for an entered item #
MODIFY White Center-Middle Modify entered data
#
White
Center-Right
Displays total lines and quantities entered
. White Bottom-Right Only available under Inventory for quantities
/ White Center-Right Hold for three beeps to delete an item
3
Maintenance
Keep the Telxon unit and batteries away from heat and direct sunlight. The Telxon PTC- 510 and PTC-610 requires three of any brand of Double (AA) batteries to operate. These batteries can be ordered from Dowlings Inc., and here is some of our battery ordering information:
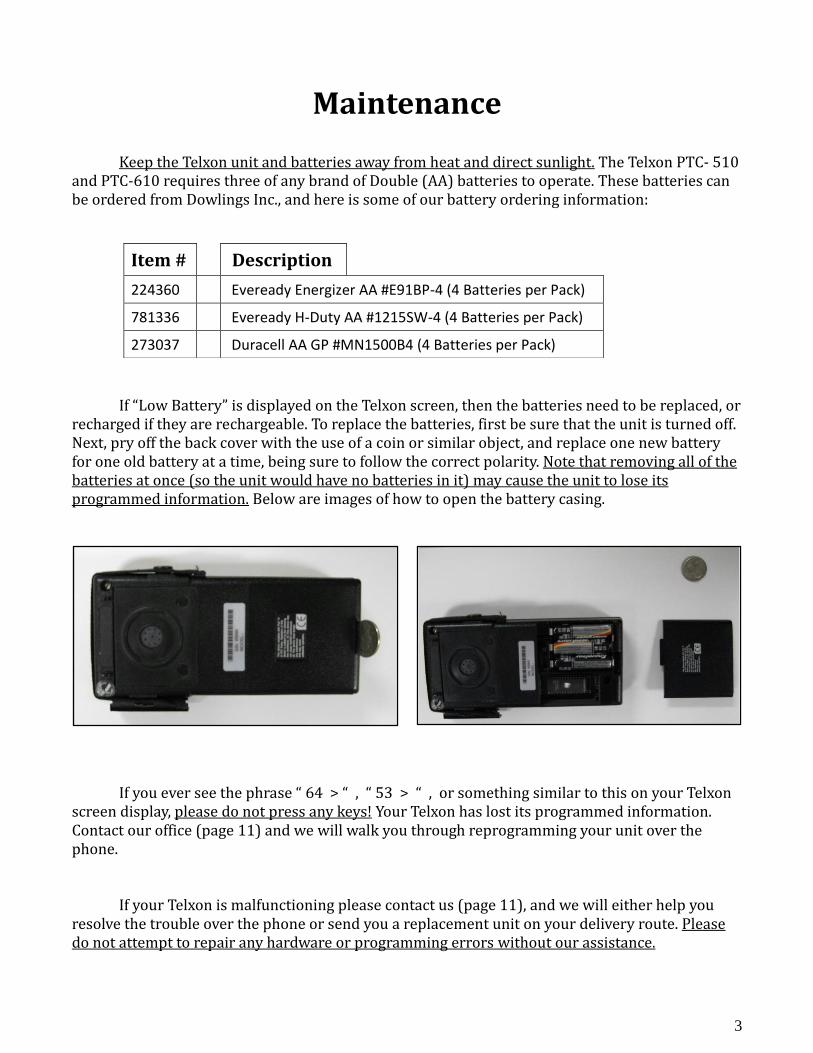
If “Low Battery” is displayed on the Telxon screen, then the batteries need to be replaced, or
recharged if they are rechargeable. To replace the batteries, first be sure that the unit is turned off. Next, pry off the back cover with the use of a coin or similar object, and replace one new battery for one old battery at a time, being sure to follow the correct polarity. Note that removing all of the batteries at once (so the unit would have no batteries in it) may cause the unit to lose its programmed information. Below are images of how to open the battery casing.
If you ever see the phrase “ 64 > “ , “ 53 > “ , or something similar to this on your Telxon
screen display, please do not press any keys! Your Telxon has lost its programmed information. Contact our office (page 11) and we will walk you through reprogramming your unit over the phone.
If your Telxon is malfunctioning please contact us (page 11), and we will either help you
resolve the trouble over the phone or send you a replacement unit on your delivery route. Please do not attempt to repair any hardware or programming errors without our assistance.
Item #
Description 224360 Eveready Energizer AA #E91BP-4 (4 Batteries per Pack)
781336 Eveready H-Duty AA #1215SW-4 (4 Batteries per Pack)
273037 Duracell AA GP #MN1500B4 (4 Batteries per Pack)

4
Partitions
Telxon units have three sections, called partitions. Each partition is setup for a particular purpose: Order Entry, Unique Pricing, or Inventory. This partitioning allows you to work in all three areas at one time without losing any data.
You access these partitions from the start menu by pressing the MENU button. It will then display the name of a partition and you can press YES to enter that partition, or you can press NO and the name of the next partition will be displayed. If you answer NO to all three partitions you will be returned to the start menu.
If you press YES to enter a partition, and you do not already have data entered in that partition, you may be prompted to enter a delivery code. Below are our available delivery codes for each partition.
Delivery Codes
Delivery codes signify how you wish your request to be processed. For order entry, unique pricing, and inventory there is only one valid delivery code for each.
If your delivery code is not valid in its partition, your request may not be processed
correctly. To change your delivery code step through the order with the key until you get to the “Enter Delivery” screen. Press MODIFY, punch in the desired delivery code followed by ENTER.
Order Entry
Unique Pricing
Inventory
01 : Next Delivery Date
89 : Unique Pricing
90 : Inventory

5
Order Entry
1. From the start menu press the MENU key. You will be prompted for a Yes/No response to which Partition you wish to be in.
2. You will be prompted with “ORDER ENTRY ?” Press the YES key. 3. The screen will read “ENTER DELIVERY”. Press the number keys 01 for your next delivery
date. Delivery code 01 is the only valid option for order entry. Then press the ENTER key.
4. Next the screen will read “Enter ITEM #”. Key in your six digit item number using the 0 – 9 number keys on the keypad.
5. If you have keyed in a valid item number, the Telxon will read “Enter QUANTITY”. Key in the quantity you wish for that item and press ENTER.
6. Continue this process until you have keyed in all the items you want to order.
7. Once your order is complete, press the END key to start the transmission process. Please see page 8 for a detailed directions on this process.
Keying Guide Never type in two items that are duplicates within the same transmission. You will not get
the correct quantity that you requested.
To modify an item use the arrow keys to display the item you wish to change and then press MODIFY. If you wish to change that item’s quantity only, press the MODIFY again.
To delete an item use the arrow keys to display the item you wish to change, and then press
and hold / (letter M) for three beeps.
To search for an item press the SEARCH key. The screen will read “Displays Find=”. Enter the item number, followed by ENTER.
You will always be prompted for a delivery code at the time you start a new order.
Decimal points are not allowed in order entry nor unique pricing.
Items transmitted with 0 as a quantity will be assumed the quantity of 1 has been ordered.
If the screen goes blank, press the ON/OFF key. The Telxon automatically turns itself off
after a minute of no activity.

6
Unique Pricing 1. From the start menu press MENU, respond NO to “ORDER ENTRY ?”, and YES to “UNIQUE
PRICE ?” . If your account number is not in that partition it will request it as “CUST #”. If this is the case, enter your customer # using the 0 – 9 number keys on the keypad then press ENTER.
2. It may now read “Enter DELIVERY”. The delivery code for unique pricing should already be
setup as 89, to verify it, once it displays “Enter ITEM #” push the key once; this will display the two digit delivery code. If you do not have a delivery code of 89 in the unique pricing partition, and are doing unique pricing, please press MODIFY and key 89 on the number pad as the delivery code followed by ENTER at this time.
3. The screen will read “Enter ITEM #”. Enter the item number you with to add unique pricing to.
4. The screen will now prompt you to enter a margin, enter that number on the keypad now. If you so desire, you may select a price instead. To do so hit the END key when it prompts you for a margin, and enter the price you want. You may have items with margins and prices in the same transmission. 4.1 If entering a margin, it must contain three digits and the decimal position is assumed. For example, if you enter 131 as your margin, our system would read 13.1 as your margin. 4.2 If entering a price, the decimal position is also assumed. For example, if you enter 1400 as your price, our system would read $14.00 as your price.
5. After you have keyed in your margin or price, press ENTER to continue.
6. Continue this process until you have keyed in all the items you want unique pricing for.
7. If you need to modify a value, delete an item, or are having other problems with entering your unique pricing, please see the Keying Guide on page 5.
8. Once you are finished entering your unique pricing, press the END key to start the transmission process. Please see page 8 for a detailed directions on this process.

7
Inventory 1. From the start menu press MENU, respond NO to “ORDER ENTRY ?”, NO to “UNIQUE PRICE ?”,
and YES to “INVENTORY ?”.
2. It may now read “Enter DELIVERY”. The delivery code for inventory should already be setup as
90, to verify it, once it displays “Enter ITEM #”, push the key once; this will display the two digit delivery code. If you do not have a delivery code of 90 in the inventory partition, and are doing inventory, please press MODIFY and key 90 on the number pad as the delivery code followed by ENTER at this time.
3. Next the screen will read “Enter ITEM #”. Key in your six digit item # using the 0 – 9 number
keys on the keypad. 4. If you have keyed in a valid item number, the Telxon will read “Enter QUANTITY”. Key in the
quantity you wish for that item and press ENTER.
4.1 Here is the only place on the Telxon unit where decimal quantities are allowed. For example, to key in ½ units you would type in a whole number followed by .5, so 25 ½ would be entered as 25.5
5. Continue this process until you have keyed in all the items you want to enter in inventory.
6. If you need to modify a value, delete an item, or are having other problems with entering your inventory, please see the Keying Guide on page 5.
7. Once you are finished entering your inventory, press the END key to start the transmission process. Please see page 8 for a detailed directions on this process.

8
Transmissions
1. Before you are ready to transmit and order, strap the mouthpiece of the phone to the circular speaker on the back of your Telxon unit with the elastic band the unit came with (as seen in the image below). If your Telxon unit did not come with an elastic band, you may hold the Telxon unit in your hand against the phone receiver. Please note that you should have a very tight contact between the phone mouthpiece and the Telxon’s circular speaker.
2. When you press the END key to end the session, you will receive the message: “Ready to SEND the Data Y/N”. There are three ways to respond to this message as detailed below:
2.1 If you wish to transmit your entered data press YES. Your Telxon should now read “PUSH ENTER KEY TO START SEND”.
2.2 If you wish to exit the current partition and not transmit your entered data at this time, please press EXIT. The next time you enter that partition it will prompt you with “Ready to SEND the Data Y/N”.
2.3 If you wish to modify or add to your entered data before you transmit, please press NO. The next screen will read “EXIT from Order Entry Y/N”, press NO. You may now modify or add to your entered data.
3. Dial one of our automated receiver phone numbers at:
Unattended Local: (802) 893 – 5122 or Unattended Non-Local: (800) 426 – 9517 4. You will hear a beep followed by “Ready for transmission”. If your Telxon screen is blank press the ON/OFF button as it has turned itself off due to inactivity. Your screen should read “PUSH ENTER KEY TO START SEND”. Press the ENTER key. 5. You will hear your Telxon unit transmitting your data and the screen will read “COMMUNICATING .. PLEASE WAIT !!”. When noise stops coming from your Telxon, take the phone and listen to hear the recorded message.

9
WARNING: If you do not get a successful call number or your message says duplicate order, do not erase your data. Doing so will force you to reenter the entire order. 5.1 If the message says the transmission was successful, please write down your three- digit confirmation number. If the message said “duplicate” after saying successful then your order will not be placed. If this happens please see the Transmission Helpful Hints below. Otherwise please continue to step 6. 5.2 If the message says that the transmission failed then you will need to resend the
data. Please see the following section for helpful hints, and if you repeatedly get failed transmissions please contact us (page 11). Your Telxon screen should read “RE-SEND the Data Y/N”. Press the YES key and return to step 1 of Transmissions.
6. Your Telxon should display “RE-SEND the Data Y/N”. Press NO.
7. Next you will be prompted with “SAVE the Data Y/N”, press NO.
8. Now the screen will read “Ready to ERASE the Data Y/N”, press YES.
9. Lastly the Telxon will read “ERASE !!! You SURE Y/N”, press YES.
Transmission Helpful Hints
Be sure to listen to the full transmission message. If the message says “successful”, but it also says “duplicate”, then your order will not be filled. The reason you are hearing the message is because this order is the exact same as your last order. Changing an item or adding an item will remove this message and create an order to be filled.
If you get a noisy line when dialing the Telxon receiver, hang up and try again a few
minutes later. If the noise continues, try another telephone in a different location.
If the unit is placed on a hard surface, such as a desk, when transmitting this may cause a bad transmission due to noise reverberation through the desk.
Placing a facial tissue over the telephone receiver may help.
Analog, wired, and multiple holed phone receivers tend to work better than digital,
cordless, or single holed phone receivers for Telxon transmissions. Examples of different phone receivers are found below.
Multiple Single

10
Wands Telxon wands are available to provide an alternate means of entering item numbers for orders. Please note that these wands only work with Dowlings Inc. barcode labels which are designed to contain our item numbers, so the wands cannot scan UPC codes. To attach a wand to your Telxon unit, line up the cable with the bottom of the Telxon as seen in the pictures below. Then push it in and you should hear a click. In order to remove a wand you will need to use a pen cap or similar device to push down the clear plastic tab found on the cable. After the wand is connected to your Telxon you may rest it in the slot provided to the right of the display as seen below.
Once you have navigated to a partition and see “Enter ITEM #” on the screen display, you can begin to scan your items. After each scanned item you will still need to enter your desired order quantity, unique pricing information, or inventory quantity. Your wand should be flashing until you touch its surface to something solid, then it will stop flashing and be ready for scanning.
Some helpful hints for scanning our barcode labels include:
Scanning has the best success rate if you go from right to left in a quick, horizontal motion.
If your wand light remains flashing or is not on at all, try reseating the cable and pushing the connection up into the Telxon.
Sometimes the wand tip becomes dirty and makes scanning difficult. We recommend
cleaning it occasionally with a soft cloth and water.

11
Contact Us
*** Please note that all general usage questions regarding your Telxon should be directed to your assigned sales representative. ***
Telxon Receiver
Unattended Local: (802) 893 – 5122
Unattended Non-Local: (800) 426 – 9517
Customer Service
Attended Local: (802) 893 – 5100
Attended Non-Local: (800) 833 – 4811