operators manual series allrounder... · · 2016-11-29without the relevant documents your...
TRANSCRIPT

OPERATORS MANUAL
www.simplicityaus.com.au
33 00 55 SS ee rr ii ee ss ALLROUNDER
Double Fold

Contents
Simplicity Australia Version 1.0
Section 1: Introduction Welcome to Simplicity Australia Page 1.1 Company Profile 1.2 Section 2: Safety Safety Instructions – ‘Key Words’ Page 2.1 Location of Safety Decals – LHS and Rear 2.2 Location of Safety Decals – RHS and Front 2.3 Road and Field Travel 2.4 Section 3: Operation Hooking up Page 3.1 Bleeding the Tyne Circuit 3.2 Leveling 3.3 Folding 3.4 Double Fold Folding Procedure – Important 3.4.1 Tilting 3.5 Accumulator Pressure - Setting and Adjusting 3.6 Air Seeder Hitching (Optional Equipment) 3.7 Air Seeder Hydraulic Circuit (Optional Equipment) 3.8 Notes 3.9 Section 4: Maintenance Lubrication and Maintenance Overview Page 4.1 Daily Checklist 4.2 Pre and Post Season Maintenance 4.3 Lubrication and Maintenance Schedule 4.4 Frame Grease Points and Lube Intervals 4.5 Tyne Grease Points and Lube Intervals 4.6 Service and Repair Records 4.7 Notes 4.8 Section 6: Miscellaneous Useful Formulae Page 5.1 Risk Assessment 5.2 Notes 5.3 Disclaimer Rear cover

Introduction
Simplicity Australia Page 1.1 Version 1.0
Welcome to Simplicity Australia The Management and Staff of Simplicity Australia would like to thank you and congratulate you on your decision to purchase a new Simplicity “Allrounder” cultivator. The design of your Simplicity “Allrounder” incorporates many innovative features to make your farming operations easier, more efficient, and as the name suggests, simpler. Your Simplicity “Allrounder” has been designed and manufactured with the utmost care and pride. By following the operation instructions outlined in this Operator’s Manual you will have many years of trouble free operation. This Operator’s Instruction Manual has been prepared to familiarise you with the set up, operation and maintenance of your new Simplicity “Allrounder”. By reading this Operator’s Instruction Manual thoroughly, the most efficient and trouble free operation of your Simplicity “Allrounder” will be achieved. Simplicity Australia operates Australia wide through a professional agricultural equipment Dealer network which includes factory trained Sales and Service personnel. If you have any concerns with the operation and maintenance of your Simplicity “Allrounder” your local selling Dealer will be able to assist you with advice, service and spare parts back up. Your Simplicity Australia Dealer will register your Simplicity “Allrounder” for warranty according to the guidelines of the Simplicity Australia Warranty Policy document included in your warranty registration booklet. Please ensure you complete the warranty registration documents in conjunction with your Dealer when you first use your Simplicity “Allrounder”. Your Dealer will then forward the necessary documentation to Simplicity Australia. Without the relevant documents your Simplicity “Allrounder” cannot be registered for warranty. When ordering replacement parts for your Simplicity “Allrounder” be sure to quote the serial number attached to the machine which is also recorded on the warranty registration certificate. The Management and Staff of Simplicity Australia sincerely wish you every success with your new Simplicity “Allrounder" and are available to assist your Simplicity Australia Dealer should they require any specialist assistance. Yours faithfully David W. Law Managing Director

Introduction
Simplicity Australia Page 1.2 Version 1.0
Company Profile
Simplicity Australia Pty Ltd designs and manufactures the most comprehensive and innovative range of Air Seeders and Tillage Equipment in Australia today. Simplicity Australia has its origins as a small business in Dalby Queensland that started manufacturing Air Seeders in 1979, utilising an auger type metering system. David Law, owner and Director of Simplicity Australia, saw the potential and bought the Business in 1982. He soon began using Napier distributors for metering seed and fertiliser. By 1985 he developed and introduced his own innovative metering system to meet the diversity of Australian farming needs. He has continued to develop Air Seeder and Tillage equipment technology using the latest manufacturing methods and expertise to meet changing farmer’s requirements while continually increasing product strength, quality, functionality and diversity. All of this has seen customer needs becoming standard features. With the town of Dalby located in the centre of eastern Australia the Company easily distributes its products through a vast Dealer network Australia wide and internationally. Product strength, quality, reliability and an extensive professional Dealer network providing customised service are key elements of the Company’s success in winning its share of the Australian Air Seeder and Tillage equipment market. Simplicity Australia products have a high degree of customer satisfaction and loyalty with recent research indicating that in excess of 95% of owners will purchase the Simplicity product again. Today the Company’s range of Air Seeders includes seven types comprising over forty different models including liquid options. To compliment the wide range of Air Seeders Simplicity Australia also offers the “Allrounder” cultivator, and the recently developed “Striker” planting unit available to suit the innovative “X-Bar”. With all models of Air Seeder and Tillage equipment now manufactured with the latest manufacturing methods and technology combined with a widespread, diverse and professional Dealer network, Simplicity Australia stands ready to maintain and increase its market share in Australia and meet any new challenges future farming requirements may provide.

Safety
Simplicity Australia Page 2.1 Version 1.0
The symbol identifies points of interest that could result in the more efficient operation of the equipment
Instruct all operators in safe and efficient operation
Safety Instructions
All equipment manufactured by Simplicity Australia has been designed to provide long term trouble free operation with the personal safety of the Operator and others the number one priority. The equipment can only be manufactured as safe as the person operating it. With this in mind it is very important that the information contained in this Operator’s Instruction Manual is read and understood. It is equally important that this Operator’s Manual remains with the equipment to ensure that the Operator has all operating and safety instructions at hand. Owners of Simplicity Australia product are encouraged to adopt a regular lubrication and maintenance program to ensure long and trouble free operation. This program should also include the maintenance of all safety and accident prevention devices fitted to the equipment as outlined in this Operator’s Instruction Manual. Throughout this Operator’s Manual, and on the Cultivator itself, there are a number of ‘safety alert’ symbols. Each symbol appears as a yellow equilateral triangle with a black border. Each yellow triangle contains a black pictogram depicting the hazard relevant to that area of the Cultivator. Any ‘safety alert’ symbol appearing as an exclamation mark in a yellow triangle will be a separate decal with associated text. Two ‘Signal’ words WARNING and CAUTION are used in conjunction with the ‘safety alert’ symbol. WARNING – indicates a potentially hazardous situation that could result in DEATH or SERIOUS INJURY if not avoided. CAUTION – indicates a potentially hazardous situation that could result in MINOR INJURY if not avoided. A master decal itemising each symbol with it’s individual pictogram and description is located on the Cultivator. A copy of the master decal also appears on Page 2.2 & 2.3 of this Operator’s Manual. This ‘IMPORTANT’ box identifies procedures that, if not strictly observed, could result in damage to the equipment or other property. At the time of delivery your authorised Simplicity Australia Dealer will request you sign a ‘Safety Declaration’ document. Prior to signing this document it is to your advantage to have the Dealer explain the safety features of the equipment to you. This ‘Safety Declaration’ document is very important and is part of the warranty registration process. Without this document being completed the registration of your Simplicity Australia product for warranty cannot proceed. The following pages show the Safety Decals and where they are located. For the safety of the operator and others ensure that any safety decal that is damaged or unreadable is replaced. If further information is required contact your local authorised Simplicity Australia Dealer for assistance.
All references to the left side and right side are from the rear facing direction of travel
IMPORTANT

Safety
Simplicity Australia Page 2.2 Version 1.0
Location of Safety Decals LHS and Rear
WARNING: Do not enter underneath cultivator at any time unless machine is secured, stationary, tractor is not running, and hydraulics are closed or have been disconnected,
WARNING: Do not disconnect breakaway hydraulic couplings or any other hydraulic connection while hydraulic system is under pressure. Disconnecting hydraulic components while under pressure will result in uncontrollable discharge of hydraulic fluid which may cause injury
WARNING: Read and understand the Operator’s Manual before using this equipment. Failure to follow operating instructions could result in death or serious injury.
WARNING: Ensure hitch pin is locked in position and jack is locked in transport position prior to movement.
WARNING: Rolling Hazard. Ensure wheels are securely blocked before unhooking.
WARNING: In field and road travel should not exceed 20 kph
WARNING: A ‘crush zone’ is developed in this area when connecting the implement to the tractor. Keep bystanders clear of this area when reversing
WARNING: Be aware of the equipments height when working around overhead power lines. Contact with overhead power lines will cause serious injury or death
WARNING: Never allow others to ride on the equipment. Falling from the equipment while in motion can cause death or injury
WARNING: Do NOT check for hydraulic oil leaks with bare hands. Small, almost invisible, high pressure oil leaks can penetrate the skin requiring medical attention.
CAUTION: Crush points. Keep hands well clear when Allrounder is folding, moving or working.

Safety
Simplicity Australia Page 2.3 Version 1.0
Location of Safety Decals RHS and Front
WARNING: Do not enter underneath cultivator at any time unless machine is secured, stationary, tractor is not running, and hydraulics are closed or have been disconnected,
WARNING: Do not disconnect breakaway hydraulic couplings or any other hydraulic connection while hydraulic system is under pressure. Disconnecting hydraulic components while under pressure will result in uncontrollable discharge of hydraulic fluid which may cause injury
WARNING: Read and understand the Operator’s Manual before using this equipment. Failure to follow operating instructions could result in death or serious injury.
WARNING: Ensure hitch pin is locked in position and jack is locked in transport position prior to movement.
WARNING: Rolling Hazard. Ensure wheels are securely blocked before unhooking.
WARNING: In field and road travel should not exceed 20 kph
WARNING: A ‘crush zone’ is developed in this area when connecting the implement to the tractor. Keep bystanders clear of this area when reversing
WARNING: Be aware of the equipments height when working around overhead power lines. Contact with overhead power lines will cause serious injury or death
WARNING: Never allow others to ride on the equipment. Falling from the equipment while in motion can cause death or injury
WARNING: Do NOT check for hydraulic oil leaks with bare hands. Small, almost invisible, high pressure oil leaks can penetrate the skin requiring medical attention.
CAUTION: Crush points. Keep hands well clear when Allrounder is folding, moving or working.

Safety
Simplicity Australia Page 2.4 Version 1.0
Road and Field Travel The Simplicity “Allrounder” is designed with the purpose of in field; seed planting (minimum till and conventional), and also primary and secondary tillage in mind and therefore is not designed for continuous, high speed, road travel. However, it is understood that the locations of some working areas would necessitate that the Simplicity “Allrounder” be moved on public roads from time to time for the purpose of carrying out tillage operations. The Simplicity “Allrounder” has been designed with this in mind and is quite capable of infrequent, short distance movements on the road providing the following criteria are met:
Always use an agricultural tractor large enough and with sufficient braking capacity to stop the combined unit quickly and safely.
Make sure all wheel nuts on the Simplicity “Allrounder” are present and
tight.
Make sure all hitching components are in good order with all pins secure and there is no possibility of the Simplicity “Allrounder” coming unhooked.
Make sure hydraulic jack is in the transport position.
Traveling speed in field or on the road should not exceed 20 kilometres per
hour.
Know the equipments’ limitations when negotiating changes in road or operating conditions. Reduce tractor speed further over uneven or rough ground and be aware of potential hazards such as bridges, trees, fences, gates, water courses and other road users etc.
Exercise Caution when transporting the Simplicity “Allrounder” on public
roads when wet. The stopping capability of the tractor will be significantly reduced.
Exercise Caution when transporting the Simplicity “Allrounder” on public
roads in poor visibility.
The dimensions of the equipment may exceed local laws regarding road travel. Always check with the relevant local authority regarding excess dimension requirements before transporting the Simplicity “Allrounder”.
Be aware of the height of the Simplicity “Allrounder” when traveling or
working around over head power lines.
Do not allow others to ride on the Simplicity “Allrounder” or any part of the equipment either in field or on the road.
Make certain there is no possibility of any component falling from the
Simplicity “Allrounder”. It is important to remember that the Simplicity “Allrounder” is NOT designed for frequent, high speed, activities and as such Simplicity Australia does NOT recommend on road travel other than necessary, infrequent, short distance road travel at a greatly reduced speed following all criteria outlined above.

Operation
Simplicity Australia Page 3.1 Version 1.0
When hitching cultivator to tractor drawbar use the largest pin possible.
Hooking Up
The Simplicity “Allrounder” is manufactured to suit specific customer requirements for a wide range of farming applications. As Simplicity Australia has no control over the make and model of the tractor or Air Seeder the Cultivator is to be used with, it is necessary to ensure you have the correct components required for the hitching process with the given machines. Crush points, impact and entrapment risks are hazards which are produced by the relative movement of one machine to the other when hooking up. The safety of the Operator and any assistant is of highest priority. Be aware of the hazards that hooking together machines can produce. Be sure to:
• Connect all hydraulic lines making sure all hose ends are perfectly clean prior to connection
• Connect electrical wiring harnesses (If Applicable)
• Once Connected ensure jack is raised to the Transport
Position.
• Ensure hitch pin is correct size for both tractor and cultivator. (Use as large a pin as possible).
WARNING: A ‘crush zone’ is developed in this area when connecting the implement to the seeder. Keep bystanders clear of this area when reversing
WARNING: Ensure all hitch point safety chains are in place. A safety chain will assist in maintaining control of the equipment should it become separated. An uncontrollable machine could cause serious injury or death.
As the hydraulic jack is capable of transferring a great deal of force, care should be taken for smooth operation.
IMPORTANT

Operation
Simplicity Australia Page 3.2 Version 1.0
Another effective method to compress the tine ram is to simply tie up end of tine, in fully broken-out position.
Bleeding the Tyne Circuit
The process of bleeding the hydraulic system is basically to release any pockets of air which may remain in the system. To effectively bleed the hydraulic system all tyne cylinders must be totally compressed. To compress the tyne rams unfold wings and ensure tyne pressure lever in tractor is left in float position. Slowly lower cultivator whilst gradually moving forward. This should push the tynes back far enough to compress the rams. Once tynes rams are compressed pressurise tyne circuit and while pressure is maintained slightly unscrew end cap of tyne manifold. Continue to hold open until free flow of pure oil is obtained. Re-tighten manifold end cap and be sure to top up hydraulic oil reservoir. Repeat this process on the four outside corners of cultivator manifolds.
Tyne in Working Position Tyne in Broken Out Position
WARNING: Be sure to stand clear of manifold end when bleeding the system. High pressure oil leaks can penetrate the skin causing serious injury and requiring medical attention.
Note: Tyne cylinder
completely compressed when Tyne is in broken-out
position.
Manifold End Cap

Operation
Simplicity Australia Page 3.3 Version 1.0
A good starting point is to ensure that the length; centre to centre of turnbuckles on either side are equal.
Leveling the Cultivator
To create a uniform depth for seed placement or cultivating depth the ‘Allrounder’ needs to be set to an even height across its width. Using the leveling turnbuckles, you are able to adjust the height of the bar sections, this in turn, gives control over the overall level of the cultivator and also the maximum working depth. To set the level of the cultivator:
1) Position the ‘Allrounder’ on flat, level ground 2) Unfold wings 3) Raise so only the wheels are in contact with the
ground 4) Check tyre pressure – adjust if necessary
(See pg 4.2) Adjust turnbuckles on lift wheels for the centre section until level. (Ancillary devices such as spirit levels or tape measures etc may be used to aid in the accuracy of leveling.) Once centre section is level, adjust turnbuckles on wheels for both wings until a consistent level is achieved across the width of the cultivator. During operation the Fore and Aft leveling of the Simplicity ‘Allrounder’ is manually controlled by the tilt cylinders positioned between the ‘pull’ of the cultivator and the centre section of the cultivator itself (unless ‘Auto Hitch’ is fitted).
Leveling Turnbuckle
Tilt Cylinder
Note: Centre to Centre of Leveling Turnbuckle
Once turnbuckles are set – Ensure both locknuts are LOCKED
IMPORTANT

Operation
Simplicity Australia Page 3.4 Version 1.0
After connecting hydraulic lines for the first time charge circuits prior to operation to ensure oil flow is free from airlocks and system contains only pure hydraulic oil.
Folding Prior to any tilting or folding operation, all safety locking pins must be removed and the hydraulic cylinders must be phased to ensure smooth, safe and effective movement. To phase the cylinders, reduce oil flow rate, and fully raise the cultivator and hold levers open momentarily then lower slightly. Repeat to allow oil to fill lines and cylinders completely and ensure that all phasing poppets are correctly seated. Once cylinders are phased all lift, tilt, and fold operations can occur smoothly. When folding or unfolding you will notice that the wings will not travel together. This is normal as oil will attempt to flow to the least loaded side first. When folding for transport ensure that wings are fully folded and wing locking pins securely in place.
WARNING: When using Hydraulic tilt and fold functions always operate smoothly and with care. Excessive force and/or violent operation may case damage, compromising structural integrity.
WARNING: Be aware of the equipments height when working around overhead power lines. Contact with overhead power lines will cause serious injury or death
Pin Locked in Transport Position
Prior to any Folding/ Unfolding make certain area is free from obstructions, and be sure there are no people in the immediate vicinity of equipment
IMPORTANT

Operation
Simplicity Australia Page 3.4.1 Version 1.0
Double Fold Procedure
For safe folding/unfolding of your double-fold Simplicity “Allrounder” it is crucial that you follow these steps each and every time a folding operation is performed.
Step 1. Fold outer wings slowly until resting on wing stops. (As shown in picture 3).
Step 2. Flick toggle switch to isolate outer wing wheel. Step 3. Operate raise-lower circuit to pull in outer wing wheel. (In working operation this process would result in the lowering of the cultivator)
Step 4. Slowly fold outer wings until both are resting firmly in the transport position. (Take care when folding wings over centre) Step 5. Insert and lock transport pins before moving. To unfold, follow procedure in reverse order. Be sure to never unfold outer wings without extending wing wheel.
WARNING: When using Hydraulic tilt and fold functions always operate smoothly and with care. Excessive force and/or violent operation may case damage, compromising structural integrity.
Before attempting any folding or unfolding of the Simplicity “Allrounder” ensure the wing wheels are in the correct position for the corresponding operation. As outlined above.
IMPORTANT
Wheel Out
Wheel In
Prior to any Folding/Unfolding make certain area is free from obstructions, and be sure there are no people in the immediate vicinity of equipment.
IMPORTANT

Operation
Simplicity Australia Page 3.5 Version 1.0
Tilting Because almost every tractor has a different drawbar height it is necessary for a cultivator to have the ability to accommodate these varying heights while staying parallel to the ground. This feature of the “Allrounder” is attributed to the setup of the tilt rams, which operate between the pull and the centre section of the cultivator. The position of these rams allows the level to be set and maintained for virtually any tractor drawbar height. Provision has also been made to tap into the tilt circuit to offer a floating hitch option. This option comprises of ultrasonic sensors (mounted front and rear) which control the tilt rams to ensure the distance (ground to frame) is the same from front to back. This option is particularly useful in undulating country where it is of great benefit to have the cultivator follow the undulations whilst still maintaining a relatively even working depth. Leveling, however, is not the only use for the “Allrounder” tilt circuit. This function, above any other allows the “Allrounder” to be a class leader when it comes to under-frame serviceability. These rams have the ability to tilt the cultivator to a degree which allows access to the underside, when changing or servicing points.
WARNING: When using Hydraulic tilt and fold functions always operate smoothly and with care. Excessive force and/or violent operation may case damage, compromising structural integrity.
WARNING: Do not enter underneath cultivator at any time unless machine is secured, stationary, tractor is not running, and hydraulics are closed or have been disconnected.
CAUTION: Crush points. Keep hands well clear when Allrounder is moving or working. Or unless stationary and deemed safe.
Tilt Cylinders

Operation
Simplicity Australia Page 3.6 Version 1.0
Tyne circuit will not pressurise if six port selector is not switched to “on”. If wings still fold/ unfold, switch is not selected.
Accumulator Pressures
The accumulator is a storage area of controlled pressurised oil to maintain an appropriate pressure in the tyne circuit during the fluctuations of loads to the hydraulic system. Adjusting this pressure in turn controls the necessary break-out force for the tines The accumulators themselves consist of a piston with pressurised Nitrogen gas on one side and a volume of oil on the other. As the volume of oil increases, the resisting force from the gas being compressed; pressurises the hydraulic lines. To set the accumulator pressure, unfold the wings and open the valve to the accumulator. (Flick six port selector switch to “on” to divert oil from the Fold circuit, to the Tyne circuit). Observe the pressure reading on accumulator pressure gauge (located on the Hydraulic Control Block) and once it reaches desired pressure, close the accumulator valve (six port selector switch to “off” position). Fine tuning of accumulator pressure can be done during operation by following the same process and simply watching the amount of tine breakout movement. The breakout pressure will be approximately half of the hydraulic system pressure. I.e. At max 700lb breakout pressure, the system gauge will read 1400psi. Note: The Accumulator gas pressures are factory pre set to 200psi and 700psi of nitrogen gas.
Hydraulic Control Block Accumulator
Accumulator Pressure Gauge
Accumulator will not work as desired if the gas pressure inside accumulator is higher than the accumulated pressure.
IMPORTANT
The Accumulator gas pressures are factory pre set to 200psi and 700psi of nitrogen gas. Do not attempt to alter these pressures
IMPORTANT
Operation
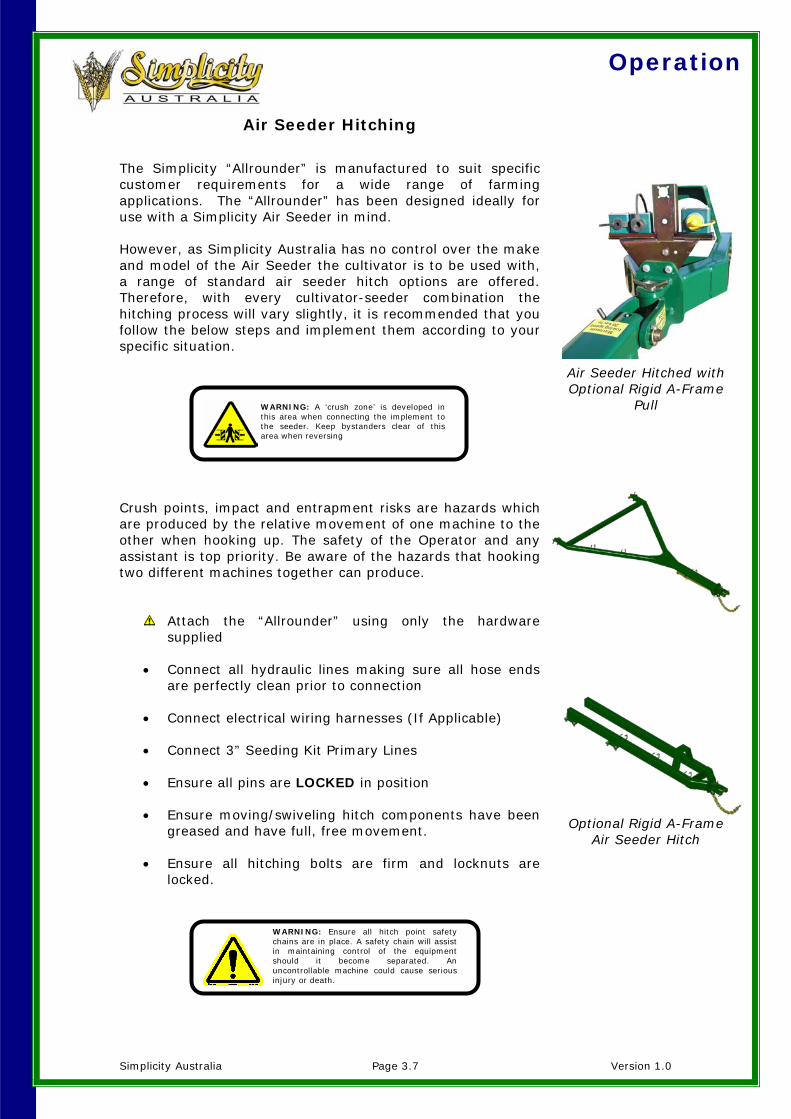
Simplicity Australia Page 3.7 Version 1.0
Air Seeder Hitched with Optional Rigid A-Frame
Pull
Optional Rigid A-Frame Air Seeder Hitch
Air Seeder Hitching
The Simplicity “Allrounder” is manufactured to suit specific customer requirements for a wide range of farming applications. The “Allrounder” has been designed ideally for use with a Simplicity Air Seeder in mind. However, as Simplicity Australia has no control over the make and model of the Air Seeder the cultivator is to be used with, a range of standard air seeder hitch options are offered. Therefore, with every cultivator-seeder combination the hitching process will vary slightly, it is recommended that you follow the below steps and implement them according to your specific situation. Crush points, impact and entrapment risks are hazards which are produced by the relative movement of one machine to the other when hooking up. The safety of the Operator and any assistant is top priority. Be aware of the hazards that hooking two different machines together can produce.
Attach the “Allrounder” using only the hardware supplied
• Connect all hydraulic lines making sure all hose ends
are perfectly clean prior to connection
• Connect electrical wiring harnesses (If Applicable)
• Connect 3” Seeding Kit Primary Lines
• Ensure all pins are LOCKED in position
• Ensure moving/swiveling hitch components have been greased and have full, free movement.
• Ensure all hitching bolts are firm and locknuts are
locked.
WARNING: A ‘crush zone’ is developed in this area when connecting the implement to the seeder. Keep bystanders clear of this area when reversing
WARNING: Ensure all hitch point safety chains are in place. A safety chain will assist in maintaining control of the equipment should it become separated. An uncontrollable machine could cause serious injury or death.

Operation
Simplicity Australia Page 3.8 Version 1.0
Steel Lines
Air Seeder Hydraulic Circuit – (shown with optional floating A-frame hitch)
Air Seeder Hydraulic Circuit
Upon request your Simplicity “Allrounder” may have an Air Seeder Hydraulic Circuit fitted. This hydraulic circuit is designed to customer specifications and will consist of either two or three hydraulic lines. In either case the circuit will include a 5/8” Pressure line and a 1” Return line, however, where necessary there may be the addition of a ½” Case Drain line. These lines run as a separate circuit, apart from all the hydraulics concerned with the operation of the cultivator. The Air Seeder circuit does not pass through the hydraulic control block. Steel seeder hydraulic lines are run down the left-hand side of the cultivator pull, with traditional hydraulic lines following the frame of the centre section. At the rear of the cultivator all seeder lines are fitted into a mounted breakaway assembly (If Genuine Simplicity Seeder Hitch is ordered). This allows the cultivator to be easily separated from the seeder and used for tillage purposes which do not require a planting capability.
WARNING: Do NOT check for hydraulic oil leaks with bare hands. Small, almost invisible, high pressure oil leaks can penetrate the skin requiring medical attention.

Operation
Simplicity Australia Page 3.9 Version 1.0
Notes

Maintenance
Simplicity Australia Page 4.1 Version 1.0
Proper care, regular maintenance and lubrication will ensure years of trouble free operation and product life
After some time (depending on amount of use) it is advisable to unpack the wheel bearing grease hubs and repack with fresh grease.
Lubrication and Maintenance
Owners of Simplicity Australia product are encouraged to adopt a regular lubrication and maintenance program. By following the Pre Season, Daily, Weekly and Post Season lubrication and maintenance programs outlined in this Operators Manual and in conjunction with your preferred Simplicity Australia Dealer, long and trouble free operation is achievable. Pre Season Before sowing, at the beginning of the season, it is important that the pre season procedures outlined in the Schedule Page 4.4 are checked off, and prior to use ensure all checks listed on Page 4.3 have been completed. Following the procedures outlined in these check lists should ensure a trouble free season. Contact your Simplicity Australia Dealer for a Pre-Season check of all equipment. Daily Checks The ‘Daily Checklist’ Page 4.2 should be used in conjunction with the daily procedures outlined in the Schedule Page 4.4 to ensure trouble free daily operation of the Simplicity “Allrounder”. Weekly Checks The weekly checks outlined in the Schedule Page 4.4 are procedures which can, but don’t need to be, carried out every day. It is advisable that once a week during a period of use, further to the daily checks, these additional checks also be completed. As outlined in the Lubrication and Maintenance Schedule Page 4.4 the majority of the lubrication program is required to be carried out on a weekly basis. Following this weekly program is essential in achieving the maximum service life from all components of the Simplicity “Allrounder”. Post Season Following the ‘Post Season Maintenance’ checklist Page 4.3 in conjunction with the ‘Post Season’ procedures outlined in the Schedule Page 4.4 prior to storage will ensure that minimal component deterioration occurs and that the cultivator is ready for trouble free operation next season.
Over greasing can shorten the service life of some components
IMPORTANT
The necessary Tyne lubrication period is entirely dependant upon application. Where the operation results in a great deal of movement in tyne pivot points more frequent greasing may be necessary. (i.e. When being used for primary tillage, or when tynes are regularly being broken out)
IMPORTANT

Maintenance
Simplicity Australia Page 4.2 Version 1.0
Time taken to carry out Daily Checks should ensure daily trouble free operation
Daily Checklist
Check:
• Periodically check wheel nut tension throughout the first
days after delivery until wheel nut tension is maintained • Hydraulic lines are correctly coupled at all breakaway
connections, and system is free from leaks • Ram seals for leaks • Cylinders are in phase • Correct Hydraulic system pressure • Oil flow is reduced when unfolding and folding • Accumulator valve control solenoid functioning correctly • Correct working pressures for accumulator • Condition of tines and sweeps • That all stands, guards and safety pins are in correct
position for operation • Air Seeding system (Seeding Kit) free from blockages
and leaks (if attached) • If fitted with floating hitch monitoring system – Sensors
clean and intact • Correct Tyre inflation (see below) Tyre Inflation: When setting cultivator tyre pressures many variables come into play, such as; weight vs. transport weight, min/max speed, working conditions, aftermarket additions. Being each machine varies in many of these areas it is impossible if list an exact tyre pressure for each machine. Therefore below is a list of recommended tyre pressures which will suit most applications. A method of accurately checking tyre pressure vs. load is by measuring the Static Loaded Radius (SLR). This is the distance from the centre of the wheel to the ground when the tyre is under its given load. The minimum SLR’s are listed below. Centre Tyres
Wing Tyres
Tyre Size Ply Rec. Pressure Max Pressure Minimum SLR 15.5/80-24 12 30psi 35psi 564 15.5/80-24 16 34psi 45psi 564
Tyre Size Ply Rec. Pressure Max Pressure Minimum SLR 10.5/80-18 10 24psi 44psi 415 15.5/80-24 12 24psi 35psi 564
Wheel Nut Tension
M18 stud 27mm nut – 250 lbf ft/340Nm
M22 stud 30mm nut –
500 lbf ft/678Nm
CAUTION: Specialist Repair. Tyre repair or replacement should be carried out by suitably trained personnel using the correct equipment.
Failure to maintain tyre pressures within range of those listed may result in damage to the tyre as well as decreasing the life of the tyre.
IMPORTANT
*The centre section tyres
must be set when the machine is folded and on hard ground to determine correct tyre pressure for transport

Maintenance
Simplicity Australia Page 4.3 Version 1.0
To maintain the appearance of the powder coat finish used in production it will be necessary to wash the exterior of the “Allrounder” with water and a soft cloth.
Pre Season Maintenance
Maintenance should be carried out on a regular basis depending on frequency of use. Ensure:
• All nuts and bolts are tight • Check tyre pressure – Adjust if necessary (as per page
4.2) • Tyres in good condition • Grease wheel bearings and check preload • All pins are secure and are not worn • Cultivator is level and leveling turnbuckle locknuts are
LOCKED • Hydraulic hoses are not cracked or perished • All greaseable joints have been adequately lubricated (as
per page 4.5) • Welded joints have not fatigued • Lift cylinders are phased correctly • Hydraulic circuit has been bled and is free from air locks • Adequate hydraulic oil in tractor Reservoir • Tyne fastening diamond bolts are present and tight • Tine shanks and sweeps are in good condition • Correct tine sweeps for situation • Air Seeding system free from blockages and not cracked
or perished
Post Season Maintenance
Ensure no hydraulic circuit is stored with pressure in its system. Breakaways should be disconnected with tractor hydraulic system in float. This will ensure circuits are filled with oil at minimal pressure.
Check:
• All hydraulic components are in good condition, free
from leaks, and functioning correctly • Wheel bearings are; packed with grease and have
smooth movement (free from damage) • Tyres are in good condition with an acceptable tread
depth • Cultivator is generally clean (no buildup of material
which may retain moisture and cause damage) • A suitable rust preventative is sprayed on any area
where the powder coat has been damaged or worn away, and bare metal is exposed.
• Contact your Simplicity Australia Dealer and place an
order for any service parts or wear and tear item such as tyne shanks, keech points etc.
Do not use high water pressure, abrasive materials or harsh cleaning products as irreversible scratching could occur
IMPORTANT
Do not use steam or hot water as a cleaning medium. Some hydraulic components such as hydraulic rams depend on the oil residue left on them as a rust barrier
IMPORTANT

Maintenance
Simplicity Australia Page 4.4 Version 1.0
Adj
ust
whe
el n
ut
tens
ion
Che
ck w
heel
bea
ring
pr
eloa
d
Gre
ase
whe
el
bear
ings
H
ydra
ulic
con
trol
bl
ock
& h
ydra
ulic
line
s ar
e fr
ee f
rom
leak
s Che
ck fol
d pi
ns a
re in
pl
ace
and
bolts
are
tig
ht
Hitc
h pi
ns in
pla
ce &
se
cure
Hyd
raul
ic li
nes
are
secu
rely
con
nect
ed
Pull
pivo
t pi
ns a
re in
pl
ace
and
bolt
is t
ight
Che
ck h
ydra
ulic
pin
s ar
e se
cure
with
end
cl
ips
in p
lace
All
safe
ty d
ecal
s ar
e cl
early
read
able
and
in
pos
ition
Ty
ne R
ams
are
free
fr
om d
amag
e an
d/or
le
aks
Tyre
pre
ssur
es
Gre
ase
pull
pivo
t pi
ns
Gre
ase
fold
ram
ro
llers
Leve
lling
tur
nbuc
kles
lo
cknu
ts a
re L
OCKED
Gre
ase
tyne
piv
ot p
ins
All
tyne
fas
teni
ng
“dia
mon
d” b
olts
are
in
plac
e &
sec
ure
Gre
ase
whe
el s
uppo
rt
arm
piv
ot p
in
As
per
“Pos
t Sea
son
Mai
nten
ance
” (P
g 4.
3)
Periodically during 1st
season use X
After first ten hours X X X
Daily X X X X X X X X
Weekly X X X X X
Pre Season X X X X X X X X X X X X X X X X X X
Season End X
Use in conjunction with pages 4.2 & 4.3

Mai
nte
nan
ce
Gre
ase
Po
ints
an
d L
ub
e In
terv
als
Page
4.5
Sim
plic
ity A
ustr
alia
Ver
sion
1.0
Grease Every 100 Hours Grease Seasonally
Grease Every 100 Hours Grease Seasonally Grease Seasonally
Grease Seasonally

Maintenance
Simplicity Australia Page 4.6 Version 1.0
Tyne Grease Points and Lube Intervals
Grease Every 100 Hours
Grease Every 100 Hours
Grease Every 100 Hours

Maintenance
Simplicity Australia Page 4.7 Version 1.0
Tyne Grease Points and Lube Intervals
Grease Every 100 Hours
Grease Every 100 Hours
Grease Every 100 Hours

Maintenance
Simplicity Australia Page 4.8 Version 1.0
Record of Service and Repairs
Date Service/Repair Carried out by: Dealer/Owner
Comments

Maintenance
Simplicity Australia Page 4.9 Version 1.0
Notes

Maintenance
Simplicity Australia Page 4.10 Version 1.0
Notes

Miscellaneous
Simplicity Australia Page 5.1 Version 1.0
Useful Formulae/Conversions
Length 1 km = 0.62 mile 1 mile = 1.609 km 1 m = 3.28 ft 1 ft = 0.304 m 1 mm = 0.039 inch 1 inch = 25.40 mm Area 1 ha = 10,000 m2 = 2.47 acre 1 acre = 4840 sq. yd = 0.40 ha 1 km2 = 0.38 sq. mile 1 sq. mile = 2.589 km2 Volume 1 m3 = 35.31 cu.ft 1 cu.ft = 0.028 m3 1 litre = .22 gal. 1 gal = 4.54 litre 1 litre = 0.26 US gal 1 US gal = 3.78 litre 1 bushel = 8.00 gal = 1.28 ft3 1 litre = 0.027 bushel 1 Bushel = 36.36 litre Pressure 1 psi = 6.89 kPa 1 kPa = 0.14 psi 1 Bar = 14.5 psi Mass 1 kg = 2.20 lb 1 lb = 0.45 kg 1 kg = 1000 grams Application Rate 1 kg/ha = 0.89 lb/acre 1 lb/acre = 1.12 kg/ha Mass Flow Rate kg/hr = Application Rate (kg/ha) x Area Rate (ha/hr) kg/min = Application Rate (kg/ha) x Area Rate (ha/hr) 60 lb/hr = Application Rate (lb/acre) x Area Rate (acre/hour) lb/min = Application Rate (lb/acre) x Area Rate (acre/hour) 60

Miscellaneous
Simplicity Australia Page 5.2 Version 1.0
Risk Assessment Hazard Checklist for “Allrounders”
Product Description
Simplicity “Allrounder”
Model 10m - 250mm Serial Number 1838
Date of Inspection 20/11/08 Location of Inspection Dalby
Inspected by: Signature
Hazard Risk Source Safety Measure Safety
Measure Check?
Incorrect Operation • Lack of Information
• Comprehensive Operator’s Manual with safety and operating information
Yes
Crushing • Wings Falling When in Transport Position
• Hitch Dropping
• Counter Balance Valves Fitted
• Hydraulic Jack Fitted
• Warning decals fitted at all crush points
Yes
Yes
Yes
Falling off during operation
• Riding on Cultivator during operation
• Warning Decals Fitted
Yes
Contact with over head power lines
• Transport Height • Warning decal fitted
Yes
High pressure fluid leak Oil ingress through skin
• Hydraulic hoses • Checking for
hydraulic leaks with hands
• Hoses clamped at close intervals to prevent rubbing
• Warning decal fitted
Yes
Yes

Miscellaneous
Simplicity Australia Page 5.3 Version 1.0
Notes

Simplicity Australia Pty Ltd 18 Loudoun Road
P.O. Box 267 Dalby QLD 4405
Australia www.simplicityaus.com.au
Disclaimer: We reserve the right to alter the design or discontinue any of the Company’s products or services without notice. Whilst every effort has been made to ensure the accuracy of the information contained in this publication, our Company Policy of continual research and product development necessitates changes and refinements which may not be reflected in these pages. If in doubt, please contact your nearest Simplicity Australia Dealer