oracle® enterprise data quality for product data · v preface. this guide highlights the core...
TRANSCRIPT

Oracle® Enterprise Data Quality for Product DataR12 PIM Connector User’s Guide
Release 5.6.2
E23408-01
November 2011

Oracle Enterprise Data Quality for Product Data R12 PIM Connector User’s Guide, Release 5.6.2
E23408-01
Copyright © 2001, 2011 Oracle and/or its affiliates. All rights reserved.
This software and related documentation are provided under a license agreement containing restrictions on use and disclosure and are protected by intellectual property laws. Except as expressly permitted in your license agreement or allowed by law, you may not use, copy, reproduce, translate, broadcast, modify, license, transmit, distribute, exhibit, perform, publish, or display any part, in any form, or by any means. Reverse engineering, disassembly, or decompilation of this software, unless required by law for interoperability, is prohibited.
The information contained herein is subject to change without notice and is not warranted to be error-free. If you find any errors, please report them to us in writing.
If this is software or related documentation that is delivered to the U.S. Government or anyone licensing it on behalf of the U.S. Government, the following notice is applicable:
U.S. GOVERNMENT RIGHTS Programs, software, databases, and related documentation and technical data delivered to U.S. Government customers are "commercial computer software" or "commercial technical data" pursuant to the applicable Federal Acquisition Regulation and agency-specific supplemental regulations. As such, the use, duplication, disclosure, modification, and adaptation shall be subject to the restrictions and license terms set forth in the applicable Government contract, and, to the extent applicable by the terms of the Government contract, the additional rights set forth in FAR 52.227-19, Commercial Computer Software License (December 2007). Oracle America, Inc., 500 Oracle Parkway, Redwood City, CA 94065.
This software or hardware is developed for general use in a variety of information management applications. It is not developed or intended for use in any inherently dangerous applications, including applications that may create a risk of personal injury. If you use this software or hardware in dangerous applications, then you shall be responsible to take all appropriate fail-safe, backup, redundancy, and other measures to ensure its safe use. Oracle Corporation and its affiliates disclaim any liability for any damages caused by use of this software or hardware in dangerous applications.
Oracle and Java are registered trademarks of Oracle and/or its affiliates. Other names may be trademarks of their respective owners.
Intel and Intel Xeon are trademarks or registered trademarks of Intel Corporation. All SPARC trademarks are used under license and are trademarks or registered trademarks of SPARC International, Inc. AMD, Opteron, the AMD logo, and the AMD Opteron logo are trademarks or registered trademarks of Advanced Micro Devices. UNIX is a registered trademark of The Open Group.
This software or hardware and documentation may provide access to or information on content, products, and services from third parties. Oracle Corporation and its affiliates are not responsible for and expressly disclaim all warranties of any kind with respect to third-party content, products, and services. Oracle Corporation and its affiliates will not be responsible for any loss, costs, or damages incurred due to your access to or use of third-party content, products, or services.

iii
Contents
Audience....................................................................................................................................................... vDocumentation Accessibility ..................................................................................................................... vRelated Documents ..................................................................................................................................... viConventions ................................................................................................................................................. vi
1 Overview
Integration with Oracle Product Data Hub R12 ................................................................................. 1-2R12 PIM Connector Configuration .................................................................................................. 1-2
ICC Structure as Product Hierarchy ........................................................................................ 1-2Relationship Between ICC and Semantic Model.................................................................... 1-2
Cleansing and Matching Item On-Boarding Process.................................................................... 1-3Getting Started .......................................................................................................................................... 1-4
2 Creating the Initial Data Lens
1. Setting the Profile Options................................................................................................................. 2-22. Setting the Display Format................................................................................................................. 2-83. Creating the PIM_Connector Database Connection .................................................................. 2-134. Processing the ICC Import from Excel .......................................................................................... 2-155. Using AutoBuild Wizard in Excel to Create a Data Lens .......................................................... 2-18
Using Value Sets when Creating a Data Lens............................................................................. 2-226. Reviewing and Refining the Data Lens ........................................................................................ 2-23
Refining Value Sets in a Data Lens............................................................................................... 2-247. Refining Standardization and Match Rules ................................................................................ 2-258. Testing a Data Lens on Sample Data and Create Base File ....................................................... 2-269. Creating Semantic Key 1 Cache ...................................................................................................... 2-27
3 Cleansing and Matching R12 PIM Connector Batches
Creating an R12 PIM Connector Batch................................................................................................. 3-1Creating an R12 PIM Connector External Data Source Batch ..................................................... 3-1Creating an R12 PIM Connector Production Pull Data Source Batch ........................................ 3-5
Reviewing Items for Enrichment ......................................................................................... 3-10Reviewing Duplicates Within the Batch ............................................................................ 3-10Reviewing Matches Against PIM ........................................................................................ 3-13Reviewing Exceptions ............................................................................................................ 3-14Reviewing Ready for Load.................................................................................................... 3-14

iv
Reviewing the Release Batch................................................................................................ 3-16
A Installing the Client Software
B Creating R12 PIM Connector Users

v
Preface
This guide highlights the core process steps and features of Oracle Enterprise Data Quality for Product Data R12 Product Information Management systems.
By extending the Oracle Product Information Management Data Hub with data quality capabilities, Oracle enables you to improve the accuracy, completeness, and integrity of your master product data.
To understand all of the features presented, you must use this guide in conjunction with the Oracle Enterprise Data Quality for Product Data documents listed in "Related Documents" on page 2-vi.
You must have the Oracle Enterprise Data Quality for Product Data installed on your computer.
Note: Enterprise DQ for Product is only certified with the Oracle Site Hub and Oracle Product Hub for Retail Media Pack.
AudienceYou should have a basic understanding of the DataLens Technology.
This manual is designed for the new users of the Oracle Enterprise Data Quality for Product Data:
■ Business Analysts
■ Subject Matter Experts (SME)
■ IT Administrators
Documentation AccessibilityFor information about Oracle's commitment to accessibility, visit the Oracle Accessibility Program website at http://www.oracle.com/pls/topic/lookup?ctx=acc&id=docacc.
Access to Oracle SupportOracle customers have access to electronic support through My Oracle Support. For information, visit http://www.oracle.com/pls/topic/lookup?ctx=acc&id=info or visit http://www.oracle.com/pls/topic/lookup?ctx=acc&id=trs if you are hearing impaired.

vi
Related DocumentsFor more information, see the following documents in the documentation set:
■ The Oracle Enterprise Data Quality for Product Data R12 PIM Connector Installation Guide provides installation and configuration of Enterprise DQ for Product R12 PIM Connector.
■ The Oracle Enterprise Data Quality for Product Data R12 PIM Connector API Interface Guide provides information about installing and using the R12 PIM Connector API.
■ The Oracle Enterprise Data Quality for Product Data Oracle DataLens Server Installation Guide provides detailed Oracle DataLens Server installation instructions.
■ The Oracle Enterprise Data Quality for Product Data Oracle DataLens Server Administration Guide provides information about installing and managing an Oracle DataLens Server.
■ The Oracle Enterprise Data Quality for Product Data COM Interface Guide provides information about installing and using the Oracle DataLens Server COM APIs.
■ The Oracle Enterprise Data Quality for Product Data Java Interface Guide provides information about installing and using the Oracle DataLens Server Java APIs.
■ The Oracle Enterprise Data Quality for Product Data Application Studio Reference Guide provides information about creating and maintaining Data Service Applications (DSAs).
■ The Oracle Enterprise Data Quality for Product Data AutoBuild Reference Guide provides information about creating an initial data lens based on existing product information and data lens knowledge.
■ The Oracle Enterprise Data Quality for Product Data Knowledge Studio Reference Guide provides information about creating and maintaining data lenses.
■ The Oracle Enterprise Data Quality for Product Data Governance Studio Reference Guide provides information about creating and maintaining Data Service Applications (DSAs).
■ The Oracle Enterprise Data Quality for Product Data Glossary provides definitions to commonly used Enterprise DQ for Product technology terms.
■ The Oracle Enterprise Data Quality for Product Data Services for Excel Reference Guide provides information about creating a DSA based on data contained in a Microsoft Excel worksheet.
■ The Oracle Enterprise Data Quality for Product Data Task Manager Reference Guide provides information about managing tasks created with the Task Manager or Governance Studio applications.
See the latest version of this and all documents listed at the Oracle Enterprise Data Quality for Product Data Documentation Web site at:
http://download.oracle.com/docs/cd/E20593_01/index.htm
ConventionsThe following text conventions are used in this document:

Convention Meaning
boldface Boldface type indicates graphical user interface elements associated with an action, or terms defined in text or the glossary.
italic Italic type indicates book titles, emphasis, or placeholder variables for which you supply particular values.
monospace Monospace type indicates commands within a paragraph, URLs, code in examples, text that appears on the screen, text that you enter, or a file, directory, or path name.
monospace Boldface, monospace type indicates commands or text that you enter.
vii

viii
1
Overview 1-1
1Overview
Oracle DataLens Server is built on industry-leading DataLens™ Technology to standardize, match, enrich, and correct product data from different sources and systems. The core DataLens Technology uses patented semantic technology designed from the ground up to tackle the extreme variability typical of product data.
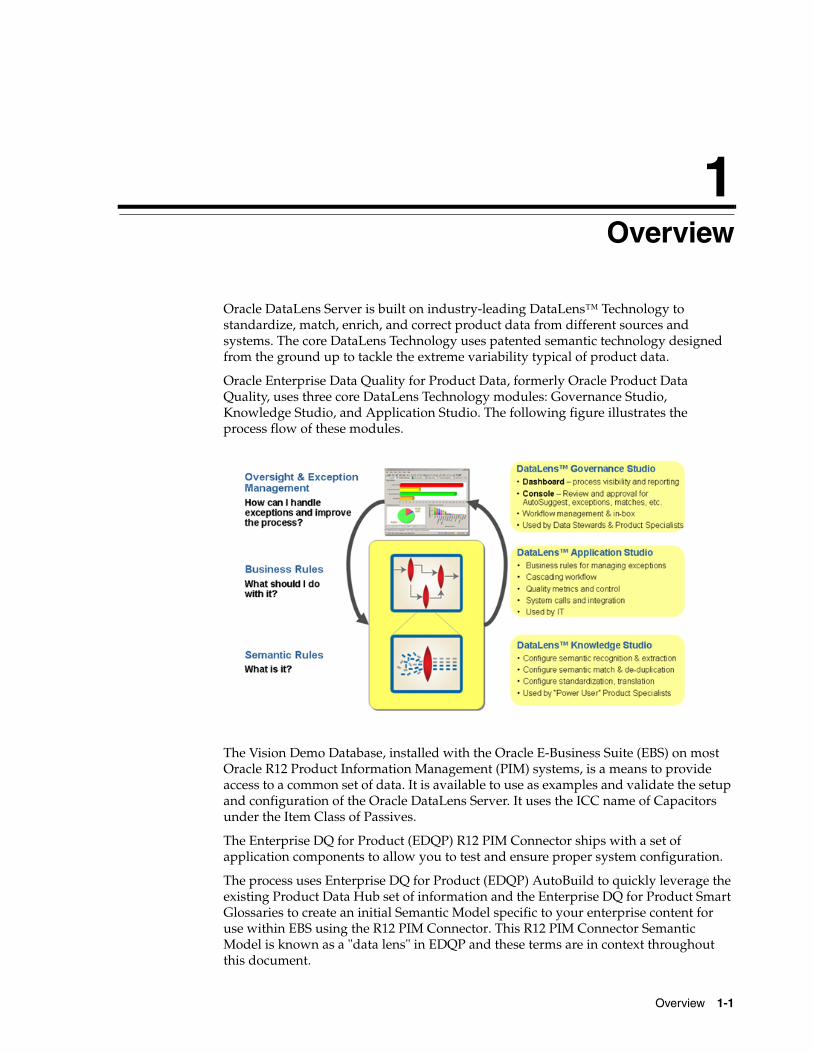
Oracle Enterprise Data Quality for Product Data, formerly Oracle Product Data Quality, uses three core DataLens Technology modules: Governance Studio, Knowledge Studio, and Application Studio. The following figure illustrates the process flow of these modules.
The Vision Demo Database, installed with the Oracle E-Business Suite (EBS) on most Oracle R12 Product Information Management (PIM) systems, is a means to provide access to a common set of data. It is available to use as examples and validate the setup and configuration of the Oracle DataLens Server. It uses the ICC name of Capacitors under the Item Class of Passives.
The Enterprise DQ for Product (EDQP) R12 PIM Connector ships with a set of application components to allow you to test and ensure proper system configuration.
The process uses Enterprise DQ for Product (EDQP) AutoBuild to quickly leverage the existing Product Data Hub set of information and the Enterprise DQ for Product Smart Glossaries to create an initial Semantic Model specific to your enterprise content for use within EBS using the R12 PIM Connector. This R12 PIM Connector Semantic Model is known as a "data lens" in EDQP and these terms are in context throughout this document.

Integration with Oracle Product Data Hub R12
1-2 R12 PIM Connector User’s Guide
Integration with Oracle Product Data Hub R12The integration of the EDQP solution with the PIM Data Hub (PIMDH) R12 provides an integrated set of capabilities to categorize, standardize, match, govern, validate, correct, and repurpose product data being introduced from any source system(s) or catalog(s). It provides a set of out of the box integration templates in addition to a robust set of interface functions and procedures that can be leveraged to create customized process flows. These process flows consolidate external data from one or more legacy systems into the PIM staging tables, create interfaces to external systems, import entire catalogs or updates to these catalogs, amongst others.
The included templates allow a quick path to performing the following functions:
■ PIM Metadata Synchronization Templates:
– Automatically generate semantic models from the ICC metadata, attributes, and associated valid values.
– Provide support for alternate catalog synchronization.
■ Create Semantic Key Cache to leverage duplicate prevention and cross referencing.
■ Create PIM Production Batch to cleanse and revalidate existing items in your PIM.
■ Import external data and load into the PIM staging area by automatically creating a batch.
■ Run Cleansing and Matching Process to cleanse either external data or PIMDH batches.
R12 PIM Connector ConfigurationThe system can be configured to perform any or all of these checks on all batches of data being imported into the system using the Import Workbench process. These configuration steps are fully described in this document. The integration is delivered with a set of preconfigured integration templates that can be personalized to meet your project requirements. The templates allow you to do operations such as the following: validating global attributes or populating Semantic User Defined Attributes (Form, Fit or Function) for an item on-boarding process using the EDQP system.
ICC Structure as Product HierarchyFor most effective metadata synchronization, the PIM ICC structure should be set up as a product hierarchy (for example, Category family, Category group, Category line, or Category.) A product hierarchy contains multiple levels and each level is identified by a set of defining attributes. The levels must be non-overlapping and unique. Each PIM item should correspond to a single ICC. The category-specific semantic attributes must be defined at the leaf-node level while the more general category attributes may be defined at higher ICC levels.
Relationship Between ICC and Semantic ModelThere is a one-to-one relationship between the ICC structure and the data lens generated from the Semantic Model. Since a product hierarchy ICC structure ensures that any given item will have only one Semantic Model, the process of standardizing data is automated, accurate, and reproducible. If a PIM system were to contain more than one ICC for a given category, then multiple Semantic Models and possibly multiple standardization rules could exist for a given item. This can be successfully avoided by upholding the one-to-one relationship between the ICC structure and the Semantic Models, a natural result of using a product hierarchy.

Integration with Oracle Product Data Hub R12
Overview 1-3
Cleansing and Matching Item On-Boarding ProcessThe integration of the EDQ for Product Data solution with the PIM Data Hub R12 system adds an important set of data quality capabilities every time product data is imported using the Import Workbench into PIM. The set of pre-built integration processes allow for various automated data quality checks such as:
■ Automated Categorization of data into the correct ICC.
■ Automated assignments to alternate catalogs categories thru ICC and attribute mappings.
■ Automated extraction, validation and standardization of category specific attributes.
■ Automated validation and standardization of primary and global attributes.
■ Automated multiple description generation and standardization from category specific attributes.
■ Duplicate identification and merge of incoming data.
■ Duplicate prevention and cross-reference of new items to existing items in the production tables.
■ Remediation step for items not meeting standards, assisted by AutoSuggest feature.
■ Exception identification and routing.

Getting Started
1-4 R12 PIM Connector User’s Guide
Getting StartedTo use all of the R12 PIM Connector functions, you must ensure that you have completed the following actions before using the R12 PIM Connector:
■ Install the EBS server (including the latest patch sets)
Install and configure the R12 PIM Connector 5.6.2.
For installation instructions, see Oracle Enterprise Data Quality for Product Data PIM Connector Implementation Guide.
■ Install and configure an EDQP 5.6.2 Oracle DataLens Server. For instructions, see Oracle Enterprise Data Quality for Product Data Oracle DataLens Server Installation Guide.
■ Install the EDQP 5.6.2 client software. For installation instructions, see "Installing the Client Software" on page A-1.
■ Install and configure the EDQP Services for Excel 5.6.2. For instructions, see Oracle Enterprise Data Quality for Product Data Services for Excel Reference Guide.
■ Identify EBS user that will be used. Typically, this is plmmgr or pimmgr. The basic outline for creating your own users with the appropriate R12 PIM Connector roles is described in "Creating R12 PIM Connector Users" on page B-1.
2
Creating the Initial Data Lens 2-1
2Creating the Initial Data Lens
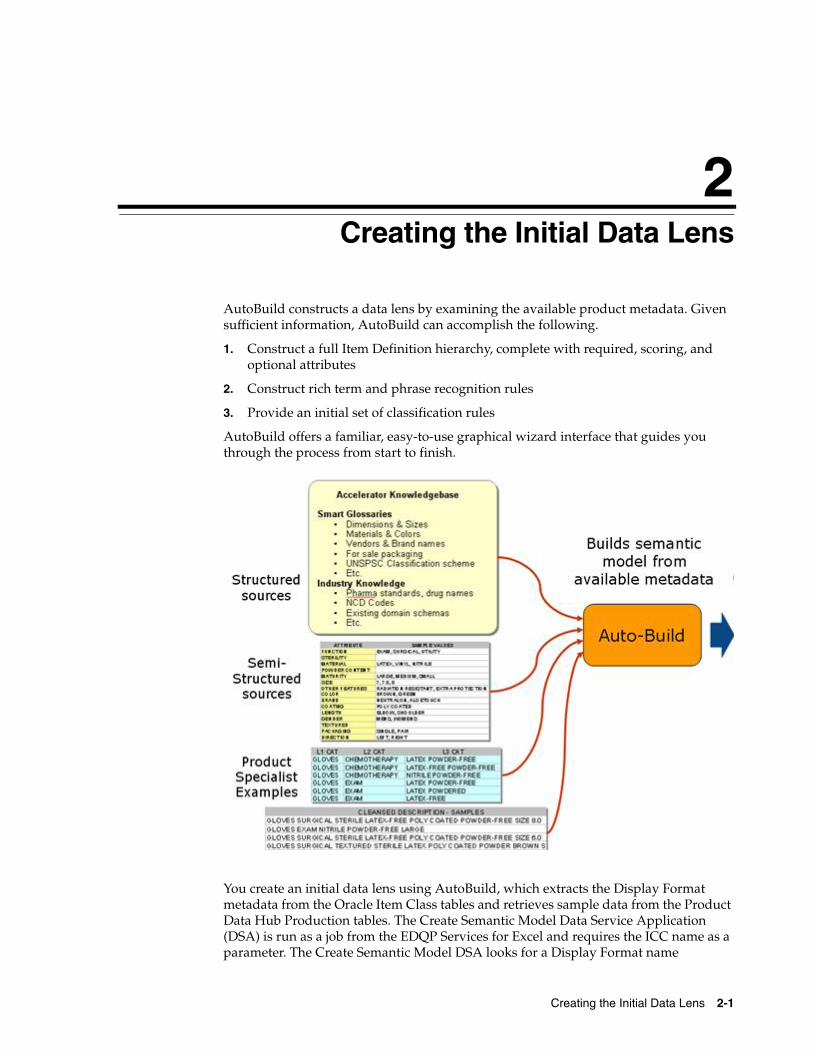
AutoBuild constructs a data lens by examining the available product metadata. Given sufficient information, AutoBuild can accomplish the following.
1. Construct a full Item Definition hierarchy, complete with required, scoring, and optional attributes
2. Construct rich term and phrase recognition rules
3. Provide an initial set of classification rules
AutoBuild offers a familiar, easy-to-use graphical wizard interface that guides you through the process from start to finish.
You create an initial data lens using AutoBuild, which extracts the Display Format metadata from the Oracle Item Class tables and retrieves sample data from the Product Data Hub Production tables. The Create Semantic Model Data Service Application (DSA) is run as a job from the EDQP Services for Excel and requires the ICC name as a parameter. The Create Semantic Model DSA looks for a Display Format name

1. Setting the Profile Options
2-2 R12 PIM Connector User’s Guide
associated with the ICC string that matches the name configured in the system profile table for the DLS user. The default Display Format name is "SemanticModel" though any name can be configured as the default Display Format name. For more information about configuring this option, see Oracle Enterprise Data Quality for Product Data PIM Connector Implementation Guide.
The Create Semantic Model DSA and corresponding metadata pull process extracts the attributes for the ICC and all of its children. The parent catalog name is also extracted. The Display Format specifies which attributes will be inserted into a worksheet in Excel. The ICC determines which sections of the Item Class Hierarchy are extracted and the Display Format determines which attribute metadata to extract and create the initial data lens.
Once the attributes for the ICC (specified by the Display Format) have been extracted, EDQP AutoBuild is used to create a new data lens that represents the internal Semantic Model of the specified ICC in the EBS PIM. The data lens is then modified with additional grammar rules, standardization, and classification to improve the quality of the data loaded into EBS PIM.
1. Setting the Profile OptionsThe user profile options must be set for use with the R12 PIM Connector as follows:
Note: The following steps are based on the EBS Release 12.1.3.0.0.

1. Setting the Profile Options
Creating the Initial Data Lens 2-3
1. Browse to the EBS Web site:
http://rws3210039.us.oracle.com:8095/OA_HTML/AppsLogin
2. Log in to EBS as a user that has System Administrator privileges.
The Oracle Applications Home Page is displayed.
3. Click System Administrator.
4. Click Define Profile Options.
An Oracle Forms application is started. If you are prompted to verify its digital signature, click Run to allow Oracle Applications to install and run.

1. Setting the Profile Options
2-4 R12 PIM Connector User’s Guide
5. Close the Profiles dialog.
6. Double-click Profile to expand it.

1. Setting the Profile Options
Creating the Initial Data Lens 2-5
7. Double-click System.
8. Enter DLS% in the Profile field and click Find to search for the profile options that must be updated.

1. Setting the Profile Options
2-6 R12 PIM Connector User’s Guide
You should use an existing user with correct rights, for example, PIMMGR or PLMMGR. The PLMMGR user has the necessary roles thus avoiding further configuration. The Vision Database user, PIMMGR, can be used as well. If you do not have a PLMMGR user, create the DLSUSER and DLSMANAGER users as described in "Creating R12 PIM Connector Users" on page B-1.
The Product Information Manager Data Librarian is used for two of these profile options.
These default values are populated during the R12 PIM Connector installation.
These system profile options are described as follows:
Profile Option Description
DLS Attribute Metadata & item extract This option is not used in this release. A switch to toggle the method of metadata extraction. The two values are:
■ Display Format - Uses the original "Display Format" to list the metadata to be extracted.
■ DLS Table - Used a new table in the DLS schema call "DLS_EXTRACT_ATTRIBUTE" to list the metadata to be extracted.
DLS Autobuild Sample Size Contains the number of rows pulled in the metadata pull for each ICC.
DLS Catalog Display Type Matches the Display Format Type that was setup for the attributes at the catalog level. This is used to define the subset of item form, fit, and function attributes that EDQP will process.
DLS Default Source System The name of the source system where the new batch is created and this is set to Product Information Management Data Hub. For example, a production pull that you are going use to clean the production data, you pull all the information and put it in the Staging or Interface Tables, and then create the batch against this source.
DLS External Source System The default external system source name if one is not included with the external batch load. You must select one of the existing names from the list. In this example, it shows as Agile9224.

1. Setting the Profile Options
Creating the Initial Data Lens 2-7
9. Click anywhere in the DLS External Source System field, and then click the ellipses to activate the associated list of DLS External Source Systems.
10. Select one of the default external source system value that you want to use, and click OK. This name must exist in the EBS PIM system.
11. Exit Oracle Applications.
An informational message that your changes to the form have been saved is displayed.
DLS Import Batch Assignee Once the batch is created, you assign the batch to this user. If this is left blank, then the Production API will assign this to the PIM Manager User. For example, you enter PLMMGR or PIMMGR. This parameter is a fallback if the API is called without specifying the Import Batch Assignee.
DLS Import Batch Size This is the "chunk size" for creating batches that contain a large number of records. For example, if you are creating a batch for a large set of data such as PLM High Tech. These separate batches are tied together with the DLS Job Id. This parameter is a fallback if it is not passed with the DLS API call.
DLS Import datetime format When importing User Defined Attribute data, this holds the expected date and time format of the data.
DLS PIM Manager Responsibility The user and the responsibility together set the context for the execution of the API. This information is used when the EDQPGovernance Studio needs to do a production pull. This information is passed to the Oracle APIs to pull the attribute information. For example, Product Information Management Data Librarian.
DLS PIM Manager User The user that has the privilege to create the batch. This parameter is a fallback if the API is called without specifying the PIM Manager User. As an example, you enter PLMMGR or PIMMGR.
DLS import date format The default date format. For example, you could enter YYYYMMDD.
Profile Option Description

2. Setting the Display Format
2-8 R12 PIM Connector User’s Guide
12. Click OK to close the dialog.
2. Setting the Display FormatYou must determine the target ICC before a data lens can be created. This requires the creation of an Oracle ICC Name.
The data lens creation process relies on each ICC Name being setup correctly and named correctly. The data lens is associated with the Item Catalog hierarchy. The following shows the "Capacitor" hierarchy, as laid out in the Vision Operations ICC.
- PLM High Tech
- Electronic Components
- Passives
- Capacitors
Set the display format:
1. Browse to the EBS Web site:
http://rws3210039.us.oracle.com:8095/OA_HTML/AppsLogin
2. Log in to EBS.
The Oracle Applications Home Page is displayed.
3. For EBS 12.1.3, click Favorites to display the menu.
4. From the Favorites list, click Setup Workbench.

2. Setting the Display Format
Creating the Initial Data Lens 2-9
5. Search the Item Catalog Category for the category you want to create a semantic model for by entering a search term then click Go.
For this example, enter "Capacitors" into the search field and click Go.
6. Click Capacitors.

2. Setting the Display Format
2-10 R12 PIM Connector User’s Guide
7. From the left navigation menu, click Display Formats to create the Semantic Model definition created from a set of attributes available in the Product Data Hub.
The Display Formats page allows you to create, copy, edit (update), or delete a Display Model.
8. Begin creating the Display Format as follows by clicking the Create button.
9. Enter "SemanticModel" into the Name field.
10. Enter "DataLens Semantic Model Attributes" into the Description field.
11. Select 100 from the Number of Rows Displayed list.
12. Select the Set as Default check box.

2. Setting the Display Format
Creating the Initial Data Lens 2-11
13. Select Attributes from the Attribute Columns list on the left side (there are a set from the Primary Attribute Group by default in the Selected Columns list).
14. Click Remove All to remove all of the Item:Primary: attributes from the Selected Columns pane.
15. From the Business Entity list, select Item.
16. Each Attribute Group has a set of Attributes values. From the Attribute Group list, select Capacitor Specifications, and then click Go.
The set of attributes associated with that Attribute Group is displayed.
17. From the Available Columns list, select all of the Item:Capacitor Specifications attributes, and then click Move All.
All of the Capacitor attributes are moved to the Selected Columns list.
18. From the Attribute Group list, select Capacitor Packing Specs, and then click Go.

2. Setting the Display Format
2-12 R12 PIM Connector User’s Guide
19. From the Available Columns list, select Item:Capacitor Packing Specs:Case and Item:Capacitor Packing Specs:Case Size, and then click Move.
The attributes in the Selected Columns list should be the following:
Business Entity Attribute Group Attribute
Item Capacitor Specifications Capacitance
Item Capacitor Specifications Dielectric
Item Capacitor Specifications Voltage
Item Capacitor Specifications Tolerance1
Item Capacitor Packing Specs Case
Item Capacitor Packing Specs Case_Size
Item Capacitor Specifications Temp_Coefficient
Item Capacitor Specifications Min_Temperature
Item Capacitor Specifications Maximum_Temperature
Item Capacitor Specifications Mount
Item Capacitor Specifications ESR_Type
Item Capacitor Specifications ESR_Value
Item Capacitor Specifications Ripple_Current
Item Capacitor Specifications Load_Life
Item Capacitor Specifications Mean_Time
20. The attribute order is important because it will be the default attribute order in the data lens that you create using AutoBuild.
Reorder the attribute order in the Selected Columns list using the arrow buttons to the right so that theItem:Capacitor Packing Specs:Case and Item:Capacitor Packing Specs:Case Size attributes immediately follow Item:Capacitor Specifications:Tolerance.

3. Creating the PIM_Connector Database Connection
Creating the Initial Data Lens 2-13
21. Click the Apply button.
A new Display Format named "SemanticModel" with all of the specified attributes is created for input into the AutoBuild process.
3. Creating the PIM_Connector Database ConnectionYou must create a database connection for use by the EDQP DSAs to process data. This database connection is created in the EDQP Oracle DataLens Administration Server using the Oracle DataLens Administration Server Web pages. For more information, see Oracle Enterprise Data Quality for Product Data Oracle DataLens Server Administration Guide.
1. Browse to the Oracle DataLens Administration Server Web pages:
http://server:2229/datalens
Where server is the name of your Oracle DataLens Server.
2. Log in.
3. From the Configuration section of the menu, click Database Connections.
4. Click Create New Db Connection.

3. Creating the PIM_Connector Database Connection
2-14 R12 PIM Connector User’s Guide
5. From the list above the Connection field, select Oracle as the connection type. The form is then populated for you with default information.
6. In the Connection Name field, enter PIM_Connector.
The Connection Name must be this exact name or the process will not work correctly. The DSAs rely on the presence of this exactly named connection.
7. Complete the form:
a. Enter a description for this database connection.
b. In the Connection field, edit the machine name, Oracle Database Port, and Database SID to match your environment.
In the following example, these values are set to:

4. Processing the ICC Import from Excel
Creating the Initial Data Lens 2-15
rws3210039.us.oracle.com:1616:pim1213
The Oracle Database Port default value is 1521.
c. Enter the Db User name.
d. Enter the DB User password.
8. Click Save.
Save the connection information and it is added to the list of database connections to which you are returned.
9. Click the PIM_Connector database connection.
10. Click the Test Saved Development Connection button to verify that your EDQP Named Development Database Connection is working properly. The following message should be displayed:
SUCCESSFUL test of the database connection
4. Processing the ICC Import from ExcelYou use Services for Excel to import the ICC and Attribute metadata from the Oracle PIM Data Hub system to create the import files for use by AutoBuild. For more information about Services for Excel, see Oracle Enterprise Data Quality for Product Data Services for Excel Reference Guide.
1. Start Excel.
2. From the Services for Excel toolbar on the Add-Ins tab, click the DataLens Tools and select Job Options to set the necessary job parameters.
You are prompted to log in to your Oracle DataLens Server.

4. Processing the ICC Import from Excel
2-16 R12 PIM Connector User’s Guide
3. Enter your user id and password, and then click OK.
Optional: Use the Change Server button to login to a different server or use Secure HTTP.
4. Select the AUPIM_CREATE_SEMANTIC_MODEL DSA from the DSA list.
5. Click Insert Headings to update your open Excel workbook with the correct input and output column headings as defined by the DSA, and then click OK.
The following three sheets are created:
■ The 10_Job_Messages worksheet contains information about DSA jobs that have run and any messages that occurred.
■ The 20_Autobuild worksheet contains the following columns:
Columns Definition
parent_catalog_group_id System ID
parent_catalog_group ICC Parent Hierarchy Node Name
catalog_group_id System ID
catalog_group ICC Name
attr_id System ID
attr_name Attribute name
attr_value Attribute value
attr_uom Attribute is a Unit of Measure
valueset Set attribute values to be used

4. Processing the ICC Import from Excel
Creating the Initial Data Lens 2-17
These exact columns must be present and in this order for the DSA job to run correctly.
■ The 30_SampleData worksheet contains the following columns
Columns Definition
catalog_group ICC Name
item_number Part number
description Attribute description
6. Click the Process Records button to run the AUPIM_CREATE_SEMANTIC_MODEL DSA to create the AutoBuild input sheets for use by the R12 PIM Connector.
The AUPIM_CREATE_SEMANTIC_MODEL DSA is then run.
Note: If the following message is displayed, then the DSA Job Options are not set properly:
Click the DataLens Tools button and select Job Options, and then return to step 4.
7. Enter the ICC parameter associated with the data lens that you are building and click OK. For example, "Capacitors".
The job is submitted to the server for processing.
5. Using AutoBuild Wizard in Excel to Create a Data Lens
2-18 R12 PIM Connector User’s Guide
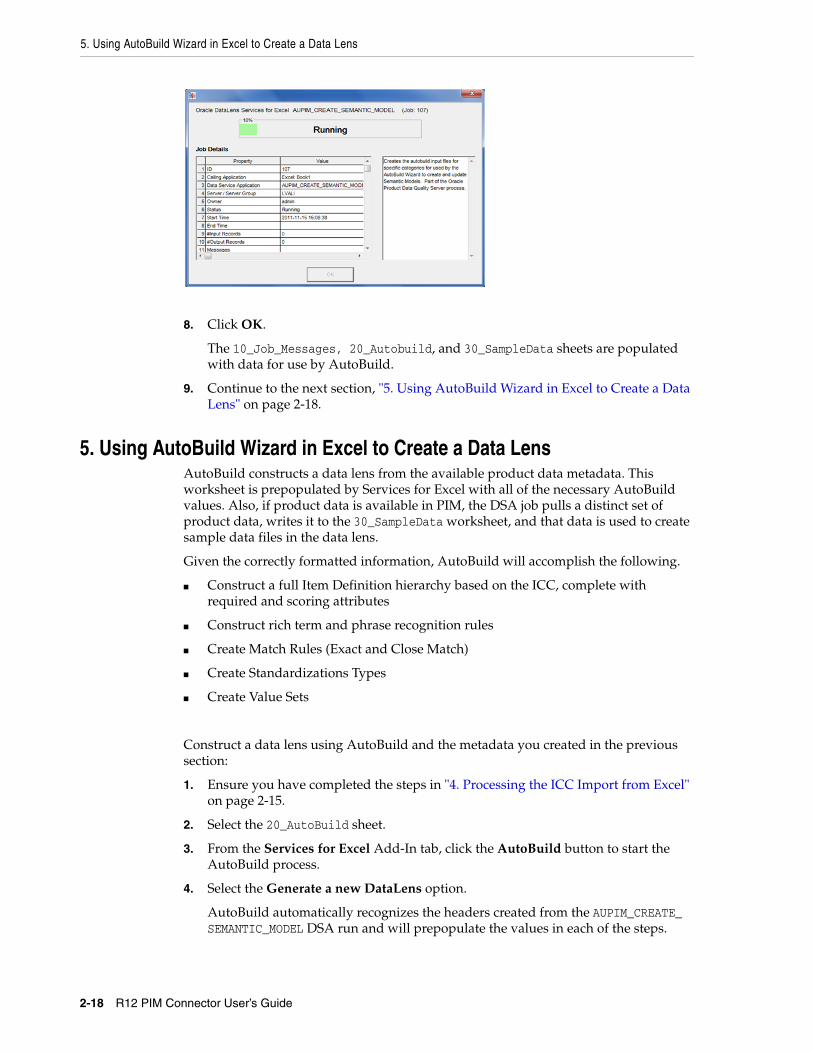
8. Click OK.
The 10_Job_Messages, 20_Autobuild, and 30_SampleData sheets are populated with data for use by AutoBuild.
9. Continue to the next section, "5. Using AutoBuild Wizard in Excel to Create a Data Lens" on page 2-18.
5. Using AutoBuild Wizard in Excel to Create a Data LensAutoBuild constructs a data lens from the available product data metadata. This worksheet is prepopulated by Services for Excel with all of the necessary AutoBuild values. Also, if product data is available in PIM, the DSA job pulls a distinct set of product data, writes it to the 30_SampleData worksheet, and that data is used to create sample data files in the data lens.
Given the correctly formatted information, AutoBuild will accomplish the following.
■ Construct a full Item Definition hierarchy based on the ICC, complete with required and scoring attributes
■ Construct rich term and phrase recognition rules
■ Create Match Rules (Exact and Close Match)
■ Create Standardizations Types
■ Create Value Sets
Construct a data lens using AutoBuild and the metadata you created in the previous section:
1. Ensure you have completed the steps in "4. Processing the ICC Import from Excel" on page 2-15.
2. Select the 20_AutoBuild sheet.
3. From the Services for Excel Add-In tab, click the AutoBuild button to start the AutoBuild process.
4. Select the Generate a new DataLens option.
AutoBuild automatically recognizes the headers created from the AUPIM_CREATE_SEMANTIC_MODEL DSA run and will prepopulate the values in each of the steps.

5. Using AutoBuild Wizard in Excel to Create a Data Lens
Creating the Initial Data Lens 2-19
The following values are prepopulated in the AutoBuild wizard when you have selected the Generate a new DataLens option:
Step and Option Value
Step 1: Identify Category Information
Generate a new DataLens Selected
Smart Glossary DLS_Import_Template
List of category columns 1,2,3,4
Category column layouts Multi-Column List of Category Code/Title Pairs
Step 2: Identify Attribute Information
Required Attributes Options
Add Required Attributes Selected
Item Name Column(s) 4
Scoring Attributes Options
Add Scoring Attributes Selected
Attribute names are in the same row at the category Selected
Row contains Attribute Name/Value pairs/UOM Selected
Scoring Attributes 6,7,8
Single term columns 6,7,8
Attribute Details Select Attribute Details <<
Phrase Separator ;
Maximum Terms in a Phrase 5

5. Using AutoBuild Wizard in Excel to Create a Data Lens
2-20 R12 PIM Connector User’s Guide
5. Click Next on Steps 1 through 3 of the AutoBuild Wizard to advance it.
6. On Step 4 of the AutoBuild Wizard, click the Output Details button.
These two check boxes are optionally used as follows:
■ Generate Report - Select to generate a set of AutoBuild reports that is added to the open workbook as new sheets. These reports include, AutoLearning Metrics Report, Semantic Knowledge Structure, and AutoBuild Details Report. These reports represent the results of the AutoBuild knowledge building process and correspond to the data lens that is built.
Step 3: Identify Sample Data Information
File Selection Options
Use current file Selected
Sample Data Worksheet 30_SampleData
Sample Data Rows and Columns Options
Id Column 2
Group By Column 1
List of Sample Data Columns 3
Step 4: Identify Sample Data Information
Data Lens Options
Generate / Update Data Lens Selected
Open New / Updated Data Lens Selected
New / Updated Data Lens Enter a unique Data Lens Name
Output Details Options Select Output Details <<
Create Match Rules Selected
Define Exact Match Exact_Match 4
Define Close Match Close_Match 1
Generate Report Selected
Use alias for Ids Selected
Step and Option Value

5. Using AutoBuild Wizard in Excel to Create a Data Lens
Creating the Initial Data Lens 2-21
For more information about AutoBuild Reports, see Oracle Enterprise Data Quality for Product Data AutoBuild Reference Guide.
■ Use alias for Ids - Automatically selected to use the worksheet headers generated as the alias for Item Definitions and attributes.
■ Activate Item Definitions - Select to activate the Item Definitions created in your data lens from your source data.
The Item Definitions created by AutoBuild may be incomplete, so if the Item Definitions are not closely reviewed in Knowledge Studio before the data lens is checked in for production use, the result is that many matches are found for incomplete Item Definitions. You can set the Item Definitions in the data lens to be included in the output data by setting the active and inactive flags using this check box. The Knowledge Studio recognizes your data using all Item Definitions though does not standardize the output data in Production mode if the inactive flag is set. In other words, all Item Definitions are always used for recognition, but does not extract or standardize the output data. This is applicable to Production and QA Oracle DataLens Servers only; Development servers ignore the inactive flag.
By default, Item Definitions created by AutoBuild are set to inactive so this check box is not selected.
7. Click Finish to complete the AutoBuild Wizard.
The initial data lens is built with the Item Definition (Category) and attribute structure shown in the pre-configured AutoBuild settings.
EDQP is started and you are prompted to log in.
8. Enter your user id and password, and then click OK.
The Knowledge Studio is started and you are prompted to select a data file.
9. Click Browse.
10. Select a data file and click Open.
11. In the Check-Outs dialog, click OK to close it.
You data lens is opened so that you can review and refine it.

5. Using AutoBuild Wizard in Excel to Create a Data Lens
2-22 R12 PIM Connector User’s Guide
For more information about the Knowledge Studio, see Oracle Enterprise Data Quality for Product Data Knowledge Studio Reference Guide.
12. Continue to the next section, "6. Reviewing and Refining the Data Lens" on page 2-23.
Using Value Sets when Creating a Data LensCertain attributes may have been set up in PIM to have value sets and valid values. The attribute values are restricted such that only the values specified are valid. When you create a Semantic Model, this value set and valid information is exported from the R12 PIM Connector and it appears in your metadata worksheet. The data lens created from the metadata will reflect the valid value and value set information from the metadata worksheet. If there is a value set for an attribute, the valueset column will be populated with the name of the valueset, and the valid values appear in the attr_value column as in the following example:
Figure 2–1 Value Set Example Spreadsheet
There are two types of value sets: Standard Value Sets and Yes/No Value Sets. The following describe how the R12 PIM Connector handles them in a data lens:

6. Reviewing and Refining the Data Lens
Creating the Initial Data Lens 2-23
Standard Value SetsIn a standard value set, the valid values correspond to the standardized forms of attribute values that are likely to be found in product data. In this example, 'Dielectric' is the attribute identified in the 'value set' column and 'AB', 'AL', 'CE', 'MP', and 'TA' in the 'attr_value' column. The value is considered to be an abbreviation unless it exceeds four characters, in which case, the fullform in the EDQP Knowledge Studio is set to this value. For example using the metadata in "Value Set Example Spreadsheet" on page 2-22, 'AL' would set the term as an abbreviation while 'Aluminum' would set it to the full form. The phrase structure for the abbreviation is:
Yes/No Value SetsThe Yes/No value set is a special form of the value set; this value set has 'yes' and 'no' (and alternate forms, such as 'y' and 'n') as the valid values. For example, using the metadata in "Value Set Example Spreadsheet" on page 2-22, the value set is a yes/no value set, and the valid values are "yes" and "no". The data lens is created such that there are phrase and term rules to recognized forms of "shielded" and "not-shielded". Additionally, the standardization rules for these 'y' and 'n' attributes will be set to "yes" and "no". The phrase structure for the yes, or shielded, term is:
All variations of both yes and no are created in the data lens. For example, the variations of 'not shielded' would be:
'not shielded''not-shielded''not- shielded''not -shielded''not - shielded''notshielded'
In the data lens, all value set phrase rule names are created with a '_vs' appended to the attribute and '_vv' appended to the term rule name so that they are easily identified in phrase structures.
When using value sets, be sure to refine your data lens as described in "Refining Value Sets in a Data Lens" on page 2-24.
6. Reviewing and Refining the Data LensReview the data lens to confirm proper creation. The data lens should have the correct Item Definitions, Attributes, Phrases, and Terminology as defined by the AutoBuild process.
6. Reviewing and Refining the Data Lens
2-24 R12 PIM Connector User’s Guide
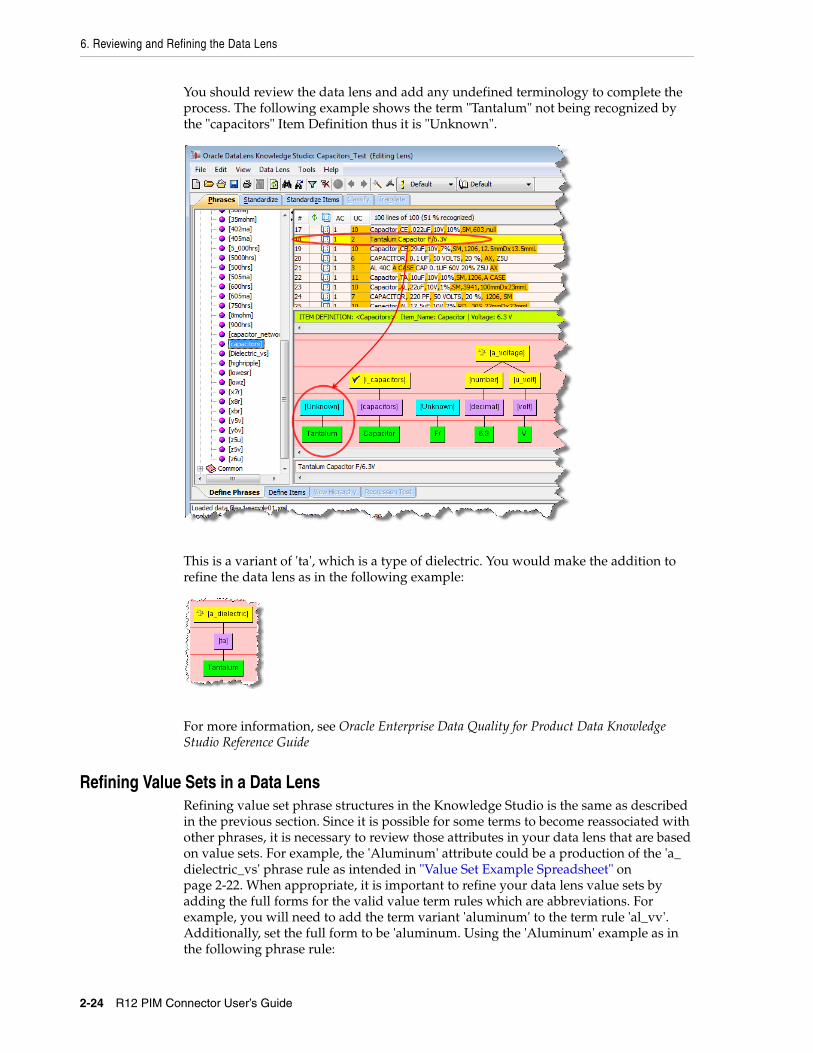
You should review the data lens and add any undefined terminology to complete the process. The following example shows the term "Tantalum" not being recognized by the "capacitors" Item Definition thus it is "Unknown".
This is a variant of 'ta', which is a type of dielectric. You would make the addition to refine the data lens as in the following example:
For more information, see Oracle Enterprise Data Quality for Product Data Knowledge Studio Reference Guide
Refining Value Sets in a Data LensRefining value set phrase structures in the Knowledge Studio is the same as described in the previous section. Since it is possible for some terms to become reassociated with other phrases, it is necessary to review those attributes in your data lens that are based on value sets. For example, the 'Aluminum' attribute could be a production of the 'a_dielectric_vs' phrase rule as intended in "Value Set Example Spreadsheet" on page 2-22. When appropriate, it is important to refine your data lens value sets by adding the full forms for the valid value term rules which are abbreviations. For example, you will need to add the term variant 'aluminum' to the term rule 'al_vv'. Additionally, set the full form to be 'aluminum. Using the 'Aluminum' example as in the following phrase rule:

7. Refining Standardization and Match Rules
Creating the Initial Data Lens 2-25
You would edit the 'al_vv' term and add the 'Aluminum' full form (variants can be generated as well):
Then review the phrase rule to ensure that it was added properly:
Finally, review the productions of the 'a_dielectic_vs' phrase rule:
Note: Since AutoBuild ignores duplicate phrase productions when created from a value set, you should review all productions carefully.
7. Refining Standardization and Match RulesFor the R12 PIM Connector, the relevant rules are located in the 'Match_Attributes' Standardization Type. For standardization of data related to R12 PIM Connector loads, all of your refinements should be made to the 'Match_Attributes' Standardization Type.

8. Testing a Data Lens on Sample Data and Create Base File
2-26 R12 PIM Connector User’s Guide
You can view the available standardizations from the Standardizations list on the toolbar.
Note: The attribute order is the same order as the name/value attribute order in the 20_AutoBuild worksheet of the open workbook, which is based on the Display Format order.
For the Match_Attributes standardization, there should be two Match types created (Exact_Match with four attributes and Close_Match with one attribute).
For example, the Match_Attributes Standardization Type has the following attribute order:
You should review and change the attribute ordering if necessary, create phrase standardizations and replacements appropriate to the data lens, and then check the data lens in.
8. Testing a Data Lens on Sample Data and Create Base FileThe purpose of regression testing is to validate that maintenance to the data lens has not created any ambiguities or issues compared to a previously saved version of the

9. Creating Semantic Key 1 Cache
Creating the Initial Data Lens 2-27
data lens. This important step should be performed after changes have been made to a mature data lens.
Regression testing can be accessed from the phrases, standardization and classification tabs. You should set the Regression Testing Active option from the DataLens Options to create the base file to enable Regression testing.
For more information about setting up and using Regression tests, see Oracle Enterprise Data Quality for Product Data Knowledge Studio Reference Guide.
Once you are happy with the data lens works, you should contact your Administrator to associate this new data lens with the cleansing and matching process.
9. Creating Semantic Key 1 CacheEnterprise DQ for Product uses patented Semantic technology to create a set of standardized attributes that are output to generate a set of master data or Semantic Key 1 Cache. The cache represents a "semantic" index created from the extracted and standardized attribute information from the R12 PIM Connector.
After you have created the cache, it can be used to rapidly match (compare) requested products to the items found in the cache. Any matches are returned to enable further processing such as form, fit or functional equivalents or duplicate detection to protect the R12 PIM Connector from the addition of identical records.
Open the Governance Studio and run the Update_Semantic_Cache job. You are prompted to enter the Category (for example, Capacitors). Once this job has run, it produces the Semantic Key 1 Cache for that Category with typically no results shown in a Governance Studio tab for successful items. Two review tabs, Unassigned_Semantic_Key and Unassigned_Item_Class, are created to provide you with information about exceptions.
At the end of the process, you will have a complete Semantic Key 1 Cache. This is really an IT function and can only be confirmed by looking at the database. For more details, see Oracle Enterprise Data Quality for Product Data PIM Connector Implementation Guide.
The process is typically run on a periodic basis (for example, nightly) to ensure that new updates to the R12 PIM Connector are included in the cache.

9. Creating Semantic Key 1 Cache
2-28 R12 PIM Connector User’s Guide

3
Cleansing and Matching R12 PIM Connector Batches 3-1
3Cleansing and Matching R12 PIM Connector Batches
The status of a newly created R12 PIM Connector batch is set to "Active" in EBS. When the batch is in process, the EBS automatically changes the batch status to "Pending" to ensure that the batch cannot be changed while it is in process. This is a critical step to ensure that the job can be correctly processed. The Governance Studio project will not produce any results if the status is not set to "Active".
Creating an R12 PIM Connector BatchThere are two types of batches that can be created for processing. The first type of batch is from an external source (outside the PIM) using Excel. The second type of batch is a pull from production (within the PIM).
Note: You can utilize the WebADI tool that is integrated into the EBS PIM Import Workbench to process external batches, however the two methods described in this chapter are the recommended methods.
Creating an R12 PIM Connector External Data Source BatchUsing Excel, you can create a batch to process data that is external to PIM then load it into the following PIM interface tables:
■ EGO_ITM_USR_ATTR_INTRFC
■ MTL_SYSTEM_ITEMS_INTERFACE
■ MTL_ALT_CATEGORIES_INTERFACE
The external data must be in an Excel spreadsheet contain the following columns in order:
■ ID
■ source_system_code
■ source_system_reference
■ description
These columns are the defaults necessary to the AUPIM_PROCESS_EXTERNAL_DATA DSA that is used for processing the data.
1. Log in to EBS.
The Oracle Applications Home Page is displayed.

Creating an R12 PIM Connector Batch
3-2 R12 PIM Connector User’s Guide
2. For EBS 12.1.3, click Favorites to display the menu.
3. From the Favorites list, click:
On EBS 12.1.3: Import Batches
On EBS 12.1.1: Import Workbench
4. Click one of the following:
On EBS 12.1.3: System Setup
On EBS 12.1.1: Source System Setup
5. Ensure that the source_system_code you want to use exists in EBS:
a. From the Search list, select Source System Code, and then click Go.
b. Review the list for the source_system_code you want to use. In this example, the ’Agile2994’ Source System Code is used.
If it exists, ensure that there is a check mark in the Enabled for Items column. If necessary, click the Update pencil, select the Enabled for Items option, and then click Apply. Continue to step 6.
If it does not exist, go to step c.
c. Create a new Source System Code in EBS by clicking Define Source System.
d. Enter a Source System Name in the Name field.

Creating an R12 PIM Connector Batch
Cleansing and Matching R12 PIM Connector Batches 3-3
e. Enter the Source System Code you want to use in the Code field.
f. Select the Enabled for Items option.
g. Click Apply.
The new Source System Code is created and the Source Systems page is refreshed to display it; you may need to click Go to refresh the page.
6. On your client machine, start Excel.
7. Open the Excel spreadsheet containing your external data. For this example, open the CapacitorsExternalBatchTestInput.xls template spreadsheet.
8. Modify the source_system_code column so that it matches the name you set in the System Profile Option. In this example, it is "Agile2994".
9. From the Services for Excel toolbar on the Add-Ins tab, click the Process Records button.
If you have not logged into your Oracle DataLens Server, the Oracle Enterprise Data Quality for Product Data Login dialog box appears. Login to the server displayed or use the Change Server button to login to a different server.
When you have successfully logged into the server, your data is processed, inserted in the PIM interface table, and the batch is created within PIM. A status dialog box is displayed that identifies the DSA that was processed and the JobID.

Creating an R12 PIM Connector Batch
3-4 R12 PIM Connector User’s Guide
10. Click OK.
11. Review the 10_Job_Messages worksheet to verify that no processing errors occurred. If errors occur, resolve the errors in the DSA or data, and then reprocess the records.
12. Return to EBS.
13. Click Import to return to the Import Batches page.
14. Click Go.
All batches are displayed.
15. Review the list of batches and confirm that your external batch job is displayed. The JobID displayed in Excel is included in the Batch Name.

Creating an R12 PIM Connector Batch
Cleansing and Matching R12 PIM Connector Batches 3-5
16. Optional: Select the Update pencil in the row of the batch you want to review, and then click the Confirmed tab to see the batch run details.
Creating an R12 PIM Connector Production Pull Data Source BatchThe AUPIM_Create_Production_Batch.ams Governance Studio project creates a new Batch, pulling data from the Production tables in the PIM.
1. Start EDQP and log in.
The EDQP Launch Pad is displayed.
2. Click Oracle DataLens Governance Studio.
For more information, see Oracle Enterprise Data Quality for Product Data Governance Studio Reference Guide.
3. Select the AUPIM_Create_Production_Batch project or click Cancel to import it as follows:
a. From the File menu, select Import.
b. Locate the AUPIM_Create_Production_Batch.ams file in the gov_studio_projects directory that you extracted during the R12 PIM Connector Connector installation. For installation information, see Oracle Enterprise Data Quality for Product Data PIM Connector Implementation Guide.
c. Select the file and click Open.

Creating an R12 PIM Connector Batch
3-6 R12 PIM Connector User’s Guide
The project is imported and opened.
4. On the toolbar, click Transform Data to begin the production pull batch.
5. Enter the name of the Item Category, "Capacitors" for this example, and then click OK.
When the job finishes, it creates a new batch with data from the selected Item Category.
6. Select the Batch Creation Details tab to see the results of the job run, and note or copy the new Batch Id for later use.
7. Begin verifying the production batch, browse to the EBS Web site:
http://rws3210039.us.oracle.com:8095/OA_HTML/AppsLogin

Creating an R12 PIM Connector Batch
Cleansing and Matching R12 PIM Connector Batches 3-7
8. Log in to EBS.
The Oracle Applications Home Page is displayed.
9. For EBS 12.1.3, click Favorites to display the menu.
10. From the Favorites list, click:
On EBS 12.1.3: Import Batches
On EBS 12.1.1: Import Workbench
11. Click Go.
All batches are displayed.
12. Review the list of batches and confirm that your external batch job is displayed. The JobID displayed in Excel is included in the Batch Name.
13. Review the newly created Batch in Oracle Batch Interface table. The new batch uses the following defaults:
Field Name Value
Batch Id New Batch Number (System Generated)
Batch Name DLS Production pull batch
Batch Type Item
Source System Agile9224
Assigned To Albert Bakker
Batch Status Completed

Note: The batch is set to the "Active" status in order to allow the system to correctly process the batch; otherwise, you an error is generated.
Creating an R12 PIM Connector Batch
3-8 R12 PIM Connector User’s Guide
The results will be an Oracle batch with a set of imported rows in EBS that can be reviewed on the Confirmed tab created from the production PIM data for the selected item category as described in the previous section. These imported rows are considered "Confirmed" because they are the PIM.
14. Identify the EBS Batch Id for this production pull batch. You use the Batch Id to create a unique Governance Studio job to process the data pulled for the selected Category.
15. Return to Governance Studio.
16. Open the DataLens_Cleansing_and_Matching project or a previously created project (for example, DataLens_Cleansing_and_Matching-10003377).
17. From the File menu, select New Project From...
18. Enter the Governance Studio Batch Id number noted in step 6, click Run. In this example, it is "batch1396".
19. Click Refresh, and then Yes.
20. Click Transform Data, and then Yes.

Creating an R12 PIM Connector Batch
Cleansing and Matching R12 PIM Connector Batches 3-9
21. Enter the EBS Batch Id noted in step 14. In this example, it is "10007455".
The job runs and the Governance Studio tabs are populated with data.
Reviewing the R12 PIM Connector Production Pull Batch ResultsOnce the DataLens_Cleansing_and_Matching Governance Studio job runs, it produces a series of output tabs that provide you with a way to process the batch using a series of processing tabs.
The logic used in each of the tabs is as follows.
Tab Name Description
Graph Summary Provides a graphical summary of the state of the batch processing.
Data Summary Displays the totals by processing category. As you process items, the numbers change and you can monitor this tab to verify the result. For example, if you enrich a record to the point where it can pass the quality threshold for import into the PIM, it will move from the Items for Enrichment category to the Confirmed New Review category.
Items for Enrichment If a source record is not a duplicate and does not meet the Quality Index threshold, then it is displayed on this tab for you to enrich the records so that they may be of the necessary completeness to load into the PIM.
Dups Within Batch The process checks for duplicates within the original source batch and presents them to you to determine what to do with them.
Match Against PIM The process checks for the source with the records in the PIM using the Semantic index cache to determine if the source is a duplicate to an existing record in the PIM.
Exceptions If the record falls below a Quality Index, (nothing is recognized) then it becomes an exception.
Ready for Load Fully complaint, standardized, and enriched records ready to be imported into the PIM.
Release Batch Provides a mechanism to change the Oracle batch from "Pending" to "Active", allowing you to review the completed changes.
The following sections describe how to use each of these tabs.

Creating an R12 PIM Connector Batch
3-10 R12 PIM Connector User’s Guide
Reviewing Items for EnrichmentThe Governance Studio Items for Enrichment tab with AutoSuggest output is identified by a light bulb icon to the left of the tab name. Data in these tabs may access the Governance Studio AutoSuggest feature that automatically predicts attribute values that may have been missed due to misspellings and abbreviations or missing grammar. When this tab is not empty and there are suggestions available, the AutoSuggest light bulb button in the toolbar will be active; if no suggestions were found this button bar is dimmed.
After clicking on an AutoSuggest output tab, a list of rows of data that were designated for output by the respective output step in the DSA is displayed. To view suggestions, click the AutoSuggest light bulb button. Suggestions are now highlighted in green.
Several operations are allowed in the AutoSuggest table to process your data further and make it easy to edit, move, copy, or accept suggestions. In addition to the normal table functions available to output tables, an AutoSuggest table allows you to accept or reject suggestions by double-clicking over them. If you double-click a suggestion then the cell is highlighted in pink showing that the attribute has been rejected.
When you have completed reviewing the suggestions by rejecting the bad ones, keeping the good ones and editing the cells to add (enrich) the data, you may select the rows that you want to reprocess by clicking on the row then click Re-Run. After enriching, the item will follow the standard process and end up in one of the tabs depending on the outcome (for example, If the enrichment was sufficient then it will be of high enough quality to appear in the Exceptions tab).
1. Select the Items for Enrichment tab in the Governance Studio.
2. Make the process selections as previously described in this section.
3. Click the Re-Run button to process the selected rows.
4. Confirm that the enriched row appears in one of the other tabs. If the meets the quality standards and completeness, it will appear in the Exceptions tab; otherwise, it may appear Items for Enrichment tab or Match Against PIM tab.
Reviewing Duplicates Within the BatchThe Governance Studio Dups Within Batch tab uses a split screen function that shows a set of record groups (rows) in the top pane, which are considered duplicates within the import batch. After a row in the top pane has been selected, the system presents the corresponding matched candidates for that row on the bottom pane.

Creating an R12 PIM Connector Batch
Cleansing and Matching R12 PIM Connector Batches 3-11
The duplicate rows are showed in the bottom pane. The system also gives Data Stewards color coding to highlight key attributes participating in the match. The system will color the attributes based on the type of match rule that has been triggered on the attribute. Following is the breakdown of the color coding:
■ Green Attributes: Denotes attributes that match to the parent row and that these attributes were set to required in the item specific match rules.
■ Blue Attributes: Denotes attributes that match to the parent row and that were set to participating but not required in the item specific match rules.
■ Blank and un-highlighted: Indicates that the matched row did not contain a value for that particular attribute and therefore that attribute did not participate in the match score.
■ Populated and un-highlighted: Indicates that the matched row contains a value for that attribute but that the attribute value for the matched row did not match the attribute value for the parent row.
The bottom child pane view allows you to choose either a single override row or create a combined value (blended) row by choosing a primary row with values from other rows. This survivorship process ends up with the one row or combined row that represents the set of values to be input into the system as the master record. The following steps should be used to create the master record:
1. Select the override row by right-clicking on the row and selecting Create Override Row. After the selection, the following will occur:
a. The override row will turn orange and the new master row will appear at the bottom on the set in red with a Match Status of "MO" (Manual Override). The override row check box will be selected and disabled.
b. All other rows will be automatically selected, but available to uncheck to exclude from processing.
2. Optionally, right-click an individual cell from any of the other rows to create an override cell by right-clicking from the desired cell and selecting "Set Override Cell". The override cell will turn orange and that row will be automatically selected (if unselected) and disabled while the cell in the original override row will be deselected and return to the original color. Finally, the value will appear in the master row.
Note: If you want to enter a value, you must first enter the value prior to selecting that cell as an override cell; otherwise the change will not be reflected in the master row.
You can also change the override cell selection by right-clicking an orange highlighted cell and selecting another cell using the Set Override Cell option. You can select an unlimited number of override cells to create the blended record. To remove an

Creating an R12 PIM Connector Batch
3-12 R12 PIM Connector User’s Guide
override cell, you needs to right-click the cell from the red row and select Set Override Cell. You can also remove the override row selections by right-clicking any row and selecting Remove Override Row. Selecting Remove Override Row, resets the entire duplicate set and returns the set to the original state.
Once you completes the selection process, click the Re-Run button to reprocess the row(s).
Expected ResultThe Override row (orange / red row) is reprocessed as a new row and could end up back in any of the tabs, but it is very unlikely that it will end up in the Enrich or Exception tabs because in order to participate in the Dedup process, the QI needed to be above the threshold. The other selected rows in the set, which Match Status is not changed by you, should be updated in the interface tables with a match status of "Ignore".
You may also override the system by entering a match status and sending the rows to be reprocessed. They may be one of the following:
■ Confirmed New: After reviewing the information, you may conclude that although the system thinks these are duplicates, they are not. The row(s) will be included as new items in the PIM.
■ Unconfirmed: (default value) - You must confirm the match status in order to import the item.
■ Ignore / Blank: Temporarily hold this item from import. The next time the same item data is uploaded within a batch, it appears in the Excluded tab for that batch.
■ Exclude: The row(s) will not be included as new items in the PIM and will be moved to an excluded region so that if the same item data row is loaded, it will be automatically moved to the Excluded tab.
■ Reprocess: Allow you to update the data so that the row can be reprocessed and removed as a duplicate.
Once you completes the selection process, click the Re-Run button to process the row(s). The only instance that the data in the PIM will actually be enriched is when you select the "Confirmed New" Match Status. The system will ignore all other rows that you enriched (for example, unselected, and selected and any match type including blank).
Use the following processing steps:
1. Select the Dups Within Batch tab in the Governance Studio.
2. Make the process selections as described previously in this section.
3. Click Re-run to process the selected rows.
4. For duplicate processing, confirm that the override row appears in one of the Process Interface Batch tabs. If the meets the quality standards and completeness, it will appear in the Confirmed New Review tab; otherwise, it may appear Items for Enrichment tab or Match Against PIM tab.
5. For override processing, once the processing is complete, you must run Release Batch process to reset the batch status from "Pending" to "Active" to review and confirm the changes made during this process. The job uses the batch id as input.
6. Confirm that the data is set correctly for the selected row(s) by going back into batch in the Oracle Item Import Workbench (Assumes batch set back to Active to review - see note in Introduction section).

Creating an R12 PIM Connector Batch
Cleansing and Matching R12 PIM Connector Batches 3-13
a. Search for the batch.
b. Select Update to review the batch.
c. Select (for example, SemanticModel (Capacitors)) from Display Format list, and then click Go.
d. Select Apply.
e. Use the Previous and Next buttons to review the items for accuracy.
The override row is present on one of Process Interface Batch Governance Studio job tabs or for overridden rows in the Oracle Batch with the correct status.
Reviewing Matches Against PIMThe Governance Studio Match Against PIM tab uses a split screen function that shows a set of record groups (rows) in the top pane from the incoming records which are functionally equivalent (duplicate) with record(s) in the Product Data Hub. It allows the system to identify these incoming records as a cross-reference to an existing Product Data Hub record. Once a row is selected from the top pane, the system highlights the corresponding matched candidates for that row on the bottom pane. You select the row in the bottom pane that is the preferred match for the cross-reference.
The matched row(s) are showed in the bottom pane. The system also gives Data Stewards color-coding to highlight key attributes participating in the match. The system will color the attributes based on the type of match rule that has been triggered on the attribute. Below is the breakdown of the color-coding:
■ Green Attributes: Denotes attributes that match to the parent row and that these attributes were set to required in the item specific match rules.
■ Blue Attributes: Denotes attributes that match to the parent row and that were set to participating but not required in the item specific match rules.
■ Blank and un-highlighted: Indicates that the matched row did not contain a value for that particular attribute and therefore that attribute did not participate in the match score.
■ Populated and un-highlighted: Indicates that the matched row contains a value for that attribute but that the attribute value for the matched row did not match the attribute value for the parent row.

Creating an R12 PIM Connector Batch
3-14 R12 PIM Connector User’s Guide
You select a row in the top pane to see a set of candidate row(s) in the bottom pane to create a cross reference row. Once the cross reference row is selected, you can send the cross reference row to the Oracle Interface Table.
Note: The ITUI (Interface Table Unique) ID / Match_Id relationship is used for the cross reference. The Match Status is set to "Confirmed Match" which denotes a cross reference to an existing item in the PIM.
The system will automatically enter the PIMDH Item number (for example, VI10585) in the PIMDH Item field and will set the confirm status to "CM" (Confirmed Match).
Once you completes the selection process, you click the Re-Run button to process the row(s).
The cross reference appears in the batch.
Note: The cross reference row(s) are removed from the list and the only way to confirm is by reviewing the Oracle batch.
Reviewing ExceptionsThe Governance Studio Exceptions tab presents you with items that were unrecognized (did not meet the quality threshold). You has the opportunity to review and / or edit the description then make a decision about what to do with the item.
1. Select the Exceptions tab in the Governance Studio.
2. Make a Match Status selection from the following set of selections:
IGNORE Ignore the row
EXCLUDE Exclude the row
CONFIRMED NEW Confirm new row (allow into PIM)
UNCONFIRMED Unconfirmed row that must be manually reviewed by you in the Oracle Batch
REPROCESS Reprocess the row
3. Click the Re-Run button to process the selected rows.
4. Confirm that the row appears in the Process Interface Batch tab with the correct status or in one of the Process Interface Batch tabs if reprocessed. If the meets the quality standards and completeness, it will appear in the Confirmed New Review tab; otherwise, it may appear in either the Items for Enrichment tab or Match Against PIM tab.
Reviewing Ready for LoadThe Governance Studio Ready for Load tab provides a view of the fully complaint, standardized and enriched records that met the quality requirements and are "import ready" and will be moved into the PIM through the interface table (batch) process.
Once you have reviewed and handled all of the items on the other tabs, bringing the totals to zero, the remainder will appear on the Confirmed New Review tab. You select one or more rows to complete the process, which updates the Interface Batch with this set of standardized high quality data, using the Batch Id and the ITUI (Interface Table Unique Id) as the key as follows:

Creating an R12 PIM Connector Batch
Cleansing and Matching R12 PIM Connector Batches 3-15
1. In the Governance Studio, select the Ready for Load tab.
2. Select on from one to all of the rows in the tab.
3. Click the Apply Checked Rows button to process the selected rows.
The selected rows turn blue indicating that the rows have been processed and that the rows are now unavailable for further processing.
4. Once the processing is complete, run the Release Batch process to reset the batch status from "Pending" to "Active" then review and confirm the changes made during this process. The job uses the batch id as input.
5. Confirm that the data is set correctly for the selected row(s) by going back into batch in the Oracle Item Import Workbench (assumes batch set back to Active to review).
a. Search for the batch.
b. Select Update to review the batch.
c. Select (for example, SemanticModel (Capacitors)) from the Display Format list.
Note: If this does not exist, select More and search for SemanticModel. Select the correct SemanticModel (in the case where there are multiple and press Select.
It then appears in the list as follows:
6. Select Go to apply it.
7. Select Previous or Next to review the items for correctness
Creating an R12 PIM Connector Batch
3-16 R12 PIM Connector User’s Guide
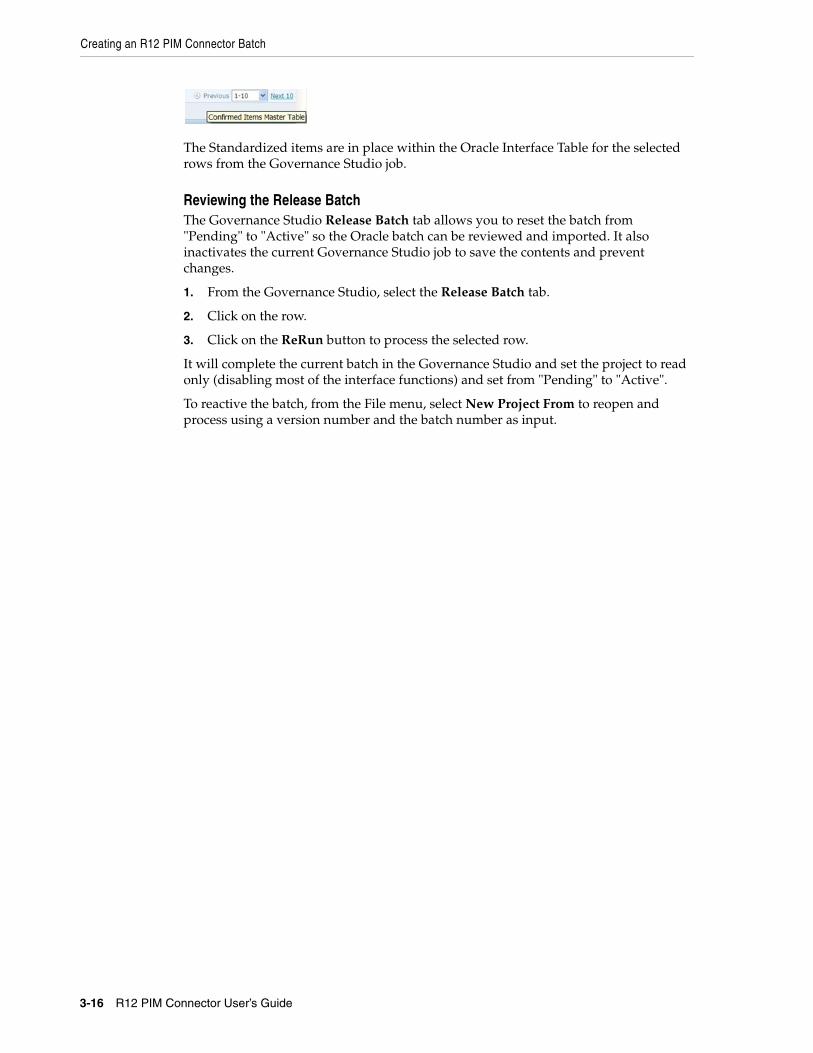
The Standardized items are in place within the Oracle Interface Table for the selected rows from the Governance Studio job.
Reviewing the Release BatchThe Governance Studio Release Batch tab allows you to reset the batch from "Pending" to "Active" so the Oracle batch can be reviewed and imported. It also inactivates the current Governance Studio job to save the contents and prevent changes.
1. From the Governance Studio, select the Release Batch tab.
2. Click on the row.
3. Click on the ReRun button to process the selected row.
It will complete the current batch in the Governance Studio and set the project to read only (disabling most of the interface functions) and set from "Pending" to "Active".
To reactive the batch, from the File menu, select New Project From to reopen and process using a version number and the batch number as input.

A
Installing the Client Software A-1
AInstalling the Client Software
Enterprise DQ for Product uses Java Web Start to initially install and maintain the current version of the software on your client desktop. The process requires you to access the Oracle DataLens Server to initiate the connection and download the software.
The Enterprise DQ for Product client applications downloaded and installed using Java Web Start by browsing to the installation page for your Oracle DataLens Server as follows:
1. Ensure that you have the Java SE Runtime Environment (JRE) 6 Update 21 installed. You can download the JRE and obtain the installation instructions by browsing to:
http://www.oracle.com/technetwork/java/javase/downloads/index.html
2. Start Microsoft Internet Explorer.
3. Initiate a connection and download the client software by browsing to:
http://server:2229/datalens/datalens.
Where server is the hostname of the Oracle DataLens Server.
Note: If you have setup a different port number for your application server other than 2229, you must use that port number in the following URL when browsing to the Oracle DataLens Server to download the client applications.
The application download and verification begins.

Note: If you receive a File Download message indicating that the . file is not associated with a program, you do not have the supported JRE installed. Click Cancel and return to Step
A-2 R12 PIM Connector User’s Guide
After the verification completes, the installation begins. Enterprise DQ for Product files are digitally signed by a trusted source so the following security warning is displayed:
Tip: To avoid this security dialog in the future, select the Always trust content from this publisher check box.
4. Click Run to continue and complete the installation.
The Oracle Enterprise Data Quality for Product Data log in dialog is displayed.
B
Creating R12 PIM Connector Users B-1
BCreating R12 PIM Connector Users
This appendix provides a basic outline for creating R12 PIM Connector users in EBS for use by Enterprise DQ for Product client applications and R12 PIM Connector batch processing.
The process for setting up the required roles and users and updating the profile options in EBS is as follows:
■ Create two new roles, one role to be used by DLSUSER and one role to be used by DLSMANAGER. These two new roles could be the same name as the user names.
■ Add the required privileges to each of the two new roles.
■ Create the two new users of DLSUSER and DLSMANAGER, assigning the users the above roles as appropriate.
Create the necessary roles and users in EBS:
1. Log in to the EBS as a System Administrator.
2. Click System Administrator.
3. Create two new roles named, dlsuser and dlsmanager, with the following privileges:
■ Add/Delete Approved Manufacturer Parts Item
■ Add/Delete Customer Item Cross References
■ Add/Delete Item Cross References
■ Add/Delete Related Items
■ Add/Update Item Revision
■ Change Item Status
■ Create Item Supplier Assignment
■ Create/Edit Item Organization Assignments
■ Edit Item
■ Edit Item Catalog Assignments
■ Edit Key Metrics
■ Edit Source System Item Cross Reference
■ View Approved Manufacturer Parts Item
■ View Customer Item Cross References
■ View Item

B-2 R12 PIM Connector User’s Guide
■ View Item/Item revision lifecycle
■ View Item Catalog Assignments
■ View Item Cross References
■ View Item Organization Assignments
■ View Item Revision List
■ View Item Supplier Assignment
■ View Key Metrics
■ View Related Items
4. Create the following two required users:
■ dlsuser - The user assigned to the batches created by the Enterprise DQ for Product R12 PIM Connector.
■ dlsmanager - The user who creates the batches with the Enterprise DQ for Product R12 PIM Connector.
5. Assign each of these new users the responsibility that uses the roles, dlsuser and dlsmanager, created in step 2.
6. Assign each user to an organization that will be used. For example, Vision Operations.
7. Add Cross Reference Privileges to the organization by adding a new role called Item Author to the organization for all users.
8. By default, the profile options for DLS_PIMMGR_USER and DLS_EGO_IMPORT_BATCH_ASSIGNEE are assigned to the user operations. Change these profile options to use dlsuser and dlsmanager respectively.