oracle rac 설치매뉴얼 -...
TRANSCRIPT

ORACLE RAC 설치 매뉴얼(11g+HACMP 6.1+RAWDEVICE)OTS 유명수, 정명호
2015.08.04

Contents
1. HACMP 설치
2. HACMP 설정
3. 사전 준비 사항
4. Grid 설치
5. DB 엔진 설치
6. DB 생성
7. 설치 확인 및 설정 사항

1. HACMP 설치(1/5)
HACMP S/W를 특정 디렉토리에 압축해제
smit installp 명령어 실행
Install software 선택
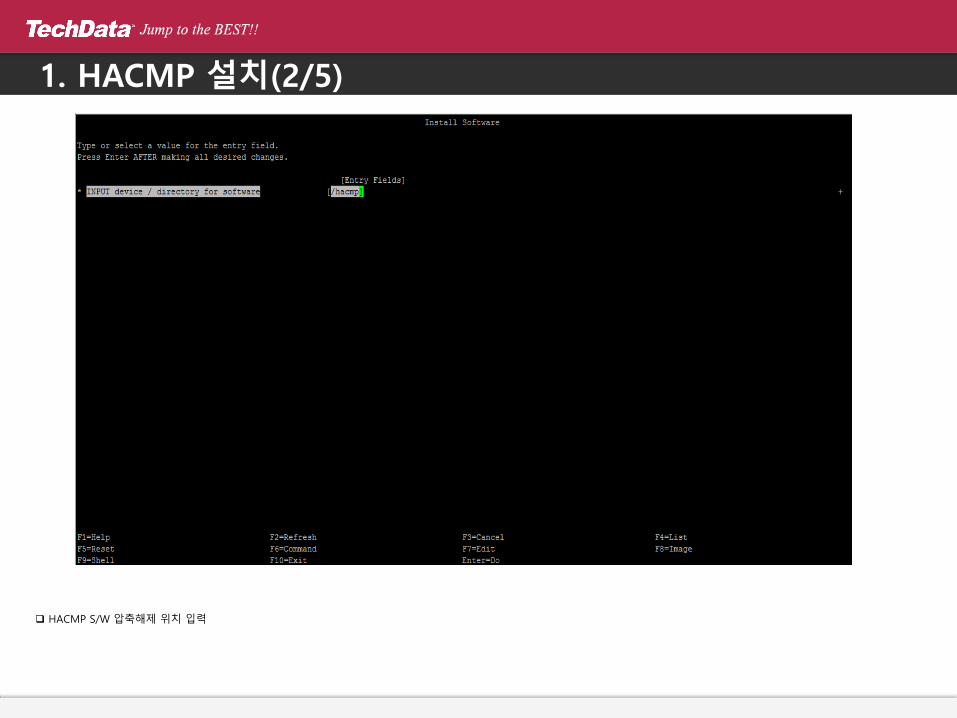
1. HACMP 설치(2/5)
HACMP S/W 압축해제 위치 입력

1. HACMP 설치(3/5)
SOFTWARE to install에서 아래 항목들 F4 누른 후 List에서 선택
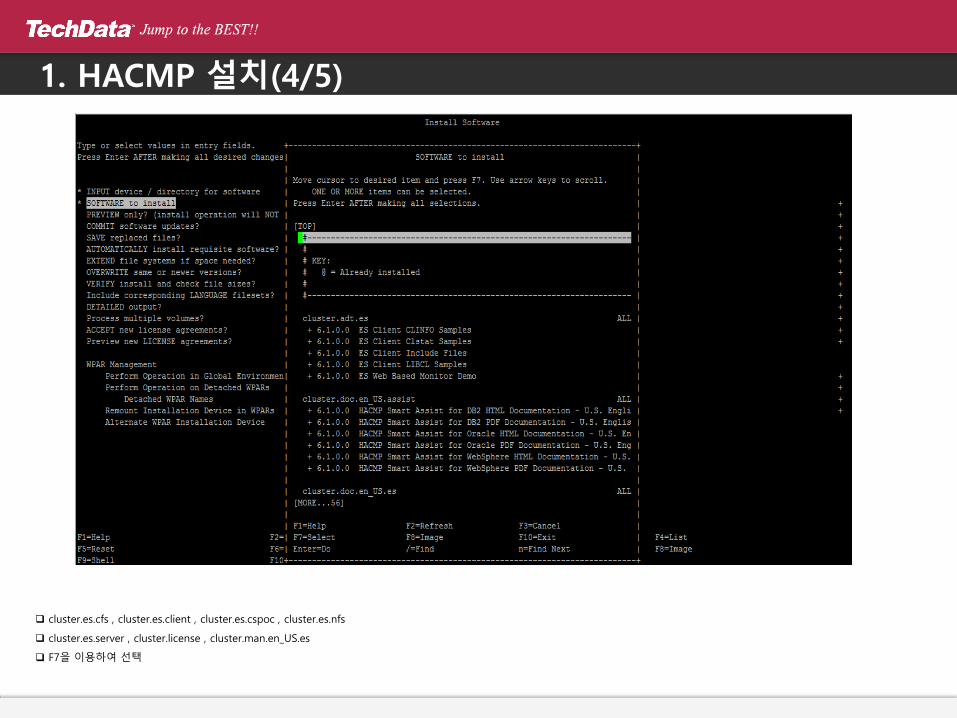
1. HACMP 설치(4/5)
cluster.es.cfs , cluster.es.client , cluster.es.cspoc , cluster.es.nfs
cluster.es.server , cluster.license , cluster.man.en_US.es
F7을 이용하여 선택
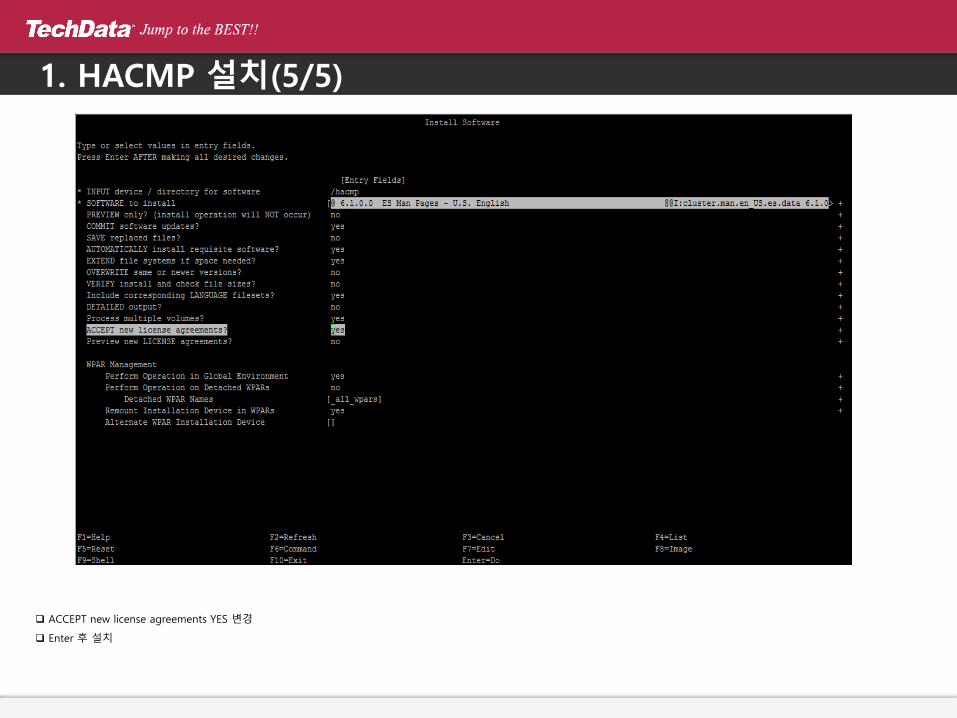
1. HACMP 설치(5/5)
ACCEPT new license agreements YES 변경
Enter 후 설치

2. HACMP 설정(1/17)
/etc/hosts 파일 내용
HACMP에서는 rac1-priv , rac2-priv 인터페이스를 사용할 예정
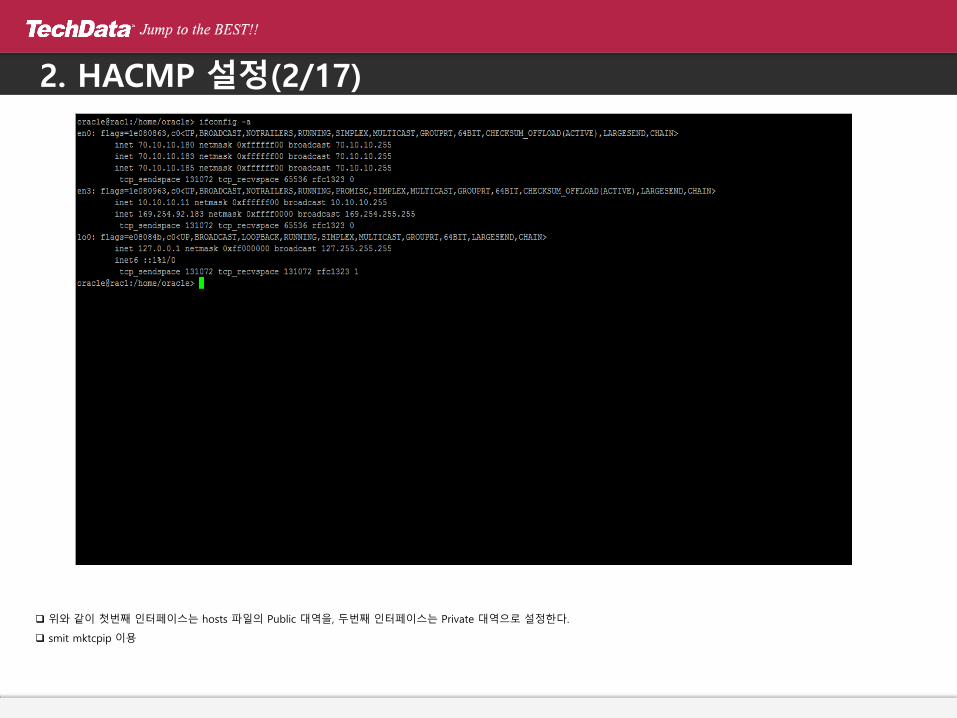
2. HACMP 설정(2/17)
위와 같이 첫번째 인터페이스는 hosts 파일의 Public 대역을, 두번째 인터페이스는 Private 대역으로 설정한다.
smit mktcpip 이용

2. HACMP 설정(3/17)
ORACLE이 RAWDEVICE 사용 하기 위한 권한을 주기 위해 미리 유저 및 그룹 생성. 생성 후 password 설정
smit mkuser/group/chuser 이용
2. HACMP 설정(4/17)
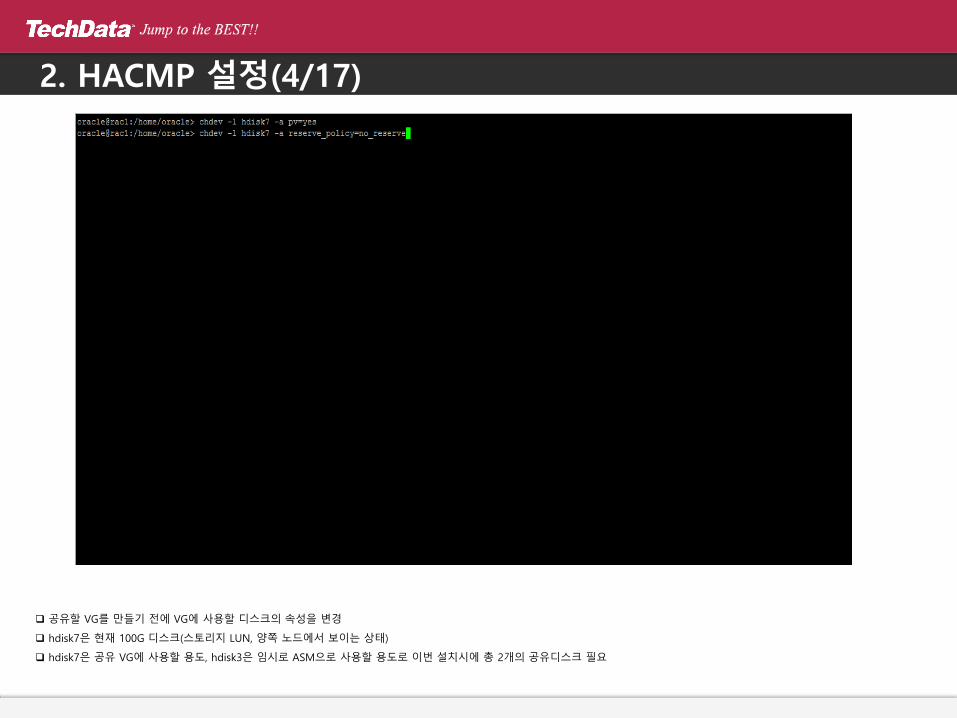
공유할 VG를 만들기 전에 VG에 사용할 디스크의 속성을 변경
hdisk7은 현재 100G 디스크(스토리지 LUN, 양쪽 노드에서 보이는 상태)
hdisk7은 공유 VG에 사용할 용도, hdisk3은 임시로 ASM으로 사용할 용도로 이번 설치시에 총 2개의 공유디스크 필요
2. HACMP 설정(5/17)
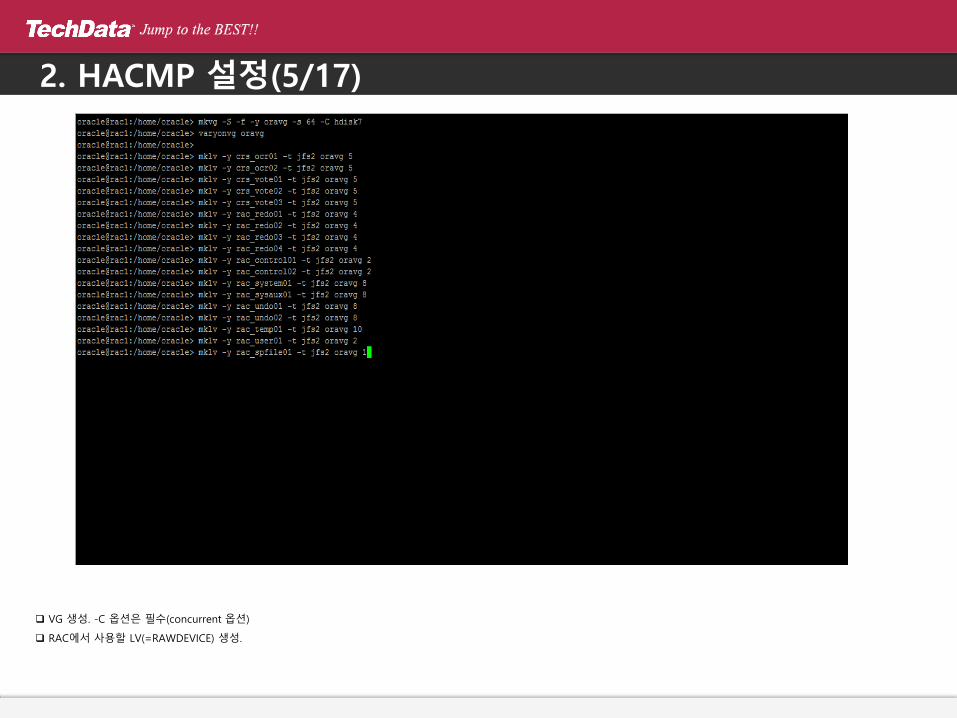
VG 생성. -C 옵션은 필수(concurrent 옵션)
RAC에서 사용할 LV(=RAWDEVICE) 생성.
2. HACMP 설정(6/17)
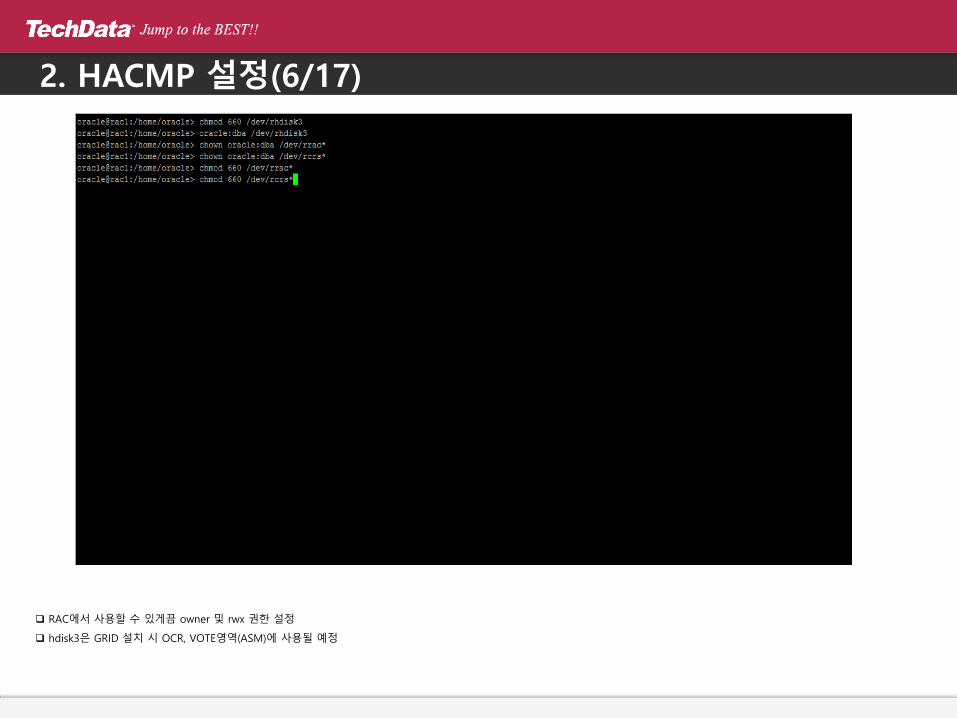
RAC에서 사용할 수 있게끔 owner 및 rwx 권한 설정
hdisk3은 GRID 설치 시 OCR, VOTE영역(ASM)에 사용될 예정

2. HACMP 설정(7/17)
smit hacmp 실행 후 Extended Configuration - Extended Topology Configuration - Configure an HACMP Cluster - Add/Change/Show an HACMP Cluster 선택
cluster5 으로 설정
앞으로 하는 작업은 1번 노드에서만 설정(설정하는 도중 2번노드에 자동으로 Sync 맞추는 부분이 있음)
2. HACMP 설정(8/17)
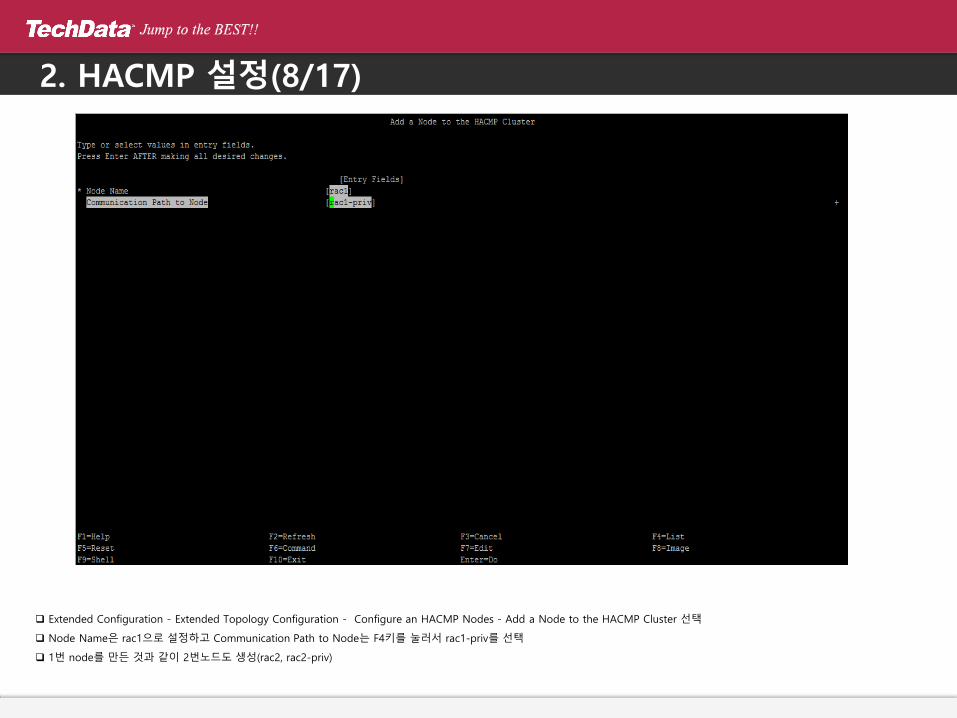
Extended Configuration - Extended Topology Configuration - Configure an HACMP Nodes - Add a Node to the HACMP Cluster 선택
Node Name은 rac1으로 설정하고 Communication Path to Node는 F4키를 눌러서 rac1-priv를 선택
1번 node를 만든 것과 같이 2번노드도 생성(rac2, rac2-priv)
2. HACMP 설정(9/17)
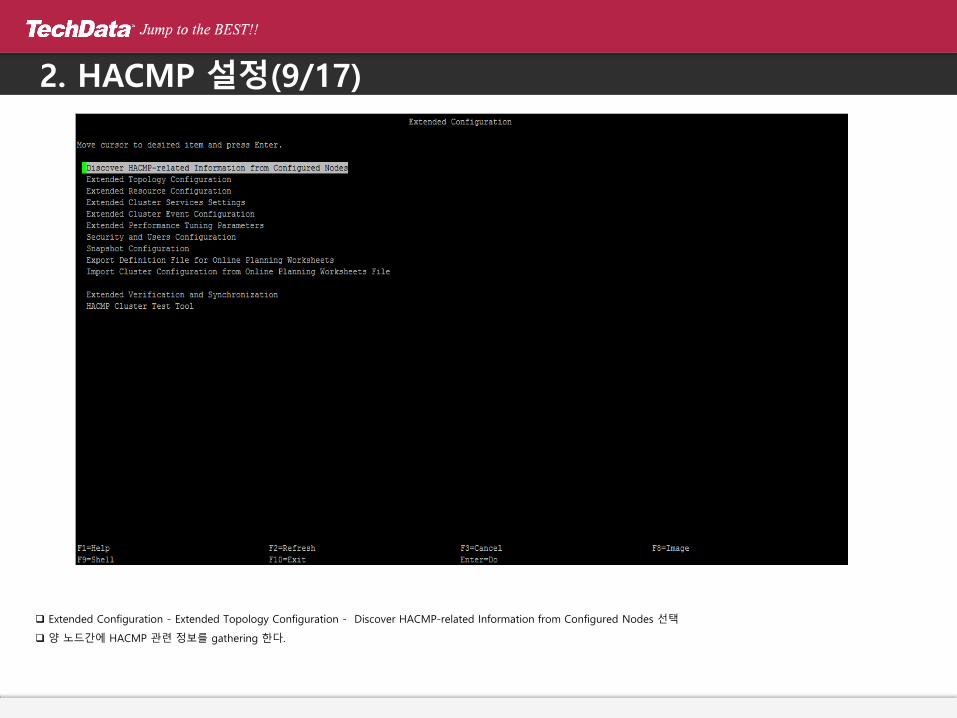
Extended Configuration - Extended Topology Configuration - Discover HACMP-related Information from Configured Nodes 선택
양 노드간에 HACMP 관련 정보를 gathering 한다.
2. HACMP 설정(10/17)
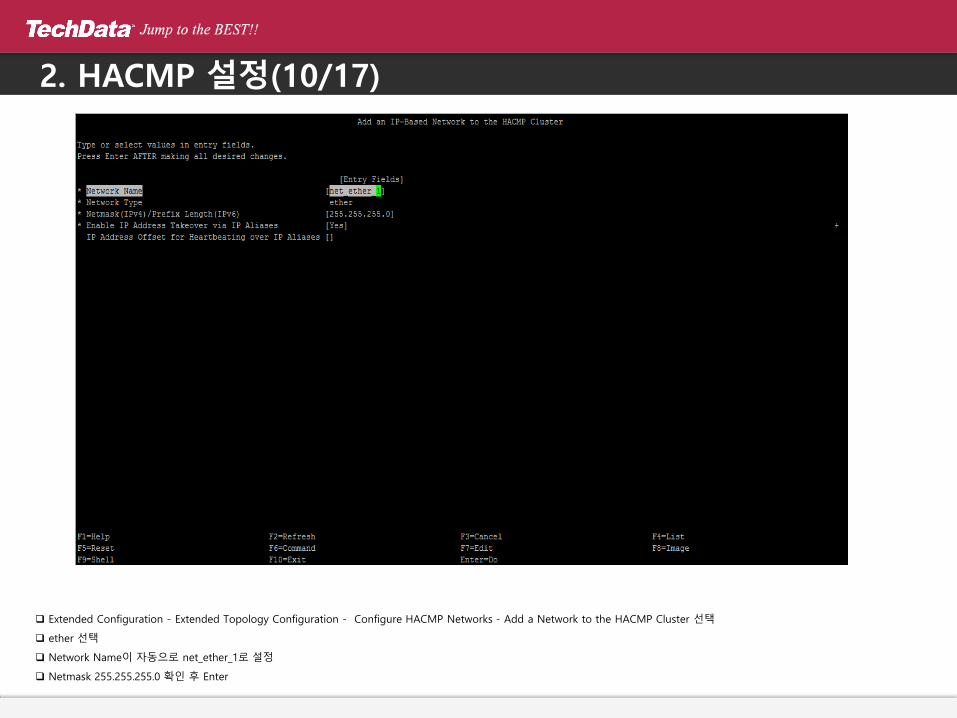
Extended Configuration - Extended Topology Configuration - Configure HACMP Networks - Add a Network to the HACMP Cluster 선택
ether 선택
Network Name이 자동으로 net_ether_1로 설정
Netmask 255.255.255.0 확인 후 Enter

2. HACMP 설정(11/17)
Extended Configuration - Extended Topology Configuration - Configure HACMP Communication Interfaces/Devices - Add Communication Interfaces/Devices - Add Discovered Communication Interface and Devices - Communication Interfaces - net_ether_01 선택
rac1, rac2 선택
2. HACMP 설정(12/17)
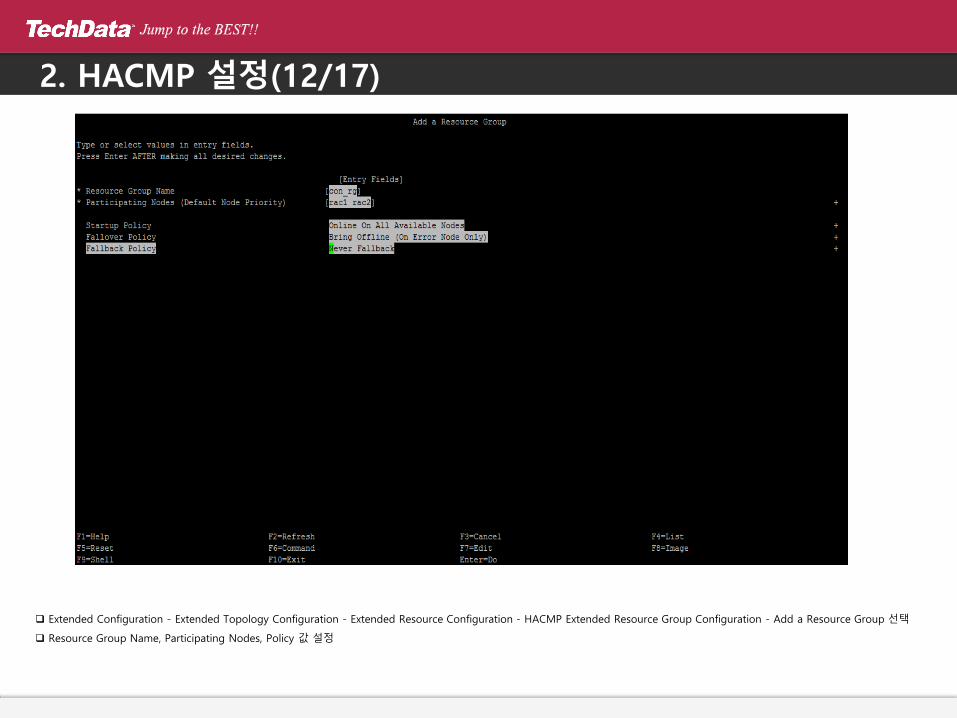
Extended Configuration - Extended Topology Configuration - Extended Resource Configuration - HACMP Extended Resource Group Configuration - Add a Resource Group 선택
Resource Group Name, Participating Nodes, Policy 값 설정
2. HACMP 설정(13/17)
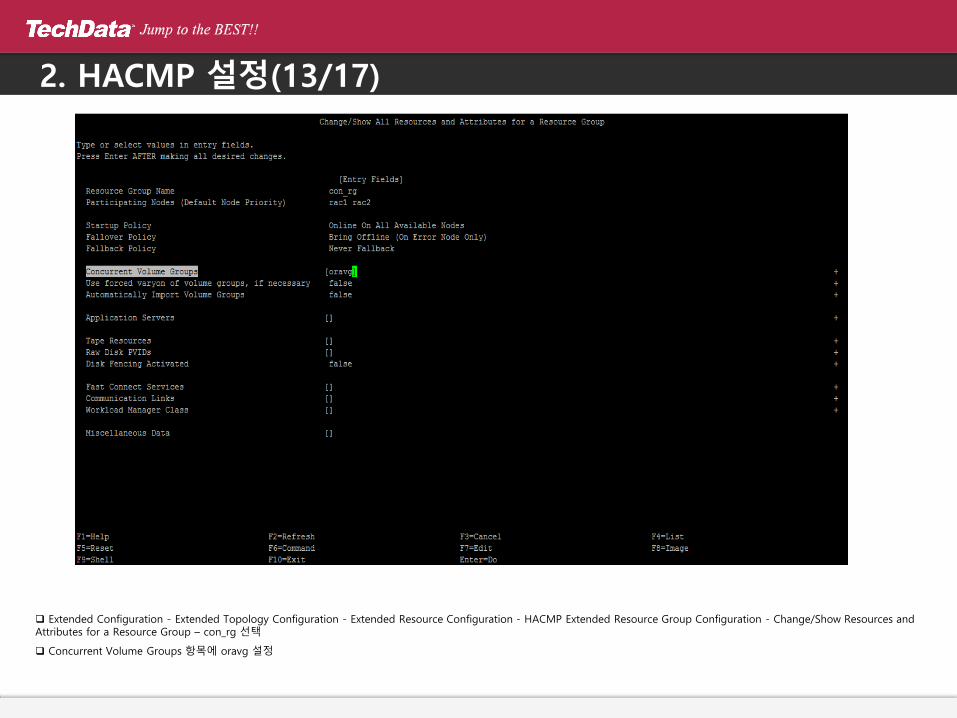
Extended Configuration - Extended Topology Configuration - Extended Resource Configuration - HACMP Extended Resource Group Configuration - Change/Show Resources and Attributes for a Resource Group – con_rg 선택
Concurrent Volume Groups 항목에 oravg 설정
2. HACMP 설정(14/17)
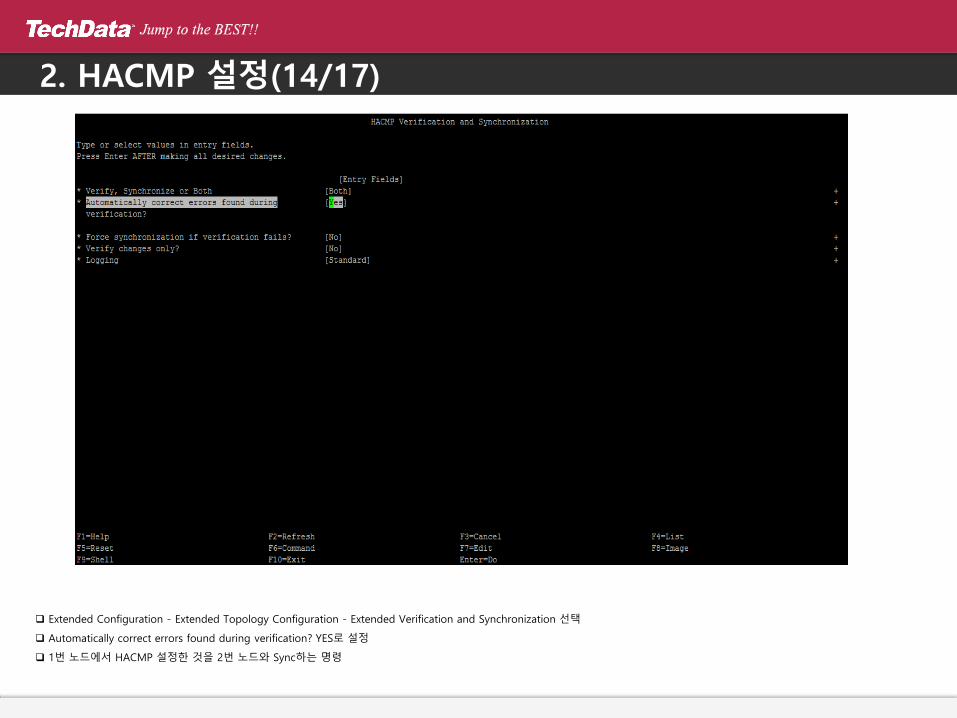
Extended Configuration - Extended Topology Configuration - Extended Verification and Synchronization 선택
Automatically correct errors found during verification? YES로 설정
1번 노드에서 HACMP 설정한 것을 2번 노드와 Sync하는 명령
2. HACMP 설정(15/17)
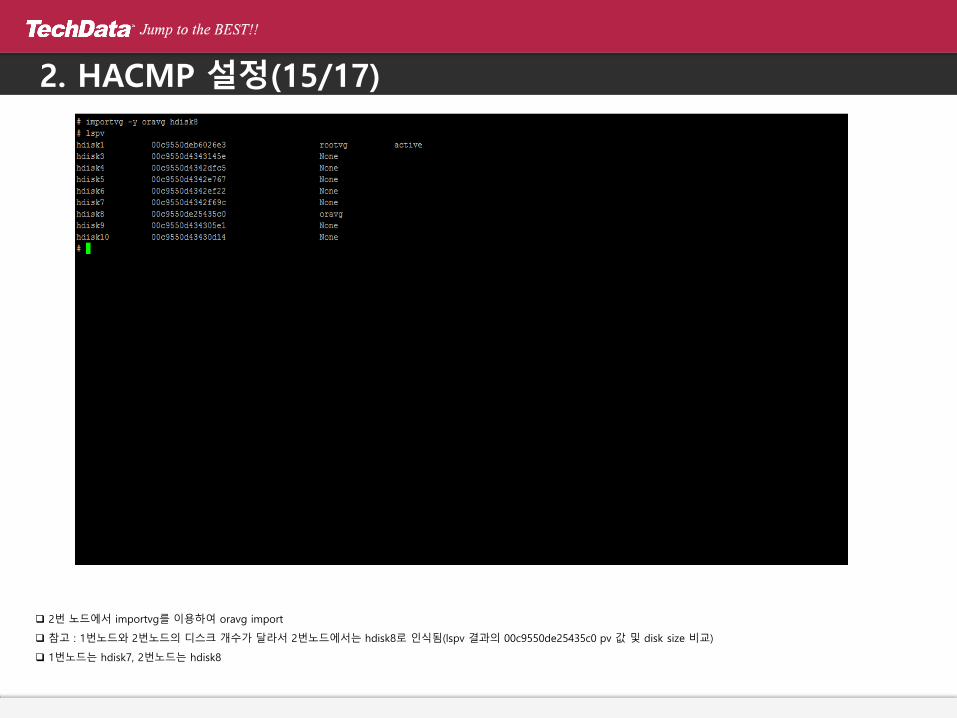
2번 노드에서 importvg를 이용하여 oravg import
참고 : 1번노드와 2번노드의 디스크 개수가 달라서 2번노드에서는 hdisk8로 인식됨(lspv 결과의 00c9550de25435c0 pv 값 및 disk size 비교)
1번노드는 hdisk7, 2번노드는 hdisk8
2. HACMP 설정(16/17)
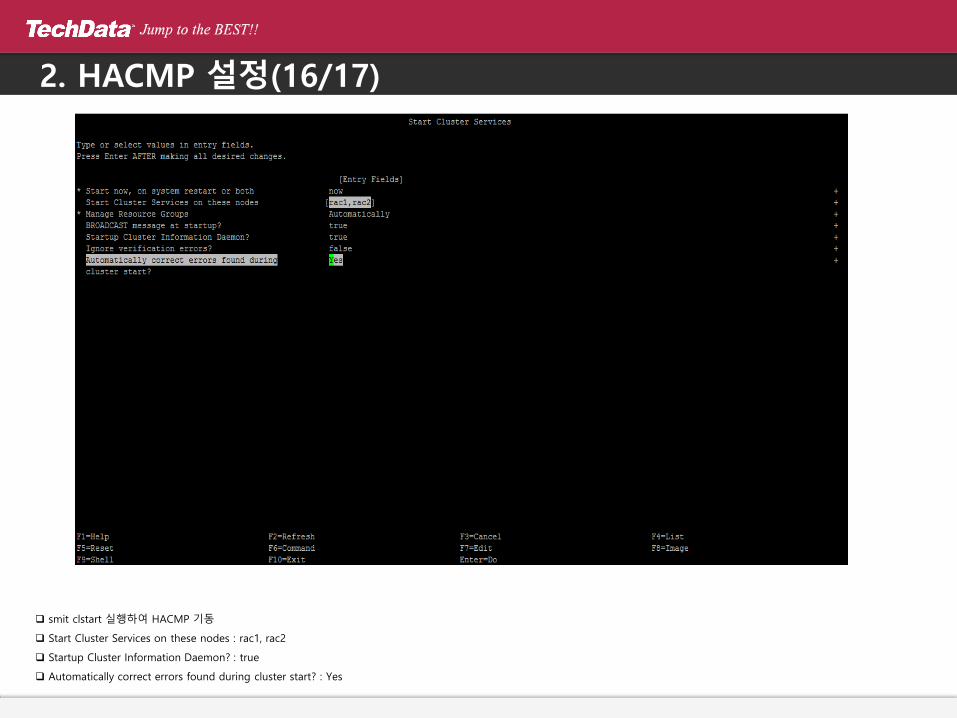
smit clstart 실행하여 HACMP 기동
Start Cluster Services on these nodes : rac1, rac2
Startup Cluster Information Daemon? : true
Automatically correct errors found during cluster start? : Yes

2. HACMP 설정(17/17)
양 노드 lspv 결과에서 concurrent 확인
HACMP 중지는 smit clstop 이용
3. 사전 준비 사항 (1/5)
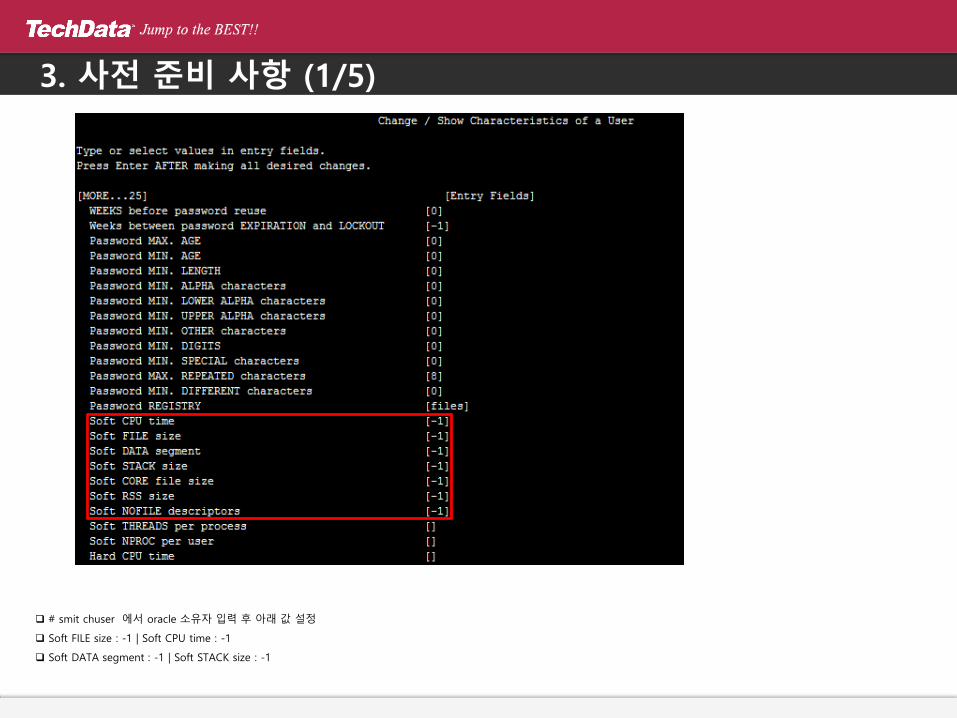
# smit chuser 에서 oracle 소유자 입력 후 아래 값 설정
Soft FILE size : -1 | Soft CPU time : -1
Soft DATA segment : -1 | Soft STACK size : -1

3. 사전 준비 사항 (2/5)
# smit chgsys
Maximum number of PROCESSES allowed per user 값을 16384 이상으로 설정
3. 사전 준비 사항 (3/5)
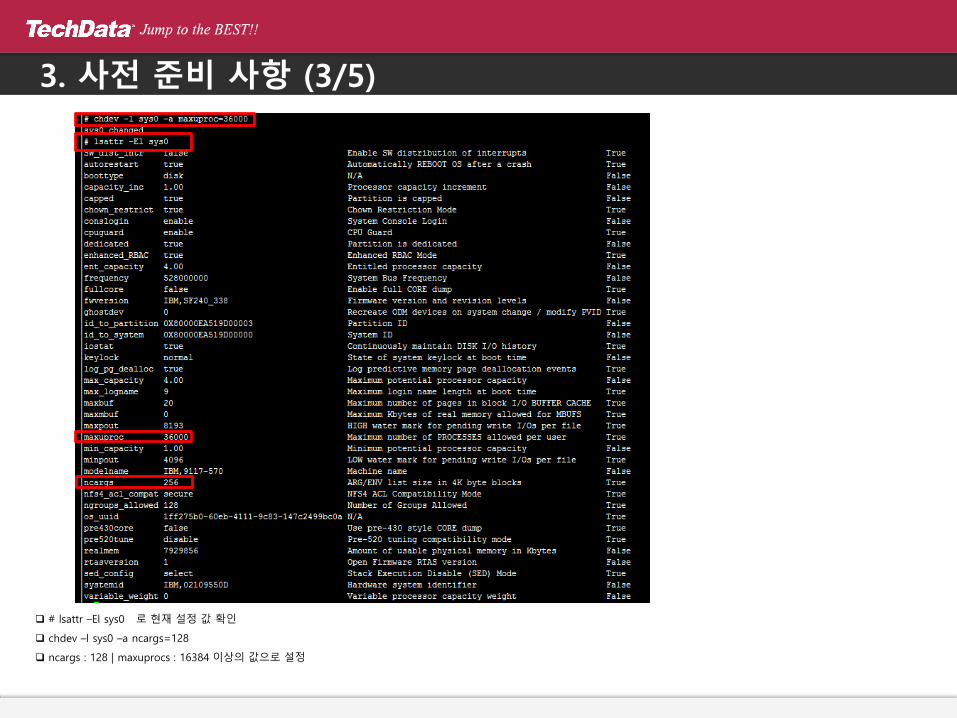
# lsattr –El sys0 로 현재 설정 값 확인
chdev –l sys0 –a ncargs=128
ncargs : 128 | maxuprocs : 16384 이상의 값으로 설정

3. 사전 준비 사항 (4/5)
oracle 유저의 .profile 에 환경 변수 세팅
ORACLE_BASE, ORACLE_HOME, ORACLE_SID, PATH 등

3. 사전 준비 사항 (5/5)
Grid설치 파일을 unzip
unzip한 경로에 있는 rootpre.sh 실행
4. Grid 설치 (1/18)
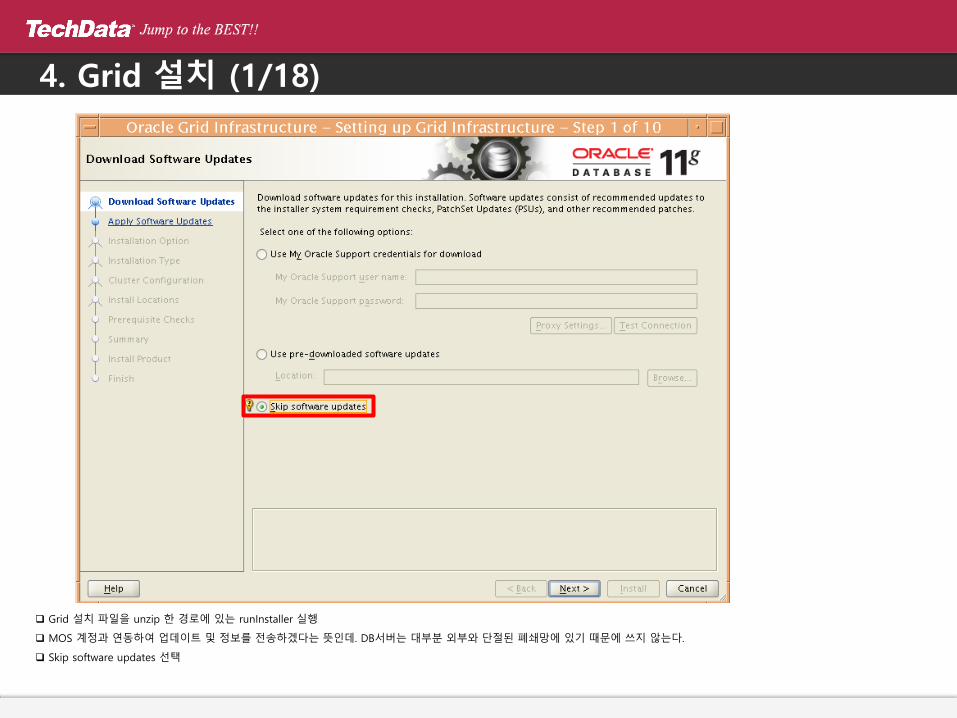
Grid 설치 파일을 unzip 한 경로에 있는 runInstaller 실행
MOS 계정과 연동하여 업데이트 및 정보를 전송하겠다는 뜻인데. DB서버는 대부분 외부와 단절된 폐쇄망에 있기 때문에 쓰지 않는다.
Skip software updates 선택
4. Grid 설치 (2/18)
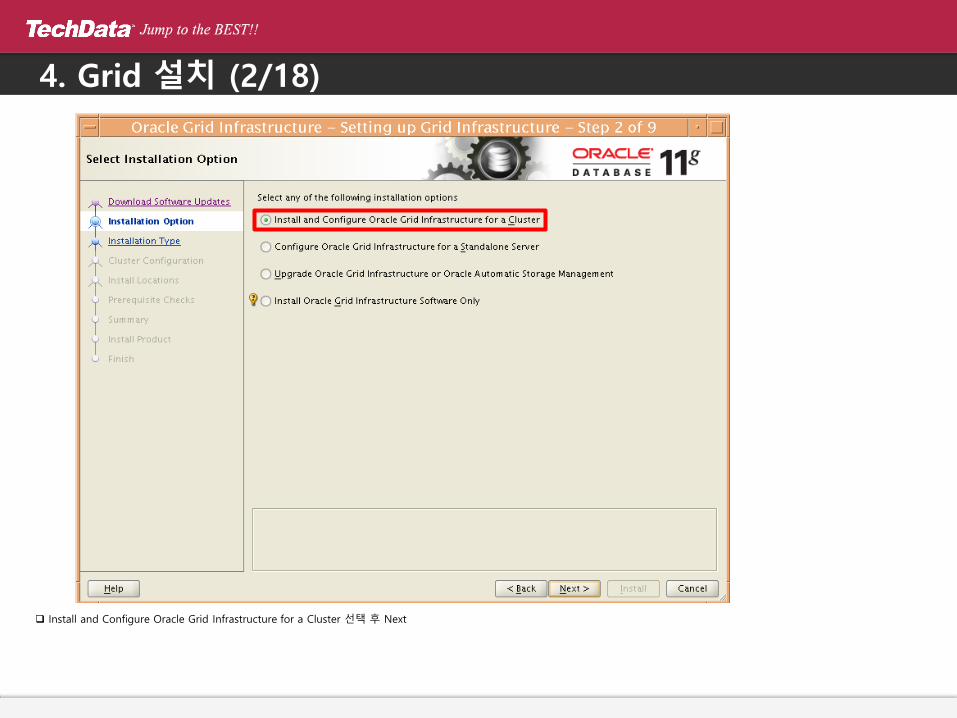
Install and Configure Oracle Grid Infrastructure for a Cluster 선택 후 Next
4. Grid 설치 (3/18)
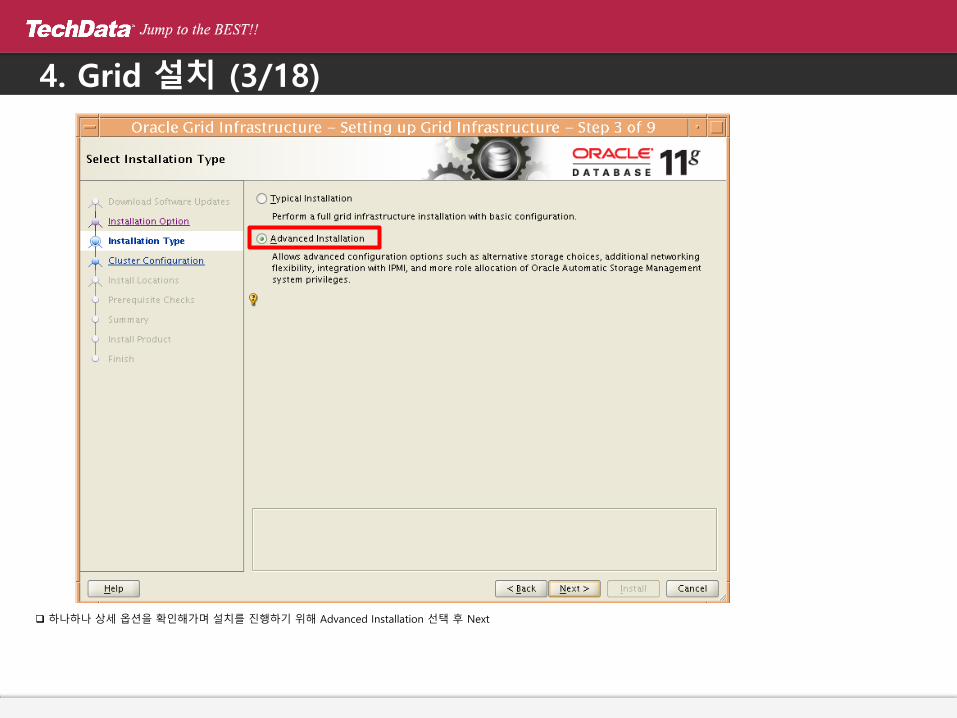
하나하나 상세 옵션을 확인해가며 설치를 진행하기 위해 Advanced Installation 선택 후 Next
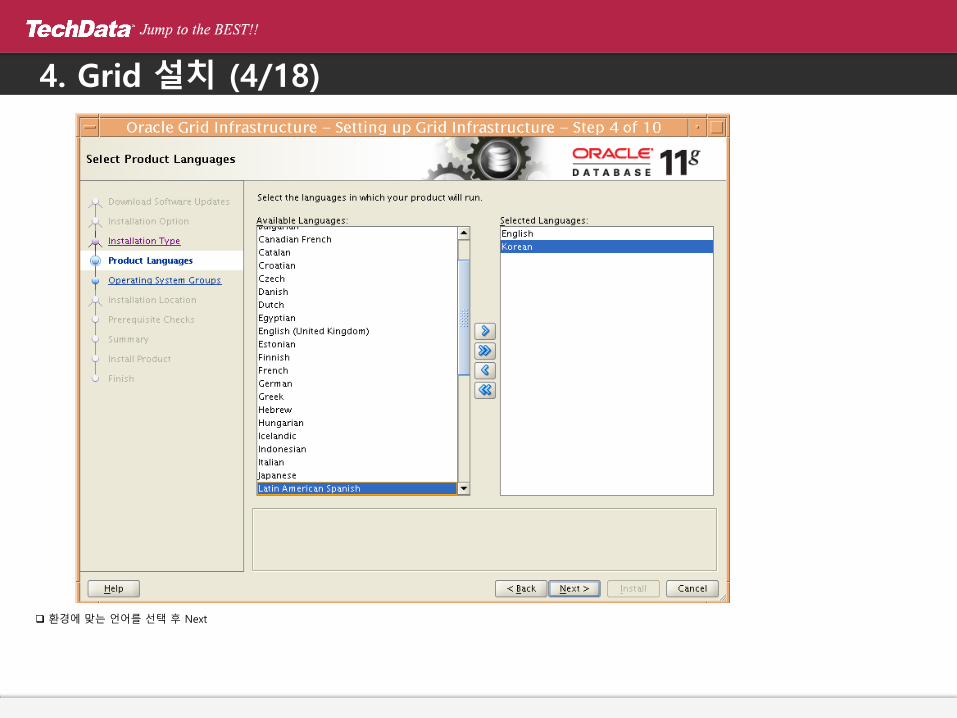
4. Grid 설치 (4/18)
환경에 맞는 언어를 선택 후 Next

4. Grid 설치 (5/18)
Cluster Name 과 SCAN Name, SCAN Port 를 확인 후 환경에 맞게 작성 후 Next
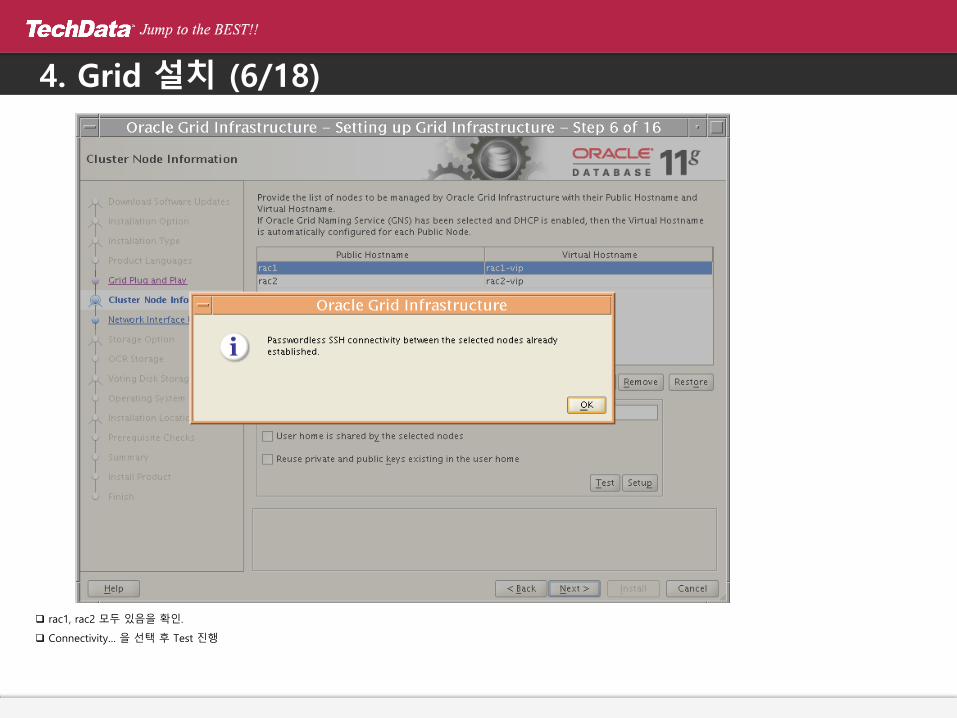
4. Grid 설치 (6/18)
rac1, rac2 모두 있음을 확인.
Connectivity… 을 선택 후 Test 진행
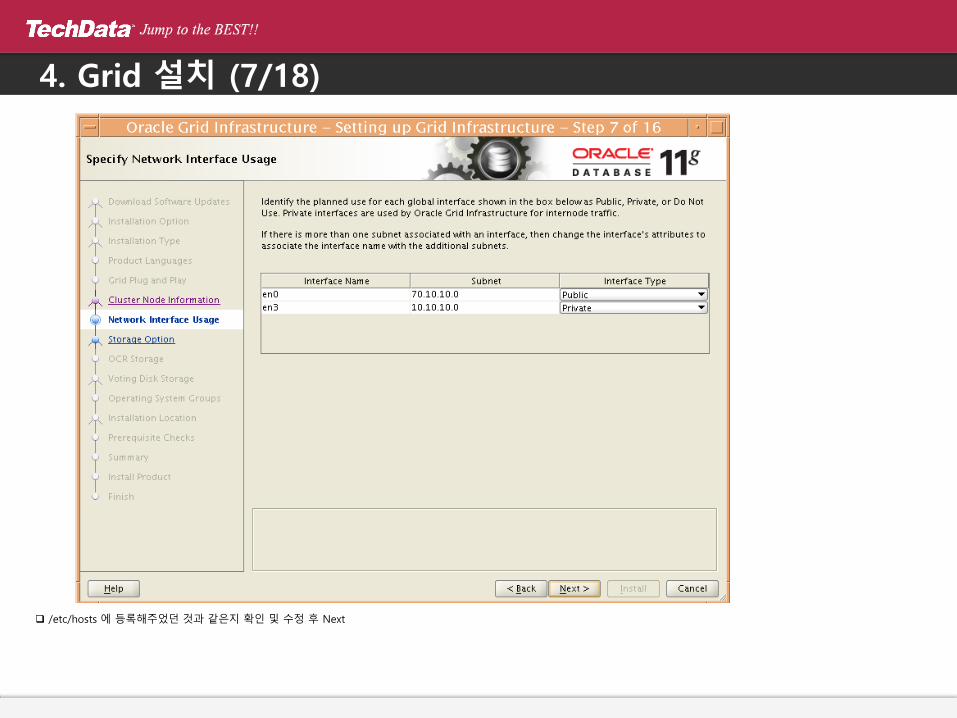
4. Grid 설치 (7/18)
/etc/hosts 에 등록해주었던 것과 같은지 확인 및 수정 후 Next

4. Grid 설치 (8/18)
ASM 으로 설정 후 RAW Device 로 변경 진행 할 예정이기 때문에
Oracle Automatic Storage Management (Oracle ASM) 선택 후 Next
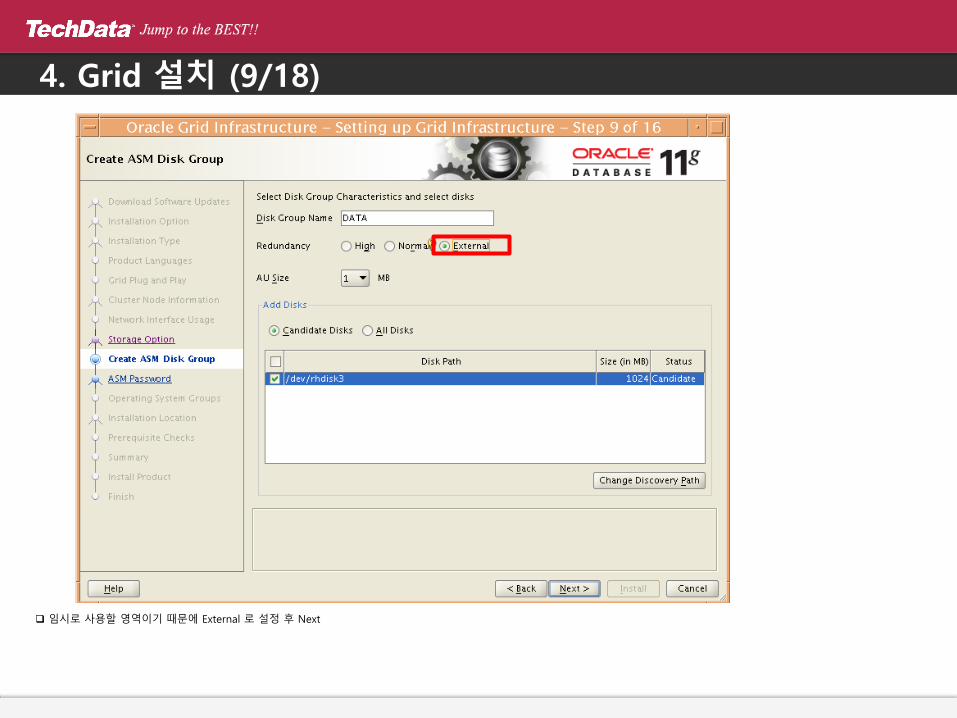
4. Grid 설치 (9/18)
임시로 사용할 영역이기 때문에 External 로 설정 후 Next
4. Grid 설치 (10/18)
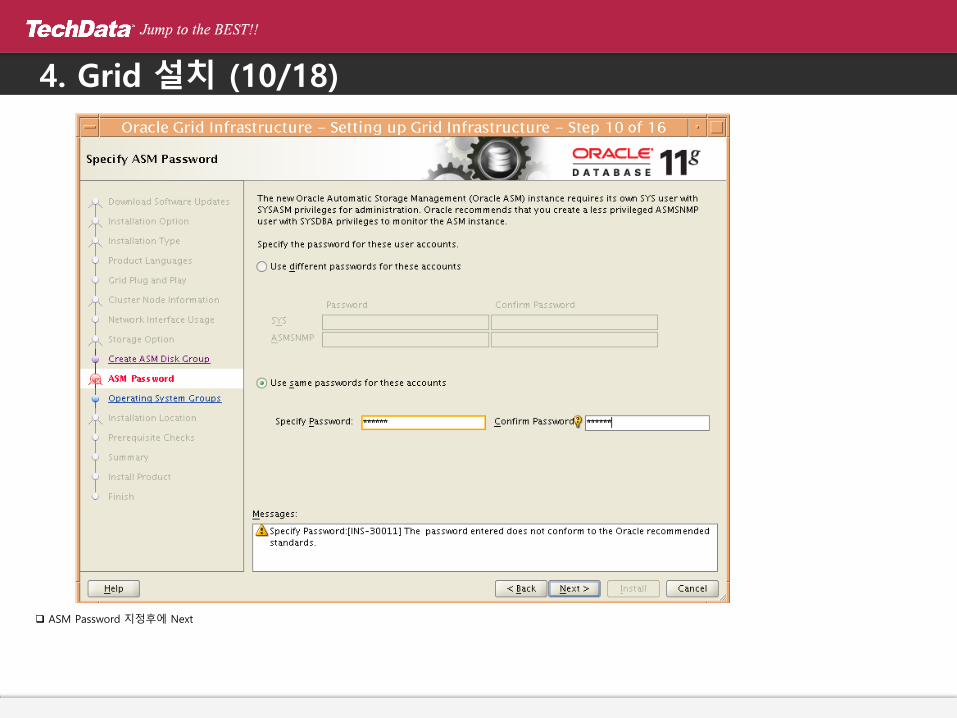
ASM Password 지정후에 Next

4. Grid 설치 (11/18)
Group 을 dba 로 맞춘 후 Next (OPER 는 Optional 하기 때문에 미지정 해도 상관 없음)
4. Grid 설치 (12/18)
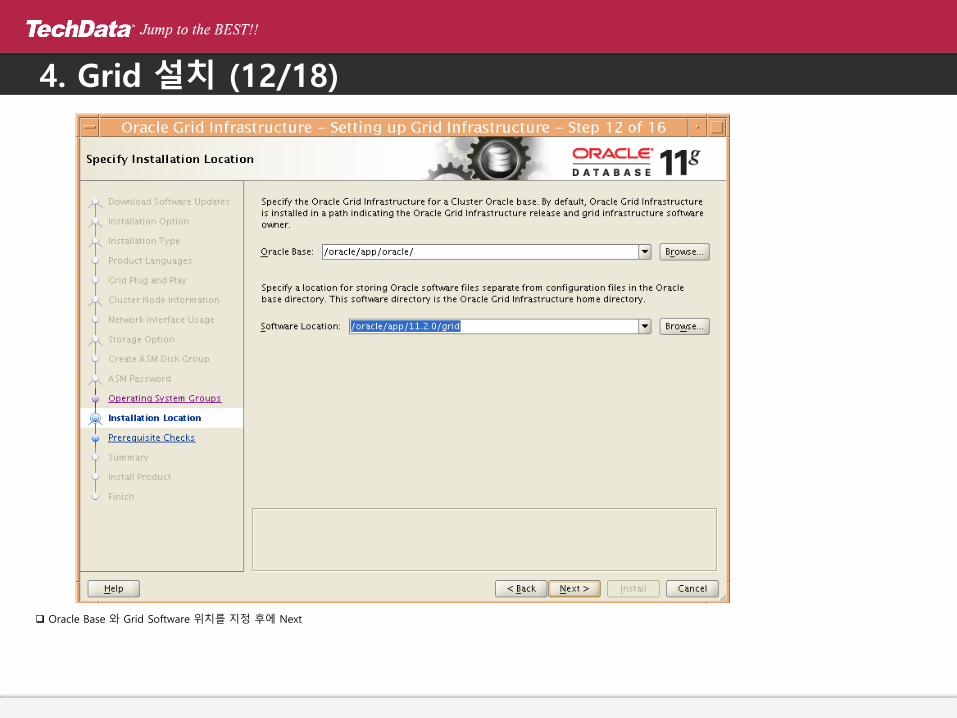
Oracle Base 와 Grid Software 위치를 지정 후에 Next

4. Grid 설치 (13/18)
요구조건 검사를 진행 후에 문제 있는 부분은 수정 후 진행
4. Grid 설치 (14/18)
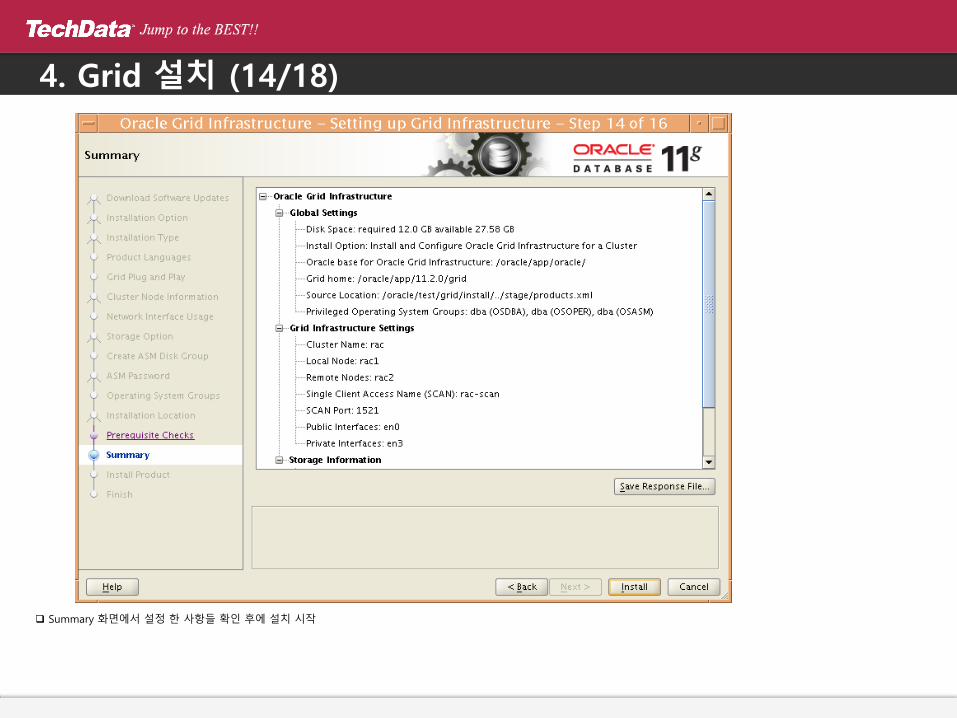
Summary 화면에서 설정 한 사항들 확인 후에 설치 시작
4. Grid 설치 (15/18)
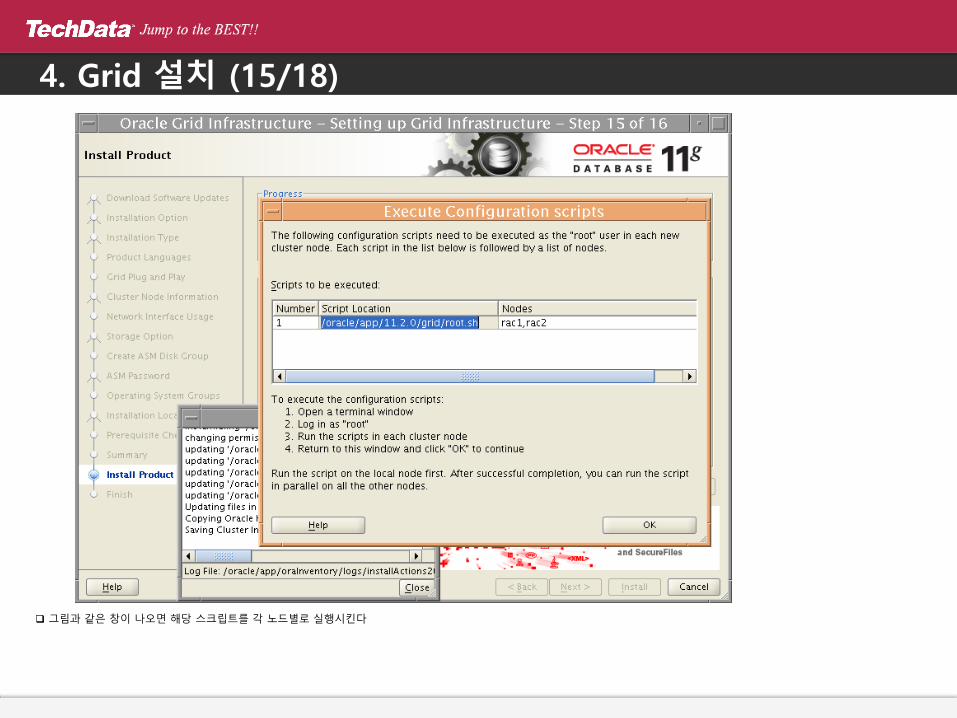
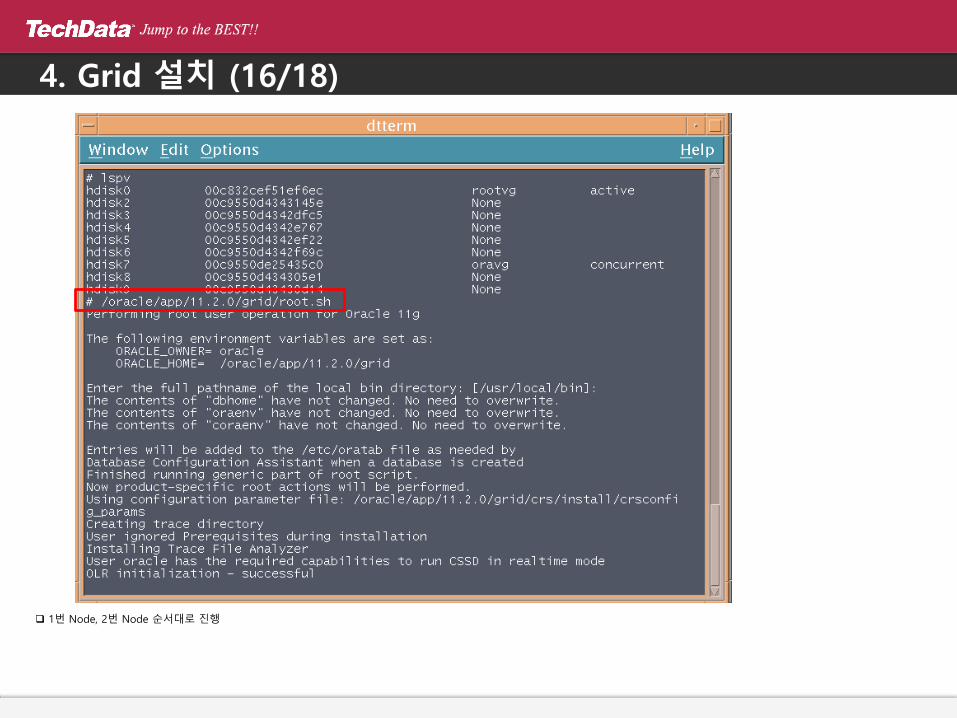
그림과 같은 창이 나오면 해당 스크립트를 각 노드별로 실행시킨다
4. Grid 설치 (16/18)
1번 Node, 2번 Node 순서대로 진행

4. Grid 설치 (17/18)
스크립트 실행 이후 OK 를 누르면 설치 완료
4. Grid 설치 (18/18)
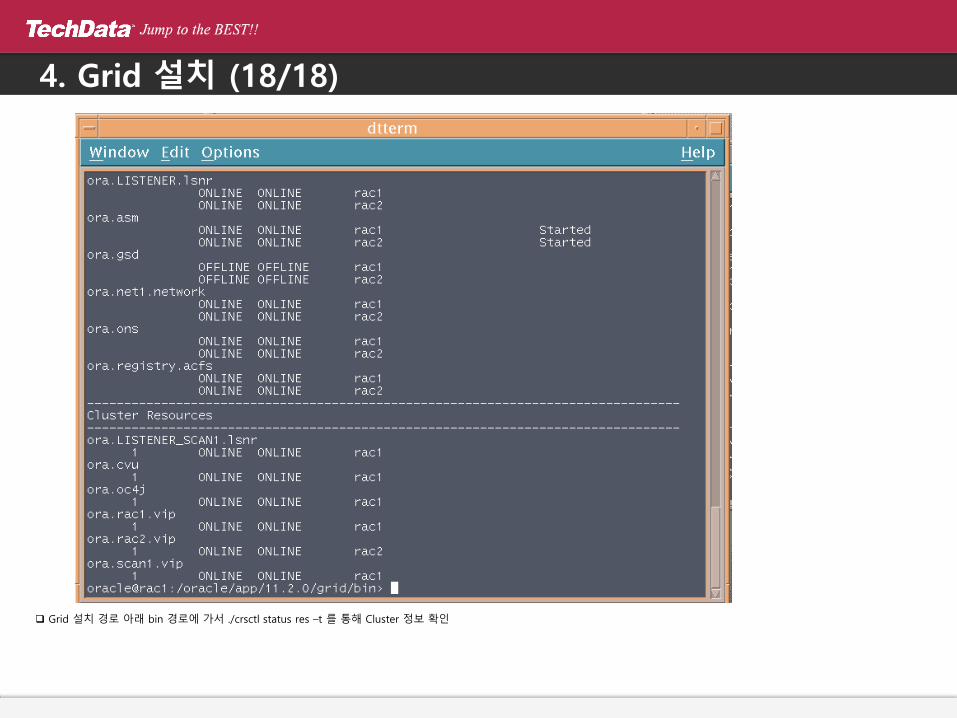
Grid 설치 경로 아래 bin 경로에 가서 ./crsctl status res –t 를 통해 Cluster 정보 확인
5. DB 엔진 설치 (1/12)
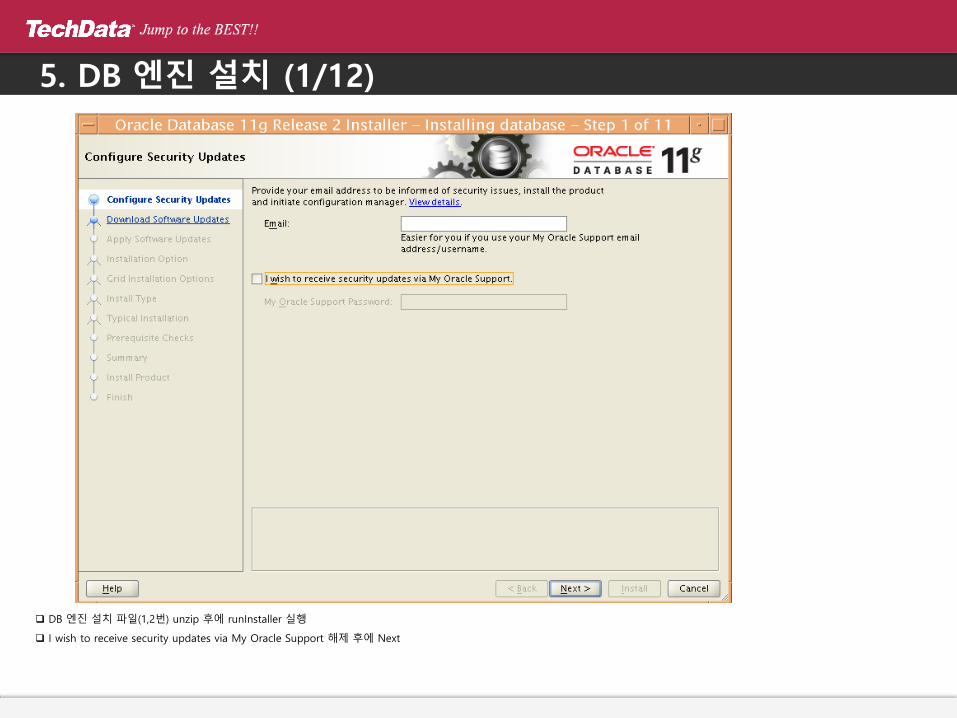
DB 엔진 설치 파일(1,2번) unzip 후에 runInstaller 실행
I wish to receive security updates via My Oracle Support 해제 후에 Next

5. DB 엔진 설치 (2/12)
Skip software updates 선택 후 Next
5. DB 엔진 설치 (3/12)
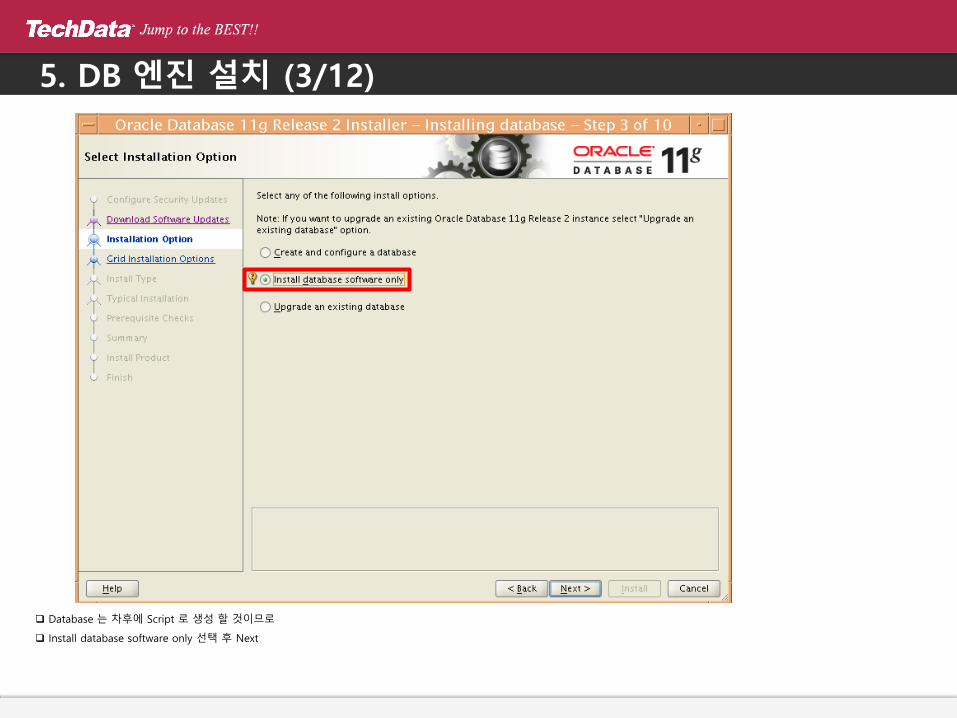
Database 는 차후에 Script 로 생성 할 것이므로
Install database software only 선택 후 Next
5. DB 엔진 설치 (4/12)
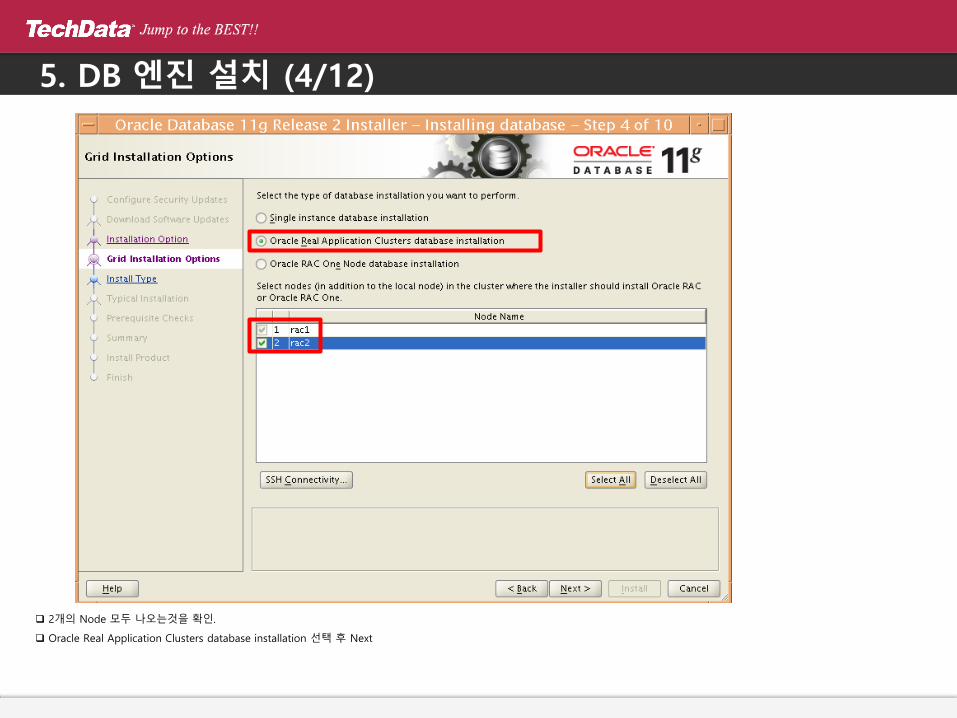
2개의 Node 모두 나오는것을 확인.
Oracle Real Application Clusters database installation 선택 후 Next

5. DB 엔진 설치 (5/12)
언어 선택 후 Next

5. DB 엔진 설치 (6/12)
설치할 버전 확인 및 선택 후 Next

5. DB 엔진 설치 (7/12)
Oracle Base, Oracle Home 경로 확인 후 Next
5. DB 엔진 설치 (8/12)
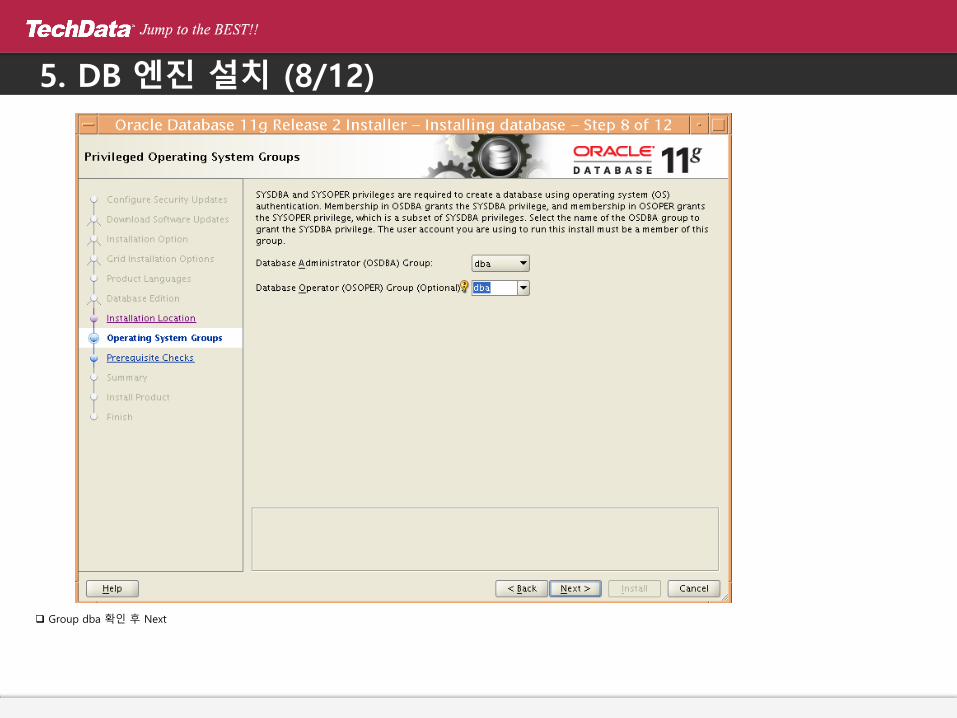
Group dba 확인 후 Next

5. DB 엔진 설치 (9/12)
설치 중 위의 그림과 같은 창이 뜨면 각각 노드에서 해당 스크립트 실행.
5. DB 엔진 설치 (10/12)
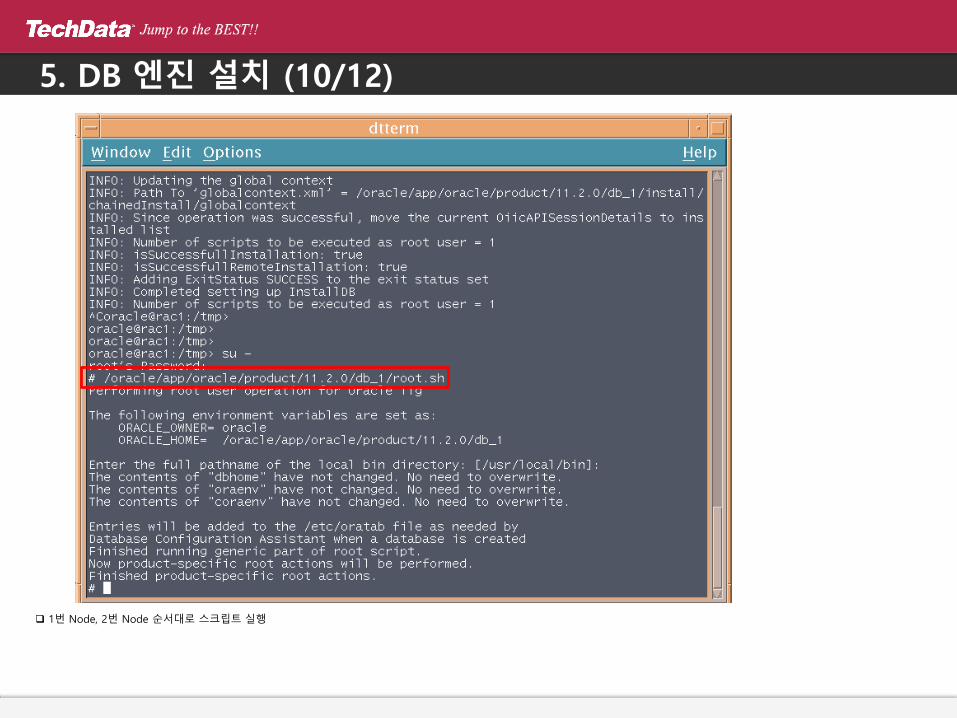
1번 Node, 2번 Node 순서대로 스크립트 실행

5. DB 엔진 설치 (11/12)
스크립트 실행 후에 OK 선택 후 설치 완료.

5. DB 엔진 설치 (12/12)
설치 이후 votedisk 를 asm 에서 RAW Device 로 교체 및 확인
./crsctl replace votedisk /dev/rcrs_vote01
./crsctl add css votedisk /dev/rcrs_vote02 , ./crsctl add css votedisk /dev/rcrs_vote03
./crsctl query css votedisk
6. DB 생성 (1/20)
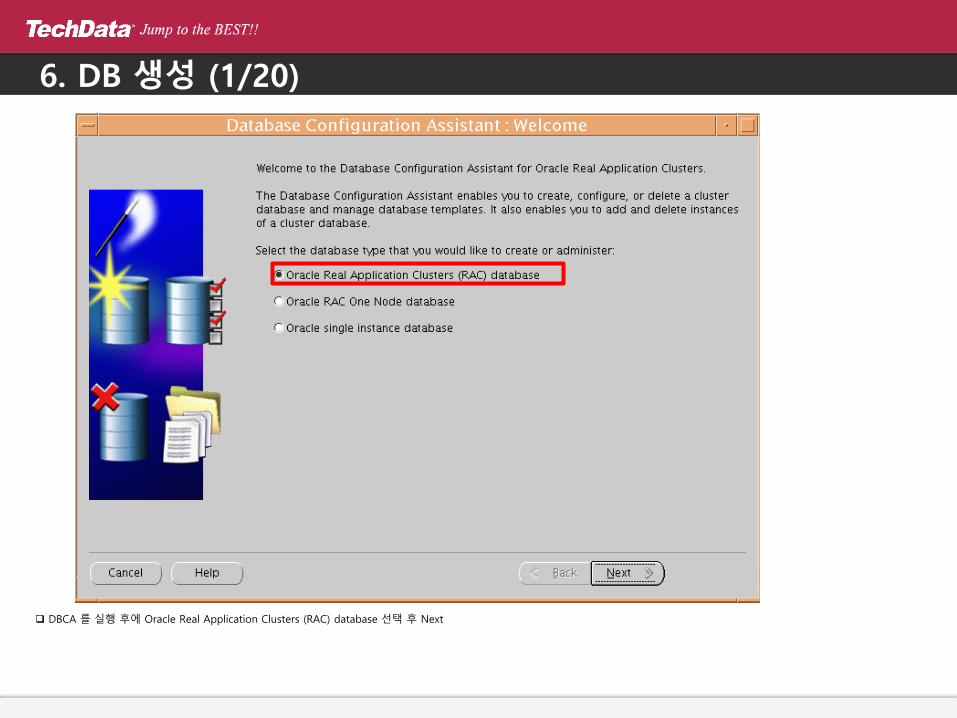
DBCA 를 실행 후에 Oracle Real Application Clusters (RAC) database 선택 후 Next
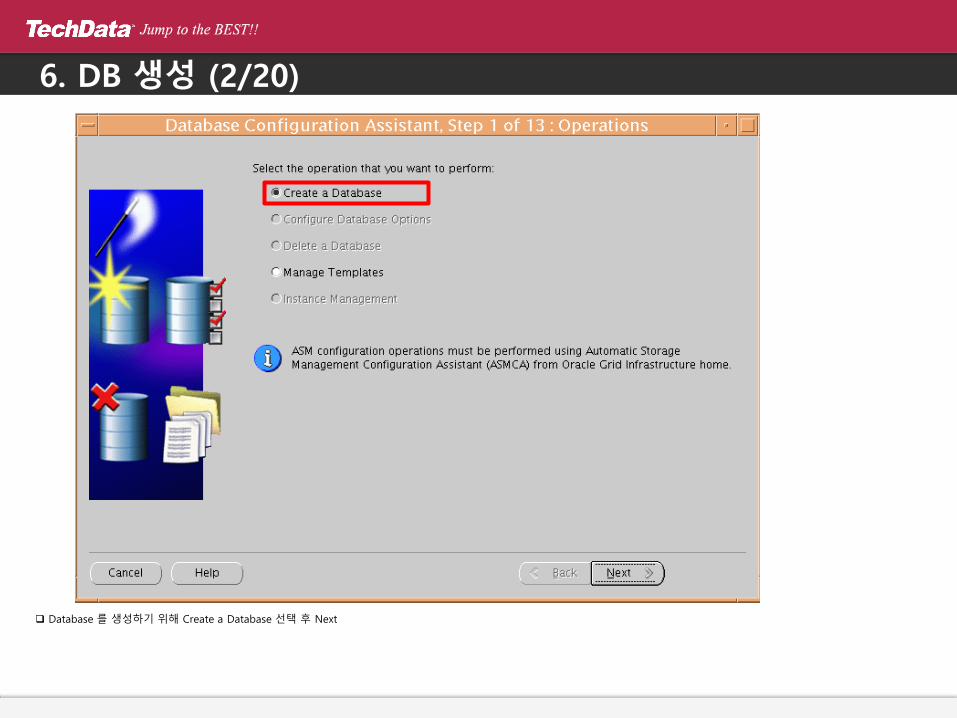
6. DB 생성 (2/20)
Database 를 생성하기 위해 Create a Database 선택 후 Next
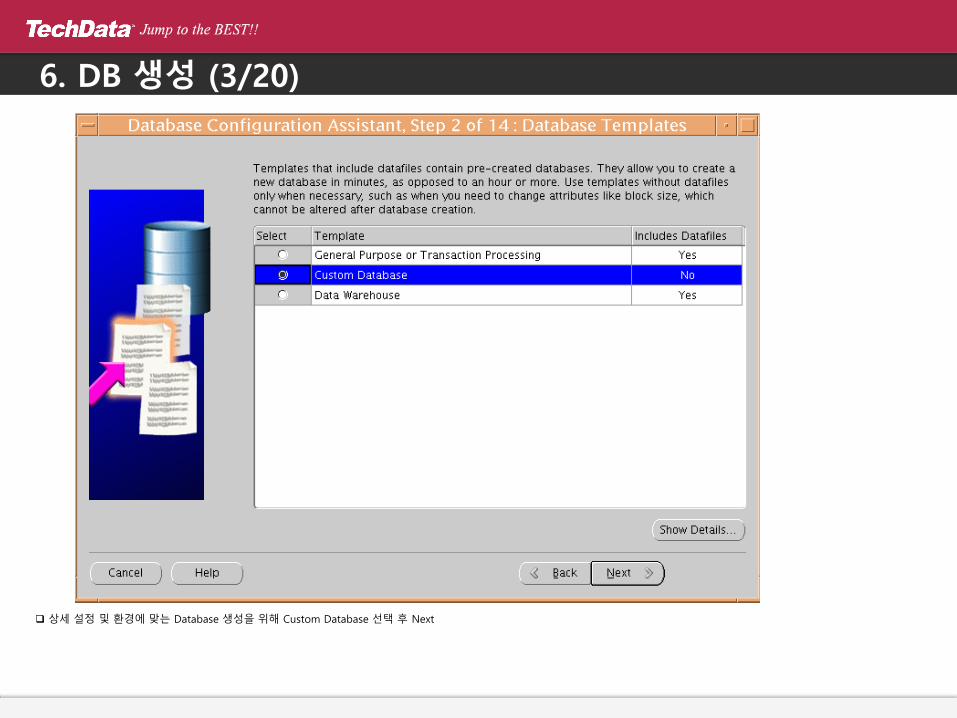
6. DB 생성 (3/20)
상세 설정 및 환경에 맞는 Database 생성을 위해 Custom Database 선택 후 Next

6. DB 생성 (4/20)
SID 와 Global Database Name 을 입력
양쪽 Node에서 사용하는 Database 를 생성 할 것이므로 Select All 선택 후 Next
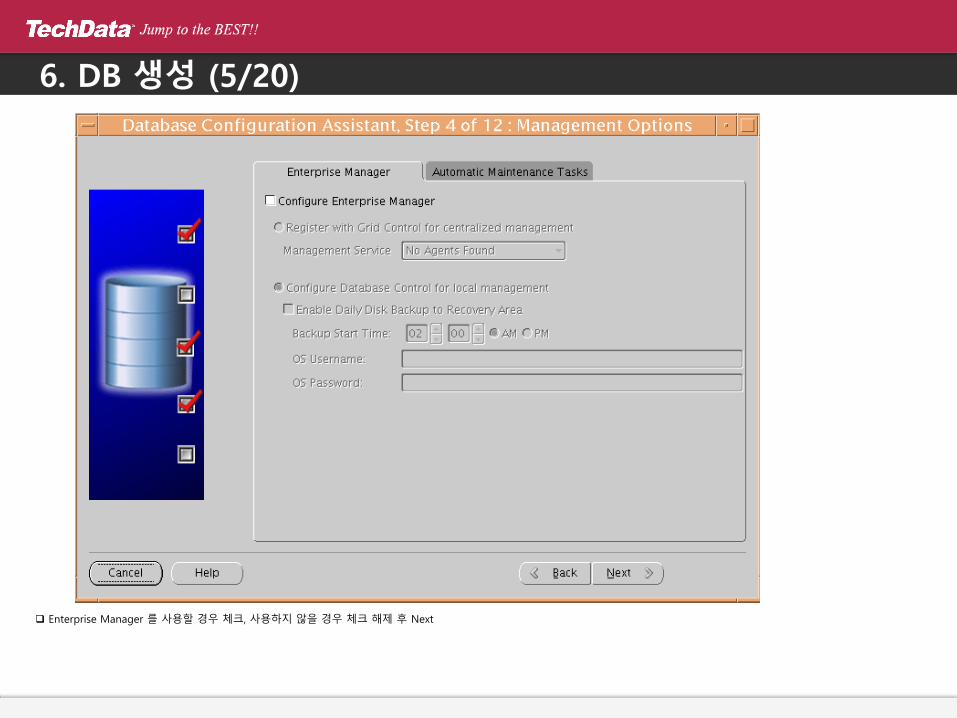
6. DB 생성 (5/20)
Enterprise Manager 를 사용할 경우 체크, 사용하지 않을 경우 체크 해제 후 Next

6. DB 생성 (6/20)
SYS, SYSTEM 계정 Password 설정 후 Next
6. DB 생성 (7/20)
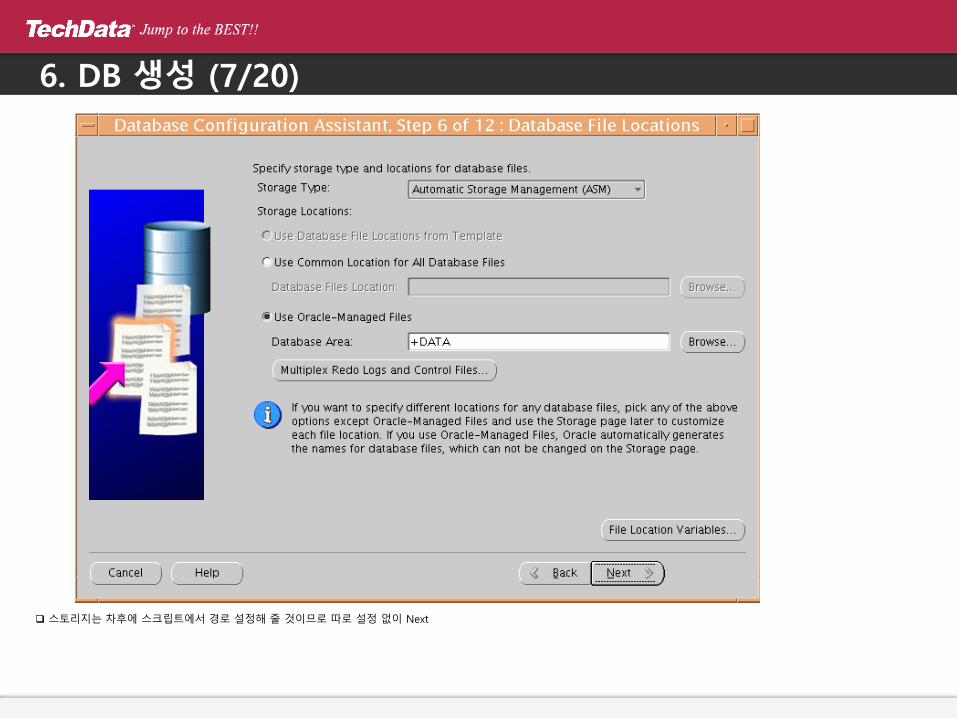
스토리지는 차후에 스크립트에서 경로 설정해 줄 것이므로 따로 설정 없이 Next

6. DB 생성 (8/20)
FRA 와 Archive Mode 설정도 차후에 설정 가능하므로 Next

6. DB 생성 (9/20)
사용 환경에 맞게 설치 목록 체크 및 체크 해제
현재 설치는 Test 목적이므로 체크 해제 후에 Next

6. DB 생성 (10/20)
Memory 관리 기법 및 Size 설정
6. DB 생성 (11/20)
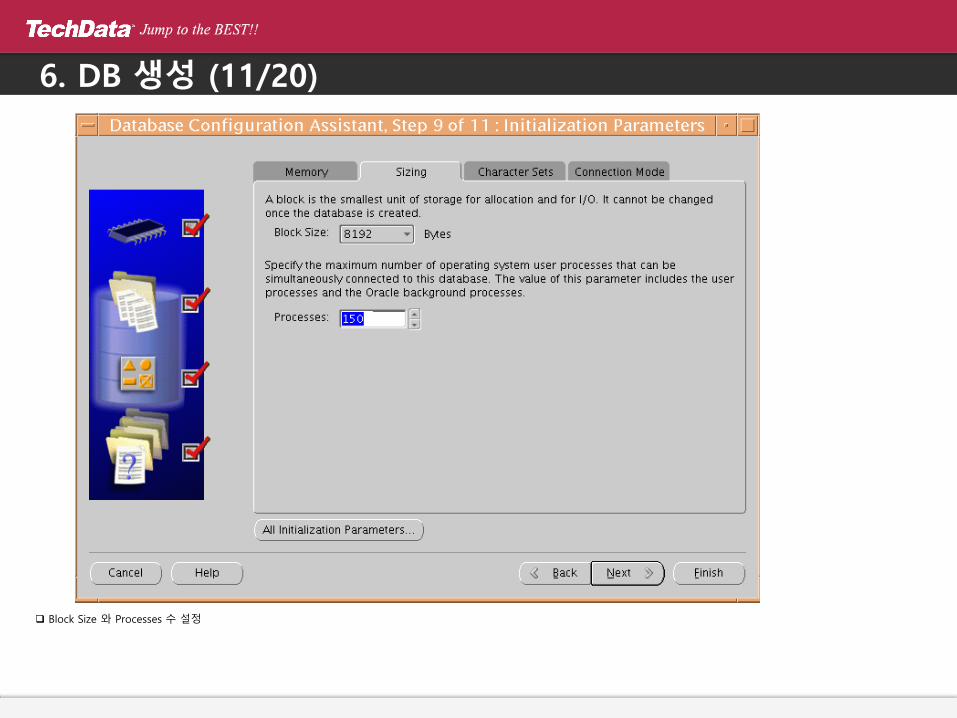
Block Size 와 Processes 수 설정
6. DB 생성 (12/20)
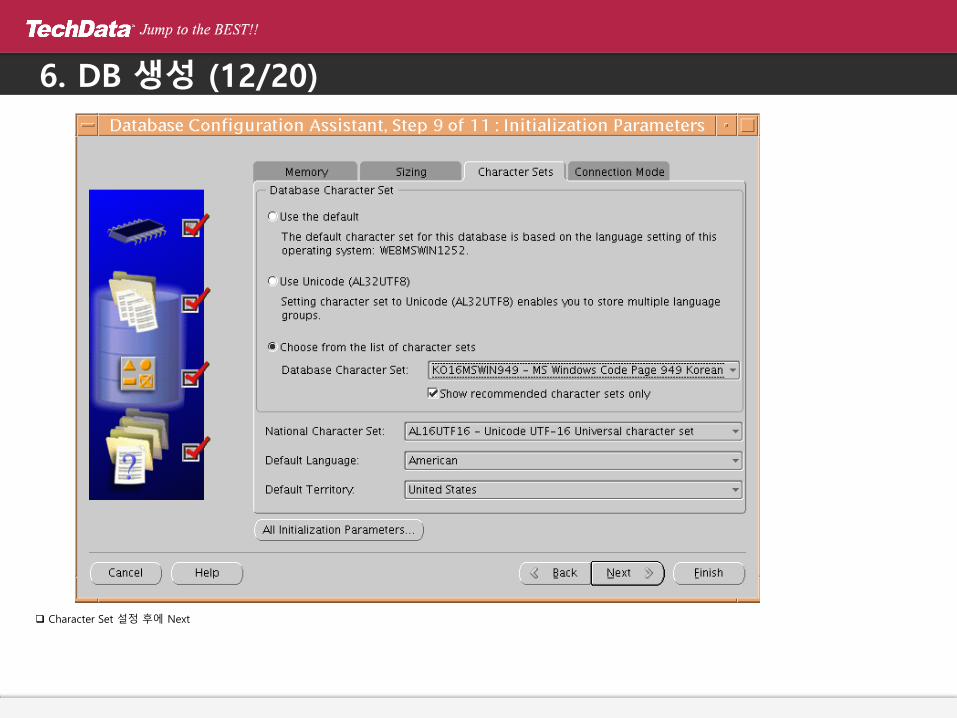
Character Set 설정 후에 Next
6. DB 생성 (13/20)
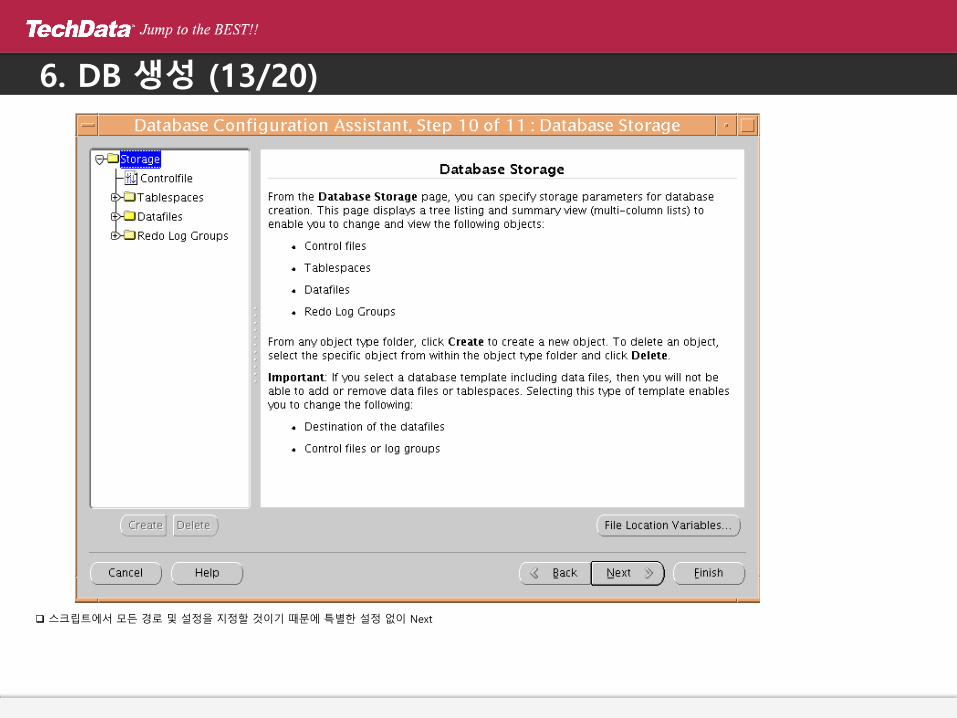
스크립트에서 모든 경로 및 설정을 지정할 것이기 때문에 특별한 설정 없이 Next

6. DB 생성 (14/20)
바로 Database 생성하지 않고 스크립트를 생성해서 수정 후에 생성
Create Database 체크 해제
Generate Database Creation Scripts 체크 및 경로 확인 후 Next
6. DB 생성 (15/20)
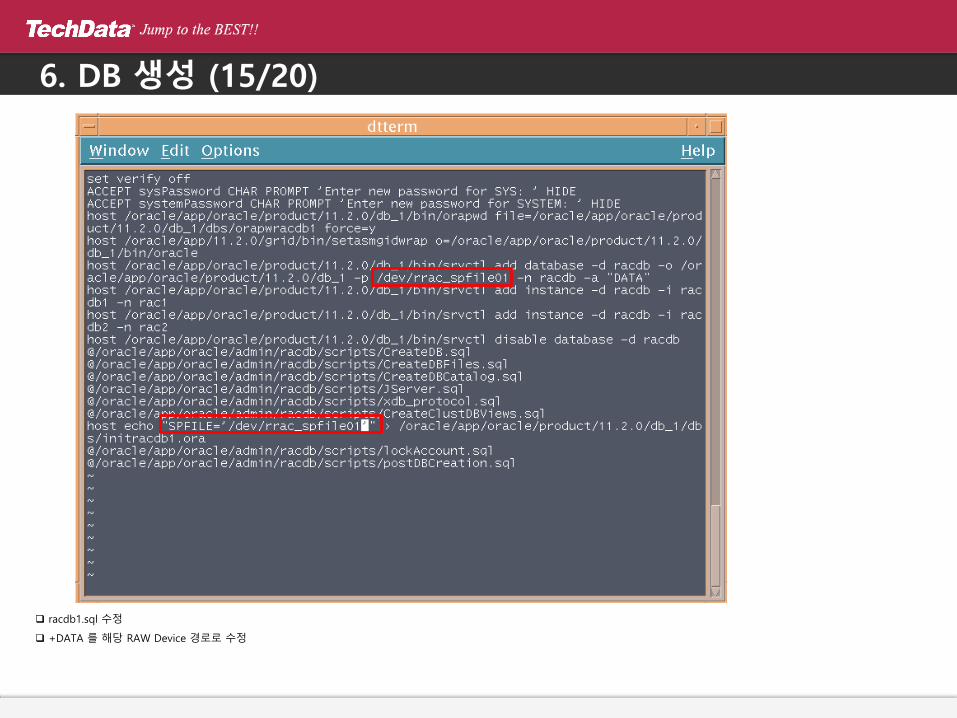
racdb1.sql 수정
+DATA 를 해당 RAW Device 경로로 수정
6. DB 생성 (16/20)
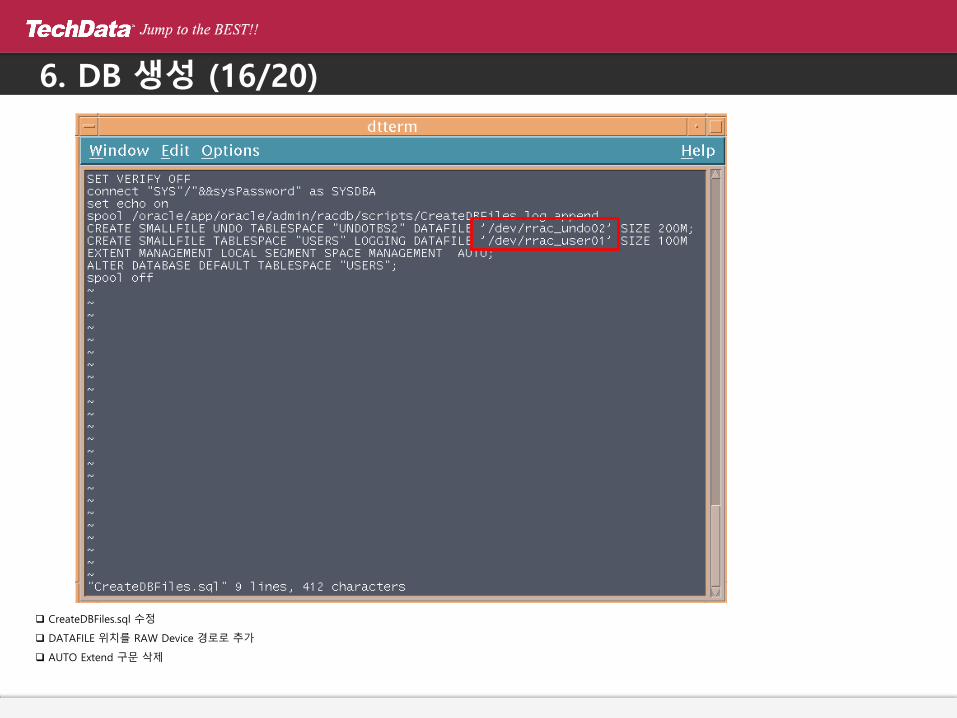
CreateDBFiles.sql 수정
DATAFILE 위치를 RAW Device 경로로 추가
AUTO Extend 구문 삭제
6. DB 생성 (17/20)
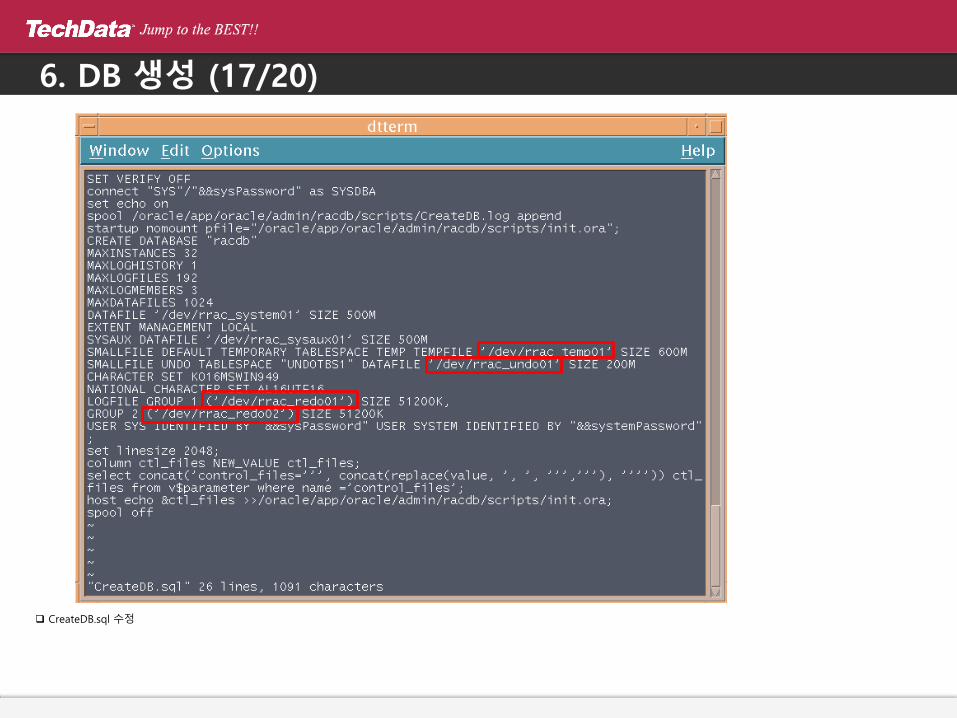
CreateDB.sql 수정
6. DB 생성 (18/20)
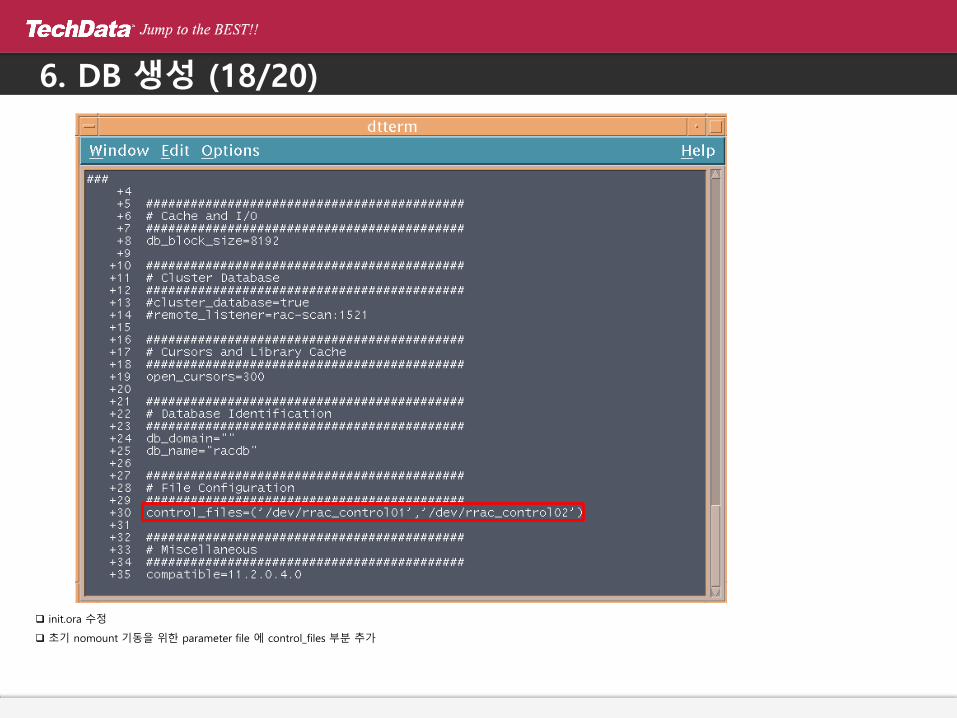
init.ora 수정
초기 nomount 기동을 위한 parameter file 에 control_files 부분 추가

6. DB 생성 (19/20)
racdb1.sh 실행시켜서 Database 생성
6. DB 생성 (20/20)
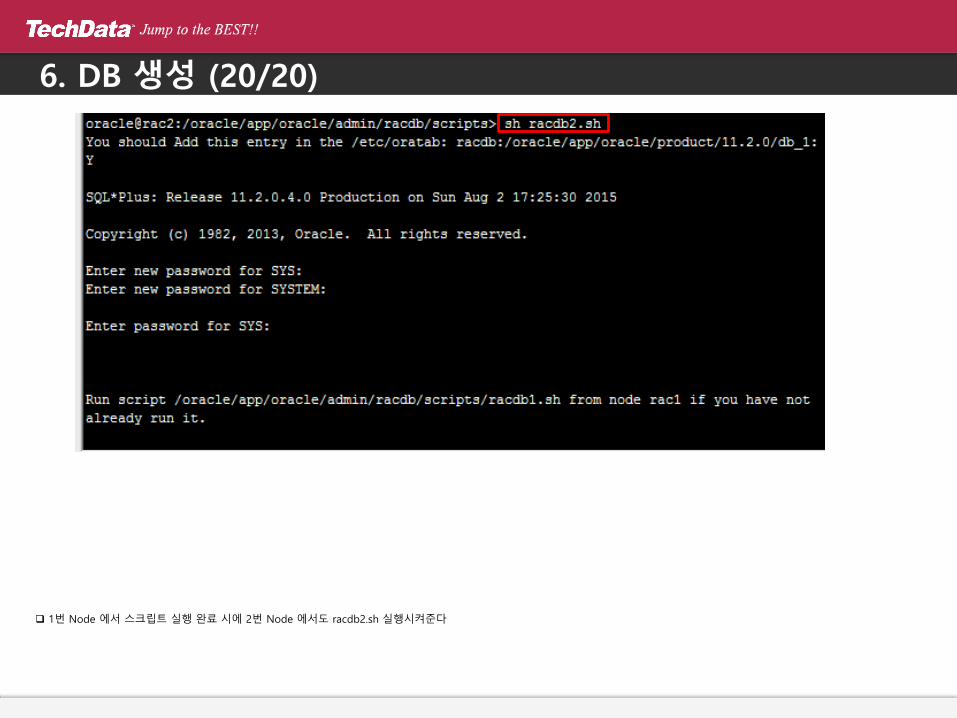
1번 Node 에서 스크립트 실행 완료 시에 2번 Node 에서도 racdb2.sh 실행시켜준다
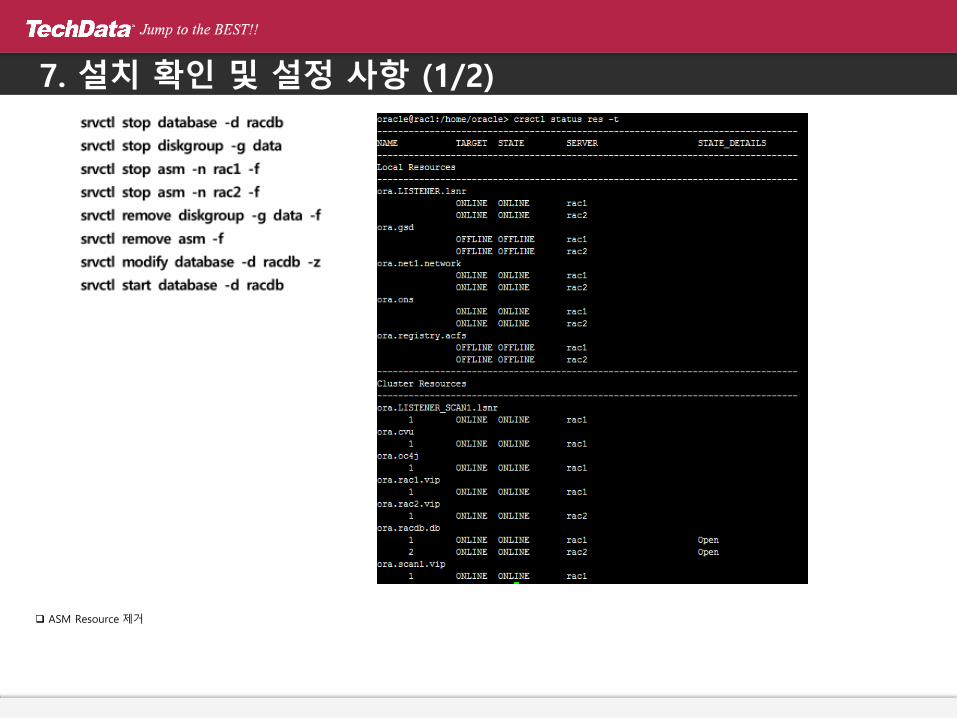
7. 설치 확인 및 설정 사항 (1/2)
ASM Resource 제거

7. 설치 확인 및 설정 사항 (2/2)
Instance OPEN 상태 확인
select instance_name, status from gv$instance;