oris cxf toolbox v1.1 user manual toolbox user gui… · oris cxf tools were designed to make...
TRANSCRIPT

ORIS CxF Toolbox
V1.1
User Manual
CGS Publishing Technologies International
Hainburg, Germany
March 4, 2016


Legal Information
Copyright
© 2016 CGS Publishing Technologies International. All rights reserved.
This documentation or any part of it may not be reproduced, published, translated or transmitted, in any form or by any means (electronic, mechanical, photocopying, recording or otherwise) without the prior consent of CGS Publishing Technologies International.
Adobe PDF Print Engine 3.4.4 © 2014 Adobe Systems Incorporated. All rights reserved.
Protected by U.S. Patent 7,365,876.
Trademarks
ORIS CxF Toolbox and ORIS CxF Designer are registered trademarks of CGS Publishing Technologies International.
All other trademarks referenced in this documentation are the property of the respective owners.
Disclaimer of Warranty
To the maximum extent permitted by applicable law, in no event shall CGS Publishing Technologies International or its suppliers be liable for any damages whatsoever (including without limitation, special, incidental, consequential, or indirect damages for personal injury, loss of business profits, business interruption, loss of business information, or any other pecuniary loss) in connection with or arising from the use or inability to use this product, the accompanying manuals, or any related product. In any case, the entire liability of CGS Publishing Technologies International and its suppliers under any provision of this agreement shall be limited to the amount actually paid for the software.
The information contained in this documentation is subject to change without notice.


ORIS CXF TOOLBOX V1.1 USER MANUAL i
Contents
Chapter 1: Introduction 1Global Brand Color Communication via CxF/X-4 . . . . . . . . . . . . . . . .1ORIS CxF Tools . . . . . . . . . . . . . . . . . . . . . . . . . . . . . . . . .1ORIS CxF Toolbox . . . . . . . . . . . . . . . . . . . . . . . . . . . . . . .2ORIS CxF Toolbox Features . . . . . . . . . . . . . . . . . . . . . . . . . .2ORIS CxF Designer . . . . . . . . . . . . . . . . . . . . . . . . . . . . . . .3CxF/X-4 Workflow . . . . . . . . . . . . . . . . . . . . . . . . . . . . . . . .4System Requirements for ORIS CxF Toolbox . . . . . . . . . . . . . . . . . .5Selecting Available Tools . . . . . . . . . . . . . . . . . . . . . . . . . . . .6
Chapter 2: Using ORIS CxF Toolbox 7Creating CxF/X-4 Data by Measurement . . . . . . . . . . . . . . . . . . . .7
Example . . . . . . . . . . . . . . . . . . . . . . . . . . . . . . . . . .8Creating CxF/X-4 Data from Files . . . . . . . . . . . . . . . . . . . . . . . .9Editing CxF/X-4 Data . . . . . . . . . . . . . . . . . . . . . . . . . . . . . 11
Single-color Editing and Renaming . . . . . . . . . . . . . . . . . . . . 12Multi-Color Editing and Deleting . . . . . . . . . . . . . . . . . . . . . 12
Creating CxF/X-4 Libraries . . . . . . . . . . . . . . . . . . . . . . . . . . 14Example . . . . . . . . . . . . . . . . . . . . . . . . . . . . . . . . . 15
Viewing Spectral Curves and Metadata . . . . . . . . . . . . . . . . . . . . 15Alternatives . . . . . . . . . . . . . . . . . . . . . . . . . . . . . . . . 17
Managing CxF/X-4 Data in PDF Files . . . . . . . . . . . . . . . . . . . . . 18Example . . . . . . . . . . . . . . . . . . . . . . . . . . . . . . . . . 19Assigning CxF/X-4 Data to Spot Colors . . . . . . . . . . . . . . . . . 19
Assigning CxF/X-4 Data Automatically . . . . . . . . . . . . . . . . 19Assigning CxF/X-4 Data Manually . . . . . . . . . . . . . . . . . . 20
Removing CxF/X-4 Data from PDF Files . . . . . . . . . . . . . . . . . 21Example . . . . . . . . . . . . . . . . . . . . . . . . . . . . . . . 22
Extracting Data From PDF Files . . . . . . . . . . . . . . . . . . . . . 22Extracting CxF/X-4 Data . . . . . . . . . . . . . . . . . . . . . . . 22Extracting Output Intent . . . . . . . . . . . . . . . . . . . . . . . 22
Changing Ink Laydown Order . . . . . . . . . . . . . . . . . . . . . . . 23Examples . . . . . . . . . . . . . . . . . . . . . . . . . . . . . . . 23
Creating Reports . . . . . . . . . . . . . . . . . . . . . . . . . . . . . . . 24Example . . . . . . . . . . . . . . . . . . . . . . . . . . . . . . . . . 25
Print Validation (Certification) . . . . . . . . . . . . . . . . . . . . . . . . . 25Load CxF/X-4 Data . . . . . . . . . . . . . . . . . . . . . . . . . . . . 26
First-time Job Certification . . . . . . . . . . . . . . . . . . . . . . 26

ii ORIS CXF TOOLBOX V1.1 USER MANUAL
Follow-Up Certification with PQX File . . . . . . . . . . . . . . . . 27Make Certification Settings . . . . . . . . . . . . . . . . . . . . . . . . 28
Example . . . . . . . . . . . . . . . . . . . . . . . . . . . . . . . 29Measure Colors . . . . . . . . . . . . . . . . . . . . . . . . . . . . . . 29
Measuring with ORIS CxF Toolbox . . . . . . . . . . . . . . . . . 29Measuring with a Third-Party Tool . . . . . . . . . . . . . . . . . . 30
Save Certification Results . . . . . . . . . . . . . . . . . . . . . . . . 32Print Validation of GBA Jobs (Certification) . . . . . . . . . . . . . . . . . . 33
Connect to GBA Server and Select Job . . . . . . . . . . . . . . . . . 33Measure Colors . . . . . . . . . . . . . . . . . . . . . . . . . . . . . . 34
Measuring with ORIS CxF Toolbox . . . . . . . . . . . . . . . . . 34Measuring with a Third-Party Tool . . . . . . . . . . . . . . . . . . 35
Upload Results to GBA Server . . . . . . . . . . . . . . . . . . . . . . 37
Chapter 3: Parameter Reference 39Measure CxF/X-4 Data . . . . . . . . . . . . . . . . . . . . . . . . . . . . 39
Buttons . . . . . . . . . . . . . . . . . . . . . . . . . . . . . . . . . . 39Properties . . . . . . . . . . . . . . . . . . . . . . . . . . . . . . . . . 40
Import and Edit CxF/X-4 Data . . . . . . . . . . . . . . . . . . . . . . . . . 41Diagram . . . . . . . . . . . . . . . . . . . . . . . . . . . . . . . . . . 42CxF/X-4 Metadata . . . . . . . . . . . . . . . . . . . . . . . . . . . . 42Buttons . . . . . . . . . . . . . . . . . . . . . . . . . . . . . . . . . . 43Log . . . . . . . . . . . . . . . . . . . . . . . . . . . . . . . . . . . . 44User Action: Related Spot Color Names . . . . . . . . . . . . . . . . . 44
Parameters . . . . . . . . . . . . . . . . . . . . . . . . . . . . . . 45Supported Color Name Patterns . . . . . . . . . . . . . . . . . . . 45
User Action: Invalid Spectral Data . . . . . . . . . . . . . . . . . . . . 46Import and Edit CxF/X-4 Data . . . . . . . . . . . . . . . . . . . . . . . . . 47
Spot Color List (left) . . . . . . . . . . . . . . . . . . . . . . . . . . . . 47CxF/X-4 Metadata List (right) . . . . . . . . . . . . . . . . . . . . . . . 48Buttons . . . . . . . . . . . . . . . . . . . . . . . . . . . . . . . . . . 48
View CxF/X-4 Data . . . . . . . . . . . . . . . . . . . . . . . . . . . . . . 49Diagram . . . . . . . . . . . . . . . . . . . . . . . . . . . . . . . . . . 50CxF/X-4 Metadata . . . . . . . . . . . . . . . . . . . . . . . . . . . . 50Buttons . . . . . . . . . . . . . . . . . . . . . . . . . . . . . . . . . . 51
Manage CxF/X-4 Data in PDF File . . . . . . . . . . . . . . . . . . . . . . 51CxF/X-4 Data . . . . . . . . . . . . . . . . . . . . . . . . . . . . . . . 52Ink laydown order . . . . . . . . . . . . . . . . . . . . . . . . . . . . . 53Buttons . . . . . . . . . . . . . . . . . . . . . . . . . . . . . . . . . . 53Assign CxF/X-4 Data . . . . . . . . . . . . . . . . . . . . . . . . . . . 54
Global Brand Assurance . . . . . . . . . . . . . . . . . . . . . . . . . . . 55User data . . . . . . . . . . . . . . . . . . . . . . . . . . . . . . . . . 55Job data . . . . . . . . . . . . . . . . . . . . . . . . . . . . . . . . . . 55Buttons . . . . . . . . . . . . . . . . . . . . . . . . . . . . . . . . . . 55
Certification . . . . . . . . . . . . . . . . . . . . . . . . . . . . . . . . . . 56<Spot Color Name> . . . . . . . . . . . . . . . . . . . . . . . . . . . . 57Measurement . . . . . . . . . . . . . . . . . . . . . . . . . . . . . . . 58Overall Result . . . . . . . . . . . . . . . . . . . . . . . . . . . . . . . 58Comments . . . . . . . . . . . . . . . . . . . . . . . . . . . . . . . . 59Buttons . . . . . . . . . . . . . . . . . . . . . . . . . . . . . . . . . . 59Assign Measurements . . . . . . . . . . . . . . . . . . . . . . . . . . 59Certification Parameters . . . . . . . . . . . . . . . . . . . . . . . . . 61
Measurement Parameters . . . . . . . . . . . . . . . . . . . . . . 61

ORIS CXF TOOLBOX V1.1 USER MANUAL iii
Tolerances . . . . . . . . . . . . . . . . . . . . . . . . . . . . . . 61Process Color Certification . . . . . . . . . . . . . . . . . . . . . . 62
Certification . . . . . . . . . . . . . . . . . . . . . . . . . . . . . . . . . . 62<Spot Color Name> . . . . . . . . . . . . . . . . . . . . . . . . . . . . 63Measurement . . . . . . . . . . . . . . . . . . . . . . . . . . . . . . . 64Overall Result . . . . . . . . . . . . . . . . . . . . . . . . . . . . . . . 65
Reports . . . . . . . . . . . . . . . . . . . . . . . . . . . . . . . . . . . . 65CxF/X-4 Metadata . . . . . . . . . . . . . . . . . . . . . . . . . . . . . . . 68
Spot color . . . . . . . . . . . . . . . . . . . . . . . . . . . . . . . . . 68Tolerances . . . . . . . . . . . . . . . . . . . . . . . . . . . . . . . . 69Measurement . . . . . . . . . . . . . . . . . . . . . . . . . . . . . . . 70Measurement device . . . . . . . . . . . . . . . . . . . . . . . . . . . 70File . . . . . . . . . . . . . . . . . . . . . . . . . . . . . . . . . . . . 71
Write CxF/X-4 Data . . . . . . . . . . . . . . . . . . . . . . . . . . . . . . 71Preferences . . . . . . . . . . . . . . . . . . . . . . . . . . . . . . . . . . 72
Appendix A: Glossary . . . . . . . . . . . . . . . . . . . . . . . . . . . . . . . . . . . 73CGATS . . . . . . . . . . . . . . . . . . . . . . . . . . . . . . . . . . . . 73CxF . . . . . . . . . . . . . . . . . . . . . . . . . . . . . . . . . . . . . . 73CxF1 . . . . . . . . . . . . . . . . . . . . . . . . . . . . . . . . . . . . . . 73CxF3 . . . . . . . . . . . . . . . . . . . . . . . . . . . . . . . . . . . . . . 73CxF/X-4 . . . . . . . . . . . . . . . . . . . . . . . . . . . . . . . . . . . . 73Delta E Formula . . . . . . . . . . . . . . . . . . . . . . . . . . . . . . . . 73dE . . . . . . . . . . . . . . . . . . . . . . . . . . . . . . . . . . . . . . . 73dE94 . . . . . . . . . . . . . . . . . . . . . . . . . . . . . . . . . . . . . . 74dE2000 . . . . . . . . . . . . . . . . . . . . . . . . . . . . . . . . . . . . 74dE CMC . . . . . . . . . . . . . . . . . . . . . . . . . . . . . . . . . . . . 74Dot gain . . . . . . . . . . . . . . . . . . . . . . . . . . . . . . . . . . . . 74GBA . . . . . . . . . . . . . . . . . . . . . . . . . . . . . . . . . . . . . . 74Global Brand Assurance . . . . . . . . . . . . . . . . . . . . . . . . . . . 74ISO 17972 . . . . . . . . . . . . . . . . . . . . . . . . . . . . . . . . . . . 75ISO 32000-2 . . . . . . . . . . . . . . . . . . . . . . . . . . . . . . . . . . 75Metamerism index . . . . . . . . . . . . . . . . . . . . . . . . . . . . . . . 75Output intent . . . . . . . . . . . . . . . . . . . . . . . . . . . . . . . . . . 75PQX . . . . . . . . . . . . . . . . . . . . . . . . . . . . . . . . . . . . . . 75QTX . . . . . . . . . . . . . . . . . . . . . . . . . . . . . . . . . . . . . . 76Spectra reflectance curve . . . . . . . . . . . . . . . . . . . . . . . . . . . 76Spot ink characterization chart . . . . . . . . . . . . . . . . . . . . . . . . 76Tint ramp . . . . . . . . . . . . . . . . . . . . . . . . . . . . . . . . . . . 76Tone value increase . . . . . . . . . . . . . . . . . . . . . . . . . . . . . . 76

iv ORIS CXF TOOLBOX V1.1 USER MANUAL
ORIS CxF Toolbox V1.1 User Manual 1
1 Introduction
Global Brand Color Communication via CxF/X-4
In a global world, electronically communicating brand colors accurately and consistently is quickly becoming a requirement. Global and in-house work-flows from designer to press are demanding common, adequate and effec-tive means to communicate color and appearance.
X-Rite’s Color Exchange Format (CxF) was designed to meet these require-ments. CxF files allow the seamless digital communication of all commer-cially significant aspects of color across devices, applications and locations.
CxF/X-4 is defined in ISO 17972 as a subset of the CxF3 standard. CxF/X-4 files characterize a spot color in conjunction with a print substrate by means of its spectral reflectance data and include a wide range of metadata.
The PDF V2.0 format is defined in ISO 32000-2. PDF 2.0 files can embed CxF/X-4 data and print order information. This accurately characterizes the spot colors used in the file. PDF/X files with embedded CxF/X-4 data provide all the color information required along the entire supply chain.
Printers are provided with press-critical variables such as target colors, TVI aims, opacity and ink laydown order. Proofing applications can use the spectral data to provide excellent matches of spot color tints and overprints. Ink formulation software uses CxF/X-4 data to accurately formulate ink recipes.
ORIS CxF Tools
If brand color consistency is an important part of your business, then you need to be able to utilize CxF/X-4 files easily.
ORIS CxF Tools were designed to make creating, managing and applying CxF/X-4 data as easy and effective as possible. The tools provide all the information required to improve quality, reduce costly errors and improve customer satisfaction.
The tool set comprises the ORIS CxF Toolbox application and the ORIS CxF Designer plug-in for Adobe Illustrator.

INTRODUCTIONORIS CXF TOOLBOX
2 ORIS CxF Toolbox V1.1 User Manual
ORIS CxF Toolbox
ORIS CxF Toolbox creates ISO 17972 compliant CxF/X-4 files from existing color data, such as CGATS measurement files, QTX files and legacy CxF formats, or by measuring printed samples.
Spectral reflectance data can be viewed in detail, including data embedded in PDF/X files. All metadata information can be added and corrected.
ORIS CxF Toolbox also allows you to conveniently assign CxF/X-4 data to the spot colors in a PDF/X file and to extract such data to a file. Missing CxF/X-4 data is assigned automatically if a CxF/X-4 library file is specified. You can also modify the ink laydown order and extract the output intent profile. Missing output intent profiles can be assigned manually.
The report function provides an overview of all spectral and colorimetric data both graphically and numerically. It also includes data for print process control such as TVI aims and ink properties.
Print quality can be verified by measuring spot ink characterization charts against the tolerances defined in the CxF/X-4 metadata. Alternatively, if your measurement device is not supported, you can load a CGATS measurement file or QTX file. Process color verification based on the PDF output intent or a user-selected ICC profile is also supported. The verifica-tion results can be saved as a PQX file and sent on for evaluation.
ORIS CxF Toolbox also allows you to access CxF/X-4 data stored on the Global Brand Assurance web server. The data can be analyzed, extracted and used for verifying print quality. The verification results can be uploaded to the GBA database.
ORIS CxF Toolbox Features
ORIS CxF Toolbox allows you to do the following:
• Measure spectral reflectance of color samples
• Import color data from CGATS measurement files
• Import color data from CxF1, CxF3, CxF/X-4, QTX and PDF files
• Download color data from Global Brand Assurance web server
• Create CxF/X-4 files from measured, imported or downloaded data
• Compile CxF/X-4-defined brand color libraries from various files
• View spectral reflectance curves for each color and tint value
• Add and correct CxF/X-4 metadata
– Including brand owner identification and contact information
– Bulk editing mode for quickly changing multiple colors
• Analyze and modify PDF/X files:

INTRODUCTIONORIS CXF DESIGNER
ORIS CxF Toolbox V1.1 User Manual 3
– Indication of spot colors with missing CxF/X-4 data
– Assign CxF/X-4 data to spot colors
– Automatically assign CxF/X-4 data from library file
– View, extract, replace or remove CxF/X-4 data
– Extract ICC profile defining output intent
– Assign output intent profile if missing
– Change ink laydown order
• Create CxF/X-4 reports:
Spectral data, CIE Lab data, TVI aims, opacity, print contrast and other ink properties – all displayed both graphically and numerically
• Verify print quality (certification)
– Measure spot ink charts against tolerances defined in CxF/X-4 data (delta E, metamerism index)
– Measure process colors against target values derived from PDF/X output intent profile or user-selected ICC profile
– Load measurement results stored in CGATS or QTX files (allows use of unsupported measurement devices)
– Save certification results as a PQX file (for evaluation at remote sites)
– Upload certification results to Global Brand Assurance web server
ORIS CxF Designer
ORIS CxF Designer is a plug-in for Adobe Illustrator which imports CxF/X-4-defined spot colors into Illustrator’s swatch palette.
This allows designers to use exact brand colors in the creation of any pack-aging or other printed product. On exporting the documents to PDF/X format, the CxF/X-4 data – including spectral data, opacity information and metadata – is embedded into the file.
Designers no longer need to wait for the perfect color to be created. What is used on screen can be sent directly with the final PDF file.
INTRODUCTIONCXF/X-4 WORKFLOW
4 ORIS CxF Toolbox V1.1 User Manual
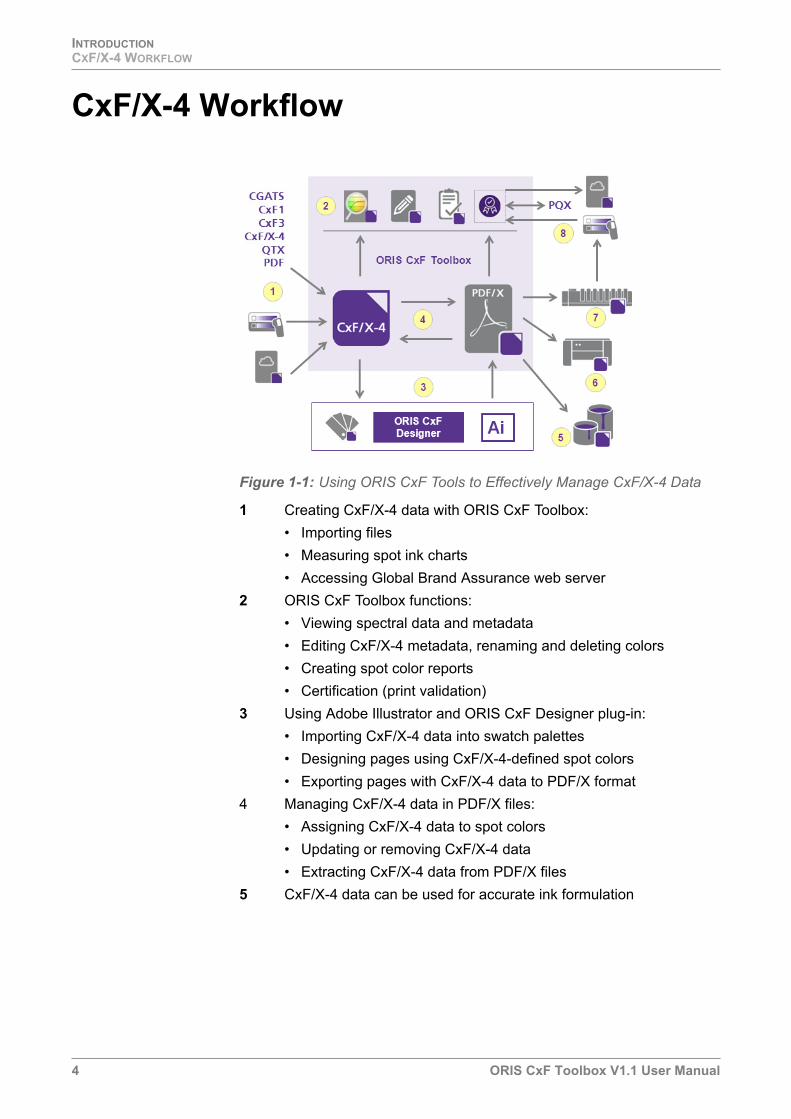
CxF/X-4 Workflow
Figure 1-1: Using ORIS CxF Tools to Effectively Manage CxF/X-4 Data
1 Creating CxF/X-4 data with ORIS CxF Toolbox:
• Importing files
• Measuring spot ink charts
• Accessing Global Brand Assurance web server
2 ORIS CxF Toolbox functions:
• Viewing spectral data and metadata
• Editing CxF/X-4 metadata, renaming and deleting colors
• Creating spot color reports
• Certification (print validation)
3 Using Adobe Illustrator and ORIS CxF Designer plug-in:
• Importing CxF/X-4 data into swatch palettes
• Designing pages using CxF/X-4-defined spot colors
• Exporting pages with CxF/X-4 data to PDF/X format
4 Managing CxF/X-4 data in PDF/X files:
• Assigning CxF/X-4 data to spot colors
• Updating or removing CxF/X-4 data
• Extracting CxF/X-4 data from PDF/X files
5 CxF/X-4 data can be used for accurate ink formulation

INTRODUCTIONSYSTEM REQUIREMENTS FOR ORIS CXF TOOLBOX
ORIS CxF Toolbox V1.1 User Manual 5
Related information:
CGATS (page 73)CxF1 (page 73)CxF3 (page 73)CxF/X-4 (page 73)GBA (page 74)PQX (page 75)QTX (page 76)
System Requirements for ORIS CxF Toolbox
Operating System
Windows 7 or higher
Measurement Device
• X-Rite i1Pro 2 – or
• X-Rite eXact (single-patch measurements only)
Other devices are supported indirectly via import of CGATS measure-ment files or QTX files.
Software License
When you start the program for the first time, enter the license code and activate it.
Without a valid license, the program can be activated as a trial version which will be functional for 30 days.
6 Proofing:
Creating excellent spot color matches from PDF/X file
7 Printing:
All press-critical data included in PDF/X file
8 Certification:
• Measuring print results against CxF/X-4 data
• Uploading certification results to GBA web server
• Saving certification results as PQX file
• Loading PQX file to remeasure same job

INTRODUCTIONSELECTING AVAILABLE TOOLS
6 ORIS CxF Toolbox V1.1 User Manual
Selecting Available Tools
ORIS CxF Toolbox provides various tools which are accessible via icons located on the left of the main window. Some of the tools may be essential for a particular user, others may not be required. You can hide and display each tool as you see fit.
1. Click at the top right.
2. Click the check boxes underneath the icons to enable or disable the respective tools.
Disabled tools are immediately removed from the main window.
Figure 1-2: Example – Selecting the ‘View’ Tool

ORIS CxF Toolbox V1.1 User Manual 7
2 Using ORIS CxF Toolbox
Creating CxF/X-4 Data by Measurement
How to create CxF/X-4 files by measuring the spectral reflectance of spot ink characterization charts or single spot color patches.
1. Make sure the measurement device is connected to your PC.
2. Click on the left.
3. Click on the top right to configure the measurement device.
4. Specify the number of patches on your spot ink chart.
5. Optional: Enable the Average option and specify the number of measurements to be averaged.
Average measurements of the same printout to minimize imprecisions of your measurement device. Average measurements of different printouts to minimize imprecisions of your printing press.
6. Specify whether you are measuring color strips or individual patches.
Color strips can be measured from either left to right or right to left. It is only important to measure both strips in the same direction.
7. Click to start the measuring process.
8. If requested to do so, place the measurement device on the white reference, then click OK.
9. Perform the measurements.
In case of errors click to repeat the last measurement. This button is only available if all color strips have been measured. You cannot repeat a single strip.
Click if you want to cancel the measuring process. All measure-ments will be discarded and you have to repeat the process from the beginning.
10. If Average is enabled, always click after completing one measure-ment in order to start the next.
You can choose to average less measurements than specified by not clicking .

USING ORIS CXF TOOLBOXCREATING CXF/X-4 DATA BY MEASUREMENT
8 ORIS CxF Toolbox V1.1 User Manual
11. Click after completing all measurements.
The spectral curve for one of the tints (usually 100%) appears.
12. To view the spectral curves, click on a patch in the tint ramp. Ctrl-click to add the spectral curve to those displayed already.
13. Enter a spot color name, substrate name and substrate type (manda-tory). Also complete the other metadata fields.
Measurement device details and various default values are added automatically.
14. Click to save the measurements as a CxF/X-4 file. Select a folder and click Save.
The file name will be identical to the spot color name specified in the metadata.
Related information:
Spot ink characterization chart (page 76)System Requirements for ORIS CxF Toolbox (page 5)CxF/X-4 Metadata (page 68)Measure CxF/X-4 Data (page 39)
Example
Figure 2-1: Measuring Spot Ink Charts
Figure 2-2: Viewing Spectral Curves

USING ORIS CXF TOOLBOXCREATING CXF/X-4 DATA FROM FILES
ORIS CxF Toolbox V1.1 User Manual 9
Figure 2-3: Entering Metadata and Saving as CxF/X-4 File
Creating CxF/X-4 Data from Files
You can create CxF/X-4 files from the color data stored in CGATS measurement files, legacy CxF1 and CxF3 files, and QTX files. It is also possible to import the CxF/X-4 color data stored in PDF/X documents and existing CxF/X-4 files. The metadata information can be corrected, missing metadata can be added.
1. Load the files to be imported or converted:
• Drag a CxF1, CxF3, CxF/X-4, CGATS or QTX file onto the ORIS CxF Toolbox window.
• Click on the left, then click on the right and select such files or PDF/X files. Hold the Shift or Ctrl key pressed down to select multiple files.
• Use and to successively load all files of the selected type available in the current folder (only one at a time).
2. If a log window appears, click on the messages to see more details, then close the window.
If a user action is required, however, click on the message details. Then click on a color name, select the action and specify whether to apply it to all colors or all files. Then click OK and close the window.
The following situations require a user action, for example:
• Spot colors with invalid spectral data. Such definitions can be discarded.
• Spot colors with similar names interpreted as different tint values of the same color. Example: Blue, Blue10, Blue20 … Blue90. Such colors can be combined into a single color.
USING ORIS CXF TOOLBOXCREATING CXF/X-4 DATA FROM FILES
10 ORIS CxF Toolbox V1.1 User Manual
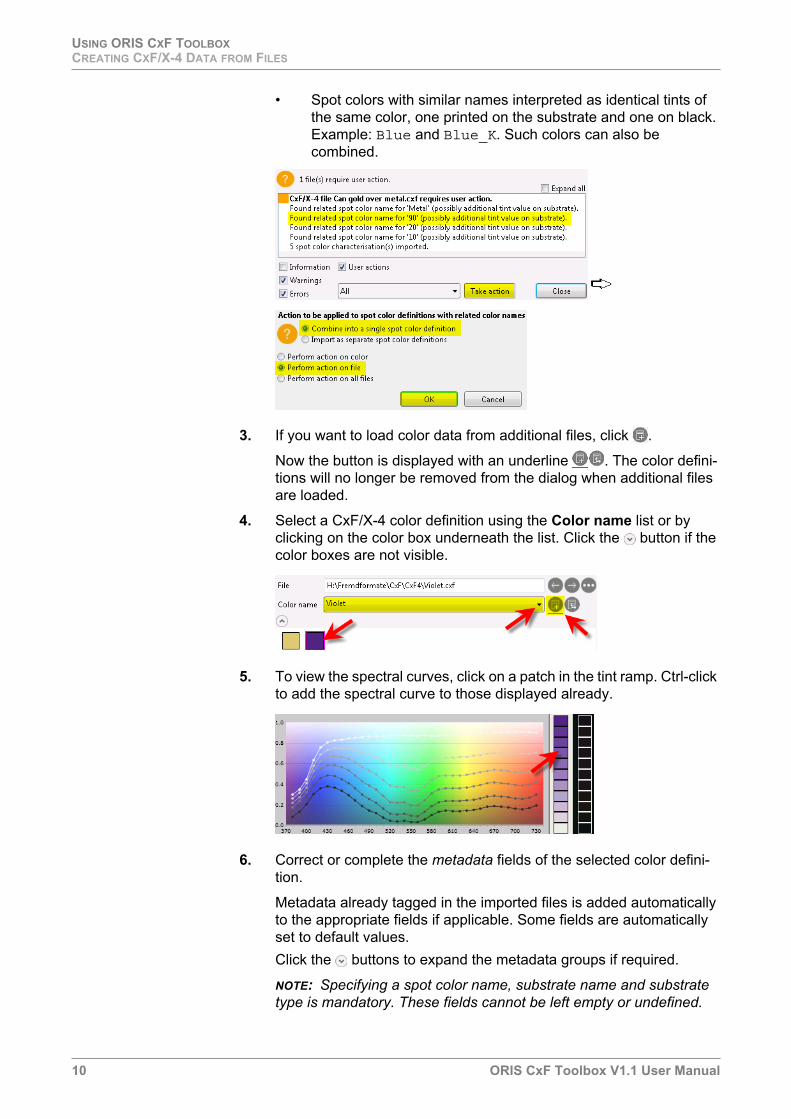
• Spot colors with similar names interpreted as identical tints of the same color, one printed on the substrate and one on black. Example: Blue and Blue_K. Such colors can also be combined.
3. If you want to load color data from additional files, click .
Now the button is displayed with an underline . The color defini-tions will no longer be removed from the dialog when additional files are loaded.
4. Select a CxF/X-4 color definition using the Color name list or by clicking on the color box underneath the list. Click the button if the color boxes are not visible.
5. To view the spectral curves, click on a patch in the tint ramp. Ctrl-click to add the spectral curve to those displayed already.
6. Correct or complete the metadata fields of the selected color defini-tion.
Metadata already tagged in the imported files is added automatically to the appropriate fields if applicable. Some fields are automatically set to default values.
Click the buttons to expand the metadata groups if required.
NOTE: Specifying a spot color name, substrate name and substrate type is mandatory. These fields cannot be left empty or undefined.

USING ORIS CXF TOOLBOXEDITING CXF/X-4 DATA
ORIS CxF Toolbox V1.1 User Manual 11
7. Repeat steps 4 and 6 to view and edit additional color data.
In bulk-edit mode, you can change multiple color definitions in one go. Click and refer to Multi-Color Editing and Deleting for more details.
8. Click if you want to delete the selected color definition.
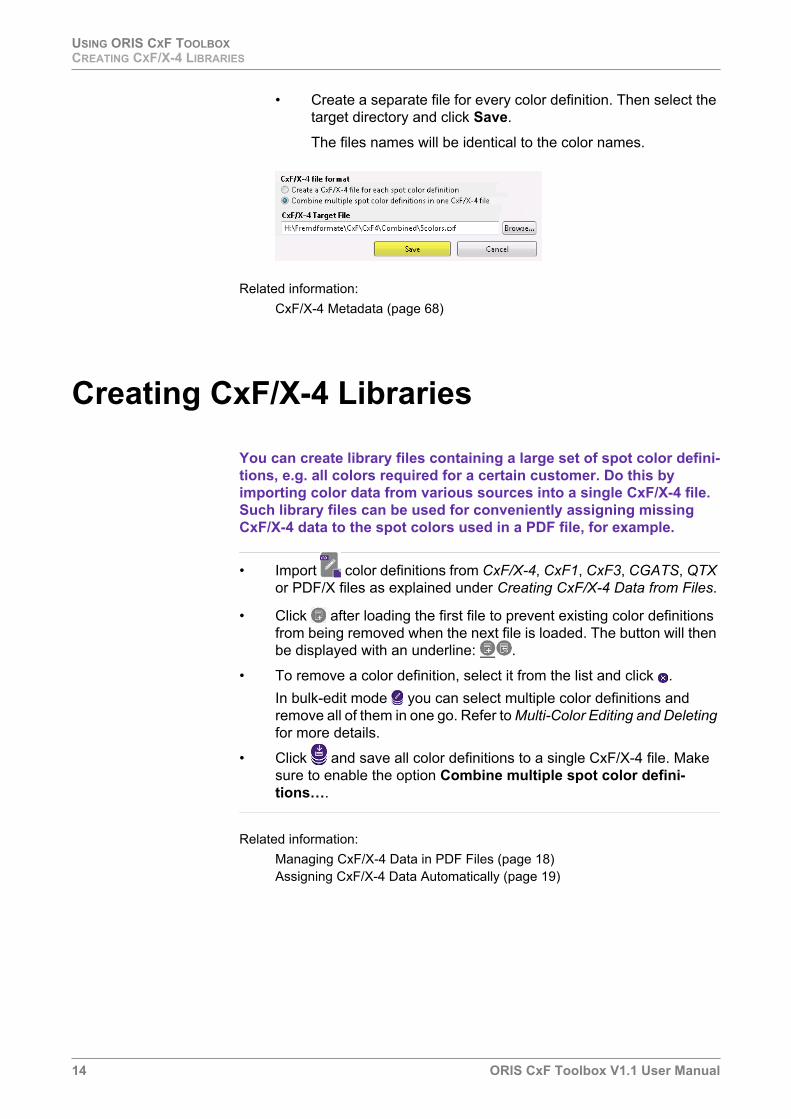
9. Click to save the color data in CxF/X-4 format. There are two options
• Create a single file with all color definitions. Then specify the target directory and file name and click Save.
• Create a separate file for every color definition. Then select the target directory and click Save.
The files names will be identical to the color names.
Related information:
Editing CxF/X-4 Data (page 11)Viewing Spectral Curves and Metadata (page 15)CxF/X-4 Metadata (page 68)
Editing CxF/X-4 Data
You can add and modify the CxF/X-4 metadata stored for a spot color. It is also possible to rename and delete color definitions. Most actions can be applied quickly to multiple color definitions in one go.
Related information:
Viewing Spectral Curves and Metadata (page 15)CxF/X-4 Metadata (page 68)
Single-color Editing and Renaming
How to make changes to a single spot color definition.

USING ORIS CXF TOOLBOXEDITING CXF/X-4 DATA
12 ORIS CxF Toolbox V1.1 User Manual
In single-edit mode, you can add or change all of the CxF/X-4 metadata including the color name and inventory ID. You can delete a single color definition or all.
• Import a CxF/X-4, CxF1, CxF3, CGATS, QTX or PDF/X file.
• Refer to Creating CxF/X-4 Data from Files for more details.
Multi-Color Editing and Deleting
How to quickly change a set of spot color definitions in one go. In bulk-edit mode, you can change the CxF/X-4 metadata of multiple color definitions, except for the color name and inventory ID. It is also possible to delete multiple color definitions or all in one go.
1. Import CxF/X-4, CxF1, CxF3, CGATS, QTX or PDF files.
Refer to Creating CxF/X-4 Data from Files for details.
2. Click to change to bulk-edit mode.
3. Using the check boxes on the left, select the color definitions to be edited or deleted.
In a long list, it is a good idea to first deselect all color definitions by clicking and then individually select the color definitions you want.
4. If you want to delete the selected color definitions, click .
The button deletes all color definitions, i.e. the dialog will be empty.
5. If you want to edit metadata information for the selected color defini-tions, do the following:
• To add or change metadata, enter text or select a list item on the right.
• To remove metadata, delete the text from the field or select the list item Undefined.
• To assign the value being displayed in a metadata field to all selected color definitions, enable the check box to the right of this field.
The check boxes on the right always indicate the metadata fields you have changed. The changes will be applied to all color definitions

USING ORIS CXF TOOLBOXEDITING CXF/X-4 DATA
ORIS CxF Toolbox V1.1 User Manual 13
which are currently selected on the left. Metadata fields with a disabled check box will be left unchanged.
NOTE: Metadata fields displayed as empty are either really empty or have ‘mixed contents’. The latter means that each of the selected color definitions has different information in this metadata field.
NOTE: Enabling the check box of an empty or undefined field causes the metadata information to be deleted from all selected color defini-tions.
NOTE: The Color name and Inventory ID can only be changed in single-color editing mode . Some fields such as Creator or Creation date are read-only and cannot be changed at all.
NOTE: Some metadata fields such as Substrate name and type are mandatory and cannot be left empty or undefined. Some tolerances are automatically set to default values.
6. To make changes to a different set of color definitions, select these color definitions using the check boxes on the left (see step 3).
7. A question dialog appears when you click on the first check box. Select Yes to apply the metadata changes you have just made. Select Cancel if the program should always apply these changes automati-cally without asking again.
8. Edit or delete the selected color definitions as explained above.
9. Repeat the steps above until you have changed all color definitions.
10. If you want to save only some of the color definitions, enable the check boxes displayed next to the respective color names (on the left).
11. Click to save the selected colors as a CxF/X-4 file or click to save all colors. There are the following options:
• Create a single file with all color definitions. Then specify the target directory and file name and click Save.
USING ORIS CXF TOOLBOXCREATING CXF/X-4 LIBRARIES
14 ORIS CxF Toolbox V1.1 User Manual
• Create a separate file for every color definition. Then select the target directory and click Save.
The files names will be identical to the color names.
Related information:
CxF/X-4 Metadata (page 68)
Creating CxF/X-4 Libraries
You can create library files containing a large set of spot color defini-tions, e.g. all colors required for a certain customer. Do this by importing color data from various sources into a single CxF/X-4 file. Such library files can be used for conveniently assigning missing CxF/X-4 data to the spot colors used in a PDF file, for example.
• Import color definitions from CxF/X-4, CxF1, CxF3, CGATS, QTX or PDF/X files as explained under Creating CxF/X-4 Data from Files.
• Click after loading the first file to prevent existing color definitions from being removed when the next file is loaded. The button will then be displayed with an underline: .
• To remove a color definition, select it from the list and click .
In bulk-edit mode you can select multiple color definitions and remove all of them in one go. Refer to Multi-Color Editing and Deleting for more details.
• Click and save all color definitions to a single CxF/X-4 file. Make sure to enable the option Combine multiple spot color defini-tions….
Related information:
Managing CxF/X-4 Data in PDF Files (page 18)Assigning CxF/X-4 Data Automatically (page 19)

USING ORIS CXF TOOLBOXVIEWING SPECTRAL CURVES AND METADATA
ORIS CxF Toolbox V1.1 User Manual 15
Example
Figure 2-4: Importing and Deleting Color Data
Figure 2-5: Saving all Color Data to a Single File
Viewing Spectral Curves and Metadata
You can inspect spectral reflectance curves and CxF/X-4 metadata information in a safe mode. In this mode all metadata fields are write-protected and cannot be changed. This tool allows you to load CxF1, CxF3, CxF/X-4, QTX and PDF files as well as CGATS measure-ment files.
1. If the tool is not available, click and enable it.
2. Click on the left of the main window.
3. Load the files to be analyzed:
• Drag a CxF1, CxF3, CxF/X-4, CGATS or QTX file onto the ORIS CxF Toolbox window.
• Click and select such files or PDF/X files. Hold the Shift or Ctrl key pressed down to select multiple files.

USING ORIS CXF TOOLBOXVIEWING SPECTRAL CURVES AND METADATA
16 ORIS CxF Toolbox V1.1 User Manual
• Use and to successively load all files of the selected type available in the current folder (only one at a time).
4. If a log window appears, click on the messages to see more details, then close the window.
If a user action is required, however, click on the message details. Then click on a color name, select the action and specify whether to apply it to all colors or all files. Then click OK and close the window.
The following situations require a user action, for example:
• Spot colors with invalid spectral data. Such definitions can be discarded.
• Spot colors with similar names interpreted as different tint values of the same color. Example: Blue, Blue10, Blue20 … Blue90. Such colors can be combined into a single color.
• Spot colors with similar names interpreted as identical tints of the same color, one printed on the substrate and one on black. Example: Blue and Blue_K. Such colors can also be combined.
5. Select a CxF/X-4 color definition using the Color name list or by clicking on the color box underneath the list. Click the button if the color boxes are not visible.
6. To view the spectral curves, click on a patch in the tint ramp. Ctrl-click to add the spectral curve to those displayed already.

USING ORIS CXF TOOLBOXMANAGING CXF/X-4 DATA IN PDF FILES
ORIS CxF Toolbox V1.1 User Manual 17
7. Click the buttons to expand the metadata groups if required.
Related information:
Editing CxF/X-4 Data (page 11)
Alternatives
There are additional tools which allow you to view CxF/X-4 data in a write-protected mode. Examples:
• Click , then . See also Managing CxF/X-4 Data in PDF Files.
• Click , then . See also Print Validation (Certification).
• Click , then . See also Print Validation of GBA Jobs (Certifica-tion).
Managing CxF/X-4 Data in PDF Files
CxF/X-4 color definitions can be assigned to the spot colors in a PDF/X file if missing or incorrect. Color definitions are assigned automati-cally if a suitable CxF/X-4 library file is specified. You can extract or remove CxF/X-4 color definitions and view the spectral curves and metadata. It is also possible to change the ink sequence and to extract the embedded output intent profile or to embed an ICC profile if missing.
1. Load a PDF/X file with spot colors in one of the following ways:
• Drag the PDF file onto the ORIS CxF Toolbox window.

USING ORIS CXF TOOLBOXMANAGING CXF/X-4 DATA IN PDF FILES
18 ORIS CxF Toolbox V1.1 User Manual
• Click on the left, then click on the right and select a PDF file.
• Use and to successively load all PDF files available in the current folder.
2. A message appears if the PDF file has no embedded output intent profile. In this case click and select a suitable ICC profile. Other-wise it will not be possible to assign CxF/X-4 color definitions.
3. Examine the data stored in the PDF/X file (output intent, CxF/X-4 data, ink laydown order).
Click to view the spectral curves and metadata for the selected spot color. Editing the data is not possible. Click to return to the dialog for editing PDF files.
4. Add, correct or manage the data in the PDF file as you see fit. See below for more details.
5. Click to save your modifications to this PDF/X file or as a new file.
Example
Figure 2-6: Loading and Saving PDF Files

USING ORIS CXF TOOLBOXMANAGING CXF/X-4 DATA IN PDF FILES
ORIS CxF Toolbox V1.1 User Manual 19
Assigning CxF/X-4 Data to Spot Colors
You can assign CxF/X-4 color definitions to the spot colors in a PDF/X file if such data is missing or needs to be replaced. The data is assigned automatically if a CxF/X-4 library with suitable color defini-tions is used.
Assigning CxF/X-4 Data Automatically
How to have the program automatically assign CxF/X-4 color defini-tions to the spot colors in a PDF file.
1. Click next to the CxF/X-4 library option.
2. Select a CxF/X-4 file with a large number of color definitions.
Now the program searches this file for CxF/X-4 color definitions which are named exactly like the spot colors in the PDF/X file. Such color definitions are automatically assigned to the corresponding spot colors. A message appears if there are no matching color definitions in the library file.
This search is always performed when a PDF file or CxF/X-4 library is loaded.
3. To switch this functionality off, delete the path name from the input box.
Related information:
Creating CxF/X-4 Libraries (page 14)
Example
Figure 2-7: Specifying a CxF/X-4 Library
Figure 2-8: Automatic Search Switched Off
Assigning CxF/X-4 Data Manually
How to manually assign CxF/X-4 color definitions to the spot colors in a PDF file.

USING ORIS CXF TOOLBOXMANAGING CXF/X-4 DATA IN PDF FILES
20 ORIS CxF Toolbox V1.1 User Manual
1. Click the button to the right of the color list. A dialog opens.
2. Click and select a CxF/X-4 file. Hold the Shift or Ctrl key pressed down to select multiple files.
3. From the Color name list, select one of the spot colors in the PDF/X file.
4. From the CxF/X-4 definition list, choose the CxF/X-4 data to be assigned to the selected spot color.
This list contains the color definitions from all CxF/X-4 files you have loaded.
Click if you want to view the metadata and spectral curves of the selected CxF/X-4 data. The data appears in the background and cannot be edited. Reclick to redisplay the Manage CxF/X-4 Data in PDF File dialog.
5. Click to assign the CxF/X-4 color definition to the spot color.
In the color list, the status <missing> or <embedded> changes to indicate the spot color name defined in the CxF/X-4 file.
6. Select the next spot color and assign a CxF/X-4 color definition to it. Repeat these steps (3–5) until all spot colors have embedded CxF/X-4 data.
7. Click the Close button.
The icon is displayed next to the color list if there are still spot colors without CxF/X-4 data. Having assigned CxF/X-4 data to all spot colors, the icon changes to .
Example
Figure 2-9: Manually Assigning CxF/X-4 Data to Spot Colors in a PDF File

USING ORIS CXF TOOLBOXMANAGING CXF/X-4 DATA IN PDF FILES
ORIS CxF Toolbox V1.1 User Manual 21
Removing CxF/X-4 Data from PDF Files
You can remove CxF/X-4 color definitions from the spot colors in a PDF file. Unused CxF/X-4 definitions which are not assigned to any spot color can be hidden or removed from the PDF file.
Removing embedded CxF/X-4 data
Select a spot color in the list, then click .
The CxF/X-4 status changes from <embedded> to <removed>.
Having assigned CxF/X-4 data, undoing this and restoring the data embedded originally
Select a spot color in the list, then click .
The CxF/X-4 status changes back to <embedded>.
To remove the embedded CxF/X-4 data from the spot color, click again.
To hide unused CxF/X-4 data
Enable the option Display only CxF/X-4 data used in PDF file.
All color definitions with the status <not used> disappear and will not be written to the PDF file when the file is saved. Disable this option to make the unused color definitions visible again.
To remove unused CxF/X-4 data
Select a color definition with the status <not used>, then click .
The color definition disappears permanently and will not be written to the PDF file when the file is saved.
Related information:
Assigning CxF/X-4 Data to Spot Colors (page 19)
Example
Figure 2-10: Removing CxF/X-4 Data From a Spot Color
Extracting Data From PDF Files
The CxF/X-4 color definitions and the output intent stored in a PDF/X file can be extracted and saved as a file.

USING ORIS CXF TOOLBOXMANAGING CXF/X-4 DATA IN PDF FILES
22 ORIS CxF Toolbox V1.1 User Manual
Extracting CxF/X-4 Data
Each CxF/X-4 color definition stored in the PDF file can be saved as a separate CxF/X-4 file.
1. From the list at the top, select a spot color with embedded CxF/X-4 data.
2. Click the button located next to this list.
3. Select a folder and enter a file name, then click Save.
Figure 2-11: Extracting CxF/X-4 Data From PDF File
Extracting Output Intent
The ICC profile defining the PDF output intent can be saved to a file (*.icc). The name of the output intent and the profile name are indi-cated at the top of the dialog.
1. Click the button displayed next to the profile name.
2. Select a folder and, if required, modify the file name.
3. Click the Save button to save the ICC profile to the specified location.
Figure 2-12: Extracting PDF Output Intent Profile
Changing Ink Laydown Order
ORIS CxF Toolbox allows you to change the information about the order in which CxF/X-4-defined spot colors and process colors are printed. This information can also be removed from the PDF file.

USING ORIS CXF TOOLBOXCREATING REPORTS
ORIS CxF Toolbox V1.1 User Manual 23
1. Make sure the Ink laydown order option is enabled.
If disabled, the ink sequence information cannot be changed and will not be written to the PDF file when being saved.
2. Disable the Keep process colors grouped option if the sequence of CMYK process colors should be interrupted by spot colors.
This replaces the list entry named CMYK with the entries Cyan, Magenta, Yellow and Black. Now each process color can be moved individually and you can place spot colors between process colors.
3. Click on the color to be moved.
4. Repeatedly click the or button to move the selected color the position you want.
The color at the top will be printed first, the color at the bottom will be printed last.
Examples
Figure 2-13: Moving a Spot Color to Start of Ink Sequence
Figure 2-14: Placing a Spot Color Between Process Colors
Creating Reports
You can create a report for the CxF/X-4-defined spot colors you have loaded. A report includes important data for design, proofing, ink formulation and process control as well as customer tolerances for print quality verification. The data is presented both graphically and numerically.
USING ORIS CXF TOOLBOXCREATING REPORTS
24 ORIS CxF Toolbox V1.1 User Manual
1. Load CxF/X-4 data by measuring colors, importing data or loading PDF files.
Proceed as explained in the following sections:
• Creating CxF/X-4 Data by Measurement
• Creating CxF/X-4 Data from Files
• Managing CxF/X-4 Data in PDF Files
• Connect to GBA Server and Select Job
2. Open the Spot Color Report dialog:
• Click on the left. Or:
• Click at the bottom. (This button is only available if CxF/X-4 data is loaded.)
3. Load CxF/X-4 data if the Spot Color Report dialog is empty:
• Click and select a CxF/X-4, QTX file or PDF file. Hold the Shift or Ctrl key pressed down to select multiple files.
• Use and to successively load all files with the currently selected type available in the current folder.
4. If the file contains more than one CxF/X-4-defined color, select a color from the Color name list or click on the color box.
5. If various tint values are defined for this color, select a tint value from the list .
6. To view a large chart with spectral curves for all tint values of the color, select Spectral data from the list at the bottom right.
Select CxF/X-4 data from this list to switch back to the way the report was displayed previously.
7. If you need help with understanding the various charts and tables, refer to the Reports section.
8. Click the Print button to print the report with the charts that are currently displayed on the screen.
9. If you want to change the logo, close the report, click the button and select another image file.
Related information:
Reports (page 65)

USING ORIS CXF TOOLBOXPRINT VALIDATION (CERTIFICATION)
ORIS CxF Toolbox V1.1 User Manual 25
Example
Figure 2-15: Understanding a CxF/X-4 Report
Print Validation (Certification)
You can check print quality by measuring spot ink characterization charts against CxF/X-4 color definitions. The application provides an instant pass/fail indication and various charts for assessing the devi-ations both visually and numerically. Process colors can be checked against the target values defined in the PDF/X output intent or a user-defined ICC profile. The complete set of certification data can be saved as a PQX file.
Related information:
Print Validation of GBA Jobs (Certification) (page 33)
Load CxF/X-4 Data
You can load and certify the color data stored in CxF/X-4, QTX and PDF/X files. Load certification results stored as a PQX file to conve-niently certify the same job again.
1 Select spot color here.
2 Select tint value here.
3 Click here to display spectral curves for all tint values.
4 Click here to print the report.

USING ORIS CXF TOOLBOXPRINT VALIDATION (CERTIFICATION)
26 ORIS CxF Toolbox V1.1 User Manual
First-time Job Certification
How to load CxF/X-4 color definitions for certification if a PQX file is not available. This is usually the case when certifying a print job for the first time.
1. Load CxF/X-4 data by measuring colors, importing data or loading PDF files.
Proceed as explained in the following sections:
• Creating CxF/X-4 Data by Measurement
• Creating CxF/X-4 Data from Files
• Managing CxF/X-4 Data in PDF Files
2. Do the following if you want to conveniently view the metadata defined for each spot color as you select these colors during the certification process.
1. Click if the Manage CxF/X-4 Data in PDF File dialog is displayed.
2. Resize the main window in such a way that you can see all of the CxF/X-4 metadata you are interested in.
3. Open the Certification dialog by doing one of the following:
• Click on the left.
• Click at the bottom. (This button is only available if CxF/X-4 data is loaded.)
4. Load CxF/X-4 data if the Certification dialog is empty:
• Click and select a CxF/X-4, QTX file or PDF file.
• Use and to successively load all files with the currently selected type available in the current folder.
Example
USING ORIS CXF TOOLBOXPRINT VALIDATION (CERTIFICATION)
ORIS CxF Toolbox V1.1 User Manual 27
Figure 2-16: Starting Certification Function and Loading Color Data
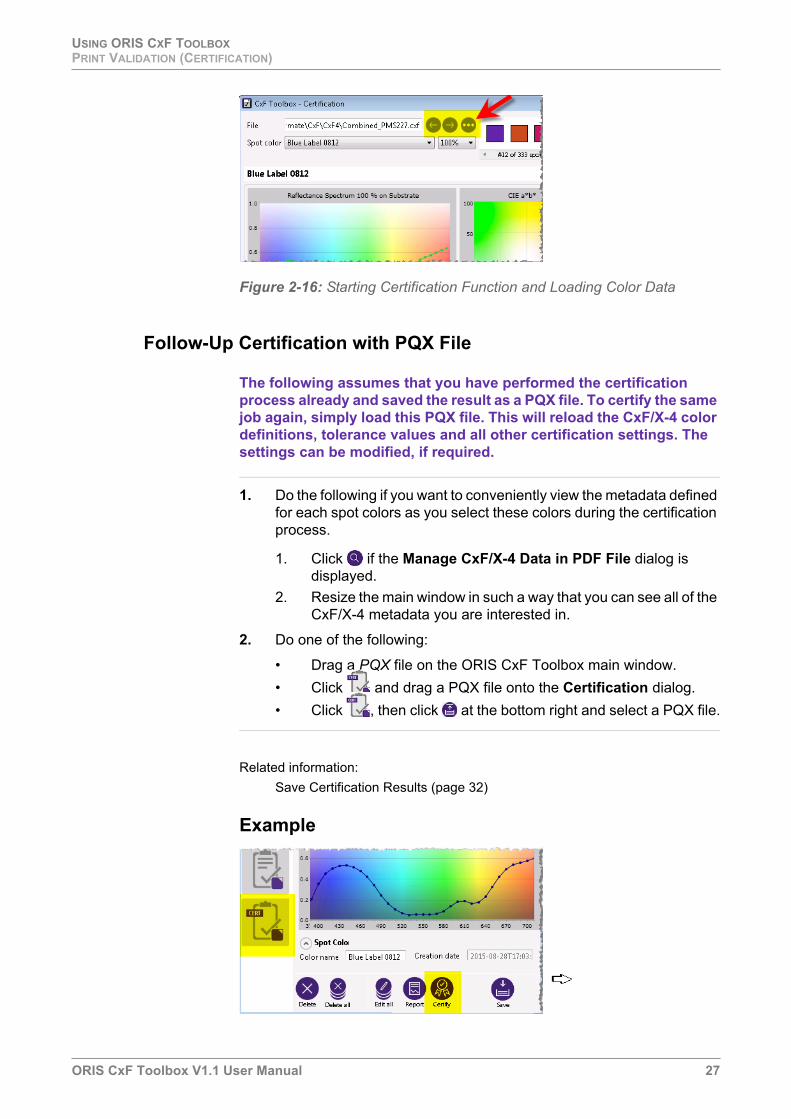
Follow-Up Certification with PQX File
The following assumes that you have performed the certification process already and saved the result as a PQX file. To certify the same job again, simply load this PQX file. This will reload the CxF/X-4 color definitions, tolerance values and all other certification settings. The settings can be modified, if required.
1. Do the following if you want to conveniently view the metadata defined for each spot colors as you select these colors during the certification process.
1. Click if the Manage CxF/X-4 Data in PDF File dialog is displayed.
2. Resize the main window in such a way that you can see all of the CxF/X-4 metadata you are interested in.
2. Do one of the following:
• Drag a PQX file on the ORIS CxF Toolbox main window.
• Click and drag a PQX file onto the Certification dialog.
• Click , then click at the bottom right and select a PQX file.
Related information:
Save Certification Results (page 32)
Example

USING ORIS CXF TOOLBOXPRINT VALIDATION (CERTIFICATION)
28 ORIS CxF Toolbox V1.1 User Manual
Figure 2-17: Starting Certification Function and Loading PQX File
Make Certification Settings
The default certification settings stored in the CxF/X-4 data can be adjusted according to your preferences. You can choose to measure different tint values, certify also process colors, or use different toler-ances. This step is usually not required if you have loaded a PQX file.
1. Successively select the CxF/X-4 color definitions and examine the list of tint values and the tolerances defined for each spot color.
2. Click at the bottom if you want to change the default settings.
3. In the Certification Parameters dialog you can do the following:
• Select a different set of tint values to be measured (default: 100% only).
• Modify the tolerance values (delta E, metamerism index)
• Choose to also certify CMYK process colors
• Choose to apply these settings to all color definitions (default) or to the selected color definition only (disable option at the bottom)
4. Click OK to close the dialog.
Related information:
Certification Parameters (page 61)

USING ORIS CXF TOOLBOXPRINT VALIDATION (CERTIFICATION)
ORIS CxF Toolbox V1.1 User Manual 29
Example
Figure 2-18: Default Certification Settings
Measure Colors
To verify print quality, measure your spot ink characterization chart against the CxF/X-4 color definitions you have loaded. You can use a supported measurement device connected to your PC or load measurement files created with a different device.
Measuring with ORIS CxF Toolbox
How to measure a spot ink characterization chart against the specifi-cations in the CxF/X-4 data using a measurement device which is supported by ORIS CxF Toolbox and connected to your computer.
1. Select a CxF/X-4 color definition from the Spot color list or by clicking on a color box displayed next to the list. Also, from the list of tint values, select the patch to be measured.
2. Optional: Click if the spectral data and metadata should always be displayed automatically for the currently selected color.
The data appears in the main window in the background. Reclick to redisplay what was shown before.
3. Optional: Click at the bottom if you want to change the certification settings for the selected color definition.
Select a different set of tint values to be measured or change the toler-ances. Make sure to disable the Apply to all CxF/X-4 color defini-tions option. Then click OK. For more details refer to the Parameter Reference section.
4. Click at the top right to start the measuring function.
5. If a white calibration is required, follow the instructions on the screen.

USING ORIS CXF TOOLBOXPRINT VALIDATION (CERTIFICATION)
30 ORIS CxF Toolbox V1.1 User Manual
6. Measure the selected color patch.
The application checks the measurement against the specifications in the CxF/X-4 data. The result ( or ) is indicated separately for delta E and the metamerism index. The measurement result is counted as successful if both icons are .
7. Examine the various charts and tables which indicate the color devia-tions both visually and numerically. For more details, refer to the Parameter Reference section.
8. Select the next color or tint value and measure it as explained above. Do this until all colors have been measured.
The table on the right indicates the number of measurements which were successful, which failed, and which remain to be made.
The overall certification result is indicated using a large icon as soon as the last measurement has completed. Certification is successful if all measurement results are successful, otherwise certification has failed .
Related information:
System Requirements for ORIS CxF Toolbox (page 5)Certification (page 56)Certification Parameters (page 61)
Example
Figure 2-19: Making Certification Measurements
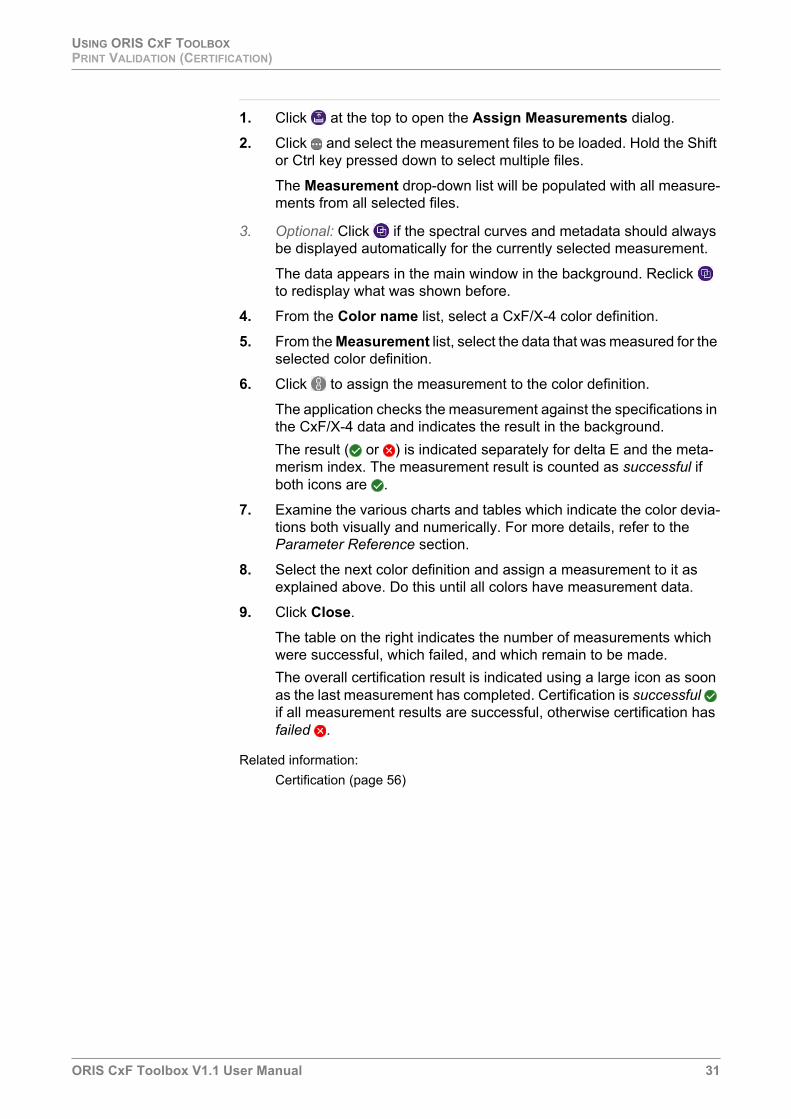
Measuring with a Third-Party Tool
Certification is also possible if your measurement device is not supported by ORIS CxF Toolbox. Measure the spot ink characteriza-tion chart with another tool, save the measurements as a CGATS or QTX file and assign them to the CxF/X-4 color definitions as explained below.
USING ORIS CXF TOOLBOXPRINT VALIDATION (CERTIFICATION)
ORIS CxF Toolbox V1.1 User Manual 31
1. Click at the top to open the Assign Measurements dialog.
2. Click and select the measurement files to be loaded. Hold the Shift or Ctrl key pressed down to select multiple files.
The Measurement drop-down list will be populated with all measure-ments from all selected files.
3. Optional: Click if the spectral curves and metadata should always be displayed automatically for the currently selected measurement.
The data appears in the main window in the background. Reclick to redisplay what was shown before.
4. From the Color name list, select a CxF/X-4 color definition.
5. From the Measurement list, select the data that was measured for the selected color definition.
6. Click to assign the measurement to the color definition.
The application checks the measurement against the specifications in the CxF/X-4 data and indicates the result in the background.
The result ( or ) is indicated separately for delta E and the meta-merism index. The measurement result is counted as successful if both icons are .
7. Examine the various charts and tables which indicate the color devia-tions both visually and numerically. For more details, refer to the Parameter Reference section.
8. Select the next color definition and assign a measurement to it as explained above. Do this until all colors have measurement data.
9. Click Close.
The table on the right indicates the number of measurements which were successful, which failed, and which remain to be made.
The overall certification result is indicated using a large icon as soon as the last measurement has completed. Certification is successful if all measurement results are successful, otherwise certification has failed .
Related information:
Certification (page 56)

USING ORIS CXF TOOLBOXPRINT VALIDATION (CERTIFICATION)
32 ORIS CxF Toolbox V1.1 User Manual
Example
Figure 2-20: Assigning Measurements to CxF/X-4 Color Definitions
Figure 2-21: Certification Results
Save Certification Results
The data currently loaded in the Certification dialog can be saved as a PQX file. These files include the complete set of data required for certi-fying a particular job – spot color definitions, target values and toler-ances – as well as the measurement data. PQX files can therefore be sent on for print quality evaluation at remote sites or loaded in ORIS CxF Toolbox in order to quickly certify the same print job again.
1. Into the box at the bottom left, enter a comment on the selected CxF/X-4 color definition. This is only possible if the 100% tint value is selected.
2. Click at the bottom right to save the certification settings as a PQX file.
When certifying the same job again, load this file as explained under Load CxF/X-4 Data. This will save you the trouble of having to reload the original PDF job files or having to adjust any certification parame-ters.

USING ORIS CXF TOOLBOXPRINT VALIDATION OF GBA JOBS (CERTIFICATION)
ORIS CxF Toolbox V1.1 User Manual 33
Print Validation of GBA Jobs (Certification)
You can check print quality by measuring spot ink characterization charts against CxF/X-4 color definitions maintained in the database of the Global Brand Assurance web server. The application provides an instant pass/fail indication and various charts for assessing the devi-ations both visually and numerically. The certification results can be uploaded to the GBA web server.
Related information:
Print Validation (Certification) (page 25)
Connect to GBA Server and Select Job
Login in to the GBA web server and select a job from the database. The CxF/X-4 color definitions stored for this job can then be used for the certification measurements.
1. Click on the left to change to the Global Brand Assurance tab.
2. Enter you user name and password. Then click to log in to the GBA web server.
The Job list will be populated with the names of the print jobs you are allowed to access.
3. Select the job which contains the spot colors to be verified.
These colors will be listed underneath the job name.
4. Click on the left or on the bottom to open the Certification dialog.

USING ORIS CXF TOOLBOXPRINT VALIDATION OF GBA JOBS (CERTIFICATION)
34 ORIS CxF Toolbox V1.1 User Manual
Figure 2-22: Selecting Jobs from GBA Database
Related information:
Creating Reports (page 24)Viewing Spectral Curves and Metadata (page 15)
Measure Colors
To verify print quality, measure your spot ink characterization chart against the CxF/X-4 color definitions you have loaded. You can use a supported measurement device connected to your PC or load measurement files created with a different device.
Measuring with ORIS CxF Toolbox
How to measure a spot ink characterization chart against the specifi-cations in the CxF/X-4 data using a measurement device which is supported by ORIS CxF Toolbox and connected to your computer.
1. The File list displays the GBA job selected in the main window. If this is not the correct job, close the dialog and select another job on the Global Brand Assurance tab.
2. Select a CxF/X-4 color definition from the Spot color list or by clicking on a color box displayed next to the list. Also, from the list of tint values, select the patch to be measured.
3. Optional: Click if the spectral data and metadata should always be displayed automatically for the currently selected color.
The data appears in the main window in the background. Reclick to redisplay what was shown before.
4. Click at the top right to start the measuring function.
5. If a white calibration is required, follow the instructions on the screen.
6. Measure the selected color patch.
The application checks the measurement against the specifications in the CxF/X-4 data. The result ( or ) is indicated separately for

USING ORIS CXF TOOLBOXPRINT VALIDATION OF GBA JOBS (CERTIFICATION)
ORIS CxF Toolbox V1.1 User Manual 35
delta E and the metamerism index. The measurement result is counted as successful if both icons are .
7. Examine the various charts and tables which indicate the color devia-tions both visually and numerically. For more details, refer to the Parameter Reference section.
8. Select the next color or tint value and measure it as explained above. Do this until all colors have been measured.
The table on the right indicates the number of measurements which were successful, which failed, and which remain to be made.
The overall certification result is indicated using a large icon as soon as the last measurement has completed. Certification is successful if all measurement results are successful, otherwise certification has failed .
Related information:
System Requirements for ORIS CxF Toolbox (page 5)Certification (page 62)
Example
Figure 2-23: Making Certification Measurements
Measuring with a Third-Party Tool
Certification is also possible if your measurement device is not supported by ORIS CxF Toolbox. Measure the spot ink characteriza-tion chart with another tool, save the measurements as a CGATS or QTX file and assign them to the CxF/X-4 color definitions as explained below.

USING ORIS CXF TOOLBOXPRINT VALIDATION OF GBA JOBS (CERTIFICATION)
36 ORIS CxF Toolbox V1.1 User Manual
1. Click at the top to open the Assign Measurements dialog.
2. Click and select the measurement files to be loaded. Hold the Shift or Ctrl key pressed down to select multiple files.
The Measurement drop-down list will be populated with all measure-ments from all selected files.
3. Optional: Click if the spectral curves and metadata should always be displayed automatically for the currently selected measurement.
The data appears in the main window in the background. Reclick to redisplay what was shown before.
4. From the Color name list, select a CxF/X-4 color definition.
5. From the Measurement list, select the data that was measured for the selected color definition.
6. Click to assign the measurement to the color definition.
The application checks the measurement against the specifications in the CxF/X-4 data and indicates the result in the background.
The result ( or ) is indicated separately for delta E and the meta-merism index. The measurement result is counted as successful if both icons are .
7. Examine the various charts and tables which indicate the color devia-tions both visually and numerically. For more details, refer to the Parameter Reference section.
8. Select the next color definition and assign a measurement to it as explained above. Do this until all colors have measurement data.
9. Click Close.
The table on the right indicates the number of measurements which were successful, which failed, and which remain to be made.
The overall certification result is indicated using a large icon as soon as the last measurement has completed. Certification is successful if all measurement results are successful, otherwise certification has failed .
Related information:
Certification (page 62)

USING ORIS CXF TOOLBOXPRINT VALIDATION OF GBA JOBS (CERTIFICATION)
ORIS CxF Toolbox V1.1 User Manual 37
Example
Figure 2-24: Assigning Measurements to CxF/X-4 Color Definitions
Figure 2-25: Certification Results
Upload Results to GBA Server
Click to upload the measurement results to the Global Brand Assur-ance web server.
The GBA web server provides a wide range of reporting and analysis tools which help you monitor print quality and clearly indicate trends that can affect color.
Figure 2-26: Uploading Certification Results to GBA Web Server

USING ORIS CXF TOOLBOXPRINT VALIDATION OF GBA JOBS (CERTIFICATION)
38 ORIS CxF Toolbox V1.1 User Manual

ORIS CxF Toolbox V1.1 User Manual 39
3 Parameter Reference
Measure CxF/X-4 Data
Use this dialog to create CxF/X-4 files by measuring the spectral reflectance of spot ink characterization charts or single spot color patches.
For step-by-step instructions, refer to Creating CxF/X-4 Data by Measure-ment.
Device
Name of the measurement device. If supported, the device is detected automatically.
Click this icon to configure the measurement device. This opens the Properties dialog.
Reference
Select the type of spot ink characterization chart (number of color patches).
Average
If you want to average multiple measurements, enable this option and specify the number of measurements.
Average measurements of the same printout to minimize imprecisions of your measurement device. Average measurements of different printouts to minimize imprecisions of your printing press.
Measure strips/single patches
Specify whether you are measuring color strips or individual patches.
Color strips can be measured from either left to right or right to left. It is only important to measure both strips in the same direction.
Buttons
Click this button to start the measuring process. Usually a white cali-bration will be performed.
PARAMETER REFERENCEMEASURE CXF/X-4 DATA
40 ORIS CxF Toolbox V1.1 User Manual
When averaging measurements, click this icon after completing one measurement in order to start the next. You can choose to average less measurements than specified by not clicking .
Click this button if you want to cancel the measuring process. All measurements will be discarded and you have to repeat the process from the beginning.
Click this button to repeat the last measurement if a measurement error has occurred.
This button is only available if all color strips have been measured. You cannot repeat a single strip if a chart consists of more than one strip.
Click this button after completing all measurements. This opens the Import and Edit CxF/X-4 Data dialog allowing you to view the spectral curves and enter metadata information. You can then save the data as a CxF/X-4 file.
Related information:
Spot ink characterization chart (page 76)Creating CxF/X-4 Data by Measurement (page 7)System Requirements for ORIS CxF Toolbox (page 5)
Properties
Use this dialog to configure the measurement device.
Response status
Standard to be used for measuring color density.
Filter
Specify whether a UV-cut filter should be used for measuring.
Illuminant
Expected viewing conditions, i.e. the light source (color temperature) to be used for viewing the print jobs. The illuminant selected here determines the white point used for calculating the measurements.
Standard observer
Standardized observation angle of the average human eye (2° or 10°). This angle determines the field of view and thus the way a person perceives color.

PARAMETER REFERENCEIMPORT AND EDIT CXF/X-4 DATA
ORIS CxF Toolbox V1.1 User Manual 41
Measurement mode
Light source (illuminant) used during measurement.
Measuring color strips in M1 or M2 mode with i1Pro 2 requires the use of a special aluminium ruler. Each row has to be measured twice, in opposite directions. The second measurement uses UV light. M0 is the light source used with first-generation i1Pro devices.
Device signal on
If you disable this option, the device will not send any ‘beep’ signals.
Related information:
Creating CxF/X-4 Data by Measurement (page 7)Measure CxF/X-4 Data (page 39)
Import and Edit CxF/X-4 Data
Use this dialog to create CxF/X-4 files from the color data stored in CGATS measurement files, legacy CxF1 and CxF3 files, and QTX files. It is also possible to import the CxF/X-4 color data stored in PDF/X documents and existing CxF/X-4 files. You can view the spectral curves, add or correct the CxF/X-4 metadata and rename or delete color definitions. This is a single-color editing mode.
For step-by-step instructions, refer to Creating CxF/X-4 Data from Files and Editing CxF/X-4 Data.
File
Click and select the files to be loaded. Hold the Shift or Ctrl key pressed down to select multiple files.
Use and to successively load all files of the selected type avail-able in the current folder (only one at a time).
Alternatively, drag a file (any except PDF) onto the ORIS CxF Toolbox window.
Color name
Use this list to select the CxF/X-4 color definition to be viewed, edited or deleted. The list is populated with all color definitions from all files you have loaded. Alternatively, click on a color box displayed under the list.
Ascending numbers – (1), (2), etc. – are automatically appended to the color name to distinguish different color definitions with identical names.
ISO 13655 M0 Illuminant A: Traditional unfiltered tungsten light
ISO 13655 M1 CIE D50: Normal daylight, defined UV content
ISO 13655 M2 UV-cut: Non-polarized light, UV filtered out

PARAMETER REFERENCEIMPORT AND EDIT CXF/X-4 DATA
42 ORIS CxF Toolbox V1.1 User Manual
Use these buttons to toggle between two modes of handling the import of additional files. The active mode is indicated with an under-line.
Click to expand the area containing the color boxes. Click to hide it.
Click a color box to select the CxF/X-4 color definition represented by the color. This has the same effect as using the Color name drop-down list.
Diagram
Reflectance spectrum
Spectral reflectance curves for the selected color and tint values.
X-axis: Wavelength of incident light in nanometers.
Y-axis: Portion of reflected light (1,0 = 100%)
Curve points: Measurement data
Tint ramp
Solids and tint values (10% steps) of the spot color printed on the substrate (left) and on a black background (right). See also Tint ramp.
Click on a patch in the tint ramp to display its spectral curve.
Ctrl-click on a patch to add the spectral curve to those displayed already. Ctrl-click on the same patch again to remove this curve. Click normally on a patch to display its spectral curve and remove all others.
CxF/X-4 Metadata
Metadata information stored for the selected CxF/X-4 color definition. Click the buttons to expand the metadata groups if required. Refer to section CxF/X-4 Metadata for more details.
Add and correct information or rename colors as you see fit. Metadata already tagged in the imported files is added automatically to the appro-priate fields if applicable. Some fields are automatically set to default values.
All color definitions are removed from the dialog, i.e. replaced by those imported from the new files (default).
All color definitions remain in the dialog, the new color defi-nitions are added to them. Use this mode to create CxF/X-4 library files, for example.

PARAMETER REFERENCEIMPORT AND EDIT CXF/X-4 DATA
ORIS CxF Toolbox V1.1 User Manual 43
NOTE: Specifying a spot color name, substrate name and substrate type is mandatory. These fields cannot be left empty or undefined. Switch to bulk-edit mode to change metadata fields for multiple color definitions in one go.
Buttons
Click this button to remove the selected CxF/X-4 color definition from the dialog.
Click this button to remove all CxF/X-4 color definitions from the dialog.
Click this button if you want to edit or delete multiple color definitions in one go. This switches to bulk-edit mode. Click to return to the single-color edit mode.
Click this button to create a report for all CxF/X-4 color definitions loaded in this dialog.
Click this button to verify print quality by measuring spot colors against the CxF/X-4 color definitions loaded in this dialog (certification).
Click this button to save the color definitions in CxF/X-4 format. You can choose to save all colors to a single CxF/X-4 file or create a sepa-rate CxF/X-4 file for every color.
Related information:
CGATS (page 73)CxF1 (page 73)CxF3 (page 73)CxF/X-4 (page 73)QTX (page 76)Creating CxF/X-4 Data from Files (page 9)Editing CxF/X-4 Data (page 11)Creating CxF/X-4 Libraries (page 14)Creating Reports (page 23)Print Validation (Certification) (page 25)Import and Edit CxF/X-4 Data (page 47)

PARAMETER REFERENCEIMPORT AND EDIT CXF/X-4 DATA
44 ORIS CxF Toolbox V1.1 User Manual
Log
This dialog summarizes the result of the file import process and provides a list of errors, warnings and actions to be taken by the user.
Import summary
Total number of files with a specific import status.
Import status for each file
List of all imported files with file name, file type and import status. There are four different types of import statuses:
To see more details, click on a status message or enable the Expand all option underneath this list. When a user action is performed, the message details change to indicate the result.
Information, Warnings, Errors, User actions
Use these check boxes to narrow down the list of status messages. You may want to see only files that have produced an import error, for example.
Use the list underneath User actions if you only want to see user actions of the type invalid spectral data or related spot color names.
Take action
Click this button if a user action is required for the file with the selected status message. Alternatively, click on the details for the import status. The result of this action will be indicated in the list of status messages.
Related information:
Creating CxF/X-4 Data from Files (page 9)
User Action: Related Spot Color Names
Some of the spot color names defined in the imported files are similar and may therefore relate to the same color. The color data may charac-terize variants of the same color with different tint values or different backgrounds (substrate or black). Choose whether related spot color definitions should be combined into a single color definition or imported separately.
Success All color definitions imported successfully.
Warning Some color definitions cannot be imported. Example: Missing data for 100% tint on substrate.
Error No color definitions imported. Example: Invalid XML data.
User action
Data import can be handled in various ways. User needs to choose the action to be taken.
PARAMETER REFERENCEIMPORT AND EDIT CXF/X-4 DATA
ORIS CxF Toolbox V1.1 User Manual 45
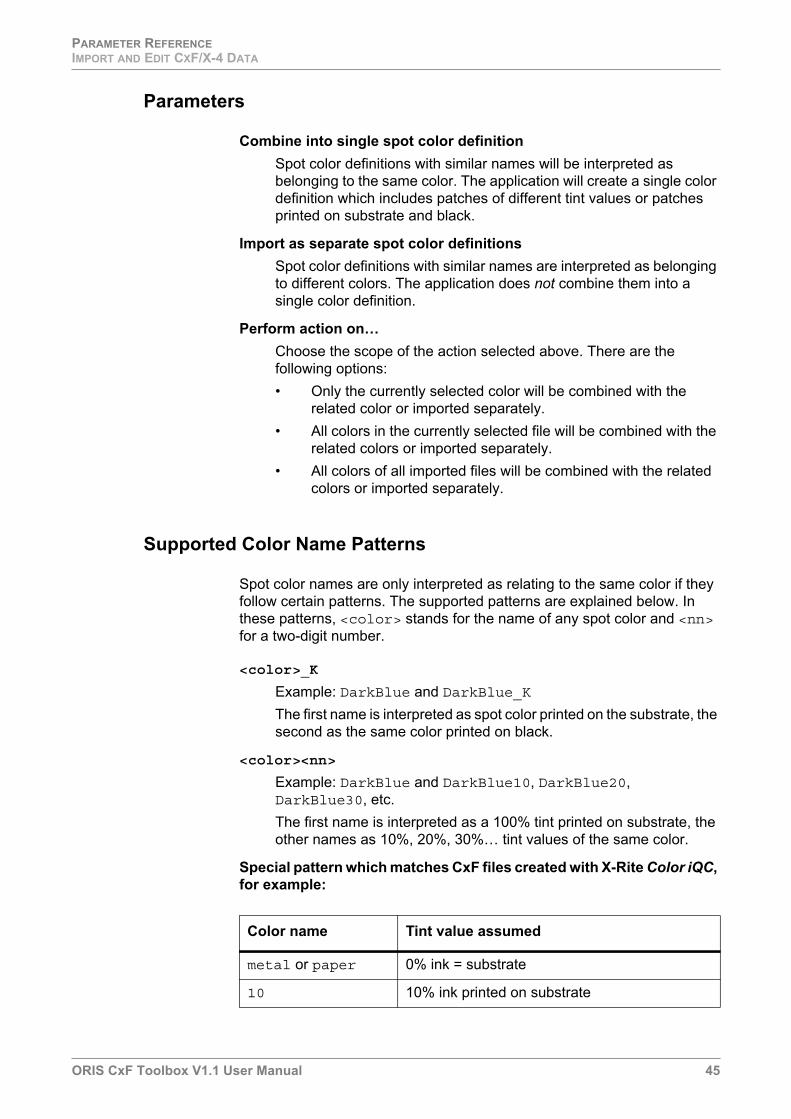
Parameters
Combine into single spot color definition
Spot color definitions with similar names will be interpreted as belonging to the same color. The application will create a single color definition which includes patches of different tint values or patches printed on substrate and black.
Import as separate spot color definitions
Spot color definitions with similar names are interpreted as belonging to different colors. The application does not combine them into a single color definition.
Perform action on…
Choose the scope of the action selected above. There are the following options:
• Only the currently selected color will be combined with the related color or imported separately.
• All colors in the currently selected file will be combined with the related colors or imported separately.
• All colors of all imported files will be combined with the related colors or imported separately.
Supported Color Name Patterns
Spot color names are only interpreted as relating to the same color if they follow certain patterns. The supported patterns are explained below. In these patterns, <color> stands for the name of any spot color and <nn> for a two-digit number.
<color>_K
Example: DarkBlue and DarkBlue_K
The first name is interpreted as spot color printed on the substrate, the second as the same color printed on black.
<color><nn>
Example: DarkBlue and DarkBlue10, DarkBlue20, DarkBlue30, etc.
The first name is interpreted as a 100% tint printed on substrate, the other names as 10%, 20%, 30%… tint values of the same color.
Special pattern which matches CxF files created with X-Rite Color iQC, for example:
Color name Tint value assumed
metal or paper 0% ink = substrate
10 10% ink printed on substrate

PARAMETER REFERENCEIMPORT AND EDIT CXF/X-4 DATA
46 ORIS CxF Toolbox V1.1 User Manual
Two examples:
Related information:
Creating CxF/X-4 Data from Files (page 9)Log (page 44)
User Action: Invalid Spectral Data
The spectral reflectance data defined in some of the imported files are outside the valid range of values, e.g. owing to measurement errors. Choose whether or not color definitions with invalid spectral data should be imported.
Accept spot color definition
Yes, import spot color definitions with invalid spectral data.
Discard spot color definition
No, do not import spot color definitions with invalid spectral data.
Perform action on…
Choose the scope of the action selected above. There are the following options:
• Only the currently selected color will be accepted or discarded.
• All colors with invalid spectral data in the currently selected file will be accepted or discarded.
20 20% ink printed on substrate
30 30% ink printed on substrate
etc. Additional tint values (not all need to be defined)
90 90% ink printed on substrate
<color> over metal or
<color> over paper or
<color> metal or
<color> paper or
100% ink printed on substrate = solid ink
(This will be used as new spot color name.)
Color names com-bined
Metal, 20, 40, 60, 80, Gold Over Metal
Paper, 30, 50, 70, 90, Salmon Pink Paper
Result Gold Over Metal Salmon Pink Paper
Color name Tint value assumed

PARAMETER REFERENCEIMPORT AND EDIT CXF/X-4 DATA
ORIS CxF Toolbox V1.1 User Manual 47
• All colors with invalid spectral data of all imported files will be accepted or discarded.
Related information:
Creating CxF/X-4 Data from Files (page 9)Log (page 44)
Import and Edit CxF/X-4 Data
Use this dialog to create CxF/X-4 files from the color data stored in CGATS measurement files, legacy CxF1 and CxF3 files and QTX files. It is also possible to import the CxF/X-4 color data stored in PDF/X documents and existing CxF/X-4 files. This is a bulk-edit mode which allows you to quickly change a set of spot color definitions in one go. The CxF/X-4 metadata of multiple colors can be modified and some or all colors can be deleted.
For step-by-step instructions, refer to Creating CxF/X-4 Data from Files and Multi-Color Editing and Deleting.
File
Click and select the files to be loaded. Hold the Shift or Ctrl key pressed down to select multiple files.
Use and to successively load all files of the selected type avail-able in the current folder (only one at a time).
Alternatively, drag a file (any except PDF) onto the ORIS CxF Toolbox window.
Use these buttons to toggle between two modes of handling the import of additional files. The active mode is indicated with an under-line.
Spot Color List (left)
The list is populated with all color definitions from all files you have loaded.
Select the CxF/X-4 color definition to be edited, saved or deleted by clicking on the boxes in front of the color name. Selected colors have a check mark.
All color definitions are removed from the dialog, i.e. replaced by those imported from the new files (default).
All color definitions remain in the dialog, the new color defi-nitions are added to them. Use this mode to create CxF/X-4 library files, for example.

PARAMETER REFERENCEIMPORT AND EDIT CXF/X-4 DATA
48 ORIS CxF Toolbox V1.1 User Manual
Use to select all colors and to deselect all colors in one go.
Ascending numbers – (1), (2), etc. – are automatically appended to the color name to distinguish different color definitions with identical names.
NOTE: If you have changed metadata and then select a different set of color definitions, you are asked to apply your changes. Select Yes, otherwise these changes will be lost.
CxF/X-4 Metadata List (right)
This is the metadata information stored for the CxF/X-4 color definitions selected on the left. Click the buttons to expand the metadata groups if required. Refer to section CxF/X-4 Metadata for more details.
Enter missing information or correct it as you see fit. To remove metadata, delete the text or select Undefined.
NOTE: The Color name and Inventory ID can only be changed in single-color editing mode . Some metadata fields such as Substrate name and type are mandatory and cannot be left empty or undefined.
To assign the value being displayed in a metadata field to all selected color definitions, enable the check box to the right of this field.
NOTE: Enabling the check box of an empty or undefined field causes the metadata information to be deleted from all selected color definitions.
Metadata fields displayed as empty are either really empty or have ‘mixed contents’. The latter means that each of the selected color definitions has different information in this metadata field.
Buttons
Click this button to remove the selected CxF/X-4 color definition from the dialog.
Click this button to remove all CxF/X-4 color definitions from the dialog.
Click this button to select all color definitions listed on the left. The button will change to .
Click this button to deselect all colors. The button will change to .

PARAMETER REFERENCEVIEW CXF/X-4 DATA
ORIS CxF Toolbox V1.1 User Manual 49
Click this button if you want to switch to single-color editing mode. You can then view the spectral curves and edit or rename colors individu-ally. Click to return to the bulk-edit mode.
Click this button to create a report for all CxF/X-4 color definitions loaded in this dialog.
Click this button to verify print quality by measuring spot colors against the CxF/X-4 color definitions loaded in this dialog (certification).
Click this button to save the selected color definitions, i.e. the colors with a check mark displayed next to their name.
You can choose to save all colors to a single CxF/X-4 file or create a separate CxF/X-4 file for every color.
Click this button to save all color definitions even if they are not selected.
You can choose to save all colors to a single CxF/X-4 file or create a separate CxF/X-4 file for every color.
Related information:
CGATS (page 73)CxF1 (page 73)CxF3 (page 73)CxF/X-4 (page 73)QTX (page 76)Import and Edit CxF/X-4 Data (page 41)
View CxF/X-4 Data
Use this dialog to inspect the spectral reflectance curves and meta-data information for spot colors defined in CxF1, CxF3, CxF/X-4, QTX, PDF and CGATS measurement files. All metadata fields are read-only to protect them against modifications.
For step-by-step instructions, refer to Viewing Spectral Curves and Meta-data.
File
Click and select the files to be loaded. Hold the Shift or Ctrl key pressed down to select multiple files.

PARAMETER REFERENCEVIEW CXF/X-4 DATA
50 ORIS CxF Toolbox V1.1 User Manual
Use and to successively load all files of the selected type avail-able in the current folder (only one at a time).
Alternatively, drag a file (any except PDF) onto the ORIS CxF Toolbox window.
Color name
Use this list to select the CxF/X-4 color definition to be inspected. The list is populated with all color definitions from all files you have loaded. Alternatively, click on a color box displayed under the list.
Ascending numbers – (1), (2), etc. – are automatically appended to the color name to distinguish different color definitions with identical names.
Click to expand the area containing the color boxes. Click to hide it.
Click a color box to select the CxF/X-4 color definition represented by the color. This has the same effect as using the Color name drop-down list.
Diagram
Reflectance spectrum
Spectral reflectance curves for the selected color and tint values.
X-axis: Wavelength of incident light in nanometers.
Y-axis: Portion of reflected light (1,0 = 100%)
Curve points: Measurement data
Tint ramp
Solids and tint values (10% steps) of the spot color printed on the substrate (left) and on a black background (right). See also Tint ramp.
Click on a patch in the tint ramp to display its spectral curve.
Ctrl-click on a patch to add the spectral curve to those displayed already. Ctrl-click on the same patch again to remove this curve. Click normally on a patch to display its spectral curve and remove all others.
CxF/X-4 Metadata
Metadata information stored for the selected CxF/X-4 color definition. Click the buttons to expand the metadata groups if required. Modifications are not possible. Refer to section CxF/X-4 Metadata for more details.

PARAMETER REFERENCEMANAGE CXF/X-4 DATA IN PDF FILE
ORIS CxF Toolbox V1.1 User Manual 51
Buttons
Click this button to return to the dialog that was displayed previously. This button is only available if you have opened the dialog by clicking
.
Manage CxF/X-4 Data in PDF File
Use this dialog to assign CxF/X-4 color definitions to the spot colors in a PDF/X file. You can extract or remove CxF/X-4 color definitions and view the spectral curves and metadata. It is also possible to change the ink sequence and to extract the embedded output intent profile or to embed a profile if missing.
For step-by-step instructions, refer to Managing CxF/X-4 Data in PDF Files.
Icons
Click and select the PDF/X file to be modified.
Use and to successively load all PDF files available in the current folder.
Alternatively, drag a PDF/X file onto the ORIS CxF Toolbox window.
Output intent info
Description of the embedded ICC profile which specifies the output intent of the PDF/X file.
If no output intent is embedded, a message stating this appears instead. In this case it is not possible to assign any CxF/X-4 data. Embed an ICC profile as described below.
ICC profile
File name of the embedded output intent profile.
Click to extract the ICC profile and save it as a separate file.
Click to embed an ICC profile if the output intent is missing.
CxF/X-4 library
Use this option to assign missing CxF/X-4 color definitions automati-cally. Click and select a CxF/X-4 file with a large number of color definitions.
The library file is then searched for color definitions which are named exactly like the spot colors in the PDF/X file. Such color definitions are automatically assigned to the corresponding spot colors.
This search is always performed when a PDF file or CxF/X-4 library is loaded. A message appears if there are no matching color definitions in the library file.

PARAMETER REFERENCEMANAGE CXF/X-4 DATA IN PDF FILE
52 ORIS CxF Toolbox V1.1 User Manual
To switch this functionality off, delete the path name from the input box.
CxF/X-4 Data
This table indicates, for each spot color defined in the PDF file, whether CxF/X-4 data is embedded or missing. The icon at the bottom left summa-rizes the status:
For step-by-step instructions, refer to Assigning CxF/X-4 Data to Spot Colors.
Spot Color in Document
The column on the left is the list of spot colors defined in the PDF file.
The name <not used> indicates that the CxF/X-4 data listed on the right is not used for any spot color in the PDF/X file.
CxF/X-4 Data
The column on the right indicates the status of the spot colors listed on the left:
Click this button if CxF/X-4 data is missing or needs to be replaced. This opens a dialog allowing you to load CxF/X-4 files and then assign color definitions to the spot colors. You can also view the spectral curves and metadata.
The status <missing> or <embedded> changes to indicate the spot color name defined in the CxF/X-4 file.
Click this button to remove the CxF/X-4 color definition from the selected spot color. The spot color status changes to <removed>.
You can also use for the following purposes:
• To remove selected CxF/X-4 definitions with the status <unused>.
• To restore the CxF/X-4 data embedded originally if you have replaced this data. The status will change back to <embedded>. Click again to remove the CxF/X-4 data from the spot color.
There is at least one spot color without CxF/X-4 data.
All spot colors have embedded CxF/X-4 data.
<embedded> CxF/X-4 data is embedded in the PDF/file.
<missing> No CxF/X-4 data embedded for this spot color.
<removed> CxF/X-4 data has been removed by the user.
[Spot color name] The user has assigned CxF/X-4 data to this spot color.

PARAMETER REFERENCEMANAGE CXF/X-4 DATA IN PDF FILE
ORIS CxF Toolbox V1.1 User Manual 53
Click this button to save the selected color definition as a CxF/X-4 file. Specify a folder and a file name.
Display only CxF/X-4 data used in PDF file
Enable this option to hide all CxF/X-4 color definitions with the status <not used>. Such color definitions disappear from the list and will not be written to the PDF file when the file is saved. Disable this option to make the unused color definitions visible again.
Ink laydown order
This list shows the order in which process and spot colors will be printed. The color at the top will be printed first, the color at the bottom will be printed last.
For step-by-step instructions, refer to Changing Ink Laydown Order.
Ink laydown order
Enable this option if you want to change the ink sequence. If disabled, the ink sequence information cannot be changed and will not be written to the PDF file when being saved.
Use these buttons to move the selected color up or down, respec-tively. Click repeatedly until the color is at the position you want.
Keep process colors grouped
Disable this option if the sequence of CMYK process colors should be interrupted by spot colors.
This replaces the list entry named CMYK with the entries Cyan, Magenta, Yellow and Black. Now each process color can be moved individually and you can place spot colors between process colors.
Buttons
Click this button to view the spectral curves and metadata for the selected spot color. Editing the data is not possible. Click to return to the dialog displayed previously.
Click this button to create a report for all CxF/X-4 color definitions loaded in this dialog.
Click this button to verify print quality by measuring spot colors against the CxF/X-4 color definitions loaded in this dialog (certification).

PARAMETER REFERENCEMANAGE CXF/X-4 DATA IN PDF FILE
54 ORIS CxF Toolbox V1.1 User Manual
Click this button to save the modified PDF file. This will save all changes to CxF/X-4 data and, if the ink laydown order option is enabled, also the changes to the ink sequence. Overwrite the PDF file or save it under a new name.
Related information:
Managing CxF/X-4 Data in PDF Files (page 17)Viewing Spectral Curves and Metadata (page 15)Creating Reports (page 23)Print Validation (Certification) (page 25)
Assign CxF/X-4 Data
Use this dialog to load CxF/X-4 files and then assign color definitions to the spot colors in the PDF file. Do this if CxF/X-4 data is missing or needs to be replaced.
CxF/X-4 file
Click and select a CxF/X-4 file. Hold the Shift or Ctrl key pressed down to select multiple files.
Color name
This is the list of all spot colors defined in the PDF/X file. Select a color with missing or incorrect CxF/X-4 data.
CxF/X-4 definition
This list contains the color definitions from all CxF/X-4 files you have loaded. Choose the CxF/X-4 data to be assigned to the selected spot color.
Click this button to assign the selected CxF/X-4 color definition to the selected spot color.
In the color list, the status <missing> or <embedded> changes to indicate the spot color name defined in the CxF/X-4 file.
Click this button if you want to view the metadata and spectral curves of the selected CxF/X-4 data. The data appears in the background and cannot be edited. Reclick to redisplay the Manage CxF/X-4 Data in PDF File dialog.
Related information:
Assigning CxF/X-4 Data to Spot Colors (page 19)

PARAMETER REFERENCEGLOBAL BRAND ASSURANCE
ORIS CxF Toolbox V1.1 User Manual 55
Global Brand Assurance
Use this dialog to download jobs with CxF/X-4-defined spot colors from the Global Brand Assurance web server. The color definitions can then be used in the same way as CxF/X-4 files stored on your local file system.
User data
Enter your user name and password, then click to log in to the Global Brand Assurance web server. The Jobs list will be populated with print jobs maintained in the GBA database.
Click if you want to log off from the web server.
Job data
Job
This is the list of print jobs which you are allowed to access on the GBA web server. Select a job from the list.
Brand colors
This is the list of CxF/X-4-defined spot colors used in the selected job. Select a color if you want to view or extract it.
Click this button to save the selected color definition as a CxF/X-4 file. Specify a folder and a file name.
Buttons
Click this button to view the spectral curves and metadata for the selected spot color. Editing the data is not possible. Click to return to the dialog displayed previously.
Click this button to create a report for all CxF/X-4 color definitions loaded in this dialog.
Click this button to verify print quality by measuring spot colors against the CxF/X-4 color definitions loaded in this dialog (certification).

PARAMETER REFERENCECERTIFICATION
56 ORIS CxF Toolbox V1.1 User Manual
Related information:
Print Validation of GBA Jobs (Certification) (page 33)Creating Reports (page 23)Viewing Spectral Curves and Metadata (page 15)
Certification
Use this dialog to check print quality by measuring a spot ink charac-terization chart against the CxF/X-4 color definitions. The application provides an instant pass/fail indication and various charts for assessing the deviations both visually and numerically. Process colors can be checked against the target values defined in the PDF/X output intent or a user-defined ICC profile. The certification results can be saved as a PQX file.
For step-by-step instructions, refer to Print Validation (Certification).
File
Load CxF/X-4 color definitions if the dialog is empty:
Click and select a CxF/X-4, QTX file or PDF file.
Use and to successively load all files with the currently selected type available in the current folder.
To load a PQX file, click the button in the bottom right corner.
Spot color
Use this list to select the spot color to be measured next.
The list is automatically populated with all CxF/X-4 color definitions which were currently loaded when you opened the Certification dialog. If the list is empty, load a file as explained above.
Click if you want to add process colors to the list.
Clicking on one of the color boxes is an alternative to selecting a CxF/X-4 color definition from the list.
The boxes are marked up like in the following example if measure-ments have been made already for the selected tint value:
Select the tint value of the spot color to be measured.
If some tint values are not listed or missing on your spot ink character-ization chart, click and select a different set of tint values.
Certification successful (within tolerance limits)
Certification failed (out of tolerance)

PARAMETER REFERENCECERTIFICATION
ORIS CxF Toolbox V1.1 User Manual 57
<Spot Color Name>
Reflectance Spectrum
Spectral reflectance curves for selected color and tint value.
• X-axis: Wavelength of incident light in nanometers.
• Y-axis: Portion of reflected light (1,0 = 100%)
Target values (reference): . Actual values (measurement): .
Target values for spot colors are defined by the CxF/X-4 data. Target values for process colors are calculated from the specified ICC profile or PDF output intent, respectively.
CIE a*b* / L*
Graphical representation of the target values and actual values calculated from the spectral data:
• Hue (ab) chart
• Lightness (L) chart
Colorimetric Data
Target and actual values indicated numerically:
• CIE L*a*b* values (lightness, red/green hue, blue/yellow hue)
• CIE L*C*h° values (lightness, chromaticity, hue angle)
• Deviation between actual and target color (dE)
A pass/fail icon indicates whether dE is out of tolerance.
To calculate dE, the program uses the tolerance value and dE formula stored in the CxF/X-4 metadata. A default value of 2.5 dE2000 is used automatically if these values are set to 0 or undefined.
Users can change these values by clicking .
Metamerism index
The metamerism index (MI) indicates the probability that two samples (reference and measured sample) will show the same color difference under two different illuminants.
ORIS CxF Toolbox calculates three MI values using D50 as a refer-ence illuminant and A, C and F11 as test illuminants. The certification result is indicated as successful if all of these MI values are within the tolerance limit. Otherwise certification is indicated as failed .
The program uses the tolerance value stored in the CxF/X-4 meta-data. If this value is 0 or unavailable, a default tolerance of 3.0 will be used automatically. The tolerance limit is the maximum deviation permitted from a target value of 0 dE.
If the actual MI value was 0, the reference and measured sample would show exactly the same color deviations under both illuminants. A tolerance value of 3.0 means that the two samples are not allowed to differ in metamerism by more than 3.0 delta E.
Users can change the tolerance value by clicking .
NOTE: The metamerism index cannot be calculated for process colors because spectral reflectance data is not available in this case. Target

PARAMETER REFERENCECERTIFICATION
58 ORIS CxF Toolbox V1.1 User Manual
values for process colors are calculated from the specified ICC profile or PDF/X output intent, respectively.
Measurement
Click this button to start the measuring process. The button changes to .
Perform a white calibration if requested to do so. Then repeatedly select a color/tint value combination and measure the corresponding color patch.
Click this button if you want to stop the measuring process. All measurement results will be discarded. The button changes to .
Click this button to load CGATS and QTX measurement files created with a third-party tool. This useful is important if your measurement device is not supported by ORIS CxF Toolbox.
This opens a dialog allowing you to load measurement files and then assign a particular measurement to each CxF/X-4 color definition.
Target Actual
The two big color boxes serve as a visual aid for assessing the differ-ence between the target color and actual color.
The table underneath the button indicates the following:
• Total number of measurements for all colors and tint values
• Number of measurements remaining to be made
• Number of completed measurements which are successful
Both delta E and metamerism index are within the tolerance limits
• Number of completed measurements which have failed
Delta E, metamerism index, or both values are out of tolerance
Overall Result
Icon
A big icon indicates the overall certification result when the last measurement has completed:
Successful All measurement results are successful.
Failed One or more measurement results have failed.
Incomplete There are still measurements to make.

PARAMETER REFERENCECERTIFICATION
ORIS CxF Toolbox V1.1 User Manual 59
Click this button to save the complete set of certification data as a PQX file. This includes all CxF/X-4 color definitions, certification settings (e.g. user-defined tolerances), and the certification results (actual values).
PQX files usually contain the certification data for a particular print job. Load a PQX file to conveniently certify the same job again.
PQX files can be also sent on for print quality evaluation at remote sites.
Click this button to load the certification data stored in a PQX file. This is useful if you want to certify the same job again or to evaluate the results of a certification process performed at a remote site.
See also Follow-Up Certification with PQX File.
Comments
This box allows you to enter a comment which will be saved together with the PQX file. Comments can be entered separately for each CxF/X-4 color definition, but only if the 100% tint value is selected.
Buttons
Click this button if you want to view the metadata and spectral curves of the selected CxF/X-4 data. The data appears in the main window in the background. Reclick to redisplay what was shown before.
Click this button to open a dialog allowing you to change some of the default certification settings. This includes the tint values to be measured, the dE tolerance value and formula, and the certification of process colors.
Related information:
Print Validation (Certification) (page 25)System Requirements for ORIS CxF Toolbox (page 5)
Assign Measurements
Use this dialog to assign spot color measurements from CGATS or QTX files to the CxF/X-4 color definitions you have loaded. This allows you to use measurement devices which are not supported by ORIS CxF Toolbox.

PARAMETER REFERENCECERTIFICATION
60 ORIS CxF Toolbox V1.1 User Manual
For step-by-step instructions, refer to Measuring with a Third-Party Tool.
Measurement file
Click and select a measurement file with CGATS or QTX format. Hold the Shift or Ctrl key pressed down to select multiple files.
Color name
This is the list of all CxF/X-4 color definitions currently loaded in the Certification dialog. Select the name of a spot color to which measurement data should be assigned.
The window in the background will display the spectral curves and metadata, but only if was clicked before opening the Certification dialog.
Measurement
This list is populated with the measurements from all files you have loaded. Select the data that was measured for the selected spot color.
Click this button to assign the selected measurement to the selected CxF/X-4 color definition.
The application checks the measurement against the specifications in the CxF/X-4 data and indicates the result in the background ( or ).
Only display colors without measurement data assigned
Option enabled :
Having assigned a measurement to a CxF/X-4 color definition, the color definition will disappear from the Color name list. This allows you to immediately recognize the colors which still lack measurement data
Option disabled :
All CxF/X-4 color definitions are always available in the Color name list. This setting allows you to replace measurement data already assigned to a color definition.
Always overwrite existing measurement data
By default, the application asks you to confirm your action when you replace measurement data already assigned to a color definition. Disable this option to do this without being asked for confirmation.
Click this button if the spectral data and metadata should always be displayed automatically for the currently selected measurement. The data appears in the main window in the background. Reclick to redisplay what was shown before.
Related information:
Print Validation (Certification) (page 25)System Requirements for ORIS CxF Toolbox (page 5)

PARAMETER REFERENCECERTIFICATION
ORIS CxF Toolbox V1.1 User Manual 61
Certification Parameters
Using this dialog the default certification settings stored in the CxF/X-4 data can be adjusted according to your preferences. You can choose to measure different tint values, certify also process colors, or use different tolerances.
Apply to all CxF/X-4 definitions
This option is located at the bottom of the dialog, next to the OK button.
If enabled, the changes made in this dialog will apply to all CxF/X-4 color definitions loaded in the Certification dialog (default setting). Disable this option if the changes should only be applied to the currently selected color definition.
Measurement Parameters
Select patches to be certified
Select the set of tint values to be measured for a spot color. Click the check box underneath a tint value to select or deselect this patch. Use the Select all option to select or deselect all 11 tint values in one go.
Changes are required, for example, if some of the tint values on the spot ink characterization chart are not listed in the Certification dialog or if tint values are listed which are not available on the chart.
Display selected patches only
This option applies to the tint values you have selected, i.e. to the patches with a check mark.
Option enabled :
Only the selected tint values will be available on the list in the Certifi-cation dialog. The deselected patches are not listed and cannot be measured.
Option disabled :
All tint values continue to be available on the list. The deselected patches can be measured, but the measurements will not have any effect on the certification result.
Tolerances
These options allow you to add or modify the tolerance values if they are incorrect or missing in the CxF/X-4 data.
Delta E
Select the delta E formula to be used for calculating the average devi-ation between the target values (defined by the CxF/X-4 data) and the actual values (measurements).

PARAMETER REFERENCECERTIFICATION
62 ORIS CxF Toolbox V1.1 User Manual
Also enter a tolerance value for this color deviation. Certification is successful if the actual deviation value is not greater than the toler-ance value and fails otherwise.
ORIS CxF Toolbox automatically uses a default value of 2.5 dE2000 for the certification process if these values are set to 0 or undefined.
Metamerism index
Enter a tolerance value for the metamerism index.
ORIS CxF Toolbox calculates three metamerism index values for every measurement. Certification is successful if all of these values are within this tolerance. Otherwise certification fails .
ORIS CxF Toolbox automatically uses a default value of 3.0 for the certification process if this value is not defined (0). A value of 3.0 means that the reference and measured sample are not allowed to differ in metamerism by more than 3.0 delta E.
Process Color Certification
Enable this option (any setting except Off) if you also want to verify the print quality of process colors. The process colors cyan, magenta, yellow and black will be added to the list of spot colors in the Certification dialog and can be measured.
Measurements made for process colors can only be checked against the target values defined by an ICC profile. Select between the following settings:
• Use ICC profile from PDF
This setting is only available if a PDF/X file is loaded. Select it to use the ICC profile defining the embedded output intent.
• Use the following ICC profile
Select this setting to use your own ICC profile. Click and select a file.
NOTE: It is not possible to calculate a metamerism index for process colors because the ICC profile does not include any spectral reflectance data.
Related information:
Print Validation (Certification) (page 25)System Requirements for ORIS CxF Toolbox (page 5)
Certification
Use this dialog to check print quality by measuring a spot ink charac-terization chart against the CxF/X-4 color definitions. The application provides an instant pass/fail indication and various charts for assessing the deviations both visually and numerically. The measure-
PARAMETER REFERENCECERTIFICATION
ORIS CxF Toolbox V1.1 User Manual 63
ment results can be uploaded to the Global Brand Assurance web server, which provides a wide range of reporting and analysis tools.
For step-by-step instructions, refer to Print Validation of GBA Jobs (Certifi-cation).
Job
This the GBA print job you have selected in the main window. If this is not the correct job, close the dialog and select another job on the Global Brand Assurance tab.
NOTE: You cannot use the button for selecting jobs from the GBA web server. Use this button for loading PDF, CxF/X-4, or QTX files stored locally. This will cause some dialog elements to change (see Certification dialog).
Spot color
This is the list of spot colors used in the selected job. Select the color to be measured next.
Clicking on one of the color boxes is an alternative to selecting a CxF/X-4 color definition from the list.
The boxes are marked up like in the following example if measure-ments have been made already for the selected tint value:
If there are patches with different tint values for the selected spot color, select the tint value to be measured next.
<Spot Color Name>
Reflectance Spectrum
Spectral reflectance curves for selected color and tint value.
• X-axis: Wavelength of incident light in nanometers.
• Y-axis: Portion of reflected light (1,0 = 100%)
Target values (reference): . Actual values (measurement): .
CIE a*b* / L*
Graphical representation of the target values and actual values calculated from the spectral data:
• Hue (ab) chart
• Lightness (L) chart
Colorimetric Data
Target and actual values indicated numerically:
Certification successful (within tolerance limits)
Certification failed (out of tolerance)

PARAMETER REFERENCECERTIFICATION
64 ORIS CxF Toolbox V1.1 User Manual
• CIE L*a*b* values (lightness, red/green hue, blue/yellow hue)
• CIE L*C*h° values (lightness, chromaticity, hue angle)
• Deviation between actual and target color (dE)
A pass/fail icon indicates whether dE is out of tolerance.
To calculate dE, the program uses the tolerance value and dE formula stored in the CxF/X-4 metadata. A default value of 2.5 dE2000 is used automatically if these values are set to 0 or undefined.
Metamerism index
The metamerism index (MI) indicates the probability that two samples (reference and measured sample) will show the same color difference under two different illuminants.
ORIS CxF Toolbox calculates three MI values using D50 as a refer-ence illuminant and A, C and F11 as test illuminants. The certification result is indicated as successful if all of these MI values are within the tolerance limit. Otherwise certification is indicated as failed .
The program uses the tolerance value stored in the CxF/X-4 meta-data. If this value is 0 or unavailable, a default tolerance of 3.0 will be used automatically. The tolerance limit is the maximum deviation permitted from a target value of 0 dE.
If the actual MI value was 0, the reference and measured sample would show exactly the same color deviations under both illuminants. A tolerance value of 3.0 means that the two samples are not allowed to differ in metamerism by more than 3.0 delta E.
Measurement
Click this button to start the measuring process. The button changes to .
Perform a white calibration if requested to do so. Then repeatedly select a color/tint value combination and measure the corresponding color patch.
Click this button if you want to stop the measuring process. All measurement results will be discarded. The button changes to .
Click this button to load CGATS and QTX measurement files created with a third-party tool. This useful is important if your measurement device is not supported by ORIS CxF Toolbox.
This opens a dialog allowing you to load measurement files and then assign a particular measurement to each CxF/X-4 color definition.
Target Actual
The two big color boxes serve as a visual aid for assessing the differ-ence between the target color and actual color.

PARAMETER REFERENCEREPORTS
ORIS CxF Toolbox V1.1 User Manual 65
The table underneath the button indicates the following:
• Total number of measurements for all colors and tint values
• Number of measurements remaining to be made
• Number of completed measurements which are successful
Both delta E and metamerism index are within the tolerance limits
• Number of completed measurements which have failed
Delta E, metamerism index, or both values are out of tolerance
Overall Result
Icon
A big icon indicates the overall certification result when the last measurement has completed:
Click this button to upload the measurement results to the GBA web server.
This button is enabled as soon as one measurement has been made. It is disabled after being clicked.
Comments
This box allows you to enter a comment which will be uploaded to the web server together with the certification result. Comments can be entered separately for each CxF/X-4 color definition, but only if the 100% tint value is selected.
Click this button if you want to view the metadata and spectral curves of the selected CxF/X-4 data. The data appears in the main window in the background. Reclick to redisplay what was shown before.
Reports
This report on CxF/X-4 color definitions includes important data for design, proofing, ink formulation and process control as well as customer tolerances for print quality verification. The data is presented both graphically and numerically.
For step-by-step instructions, refer to Creating Reports.
Successful All measurement results are successful.
Failed One or more measurement results have failed.
Incomplete There are still measurements to make.
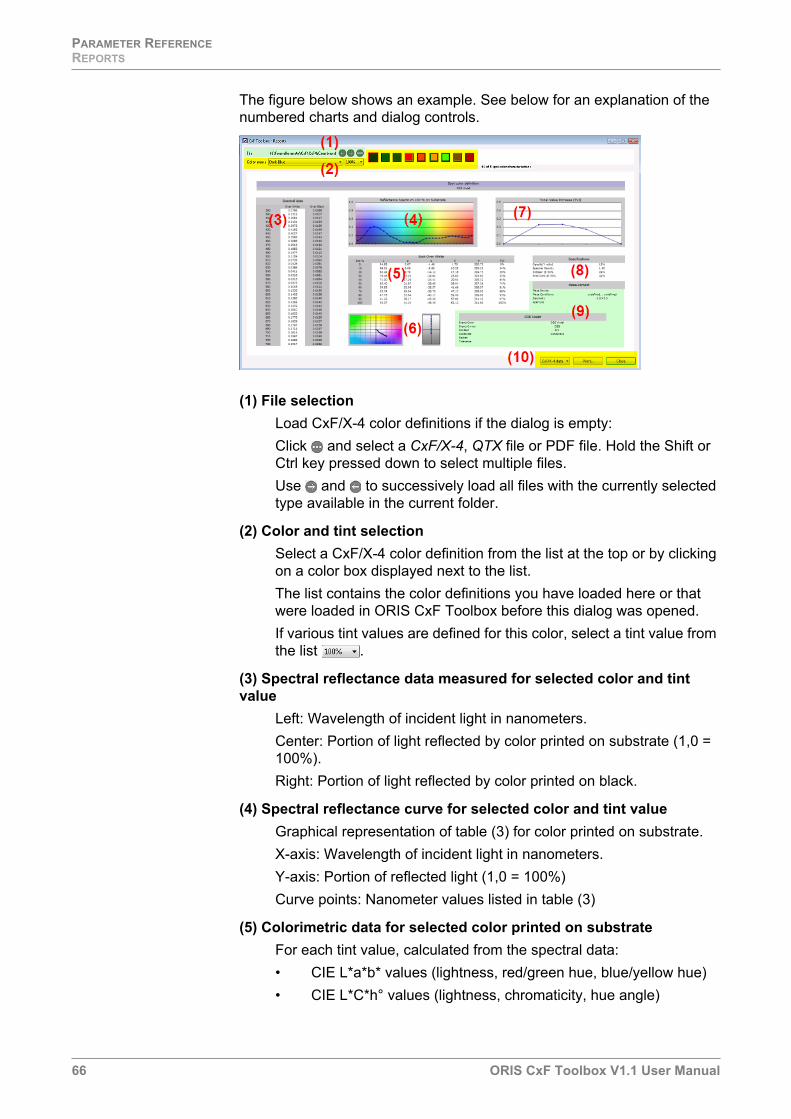
PARAMETER REFERENCEREPORTS
66 ORIS CxF Toolbox V1.1 User Manual
The figure below shows an example. See below for an explanation of the numbered charts and dialog controls.
(1) File selection
Load CxF/X-4 color definitions if the dialog is empty:
Click and select a CxF/X-4, QTX file or PDF file. Hold the Shift or Ctrl key pressed down to select multiple files.
Use and to successively load all files with the currently selected type available in the current folder.
(2) Color and tint selection
Select a CxF/X-4 color definition from the list at the top or by clicking on a color box displayed next to the list.
The list contains the color definitions you have loaded here or that were loaded in ORIS CxF Toolbox before this dialog was opened.
If various tint values are defined for this color, select a tint value from the list .
(3) Spectral reflectance data measured for selected color and tint value
Left: Wavelength of incident light in nanometers.
Center: Portion of light reflected by color printed on substrate (1,0 = 100%).
Right: Portion of light reflected by color printed on black.
(4) Spectral reflectance curve for selected color and tint value
Graphical representation of table (3) for color printed on substrate.
X-axis: Wavelength of incident light in nanometers.
Y-axis: Portion of reflected light (1,0 = 100%)
Curve points: Nanometer values listed in table (3)
(5) Colorimetric data for selected color printed on substrate
For each tint value, calculated from the spectral data:
• CIE L*a*b* values (lightness, red/green hue, blue/yellow hue)
• CIE L*C*h° values (lightness, chromaticity, hue angle)

PARAMETER REFERENCEREPORTS
ORIS CxF Toolbox V1.1 User Manual 67
• Tone value increase (TVI) [see glossary]
Size to which a printing dot is expected to increase in the print run.
Example: A size of 55% is expected for a 50% dot (which means a dot gain of 5%).
(6) CIE ab and L charts
CIE Lab values of all tint values listed in table (5) plotted as:
• Hue (ab) chart
• Lightness (L) chart
(7) Tone value increase chart
X-axis: Original printing dot sizes for all tint values of the spot color.
Y-axis: Increased dot sizes expected in the print run, as indicated in table (5).
(8) Ink Properties
Specifications of ink properties intended for ink suppliers, calculated from spectral data measurements.
(9) CxF/X-4 metadata
Information that identifies the spot color and how it was measured, stored in the metadata of the CxF/X-4 file.
(10) Buttons
To view a large chart with spectral curves for all tint values of the color, select Spectral data from the list at the bottom right. Select CxF/X-4 data from this list to switch back to the way the report was displayed previously.
Click the Print button to print the report with the charts that are currently displayed on the screen.
Related information:
CxF/X-4 Metadata (page 68)Preferences (page 72)
Opacity Ratio of lightness values of 100% tint printed on sub-strate and 100% tint printed on black.
0% means: Ink is invisible when printed on black. 100% means: Ink is completely opaque.
Spectral Density
Ink density of 100% tint printed on substrate.
Dot gain at 50%
Dot gain value for a 50% tint, derived from the TVI value in chart (7). See also glossary.
Print con-trast at 70%
Ratio of ink densities for 70% and 100% tints calculated as follows: (1–D70/D100)*100
0% means: 70% tint has same density as 100% tint. 100% means: 70% tint is invisible.

PARAMETER REFERENCECXF/X-4 METADATA
68 ORIS CxF Toolbox V1.1 User Manual
CxF/X-4 Metadata
The metadata information identifies the conditions in which the spot color was created and provides important data for all supply chain partners. Tolerance values for print validation are also included. Click the buttons to expand the metadata groups if required.
NOTE: In the View CxF/X-4 Data dialog, all metadata fields are write-protected and cannot be modified.
Spot color
Color name
Name by which the spot color is identified by the user.
Used automatically as file name when CxF/X-4 files consisting of a single color definition are created.
Mandatory field, cannot be left empty. Write-protected in bulk-edit mode. Can only be modified when a single color is edited.
Inventory ID
ID by which the spot ink is identified within a workflow.
Write-protected in bulk-edit mode. Can only be modified when a single color is edited.
Substrate
User-friendly name of the substrate.
Mandatory field, cannot be left empty.
Substrate type
Category of substrate, such as coated paper, cardboard or trans-parent film.
Print process
Category of printing process used to print the spot ink characterization chart.
Surface finish
Property of the substrate surface, such as gloss laminated or matt varnished.
Creation date
Date and time at which the spot color was created.
This field is always write-protected and cannot be modified.
Comment
Additional information on this spot color.

PARAMETER REFERENCECXF/X-4 METADATA
ORIS CxF Toolbox V1.1 User Manual 69
Brand owner
Organization or company that is the proprietor of the brand associated with the spot color.
Contact
Brand owner’s contact data such as postal address, phone number, etc.
Tolerances
The following is relevant for ORIS CxF Toolbox’s Certification function. The settings for Color deviation and Metamerism index are used as toler-ance values for certification measurements. Users can change these default values for specific jobs or measurements.
Color deviation
Maximum average delta E value permitted when the reference values are checked against a measured sample.
A default value of 2.5 is set automatically when spot colors are created by measurement or if this value is not defined in the files you are importing.
dE formula
Formula used for calculating color deviations (see also glossary).
The dE2000 formula is set by default when spot colors are created by measurement or if no dE formula is defined in the files you are importing.
Metamerism index
The metamerism index indicates the probability that two samples (reference and measured sample) will show the same color difference under two different illuminants. If the metamerism index is zero, the two samples have the same degree of metamerism, i.e. one sample looks as much similar or different under the two illuminants as the other.
A default value of 3.0 is set automatically when spot colors are created by measurement or if this value is not defined in the files you are importing.
For more details, refer to the glossary.
Gloss
Gloss level measured in gloss units. 0 means ‘no gloss’.
Measurement angle
Geometry of the gloss meter. This is the angle at which the sample is illuminated.
Certify
Set of tint values to be measured for a spot color.

PARAMETER REFERENCECXF/X-4 METADATA
70 ORIS CxF Toolbox V1.1 User Manual
To measure different tint values, click the check boxes to select or deselect the values. Use the Select all option to select or deselect all 11 tint values in one go.
Measurement
Information about how color data was measured.
All of these fields are write-protected if they occur in a CxF/X-4 file which was created by measuring or importing measurements with ORIS CxF Toolbox.
Illumination
Light source that was used for measuring color.
Angle
Geometry of the measurement device. Relative positions of the light source, sample plane and detector.
There are instruments with a directional geometry (45°/0° or 0°/45°) and a diffuse sphere geometry (d/8° or 8°/d).
Filter
Filter that was used for measuring.
Aperture
Aperture size of the measurement device
Backing
Type of backing or background used when the spot ink characteriza-tion chart was measured. Enter black or white, for example.
Measurements
This number is only greater than 1 if the data was derived from the average of a series of measurements.
This field is always write-protected and cannot be modified.
Measurement device
Information about the measurement device from which the color values were derived. This information is usually added automatically when spot colors are created by measurement.
All of these fields are write-protected if they occur in a CxF/X-4 file which was created by measuring or importing measurements with ORIS CxF Toolbox.
Manufacturer
Name of the manufacturer of the measurement device, e.g. X-Rite

PARAMETER REFERENCEWRITE CXF/X-4 DATA
ORIS CxF Toolbox V1.1 User Manual 71
Model
Model name of the measurement device
Calibration date
Date and time of the last device calibration
Serial number
Serial number of the measurement device
File
This data is added automatically when spot colors are created by measure-ment.
Creator
Name of the person, organization or software that created the file.
This field is always write-protected and cannot be modified.
Creation date
Date and time at which the file was created.
This field is always write-protected and cannot be modified.
Comment
Additional information on the file.
Related information:
Metamerism index (page 75)Editing CxF/X-4 Data (page 11)
Write CxF/X-4 Data
Use this dialog to save the spectral data and metadata information in CxF/X-4 format.
CxF/X-4 file format
This option is only relevant if more than one spot color definitions have been selected. In this case you have the following options:
• Create as separate CxF/X-4 file for each color definition (single-color files).
• Create a single CxF/X-4 file which includes all color definitions (combined file).
CxF/X-4 target directory
Click Browse and select a folder for storing the single-color CxF/X-4 files. The spot color names will be used as file names.
PARAMETER REFERENCEPREFERENCES
72 ORIS CxF Toolbox V1.1 User Manual
CxF/X-4 target file
Click Browse, select a folder and enter a file name for the combined CxF/X-4 file.
Save
Click here to create the CxF/X-4 file(s).
Preferences
Use this dialog to specify user preferences for ORIS CxF Toolbox.
Logo
This option applies to the company logo displayed in a spot color report.
You can select a different logo file or remove the logo.
Icon Text
Use this option to hide the explanatory text displayed for icons and buttons.
Example: Option enabled: , option disabled:
The texts will only remain hidden in the current program session. They will be reappear when you restart the program.
Available Tools
These are the tools listed in the menu on the left of the main window.
Each tool can be hidden and redisplayed by clicking the respective check boxes. This allows users to customize the menu and remove tools which are not required.
Related information:
Creating Reports (page 23)Reports (page 65)
ORIS CxF Toolbox V1.1 User Manual 73
A Glossary
CGATS Committee for Graphic Arts Technology Standards
CGATS was formed in 1987 and received ANSI accreditation in 1989. The goal of CGATS is to have the entire scope of technical work for printing, publishing and converting technologies represented in one national stan-dardization and coordination effort, while respecting the established activi-ties of existing accredited standards committees and industry standards developers.
CGATS has defined a standard file format for storing measurement data. CGATS files are tab-delimited text files capturing each measured patch in a tabular format along with a header of metadata pertinent to the measure-ment condition.
CxF Color Exchange Format. XML-structured file format created by X-Rite Inc. CxF files allow the seamless, worldwide, digital communication of all commercially significant aspects of color.
See also CxF1, CxF3, CxF/X-4.
CxF1 CxF Version 1.0.
CxF3 CxF Version 3.0.
CxF/X-4 CxF/X-4 is defined in ISO 17972-4 as a subset of the CxF Version 3.0 stan-dard for exchanging color information. A CxF/X-4 file characterizes a partic-ular spot color in conjunction with a print substrate by means of its spectral reflectance data. It also includes a wide range of metadata.
CxF/X-4 data can be embedded in PDF/X documents to effectively commu-nicate the characteristics of the spot colors used in the file. See also ISO 32000-2.
Delta E Formula Mathematical formula used for calculating deviations between two colors:
• dE
• dE94
• dE2000
• dE CMC
dE Numerical value that represents the distance between two colors in the Lab color space. This formula was introduced in 1976 and is therefore also known as Delta E 1976.
In many cases, a delta E of 1.0 is the smallest color difference the human eye can see. Unfortunately it’s not that simple. Some color differences

GLOSSARY
74 ORIS CXF TOOLBOX V1.1 USER MANUAL
greater than 1 are perfectly acceptable, maybe even unnoticeable. Also, the same delta E color difference between two yellows and two blues may not look like the same difference to the eye.
dE94 A variant of the dE color distance formula published in 1994. It gives more weight to chroma, which comes closer to what the human eye perceives.
dE2000 Revision of the dE94 formula, released in 2000. Unlike delta E 94, which assumes that L* correctly reflects the perceived differences in lightness, delta E 2000 varies the weighting of L* depending on where in the lightness range the color falls.
This formula uses an equation (l:c:h) which allows the setting of lightness, chroma and hue factors. Most common are the following factors:
• Delta E 2000 1:1:1
Equal weighting of lightness, chroma and hue. These are the default factors. This formula is usually abbreviated as Delta E 2000.
• Delta E 2000 2:1:1
Lightness has twice the weighting of chroma and hue.
dE CMC Color difference formula adopted by the Colour Measurement Committee of the Society of Dyers and Colourists of Great Britain in 1984. It describes color differences in the CIE LCh color space.
This formula uses an equation (l:c) which allows the setting of lightness and chroma factors. Most common are the following factors:
• dE CMC 1:1
Equal weighting of lightness and chroma. This formula can detect perceptible color differences.
• dE CMC 2:1
Lightness has twice the weighting of chroma. This formula can detect acceptable color differences.
Dot gain Percentage by which a printing dot is expected to increase in the print run. Dot gain is calculated by subtracting the original dot size from the increased dot size (TVI value).
Example: A dot size increase from 50% to 55% means a dot gain value of 5% or 0.05.
GBA See Global Brand Assurance.
Global Brand Assurance
A web-based application located at globalbrandassurance.com which maintains information on print jobs with CxF/X-4-defined brand colors. Applications such as ORIS CxF Toolbox can download the color definitions of a job, measure the colors and upload the result to the web server. There is a wide range of reporting and analysis tools which help you monitor print quality and clearly indicate trends that can affect color.

GLOSSARY
ORIS CXF TOOLBOX V1.1 USER MANUAL 75
ISO 17972 ISO 17972 defines methods for the use of CxF3 to exchange measurement data and associated metadata within the graphic arts industry and for the exchange of files between graphic arts users. It is a multi-part document where each part is intended to respond to different workflow requirements:
• ISO 17972-1 Graphic technology — Colour data exchange format (CxF/X) — Part 1: Relationship to CxF3 (CxF/X-1)
• ISO 17972-2 Graphic technology — Colour data exchange format (CxF/X) — Part 2: Scanner target data (CxF/X-2)
• ISO 17972-3 Graphic technology — Colour data exchange format (CxF/X) — Part 3: Output target data (CxF/X-3)
• ISO 17972-4 Graphic technology — Colour data exchange format (CxF/X) — Part 4: Spot color characterization data (CxF/X-4)
ISO 32000-2 ISO 32000 is the standard for document management using the Portable Document Format (PDF). Part 2 specifies PDF Version 2.0. PDF 2.0 docu-ments can embed CxF/X-4 data, spectral data, opacity and print order infor-mation.
Metamerism index
Metamerism exists if a sample looks different under two different lighting conditions.
The metamerism index indicates the probability that two samples (reference and measured sample) will show the same color difference under two different illuminants. If the metamerism index is zero, the two samples have the same degree of metamerism, i.e. one sample looks as much similar or different under the two illuminants as the other.
The MI is a delta E value calculated from the difference between the following:
• CIE Lab deviation between reference and measured sample viewed under a reference illuminant (e.g. D50)
• CIE Lab deviation between reference and measured sample viewed under a test illuminant (e.g. A, C or F11)
Output intent Embedded ICC profile which specifies the color characteristics of the intended output device associated with the PDF/X file.
PQX XML-structured files developed by the Print Quality eXchange (PQX) Working Group for the transmission of performance data within the print supply chain, allowing brand owners to assess and track relevant produc-tion and quality data.
PQX files intend do facilitate the one-way transmission of performance data for one or more printed samples from a single press run between print service providers to relevant stakeholders and brand owners; thus allowing brand owners to assess and track relevant business, production, color and quality data of printed materials of all forms.
Color data is reported using the ISO-compliant CxF format and may include both spectral and non-spectral data.

GLOSSARY
76 ORIS CXF TOOLBOX V1.1 USER MANUAL
QTX QTX is a proprietary format from Datacolor for the exchange of color-related information in the textile industry. QTX files contain spectral reflectance data and information about the measurement procedure.
Spectra reflec-tance curve
A plot of color reflectance in the visual and non visual spectrum.
Spot ink charac-terization chart
Test chart for measuring the spectral reflectance of spot colors. Also referred to as ink step-wedge chart.
The CxF/X-4 standard recommends the use of charts with 11 tints of ink printed on substrate and also on black background, as shown in the following figure:
Tint ramp Color patches of a spot color printed on substrate and black with solids and various tonal values, usually increasing in steps of 10%. See also Spot ink characterization chart.
Tone value increase
Effect produced when ink soaks into the substrate and spreads out, causing the printing dots to become larger than their intended size, which darkens the printed image. This phenomenon is also known as dot gain.
Example: A 50% dot may increase to 55% in the print run. This is a dot gain of 5% or 0.05.
1 Tint ramp: Solids and tints of spot color printed over white and black backgrounds
2 White background (substrate)
3 Black background
4 Substrate
5 Solid black
6 Solid spot color printed over white (i.e. over the substrate)
7 Solid spot color printed over black