overview - classes.ischool.syr.educlasses.ischool.syr.edu/ist346/content/lab-server-operati… ·...
TRANSCRIPT

IST346: Lab Last Update: 9/24/2010 2:07 PM
LAB: SERVER OPERATING SYSTEMS
OVERVIEW
This lab will help you understand the management issues associated with servers and server operating systems. The key differentiator between a server and a workstation is that a server provides a service. In this lab you will learn how to issue commands to administer a common service used by the Windows and Linux operating systems. Since we will be diving into services in great depth throughout the semester, this particular lab will focus on the essentials of how server operating systems use and advertise services.
We will demonstrate how servers and services work by using the most common service used internally by companies and organizations – File sharing. File sharing services like Windows File Sharing (on Windows) and Samba (on Linux) allow users to store their documents remotely (off workstation). File sharing makes user’s file more accessible since they can be accessed from any workstation, since as users move from workstation to workstation; the files remain in one common place. Also files stored remotely are easier to back them up and configure the storage to be fault-tolerant, both of which help prevent data loss.
LEARNING OBJECTIVES
Upon completion of this lab, you should be able to
Demonstrate and explain the user and group security models used by the server variants of Windows and Linux operating systems
Understand the basic steps required to setup and use file sharing services. Test the services being offered by the server operating systems using client connections.
LAB BREAKDOWN
This lab consists of 3 parts:
1. Setup the file sharing services Samba on centos Linux server.2. Setup the Windows networking file sharing service on Windows server 2008.3. On your own: Get the Win7 virtual machine to talk to both remote file shares.
Page 1

IST346: Lab Last Update: 9/24/2010 2:07 PM
REQUIREMENTS
Before you start this lab you will need:
1. These virtual machines, a. Win2008 (Windows Server 2008) – acting as a serverb. Centos5 (Centos Linux 5) – acting as a server c. Win7 (Windows 7) – acting as a workstation
2. Startup the Win2008, Centos5, and Win7 virtual machines:a. Logon to win2008 as Administrator (the account with the most access on the Windows platform)b. Logon to Centos5 as root (the account with the most access on a *nix platform)c. Logon to Win7 as user (a non-privileged account)d. Remember, in all cases, the password is SU2orange!
W INDOWS F ILE SHARING IN P ICTURES
This diagram serves as a visual representation of how all the virtual machines used in the lab interact with each other and also communicate with the internet.
TODO: Make Diagram
Win7 will the workstation. As workstations, they are consumers (users) of the File Sharing service. It is important to note that any server may also act as a workstation (this is quite useful for testing out services.)
Centos5 and Win2008 will be servers. In the server role, they are producers of the File Sharing Service. If things go to plan you should be able to use any workstation to access any of the files on either of the
two servers.
PART 1 – SETTING UP SAMBA ON L INUX
This section will introduce and demonstrate how to setup and then use the Samba file-sharing service on Linux. The Samba service is the Linux version of the Windows networking protocol. In this part we will set Samba up on your Centos5 virtual machine and then test the file sharing by reading and writing to the file share using the winxp1 virtual machine.
SETUP SAMBA ON CENTOS5
First, we will configure our Centos5 Linux server for file sharing. Execute each of the following commands from the terminal window (a.k.a. Bash shell prompt) logged in as the root user.
1.A INSTALLING THE SAMBA SOFTWARE PACKAGES
1. The first thing we need to do is download and install the samba 3.x software package from the internet. Since the Linux operating system is open source, the freshest and most recent add-ons to the operating system are available on the Internet.
Page 2

IST346: Lab Last Update: 9/24/2010 2:07 PM
2. Let’s remove all existing traces of samba from our server, type:[root@centos5 ~]# yum remove samba* The yum command manages the software installed on your Centos Linux computer. You will be prompted to remove a few samba-based packages, press Y to remove them and install them.
3. When the process is complete, you should see a list of the packages that were removed. Your list should be similar to this: NOTE: if it’s not, that is okay. We just need to make sure the older version of Samba is removed before we install the latest and greatest version!
Page 3

IST346: Lab Last Update: 9/24/2010 2:07 PM
4. Next, Let’s install the Samba3x package, type:[root@centos5 ~]# yum install samba3x* This will prompt you to install about 10 packages. Press Y to download these packages from the internet and install them:
5. After you press Y, the packages will install.
1.B SETTING UP SECURITY AND ACCESS FOR THE FILE SHARE
At this point, Samba is installed, but has yet to be configured. Before we can configure Samba, we will need to setup a folder to share and the users and groups which have access to it. Enter these commands into the terminal window.
1 The user account we will use to access the share is user. Let’s verify this account already exists in the system, type:[root@centos5 ~]# cat /etc/passwd | grep “user”This command displays the contents of the password database (where user accounts are stored in linux). Grep helps us filter that output to only the text in quotes. You should see a line like this in the output:
If you do, then you’re all set, if not then you will have to execute this command to create the user account and set its password: useradd user –p
Page 4

IST346: Lab Last Update: 9/24/2010 2:07 PM
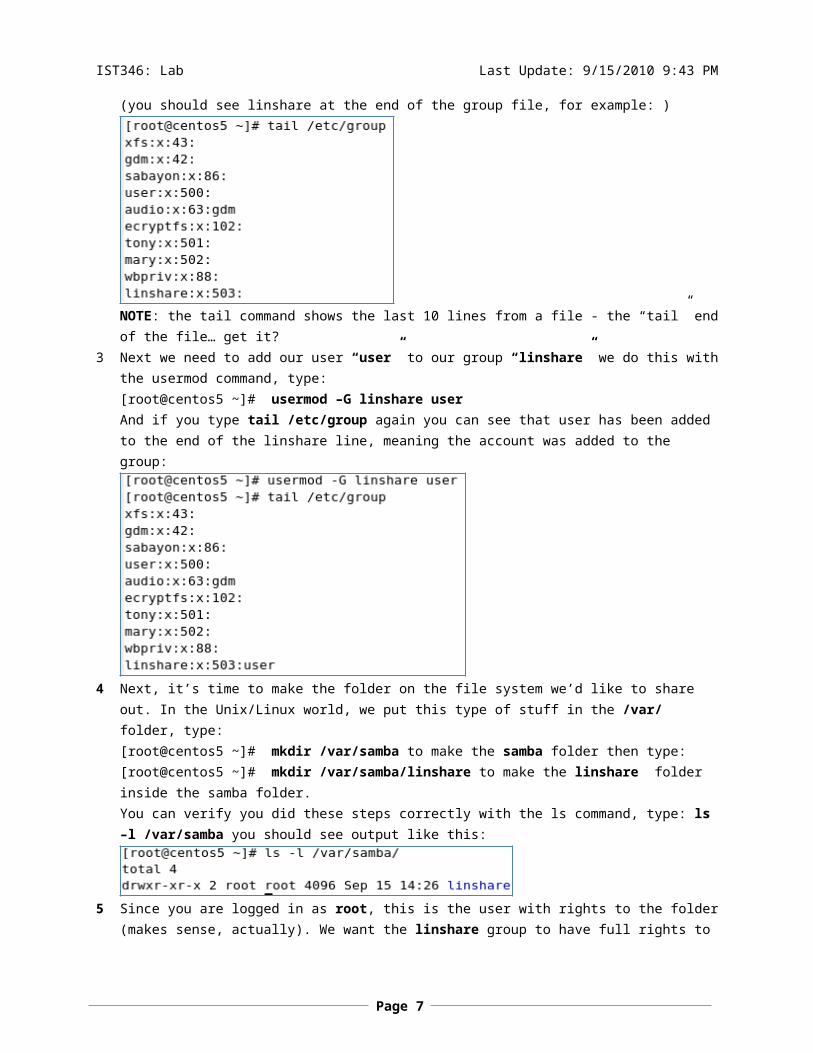
2 Next we need to create a group for the file share. As a rule of thumb, it is a bad idea to assign a user rights to a resource. The better plan is to assign a user to a group (or role) and then assign that group to the resource. Why? Users come and go, but the access that any user needs, such as rights to a folder, printer, or website does not change nearly as much over time. For example if people in the accounting department need to use the printer outside their office, I would assign the right to print to the accounting group, and then place the users in the group. This way when Bob is no longer in accounting, I only have to remove him from the accounting group, I don’t have to remember to revoke his access to the printer as well.Now that the tangent is over , let’s create the group linshare (short for linux share) Type:[root@centos5 ~]# groupadd linshare You can verify the group was created by checking for linshare in the at the end of the group file /etc/group, type:[root@centos5 ~]# tail /etc/group(you should see linshare at the end of the group file, for example: )
NOTE: the tail command shows the last 10 lines from a file - the “tail” end of the file… get it?3 Next we need to add our user “user” to our group “linshare” we do this with the usermod command, type:
[root@centos5 ~]# usermod –G linshare user And if you type tail /etc/group again you can see that user has been added to the end of the linshare line, meaning the account was added to the group:
4 Next, it’s time to make the folder on the file system we’d like to share out. In the Unix/Linux world, we put this type of stuff in the /var/ folder, type:[root@centos5 ~]# mkdir /var/samba to make the samba folder then type: [root@centos5 ~]# mkdir /var/samba/linshare to make the linshare folder inside the samba folder. You can verify you did these steps correctly with the ls command, type: ls –l /var/samba you should
Page 5

IST346: Lab Last Update: 9/24/2010 2:07 PM
see output like this:
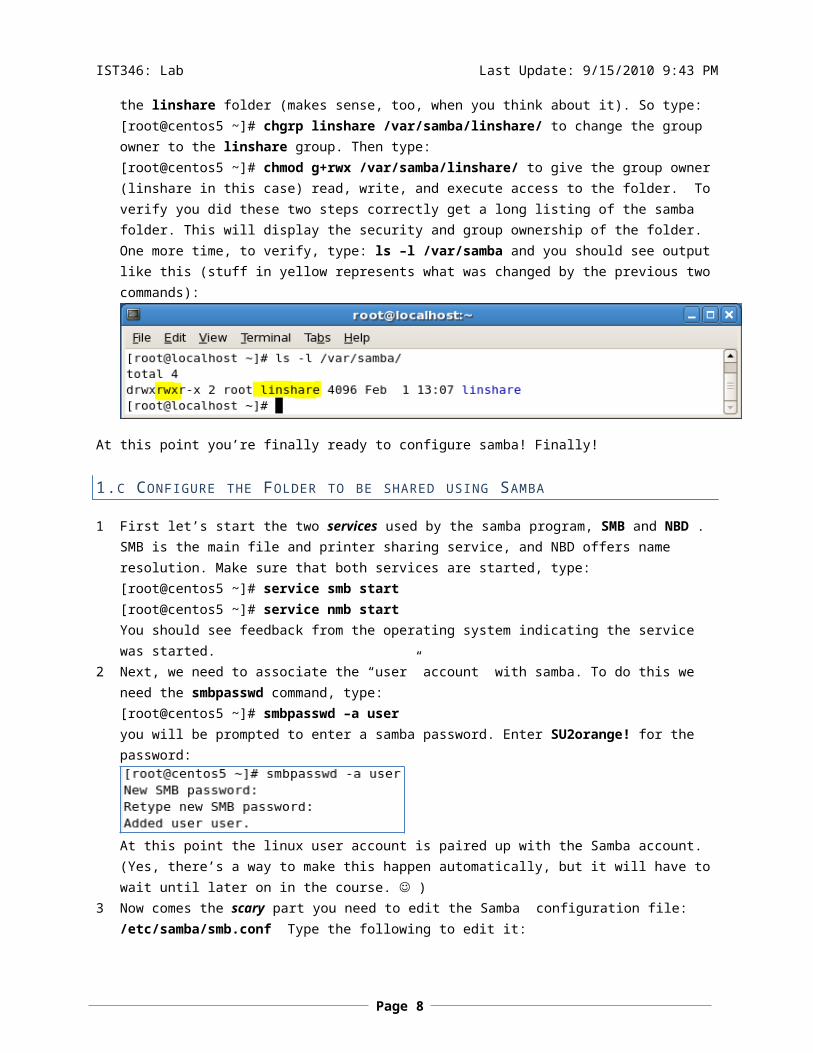
5 Since you are logged in as root, this is the user with rights to the folder (makes sense, actually). We want the linshare group to have full rights to the linshare folder (makes sense, too, when you think about it). So type:[root@centos5 ~]# chgrp linshare /var/samba/linshare/ to change the group owner to the linshare group. Then type:[root@centos5 ~]# chmod g+rwx /var/samba/linshare/ to give the group owner (linshare in this case) read, write, and execute access to the folder. To verify you did these two steps correctly get a long listing of the samba folder. This will display the security and group ownership of the folder. One more time, to verify, type: ls –l /var/samba and you should see output like this (stuff in yellow represents what was changed by the previous two commands):
At this point you’re finally ready to configure samba! Finally!
1.C CONFIGURE THE FOLDER TO BE SHARED USING SAMBA
1 First let’s start the two services used by the samba program, SMB and NBD . SMB is the main file and printer sharing service, and NBD offers name resolution. Make sure that both services are started, type:[root@centos5 ~]# service smb start[root@centos5 ~]# service nmb startYou should see feedback from the operating system indicating the service was started.
2 Next, we need to associate the “user” account with samba. To do this we need the smbpasswd command, type:[root@centos5 ~]# smbpasswd –a useryou will be prompted to enter a samba password. Enter SU2orange! for the password:
At this point the linux user account is paired up with the Samba account. (Yes, there’s a way to make this happen automatically, but it will have to wait until later on in the course. )
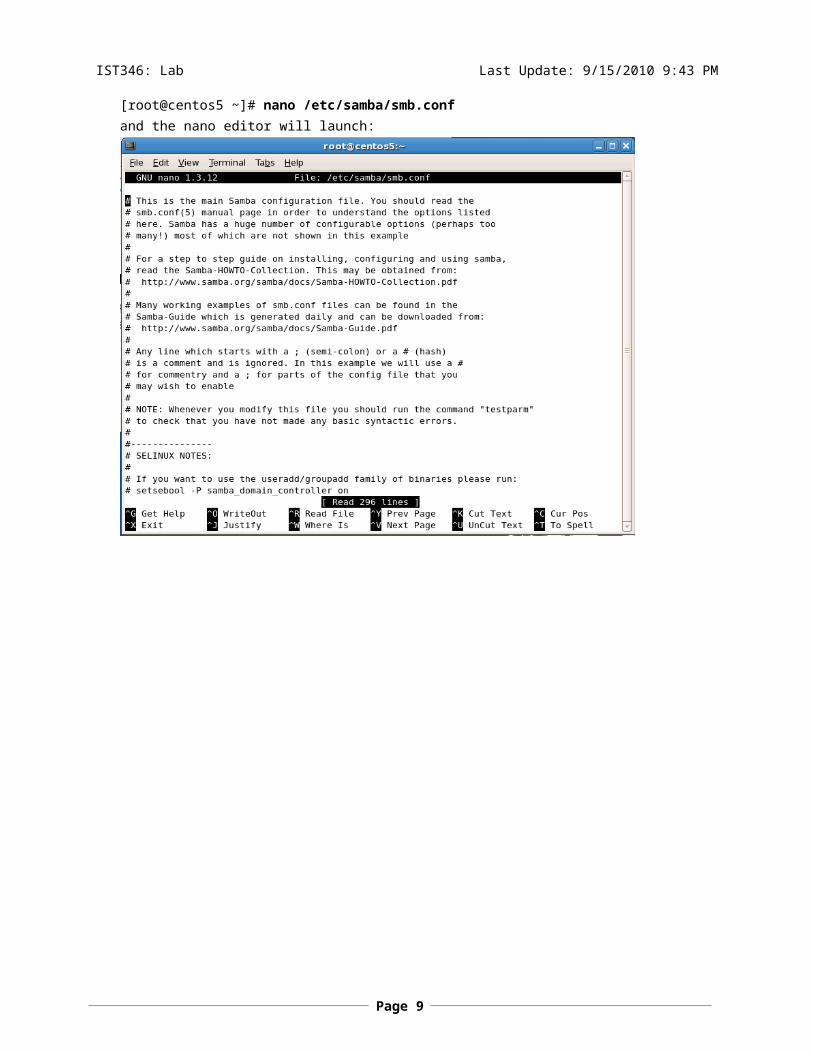
3 Now comes the scary part you need to edit the Samba configuration file: /etc/samba/smb.conf Type the following to edit it: [root@centos5 ~]# nano /etc/samba/smb.conf
Page 6
IST346: Lab Last Update: 9/24/2010 2:07 PM
and the nano editor will launch:
4 At the end of the file, enter the following text
Page 7
IST346: Lab Last Update: 9/24/2010 2:07 PM
5 Let’s examine the specifics of what you’re adding:
When you’ve got the information entered in, Triple Check it to make sure it’s accurate!!!! And then save the file by pressing CTRL+X then Y to save changes then ENTER to save.
6 Any time you edit the configuration of a service, you must restart that service, to do this, type:[root@centos5 ~]# service smb restart You should see the services stop & start again.
NOTE: You are done configuring samba and the linshare folder, time to go “FTW” and try to connect to our new share!
TEST YOUR SAMBA SERVER USING W IN7
Now it is time to test your connection to the Centos5 Samba file share. Make sure you’ve logged in to your Win7 virtual machine as user.
1.D CONNECT TO THE REMOTE F ILE SHARE
1 From the Desktop of your Win7 virtual machine. Click on start type in cmd and press ENTER to bring up a command prompt.
2 From this command prompt we will Map a Network Drive this adds a drive letter under my computer which corresponds to a remote file share. To accomplish this, type:C:\Users\user> net use L: \\centos5\linshare If things go to plan you should see:
This command associates a drive letter L: with the shared folder linshare on the server centos5. Yes, there’s a
Name of Share
Path to the share
Writeable by this group
Page 8
IST346: Lab Last Update: 9/24/2010 2:07 PM
lot of magic happening here but the details will be covered in the file sharing lab. If things do not go as planned, you might need to re-trace your steps in parts 1.a – 1.c
3 Now, let’s go for the win! Click on Start Computer you should see a network drive like this:
4 Double-click on the drive, and you should see an empty folder. (Makes sense because we did not place any files in /var/samba/linshare on the centos5 server!)
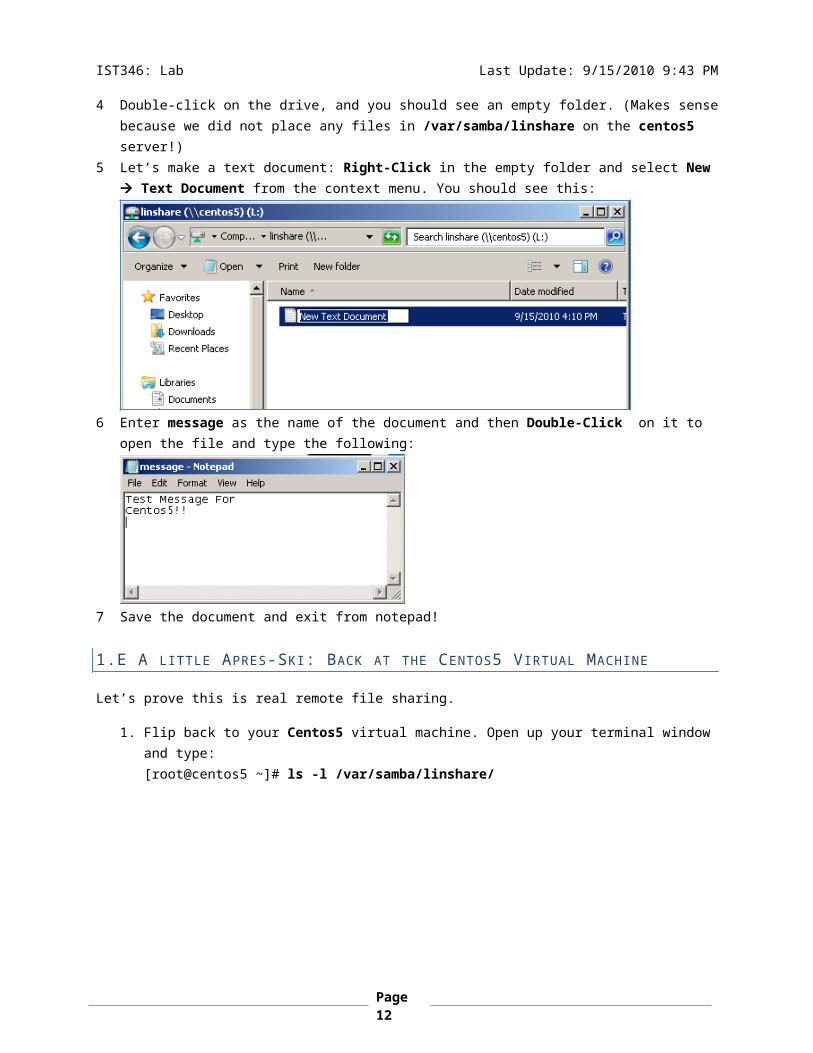
5 Let’s make a text document: Right-Click in the empty folder and select New Text Document from the context menu. You should see this:
6 Enter message as the name of the document and then Double-Click on it to open the file and type the following:
7 Save the document and exit from notepad!
1.E A LITTLE APRES-SKI: BACK AT THE CENTOS5 V IRTUAL MACHINE
Let’s prove this is real remote file sharing.
1. Flip back to your Centos5 virtual machine. Open up your terminal window and type:[root@centos5 ~]# ls -l /var/samba/linshare/
Page 9

IST346: Lab Last Update: 9/24/2010 2:07 PM
You should see the document you created!
2. Check out what’s inside the message.txt file, type:[root@centos5 ~]# cat /var/samba/linshare/message.txtand you should see the message inside!
QUESTIONS / FOOD FOR THOUGHT
1.1 What does the linux command yum do?1.2 What is samba?1.3 Why is it a better administrative practice to assign a group access to a resource rather than a user?1.4 What is the difference between the cat and tail commands?1.5 Use the nano command (nano /var/samba/linshare/message.txt) to add another message of
your choosing to the file and then save it. When you switch back to the Win7 virtual machine and open message.txt do you see those changes? Can you explain why or why not?
1.6 From the linux terminal type smbstatus based on the output, what do you think this command does?
PART 2 – SETUP F ILE SHARING ON W INDOWS
Next, we will setup the win2008 virtual machine as a file server in the same manner as we did on Linux. Since file sharing is native on Windows, the setup and configuration is a little more straightforward.
SETUP F ILE SHARING ON W INDOWS SERVER 2008
2.A INSTALLING FILE SERVICES ROLE
To install the File Services Role, from the win2008 virtual machine, logged in as Administrator, do the following:
1. Open the server manager utility. Click Start Administrative Tools Server Manager. The server manager utility is a one stop shop for configuring and administering services on Windows Server 2008.
Page 10

IST346: Lab Last Update: 9/24/2010 2:07 PM
2. Next, let’s add the File Server role to this server. From Server Manager, click on Roles then Add Roles. The “Add Roles Wizard” will appear. Click on Server Roles. You should see this screen:
3. Select the File Services role, and click on Role Services on the left-hand side.
Page 11
IST346: Lab Last Update: 9/24/2010 2:07 PM
4. From the Role Services screen select only File Server (screenshot below) and then click Next > to advance to the confirmation screen:
5. At the Confirmation screen, click the Install button to setup file services on this computer.
Page 12

IST346: Lab Last Update: 9/24/2010 2:07 PM
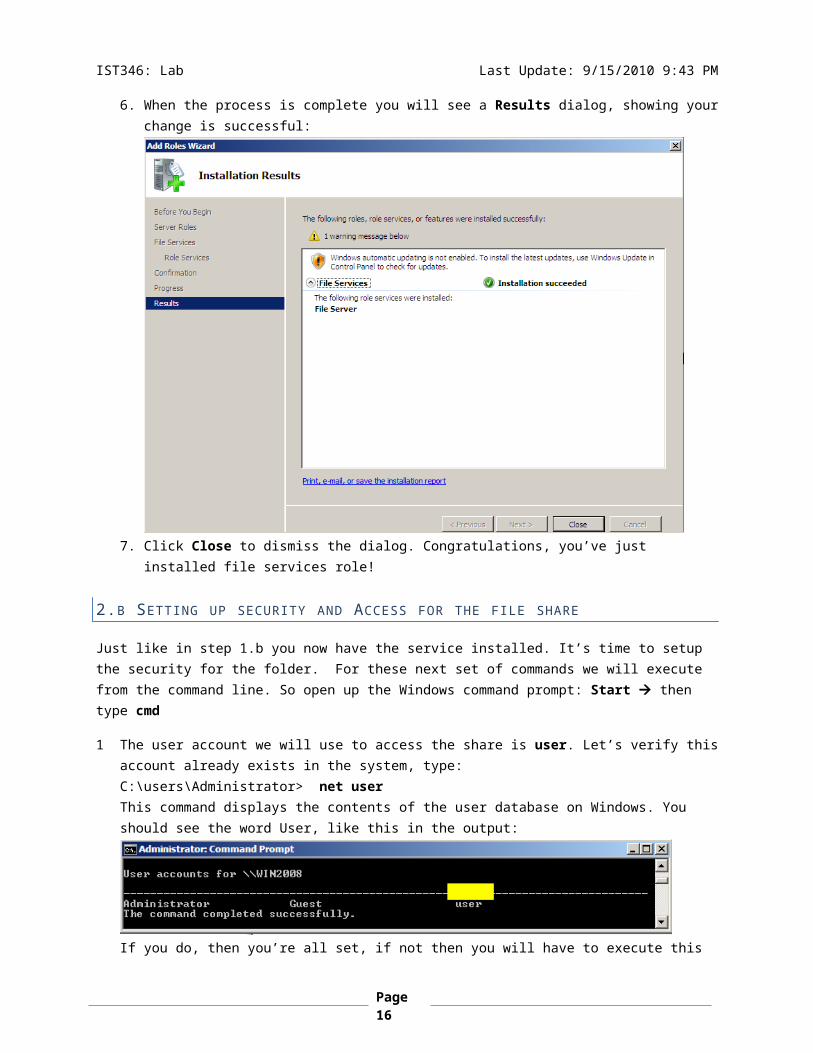
6. When the process is complete you will see a Results dialog, showing your change is successful:
7. Click Close to dismiss the dialog. Congratulations, you’ve just installed file services role!
2.B SETTING UP SECURITY AND ACCESS FOR THE FILE SHARE
Just like in step 1.b you now have the service installed. It’s time to setup the security for the folder. For these next set of commands we will execute from the command line. So open up the Windows command prompt: Start then type cmd
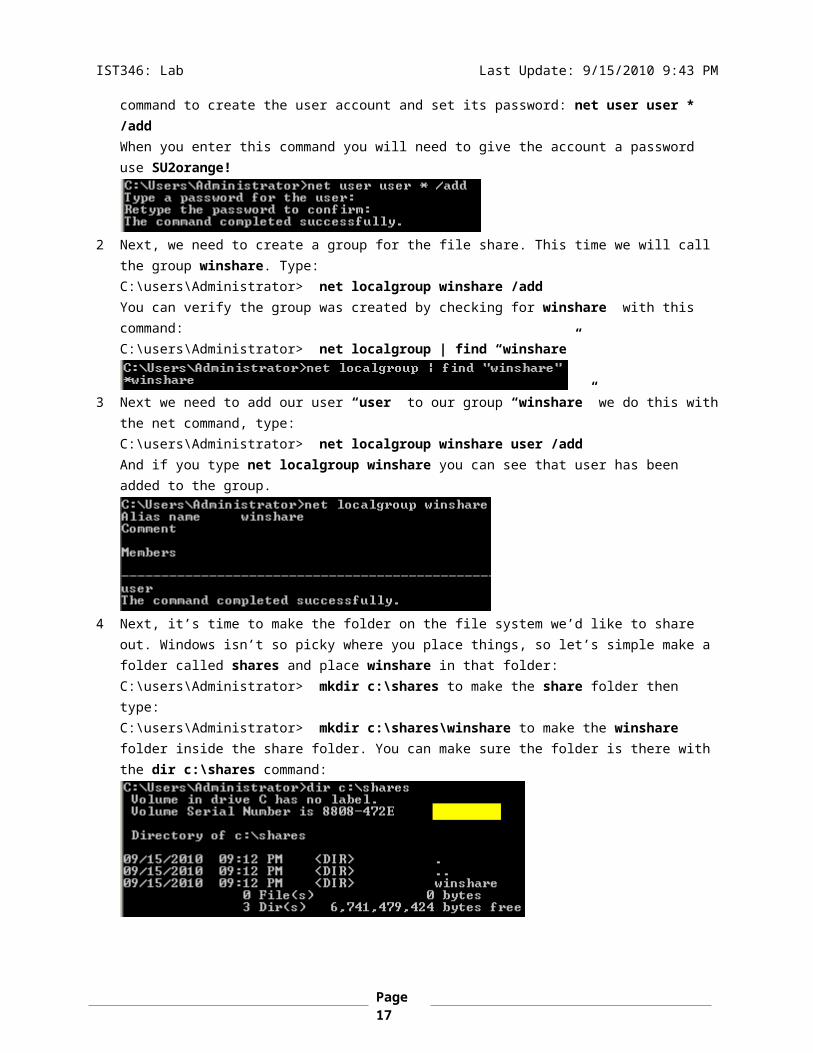
1 The user account we will use to access the share is user. Let’s verify this account already exists in the system, type:C:\users\Administrator> net user This command displays the contents of the user database on Windows. You should see the word User, like this in the output:
If you do, then you’re all set, if not then you will have to execute this command to create the user account and set its password: net user user * /add
Page 13

IST346: Lab Last Update: 9/24/2010 2:07 PM
When you enter this command you will need to give the account a password use SU2orange!
2 Next, we need to create a group for the file share. This time we will call the group winshare. Type:C:\users\Administrator> net localgroup winshare /add You can verify the group was created by checking for winshare with this command:C:\users\Administrator> net localgroup | find “winshare”
3 Next we need to add our user “user” to our group “winshare” we do this with the net command, type:C:\users\Administrator> net localgroup winshare user /addAnd if you type net localgroup winshare you can see that user has been added to the group.
4 Next, it’s time to make the folder on the file system we’d like to share out. Windows isn’t so picky where you place things, so let’s simple make a folder called shares and place winshare in that folder: C:\users\Administrator> mkdir c:\shares to make the share folder then type: C:\users\Administrator> mkdir c:\shares\winshare to make the winshare folder inside the share folder. You can make sure the folder is there with the dir c:\shares command:
5 Since you are logged in as administrator, the security on the folder is designed to match this user. We would like to change the security so that the winshare group has full rights to the winshare folder. The easiest method of doing this is through the windows GUI. So, at the command prompt, type:C:\users\Administrator> start c:\shares to open a GUI shell folder for the winshare folder.
Page 14

IST346: Lab Last Update: 9/24/2010 2:07 PM
6 Right-Click on the winshare folder and choose Properties from the context menu, then select the Security tab. You will see this dialog:
7 From the Security tab, click Edit… to bring up the Permissions for winshare dialog.8 From this dialog click the Add… button and in the Select Users Or Groups dialog type winshare and click Ok. 9 You will now be back at the Permissions for winshare dialog. Click on the winshare group and select Full
Control from the permissions section. (see attached screenshot)
10 Once you’ve selected full control click Ok to close the Permissions for Winshare dialog. Then click Ok again to close the winshare Properties dialog. Your permissions are now set properly. Phew! Somehow that seemed easier in Linux!
Click to select winshare group
Click full control to grant this group full rights to the folder
Page 15
IST346: Lab Last Update: 9/24/2010 2:07 PM
2.C SHARE THE WINSHARE FOLDER
Now it’s time to share out the winshare folder.
1 From the windows GUI, right click on the winshare folder and choose Share… This will open the file sharing dialog which should look like this:
2 Click on the Share button.
When the Network discover and File Sharing dialog appears, click on Yes:
3 When the process is complete, click Done.4 Congratulations! You are now sharing the folder… you may press the Staples “That was easy” ™ button now.
TEST YOUR W INDOWS F ILE SHARING USING W IN7
Now it is time to test your connection to the Win2008dc file share. Make sure you’ve logged in to your winxp1 virtual machine as user.
Page 16
IST346: Lab Last Update: 9/24/2010 2:07 PM
2.D CONNECT TO THE REMOTE F ILE SHARE
1 Return to the Command Prompt from the Desktop of your Win7 virtual machine (it should still be open from part one).
2 From this command prompt we will Map a Network Drive to winshare on win2008To accomplish this, type:C:\Users\user> net use W: \\win2008\winshare (NOTE: we could have used any letter, but I thought I’d be cute and use L: for Linux & W: for Windows.) If things go to plan you should see:
3 Now, let’s go for the win! Click on Start Computer you should see a network drive like this:
4 Double-click on the drive, and you should see an empty folder. (Makes sense because we did not place any files in c:\shares\wwinshare on the win2008 server!)
5 Let’s make a text document: Right-Click in the empty folder and select New Text Document from the context menu. You should see this:
6 Enter message as the name of the document and then Double-Click on it to open the file and type the following:
7 Save the document and exit from notepad!
Page 17

IST346: Lab Last Update: 9/24/2010 2:07 PM
2.E W IN2008 F ILE SHARING: AFTER THE LAUGHTER
Let’s prove this is real remote file sharing one more time.
1. Flip back to your Win2008 virtual machine. Go back to the command prompt, and type:C:\users\Administrator> dir c:\shares\winshareYou should see:
2. Let’s see what the message says by taking a look inside the file:C:\users\Administrator> type c:\shares\winshare\message.txt
3. Very Nice, Indeed!
QUESTIONS / FOOD FOR THOUGHT
2.1 What command displays the members of a group, such (as the winshare group) in windows?2.2 What command creates a new user account in Windows?2.3 What is the command to make a folder from the windows command line?2.4 From the win2008 command prompt terminal type net session based on the output, what do you think
this command does?
PART 3 ON YOUR OWN
See if you can apply what you learned and create two new shares linshare2 and winshare2. Verify these shares work and are accessible from your Win7 workstation.
ADDITIONAL QUESTIONS
3.1 Describe the process for copying files from the winshare to the linshare?3.2 Does a windows share always need to use the W: drive? Explain.3.3 In your opinion, which server was easier to configure why? Linux or Windows?3.4 Do you see any challenges to rolling out a service like this one en masse (to everyone in an organization)?
Sharing on a server is a one-time setup but what would you need to do to each workstation?3.5 What parts of this lab did you have the most difficulty with completing and why?
Page 18