overview of arts online drawing progression...
TRANSCRIPT

Overview of Arts Online Drawing Progression Resources: These education resources support the development of selected drawing skills to accompany other resources on the Arts Online site; - Drawing Progression Exemplars on the Arts Online Teacher Resource Exchange
http://artsonline.tki.org.nz/Planning-tools/Teacher-Resource-Exchange - Drawing Progression Resources on the Arts Online Visarts Pinterest boards of the same name
https://nz.pinterest.com/visartsonline/drawing-progressions-primary-resources/
The resources loosely scaffold into progressive sessions according to the level of difficulty - not necessarily age. The Drawing Progressions exemplars and research show that learning can occur in profoundly non-linear ways and that age does not necessarily correlate to students’ skill level. The resources that accompany the drawing progressions focus mainly on the Practical Knowledge and Communicating and Interpreting strands of the Arts in the New Zealand Curriculum achievement objectives. Each resource contains a range of ideas and strategies for developing students’ understanding of drawing as a way of recording the world in two dimensions. More detailed tasks can be easily located via the links provided, the Arts Online Pinterest board (above) and online education links.
Drawing Progressions Resource – Space in drawing
The following resources introduce a variety of picture-making devices that can be used to
create the illusion of space (depth) in two-dimensional artworks.
OVERVIEW: Duration – 6 lessons: Length of lessions can be tailored to suit by breaking into activites Single sessions or episodes within lessons can be integrated to complement learning on other curriculum areas Levels: Activities can be completed at any level. These activities are aimed at levels 1-4.
Lessons on space in drawing: 1: Pictorial space 2: Overlapping 3: Scale and Placement 4: Scale of mark-making 5: Isometric Projections 6: Linear perspective
N.Z. Curriculum Strands
Developing practical knowledge – Level 2 Explore some art-making conventions, to discover/apply knowledge of elements and selected principles through the use of materials and processes. Communicating and interpreting – Level 2-3 Share / describe the ideas their own and others’ objects and images communicate.
Specific Learning Outcomes
Students will explore principles of; overlapping, scale and perspective conventions to create pictorial space through the use a variety of materials and techniques. Students will learn about and discuss / describe a range of conventions used to create the illusion of depth in two- dimensional artworks
LESSION 1: Pictorial Space
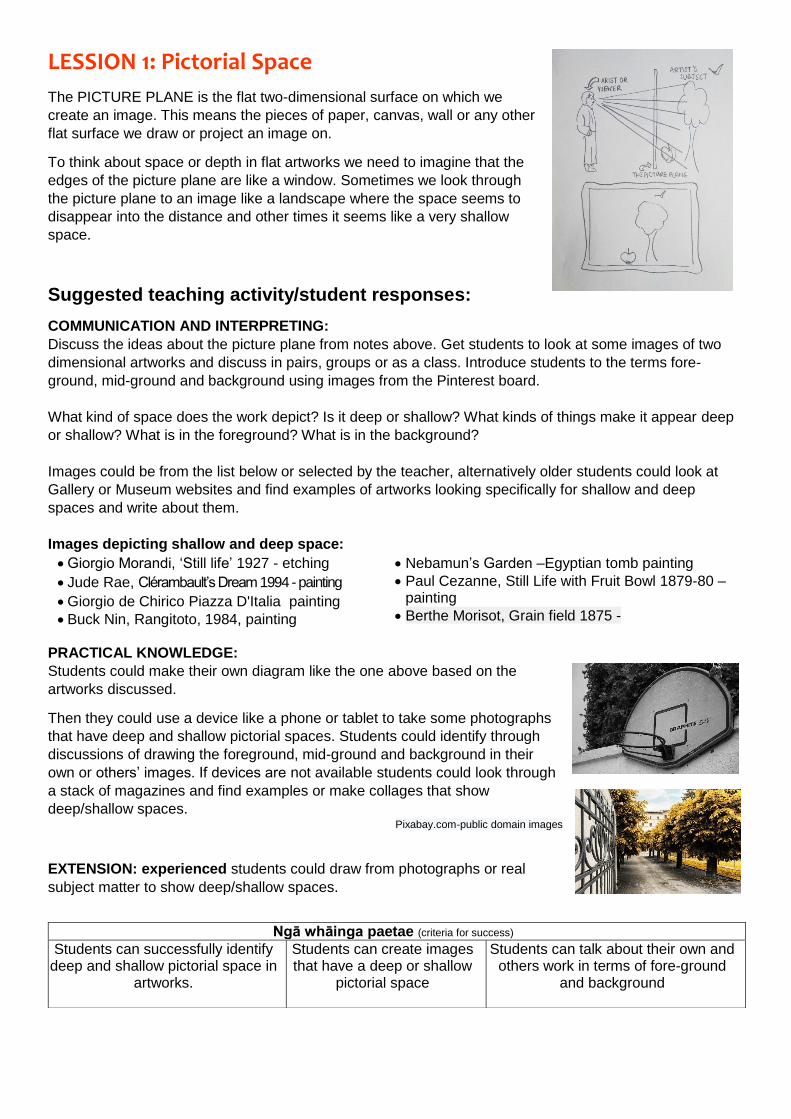
The PICTURE PLANE is the flat two-dimensional surface on which we
create an image. This means the pieces of paper, canvas, wall or any other
flat surface we draw or project an image on.
To think about space or depth in flat artworks we need to imagine that the
edges of the picture plane are like a window. Sometimes we look through
the picture plane to an image like a landscape where the space seems to
disappear into the distance and other times it seems like a very shallow
space.
Suggested teaching activity/student responses:
COMMUNICATION AND INTERPRETING:
Discuss the ideas about the picture plane from notes above. Get students to look at some images of two
dimensional artworks and discuss in pairs, groups or as a class. Introduce students to the terms fore-
ground, mid-ground and background using images from the Pinterest board.
What kind of space does the work depict? Is it deep or shallow? What kinds of things make it appear deep
or shallow? What is in the foreground? What is in the background?
Images could be from the list below or selected by the teacher, alternatively older students could look at
Gallery or Museum websites and find examples of artworks looking specifically for shallow and deep
spaces and write about them.
Images depicting shallow and deep space:
Giorgio Morandi, ‘Still life’ 1927 - etching
Jude Rae, Clérambault’s Dream 1994 - painting
Giorgio de Chirico Piazza D'Italia painting
Buck Nin, Rangitoto, 1984, painting
Nebamun’s Garden –Egyptian tomb painting
Paul Cezanne, Still Life with Fruit Bowl 1879-80 – painting
Berthe Morisot, Grain field 1875 -
PRACTICAL KNOWLEDGE:
Students could make their own diagram like the one above based on the
artworks discussed.
Then they could use a device like a phone or tablet to take some photographs
that have deep and shallow pictorial spaces. Students could identify through
discussions of drawing the foreground, mid-ground and background in their
own or others’ images. If devices are not available students could look through
a stack of magazines and find examples or make collages that show
deep/shallow spaces. Pixabay.com-public domain images
EXTENSION: experienced students could draw from photographs or real
subject matter to show deep/shallow spaces.
Ngā whāinga paetae (criteria for success)
Students can successfully identify deep and shallow pictorial space in
artworks.
Students can create images that have a deep or shallow
pictorial space
Students can talk about their own and others work in terms of fore-ground
and background
LESSION 2: Overlapping to create pictorial space
Placing one object in front of another (overlapping) can create the illusion of depth even if the objects themselves mostly look flat and are on a flat surface.
Suggested teaching activity/student responses: COMMUNICATING AND INTERPRETING: Look at these artworks below using an online image search. Discuss as a class and/or give students small reproductions of one or more of the artworks to draw over edges where objects overlap. Students could discuss or write about which objects look like they are behind or in front of others and why it looks this way to them.
‘Sorrows of the King’ by Matisse
‘Pop Shop Quad 1” or ‘DJDog” by Keith Haring
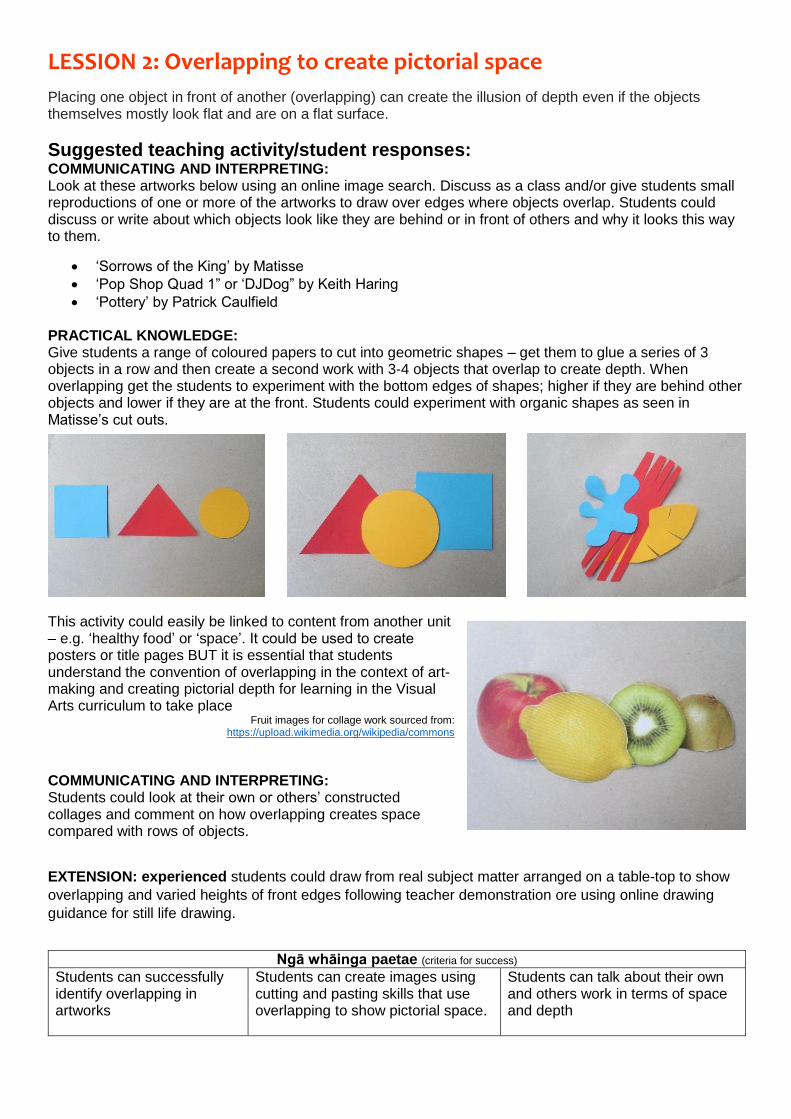
‘Pottery’ by Patrick Caulfield PRACTICAL KNOWLEDGE: Give students a range of coloured papers to cut into geometric shapes – get them to glue a series of 3 objects in a row and then create a second work with 3-4 objects that overlap to create depth. When overlapping get the students to experiment with the bottom edges of shapes; higher if they are behind other objects and lower if they are at the front. Students could experiment with organic shapes as seen in Matisse’s cut outs.
This activity could easily be linked to content from another unit – e.g. ‘healthy food’ or ‘space’. It could be used to create posters or title pages BUT it is essential that students understand the convention of overlapping in the context of art-making and creating pictorial depth for learning in the Visual Arts curriculum to take place
Fruit images for collage work sourced from: https://upload.wikimedia.org/wikipedia/commons
COMMUNICATING AND INTERPRETING: Students could look at their own or others’ constructed collages and comment on how overlapping creates space compared with rows of objects.
EXTENSION: experienced students could draw from real subject matter arranged on a table-top to show
overlapping and varied heights of front edges following teacher demonstration ore using online drawing
guidance for still life drawing.
Ngā whāinga paetae (criteria for success)
Students can successfully identify overlapping in artworks
Students can create images using cutting and pasting skills that use overlapping to show pictorial space.
Students can talk about their own and others work in terms of space and depth

LESSION 3: Scale and Placement to create space Making things bigger or smaller compared to each other (relative size) can make them look closer/far away creating the appearance of depth
Suggested teaching activity/student responses: COMMUNICATING AND INTERPRETING: Look at these images online: - ‘Christina's World’ by Andrew Wyeth, 1948 - ‘Les valeurs personnelles’ (Personal Values) by René Magritte, 1952
Discuss the relative scale (sizes) of objects. Are they realistic sizes? How deep or shallow does the space in the picture space feel? PRACTICAL KNOWLEDGE: Give students a copy of the same image in 2-3 different sizes OR get them to find a group of images based around a topic -making sure they are quite different in size. Cut out the objects and experiment with the position of the objects on a white A4 sheet of paper to create the illusion of space – if using table-top sized items students may wish to add a horizon line and dark background
COMMUNICATING AND INTERPRETING:
Look at some ‘forced perspective’ images online like the one to the left and discuss; What is in the ‘foreground’ or at the front of the picture and what is in the background? What effect does the relative size of the objects and placement (front/back) do to the space in the picture? What kinds of humorous illusions can this create?
Public domain image sourced from: https://commons.wikimedia.org/wiki/File:Europe_2007_Disk_1_340.jpg#file
PRACTICAL KNOWLEDGE: Students could complete a drawing using crayons that demonstrates what they have learned about scale – a common example of this is the ANZAC day Poppy field exercise found on the Pinterest page. Look at Monet’s Poppy Field or a similar work before beginning. EXTENSION: experienced students could draw from real
subject matter arranged on a table-top with some objects
near the very front of the table and some objects at the
back to show relative sizes.
For interest Students could research Ames rooms online for more ideas about size and visual illusions.
Ngā whāinga paetae (criteria for success)
Students can successfully identify relative scale in artworks
Students can create images using cutting and pasting and photographic skills that use scale to show pictorial space.
Students can talk about their own and others work in terms of scale.
Image author’s own; drawn by Soren aged 5 ½

LESSION 4: Scale of mark-making to create space Making things bigger or smaller in a picture can make them look closer/far away creating the appearance of depth. This effect can also be enhanced by how close objects of varying scales are to each other. Sometimes it is also the marks that artists make that change in size to show distance.
Suggested teaching activity/student responses: COMMUNICATING AND INTERPRETING: Look at these ink line drawings by Vincent Van Gogh and the many others by him available online.
From left to right; Wheat field with View of Arles, Fenced field behind the hospital of Saint-Paul, A Fishing Boat at Sea.
Van Gogh images are in the public domain sourced from Wikimedia and Wikiart. https://commons.wikimedia.org, http://www.wikiart.org
Discuss the different types and sizes (scale) of marks he has made. What kind of spaces are depicted – shallow or deep? How do the marks convey the space in the paintings? Do the marks add any other kind of feeling or mood to the work? PRACTICAL KNOWLEDGE: Get students to experiment with a range of dots, dashes, squiggles and thicknesses of line with charcoal pencil or black crayons on a piece of paper – make a range of sizes for each type of mark. Give students an A4 or larger landscape photograph of a deep space with some recognisable objects such as buildings or cars. Images could be from around the school or a place of significance to the community. On a window or lightbox place the images face-down and get students to experiment with making their own crayon version of a work like Van Gogh’s using the photograph to guide them. Placing larger types of marks in the fore-ground of their pictures with much smaller marks at the back Students could discuss the different types and sizes of marks in their own and others’ drawings.
Pixabay.com-public domain image above, author’s own image to the right.
EXTENSION Students could experiment with sight-size drawing by measuring objects nearby and faraway with their
pencil and marking in the relative sizes on paper before drawing – see online resources for support.
Ngā whāinga paetae (criteria for success)
Students can successfully identify scale of marks in drawings
Students can create images using only marks that change in size to suggest depth.
Students can talk about their own and others work in terms of mark-making and depth

LESSION 5: Isometric Projections
Isometric drawing is a mathematical method to represent the accurate scale and dimensions of
3-D objects and is useful for maths exercises, mechanical diagrams, video games. There are
many online drawing exercises demonstrate how to draw using this technique as well as
resources on the Arts Online Pinterest drawing board. Image sourced from wikipedia.org – public domain
Suggested teaching activity/student responses: PRACTICAL KNOWLEDGE:
Experiment with drawing different geometric shapes on isometric dot paper. Examples of how to use isometric dot paper are on the Primary Drawing Progressions Pinterest board and can easily be located along with free templates online. Include a basic square and rectangle and then ‘build’ with them – this is especially appealing to students interested in Minecraft. https://www.sketchport.com/drawing/6201302967123968/3d-creepers
COMMUNICATING AND INTERPRETING: Look at examples of traditional Asian drawings and paintings. Identify isometric lines through discussion or
tracing over examples. What kind of effect of space does this create in the picture? Does it look more or
less realistic than other types of artworks (reference could be made to session 1 examples)?
Look at isometric mechanical drawings of parts of machines or exploded views of objects found online –
discuss why these are more useful than a ‘flat’ drawing. What kind of information do they include that is
useful? Why are these drawings made and who for? How is this different from the traditional Asian artworks
that use the same drawing method?
PRACTICAL KNOWLEDGE: Once students know how to draw an isometric cube or rectangle this knowledge can be used to draw objects related to any current unit. For example; if the students are reading a Pirate story they could draw a treasure chest using isometric perspective. Search online “how to draw a treasure chest step by step” Or go to: http://www.drawingpower.org/drawing-lessons.htm
A large fish tank drawn using the same method could be filled with images of fish to complement a Science project or a review of the movie Finding Dory Image source: wikimedia –public domain
The Arts Online Pinterest board – ‘Drawing Progressions Resources’ currently includes examples of; a treasure chest, Lego bricks, optical illusions and Minecraft swords using isometric lines. EXTENSION: more experienced students could use isometric dot paper to:
make a fantasy environment for selected animals (Penguin example on Pinterest board)
Draw Minecraft objects like this sword: https://www.youtube.com/watch?v=fd0PutJQoYI
Or draw food items such as liquorice allsorts or sandwiches (Exploded view of sandwich on Pinterest)
Image open domain sourced from: https://pixabay.com
Ngā whāinga paetae (criteria for success)
Students can successfully identify parallel lines in isometric artworks
Students can create basic geometric shapes using dot paper
Students can draw simple rectangular or square objects using isometric perspective

LESSION 6: Linear perspective to create space
Linear perspective uses lines converging on one, two or multiple
points – called the vanishing points. This is a popular device used
by children drawing rooms, landscapes and buildings to give the
appearance of depth. It was a major development in Visual Arts
during the Renaissance.
Image by Oliver Harrison (Directly from the creator) [CC BY 2.5
(http://creativecommons.org/licenses/by/2.5)], via Wikimedia Commons
Suggested teaching activity/student responses:
COMMUNICATING AND INTERPRETING: Look at the animation on the Artists Toolkit about linear and atmospheric perspective.
http://archive.artsmia.org/artists_toolkit/watch_space_perspective.cfm.html
Give students an artwork that uses 1 point perspective and get them to rule or draw over the lines to find
the vanishing point as in the example below:
Piero della Francesca [Public domain or Public domain], via Wikimedia Commons
PRACTICAL KNOWLEDGE:
Students could draw; a simple number letter, object, room, surreal
space or landscape using 1-point perspective. There are
numerous online examples including those on the Arts Online
Pinterest board.
These can be linked to another topic, activity or book, for example
at the time of writing this resource children’s’ book ‘The 52 Storey
Treehouse’ by Andy Griffiths is very popular. As a result there are
many 1-point perspective fantasy rooms and 2-point perspective
treehouse drawing lessons currently on the Pinterest board.
EXTENSION: more experienced students could try;
Using 2-point, multi-point perspective to create more complex images with
guidance from online and Pinterest resources in response to a topic, idea or
motivation.
Experimenting with atmospheric perspective in a colour landscape work.
I
Image by Mmroberts (Own work) [CC BY 3.0 (http://creativecommons.org/licenses/by/3.0)], via Wikimedia Commons
Ngā whāinga paetae (criteria for success)
Students can successfully identify parallel lines in isometric artworks
Students can create basic geometric shapes using dot paper
Students can draw simple rectangular or square objects using isometric perspective
Image: Ourladyshigh at English Wikipedia