owerfibers online magazine - spectrumwebpages.charter.net/jpfcf/powerfibers_issue_15.pdfliving room...
TRANSCRIPT

Photo by Val Atkinson
April, 2004 (Volume 15)
P O W E R F I B E R S O N L I N E M AG A Z I N E
D e d i c a t e d t o t h e b u i l d i n g o f F i n e B a m b o o F l y R o d s
Inside this issue: The First Cast 3
Home, Sweet Rod Shop 4
Making Reel Seat Inserts 7
Rodmaker: Jim Bureau 13
Conception—A Poem 18
Bamboo/Argentine FF 21
Smarter Blanks , Part II 27
Flies with a Past 32
Expanding Draw Collet 35
Norwegian Wood 41
The 2 Day Rod 44
Photography, Fine Art 46
Setting Depth Gauges 49
Just Planed Fun 51
Photo by Val Atkinson
P a g e 2
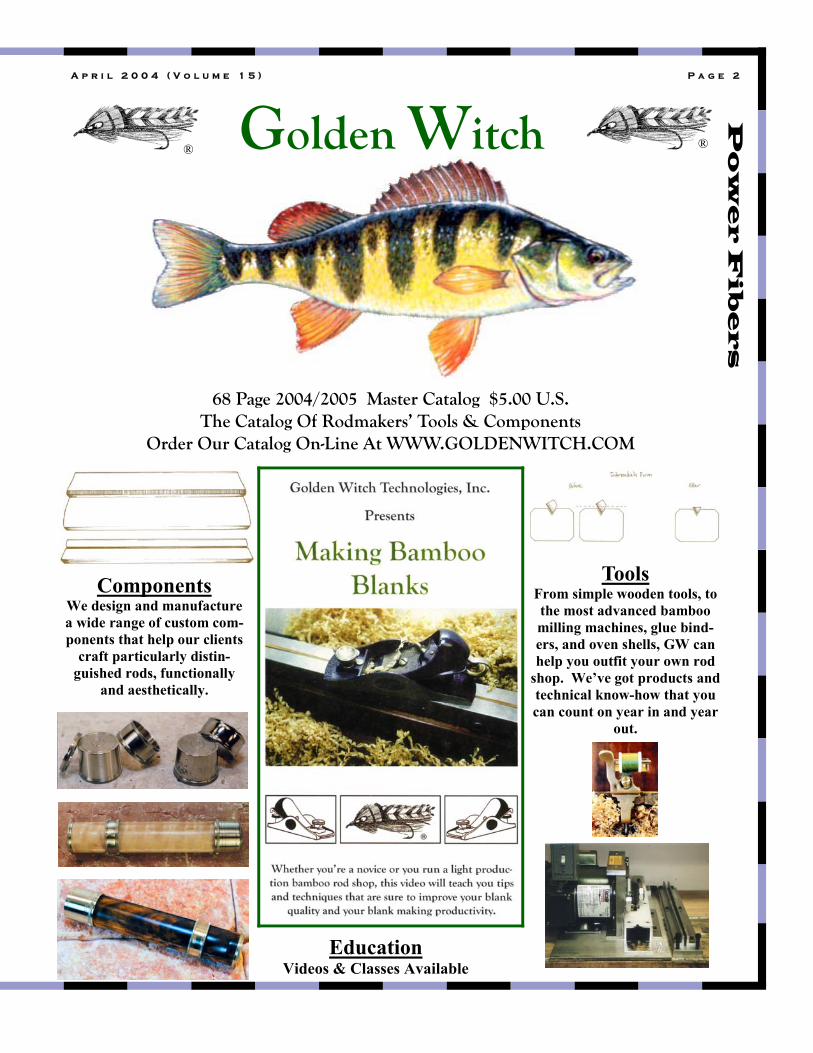
® ® Golden Witch
A p r i l 2 0 0 4 ( V o l u m e 1 5 )
68 Page 2004/2005 Master Catalog $5.00 U.S. The Catalog Of Rodmakers’ Tools & Components
Order Our Catalog On-Line At WWW.GOLDENWITCH.COM
Education Videos & Classes Available
Components We design and manufacture a wide range of custom com-ponents that help our clients
craft particularly distin-guished rods, functionally
and aesthetically.
Tools From simple wooden tools, to the most advanced bamboo milling machines, glue bind-ers, and oven shells, GW can help you outfit your own rod
shop. We’ve got products and technical know-how that you can count on year in and year
out.

A p r i l 2 0 0 4 ( V o l u m e 1 5 ) P a g e 3
Power Fibers
Online Magazine
Editor Todd Talsma
Contributors Carl DiNardo
Don Johnson
Bob Maulucci
Bret Reiter
Kathy Scott
Tony Spezio
Jerry Snider
Vidar Steimler
Jorge Trucco
Joe West
Copy Editors Bret Reiter
Carol Talsma
Mark Wendt
Advisory Board Russ Gooding
Bob Maulucci
Ralph Moon
Bob Nunley
Joseph Perrigo
J.D. Wagner
For more info contact:
Todd Talsma
8412 North Maple Court
Zeeland MI 49464
616.772.5043
Copyright © 2004 by Power Fibers
The First Cast Todd Talsma, Editor
Fresh from a trip to Wisconsin and Minnesota with the family, my thoughts begin to wander toward the coming fishing season. I found myself constantly checking for po-tential water as I went over bridges while driving. I find myself doing that often when I’m driving here and there. It seems that I’ve always been a little distracted with moving water. I look back and remember that there was always something special about fishing in the Baldwin River when I was young. I’m also looking forward to the Grayrock gathering that will be held in June. I hope to see many of you there. I’ve found over the last 5 years or so that this craft tends to attract some of the best people I’ve ever known. I could start listing people who exemplify this, but I fear that I’d miss someone who is deserving of this “title” for lack of a better word. The first time I at-tended a gathering, I felt like I knew many of the people there for most of my life. I guess the Internet has helped that, with the ROD-MAKERS listserv, but even with that, I’m amazed with the sense of community that exists with rodmak-ing. I think you will all enjoy this, my second issue of Power Fibers. Many thanks go out to the contribu-tors and copy editors that are listed at right. They are the ones who really make this magazine what it is.
As always, if you have any com-ments, suggestions or would like to write an article for us, please drop me a line at: [email protected]
Warning! Because many aspects of bam-boo rod building bring the maker in contact with machin-ery, bladed tools, volatile chemi-cals and gases, the editor and advisory board of Power Fibers ask you to exercise the utmost caution when attempting to build or mimic any devices or activities mentioned in this magazine. Please have any devices you build and use in your shop checked by a safety professional before attempting to use such devices. This is to guarantee your personal safety and that of others around you. If you choose to build any de-vice or use any technique found in this magazine, you are doing so at your own risk.

A p r i l 2 0 0 4 ( V o l u m e 1 5 ) P a g e 4
Home, Sweet Rod Shop Text & Photos by Carl DiNardo
Editor’s note: This is the third in a series of arti-cles about rodmaking from the perspective of a new rodmaker. I tidied up the shop a bit, as the last few times that a guest had shown up it looked the same as it typi-cally does. That is, more like the catastrophe that is my fly patch in June than the structured array of my fly boxes in February. This is a bit of a per-sonal struggle for me because I have the incredible fortune to be able to call the northern third of my living room my “Rod Shop.” Consequently I tend to refer to the whole room as the “Rod Shop,” even though in the middle there are the requisite sofas, chairs and coffee table, and then beyond that the not-quite-so-requisite guitars. That’s the southern wall, the “Music Room.” The southern wall is also typically home to all of my rodmaking, fly-tying, and various other fishing and related books and media. I feel this is enough to justify classifying the entire room as the “Rod Shop.” And if it isn’t enough, then just add the stash of bamboo that is stored above the southern wall on the beams trav-ersing the length of the room’s vaulted ceiling. It’s
a shame, really, for when people visit they are in-vited inside only to witness firsthand the chaos that for me is inherent to having more than one stage of rodmaking in progress. My only defense is that I try to keep the mess to the north, and that I sweep up my shavings and turnings on something resem-bling a regular basis. Maybe that isn’t my only de-fense, as it just may be that I am simply trying to work this out of my system before I am happily married and such things as Harley-Davidsons and First Floor Rod Shops are single, distant pipe dream.
The more I think about this, however, the more I real-ize that my rodmaking endeavors have encroached on more than my living room. The counter in my kitchen, for example, is where I lay a 12” x 12” slab of tile for sharpening plane blades. In the little room be-hind the kitchen where my water heater resides, there is a two-wheel grinder for sharpening lathe tooling and, well, grinding. In the same room are some ele-vated, blue metal cabinets that house, among other things, little used tools and chemicals such as turpen-tine, mineral spirits, bleach, and the like. I have to confess that oftentimes the contents of these cabinets can migrate to the backside of my workbench. From there they inevitably begin to work on whichever side of the brain it is that is responsible and safety-minded, at which point I begin banishing them back to the ugly blue cabinets in the chilly back room. Guide wrapping and thread varnishing both are per-formed on my dining room table. My dining room is little more than a small, undivided area adjacent to my living room. It happens to be right next to the kitchen, so that is where my table stands, and that is where I dine. I like eating dinner and looking at a rod hanging in my drying cabinet, which just so happens to be di-rectly across from the table. Try convincing your sig-nificant other that it really does cast a romantic glow. Never mind the hint of varnish in the air; the smell of turpentine should cut it. I had thought for a second that I would be able to ex-clude my bedroom from this tour, but I quickly real-ized that I am tapping away about one of my most fa-vored subjects from said room. My computer is in my bedroom, so I find myself here daily, devouring bam-boo-flavored emails and visiting all manner of related Internet sites. Of course, I also have dreams about the stuff, but I can rarely remember them in the morning. Some of them are probably wonderful dreams about lovely casting and gorgeous fish, but others are proba-bly about glue failures and exploding nodes, so it is most likely a good thing I forget, or it’s at least a wash. Occasionally a three thousandth inch thick curl of bamboo makes its way into the bedroom too, but I don’t think I can reasonably pass that off as rodmak-
(Continued on page 5)

A p r i l 2 0 0 4 ( V o l u m e 1 5 ) P a g e 5
ing. It’s more like messiness. One final room in my house that deserves mention-ing is the bathroom. I can’t say that I have ever ex-perienced anything resembling a stroke of genius whilst bathrooming, but I often find otherwise ab-sent books and catalogues in there; evidence that I must have been reading them. Moving outside of the house, I find that my screened in patio makes a wonderful place to flame a culm of bamboo on rainy days. When it is sunny, I move this operation to the front yard. Speaking of the front yard, it does not make the most ideal spot for lawn casting, but there is room enough to shoot out a fair bit of line if I stand in just the right spot and carefully place my back-cast. If I am practicing the way I should, though, I needn’t get carried away with super-hauling for distance and the front yard suddenly becomes much more ideal than it was. The small creek (more of a diversion ditch, actually) cutting through this patch of ground does nothing for fishing or casting purposes, but it serves to fuel the inevitable “YOU CATCH ANY?” that passersby yell as they drive down my lane. While this area sees the most of practice lines, it also sees my test casts, so I include it in the tour of the Rod Shop. Besides, the only way I can get myself to practice is under the auspices of en-joying the responsive nature that is inherent in a well designed and well-crafted bamboo flyrod; or, at least enjoying one that I made. If all of this sounds rather idyllic, it shouldn’t. Rather, maybe it should, but with qualifications. What I mean is that even if I do have the ideal situation to be making bamboo flyrods in, it is tran-sitory; a temporary resting place in my journey of life. In fact, this point is starting to ring clear and true to me, as I am faced with big changes that may include, among other things, moving to an apart-ment. I have heard rumblings of those who have made due with very little space and done very well at it. I gather up every little piece of information from these folks about how they make things work in tight quarters as often as I can. I know that it is coming, and I fear that my sprawling ways may have rooted well enough to handicap my creative thinking. In the end, however, I believe this change will be
good for me. After all, I will probably learn some space saving techniques that I will undoubtedly drag along with me when I finally do settle down. A habit like that is certain to be a benefit to anyone. Apparently my Rod Shop has become far more than the plywood bench upon which I slice curls of bam-boo. Not only is it more than that spatially, but also it has much more meaning to me personally. It has, over the last couple of years, become more of a home where it once was merely a house. Much of this I at-tribute to the work area in the living room. Before I moved the workbench out there, I had little reason to spend much time in that large open space. Now, I spend a great deal of time there. I will guard against the house being completely overrun with rod making paraphernalia, but when the time comes I will also work to keep the needed space available. I figure that as long as my operation falls somewhere between the complexity of whittling rods with a pocketknife and cutting them with a CNC laser mill, I should be okay with the happy medium that my home, my Rod Shop, wherever that may be, will provide me. In the mean-time, I will enjoy the romance of my drying cabinet over a fine homemade wine.


A p r i l 2 0 0 4 ( V o l u m e 1 5 ) P a g e 7
Making Reel Seat Inserts Text & Photos by Tony Spezio
It seems that making reel seat inserts is inti-mating to some. I hope this article will make it easy to learn how to make them.
I start off with a 3/4" X 3/4" X 3 3/4" block. In this case it is a piece of cedar. Mark an X on each end from corner to corner. Where the lines intersect will be the center.
Drill a 3/16" pilot hole at each center; one for the turning spur and the other for the live center. Instead of a spur, a dull Forstner bit can be used; it will work just as well.
Mount the block between the spur and the live center. After the block is locked between the spur and live center it is time to start turning.
Lets talk about the cutting bit first. The cutting bit should have a blunt nose. The rounded nose and slight rake in the direction you will be cutting will make a cleaner cut.
Turn the block at a medium speed and take a light cut off the corners. If you try to take a deep cut, the block might split or hang up on the cutting bit.
As the corners are removed, deeper cuts can be taken and the speed can be increased.
(Continued on page 8)

A p r i l 2 0 0 4 ( V o l u m e 1 5 ) P a g e 8
(Continued from page 7)
When the block is round so it can be chucked up in the three-jaw chuck it is ready for the cen-ter hole to be drilled. Put the block in the three-
jaw chuck and the drill in the tail stock chuck. I use a 3/8" 5" long parabolic drill. The Parabolic drill has long flutes that clear chips bet-ter. (Left)
After the center hole is drilled the block is put on the turning mandrel.
The mandrel I use is a length of 3/8" steel rod. It is 9" long and threaded on each end. Note the washers; they are turned to the finished size of the insert so that I can use them as a guide. I just turn the insert till I reach the washers and then start the finish sanding.
After the insert is turned to size the sanding is done with 240, 320 and 600 sandpaper. I finish off with 4/0 steel wool.
The final check on the insert is done with Tony Larson's reel seat insert gauge (Left)
When this is done, the arbor with the insert is re-moved from the chuck and the end blocks for mortising are put on the ends of the arbor.
(Continued on page 9)

A p r i l 2 0 0 4 ( V o l u m e 1 5 ) P a g e 9
(Continued from page 8)
The insert is then ready to cut the mortise. A fingernail bit is used. It has to be centered in order to get an even cut on the insert. It takes a while to set it up so I dedicated a router setup to cutting the mortises.
The mortise can be cut in a couple of passes. The fence is set for the deepest cut. (Left & Right)
When cutting the mortise don't cut the full length of the insert. Leave one end round to accommo-date the cork check.
After the mortise is finished, remove the end blocks and put the assembly back in the lathe. The finish is applied with a soft cloth while the insert is spin-ning. I have tried sev-eral types of finishes. I like to apply one or two coats of Crystal Coat,
then a couple of coats of Helmsman Urethane.
To the right are some reel seats that I have turned.
Hope this might help in making your reel seat in-serts.

A p r i l 2 0 0 4 ( V o l u m e 1 5 ) P a g e 1 0

A p r i l 2 0 0 4 ( V o l u m e 1 5 ) P a g e 1 1
Rodmaker Profile: Jim Bureau, J.W. Bureau Classic Rods Interview by Bob Maulucci Photos Courtesy of Jim Bureau
I first met Jim Bureau in Grayling, Michigan at the 2001 Gray Rock Rodmaker’s Gathering. Over the past three years, I have kept close in touch with Jim, and he has been an invaluable help to me with both rod making and casting questions. In addition to being a world class rod maker and casting instructor, Jim is an accom-plished canoeist and carver, and he even knows a thing or two about coaching softball. I guess in a way, the term “coach” fits Jim to a tee. He is the gentle, knowing man who graciously passes on to me what others have passed on to him. When catching up with Jim at last year’s gather-ing in Grayling, he was kind enough to show me some of the secrets that resided in his trunk. Rod after rod, hexagonal case after case, each handcrafted piece was a perfect balance of func-tion and beauty. The figure of the woods that Jim used in his reel seat fillers and cases was like none I had ever seen. It possessed more “eyes” per square inch than any other bird’s eye maple I had ever seen, and the figured curly ma-ple was equally stunning. I was intrigued when Jim clued me in on his new business venture. He was ready to bring his splendid wood and reel seat designs to the rod making community. Clearly, the time has come. I hope you enjoy this brief conversation with my friend and master rodmaker Jim Bureau. What first got you started in rod making? I actually was doing quite a bit of duck decoy and realistic animal carving when the rod mak-ing bug hit me. I was on a fly fishing trip to the Grayling area and happened to stop at a local fly fishing shop. During a conversation with Steve Southard, owner of the Fly Factory, I learned about a bamboo rodmakers gathering
that was to take place on the following week-end. I'd always been interested in bamboo fly rods, but I had no idea that anyone other then a few seasoned professionals were making bam-boo rods. I showed up for the Grayrock Bam-boo Rodmakers Gathering on the following weekend, and I've been making bamboo rods ever since. You had mentioned Al Medved a bit when we talked. Tell me more about your connec-tion. Al Medved was the first bamboo rodmaker I ever met. While at Grayrock, I happened to walk up to the picnic table Al was sitting at, with his bamboo rods and his brand new bevel-
(Continued on page 12)

A p r i l 2 0 0 4 ( V o l u m e 1 5 ) P a g e 1 2
ler he'd just invented. I introduced myself and we've been friends from that day on. I was amazed at the quality of Al's fly rods and I knew I wanted to learn to make rods of that quality. It's now ten years later and I'm still try-ing. When I returned home, I immediately started making the beveller and had it com-pleted in short order. Ever since my introduc-tion to bamboo rod making, it's been Al who's been my inspiration, and my mentor. How would you describe yourself as a rod-maker? How do you like to go about building a rod? I consider myself a self taught rodmaker, but I have a real appreciation for the help I received from others who've been there before me. I've always tried to make each and every bamboo rod better then the previous rods I've made. That's what motivates me to go on with the next rod. I hand plane my rods but I do use a rough bev-eller to get my initial strips to 60 degrees. I really enjoy the hand planing process and use mostly hand tools when building. I usually have two or three rods in different stages of produc-tion at the same time. I like it this way because it gives me the flexibility to work on whatever I feel like when I go into my shop. It may be sort of a non-conventional way to go about things, but it's what works for me. What are your thoughts on sharpening? So many new rodmakers struggle with getting and staying sharp.
I like to get all of my tools shaving sharp. No matter if I'm using a plane blade, gouge, knife, or chisel, I find rod making much easier and more enjoyable when I have tools that cut with ease. For anyone who's just getting started in rod making I'd highly recommend power sharp-ening over sharpening by hand. Not only is power sharpening faster then sharpening by hand, you'll find yourself sharpening much more often, thus keeping your tools razor sharp. I've invested considerable money into a hand sharpening system in the past and those stones and jigs now sit idle. With my simple power sharpening system I can sharpen a plane blade to a razors edge in a minute or two. All that's really needed is a powered leather wheel and some white buffing compound to do the cutting. I personally have a setup with three wheels which I'd bought when I was making wood carvings. One of the wheels is the leather wheel and the other two are covered with varying grits of emery cloth. This setup allows me to sharpen anything from a miniature v gouge to my lawn mower blades.
(Continued on page 13)

A p r i l 2 0 0 4 ( V o l u m e 1 5 ) P a g e 1 3
There has been a lot of lively discussion about heat treating as of late. What do you think about oven treating a rod versus flam-ing, temp, time, etc…? What is the right way to heat treat a rod? I oven treat all my rods, whether they're flamed or not. I flame rods for color and I personally don't consider this flaming to be a part of my heat treating process, although it obviously has an effect on the bamboo. I heat treat in my oven for three reasons. One, to drive off moisture, which helps prevent sets from occurring later on. The result of driving off the moisture ends up creating springiness, with rebound to the later finished rod blank. Secondly, to help relax the strips so they fit into the planing form better. Third, to create a desired color, such as in an oven toned rod. Oven treating bamboo does have an effect on the springiness of the com-pleted rod. However, I don't vary temperatures to try to create different actions. I've found the temperatures that work for my oven and I stick with those temps. If I want to make changes to a rod’s action I'll vary the taper rather then ex-periment with varying oven temperatures. For me, the most critical part of preparing a rod to plane is in the way I go about flaming the culm. I much prefer to have a rod medium, or even lightly flamed, then to have them very dark. I've noticed that with the darker rods I've made in the past, the bamboo strips often become some-what brittle and more difficult to plane to final dimension. You end up with those stringy, dam-aged fibers that you never can seem to get rid of during planing. The right way to go about heat-
treating will vary from one rodmaker to another. What's really important is to heat-treat so one’s rods don't later end up taking a set, and to end up with a nice springy action with strips that aren't damaged from the heat treating and flam-ing process. As long as you can get results such as this, then it really doesn't matter how you go about doing so. When I first started making rods I heat-treated for about 8 minutes at 375 de-grees. Why? Because that's what everyone else I knew was doing. It's now ten years later and I've changed because of conclusions I've come to through my own observations. For my flamed rods, I heat treat at about 330-340 degrees for 20 minutes. If I'm heat-treating a rod to be oven toned, I'll use a temperature of 275-300 degrees, and 45 minutes to one hour time duration, de-pending on the way the bamboo takes the color. I move the bound up strips back and forth in my oven from time to time, which helps to even the color somewhat. You seem to make every part of the rod from blank to case. When do you decide to make a part and when do you decide to buy? The parts I make are the ones I feel I can make better then manufactured parts. I tried making my own guides several years ago and gave up on the idea. I just couldn't produce guides that
(Continued on page 14)

A p r i l 2 0 0 4 ( V o l u m e 1 5 ) P a g e 1 4
were of the precision qual-ity of manufactured guides so I now buy them in-stead. Reel seats fillers were something I learned to make from nearly the beginning because of the high quality local wood I was able to obtain. I didn't care for the straight grained woods that were being offered on most manufactured reel seat so I started making my own fillers. I started making hexagon rod cases because I wanted a fancy case to put my bamboo rod into. What are your favorite tapers? I know you like the Payne 98 quite a bit. For dry fly fishing to ris-ing trout I'll take the 7613 or 8013 Dickerson. I'd also choose either of these rods as nymphing rod fa-vorites. When I'm fishing dry flies to trout that aren't rising, I'd prefer a slower action rod for the hun-dreds of casts that I'll be making when doing this type of fishing. The 4wt Perfectionist is my favorite and any of the Garrisons would also be great for this type of fishing. If I'm fishing brookies in tight brush I'd like a faster action rod with a tip that isn't too small. I also want something short in length for the brush with about 7ft as a maximum. A great little brookie rod for tight brush is the Paul Young Midge. It's short, somewhat fast in action, and has a good sized tip. My steamer rod favorite is the Paul Young Para 15 wet fly tipped rod. It's got a good sized tip and bends into the handle. I really like a streamer rod to do most of its work in the butt section due to the stress I put on the
rod when stripping streamers under water. This rod also has the abil-ity to pick up a lot of line off the water. The Payne 98 is a cannon to say the least. If some-one were to just own one rod, for all types of fish-ing, and in a 7 foot length, I don't know how you could make a better choice then the Payne 98. Have you developed any proprietary tapers? I haven't designed any of my own tapers but I have modified existing tapers with good success. My idea of designing a great fly rod would be to take an existing rod that I've fished and like very much, and to make what I consider to be slight modifications to this rod. These modifications would be based on cast-ing style (aggressive
(Continued on page 15)
After receiving this story, I asked Jim for a taper that he particularly likes. Here is his response—Todd Talsma, Editor Here's a really nice 8 foot, 5 weight dry fly rod taper that's one of my favorites. The varnish has already been deducted from the measurements. It is derived from a Dickerson 8013. What I did was to take an average from three different Dickerson tapers that I have and average out the slope per inch of the rod to come out with the figures. I use Garrison guide spacing when building all of my rods. Jim 0 .074 5 .086 10 .098 15 .112 20 .126 25 .140 30 .154 35 .168 40 .182 45 .192 50 .210 55 .228 60 .246 65 .264 70 .282 75 .300 80 .318 85 SWELLED 90 HANDLE 96 HANDLE

A p r i l 2 0 0 4 ( V o l u m e 1 5 ) P a g e 1 5
caster, or lazy caster) and give me the exact rod I was looking for. Would this new rod be better then the original, not really, but it did accom-plish what I was trying to achieve. What about the short rod vs. long rod argu-ment? What do you base rod selections on? My choice for fly rod length is based on the type of fishing I'm doing at the time. I like the shorter rods in tight cover simply because they're easier to get into position to cast and much easier to haul around in the woods. For waters where I'm wading deep, I like a longer rod of 7 1/2 to 8 feet. I'm short in stature and the longer rod makes it easier to keep my back cast elevated and out of trouble. I also like a some-what longer and stiffer rod for nymphing. The stiffness helps to detect the take and the longer length allows me to keep more line off the wa-ter when dead drifting the nymph. Short rods are fun to cast but I do find them to be much more limited then longer length rods. How has your casting instruction influenced your rod making? My being a certified casting instructor has had very little influence on the way I go about rod making. What's really influenced me is the fact that I now have much more time to go fishing and to evaluate rods, and their design, now that my children are raised and gone. I'd much pre-fer to go fishing with a friend who's an excellent caster and evaluate a rod through casting and fishing than to use any kind of a computer pro-gram to design a rod. These on stream evalua-tions have done more for me in choosing a fly rod to build then my becoming a casting in-structor. You have just recently started a component business. What are some of the products you are offering? What inspired you to enter the business end of things? My new business has only one product for sale
at the moment, reel seats with highly figured stabilized wood fillers. I'm offering fifteen spe-cies of high quality stabilized woods with nickel silver hardware. This is the foundation of my business. In the very near future I'll be adding matching winding checks for sale. I entered this business because I know I can offer something special to rodmakers in the way of special highly figured woods and nickel silver hardware that is functional, and of the highest quality. What is the business’s working name? The name of the company is J.W. Bureau Clas-sic Rods. You can view my website at www.jimbureau.com What are your favorite woods? How do you choose which reel seat filler you will use on a rod? How do you match blank and filler col-ors, so to speak? Wood choices are not a cut and dried issue with me. I personally like highly figured wood that somewhat matches the color of the bamboo. If I want to replicate a rod from the past and yet still have a nicely figured filler, I'll use something like soft or hard curly maple. These woods have been used on bamboo rods for many years and they look great on a rod. My personal favorites for blonde or oven toned rods is box elder burl. For lightly flamed rods I like the bird’s eye ma-ple, and for darker flamed rods I really like the black ash burl. The nice thing about modern rod making is that all these different selections al-lows us rodmakers to be different from one an-other but yet still have great looking rods. That's why I'm offering so many different species of woods for rodmakers to choose from. When do you need to stabilize fillers and
(Continued on page 16)

A p r i l 2 0 0 4 ( V o l u m e 1 5 ) P a g e 1 6
when are they okay with a standard finish? The woods that truly need to be stabilized are those that are so soft that they couldn't be turned otherwise. Many of these newer species of fill-ers like box elder burl, spalted maple, or buck-eye burl were never considered for much of anything in the past. Now that stabilizing is pos-sible these highly figured woods are being used more and more. Another nice thing about stabi-lized wood is that the filler won't take on mois-ture which possibly could swell the filler. The best woods to use a standard finish on are woods that are quite hard to begin with. Woods like hard maple, oak, or cherry would be good examples. With the hardness of these woods the filler is far less likely to dent over time, or take on water, than a softer species. How is the stabilization accomplished? The actual process of stabilizing wood seems to be a somewhat closely guarded secret. The ba-sic process of professional stabilizing is well known to others but the specifics are not. What I can tell you is that the professional stabiliza-tion process to the wood gives 100% penetra-tion of monomers and polymers through a vac-uum and pressure process, while under con-trolled heat. The process leaves very little ab-sorption qualities left in the wood, thus prevent-ing swelling of the wood. A good example of a product that would have similar absorption qualities would be steel wool. Another nice thing about this stabilized wood is that it's easy to re-polish the wood after a few years of hard fishing. Just simply apply some plastic polish, buff the filler and you'll be like new again. Your reel seat hardware is unique in that it has an internal taper that matches the taper on a standard AFTMA reel foot. How impor-tant is your internally tapered slide band? Is it a critical part that most manufacturers skip?
I consider my internally tapered slide band to be a major improvement over straight bore cap and ring reel seats. What's really nice about this de-sign is that it seems to fit every modern fly reel foot to near perfection. The internal taper of my slide band is a direct match to the taper of a modern fly reel foot and it results in a great fit. I think that once tried, it will be hard to dispute, that this design is superior for fitting and hold-ing a fly reel then a straight bore style slide band.
I think the world will be hearing a lot from Jim Bureau in the next few months. I know that he has already caused quite a stir on the Rod-maker’s List. In phone conversations I have had with fellow makers, his beautiful reel seats are being talked about and are sure to be adorn-ing rods everywhere. As I sit here looking at one of the lovely maple and nickel silver seats that Jim has sent me, I cannot help but smile. Beyond the pure beauty of it, I smile knowing that it came from a great guy, my friend, Jim Bureau.


A p r i l 2 0 0 4 ( V o l u m e 1 5 ) P a g e 1 8
What would you like? The maker asked. The angler in the moment basked, The day he had so sorely whist, The day he made the top, The List. What would you like? The maker asked. Decision-making time at last. The angler spoke but no words came - Garrison, Leonard, Thomas, Payne? What would you like? The maker asked. How long a rod? How should it cast? Blond rod? Dark rod? Lightly flamed? Traditional taper? One unnamed? What would you like? The maker asked. A nice slow action? Medium? Fast? Wrapped in silk? And then, which hue? Agate guide? Ferrules blued? What would you like? The maker asked. Traditional hardware from the past? Reel seat insert from what wood? A slide band ring, would that be good? What would you like? The maker asked, His own decisions somewhat masked (Questions number by the score; The maker faces many more). What would you like? The maker asked (Which culms of cane to split or cache? Spar urethane? Which type of glue? The depth gauge point, is it still true?)
What would you like? The maker asked (Has plane or blade now been surpassed? Will this caliper work once more? Despite its plummet to the floor?) What would you like? The maker asked (Which binder belt did I use last? Nodeless? Stagger? – Hmm, which one? How hot to treat? How long ‘til done?) What would you like? The maker asked, Struck with the beauty of the grass. In his heart, he had one wish: To make another after this. What would you like? The maker asked. The angler’s face by now aghast - Here’s the fishing that I do, Could answers, maybe, come from you? What would you like? The maker asked. They conferred, the die was cast, The angler tuned to reel and line, The maker, cane, and the sublime. Kathy Scott, 2004
Conception by Kathy Scott

A p r i l 2 0 0 4 ( V o l u m e 1 5 ) P a g e 1 9
J.D. Wagner, Rodmaker Fine Split-Cane Fly Rods
REELS BY HARDY PHOENIX & THEBAULT SILK FLYLINES
“Practice Makes Perfect”
Deal with a Full-Time, Professional Rodmaker For all your rodbuilding needs
RODBUILDING CLASSES TOOLS BLANKS SUPPLIES
WWW.WAGNERRODS.COM
Although rodbuilding tools & classes are a part of our business, our main focus continues to be the actual building and restoring of cane rods.
As we embark on our 11th year in business, we remain focused on making the best cane rod we can, using only the finest available materials.
The more one practices one’s craft, the better one gets.
If you are looking to take a rodbuilding class, consider taking instruction from a full-
time professional.
2004 Class Schedule
July 10-15, 2004 July 17-22, 2004 July 24-29, 2004
Limited to four students per class Contact us for a class brochure
[email protected] 440.845.4415
www.wagnerrods.com

A p r i l 2 0 0 4 ( V o l u m e 1 5 ) P a g e 2 0
Tools from J.D. Wagner, Rodmaker
Now you can build rods with dramatic Heddon and Thomas & Thomas style swelled butts with our new swelled butt forms. Like our forms that set the standard for accu-racy and quality, these forms can also make any rod without a butt swell (up to a 8’ 2 piece rod). So there's no need for a dedicated form. These forms do it all! A full 1” thick, fully precision ground from heat treated, stress–relieved steel. The picture be-low shows a swell of .120 over 2” (and can be made larger) or a minimum swell of about .60 over 2”. See our web page for more details and photos.
Quad Forms! We began making quads about three years ago and the first thing we needed to do was design the tools to do the job. The first project was making the plan-ing forms and rodmaker Don Schroeder and others recently asked us to make them available. These forms are a full 1” thick to accommodate the wider quad strips. We used the same steel as our regular and swelled butt forms. The tip side bevels are ex-tremely fine so that one can make quad tip tapers smaller than ever before. See our website for full details on these forms as well as our quad ferrule punches and square winding check forming punches.
Don’t forget about our splicing block for making nodeless rods! Cut nodeless splices with ease. Cuts a glass-smooth splice in 15 seconds! See more details at our web site.
WWW.WAGNERRODS.COM

A p r i l 2 0 0 4 ( V o l u m e 1 5 ) P a g e 2 1
Bamboo Rods and Argentine Fly Fishing Text by Jorge Trucco, Photos by Val Atkinson, Cathy & Barry Beck
“Patagonian
rivers present all
the challenge
and all the
fishing
alternatives
found in the
rivers of
Montana,
Wyoming or
Idaho.”
Bamboo rods have a place of privilege in the history of Argentine fly-fishing. Legends such as Bebe Anchorena, Jorge Donovan and Prince Charles Radziwill used bamboo rods, and Joe Brooks, as well, contributed to the cause during the 50’s and 60’s. In fact, when Marcelo Calviello and I took up fly-fishing in the late 60’s bamboo rods were the ultimate fishing tools and we grew up with that con-cept. We became knowledgeable bamboo rod testers and we developed opinions regard-ing rod models, lengths, tapers, actions, and what not. The rivers of the Patagonia region of Argentina only reinforced our passion. Many of them seemed to be designed by God to be fished with bamboo rods. Much like the American West, the Patagonian rivers present all the challenge and all the fishing alternatives found in the rivers of Montana, Wyoming or Idaho: overhanging willows, cut banks, canyons and meadows, riffles and pools, as well as rainbows and browns rising to mayflies, caddis and stoneflies. The only difference? More and bigger fish, and less people. On normal conditions the Patagonian rivers are just right for slow action bamboo rods. And very rewarding too, you may always hook onto a real hog and then you’re in for a long battle. But Patagonia may also be windy, and that is when the faster bamboo rods excel. And this is the ongoing story, windy days and then calm ones, and both have their enchantment, their challenges and rewards.
The Boca of the Chimehuin was the “sacred place” for fly-fishers from Argentina and abroad. Fishermen would congregate at the Boca not just to fish but also to show off. Some would show up with fine tackle includ-ing some expensive bamboo rods and fly-reels. And bamboo rods were put to test big time: many monster browns up to18 and 20 pounds were taken with bamboo rods. Bebe Anchorena caught a 17 pounder on a dry Wulff pattern, and when everybody claimed
it was pure luck he did it again, catching another 17 pounder on a skating-spider tied by Ed Shenk. The rods used were an Orvis Battenkill and a Hardy “Salmon Deluxe” respectively. On another occasion, Joe Brooks caught an 18 pound brown on a pop-
per fly using his 8’6” Battenkill. Art Lee also dedicated some of his best moments to work-ing out the mysteries of fishing the Boca and to writing about them. Billy Pate, on his part, has had his impressive share of monster browns having spent over twenty years and countless hours at the Boca in search of the “world record brown on a fly”, to the point that there is a rock named after him... And much like those “Golden Years” of US fly-fishing, here in Patagonia we sometimes dare to think we are still living the golden years of fly-fishing. It’s still the vast, empty territories; still that feeling of solitude with-out loneliness, so highly seeked for by Robert Traver. And as much as we thought that the “Golden Years” were those we didn’t experience, reflecting on those we did experi-ence and on what we are experiencing now,
(Continued on page 22)

A p r i l 2 0 0 4 ( V o l u m e 1 5 ) P a g e 2 2
“Probably the
biggest
American
influence is in
flies.“
(Continued from page 21) we may attempt to entertain the idea that those golden years are not yet over. Those magic moments are still with us and their enchantment is as strong as ever. Thank God, Patagonia is still Patagonia. The American fly-fishing heritage has had a lot of influence in Argentine fly-fishing, since the mid 50’s Argentine anglers adopted many items that have to do with the American fly fishing culture. Joe Brooks had a lot to do with this phenome-non. He introduced the double-haul in fly-casting, and nowadays all Argentine fly fishers know how to double-haul. Double hauling is conceived as an essential part of fly-casting and there’s no fly-casting without double haul-ing in Argentina, pe-riod. But probably the big-gest American influ-ence is in flies. The Patagonia region of Argentina is, fishing-wise, so similar to the American west that all American flies ap-ply to Patagonian fly-fishing. Here again, Joe Brooks pioneered this trend of Ameri-can flies in Patago-nia. And what’s more, he brought some patterns that were actually uncom-mon in the West, he introduced the “blonde” in five versions: honey, black, strawberry, platinum and Ar-gentine. The “blonde” was originally a salt water fly and it was tied with bucktail on a 3407 Mustad hook, and was not designed to attract trout, however, these “blonde” flies were extremely effective on big browns, especially in the Chimehuin and Traful Rivers and they became very popu-
lar among Argentine anglers. And as for streamers, all good US patterns work per-fectly in the Argentine rivers: marabou mud-dler, muddler minnow, matuka, zonker, wooly bugger, spruce, etc. Nymphs have be-come extremely popular in Patagonia as well; “attractor” nymph patterns such as Bitch Creeks and Montana nymphs are readily used in all of Patagonia including the big sea-run browns of Tierra del Fuego. More specific patterns like various stonefly imitations, as well as caddis pupa imitations, pheasant tails and hare’s ears and bead-head nymphs of dif-ferent types including the highly successful prince are part of the every day fly-fishing menu. Dry fly fishing is at its best in Patago-
nia from tiny midges to #6 attractor patterns. Parachute patterns down to size 20 have been ex-tremely successful over the years and they are used even under the most demanding situa-tions. Wulff dry flies and humpies, as well as various stimulator pat-terns are readily used in faster waters and riffles with great success. Trout can also become very selective in Patagonia and that’s when “matching the hatch” may become the name of the game, especially in sections of the Mal-leo, the Quillen and the Chimehuin, for example. That’s when the realistic imitations excel, from #22 no-hackle patterns
and emergers, to #8 hexagenia imitations. Elk- hair caddis flies work excellent in many situations, as well as terrestrials from ants and beetles to grasshoppers. Big attractors such as tarantula patterns and Chernobyl ants have also been extremely successful in big-ger and faster waters over the last ten years.
(Continued on page 23)

A p r i l 2 0 0 4 ( V o l u m e 1 5 ) P a g e 2 3
(Continued from page 22) As for the fish, Argentina has been blessed with some native species as well as with the successful introduction of trout and Sebago landlocked-salmon more than 100 years ago. Two native spe-cies are worth mentioning, the golden-dorado and the wolf fish (also called Tararira or Trahira). Both species live in warmer environments and will take flies readily. The golden-dorado (Salminus maxillosus) is sort of a cross between an Atlantic salmon and a bull terrier and can be fly-fished for in the rivers and streams of the Parana River ba-sin. The wolf fish (Hoplias malabari-cus) can be de-scribed as well as a cross between a black bass and a meaner bull terrier and will take bass-bugs and popper-flies like there is no tomorrow. Inci-dentally, Marcelo has built a pond full of wolf fish in his back yard, these fish love to feed on frogs and minnows as well as on doves or pigeons that come to the pond to water and he daily puts his bamboo rods to test on these fish. This is a spectacular scene to witness. Three species of trout (browns, rainbows and brook-trout) and landlocked-salmon (Salmo Salar Sebago) dwell in the colder Patagonian country all the way down south to the island of Tierra del Fuego. And talking about TDF, what’s happened there in some rivers is a real miracle. The brown trout that were originally introduced in rivers such as the Rio Grande, Rio Irigoyen and even Rio Gallegos came from the same stock that was intro-duced in the other rivers of Patagonia and they were not supposed to go to the sea, they were not supposed to be “sea run”. But those trout didn’t know all that and as they didn’t find enough food in those Southern rivers, what did they do? They decided to go to the sea for food. They became anadromous fish! They became sea-run brown trout!
Today, fly-fishing for sea-run brown trout in Tierra del Fuego and Rio Gallegos is in a league of its own. It’s actually like Atlantic salmon fishing, with the dif-ference that those sea-runs will come back to the river to spawn every year of their lives reaching enormous sizes. We’ve caught fish up to 28 pounds, we’ve seen 36 pound fish caught and we know there has to be a 40 or 50 pounder waiting out there somewhere, and much like salmon, these sea-run browns will not feed after they’re back in the rivers, they will just attack flies due to their aggressive instinct, and that’s why
we get to catch them. During the early years of fishing for sea-runs the most popular flies were the Big Hole demon and the fuzzy-wuzzy (a New Zealand pat-tern). Later came the wooly bugger. Nowadays we like to fish small size 8 or 10 flies such as gir-dle bugs, Bitch Creeks, wooly worms, as well as larger rubber-leg-
zonkers and wooly-buggers. Bombers skated across the surface can be extremely effective and spectacular. The latest trend in fishing for sea-runs has been Spey rods; we discovered that Spey casting allowed us to fish more efficiently and to catch more fish. And this has become our latest challenge, an unaccomplished mission, to design the perfect bamboo Spey-rod taper that will adapt to windy Tierra del Fuego. Back in the 60’s and 70’s Marcelo and I had our choice of bamboo rods for different situations, includ-ing the use of shooting-head lines. We were permeable to Joe Brooks’s preferences and the 8 ½’ slow action Orvis Battenkill became also our favorite. But Hardys, Leonards, Farlows, Pezon & Michels, Paynes were also seen in the hands of the few people that formed the exclusive Argentine fly-fishing fraternity. I used to fish two versions of the “Fario Club”, an 8’3” 5wt. rod offered by both Pezon & Michel and
(Continued on page 24)

A p r i l 2 0 0 4 ( V o l u m e 1 5 ) P a g e 2 4
“From our very
beginning, we
were in search of
the ‘perfect
rod.’”
(Continued from page 23) Farlow. I used the “Fario Club” to dry fly fish the Malleo, the Quillen, the Quilqui-hue and the Chimehuin. My “fast” rod was an Orvis 8’ marked as an 8 weight rod. I fished it with #7 or #6 WF floating line and only when fishing shooting heads or sink-ing lines would I cast 8 weight lines with it. Marcelo had an 8’6” ft. slow action Bat-tenkill, he fished with a #6 floating line and he mastered it better than many. I remember I first met Marcelo Calviello some 35 years ago in some fly-casting competition held in Palermo Park in Buenos Aires. Back then the fly fishing frater-nity in Argen-tina was not huge and fly tackle of any sort was hard to come by. We would struggle to get some traveling rela-tive to bring us rods, reels or fly tying materials from either the US or Europe. I can remember when Marcelo and I would go to the countryside in search of gamecocks and roosters to find the right hackles for our fly-tying. Or even digging into piles of threads and yarns in notions-stores looking for materials that would work as chenille, floss, or tinsel. And how excited we would get when the postman brought us the latest fly-fishing catalogs that we had ordered months before from England or the US. I also remember that afternoon in down town Buenos Aires when I walked by a shop- window and something struck me. This feather…, it was this feather that caught my attention; it looked like a jungle cock feather! I walked into this sort of dancing-girl garment shop and I asked the owner about that feather. “Oh, it’s some sort of Indian-cock feather,
they used to be very fashionable, but not any more. I actually don’t have any use for them.” He went in the back room and came back with three capes: two golden pheasants and one jungle cock. I paid him the 15 dol-lars he requested and walked out with all three capes. Back then Bebe Anchorena had been struggling for years to get jungle-cock with no luck and I decided it would make a great gift to someone who had adopted me and Marcelo as his fly-fishing apprentices. In return Bebe gave me a very fine bamboo rod for Christmas, one of his favorite rods, an Orvis 8ft medium action. I still keep it and I
still fish it. Marcelo Calviello has always been a gifted caster and usually won the distance fly-casting tourna-ments organized by the then newly created Argentine Fly Fishing Associa-tion. No one could cast as far as he could. He
was also a perfectionist; he was always look-ing for the perfect rod, bamboo rods were his passion; he never abandoned bamboo, even in the mid 70s when graphite came out and many fishermen and guides adopted it. Our paths parted some 20 years ago and it was our passion for bamboo rods that got us back together. Today Marcelo and I are fishing our own bamboo rods, the rods made by us. From our very beginning we were in search of the “perfect rod.” That one with which we would launch the tightest loops, or cast the longest line to reach the impossible fish. Lit-tle did we know back then, that we would end up making our own bamboo rods, dis-cussing our own tapers or our favorite rod-action for each given situation. All that early experience was slowly but surely accumu-
(Continued on page 25)

A p r i l 2 0 0 4 ( V o l u m e 1 5 ) P a g e 2 5
(Continued from page 24) lated in our unconscious mind, and now may be flourishing in ways of tapers, ac-tions, and design, flowing out like a most natural part of our essence. And pursuing the “dream” rod will always continue to be the everlasting drive, no matter how good our last made rod may be, our best rod will probably always be our next one.


A p r i l 2 0 0 4 ( V o l u m e 1 5 ) P a g e 2 7
Building Smarter Blanks, Part II Text & Photos by Bob Maulucci
Last issue, we went from raw bamboo to 24 or so strips, each perfectly square in cross section. This was accomplished using the band saw and Medved style beveller as seen last time. The real advantage to this system is that now we can easily plow through the next few rod mak-ing steps with the repeatability and ease of set up that equal strips allows us to have. Our strips are square, but they still have the remnants of the nodes intact, and these need to be removed before we can go through the rough beveling process. The quickest way to accomplish this is to return to the belt/disc sander combo. But before we address the nodes, let’s take a moment to discuss some simple shop safety. I use my belt sander so frequently that I went out and bought a second dust collector that re-mains attached to it 90% of the time. The other dust collector sits on the far side of the shop where it handles duties on the saws and the bevellers. I highly recommend the use of a good dust collection system in tandem with work gloves, ear protection, and a good filter mask. I never work in the shop without em-ploying these precautions, and I have made it very clear to my family that they should not sneak up on me when I am operating machin-ery and wearing the ear protection! We have a system worked out where one side of the base-ment’s lights can be flicked on and off from the top of the stairs without affecting the tools or lights on my side. Until I call up to them, no one comes down the stairs and into the shop when machines are running. No exceptions. Furthermore, all machines are unplugged the moment that they are done being used. Believe me, the big red “ON” switch on the table saw or other machine is a magnet for toddlers. I feel safe knowing that the saw is never left plugged in, and the blade is always lowered be-
low the table’s surface. All safety shields are kept in place, 24/7. Another tip that I have adopted in the shop came from a recent woodworking magazine in which the author recommended putting 10 items away every time you enter the workshop. Every time I walk down into the basement shop, I try to remember to put away 10 items. A neat shop is a safe shop! Okay, enough about safety, let’s get to work. Using the belt sander, I can quickly take down the pith side of the nodes that remain from our first few processes. Using rubber-ized work gloves (mine are blue Atlas work gloves from Home Depot or MSC), I hold the node over the running belt and press the pith side down with my left hand. I continue down each strip to the middle, and then I flip the strip and work towards the middle to fin-ish the strip off. The rubberized gloves not
only protect my hand, but they give me good control over the strip as I press the strip into the running belt. The running belt has a ten-dency to want to throw the strip if you do not have a good grasp of it. I only use the gloves for a few months to insure that the padded fingers and palms don’t wear out. Afterwards they are good for my wife to garden with.
(Continued on page 28)

A p r i l 2 0 0 4 ( V o l u m e 1 5 ) P a g e 2 8
(Continued from page 27)
Remember, bamboo is sharp, and you are most likely to learn that after the cut has already started to bleed! Before sanding the enamel side of the nodes, I inspect each strip to look for any wily kinks or bends at the nodes. It is a simple fact that some bamboo culms have more pronounced nodes than others. These nodes should be straight-ened and pressed accordingly using a heat gun and machinist’s vice. My technique is very similar to that used by Tony Spezio and de-scribed in his article in Power Fibers #6, page 10. A notched vise makes short work of the nodes. I then take the bamboo and take a light pass on the enamel side to flatten the node,
pressing firmly for three seconds or so onto the running belt. Work your way through all of your strips. Now that the pith side is rather flat from sand-ing, it is important to remove the enamel for rough planing. This allows the bamboo to rest firmly in the forms or to sit perfectly in your beveller or mill’s in feed. This flatness is es-sential in achieving the perfect 60 degree an-gles for your strips, and it should not be over-looked. The enamel should be flat despite one’s natural inclination to remove as little power fibers as possible. I achieve this flatness using the belt sander,
once again implementing techniques found in Golden Witch Technologies video, Roughing and Tapering Under Power. I hold the strips in my right hand standing perpendicular to the belt sander. I lower the middle of the strip enamel side down onto the running belt, and I press down, sliding the strip from middle to end. I pull up on the strip and then work from middle to the other end. The running belt should have taken off nearly all the enamel and flattened the strip sufficiently for rough plan-ing or milling. It does take some practice to
achieve this without taking too much off. One work around I have found is to use a 120 or 150 grit belt. This gives one more leeway be-fore going to far into the power fibers. You cannot replace material once it is gone. Of course, if you prefer, you may use a block sander and do this work by hand. Some may scoff at this cruel treatment of the strips, but I guarantee that the results and the time savings are well worth it.
(Continued on page 29)

A p r i l 2 0 0 4 ( V o l u m e 1 5 ) P a g e 2 9
(Continued from page 28)
Next, it is time to cut your 6’ strips to size. I like to use a spiral stagger mainly from my ex-tensive work with quadrate rods, but a simple jig (see photo below) can accomplish this eas-
ily in the shop. Using a stair stepped rod board, the six strips are easily laid out and marked to length. In the photos, I am making a quadrate blank, but the same method is easily adapted to hexagonal rods. I use a white china marker to mark my cut points on each rod strip. I then
line up all the strips and cut to somewhere less than 5’ in length. This allows me to use the 5’ heat treating fixtures in my Reiter mica strip oven. Another nice thing about having 5’ strips is that I can do many strips in a batch and the rod’s eventual length will have no affect on my work. I can use these strips for rods of any
length I care to make, pending the proper depth of power fibers of course. Strips are cut on the band saw and marked black on the butts for butt strips and blue on the butt for tip strips. The enamel is marked with strip numbers with a series of slashes, pretty standard rod making stuff. Whether using the Medved style beveller or the
Bellinger milling cutter based beveller (see
picture), I have strips of equal length and width. This makes setting up the initial cuts a breeze. Using the rubber work gloves, I can safely rough triangles into all my strips. If you use a hand plane and roughing form, the rubber glove on your off hand provides a good anchor for the strip. Even better, try a #4 bench plane. You will find this an effective way to make the
(Continued on page 30)
A p r i l 2 0 0 4 ( V o l u m e 1 5 ) P a g e 3 0
(Continued from page 29)
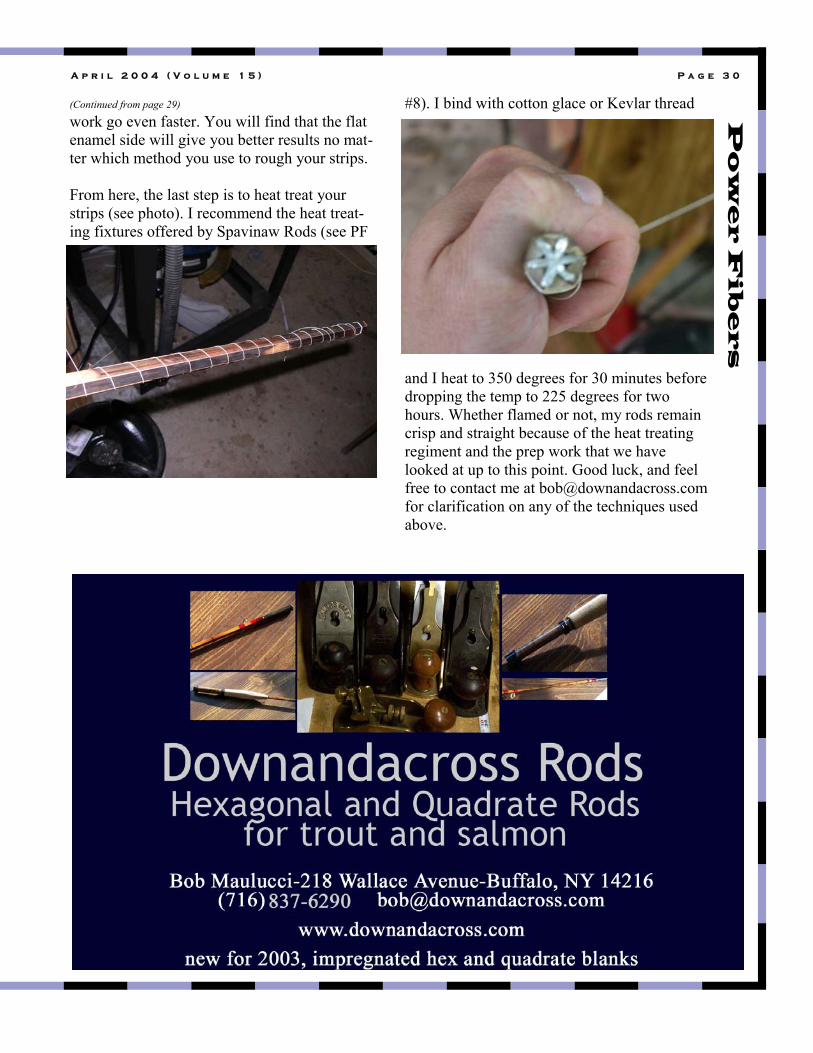
work go even faster. You will find that the flat enamel side will give you better results no mat-ter which method you use to rough your strips. From here, the last step is to heat treat your strips (see photo). I recommend the heat treat-ing fixtures offered by Spavinaw Rods (see PF
#8). I bind with cotton glace or Kevlar thread
and I heat to 350 degrees for 30 minutes before dropping the temp to 225 degrees for two hours. Whether flamed or not, my rods remain crisp and straight because of the heat treating regiment and the prep work that we have looked at up to this point. Good luck, and feel free to contact me at [email protected] for clarification on any of the techniques used above.
A p r i l 2 0 0 4 ( V o l u m e 1 5 ) P a g e 3 1
Custom Components
Robert Venneri 21 Chuck Hill Road Saugerties NY 12477 [email protected]
(845) 246-5882 Catskills craftsmanship at it’s finest.
Visit our web site at: http://www.venneris.com
HAND CRAFTED REEL SEATS MADE FROM THE FINEST MATERIALS OF WOOD AND METAL, ARTISTICALLY CONSTRUCTED, BRINGING TOGETHER
PRECISION AND BEAUTY IN THE CATSKILL TRADITION.
Venneri’s also carries a full line of tools and materials to make your own ferrules and reel seats.
Ask about our new
agate guides.
Venneri reel seats start with the finest woods and metal. Each reel seat is then carefully constructed to exacting specifications. The Tradition series of fly reel seats add a statement of beauty and quality to any fly rod. As with all Venneri’s
reel seats, custom boring, milling and engraving is available.

A p r i l 2 0 0 4 ( V o l u m e 1 5 ) P a g e 3 2
Classic Flies: Flies with a Past Text by Bret Reiter, Photos & Recipe from Nick Kingston
Editor’s note: This is a new column about classic flies that Bret has been using in recent years and doing very well with them. When I think of bamboo rods I think of times past and how things must have been back in the “Glory Days” of fly-fishing. A time before the waters were overcrowded and fishing was less technical. A time when there was no “One Fly Contest” or other fly-fishing competitions. These times echo back to bamboo rods, silk lines, gut leaders and flies made with all natural materials. Though I don’t use gut leaders, I have taken to using silk lines on my bamboo rods and I have always used the old traditional wet flies and Catskill dry flies. I love nothing better than swinging old pattern wets and streamers through a run or a pool, or watching a dry fly bouncing through the riffles. I have had great success in fishing these flies throughout the years. This past year in Michigan, I was fishing the Pere Marquette and Muskegon using one of my favorite old patterns, the Professor wet fly, with incredible success. I was catching browns, rainbows and brookies from 12 inches to the largest, a 19-inch brown. This was on bright sunny days when others were catching small fish or nothing at all. I think that a lot of fly fishermen are missing the boat by not using these old wet flies. Bob Maulucci, Todd Talsma and I had discussed why are so many of us fishing bamboo rods and silk lines, but at that same time using modern pattern synthetic flies. The three of us thought that a new column dedicated to the old patterns and how to tie them would be a nice addition to Power Fibers. The premier pattern is the Professor wet fly and you will be introduced to both the American and
(Continued on page 33)

A p r i l 2 0 0 4 ( V o l u m e 1 5 ) P a g e 3 3
(Continued from page 32)
English versions. Future articles will feature wet flies, dry flies and streamer flies from the past, their histories and patterns. The Professor was originated by Professor John Wilson (1785-1854) of Edinburgh University. It was a traditional fly used in Scottish lochs for brown trout. It was the favorite fly of Thomas Stoddart a Scottish poet who wrote “The Art of Angling, As Practiced in Scotland”, published in Edinburgh in 1836. In Mary Orvis Marbury’s book; Favorite Flies and Their Histories. She writes, “The Queen of the Water is credited to both Professor John Wilson (Christopher North”) and his brother, the natural-ist, Professor James Wilson. It is claimed by old fishermen that the Professor fly was made originally without the bit of scarlet ibis feather representing the stylets of an insect, and many experienced fish-ermen of the to-day cut these fibers of ibis off, while others consider the fly useless without them. If, as is asserted, the Professor was first made without them, there was then little difference between the Professor and the Queen of the Water, except that the body of the latter is of a darker shade of yellow, and almost an orange, and the hackle is wound the entire length of the body; therefore it is reasonable to presume that the two are only variations of the original fly, that in time came to be known as the distinct patterns.”
Step 1. Attach thread at front of hook and wind to the bend. (Hook size 10-16 wet fly.) Step 2. English version, tie in gold tinsel and wrap a small tag, do not cut off tinsel. Tie in red floss and form tag for American version Step 3. Tie in scarlet feather as long as hook shank for tail, English pattern. Tail is omitted on American pattern. Step 4. Wind thread to front of hook and tie in floss. Wrap floss to rear of hook and then wind forward forming slim tapered body. Step 5. Wind tinsel/wire forward to front of hook and tie off. Cut tag end of tinsel/wire off. Step 6. Tie in hackle beard style under hook, American pattern. English pattern wrap collar, swept back. Step 7. Tie in wing material swept back over hook to bend. (I don’t roll my wing on the American pattern I tie it traditional wet fly style.) Step 8. Wind small tapered head and tie off.
(Continued on page 34)
American Tie: Hook: wet fly Thread: black Tag: red rayon floss Body: Yellow rayon floss Rib: gold wire Throat: Dark Ginger or Light Brown hen hackle (sparse) Wing: barred mallard (rolled)
English Tie: Hook: wet fly Thread: Black Tag: flat gold tinsel Tail: red ibis Body: yellow silk floss Rib: flat gold tinsel Collar: Dark Ginger or Light Brown hen hackle (swept back) Wing: Barred mallard or teal set flat

A p r i l 2 0 0 4 ( V o l u m e 1 5 ) P a g e 3 4
(Continued from page 33)
As can be seen from observing the two versions the only real difference is adding the red tag to the American pattern, substituting wire for the tinsel and the red tail. I prefer the American pattern, but do on occasion tie the other. If you haven’t tried the old wet flies tie up a few of these and give them a go this season. Fish them either singly; in tandem or the way it was done in yesteryears, a cast of three flies. If you enjoy bamboo rods and silk lines you may find that the old traditional flies are what you need to come full circle in fly-fishing. Don’t be surprised if you end up with more than one fish on the end of your line either. I have caught more than one fish at the same time on many occasions fishing this way. I hope that this and future articles help you to broaden your fishing experience. If you have any suggestions for future flies you would like featured drop a line to Todd at [email protected] or myself at [email protected].

A p r i l 2 0 0 4 ( V o l u m e 1 5 ) P a g e 3 5
Expanding Draw Collet Text & Photos by Jerry Snider
One of the difficulties in turning sliding band type reel seat hardware from solid bar stock for the amateur rodmaker is obtaining a decent fin-ish on the end of the butt cap. After turning the cork check and sliding band, the butt cap is usually cut off and sanded and buffed by hand to obtain a decent looking finish--a hit or miss proposition at best. In discussing this dilemma with a precision tools machinist friend, he sug-gested that I make an expanding draw collet to hold the butt cap for final turning and facing off. When I somewhat hesitantly asked what an expanding collet was he responded, “Just think about it and you’ll figure it out.” Thus, the idea was planted.
I made the prototype from aluminum to see if the expanding collet idea would work. It per-forms so well that I have made no changes
when making additional collets. Figure 1 shows an exploded view of an expanding collet with drawbar (drawbar shortened for photo-
graphic purposes), collared thrust washer, collet, and tapered nut. Figure 2 shows an ex-panded collet in use.
Making the expanding collet The following instructions for making the collet will quickly reveal my rank amateur status when it comes to using a metal lathe. Hopefully they are written clearly enough so that a novice can make an expanding collet with little difficulty.
The collet dimensions provided below are for use in a Sherline lathe. Adjust dimensions accordingly for the type of lathe you use. The collet dimensions also fit 7”x 10” and similar mini lathe imports by changing the dimen-sions of the collared drawbar washer to fit the spindle bore of your particular lathe.
1. Insert a 2” length of .750” diameter round aluminum bar stock (I used 6061 T6) in the lathe chuck and face off the exposed end. Turn a 1.250” length of the stock to a diameter of approximately .550”. The diameter isn’t critical as long as it is larger than the spindle bore of your headstock.
(Continued on page 36)

A p r i l 2 0 0 4 ( V o l u m e 1 5 ) P a g e 3 6
(Continued from page 35)
2. Reverse the stock in the chuck and face off the end. Coat with layout fluid or ink from a broad nib magic marker, and use a surface gauge or similar tool to etch three equidistant lines on the face of the collet (fig. 3). These identify
where the slits dividing the collet jaws will be sawed in step 6.
3. Center drill and drill a .250” diameter hole the full length of the stock.
4. Turn the remaining .750” length of the stock to a diameter approximately .005” less than the inside diameter of the butt cap. (Do not turn the diameter any more than .005” undersized unless you enjoy dodging uncontrolled flying objects in your workshop!)
5. Ream a .750” deep taper in the hole drilled in the face of the collet. Taper the hole until the diameter on the collet face is approximately .350” inside diameter, i.e. the taper runs from .350” I.D. to .250” I.D. through the .750” length of the collet. I used a tapered reamer with a maximum diameter of 1/2” and a mini-mum diameter of 1/8”, and supported
the collet in a bench vise to ream the ta-per (fig. 4).
6. I use a milling machine and a .032” thick jeweler’s saw to cut the slits forming the collet jaws. If the latter is unavailable, simply center and lock the collet upright in a bench vise and use a hacksaw to saw the slits to within ca. .050”of the collet base (fig. 5). The same collet is shown in
(Continued on page 37)

A p r i l 2 0 0 4 ( V o l u m e 1 5 ) P a g e 3 7
(Continued from page 36)
fig. 6 after burrs have been filed off the
outer diameter and the sawed slits touched up with 220-grit sandpaper. The jaws won’t look as neat as those sawed with a milling machine and jeweler’s saw, but the collet will work equally well.
7. Taper a 1/4” connector nut (can be pur-chased at any hardware store) to insert in the tapered hole in the collet. The ta-per can be cut on the lathe; however, if you aren’t set up to turn tapers you can file the taper on the connector nut. To file the taper, attach a wing nut to a ¼” machine bolt, then screw the connector nut only about 3/4 of its length to the threaded portion of the bolt, i.e. about 1/4 of the nut is protruding off the end of the threaded bolt (fig. 7). Jam the
wing nut firmly against the upper end of the connector nut to keep the latter from turning. Cut the head off the bolt so it will fit through the chuck and into the spindle bore, and tighten the upper, non-threaded portion of the bolt in the lathe chuck. Tighten up the tailstock live cen-ter against the connector nut and turn ap-proximately 3/4 the length of the connec-tor nut to a diameter of ca. .350”. Back off the tailstock and file the connector nut to the proper taper (is it becoming obvi-ous that I am not a machinist?) (fig. 8
shows completed taper). The taper doesn’t have to be exact, and you can check for fit by slipping the tapered hole in the collet over the tapered nut as you file to size. The tapered nut should fit more or less flush with the face of the collet when inserted in the hole. Insert untapered portion of nut in lathe chuck and turn off to correct length. (Fig. 9
(Continued on page 38)

A p r i l 2 0 0 4 ( V o l u m e 1 5 ) P a g e 3 8
(Continued from page 37)
shows a connector nut, a tapered nut, and a tapered nut fitted in the collet hole.)
8. Use a 1/4” threaded machine bolt ap-proximately 8” long for the drawbar. If unavailable, an 8” length of 1/4” threaded rod with a nut screwed on the rear will also work.
9. Turn a collared thrust washer from .750” diameter aluminum stock to fit the spin-dle bore of the lathe headstock. The thrust washer for the Sherline lathe is ca. .200” wide (or thick) by .575” O.D. and has a .250” center hole. The collar is formed by turning a .410” diameter x .100” wide (i.e., about half the thick-ness of the washer) section on the ex-posed face of the washer (see collared
washer in fig. 1). (The spindle bore is .410” on a Sherline lathe. It may be different for your lathe.) The thrust washer is slipped onto the drawbar and serves as a platform for tightening the drawbar against the headstock when ex-panding the collet jaws.
The collet is now ready to use.
Using the expanding collet
1. Snug up the chuck jaws on the smaller diameter rear cylinder of the collet just enough to center the collet in place.
2. Insert the drawbar with thrust washer through the spindle bore of the headstock and loosely screw into the tapered nut in-serted in the mouth of the collet.
3. Slip the butt cap over the collet jaws with the inside flat end of the butt cap seated firmly against the collet face. To insure the latter, tap the butt cap gently with a small nylon or rubber faced hammer.
4. Tighten the collet drawbar slightly to ex-pand the collet jaws and snug the butt cap in place.
5. Now firmly tighten the jaws of the 3-jaw chuck against the rear cylinder of the col-let.
6. Turn the lathe chuck by hand (or at a very low rpm) to see if the butt cap is running true on the collet. If an obvious wobble is observed, tap the butt cap lightly to get it correctly aligned. If only a slight wobble is seen there should be no problem.
7. When the butt cap is properly centered and aligned, tighten the draw bar to ex-pand the collet, firmly seating the butt cap in place.
8. When using the collet, take small (ca. .010” or less) cuts. Face off the end of the butt cap and turn the outside of the butt cap down to final dimensions. If de-sired, file a rounded profile on the shoul-
der of the butt cap. Fig. 2 shows a com-pleted butt cap with rounded shoulder.
(Continued on page 39)

A p r i l 2 0 0 4 ( V o l u m e 1 5 ) P a g e 3 9
(Continued from page 38)
Do not attempt to knurl the butt cap using the collet. All knurling should be done with the stock in the 3-jaw chuck prior to cutting off the unfinished butt cap.
9. Remove the drawbar and the collet from the 3-jaw chuck with the butt cap still attached. To remove the butt cap from the collet, insert a shorter 1/4” bolt in the collet and gently tap the head of the bolt until the tapered nut releases from the center hole forcing the butt cap to slide off. Be careful, if you tap too firmly you may dimple the end of the butt cap.
BUFFING AND POLISHING If you want to buff/polish the butt cap on a buffing wheel, do so prior to releasing the cap from the collet. Use the short bolt and collet as a gripping device for holding the butt cap against the buffing wheel. I typically buff the end cap (but not the raised knurling!) with a hard sisal buffing wheel and emery-cutting compound, followed by buffing on a spiral sewn cotton wheel with Tripoli compound. If desired, do a final buff with white rouge on a spiral sewn cotton wheel and finish off on a loose cotton wheel. A detailed primer on how to buff and polish can be downloaded from the following web site: http://www.caswellplating.com/buffs/buffman.htm.
I don’t have room for a buffer in my shop so I use my Jet mini wood lathe. For an arbor I use a 12” length of 1/2” threaded rod center drilled on one end, equally space two buffing wheels on the arbor, anchor each in place with lock nuts, and insert in the 3-jaw chuck of the lathe. This setup works very well for buffing small objects such as reel seat hardware and ferrules. Using a collared expanding collet to taper the inside of sliding
bands An expanding collet also works well to support a sliding band when turning a slight taper along the inside edges to prevent the band from mar-ring the reel seat insert. It also allows one to ta-per the inside of the sliding band to better fit the foot of the reel seat.
1. Make an expanding collet as described in steps 1 through 3.
2. Replace step 4 with the following: turn the .750” length of the chuck portion of the collet to a diameter .050” larger than the inside dimension of the sliding band.
3. Turn a narrow collar at the front of the collet. The collar should be approxi-mately half the width of the sliding band and have a diameter approximately .005” less than the inside diameter of the band.
4. Continue with steps 5 through 9. To use the collet, slip the band over the collar until it butts firmly against the rear edge and tighten up the drawbar. The front third or so of the band now overhangs the end of the collet al-lowing access to the inside margin. (Fig. 10
shows a sliding band attached to the collet and ready to taper). Taper one end, reverse the slid-ing band and taper the opposite end. As with the butt cap collet, the sliding band collet can also be used for gripping the band for buffing/polishing.
(Continued on page 40)
A p r i l 2 0 0 4 ( V o l u m e 1 5 ) P a g e 4 0
(Continued from page 39)
The finish obtained on reel seat hardware re-sulting from using an expanding collet and a
buffer system is near professional quality. Fig. 11 shows the final product on a Carolina cherry burl reel seat and a California buckeye burl seat. Obviously, your taste for hardware dimensions, knurling pattern selection and insert type will likely differ from those I have chosen. How-ever, using the techniques described here, even we amateur rod builders can obtain excellent results and a satisfaction of accomplishment that simply can’t be measured!
A special thanks to Tony Spezio and Robert Milardo for several valuable comments and suggestions.

A p r i l 2 0 0 4 ( V o l u m e 1 5 ) P a g e 4 1
Norwegian Wood: Birch Bark Handles Text & Photos by Vidar Steimler I often find it difficult to find cork of good quality for my rod handles. A few years back, in the middle of the Easter holiday of 1998, I was about to finish a small 6’ 3 weight rod. Searching through my shop I discovered that I was almost out of cork rings. The few I had left were the ones rejected for my previous made rods. This rod was meant to be my new “Sunday morning rod,” so I was maybe as much concerned about the looks as the action. All of my local suppliers were closed for the holiday, and I was eager to finish the job. In my despair I started to figure out what other materials could be used to make a rod handle. In the town were I live, we have a museum with, among other items, a large collection of traditional hand made knifes. In this collection there is one particular knife with a handle made of birch bark. This knife gave me the idea. Could I make a rod handle in the same fashion? I decided to give it a try. Then my next problem came up; where can I find dry birch bark at this time? When I looked out of the window I found the answer. My neighbour had a nice stable of dry birch firewood outside his window. Luckily, he was away on holiday and as soon as it began to get dark I sneaked outside and ripped off the bark from a consid-erable number of wood pieces. I don’t consider myself as a criminal but this is actually how it started. By the way, the neighbour has moved to another part of the country and he doesn’t even bother to send me a Christmas card…. I considered my first rod to be a test sample because I didn’t know how the handle would work. In Norway birch bark has been used for waterproofing roofs for centuries. Fishing creels and baskets are made out of it, and I even think the Indians made canoes from birch bark. So, I was quite confident that it would handle water. But would it be slippery when wet, or would it tolerate the flexing of the rod
without cracking? I decided to try the rod for a season or two to find the answers to my questions. After using the rod for two sea-sons I made my conclusion. The handle looks beautiful, it feels nice to hold and it works great. I have only found two disadvantages. First, it is a bit heavier than cork but as long as the weight is located in the handle it doesn’t affect my casting. Second, making a birch bark handle adds a lot of hours to the rod making, but who really cares? You can cut the birch bark from the trees yourself. Just remember to get permission
from the landowner. If you do so, make a 20 cm vertical cut through the bark, and then gently loosen it and tear it off all the way around the tree. When this is done, lay the piece of bark flat under pressure and let it dry
(Continued on page 42)

A p r i l 2 0 0 4 ( V o l u m e 1 5 ) P a g e 4 2
(Continued from page 41)
for a couple of months. The bark plates should be about 1 – 3 mm thick. In Norway it is pos-sible to buy birch bark, but I don’t know if this is possible elsewhere. Personally I do it the easiest and cheapest way possible. I have a friend who makes baskets and fishing creels out of birch bark. The small pieces that he can’t use are perfect for my use (lucky me). When you have got the dry bark it is time to start. I cut the bark into small square pieces
about 3x3 cm, simply using a scissors. Avoid the black knurled parts. They work better in the stove. A normal trout rod handle takes about 150 – 200 pieces, depending on the thickness of the bark. When all the pieces are cut, I have to sand each of them on both sides to make sure they are completely flat. The “thin white stuff” from the outside of the tree must off, and the backside must be sanded completely flat. The next step is to drill a hole suitable for the rod I am making in each piece. Then I glue each bark piece to the rod. You can also glue for example 20 pieces together and let them dry under pressure before drilling and gluing to the rod. One way or the other, the process is just the same as for making a cork handle. It’s just a lot more pieces. When all the pieces are glued to the rod I put them under pressure with an ordinary cork ring press and leave the han-dle to dry. I’m using slow curing epoxy glue for this job.
When the glue has dried I turn and sand the
handle in my lathe. Birch bark is harder than cork, so I think that turning it using a drill might be difficult (I haven’t tried it though). The bark has a tendency to split in thin layers near the reel seat and at the top of the handle. I solve this problem by using a wooden layer (or some other nice looking substance) at both ends of the handle. I make a winding cheek out of wood, and I turn the reel seat filler to match the diameter of the bottom of the handle. When the handle is finished I treat both the reel
seat and the handle with Danish oil (tung oil). Note that I only give the bark one or two coats, while the wooden parts are covered with sev-eral coats. The handle will get sticky if too
(Continued on page 43)

A p r i l 2 0 0 4 ( V o l u m e 1 5 ) P a g e 4 3
(Continued from page 42)
much oil is applied. In Norway we have a long tradition of hand-crafting tools using materials available in the nature. The traditional Norwegian knifes made of a combination of steel, bone, wood and leather is a typical example of this. Bamboo is far from Norwegian, but I like to give my rods a look influenced by our old handcraft tradi-tions. With the deepest respect of Chinese bamboo, traditional Norwegian handcraft, and The Beatles I therefore call my birch bark han-dled rods “Norwegian Wood”.
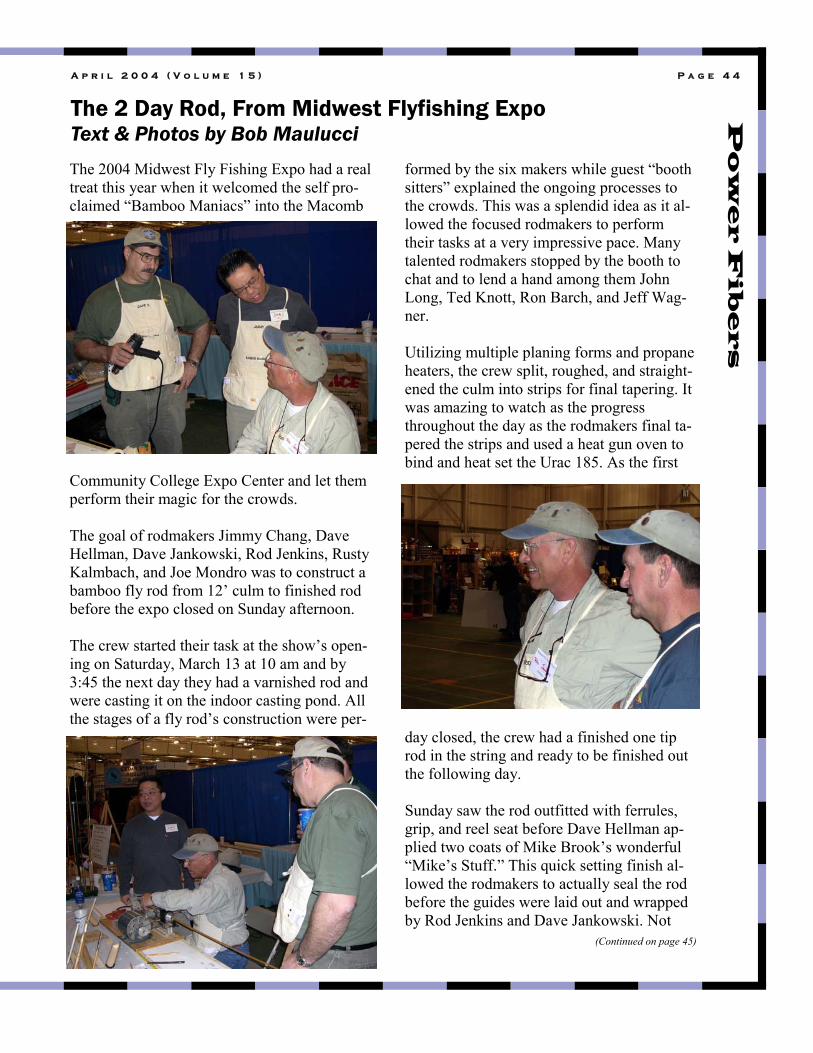
A p r i l 2 0 0 4 ( V o l u m e 1 5 ) P a g e 4 4
The 2 Day Rod, From Midwest Flyfishing Expo Text & Photos by Bob Maulucci The 2004 Midwest Fly Fishing Expo had a real treat this year when it welcomed the self pro-claimed “Bamboo Maniacs” into the Macomb
Community College Expo Center and let them perform their magic for the crowds. The goal of rodmakers Jimmy Chang, Dave Hellman, Dave Jankowski, Rod Jenkins, Rusty Kalmbach, and Joe Mondro was to construct a bamboo fly rod from 12’ culm to finished rod before the expo closed on Sunday afternoon. The crew started their task at the show’s open-ing on Saturday, March 13 at 10 am and by 3:45 the next day they had a varnished rod and were casting it on the indoor casting pond. All the stages of a fly rod’s construction were per-
formed by the six makers while guest “booth sitters” explained the ongoing processes to the crowds. This was a splendid idea as it al-lowed the focused rodmakers to perform their tasks at a very impressive pace. Many talented rodmakers stopped by the booth to chat and to lend a hand among them John Long, Ted Knott, Ron Barch, and Jeff Wag-ner. Utilizing multiple planing forms and propane heaters, the crew split, roughed, and straight-ened the culm into strips for final tapering. It was amazing to watch as the progress throughout the day as the rodmakers final ta-pered the strips and used a heat gun oven to bind and heat set the Urac 185. As the first
day closed, the crew had a finished one tip rod in the string and ready to be finished out the following day. Sunday saw the rod outfitted with ferrules, grip, and reel seat before Dave Hellman ap-plied two coats of Mike Brook’s wonderful “Mike’s Stuff.” This quick setting finish al-lowed the rodmakers to actually seal the rod before the guides were laid out and wrapped by Rod Jenkins and Dave Jankowski. Not
(Continued on page 45)

A p r i l 2 0 0 4 ( V o l u m e 1 5 ) P a g e 4 5
(Continued from page 44)
only did these adept rodmakers wrap the rod, but they applied tipping, signature wraps, and a hook tender! The whole process was done with remarkable precision, and no corners were cut. While watching the progress and helping the crew tend to the booth, I could not help but be impressed by the crowd’s positive reaction and the whole Midwest Fly Fishing Club’s warm reception. When the rod was cast by the makers on Sunday after-noon, the whole expo was buzzing
with excite-ment. Even master caster Bruce Rich-ards got in on the act. All in all, these six rodmakers are helping pro-
mote the craft to new audiences and they should be commended for their fine work and their meeting such a daunting goal head on. Special thanks to Ron Barch at Alder Creek for donating the rod components and to John Long for getting the booths donated for the event. Everyone involved should be thanked for a job well done.

A p r i l 2 0 0 4 ( V o l u m e 1 5 ) P a g e 4 6
The Fine Art of Product Photography Text by Joe West A big part of selling your cane rods or other angling creations is the marketing of the prod-uct. A large part of the marketing of the prod-uct is the visual representation of your product. Unless you have an Old Master conveniently located down the street from you, the medium that you’ll be representing your work in is pho-tography. As with any other tool, the photography is not something simply mastered or mastered sim-ply. Please see my Recommended Books List for photography resources of all kinds and lev-els, including whole books on many of the sub-jects touched upon here. I’ll concentrate on some of the theory and a lit-tle of the practice of how you can make the photographs of your work as good as can be. Camera basics are dealt with in detail in other texts. I’ll assume a basic knowledge of camera use, but I’ll assume little or no knowledge of fine art. The Art of Experimentation Photography is not like mixing a two-part ad-hesive. It’s very subjective. While there are accepted norms, they all are made to be bro-ken. Product photography, which is the sort that is in discussion here, sticks to the basics, for the most part. For each “setup” (a particu-lar subject in a particular scene), try a few variations. More depth of field, different fram-ing, etc. Composition The composition of the “scene” (mise en scene, for you film junkies) OR the framing of the shot (camera placement in relation to the scene) collectively comprise Composition. Men have devoted their whole lives to this sub-
jective science. Using these rules of thumb, you can achieve a pleasing composition no matter the situation or subject. The Rule of Thirds My definition of this old-standby composi-tion is succinct for your benefit: don’t put your subject right in the middle of the photo-graph. Always offset the most important part of the subject. Go ahead and offset the other parts of the scene, too. The size of the offset is up to you and can range from barely per-ceptible to noticeably offset. You may offset in the X, Y, or Z axis. Don’t forget that there is that Z axis in product shooting. You have control. Move your camera or the scene itself to alter the offset. Depth of Field Control what is in focus! Here is your most powerful tool for directing attention to or away from some element of your scene. Fol-low my version of the rule of thirds. No need to have the area in focus directly in the X, Y, Z center of the image. Try an offset. Another thing to think about is the amount of depth of field. For most product shots, it is traditional to have a somewhat small depth of field. Remember, you are directing the atten-tion of your audience. If you want people to see the beauty of your wraps, use a depth of field that will only encompass your wraps. No need to have the plane in the background in focus. On the other hand, if you want to communicate the complexity of your rod shop, a shop shot with great depth of field may be in order. Finally, don’t forget to think of depth of field in the fourth dimen-
(Continued on page 47)

A p r i l 2 0 0 4 ( V o l u m e 1 5 ) P a g e 4 7
(Continued from page 46)
sion, time. You can “deconstruct” that great depth of field rod shop shot into four short depth of field shots and arrange them in an im-age editing application in your PC. Layering Nothing is less interesting than viewing a se-quence of photos that are all foreground or all background. Layer your photos. Try to have at least two layers in all photographs. For a tight product shot, the two layers might be “subject” and “fuzzy white background.” For a shot of a finished rod, it might be “planing form,” “rod,” “bamboo shavings.” Even when depth of field is short, put some thought into layering. Even a tight product shot should give the illusion of depth. Texture Contrasts Cane rods are a tactile experience: smooth cork, knurled rings, soft flannel bag. Pay at-tention to the notion of texture in your photos. Texture is most easily created by contrasts. Smooth wraps and bamboo shavings. Knurls and smooth metal. Flawless cork and low-grade cork. Interesting Angles Pick an odd angle to shoot a scene from. A staid composition can be made much more in-teresting by using an interesting angle. Instead of shooting a rod from left to right as usual, try “sighting down” the rod with the camera for an interesting shot. Experiment. Part Two The Shortest Explication of Lighting Ever Attempted By Man or Beast This is the big one. You must put some thought into the lighting of the scene. Use
lighting to accentuate any of the above compo-sitional elements. Overhead, diffuse lighting (like what those big fluorescents in your shop) throw is really boring and does nothing to en-hance the subject (your hard work). Plan your lighting with the following structure in mind. This is another one of those subject areas wherein artists and theoreticians have been writing whole books for a long time. My distillation follows. • Key light—The main light directly illumi-
nating your subject • Kick light—This light provides an accent
to the key light. It could be a side light or a rim light (a light placed behind and above the subject to create a “rim of light” around the outline of the subject)
• Fill Light—Provides the base light level and is usually diffuse.
My really simple 3-point lighting • Fill Light—Bounce one or two lights off a
white surface or shoot through a white sheet.
• Key Light—Point a light at the subject. Can be diffused or not. Vary angle to sub-ject based on subject matter and taste
• Kick Light—Point another light at the sub-ject, but change it’s intensity and angle to be different from the key light. You may add a rim light, too.
Component Makers need a cocoon A cocoon is a device used to shoot products in the world of commercial photography. Func-tionally, it is a piece or pieces of seamless dif-fusion material shaped into a half sphere or open cube. The product to be shot is set inside the cocoon and lights are shown through. The idea is that the cocoon diffuses the light and, if properly lit, creates the appearance of the ob-ject floating in space. This is a great effect for
(Continued on page 48)

A p r i l 2 0 0 4 ( V o l u m e 1 5 ) P a g e 4 8
(Continued from page 47)
those of you who make their own rod fitments to show off their shape and texture in a space unencumbered by distractions. While you can certainly try to build one, I’ve done just that and found the results lacking. Buy one, they’re around $100. Digital Photography The most powerful tool at your disposal is your PC. The things you can do with your PC and a decent image-editing application will make your head spin. The range of experimentation INSTANTLY is astounding. Want to see your scene with a blue cast? Want to blur that area a little? Want to sharpen that area? No prob-lemo. For a great image editing application at a great price, I suggest Photoshop Elements. Once you go digital, you’ll wonder how you ever managed with film. For the rodmaker’s purposes, the image quality is spot on. More importantly, the time saved is worth the price of entry. The extra price of an SLR digital camera is worth it. For product shooting, “point-and-shoot” digital cameras are lacking the necessary manual controls. If you are stuck in film, acquiring a flatbed scanner is the next best thing to getting an SLR digital camera. Scan your photo and then edit it with you image editing application. You can get great results outputting to even cheaper (under $300) inkjet printers, but you must purchase high-quality paper (there is a huge range available) and use good ink (same large range). Use your printer’s highest quality mode and for goodness sakes have lunch while the thing prints out- the anticipation is not good for your cardiac health. Conclusion In the business of selling a product, your suc-
cess or failure depends on your ability to effec-tively communicate the strengths of your prod-uct to your clientele. I hope my little photogra-phy primer helps increase your business and assists you in creating fine photos of the prod-ucts of your craft.
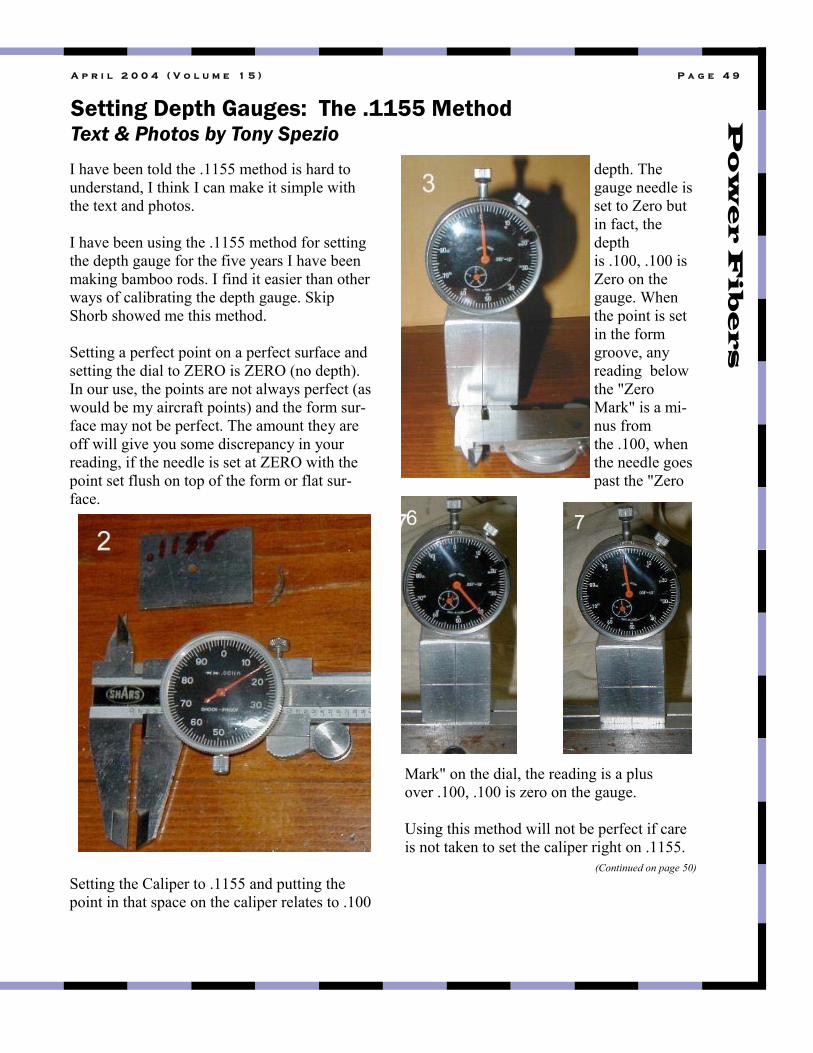
A p r i l 2 0 0 4 ( V o l u m e 1 5 ) P a g e 4 9
Setting Depth Gauges: The .1155 Method Text & Photos by Tony Spezio I have been told the .1155 method is hard to understand, I think I can make it simple with the text and photos. I have been using the .1155 method for setting the depth gauge for the five years I have been making bamboo rods. I find it easier than other ways of calibrating the depth gauge. Skip Shorb showed me this method. Setting a perfect point on a perfect surface and setting the dial to ZERO is ZERO (no depth). In our use, the points are not always perfect (as would be my aircraft points) and the form sur-face may not be perfect. The amount they are off will give you some discrepancy in your reading, if the needle is set at ZERO with the point set flush on top of the form or flat sur-face.
Setting the Caliper to .1155 and putting the point in that space on the caliper relates to .100
depth. The gauge needle is set to Zero but in fact, the depth is .100, .100 is Zero on the gauge. When the point is set in the form groove, any reading below the "Zero Mark" is a mi-nus from the .100, when the needle goes past the "Zero
Mark" on the dial, the reading is a plus over .100, .100 is zero on the gauge. Using this method will not be perfect if care is not taken to set the caliper right on .1155.
(Continued on page 50)

A p r i l 2 0 0 4 ( V o l u m e 1 5 ) P a g e 5 0
(Continued from page 49)
I have recently had a reamer precision ground to .1155 by Barry Grantham, a list member from England. I also had a precision .1155 hole
reamed in a plate as standard. I check my set-ting from the caliper with the reading I get from standard. If I set my caliper right at .1155, the readings are the same. The dial is set at Zero but the point is .100 deep in the caliper jaws or the standard.

A p r i l 2 0 0 4 ( V o l u m e 1 5 ) P a g e 5 1
Just Planed Fun Relevant Commentary from an Outsider Text & Photos by Don Johnson
The Salmonator—Part I
I was saddened a bit as I made the last road trip in my truck over to the coast to drop it off so it could be sold. She was, and still is, a good truck. Not a great truck, but then again I never intended to own a really great truck. She was simple and a thing of beauty; four wheels, a re-liable engine, and a seat. No frills or fancy gin-gerbread, no leather or CD player; basically nothing that would get ruined by a good hos-ing-out after a fishing or hunting trip. I already miss her. Like everything else, life goes on, changes occur, and things get replaced. This change and re-placement I am re-ferring to is a 1972 Dodge Dart; my new fishing car. As far as appearances go, it has seen quite a few better days. However, the thing runs like a Swiss watch. It characterizes its previous owner's philosophy fairly well in that it is a little rough around the edges, but the running gear works pretty well. Form follows function you might say. The way in which I acquired this beauty I am still a little uncomfortable with. I inherited her from my brother-in-law, Rick, who unfortu-nately had his own running gear give out on him too early in life. He is no longer here in body but his spirit will always remain within
our hearts and minds...and in this 1972 Dart. As I made up my mind not to fly home but to drive the car instead, I wondered what I was getting myself into. The car was an absolute mess and because it had been sitting for a while it didn't want to start right up. A quick trip to the auto parts store for a new battery remedied that problem and I was on my way. The road trip home was going to be of epic proportions and I actually began to look for-ward to peeling off miles of asphalt in an un-
known vehicle. Kind of a mini-adventure. When I say the car was a mess, that is somewhat of an understate-ment. It was so bad that in order for me to be able to bring it home, I had to agree that my wife would never have to be seen
in or around the thing. For the most part, even after I cleaned the car, she still harbors that sentiment. The exterior has a few dents and dings here and there but that's not really the first thing I noticed about it. The first thing my attention was drawn to was the quantity of moss and the like that had taken up root on the car. I guess it was moss. It may have been algae of some sort but what-ever it was, it encompassed almost half of the car and was more heavily concentrated in the
(Continued on page 52)

A p r i l 2 0 0 4 ( V o l u m e 1 5 ) P a g e 5 2
areas where water didn't drain off the body very well. The interior was somewhat indescribable. Spade, Rick's dog, was a permanent fixture in the back seat, and you could tell. The carpet in the back looked as if it was shedding and as a friend told me, "You probably have a couple years worth of tying material back there." The side windows were heavily smudged and the back window was almost opaque; a direct re-sult of dried slobber from Spade's presence. Moving forward to the front seat, the first thing to catch your eye was this beautiful pillow with such a nice floral pattern. It per-fectly filled the hole in the seat which was the size of a bath-room sink. This huge, uphol-sterer's nightmare just happened to be on the driver's side which will give some idea of the comfort of which I was about to travel in. Upon moving the pillow to inspect the actual damage I wondered if any more crap could get crammed under the seat and noticed in what wonderful shape the carpet appeared to be. I also came to realize that there are a lot of springs that go into the making of a car seat and was wondering how much they were going to be felt through the flimsy pillow. As I sat behind the wheel making sure the ra-dio, headlights, and wipers worked, I gazed out the windshield and couldn't help but think of Christmas. The glass was so old that the pe-rimeter was permanently frosted. I remem-
bered back to when I was growing up in Texas, people would do that to the windows of their house during the holidays with that flocking-in-a-can. I sat there motionless tak-ing in the combined aromas of cigarettes, old dog, dirt, tools and a few spilled beers, and wondered again what I was getting myself into. I was committed. There was no way I could catch my flight and I had to get back for work on Monday. I said my good-byes, hopped in and fired her up. As I said earlier, the car runs wonder-fully, and for some reason I had no reserva-tions about heading off in some unknown ve-
hicle for a 400 mile trip. Rick took a lot of pride in being a crackpot me-chanic and I figured I was in good hands. With the tank filled up, I hit the highway with 8 cylinders of good old American mus-cle firing in per-fect order. I had
some of Rick's old tunes with me, so I popped some Doors into the cassette-deck and cranked it up. All the way home I got an overdose of The Doors, Ted Nugent, Led Zeppelin, The Stones, and Joe Walsh. It was kind of fitting to be jammin' to these, Rick's favorites, in his old ride. After I got myself adjusted into a somewhat comfortable position on the pillow, I punched it. At about 65 mph the car just floats, which describes the ride extremely
(Continued on page 53)

A p r i l 2 0 0 4 ( V o l u m e 1 5 ) P a g e 5 3
(Continued from page 52)
well. The running gear makes you feel like you are in a much larger land yacht. At 85 mph things haven't changed and you still don't feel like you are going that fast. Absolutely beauti-ful. Well, the trip ended too soon in my opinion and as I pulled in behind my house I cut the motor. Very anticlimactic yet rewarding in its own way. I felt invigorated as well as stiff and a little sore in the posterior region. The next morning I arose and started cleaning the Dart. The solution I used contained two gallons of water, two cups of bleach and a half-cup of soap. I figured that would clean, disin-fect, and eradicate all in one step. I cleaned out 2½ gallons of nails Rick had in the trunk as well as some rusted, old carpentry tools. After a thorough scrubbing she doesn't even really look like the same old car. I believe that al-though he probably would have thought I was wasting my time, Rick would be pleased none-theless. All in all it took around five hours to scrub the thing from top to bottom, end to end, and inside and out. I am looking forward to my first fishing trip in my new "truck." I already have plans for some needed accessories like some float tube tie-downs for the rear deck lid and the thing really needs a hood ornament. I would like a fish, the Mack Truck dog, or an old reel right in the middle of the hood. A Mercedes Benz emblem or a brass knob (like a shotgun bead) on the left front quarter panel would be nice for use as sighting aid in procuring tying materials through the road-kill method. Since I don't have anything invested in her and I can afford them, I have even thought of getting some of those custom plates for her. I already have a name in mind and everything. At Rick's memorial service a good friend of his talked about Rick and the relationship they
Don Johnson’s Northwest-Country
Flies
Proven patterns. Quality components. Impeccable
construction.
“Providing dozens of ways to get your point across.”
A division of
Canyon Creek Angling & Mercantile 2411 Saint Andrews Drive
Shelton, Washington 98584 360.432.0402
had. They were fishing buddies and he was very shaken at Rick's sudden, unexpected passing. As Rusty tried to hold back emotions, he talked of how one of Rick's goals in life was to "systematically reduce the population of salmon in the Puget Sound, one by one." He used to joke around with Rick about a nickname he had given him, "The Salmonator." Although The Salmona-tor won't "be back", his spirit lives on in our hearts, our minds, and in my 1972 Dodge Dart, the SALMN8R. Dedicated in fond memory of Rick Capps (1956-1998); a highly talented carpenter and me-chanic; obsessive angler; magnificent brew meister and cook; and most of all, a beloved son, brother, and friend. In his passing may he find the eternal peace and tranquility he so deserves.

Power Fibers is an online magazine that is dedicated to all things
related to bamboo rodmaking and fishing. We welcome submis-
sions of material from you, the readers. Submissions can be for
rodmaking techniques, maker interviews, product reviews, book
reviews, tapers, bamboo fishing stories or fly patterns and how to
fish them. Please visit our web site and go to the “Write for Us” link
for more information about submitting articles for the magazine.
P o w e rF i b e r s O n l i n e M a g a z i n e 8412 North Maple Court
Zeeland MI 49464 Phone: 616-772-5043 Cell: 616-886-8695
Email: [email protected]
D e d i c a t e d t o
B a m b o o
R o d m a k i n g
We’re on the Web! www.powerfibers.com
PowerFibers
Visit Our Web Site To be one of the first to have an Official Power Fibers Hat. Just $22, shipping included.
We also offer custom rod bags and rod tube travel bags.