owner’s manual - kirby.com · read this manual carefully before using the kirby ... way down to...
TRANSCRIPT

quality • reliability • performancequality • reliability • performance
OWNER’S MANUALOWNER’S MANUAL
1
Welcome to the Kirby® family! Thank you for your purchase of a Kirby® Home Care System. It’s not just a vacuum; it is a complete home care system!
Read this manual carefully before using the Kirby® Home Care System. If you have questions, contact an independent authorized Kirby® Distributor.
This manual is available online in a selection of languages. Please visit www.kirby.com to view a manual in an alternate language.
Or, contact The Kirby Company: [email protected] United States: 1-800-494-8586 (M-F, 8:00AM - 5:00 PM EST) Australia: 1-800-781-556 Balkans: 0800-328-1247 Canada: 1-800-494-8586 Commonwealth of Independent States: +7 495 374 72 82 Europe: 00-800-5472-9272 Far East: 0800-328-1247 Middle East: 0800-328-1247 Russia: 7800500-51-46 or 7495374-72-82 Scandinavia: 80014747, 0200895477, or 0800-328-1247 South Africa: 0800-203-222 or 0800-983-044 United Kingdom: 0800-328-1247
Consumer Relations The Kirby Company 1920 West 114th Street Cleveland, OH 44102
For parts and supplies: www.kirby.com (where available) [email protected]
United States: 1-800-437-7170 (M-F, 8:00AM - 5:00 PM EST) Australia: 1-800-781-556 Balkans: 0800-328-1247 Canada: 1-800-437-7170 Commonwealth of Independent States: +7 495 374 72 82 Europe: 00-800-5472-9272 Far East: 0800-328-1247 Middle East: 0800-328-1247 Russia: 7800500-51-46 or 7495374-72-82 Scandinavia: 80014747, 0200895477, or 0800-328-1247 South Africa: 0800-203-222 or 0800-983-044 United Kingdom: 0800-328-1247
Kirby®, Avalir 2™, Kirby Micron Magic
®, Tech Drive
®, and Mini Em-Tor
® are registered trademarks of The Scott Fetzer Company.
Visit our welcome page at www.kirby.com/welcome/. We’ve put all of the information you need to get the most out of your Kirby® Home Care System in one convenient location.

32
TABLE OF CONTENTSParts of the Kirby® Home Care System ..................................................................... 6
Getting Started ...............................................................................................11
Assembling the Unit ..................................................................................................11
Power Switch ...........................................................................................................12
Disposable Filter Bag ................................................................................................13
Moving the Unit with the Power Off ............................................................................14
Locking the Upright Handle .......................................................................................15
Lift The Unit ..............................................................................................................16
Belt Lifter..................................................................................................................16
Outer Permanent Bag & Mini Em-Tor® Collector ...........................................................18
Upright & Portable Cleaner ............................................................................19
Upright Cord Management .......................................................................................19
Adjusting the Cleaning Height ...................................................................................20
Tech Drive® Power Assist ...........................................................................................20
Converting to a Portable Cleaner ...............................................................................21
Cleaning Carpeted Stairs ..........................................................................................22
Cleaning a Mattress .................................................................................................22
Canister Cleaner and Attachments ................................................................ 22
Attach the Hose to Convert to a Canister Cleaner ........................................................22
Installing Attachments on the Hose .............................................................................24
Blower/Inflator ........................................................................................................26
Portable Sprayer ......................................................................................................27
Portable Shampooer .................................................................................................29
Optional Accessories ..................................................................................... 30
Zippbrush ................................................................................................................30
Multi-Surface Shampoo System: Carpets .....................................................................31
Multi-Surface Shampoo System: Hard Floors ...............................................................38
Miracle Shine Kit ......................................................................................................45
Tile & Grout Kit ........................................................................................................48
Hard Floor Pad ........................................................................................................50
Turbo Accessory .......................................................................................................51
Maintenance .................................................................................................. 53
Troubleshooting ............................................................................................. 58

3
READ THIS MANUAL BEFORE USING THIS PRODUCT. FAILURE TO FOLLOW THE INSTRUCTIONS AND SAFETY PRECAUTIONS IN THIS MANUAL CAN RESULT IN PERSONAL INJURY. INTENDED FOR HOUSEHOLD USE ONLY. Operating Instructions are available by contacting The Kirby Company or online at www.kirby.com
Certified by:
UL LLC as a double insulated appliance.
Outside North America: Certified by national test authorities as appropriate.
Kirby® Model and Optional Accessories:
Avalir 2™: Model G10D2930** and 2950** Multi-Surface Shampoo System2931** and 2951** Floor Care System2935** Zippbrush2932** Turbo Accessory System
Avalir 2™: Model G10E Sentria 220/240 VoltAvalir 2™: Model G10E 220/240 VoltAvalir 2™: Model G10IL 220/240 VoltAvalir 2™: Model G10J 110 VoltAvalir 2™: Model G10B1 127 VoltAvalir 2™: Model G10B2 220 Volt
CE DECLARATION OF CONFORMITYWe, Kirby®, declare under our sole responsibility that, where applicable,
the Kirby® Model G10E Vacuum Cleaner is in conformity with the following standards or standardized documents.
IEC 60335-1 (EN 60335-1), IEC 60335-2-2 (EN 60335-2-2), EN 55014-1, EN 55014-2, EN 61000-3-2, EN 61000-3-3, EN 50366
and EN 62233 in accordance with the regulations including the Low Voltage Directive 2006/95/EC and EMC Directive 2004/108/EC
CE 95
1920 West 114th Street • Cleveland, OH 44102 • U.S.A.

54
Important Safety InstructionsOverview of Safety Guidelines and Your Responsibilities:• Your safety and the safety of others depend on you thoroughly reading and understanding this manual. If you have questions or do not understand the information presented in this manual, please contact The Kirby Company.
• Most vacuum-related incidents are caused by failure to observe basic safety rules or precautions. You must be alert to potential hazards.
• The Kirby Company cannot anticipate every possible circumstance that might involve a potential hazard. Therefore, the warnings in this manual may not be all inclusive. If a tool, procedure, work method or operating technique that is not specifically recommended by The Kirby Company is used, you must ensure that the product will not be damaged or be made unsafe by the operation, maintenance or repair procedures that you choose.
WARNING – To reduce the risk of fire, electric shock, or injury: • ALWAYS unplug before cleaning or servicing.
• NEVER leave appliance when plugged in.
• NEVER use outdoors or on wet surfaces.
• NEVER use with damaged cord or plug. If appliance is not working as it should, has been dropped, damaged, left outdoors or dropped into water, return it to a Kirby® authorized service center.
• NEVER run appliance over cord, pull or carry by cord, use cord as a handle, close a door on cord, or pull cord around sharp edges or corners.
• KEEP cord away from heated surfaces.
• NEVER unplug by pulling on cord. To unplug, grasp the plug, not the cord.
• NEVER handle plug or appliance with wet hands.
• Use only as described in this manual. Use only Kirby®’s recommended attachments.
• DO NOT put any object into openings. Do not use with any opening blocked; keep openings free of dust, lint, hair or anything that may reduce airflow.
• Keep hair, loose clothing, fingers and all parts of body away from openings and moving parts.

5
• Keep motor shaft free from lint, hair and debris build-up.• NEVER use to pick up flammable or combustible liquids, such as gasoline, or use in areas where they may be present.
• Turn off all controls before unplugging.
• Use extra care when cleaning on stairs.
• Do not allow to be used as a toy. Close attention is necessary when used by or near children. o Keep all Kirby® chemicals out of reach of children. These chemicals may cause irritation or discomfort if swallowed or placed in the eyes.
o In accordance to IEC (International Electrotechnical Commission) 60335-1: This appliance can be used by children aged from 8 years and above and persons with reduced physical, sensory or mental capabilities or lack of experience and knowledge if they have been given supervision or instruction concerning use of the appliance in a safe way and understand the hazards involved. Children shall not play with the appliance. Cleaning and user maintenance shall not be made by children without supervision.
• Use only Kirby® cleaning solutions intended for use with the Multi-Surface Shampoo System. See the Kirby® Home Care Products section of the manual.
• Do not pick up anything that is burning or smoking, such as cigarettes, matches, or hot ashes.
• Do not use without dust bag and/or filters in place.
WARNING In the State of California: This product contains chemicals known to the State of California to cause cancer and birth defects or other reproductive harm.
Safety Symbols and Warning Levels This is the safety alert symbol. It is used to alert you to potential personal
injury hazards. Attention! Become alert! Your safety may be at risk. NOTICE Indicates a situation that may result in property-related damage.
This is the information symbol. It is used to indicate product usage tips.
SAVE THESE INSTRUCTIONS.

76
PARTS OF THE KIRBY® HOME CARE SYSTEMNo. Part 1 Outer Permanent Bag
2 Bag Release Button
3 Bag Support Strap
4 Disposable Filter Bag
5 Top Adaptor
6 Mini Em-Tor® Collector
7 Brush Roll Performance Indicator Light
8 Belt Lifter
9 Air Exhaust Port
10 Lower Carrying Grip
11 Upper Carrying Grip
12 Upright Handle
13 Handle Tilt Latch Lever
14 Headlight Hood
15 Accessory Lock
16 Motor Shaft
17 Attaching Bar
18 Power Nozzle
19 Bumper
20 Power Switch
21 Tech Drive® Power Assist Pedals
22 Toe-Touch Control Pedals
23 Handle Release Button
Accessories & Attachments
24 Multi-Surface Shampoo System (optional)
25 Rotary Mop (optional)
26 Miracle Shine Mop (optional)
27 Tile & Grout Brush Roll (optional)
28 Hard Floor Pad (optional)

7
4
9
8
3

98
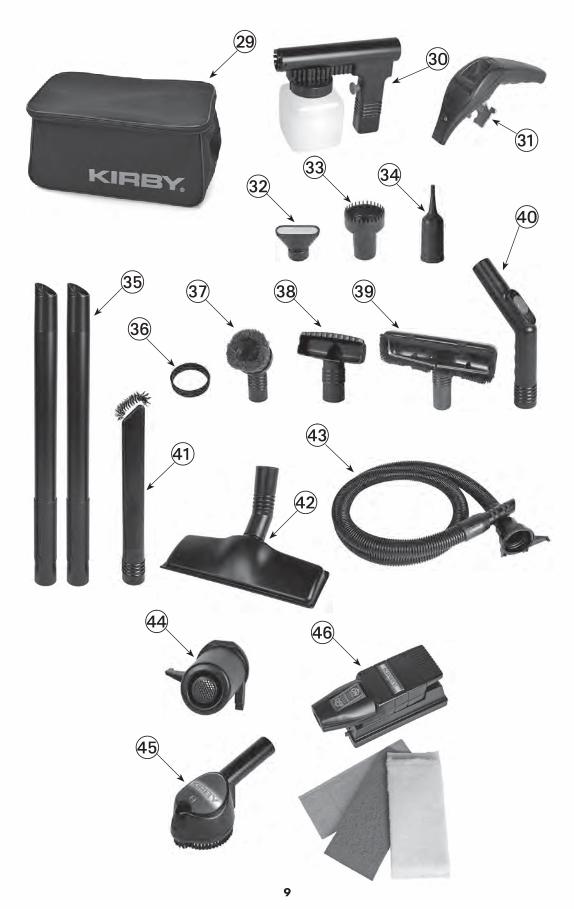
ACCESSORIES & ATTACHMENTS
No. Part
29 Attachment Kaddy
30 Portable Sprayer
31 Portable Carry Handle
32 Portable Shampooer Cap
33 Utility Tool
34 Inflator/Deflator Tool
35 Extension Tubes
36 Replacement Belt
37 Duster Brush
38 Upholstery Nozzle
39 Wall and Ceiling Brush
40 Suction Control Grip
41 Crevice Tool
42 Surface Nozzle
43 Attachment Hose
44 Air Intake Guard
45 Zippbrush (optional)
46 Turbo Accessory (optional)
9

1110

11
GETTIN
G STA
RTEDAssembling the Unit
1 Assemble the Upright Handle by sliding the two pieces together. Screw in the cord hook and spring to secure.
2 Push the base of the Upright Handle into the connection on the top of the unit.
3 Attach the Bag Latch Tab on the Outer Permanent Bag to the Upright Handle.
4 With the arrows lined up, slide the Mini Em-Tor® collector on to the Air Exhaust Port. Rotate it toward the unit to lock
in place.
5 Flip out the handle on the Belt Lifter on the Power Nozzle. Turn it counterclockwise until the red arrows line up.
The hook should catch and stretch the Belt inside the Power Nozzle.

1312
GET
TIN
G S
TART
ED
6 Press the bottom pedal on the Toe-Touch Control all the way down to raise the front of the unit. Raise the
Headlight Hood.
7 Rest the two hooks on the back of the Power Nozzle on the Attaching Bar on the front of the unit. Press the Power
Nozzle against the unit and secure with the Accessory Lock.
8 Flip out the handle on the Belt Lifter and use it to turn the Belt Lifter clockwise until the green arrows line up. This will
engage the belt so the Brush Roll will spin. See page 17. Lower the Headlight Hood.
9 Install a Disposable Filter Bag before vacuuming. See page 13.
Power SwitchPress the Power Switch at the rear of the unit to turn it on or off.

13
GETTIN
G STA
RTEDDisposable Filter BagFor best performance, use only genuine Kirby® Disposable Filter Bags and replace them when dirt reaches the FULL line. A Disposable Filter Bag must be installed before vacuuming.
To Remove a Used Disposable Filter Bag:
1 Turn the unit off. Unplug the power cord from the wall outlet. Unzip the Outer Permanent Bag. Flip up the cardboard tab
that attaches the Disposable Filter Bag and pull it away. Do not use as a vacuum cleaner without filter bag in place.
Before changing the Disposable Filter Bag, unplug the power cord from wall outlet and be sure that the motor and fan have stopped.
To Install a New Disposable Filter Bag:
2 With the Outer Permanent Bag unzipped and the Top Adaptor pulled out, rest the cardboard faceplate of the
Disposable Filter Bag against the bottom of the Top Adaptor.
3 Pivot the cardboard faceplate up against the flat surface of the Top Adaptor.
4 Bend and press the tab at the top of the cardboard face plate onto the Top Adaptor to secure.
5 Check to make sure the Bag Support Strap is connected through the small hole of the Top Adaptor and that it is
secured over the stud.
6 Insert the Disposable Filter Bag into the Outer Permanent Bag and close the zipper.

1514
GET
TIN
G S
TART
EDMoving the Unit with the Power OffTech Drive® power assist makes it easy to push or pull the unit when the motor is on. Tech Drive® power assist should be put in neutral before moving the unit when the motor is off.
1 Raise the front of the unit by pressing the bottom pedal on the Toe-Touch Control down.
2 Put Tech Drive® power assist in neutral by pushing the left “N” neutral pedal down.

15
GETTIN
G STA
RTEDLocking the Upright HandleThis unit has a Handle Tilt Latch Lever which locks the upright handle for carrying and storage.
Firmly grasp the handle BEFORE unlocking the Handle Tilt Latch Lever.
For vacuuming:The Handle Tilt Latch Lever should be unlocked in the center position for vacuuming.
NOTICE Property Damage Risk. Unlock the Handle Tilt Latch Lever before pulling backwards. Failure to follow this notice could result in damage to the floor.
For carrying:Move the Handle Tilt Latch Lever away from the bag to lock the base in place when the unit is lifted off the floor.
For lifting over a door threshold:Move the Handle Tilt Latch Lever toward the bag and push down on the locked Upright Handle to raise the front of the unit over a door threshold or throw rug.
Optional Storage Method:Lower the Upright Handle to a horizontal position near the floor and move the Handle Tilt Latch Lever away from the bag to lock the Upright Handle in place. Stand the unit up onto its Bumper and lean it against a wall for storage.

1716
GET
TIN
G S
TART
EDLift The UnitMove the Handle Tilt Latch Lever away from bag to lock the base in place. Use the handle on the bag arm to lift the unit.
Or, use the Lower Carrying Grip in the center of the handle to lift the unit.
Belt LifterThe Belt Lifter rotates a hook inside the Power Nozzle that lifts and lowers the belt on to the Motor Shaft. It is used to:
1 Disengage the Brush Roll: Turn the unit off. Raise the Headlight Hood. Flip out
the handle on the Belt Lifter. Use it to turn the Belt Lifter counterclockwise until the red arrows line up. Close the handle. Close the Headlight Hood.
In this position, the Brush Roll will not spin during vacuuming.
Do not turn Belt Lifter when unit is on.
NOTICE Property Damage Risk. Re-engage the Brush Roll prior to storage so that it is not stretched on the Belt Lifter hook. Failure to follow this notice could result in damage to the belt.
2 Engage the Brush Roll: Turn the unit off. Raise the Headlight Hood. Flip out the
handle on the Belt Lifter. Use it to turn the Belt Lifter clockwise until the green arrows line up. Close the handle. Close the Headlight Hood.
In this position, the Brush Roll will spin when vacuuming.

17
GETTIN
G STA
RTEDStraight Suction CleaningDisengage the Brush Roll to use straight suction cleaning to vacuum hard floors, throw rugs and delicate carpets. When using straight suction cleaning on bare floors, lower the Power Nozzle as close as possible to the floor without touching the floor.Put Tech Drive® power assist in neutral when cleaning hard floors.For additional protection of hard floors, use the optional Hard Floor Pad. See page 50.
Brush Roll Performance Indicator LightThe Brush Roll Performance Indicator Light, located on the top of the Power Nozzle turns on when the Brush Roll is spinning. If the Brush Roll Performance Indicator Light flashes intermittently or does not come on, the belt may not be engaged properly or the belt may need to be replaced. See page 53.

1918
GET
TIN
G S
TART
EDRemoving the Outer Permanent Bag and the Mini Em-Tor® CollectorThe Mini Em-Tor® collector holds large, heavy particles that do not reach the Disposable Filter Bag.
1Grasp the base of the Mini Em-Tor® collector and rotate it away from the unit and lift it off.
2 Remove the top of the Outer Permanent Bag from the unit by pressing the Bag Release Button.
3 Position the opening of the Mini Em-Tor® collector over a newspaper and shake it to remove particles. Reattach the
Mini Em-Tor® collector when complete.
Lock the Mini Em-Tor® collector securely in place or the unit will not operate. (It will not turn on).
NOTICE Property Damage Risk. Do not intentionally vacuum up heavy objects such as coins. Failure to follow these warnings could result in damage to the fan.

19
UPRIG
HT &
PORTA
BLE CLEAN
ERUpright Cord ManagementA series of holders keeps the cord attached to the Upright Handle.
1 Attach the cord by snapping it into the holders located at the base and side of the Upright Handle.
2 With the upper cord hook in the up position, wrap the cord toward the rear of the unit and slide the cord under the
holder on the hook.
Electrical cord can only be inserted or removed from this holder when the upper cord hook is in the up position.
The upper cord hook is designed to lock the cord in place when it is turned down.
3 For storage, wrap the cord around the upper and lower cord hooks.
4 Rotate the upper cord hook down to release the cord for use. The first loop will remain in the holder.

2120
UPR
IGH
T &
PO
RTA
BLE
CLEA
NER
Adjusting the Cleaning HeightThe Toe-Touch Control, located over the front wheel, raises and lowers the Power Nozzle. The numbered settings are for carpet and floors. The dotted settings are for accessories and other cleaning needs.
1 Turn the unit on. Press the Toe-Touch Control Upper Pedal as often as necessary to lower the Power Nozzle to its
lowest setting.
2 Press the Toe-Touch Control Lower Pedal one notch at a time to raise the Power Nozzle to the desired height.
Listen for the click with each raised notch. Count the clicks to the desired setting.
Raise Unit Purpose Lowest position Recommended: Carpets 1 Click up Optional: Deep Pile Carpeting 2 Clicks up Optional: Long Fiber Carpeting 3 Clicks up Recommended: Pet Hair Removal 4+ Clicks up Hose and Attachments
Tech Drive® Power AssistTech Drive® power assist makes it easy to push or pull the unit when the motor is on.
1 Turn Tech Drive® power assist on by pressing down on the side of the pedal marked D for drive. This eliminates most
of the effort required to move the unit when the unit is turned on.
2 Put Tech Drive® power assist in neutral by pressing down on the side of the pedal marked N for neutral. This makes it
easier to push or pull the unit when the motor is turned off.
NOTICE Property Damage Risk. Put Tech Drive® power assist in neutral before vacuuming soft tile or hard floors.
Failure to follow this warning could result in damage to the floor.

21
UPRIG
HT &
PORTA
BLE CLEAN
ERConverting to a Portable CleanerThe Portable Cleaner provides the full power of an upright vacuum with a shorter handle for convenient cleaning of stairs and mattresses.
1 Turn off and unplug the unit. Put Tech Drive® power assist in neutral. Release the Outer Permanent Bag from the unit by
pressing the Bag Release Button.
2 Remove the cord from the Upright Handle. Push the Handle Release Button at the base of the Upright Handle and pull
the Upright Handle straight up and out of the slot. (Bag not shown for clarity)
3 Insert the Portable Handle into the slot where the Upright Handle was connected.
4 Bend the Outer Permanent Bag in half and insert the Bag Latch Tab into the slot on the Portable Handle, with zipper
facing up.
NOTICE Property Damage Risk. Do not use the Portable Cleaner on upholstered furniture. Failure to follow this
warning could result in damage to the furniture.

2322
UPR
IGH
T &
PO
RTA
BLE
CLEA
NER
Cleaning Carpeted Stairs with the Portable CleanerPut Tech Drive® power assist in neutral by pressing down on the left “N” Neutral pedal. Place the unit on a carpeted step, supporting the rear of the unit. Turn the unit on after it is in place.
Keep hair, loose clothing/jewelry, fingers, and all parts of body away from the unit openings and moving parts while operating.
Tech Drive® power assist pedal should be in the neutral position when vacuuming stairs.
Cleaning a Mattress with the Portable CleanerLeave the sheet or mattress cover on the bed when vacuuming to protect the mattress from snags.
Put Tech Drive® power assist in neutral by pressing down on the left “N” Neutral pedal. Disengage the Brush Roll by lifting the Headlight Hood and turning the Belt Lifter counterclockwise until the red arrows line up. Lower the Headlight Hood. Place the unit on the mattress. Turn the unit on after it is in place.
NOTICE Property Damage Risk. Disengage Brush Roll, put Tech Drive® power assist in neutral, and leave sheet on mattress. Failure to follow these warnings may result in damage to the mattress.
Remove the Power Nozzle: Attach the Hose to Convert to a Canister CleanerUse the unit as a canister cleaner with the hose and attachments for dusting and cleaning high or small areas.
1 With the unit off and unplugged, press the bottom Toe-Touch Control pedal all the way down.

23
CAN
ISTER CLEAN
ER AN
D A
TTACH
MEN
TS
2 Put Tech Drive® power assist in neutral by pressing down on the left “N” Neutral pedal.
3 Raise the Headlight Hood. Flip out the handle on the Belt Lifter. Use it to turn the Belt Lifter counterclockwise until
the red arrows line up.
4 Turn the Accessory Lock counterclockwise to release the Power Nozzle. Lift the Power Nozzle away. Clean any lint,
hair or debris from the Motor Shaft.
Motor shaft may be hot. Allow to cool before touching or removing lint, hair or debris.
Keep Motor Shaft free from lint, hair, and debris build up. Failure to follow these warnings may result in damage to
the Attachment Hose as well as bodily injury.
5 Place the hooks of the Attachment Hose over the Attaching Bar. Push the opening of the Attachment Hose up against
the unit. Turn the Accessory Lock clockwise to lock in place. Lower the Headlight Hood. Turn unit on.
The Upright Handle or the Portable Handle may be used with the Attachment Hose.
If the unit will not turn on after connecting the Attachment Hose, see page 58.

2524
CAN
ISTE
R CL
EAN
ER A
ND
ATT
ACH
MEN
TSInstalling Attachments on the HoseTo attach tools to the hose, push lightly while twisting the smaller end of the hose into the tool.
Extension TubesAttach one or two Extension Tubes for extended reach.
Surface NozzleUse on bare floors and under low furniture.
Duster BrushRemove dust from contoured or irregular surfaces.
NOTICE Property Damage Risk. Do not use Duster Brush on television screens. Failure to follow these warnings may result in property damage.
Upholstery NozzleClean upholstered furniture, carpeted steps, and clothing. Clean the inside of cars.

25
CAN
ISTER CLEAN
ER AN
D A
TTACH
MEN
TSCrevice Tool with Removable BrushUse the Crevice Tool with the brush to remove dirt from corners, button tufts, radiator coils and sliding window tracks.Remove the brush to clean cracks, crevices, corners, grooves and narrow openings.
Suction Control GripSlide the valve on the Suction Control Grip to adjust the level of suction.
Use the Suction Control Grip at the beginning of the Extension Tubes to reach down.
Wall and Ceiling BrushAttach the Wall and Ceiling Brush to the Suction Control Grip to provide the proper angle to vacuum walls and ceilings.
To vacuum the top of door frames, ledges, or books on a shelf, rotate the Wall & Ceiling Brush 180°.
Utility ToolUse to clean car floor mats.
Inflator/Deflator ToolUse as a Deflator Tool to clean small places or to deflate air-filled toys or mattresses.
To use as an Inflator Tool, see page .
NOTICE Property Damage Risk. Use the Inflator/Deflator tool for 60 second bursts with a brief rest period between bursts. Failure to follow these warnings could cause the motor to overheat and damage the fan blades.

2726
CAN
ISTE
R CL
EAN
ER A
ND
ATT
ACH
MEN
TSBlower/Inflator Convert the Kirby® system to a blower by attaching the hose to the Exhaust Port.
1Remove the Power Nozzle. See Page 22. Place the hooks on the back of the Air Intake Guard over the Attaching Bar
on the front of the unit. Push the Air Intake Guard up against the unit and turn the Accessory Lock clockwise to secure.
2 Remove the Outer Permanent Bag. Press the Bag Release Button to remove the top. Then, grasp the base of the
Mini Em-Tor® collector and rotate it away from the unit and lift off.
3 Connect the Attachment Hose to the Air Exhaust Port. Line up the arrow on the large end of the Attachment Hose with
the arrow on the Air Exhaust Port. Twist the Attachment Hose clockwise to lock in place.
4 Attach the Inflator/Deflator Tool. Use it to inflate toys, air mattresses or any other low-pressure inflatable items up to
1 p.s.i. (pounds per square inch of air pressure). If the unit will not operate after converting to the blower mode, see page 58.
NOTICE Property Damage Risk. Use the Inflator/Deflator tool for 60 second bursts with a brief rest period between bursts. Failure to follow these warnings could cause the motor to overheat and damage the fan blades.

27
CAN
ISTER CLEAN
ER AN
D A
TTACH
MEN
TSPortable SprayerThe Portable Sprayer is only used in the blower mode. See page 26. It is used to spray water-based liquids.
1 Set up the Portable Sprayer. Unscrew the jar and fill it ¾ full with non-flammable liquid.
Make sure the dip tube is attached to the Portable Sprayer before screwing the jar on tightly. Attach the Portable Sprayer to the end of the Attachment Hose.
NOTICE Property Damage Risk. Use less solution in the jar if the Portable Sprayer must be tilted during use. Failure to
follow these warnings could result in spilled fluid and property damage.
Never use oil or solvent based paint or other flammable or combustible liquids in the sprayer.
2 Hold the Portable Sprayer horizontally. Turn the unit on. Squeeze the trigger to spray the solution onto a newspaper.
to check the spray pattern. Turn the control on the trigger to adjust the spray pattern.
3 Squeeze the trigger fully and use slow, sweeping motions when spraying.
Do not use pesticides or chemical products in the Portable Sprayer that may affect or damage the
human respiratory system, eyes or skin.

2928
CAN
ISTE
R CL
EAN
ER A
ND
ATT
ACH
MEN
TSCleaning the Portable Sprayer
1 Clean the Portable Sprayer immediately after use. Empty the jar. ONLY clean with warm soapy water.
Never clean the Portable Sprayer with flammable cleaning fluids.
2 Remove and wash the dip tube. (Make sure to reinstall it after cleaning)
3 Press the two latches on the front of the nozzle jet, pull it out, and thoroughly rinse. Fill the jar with water, reattach and
spray water until clear.

29
CAN
ISTER CLEAN
ER AN
D A
TTACH
MEN
TSPortable Shampooer
The Portable Shampooer is used to shampoo steps and small areas that can not be cleaned with the full-sized Multi-Surface Shampoo System.
1 Vacuum the surface to be cleaned.
2 Assemble the Portable Shampooer in the same manner as the Portable Sprayer. See page 27. Fill jar to the first line
with water. Add Kirby® Carpet Shampoo until the liquid reaches the second line on the jar.
3 Attach the Portable Shampooer cap to the end of the Portable Sprayer.
4 Turn the unit on and pull the trigger to make suds. Turn the control on the trigger to adjust the suds volume.
5 Spray suds directly onto the surface being cleaned. Work suds into the surface with a soft clean brush or sponge until
they disappear. Allow the surface to dry completely and then vacuum to remove the dry residue which contains dirt and grime.
NOTICE Property Damage Risk. Do not use the Portable Shampooer on delicate upholstery fabrics such as silk, brocade or velvet. If in doubt, try a test patch. Let the test patch dry and then check it before shampooing further.
6 Thoroughly clean the Portable Shampooer after use. See page 28.

3130
OPT
ION
AL
ACC
ESSO
RIESZippbrushThe Zippbrush can be used for vacuuming upholstery and carpeted steps. It can be used to clean automotive interiors.
For best results, do not press down heavily on the Zippbrush. Allow it to rotate at maximum speed by gently moving it over the surface being cleaned.
Keep hair, loose clothing/jewelry, fingers, and all parts of body away from spinning Zippbrush. Keep brush flat against surface being cleaned as the brush can throw particles outward.
NOTICE Do not use Zippbrush on delicate fabrics. Failure to follow this warning could result in property damage.
Clean the Zippbrush after use:
1 Remove the Zippbrush from the hose. Press the button on the front of the brush to release the outer brush ring.
2 Lift the turbine out of the tool and remove any particles or lint from the turbine and tool cavity.
3 Place the turbine back in the tool and turn it until the tabs drop into the slots. Snap the brush ring back into place.

31
OPTIO
NA
L ACCESSO
RIESMulti-Surface Shampoo System The Multi-Surface Shampoo System is used for the shampooing of carpets and the cleaning of hard surface floors.
Converting to a Shampoo System for CarpetsMaintain the cleanliness of carpets by shampooing regularly. Clean spots and high traffic areas more frequently. Vacuum carpet thoroughly before shampooing.
1 Remove the Power Nozzle. See page 22.
2 Remove the Outer Permanent Bag. See page 18.
3 Lift and remove the Waste Tray from the Multi-Surface Shampoo System.
4 When shampooing carpets, the carpet brush roll must be used. If the carpet brush roll is already inserted,
skip to step #8.
If necessary, insert the carpet brush roll. Using the handle, turn the Multi-Surface Shampoo System Nozzle Belt
Lifter clockwise until the green arrows line up.

3332
5 Turn the Multi-Surface Shampoo System over and pull up on the Belt to loosen and remove the Rotary Mop.
6 Slide the Belt from the Multi-Surface Shampoo System over the center of the carpet brush roll and insert it into the Multi-
Surface Shampoo System.
7 Turn the Multi-Surface Shampoo System over. While pushing up on the belt with your finger, use the handle on the Belt
Lifter to turn it counterclockwise until the red arrows line up. The Belt Lifter Hook will catch and stretch the belt.
8 Check to make sure that the baffle strip is in place on the bottom of the Multi-Surface Shampoo System. Insert the
baffle strip if necessary with flat side facing the brush roll.
NOTICE Property Damage Risk. Make sure the baffle strip is in place on the Multi-Surface Shampoo System before
using on carpet. Failure to do so may result in property damage.
9 Press the Toe-Touch Control Bottom Pedal all the way down to raise the front of the unit.
OPT
ION
AL
ACC
ESSO
RIES

33
OPTIO
NA
L ACCESSO
RIES
10 Connect the hooks on the rear of the Multi-Surface Shampoo System to the Attaching Bar.
11Push the Multi-Surface Shampoo System up against the unit and turn the Accessory Lock clockwise to lock in place.
12 Use the handle on the Multi-Surface Shampoo Nozzle Belt Lifter to turn it clockwise until the green arrows line
up. Lower the Headlight Hood.
13 Insert the Waste Tray.
14 On the Shampoo Tank, check that the Suds Screen and foam sponge are in place. If they are not in place,
proper foaming will not occur.

3534
15 The Shampoo Tank should be filled or emptied at a sink. Unscrew the large cap from the top of the Shampoo Tank.
Turn the Suds Control Valve to OFF. Fill the tank with warm water (not hot) according to the chart below.
Use the large cap from the top of the Shampoo Tank to measure Carpet Shampoo, not the cap from the shampoo
bottle. Do not use more than the appropriate number of capfuls of shampoo as overfoaming will occur.
AREA WATER SHAMPOO Small 1st Line on Shampoo Tank 1 Capful Medium 2nd Line on Shampoo Tank 2 Capfuls Large 3rd Line on Shampoo Tank 3 Capfuls
Replace the large cap on the Shampoo Tank.
One tankful of solution filled to the third line will clean a large carpet area about 10 x 12 feet in size (3x3.5m).
Use only Kirby® cleaning solutions, such as Kirby® Carpet Shampoo, intended for use with this product. Failure to follow this warning could result in injury due to internal component damage.
16 Firmly connect the elbow hose to the Multi-Surface Shampoo Nozzle.
17 Taking care to avoid spilling liquid on the unit or the floor, place the opening in the bottom of the Shampoo
Tank over the Air Exhaust Port.
Rotate the Shampoo Tank toward the unit to lock it in place.
18 Connect the elbow hose to the bottom of the Shampoo Tank.
OPT
ION
AL
ACC
ESSO
RIES

35
OPTIO
NA
L ACCESSO
RIESShampooing Carpets
1 Step on the upper pedal of the Toe-Touch Control until the Multi-Surface Shampoo System is at its lowest position.
2 Turn the Suds Control Valve to the Carpet Setting. Turn the unit on. As the unit is moved back and forth, foam will
release and the brush will work it into the carpet. For ease of cleaning, shampoo smaller sections of the carpet at a time.
3 Turn the Suds Control Valve to the off position. Go back over the shampooed carpet in multiple directions to
thoroughly work all of the shampoo into the carpet.
4 If necessary, empty the Waste Tray during shampooing. Check the indicators on the edge of the Waste Tray Cover.
When liquid begins to fill the area below the indicators, it is time to empty the Waste Tray.
Turn off the unit. Lift the Waste Tray and carry to a sink to empty. Replace the Waste Tray before turning the system
back on and resuming shampooing.
5 Allow carpet to dry completely. Convert the unit to an upright vacuum. Vacuum to remove the dry residue which
contains dirt and grime.

3736
Cleaning The Multi-Surface Shampoo System
1 Turn the Suds Control Valve to the off position.
2 Push the Toe-Touch Control Bottom Pedal all the way down to raise the nozzle and tray. Let the unit run for several
seconds to allow any remaining shampoo and water to spin off the brush. Turn the unit off and unplug it.
3 Lift the Waste Tray and carry to a sink to empty. Thoroughly rinse all parts of the tray and set aside to dry.
4 Remove the hose from the bottom of the Shampoo Tank.
5 Raise the Headlight Hood. Turn the Belt Lifter counterclock wise until the red arrows line up.
OPT
ION
AL
ACC
ESSO
RIES

37
OPTIO
NA
L ACCESSO
RIES
6 Turn the Accessory Lock counterclockwise. Lift off the Multi-Surface Shampoo System and carry it to the sink.
7 Rinse all areas of the Multi-Surface Shampoo System, and remove any lint from brush tufts. Shake excess water from
the unit. Allow all parts to dry thoroughly.
8 Rotate the Shampoo Tank away from the unit and lift off.
9 At the sink, discard any remaining liquid in the Shampoo Tank. Remove and clean the Suds Screen Cap, tank cap
and sponge filter. Rinse out the Shampoo Tank with cold water and replace the Suds Screen Cap, tank cap and sponge filter. Allow all parts to dry thoroughly before reassembling.

3938
Multi-Surface Shampoo System: Hard FloorsThe Multi-Surface Shampoo System can be used to clean hard floors by inserting the Rotary Mop and cleaning with Kirby® Hard Floor Cleaner. Before cleaning hard floors, vacuum or sweep the floor to remove large debris.
Converting to a Cleaner for Hard Floors
1 Remove the Power Nozzle. See page 22.
2 Remove the Outer Permanent Bag. See page 18.
3 Lift and remove the Waste Tray from the Multi-Surface Shampoo System.
4 When cleaning hard floors, the Rotary Mop must be used. If the Rotary Mop is already inserted, skip to step #8.
If necessary, remove the carpet brush roll and insert the Rotary Mop. Using the handle, turn the Multi-Surface Shampoo System Nozzle Belt Lifter clockwise until the green arrows line up.
OPT
ION
AL
ACC
ESSO
RIES

39
OPTIO
NA
L ACCESSO
RIES
5 Turn the Multi-Surface Shampoo System over and pull up on the belt to loosen and remove the Carpet Shampoo
BrushRoll.
6 Slide the Belt from the Multi-Surface Shampoo System over the center of the Rotary Mop and insert it into the Multi-
Surface Shampoo System.
7 While pushing up on the belt with your finger, use the handle on the Belt Lifter to turn it counterclockwise until the
red arrows line up. The Belt Lifter Hook will catch and stretch the belt.

4140
8 Press the Toe-Touch Control Bottom Pedal all the way down to raise the front of the unit.
9 Connect the hooks on the rear of the Multi-Surface Shampoo System to the Attaching Bar.
10 Push the Multi-Surface Shampoo System up against the unit and turn the Accessory Lock clockwise to lock in
place. Use the handle on the Shampoo Nozzle Belt Lifter to turn it clockwise until the green arrows line up. Lower the Headlight Hood.
11 Insert the Waste Tray.
OPT
ION
AL
ACC
ESSO
RIES

41
OPTIO
NA
L ACCESSO
RIESCleaning Hard Floors Always use a small amount of liquid when cleaning hard floors. Never let liquid sit on hard floors. Do not use on unsealed floors. Always follow floor manufacturer’s recommended cleaning instructions. Failure to follow these warnings could result in property damage.
Clean Hardwood or Laminate Floors
1 Attach the empty Shampoo Tank to the Air Exhaust Port. It is not necessary to attach the elbow hose.
2 Spray a fine mist of Kirby® Hard Floor Cleaner Ready to Use on a small area of the floor. Do not over-wet floor.
3 Put Tech Drive® power assist in neutral and turn the cleaner on.

4342
4 Press the Toe Touch Control Upper Pedal repeatedly until the Rotary Mop contacts the floor. Move the Kirby® system over
the area to be cleaned. Spray additional cleaner as needed.
5 If necessary, empty the Waste Tray during shampooing. Check the clear indicators on the edge of the Waste Tray
Cover. When liquid begins to fill the area below the indicators, it is time to empty the Waste Tray.
Turn off the unit. Lift the Waste Tray and carry to a sink to empty. Replace the Waste Tray before shampooing.
6 Allow the floor to dry completely. If necessary, use a towel to wipe up excess fluid.
7 Clean the Multi-Surface Shampoo System thoroughly. Allow all parts, especially the Rotary Mop, to dry thoroughly
before storage.
8 Over time, the Rotary Mop fibers will wear down. Replace the Rotary Mop regularly for best cleaning results.
OPT
ION
AL
ACC
ESSO
RIES

43
OPTIO
NA
L ACCESSO
RIESClean Vinyl or Tile Floors
1 Fill the Shampoo Tank with warm water to the first line. Add one tank cap full of Kirby® Hard Floor Cleaner Concentrate.
Using the large cap from the top of the tank, pour one capful of Kirby® Hard Floor Cleaner into the Shampoo
Tank. Do not use more, as over-foaming will result.
Replace the large cap on the Shampoo Tank.
Use only Kirby® cleaning solutions, such as Kirby® Hard Floor Cleaner Concentrate, intended for use with this product. Failure to follow this warning could result in injury due to internal component damage.
2 Firmly connect the elbow hose to the Multi-Surface Shampoo Nozzle.
3 Taking care to avoid spilling liquid on the unit or the floor, place the opening in the bottom of the Shampoo Tank over
the Air Exhaust Port.
Rotate the Shampoo Tank toward the unit to lock it in place.
4 Connect the elbow hose to the bottom of the Shampoo Tank.
5 Press the Toe-Touch Control Upper Pedal repeatedly until the Rotary Mop contacts the floor.

4544
6 Turn the Suds Control Valve clockwise to the Hard Floor Setting. Put Tech Drive® power assist in neutral. Turn the
unit on. As the unit is moved back and forth, cleaning solution will release and the Rotary Mop will scrub the floor.
7 Turn the Suds Control Valve to the OFF position. Go back over the floor to thoroughly clean the floor and to pick up
excess solution.
8 If necessary, use a towel to wipe up excess fluid. Allow the floor to dry completely.
9 Clean the Multi-Surface Shampoo System thoroughly. Allow all parts, especially the Rotary Mop, to dry
thoroughly before storage.
10 Over time, the Rotary Mop fibers will wear down. Replace the Rotary Mop regularly for best
cleaning results.
OPT
ION
AL
ACC
ESSO
RIES

45
OPTIO
NA
L ACCESSO
RIESMiracle Shine KitBring a high gloss to hard surface floors with the Miracle Shine kit.
1 Vacuum the floor and/or clean with the Multi-Surface Shampoo System for Hard Floors before applying Kirby®
Miracle Shine. Allow floor to dry completely.
2 Convert the Kirby® system to a cleaner for hard floors (p. 38). Instead of using the Rotary Mop, insert the striped Miracle
Shine Mop.
3 Attach the empty Shampoo Tank to the Air Exhaust Port. It is not necessary to attach the elbow hose. This setting
allows airflow through the system.

4746
OPT
ION
AL
ACC
ESSO
RIES
5 Make sure Tech Drive® power assist is in neutral and turn the cleaner on.
6 Press the Toe-Touch Control Upper Pedal repeatedly until the Miracle Shine Mop contacts the floor. Immediately move the
cleaner over the sprayed area to spread the Miracle Shine in an even layer. For best results, only go over the area with one or two quick passes; additional passes of the Kirby® system may cause streaks. Spray additional solution as needed.
4 Working in small sections, lightly spray Kirby® Miracle Shine directly on the floor.
NOTICE Test Kirby® Miracle Shine in an inconspicuous area of floor prior to full application.

47
OPTIO
NA
L ACCESSO
RIES
7 Allow floor to completely dry before walking on surface.
8 Disassemble and clean all parts of the Multi-Surface Shampoo System using a mixture of 50% ammonia and
50% water to remove any build up of Kirby® Miracle Shine. Allow parts to dry before storage. If necessary, wipe off bottom of the Kirby® system with soft rag dampened with a mixture of 50% ammonia and 50% water
9 Re-apply Kirby® Miracle Shine as needed to maintain a glossy shine.

4948
OPT
ION
AL
ACC
ESSO
RIESTile & Grout KitClean, scrub and beautify your tile and grout floors.
1 Convert the Kirby® system to a cleaner for hard floors (p. 38). Instead of using the Rotary Mop, insert the Tile & Grout
Brush Roll.
2 Attach the empty Shampoo Tank to the Air Exhaust Port. It is not necessary to attach the elbow hose. This setting
allows airflow through the system.
3 Working in small sections, lightly apply Kirby® Tile & Grout Pre-Treat directly to discolored or stained grout lines.
Spray Kirby® Tile & Grout Cleaner directly on the floor.
NOTICE Test Kirby® Tile & Grout Cleaner in an inconspicu-ous area of floor prior to full application.

49
OPTIO
NA
L ACCESSO
RIES
4 Make sure Tech Drive® power assist is in neutral and turn the cleaner on.
6 Allow floor to completely dry before walking on surface.
7 Disassemble and rinse parts of the Multi-Surface Shampoo System. Allow parts to dry before storage.
5 Press the Toe Touch Control Upper Pedal repeatedly until the Tile and Grout brush roll contacts the floor. Move the cleaner
over the area to be cleaned. Spray additional cleaner as needed.

5150
OPT
ION
AL
ACC
ESSO
RIESHard Floor PadFor additional floor protection from possible scratches, the optional Hard Floor Pad can be used when vacuuming bare floors.
NOTICE For use on dry floors only.
1 Turn the unit off. Step on the bottom pedal of the Toe-Touch Control to raise the Power Nozzle. Slide the Hard Floor Pad
under the nozzle and press up until the clips lock in place.
Turn unit off, unplug power cord from wall outlet, and be sure the motor and nozzle brush have stopped
before attaching the Hard Floor Pad.
2 Turn the Belt Lifter counterclockwise until the red arrows line up to convert the unit to a straight suction cleaner.
3 Put Tech Drive® power assist in neutral. Lower the Power Nozzle and vacuum the floor.
4 To remove the Hard Floor Pad, raise the Power Nozzle and step down on the tabs at the back of the Hard Floor Pad.
51
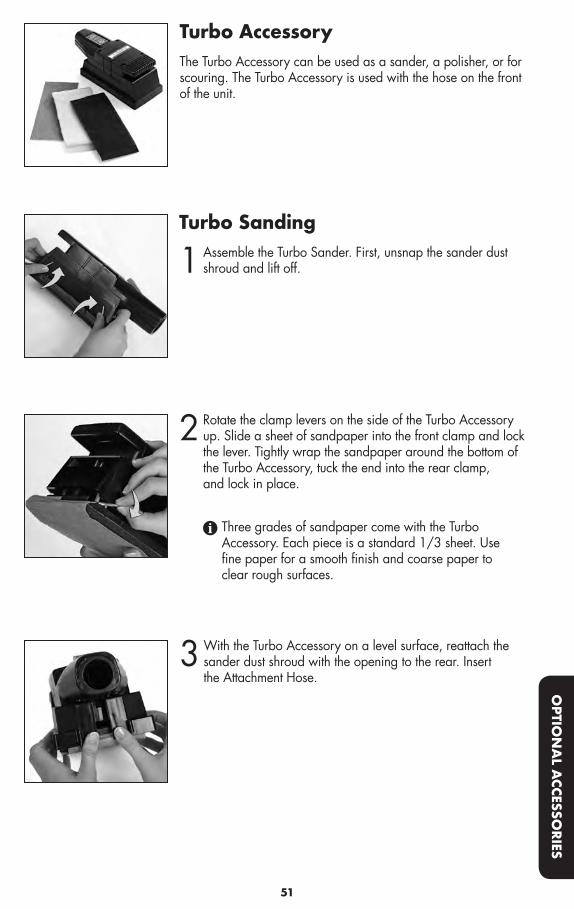
Turbo AccessoryThe Turbo Accessory can be used as a sander, a polisher, or for scouring. The Turbo Accessory is used with the hose on the front of the unit.
Turbo Sanding
1 Assemble the Turbo Sander. First, unsnap the sander dust shroud and lift off.
2 Rotate the clamp levers on the side of the Turbo Accessory up. Slide a sheet of sandpaper into the front clamp and lock
the lever. Tightly wrap the sandpaper around the bottom of the Turbo Accessory, tuck the end into the rear clamp, and lock in place.
Three grades of sandpaper come with the Turbo Accessory. Each piece is a standard 1/3 sheet. Use
fine paper for a smooth finish and coarse paper to clear rough surfaces.
3 With the Turbo Accessory on a level surface, reattach the sander dust shroud with the opening to the rear. Insert
the Attachment Hose.
OPTIO
NA
L ACCESSO
RIES

5352
OPT
ION
AL
ACC
ESSO
RIES
4 Grip the Turbo Accessory at the front and rear and turn the Kirby® system on. Press the button on the top of the
Turbo Accessory to turn on.
While applying light pressure, move it over the surface slowly. Allow the Turbo Accessory to do the work. Don’t
force it or lean heavily on it.
Sanding can result in an explosive mixture of fine dust
and air. Use sanding machine only in well-ventilated area. - Never leave a dust bag unattended with sanding dust. - Never empty the contents of the dust bag into a fire. - Replace the dust bag when the bag is 1/3 full and empty the bag each time you finish using the machine. - Be sure no metal objects, such as tacks, nails, etc. are sticking up from the surface. They can damage the sandpaper and the Turbo Accessory. Always use a hammer and punch to countersink all nails before sanding. Hitting a nail while sanding can cause sparks and create an explosion or fire. - Always wear safety glasses.
Turbo PolishingAttach the synthetic lamb’s wool pad using the same procedure as attaching sandpaper. Do not reattach the dust shroud. It is not used for polishing.
Use Turbo Accessory for polishing tabletops, paneling, and large flat surfaces.
Turbo ScouringAttach the webbed nylon scouring pad using the same procedure as attaching sandpaper. Do not reattach the dust shroud. It is not used for scouring.
Use Turbo Accessory for scouring hard surfaces such as ceramic tile. Do not use on painted surfaces.

53
MAINTENANCE
ALWAYS turn off the unit and unplug it from the wall outlet prior to doing any maintenance.
Changing the Power Nozzle Belt
1 After removing the Power Nozzle, turn the Belt Lifter clockwise until the green arrows line up.
2 Unlock the Rug Plate by unhooking the two latches on the rear of the Power Nozzle. Pull on the rear edge of the Rug
Plate to remove.
3 Note the bristle height setting which is marked on the end of the Brush Roll before lifting out the Brush Roll. See page 55.
4 Slide off the old belt and replace with a new one.

5554
MAINTENANCE
5 Make sure the numbers on the Brush Roll end caps are the same on both sides before inserting it into the Power Nozzle.
Place the belt and Brush Roll back into the Power Nozzle. One of the Brush Roll ends is larger than the other. The
Brush Roll will only fit in the Power Nozzle one way.
Center the belt on the Brush Roll.
NOTICE Property Damage Risk. Use only genuine Kirby® replacement parts. Failure to follow this warning could result in property damage.
6 Place the Rug Plate on the front of the Bumper first and then pull it over the rear. Secure it in place with the two latches.
7 Turn the Belt Lifter counterclockwise until the red arrows line up. The belt should catch on the hook inside the nozzle.
Reattach the Power Nozzle to the unit.
8 Turn the Belt Lifter clockwise until the green arrows line up.
9 Turn the unit on and check that the Brush Roll Indicator Light is on. This means that the brush roll is spinning.

55
MAINTENANCE
Adjusting the Brush Roll Height
1 The Brush Roll height is adjustable. The bristles, which wear down after long periods of use, can be extended.
Follow the directions for changing the Power Nozzle belt on page 53. When the brush has been removed, select the
Brush Roll height.
2 Rotate the Brush Roll ends to the desired setting: 1, 2 or 3 notches. Make sure the setting is the same on both ends.
The greater the number of notches, the further the bristles are extended.
Reinsert the Brush Roll and attach the Rug Plate.
Service TipsKeep the entire Brush Roll and belt track clear of lint, string, hair and other fibers. This will allow the Brush Roll to perform at its fullest potential.
Keep Motor Shaft free from lint, hair and debris built-up.
Motor shaft may be hot. Allow to cool before touching or removing lint, hair or debris.
Keep Motor Shaft free from lint, hair, and debris build up. Failure to follow these warnings may result in damage to
the Attachment Hose as well as bodily injury.

5756
Belt and Brush Roll ReplacementSee detailed instructions on page 53.
Wheel Wear and ReplacementKirby® wheels are made with a pliable tread that is designed to prevent carpet wear and damage to floors. After extended periods of use, the tread on the wheels will wear out and the wheels will need to be replaced.Check the wheel treads. If any of the plastic wheel is showing through the tread, contact an authorized Kirby® Distributor to replace the wheels.
Cord Replacement If the electrical cord becomes cut or frayed, DO NOT USE THE UNIT.
Contact an authorized Kirby® Distributor for replacement.The new replacement cord should be attached to the unit first before it is plugged into the wall outlet.
Headlight ReplacementIf one or more of the LED lights in the Headlight burn out, contact an authorized Kirby® Distributor for replacement.
MAINTENANCE

57
Servicing a Double Insulated ApplianceIn a double insulated appliance, two systems of insulation are provided instead of a ground-ing. No grounding means is necessary, nor should a means for grounding be added to the appliance. A double insulated appliance is marked with the words “DOUBLE INSULATED” (U.S.A. and Canada). The symbol may also be marked on the appliance.Servicing a double insulated appliance requires extreme care and knowledge of the system and should be done only by qualified service personnel.Replacement parts for this double insulated model must be genuine Kirby® parts for maintenance of safety and protection of warranty.
DANGER Electric Shock Hazard. - Always unplug before servicing. - NEVER use with damaged plug. - If appliance is not working as it should, has been dropped, damaged, left outdoors, or dropped into water, return it to an authorized Kirby® Distributor. Failure to follow these warnings will result in death or serious injury.
MAINTENANCE

5958
The motor does not turn on.
1. Make sure the Power Cord is plugged into an outlet and that the outlet has power.
2. Make sure the cord is fully inserted into the unit.
3. Check the Power Cord for damage. If it is damaged, have it replaced by an authorized Kirby® Distributor.
4. Make sure that an attachment or accessory is properly mounted on the front of the unit. The unit will not run without the Power Nozzle, Attachment Hose or Air Intake Guard properly in place.
5. The unit will not run without one of the following properly mounted to the Air Exhaust Port: Mini Em-Tor® collector, Attachment Hose or Multi-Surface Shampoo Tank.
The unit is not picking up dirt.
1. Check to see if the Brush Roll is turning when the unit is on by looking at the green Brush Roll Indicator Light. If the light is not on, the Brush Roll is not turning freely, the belt is slipping (stretched), broken or not engaged. The belt may need to be replaced.
2. Make sure that the Power Nozzle height is adjusted to place the brush in contact with the carpet. Use the Toe-Touch Control to adjust the height. See page 20.
3. If the brush is turning, and the brush is in contact with the carpet, check for bristle wear and adjust the brush roll height if necessary. See page 55.
4. Check the disposable filter bag to see if it is full. If it is, replace with a new filter bag.
5. Check the fill tube and air exhaust port for clogging.
The unit is difficult to push.
1. If the motor is off, make sure Tech Drive® power assist pedal is in neutral before pushing the unit.
2. If the motor is on, put the Tech Drive® power assist pedal in drive to make the unit easier to push. Do not use Tech Drive® power assist on hard surface floors.
3. Adjust the height of the Power Nozzle if necessary.
TROUBLESHOOTING

59
There is a smell of burning rubber when using the unit.
1. Check to see if the Brush Roll is turning when the unit is on by looking at the green Brush Roll indicator light. If the light is not on, then the Brush Roll may be stalled due to threads around the ends. Unplug the unit. Then, remove the Brush Roll and make sure it rotates freely at both ends.
2. The belt may not be fully engaged or disengaged. Make sure the green arrows or red arrows on the Belt Lifter match up fully.
3. If a slipping belt has deposited a black residue on the Motor Shaft, remove it gently using steel wool or sandpaper and replace the belt.
The Outer Permanent Bag or the Disposable Filter Bag has an unpleasant smell.
1. Replace the Disposable Filter Bag. See page 13.
2. Place a few drops of Odorific II®
on a cotton ball and toss it in the Outer Permanent Bag.
3. Check for debris in the Mini Em-Tor®.
4. It is not recommended to wash the outer cloth bag.
The Multi-Surface Shampoo System does not produce foam when cleaning carpets.
1. Make sure the Suds Control Valve on the Shampoo Tank is turned clockwise to the Carpet position.
2. Remove the elbow hose and check that the small suds screen is properly seated in the bottom opening of the Shampoo Tank.
3. Remove the Shampoo Tank from the unit and check that the foam filter is in place on the bottom of the large opening that connects to the Exhaust Port.
4. Use only Kirby® Carpet Shampoo. Verify that the proper mixture of water and Kirby® Carpet Shampoo has been used in the tank. See page 34.
5. In addition, for proper cleaning, make sure the belt is engaged, and that the baffle strip is inserted correctly on the bottom of the tray. See page 32.
Need additional assistance?
Your local independent authorized distributorship is available to assist you.
Or, contact The Kirby Company: [email protected] 1-800-494-8586 (United States and Canada)
TROUBLESHOOTING

6160
NOTICE Only use genuine Kirby® cleaning products with the Kirby® Home Care System. Failure to follow this warning could result in property damage.
WARNING – To reduce the risk of fire and electric shock due to internal component damage, use only Kirby® cleaning solutions, such as Kirby® Hard Floor Cleaner Concentrate and Kirby® Carpet Shampoo in the Multi-Surface Shampoo System.
CARPET CLEANING PRODUCTSCarpet Shampoo Deep-cleans carpets and rugs. Carpet-safe and non-toxic.
Multi-Purpose Spot Remover Spray on stain and blot with a clean, white cloth.
Pre-Treatment for Heavy Traffic Areas Spray on heavily-soiled areas a few minutes prior to shampooing.
Kirby® Foam Use to clean carpeted stairs, auto floor mats, and other hard-to-reach places.
Brightening Oxygen Additive Add to Kirby® Carpet Shampoo to brighten light colored carpets.
CLEANING PRODUCTS FOR PET OWNERSCarpet Shampoo for Pet Owners Neutralizes pet stains and odors while it cleans.
Pet Stain and Odor Remover Cleans occasional accidents quickly.
HOME FRAGRANCE PRODUCTSHomeFresh Room and Carpet Freshener Sprinkle on carpets then vacuum after a few minutes for a fresh, pleasant smell.
Odorific II® Deodorizer
Deodorize trash cans and damp corners. A few drops will leave a fresh scent in the vacuum bag.
KIRBY® HOME CARE PRODUCTS

61
HARD SURFACE PRODUCTSCitrus Split Adhesive Remover Removes labels and sticky residue.
Hard Floor Cleaner Gently loosens dirt and grime on hard floor surfaces.
Tile & Grout Pre-treat and Cleaner Tile & Grout Pre-treat penetrates deep stains in grout lines. Tile & Grout Cleaner cleans and beautifies tile floors.
Miracle Shine Bring a durable, high gloss to hard surface floors.
Kirby® Home Care Products are available from your authorized Kirby® Distributor, online at www.kirby.com (where available), or by calling:
United States: 1-800-437-7170 (M-F, 8:00AM - 5:00 PM EST) Australia: 1-800-781-556 Balkans: 0800-328-1247 Canada: 1-800-437-7170
Commonwealth of Independent States: +7 495 374 72 82 Europe: 00-800-5472-927 Far East: 0800-328-1247
Middle East: 0800-328-1247 Russia: 7800500-51-46 or 7495374-72-82
Scandinavia: 80014747, 0200895477, or 0800-328-1247 South Africa: 0800-203-222 or 0800-983-044
United Kingdom: 0800-328-1247 Product offerings may vary by location.
KIRBY® HOME CARE PRODUCTS

6362
AAccessory Lock . . . . . . . . . . . .23Assembling the Unit . . . . . . . . .11Attaching Bar . . . . . . . . . . . . .23Attachments . . . . . . . . . . . . . .24 Attachment Hose . . . . . . . .24 Crevice Tool . . . . . . . . . . .25 Duster Brush . . . . . . . . . . .24 Extension Tubes . . . . . . . . .24 Inflator/Deflator Tool . . . . .25 Suction Control Grip . . . . .25 Surface Nozzle . . . . . . . . .24 Upholstery Nozzle . . . . . . .24 Utility Tool . . . . . . . . . . . . .25 Wall and Ceiling Brush. . . .25 Zippbrush . . . . . . . . . . . . .30
BBag Attaching . . . . . . . . . . . . .11 Removing . . . . . . . . . . . . .18Bag Release Button . . . . . . . . .18Bag Support Strap . . . . . . . . . .13Belt Lifter . . . . . . . . . . . . . . . . .16Belts Changing . . . . . . . . . . . . .53Blower . . . . . . . . . . . . . . . . . .26Brush Roll Disengage . . . . . . . . . . . .16 Engage. . . . . . . . . . . . . . .17Brush Roll Height . . . . . . . . . . .55 Adjusting . . . . . . . . . . . . .55Brush Roll Performance Indicator Light . . . . . . . . . .17
CCanister Cleaner . . . . . . . . . . .22Carrying Lower Grip . . . . . . . . . . . .16 Upper Grip . . . . . . . . . . . .16Cleaning Height Adjusting . . . . . . . . . . . . .20Cleaning Products . . . . . . . . . .60Cord Management . . . . . . . . .19Crevice Tool . . . . . . . . . . . . . .25
DDisposable Filter Bag . . . . . . . .13Duster Brush . . . . . . . . . . . . . .24
EExtension Tubes . . . . . . . . . . . .24
HHandle Tilt Latch Lever . . . . . . .15Hard Floor Pad . . . . . . . . . . . .50Hose . . . . . . . . . . . . . . . . . . .24 Attaching . . . . . . . . . . . . .24
IInflator/Deflator Tool . . . . . . . .25
LLift the System . . . . . . . . . . . . .16Locking the Handle . . . . . . . . .15
MMaintenance. . . . . . . . . . . . . .53 Changing the Belt . . . . . . .53Mattress Cleaning . . . . . . . . . .22Mini Em-Tor® Collector . . . . . . .18Miracle Shine Kit . . . . . . . . . . .45Moving the System Power Off . . . . . . . . . . . . .14Multi-Surface Shampoo System Tank . . . . . . . . . . . . . . . . .33 Waste Tray . . . . . . . . . . . .31Multi-Surface Shampoo System Carpeting . . . . . . . . . . . . 31Multi-Surface Shampoo System Hard Floors . . . . . . . . . . . 38
OOptional Accessories . . . . . . . .31Outer Permanent Bag. . . . . . . .18
PPortable Cleaner . . . . . . . . . . .21 Cleaning a Mattress . . . . . .22 Cleaning Stairs . . . . . . . . .22Portable Shampooer . . . . . . . .29Portable Sprayer . . . . . . . . . . .27Power Nozzle Removing . . . . . . . . . . . . .22Power Switch . . . . . . . . . . . . .12
RRotary Mop. . . . . . . . . . . . . . .38
SStraight Suction Cleaning . . . . .17Suction Control Grip . . . . . . . .25Surface Nozzle . . . . . . . . . . . .24
TTech Drive® Power Assist. . . . . .20Toe-Touch Control Lower Pedal . . . . . . . . . . .20 Upper Pedal . . . . . . . . . . .20Tile & Grout Kit . . . . . . . . . . . .48Troubleshooting . . . . . . . . . . . .58Turbo Accessory . . . . . . . . . . .51 Turbo Polishing . . . . . . . . .52 Turbo Sanding. . . . . . . . . .51 Turbo Scouring . . . . . . . . .52
UUpholstery Nozzle. . . . . . . . . .24Upper Cord Hook . . . . . . . . . .19Upright Cleaner. . . . . . . . . . . .20Upright Handle Assembling . . . . . . . . . . . .11 Locking. . . . . . . . . . . . . . .15Utility Tool . . . . . . . . . . . . . . . .25
WWall and Ceiling Brush . . . . . .25
ZZippbrush . . . . . . . . . . . . . . . .30
INDEX

63
Made under one more of the following patents and design registrations. Other patents and design registrations pending.
United States 4947512 5007133 5086536 5115537 7794516 D600868 D672104 D762,992 D778,624 D780,390 D789,632
Australia 322271 334155 334156 2008207570 361319 362355 361351
Austria ATE142865
Belgium 0584961
Benelux 38610-00
Canada 127585 137881 2638641 2742137
D Kirby®162067 D Kirby®162071 D Kirby®162068
China ZL200830142963 ZL200930237374.5 ZL201130007059 ZL200910000791.7 ZL201530091045.X ZL201530090954.1 ZL201530090953.7
Denmark 0584961
Europe (design) 002669291-0001 002671248-0001 002671248-0002 002671248-0003 002669689-0001
France 902235 0584961 20106183
Germany 69304847 402010006532.8 69606774
Italy 0584961 98401 98546
Japan 2011083
Korea 0822516 0829774-0001 0829774-0002 0829774-0003 0830022
Mexico 175879
Netherlands 0584961
New Zealand 411288 570620 420040 420041 420039
Portugal 0584961
Russia 73673 2378973 81234 99653 98535 100549
South Africa A2008/01498 A2010/01540
Spain 2092232
Sweden 49181 0584961
Switzerland 0584961
United Kingdom 0433439 0584961 1090578
Other patents pending
Patent List 6/2/2017

64
P/N 260017 Rev. C - English Printed in U.S.A. ©2017 The Scott Fetzer Company
Have a Question? Need Assistance?
Your local independent authorized distributorship is available to answer any questions regarding your purchase or the operation of your Kirby® Home Care System.
Or, contact The Kirby Company: [email protected] United States: 1-800-494-8586 (M-F, 8:00AM - 5:00 PM EST) Australia: 1-800-781-556 Balkans: 0800-328-1247 Canada: 1-800-494-8586 Commonwealth of Independent States: +7 495 374 72 82 Europe: 00-800-5472-9272 Far East: 0800-328-1247 Middle East: 0800-328-1247 Russia: 7800500-51-46 or 7495374-72-82 Scandinavia: 80014747, 0200895477, or 0800-328-1247 South Africa: 0800-203-222 or 0800-983-044 United Kingdom: 0800-328-1247
Consumer Relations The Kirby Company 1920 West 114th Street Cleveland, OH 44102
For parts and supplies: www.kirby.com (where available) [email protected]
United States: 1-800-437-7170 (M-F, 8:00AM - 5:00 PM EST) Australia: 1-800-781-556 Balkans: 0800-328-1247 Canada: 1-800-437-7170 Commonwealth of Independent States: +7 495 374 72 82 Europe: 00-800-5472-9272 Far East: 0800-328-1247 Middle East: 0800-328-1247 Russia: 7800500-51-46 or 7495374-72-82 Scandinavia: 80014747, 0200895477, or 0800-328-1247 South Africa: 0800-203-222 or 0800-983-044 United Kingdom: 0800-328-1247

quality • reliability • performancequality • reliability • performance
For assistance, contact your local Authorized Distributor.
The Kirby Company, a division of The Scott Fetzer Co., 1920 West 114th Street, Cleveland, OH 44102, U.S.A.
U.S.A./Canada Parts & Supplies: 1-800-437-7170 [email protected] Consumer Relations: 1-800-494-8586 [email protected]
Australia: 1800 781 556 Europe: 00 800 547 292 72 Russia: 7 800 500 51 46 or 7 495 374 72 82 South Africa: 0800-203-222 United Kingdom: 0800-328-1247
www.kirby.com
For assistance, contact your local authorized Distributor.
The Kirby Company, a division of The Scott Fetzer Co., 1920 West 114th Street, Cleveland, OH 44102, U.S.A.
U.S.A./Canada Parts & Supplies: 1-800-437-7170 [email protected] Consumer Relations: 1-800-494-8586 [email protected]
Australia: 1800 781 556 Europe: 00 800 547 292 72 Russia: 7 800 500 51 46 or 7 495 374 72 82 South Africa: 0800-203-222 United Kingdom: 0800-328-1247
www.kirby.com