owners manual - superscopetechnologies.com · the lightning flash with arrowhead symbol within an...
TRANSCRIPT

CLASS 1 LASER PRODUCTLUOKAN 1 LASERLAITEKALSS 1 LASERAPPARAT
OWNERS MANUAL
© Copyright 2005, Superscope Technologies, Inc.
PSD340Music Practice & CD Recording System
POWERPOWER TEMPOTEMPOKEYKEYSTANDBYSTANDBY
PLAYPLAY
MICMIC
OPENOPEN
MP3MP3PUSHPUSHCD-RW PLAYBACKCD-RW PLAYBACK
REC REVIEWREC REVIEW
VRVRMETROMETRO TUNERTUNERREV/DLYREV/DLY
REC/PLAYREC/PLAY
RECREC
FINALIZEFINALIZEERASEERASE
SELECTSELECT
PUSH ENTERPUSH ENTER
CANCEL/DELETECANCEL/DELETEPROGPROGDISPDISPBALANCEBALANCETR INCTR INC
MENU/STOREMENU/STORESINGLESINGLEREPEATREPEATA-BA-BREC MODEREC MODE
-- ++
PSD340 Music Practice
CD RECORDING SYSTEM

The lightning flash witharrowhead symbol withinan equilateral triangle isintended to alert the userto the presence ofuninsulated "dangerousvoltage" within the
p r o d u c t ' s enclosure that may be ofsufficient magnitude to constitute a risk ofelectric shock to persons.
- 2 -
Important SafetyInstructionsREAD BEFORE OPERATING EQUIPMENT
This product was designed and manufactured to meet strict quality andsafety standards. There are, however, some installation and operationprecautions which you should be particularly aware of.
1. Read instructions.
2. Keep these instructions.
3. Heed all warnings.
4. Follow all instructions.
5. Clean only with dry cloth.
6. Do not use this apparatus near water.
7. To ventilate the unit, do not install it in a rack or bookshelf, andnote the following: Do not insert objects beneath the unit. Do notblock ventilation slots at the top of the unit. Do not place anythingabout 1 meter above the top panel. Make a space of about 8”(20 cm) around the unit.
8. Do not install near nay heat sources such as radiators, heat registers,stoves, or other apparatus (including amplifiers) that produce heat.
9. Do not defeat the safety purpose of the polarized or grounding-type plug. A polarized plug has two blades with one wider than theother. A grounding type plug has two blades and a third groundingprong. The wide blade or the third prong are provided for your safety.If the provided plug does not fit into your outlet, consult an electricianfor replacement of the obsolete outlet.
10. Protect the power cord from being walked on or pinched particularlyat plugs, convenience receptacles, and the point where they exitfrom the apparatus.
11. Only use attachments/accessories specified by the manufacturer.
12. Use only with the cart, stand, tripod, bracket, ortable specified by the manufacturer, or sold withthe apparatus. When a cart is used, use cautionwhen moving the cart/apparatus combination toavoid injury from tip-over.
13. Unplug this apparatus during lightning storms orwhen unused for long periods of time.
14. Refer all servicing to qualified service personnel. Servicing is requiredwhen the apparatus has been damaged in any way, such as power-supply cord or plug is damaged, liquid has been spilled or objectshave fallen into the apparatus, the apparatus has been exposed torain or moisture, does not operate normally, or has been dropped.
Additional Safety Information!• This product should not be placed in a built-in installation such as a
bookcase or rack unless proper ventilation is provided or themanufacturer’s instructions have been adhered to.
• Apparatus shall not be exposed to dripping or splashing and that noobjects filled with liquids, such as vases, shall be placed on the apparatus.
• When the switch is in the OFF position, the apparatus isn’tcompletely switched-off from the MAINS.
WARNINGTO REDUCE THE RISK OF FIRE OR ELECTRIC SHOCK, DONOT EXPOSE THIS PRODUCT TO RAIN OR MOISTURE.
CAUTION: TO PREVENT ELECTRIC SHOCK, MATCH WIDE BLADEOF PLUG TO WIDE SLOT, FULLY INSERT.
ATTENTION: POUR EVITER LES CHOC ELECTRIQUES, INTRODUIRELA LAME LA PLUS LARGE DE LA FICHE DANS LA BORNECORRESPONDANTE DE LA PRISE ET POUSSER JUSQU’AU FOND.
NOTE TO CATV SYSTEM INSTALLER:This reminder is provided to call the CATV (Cable-TV) system installer’sattention to Section 820-40 of the NEC which provides guidelines forproper grounding and, in particular, specifies that the cable groundshall be connected to the grounding system of the building, as close tothe point of cable entry as practical.
NOTE: This equipment has been tested and found to comply with thelimits for a Class B digital device, pursuant to Part 15 of the FCC Rules.These limits are designed to provide reasonable protection againstharmful interference in a residential installation. This equipmentgenerates, uses and can radiate radio frequency energy and, if notinstalled and used in accordance with the instructions, may causeharmful interference to radio communications. However, there is noguarantee that interference will not occur in a particular installation. Ifthis equipment does cause harmful interference to radio or televisionreception, which can be determeined by tuning the equipment off andon, the user is encouraged to try to correct the interference by one ormore of the following measures:• Reorient or relocate the receiving attenna.• Increase the separation between the equipment and receiver.• Connect the equipment into an outlet on a circuit different from
that to which the receiver is connected.• Consult the dealer or an experienced radio/TV technician for help.
NOTE: Changes or modifications not expressly approved by the partyresponsible for compliance could void the user’s authority to operatethe equipment.
This Class B digital apparatus complies with Canadian ICES-003.
Cet appareil numérique de la Classe B conforme à la norme NMB-003 duCanada.
This product is in conformity with the EMC directive and low-voltage directive.
This product complies with household power and safetyrequirements in your area.
The exclamation point within an equilateraltriangle is intended to alert the user to thepresence of important operating andmaintenance (servicing) instructions in theliterature accompanying the appliance.
RISK OF ELECTRIC SHOCKDO NOT OPEN
CAUTION
CAUTION: TO REDUCE THE RISK OF ELECTRIC SHOCK,DO NOT REMOVE COVER (OR BACK)
NO USER-SERVICEABLE PARTS INSIDEREFER SERVICING TO QUALIFIED SERVICE PERSONNEL
CE MARKINGEnglishThe PSD340 is in conformity with the EMC directive and low-voltage directive.FrançaisLe PSD340 est conforme à la directive EMC et à la directive sur les basses tensions.DeutschDas Modell PSD340 entspricht den EMC-Richtlinien und den Richtlinien fürNiederspannungsgeräte.NederlandsDe PSD340 voldoet aan de EMC eisen en de vereisten voor laag-voltage.EspañolEl PSD340 está de acuerdo con las normas EMC y las relacionadas con baja tensión.ItalianoIl PSD340 è conforme alle direttive CEE ed a quelle per i bassi voltaggi.PortuguêsO PSD340 conforma com as diretrizes EMC e de baixa voltagem.SvenskaPSD340 är tillverkad i enlighet med EMC direktiven och direktiven för lågvoltsutrusning.
English
WARNINGS- Do not expose the equipment to rain or moisture.
- Do not remove the cover from the equipment.
- Do not insert anything into the equipment through the ventilationholes.
- Do not handle the mains lead with wet hands.
- Do not cover the ventilation with any items such as tablecloths,newspapers, curtains, etc.
- No naked flame sources, such as lighted candles, should be placedon the equipment.
- When disposing of used batteries, please comply with governmentalregulations or environmental public instruction’s rules that apply inyour country or area.
- Do not place anything about 0.5 meter above the top panel.
- Make a space of about 0.5 meter around the unit.
- No objects filled with liquids, such as vases, shall be placed on theapparatus.
- When the switch is in the OFF position, the equipment is notcompletely switched off from MAINS.
Français
AVERTISSEMENTS- Ne pas exposer l’appareil à la pluie ni à l’humidité.
- Ne pas essayer de retirer le boîtier de l’appareil.
- Ne rien insérer dans l’appareil par les orifices de ventilation.
- Ne pas manipuler le cordon d’alimentation avec les mainsmouillées.
- Ne pas recouvrir les ouïes de ventilation avec un objet quelconquecomme une nappe, un journal, un rideau, etc.
- Ne placer aucune source de flamme nue, comme une bougieallumée, sur l'appareil.
- Pour mettre au rebut les pi les usées, respecter les loisgouvernementales ou les règlements officiels concernantl’environnement qui s'appliquent à votre pays ou région.
- Ne placez aucun object à moins de 0,5 mètre environ du panneausupérieur.
- Veiller à ce qu’aucun objet ne soit à moins de 0,5 mètre des côtésde l'appareil.
- Aucun objet rempli de liquide, un vase par exemple, ne doit êtreplacé sur l'appareil.
- Lorsque l'interrupteur est sur la position OFF, l'appareil n'est pascomplètement déconnecté du SECTEUR (MAINS).
Deutsch
WARNHINWEISE- Das Gerät nicht Regen oder Feuchtigkeit aussetzen.
- Die Abdeckung nicht vom Gerät abnehmen.
- Keine Gegenstände durch die Belüftungsschlitze stecken.
- Das Netzkabel nicht mit feuchten oder nassen Händen anfassen.
- Decken Sie die Lüftungsöffnungen nicht mit einem Tischtuch, einerZeitung, einem Vorhang usw. ab.
- Es dürfen keine Gegenstände mit offener Flamme, wie etwabrennende Kerzen, auf dem Gerät aufgestellt werden.
- Beachten Sie bei der Entsorgung der verbrauchten Batterien allegeltenden lokalen und überregionalen Regelungen.
- Darauf achten, daß über dem Gerät ein Freiraum von mindestens0,5 meter vorhanden ist.
- Auf allen Geräteseiten muß ein Zwischenraum von ungefähr 0,5meter vorhanden sein.
- Auf das Gerät dürfen keine mit Flüssigkeiten gefüllte Behälter, wieetwa eine Vase, gestellt werden.
- Wenn der Schalter ausgeschaltet ist (OFF-Position), ist das Gerätnicht vollständig vom Stromnetz (MAINS) abgetrennt.
Nederlands
WAARSCHUWINGEN- Stel het apparaat niet bloot aan regen of vocht.
- Verwijder de afdekplaat van het apparaat niet.
- Duw niets door de ventilatieopeningen in het apparaat.
- Raak het netsnoer niet met natte handen aan.
- Bedek de ventilatieopeningen niet met enige voorwerpen, zoalstafelkleden, kranten, gordijnen, enz.
- Plaats geen brandende voorwerpen, zoals kaarsen, op hetapparaat.
- Vo lg b i j he t weggoo ien van verbru ik te ba t te r i jen deoverheidswetgeving of milieuvoorschriften op die van kracht zijn inhet land of de regio waarin u zich bevindt.
- Zorg dat er tenminste 0,5 meter vrije ruimte boven het toestel is.
- Zorg dat er 0,5 meter vrije ruimte rond het toestel is.
- Plaats geen voorwerpen met een vloeistof erin, zoals eenbloemenvaas, op het apparaat.
- Als de schakelaar op OFF staat, is het apparaat niet vollediglosgekoppeld van de netspanning (MAINS).
2a

Español
ADVERTENCIAS- No exponga el equipo a la lluvia ni a la humedad.
- No extraiga la tapa del equipo.
- No introduzca nada en el interior del equipo a través de los orificiosde ventilación.
- No maneje el cable de alimentación con las manos mojadas.
- No cubra la ventilación con objetos como manteles, periódicos,cortinas, etc.
- No deben colocarse sobre el equipo elementos con fuego, porejemplo velas encendidas.
- Cuando se eliminen baterías usadas, deben cumplirse lasreglamentaciones of ic iales o las normas de protecciónmedioambiental aplicables en su país o en su zona.
- No ponga nada a menos de 0,5 metro por encima del panelsuperior.
- Deje un espacio de unos 0,5 metro alrededor de la unidad.
- No se deben colocar sobre el aparato recipientes que contenganlíquidos, como por ejemplo jarrones.
- Cuando el interruptor está en la posición OFF, el equipo no estácompletamente desconectado de la alimentación MAINS.
Italiano
AVVERTENZE- Non esporre l’apparecchio alla pioggia o all’umidità.
- Non rimuovere il coperchio dell’apparecchio.
- Non introdurre oggetti all’interno dell’apparecchio attraverso i fori diventilazione.
- Non toccare il cavo di alimentazione con le mani bagnate.
- Non coprire le fessure di ventilazione con tovaglie, giornali, tendeod oggetti analoghi.
- Non posare sull'apparecchio sorgenti di fiamme scoperte qualicandele accese.
- Smaltire le pile usate in conformità alle norme governative odisposizioni ambientali vigenti nel proprio paese o zona.
- Non posare alcun oggetto sopra il pannello superiore, lasciandolibero uno spazio di circa 0,5 m.
- Lasciare 0,5 metro liberi tutto intorno l'unità.
- Non mettere sull'apparecchiatura alcun contenitore di liquido, comead esempio dei vasi.
- Quando l'interruttore è nella posizione OFF, l'apparecchiatura non ècompletamente scollegata da MAINS.
Português
ADVERTÊNCIAS- Não exponha o equipamento à chuva nem à humidade.
- Não retire a tampa do equipamento.
- Não atire nada para dentro do equipamento através dos orificíos deventilação.
- Não manuseie o cabo de alimentação com as mãos molhadas.
- Não cobrir os orifícios de ventilação com objectos tais como toalhasde mesa, jornais, cortinas, etc.
- Não colocar chamas abertas tais como velas acesas, sobre oaparelho.
- Ao deitar foras as pilhas usadas, favor observar os regulamentosgovernamentais ou as regras com respeito ao meio ambiente quese aplicam no seu país ou área de residência.
- Deixar um espaço completamente livre de cerca de 0,5 metroacima do painel superior.
- Deixar um espaço de cerca de 0,5 metro ao redor do aparelho.
- Não colocar recipientes com água, tal como vasos, sobre oaparelho.
- Quando o interruptor está na posição OFF, o equipamento não ficatotalmente desligado de MAINS.
Svenska
VARNINGAR- Utsätt inte utrustningen för regn eller fukt.
- Ta inte bort utrustningens hölje.
- För inte in föremål i utrustningen genom ventilationshålen.
- Hantera inte nätsladden med våta händer.
- Täck inte för ventilationsöppningarna med några föremål som tillexempel bordsdukar, dagstidningar, gardiner e.d.
- Inga föremål med öppen låga, som till exempel tända stearinljus,bör placeras på utrustningen.
- Följ de lagar och miljöskyddsråd som gäller i det land eller områdedär du bor när du gör dig av med batterier.
- Placera inte någonting närmare än 0,5 meter ovanför apparateneller enheten.
- Se till att det finns omkring 0,5 meter fri plats runt omkring enheten.
- Inga objekt som är fyllda med någon vätska, ti l l exempelblomstervaser, bör placeras på apparaten.
- Även om strömbrytaren står i det avstängda läget OFF, så ärutrustningen inte helt bortkopplad från det elektriska nätet (MAINS).
2b

Table of Contents
- 3 -
Warning ..................................................................2Safety Instructions .................................................2Table of Contents ..................................................3Specifications .....................................................3Introduction .....................................................4Package Contents ...................................................4Features .................................................5Top of Unit......................................................5Front of Unit......................................................8Remote Control...............................................9Back of Unit.........................................................10Set Up ........................................................11Powering Up ......................................................11Setting Up Speakers ............................................11
Headphones or Built-In Speaker....................11External Speakers......................................11
Setting Up Instruments, Mics, & Other Sound Sources ....11Microphones... . . . . . . . . . . . . . . . . . . . . . . . . . . . . . . . . .11Internal Microphone.....................................12Instruments........................................12Line Level Sources..............................12Setting Levels...........................................12
Music Practice & CD Playback ....................................13How to Use the Tuner .......................................13How to Use the Metronome .............................14Playing a CD ...................................................15Selecting A-B Practice Loops ............................15Changing Key and Tempo ........................15Voice Reduction ..........................................16Recording ......................................................17Making a Live Recording ...................................17Minute Track Mode..............................................18
Recording from a Digital Input ................18Adding Reverb or Delay ........................................18Right & Left Channel Mix ....................................18How to Record with CD .................................19
Program a Playlist ....................................19Recording Key, Tempo and VR Changes .........19Activating “Record with CD” Mode............19
How to Record a Song Segment ..............................20How to Copy an Existing CD ............................20Copying from an External Source .............................20How to Finalize a Disc .......................................21
How to Unfinalize a CD-RW disc.......................21How to Erase a CD-RW...................................21
Menus .......................................................................22Play Menu .........................................22Record Menu .........................................23Stop Menu ................................................24
Troubleshooting .......................................................25Further Information ...................................................27Warranty......................................................30
Topic Page
SpecificationsGeneralSystem........................ Compact Disc Digital Audio (CD-DA)Number of channels...............................................2 (stereo)Applicable discs.......................................CD, CD-R, CD-RWPower requirements:
/U1B...........................................120V 60Hz,21W/N1B............................................230V 50Hz,21W/K1B............................................220V 50Hz,21W
Dimensions (maximum)Width.......................................11.625 inches (296 mm)Height......................................... 3.635 inches (92 mm)Depth...........................................8.75 inches (222 mm)Weight...............................................7 pounds (3.2 Kg)
AudioADC..............................24 Bit Resolution 64x OversamplingDAC.......................................................... 20 Bit ResolutionOverall frequency response.............................20Hz - 20kHz
CD-R drive outputPlayback S/N................................................................90dBPlayback Dynamic Range.............................................90dBPlayback Total Harmonic Distortion.............................0.01%Output Voltage/Impedance (Line Output)...............2.0V/2.2K
CD drive outputPlayback S/N................................................................90dBPlayback Dynamic Range..............................................90dBPlayback Total Harmonic Distortion............................0.01%Output Voltage ....................................................2.0V/2.2K
MIC/LINE analog inputLINE level
S/N .....................................................................85dBTHD...................................................................0.05%Input Sensitivity/Impedance...........................500mV/6K
MIC levelS/N .....................................................................70dBTHD ....................................................................0.1%Input Sensitivity/Impedance ...........................3.0mV/6K
AUX analog inputS/N ....................................................................85dBTHD ..................................................................0.01%Input Sensitivity/Impedance ...................... 500mV/50K
Digital InputSample rate .................................32kHz/44.1kHz/48kHZ
Digital OutputOutput Level/Impedance ..........................0.5Vp-p/75Ω
Headphone Output (10% THD)Level/Impedance........................................30mW/32Ω
Speaker Output (10% THD)Level/Impedance ........................................... 2.0W/8Ω
Operating Temperature .........+5° C -+35°C (41°F -95°F)

- 4 -
Package Contents
POWER TEMPOKEYSTANDBY
PLAY
MIC
OPEN
MP3MP3PUSHPUSHCD-RW PLAYBACKCD-RW PLAYBACK
REC REVIEW
VRMETRO TUNERREV/DLY
REC/PLAY
REC
FINALIZEERASE
SELECT
PUSH ENTER
CANCEL/DELETEPROGDISPBALANCETR INC
MENU/STORESINGLEREPEATA-BREC MODE
ò ó - +
PSD340 Music Practice
CD RECORDING SYSTEM
PSD340Infrared (IR)
Remote
AC Power Chord
RCA Patch Cables
Installing Remote Batteries
Press and lift at arrow to open the remote controlbattery compartment.
Install two AA batteries then replace compartmentcover.
When disposing of used batteries, please comply withgovernmental and environmental regulations.
AA batteries (2)
IntroductionCongratulations on your purchase of the PSD340 MusicPractice CD Recording System. The PSD340 is a combina-tion CD player and CD recorder with special featuresdesigned for music teachers, choral directors, vocalists,musicians and sound engineers. Tune up, practice to themetronome, control the playback of CDs and MP3 filesfor custom accompaniment, and record directly to CD.It’s convenient and easy with the PSD340.
Features for Music Practice
• Change the key of a song without affecting tempo(± one octave in half steps or finer increments)
• Change the tempo of a song without affectingmusical pitch (-75% to +50%)
• Change key and tempo simultaneously• Select A-B (Point A to Point B) repeat loops• Reduce lead vocals from stereo recordings• Use built-in metronome• Use built-in chromatic tuner and 440Hz tone• Play and manipulate MP3 audio files on a CD-R or
CD-RW disc• CD-G graphics output (with optional decoder)
Recording Features
• Direct recording to CD-R (write once) or CD-RW(rewritable) discs
• Recording of music manipulations such as key ortempo changes
• Built-in microphone preamplifiers• Built-in condenser microphone• Automatic Rec Level Control for “worry free” recording• Record-Review which allows immediate playback of
the last track recorded• Mixing of CD or CD-MP3 (MP3 files on a disc)
accompaniment with mic or instrument input• Independent operation of the CD recording drive
and CD player drive. Audio from the CD player canbe mixed with other sources, processed, and routedback to the CD recording drive through the DIGITAL IN
Recommended Media
The PSD340 will record on computer CD-R or CD-RWdata discs as well as “Music CD-R” discs. The mostimportant factor in choosing CD-R or CD-RW media is a1X speed rating. Choose brand name discs that arerated 1X (e.g. 1X - 40X) or imply 1X (e.g., “up to40X”). We do not recommend using generic discs withthe PSD340. If possible, test any brand before buying inbulk.

POWER TEMPOKEYSTANDBY
PLAY
MIC
OPEN
MP3MP3PUSHPUSHCD-RW PLAYBACKCD-RW PLAYBACK
REC REVIEW
VRMETRO TUNERREV/DLY
REC/PLAY
REC
FINALIZEERASE
SELECT
PUSH ENTER
CANCEL/DELETEPROGDISPBALANCETR INC
MENU/STORESINGLEREPEATA-BREC MODE
ò ó - +
PSD340 Music Practice
CD RECORDING SYSTEM
Features
2
1.2
5-1
9 8 7 6
1 Control Buttons2 Speaker3 CD Player Drive4 Internal Microphone5 CD Player and CD Recorder Controls
11 Key Controls12 Standby Light13 Standby Power Button14 Display
Top of Unit
3a3b
5-2
34
1413
- 5-
101112
1.1
CANCEL/DELETEPROGDISPBALANCETR INC
MENU/STORESINGLEREPEATA-BREC MODE
A B C D E
F G H I J
A. Record ModeB. A-B LoopC. RepeatD. Single Track PlayE. Menu/Store
F. Track IncrementG. BalanceH. DisplayI. ProgramJ. Cancel/Delete
[1-1] Control Buttons
A. RECORD MODE (REC MODE) buttonWith a CD-R or CD-RW disc in the CD Recordingdrive, press this button to enter Record mode.Turn the SELECT jog wheel to select the recordingmode. Then press the SELECT jog wheel tochoose that mode.
B. A-B LOOP (A-B) buttonWhile a CD is playing in the CD player drive, pressthis button to start point A to point B repeat play(pg. 15).
C. REPEAT buttonThere are two Repeat modes: Track or Entire CD.
6 Finalize Button7 Record Button8 Erase Button9 Select Jog Wheel
Tempo Controls10

prefer, you can use the OUTPUT feature to takeaudio from one channel and send it into bothchannels or both sides of your headphones. Howto do this:
1. While the unit is stopped, press the MENU/STORE button.
2. Turn the SELECT jog wheel until you see theoption OUTPUT.
3. Press the SELECT jog wheel to enter.4. If display reads “STEREO” turn the SELECT jog
wheel to change the display to read “MONO.”5. Press the MENU/STORE button to store the new
setting.
H. DISPLAY (DISP) buttonWhile playing a CD in either drive, press theDISPLAY button once to display the remainingplay time for the current track. The display reads“TRACK.”
Press the button a second time to display theremaining play time for the entire CD. The displayreads “TOTAL TRACK.” Press the DISPLAY buttonagain to return to the default display showingelapsed track time.
I. PROGRAM (PROG) buttonUse this button to program a play list of tracks orMP3s (for the CD drive only.) (See pg. 19 for moreinformation).
J. CANCEL/DELETE buttonPress this button to delete tracks from a program,to delete text when entering CD text, to cancelmenu changes, or to return to a higher level inthe menu.
- 6 -
Track RepeatWhile playing a CD in either drive press thisbutton once to repeat only the track beingplayed. The display reads “REPEAT 1.”
Entire CD RepeatPress the REPEAT button twice to repeat theentire CD. The display reads “REPEAT.”
Press REPEAT a third time to exit Repeat mode.
D. SINGLE TRACK PLAY (SINGLE) buttonPress the SINGLE button to toggle Single TrackPlay ON or OFF.
While in Single Track Play and when a track isselected with the SELECT jog wheel, the trackdoes not automatically start playing. Instead, it ispaused and cued up at the beginning of the audioand the PLAY/PAUSE button flashes.
Press the PLAY/PAUSE button to begin playback.
When the track is finished, the PSD340 willautomatically pause, cued to music, at thebeginning of the next track. (See pg. 27 on howto adjust the cue point).
E. MENU/STORE buttonPress this button to enter Menu mode. Menuselections and changes are made using theSELECT jog wheel. Turn the SELECT jog wheel toscroll through the options. Press the SELECT jogwheel to select an option. Press the MENU/STOREbutton to store changes and exit Menu mode. (Fora complete list of menu selections see pg. 22).
F. TRACK INCREMENT (TR INC) buttonDuring recording, press this button to manuallyincrement a new track. RECOMMENDED: Whenusing this feature, set AUTO TRACK to OFF (Seepg. 23).
G. BALANCE buttonThe BALANCE control allows you to adjust theright-left stereo balance of the line output andheadphones and the R-L channel mix of thespeaker. Press the BALANCE button, then turn theSELECT jog wheel to adjust the stereo balance.
When transcribing, you might want to zero in ona particular instrument in the stereo mix. If thatinstrument is located mostly in the right channel,you may turn the BALANCE control all the way tothe right. However, this will remove all the soundfrom the left channel and left headphone. If you
VRMETRO TUNERREV/DLY
K. MetronomeL. Reverb/DelayM. TunerN. VR (Voice
Reduction)
[1-2] Music Practice Controls
K. METRONOME (METRO) buttonPress this button to turn the metronome ON/OFFand to adjust metronome settings (pg. 14).
L. REVERB/DELAY (REV/DLY) buttonPress this button to add a Reverb or Delay effectto AUX IN, the left MIC/LINE/INST input and/orthe right MIC/LINE/INT MIC input and to adjustReverb/Delay settings (pg. 18).
K L M N

[7] RECORD (REC) button / lightPress this button to enter Record Pause mode. Pressit to start recording when the unit is in RecordPause mode. Also used when finalizing.
[8] ERASE button / lightUse to enter Erase mode (CD-RW only) (pg. 21).
[9] SELECT jog wheelThis is the master control for the PSD340. Pressthe SELECT jog wheel to switch between drives.For most operations, you scroll through choiceswith the SELECT jog wheel and press it to acceptyour choice.
• In Program mode, turn to select a track, thenpress to program the track.
• In Play mode, turn to select a track.• When recording, turn to adjust recording level.• After the MENU/STORE button is pressed, turn
the SELECT jog wheel to scroll through menuselections and make adjustments.
[10] Tempo Change buttonsPress the “+” button to increase or the “-”button to decrease the tempo of the disc in theCD drive (pg.15). The key will be unaffected.
[11] Key Change buttonsPress to lower or to raise the key (musicalpitch) (pg. 15). The tempo will be unaffected.
[12] STANDBY lightSTANDBY light is lit when power is switched OFF bythe Standby POWER switch on the unit or remote.
[13] Standby POWER switchSlide the Standby POWER switch to the right toturn power ON or OFF. The MASTER POWERbutton on rear of unit must be ON (the redSTANDBY light must be lit).
[14] Display1. TOC - Lit when TOC (disc table of contents)
information is held in memory. The table ofcontents includes the total number of tracks,playback time and other CD text if provided.
2. Record indicator - Lit when recording.3. Pause indicator - Lit when recording or when
playback has been paused.4. Play indicator - Lit during recording or playback.5. PROG indicator - Lit during Programming
mode (selecting track playback sequence).6. REPEAT indicator - Lit during a repeat opera-
tion. NOTE: When the “1” indicator is also lit,only the currently playing track is repeated.
- 7 -
M. TUNER buttonPress this button to activate the built-in tuner andto adjust tuner settings (pg. 13).
N. VOICE REDUCTION button (VR)Press this button to activate voice reduction. Aspecial processor reduces the volume of centeredlead vocals during playback of stereo CD or MP3recordings (See pg. 16).
[2] Internal SpeakerThe internal speaker allows listening to thePSD340 recording system without having toconnect to other equipment for amplification.
[3] CD Player DriveThe top loading CD drive is for playback only. ThePSD340 can playback CD, CD-MP3, CD-R andCD-RW discs.
The CD drive is opened by the OPEN slide switch(3a), and closed by pushing on the corner markedPUSH (3b).
[4] Built-In Microphone (MIC)Internal condenser microphone.
[5] Play controlsPlay controls (5-1) controlplayback of a disc in the CDplayer drive [3]. Anotherset of play controls (5-2)control playback of a disc inthe CD-R drive (pg 9, #13 ).
A. FAST BACKWARDSEARCH button. Hold down to go backwardswithin an audio track. NOTE: Use the SELECTjog wheel to change tracks.
RECORD-REVIEW button.For the CD-R drive, theFAST BACKWARD SEARCHbutton (A) also controls theRECORD REVIEW feature.Press this button whilerecording, or after the
recording has been stopped, and the unit willstop and play back the last track recorded.
B. FAST FORWARD search button. Hold down to advance within an audio track.
C. PLAY/PAUSE buttonD. STOP button
[6] FINALIZE button / lightPress this button to enter CD-R Finalize mode (pg. 21 ).
(Fig. 5-1)
A B
C D
REC REVIEW
(Fig. 5-2)
A B
C D

Front of Unit(controls and connections)
[1] PHONE/SPEAKER LEVEL controlTurn this knob to adjust the level (volume) of thebuilt-in speaker or headphones plugged into thePHONE jack.
[2] PHONE SELECTOR knobSelect the audio source for the PHONE jack andINTERNAL SPEAKER by turning this knob to oneof the following four settings:
CD – CD player driveLINE OUT – Audio available at the LINE OUT jacks.MIC/LINE – Audio being input via the MIC/LINE/INST and MIC/LINE/INT MIC input jacks.AUX – Audio being input via the AUX IN jack.
[3] LEFT LINE/MIC/ INSTRUMENT(INST) switchSwitch to LINE for a line level input, MIC for amicrophone level input or INST for an instrumentlevel input.
Note: Audio from the front inputs can be mixedwith audio entering the stereo AUX input on therear panel.
[4] Left level controlTurn this knob to adjust the Left Input signal level.
[5] Right LINE/MIC/INT MIC switchSwitch to LINE for a line level input, MIC for amicrophone level input, or INT when using theinternal microphone. When using an instrumentin the right channel, select MIC and set the ALC/ATT switch to -15dB (See #8).
INSTINST
MIXMIXSPLITSPLITSTEREOSTEREO
MIC/LINEMIC/LINEONON
OFFOFF -20dB-20dB
LINELINEMICMIC
LEFTLEFT RIGHTRIGHTMIC/LINEMIC/LINE
OPEN/CLOSEOPEN/CLOSESPEAKERSPEAKERALC/ATTALC/ATTINPUTINPUT
ONONOFFOFFDIGITALDIGITALANALOGANALOG
PHONE SELECTORPHONE SELECTOR MIC/LINEMIC/LINELINELINE
CDCD
PHONE/SPEAKERPHONE/SPEAKER
MIC/LINEMIC/LINEAUXAUX RRLINE OUTLINE OUT
MICMIC INT MICINT MICLEVELLEVEL
LL
PHONESPHONES LINE OUTLINE OUT
CD PLAY/RECORDCD PLAY/RECORD
PUSHPUSH
NEUTRIKNEUTRIK
PUSHPUSHPUSH
NEUTRIKNEUTRIK
Note: When INTERNAL MIC is selected, both theLEFT level control and the RIGHT level control areactive. Use the RIGHT and LEFT level controlknobs to adjust the INTERNAL MIC level appliedto each channel.
[6] Right level controlTurn this knob to adjust the Right Input signallevel.
[7] INPUT ANALOG/DIGITAL switchSelect between analog or digital external input.
[8] ALC/ATT switchRecord level limiter or MIC/LINE/INST attenuator.ON - Limits any analog input signal greater than-6 dB. Record balance and Record Level areinactive when ALC is on.OFF - Set level using left and right MIC/LINE/INST(or INT MIC) level controls. Levels in excess of 0dB may be recorded and may result in distortedrecordings.-15dB – Reduces right and left MIC levels by-15dB. Does not effect the internal mic.
[9] MIC/LINE SPLIT/STEREO/MIX switchDetermines how the signal from the CD drive andthe signals from the MIC/LINE/INST (or INT MIC)inputs are recorded.SPLIT - Left and right signals from the CD driveare sent to the left channel of the recording. Leftand right signals from MIC/LINE/INST (or INT MIC)are sent to the right channel of the recording.Left and right signals from the AUX inputs are sentto the left and right channels of the recording.
1 2 3 4 5 6 7 8 9 10 11
17 16 15 14 13 12
- 8 -
Most of the controls on the remote work identically tothe controls on the unit. Special attention is given herefor controls that are on the remote only or thatfunction differently from controls on the unit.
Note: When using the remote to scroll throughmenus, use the forward search button >> to scrollforward and the backward search button << to scrollbackward. Press the Enter button to confirm selections.
1) CD-R select button. Press to select the CD-R drive.When selected, buttons on this remote such as Play,Pause, Stop, and Search work on the CD-R drive.
2) CD select button. Press to select the CD playerdrive. When selected, buttons on this remote suchas PLAY, PAUSE, STOP and SEARCH work on the CDplayer drive.
3) TEMPO RESET button. Pressing the TEMPO RESETbutton on the remote will reset the tempo to 0%(normal speed).
4) VOLUME MUTE (VOL MUTE). Press to mute theaudio to the Line Output. This does not affect thebuilt-in speaker.
5) VOLUME UP/DOWN. Press these buttons to controlthe volume of the audio sent to the Line Output.
6) BALANCE LEFT/ BALANCE RIGHT buttons (BALLEFT/ BAL RIGHT). Press these buttons to controlthe right-left stereo balance of the Line Output andheadphones, and the right-left channel mix of thespeaker.
7) BALANCE RESET (BAL RESET). Press this button toreturn the right-left stereo balance of the LineOutput and headphones, and the right-left channelmix of the speaker, to the center position (right andleft channels equal).
8) Alphanumeric keypad. Performs some of thefunctions of the SELECT jog wheel. In Play andProgram modes, press a number to select a track.Then press ENTER to enter the selection. Whenentering CD TEXT, press a number button once toselect the first of the three letters, twice for thesecond and three times for the third. Press ENTER toenter the selected letter.
STEREO - Left and right signals from the CDdrive are sent to the left and right channels of therecording. Left and right signals from the MIC/LINE/INST (or INT MIC) and/or AUX inputs aresent to the left and right channels of therecording.MIX - Left and right signals from the CD driveand the AUX inputs are sent to the left and rightchannels of the recording. MIC/LINE/INST (or INTMIC) inputs are mixed together and then sent toboth channels of the recording.
[10] SPEAKER OFF/ON switchTurns the built-in speaker ON or OFF.
[11] OPEN/CLOSE switchPress to OPEN the CD-R drive. Press again toCLOSE the CD-R drive.
[12] Remote control sensorSensor for the supplied wireless remote control.
[13] CD-R drive (disc tray)In this manual, this drive is referred to as theCD-R drive or CD Recording drive. It is used forrecording and can record both CD-R and CD-RWdiscs. NOTE: It cannotrecord in MP3 file format.
The CD-R drive canalso playback CD,CD-R and CD-RWdiscs. You can notuse music practicefeatures such as key andtempo controls with this drive.
[14] Right XLR or 1/4" input jackPlug in a microphone or line level audio sourcehere to provide audio to the right stereo channel.
[15] Left XLR or 1/4" input jackPlug in a microphone, instrument or line levelaudio source here to provide audio to the leftstereo channel.
[16] LINE OUT level controlTurn this knob to adjust the output level of theLINE OUT jacks.
[17] PHONES jackPlug stereo headphones in here. Adjustheadphone volume with the PHONE/SPEAKERlevel control.
Remote Control
- 9 -

Phantom PowerPhantom Power
ININ
RC-5RC-5
OUTOUT
ONON OFFOFF
ININ
OFFOFFON/ON/POWERPOWER
OUTOUTDIGITALDIGITAL
OUTOUTAUXAUXLINELINEMIXMIXININ
PEDALPEDALFOOTFOOTOUTOUT
ININ
LL
RR
InputLevel
[1] MIX OUT jacksSound from the CD drive can be mixed with soundfrom the MIC/LINE/INST input, the MIC/LINE/INTMIC input, and the AUX IN jacks. The mixed signalis output through the MIX OUT jack as L-R linelevels. This signal can be output to an externalrecorder, amplifier or powered speakers. This signalbypasses the CD-R drive, so it is available for outputeven if the CD-R drive is stopped.
[2] LINE OUT jacksSound from the CD-R drive is output as L-R linelevels to an external recorder, amplifier or poweredspeakers. When the CD-R drive is not recording,the LINE OUT jacks output the MIX OUT signal.Unlike the MIX OUT signal, the LINE OUT signal canbe adjusted by the LINE OUT level control andequalized with the OUTPUT EQ feature (pg. 22).
[3] AUX IN jacksUse this stereo RCA connection for recording ontothe CD-R drive from an external audio source suchas a cassette deck. Audio from the AUX IN can bemixed with audio from the front panel inputs, theinternal microphone and the CD player drive.
[4] AUX IN level controlTurn to adjust the input signal level of the AUX IN.
[5] DIGITAL IN and OUT jacksPlug in RCA coaxial cables here to connect to theinput and/or output of an external digital unit.Use DIGITAL IN for recording onto the CD-R drivefrom an external digital audio source. Use DIGITALOUT for going to an external digital device.
[6] REMOTE RC-5 IN and OUT jacksPlug in RCA coaxial cables here to connect to theinput or output of an RC-5 remote control system.
For more information on the RC-5 system pleasecontact Superscope Technologies.
[7] Phantom Power ON/OFF switchSwitch ON to apply 48V phantom power to XLRmic inputs. Switch OFF if the microphones beingused do not require 48V phantom power.
[8] FOOT PEDAL jackAn optional foot pedal can provide Play/Pausecontrol for the CD drive and Play/Pause or Record/Pause control for the CD-R drive. The FT200 FootPedal is available from Superscope TechnologiesInc. NOTE: Use foot pedal menu selection toselect which drive (CD or CD-R) the foot pedal iscontrolling. (See pg. 22 for this menu selection).
[9] Power plugPlug one end of the supplied power cord in hereand the other end into an AC outlet.
[10] MASTER Power switchPress to turn power ON (in position). Press againto turn power OFF (out position).
To retain certain settings in memory, leave thisswitch ON and turn power ON and OFF withthe Standby POWER slide switch on the top ofthe unit.
Back of Unit(rear panel connections)
1 2 3 4 5 6 7 8 9 10
- 10 -

INST
INSTMIX
MIX
SPLIT
SPLIT
STEREO
STEREO
MIC/LINE
MIC/LINE
ON
ON
OFF
OFF
-20dB
-20dB
LINE
LINE
MIC
MIC
LEFT
LEFT
RIGHT
RIGHT
MIC/LINE
MIC/LINE
OPEN/CLOSE
OPEN/CLOSESPEAKER
SPEAKER
ALC/ATT
ALC/ATT
INPUT
INPUT
ON
ON
OFF
OFF
DIGITAL
DIGITAL
ANALOG
ANALOG
PHONE SELECTOR
PHONE SELECTOR
MIC/LINE
MIC/LINE
LINE
LINE
CD
CD
PHONE/SPEAKER
PHONE/SPEAKER
MIC/LINE
MIC/LINE
AUX
AUX
R
R
LINE OUT
LINE OUT
MIC
MIC
INT MIC
INT MIC
LEVEL
LEVEL
L
L
PHONES
PHONES
LINE OUT
LINE OUT
CD PLAY/RECORD
CD PLAY/RECORD
PUSH
PUSH
NEUTRIK
NEUTRIK
PUSHPUSH
PUSH
NEUTRIK
NEUTRIK
Powering Up1. Check that the AC power cord fits snuggly into the
power cord jack on the back panel.2. Make sure the back panel MASTER POWER switch is
ON. The STANDBY light should now be ON. Slidethe STANDBY POWER switch to the right. Uponpower up, this light will dim and the display willcome on.
TIP:TIP:TIP:TIP:TIP: If you are switching power ON/OFF via theRemote or if you wish to retain certain settings inmemory when powering off, leave the back panelMASTER POWER switch ON.
Setting Up Instruments, Micsand other Sound SourcesThe PSD340 is designed to work with microphones,instruments, and line level sources (e.g., mixers, externalpreamps). See the following diagrams for the setup thatsuits your application:
Microphones
Setting Up Speakers
When using the built-in speaker, turn onthe SPEAKER switch. Turn off thespeaker when using headphones orwhen connecting to powered speakersor other sound equipment. Adjustvolume of the headphones or speaker by using the
PHONE/SPEAKER level knob.
The PHONE SELECTOR knobdetermines which audio path willbe amplified/monitored throughthe headphones and built-inspeaker. It does not affect anyaudio being recorded. Use it tomonitor one of the following:CD, AUX inputs, MIC/LINE inputs,or LINE OUT which is a mix of theCD drive or CD-R drive, and frontand rear panel inputs.
TIP:TIP:TIP:TIP:TIP: Typically, you will want to leave the PHONESELECTOR knob set on LINE OUT. Remember thatthe LINE OUT level control affects the volume ofsound emanating from any external speakers.
Headphones or Built-In Speaker
SPEAKERSPEAKERONONOFFOFF
REMOTEREMOTE
ININ
RC-5RC-5
OUTOUT
EXT.EXT. INT.INT.
ININ
OFFOFFON/ON/POWERPOWER
OUTOUTDIGITALDIGITAL
OUTOUTAUXAUXLINELINEMIXMIXININ
PEDALPEDALFOOTFOOTOUTOUT
ININ
LL
RR
InputLevel
Connect external powered speakers to the rear panelRCA line outputs, making sure the Left channel lineoutput is securely attached to the speaker’s Left inputand the Right channel line output is securely attachedto the speaker’s Right input. (see Figure A.)
Or, similarly connect the L-R channel line outputs to theL-R auxiliary or line inputs of a stereo amplifier that isattached to speakers.
External Speakers
Fig A. - Powered Speaker Set Up
1. Set both front panel input switches to MIC. The leftswitch is labeled LINE/MIC/INST and the right switchis labeled LINE/MIC/INT MIC.
2. Plug microphones into either the XLR or 1/4” frontpanel inputs, depending on your mic type
3. For condenser microphones that use batteries, makesure the mic’s batteries are fresh. When usingmicrophones that require +48V phantom power,connect mics to the XLR inputs and make sure thatthe phantom power switch on the rear panel is ON.
4. See Setting Levels sidebar (pg. 12).
Set Up
- 11 -
INST
MIXSPLITSTEREO
MIC/LINEON
OFF -20dB
LINEMIC
LEFT RIGHTMIC/LINE
OPEN/CLOSESPEAKERALC/ATTINPUT
ONOFFDIGITALANALOG
PHONE SELECTORPHONE SELECTOR MIC/LINELINE
CDCD
PHONE/SPEAKERPHONE/SPEAKER
MIC/LINEMIC/LINEAUXAUX RLINE OUTLINE OUT
MIC INT MICLEVELLEVEL
L
PHONESPHONES LINE OUTLINE OUT
CD PLAY/RECORD
PUSH
NEUTRIK
PUSH
NEUTRIK

INSTINST
MIXMIXSPLITSPLITSTEREOSTEREO
MIC/LINEMIC/LINEONON
OFFOFF -20dB-20dB
LINELINEMICMIC
LEFTLEFT RIGHTRIGHTMIC/LINEMIC/LINE
OPEN/COPEN/CLOSESPEAKERSPEAKERALC/ATTALC/ATTINPUTINPUT
ONONOFFOFFDIGITALDIGITALANALOGANALOG
PHONE SELECTORPHONE SELECTOR MIC/LINEMIC/LINELINELINE
CDCD
PHONE/SPEAKERPHONE/SPEAKER
MIC/LINEMIC/LINEAUXAUX RRLINE OUTLINE OUT
MICMIC INT MICINT MICLEVELLEVEL
LL
PHONESPHONES LINE OUTLINE OUT
CD PLAY/RECORDCD PLAY/RECORD
PUSHPUSH
NEUTRIKNEUTRIK
PUSHPUSHPUSH
NEUTRIKNEUTRIK
REMOTEREMOTE
ININ
RC-5RC-5
OUTOUT
EXT.EXT. INT.INT.
ININ
OFFOFFON/ON/POWERPOWER
OUTOUTDIGITALDIGITAL
OUTOUTAUXAUXLINELINEMIXMIXININ
LLPEDALPEDALFOOTFOOT
RR
OUTOUT
ININ
LL
RR
INSTINST
MIXSPLITSTEREO
MIC/LINEON
OFF -20dB
LINELINEMICMIC
LEFTLEFT RIGHTRIGHTMIC/LINEMIC/LINE
OPEN/CLOSESPEAKERALC/ATTINPUT
ONOFFDIGITALANALOANALOG
PHONE SELECTORPHONE SELECTOR MIC/LINEMIC/LINELINELINE
CDCD
PHONE/SPEAKERPHONE/SPEAKERMIC/LINEMIC/LINE AUXAUX RRLINE OUTLINE OUT
MICMIC INT MICINT MICLEVELLEVEL
LL
PHONESPHONES LINE OUTLINE OUT
CD PLAY/RECORD
PUSHPUSH
NEUTRIKNEUTRIK
PUSHPUSHPUSH
NEUTRIKNEUTRIK
Internal Microphone
1. Set the Right LINE/MIC/INT MIC switch to “INT MIC.”2. When “INT MIC” is selected, both the left level
control and the right level controls are active. Adjustboth left and right level controls to determine howmuch signal is sent to either channel.
3. When using the INTERNAL MIC, it is recommendedthat the SPEAKER switch be turned OFF. If you needto monitor the incoming sound, use headphones.Using headphones avoids feedback--the nasty squealthat is heard when the mic picks up sound from thespeaker and amplifies it, creating a feedback loop.Using the remote will also ensure that the INTERNALMIC will not pick up the sound of any buttons beingdepressed.
4. See Setting Levels sidebar on this page.
Instruments
1. Set the Left LINE/MIC/INST switch to “INST.”2. Plug an instrument into the Left 1/4” front panel
input.3. Set the Right LINE/MIC/INT MIC switch to “LINE.”4. See Setting Levels sidebar on this page.
Setting Levels
If you are setting levels while using the CDrecorder drive, make sure to press RECORDfirst. This will place the unit in record pausemode. You may set levels at any time duringCD player operation. As you sing or play yourinstrument, turn the Left and Right input-levelcontrol knobs clockwise while observing thedisplay VU meters. When your performance isat its loudest, the VU meter should read closeto 0 dB without going into the red zone. Ifthe meter consistantly bounces into the red,adjust the level control knob counter clock-wise to reduce the level. If your mics havehigher than normal output, try switching theALC/ATT switch to -15dB. Peaking at 0 dB willprovide the greatest dynamic range whileavoiding distortion.
Line Level Sources
1. Set the Left LINE/MIC/INST switch to “LINE” and setthe Right LINE/MIC/INT MIC switch to “LINE.”
2. Line level equipment can be connected to the frontpanel Right and Left inputs ... OR ... to the rear panelRCA AUX inputs. Note: When connecting an auxil-iary source into the rear panel AUX inputs, you canadjust the signal input level using the AUX IN controlon the rear panel. Use the front panel inputs forindividual control of Right and Left input levels.
3. See Setting Levels sidebar on this page.
OR
R
LdB-50 -30 -22 -16 -12 -8 -4 0OVER
- 12 -
SIDEBAR
Mixer
Stereo Preamp

Music Practice & CD Playback
5. Press the TUNER button to stop the tone genera-tor and exit the Tuner.
NOTE: The next time you press the TUNER button,the 440Hz tone will sound. This is because thePSD340 remembers which mode; Chromatic orTuning Tone was used last. To switch back to theChromatic Tuner, simply turn the SELECT jog wheeland select “Chromatic Tuner.” The unit will returnto the Chromatic Tuner display.
Adjusting the Tuning Tone
The Tuning Tone can be adjusted between 435 and445Hz. Follow these steps for adjusting Tunerfrequency.
1. While the Tone generator is active and the displayshows your current Tone frequency and volumesettings, press the SELECT jog wheel.
2. The display will now read “TUNER FREQ ADJ.”Press the SELECT jog wheel to enter.
3. The current frequency setting will blink. Turn theSELECT jog wheel to adjust the frequency.
4. Press the SELECT jog wheel to confirm changes.The display will now show the current Tonefrequency and volume settings.
To adjust the volume of the Tuning Tone:
1. While the tone generator is active and the displayshows your current Tone frequency and volumesettings, press the SELECT jog wheel.
2. The display will now read “TUNER FREQ ADJ.”Turn the SELECT jog wheel until the display reads“TUNER VOL ADJ.” Press the SELECT jog wheel toenter.
4. The current volume setting will now blink. Turnthe SELECT jog wheel to adjust the volume.
5. Press the SELECT jog wheel to confirm changes.The display will show the current Tone frequencyand volume settings.
- 13 -
INST
MIXSPLITSTEREO
MIC/LINEON
OFF -20dB
LINEMIC
LEFT RIGHTMIC/LINE
CLOSEOPEN/CLOSESPEAKERALC/ATTINPUT
ONOFFDIGITALANALOG
PHONE SELECTOR MIC/LINELINE
CD
PHONE/SPEAKER
MIC/LINEAUX RLINE OUT
MIC INT MICLEVEL
L
PHONES LINE OUT
CD PLAY/RECORD
PUSH
NEUTRIK
PUSH
NEUTRIK
REMOTE
IN
RC-5
OUT
EXT. INT.
IN
OFFON/POWER
OUTDIGITAL
OUTAUXLINEMIXIN
LPEDALFOOT
R
OUT
IN
L
R
How to Use the Tuner
The PSD340 has two modes for tuning your instrument,Chromatic Tuner or 440Hz Tuning Tone.
Using the Chromatic Tuner
The PSD340 Chromatic Tuner will pick up monophonicsignals from the Left Mic/Line/Inst input, the Right Mic/Line input or the internal mic. The musical note corre-sponding to the incoming frequency is displayed inconcert pitch as natural (no indication) or sharp (#). TheTuner operates on a wide range of pitches from A0 toC8. The CD and CD-R must be in Stop Mode for theTuner to operate.
1. Press the TUNER button.2. Turn the SELECT Jog Wheel until the display reads
“Chromatic.” Press the SELECT Jog Wheel to acceptthis selection. The chromatic tuner display willappear.
3. Play a note on your instrument and watch, as theunit will display the closest musical pitch.
4. Adjust the pitch of your instrument until the squareindicator is in the center box. Right (sharp) or left(flat) arrows indicate an out of tune condition.
5. Press the TUNER button to exit the Tuner.
How to Use the 440Hz Tuning Tone
1. Press the TUNER button.2. If the display reads, “Chromatic”,turn the SELECT jog
wheel until the display reads “Tuner Tone.”3. Press the SELECT jog wheel to accept change. A
440Hz tone will sound in the speaker, headphones,and LINE OUT.
4. Play the appropriate tuning note on your instrumentand adjust the instrument to match the 440Hz tonegenerated by the PSD340.
CD R
LdB-50 -30 -22 -16 -12 -8 -4 0
TOTAL
OUT OF TUNE
CD R
LdB-50 -30 -22 -16 -12 -8 -4 0
TOTAL
IN TUNE

How to Use the MetronomeThe sound of the metronome will be output through theLine Out. When using the PSD340 with a separateamplifier or powered speakers (pg. 11), it may be bestto turn down the LINE OUT level control knob on thefront panel before starting the metronome and thenturn the LINE OUT level control up to an appropriatelistening level. If the PHONE SELECTOR knob is set forLINE OUT, the metronome will also be heard in thespeakers and headphones. Therefore, you may also wantto turn the PHONE/SPEAKER LEVEL knob down beforestarting the metronome and then turn the PHONE/SPEAKER LEVEL up to an appropriate listening level.
The METRONOME has four adjustable parameters,• Tempo• Metronome Volume• Accent Beat• Accent Beat Level
Tempo and Metronome Volume
1. Press the METRONOME (METRO) button. Themetronome will start “clicking” and the tempo willbe displayed.
2. To change the tempo, press the SELECT jog wheel.The tempo will start to blink. Turn the SELECT jogwheel to adjust the tempo. Press the SELECT jogwheel to accept the change or wait 10 seconds andthe PSD340 will automatically accept it.
3. The display will now show the new tempo. To adjustthe metronome volume, turn the SELECT controluntil the display shows the current metronomevolume setting.
4. Press the SELECT jog wheel. The metronome volumewill start to blink.
5. Turn the SELECT jog wheel to adjust metronomevolume. Then press the SELECT jog wheel to acceptthe change.
6. Press the METRONOME button to stop the metronome.
Accent Beat and Accent Beat Levels
By designating a particular beat to play louder thanothers, the PSD340 metronome is able to imply different
rhythmic meters. For instance, setting the Accent Beatto 3 will cause every third beat to sound louder than theother two. At moderate tempos, this will create a Waltzfeel. Adjusting the Accent Beat volume will determinehow much louder the Accent Beat will sound over thenon-accented beats.
Follow these steps for adjusting Accent Beat and AccentBeat volume:
1. Press the METRO button. The metronome will start“clicking” and the tempo will be displayed.
2. Turn the SELECT jog wheel until the display showsthe current Accent Beat setting. Press the SELECT jogwheel to enter.
3. The Accent Beat value (abbreviated as ACENT)should be flashing. Turn the SELECT jog wheel tochange the Accent Beat. The Accent Beat is adjust-able from 1-6 or turned OFF for no accent. Press theSELECT jog wheel to enter the change.
4. The display will now show the new Accent Beat.Turn the SELECT jog wheel until the display showsthe current Accent Volume setting. Press the SELECTjog wheel to enter.
5. The current Accent Volume will be flashing. Turn theSELECT jog wheel to adjust the Accent Volume. Pressthe SELECT jog wheel to enter.
The display will show the new Accent Volume. After10 seconds, the unit will return to the main metro-nome display.
NOTE: For the Accent Beat to be heard, the AccentBeat Volume must be higher than the MetronomeVolume level. The PSD340 automatically adjusts theAccent Beat to a higher level than the MetronomeVolume. However, you can adjust the volumedifference by either increasing the Accent BeatVolume level or decreasing the Metronome Volumelevel.
R
LdB-50 -30 -22 -16 -12 -8 -4 0
R
LdB-50 -30 -22 -16 -12 -8 -4 0
R
LdB-50 -30 -22 -16 -12 -8 -4 0
R
LdB-50 -30 -22 -16 -12 -8 -4 0
R
LdB-50 -30 -22 -16 -12 -8 -4 0
- 14 -

Playing a CD
When placing a CD in the CD player drive, be sure tofirmly push the CD onto the drive spindle so the CD snapsinto the place and doesn’t wobble. When you close thedrive lid, after a moment the display will show the totalnumber of tracks and total playing time on the CD.
NOTE: You can always tell which drive is active (the CDplayer or CD recorder) by which set of control buttonsare lit. You can change the active drive by pressing theSELECT jog wheel or pressing the Stop button of thedrive to be activated.
In Play mode, change tracks by turning the SELECT jogwheel.
Selecting A-B Practice Loops
When practicing with a CD audio track in either drive, itis easy to continuously loop a section of music. Here arethe steps:1. While a CD is playing, press the A-B button when
playback reaches the beginning of the segment youwant to repeat (A point).
2. Press the A-B button again when playback reachesthe end of the segment you want to repeat (B point).Playback will automatically start again from the Apoint when the B point is reached.
ALTERING THE AB LOOP
1. You can make the B point the A point of the nextloop by pressing the A-B button again. Let playbackcontinue until you reach the end of the next segmentyou wish to loop, then press the A-B button again. Inthis way, you can select loops and step through anentire song.
TOTAL TRACK
CD
R
LdB-50 -30 -22 -16 -12 -8 -4 0
CD
START END
00:00
A-BA-B
2. At any time before or after you select an A-B loop,you can also use the other music practice featuressuch as Key and Tempo changing.
3. To keep the A point but extend the loop to a new Bpoint, press and hold the A-B button for one second.Press the A-B button again to set a new B point,while keeping the A point.
Changing Key & Tempo
The CD player drive allows control of key (musical pitch)and tempo of any CD or MP3 file on CD.
Changing Key
KEY control can change a musicCD or MP3 on disc as much as anoctave up or down. Press eitherof the Key Change buttons onceto start key control.
The KEY control system works on the following musicalprinciples:
100 cents = 1 half step2 half steps = 1 whole step12 half steps = 1 octave
There are two key change methods available, dependingon how long you hold down the buttons.
Half Step Method: When playing a CD, press and holdto decrease or increase the key in half step increments.The display will read whole integers for each half step.(For example,1.00 = 1 half step)
12.5 Cent Increment Method. If Key control is active,and you press or without holding, the key willchange by 12.5 cent increments. The display shows theincrement rounded to 0.13 cents. (For example, 1.13 =1 half step + 12.5 cents).
• Press both the and buttons at the same time toreturn to the original Key position (0.00).
• If the or the buttons are pressed while anotherdisplay (such as CD-TEXT) is shown, the currentposition of the KEY control is shown first. Once oneof the or buttons are pressed a second timethe Key changes.
• Once the Key has been adjusted by pressing eitherthe or button, it is possible to also adjust thetempo (CD or MP3 on disc playback speed). For aKey adjustment in the range of ±5.00 half steps orless, the Tempo can also be adjusted -50% to +50%.
• Pressing the STOP button during stop mode will resetthe Key to the 0.00 position.
KEY
- 15 -

TEMPO control
TEMPO can be changed as muchas +50% to -75%.• Pressing the “+” button
increases the speed in incre-ments of 1%.
• Pressing the “-” button decreases the tempo in stepsof 1%.
• Holding down either a “+” or a “-” button causesthe tempo adjustment to change in 5% increments.Pressing both the “+” and “-” buttons at the sametime returns the TEMPO to 0% (original tempo).
Fine Tuning
Once the Tempo has been adjusted by pressing eitherthe “-” or “+” button, it is possible to also “fine tune”the key (musical pitch). Fine tuning is useful whenpracticing an instrument because it lets you adjust themusic practice source (CD drive only) to your instru-ment. (+/- 2% maximum adjustment.)
After the desired tempo change has been made, press to lower the key (musical pitch) or to raise it.
The button lowers the tuning in 0.1% incrementsand is displayed as a whole number with a “-” sign. Forexample, to lower the tuning by 0.8% the displayshould read “TUNING -0.8”.
The button raises the tuning in 0.1% increments andis displayed as a whole number with a “+” sign. Forexample, to raise the tuning of the CD or MP3 by 1.5%the display should read “TUNING + 1.5.”
Voice Reduction
In most commercial recordings, prominent elementssuch as lead vocals are mixed in the center of the stereofield (equal amounts on the right and the left channel).With this in mind, the VR feature is able to reduce therelative volume of lead vocals by cancelling certainelements in the center channel. This is useful forvocalists who want to blend their voices with a stereorecording containing prerecorded lead vocals.
NOTE: The results of this feature will vary. VR will be less
TEMPO
effective if the lead vocal in the recording was notoriginally mixed in the center of the stereo field or if aconsiderable amount of stereo processing such as reverband delay has been added to the lead vocal track.
While the CD player drive is playing or paused, press theVR button. The display will show the VR status.
Pressing the VR button again switches the status ofvoice reduction. When voice reduction is ON, VR isdisplayed during play.
CDTRACK R
LdB-50 -30 -22 -16 -12 -8 -4 0
TOTAL TRACK
CD
R
LdB-50 -30 -22 -16 -12 -8 -4 0
CD
- 16 -
If your Key adjustment is greater than 5.00 half steps,then no tempo adjustment can be made. To adjust bothKey and Tempo, you must first adjust Key and thenadjust Tempo. Adjusting Tempo first will turn on the FineTune feature.
NOTE: A-B Looping, Key, Tempo and Voice Reductioncan only be applied to the CD being played in the topCD player drive.
When Voice Reduction is ON, the OUTPUT EQ featurewill be not be available in the menu.
Making a Live Recording
We realize that one of the primary reasons you pur-chased a PSD340 is to record live to CD. That’s whywe’ve made the recording process as direct as possible.It shouldn’t take long from the time you open the boxto the time you record your first CD. Just follow thesesimple steps:
1. Insert a disc. ThePSD340 can recordonto any 1X or 2Xcompatible CD-R (writeonce), or CD-RW(rewritable) disc. Justmake sure you placethe disc in the CDrecording drive and not theCD player drive on top!
2. Connect your equipment. If you’ve already set upthe PSD340 for practice, you may be ready to moveon. If not, see pages 11-12 for setting up micro-phones, instruments and line level sources.
3. Set the INPUT switch to “ANALOG.” This switch islocated above the CD recording drive. The INPUTswitch tells the PSD340 what type of signal it will berecording. Microphones, instruments, and mostmixers are analog sources. Don’t let this switchconfuse you. Even though you are making a digitalCD recording, input sources are typically analog. Theonly time you would set this switch to DIGITAL, is ifyou were recording from the rear panel digital input.(see sidebar pg. 18)
4. Press the RECORD button. Thefirst time you press RECORD, thePSD340 enters ‘Record PauseMode.’ In this mode, you will nowbe able to adjust the RecordLevels.
5. Set your record levels. After a moment, the displaywill now prompt you to ‘Push Rec Key.’ But, you maywant to first adjust your record levels. The overallrecord level is set by turning the SELECT jog wheelcontrol. This level is adjustable from -78dB to +6dB.While monitoring record levels, we recommend usingheadphones. This helps to eliminate feedback. (Seepg.12 for advice on how to set up the PSD340 torecord optimal levels.)
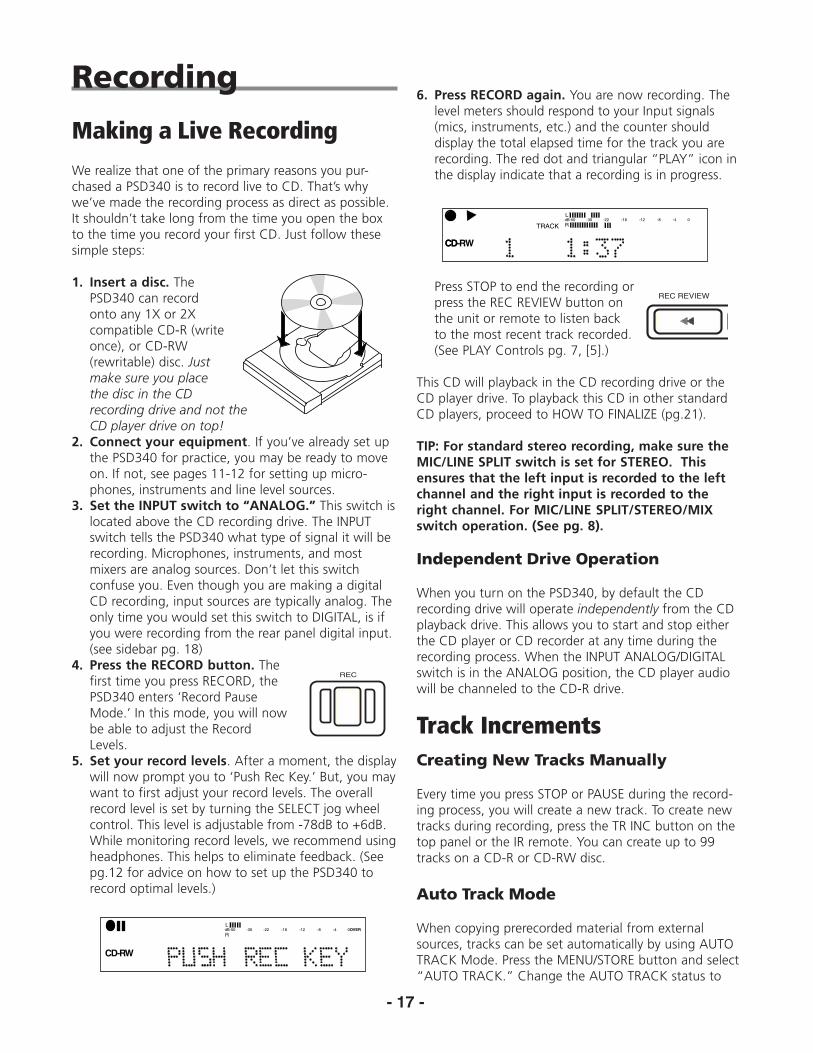
Recording6. Press RECORD again. You are now recording. The
level meters should respond to your Input signals(mics, instruments, etc.) and the counter shoulddisplay the total elapsed time for the track you arerecording. The red dot and triangular “PLAY” icon inthe display indicate that a recording is in progress.
Press STOP to end the recording orpress the REC REVIEW button onthe unit or remote to listen backto the most recent track recorded.(See PLAY Controls pg. 7, [5].)
This CD will playback in the CD recording drive or theCD player drive. To playback this CD in other standardCD players, proceed to HOW TO FINALIZE (pg.21).
TIP: For standard stereo recording, make sure theMIC/LINE SPLIT switch is set for STEREO. Thisensures that the left input is recorded to the leftchannel and the right input is recorded to theright channel. For MIC/LINE SPLIT/STEREO/MIXswitch operation. (See pg. 8).
Independent Drive Operation
When you turn on the PSD340, by default the CDrecording drive will operate independently from the CDplayback drive. This allows you to start and stop eitherthe CD player or CD recorder at any time during therecording process. When the INPUT ANALOG/DIGITALswitch is in the ANALOG position, the CD player audiowill be channeled to the CD-R drive.
Track IncrementsCreating New Tracks Manually
Every time you press STOP or PAUSE during the record-ing process, you will create a new track. To create newtracks during recording, press the TR INC button on thetop panel or the IR remote. You can create up to 99tracks on a CD-R or CD-RW disc.
Auto Track Mode
When copying prerecorded material from externalsources, tracks can be set automatically by using AUTOTRACK Mode. Press the MENU/STORE button and select“AUTO TRACK.” Change the AUTO TRACK status to
REC
CD-RW
dB-50 -30 -22 -16 -12 -8 -4 0OVERR
L
TRACK
CD
R
LdB-50 -30 -22 -16 -12 -8 -4 0
CD-RW
REC REVIEW
- 17 -

Certain mixers and outboard effects processors areequipped with digital outputs. If you are recording withequipment that has a coaxial digital output, connect tothe PSD340’s DIGITAL IN. Follow the same recordingsteps from pg. 17, with the exception of step #3.When recording digital equipment, set the Input switchto “DIGITAL.”
Adding Reverb or DelayYou can add a reverb or a delay effect to either input(right or left) on the front panel and the AUX IN. ThePSD340 provides three effects presets: ROOM REVERB,HALL REVERB, and DELAY. Only one preset can beused at a time. After an effect preset is selected, youare then able to determine how much of the effectyou want in each channel. This is known as the MIXparameter. Reverb cannot be added to recorded tracks.
1. Press the REV/DLY button.2. Turn effects ON. The display should read “REV/
DELAY OFF”. Turn the SELECT jog wheel to changethe display to “REV/DELAY ON.” Press the SELECT jogwheel to enter.
3. Select an effect preset. As you turn the SELECT jogwheel, the display should indicate the different presetoptions, REVERB ROOM, REVERB HALL, and DELAY.Press the SELECT jog wheel to choose a preset.
If you find the sound of the effect to be appropriate,press the REV/DLY to exit the effects menu and continuepracticing or recording. If you would like to fine tunecertain parameters, proceed to the following section.
4. Adjust the Delay Time. If you have chosen REVERBROOM OR REVERB HALL, skip to step #5. If you havechosen DELAY, you will now be able to adjust delaytime. When the display reads “DELAY TIME,” pressthe SELECT jog wheel. The actual delay time value isnow displayed in milliseconds and should be blinking.The PSD340 is capable of producing delay times up to1 second. Turn the SELECT jog wheel to adjust thedelay time and press the SELECT jog wheel to enterthe change.
5. Adjust the MIX levels. For each preset, the PSD340has default MIX settings designed to provide a moder-ate blend of processed and unprocessed sound. If youwould like to hear more or less Reverb or Delay ineither the right or left channel, adjust the MIX levels.Here’s how:a. After completing steps 1-4, the display will read
“MIX LEFT.” Press the SELECT jog wheel to accept.b. The MIX percentage is now flashing. Turn the
SELECT jog wheel to adjust the MIX level. As youturn the SELECT jog wheel, you should be able tohear the change in MIX level. Press the SELECT jogwheel to accept your setting. The display shouldread “MIX LEFT.”
c. If you do not need to adjust the RIGHT MIX level,press the REV/DLY button to return to the CDdisplay. If you do need to adjust it, turn the SELECTjog wheel to change the display to “MIX RIGHT”and press the SELECT jog wheel to accept.
d. The MIX percentage is now flashing. Turn theSELECT jog wheel to adjust the RIGHT MIX level.Press the SELECT jog wheel to accept your setting.
e. Press the REV/DLY button to return to the CD display.
Here’s how the MIX function works.
• A MIX setting of 100% means that all audio isprocessed through the Reverb/Delay effect.
- 18 -
REVERB/DELAYINPUT >
>
100%
0%
+ 100%
ON by turning the SELECT jog wheel. Press it to acceptthe change. Press the MENU/STORE button to exit andproceed with recording. The unit will then incrementtracks when audio falls below a threshold of silence (-40dB) for a minimum of three seconds.
Minute Track Mode
MINUTE TRACK will automatically create a track incre-ment every minute during recording. That means eachtrack is one minute long, offering a quick and conve-nient way to locate a particular time in a recording. Forexample, Track 10 is ten minutes into the recording, andTrack 17 is 17 minutes into the recording.
To access this mode press the MENU/STORE button, thenselect “AutoTrack.” Select “MIN” and press ENTER.
Recording from the DIGITAL INPUT
REMOTEREMOTE
ININ
RC-5RC-5
OUTOUT
EXT.EXT. INT.INT.
ININ
OFFON/POWER
OUTOUTDIGITALDIGITAL
OUTOUTAUXAUXLINELINEMIXMIXININ
LLPEDALPEDALFOOTFOOT
RR
OUTOUT
ININ
LL
RR
Effects Processor

tracks in any order.4. Once all desired tracks have been selected, press the
PROGRAM button to accept and exit the Programmode. Your tracks are now programmed. NOTE:Tracks can only be programmed in the CD drive.Once you take a CD out of the drive, the program iserased. You can also erase the program by pressingthe CD player STOP button twice.
5. As you rotate the SELECT jog wheel, the display willnow show only the programmed track numbers.
Key, Tempo & Voice Reduction Changes
Make any Key, Tempo, or Voice Reduction manipulationsbefore putting the unit into “RECORD WITH CD” mode.(See next section for more detail).
For setting up Key changes” see page 15.For setting up Tempo changes see page 15.For setting up Voice Reduction see page16.
If you want to record with Voice Reduction activated,press the VR button twice while the REC button isflashing. You can turn Vocal Reduction ON and OFF anytime while recording a CD in RECORD WITH CD mode.
When you are finished setting your music manipula-tions, press the SELECT jog wheel or the CD recorderdrive’s STOP button to activate the CD recorder drive.Any changes in Key and Tempo will be applied to yourentire programmed playlist or the entire CD.
Activating “Record with CD” Mode
Select the “RECORD WITH CD” mode to sync the CDplayback drive with the CD recorder. This means the CDrecording drive will begin recording the same time CDplayer drive begins playing.
1. With a CD in the CD Player drive, place a blank CD-Ror CD-RW disc in the CD recorder drive.
2. Press the RECORD MODE button located above thedisplay.
3. “REC WITH CD” should appear in the display. Pressthe SELECT jog wheel to accept the RECORD WITHCD mode. After initialization, “PUSH REC KEY” willnow appear in the display and the RECORD buttonwill be flashing. [If you want to record a songsegment see the next section before proceeding.]
4. Press the flashing red RECORD button to beginrecording. Any music practice manipulations made tothe CD player drive (i.e. Key or Tempo changes) willbe recorded to the CD recorder drive.
• A MIX setting of 50% means that half theaudio is processed by the Reverb/Delay effectwhile the other 50% of audio bypasses theReverb/Delay processor.
• A MIX setting of 0% means that you will onlyhear “dry,” unprocessed audio.
How to Record with a CDAnytime you start the CD player drive during recording,audio from the CD player will be recorded. (Inputswitch must be set to analog). This allows you to:• Record a mix of live musicians with prerecorded CD
music accompaniment, and/or• Record key and tempo changes and voice reduction
to a CD-R/RW disc.• Intersperse live recordings with tracks, or parts of
tracks, copied from a CD. Simply locate the point inthe CD that you want to copy and press the Pausebutton. During recording, release the Pause buttonon the CD player drive and you will begin recordingCD audio from that point. To sync the CD playerdrive to the CD recorder drive see “How to Record aSong Segment.” (pg. 20)
.Program a Playlist(Recording part of a CD)
If you plan to record only select tracks from the CD,follow these steps:1. Press the PROGAM (PROG) button on top of the unit.2. “PROG” will be flashing in the display showing no
tracks programmed and no track time displayed.The letter “P” indicates programmed tracks.
3. Use the SELECT jog wheel to scroll to the track youwish to program. Press the SELECT jog wheel toaccept the track, or, wait 3 seconds and the trackwill automatically be added to the playlist. Thedisplay will show one track programmed and itstotal playing time. Continue selecting tracks usingthe SELECT jog wheel. As you select tracks, thedisplay will show total playing time for the selectedtracks in the program. NOTE: You can program
- 19 -
REVERB/DELAYINPUT >
>
0%
100%
+ 100%
REVERB/DELAYINPUT >
>
50%
50%
+ 100%

- 20 -
How to Copy an Existing CDThe PSD340 provides several options for duplicatingexisting material. First, put a music CD or CD-MP3 intothe CD player drive. If you are not copying the entireCD, you will need to program a playlist (see pg. 19)
NOTE: When copying CD+G discs, the PSD340 will copythe audio but not the graphics to a new disc.
Press the RECORD MODE button and turn the SELECTjog wheel to view the record modes. Press the SELECTJog wheel to chose the mode that fits your needs basedon the following descriptions. After a record mode isselected, the display will read “PUSH REC KEY.”
COPY + LISTEN
This mode is used to digitally copy a CD or a pro-grammed playlist in real-time while listening to it. This isan internal recording function that allows no inputsfrom outside sources.
An 80-minute CD will take 80 minutes to copy and thenmust be finalized in order to play in other CD drives.
COPY 2X
Digitally copy individual or programmed tracks or anentire disc. This is an internal recording function thatallows no inputs from outside sources. An 80-minuteCD will take approximately 40 minutes to copy and thenmust be finalized in order to play in other CD drives.You cannot listen to the CD as it is being copied.
NOTE: This copy mode does not work for MP3 files.
COPY 2X +FINAL
This is the quickest way to digitally copy individualprogrammed tracks or an entire disc. This is aninternal recording function that allows no inputs fromoutside sources. An 80-minute CD will take approxi-mately 40 minutes to copy and will automatically befinalized at the end of the recording session. Thefinalization takes approximately 2 minutes. Youcannot listen to the CD as it is being copied.
NOTE: This copy mode does not work for MP3 files.
CONV HALFSPEED
This will record individual or programmed tracks athalf speed. The converted recording will play oneoctave lower which provides a powerful tool fordifficult music transcription. NOTE: This process requirestwice the space on a disc as the original recording, thus40 minutes is the maximum amount you can convert athalf speed to a blank 80 minute CD-R or CD-RW disc.
NOTE: This copy mode does not work for MP3 files.
Converting MP3s to Red Book Audio
Note: The PSD340 does not record or duplicateMP3 files. What it will do, is convert MP3 files toCD audio tracks. If a disc of MP3 files is inserted intothe CD Player drive and a copy mode is initiated, thePSD340 will convert the MP3 files to Red Book Audioformat. This means that the finalized copy will beplayable in standard CD players. Most CD-R and CD-RWdiscs store 80 minutes worth of CD quality audio. SinceMP3 is a compressed file format, it is possible to storefar more than 80 minutes worth of audio on a discusing MP3s. If you attempt to copy more than 80minutes of MP3 audio to a blank 80-minute disc, thePSD340 will simply display “DOES NOT FIT.” Whencopying MP3 files, be aware of the playing time foreach file. Make sure that you are copying less than 80minutes of audio.
How to Record a Song SegmentIf you only want to record part of a CD audio track or aparticular section of an MP3 file, the PSD340 makes iteasy. Just follow these steps to utilize Song SegmentRecording.
1. Follow steps 1- 3 in the section above, “Activating“Record with CD” mode.
2. The display will read “PUSH REC KEY”. Next, pressthe SELECT jog wheel to switch to the CD player drive.
3. Use the SELECT jog wheel to scroll to the track youwish to record. Skip step #4 if you intend to startrecording from the beginning of the track.
4. Fast forward or play a song until you reach the pointin the track you wish to record, then pause whenyou get there.
5. Press the SELECT jog wheel to return to the CD-R drive.6. Push the RECORD button. Recording will begin from
the point at which you paused the CD or CD-MP3.NOTE: The recording will continue on to the nexttrack, unless you are recording with the last track ona CD or you press the CD-R drive stop button.

- 21 -
Copying frCopying frCopying frCopying frCopying from an Externalom an Externalom an Externalom an Externalom an ExternalSourSourSourSourSourcececececeSYNC RECORD
This REC mode is used to automatically start the record-ing process from an outside digital or analog sourceincluding DAT, minidisc, cassette tape or LP for example.When this mode is selected, the PSD340 will display“PUSH REC KEY” as normal. When the RECORD buttonis pressed, the PSD340 will search for an input signal,either analog or digital depending on how the Inputswitch (pg. 8, #7) is set. When an input is detected, therecording will begin and the display counter will start toincrement.
SYNC RECORD+FINAL
This mode operates similarly to SYNC RECORD modeexcept that in SYNC RECORD+FINAL mode, the disc willautomatically be finalized at the end of the recordingsession. The finalization takes approximately 2 minutes.Before using this mode, change the AUTO STOP featureto ON (see pg. 23).
How to Finalize a DiscBoth drives of the PSD340 will play finalized orunfinalized CD-R and CD-RW discs. However, forrecorded discs to play on other CD players, a disc mustfirst be finalized.
To finalize a disc onceyou have stoppedrecording onto it,press the FINALIZEbutton.
“FINALIZE” isdisplayed for acouple of seconds.Then “PUSH RECKEY” is displayed.
Note: If the disc isblank or has alreadybeen finalized, “NOT POSSIBLE” flashes three times,then the previous display returns.
Now press theRECORD button.Finalizing countsdown for about 2minutes and auto-matically stops.
TOTAL TRACK
CD-R
R
LdB-50 -30 -22 -16 -12 -8 -4 0
CD-RW
TOTAL TRACK
CD-R
R
LdB-50 -30 -22 -16 -12 -8 -4 0
CD-RW
TOTAL TRACK
CD-R
R
LdB-50 -30 -22 -16 -12 -8 -4 0
CD-RW
TOTAL TRACK
CD-R
R
LdB-50 -30 -22 -16 -12 -8 -4 0
CD-RW
TOTAL TRACK
CD
R
LdB-50 -30 -22 -16 -12 -8 -4 0
CD
When done, thedisplay shows thenumber of tracksand their totalplaying time(example shown). Note: Once a CD-R or CD-RW disc isfinalized the display will indicate that it is a “CD.”
Once a CD-R disc is finalized it cannot be unfinalized orrecorded on further.
How to Unfinalize a CD-RW disc
The CD-RW (rewritable) format provides a way tounfinalize a disc, erase the last track or erase an entiredisc.
1. Push STOP on the CD-R drive.2. Push ERASE three times. After the third push,
“UNFINALIZE” is displayed for about three seconds,then “PUSH ENTER” is displayed.
3. Push the SELECT jog wheel. The timer counts downas the disc is unfinalized. When the display showsthe number of tracks and their total playing time, thedisc has been unfinalized but not erased.
How to Erase a CD-RW
You can only erase CD-RW discs. You can erase one ormore tracks from the end of the CR-RW disc, or you canerase the entire disc. If finalized, erasing a track or thedisc automatically unfinalizes the disc.
• To erase the last track of a disc, press the ERASEbutton once. “ERASE TRACK” is displayed. After 2-3seconds, the display will read “PUSH ENTER.” Whenyou push the SELECT jog wheel, the last track will beerased.
• To erase the entire disc, press the ERASE buttontwice in succession. “ERASE DISC” is displayed.After 2-3 seconds the display will read “PUSHENTER.” When you push the SELECT jog wheel, theentire disc will be erased.

- 22 -
PR
ES
S
SC
RO
LLS
CR
OLL
SC
RO
LLS
CR
OLL
SC
RO
LL
ME
NU
/S
TO
RE
MIC
EQ
UA
LIZ
ER
CD
BA
LA
NC
EF
ILT
ER
SE
LEC
T
FO
OT
PE
DA
L C
TL
OU
TP
UT
EQ
Use
the
Mic
Equ
aliz
er
to a
djus
t the
leve
l of h
igh
and
low
freq
uenc
ies
for t
he
Mic
/Lin
e in
puts
.
Allo
ws
you
to a
dd p
rese
t EQ
cur
ves
toth
e M
IC/L
INE
inpu
ts. I
f you
sel
ect t
he
HIG
H P
AS
S o
ptio
n, lo
w fr
eque
ncie
s (b
elow
100
Hz)
will
be
cut.
Sel
ectin
g B
AN
D P
AS
S w
ill c
ut lo
w fr
eque
ncie
s( b
elow
100
Hz)
and
hig
h fre
quen
cies
(abo
ve 1
0kH
z).
Sel
ect C
D P
LAY
/PA
US
E if
the
foot
pe
dal (
pg. 1
0, #
8 )
is c
ontr
ollin
g th
e C
D d
rive.
Cho
ose
CD
R
RE
C/P
AU
SE
if th
e fo
ot p
edal
is
cont
rolli
ng th
e C
DR
driv
e.This
opt
ion
cont
rols
the
leve
l of L
OW
, M
IDR
AN
GE
, and
HIG
H fr
eque
ncie
s fo
r the
ent
ire s
yste
m. L
evel
ad
just
men
ts a
re h
eard
at t
he L
INE
O
UT,
inte
rnal
spe
aker
, and
he
adph
ones
but
not
the
MIX
OU
T.
CD
LE
VE
L
Use
this
feat
ure
to a
djus
tth
e ou
tput
of t
he C
D p
laye
rdr
ive.
This
feat
ure
only
wor
ks w
hen
the
MIC
/LIN
E S
PLI
T/S
TER
EO
/MIX
bu
tton
is s
et fo
r SP
LIT.
In S
PLI
T m
ode,
all
CD
aud
io is
pla
ced
in
the
left
chan
nel,l
eavi
ng th
e rig
ht c
hann
el o
pen
for r
ecor
ding
. Wha
t th
e ba
lanc
e m
enu
real
ly c
ontro
ls, t
hen,
is h
ow m
uch
of th
e rig
ht o
r le
ft ch
anne
l of t
he C
D w
ill be
reco
rded
to th
e C
D-R
driv
e.
Spi
n th
e th
e jo
g w
heel
all
the
way
to th
e le
ft, a
nd o
nly
the
left
chan
nel o
f the
CD
will
be re
cord
ed. S
o, fo
r exa
mpl
e, if
you
hav
e a
"spl
it tra
ck" C
D, w
ith p
iano
exc
lusi
vely
in th
e rig
ht c
hann
el, a
nd th
e C
D b
alan
ce is
turn
ed fu
lly le
ft, th
e pi
ano
in th
e rig
ht c
hann
el w
ill no
t be
reco
rded
.U
se th
e O
UTP
UT
feat
ure
to d
eter
min
e w
heth
er th
e O
UTP
UT
BA
LAN
CE
will
wor
k in
nor
mal
STE
RE
O o
r M
ON
O o
pera
tion.
(See
pg.
6, G
)
OU
TP
UT
SC
RO
LL
Whe
n yo
u pr
ess
the
MEN
U/S
TORE
but
ton,
you
will
be
pres
ente
d w
ill o
ptio
ns t
hat
chan
ge d
epen
ding
on
whe
ther
the
PSD
340
is p
layi
ng, r
ecor
ding
, or
stop
ped.
Alw
ays
turn
the
SEL
ECT
jog
whe
el t
o sc
roll
thro
ugh
men
u op
tions
.Pr
ess
the
SELE
CT
jog
whe
el t
o se
lect
a m
enu
optio
n an
d pr
ess
the
MEN
U/S
TORE
but
ton
to s
ave
sett
ings
. Obs
erve
thes
e flo
wch
arts
for
des
crip
tions
of
the
vario
us m
enu
optio
ns.
PLA
Y M
EN
U
Me
nu
s

REC
OR
D M
EN
U
PR
ES
S
SC
RO
LLS
CR
OLL
SC
RO
LL
ME
NU
/S
TO
RE
RE
CB
AL
AN
CE
AU
TO
TR
AC
K
This
men
u ite
m a
llow
s yo
u to
adj
ust t
he ri
ght-l
eft s
tere
oba
lanc
e fo
r rec
ordi
ng o
n th
e C
D-R
driv
e.
Turn
this
feat
ure
ON
whe
n yo
u w
ant
the
PS
D34
0 to
aut
omat
ical
ly
incr
emen
t tra
cks
durin
g re
cord
ing.
T
urn
this
feat
ure
OF
F w
hen
you
wan
t to
man
ually
incr
emen
t tra
cks.
Turn
this
feat
ure
ON
whe
n yo
u w
ant t
heP
SD
340
to a
utom
atic
ally
sto
p re
cord
ing
afte
r det
ectin
g a
perio
d of
sile
nce.
(20
seco
nds
for
anal
og s
ourc
es, 4
sec
onds
CO
PY
+LIS
TE
N, C
OP
Y2X
, or
CO
NV
H
ALF
SP
EE
D m
ode,
the
reco
rdin
g
will
stop
afte
r det
ectin
g st
op d
ata
AU
TO
ST
OP
FILT
ER
SE
LEC
TM
ICE
QO
UT
PU
TO
UT
PU
TE
Q
CD
BA
LAN
CE
for d
igita
l sou
rces
.) W
hen
usin
g
from
the
disc
in th
e C
D d
rive.
CD
LE
VE
L
(Det
aile
d de
scrip
tions
of
thes
e M
ENU
item
sar
e ou
tline
d in
the
PLA
Y M
ENU
.)
- 23 -

PR
ES
S
(See
Pla
y M
od
e)
SC
RO
LLS
CR
OLL
SC
RO
LL
FIL
TE
RS
ELE
CT
TEX
TE
DIT
TEX
TE
RA
SE
TEX
TV
IEW
This
men
u ite
m a
llow
s yo
u to
add
C
D ti
tle a
nd tr
ack
title
s to
you
r u
nfin
aliz
ed re
cord
ings
. (s
ee p
g. 2
8.)
Thi
s m
enu
item
allo
ws
to e
rase
CD
te
xt fr
om a
n un
final
ized
dis
c.
(see
pg.
28.
)
Bef
ore
you
final
ize
a di
sc, u
se th
is
feat
ure
to re
view
the
CD
text
that
has
be
en e
nter
ed.
MIC
EQ
CD
BA
LAN
CE CH
AN
GE
RM
OD
E
Tur
n th
is m
ode
ON
to p
rodu
ce
cont
inou
s pl
ay b
etw
een
driv
es.
The
CD
R d
rive
will
aut
omat
ical
ly
begi
n pl
ayin
g w
hen
the
CD
driv
e is
fini
shed
. The
CD
driv
e w
ill b
egin
pl
ayin
g w
hen
the
CD
R d
rive
is fi
nish
ed.
Gre
at D
J fe
atur
e!
FO
OT
PE
DA
LC
TL
OU
TP
UT
EQ
ME
NU
/S
TO
RE
CD
_G
Tur
n th
is fe
atur
e O
N to
pas
s C
D G
raph
ics
thro
ugh
the
digi
tal o
utpu
t. (S
ee p
g. 2
9.)
Ena
blin
g th
is fe
atur
e w
ill
disa
ble
tem
po c
ontro
l. K
ey
cont
rol w
ill s
till b
e ac
tive.
CD
LEV
EL
OU
TP
UT
(Tex
t Edi
t, T
ext E
rase
and
Tex
t Vie
w o
nly
appe
ar w
hen
an
unfin
aliz
ed d
isc
is in
the
CD
Rec
ordi
ng d
rive)
STO
P M
EN
U
- 24 -

- 25 -
GenerGenerGenerGenerGeneralalalalal
No power
Check that the POWER switch on the back of thePSD340 is in the ON position. Check that the powercord is securely plugged in. If the STANDBY light is lit,slide the POWER switch to the right.
The chromatic tuner does not show thesame note I am playing on my instrument
The Chromatic Tuner determines which frequency isbeing played and displays the corresponding note inconcert pitch. Use this guide for transposing instruments.
When a Bb instrument plays:D D# E F F# G G# A A# B C C#
or an Eb instrument plays:A A# B C C# D D# E F F# G G#
or an F instrument plays:G G# A A# B C C# D D# E F F#
The display will read:C C# D D# E F F# G G# A A# B
Playback
No sound from CD player drive
1) If you wish to use the internal speaker, make surethe SPEAKER switch on the front panel is set to ON.
2) If you are listening through the internal speaker orheadphones, set the PHONE SELECTOR switch on thefront panel to LINE OUT and turn the PHONE/SPEAKER LEVEL knob clockwise.
3) If you are listening through powered speakersconnected to the LINE OUT, make sure to turn up theLINE OUT level control knob on the front panel.
4) Enter the menu and select “CD LEVEL.” Confirm thatCD level is set for 0dB.
No sound from CD recording drive
Make sure the PHONE SELECTOR switch is set to LINEOUT. This is the only setting that lets you monitorplayback of the CD-R drive via headphones or the built-in speaker.
No CD Graphics when playing a CD+G disc
1 Confirm that the CD+G disc is in the CD player driveand not the CD recording drive.
2 Confirm proper connections (see pg. 29)3 Make sure that CD+G function is set for ON (See
pg 24)
RecorRecorRecorRecorRecordingdingdingdingding
Mics plugged in, no levels on the VUmeters
1) Check the LINE/MIC/INST and LINE/MIC/INT MIC.These switches should be set for “MIC.”
2) Check that the LEVEL control knobs are turned up.3) If you are using a condenser mic, make sure the
required power is provided, either by Phantom Powersupply or batteries. Check your mic manufacturer’srecommendations. If Phantom Power is required,switch the Phantom Power switch on the back panelto ON.
4) Check that controls for the CD player drive are lit. Ifcontrol for the CD recorder drive is active, you mustbe in RECORD PAUSE mode to observe levels in theVU meters.
“Squealing” sound when recordingwith internal or external mics
You’ve created a feedback loop. Switch the SPEAKERswitch on the front panel to OFF. To monitor accompani-ment CDs when using “REC WITH CD” mode, useheadphones.
Only recording to one channel
1) Find the front panel switch labeled “SPLIT/STEREO/MIX.” Chances are this switch is set for SPLIT orSTEREO. If you want your mic or instrument torecord to both channels equally, move this switch tothe MIX position.
2) While in RECORD PAUSE mode, enter the menu toselect “RECORD BALANCE.” Confirm that thebalance is set in the CENTER position.
The display reads “NOT POSSIBLE”
Check if the display also reads CD rather than CD-R. Ifthe disc in the CD-R drive has been finalized or is not aCD-R/RW, the PSD340 will flash “NOT POSSIBLE”instead of entering record mode.
Troubleshooting

- 26 -
When attempting to copy MP3s thedisplay reads “DOES NOT FIT”
The PSD340 records CD audio. It does not record toMP3 file format. This means that when you “copy” adisc of MP3 files using the PSD340, you are actuallydecoding the MP3 files and rerecording them as CDaudio tracks. Since MP3 is a compressed file format, it ispossible to store more than 80 minutes of MP3 audio onan 80-minute disc. If you attempt to “copy” more than80 minutes worth of audio to a blank 80-minute disc,the PSD340 will display “DOES NOT FIT.”
The display reads “NO SIGNAL”
Find the ANALOG/DIGITAL INPUT switch on the frontpanel. Chances are this switch is set for DIGITAL. Thismeans the PSD340 is searching for a signal from thedigital input and not finding one. Move this switch tothe ANALOG position if you are recording a micro-phone, instrument, or line level source. If you arerecording a digital signal, check the connection to thedigital input on the back panel and confirm that thedigital source equipment is functioning properly.
Distortion when playing backrecordings
If distortion has been recorded to a CD, the PSD340 hasno means of removing that distortion. When you placethe unit in Rec/Pause mode, turn the SELECT jog wheelto adjust the Record level. If the record level was set toohigh, reduce the level to reduce distortion on futurerecordings. See “Setting Levels” (pg.12) for info onrecording proper levels without distortion.
The unit flashes “CD ERROR”
The CD you are using may be corrupted or out ofspecification. Try a different CD. The PSD340 records inreal time, therefore it is important that the disc you arerecording is real time or “1X” speed compatible. If thedisc you are using is only rated for high speed duplica-tion, you may experience problems with the CD record-ing process.
The unit flashes “REC ERROR”
It is possible that the recording was interrupted as aresult of transport failure due to shock or a bad sectoron a disc. Replace the disc and try placing the unit on apiece of foam. This is a simple and effective way toprevent large sound pressure levels or room vibrationsfrom disrupting the recording process.
Voice Reduction, Key, or Tempomanipulations aren’t being recorded
COPY & LISTEN, COPY 2X, COPY 2X AND FINALIZE, andCONVERT HALF SPEED modes will not transfer key,tempo and vocal reduction changes. RECORD WITH CDmode is the prefered method for transferring thesechanges. If you are not recording any microphones orinstruments along with the CD in the CD drive, simplyturn the input level controls on the front panel OFF(counterclockwise).
Unable to change Key more than 5 halfsteps
You are combining Key and Tempo changes. When thePSD340 performs simultaneous Key and Tempo adjust-ments, the KEY control is limited to + or – 5.00 halfsteps, as opposed to the full octave that is allowedwhen the KEY control is used alone. Tempo can be ad-justed –50% or +50% when key adjustments are made.
When using “REC with CD” mode torecord a CD containing several tracks,the resulting CD-R only has one big track
AUTO TRACK is OFF. When the unit is in Rec/Pausemode, press the MENU/STORE button. Select the AUTOTRACK option. Change the AUTO TRACK status to ONand press the SELECT jog wheel to accept the change.Press the MENU/STORE button to exit and proceed withrecording. The unit will then increment tracks whenaudio falls below a threshold of silence (-40dB) for aminimum of three seconds. If the CD in the CD playerdrive does not have the necessary silence gaps (forinstance, if the recording is a medley or contains crowdnoise), the PSD340 may not increment every track.

Working with MP3 Files
MP3 files on a CD-R or CD-RW are either in the disc’sroot directory or in sub folders. Folders are identified asas “albums” by the PSD340. Albums are abbreviated as“AL” in the PSD340 display.
When the PSD340 recognizes a CD containing MP3files, it will display the contents of the disc in thefollowing format:
9 AL 3| || Total # of albums
Total # of files
When playing a disc of MP3 files, the PSD340 will playfiles in order, starting with the first album. (The order ofthe albums are the same as the order of file folders onthe disc.) When all the files in the first album have beenplayed, the PSD340 begins playing the files from thesecond album and so on. The PSD340 can play amaximum of 253 albums and 253 files per album.
If there are files in the root directory, the PSD340 willconsider those files to be in the first Album.
When using the SELECT jog wheel to choose tracks, thePSD340 will follow the same order, moving through allthe files in the first album before moving on to thesecond, etc.
To advance through albums quickly, it is best to use thefast forward search and fast backward search buttons.Once the desired album is selected, use the SELECT jogwheel to move through files in that album.
Precautions for discs recorded using MP3 files
• The format of the files played have the “.mp3” or“.MP3” extension. Files with any other extensioncannot be played.
• The Joliet file system, an extension to the ISO9660file format, is supported as the write format. Bothmode 1 (CD-ROM) and mode 2 (CD-ROM XA) aresupported. MP3 file discs recorded using packetwriting cannot be played.
• The recommended MP3 file sampling frequency is44.1 kHz and the bit rate is 128 kbps. The soundmay be interrupted when playing files with any othersampling frequency and bit rate.
• The maximum number of characters in the ID3 taginformation that can be displayed by this player is 32.
Characters other than alpha-numerics will not bedisplayed properly.
• Digital signals are not output from the player whileplaying discs recorded using MP3 files.
• It may not be possible for CD-R/CD-RW discs onwhich MP3 files were recorded to be played properlydepending on the environment of the personalcomputer used to record the files, the writingsoftware program, and the CD-R/CD-RW discsconcerned. Check the external components used.
• MP3 files on mixed CDs or enhanced CDs containinga mixture of the CD-DA format for music purposesand MP3 files cannot be played. Only the CD-DAformat for music purposes will be played.
• This player also supports discs created bymultisessions.
• It is recommended that the maximum number ofsessions on a CD-R or CD-RW disc be 10; the maxi-mum number of albums for all sessions be 20; andthe maximum number of files be 200.
Functions not supported by MP3 playThe following functions are not supported when theplayer is to play discs recorded with MP3 files.• A-B repeat• Program play• Auto cue• Time mode changes
Further Information
- 27 -
How to Cue-to-Music
Normally there is some silence between the beginning ofa track (track ID position) and the beginning of themusic (audio). Cue-to-music skips the silence so you candirectly switch to audio from Play/Pause mode.
How to Adjust Cue PointIn Single Track mode, the PSD340 automatically turns oncue-to-music. Enter Single Track mode by pressing theSINGLE button. The cue point is set by the PSD340when it detects audio.
To adjust:1. With a CD in the CD player drive, press the SINGLE
button.2. Turn the SELECT jog wheel to choose the track and
press the SELECT jog wheel to confirm.3. The unit will be paused on that track.4. Press the MENU/STORE button. The display switches
to “CUE POINT ADJUST.”5. Press the SELECT jog wheel. The display shows “O
FRAME.”

After the final character is entered, press the MENU/STORE button.
NOTE: All CD TEXT entries are in short term memoryuntil the CD is finalized. You can play, pause and stop,but if you turn off power, or open the CD-R drive yourediting will be lost.
How to Erase CD Text
The TEXT ERASE menu item lets you delete CD TEXTthat has been entered, prior to finalizing.
With your disc in the CD-R drive and stopped:1 Press the MENU/STORE button.2 Turn the SELECT jog wheel so “TEXT ERASE” is
displayed.3 Press the SELECT jog wheel to confirm the selection.
The display reads “ALL TEXT.” Now turn the SELECTjog wheel to choose between erasing CD TITLE orCD TRACK TITLE.
4 Press the SELECT jog wheel to confirm the selection.“ERASE?” is displayed briefly, then “PUSH ENTER” Isdisplayed.
5 Press the SELECT jog wheel to erase the selected text.
- 28 -
CD-R
R
LdB-50 -30 -22 -16 -12 -8 -4 0
CD-RW
4 Turn the SELECT jog wheel to choose betweenediting CD TITLE or CD TRACK TITLE. Press to makeyour selection.
5 The first character of the title is flashing. Turn theSELECT jog wheel to select the character. Or from theremote with CDR selected, press alphanumeric keysto select each character.
6. Depending on the specific track, the FRAME adjust-ment can be from 75 to -75 (75 frames = 1 second).
7. Turn the SELECT jog wheel to change the audio startposition. Then push and release the SELECT jogwheel to store the adjustment.
8. Press the MENU/STORE button to exit.
About CD Text
CD text, when present, provides text information suchas the CD title, artist, track titles, and track artists.
When a disc is inserted in the CD drive or CDR drive thePSD340 automatically detects if a disc has text informa-tion and automatically displays the CD title. The PSD340can display 14 characters, if the text information islonger than that the text automatically scrolls from rightto left.
Creating CD Text
Before finalization of a CD you can enter text informa-tion. Only the CD title and track titles can be entered.
With your unfinalized disc in the CDR drive andstopped.1 Press the MENU/STORE button.2 Turn the SELECT jog wheel until the display reads
“TEXT EDIT.”3 Press the SELECT jog wheel to select. The display
reads “CD TITLE.”
CD Title
Title of each track
The SELECT jog wheel control presents the followingcharacters in order:
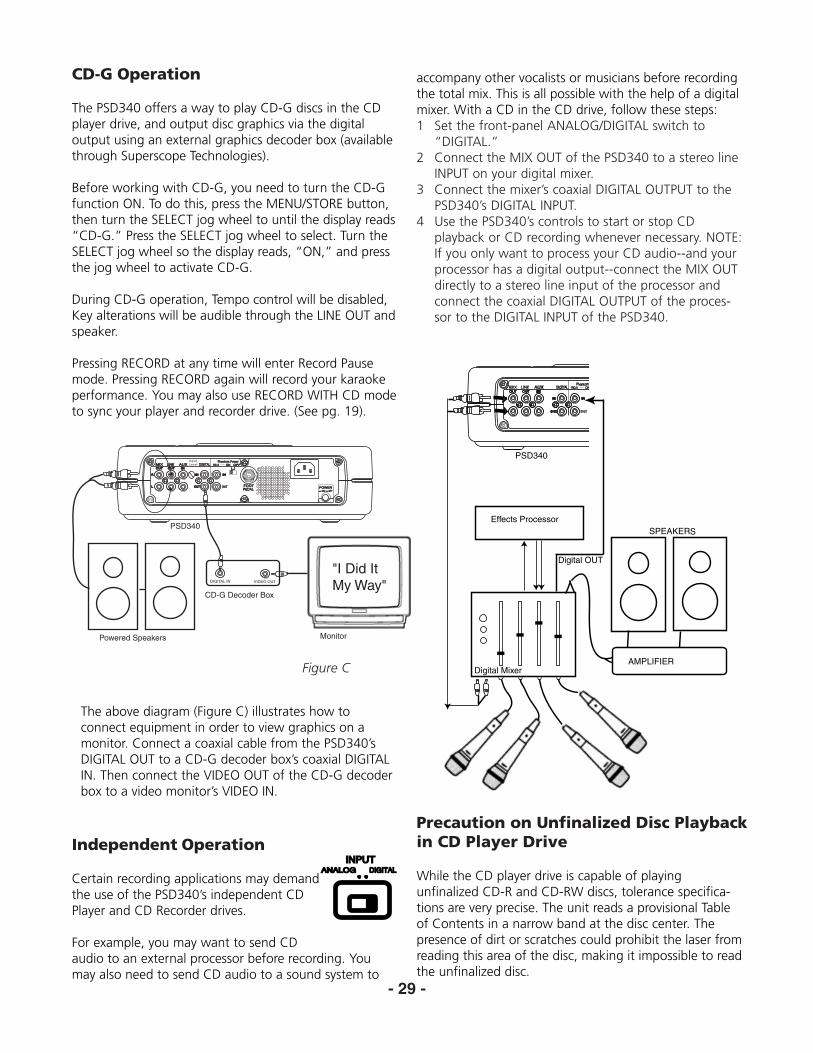
CD-G Operation
The PSD340 offers a way to play CD-G discs in the CDplayer drive, and output disc graphics via the digitaloutput using an external graphics decoder box (availablethrough Superscope Technologies).
Before working with CD-G, you need to turn the CD-Gfunction ON. To do this, press the MENU/STORE button,then turn the SELECT jog wheel to until the display reads“CD-G.” Press the SELECT jog wheel to select. Turn theSELECT jog wheel so the display reads, “ON,” and pressthe jog wheel to activate CD-G.
During CD-G operation, Tempo control will be disabled,Key alterations will be audible through the LINE OUT andspeaker.
Pressing RECORD at any time will enter Record Pausemode. Pressing RECORD again will record your karaokeperformance. You may also use RECORD WITH CD modeto sync your player and recorder drive. (See pg. 19).
The above diagram (Figure C) illustrates how toconnect equipment in order to view graphics on amonitor. Connect a coaxial cable from the PSD340’sDIGITAL OUT to a CD-G decoder box’s coaxial DIGITALIN. Then connect the VIDEO OUT of the CD-G decoderbox to a video monitor’s VIDEO IN.
Phantom PowerPhantom Power
ININ
RC-5RC-5
OUTOUT
ONON OFFOFF
ININ
OFFOFFON/ON/POWERPOWER
OUTOUTDIGITALDIGITAL
OUTOUTAUXAUXLINELINEMIXMIXININ
PEDALPEDALFOOTFOOTOUTOUT
ININ
LL
RR
InputLevel
VIDEO OUT DIGITAL IN
"I Did It My Way"
CD-G Decoder Box
Powered Speakers Monitor
PSD340
Figure C
Precaution on Unfinalized Disc Playbackin CD Player Drive
While the CD player drive is capable of playingunfinalized CD-R and CD-RW discs, tolerance specifica-tions are very precise. The unit reads a provisional Tableof Contents in a narrow band at the disc center. Thepresence of dirt or scratches could prohibit the laser fromreading this area of the disc, making it impossible to readthe unfinalized disc.
- 29 -
Independent Operation
Certain recording applications may demandthe use of the PSD340’s independent CDPlayer and CD Recorder drives.
For example, you may want to send CDaudio to an external processor before recording. Youmay also need to send CD audio to a sound system to
INPUTINPUTDIGITALDIGITALANALOGANALOG
accompany other vocalists or musicians before recordingthe total mix. This is all possible with the help of a digitalmixer. With a CD in the CD drive, follow these steps:1 Set the front-panel ANALOG/DIGITAL switch to
“DIGITAL.”2 Connect the MIX OUT of the PSD340 to a stereo line
INPUT on your digital mixer.3 Connect the mixer’s coaxial DIGITAL OUTPUT to the
PSD340’s DIGITAL INPUT.4 Use the PSD340’s controls to start or stop CD
playback or CD recording whenever necessary. NOTE:If you only want to process your CD audio--and yourprocessor has a digital output--connect the MIX OUTdirectly to a stereo line input of the processor andconnect the coaxial DIGITAL OUTPUT of the proces-sor to the DIGITAL INPUT of the PSD340.

2. You must pay any shipping charges if it is necessaryto ship the product for service. If the necessaryrepairs are covered by the warranty, we will payreturn shipping charges to your location anywhere inthe United States.
3. Whenever warranty service is required, you mustpresent the original dated sales receipt, or otherproof of purchase.
Limitation of implied warranties
All implied warranties, including warranties of mer-chantability and fitness for a particular purpose, arelimited in duration to the length of this warranty.
Exclusion of damages
Liability for any defective product is limited to repair orreplacement of the product at Superscope's option.Superscope shall not be liable for damage to otherproducts caused by any defects in Superscope products,damages based on inconvenience or loss of use of theproduct, or any other damages, whether incidental,consequential, or otherwise.
Some States do not allow limitations on how long animplied warranty lasts and/or do not allow the exclu-sion or limitation of incidental or consequentialdamages, so the above limitations and exclusions maynot apply to you.
How State law relates to the warranty
This warranty gives you specific legal rights, and youmay have other rights which may vary from State toState.
This warranty is enforceable only in the United Statesand its possessions or territories.
- 30 -
WarrantyOne Year Limited Warranty:Your Superscope PSD340 is warranted against manufac-turer defects in material and workmanship for one yearparts and labor.
Non-transferable warranty:
This warranty may be enforced only by the originalpurchaser.
The following are not covered under warranty:1. Damage, deterioration, malfunction or failure to
meet performance specifications resulting from:• accident, acts of nature, misuse, abuse, neglect
or unauthorized product modification.• improper installation, removal or maintenance, or
failure to follow supplied instructions.• repair or attempted repair by a non-Superscope
authorized agent.• any shipment (claims must be presented to the
carrier).• any cause other than a defect of manufacturing.
2. Cleaning, check-ups with no fault found.3. Any product on which the serial number has be
defaced, modified or removed.4. Accessories, including but not limited to, cables and
adaptors.5. Product purchased outside of the United States, its
possessions or territories.
The following are covered under warranty:
All labor and material expenses for items covered by thewarranty.
To obtain service:
1. If your unit needs service contact Superscope at(630) 232-8900 Ext. 396. A service representativewill advise you of how to obtain service. Please donot return the unit directly to Superscope Technolo-gies, unless specified by our service representative.