p 4.1.1 wind turbine design - aerospace engineering...
TRANSCRIPT

Project 4.1.1 Wind Turbine DesignIntroduction
Wind turbines populate the landscape in many parts of the world. These systems harness naturally abundant wind and transform it into electrical energy. Turbine blades efficiently convert wind energy into a force which turns a wind turbine. This energy conversion is an application of aerospace engineering principles. In this project you will research and design wind turbine blades, then you will design and build your own turbine.
Equipment Computer with Internet connection Plywood or similar base approximately 12 in. x 12 in. Basic Turbine Building Parts:
KidWind Hub Dowels Wind Turbine Generator
Hook up wires Box fan or similar (one per class) 1 in. PVC pipe (8 in.) 1 in. PVC pipe plug 1 in. PVC coupler 1 in. PVC 90 degree elbow Various materials to build wind turbine blade and attachment mechanism
© 2011 Project Lead The Way, Inc.AE Project 4.1.1 Wind Turbine Design – Page 1

Multimeter (one per class) Engineering notebook Pencil
Procedure1. Divide into groups of two under your teacher’s direction.
2. Research wind turbine blade design.
3. Build the turbine test stand
a. Attach a 1 in. PVC pipe plug to a base using a wood screw similar to image shown below. Attach a 1 in. PVC coupler to the plug.
Wind Turbine Base
b. Drill a ¼ in. hole in the elbow. Wires from the motor will pass through this hole. Attach a 1 in. PVC pipe (8 in.) to the coupler then attach a 1 in. PVC 90 degree elbow to the pipe. Carefully thread the pancake motor wires through the elbow hole while inserting the motor into the elbow. Attach KidWind Hub and dowels as shown below.
90 Degree Elbow with Hole KidWind Hub and Motor Installed
© 2011 Project Lead The Way, Inc.AE Project 4.1.1 Wind Turbine Design – Page 2

4. Build the turbine and attach it to the motor shaft.
5. Test the turbine.
a. Set up the multimeter to measure DC Voltage.
b. Connect the multimeter leads to the motor leads.
c. Power on the multimeter.
d. Start the fan on the lowest setting to turn your turbine.
e. Record the voltage.
f. Run the fan at various speeds up to the maximum. Record the voltage at each speed.
g. Plot the speed versus voltage.
Multimeter
© 2011 Project Lead The Way, Inc.AE Project 4.1.1 Wind Turbine Design – Page 3

Distance(in) 6 12 24Output (V) .45V .46V .43V
Fan Speed 1 2 3Output(V) .45V .62V .76V
Conclusion1. Describe the strengths and weaknesses of your turbine design.
My turbine’s weaknesses were that the fans were in a triangle shape and the wind could not properly push the blades to spin the turbine. The blades where also not postioned and angled in the same direction which caused the wind to not turn the blades to its full potential. My strengths are that it worked and that it was a unique design.
© 2011 Project Lead The Way, Inc.AE Project 4.1.1 Wind Turbine Design – Page 4
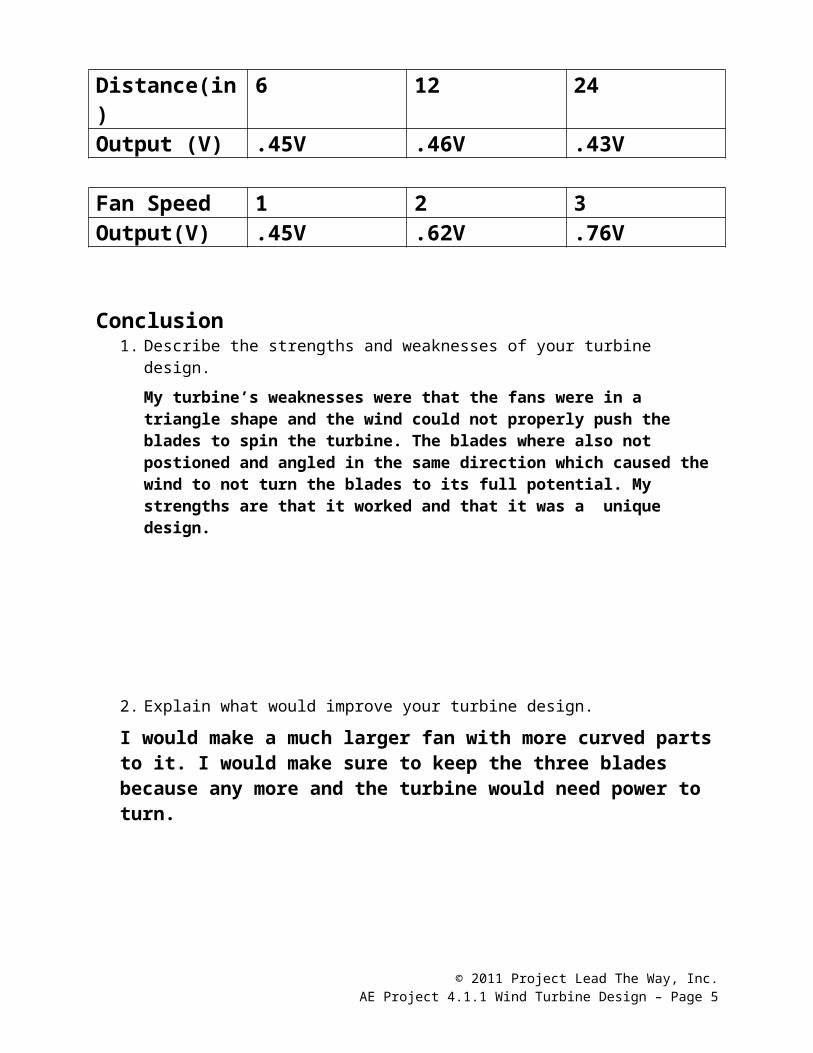
2. Explain what would improve your turbine design.
I would make a much larger fan with more curved parts to it. I would make sure to keep the three blades because any more and the turbine would need power to turn.
© 2011 Project Lead The Way, Inc.AE Project 4.1.1 Wind Turbine Design – Page 5