=p~~êÄê ÅâÉå= =dÉêã~åó - mtdproducts.eu ·...
TRANSCRIPT

jqa=mêçÇìÅíë=^âíáÉåÖÉëÉääëÅÜ~Ñí=√=p~~êÄêΩÅâÉå=√=dÉêã~åó
J 15FORM NO. 769-00765G


4
10
17
24
31
38
45
51
58
64
70
77
85
92

English Operating instructions – Scarifier with electric motor
4
ContentsFor your safety ..............................4Assembling the unit.......................6Functional description ...................6Operating safety............................6About aeration ..............................8Transporting the appliance............8Servicing/cleaning .........................8Laying up the vehicle.....................8Warranty .......................................9Identifying and eliminatingmalfunctions .................................9
Information on rating plateThese details are very important as they will not only be needed for identifying your machine when ordering replacement parts but they will also be required by Customer Service. The rating plate is found near the engine. Enter all information on the rating plate of your unit in the following box.
This and other information about the unit can be found on the separate CE Declaration of Conformity which is a component of this operating manual.
Illustrations
Fold out the illustrated pages at the start of the operating manual. The graphical representation may differ in detail from the unit which you purchased.
For your safety
Use the appliance properlyThis appliance is approved solely for use– in accordance with the descrip-
tions and safety instructions specified in this user's guide
– as a lawn scarifier in a home or hobby environment.
Any other use is not as intended. The user is liable for all damage caused to third parties and their property.Unauthorized modifications made to the appliance rule out any liability on the part of the manufacturer for damage resulting therefrom.
Observe the safety and operating informationBefore using the appliance for the first time, read and follow these operating instructions carefully. Comply with the operating manual and keep it for subsequent use. Never allow children or other persons to use the appliance who do not know the operating instructions.If the unit changes ownership, hand over the operating manual.
General safety informationIn this section you will find general information about safety. Warnings that apply specifically to individual parts of the scarifier, functions or activities are shown at the corres-ponding point in this user's guide.
Before working with the appliancePersons using the appliance must not be under the influence of intoxicants e.g. alcohol, narcotics, medication, etc.Persons younger than 16 years of age must not use this appliance – local regulations can determine the minimum age of the users.
Before you begin work, make that you are familiar with all attachments and operating controls as well as their functions.Use outdoors with the permitted and appropriately identified power cord only, e.g. H07RN – F 3 x 1.5 mm² (max. 50 m). Connecting parts of the power cord must be splash-proof and made of rubber or covered with rubber.Before using the unit, always check whether the power cord is damaged, brittle or tangled.To do this, switch off the unit and pull out the mains plug. Use only a power cord which is in perfect condition. Immediately have a damaged power cord replaced by a specialist company.Before using the appliance,– whether the grass catcher works
and the deflector closes correctly. Replace damaged, worn out or missing parts immediately.
– check for any wearing or damage to the cutters, fastening pins, and the whole cutter unit. Have worn or damaged parts replaced by a specialist company and only in sets to exclude imbalances.
– whether the power cord is damaged between the motor and switch/plug combination. Immediately have a damaged power cord replaced by a specialist company.
Spare parts must conform with the requirements specified by the manufacturer. Therefore use original spare parts only or spare parts authorised by the manufacturer. Have repairs carried out by a specialist company only.

Operating instructions – Scarifier with electric motor English
5
When working with the applianceWhen working with or on the appliance you must wear protective clothing. This includes:– safety shoes,– trousers,– close-fitting garments,– Ear protection– protective goggles, etc.Operate the vehicle only when it is in good technical condition as stipulated and delivered by the manufacturer.
Before all work on this applianceTo prevent injury before performing any work (e.g. maintenance and adjustments) on this unit– switch OFF the engine,– wait until all rotating parts have
come to a standstill,– pull out the mains plug,– leave the motor to cool down
(approx. 30 minutes).
After working with the applianceBefore leaving the unit, always– pull out the mains plug.
Safety devicesFigure 1
a~åÖÉêkÉîÉê=ìëÉ=~å=~ééäá~åÅÉ=áÑ=áí=Ü~ë=Ç~ã~ÖÉÇ=ë~ÑÉíó=ÇÉîáÅÉë=çê=áÑ=íÜÉêÉ=~êÉ=åç=ë~ÑÉíó=ÇÉîáÅÉë=ÑáííÉÇK
Discharge flap (1)The discharge flap is a safety device. The discharge flap prevents injuries from the cutter deck or ejected solid objects. The lawn scarifier should never be operated with the deflector detached.
Safety lever (2)The switch lever is for your safety to stop the motor and cutter deck in an emergency. Never attempt to disable its function.
Symbols on the applianceOn the appliance you will find various symbols on adhesive labels. They have the following specific meanings:
Warning! Please read the operating instruc-tions before putting appliance into operation!
Keep third parties away from the danger area!
Before working on the cutters, pull out the mains plug! Keep fingers and feet away from the cutters! Before adjusting or cleaning the unit or before checking whether the power cord is entangled or damaged, switch off the unit and pull out the mains plug. Keep the power cord away from the cutters.Danger! Rotating cutters!
Always wear eye and ear protection!
Danger! Appliance continues running!
Always keep these symbols on the appliance in a legible state.
Symbols in the user's guideThis manual uses symbols which identify dangers or indicate important information. They have the following specific meanings:
a~åÖÉêqÜÉó=êÉÑÉê=íç=Ç~åÖÉêë=ïÜáÅÜ=~êÉ=ÅçååÉÅíÉÇ=ïáíÜ=íÜÉ=ÇÉëÅêáÄÉÇ=~Åíáîáíó=~åÇ=ïÜáÅÜ=ã~ó=êÉëìäí=áå=áåàìêóK
`~ìíáçåqÜÉó=êÉÑÉê=íç=Ç~åÖÉêë=ïÜáÅÜ=~êÉ=ÅçååÉÅíÉÇ=ïáíÜ=íÜÉ=ÇÉëÅêáÄÉÇ=~Åíáîáíó=~åÇ=ïÜáÅÜ=ã~ó=êÉëìäí=áå=Ç~ã~ÖÉ=íç=íÜÉ=ìåáíK
NoteIndicates important information and application tips.
Disposal instructionsDispose of packaging remnants, old units, etc., in accordance with local regulations.
Old electrical equipment is recyclable and should therefore not be thrown in the dustbin!
We request that you support us with your active contribution in the conservation of resources and protection of the environment and to dispose of this unit at collection points, if available.
!
!
!
!
!

English Operating instructions – Scarifier with electric motor
6
Assembling the unit
Illustrations at the end of the instructions or in a supplementary sheet show you how to assemble your unit in a few steps and make it ready for use. You will find the assembly sequence of your unit simple by comparing the illustration at top left of the illustrated assembly page with your unit.
Functional description
The lawn scarifier is pushed by hand over the area of grass to be cut. The unit is powered via the power cord. The cutter deck is driven by an electric motor. The cutter deck rotates and removes the felt layer formed by moss, lichen and weeds and conveys the scarified material to the outside or into the grass catcher. The working depth is specified centrally via the height adjustment or individual wheel suspension.
Operating safety
a~åÖÉêbäÉÅíêáÅ=ëÜçÅâÓ rëÉ=~=ë~ÑÉíó=ëïáíÅÜ=çå=óçìê=ã~áåë=ëçÅâÉí=EZ=êÉëáÇì~ä=ÅìêêÉåí=çéÉê~JíÉÇ=ÇÉîáÅÉ=ïáíÜ=~=êÉäÉ~ëÉ=ÅìêêÉåí=åçí=ÉñÅÉÉÇáåÖ=PM=ã^FK
Ó fÑ=óçì=ëÉîÉê=íÜÉ=éçïÉê=ÅçêÇ=ïÜáäÉ=~Éê~íáåÖ=óçìê=ä~ïåI=óçì=~êÉ=~í=êáëâ=çÑ=ÄÉáåÖ=âáääÉÇ=çê=áåàìêÉÇK=päçïäó ãçîÉ=~ï~ó=áå=ëÜçêí=ëíÉéë=Ñêçã=íÜÉ=ìåáíK=mìää=íÜÉ=éäìÖ=çìí=çÑ=íÜÉ=ëçÅâÉíK=tÜÉå=~Éê~íáåÖ=óçìê=ä~ïåI=ÉåëìêÉ=íÜ~í=íÜÉ=éçïÉê=ÅçêÇ=åÉîÉê=ÖÉíë=áåíç=íÜÉ=ÅìííáåÖ=~êÉ~K
^ÅÅáÇÉåíÓ mÉêëçåëI=é~êíáÅìä~êäó=ÅÜáäÇêÉå=çê=~åáã~äëI=ãìëí=åÉîÉê=ÄÉ=åÉ~ê=íÜÉ=~ééäá~åÅÉ=ïÜÉå=ëÅ~êáÑóáåÖK=oáëâ=çÑ=áåàìêó=ÇìÉ=íç=ÉàÉÅíÉÇ=ëíçåÉë=çê=çíÜÉê=çÄàÉÅíëK
c~ääáåÖ=çîÉêÓ léÉê~íÉ=íÜÉ=îÉÜáÅäÉ=~í=ï~äâáåÖ=ëéÉÉÇ=çåäóK
Ó tÜÉå=ÅìííáåÖ=Öê~ëë=çå=~=ëíÉÉé=ëäçéÉI=íÜÉ=ä~ïå=ëÅ~êáÑáÉê=ÅçìäÇ=íáé=çîÉê=~åÇ=Å~ìëÉ=~å=áåàìêóK=píÉÉê=íÜÉ=~ééäá~åÅÉ=ÇáêÉÅíäó=~Åêçëë=áåÅäáåÉëI=åÉîÉê=ìé=~åÇ=Ççïå=íÜÉãK=kÉîÉê ëÅ~êáÑó=çå=ëäçéÉë=ïáíÜ=~å=áåÅäáå~íáçå=çÑ=ãçêÉ=íÜ~å=OM=BK
Ó _É=é~êíáÅìä~êäó=Å~êÉÑìä=ïÜÉå=ÅÜ~åÖáåÖ=íÜÉ=ÇáêÉÅíáçå=~åÇ=~äï~óë=é~ó=~ííÉåíáçå=íç=~=ÖççÇ=éçëáíáçåK
Ó _É=ÉëéÉÅá~ääó=Å~êÉÑìä=áÑ=éìääáåÖ=íÜÉ=ìåáí=Ä~Åâï~êÇë=íçï~êÇë=óçìêëÉäÑK
Ó qÜÉêÉ=áë=~=êáëâ=çÑ=áåàìêó=ïÜÉå=ëÅ~êáÑóáåÖ=~äçåÖ=ÄçêÇÉêëK=pÅ~êáÑóáåÖ=åÉ~ê=ÉÇÖÉë=çÑ=ä~ïåëI=ÜÉÇÖÉë=çê=ëíÉÉé=Ä~åâë=Å~å=ÄÉ=Ç~åÖÉêçìëK=^äï~óë=âÉÉé=íÜÉ=ë~ÑÉíó=Çáëí~åÅÉ=ïÜÉå=ëÅ~êáÑóáåÖK
Ó fÑ=~Éê~íáåÖ=Ç~ãé=Öê~ëëI=íÜÉ=ìåáí=ã~ó=ëäáé=ÇìÉ=íç=êÉÇìÅÉÇ=~ÇÜÉëáçå=~åÇ=óçì=ã~ó=Ñ~ääK=låäó=ëÅ~êáÑó=íÜÉ=ä~ïå=ïÜÉå=íÜÉ=Öê~ëë=áë=ÇêóK
Ó tçêâ=çåäó=Äó=Ç~óäáÖÜí=çê=áå=ÖççÇ=~êíáÑáÅá~ä=äáÖÜíáåÖK
fåàìêóÓ ^äï~óë=ã~áåí~áå=~=ë~ÑÉ=Çáëí~åÅÉ=Ñêçã=íÜÉ=êçí~íáåÖ=íççä=Äó=ãÉ~åë=çÑ íÜÉ=ëíÉÉêáåÖ=Ü~åÇäÉK
Ó kÉîÉê=éä~ÅÉ=óçìê=Ü~åÇëI=ÑÉÉíI=çê çíÜÉê=é~êíë=çÑ=íÜÉ=ÄçÇó=åÉ~ê=êçí~íáåÖ=é~êíëK
Ó kÉîÉê=ëí~åÇ=áå=Ñêçåí=çÑ=íÜÉ=ÉàÉÅíáçå=ÜçäÉë=ïÜÉå=ëí~êíáåÖ=íÜÉ=ëÅ~êáÑáÉêK
Ó píçé=íÜÉ=ãçíçêIÓ ÄÉÑçêÉ=íáäíáåÖ=íÜÉ=~ééäá~åÅÉIÓ Ñçê=íê~åëéçêíáåÖ=çîÉê=ëìêÑ~ÅÉë=çíÜÉê=íÜ~å=Öê~ëëK
Ó pïáíÅÜ=íÜÉ=ãçíçê=çÑÑ=~åÇ=éìää=çìí íÜÉ=ã~áåë=éäìÖI=Ó ÄÉÑçêÉ=óçì=ÅäÉ~ê=íÜÉ=ÉàÉÅíçê=çÑ ÄäçÅâ~ÖÉë=~åÇ=çíÜÉê=ÜáåÇê~åÅÉëX
Ó ÄÉÑçêÉ=óçì=ÅÜÉÅâI=ÅäÉ~åI=~Çàìëí çê=ïçêâ=çå=íÜÉ=ëÅ~êáÑáÉX
Ó áããÉÇá~íÉäó=~ÑíÉê=~=ÑçêÉáÖå=çÄàÉÅíK=`ÜÉÅâ=ëÅ~êáÑáÉê=Ñçê=Ç~ã~ÖÉ=~åÇ=Åçåí~Åí=~=ëéÉÅá~äáëí=ïçêâëÜçé=áå=íÜÉ=ÉîÉåí=çÑ=Ç~ã~ÖÉX
Ó áããÉÇá~íÉäó=~ÑíÉê=íÜÉ=~ééäá~åÅÉ=ëí~êíë=íç=îáÄê~íÉK==ïáíÜ=ìåìëì~ä=îáçäÉåÅÉ=~åÇ=ÄÉÑçêÉ=óçì=ÅÜÉÅâ=íÜÉ=~ééäá~åÅÉK
Ó kÉîÉê=äáÑí=çê=Å~êêó=íÜÉ=~ééäá~åÅÉ=ïÜÉå=íÜÉ=ÉåÖáåÉ=áë=êìååáåÖK=cáêëíI éìää=íÜÉ=ã~áåë=éäìÖ=çìí=çÑ=íÜÉ ëçÅâÉíK=
Ó tÜÉå=êÉãçîáåÖ=íÜÉ=Öê~ëë=Å~íÅÜÉê=óçì=çê=çíÜÉê=éÉêëçåë=ÅçìäÇ=ÄÉ=áåàìêÉÇ=Äó=ÉàÉÅíÉÇ=ã~íÉêá~ä=çê=Äó=ÑçêÉáÖå=ÄçÇáÉëK=kÉîÉê=Éãéíó=íÜÉ=Öê~ëë=ë~Åâ=ïÜáäÉ=íÜÉ=ÉåÖáåÉ=áë=êìååáåÖK=pïáíÅÜ=çÑÑ=íÜÉ=ëÅ~êáÑáÉêK
Ó `ÜÉÅâ=íÜÉ=íÉêê~áå=çå=ïÜáÅÜ=íÜÉ=ìåáí=áë=ÄÉáåÖ=ìëÉÇ=~åÇ=êÉãçîÉ=~ää=çÄàÉÅíë=ïÜáÅÜ=ã~ó=ÄÉ=éáÅâÉÇ=ìé=~åÇ=ÉàÉÅíÉÇK
Ó fÑ=íÜÉ=ÅìííÉê=ëíêáâÉë=~=ÑçêÉáÖå=çÄàÉÅí=EÉKÖK=ëíçåÉF=çê=áÑ=íÜÉ=ìåáí=ëí~êíë=îáÄê~íáåÖ=ìåìëì~ääóW=pïáíÅÜ=çÑÑ=íÜÉ=ãçíçê=áããÉÇá~íÉäó=~åÇ=éìää=çìí=íÜÉ=ã~áåë=éäìÖK=`ÜÉÅâ=íÜÉ=ìåáí=Ñçê Ç~ã~ÖÉ=~åÇ=Ü~îÉ=~=ëéÉÅá~äáëí=Åçãé~åó=êÉé~áê=~åó=Ç~ã~ÖÉK
Ó kÉîÉê=ëí~êí=íÜÉ=ìåáí=ïáíÜ=ÄçíÜ=Ñêçåí=ïÜÉÉäë=áå=íÜÉ=ïçêâáåÖ=éçëáíáçåK=qÜÉ=ÅìííáåÖ=íççä=áë=íçìÅÜáåÖ=íÜÉ=ÖêçìåÇ=~åÇ=íÜÉ=~ééäá~åÅÉ=Å~å=ëí~êí=ãçîáåÖK
píìãÄäáåÖ=Ó tÜÉå=íìêåáåÖ=íÜÉ=ìåáíI=óçì=ã~ó=íêáé=çîÉê=íÜÉ=éçïÉê=ÅçêÇ=~åÇ=áåàìêÉ=óçìêëÉäÑK=^äï~óë=ÖìáÇÉ=íÜÉ=éçïÉê=ÅçêÇ=ëç=íÜ~í=áí=Å~å=åÉîÉê=Ñ~ää=áåíç=íÜÉ=ï~äâáåÖ=~åÇ=~Éê~íáåÖ=~êÉ~K
Ó léÉê~íÉ=íÜÉ=îÉÜáÅäÉ=~í=ï~äâáåÖ=ëéÉÉÇ=çåäóK
a~ã~ÖÉ=íç=íÜÉ=ä~ïå=ëÅ~êáÑáÉêÓ píçåÉëI=Äê~åÅÜÉë=çê=ëáãáä~ê=çÄàÉÅíë=äóáåÖ=~Äçìí=ã~ó=Ç~ã~ÖÉ=íÜÉ=ìåáí=~åÇ=áíë=ãçÇÉ=çÑ=çéÉê~íáçåK=oÉãçîÉ=~ää=çÄàÉÅíë=Ñêçã=íÜÉ=~ééäá~åÅÉÛë=é~íÜ=ÄÉÑçêÉ=ÉîÉêó=ìëÉK
Ó aç=åçí=çéÉê~íÉ=íÜÉ=ã~ÅÜáåÉ=áÑ=áí=áë åçí=áå=éÉêÑÉÅí=ïçêâáåÖ=çêÇÉêK=pìÄàÉÅí=íÜÉ=~ééäá~åÅÉ=íç=~ íÜçêçìÖÜ=îáëì~ä=ÅÜÉÅâ=ÄÉÑçêÉ=ìëáåÖ=áíK=`ÜÉÅâ=áå=é~êíáÅìä~ê=íÜÉ=ë~ÑÉíó=ÉèìáéãÉåíI=ÉäÉÅíêáÅ=ÅçåíêçäëI=éçïÉê=Å~ÄäÉë=~åÇ=íÜêÉ~ÇÉÇ=ÅçååÉÅíáçåë=Ñçê=Ç~ã~ÖÉ=~åÇ=ëÉÅìêÉ=~íí~ÅÜãÉåíK=oÉéä~ÅÉ Ç~ã~ÖÉÇ=é~êíë=ÄÉÑçêÉ=çéÉê~íáåÖ=íÜÉ=ìåáíK
!

Operating instructions – Scarifier with electric motor English
7
Operating timesFollow the national/ municipal regulations with respect to times of usage (if required ask your local authority).
DirectionsDetails of specific locations on the lawn scarifier (e g. left, right) are always quoted as seen from the steering handle and while facing forward.
1. Hang the grass catcher(optional, depending on model)Figure 2 Lift up the deflector flap and hook
the grass sack onto the lawn scarifier.
2. Setting the depth of cut
`~ìíáçåråáíë=ïáíÜ=ÇÉí~ÅÜ~ÄäÉ=ïÜÉÉäëcáÖìêÉ=P~qÜÉ=ïçêâáåÖ=ÇÉéíÜ=ãìëí=ÄÉ=ëÉí=ÅçêêÉÅíäó=ÄÉÑçêÉ=íÜÉ=ìåáí=áë=ìëÉÇ=Ñçê íÜÉ=Ñáêëí=íáãÉK=tÜÉå=~ëëÉãÄäáåÖ=íÜÉ=ïÜÉÉäë=E^FI=ÉåëìêÉ=íÜ~í=íÜÉó=~êÉ=~ëëÉãÄäÉÇ=áå=íÜÉ=ÅçêêÉÅí=éçëáíáçå=Ñçê íÜÉ=ïçêâáåÖ=ÇÉéíÜ=ëÉííáåÖK=tçêâáåÖ=ÇÉéíÜ=ëÉííáåÖ=ïÜÉå=ìëáåÖ=íÜÉ=ìåáí=Ñçê=íÜÉ=Ñáêëí=íáãÉ=áë=éçëáíáçå=N=çÑ=íÜÉ=ïÜÉÉä=~ëëÉãÄäóKråáíë=ïáíÜ=ÜÉáÖÜí=~ÇàìëíãÉåí=äÉîÉêcáÖìêÉ=PÄqÜÉ=ïçêâáåÖ=ÇÉéíÜ=ãìëí=ÄÉ=ëÉí=ÅçêêÉÅíäó=ÄÉÑçêÉ=íÜÉ=ìåáí=áë=ìëÉÇ=Ñçê=íÜÉ=Ñáêëí=íáãÉK=qÜÉ=ÜÉáÖÜí=~ÇàìëíãÉåí=äÉîÉê=ã~ó=ÄÉ=ãçîÉÇ=íç=íÜÉ=Ñáêëí=ïçêâáåÖ=ÇÉéíÜ=ëÉííáåÖ=çåäó=E_I=Ñáêëí=åçíÅÜFK
Information on all typesWear on the blades will make it necessary to re-adjust the depth of cut at a later date. An optimum working depth is obtained when the blades of the cutter are inserted 2–3 mm into the ground. If the working depth is too deep, this can overload the scarifier and cause damage. Ensure that the depth of cut setting is correct.
Figure 3a Unscrew wheels (A) and move
to the appropriate height setting. Screw on wheels tightly.
orFigure 3b Set height adjustment lever
(depending on model) according to the wear on the blades. Settings C, D, E are not required until the blades are worn. Depending on the degree of wear, gradually set the blades lower, starting at C.
3. Power cordFigure 4 Attach power cord to the cord
grip. First plug the mains plug into the
switch/plug combination on the unit and then into a 230 V socket.
4. Starting the engine
a~åÖÉêhÉÉé=Ü~åÇë=~åÇ=ÑÉÉí=ïÉää=~ï~ó=Ñêçã=íÜÉ=ÅìííáåÖ=Ää~ÇÉKFigure 5 Keep the appliance on an even
surface with little or the shortest possible grass.
Tilt the unit backwards slightly until the front wheels are off the ground (Fig. 5a) or move the height adjustment lever to position A to prevent the blade shaft from touching the ground (Fig. 5b).
Press and hold down the locking button (Fig. 5c).
Pull and hold the switch lever, release the locking button (Fig. 5c).
Slowly lower the front of the unit until the front wheels are touching the ground again or move the height adjustment lever (depen-ding on model) forwards to the first working depth setting (B, first notch) (Fig. 5b).
NoteWhen the cutter deck is in contact with the ground, the unit can move.
5. Stopping the engine Release switch lever (Fig. 8a).The motor and the cutter deck stop after a short time.
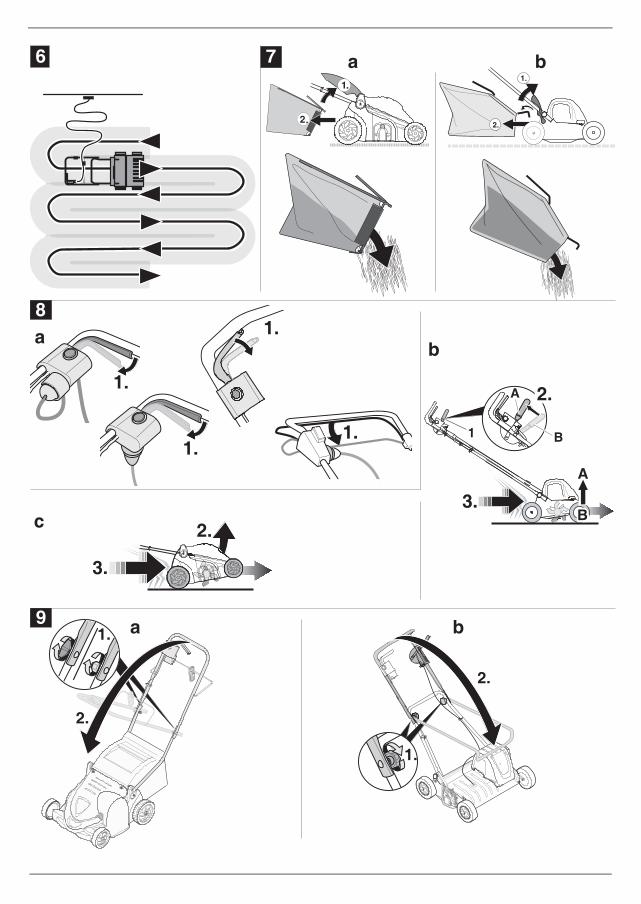
6. ScarificationFigure 6 Start the engine as indicated. Push the scarifier along parallel
strips of the lawn. Place the power cord in large
loops on the ground.
7. Detaching and emptying the grass sack(Optional, depending on model)
Figure 7 Release switch lever and wait until
the motor stops. Lift the deflector flap and unhook
the grass sack. Empty out the contents.
8. Working without the grass sack
Whenever you detach the grass sack, the deflector flap drops down. When scarifying without the grass sack attached, the cuttings are ejected straight onto the ground.
9. After finishing work Stopping the engine. Pull the mains plug out of the unit
and the socket. Empty grass catcher. Leave the motor to cool down
(approx. 30 minutes) before cleaning, servicing, storing or shutting down the unit.
About aeration
In order that a healthy lawn can develop in the spring, it is necessary for greater amounts of air to pene-trate the area around the roots of the grass. During this period the lawn must be scarified more frequently than in the summer.
!

English Operating instructions – Scarifier with electric motor
8
Scarify the lawn– more frequently in the spring,– when required in the summer,– more frequently in the summer
as well if the lawn has large areas of shade.
Only scarify the lawn when the grass height is less than 4 cm. If the grass has exceeded this length, the lawn should be mown before it is aerated.Apply fertiliser to the areas that have been scarified and water it in, so that fresh grass can grow more quickly.
Transporting the appliance
`~ìíáçåqÜÉ=ÅìííáåÖ=Ää~ÇÉë=~åÇ=íÜÉ=ìåáí=~ë=~ ïÜçäÉ=ÅçìäÇ=ÄÉ=Ç~ã~ÖÉÇ=áÑ=íÜÉ=ëÅ~êáÑáÉê=áë=ïÜÉÉäÉÇ=çîÉê=~=Ü~êÇ=ëìêÑ~ÅÉI=Ñçê=Éñ~ãéäÉI=ïáíÜ=íÜÉ=ÉåÖáåÉ=ëïáíÅÜÉÇ=çÑÑK=^îçáÇ=ÄêáåÖáåÖ=íÜÉ=ÅìííÉê=ÇÉÅâ=áåíç=Åçåí~Åí=ïáíÜ=íÜÉ=ÖêçìåÇK=^äï~óë=ÖìáÇÉ=íÜÉ=ìåáí=áå=~ íáäíÉÇ=éçëáíáçå=~åÇ=çåäó=çå=íÜÉ=êÉ~ê=ïÜÉÉäë=(Fig. 8c)=çê=ãçîÉ=íÜÉ=ÜÉáÖÜí=~ÇàìëíãÉåí=äÉîÉê=íç=éçëáíáçå=A=íç=éêÉîÉåí=íÜÉ=Ää~ÇÉ=ëÜ~Ñí=Ñêçã=íçìÅÜáåÖ=íÜÉ=ÖêçìåÇ=(Fig. 8b)K=kÉîÉê äáÑí=çê=Å~êêó=íÜÉ=ìåáí=ïáíÜçìí=Ñáêëí=éìääáåÖ=çìí=íÜÉ=ã~áåë=éäìÖK
Short distances by hand Stopping the engine. Tilt the unit backwards slightly
until the front wheels are off the ground (Fig. 8c) or move the height adjustment lever to position A to prevent the blade shaft from touching the ground (Fig. 8b).
Push the scarifier.
When using a vehicle
`~ìíáçåÓ tÜÉå=íê~åëéçêíáåÖ=íÜÉ=ëÅ~êáÑáÉê=áå=çê=çå=~=îÉÜáÅäÉI=ÉåëìêÉ=íÜ~í=áí=ÇçÉë=åçí=ãçîÉ=~êçìåÇ=ìåáåíÉåíáçå~ääóK
Ó aç=åçí=ïÉÇÖÉ=çê=âáåâ=íÜÉ=éçïÉê=ÅçêÇ=ÄÉíïÉÉå=íÜÉ=ãçíçê=~åÇ=ëïáíÅÜLéäìÖ=ÅçãÄáå~íáçåK
Figure 9 The steering handle can be folded
down to facilitate storage.
Servicing/cleaning
a~åÖÉêqç=éêçíÉÅí=~Ö~áåëí=áåàìêó=ÄÉÑçêÉ=~ää ïçêâ=çå=íÜÉ=~ééäá~åÅÉÓ ëïáíÅÜ=lcc=íÜÉ=ÉåÖáåÉIÓ ï~áí=ìåíáä=~ää=êçí~íáåÖ=é~êíë=Ü~îÉ=ÅçãÉ=íç=~=ëí~åÇëíáääI
Ó éìää=çìí=íÜÉ=ã~áåë=éäìÖIÓ äÉ~îÉ=íÜÉ=ãçíçê=íç=Åççä=Ççïå=E~ééêçñK=PM=ãáåìíÉëFK
Servicing
a~åÖÉê
qç=éêçíÉÅí=~Ö~áåëí=áåàìêó=Ñêçã=íÜÉ=ÅìííÉêëI=Ü~îÉ=~=ëéÉÅá~äáëí=Ö~ê~ÖÉ=éÉêÑçêã=~ää=ïçêâ=ëìÅÜ=~ë=êÉéä~ÅáåÖ=çê=êÉÖêáåÇáåÖ=íÜÉ=ÅìííÉêë=EëéÉÅá~ä=íççäë=êÉèìáêÉÇFKoÉéä~ÅÉ=~=ÄêáííäÉ=çê=Ç~ã~ÖÉÇ=éçïÉê=ÅçêÇK
Once a season Lubricate the joints and twist
springs on the deflector flap. At the end of the season the
appliance must be checked and serviced at a specialist garage.
Cleaning
`~ìíáçåÓ aç=åçí=ëéä~ëÜ=íÜÉ=ìåáí=ïáíÜ=ï~íÉêI=çíÜÉêïáëÉ=ÉäÉÅíêáÅ=ÅçãéçåÉåíë=ã~ó=ÄÉ=Ç~ã~ÖÉÇK
Ó `äÉ~å=íÜÉ=~ééäá~åÅÉ=~ÑíÉê=ÉîÉêó=ìëÉK=^=ìåáí=ïÜáÅÜ=áë=åçí=ÅäÉ~åÉÇ=ïáää=êÉëìäí=áå=Ç~ã~ÖÉÇ=ã~íÉêá~äë=~åÇ=áãé~áêÉÇ=ÑìåÅíáçåK
Cleaning the scarifier
a~åÖÉêtçêâ=çå=íÜÉ=ÅìííÉêë=Å~å=Å~ìëÉ=áåàìêóK=tÉ~ê=ë~ÑÉíó=ÖäçîÉë=Ñçê=óçìê=éêçíÉÅíáçåKWhenever possible, clean the lawn scarifier straight after you have finished working on the lawn.– Always park the unit on solid
ground and secure to prevent it from rolling away.
– Tilt the unit forwards.
– Clean the cutter chamber and the ejector cover with brush, hand broom, or cloth.
– Stand the scarifier on its wheels again, and remove any remaining grass cuttings or dirt that can still be seen.
Cleaning the grass sackThe best method is to clean the grass sack straight after you have finished scarifying.– Detach and empty the grass sack.– The grass catcher may be
cleaned with a powerful jet of water from the garden hose.
– Allow the grass sack to dry out thoroughly before using it again.
Laying up the vehicle
`~ìíáçåa~ã~ÖÉ=íç=~ééäá~åÅÉ=ã~íÉêá~äëK=píçêÉ=íÜÉ=ìåáí=áå=~=ÅäÉ~å=~åÇ=Çêó=êççã=çåäóK=aìêáåÖ=éêçäçåÖÉÇ=ëíçê~ÖÉI=ÉKÖK=áå=ïáåíÉêI=ÉåëìêÉ=íÜ~í=íÜÉ=ìåáí=áë=éêçíÉÅíÉÇ=~Ö~áåëí=êìëíKAt the end of the season or when the vehicle will not be used for longer than a month. Clean the scarifier and the grass
sack. To protect metal parts from rust,
wipe them all down with an oiled cloth (resin-free oil) or apply an oil spray.
Fold down the handle and store the unit in a suitable room.
Warranty
The warranty regulations issued by our company or the importer are valid in all countries. As part of the warranty, we remedy malfunctions on your appliance free of charge provided that this malfunction is caused by a material or manufac-turing defect. In the event of a warranty claim, please turn to your dealer or the nearest branch office.
!
!
!

Operating instructions – Scarifier with electric motor English
9
Identifying and eliminating malfunctions
Malfunctions that occur during the operation of your appliance often have simple causes that you should know and be able to repair on your own. In cases of doubt your specialised garage will be pleased to assist you further.
Problem Possible cause(s) Remedial action
Motor does not start Household fuse overloaded Switch on fuse; if required increase the house-hold connection fuse or have one installed by a specialist.
Power cord not connected or defective
Check and plug in power cord; if required replace or have it repaired by a specialist
Switch/plug combination defective
Have it repaired by a specialist company
Motor is humming, but not running
Aerator in operating position Place aerator on a surface with short grass; to do this, tilt the unit backwards while starting it until both front wheels are off the ground
Cutter deck blocked Pull out mains plug, remove blockage
Motor suddenly stops Plug has become loose Check power cord, ensure that it is attached to the cord grip, insert plug again
Overload protection has switched off
Pull out mains plug, remove blockage in the discharge, wait approx. 10 min., switch on again
Unusual noises (jangling, rattling, clattering)
Bolts, nuts or other mounting parts slack
Tighten parts; if the noises persist: contact a specialist company
Jolting, vibrations Cutter deck damaged, twisted Switch off motor immediately. Have cutting blades replaced in a specialist workshop
Engine attachment slack Switch off motor immediately. Engine must be secured at specialist garage
Motor speed drops off Depth of cut too great Select recommended working depth
Grass too high Mow the lawn before scarifying
Ejector channel blocked Pull out mains plug, remove blockage
Poor scarification results Depth of cut too small Set to greater depth of cut
Worn cutting blades Have cutting blades replaced in a specialist workshop
Scarified material is not being picked upGrass catcher is not filling up
Grass catcher is full, clogged Switch off aerator, empty grass catcher or clean air slots in the grass catcher
Ejector channel blocked Pull out mains plug, remove blockage