page 1 of 24 last revised - monday, may 12, 2003 utah ... · pdf filefile naming conventions...
TRANSCRIPT
Page 1 of 24
General Guidelines for Electronic Permitting and Document Conversion
Last Revised - Monday, May 12, 2003
Utah Division of Oil, Gas and Mining
Contents
Introduction ..................................................................................................................... 2
Electronic Document Standards...................................................................................... 3
Formatting Documents for Utility and Ease of Use.......................................................... 5
Document Organization for Submittal.............................................................................. 6
Printing PDF Documents from Word Processors .......................................................... 10
Document Conversion Using Adobe Acrobat ................................................................ 11
Converting Paper Documents to PDF ........................................................................... 16
Scanned Images and Estimating File Size .................................................................... 21
Image Resolution .......................................................................................................... 23
Page 2 of 24
Introduction
This paper presents suggestions for preparing and submitting documents in an
electronic format. Methodologies and software applications used for document
preparation and conversion are numerous and can vary widely in cost, hardware
requirements, and operating systems that may be available to you. Suggestions made
in this paper are based on experience with the hardware and software that the Division
of Oil, Gas and Mining are currently using. These suggestions should not be
considered as an endorsement for any particular hardware, operating system or
software application.
Page 3 of 24
Electronic Document Standards
While the Acrobat Portable Document File (PDF) format is not perfect, it is rapidly
becoming the most accepted format for electronic document conversion and storage.
The Division will accept Adobe PDF files as an electronic submittal standard for permit
applications, changes and other permit-related information.
There are several pending questions regarding how to submit documents in electronic
format while meeting regulatory requirements. Examples of such documents include
signed permits, affidavits, and design certifications. In cases where a photocopy of a
document meets such requirements, a digital image of the document in the form of a
PDF file is considered similar to such a photocopy and will be accepted. In cases
where an original signed document must be provided, the original signed paper
document must be provided and kept on file at the Division. Hopefully, as electronic
permitting and documentation evolve, methods for providing electronic signatures and
authentication will be incorporated into the process.
Currently, the Division will require that a minimum of one copy of each submittal be
provided in paper form. All additional copies of the submittal can be provided in
electronic format.
Having information provided in PDF format provides the opportunity to submit the
information in a manner that is reproducible in a line-for-line, page-for-page manner
regardless of the computer, operating system or the printer that is being used to
reproduce the pages in the document. PDF has the advantage accomplishing this.
Even word processing documents format and paginate differently depending on the
computer being used, software version, and the printer being selected. The concept
here is to have an “electronic photocopy” of the document that can always be printed to
represent the original document.
In addition to providing documents in PDF format, it is also recommended that copies of
the documents in their ‘native’ format also be provided. This can assist in completion of

Page 4 of 24
the review process by allowing the Division to utilize such files in the preparation of
review and findings documents. This is especially true with maps, spreadsheets, and
other specialized programs where the data from that application may be directly
incorporated into review and findings documents. A map provided as a PDF file does
not afford the opportunity to verify acreages, or to copy layers from that drawing into a
map generated by the Division while an AutoCAD version of that same drawing would.
Due to the variation and nature of word processors and conversion of documents into PDF form, it is strongly recommended that documents be converted into the PDF format and then printed from the PDF file. This will provide a means for reproducing printed
copies of the documents without the possibility of repagination, reformatting or other
problems that may have changed the document in converting it from a word processing
document to a PDF file. The same theory applies to all other applications in which PDF
files are to be generated for submittal.
Page 5 of 24
Formatting Documents for Utility and Ease of Use
Because a mining and reclamation plan is a large and complex document, developing a
strategy for its creation is essential. Avoid making extremely long documents or
complex documents with numerous font changes, embedded tables or images, or
having a page numbering scheme that requires regenerating the entire plan each time a
change is made to the plan.
Keep the text simple. Create tables, exhibits, etc. as separate documents. Reference
the tables and exhibits within the body of the text and then place them physically at the
end of text document. Example: Chapter 1 would consist of the main text document,
followed by the tables, then the exhibits, then the maps, etc.
Create a Table of Contents for the entire plan in standard outline form, and, after the
last page of the Table of Contents, add title and separator pages for each item to be
incorporated into the plan. Each separator page should contain the title of the following
document, the file name of the document to be inserted behind the separator page and
the document date. The Table of Contents and the separator pages can then be printed
on colored paper. The rest of the documents can then be printed on plain paper and
inserted between the separator pages thus keeping the entire plan in order.
Page 6 of 24
Document Organization for Submittal
Maintaining a chronology of information submitted to the Division for review can play a
critical role in ensuring that such information in complete and current. One of the
easiest methods to accomplish this is to utilize a root directory for each submittal based
on the date that the information is provided. Beneath the document date directory, the
submittal can be further divided into subdirectories for organizational purposes.
File naming conventions should be kept simple and file extensions must conform to the
default extensions that are used as the default for the software application. Do not
change or rename file extensions as they may render the file unreadable or unusable.
Here is a list of some of the more common file extensions for reference:
.aif .aiff Audio file
.arj File archiving
.au Audio file
.avi Video file
.bat Batch file
.bmp Windows bitmap graphics format
.doc Microsoft Word or WordPerfect document format
.dot Microsoft Word template format
.dwg AutoCAD Drawing File
.exe Executable file
.gif Graphical Interchange Format (best for line drawings,
few colors)
.gz, .gzip Compression format
.hqx Macintosh BinHex compression format
.htm, .html HyperText Markup Language
.ins Inspiration
.jpg or .jpeg Joint Photographic Experts Group (works well
with photographs and artwork)
.js JavaScript
.lha File compression format
.midi Audio file
.mov QuickTime movie
.mp3 Audio file
.mpg, .mpeg Audio and video formats
.pdf Portable Document Format
.pict Graphics format for pictures on Macintosh
.pl Perl Script
.ppt PowerPoint presentation
.ps PostScript file
.ra, .ram Real Audio formats
.rtf Rich Text Format (keeps some formatting)
.sgml Standard Generalizable Markup Language
.shw Core Presentation
.sit Stuffed file
.stk HyperStudio stack
.tif, .tiff Graphics file
.txt, .text ASCII or Simple Text format (no formatting)
.vrml Virtual Reality Markup Language
.wav Audio file
.wpd WordPerfect Document
.zip PkZip compression format
When files are to be provided in different formats, each file should have the same name
and should have the appropriate extension for that application. Example:
Page 7 of 24
“Chapter01.doc” would be the Microsoft Word version and “Chapter01.pdf” would be the
Adobe Acrobat Portable Document Format of the same information.
When choosing filenames, use only alphanumeric characters (A thru Z, a thru z, and 0
thru 9). Do not use spaces in filenames (use “MyFile.doc” not “My File.doc”), and do not
use math or other iconic symbols in the file name (don’t use #, @, -, +, ~, %, etc.).
Blank spaces and other symbols in file names can create problems in opening and
linking documents, and in copying or backing up files and should be avoided. It is also
a good idea to use leading zeroes when using a numbering scheme to keep the
documents in normal order when viewing or listing documents by name:
Without leading zeroes: With leading zeroes:
Chapter1.doc Chapter01.doc
Chapter11.doc Chapter02.doc
Chpater12.doc Chapter03.doc
Chapter2.doc Chapter04.doc
Chapter21.doc …
Chapter3.doc Chapter11.doc
Chapter4.doc Chapter12.doc
At a minimum, each file should have a PDF file and optionally, it’s corresponding ‘native’
file. In the event that an explanation for information found on the disk is necessary, a
“readme.txt” file can be used to provide such information. A “readme.txt” file can also
be added under each subdirectory when necessary to further explain special
considerations with files in that particular section. An example of this would be if a
specific version of AutoCAD were used to make the .dwg files and if a special plotter
configuration file (.pc3) would need to be used to print the drawing colors correctly.
Likewise, special fonts or graphics may be necessary to reproduce a document and
they could be provided with special instructions in the “readme.txt” file.
Page 8 of 24
When making subdirectories, include a “Redline” directory to locate the proposed
redline-strikeout versions of documents when necessary. Other directories should
contain “final” versions of the documents so that upon approval, clean copies of the
documents are not needed.
By providing a complete and final version of the entire plan on each submittal,
information does not become separated in the plan nor does the reviewer need to worry
about having the most current information for review. Having the information submitted
with a root document date directory allows for ease in referring to prior submittals and
comparing earlier versions of the plan to be compared as part of the review procedure.
Also, keeping a complete master of the entire permit document under a single
document date directory makes updating and revising the plan more straightforward.
When a change to the plan is contemplated, the entire directory and subdirectory can
be copied to a new documents date directory where all the changes and updates can be
made within that new directory without fear of writing over the original copy of the
previously approved plan.
If more that one proposed change to the plan is in process, the document date directory
for each proposed change can be maintained with submittal.
Page 9 of 24
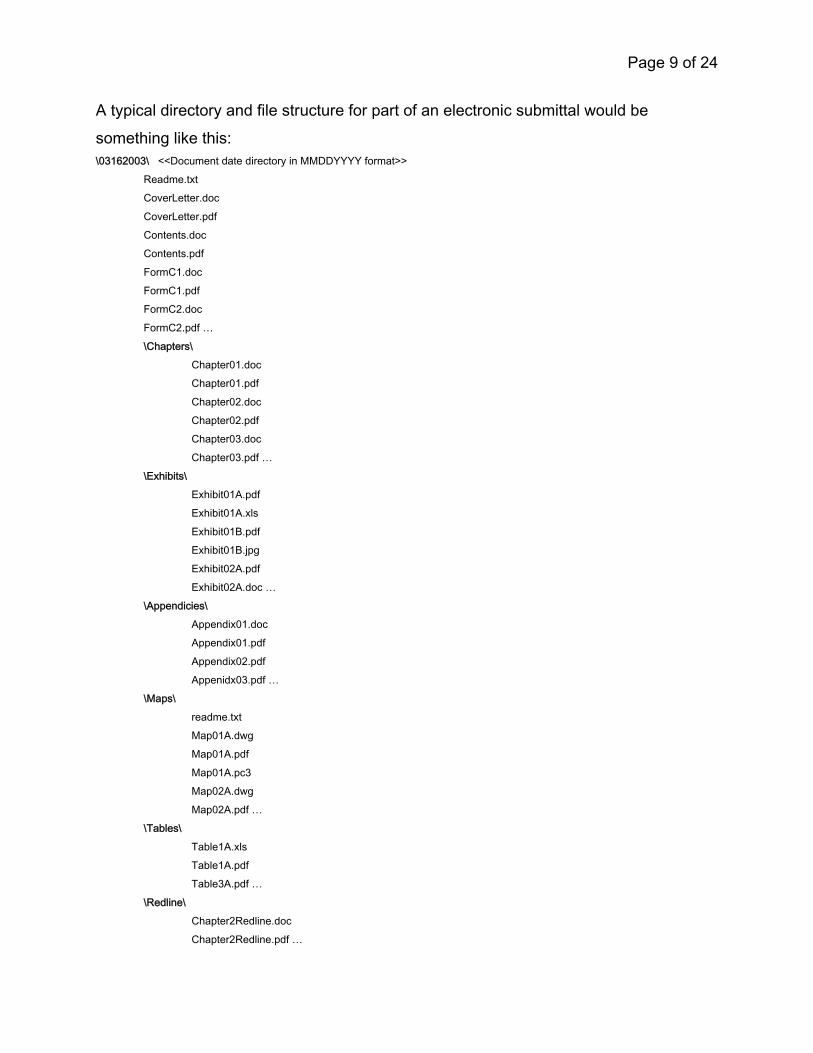
A typical directory and file structure for part of an electronic submittal would be
something like this: \03162003\ <<Document date directory in MMDDYYYY format>>
Readme.txt
CoverLetter.doc
CoverLetter.pdf
Contents.doc
Contents.pdf
FormC1.doc
FormC1.pdf
FormC2.doc
FormC2.pdf …
\Chapters\
Chapter01.doc
Chapter01.pdf
Chapter02.doc
Chapter02.pdf
Chapter03.doc
Chapter03.pdf …
\Exhibits\
Exhibit01A.pdf
Exhibit01A.xls
Exhibit01B.pdf
Exhibit01B.jpg
Exhibit02A.pdf
Exhibit02A.doc …
\Appendicies\
Appendix01.doc
Appendix01.pdf
Appendix02.pdf
Appenidx03.pdf …
\Maps\
readme.txt
Map01A.dwg
Map01A.pdf
Map01A.pc3
Map02A.dwg
Map02A.pdf …
\Tables\
Table1A.xls
Table1A.pdf
Table3A.pdf …
\Redline\
Chapter2Redline.doc
Chapter2Redline.pdf …
Page 10 of 24
Printing PDF Documents from Word Processors
In recent years, the Portable Document Format has provided nearly all computer users
a medium that allows anyone to break free of the confines of proprietary file formats and
operating systems. Despite its popularity, universality, and ease of use, PDF finds itself
at odds with word processors much more often than it should, or needs to.
It's important to realize that computer hardware and software come with built-in
limitations, and the sooner you learn to design your workflows to accommodate these
limitations, the sooner you'll be able to produce professional PDF documents from your
word processor files.
The ideal would be to have your word processor write PDF directly, and hopefully this
will be a possibility before too long. But as the situation presently stands, most, if not all,
word processors must use an indirect method to produce PDF. There are many tools
available, such as Ghostscript, and a variety of scripts and standalone converters in
addition to the tools and methods available with Adobe Acrobat.
Just as you shouldn't design a one-page business letter the same way you would
design a 300-page book, you also shouldn't design a file designated for PDF output the
same way you would design standard office documents intended to be printed with
desktop printers.
It's not up to PDF to determine where a page should end or where a line of text should
wrap. That is the job of the person designing a document with a word processor, plain
and simple. Those in the DTP business have learned this hard lesson long ago, and it
applies to everyone who wants to produce PDF files.
Page 11 of 24
Document Conversion Using Adobe Acrobat
There are two versions of Adobe's PDF software that offer different features. Depending
on the type of document or need, one version might be preferable to another. While
Adobe offers its Acrobat "reader" for free, it charges for the programs that "create" PDF
files. Adobe Acrobat must be purchased in order to convert documents. The retail price
for Adobe Acrobat 5.0 is $249.00 and a new version 6.0 is about $449 for the
Professional version, which can be used to make documents and forms.
The Adobe Acrobat PDFWriter is the basic version of Adobe's software for converting
documents into PDF files and comes packaged as a "custom install" when loading
Adobe Acrobat 5.0. Choose "Acrobat PDFWriter" in the pull-down menu for the printer
"Name" in the print window (i.e., select "File Menu, Print" or types "Ctrl + P").
PDFWriter creates acceptable electronic images for most text applications and usually
reduces the file size compared to the source document. For example, a 10-page Word
document of 600 KB might result in a 300 KB PDF file. Thus, you get not only the
benefit of a sanitized document, but also a smaller file that is easier to e-mail as an
attachment to recipients with slow connections or that use a service provider that limits
size of attachments it will route.
On the other hand, PDFWriter will sometimes perform some hocus pocus on the
spacing of a document or repaginate it so as to create artifacts or change the layout. It
also does not convert very well detailed graphics, photographs, line art, or shaded
images. Do not use PDFWriter for files that contain Encapsulated PostScript ("EPS")
graphics. The result would look extremely pixilated or badly bitmapped.
PDFWriter acts as a printer driver that converts operating system graphics and text
commands into PDF code, and then assembles it into a PDF file. Because of its
dependence on the operating system, PDFWriter is also subject to their limitations. In
Page 12 of 24
other words, if Microsoft’s software introduces limitations or errors, then all PDFWriter
can do is pass along these errors to PDF.
PDFWriter is best for simple text documents that do not contain graphics or when
memory (RAM or disk space) is limited. It is also good to use when a document must be
delivered via email over the Internet. I would recommend custom installing it on your
computer along with Distiller. Distiller is preferable, however, when the quality of the
image is critical, such as for high-end printing or when documents are graphics-
intensive or contain photographs.
The Adobe Acrobat Distiller is the higher-end version of Adobe's PDF software installed
by default with Adobe Acrobat 5.0 and is accessed in the same manner as PDFWriter
(except that you would choose "Acrobat Distiller" in the print window). It can also
convert text documents, but is optimized to handle graphics-intensive documents, such
as those created with programs like PageMaker, AutoCAD, ArcView/GIS, QuarkXPress,
FrameMaker, Illustrator, FreeHand, CorelDraw or even Photoshop. This is because
Distiller includes additional options not available with PDFWriter that allow users to
control more precisely the resolution, compression, colors, and formatting of
documents.
Distiller operates somewhat more slowly than PDFWriter and requires a lot of RAM,
especially for large documents. Moreover, in some modes, Distiller creates much larger
files; unless the user changes the resolution settings, the same 10-page document that
was 300 KB when converted using PDFWriter could be over a 1000 KB (or 1MB) when
using Distiller. You may want to try several different settings within the Distiller to
balance resolution and graphics quality, especially when generating maps and drawings
from applications like AutoCAD and ArcGIS. As a general rule of thumb, you can use
the Distiller’s default “Print” quality for regular documents and the “Press” quality for
Maps. The higher resolution in the “Press” settings makes the PDF version of the map
much easier to read when zooming in or making an enlarged print of the drawing.
Page 13 of 24
The Distiller also has a limit as to the paper size that can be generated of 44 inches x
44 inches. If your original drawings are larger than this, you may want to half the scale
of the drawing.
When using Microsoft Office, a plug-in is installed from Acrobat to Distill documents. If
you are using Microsoft Office (Word, Excel, or PowerPoint), use the plug-in that
appears as an Adobe icon on the toolbar. This method seems to provide good results
for the Microsoft Office products.
Corel WordPerfect seems to work best using the PDFWriter. Select the PDFWriter as
your default printer before your finalize and print your document. Many documents
created in WordPerfect have proprietary fonts that require font substitution in order to
create a PDF file. Worse yet, some of the fonts in WordPerfect are proprietary and
cannot be embedded in an Acrobat PDF file. If you open a PDF file that was converted
from a document with these fonts, you will get an error message stating that the font
was unavailable and that the substituted font may not display correctly. Corel has
acknowledged this problem and has provided replacement fonts for some of the more
common ones used in WordPerfect.
These updated fonts will allow Adobe Acrobat to embed these fonts into PDF's. To
install these files, download them from Corel and extract these files to a temporary
directory. Launch the Windows Font Utility within the Control Panel to add these fonts
to your Operating System. It may be necessary to uninstall (delete) the previous
versions of these fonts prior to installing the new versions.
Word processors can reformat a document every time you change your printer driver.
This is done so the document will conform to the limitations of your printer. PDFWriter
and Distiller have their own specific limitations; therefore you should be choosing
PDFWriter or Distiller as your printer driver before you start creating your document.
Page 14 of 24
If you have an existing document, then open and review your documents with PDFWriter or Distiller as your printer driver BEFORE printing them to PDF. This is a
long established standard word processing procedure. Because of the default way in
which word processors apply text and graphics to a page, repagination and text
wrapping can be serious problems.
Without a long explanation about the inner workings of word processors, here are a few
things to consider when designing documents destined for output to PDF:
• Use Postscript Type 1 fonts, and Distiller. This provides a more robust set of
tools.
• IF you MUST use PDFWriter, use True type fonts.
• Place all graphics in boxes or frames (this will help eliminate some graphics
problems).
• Place all your text in text boxes (this will help eliminate most text wrapping and
word shifts).
• Avoid any and all use of Object Linking and Embedding (OLE) in your original
source application or word processing document. Don't create links; don't embed
anything (this is a complex issue and OLE's dependence on other applications
can wreak havoc with graphics and specially formatted text).
• Break up very long documents into shorter documents (one chapter per
document is a common method).
• Avoid using the clipboard for bringing graphics and formatted text into your
document.
If you have DTP (desktop publishing) experience, you will quickly realize that making
your word processor function more like a desktop publishing application will eliminate
many of the problems you may encounter in producing PDF documents. By making
your word processor imitate a DTP application, you are bringing it one big step closer to
the Postscript standard, which in turn is much more likely to produce high quality PDF
documents.
Page 15 of 24
Keep your word processor documents as simple and short as possible. For long,
complex, and graphics rich documents, you are well advised to use a DTP package
such as Ventura, FrameMaker, PageMaker, Quark, or Canvas. These are Postscript
oriented applications that can make full use of all the features and power that Postscript
and PDF have to offer. These applications are not the least bit intimidated by the things
that can bring even the most powerful word processors to their knees.
Page 16 of 24
Converting Paper Documents to PDF
Adobe Acrobat can be used to acquire scanned images. Alternately, several other
document scanning software applications are available which can enable the user to
create PDF files, or convert the scanned image to other formats using Optical Character
Recognition (OCR). One of the more popular, and least expensive of these applications
is Omni Page Pro. (Comments below are based on Omni Page Pro 12.)
Image files can have a resolution up to 600 dpi, but 300 dpi is recommended for best
OCR results. OmniPage Pro stores black-and-white images at their original resolutions
and grayscale and color images at not more than 150 dpi. You cannot save original
images to PDF format using OmniPage Pro, but you can save recognition results to four
variants of PDF; all of these save the recognition results as viewable pages.
Adobe Acrobat can save original images to PDF format without using OCR and at the
original resolution settings of the scanner, but doing so results in ‘dumb’ images without
selectable or searchable text and, if scanned at a high resolution (like 600 dpi) and in
color, the document size will be huge (~20 MB per page). In order to capture pages
(perform OCR) in Adobe Acrobat, a plug-in has to be downloaded and installed from the
Adobe web site. The Acrobat Capture plug-in has a 50-page limit so documents must
be broken up into increments to perform OCR conversion.
Scanning at a higher resolution often does not yield better results. In addition to
creating huge files, the documents load more slowly, may crash when trying to
repurpose them using OCR software, and may print/view poorly because the image
needs to be down-sampled to match printer resolution or screen resolution which are
usually 150 dpi and 72 dpi respectively.
The best overall results for scanning, OCR recognition and PDF conversion were
produced using OmniPage Pro rather than Adobe Acrobat 5.0. The OCR accuracy was
Page 17 of 24
much better using OmniPage. Color and grayscale images are automatically down
sampled to 150 dpi, which provided optimal results considering file size, viewing and
printing of the PDF documents.
The best scanner settings were found to be 300 dpi for black and white documents, and
200 dpi for color or grayscale documents. Black and white scanning should be used
whenever possible to improve OCR accuracy and to produce significantly smaller
documents in size. While color or grayscale scanning produce ‘warmer’ images that are
easier to view on the screen, they cannot produce the OCR accuracy of black and white
images, and the files are 10-20 times larger in size.
It is highly recommended that several tests be performed using different software and
different hardware and software settings to determine the best overall results for your
equipment before you plan on scanning and converting a large number of documents.
The experience for testing and evaluating the scanning and document conversion
process can save you a tremendous amount of time and disk space.
Saving documents with the ‘image on text’ option for PDF files allows the opportunity
utilize the OCR technology for searching and copying text from a scanned document
while preserving the look of the original document. This method works best where the
accuracy of the text does not have to be perfect and the document is static and does
not require future editing or changes. If the objective of OCR is to capture a scanned
document for re-writing and editing the document, then converting the OCR test to a
compatible word processing application would be a better choice than PDF. This
method however requires significant editing of the text and reformatting of the document
to render its appearance in a manner that is suitable for republishing the document.

Page 18 of 24
OmniPage Pro can open and save these image file types:
File Type: Multi-page: Open/Save B/W, Gray, Color
Bitmap (*.bmp) No Open and Save All
DCX (*.dcx) Yes Open and Save All
GIF (*.gif) No Open and Save All
JPEG (*.jpg) No Open and Save Gray, Color
PCX (*.pcx) No Open and Save All
PDF (*.pdf) Yes Open and Save All
PNG (*.png) No Open and Save All
TIFF compressed G3/G4 (*.tif) Yes Open and Save Black-and-white
TIFF compressed LZW (*.tif) Yes Open and Save All
TIFF FX (*.xif) Yes Open All
TIFF PackBits (*.tif) Yes Open and Save All
TIFF uncompressed (*.tif) Yes Open and Save All
Page 19 of 24
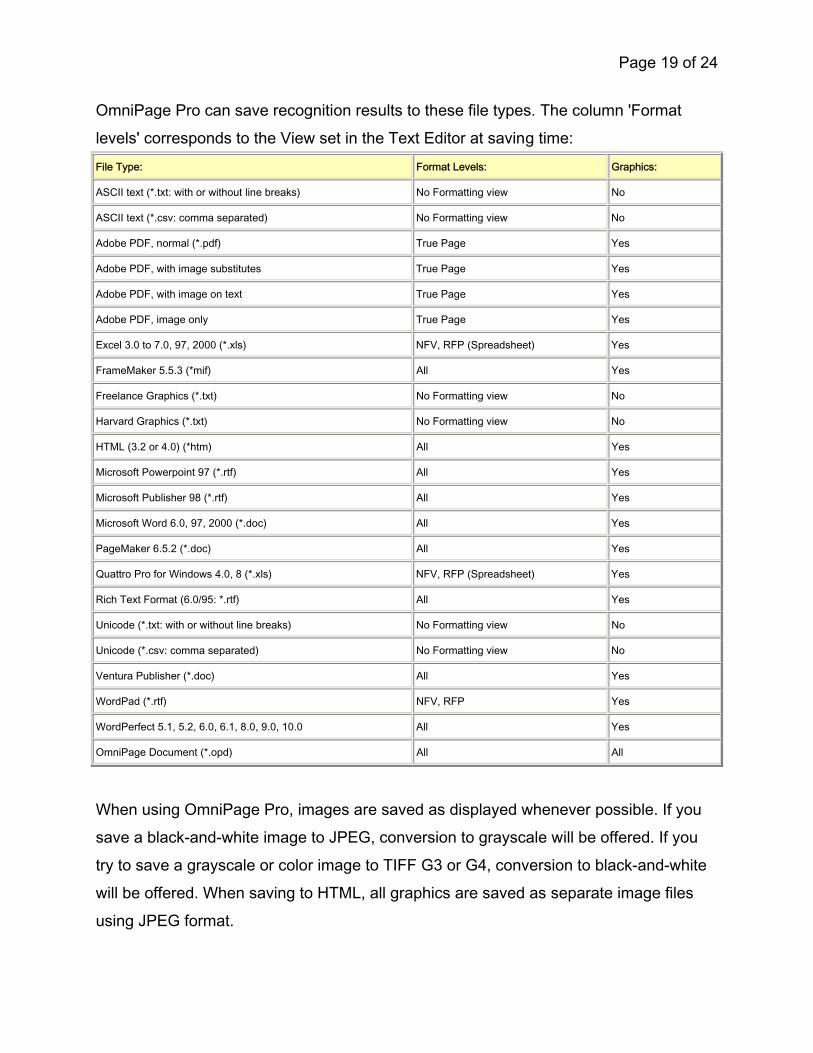
OmniPage Pro can save recognition results to these file types. The column 'Format
levels' corresponds to the View set in the Text Editor at saving time: File Type: Format Levels: Graphics:
ASCII text (*.txt: with or without line breaks) No Formatting view No
ASCII text (*.csv: comma separated) No Formatting view No
Adobe PDF, normal (*.pdf) True Page Yes
Adobe PDF, with image substitutes True Page Yes
Adobe PDF, with image on text True Page Yes
Adobe PDF, image only True Page Yes
Excel 3.0 to 7.0, 97, 2000 (*.xls) NFV, RFP (Spreadsheet) Yes
FrameMaker 5.5.3 (*mif) All Yes
Freelance Graphics (*.txt) No Formatting view No
Harvard Graphics (*.txt) No Formatting view No
HTML (3.2 or 4.0) (*htm) All Yes
Microsoft Powerpoint 97 (*.rtf) All Yes
Microsoft Publisher 98 (*.rtf) All Yes
Microsoft Word 6.0, 97, 2000 (*.doc) All Yes
PageMaker 6.5.2 (*.doc) All Yes
Quattro Pro for Windows 4.0, 8 (*.xls) NFV, RFP (Spreadsheet) Yes
Rich Text Format (6.0/95: *.rtf) All Yes
Unicode (*.txt: with or without line breaks) No Formatting view No
Unicode (*.csv: comma separated) No Formatting view No
Ventura Publisher (*.doc) All Yes
WordPad (*.rtf) NFV, RFP Yes
WordPerfect 5.1, 5.2, 6.0, 6.1, 8.0, 9.0, 10.0 All Yes
OmniPage Document (*.opd) All All
When using OmniPage Pro, images are saved as displayed whenever possible. If you
save a black-and-white image to JPEG, conversion to grayscale will be offered. If you
try to save a grayscale or color image to TIFF G3 or G4, conversion to black-and-white
will be offered. When saving to HTML, all graphics are saved as separate image files
using JPEG format.
Page 20 of 24
When using OmniPage Pro to produce PDF documents, select the Adobe PDF, with
image on text results format. The actual scanned image is preserved and is viewable in
the PDF document and the OCR text is embedded behind the image. This preserves
the scanned document to view and print as a photocopy of the document would and still
allows the text in the document to be selected, copied and searched within the
document. Preserving the image does make the document larger in size, but is
considered more than worthwhile in preserving the document as an archival electronic
copy.
Page 21 of 24
Scanned Images and Estimating File Size
The pixel (a word invented from "picture element") is the basic unit of programmable
color on a computer display or in a computer image. Think of it as a logical - rather than
a physical - unit. The physical size of a pixel depends on how you've set the resolution
for the display screen. Image size is sometimes expressed as dpi (dots per inch). Both
the physical size (length and width in inches) of the image and the resolution setting
(dots per inch) determine the total number of pixels.
Bit Depth is sometimes called ‘Pixel Depth’ or ‘Color Depth’. A pixel with a ‘bit depth’ of
1 has two possible values: black or white. A pixel with a ‘bit depth’ of 8 has 28, or 256
possible values. A pixel with a bit depth of 24 has 224, or approx. 16 million possible
values. The greater the ‘bit depth’ the finer the levels of change that can be recorded
so the higher fidelity the gradations of the image. Naturally the equipment to perform
this task this is more expensive and the resulting file size is correspondingly larger. As a
consequence more space is needed in the computer system to handle and store the
image. Depending upon scanning options, bit depth can be 24, 30, 36, 48 or even 64.
• A monochrome / black & white image uses one ‘byte’ per pixel (a ‘byte’ being 8
‘bits’).
• An 8 bit unit or a ‘byte’, as it is called, can store up to 256 levels of information. In
this way we can store up to 256 levels of brightness per pixel – which gives us an
‘8 bit grayscale’.
• A color image is made when each element of the ccd array, in the camera or
scanner, samples the level of a particular primary color - Red, Green or Blue
(RGB). The resultant sampling combines the information to create one full color
pixel. This full color pixel contains three bytes (each one 8mb in depth). Three
bytes per pixel (RGB) are needed so 8 x 3 = 24 bits. For a given area therefore, a
color image needs three times the number of bytes compared to its grayscale
equivalent. So at one byte per color, (remember, that’s 8 bits x 3 = 24 bits) we
Page 22 of 24
have what is termed ‘24 bit color’ and is the typical ‘bit depth’ for realistic images.
A 24 bit RGB image has 8 bits per pixel for each of the R, G and B channels.
Calculating File Size:
Multiply the total number of pixels by the number of 'bits' of color (usually 24) and divide
the result by 8 (because there are 8 'bits' in a 'byte').
Example:
An 8.5x11 inch page scanned at a resolution of 300 dpi contains –
(8.5in x 300dpi) x (11in x 300dpi) = 8,415,000 pixels
For a color image -
8,415,000 pixels x 24 bits per pixel (24 bit color depth) ÷ 8 bits per byte
= 25,245,000 bytes or 23.98 megabytes
For a grayscale image –
8,415,000 pixels x 8 bits per pixel (8 bit grayscale) ÷ 8 bits per byte
= 8,415,000 bytes or 8.03 megabytes
For a black & white image -
8,415,000 pixels x 1 bit per pixel (1 bit monochrome 8) ÷ 8 bits per byte
= 1,051,875 bytes or 1.00 megabytes
The above formula will provide a quick reference to estimating file size (and therefore a
guide to resolution). Note: the file format used to save the image information can
change the figure calculated but not by a vast amount. File size is based on an
uncompressed image (such as a .tif file). Files can of course be 'compressed'.
Compressing images can greatly reduce size without significant loss in image quality.
File compression models and results are not discussed in detail in this paper.
Page 23 of 24
Image Resolution
Scanning or printing a document at high-resolutions of 400 dpi, 600 dpi and even 1200
dpi is not necessarily a good idea just because your computer hardware and software
will let you do it. If you use the file sizing calculation previously discussed you will find
that the file size increases as the square of the resolution. If you double the scanning
resolution, you will increase the size of the file by four times, triple the resolution and the
file size increases by nine times. Some balance needs to be accomplished on image
resolution and the acceptable file size for each image.
A slide scanner can take a 35 mm slide and scan it at 4,000 dpi. At this resolution, the
image could be enlarged to a 24x36 inch print with minimal pixilation, but the size of the
image file would be about 52 mb. The question of course is, do you need to print out a
copy of a slide to that size?
At 'normal viewing distance', the human eye is capable of resolving separate details
about 1 minute of arc apart, which translates to around 180 lines per inch - which from
our point of view can further be translated into 180 pixels per inch. Images or
documents scanned at 200 dpi or greater, which are not enlarged when printing, should
be more than sufficient for printing documents at their original scale.
Viewing an image on a screen depends on the dot pitch of the monitor (usually .28 to
.23 mm spacing per dot, i.e. 90 to 110 screen dots per inch) and the screen resolution in
pixels (usually 800x600 pixels or 1024x768 pixels). Because the dot pitch for a given
monitor is fixed, setting the screen resolution determines how many dots on the screen
will be necessary to view each pixel. A 17-inch monitor with an average dot pitch would
have an optimal resolution of about 1600x1200 pixels to match one pixel for each dot on
the screen. For an image that was scanned at 300 dpi, the screen image would still be
3 times larger than original scanned image at that resolution.
Page 24 of 24
Screen resolution and settings are more often a function of user preference and the
capability of the monitor and video card rather than the resolution of the scanned image.
Most images that are used for web sites are down sampled to 72 dpi when sized for the
scale of the web page. Newspaper photographs are screened and printed at 80 dpi.
Having images at higher resolution available is only useful when zooming in on such an
image. Scanning or rendering an image at a higher resolution does not improve it’s
appearance at scale and may actually worsen the image’s appearance for certain
monitors and video cards.
The concept is similar with printing. For black and white documents, printing at a
resolution of 300 dpi is more than sufficient. More often, printing at 600 dpi or even
1200 dpi, just because the printer can, will yield a poorer printout that selecting 300 dpi
or even 150 dpi for the printer resolution. High-resolution color printing on the other
hand has much more to do with the ability to spray very small dots of different colors on
the page to represent each pixel of the color image. Still, the human eye can only
distinguish between different dots at resolutions less than 180 dpi at normal viewing so
high-resolution scanning once again becomes a necessity when enlarging images for
printing.