pain-free running: th ultimat guid overcomin n preventin
TRANSCRIPT

Sharon Howard, DPT, SCS
Pain-Free Running: The Ultimate Guide to Overcoming and Preventing Injuries
pg 1
Pain-Free Running
The Ultimate Guide to Overcoming and Preventing Injuries
Sharon Howard, DPT, SCS

Sharon Howard, DPT, SCS
Pain-Free Running: The Ultimate Guide to Overcoming and Preventing Injuries
pg 2
ACKNOWLEDGEMENTS:A big thank you to:
My husband who has always given me support in my dreams and helped me to make them happen.My dear friends, Sarah, who modeled exercises for me to use in this ebook and Larissa who spent long
hours editing.
Parents, teachers, mentors, coaches who have all helped me believe I could achieve anything I worked hard enough to accomplish.

Sharon Howard, DPT, SCS
Pain-Free Running: The Ultimate Guide to Overcoming and Preventing Injuries
pg 3
DISCLAIMERThe information, including but not limited to, text, graphics, images and other material contained in this e-book, “Pain-Free Running: The Ultimate Guide to Overcoming and Preventing Injuries” is not intended to be a substitute for professional medical advice, diagnosis or treatment. Always seek the advice of your physician, physical therapist or other qualified healthcare providers with any questions you may have regarding an injury, medical condition or treatment and before undertaking a new health care regimen. Do not disregard medical advice by a qualified health practitioner who has personally
evaluated your condition for any information found within this ebook.
THE USE OF ANY INFORMATION IN THIS EBOOK IS DONE SOLELY AT YOUR OWN RISK. THIS EBOOK IS PROVIDED WITHOUT ANY WARRANTIES, WHETHER EXPRESSED OR IMPLIED. NOONE ASSOCIATED WITH THE CREATION OF “PAIN-FREE RUNNING: THE ULTIMATE GUIDE TO OVERCOMING AND PREVENTING INJURIES”, OR THEHEALTHYRUNNER.COM IS RESPONSI-BLE NOR RELIABLE FOR ANY RELIANCE, ADVICE, COURSE OF TREATMENT, DIAGNOSIS, OUT-COMES, INJURIES OR DAMAGES OF ANY TYPE BASED ON YOUR INTERACTION WITH THIS
EBOOK.
© 2018 Sharon Howard. All rights reserved. No part of this eBook may be reproduced or transmitted in any form or by any means, electronic or mechanical, including photocopying, recording or by any information storage and retrieval system, without written permission from the author. For information,
contact the author at [email protected]
Please visit us at www.TheHealthyRunner.com

Sharon Howard, DPT, SCS
Pain-Free Running: The Ultimate Guide to Overcoming and Preventing Injuries
pg 4
INTRODUCTIONRunning is among the most popular sports worldwide. It is easy to do anywhere, requires very little equipment, and is an efficient way to improve fitness, burn calories, and manage stress. People run for many reasons, including weight loss, relief from stress/anxiety/depression, fitness, overall health im-provements, to enjoy nature, socialization, and more. Maybe you are a novice runner, just trying to fig-ure out how to get started. Maybe you are a veteran runner who has made running part of your routine for years. Maybe you are a high level, competitive runner. With the very personal nature of running, someone can feel accomplishment whether they run at the level of an Olympian, or if they just achieved a PR (Personal Record) in a 5K fundraiser at their child’s school. Whatever your reasons, whatever your goals, whatever your background, I hope you find this ebook helpful in making those reasons sweeter and your success in running greater.
Anywhere from 60-80% of all runners will experience some kind of injury in a given year. Injuries affect runners of all skill levels and mileage. They come to people who have a hard heel strike, they hit people who have soft forefoot landing. Injuries happen and they are frustrating, and sometimes devastating. There is almost nothing as disrupting to the enjoyment of or as halting to the goals set in running as an injury. This ebook is here to help you with resources on how to deal with those irritating injuries, as well as to develop your own plan to prevent injuries in the future and run pain free.
My very own interest in injuries in runners came from personal experience. As a young child, I loved running. My mother used to control my passion by letting me “run to the next corner” and then wait for her to catch up everytime we would walk anywhere. I found running to help regulate my emotions, my anxieties, and my energy, even as a child. When I got to Junior High, I began running on my first team and found a relative amount of success. My small high school cross country and track teams made me realize how much I loved running. I became obsessed. I would wake up early before school and run in the dark around my block. I ran extra at practice, ran with the boy’s team, raced every practice. Harder, faster, it was all exhilarating to me. With all of this effort, I often found myself struggling with injuries which would derail me emotionally. I had an assistant coach who was preparing for Physical Therapy School and I learned about the profession. I thought, if I could know how to help people, including my-self, take care of injuries, that would be awesome! And so I began along my career path. While I won’t claim to have competed as a world class athlete, I did go on to run in college at Paradise Valley Com-munity College in Phoenix, AZ, and Brigham Young University in Provo, UT, both excellent teams that helped me grow as a runner. Passion for running never ceased. It carried me through graduate school as I found myself in love with the marathon distance, it continues to carry me through life with young children, keeping my head a little more level than it would otherwise be. I did fulfil my dream of becom-ing a Physical Therapist, where a lot of my experience has been with other runners, like myself, who would rather do something to take care of an injury and get back to what they love than to sit by and “see if this will heal with rest,” or worse, stop running altogether because “my body just can’t handle it.” If there’s a will, there’s a way! I hope this ebook helps you find the way!

Sharon Howard, DPT, SCS
Pain-Free Running: The Ultimate Guide to Overcoming and Preventing Injuries
pg 5

Sharon Howard, DPT, SCS
Pain-Free Running: The Ultimate Guide to Overcoming and Preventing Injuries
pg 6
TABLE OF CONTENTS
RUNNING INJURIES
LOW BACK INJURIES
MUSCLE STRAIN
BULGING OR HERNIATED DISC
FACET JOINT SYNDROME
SI JOINT DYSFUNCTION
HIP INJURIES
LABRAL TEARS/ACETABULAR IMPINGEMENT
TENDONITIS/TENDINOSIS
MUSCLE STRAIN
BURSITIS
KNEE INJURIES
PATELLOFEMORAL PAIN SYNDROME (PFPS)
PATELLAR TENDINITIS/TENDINOSIS
LIGAMENT INJURIES
BURSITIS
ANKLE INJURIES
MEDIAL TIBIAL STRESS SYNDROME (SHIN SPLINTS)
AND TIBIAL STRESS FRACTURES
LIGAMENT SPRAINS
ACHILLES TENDINITIS/TENDINOSIS
TARSAL TUNNEL SYNDROM
POSTERIOR TIBIALIS TENDINITIS/FLEXOR
HALLUCIS LONGUS TENDINITIS
FOOT INJUIRES
09
09
10
12
15
16
19
20
21
24
25
27
28
30
31
33
35
36
38
39
40
41
43

Sharon Howard, DPT, SCS
Pain-Free Running: The Ultimate Guide to Overcoming and Preventing Injuries
pg 7
44
46
47
48
49
50
53
54
55
60
63
65
67
69
70
72
76
79
82
85
89
PLANTAR FASCITIS
METATARSALGIA
STRESS FRACTURE
NEUROMAS
TENDINITIS
CUBOID SYNDROME
PREVENTION
FLEXIBILITY
DYNAMIC WARM UP
STATIC STRETCHING
FOAM ROLLER SERIES
TIGGER POINT RELEASE
STRENGTHENING EXERCISES
CORE EXERCISES
FELXION BISA
EXTENSION BIAS
POSTERIOR EXERCISES
ANTERIOR EXERCISES
FOOT/ANKLE EXERCISES
BALANCING EXERCISES
GRADUAL PROGRESSION

Sharon Howard, DPT, SCS
Pain-Free Running: The Ultimate Guide to Overcoming and Preventing Injuries
pg 8
RUNNINGINJURIES
SECTION 1

Sharon Howard, DPT, SCS
Pain-Free Running: The Ultimate Guide to Overcoming and Preventing Injuries
pg 9
RUNNING INJURIESLOW BACK INJURIESLow back pain is one of the most common reasons the general population seeks medical care. Unfortunately, although the running population does have a decreased prevalence of low back pain compared to the general population or compared to other athletes, running does not exempt someone from low back injuries and can also be a factor in developing low back pain¹. For purposes of this ebook, we will describe the low back and pelvis areas together, which include the area from just below the rib cage down to the tailbone. The lumbar spine consists of five vertebrae, which function to provide stability to the body and to protect the valuable spinal cord and nerve roots. Between each vertebrae are two different types of joints. One is with an intervertebral disc that allows for shock absorption, stability, and mobility, which is sandwiched between the vertebrae. The other joint type is a zygapophyseal joint, which there are two of, one on each side of the vertebrae. These joints are made from the area of the vertebrae where the segments sit upon one another. Nerve roots from the spinal cord travel between the vertebrae to innervate the muscles of the body as well as to receive sensations from the body to allow function. The lumbar spine is designed for flexion and extension (bending forward and backward), and to a lesser degree, rotation (twisting) and sidebending. The pelvis is made up of a sacrum and coccyx (tailbone) that has on either side of it the hip bone, that is made up of the ilium, ischium, and pubis bones. These three bones are connected together during development and they are interconnected with the sacrum by way of the very strong sacroiliac
joint. Attaching to the lumbar spine and pelvis are numerous muscles that work to move as well as stabilize the spine and pelvis. The old notion that a low back injury requires complete bed rest has been refuted and now research and clinical practice recommend for most low back injuries that some activity is important. Using the right kind of activity, at the right time, and in the right parameters is important in a quick and full recovery. The following sections discuss specific injuries and some of the most important movements to facilitate the healing process. Some of the most common low back injuries found in runners include:
Muscle strain
Bulging or herniated disc/sciatica
Facet joint syndrome
Sacroiliac (SI) joint dysfunction
Sharon Howard, DPT, SCS
Pain-Free Running: The Ultimate Guide to Overcoming and Preventing Injuries
pg 10
MUSCLE STRAINA back muscle strain occurs when a load on the muscle fibers becomes too great and causes a tearing of the muscle fibers. Muscle strains in the back can range from a small tear causing mild discomfort to a severe tear leading to debilitating pain. The typical presentation begins with a dull or achy sensation in the low back. It often is accompanied by muscle spasm and cramping. Pain is usually worse with active movement of the low back, such as bending forward or backward or leaning to the side. It may feel tight or a stretching sensation with forward bending, although initially this motion may just feel painful due to intense muscle spasm. Usually, the injured muscles and often the surrounding muscles are painful with deep pressure upon them. The onset can occur from an incident where you felt something pull, or it can be a gradual onset where you feel pain the day after increasing an activity or trying something new, sometimes without even realizing until later that an injury occurred. Typically muscle strains improve with active rest and improving core activation.
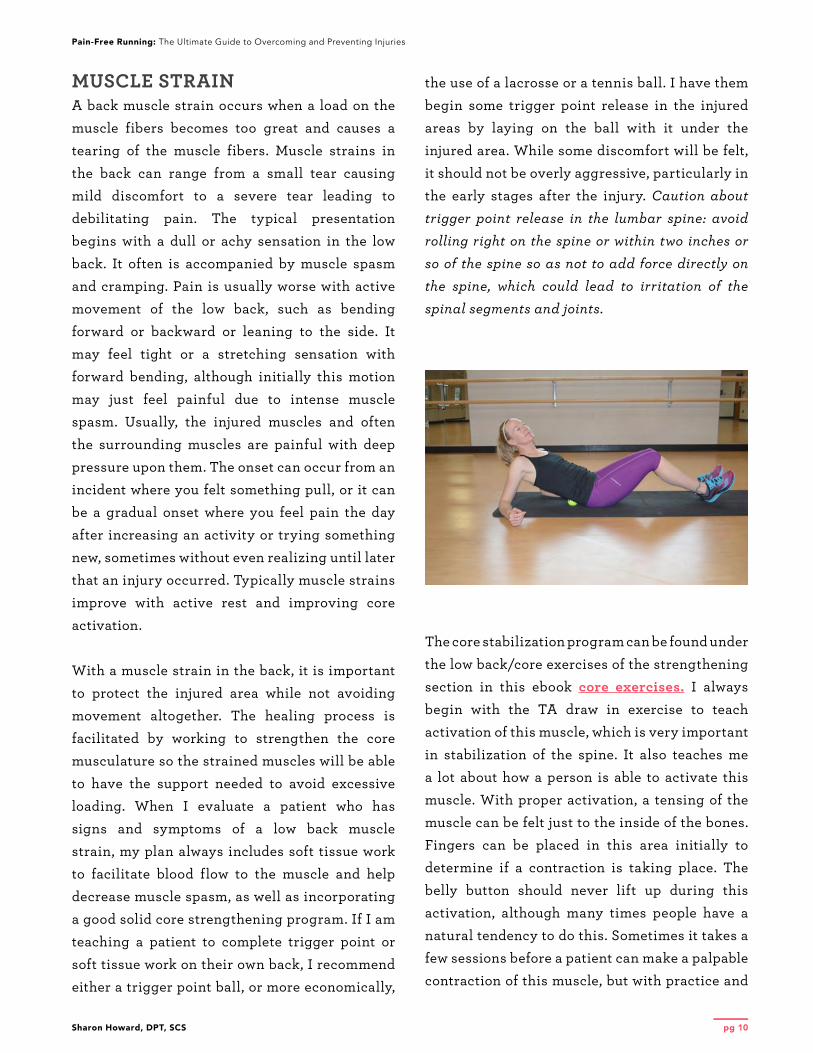
With a muscle strain in the back, it is important to protect the injured area while not avoiding movement altogether. The healing process is facilitated by working to strengthen the core musculature so the strained muscles will be able to have the support needed to avoid excessive loading. When I evaluate a patient who has signs and symptoms of a low back muscle strain, my plan always includes soft tissue work to facilitate blood flow to the muscle and help decrease muscle spasm, as well as incorporating a good solid core strengthening program. If I am teaching a patient to complete trigger point or soft tissue work on their own back, I recommend either a trigger point ball, or more economically,
the use of a lacrosse or a tennis ball. I have them begin some trigger point release in the injured areas by laying on the ball with it under the injured area. While some discomfort will be felt, it should not be overly aggressive, particularly in the early stages after the injury. Caution about trigger point release in the lumbar spine: avoid rolling right on the spine or within two inches or so of the spine so as not to add force directly on the spine, which could lead to irritation of the spinal segments and joints.
The core stabilization program can be found under the low back/core exercises of the strengthening section in this ebook core exercises. I always begin with the TA draw in exercise to teach activation of this muscle, which is very important in stabilization of the spine. It also teaches me a lot about how a person is able to activate this muscle. With proper activation, a tensing of the muscle can be felt just to the inside of the bones. Fingers can be placed in this area initially to determine if a contraction is taking place. The belly button should never lift up during this activation, although many times people have a natural tendency to do this. Sometimes it takes a few sessions before a patient can make a palpable contraction of this muscle, but with practice and

Sharon Howard, DPT, SCS
Pain-Free Running: The Ultimate Guide to Overcoming and Preventing Injuries
pg 11
training, it becomes a natural activation. Once this activation is achieved, you can progress to other core strengthening exercises, beginning with the other neutral spine exercises and progressing through the flexion and extension bias sections, then moving to the advanced section as tolerated. As you work through the core exercise section, it is important that these exercises have very little pain associated with them and that you can always keep your belly button drawn in. Sometimes, you might feel the low back injury slightly during an exercise. My rule with this sensation: if it is getting better with each repetition, continue to 1 full set, but do not do any more until you see how you respond to the exercise. If it is getting worse with each repetition, stop immediately and wait on that particular exercise until you can perform it without pain. Typical healing time for a muscle strain varies greatly depending on severity and dedication to treatment but usually falls in the range of 2-6 weeks.

Sharon Howard, DPT, SCS
Pain-Free Running: The Ultimate Guide to Overcoming and Preventing Injuries
pg 12
BULGING OR HERNIATED DISC:This term tends to cause concern or worry from a lot of my patients. I always explain that it doesn’t mean the spine is ruined or that the pain will be with you forever. It is usually treated with conservative care such as physical therapy, and most patients can expect a full recovery. As discussed earlier, between each segment of the spine, an intervertebral disc can be found. The discs are made up of two layers: the annulus fibrosus and the nucleus pulposus. The outer layer, the annulus fibrosus, is a fibrous ring that inserts into the spinal segment above and below and provides stability, while allowing mobility between the segments. The nucleus pulposus is the central portion of the disc, which is a semifluid, gel-like substance that compresses to allow for force absorption in the spine. When the border layers of the disc become compromised with age, overuse, or trauma, the inner contents can protrude or herniate, causing inflammation in the area or even compression on a nerve root. This situation can lead to severe pain. When the nerve root becomes irritated, it can lead to a radiculopathy. The lower lumbar and sacral segments of the spine contain nerve roots that contribute to the sciatic nerve. Compression or irritation of these, or anywhere along the sciatic nerve causes sciatica.
A disc injury can occur with lifting a very heavy item or using poor mechanics for lifting. It can also occur in runners due to the repetitive impact putting force through the discs. These injuries can also occur with the “last straw” incident, meaning a small movement is “the last straw” of a series of predisposing factors leading up to the injury. For instance, someone might describe an incident where they bent down to pick up a pencil and felt a pop or stabbing type pain in
back. The patient typically complains of pain that is worse with static positions such as sitting or standing for a long period of time. Pain is usually most severe first thing in the morning as the inflammation has had time to pool in the area around the nerve causing an increase in pain. Pain usually is aggravated most with bending forward to touch toes, or sitting in a slumped position, rather than extension. It can also be painful to lift the leg with the knee straight when in a seated position or while laying on your back. This type of injury can improve significantly with proper core strengthening and direction specific movement exercises.
Although the mechanism of injury and the injury itself are very different in a disc injury compared to a muscle strain, there are similarities in treatment. First of all, complete bed rest is not recommended. The nature of this injury is a pooling of inflammation around the nerve, so movement itself can help facilitate the body to flush out the inflammation around the nerve. Most people suffering from this injury try to avoid movement, but movement, if it is the proper kind, can be the cure. As the saying goes, motion is lotion! If you must rest completely, make it as brief a period of time as possible.

Sharon Howard, DPT, SCS
Pain-Free Running: The Ultimate Guide to Overcoming and Preventing Injuries
pg 13
If the flexion bias test does not improve pain, then try the extension test by placing your hands on your hips and extending backward ten times. If the first repetition feels the worst, but it improves by the tenth, then you have an extension bias.
With a disc injury, depending on the location of the herniation or bulge, a person might have a bias, or positive response to movement one direction or the other (either flexion or extension). A simple test to see if you have a bias is to complete ten repetitions of flexion by reaching toward your toes from a standing position, then returning to a standing position ten times. If the first repetition feels the worst, but it improves by the tenth, then you have a flexion bias.
It is a general rule that the further away from the spine, the worse the injury is. So, if you are having pain radiating down into your gluteal muscles and these exercises improve the glute pain, but worsen the back pain, that is still a positive result. With further emphasis on this direction, it will continue to improve and eventually the pain in the back will subside as well. If you find you do have a bias of either flexion or extension, this test also becomes a treatment. You should perform ten repetitions of the appropriate direction several times throughout the day. Avoid movements into the opposite direction.

Sharon Howard, DPT, SCS
Pain-Free Running: The Ultimate Guide to Overcoming and Preventing Injuries
pg 14
If neither direction seems to improve the pain, then you may not have a bias either direction and you should work in very moderate ranges of motion to begin. In the exercise section of this book, the core stabilization exercises are divided based on your bias. (core exercises) Begin all programs with the neutral exercises and then with your bias exercises. Once symptom free, progress to the opposite bias exercises. Typical healing time for this type of injury is 6-8 weeks for a full recovery, although some rapid progress can be made within the first week if someone responds well to the directional exercises.

Sharon Howard, DPT, SCS
Pain-Free Running: The Ultimate Guide to Overcoming and Preventing Injuries
pg 15
FACET JOINT SYNDROME:In addition to the joint formed by the disc and the vertebrae in the spine, there are two more joints in each segment called zygaphophyseal joints, or facet joints. Sometimes these joints can become irritated by a heavy load, excessive repetitive motion, or an impact injury. When they become irritated, they can created pain and inflammation in the surrounding areas. These injuries usually present fairly local to the spine, but in more severe cases, the inflammation from the joint can be severe enough to irritate the nerve roots and cause radiating pain, similar to that of a herniated disc. Pain is usually most severe with extension or bending toward the side of the injury. Long runs, excessive walking, or jumping activities might aggravate this type of injury. Typically these can improve with strengthening, positional corrections, and spinal mobilizations.
The important aspect of facet joint syndrome is to decrease the pressure on the facet joint. Back extension increases the pressure, so exercises and activities that work into back extension should be avoided in the early stages. Just as with other back injuries, core stabilization is key (sense a pattern yet?). Facet joint syndrome, like other low back injuries, requires the ability of the body to stabilize using the muscular system of the core to decrease the reliance and pressure on the boney structures, specifically, the facet joints. Using the core strengthening exercises in this ebook, begin with neutral core stabilization exercises, then progress to flexion exercises (core exercises). Once pain has ceased, you can progress into extension exercises. In addition to these treatments, working on maintaining a neutral spine throughout activities of daily living can help alleviate the stress on the facet joint. This includes avoiding standing in an extended
position of the lumbar spine, and avoiding excessive rotation with activities such as taking laundry out of the dryer and vacuuming. A rule to follow during the symptomatic phase is to always have your hips and your belly button facing the same direction to avoid twisting, which can excessively load the facet joints.

Sharon Howard, DPT, SCS
Pain-Free Running: The Ultimate Guide to Overcoming and Preventing Injuries
pg 16
SI JOINT DYSFUNCTION:The sacroiliac joint (SI joint) is the joint between the sacrum and the ilium. It is connected with a very thick fibrous ligament and is generally very stable. However, with repetitive impact from running or with a traumatic event such as landing hard on one leg or one side of the pelvis, it can become irritated. It is more common among women to have this type of injury due to hormonal factors that can increase the laxity in the stabilizing ligaments, particularly during or shortly after pregnancy. The pain is isolated to the buttocks and is usually very point specific, although resulting muscle spasms of the gluteal muscles can cause an increased radius of pain. It is aggravated by standing on one leg, particularly while lifting the other leg as you would when you are putting on pants when standing. It can also be aggravated by extreme stretching into a lunge position or any activity that puts one leg forward while the other is going backward as this causes force on the SI joint. For this reason, it is important to avoid these types of exercises while you are having pain, such as deep lunges, box step ups, deep hip yoga stretches (runner’s lunge, pigeon pose), etc.
The treatment for SI joint dysfunction focuses on mobilization and stabilization of the pelvis region. As discussed in the description of the injury, it is important to avoid aggravating activities while they are symptomatic. The following mobilization series is helpful in providing relief from symptoms by creating slight gapping or changes in the pressure of the SI joint:
1. Ball Squeeze: Lie on your back with your knees bent, with a ball between your knees. Squeeze gently, then gradually increase pressure over a period of 10 seconds then slowly release the pressure. Repeat 10 times.
2. Belt Pull Apart: Lie on your back with your knees bent. Place a belt or stretching strap looped around your knees. Pull your knees apart gently, gradually increase pressure over 10 seconds, then slowly release the pressure. Repeat 10 times

Sharon Howard, DPT, SCS
Pain-Free Running: The Ultimate Guide to Overcoming and Preventing Injuries
pg 17
3. Bridge Mobilization: Lie on your back with your knees bent. Bring one knee up toward your hands and gently press your knee into your hands as you lift up into a bridge on the other leg. Gradually increase pressure as you lift your hips higher. Repeat 10 times on each leg.
In additions to these mobilization exercises, a stabilization program is important to decrease strain on the SI joint, improving the pelvic stability. The core stabilization exercises in this ebook provide some appropriate exercises(core exercises). Begin as you would with other low back pain with the TA draw in and the pelvic tilts to begin activation of those muscles that facilitate stabilization and provide motion to promote healing in the area. The next step is a strengthening program for the gluteal muscles such as the ones found in the posterior exercise section in this ebook(posterior exercises). Then progression can be made into the other core stabilization exercises (begin with flexion bias, progress to extension bias). For those who are particularly symptomatic, I recommend purchasing an SI joint stabilization belt to wear to provide relief. I have not found the belt to work very well while running, but it can help take the pressure off the SI joint during other activities throughout the day.

Sharon Howard, DPT, SCS
Pain-Free Running: The Ultimate Guide to Overcoming and Preventing Injuries
pg 18
The following chart breaks down the general characteristics of the injuries discussed in this section:
As part of your recovery from low back pain, I recommend you read the gradual progression section of this ebook to help guide you on how to maintain fitness and return to running (gradual progression section). If you find that your symptoms are severe or not improving with these treatment recommendations, please seek out a medical assessment by your local physician or physical therapist.
Characteristic Muscle Strain Herniated Disc/Sci-atica
Facet Joint Syndrome SI joint Syndrome
Pain Description Ache, ranging from mild to severe
Intense, shooting, stabbing, radiating
Localized, stabbing Localized,stabbing
Pain Location Low back muscles Central or one side of low back, down leg
Central or slightly to one side in low back
Pelvis/gluteal region
Aggravating Movements
Any active motion of the back
Most commonly forward bending, prolonged sitting
Back extension, side-bending
Standing on one leg, extending in the back

Sharon Howard, DPT, SCS
Pain-Free Running: The Ultimate Guide to Overcoming and Preventing Injuries
pg 19
HIP INJURIESThe hip joint is formed between the head of the femur (thigh bone) and the acetabulum (socket) of the pelvic bone. The joint is classified as a ball and socket joint, which allows for a great deal of mobility. It is also designed with the structures surrounding it to be very stable, which is essential since the primary role of the hip joint is to support the body during weight bearing and dynamic activities, such as running. In general, hip injuries are less common than other lower extremity injuries, making up <3% of lower limb injuries². However, runners, particularly marathon runners, are more susceptible to injuries to this area due to the repetitive and overuse nature of the sport. During running, the hip supports 4.5 times the body weight with each landing². That is a lot of impact that can lead to derailing injuries. Some of the most common hip injuries discussed in this ebook include:
Labral tears/femoral acetabular
Impingement
Tendonitis
Muscle strain
Bursitis

Sharon Howard, DPT, SCS
Pain-Free Running: The Ultimate Guide to Overcoming and Preventing Injuries
pg 20
LABRAL TEARS/ACETABULARIMPINGEMENT:Around the acetabulum of the pelvis is a labrum, which is a rim of fibrous cartilage tissue that deepens the socket, providing for increased stability of the joint. With repetitive overuse or traumatic events, this labrum can become torn or pinched as it is compressed between the two bones of the hip joint. The risk for this type of injury increases if someone has Femoral Acetabular Impingement (FAI). This is a defect in the hip joint where either the ball is too large for the socket (CAM) and causes pinching of the labrum, or the socket is too deep (Pincer) and causes pinching of the labrum. Typically the impingement is mild enough that activity modification for a period of time and strengthening to support the joint can significantly reduce symptoms. Sometimes the impingement is severe enough that surgery is required to correct the defect and repair the labrum. Studies have shown that the labrum can deteriorate with age and that imaging of individuals without hip pain can often find labral tears³. Although not every labral tear is symptomatic, they can be a significant source of hip pain. Often with a labral tear or impingement, a patient will complain of groin pain or what has been described as the “C-sign.” The “C-sign” is a gesture that a patient makes when describing the pain they have by cupping around the outside of the hip showing they have pain in the front and the back of the hip. This sign has been associated with hip joint pathology and can be indicative of a labral tear or FAI⁴. Someone who has a labral tear will often complain of clicking, locking, catching, or giving way of the hip. They might also have limitations with range of motion and usually have pain when bringing the knee up to the chest or across the body.
While labral tears and hip impingement can both be causes for hip pain in runners, they can be treated conservatively in many cases. An injury like this for a dancer would more likely require surgery because they have extreme range of motion as a requirement for their sport. With distance running, however, depending on the severity and location of the tear or impingement, it is very possible to manage without surgery.
The first line of treatment is to avoid aggravating activities. This may necessitate cross training for a few weeks while symptoms calm down. Extreme range of motion of the hips should also be avoided during the symptomatic phase. This includes deep hip stretches such as splits or some yoga positions. It is also recommended that someone with this type of injury avoid sitting with legs crossed or in the figure four position. The next step to treatment is progressing through hip and gluteal muscle strengthening exercises such as the ones described in the exercise section of this ebook. I would suggest beginning with the posterior exercises (posterior exercises). Once symptom free, gentle flexibility of the hip can begin cautiously with hamstring and hip flexor stretching, which are demonstrated in the flexibility section (flexibility section). If this is being tolerated well, progressions can then be made into hip flexor and quad exercises that are found in the anterior exercises (anterior exercises). Typical resolve time for this type of injury can take 8-12 weeks. If progress is not being made in this time, consultation with an orthopedic physician or surgeon is recommended.

Sharon Howard, DPT, SCS
Pain-Free Running: The Ultimate Guide to Overcoming and Preventing Injuries
pg 21
TENDONITIS/TENDINOSIS:Tendonitis is defined as inflammation of a tendon. Most diagnoses of tendinitis are actually not in the inflammatory process any longer, but are defined more with disorganized tendon tissue from chronic damage and would be considered a tendinosis. Tendons are made up of cartilaginous fibrous tissue and are the area of a muscle that inserts into the bone. Any tendon in the body can become inflamed, but in the hip joint, the most common anteriorly (particularly in runners) are the iliopsoas muscle and the rectus femoris muscle, which are strong hip flexors that are used significantly with running. Posteriorly, runners can also suffer from gluteus medius or hamstring tendinitis. Runners who train on a lot of hills or increase their mileage or intensity too quickly are at a higher risk for developing tendinitis or tendinosis. Tendonitis usually is local to the tendon area of the muscle and a runner can pinpoint a very specific area of pain. The pain is usually worse when beginning a run, but tends to subside some once warmed up and return again after the run is completed and the muscle has cooled off. These types of injuries respond well to muscle tension release activities, active rest, and gradual eccentric training of the muscle. Tendonitis treatment in the hip focuses on decreasing the strain on the tendon that is irritated and training the muscle as it lengthens to help facilitate proper healing. The first phase to initiate is trigger point release. In general, completing some myofascial release on a regular basis, such as the foam roller series found in this ebook (foam roller series), can help relieve the
tension in these muscles. In addition to this, if the pain is in the front, use a trigger point ball in the muscle just above the hip bone and the muscles just below it (iliacus, iliopsoas, TFL) as described in the flexibility section of this ebook (flexibility section).
If the pain is in the hamstring or gluteus medius, use the ball to release the muscle around the area of pain, either in the glut or in the hamstring by sitting on the ball and rolling over it as described in the flexibility section of this ebook (flexibility section). Along with the muscle release techniques, it is important to begin strengthening. A key part of treatment for tendinitis or tendinosis is eccentric training. The following exercises are examples of eccentric exercises based upon which area you are experiencing pain.

Sharon Howard, DPT, SCS
Pain-Free Running: The Ultimate Guide to Overcoming and Preventing Injuries
pg 22
1. Eccentric Hip Flexor Exercise: Standing on one leg, assist your leg to your chest using your hands, then VERY SLOWLY lower your leg to the floor. Repeat 10 times.
3. Eccentric Kick Backs: With your arms on a ball or a table, kick your leg behind you on a count of 1, then on a count of 4, slowly lower leg back to the ground.
2. Hamstring Eccentric Exercises: Standing on one leg, reach very slowly toward your standing toes, kicking your other leg back straight behind you and keeping your hips level. Come back up to standing. Repeat 10 times.

Sharon Howard, DPT, SCS
Pain-Free Running: The Ultimate Guide to Overcoming and Preventing Injuries
pg 23
4. Glut Med Eccentric Loading: Standing on one leg, raise your hip of your non-standing leg, then very slowly lower the hip down. Repeat 10 times.
In addition to the appropriate eccentric exercises, I also recommend beginning the core strengthening exercises (core exercises) and the posterior exercises (posterior exercises) found in this ebook as long as they are not causing pain. Tendinitis/tendinosis can take 2-6 weeks for recovery.

Sharon Howard, DPT, SCS
Pain-Free Running: The Ultimate Guide to Overcoming and Preventing Injuries
pg 24
MUSCLE STRAIN:Muscle strains in the hip are very closely related to tendinitis/tendinosis, but affect more directly the muscle belly than the tendon of the muscle. With a muscle strain, the fibers of the muscle contractile tissues are torn apart leading to pain, inflammation, and, in severe cases, loss of strength. A muscle strain can typically be felt when rubbing the muscle. If it is severe, there might be a palpable mass in the muscle belly. Most commonly, muscle strains in runners occur in the adductors (groin muscles), hip flexors, or the hamstring muscle. A muscle strain is painful with activation of the affected muscle and stretching of the affected muscles. For the adductors, pain will occur when you pull the leg in toward the body or when you are stretching away from the body. Hip flexor muscle strain will be felt when lifting the knee toward the chest or stretching the leg behind you. Hamstring strains will be felt when stretching the leg in front of you or kicking the leg behind you. All of these muscle strains can cause pain in standing or with running
Muscle strains occur when the load being placed on the muscle exceeds the strength of the muscle at that moment. So, either the load is too much, the muscle is too weak, or the muscle is not warmed up properly to handle the load being placed on it. The pain usually worsens the further you get into a run and is typically more painful with speed work than long runs as the muscle contractions are more forceful. Treatment for a muscle strain requires a period of active rest, soft tissue release techniques, and strengthening.
Muscle strains can respond well to the muscle release techniques described previously for tendinosis, but the pressure should be lighter with a muscle strain as the injury is in the actual
muscle belly that is being massaged through. In addition, light stretching and gradual progression into a strengthening program will facilitate return of muscle length and function and help reduce the risk of future strain. For any of these muscle strains, beginning gently with some active motions, such as the dynamic warmup, can be beneficial in improving blood flow and gently activating the muscles—just avoid aggressively stretching into the stretch positions (dynamic warmup). In addition, beginning the core, anterior, and posterior strengthening exercises is beneficial in improving strength and improving muscle balance between the muscle groups (strengthening section). I would also suggest adding in the balance exercises as tolerated to improve overall muscle endurance and stability to prepare for running (balance exercises). A muscle strain can take anywhere from 1-8 weeks to fully recover. Active rest is better than no activity, but it is also important to make sure that the exercises and cross training you choose to do are not increasing your symptoms.

Sharon Howard, DPT, SCS
Pain-Free Running: The Ultimate Guide to Overcoming and Preventing Injuries
pg 25
BURSITIS:Bursae are fluid-filled sacs that help to prevent excessive friction between the tendon and the bone. Bursitis is inflammation of one of these fluid filled sacs. Three of the main bursae in the hip can become inflamed and cause pain: the iliopsoas bursa is found under the iliopsoas tendon in the front of the hip, the trochanteric bursa sits on the outside of the hip over the boney area under the tensor fascia latae, and the ischiogluteal bursa that is located over the ischium (“sit bone”) under the gluteus maximus.
Iliopsoas bursitis causes pain in the front of the hip and is most often painful with walking and running motions or even just lifting your knee toward your chest. Trochanteric bursitis causes pain on the outside of the hip, and those who have this injury find it painful to lie on their side and have pain on the outside of the hip with walking and running. Ischiogluteal bursitis causes pain under the sit bone and is painful with sitting on a hard surface for a prolonged amount of time.
With the close proximity of the bursae to muscle tendons, it is often difficult to differentiate between bursitis and tendinitis. A very definitive decision about whether it is bursitis or tendinitis requires imaging to see where the inflammation is coming from. Often, due to their close relation, both the tendon and the bursae can be involved. The bursae can be injured with a traumatic blow to the area, but are more commonly injured in a similar manner to the tendon: through overuse. Typically, if the pain doesn’t improve and instead worsens with progression into an activity, the bursae is likely at least part of the structures involved. Bursitis is also more likely to be point tender so when you press upon the area, it will be painful. Differentiation is not completely necessary as both respond well to
similar treatments. Like tendinitis, relieving muscle tension reduces the pressure on the bursae. Through muscle release techniques and strengthening to reduce muscle imbalances, relieving pressure can be very effective in treatment. For iliopsoas bursitis, releasing the hip flexors is the most important myofascial release. For trochanteric bursitis, releasing the quads, IT band, and gluteal muscles can provide some relief of pressure. For ischiogluteal bursitis, releasing gluteal and hamstring muscles can provide relief. Recommended techniques can be found in the flexibility section with both foam roller and trigger point release (foam roller series).
An important difference between the treatment of tendinitis and the treatment of bursitis is that you have to be cautious not to use muscle release techniques over the injured area of bursitis. In general, it is important to avoid rolling over the bursitis when doing muscle release techniques as this can irritate even a non-injured bursa. Rather, focus on the muscle tissue, not the insertion points to avoid aggravation. Beginning the posterior (posterior exercises) and anterior strengthening exercises (anterior exercises) can help improve support and muscle balance to decrease pressure on the bursa as well. Full recovery with bursitis usually takes 4-8 weeks.

Sharon Howard, DPT, SCS
Pain-Free Running: The Ultimate Guide to Overcoming and Preventing Injuries
pg 26
Characteristic Labral Tear/FAI Tendinitis/ Tendonosis Muscle Strain Bursitis
Pain Description Ache, ranging from mild to severe
Ache Pulling sensation, sharp pain
Localized, sharp, sometimes burning
Pain Location Groin, posterior hip At the muscle insertion of affected muscle
Middle of the muscle
Lateral hip, anterior hip, or under sit bone, depending on the bursa
Aggravating
Movements
Knee to chest or across body, figure 4 position
Activation of the muscle affected
Activation or stretching of the muscle affected
Point tender, movement of the joint
As part of your recovery from hip pain, I recommend you read the gradual progression section of this ebook to help guide you on how to maintain fitness and return to running (gradual progression section). As noted throughout this ebook, if you find that your symptoms are severe or not improving with these treatment recommendations, please seek out a medical assessment by your local physician or physical therapist.

Sharon Howard, DPT, SCS
Pain-Free Running: The Ultimate Guide to Overcoming and Preventing Injuries
pg 27
KNEE INJURIESThe knee is one of the more stable joints in the body and one of the most complex. It is made up of three bones: the femur (the large thigh bone), the tibia (the shin bone) and the patella (the kneecap). These bones create two different joints: (1) the patellofemoral joint located between the patella and the femur, and (2) the tibiofemoral joint located between the tibia and the femur. The bone setup for the joint makes the knee fairly stable, but there are a lot of other structures that play a role in the knee stability as well. The anterior cruciate ligament (ACL) and the posterior cruciate ligament (PCL) are the main interior ligaments and they provide stability to keep the femur from sliding off the tibia. The medial collateral ligament (MCL) and the lateral collateral ligament (LCL) are the main exterior ligaments and they provide stability to the joint to keep it from moving too far side to side. Inside the knee joint, two fibrocartilage menisci, the medial and the lateral, sit on top of the tibia and provide shock absorption, joint lubrication, and joint stability. Below the patella lies the infrapatellar fat pad, which is a patch of fat that sits behind the patella and can be a source of pain when irritated. The knee also contains ten bursae, or fluid-filled sacs that help with friction caused by movement within the body. Irritation of these bursae can lead to bursitis, just as it does in the hip. There are several muscles that support the joint as well. The patellar tendon, located in the front of the joint, is the tendon that travels
from the patella to the tibia and allows the quadriceps muscle to extend the knee. The back of the knee is supported by the hamstring muscle group and the gastrocnemius (calf muscle) which make bending your knee possible. With all the complexities of the knee, it is no wonder that it is the most common joint to get injured with running.
Some of the most common running injuries that occur in the knee are:
IT band friction syndrome
Patellofemoral pain syndrome(Runner’s Knee)
Patellar tendinitis/tendinosis
Ligament injuries
Bursitis

Sharon Howard, DPT, SCS
Pain-Free Running: The Ultimate Guide to Overcoming and Preventing Injuries
pg 28
IT BAND FRICTION SYNDROME (ITBFS):The Iliotibial band (IT Band) is a band of fascia that travels the length of the femur. It has attachments in the gluteus maximus, tensor fasciae latae and on the outside part of the leg, just below the knee (lateral epicondyle of the tibia). While IT band dysfunction can cause lateral hip pain, it is more commonly manifested as knee pain, which will be the focus of this section. ITBFS is one of the most common diagnosis for knee pain and it is particularly common in long distance runners. The risk for developing this syndrome increases with greater mileage and those who run on a lot of uneven or hilly terrains with an emphasis on significant downhill grades⁵. It can also occur on the down leg of a runner who is constantly running on a slant. The pain typically begins as pain on the outside of the knee, but it can also cause pain in the fat pad under the patella (kneecap) by compressing and causing friction on the lateral portion of the fat pad. Pain is usually better after a period of rest, but gets worse as you fatigue in a run. It is common for my patients with this injury to complain of pain beginning at 2 miles or later in the run once their hip muscles fatigue, thereby losing the stability and allowing for hip drop which causing stress on the IT Band and, thus, increased friction. A study by Fredericson et al. found that long distance runners with ITBFS have weaker hip abductors in the injured leg compared to their non-injured
leg and compared to other long distance runners who were not suffering from ITBFS. They also found that successful treatment was affected by improvement in hip abductor strength⁶.
ITBFS is one of my favorite diagnosis to treat as it usually responds fairly rapidly to appropriate treatment. The first line of defense I suggest is a focus on a mobility program beginning with the foam roller series with emphasis on the IT band and gluteal muscles as described in the foam roller series of this ebook (foam roller series). In addition to foam rolling, a stretching program that includes the runner’s lunge stretch, pigeon stretch, and burning logs stretch found in the flexibility section are each excellent for loosening the hips and taking pressure off the IT band (flexibility section). In addition to mobility, hip strength is key as demonstrated by the previously mentioned study⁴. Begin strengthening with the posterior exercises (posterior exercises), then progress to anterior exercises (anterior exercises) and balance exercises (balance exercises). The combination of strength and flexibility is key for treatment of this injury. With diligence, ITBFS can usually recover in 2-6 weeks. This is an injury that tends to come back if the emphasis on the strengthening program diminishes, so a regular routine of these exercises is highly recommended.

Sharon Howard, DPT, SCS
Pain-Free Running: The Ultimate Guide to Overcoming and Preventing Injuries
pg 29
PATELLOFEMORAL PAIN SYNDROME (PFPS):Another knee injury is so common among runners, it has the nickname of “Runner’s Knee.” The technical term for this injury is patellofemoral pain syndrome (PFPS), which is descriptive of the location of this injury. The injury occurs when the patella (kneecap) creates friction on the femur.This can occur with repetitive activities, such as running. This injury is also common among runners who do a lot of downhill running, have hip and core muscle weakness, or when someone has a poor training regime and increases their mileage too quickly. The pain is in the front of the knee and is increased with resisted knee extension (straightening out the knee) and with squats. Typically the pain is worse with downhill running as this increases the force of compression on the patella.
To calm down symptoms, I sometimes recommend purchasing a simple knee compression sleeve that can be found at any local drug store. This type of compression can decrease inflammation and give sensory input that can help decrease the pain signal to the brain. A mobility program including the foam roller series with emphasis on the quad muscles and stretching into the runner’s lunge and pigeon stretch are helpful in management (stretches). Similar to the study on ITBFS and hip weakness, a study done on runners with and without PFPS demonstrated significant weakness not only in the hip abductors, but also the hip external rotators and extensors⁷. Another study on high school runners tested strength prior to the season and found that those with weak
hip external rotators were more likely to develop PFPS during the season and that once injured, they also demonstrated a further weakness in hip external rotators as well as abductors compared to preseason⁸. Thus, hip strengthening should be an important part of any PFPS recovery program. Begin strengthening with the posterior exercises (posterior exercises), then progress to anterior exercises (anterior exercises) and balance exercises (balance exercises). Recovery from this injury usually takes 2-6 weeks.

Sharon Howard, DPT, SCS
Pain-Free Running: The Ultimate Guide to Overcoming and Preventing Injuries
pg 30
PATELLAR TENDINITIS/TENDINOSIS:The patellar tendon is the tendon that attaches the patella to the tibia and is important in allowing the quadriceps muscle to extend the knee. This tendon can become a problem for runners as it tends to respond poorly to overuse. Those who increase their mileage too rapidly are particularly at risk for this injury. In addition, runners who have tight hamstrings can have a higher risk because the quadriceps have to contract harder with each step to overcome the pull from the tight hamstring. On the other hand, those who are over dominant with the use of their quadriceps muscle compared to gluteal muscles are at a higher risk for this type of injury. Initial inflammation of the patellar tendon is called tendinitis, while a more chronic and non-inflammatory pain syndrome is considered tendinosis.
Pain is felt in the patellar tendon, sometimes radiating down to the insertion point of the tendon on the tibia. While not always painful to touch, it is usually felt with activities such as jumping or running, especially downhill running. At least in the early stages of the injury, pain typically feels worse at the beginning of a run, then begins to improve after a warm up period.
For symptom management, a runner might try using a “jumper’s knee strap,” which can decrease some of the pressure on the tendon and give sensory input that can help decrease the pain signal to the brain. A mobility program including the foam roller series (foam roller series) with emphasis on the quadriceps and hamstring muscles as well as using the runner’s lunge (runner’s lunge in stretching section), pigeon stretch (pigeon stretch in stretching section), and hamstring stretch (hamstring stretch in stretching section) are helpful in
management. Similar to other knee injuries, also begin strengthening with the posterior exercises, then progress to anterior exercises and balance exercises. The distinction of recovery from patellar tendinitis and tendinosis is the additional emphasis on eccentric training, which has been shown to be effective for treatment of tendinitis. Typical recovery time for patellar tendinitis is 4-6 weeks. The following exercise for eccentric training of the quadriceps muscle can alleviate tendonitis in the patellar tendon:
1. Decline Squat: Use a tilt board, or if that is not available, elevate the heels using a 3-4 inch step or block. Begin in the standing position, with the heels hip width apart. Squat down very slowly, keeping the weight in your heels (down on a count of 6, up on a count of 2). Repeat 10 times twice per day. This might be uncomfortable at first, but pain should improve after a consistent use of this exercise.

Sharon Howard, DPT, SCS
Pain-Free Running: The Ultimate Guide to Overcoming and Preventing Injuries
pg 31
LIGAMENT INJURIES:As discussed earlier, there are several ligaments that help to stabilize the knee joint. The two ligaments most likely to be injured in a runner are the medial collateral ligament (MCL) that supports the inside of the knee joint and the lateral collateral ligament (LCL) that supports the outside of the knee joint. These injuries can occur from a slip and fall while running on icy ground or with uneven surfaces such as trail running that might cause a runner to trip, step awkwardly, or fall. The first sign of an MCL or LCL sprain is pain and swelling either on the inside or the outside of the knee, respectively. Bruising sometimes occurs a couple days later and the knee might feel slightly unstable, depending on the severity of the spain. When injured, the pain typically can be felt with bending and straightening the knee, as well as weight bearing knee bending exercises such as squats or step-ups. Also, any twisting motion or side-to-side shifting can cause pain.
Immediate treatment of a ligamentous injury should include rest, ice, compression, and elevation (the basic RICE principles) to help reduce accumulation of swelling, pain, and loss of function. If pain is severe, consider using a stability knee brace that has hard supports on either side of the knee to prevent shifting of the knee, which can increase pain. An MCL or LCL injury can typically be treated conservatively and are rarely repaired surgically unless significant dysfunction occurs. Depending on the severity of the tear, the symptoms can be mild to intensely
painful. Either way, motion is very important, but often painful at the beginning. This is one of the times that I suggest that someone push through the pain since the pain will improve with gentle range of motion and worsen with lack of movement. The following are recommended exercises to treat a ligament injury:
(1) One of the most important exercises is the heel slide. Heel slides should be initiated as soon as possible. To do heel slides, lie on your back and slowly pull your heel toward your buttocks, then return to straight. Repeat 10-20 times several times throughout the day. This works best wearing a sock on a wooden or tile floor.

Sharon Howard, DPT, SCS
Pain-Free Running: The Ultimate Guide to Overcoming and Preventing Injuries
pg 32
(2) In addition to motion, It is important to begin quad activation right away to prevent the quad from shutting down, which can sometimes occur after an injury that includes swelling. This can be completed through a quad set: Straighten your leg, with a rolled up towel under your knee. Squeeze the quad muscle as you press the back of your knee down into a towel. Hold this contraction for five seconds and repeat 10-15 times several times each day. It is often helpful to do the contraction on both legs at the same time as the non-injured leg can help facilitate the contraction of the injured leg.
As soon as you are able, begin with the posterior exercises (posterior exercises) described in the exercise section of this ebook and progress to the anterior exercises (anterior exercises) as soon as they are pain free. Depending on the severity of the injury, these injuries can take anywhere from 1-10 weeks to heal.

Sharon Howard, DPT, SCS
Pain-Free Running: The Ultimate Guide to Overcoming and Preventing Injuries
pg 33
BURSITIS:Among the ten bursae of the knee, there are four bursae that are particularly subject to irritation and injury in runners. These are the prepatellar bursa, the infrapatellar bursa, the suprapatellar bursa, and the pes anserinus bursa³. Bursitis in the knee, by definition, is inflammation of a bursa and is characterized by swelling, redness, heat, and pain in the area of the bursa involved. The prepatellar bursa sits on top of the patella, just below the surface of the skin and can become irritated when someone is working on their knees without padding, such as with gardening or car mechanics. Injury to this bursa will leave a runner feeling as though they have a “full” knee from the excessive swelling that can accumulate. The pain and swelling is found on top of the kneecap. The infrapatellar bursa has a superficial sac that sits just below the skin over the patellar tendon and a deep sac that sits between the patellar tendon and the tibia. This bursa can often be involved when the patellar tendon has been irritated, such as with excessive jumping or hill running. With injury to this bursa, the pain and swelling will be found just below the kneecap, in the region of the patellar tendon. This injury can often mimic patellar tendonitis, but usually is associated with a greater amount of swelling. The suprapatellar bursa sits just below the quadriceps tendon, above the patella. This bursa is particularly at risk with repetitive contraction of the quadriceps muscle, such as with running on hills. The pes anserine bursa is found underneath the pes anserine, which is an insertion point for three muscles just below the knee joint, on the inside of
the leg. The three muscles that make up the pes anserine are the sartorius, semitendinosus, and gracilis. Injury to this bursa causes pain on the inside of the knee and can sometimes be mistaken for a medial collateral ligament sprain. Tightness found with overuse in the three muscles that insert into the pes anserine can cause excessive friction on this bursa and lead to bursitis. This is the most common location of bursitis found in runners.
Initial treatment for knee bursitis includes rest from running, icing, and compression to help with pain and accumulation of swelling. A mobility program including the foam roller series with emphasis on the quadriceps and the adductors are helpful in management, particularly for pes anserine bursitis (foam roller series). Similar to other knee injuries, also begin strengthening with the posterior exercises (posterior exercises) , then progress to anterior exercises (anterior exercises) and balance exercises (balance exercises). Bursitis typically takes 4-8 weeks to full recover.

Sharon Howard, DPT, SCS
Pain-Free Running: The Ultimate Guide to Overcoming and Preventing Injuries
pg 34
Characteristic IT Band Friction Syndrome
Patellofemoral Pain Syndrome
Patellar Tendini-tis/Tendinosis
Ligament Injuries
Bursitis
Pain Description and Location
Sharp pain in lateral knee, ache in infrapatellar fat pad
Ache under patella
Stabbing in the patellar tendon
Localized sharp pain on the in-side or outside of the knee joint
Feeling of full-ness or ache at the location of the bursa in-volved
Swelling Present Rarely Rarely During an acute tendinitis
Usually Yes
Aggravating Activities
Hill running Squats Jumping Motion of the knee, side-to-side motions
Bending and straightening the knee, kneeling
As part of your recovery from knee pain, I recommend you read the gradual progression section of this ebook to help guide you on how to maintain fitness and return to running (gradual progression). As noted throughout this book, if you find that your symptoms are severe or not improving with these treatment recommendations, please seek out a medical assessment by your local physician or physical therapist.

Sharon Howard, DPT, SCS
Pain-Free Running: The Ultimate Guide to Overcoming and Preventing Injuries
pg 35
ANKLE INJURIES:The main ankle joint (talocrural joint) is made up of the lower end of the tibia and fibula bones of the lower leg and the talus bone. The main weight bearing part of the joint is between the tibia and talus while the much smaller fibula has a less significant role in weight bearing. The outside ankle bone is called the lateral malleolus and is the lower end of the fibula while the inside ankle bone is called the medial malleolus and is the lower end of the tibia. The ankle, along with the foot, is subject to a great deal of force and is required to manage mobility necessary for running motions as well as the stability to keep the body in proper alignment. The stability of the ankle is assisted by several ligaments on the inside of the ankle, collectively called the deltoid ligament, that attach to the inside of the medial malleolus and into several bones in the foot. This is a very thick, strong ligament, which provides excellent stability and is thus less commonly injured than the lateral ankle ligaments. The lateral ankle ligaments in order from least to greatest strength are: the anterior talofibular ligament (ATFL), which connects the talus and the fibula; the calcaneofibular ligament (CFL), which connects the fibula to the calcaneus; the posterior talofibular ligament (PTFL), which is located in the back of the ankle and attaches the fibula to the talus; and the Achilles tendon, which is located at the back of the ankle and is
the tendon from the gastrocnemius and soleus muscles in the calf that inserts into the calcaneus. The Achilles tendon is the strongest tendon in the body. On the inside of the ankle, just behind the medial malleolus, the tarsal tunnel is formed by the tibia and an overlying piece of tissue, called a retinaculum. The tarsal tunnel contains the tibialis posterior tendon, the flexor digitorum longus tendon, the posterior tibial artery and vein, the tibial nerve, and the flexor hallucis longus tendon.
Some of the most common injuries in the ankle found among runners are:
Medial tibial stress syndrome(shin splints) and stress fractures
Ligament sprains
Achilles tendinitis
Tarsal tunnel syndrome
Post tib tendonitis/flexor hallicus tendonitis

Sharon Howard, DPT, SCS
Pain-Free Running: The Ultimate Guide to Overcoming and Preventing Injuries
pg 36
MEDIAL TIBIAL STRESS SYNDROME (SHIN SPLINTS) AND TIBIAL STRESS FRACTURES:This injury doesn’t technically occur in the ankle, but does relate to the bones associated with the ankle as well as the muscles that cross the ankle joint. Medial tibial stress syndrome (MTSS) is very common among runners, particularly among beginning runners. The exact mechanism for this injury is still debated, but most commonly it is described as an irritation of the periosteum which is a dense fibrous layer covering the outside of bones, which in this case is the tibia. Muscles insert into the periosteum and can cause irritation with forces that excessively surpass the amount of force that it has been accustomed to. This produces a dull ache that early on might dissipate with activity and improves with rest. As the injury progresses, it will become more intense, last for longer periods of time, and progress to pain even when not running. Pain is typically not reproducible with resisted ankle motions, but sometimes can accompany tenderness to touch along the inside of the tibia. The occurrence of this injury is typically a sign of poor training techniques, muscle weakness, and/or poor flexibility in the lower leg and foot. It is something that can and should be avoided and can benefit greatly from using proper prevention techniques.
Patients often do not realize the seriousness of this injury because it is so common among runners beginning a new program. It is important to monitor symptoms and take appropriate rest as needed. Progression of (MTSS) can lead to a tibial stress fracture, which is more common among high mileage athletes, but can occur in novice runners as well. The distinctive characteristic of a tibial stress fracture vs. “shin splints” is that with a tibial stress fracture, pain is constant
with every step, whether running, walking, or jumping, whereas shin splints are not as directly related to impact. The pain is also very localized to one point with a stress fracture. Sometimes a periosteal bump will develop along the tibia from the stress on the bone. Both injuries can be considered at different points on the same continuum, with the stress fracture being the more severe of the two. Individuals can be at greater risks for stress fractures with low bone density caused by inadequate nutrition, poor training techniques (too much, too soon), and muscle weakness and flexibility imbalances of the foot and ankle.
MTSS requires some modification of activity, which may mean decreasing mileage or cross training instead of running for a period of a few days to a couple weeks. If the injury has progressed to a stress fracture, rest from running for 4-8 weeks is required for complete healing. For this good reason, runners cringe at the thought of the diagnosis of stress fractures. I have been asked many times, “what will happen if I just run through the stress fracture?” While I completely understand the obsessive compulsive nature of those who ask me this question, I always tell of an incident of one of my teammates in college who did this very thing. She had been running through a stress fracture for many months and he was trying to finish the season strong, despite the pain. As she was approaching the finish line of a race, a blood curdling snap occurred and she collapsed to the ground. Imaging showed that her stress fracture had turned into a complete fracture of the tibia. While this may not happen to every person who runs through a stress fracture, it was enough to solidify in my mind that running through a stress fracture can create a problem that will take much longer to heal.

Sharon Howard, DPT, SCS
Pain-Free Running: The Ultimate Guide to Overcoming and Preventing Injuries
pg 37
MTSS is best treated with modified activity, foot and ankle strengthening, and lower leg mobilizations. The rest time with tibial stress fractures can also be a time to work on improving lower leg strength and flexibility. The initial phase of the injury should include using an ice cup to ice along the shins. For this, I recommend buying some disposable styrofoam cups (better than paper cups due to the insulation), filling them with water, and freezing them. You can just peel away the top layer as you rub the ice directly on the area of pain. This should be done for 6-8 minutes at a time a few times each day while painful. I also recommend the use of compression sleeves for the calves during activity throughout the healing phase to help increase blood flow to the injured area and take pressure off the muscle insertion into the periosteum. The strengthening section of this ebook contains some foot and ankle exercises that can be useful in treating MTSS (foot and ankle exercises). Progressing to the balance exercises as symptoms improve can help also in improving the lower leg weakness (balance exercises). A lower leg flexibility program is helpful, including calf stretching (calf stretch in flexibility section), foam rolling (foam roller series), and trigger point release of the calf muscles (trigger point release calf in flexibility section) as well as self massaging along the posterior tibialis muscle.
Self massaging along the posterior tibialis muscle is a simple way to release some of the tension along the periosteum. This can be done in a seated position with one ankle resting on the opposite knee. Using one of your thumbs, press along the muscle on the inside of the tibia as shown in the picture. This will likely feel quite tender initially. Self massage should be done for 2-3 minutes a few times each day while symptoms are present.
As the description of causation for both MTSS and tibial stress fractures can be summed up as “too much, too soon,” gradual progression back to running is essential. In the gradual progression section in this ebook (gradual progression section), I give a sample program for returning to running after an injury, which can be helpful in reigning in an overzealous athlete. In the healing phase, cross training is helpful to keep fitness and allow for healing. As mentioned previously, while a few days or a couple of weeks may be sufficient for recovery from MTSS, a minimum of 4 weeks is required for bone healing after a tibial stress fracture. If there is no pain at that point, a gradual progression can begin as long as it does not begin pain again. If there is pain, however, further rest should be taken up to 8 weeks, if necessary.

Sharon Howard, DPT, SCS
Pain-Free Running: The Ultimate Guide to Overcoming and Preventing Injuries
pg 38
LIGAMENT SPRAINS: Ankle sprains are a common injury in running, just as other sports. As discussed previously, the inside of the ankle is rarely sprained due to the protection from the deltoid ligament. The ligaments on the outside of the ankle are typically sprained in order of weakest to strongest, depending on the severity of the ankle sprain. In a mild ankle sprain, the ATFL is the only one involved and pain and swelling occur just in front of the lateral malleolus. This is the ligament that is most commonly injured first and requires the least amount of load to produce failure⁷. In a moderate ankle sprain, the ATFL and the CFL are sprained and pain can be felt in the front as well as on the outside of the ankle, and swelling is a little more prominent, particularly in the lateral ankle. With a severe ankle sprain, the PTFL is also injured and pain can be in the back of the ankle, swelling is more exaggerated, and the stability of the ankle is more compromised.
Ankle sprains can occur in runners when running on trails, landing awkwardly, or stepping off a curb and rolling the ankle to the outside. Evidence of injury is fairly immediate as pain occurs right away and swelling quickly ensues. Movement of the ankle is painful and the ankle is tender to touch. Along with spraining the ligaments, this injury can affect the lateral tendons (peroneals) as well and can cause soreness up the outside of the lower leg or even tendinitis in these muscles. Ankle sprains can be quite deceiving as they can look really bad when there is a great deal of swelling and people tend to want to protect by using crutches or a boot. However, optimal healing occurs with immediate range of motion and weight bearing, progressing into stability training. In rare occasions where a severe ankle sprain also had a fracture involved, immobilization is necessary for the bone healing.
If a fracture is involved, pain will not improve much with the range of motion exercises and weight bearing will continue to be nearly impossible. immediate medical attention and imaging is recommended.
Ankle sprains might be my personal favorite injury to treat, possible because of the way they respond so well to proper treatment. First and foremost, it is important to get the ankle moving. Most of the time, patients are fearful of ankle movement after a sprain because it is painful. However, with light range of motion, the pain will lessen much quicker than if left to be immobilized. I recommend beginning immediately by moving your ankle with the alphabet exercise. This is done by spelling the alphabet out with your foot, being sure to move the ankle as much as possible. Also, with your foot hanging off the edge of a chair or ottoman, move your toes up and down, in and out. Movement facilitates the lymphatic system to reabsorb inflammation, which is one of the sources of pain and stiffness after the injury. I have rarely found that crutches are helpful or necessary unless there is a fracture of the involved ankle. Often patients who have been prescribed crutches come to me with more fear of movement, less range of motion, excessive swelling, and still a large amount of pain. So move the ankle!!! That being said, wearing an ankle support brace during the early phases can help provide some stability and promote healing, just make sure you remove the brace several times a day to complete the exercises. Once the pain has subsided and walking is normal, then you can begin progressing to the foot and ankle exercises and balance exercises as tolerated. Some examples can be found in the ankle and foot exercises later in this ebook (link to foot and ankle exercises). A sprained ankle can take from 3-8 weeks to recover.

Sharon Howard, DPT, SCS
Pain-Free Running: The Ultimate Guide to Overcoming and Preventing Injuries
pg 39
ACHILLES TENDINITIS/TENDINOSIS: Tendinitis, or inflammation, can occur in any tendon. In the ankle, the Achilles tendon is particularly susceptible and is cited as the most common overuse injury in the lower leg⁹. As with other tendinitis, when the acute phase of inflammation is no longer present, the tendon is still left with dysfunctional and painful tissue that is in a disorganized and weakened state. With Achilles tendonitis or tendinosis, there is pain and sometimes swelling in the Achilles tendon and pinching the tendon will produce pain. It typically occurs with overuse and often will feel worse at the beginning of a run, but may improve some during the run. Achilles tendinitis/tendinosis is more prevalent in forefoot strikers and can often become an issue for someone attempting to change their gait to a more forefoot position, or someone who increases their mileage too aggressively, particularly on hills. There is also an increased risk for those who have high arched, rigid feet⁹.
Achilles tendonitis can become a very chronic condition if not taken seriously. Resting from running by cross training and beginning a flexibility program can facilitate a more speedy recovery. Foam rolling or trigger point release using a ball to the calves can be a helpful place to start (foam roller series). Most experts agree that eccentric training of the Achilles is essential in full recovery of the injury and to prevent recurrence. A simple and effective eccentric exercise for the Achilles tendon is the eccentric heel raise.
1. Eccentric Heel Raise: For this exercise, stand with two feet on the edge of a step, holding to a wall or a railing for support, lift up in a count of 1 onto both toes. Then, lower down very slowly in a count of 6-8. Repeat this exercise 10 times several times each day. When this is symptom free, you can lower down (only the lowering down part) on one leg by shifting to one leg after you push up onto your toes. Achilles tendinitis/tendinosis typically takes 4-6 weeks typically to recover. If it is frequently recurring, getting a running gait analysis is helpful in identifying patterns that might be perpetuating the problem.

Sharon Howard, DPT, SCS
Pain-Free Running: The Ultimate Guide to Overcoming and Preventing Injuries
pg 40
TARSAL TUNNEL SYNDROMETarsal tunnel syndrome (TTS) is an injury to the posterior tibial nerve as it passes through the tarsal tunnel below the medial malleolus. The symptoms include pain on the inside of the ankle and burning, tingling, or shooting pain down into the arch of the foot or even into the toes. Pain can be felt with stretching the foot out (eversion) or up (dorsiflexion). Pain usually worsens with activity and is worst at the end of a day, particularly if running or walking for a long period of time throughout the day. TTS can occur from a traumatic injury such as a forceful stretch of the foot into eversion and dorsiflexion, or from abnormal foot mechanics such as excessive pronation that places stress on the posterior tibial nerve. The key for treatment of this injury is to take excessive pressures off the nerve that is being irritated. Because the posterior tibial nerve travels under the inside of the ankle, over pronation of the foot places further stress on the nerve. Initially, getting arch supports can help relieve the pressure and decrease the pain. These can be over the counter shoe arch supports or custom made orthotics created by a trained professional. Some relief might also be found with a heel lift to take pressure off the nerve by putting the foot in a slightly plantarflexed position. Beginning immediately with the foot and ankle exercises found in this ebook can be helpful as well(link to foot and ankle exercises). Once symptoms allow, progressing to the balance exercises can help further foot and ankle stability (balance exercises). This type of injury requires 2-6 weeks recovery time.

Sharon Howard, DPT, SCS
Pain-Free Running: The Ultimate Guide to Overcoming and Preventing Injuries
pg 41
POSTERIOR TIBIALIS TENDINITIS/FLEXOR HALLUCIS LONGUS TENDINITISThe posterior tibialis and flexor hallucis longus tendons travel through the tarsal tunnel as well and both can become irritated anywhere along the muscle or tendon. Excessive pronation, surrounding muscle tightness, and weakness of these muscles can contribute to tendonitis. For posterior tibialis tendonitis, pain is usually present with resisted plantar flexion (pointing the toes) and inversion (pulling the toes in). For flexor hallucis longus tendonitis, pain is usually present with resisted toe flexion (curling the toes). Both of these versions of tendonitis in the early stages will feel worse at the beginning of a run and better after a “warmup.” As the injury progresses, pain will be worse throughout a run. If you try to “run through” this injury, it can lead to collapse of the arch of the foot because the posterior tibialis is one of the significant arch stabilizing muscles, so it is best to let symptoms calm down by cross training. Since the tendons of the posterior tibialis and the flexor hallucis longus muscles pass through the same area as the posterior tibial nerve, treatment for this injury is similar. Begin by taking the pressure off the tendons by getting an arch support, either over the counter or custom made from a qualified professional. In addition, begin foot and ankle strengthening with the exercises found in this ebook (foot and ankle exercises). In addition, doing a self massage on the muscle bellies of the posterior tibialis muscle and flexor
hallucis longus can improve pain and progress healing. This can be done in the same manner as described for MTSS. In a seated position with one ankle resting on the opposite knee, use one of your thumbs to press along the muscle on the inside of the tibia as shown in the picture. To work through both muscles, begin just above the medial malleolus and work along the inside of the tibia to at least ⅔ the way up toward the knee. Self massage should be done for 2-3 minutes a few times each day while symptoms are present.
As symptoms improve, progress to balance exercises and a gradual progression back to running. Depending on the severity of the injury, this injury can take from 2-8 weeks to fully recover.

Sharon Howard, DPT, SCS
Pain-Free Running: The Ultimate Guide to Overcoming and Preventing Injuries
pg 42
Characteristic Medial Tibial Stress Syndrome (Shin Splints) and Stress Fractures
Ligament Sprains Achilles Tendinitis/Tendinosis
Tarsal Tunnel Syn-drome
Posterior Tibialis Tendinitis/
Pain Description and Location
Ache to sharp pain depending on severity along the inside of the shin
Throbbing, acute injury with im-mediate pain
Ache in posterior ankle
Burning, tin-gling, shooting pain on inside of ankle, can travel into foot
Flexor Hallicus Tendinitis
Swelling Present No Yes During an acute tendinitis
Sometimes Sometimes
Mechanism of Injury
Too much too soon impact activities
Twisting, trip-ping, ankle turn-ing out forcefully
Overuse, increas-ing mileage, forefoot running
Excessive prona-tion, overuse
Excessive prona-tion, overuse
As part of your recovery from ankle pain, I recommend you read the gradual progression section of this ebook to help guide you on how to maintain fitness and return to running (gradual progression section). As noted throughout this book, if you find that your symptoms are severe or not improving with these treatment recommendations, please seek out a medical assessment by your local physician or physical therapist.

Sharon Howard, DPT, SCS
Pain-Free Running: The Ultimate Guide to Overcoming and Preventing Injuries
pg 43
FOOT INJURIESThe foot is the runner’s best friend or worst enemy. It is the tool that allows us to take each and every step, and when it is working well, we love it, appreciate it, or at the very least, don’t notice it. When an injury plagues the foot, every step feels like torture and our normal love for the sport can become soured. While so closely related to the ankle that it is often classified in the same section, I chose to focus this section purely on the injuries found below the ankle. The foot is typically divided up into three main sections: The hindfoot contains the talus and calcaneus (which is the bone of the heel), the midfoot contains the other five tarsal bones (navicular, cuboid, and three cuneiforms), and the forefoot is made up of the five metatarsal bones and fourteen phalanges. Along with so many bones in such a small body part, there are twenty muscles, many ligaments, and a plantar fascia that help stabilize and allow the foot to function in the complex manner required⁷.
The most common injuries that runners deal with in the foot are:
Plantar fasciitis
Metatarsalgia
Stress fractures
Neuromas
Tendinitis
Cuboid syndrome

Sharon Howard, DPT, SCS
Pain-Free Running: The Ultimate Guide to Overcoming and Preventing Injuries
pg 44
PLANTAR FASCIITIS:As a distance runner in college, this injury plagued me for about a year and I wish I knew then what I know now. I can still remember vividly the pain and the frustration associated with this and if you are suffering from this injury, I hope you will find some information in this ebook that will help restore you to health.
The plantar fascia is a thick band of tissue that travels on the bottom of the foot from the calcaneus to the forefoot. It plays a role in foot stability in weight bearing and impact activities such as running. Since it is responsible for managing such significant forces, it is no wonder that it can be a source of pain. When injured, pain and inflammation usually occur right at the insertion on the heel. While this injury can occur in sedentary individuals, particularly those who are overweight, it is also the most common foot injury among runners, particularly with higher mileage training plans. The pain is usually gradual at onset, beginning with a small ache after a run and progressing to pain with every step of walking or running. The pain is classically felt very sharply on the inside, front portion of the heel, although it can sometimes radiate into the arch and usually the arch “feels tight.” The typical presentation feels the worst first thing in the morning as rest allows the plantar fascia to shorten and tighten, so that first morning step pulls at the insertion point once again, causing a re-irritation. After the first step, it might loosen up some, but after sitting in the car, at your desk at work, or even to eat a meal, it might tighten up enough to cause a stabbing pain again with the first step after arising.
The first line of attack against plantar fasciitis is to get on a good calf and plantar fascia flexibility program. It is important to avoid that initial step
pulling, so I typically recommend someone keep a golf ball by their bed or at the office to use first thing before getting up by rolling the arch of your foot up and down over the golf ball. Also, using the following self stretch/massage before standing can be helpful: in a seated position, bring your injured foot to your opposite knee and pull your toes up toward your shin with one foot so the arch of your foot is tight. Using the thumb of your other hand, massage through the arch while maintaining the stretch for 2-3 minutes. A regular calf stretching program can also be helpful. One example of a calf stretch is demonstrated in the flexibility section of this ebook (calf stretch in flexibility section). In addition, sometimes a plantar fascia night splint can help to prevent the fascia from tightening overnight and improve pain. There are several varieties ranging from a sock to a boot.
I also highly recommend a custom or semi-custom orthotic as there are several studies that have found significantly greater improvement with the use of these over other treatments alone, so this would be a good time to find a qualified professional who can make orthotics¹⁰⁻¹¹. You can try an over-the-counter arch support, but they are often less rigid and usually do not provide enough support for someone with plantar fasciitis. If you do go this route, look for a support that has a hard plastic underneath the arch and can not be flattened when pressed upon. I also recommend that while symptomatic, people with this injury avoid walking around barefoot or in shoes without any arch support. Foot strengthening is essential as well. A study by Cheung et al. found that runners who were suffering from plantar fasciitis had significantly less rearfoot intrinsic muscle volume and a trend toward less total intrinsic muscle volume. They determined that patients

Sharon Howard, DPT, SCS
Pain-Free Running: The Ultimate Guide to Overcoming and Preventing Injuries
pg 45
with plantar fasciitis would benefit from intrinsic muscle strengthening exercises¹². Some great intrinsic muscle strengthening exercises can be found in the strengthening section of this ebook (foot and ankle exercises). This injury can last a long time if not treated properly. With proper treatment, 6-12 weeks is a typical recovery time.

Sharon Howard, DPT, SCS
Pain-Free Running: The Ultimate Guide to Overcoming and Preventing Injuries
pg 46
METATARSALGIA:Metatarsalgia is pain occurring in the heads of the metatarsals of the foot (the ball of the foot). It can happen for a variety of reasons, but typically involves an inflammatory process of the area. Risk factors include abnormalities in the bones of the foot such as short first metatarsal or abnormal shape of the head of the metatarsal; a hypermobile first metatarsal, which makes it possible for more pressure to be placed on the other metatarsals; tight Achilles tendon, posterior tibialis, or flexor hallicus longus muscles, which can alter the mechanics of landing to put more stress on the forefoot; improper fitting shoes, usually too narrow in the toe box; and spending a lot of time in high heels⁷. It often begins as someone rapidly increases their mileage and the feeling is typically described as a pebble under the ball of the foot with every step.
It is important to wear shoes that have a big enough toe box that there is not any compression on the toes. This is a time to wear some supportive sandals where the toes are open rather than constantly wearing running shoes. This kind of injury can also benefit from orthotics or metatarsal pads which can be found over the counter, or can be custom made by a qualified professional. Metatarsalgia treatment includes a foot mobilization program with emphasis on splaying the toes apart. You can do a simple stretch to your foot by placing your injured foot on your other leg and pulling the toes apart to stretch out the forefoot arch and alleviate pressure between the metatarsal heads.
This stretch is important to improve blood flow to the area and promote healing and take pressure off the metatarsal heads. Also soft tissue of the calf as well as the posterior tibialis and flexor hallucis longus muscles and the plantar fascia
(use plantar fascia massage) can be beneficial in taking some of the pressure off of the muscles inserting down into the foot and the toes. The self massage for the posterior tibialis and flexor hallucis longus muscles can be done with the same techniques as used for the tendinitis of these muscles in the ankle section. In a seated position with one ankle resting on the opposite knee, use one of your thumbs and press along the muscle on the inside of the tibia as shown in the picture. To work through both muscles, begin just above the medial malleolus and work along the inside of the tibia to at least ⅔ the way up toward the knee. Self massage should be done for 2-3 minutes a few times each day while symptoms are present.
In addition to a flexibility program, metatarsalgia can benefit from foot and ankle strengthening (foot and ankle exercises). As symptoms improve, balance exercises can also be added to improve muscular endurance of the foot and ankle (balance exercises). Typical recovery time for metatarsalgia is 4-6 weeks. If symptoms persist with treatment past this time, gait analysis is recommended to differentiate mechanics that might be causing pain.

Sharon Howard, DPT, SCS
Pain-Free Running: The Ultimate Guide to Overcoming and Preventing Injuries
pg 47
STRESS FRACTURES: Stress fractures can be found in any bone, but there are a few that are more common among runners. These include: tibial (discussed in previous section), metatarsal, and calcaneal. Mayer et al. cited the following intrinsic risk factors for stress fractures: cavus feet (high arches), leg length differences, excessive forefoot varus (the bones on the inside of the foot sit higher off the ground than the ones on the outside of the foot), tarsal coalitions (some bones in the back of the foot are abnormally connected together), prominent posterior calcaneal process, tight Achilles tendon, osteopenia/osteoporosis (low bone density), poor blood supply, and abnormal hormone levels. They also cited the following extrinsic factors that can increase the risk for a stress fracture: type of activity (long distance running and military participation were two of the highest), excessive/new training program, improper footwear, type of training surface (specifically, rapid changes in training surface), and sleep deprivation¹³.
With the onset of a stress fracture, the pain usually comes on gradually, beginning with a dull ache during running, progressing to pain with every step. The pain is usually sharp and able to be pinpointed in location. Once the pain has progressed to this point, extreme caution should be taken so as to avoid further stress which might progress into a complete fracture.
With stress fractures, the biggest part of treatment is giving the body enough time to rest in order to heal the bone. This means 4-8 weeks of low impact activities. Unfortunately, there are no exercises that heal bone any faster; however, by strengthening and mobilizing through the foot and ankle you can help correct imbalances that cause the injury in the first place (link to
foot and ankle exercises). After a stress fracture, It is important that that a return to running program is very gradual and monitored for symptoms. That being said, on occasion there will be an achiness that lingers in the area after a stress fracture has completely healed. I always recommend to my patients that they monitor any type of ache that they might have. If the ache seems to be getting better as they progress into the running program, then they are fine to continue. However, if it’s getting worse, they should stop running for at least 4 additional weeks.. If symptoms persist longer than 8 weeks, or are recurring, then it is recommended that you get a gait analysis by a qualified professional to see if there are any predisposing factors in the way you run that might be contributing to the recurrence. Also, this would be a situation that you might want to speak to your physician about a bone density assessment.

Sharon Howard, DPT, SCS
Pain-Free Running: The Ultimate Guide to Overcoming and Preventing Injuries
pg 48
NEUROMAS:A neuroma is a disorganized thickening of tissue around a nerve when an injury to the nerve occurs. It can happen anywhere in the body, but for runners, the most common is Morton’s neuroma, which most commonly occurs between the third and fourth toes, but can occur between the other toes as well. This injury is due to entrapment of the nerve between the metatarsals during the toe off phase (the part of the step where you push off) of running. Pain is typically described as burning, cramping, and tingling in the toes, and is relieved when walking barefoot. This has similar extrinsic risk factors to metatarsalgia including: abnormalities in the bones of the foot such as short first metatarsal or abnormal shape of the head of the metatarsal, a hypermobile first metatarsal, tight calf muscles, shoes that are too narrow in the toe box, and spending a lot of time in high heels⁷.
Footwear changes might be necessary for neuromas, just as with metatarsalgia. It is important to wear shoes that have a big enough toe box so there is no compression on the toes, thereby allowing the nerve room to decompress. Neuromas can also benefit from orthotics or metatarsal pads which can be found over the counter, or can be custom made by a qualified professional. The treatment for neuromas is very similar to that of metatarsalgia as well, due to the fact that it is caused by compression of the heads of the metatarsals just as metatarsalgia is caused
by irritation of the heads of the metatarsals. Similar to metatarsalgia, it is important to mobilize the foot with concentration on splitting of the forefoot (see mobilization techniques discussed in the metatarsal section). In addition to a flexibility program, neuromas can improve with foot and ankle strengthening (foot and ankle exercises). As symptoms improve, balance exercises can also be added to improve muscular endurance of the foot and ankle (balance exercises). Typical healing time is 2-6 weeks. In some cases where the symptoms persist or are severe, an orthopedic physician might recommend surgical intervention.

Sharon Howard, DPT, SCS
Pain-Free Running: The Ultimate Guide to Overcoming and Preventing Injuries
pg 49
TENDINITIS:Tendinitis of the foot is similar to other areas of the body. The most common I have seen with the feet of runners is tendinitis of the extensor digitorum longus and the extensor hallucis longus. Either of these can cause pain in the tendons on the top of the foot. The extensor hallucis longus is the the tendon that goes across the top of the foot to the first toe and allows for extension of the big toe. The extensor digitorum longus travels across the top of the foot and inserts into the lateral four toes and allows for extension of those toes. As with other tendinitis, pain is usually worse at the beginning of a run, improves some after warm-up, and worsens with static positions for an extended period of time. Initially, rest and ice are essential. Also, being careful about footwear choices is essential. With this type of injury, it is important to avoid backless shoes as this can add increased stress on those tendons as you are trying to hold the shoe on while walking. It can also cause pain if you have shoes that are compressing on the tendons, so you want to make sure that there are no straps compressing on the top of the foot and that the shoe is wide enough to minimize compression on the tendons.
Treatment for tendinitis of the foot is similar to other foot treatment plans. Foot mobility can be performed using the same techniques as described for plantar fasciitis and metatarsalgia. Use the foot and ankle strengthening exercises allow improved muscle balance to relieve stress from the affected tendons (foot and ankle exercises). As symptoms improve, balance exercises can also be added to improve muscular endurance of the foot and ankle (balance exercises). Typical treatment time for tendinitis is 2-6 weeks, and just as with other foot injuries, if symptoms linger longer than that you might consider getting a gait analysis.

Sharon Howard, DPT, SCS
Pain-Free Running: The Ultimate Guide to Overcoming and Preventing Injuries
pg 50
CUBOID SYNDROME:Cuboid Syndrome is an injury where the cuboid bone of the foot is repeatedly subluxed (shifted) from the connection it has with the calcaneus. The cuboid is one of the tarsal bones in the mid foot on the outside of the foot. Usually the joint between the calcaneus and the cuboid is very mobile, but sometimes with repetitive forces, it can become jammed and cause a great deal of pain. The pain is usually under the mid foot, toward the outside edge of the foot. Pain usually presents with a gradual onset and feels like there is a stone under the middle portion of the foot. Risk factors include running on uneven surfaces, or running on a slant with the outside of the foot being elevated (such as with running on the side of a road that has a slope), and increasing training too rapidly. While very painful, it can be treated fairly rapidly with proper treatment. It responds very well to manipulation of the cuboid (which requires the assistance of a physical therapist or chiropractor trained in cuboid manipulation) or self mobilization (although not as quick of a fix, it can be very effective). For a simple self-mobilization exercise, place a golf ball under the outside of your foot, and place gentle pressure down. Move the ball around until you are under the cuboid, which is typically very tender if you have cuboid syndrome. Hold for 10-15 seconds, release pressure, and repeat 10 times several times throughout the day.
Immediately following the mobilization, complete the foot and ankle exercises described in this ebook to help return normal foot mechanics (foot and ankle exercises). Treatment for this kind of injury is typically a few days to 3 weeks.

Sharon Howard, DPT, SCS
Pain-Free Running: The Ultimate Guide to Overcoming and Preventing Injuries
pg 51
As part of your recovery from your foot pain, I recommend you read the gradual progression section of this ebook to help guide you on how to maintain fitness and return to running (gradual progression section). As noted throughout this book, if you find that your symptoms are severe or not improving with these treatment recommendations, please seek out a medical assessment by your local physician or physical therapist.
Characteristic Plantar Fasciitis Metatarsalgia Stress Fractures
Neuromas Tendinitis Cuboid Syndrome
Pain Description and Location
Stabbing pain in the front of the heel
Feels like a rock under your toes
Constant pain in metatarsal with every step
Burning, tingling, shooting pain between the toes
Sharp or stab-bing pain on the top of the foot
Rock under the outside of the mid foot
Footwear Suggestions
Supportive shoes, avoid barefoot
Avoid tight fitting shoes or high heels
Based on foot mechanics
Avoid tight fitting shoes or high heels
Avoid tight fitting shoes
Supportive shoes

Sharon Howard, DPT, SCS
Pain-Free Running: The Ultimate Guide to Overcoming and Preventing Injuries
pg 52
PREVENTIONSECTION 2

Sharon Howard, DPT, SCS
Pain-Free Running: The Ultimate Guide to Overcoming and Preventing Injuries
pg 53
PREVENTIONSome of the most frequently asked questions I hear from running athletes who I work with is, “How do I keep this from happening again?” or “How do I keep from getting injured while I am training?” I had a coach who used to say that there is a very fine line between being at your fittest and being injured. Your goal is to get as close to that line as possible without crossing it. As a Physical Therapist, I might add that it is better to error on the side of slightly less fit because being incredibly fit, but too injured to run, does you no good.
One of the most important principles to remaining pain free while running is to give a little love back to your body. What I mean by this is that if you expect your body to perform for you while you are running, you need to take care of it. This includes flexibility and mobility work (go ahead and roll your eyes) and strengthening. So many runners think they can just log the miles to be the best runner, but to truly stay healthy, you have to do more. That being said, consistent running is one of the best ways to prevent running injuries. As you build consistency with your running program, your body adapts to the stresses of running and you are better able to tolerate it.
You may notice that the exercises for prevention are referred to throughout the treatment section as well. That is no error! By getting on a good strength and flexibility program, you can not only treat injuries, but you can prevent them as well. I always urge my patients to continue the program of exercises that got them feeling better. Those who do go on to achieve their goals, those who stop the exercises when they are feeling better usually end up back at my door. The following section will focus on the flexibility and mobility aspect of caring for your body. The next section includes all the exercises used for treatment and prevention. The final section will discuss specific gradual training plans and the basic principles of when it is okay to run or when you need to rest, as well as how to cross train.

Sharon Howard, DPT, SCS
Pain-Free Running: The Ultimate Guide to Overcoming and Preventing Injuries
pg 54
FLEXIBILITYFlexibility has long been reported as an important part of a runner’s program. In this section, we will discuss warm-up, foam rolling, and stretching as part of a flexibility program.
There is a great deal of debate among researchers about what kind of warm-up is best. For explosive sports and sprinting, the research most clearly supports the use of a dynamic warm-up prior to activity and the avoidance of static stretching prior to competitive events, as this can decrease performance and increase injury risk¹⁴⁻¹⁶.
Similarly, many studies support this same conclusion among distance runners. A study by Wilson et al. found that static stretching prior to endurance training decreased running efficiency by increasing energy costs, which may lead to decreased performance¹⁷. This might be explained in part by a study assessing the flexibility of distance runners that found that those with less hamstring flexibility demonstrated increased running economy¹⁸. Perhaps this is due to the lack of control that can come with increased muscle flexibility. Another study assessed the response of muscle activation in middle distance runners after two different protocols, one including a dynamic warmup and bounding and sprinting drills while the other was static stretching after a jog. These researchers found that the dynamic warmup increased muscle activation¹⁹. Static stretching can have some important benefits, however, and should be used, just not before a run. Another study by O’Sullivan et al. determined that static stretching, rather than dynamic stretching, increases hamstring flexibility in previously injured runners who were lacking flexibility post injury. As muscle
balance is important, this is an important finding to support the use of static stretching on muscles that are lacking flexibility²⁰.
With this in mind, the following is a specific dynamic warm-up that can be used prior to running as well as some static stretching that can be used for specific muscle tightness post running.

Sharon Howard, DPT, SCS
Pain-Free Running: The Ultimate Guide to Overcoming and Preventing Injuries
pg 55
DYNAMIC WARMUP:There are many options for a dynamic warm-up, the warm-up I include here is one that I have used with my patients.
1. Hacky Sack: Stand in one place and bring your foot of one leg in toward your opposite hand, then bring it out toward the same side. Complete this 20 times on each leg.
2. Soldiers: Stand and kick one leg up toward opposite hand, then sweep that leg through and reach with your other hand toward the foot on the floor. Then sweep the leg through to step and repeat on the opposite leg. Complete 20 times.

Sharon Howard, DPT, SCS
Pain-Free Running: The Ultimate Guide to Overcoming and Preventing Injuries
pg 56
3. Knee to Chest: Bring one knee to chest, step forward, repeat with the other leg. Complete 20 times.
4. Quad Pull with Heel Raise: Grab your foot behind you and pull directly toward your glute of the same side while pushing up into a heel raise. Step forward and repeat on the other side. Complete 20 times.

Sharon Howard, DPT, SCS
Pain-Free Running: The Ultimate Guide to Overcoming and Preventing Injuries
pg 57
5. Lunge with a Twist: Lunge forward, extend arms, and rotate once to each side. Step forward into a lunge on the other leg and repeat. Complete 20 times.

Sharon Howard, DPT, SCS
Pain-Free Running: The Ultimate Guide to Overcoming and Preventing Injuries
pg 58
6. Three Way Lunge: Begin with a large step and lunge with the back leg remaining straight, bring both hands to the floor on the inside of your front leg. Keeping one hand on the floor, rotate toward your front leg. Place your hand on your knee and lift up into a front lunge keeping your hips low. Step through into a lunge on the other leg and repeat. Complete 20 times.

Sharon Howard, DPT, SCS
Pain-Free Running: The Ultimate Guide to Overcoming and Preventing Injuries
pg 59
7. After these exercises, continue the warmup with 15-30 seconds each of high skips, butt kicks, high knee run, and grapevine. Then start the run with a slower pace than your normal running pace for 5-10 minutes. If you are going into a speed workout, I also highly recommend four to eight repetitions of 50-100m sprints prior to the first interval.

Sharon Howard, DPT, SCS
Pain-Free Running: The Ultimate Guide to Overcoming and Preventing Injuries
pg 60
STATIC STRETCHING:The next exercises are the stretches I have found to be most effective for any running injury prevention plan. Complete these after your workout, or very gently at a time other than before your run, particularly if you are tight in a certain area.
1. Pigeon Stretch: Sit on the floor and position one leg in front and one leg behind. tretch forward over the front leg for an adductor and hip rotator stretch, then come up and pull your foot behind to get a deep quad/hip flexor stretch. Hold 30 seconds, complete 3 times on each side.

Sharon Howard, DPT, SCS
Pain-Free Running: The Ultimate Guide to Overcoming and Preventing Injuries
pg 61
2. Runner’s Lunge: Place hands on the floor, bring one leg up next to your hands, and rest the knee of the back leg on the floor. Stretch here for hip flexor/adductors, pull up foot behind glut to add quad and hip flexors on the back leg. Hold 30 seconds, complete 3 times on each leg.
3. Burning Logs: In seated position, stack one heel on top of the opposite knee. Keep your toes pulled up toward your shin to protect your knee. Lean forward until you feel a stretch in the hip rotators. Hold 30 seconds, complete 3 times on each leg.
4. Supine Hamstring Stretch: Use a belt, dog leash, or stretching strap. Lie flat on your back and loop the strap around your foot, then pull up with your knee straight until a stretch is felt in the back of the leg. Hold 30 seconds, complete 3 times on each leg.

Sharon Howard, DPT, SCS
Pain-Free Running: The Ultimate Guide to Overcoming and Preventing Injuries
pg 62
5. Butterfly Stretch: Sit with the bottoms of your feet together, lean forward until you feel a stretch in your adductors. Hold 30 seconds, complete 3 times each leg.
6. Calf Stretch On Step: Stand on a step, hang one heel off the ledge and press down until a stretch is felt. Can do this with knee straight or knee bent to stretch the different muscles in the calf. Hold 30 seconds, complete 3 times each leg.

Sharon Howard, DPT, SCS
Pain-Free Running: The Ultimate Guide to Overcoming and Preventing Injuries
pg 63
FOAM ROLLING:Another important preventative technique is through myofascial release using a foam roller. There are lots of studies showing the benefit of using a foam roller. A study by Pearcey et al. assessed the response of athletes after some high intensity dynamic performance measures with and without the use of foam rolling immediately and over the next few days²¹. They found that 20 minutes of foam rolling decreased muscle soreness and improved dynamic performance measures. Another study described the benefit of using a foam roller prior to a workout. They studied two groups; one group was given a planking program to complete prior to performing a series of performance tests and he other group was given a foam rolling program prior to the performance tests. They found that those who foam rolled prior to the performance tests had less fatigue following the performance tests. This, they concluded, could result in improved performance by allowing for longer and more intense training, which could enhance performance in the long term²². Another study tested whether static stretching, foam rolling, or the combination of both created a difference in ankle range of motion. The researchers found that while all helped immediately with ankle range of motion, the combination of foam rolling with static stretching created the greatest changes. This is an important finding, particularly for someone who has a loss of range of motion due to muscle tightness, such as might occur after an injury²³. Now that I have you convinced of its importance, let’s go through a few of the key muscle groups.
1. IT Band: Place the foam roller under the outside of your upper leg and roll from your hip to your knee. It is important that you refrain from rolling over the bony area on the outside of your hip and that you do not roll over the knee joint in this position. Repeat for 1-2 minutes. If there are places that are sore, work slowly over those areas.
2. Quadriceps: Facing the ground with the foam roller under your thighs, roll from hips to just above the kneecaps. Do not roll onto the kneecaps. Repeat for 1-2 minutes. If there are places that are sore, work slowly over those areas.

Sharon Howard, DPT, SCS
Pain-Free Running: The Ultimate Guide to Overcoming and Preventing Injuries
pg 64
3. Adductors (groin): While on your side, place one leg on top of the foam roller, roll the inside of you leg. Repeat for 1-2 minutes. If there are places that are sore, work slowly over those areas.
4. Gluteal Muscles: Sitting on the foam roller, place one ankle on the opposite knee. Leaning back, roll back and forth through the gluteal muscles. Repeat for 1-2 minutes. If there are places that are sore, work slowly over those areas.
5. Hamstrings: Face up, place the foam roller under your thighs and roll back and forth. If not deep enough, stack one leg on top of the other for a deeper release. Repeat for 1-2 minutes. If there are places that are sore, work slowly over those areas.
6. Calves: Place the foam roller under your calf and roll up and down the calves. If needed for a deeper release, use one leg at a time. Repeat for 1-2 minutes. If there are places that are sore, work slowly over those areas.

Sharon Howard, DPT, SCS
Pain-Free Running: The Ultimate Guide to Overcoming and Preventing Injuries
pg 65
TRIGGER POINT RELEASE: Along the same lines as the foam roller, but a little more target specific, I suggest the use of a tennis ball, lacrosse ball, or trigger point ball to pinpoint specific areas of tightness. This can be done on an as needed basis due to a specific tightness, or as treatment for an injury. While this can be used for any muscle, the most commonly used trigger points with the running athletes I see are described here.
1. Low Back/QL Muscle: Being careful not to roll under the spine or directly under any ribs, place ball under the low back muscles and roll until specific trigger point is found. Hold for 60-90 seconds at a time for up to 5 minutes, moving to a new trigger point in the area as needed.
2. Glutes/Piriformis: Place the ball under tender area with one foot on top of the opposite knee, then move until the trigger point is found. Hold for 60-90 seconds at a time for up to 5 minutes, moving to a new trigger point in the area as needed.
3. Tensor Fascia Latae: On your side, just below the most prominent part of your hip bone, place the ball. Move around to find a trigger point. Hold for 60-90 seconds at a time for up to 5 minutes, moving to a new trigger point in the area as needed.

Sharon Howard, DPT, SCS
Pain-Free Running: The Ultimate Guide to Overcoming and Preventing Injuries
pg 66
4. Hip Flexors: Face down with the ball just inside and below the prominent bone of your hip. Move around to find a trigger point. Hold for 60-90 seconds at a time for up to 5 minutes, moving to a new trigger point in the area as needed.
5. Hamstring: Place the ball just under your sit bone and roll down into the hamstring. Move around to find a trigger point. Hold for 60-90 seconds at a time for up to 5 minutes, moving to a new trigger point in the area as needed.
A regular flexibility routine of a dynamic warm-up prior to a run, followed by a myofascial release using a foam rolling and some static stretching after the run can help keep your body tissues injury free. A few extra minutes a day can make a huge difference in injury prevention.

Sharon Howard, DPT, SCS
Pain-Free Running: The Ultimate Guide to Overcoming and Preventing Injuries
pg 67
STRENGTHENING EXERCISESStrengthening is an important, often neglected part of a running program. It can not only improve performance, but it can also prevent injuries. A review of many different studies on the role of strength training in injury prevention among runners done by Yamamoto et al. found enough evidence in favor of strength training that they recommended that coaches implement resistance training into any running training plan²⁴. Another study by Frederick et al. found a significant weakness in the hip abductor muscles in distance runners who were suffering from IT band syndrome⁶. Another study looked at athletes who were injured with a single overuse injury compared to those who were not injured. In the healthy athletes, there were no significant side to side differences in hip flexor, hip abductor, and hip adductor muscle strength. However, in injured athletes, the hip flexor and hip abductor groups were significantly weaker on the injured side while the hip adductor group was significantly weaker on the non-injured side. This study can’t explain whether the weakness occurred because of the injury, or the injury occurred because of the weakness, but it is clear that hip muscle weakness is correlated to injury in a significant way²⁵. A systematic review done by Neal et al. looked at studies that assessed the relationship between anterior knee pain and muscle strength. They found a great deal of research to support the notion that proximal (hip/core) strengthening can reduce knee pain and
that weakness in these areas is a risk factor for running injuries. They also found that running mechanics can be altered with specific training, which can also improve symptoms. They did find that strengthening alone did not alter poor running mechanics²⁶. Thus, when independent exercises do not improve pain, it is important to seek professional running gait assessment and training to facilitate improvement.
With regards to low back pain, one study looked at male and female recreational runners and compared those with low back pain and those without. They found that runners who had low back pain had significantly less quadriceps strength than those without low back pain. They also found that, particularly in male runners, those with low back pain had lower muscle activation of the lumbar multifidus, which is a spinal stabilizing muscle²⁷.
These are just a small sampling of studies that emphasize the importance for runners of muscle balance that can be achieved by a regular strengthening program. This section includes a variety of exercises, including exercises referred to in the treatment section for specific injury treatment. Overall, the exercises here can also work to balance muscle strength in non-injured runners, thus preventing injury. The exercises are divided into categories based on the treatment section, but can be included in a general strengthening program as well.

Sharon Howard, DPT, SCS
Pain-Free Running: The Ultimate Guide to Overcoming and Preventing Injuries
pg 68
Day 1 Day 2 Day 3 Day 4 Day 5 Day 6
Week 1 Posterior exercises
Neutral spine core exercises
Balance exer-cises
Neutral spine core exercises
Anterior exercises Rest
Week 2 Posterior exercises
Neutral spine core exercises
Balance exer-cises
Neutral spine core exercises
Anterior exercises Rest
Week 3 Posterior exercises
Neutral spine core exercises, side plank
Balance exer-cises, foot and ankle exercises
Neutral spine core exercises, side plank and forward plank
Anterior exercises Rest
Week 4 Posterior exercises, cat/cow, bird dogs
Neutral spine core exercises, side plank
Balance exer-cises, foot and ankle exercises
Neutral spine core exercises, side plank, and forward plank
Anterior exercis-es, face down heel squeeze, cobra holds
Rest
Week 5 Posterior exercises, cat/cow, bird dogs, quadruped rotations
Neutral spine core exercises, side plank, and forward plank
Balance exer-cises, foot and ankle exercises
Neutral spine core exercises, side plank, and forward plank
Anterior exercis-es, face down heel squeeze, cobra holds, ball walk-outs with tucks
Rest
STRENGTHENING PROGRAM
The following worksheet is a sample of how to use these exercises in a prevention strengthening program.

Sharon Howard, DPT, SCS
Pain-Free Running: The Ultimate Guide to Overcoming and Preventing Injuries
pg 69
BACK EXERCISES:The following exercises are divided into categories based on the emphasis on flexion or extension for ease with treatment protocol. You may notice that the same exercise is in more than one section. It is important to note that the part of the exercise that is specified is important based on the positional bias you are working with.
CORE EXERCISES:
NEUTRAL SPINE:
1. TA Draw In: Lie on your back with your knees bent and the small of your back flat on the ground. Pull your belly button down toward your spine and hold for 5 seconds. Complete 10 times. This position is considered a neutral spine.
2. Pelvic Tilts: In the same position as the TA draw in, gently rock your pelvis forward by making a small arch in your low back. Flatten your back again by drawing your belly button down to your spine. Complete a repetition of arching and flattening 20 times.
3. Supine Pullover: In the same position as the previous exercises, lift a weight over your head with a deep breath in. Pull your belly button to your spine as you exhale and pull the weight toward your legs. Complete slowly with your breath 10 times.

Sharon Howard, DPT, SCS
Pain-Free Running: The Ultimate Guide to Overcoming and Preventing Injuries
pg 70
FLEXION BIAS:
1. Cat/Cow: The flexion bias version of this exercise focuses on the cat part of the sequence. On your hands and knees, take a deep breath in while maintaining a neutral spine or going gently into an arched down position (if pain free). Breath out as you arch your back up. Complete slowly with your breath 10 times. (Note: A full cat/cow for prevention combine the flexion and the extension portions with smooth breath.)
2. Bird Dogs: For the flexion bias version of this exercise, begin on your hands and knees. Tuck one knee toward the opposite elbow, then return to starting position. Repeat on opposite side. Complete 10 times on each side. (Note: A full bird dog for prevention measures uses the extension and the flexion together.)

Sharon Howard, DPT, SCS
Pain-Free Running: The Ultimate Guide to Overcoming and Preventing Injuries
pg 71
3. Single Knee to Chest: Laying in your back in the neutral spine position, take in a deep breath. As you blow out slowly, bring one knee toward your chest and pull your belly button to your spine. Breathe in as you set it back down to the table. Repeat on the other side. Complete 5 times each leg slowly with your breath.
4. Ball Squeeze With Lift: Begin on your back with your knees bent and a ball between your knees. Squeeze the ball tightly and, while pulling your belly button to your spine, lift the ball toward your chest. Make sure your back remains flat. If you are unable to maintain a flat back, you are not stabilizing well and you should begin without lifting the ball. Just squeeze the ball and pull your belly button to your spine.

Sharon Howard, DPT, SCS
Pain-Free Running: The Ultimate Guide to Overcoming and Preventing Injuries
pg 72
EXTENSION BIAS: 1.Cat/Cow: The extension version of this begins on hands and knees. Take a deep breath in as you arch your low back. Exhale as you return to neutral spine. Complete slowly with your breath 10 times. (Note: A full cat/cow for prevention combines the flexion and the extension portions with smooth breath.)
2. Bird Dogs: The extension version of this exercise begins in neutral position on hands and knees. Take a deep breath in as you lift one leg and the opposite arm away from each other, keeping your belly button drawn in to your spine. Exhale as you return to neutral position. Repeat on opposite side. Complete 10 times on each side. (Note: A full bird dog for prevention measures uses the extension and the flexion together.)
3. Face Down Heel Squeeze: Begin this exercise face down on your stomach. Bend your knees and press your heels together. While maintaining the heel squeeze, squeeze your gluteal muscles. If able to maintain this position without pain, lift the legs off the ground. Hold for 5 seconds. Complete 10 times.
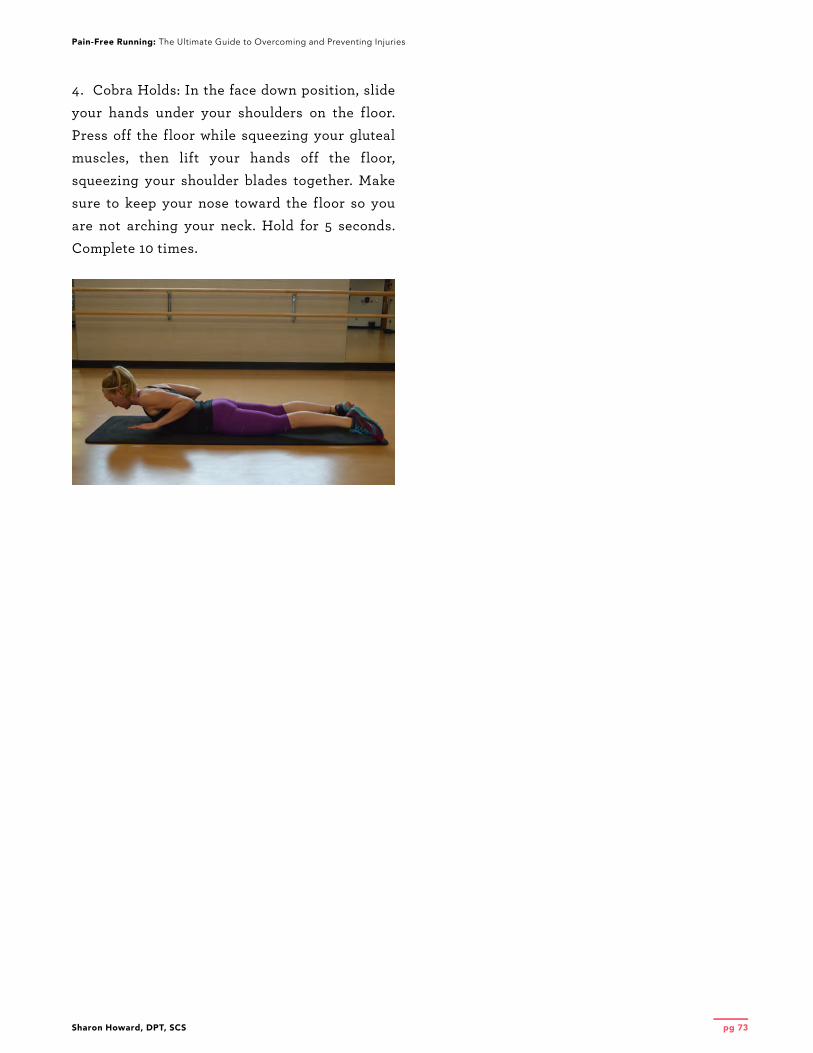
Sharon Howard, DPT, SCS
Pain-Free Running: The Ultimate Guide to Overcoming and Preventing Injuries
pg 73
4. Cobra Holds: In the face down position, slide your hands under your shoulders on the floor. Press off the floor while squeezing your gluteal muscles, then lift your hands off the floor, squeezing your shoulder blades together. Make sure to keep your nose toward the floor so you are not arching your neck. Hold for 5 seconds. Complete 10 times.

Sharon Howard, DPT, SCS
Pain-Free Running: The Ultimate Guide to Overcoming and Preventing Injuries
pg 74
ADVANCED: The following exercises are a great way to progress from the basic core activation exercises. The important items to note when doing these exercises are: 1. You must be able to maintain a neutral spine (think belly button to spine, no arching in the back), and 2. You should not be having any pain with any of these exercises. If you do have pain, go back and work further on the core activation exercises.
1. Planks Forward and Side: ith either position, ensure you are able to maintain a strong stabilization of the low back by drawing your belly button to your spine and squeezing your gluteal muscles. Make sure not to arch your low back. Begin with 15-30 seconds of each direction (front and each side) and progress as long as you are not having pain and you are able to maintain proper form.

Sharon Howard, DPT, SCS
Pain-Free Running: The Ultimate Guide to Overcoming and Preventing Injuries
pg 75
2. Quadruped Rotations: From a neutral spine on hands and knees, lift one arm toward the ceiling and the leg on the same side shooting away from your head, parallel to the floor. As a unit, keeping your belly button to your spine, rotate slowly back to neutral and over to the other side. Complete slowly 5 times on each side.
3. Ball Walkouts With Tucks: Using an exercise ball, walk your hands on the floor in front of the ball until your feet are on the ball. Pull your knees into your chest 5 times, then walk back with your hands. Complete 5 times.

Sharon Howard, DPT, SCS
Pain-Free Running: The Ultimate Guide to Overcoming and Preventing Injuries
pg 76
POSTERIOR EXERCISES: 1. Bridges: Position on your back with your knees bent so that your feet are directly under your knees if possible. Squeeze your gluteal muscles and lift your hips in the air. Complete slowly 20 times. If this exercise causes pain in your low back or your hamstring, try focusing more on activating your gluteal muscles, which can often relieve the pressure on those areas.
2. Clams: Begin on your side, with your knees bent and drawn up toward your chest. Lock your heels together and rotate the top leg open. Make sure that your hip remains forward and does not roll back as you lift your leg.
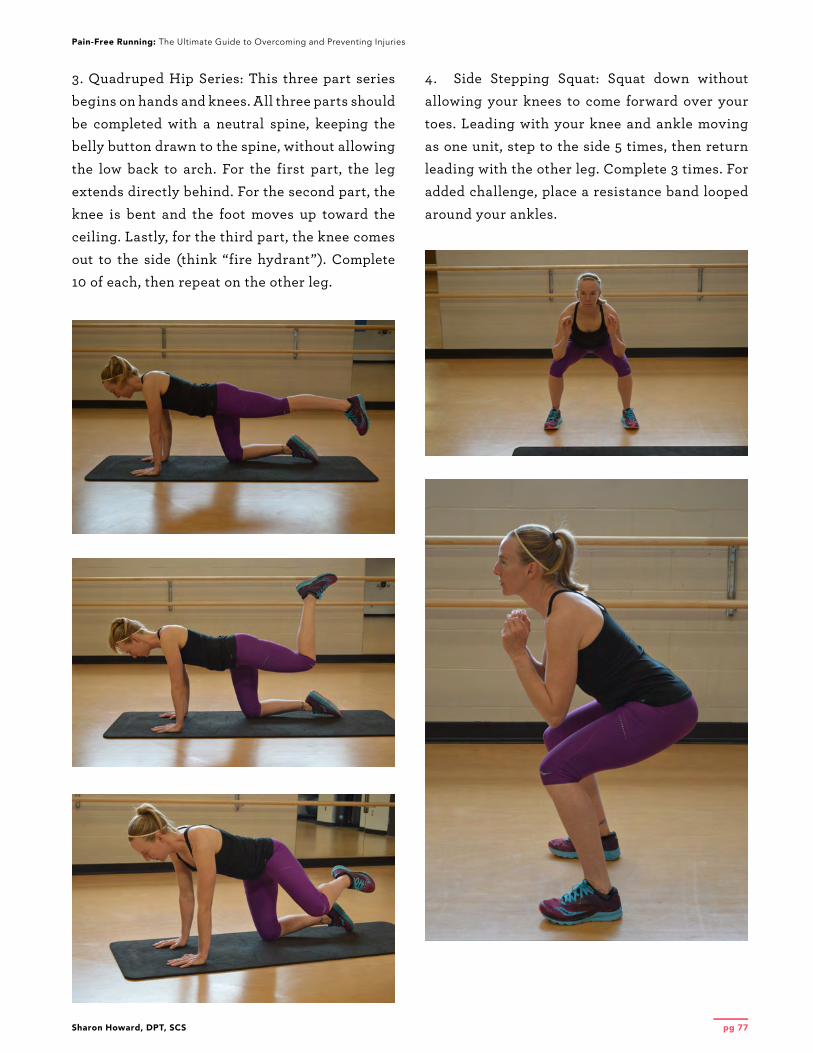
Sharon Howard, DPT, SCS
Pain-Free Running: The Ultimate Guide to Overcoming and Preventing Injuries
pg 77
3. Quadruped Hip Series: This three part series begins on hands and knees. All three parts should be completed with a neutral spine, keeping the belly button drawn to the spine, without allowing the low back to arch. For the first part, the leg extends directly behind. For the second part, the knee is bent and the foot moves up toward the ceiling. Lastly, for the third part, the knee comes out to the side (think “fire hydrant”). Complete 10 of each, then repeat on the other leg.
4. Side Stepping Squat: Squat down without allowing your knees to come forward over your toes. Leading with your knee and ankle moving as one unit, step to the side 5 times, then return leading with the other leg. Complete 3 times. For added challenge, place a resistance band looped around your ankles.

Sharon Howard, DPT, SCS
Pain-Free Running: The Ultimate Guide to Overcoming and Preventing Injuries
pg 78
5. Posterior Leg Lifts: Begin face down on the floor, lift one leg off the floor behind you 20 times, repeat on the other leg.
6. Side Leg Lifts: This exercise can be completed in a plank (as shown) or while lying on your side. The important thing with a side leg lift is that your leg stays behind you, rather than coming forward so that it activates the gluteal muscles that are being targeted. If you are unable to maintain this position, try positioning yourself with your back against the wall and placing a towel behind your heel of the top leg. Press the heel into the wall and slide up and down. Complete 10-20 times each leg.

Sharon Howard, DPT, SCS
Pain-Free Running: The Ultimate Guide to Overcoming and Preventing Injuries
pg 79
ANTERIOR EXERCISES: 1. Straight Leg Raises: Begin laying on your back with one knee bent and one knee straight. Lift and lower the straight leg slowly. Complete 20 times each leg.
2. Ball Wall Squats: Using an exercise ball in the small of your back, lean against a wall. Keep your toes in front of your knees and squat down. Complete 20 times.

Sharon Howard, DPT, SCS
Pain-Free Running: The Ultimate Guide to Overcoming and Preventing Injuries
pg 80
3. Step Ups: Using a stair or a box step, step up with one leg, making sure your knee stays in line with your hip and does not come to the inside. Tap your other foot on the step, then step down. Complete 15 times on each side.
4. Static Lunges: Place one foot forward, keeping your feet planted in the same place, lunge down, then return to standing. Make sure you are not allowing your front knee to come to the inside of the hip, and that you drop straight down, making sure your knee does not go forward over your toes.

Sharon Howard, DPT, SCS
Pain-Free Running: The Ultimate Guide to Overcoming and Preventing Injuries
pg 81
5. Lunge and Lift: Begin the same as the static lunge, but after you lunge, press off your back leg to lift it in front of you. Lunge back to the lunge position and complete 10 times on each side.
6. Knee tucks: This exercise can be positioned with hands on a wall or table, hands on a ball (pictured), or hands on the floor in a plank position. In whatever position you feel ready for, bring one knee to chest at a time. Complete 15 times on each leg, alternating legs.

Sharon Howard, DPT, SCS
Pain-Free Running: The Ultimate Guide to Overcoming and Preventing Injuries
pg 82
FOOT/ANKLE EXERCISES:
BASIC: 1. Arch Lifts: In standing or seated position, with your foot flat on the floor, tense and lift the arch of your foot. This should cause very minimal toe curling. You should feel the muscles in the arch tense, even if the movement is minimal. Relax and complete 15 times. Notice in the picture a very subtle lift in the arch.
2. Towel Scrunches: In a seated position, place a small towel under your feet. Curl your toes and scrunch the towel. At first, the towel may not move much and that is not very important, just keep activating the muscles as you curl your toes. As you get stronger, you should be able to move the towel more. Repeat for 1-2 minutes.

Sharon Howard, DPT, SCS
Pain-Free Running: The Ultimate Guide to Overcoming and Preventing Injuries
pg 83
3. Seated Toe and Heel Raises: Seated in a chair, put your feet flat on the ground and raise your toes, then raise your heels. Repeat for 1-2 minutes.
4. Seated Toes In/Toes Out: Seated in a chair, put your feet flat on the ground and raise your toes. Then point your toes toward each other, then away from each other. Repeat for 1-2 minutes

Sharon Howard, DPT, SCS
Pain-Free Running: The Ultimate Guide to Overcoming and Preventing Injuries
pg 84
5. Heel Raises: Start standing on two feet. Raise up onto your toes by lifting your heels. Repeat 20 times. For an added challenge, complete standing on one leg, 10 times each leg. You may need to put a hand on the wall to stabilize so you can better engage and reach maximum height of your heel raise. If these are pain free, you can get a bigger range of motion by completing this off a step, sinking your heels below the step, and then lifting up as high as you can onto your toes.

Sharon Howard, DPT, SCS
Pain-Free Running: The Ultimate Guide to Overcoming and Preventing Injuries
pg 85
BALANCE EXERCISES: 1. Single Leg Balance: Stand on the floor on one foot. Hold for 60 seconds, repeat on the other leg. Complete 2 times on each leg. To make this more challenging, close your eyes or stand on an unsteady surface such as a disc or a half ball.

Sharon Howard, DPT, SCS
Pain-Free Running: The Ultimate Guide to Overcoming and Preventing Injuries
pg 86
2. Diagonals Series: This series includes three different directions. They are all completed standing on one leg. First part: reach with your non-standing leg and touch the floor behind your standing leg. Pull up and out to the side, bringing your toes toward your shin. Complete 10 times. Second part: reach out with your non-standing leg behind and out to the side away from your standing leg. Pull up and through, coming across your body, toes coming up toward your shin. Complete 10 times. Third part: reach forward toward the toes of your standing leg, bringing your non-standing leg up behind you. Complete 10 times. Once you have completed all three exercises, switch standing legs and repeat on the other leg.

Sharon Howard, DPT, SCS
Pain-Free Running: The Ultimate Guide to Overcoming and Preventing Injuries
pg 87
3. Single Leg balance with Kicks in Three Directions: Standing on one leg, kick your non-standing leg out to the side 15 times slowly, then behind you 15 times slowly, then forward 15 times slowly. Switch legs and complete on the other leg.

Sharon Howard, DPT, SCS
Pain-Free Running: The Ultimate Guide to Overcoming and Preventing Injuries
pg 88
GRADUAL PROGRESSION
SECTION 3

Sharon Howard, DPT, SCS
Pain-Free Running: The Ultimate Guide to Overcoming and Preventing Injuries
pg 89
GRADUAL PROGRESSIONAs a runner, you most likely want to run when you want to run. For some, that means you have withdrawal symptoms after a single day without a run, while others just want to be able to pick up and go for a run here and there. Whichever runner you are, there are some basic principles of training that I suggest based on frequently asked questions that I hear.
When can I run through an injury, when do I need to rest?This is a common question that I get asked from my running patients. There are certain injuries that I highly recommend that you never try to run through. These include:
1.Labral tears of the hip due to the high
risk of increasing the injury if not given
adequate rest, or at least eliminating the
possibility of conservative (non-surgical)
treatment.
2.Stress fracture. As discussed previously,
these have the potential to turn into a
complete fracture if not treated with
adequate rest.
3.Any injury with significant swelling.
This could include just about any injury.
Swelling is a sign of damage and has poor
effects on the tissues of the body if left
to perpetuate for a long period of time.
Running will most certainly worsen any
accumulation of swelling due to the impact
and the gravity pooling.
With those on the table, here are my rules for other injuries and severities:
1.If your injury changes the way you are
running, you need to wait until it is healed
longer. Failure to follow this rule can lead
to other, possibly even more significant
injuries. I remember a time when I had a
fairly severe blister covering the bottom
of my big toe. A blister is something that
seems silly to limit a run over, so I went
ahead with my scheduled 12 mile run.
That run set off a cascade of injuries
because the entire time, I was running on
the outside of my foot to avoid pushing off
where the blister was located on my foot.
The body is very susceptible to drastic
changes in the way you do something like
running, which happens repetitively over
a large amount of repetitions.
2.If your injury improves as you run (for
example, the first ½ mile is uncomfortable,
but then you can’t feel pain for the next 6
½ miles), you may proceed with caution.
If your injury worsens as you get further
into your run, you should stop running.
3.If your pain is improving with each
time you run, then you can proceed with
caution, but be very gradual in your
progression. However, if each run is more
painful than the previous run, you should
take some time off running.

Sharon Howard, DPT, SCS
Pain-Free Running: The Ultimate Guide to Overcoming and Preventing Injuries
pg 90
What do I do when I can’t run?For many runners, taking a day off seems like a failure. For this reason, a beautiful thing called “cross training” was invented. Cross training for runners is doing an aerobic exercise that is different than running, most typically something with lower impact. Some of the basic and favorite methods of cross training are: walking, swimming, aqua jogging, cycling, hiking, aerobics class, skiing, as well as cardio equipment such as an elliptical trainer, stairmill, or stationary bicycle. The method of cross training you choose to use should depend on the reason you are cross training. Some people build a few days/week of cross training into their regular routine. In these situations, you can choose what method you desire to use, or what makes you feel most rested from running. Just as with running, it is important to gradually progress cross training because there is such a thing as too much too soon with cross training as well that can lead to an injury.
If you are choosing a cross training method because you have an injury, more consideration is necessary. You want to choose activities that are least aggravating. That being said, you can apply the same rules about running through an injury to cross training. If your pain is mild (less than 3) and seems to improve from one cross training session to another, then the cross training is an effective mode of active rest. If the pain is still severe, or it does not seem to be improving with cross training, another method should be considered. There are some types of pain that do not go well with some types of cross training. For example, knee pain such as runner’s knee or IT band syndrome can be aggravated by a stairmaster or a hike, particularly one with a great deal of downhill. Foot injuries can be aggravated more with walking or hiking.
What is an appropriate amount to cross train? Generally, I suggest that you cross train for as long as you would have run. That means if your typical 4 mile run takes 40 minutes, and that is what you would have run that day, cycle for 40 minutes. This is an easy way to calculate it and hopefully you will be back to running soon. This rule will help to maintain your fitness in the meantime.
How do I start a running program without getting injured? Studies have shown that beginner runners are at the highest risk for injury. As we discussed earlier, the body adapts to running, so the longer you have been running, the less likely you are to be injured. So, how do you get started? The key to this is to start at a very low mileage and to progress very gradually and consistently. You should choose how many days/week you want to run and make it a priority. Consistency is KEY! “Weekend warriors” get injured. Those who try to cram three days of running into the weekend and then they do nothing the rest of the week are much more likely to suffer an injury. Also, incorporating strength and flexibility into your program is also important to thwart off injuries.
When recovery time from an injury has been less than 4 weeks, I suggest starting back with a modified running schedule of the weekly mileage of the week prior to getting injured. Prior to beginning this schedule, you should be pain free with walking and daily activities. The first stages should be just mileage without speed or interval training. The general schedule to follow is:

Sharon Howard, DPT, SCS
Pain-Free Running: The Ultimate Guide to Overcoming and Preventing Injuries
pg 91
For 2 weeks or less: Week 1: 50% of your normal mileage
Week 2: 75% of your normal mileage
Week 3: 100% of your normal mileage
Week 4: Begin increasing the intensity of
the runs back to normal workouts
For 2-4 weeks:
Week 1: 25% of your normal mileage
Week 2: 50% of your normal mileage
Week 3: 75% of your normal mileage
Week 4: 100% of your normal mileage
Week 5: Begin increasing the intensity of
the runs back to normal workouts
The next section includes several different return-to-running programs. If you are new to running, the beginner program is also a good start up program. Each program is designed to build gradually depending on the level of experience prior to injury. For any return program where it has been longer than 4 weeks since running, use the first week to build tolerance to impact prior to starting to run by beginning with the following jumping routine

Sharon Howard, DPT, SCS
Pain-Free Running: The Ultimate Guide to Overcoming and Preventing Injuries
pg 92
Phase I (Basic, Intermediate and Advanced): PlyometricsRules for this phase (same for all levels):
1. Athlete must be pain free with walking and daily activities prior to initiating program.
2.If pain begins during this phase, rest until pain subsides (minimum of 1 day rest), then begin
again with Day 1.
3.Do not progress to the next phase until this phase can be completed without pain.
4.Once you tolerate the jumping program without any symptoms, progress to phase II at the
level that best fits your previous training levels (Basic, Intermediate, Advanced).
Day Double Leg Single Leg
1 Feet together (2 sets of 30 seconds each part): Jump in place, jump side to side, jump forward and backward
None
2 Feet together (2 sets of 30 seconds each part): Jump in place, jump side to side, jump forward and backward
Each leg (2 sets 15 seconds each leg, alternating between legs): Jump in place, jump side to side, jump forward and backward
3 Feet together (2 sets of 30 seconds each part): Jump in place, jump side to side, jump forward and backward; add 2 sets of 30 seconds squat jumps
Each leg (2 sets 15 seconds each leg, alternating between legs): Jump in place, jump side to side, jump forward and backward; add 2 sets of 30 seconds leap-ing from one side to the other
4 Feet together (2 sets of 30 seconds each part): Jump in place, jump side to side, jump forward and backward; add 2 sets of 30 seconds scissor jumps (alternating feet forward)
Each leg (2 sets 15 seconds each leg, alternating between legs): Jump in place, jump side to side, jump forward and backward; add 2 sets of 10 hops each leg: single leg hop for distance (hop forward as far as you can on one leg)
5 Feet together (2 sets of 30 seconds each part): Jump in place, jump side to side, jump forward and backward; add 2 sets of 30 seconds step jumps (can use a box step or just a bottom stair)
Each leg (2 sets 15 seconds each leg, alternating between legs): Jump in place, jump side to side, jump forward and backward; add 2 sets of 10 tuck jumps (jump in the air, bring knees to chest)
6 2 sets each: Jump in place, jump side to side, jump forward and backward, step jumps, scis-sor jumps, squat jumps
Each leg (2 sets 15 seconds each leg, alternating between legs): Jump in place, jump side to side, jump forward and backward
7 Rest Rest

Sharon Howard, DPT, SCS
Pain-Free Running: The Ultimate Guide to Overcoming and Preventing Injuries
pg 93
Basic/Beginner Phase II: Walk to Run ProgressionRules for this phase:
1. Athlete must take one rest day in between each workout, low impact cross training is
acceptable on off days.
2.Take at least one complete rest day a week (not even cross training).
3.Only complete one stage/day.
4.If athlete develops return of symptoms or other pain or cannot complete the stage, they
should rest until pain free and remain at that stage until they are able to complete it without
symptoms.
5.Do not progress to the next phase until this phase can be completed without pain.
Once you tolerate the jumping program without any symptoms, progress to one of the following return-to-running programs that best fits your previous training levels:
Basic Walk to Run Progression
Walk Run Repetitions Days at this stage
Stage 1 3 minutes 1 minute 2 2
Stage 2 4 minutes 2 minutes 2 2
Stage 3 5 minutes 3 minutes 2 2
Stage 4 6 minutes 4 minutes 2 2

Sharon Howard, DPT, SCS
Pain-Free Running: The Ultimate Guide to Overcoming and Preventing Injuries
pg 94
Basic/Beginner Phase III: Running ProgressionRules for this phase:
1. Athlete can cross train on off days, but must take at least one complete rest day each week.
2.If athlete develops return of symptoms or other pain or cannot complete the week, they
should rest until pain free and remain at that week until they are able to complete it without
symptoms (if >2 weeks rest needed, use earlier guidelines for progressions).
Basic Running Progres-sion
Day 1 Day 2 Day 3 Day 4 Day 5 Day 6 Day 7 Total Miles
Week 1 - 1 - 1 - - 2 4
Week 2 - 2 - 3 - - 3 8
Week 3 - 4 - 2 - - 4 10
Week 4 - 4 - 2 2 - 4 12
Week 5 - 4 - 3 3 - 4 14
BASIC RUNNING PROGRESSION

Sharon Howard, DPT, SCS
Pain-Free Running: The Ultimate Guide to Overcoming and Preventing Injuries
pg 95
Intermediate Phase II: Walk to Run ProgressionRules for this phase:
1. Athlete must take one rest day in between each workout, low-impact cross training is
acceptable on off days.
2.Take at least one complete rest day a week (not even cross training).
3.Only complete one stage/day.
4.If athlete develops return of symptoms or other pain or cannot complete the stage, they
should rest until pain free and remain at that stage until they are able to complete it without
symptoms.
5.Do not progress to the next phase until this phase can be completed without pain.ediat
Intermediate Walk to Run Pro-gression
Walk Run Repetitions Days at this Stage
Stage 1 3 minutes 1 minute 3 2
Stage 2 4 minutes 2 minutes 3 2
Stage 3 5 minutes 4 minutes 3 2
Stage 4 6 minutes 5 minutes 3 2

Sharon Howard, DPT, SCS
Pain-Free Running: The Ultimate Guide to Overcoming and Preventing Injuries
pg 96
Intermediate Phase III: Running ProgressionRules for this phase:
1. Athlete can cross train on off days, but must take at least one complete rest day each week.
2.If athlete develops return of symptoms or other pain or cannot complete the week, they
should rest until pain free and remain at that week until they are able to complete it without
symptoms (if >2 weeks rest needed, use earlier guidelines for progressions).
Intermedi-ate Running Progression
Day 1 Day 2 Day 3 Day 4 Day 5 Day 6 Day 7 Total Miles
Week 1 - 2 - 3 - - 3 8
Week 2 - 4 - 3 - - 4 11
Week 3 - 4 - 3 3 - 5 15
Week 4 - 5 - 4 4 - 6 19
Week 5 - 6 - 5 4 1 6 22
Week 6 - 6 6 - 5 2 7 26
Week 7 - 6 3 7 6 - 8 30
INTERMEDIATE RUNNING PROGRESSION

Sharon Howard, DPT, SCS
Pain-Free Running: The Ultimate Guide to Overcoming and Preventing Injuries
pg 97
Advanced Phase II: Walk to Run ProgressionRules for this phase:
1. Athlete must take one rest day in between each workout, low-impact cross training is
acceptable on off days.
2.Take at least one complete rest day a week (not even cross training).
3.Only complete one stage/day.
4.If athlete develops return of symptoms or other pain or cannot complete the stage, they
should rest until pain free and remain at that stage until they are able to complete it without
symptoms.
5.Do not progress to the next phase until this phase can be completed without pain.ediate
Walk
Intermediate Walk to Run Pro-gression
Walk Run Repetitions Days at this Stage
Stage 1 3 minutes 1 minute 3 2
Stage 2 4 minutes 2 minutes 3 2
Stage 3 5 minutes 4 minutes 3 2
Stage 4 6 minutes 5 minutes 3 2
Stage 5 5 minutes 10 minutes 3 2

Sharon Howard, DPT, SCS
Pain-Free Running: The Ultimate Guide to Overcoming and Preventing Injuries
pg 98
Advanced Phase III: Running ProgressionRules for this phase:
1. Athlete can cross train on off days, but must take at least one complete rest day each week.
2.If athlete develops return of symptoms or other pain or cannot complete the week, they
should rest until pain free and remain at that week until they are able to complete it without
symptoms (if >2 weeks rest needed, use earlier guidelines for progressions).
3.Choose the option that fits your needs (5 or 6 days running).
4.Avoid hill running and interval workouts until you have returned to your normal weekly
mileage.
5.If your prior level of training was greater than the mileage in the chart, increase mileage no
more than 5 miles/week and no more than 1 mile per week, increasing the long run to return
to desired level of training.
Advanced Running Progression
Day 1 Day 2 Day 3 Day 4 Day 5 Day 6 Day 7 Total Miles
Week 1 - 4 4 - 3 - 3 14
Week 2 - 5 5 - 4 - 4 18
Week 3 - 5 2 5 4 - 6 22
Week 4 - 6 6 - 6 2 8 28
Week 5 - 6 2 8 5 2 9 32
Week 6 - 7 4 9 6 4 10 40
RETURN TO 6 DAYS/WEEK RUNNING 40+ MILES/WEEK

Sharon Howard, DPT, SCS
Pain-Free Running: The Ultimate Guide to Overcoming and Preventing Injuries
pg 99
Advanced Running Progression
Day 1 Day 2 Day 3 Day 4 Day 5 Day 6 Day 7 Total Miles
Week 1 - 4 4 - 3 - 3 14
Week 2 - 5 4 - 4 - 5 18
Week 3 - 6 5 - 5 - 6 22
Week 4 - 6 6 - 5 2 7 26
Week 5 - 6 3 7 6 - 8 30
RETURN TO 5 DAYS/WEEK RUNNING 30+ MILES/WEEK
The most important thing in any running training plan is to be consistent. As mentioned throughout this ebook, the body adapts to forces placed upon it. If you run in spurts, taking many days off at a time, then expect to jump back into your scheduled training plan, you are heading down a road to injury. In a study by Rasmussen et al., the researchers found that individuals who were training for a marathon were less likely to incur an injury if they had previously run a marathon²⁸. This shows how the body adapts and the importance of maintaining consistency in a program. Intuitively, you would think injuries increase the more marathons you run because as most “non-runners” believe: “running wears out your body.” However, this study shows that it may in fact predispose your body to be more injury resistant. So, no matter what your training
goals are, find a plan that you can stick to and be consistent! I hope you have enjoyed this ebook and that you find some help for your running goals within it. Wishing you happy and pain free running, today, tomorrow and always!

Sharon Howard, DPT, SCS
Pain-Free Running: The Ultimate Guide to Overcoming and Preventing Injuries
pg 100
About the author:My name is Sharon Howard. I graduated from Northern Arizona University in 2009 with a Doctorate in Physical Therapy. I am a licensed physical therapist and a sports certified specialist through the American Board of Physical Therapy Specialties. Ever since I was a young child, running has been a huge part of my life. I have always loved to run. Even when I was young, I found my body and my mind felt better when I ran, so I did. I ran competitively through high school and college, then went on to compete recreationally in several full and half marathons. I still run to keep my life in balance as a wife, mother and practicing physical therapist. As a physical therapist, I have worked mostly with the athletic population, with a special emphasis on runners. My experience as a runner allows me to understand the mentality of fellow runners. My knowledge as a physical therapist allows me to help fellow runners achieve their pain-free running goals. When I am not running, I enjoy spending time with my amazing husband and clan of crazy kids. We like to spend time together being active in the great outdoors.
Why I wrote this ebook:My experience and passion for running, combined with my knowledge as a physical therapist, often leads to many patients, family and friends who want help achieving their running goals. Many times, they struggle with injuries. Sometimes, they just want to be able to know how to get started and what they should be doing to run healthy. I wanted to write an ebook that would lay out treatment plans, preventative strengthening programs, and return or start up running programs to help those who might need a little support in their training, to recover from injuries or to prevent them from occurring in the first place. My hope is that this ebook can reach those who might benefit from this information and that it can help others to enjoy running as much as I do.

Sharon Howard, DPT, SCS
Pain-Free Running: The Ultimate Guide to Overcoming and Preventing Injuries
pg 101
References1. Videman T, Sarna S, Battié MC, et al. The long-term effects of physical loading and exercise
lifestyles on back-related symptoms, disability, and spinal pathology among men. Spine.
1995;20(6):699-709.
2.Moore KL, Dalley AF. Lower Limb. In: Clinically Oriented Anatomy. 5th ed. Baltimore, MD:
Lippincott Williams and Wilkins; 2006: 555-724.
3.Lewis CL, Sahrmann SA. Acetabular Labral Tears. Physical Therapy. 2006;86(1):110-121.
https://doi.org/10.1093/ptj/86.1.110.
4.Byrd JW. Evaluation of the hip: history and physical examination. N Am J Sports Phys Ther.
2007; 2(4): 231–240. https://www.ncbi.nlm.nih.gov/pmc/articles/PMC2953301/.
5.Dutton M. The Knee Joint Complex. In: Orthopaedic Examination, Evaluation, and
Intervention. Pittsburgh, PA: McGraw-Hill; 2004:734-832.
6.Fredericson M, Cookingham CL, Chaudhari AM, et al. Hip abductor weakness in distance
runners with iliotibial band syndrome. Clin J Sport Med. 2000 Jul;10(3):169-75.
7. Robinson RL, Nee RJ. Analysis of hip strength in females seeking physical therapy treatment
for unilateral patellofemoral pain syndrome. J Orthop Sports Phys Ther. 2007;37(5):232-8.
8.Finnoff JT, Hall MM, Kyle K, et al. Hip strength and knee pain in high school runners: a
prospective study. Phys Ther Sport. 2009;10(1):12-8.
9.Dutton M. The Ankle and Foot. In: Orthopaedic Examination, Evaluation, and Intervention.
Pittsburgh, PA: McGraw-Hill; 2004:833-927.
10.Lee SY, McKeon P, Hertel J. Does the use of orthoses improve self-reported pain and function
measures in patients with plantar fasciitis? A meta-analysis. Phys Ther Sport. 2009;10(1):12-
8. doi: 10.1016/j.ptsp.2008.09.002. Epub 2008 Nov 20.
11.Gross, MT, Byers JM, Krafft JL, et al. The impact of custom semirigid foot orthotics on
pain and disability for individuals with plantar fasciitis. Journal of Orthopaedic and Sports
Physical Therapy. 2002;32(4):149-158. doi:10.2519/jospt.2002.32.4.149.

Sharon Howard, DPT, SCS
Pain-Free Running: The Ultimate Guide to Overcoming and Preventing Injuries
pg 102
12.Cheung RT, Sze LK, Mok NW, Ng GY. Intrinsic foot muscle volume in experienced runners
with and without chronic plantar fasciitis. Journal of Science and Medicine in Sport 2015,
19(9):713-715.
13.Mayer SW, Joyner PW, Almekinders LC, Parekh SG. Stress fractures of the foot and ankle
in athletes. Sports Health. 2014 Nov; 6(6): 481–491. doi: 10.1177/1941738113486588.
14.Kistler BM, Walsh MS, Horn TS, Cox RH. The acute effects of static stretching on the sprint
performance of collegiate men in the 60-m and 100-m dash after a dynamic warmup. The
Journal of Strength & Conditioning Research. 2010;24( 9): 2280-2284.
15.Yamaguchi T, Ishii K. Effects of static stretching for 30 seconds and dynamic stretching on
leg extension power. Journal of Strength and Conditioning Research.2005; 19(3): 677-83.
16.Mcmillian DJ, Moore JH, Hatler BS, Taylor DC. Dynamic vs. static stretching warm up:
the effect on power and agility performance. J Strength Cond Res. 2006;20(3):492-9. doi:
10.1519/18205.1.
17.Wilson JM, Hornbuckle LM, Kim J, et al. Effects of static stretching on energy cost
and running endurance performance. The Journal of Strength & Conditioning Research.
2010;24(9): 2274-2279.
18.Trehearn, TL, Buresh RJ. Sit-and-Reach Flexibility and Running Economy of Men
and Women Collegiate Distance Runners. The Journal of Strength & Conditioning
Research.2009;23(1):158-162.
19.Skof B, Strojnik V. The effect of two warm-up protocols on some biomechanical parameters
of the neuromuscular system of middle distance runners. Journal of Strength and Conditioning
Research. 2007;21(2):394-9.
20.O’Sullivan K, Murray E, Sainsbury D. The effect of warm-up, static stretching and dynamic
stretching on hamstring flexibility in previously injured subjects. BMC Musculoskeletal
Disorders. 2009; 10(37). https://doi.org/10.1186/1471-2474-10-37.
21.Pearcey G, Bradbury-Squires DJ, Kawamoto J, et al. Foam Rolling for Delayed-Onset Muscle
Soreness and Recovery of Dynamic Performance Measures. J Athl Train. 2015;50(1):5-13. doi:
10.4085/1062-6050-50.1.01.

Sharon Howard, DPT, SCS
Pain-Free Running: The Ultimate Guide to Overcoming and Preventing Injuries
pg 103
22.Healey KC, Hatfield DL, Blanpied P, Dorfman LR, Riebe D. The effects of myofascial
release with foam rolling on performance. The Journal of Strength & Conditioning Research;
2014;28(1):61–68.doi: 10.1519/JSC.0b013e3182956569.
23.Škarabot J, Beardsley C, Igor S. Comparing the effects of self-myofascial with static
stretching on ankle range of motion in adolescent athletes.Int J Sports Phys Ther.
2015;10(2):203-12. https://www.ncbi.nlm.nih.gov/pubmed/?term=%C5%A0karabot+J%2C+Be
ardsley+C%2C+Igor+S.+Comparing+the+effects+of+self-myofascial+with+static+stretching+o
n+ankle+range+of+motion+in+adolescent+athletes.
24.Yamamoto LM, Lopez RM, Klau JF, et al. The effects of resistance training on endurance
distance running performance among highly trained runners: A systematic review. The
Journal of Strength and Conditioning Research. 2008;22(6):2036-2044. doi: 10.1519/
JSC.0b013e318185f2f0.
25.Niemuth PE, Johnson RJ, Myers MJ, Thieman TJ. Hip muscle weakness and overuse injuries
in recreational runners. Clin J Sport Med. 2005;15(1):14-21. https://www.ncbi.nlm.nih.gov/
pubmed/15654186.
26.Neal BS, Barton CJ, Gallie R, O’Halloran P, Morrissey D. R. Runners with patellofemoral
pain have altered biomechanics which targeted interventions can modify: A systematic review
and meta-analysis. Gait Posture. 2016;45:69-82. doi: 10.1016/j.gaitpost.2015.11.018.
27.Cai C, Kong PW. Low back and lower-limb muscle performance in male and female
recreational runners with chronic low back pain. J Orthop Sports Phys Ther. 2015;45(6):436-
43. doi: 10.2519/jospt.2015.5460.
28.Rasmussen CH, Nielson RO, Juul MS, Rasmussen S. Weekly running volume and risk of
running related injuries among marathon runners. International Journal of Sports Physical
Therapy. 2013;8(2):111-20. https://www.ncbi.nlm.nih.gov