painless productivity programming with the autodesk...
TRANSCRIPT
Painless Productivity Programming with the
Autodesk® AutoCAD® Action Recorder —
Revealed!
Matt Murphy – 4D Technologies/CADLearning
AC2098
Productivity through programming has never been a friendly or intuitive process. Whether you are using LISP, VBA, or menus and macros, if you don't get the right syntax, it won't work. Autodesk AutoCAD 2009 introduced the ability to build custom macros and commands simply by using AutoCAD software. In this class, we cover how to record, play, save, and share macros that automate creating, editing, and modifying geometry, as well as simplify drawing maintenance and utilities, with one custom command. Reducing repetitive steps and tasks is the key to personal productivity. It is time to tap into the power of the Action Recorder!
Learning Objectives
At the end of this class, you will be able to:
Create, play back, save, store, and share macros for personal use and use by others
List features and benefits of the Action Recorder versus custom programming
Modify existing macros for enhanced productivity
Apply macros for creating geometry, modifying geometry, and simplifying drawing maintenance and utilities.
About the Speaker: Matt Murphy has been recognized by Autodesk since 1985 as a leader in providing professional training. He has served as an adviser and consultant to the training industry as Chair of the Autodesk Training Center Advisory Board (ATCAB) and Executive Committee (ATCEC), and has received numerous instructional awards, including the ATC Eastern Regional Instructor of the Year for 2004. Matt is a widely acclaimed top trainer and former featured columnist for Cadalyst and AUGIWorld magazines as well as the AutoCAD Exchange – Ask the Expert Series. As a 20-year veteran speaker at Autodesk University and the PowerTrack Manager for 2009, he was rated the top Autodesk University Speaker seven times including for a tutorial (2006), large lecture (2007) and PowerTrack session (2008 and 2009). Matt is the Director of Content Management and development for all CADLearning® products from 4D Technologies, helping create affordable training for Autodesk® software users.

Painless Productivity Programming with the Autodesk® AutoCAD® Action Recorder — Revealed!
2
Introduction
What is the Action Recorder?
The Action Recorder is a programming tool that you use to reduce repetitive steps and tasks into simple visual and intuitive macros. Simply turn the recorder on while performing a task and AutoCAD will record your commands and steps. No programming knowledge is required.
Why use the Action Recorder?
Most users don’t have time to learn LISP, VBA and menu customization. These programming tools are powerful and will reduce your repetitive tasks into a single task, but you need to learn the programming language or syntax. The Action Recorder does not require any programming knowledge. If you can use AutoCAD, you can use the Action Recorder. Some of the benefits include:
1. Easy customization without programming.
2. Recordings can be copied, renamed and even edited and shared with other AutoCAD users.
3. The Action Recorder can record routine actions from the command line as well as from toolbars, ribbon panels, menus, the Properties Palette, the Layer Properties Manager and the Tool Palette.
4. You can create more robust and interactive recordings that include text messages and requests for user input.
Why you would NOT use the Action Recorder?
If you are already an AutoCAD power user who can write and create LISP routines, VBA or DIESEL programs, or even custom commands and menu macros with the CUI, you would NOT use the Action Recorder. You can already create powerful customization! The Action Recorder is not for you. The Action Recorder is intended for the non-programming production user or occasional AutoCAD user who would like to simplify multiple tasks into a single step.
SECRET REVEALED: Think simple! Don’t try to make the Action Recorder do something it is not intended to do. It is intended to be a simple and intuitive tool to record a series of AutoCAD repetitive tasks and steps, so they can be played back in a single step. That’s all it can do!

Painless Productivity Programming with the Autodesk® AutoCAD® Action Recorder — Revealed!
3
Understanding the Action Recorder
Let’s first begin by looking at the Action Recorder in the Tools tab of the Ribbon.
Any available action recordings or action macros that are available to be used for playback are found in the drop-down list. The recordings found in this list are loaded from either a read-write folder/path or a read-only folder/path.
The system variable that controls the read-only folder or path for playback is ACTPATH.
The system variable that controls the read/write folder or path for creating and playback is ACTRECPATH.
Both of these settings may also be set using the Files tab in the Options dialog box.
In both of these cases, AutoCAD is looking for files with the extension of .ACTM. AutoCAD creates a separate file for each recording. These files may be moved, copied or deleted from the Action Recorder panel or from Windows Explorer.
SECRET REVEALED: Even if you move an action recording or .ACTM file to the folder or path for playback files (ACTPATH), this does not make the file read-only. You will still need to set permissions to the folder or files within the folder to secure them.
SECRET REVEALED: Although you can only have one folder or path for recordings (ACTRECPATH), you can have multiple paths for placing playback files (ACTPATH). In the Options dialog box simply choose “Add…” for additional paths. If you are setting the ACTPATH system variable, add a semi-colon between each path.

Painless Productivity Programming with the Autodesk® AutoCAD® Action Recorder — Revealed!
4
Exercise #1: Setting action macro paths
Let’s set the ACTPATH with the Options… dialog box to the CD drive and “action_recordings” folder.
1 – ESC out of any current AutoCAD command.
2 – Right click in the middle of the AutoCAD screen.
3 – Choose Options…
4 – Choose Add for Additional Action Reading File Locations (as shown below).
5 – Choose the drive where the sample files are located.
Play back an action macro
Choose the action macro from the list and choose the Play button. Watch the magic happen or follow the prompt on the screen.
You can control the Action Recorder Preferences. These settings control the display of the Action panel of the Action Tree.

Painless Productivity Programming with the Autodesk® AutoCAD® Action Recorder — Revealed!
5
The Action Tree shows the commands and options that were recorded or edited before playback. Basic changes may be made to any macro by a right-click on the macro name within the Action Tree. In addition to Delete, Rename… and Copy… you can also toggle between absolute coordinates and relative coordinates when the macro is played.
When you play back a macro, you also have a choice to determine how points in space are determined. Just like picking a point with the mouse, each point can be determined one of two ways:
1 – You can choose to use “absolute” coordinates based on the origin of the coordinate system.
2 – You can choose “relative” coordinates and it will specify a location relative or from the last point in space.
You make that determination upon playback. If you right click on the name of the macro in the Action Tree, you can toggle on or off “All Points are Relative”.
Exercise #2: Playing an action macro
Try each of the macros and notice the resulting difference in the location of the lines created.
Files needed for the exercise:
Coordinates.dwg
lab.actm
lre.actm
1 – Open the file called “Coordinates”.
2 – Open the Action Macro Recorder found under the Tools panel.
3 – Choose the Macro “lab” from the list of available recordings.
4 – Choose the Play button.
5 – Pick a point near the lower left-hand corner of the screen when prompted for the following:

Painless Productivity Programming with the Autodesk® AutoCAD® Action Recorder — Revealed!
6
Command: lab
LINE Specify first point:
6 – Once the macro finishes, simply press the space bar to repeat the macro. Notice that the macro repeats as an AutoCAD command.
7 – Pick a point near the lower right of the screen. Repeat again for the upper right and upper left corners of the screen. Notice that the next point or second point of each of the lines created shares the same “absolute” coordinate endpoint.
8 – Right-click on the “lab” macro name in the Action Tree. Notice that the macro does NOT have “All Points are Relative” checked. So each time the macro is played, each new line shares the same “absolute” endpoint.
9 – Choose the action recording “lre” from the playlist and choose Play.
10 – Notice that every time you play the macro, each new second endpoint is a relative coordinate from the last point.
The following two action macros are essentially the same. The only difference is that the macro “lre” draws a line segment using relative coordinates. Essentially the “to point” of the line is relative to the last point in all instances.
lab – line using absolute coordinates
lre – line using relative coordinates

Painless Productivity Programming with the Autodesk® AutoCAD® Action Recorder — Revealed!
7
Creating your own action macros
Since an action macro essentially records anything that appears at the command line, simply using AutoCAD with the recorder on will create an action macro of those steps.
The Action Recorder will record the selection of all of the following:
Command line
Toolbars
Ribbon panels
Menus
Property palette
Layer property manager
Tool palettes
Extended uses may be made with access to:
Startup Suite
ACAD.lsp or ACADDOC.lsp
MNL files
CUI
Script Files (with FILEDIA set to 0)
The Action Recorder will NOT record the selection of:
The open and saving of a file
Any selection within a dialog box
The Action Recorder will record any dialog box setting that can be driven from the command line by suppressing the dialog box with a hyphen (-).
For example, -hatch or -insert will suppress the dialog box and allow settings to be made from the command line. This is how dialog box settings may be recorded.
Types of action macros
If we look at the typical types of tasks a production user of AutoCAD performs during a day, we could break those tasks into three major categories:
1- Creating geometry
2- Editing or modifying geometry
3- Drawing setup, maintenance and utilities

Painless Productivity Programming with the Autodesk® AutoCAD® Action Recorder — Revealed!
8
1 – Action macros that create geometry
Let’s begin by creating an action macro that creates geometry.
Exercise #3: Creating a simple action macro
Files needed for the exercise:
Rectangle.dwg
rectpickm.actm
1 – Open the drawing called “Rectangle”.
2 – Open the Action Macro Recorder found under the Tools panel.
3 – Choose the Macro “rectpickm” from the list of available recordings.
4 – Choose the Play button.
5 – Follow the prompts on the screen and command line to create the rectangle as shown.
Now let’s create our own macro that creates a rectangle with preset settings.
Create the rectangle as shown with the Action Recorder.
6 – From the Tools tab, start the Action Recorder by selecting the record button.
7 – From the Home tab, choose the “Rectangle: command in the “Draw” panel. (If you prefer to access the command from the command line and type all your entries, you may do that as well.)
Set the following options:
Fillet = 3
Width = .25

Painless Productivity Programming with the Autodesk® AutoCAD® Action Recorder — Revealed!
9
Pick a first corner point for the rectangle anywhere near the middle of the screen.
Select Dimensions.
Specify length for rectangle: 20
Specify width for rectangle: 10
Pick the opposite corner for the rectangle.
Press your ESC key to ensure you are finished the command. Note: the ESC key does not cancel the recording of the action macro.
8 – Return to the Tools tab and “Stop” the Action Recorder.
9 – Save the macro with the name “rect-test”. Give the macro a description and choose the toggle option for “Restore pre-playback view”. Toggling either or both of these on essentially restores a “zoom – previous” to the view before you started the macro playback.
10 – Erase the rectangle you have just created.
11 – Choose the Play button in the Action Recorder to confirm that the rectangle macro works.
You have just created a simple action macro that creates a rectangle with preset options. Remember that the purpose of creating an action macro is to eliminate a series or repetitive steps and tasks into one step.
The action recording that you just created only creates this standard rectangle in the exact same place every time.
Now it’s time to learn how to edit your macro.

Painless Productivity Programming with the Autodesk® AutoCAD® Action Recorder — Revealed!
10
Editing the Action Tree – requesting user input As you can see, the action macro creates the rectangle. But it only creates it in that same spot. What if you want to place the rectangle in a different location?
Exercise #4: Editing a simple action macro
Files needed for the exercise:
Rectangle.dwg
rect-test.actm
First let’s create a copy of this macro.
1- Right click on the macro “rect-test” in the Action Tree.
2- Choose “Copy…”
3- Type “rectpick” as the new Action Macro Command Name:
4- Right click on the cursor icon in the Action Tree.
5- Choose “Request User Input” from the pop-up menu.
6- Play the new macro.
Notice the new macro pauses and the command prompt asks you to “Specify first corner point”.
7- Pick a location for the rectangle.
Now let’s add a user message.
8- Right click on the cursor icon in the Action Tree.
9- Choose “Insert User Message” from the pop-up menu.
10 – Add the following text and choose “OK”.
11 - Choose the Play button to confirm the addition of the message to the macro.
Note: There is no save button in the macro or action tree. Any changes that you make to the macro are automatically saved back to the .ACTM file.
Challenge exercise: Complex geometry creation action macro
Now let’s make an action macro that uses multiple commands and multiple edits to create another common task.
In this example we are going to create a macro that creates a label.

Painless Productivity Programming with the Autodesk® AutoCAD® Action Recorder — Revealed!
11
Files needed for the exercise:
Label-Room.dwg
1 – Open the file called “Label-room.dwg”.
2 – Create an action recording that labels the room as shown.
The basic criterion is to create the text using the following:
Using single-line text with a text style of Simplex, place the text on the “Notes” layer, justified by middle with a text height of 6" so the text can be placed in the center of any room.
Hint #1: Check to ensure you have the correct Object Snap settings and OTRACK in turned on first BEFORE you start the macro recording.
Hint #2: Never take the default settings, unless you always want the macro to take the previous saved value.
Partial Cheater: Select and run the action macro “RSPTXT” if you get stuck. Note that this macro only labels the current open space. Edit the Action Tree to do the following:
1- Add “Request User Input” so the text may be placed in other locations and so the text may be changed.
2- Add “Insert User Message…” so the macro will prompt the operator to place and type the text.
Full Cheater: Select and run the action macro “RSPTXT-FULL”. This is the completed macro as it should have been created. You can review the Action Tree to see the sequence of steps as well as the message and user input edits.
2 – Action macros that edit and modify geometry
Making changes, edits and modifications to geometry, data and files is where the real power of AutoCAD has always been. So here also lies the challenge of eliminating repetitive tasks to complete these changes with fewer clicks and picks.
Exercise #5: creating a simple action macro to modify geometry
Files needed for the exercise:
Offset-rows.dwg
Offset-10.actm
The Offset command is one of the common commands used to create concentric copies of objects. The problem with the Offset command is that even when using the “multiple” option, you still need to pick a point in space for each copy to create.
Let’s begin by looking at an action macro that will create 10 concentric copies of any type of geometry.
Painless Productivity Programming with the Autodesk® AutoCAD® Action Recorder — Revealed!
12
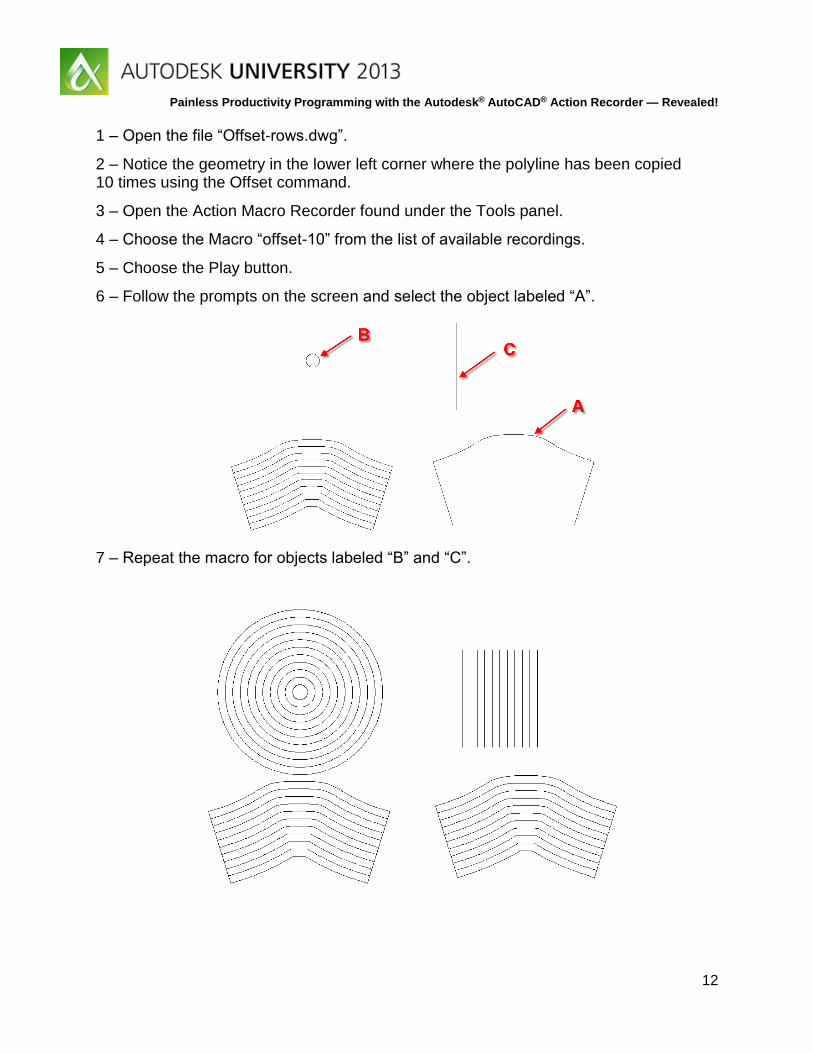
1 – Open the file “Offset-rows.dwg”.
2 – Notice the geometry in the lower left corner where the polyline has been copied 10 times using the Offset command.
3 – Open the Action Macro Recorder found under the Tools panel.
4 – Choose the Macro “offset-10” from the list of available recordings.
5 – Choose the Play button.
6 – Follow the prompts on the screen and select the object labeled “A”.
7 – Repeat the macro for objects labeled “B” and “C”.

Painless Productivity Programming with the Autodesk® AutoCAD® Action Recorder — Revealed!
13
Creating more complex modification macros can reduce repetitive steps and tasks and make shorter work of your change orders. Unfortunately there are many commands in AutoCAD that call dialog boxes. Edits in dialog boxes, like the array command, CANNOT be saved in an action macro.
To create an action macro that calls for changes in a dialog requires you to suppress the dialog box with a dash (-) in front of the command name. This will allow you to make settings and changes from the command line.
Exercise #6: Suppressing a dialog box within an action macro
In this macro exercise we will use the Group command to create a reusable selection set.
Files needed for the exercise:
Save-selection.dwg.
1 – Open the drawing file “Save-selection.dwg”.
2 – Type “G” and Enter at the command line to access the Group command. Notice that it calls the dialog box. Press the ESC key.
3 – Type (hyphen) “-G” at the command line. Notice the dialog box is now suppressed. Any action macro recordings that call dialog boxes will NOT work correctly. You must suppress the dialog box with a hyphen.
Let’s create a reusable selection set of the office cubicle furniture.
4 – Select any of the objects that make up the furniture in the cubicle on the left. Notice that they are all separate objects.
5 – Open the Action Macro Recorder found under the Tools panel.
6 – Choose the “record” button.
7 – At the command line, type “-G” and press Enter.

Painless Productivity Programming with the Autodesk® AutoCAD® Action Recorder — Revealed!
14
8 – Choose “Create” and press Enter.
9 – At type “1” and press Enter. AutoCAD will say the group already exists. Select “YES” when asked to choose redefine.
10 – Press Enter for the group description.
11 – When prompted to “Select Objects:” use the wheel mouse to zoom in to easily choose all the objects that make up all the furniture pieces. When you complete the selection you should have “74 Total” objects. Then press Enter.
12 – Choose “Stop” in the Action Recorder and save the recording as “save-selected” for the recording name.
13 – Test the macro.
Now let’s take the macro to the second step to allow us to be prompted to select the objects to be grouped.
14 – Right-click on the “save-selected” macro and choose “Copy…” and call it “save-selected-prompt”.
15 – Edit the macro so it not only allows you to select any objects (Request User Input) to become a group but so it also prompts with a User Message to select the objects.
Partial Cheater: Select and run the action macro “save-selection-prompt” if you get stuck.
Challenge exercise: Complex modify/selection action macro
Now let’s make an action macro that allows us to copy any number of objects as a single object and also allows us to select the copied objects with a single pick! Imagine “select previous” but for the copied objects, not the original objects.

Painless Productivity Programming with the Autodesk® AutoCAD® Action Recorder — Revealed!
15
Cheater: Select and run the action macro “GOPATS” to reveal the secret of the selection process.
3 – Action macros for drawing setup, maintenance and utilities
Automating drawing setup such as grid, snap, units, limits, osnap and other processes can also be done with an action macro. But one of the more powerful techniques is creating macros to do drawing maintenance.
Creating a macro to purge excessive unreferenced regapps
You may have noticed significant performance problems when you either opened or plotted drawings or created etransmit packages in AutoCAD. You also might have noticed that the file sizes of your drawings were larger than you expected.
Regapp is short for “registered application.” Using one of the Autodesk-provided APIs (AutoLISP, ObjectARX, .NET, and so on) it is possible to attach Extended Entity Data (XData) to objects in a drawing. This XData allows different types of information to be associated with specific objects and extends data storage options in AutoCAD. A regapp name (or ID) is an identifier of XData that is (or was) attached to objects in the drawing.
When objects with attached XData are deleted from a drawing, the associated regapp IDs become unreferenced and persist in the symbol table until they are manually purged from the database. A large amount of unreferenced regapp IDs in a file can add considerably to file size and can negatively affect performance. If you xref attach a drawing that contains regapp IDs, those IDs are cloned into the host drawing and can remain in the host even after the xref has been detached. To correct this issue, the unreferenced regapp IDs need to be purged from the drawing.
For individual drawings, unreferenced regapp IDs can be purged using the -Purge command, and then selecting the Regapp option.
SECRET REVEALED: The Regapp option in the Purge command can ONLY be accessed from the command line.
Exercise #7: Creating a drawing maintenance action macro
In this exercise you will create an action macro to purge unreferenced regapps and perform an audit.
Files needed for the exercise:
UnRef-REGAPPS.dwg
1 – Open the Action Macro Recorder found under the Tools panel.
2 – Pick the Record button.
3 – At the command line type “-purge” and press Enter.

Painless Productivity Programming with the Autodesk® AutoCAD® Action Recorder — Revealed!
16
4 – Pick or type “Regapps” and press Enter.
5 – At “Enter Name (s) to purge <*>: type “*”and press Enter.
6 – At “Verify each name to be purged? <Y>: type “N” and press Enter.
7 – At the command line type “audit” and press Enter.
8 – At “Fix any errors detected? <N>: type “Y” and press Enter.
9 – When the Audit is complete, stop the Action Recorder.
10 – Save the macro as “Clean-up” and add a description for the macro.
11 – Open the file named “UnRef-REGAPPS.dwg”.
12 – Play the Clean-up macro.
13 – Press the F2 key to review the macro actions in cleaning the file.
In addition to creating utility macros with purge and audit, you can also set system, drawing and environment variables with existing script files.
The problem with running a script file is that it calls an external file. In order to access the script you CANNOT simply suppress the dialog box. You will need to set the “Filedia” system variable to (zero) 0.
Exercise #8: Creating an action macro that calls a script file
In this exercise we will create a macro that calls an existing script file that resets Grips.
Files needed for the exercise:
Edit-Grips.dwg
1 – Open the file called “Edit-Grips.dwg”. All files will be affected when you attempt to edit grips once the script file has run.
2 – Access the Action Macro Recorder found under the Tools panel.
3 – Pick the Record button.
4 – Type at the command line “Filedia” and press Enter.
5 – Type (zero) 0.
6 – Type “D:\script\monkey_grip.scr” and press Enter.
7 – Type at the command line “Filedia” and press Enter.
8 – Type (one) 1. Note: it is important to reset any system variables to their original state before ending the macro.
9 – Stop the Action Recorder and save the macro as “Broken-grips”.
Painless Productivity Programming with the Autodesk® AutoCAD® Action Recorder — Revealed!
17
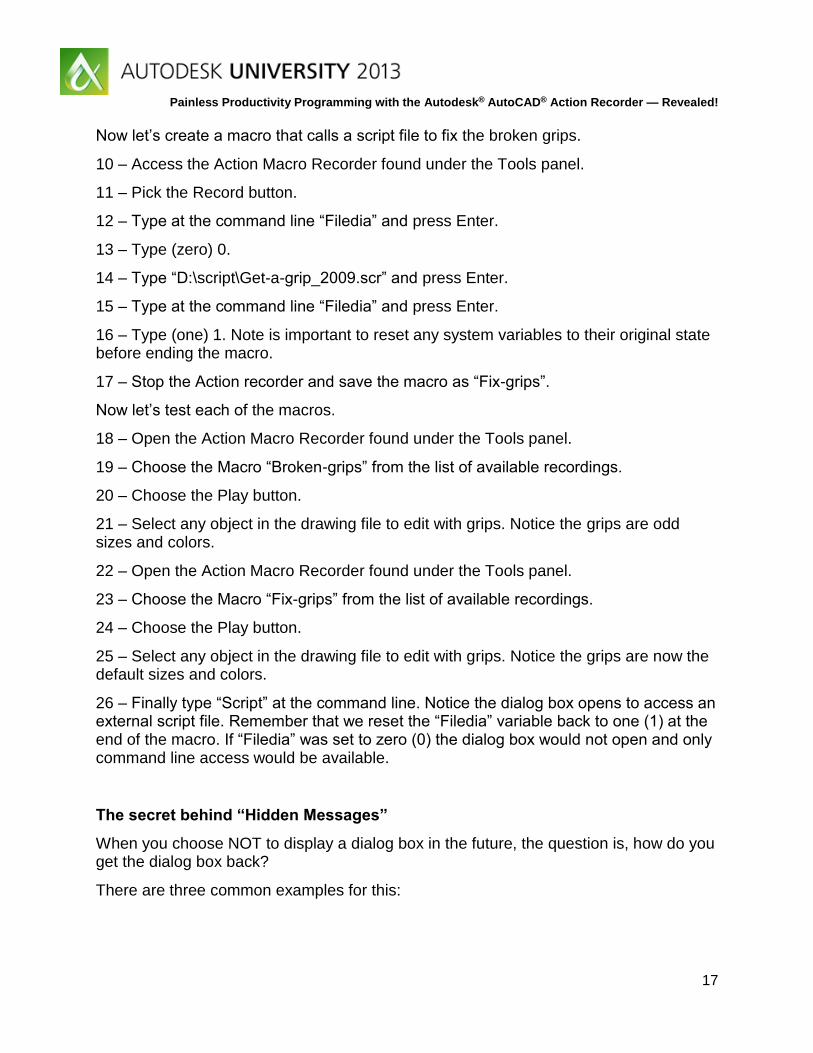
Now let’s create a macro that calls a script file to fix the broken grips.
10 – Access the Action Macro Recorder found under the Tools panel.
11 – Pick the Record button.
12 – Type at the command line “Filedia” and press Enter.
13 – Type (zero) 0.
14 – Type “D:\script\Get-a-grip_2009.scr” and press Enter.
15 – Type at the command line “Filedia” and press Enter.
16 – Type (one) 1. Note is important to reset any system variables to their original state before ending the macro.
17 – Stop the Action recorder and save the macro as “Fix-grips”.
Now let’s test each of the macros.
18 – Open the Action Macro Recorder found under the Tools panel.
19 – Choose the Macro “Broken-grips” from the list of available recordings.
20 – Choose the Play button.
21 – Select any object in the drawing file to edit with grips. Notice the grips are odd sizes and colors.
22 – Open the Action Macro Recorder found under the Tools panel.
23 – Choose the Macro “Fix-grips” from the list of available recordings.
24 – Choose the Play button.
25 – Select any object in the drawing file to edit with grips. Notice the grips are now the default sizes and colors.
26 – Finally type “Script” at the command line. Notice the dialog box opens to access an external script file. Remember that we reset the “Filedia” variable back to one (1) at the end of the macro. If “Filedia” was set to zero (0) the dialog box would not open and only command line access would be available.
The secret behind “Hidden Messages”
When you choose NOT to display a dialog box in the future, the question is, how do you get the dialog box back?
There are three common examples for this:

Painless Productivity Programming with the Autodesk® AutoCAD® Action Recorder — Revealed!
18
1 – The Input Request… dialog box opens to remind you to enter data or pick a point. If you choose “Always pause playback for input” the dialog box will never appear again, regardless of the macro that you run.
2 – The “Playback Complete” dialog box appears. If you choose “Do not show this message again” the dialog box will never appear again regardless of the macro that you run.
3 – The “Inconsistency” dialog appears. This dialog box appears when you start a macro in a file with units, scale or tilemode (paper space or model space) that is different than the file you originally created the macro in. If you choose “Always continue playback with the current settings” the dialog box will never appear again, regardless of the file you run the macro in.
Painless Productivity Programming with the Autodesk® AutoCAD® Action Recorder — Revealed!
19
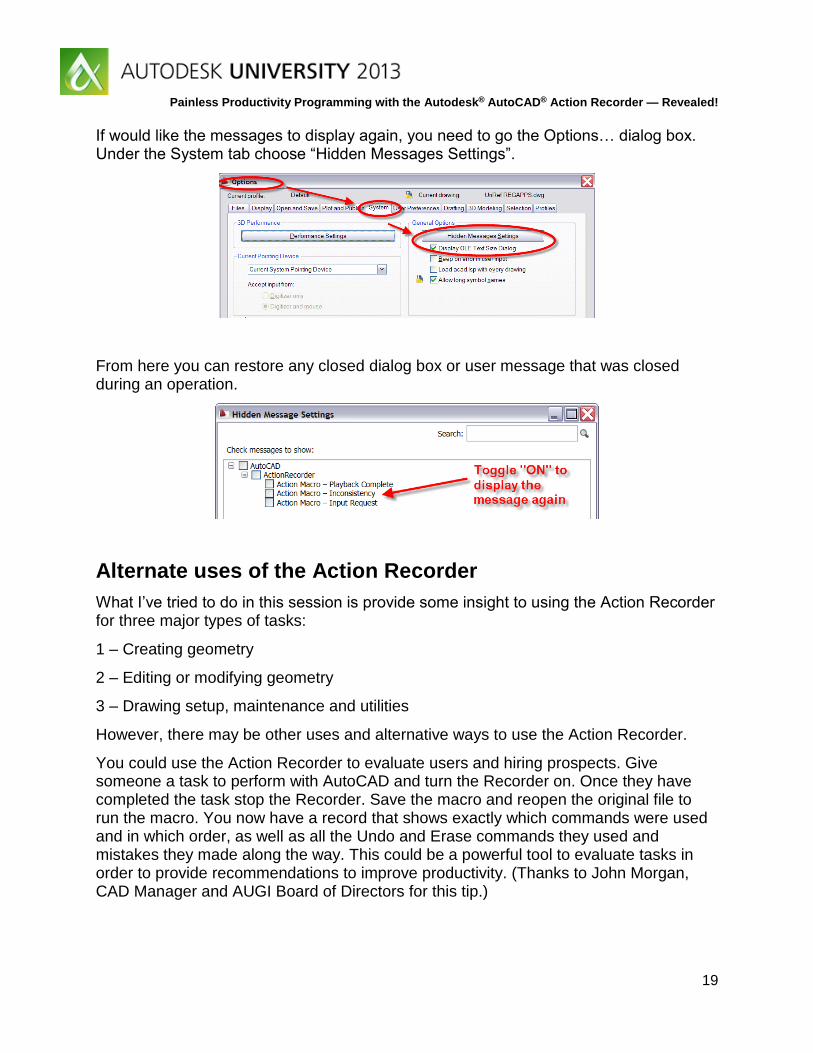
If would like the messages to display again, you need to go the Options… dialog box. Under the System tab choose “Hidden Messages Settings”.
From here you can restore any closed dialog box or user message that was closed during an operation.
Alternate uses of the Action Recorder
What I’ve tried to do in this session is provide some insight to using the Action Recorder for three major types of tasks:
1 – Creating geometry
2 – Editing or modifying geometry
3 – Drawing setup, maintenance and utilities
However, there may be other uses and alternative ways to use the Action Recorder.
You could use the Action Recorder to evaluate users and hiring prospects. Give someone a task to perform with AutoCAD and turn the Recorder on. Once they have completed the task stop the Recorder. Save the macro and reopen the original file to run the macro. You now have a record that shows exactly which commands were used and in which order, as well as all the Undo and Erase commands they used and mistakes they made along the way. This could be a powerful tool to evaluate tasks in order to provide recommendations to improve productivity. (Thanks to John Morgan, CAD Manager and AUGI Board of Directors for this tip.)

Painless Productivity Programming with the Autodesk® AutoCAD® Action Recorder — Revealed!
20
Warnings, Final Secret Revealed and Summary
Warnings
Creating a macro with the name “L” or “C” will supersede any command aliases with the same name. Essentially you can replace “L” for the Line command and “C” for the Circle command without editing the PGP file. Remember that macros are essentially AutoCAD commands. AutoCAD will NOT allow you to create a macro with the name “LINE” because that IS already an AutoCAD command.
FINAL SECRET REVEALED
Think simple – The Action Recorder is designed to record a typical task that would be performed through the command line and it allows you to play it back. That’s it!
Summary
The goal of all AutoCAD users is to reduce repetitive steps and tasks. To reduce the number of clicks and picks you make will make you more productive by getting more done is less time. The Action Recorder is the perfect intuitive tool to record those tasks into one simple new command. I wish you the best in using this new tool and don’t forget to send me any wicked cool macros that you create.
I can be reached at: