pairwise alignment course - verify your cloning
TRANSCRIPT

DON’T CLONE ALONE
Pairwise Alignment

A short guide for Pairwise Alignment
Step 1

3
A technique for verifying the integrity of your designed sequences
SEQUENCE ALIGNMENT

4
SEQUENCE ALIGNMENT
Aligning sequencing data to your template confirms the DNA you have matches the in-silico model you designed. This is especially important in cloning to ensure there are no changes in ORFs
This confirms that you are working on what you think you are working on!
5
SEQUENCE ALIGNMENT
• The pairwise alignment compares sequencing data, i.e. the query to a template sequence, pinpointing discrepancies between the two
• Use this information to decipher whether you can proceed to the next stage of your experiment, or whether you need to re-do the cloning

6
A short guide for the Restriction Ligation Cloning Method
The Cloning Strategy Overview
1. DNA target isolation bya. Option 1: Restriction Enzyme digest
b. Option 2: PCR
2. Restriction Enzyme digest of a cloning vector
3. Ligation of the DNA of interest and the cloning vector
4. Transformation with the ligation products
5. Growth on agar plates with selection for antibiotic resistance
6. Isolation of desired DNA clone
7. Verification of the cloning process

7
A short guide for the Restriction Ligation Cloning Method
The Cloning Strategy Overview
1. DNA target isolation bya. Option 1: Restriction Enzyme digest
b. Option 2: PCR
2. Restriction Enzyme digest of a cloning vector
3. Ligation of the DNA of interest and the cloning vector
4. Transformation with the ligation products
5. Growth on agar plates with selection for antibiotic resistance
6. Isolation of desired DNA clone
7. Verification of the cloning process

Practice makes the verification perfect…
Step 2

9
By the end of this practice you will…
Learn how to verify the cloning process by sequence alignment
Or:
Learn how to verify your cloning process by gel electrophoresis simulation instead
Practice makes the verification perfect…

10
• Open a Genome Compiler account in order to start your practice:
http://www.genomecompiler.com
• You may want to know first:
• Sign up will take only a few seconds
• You can decide if you want to use it online or use the downloadable version.
• Genome Compiler is FREE for academia users
Practice Makes the Verification Perfect

11
Verification of the Cloning Process
3. Verify2. Execute1. Design
a) Open in-silico template sequence
in Genome Compiler
b) Upload and align sequencing data
c) Compare sequencing data to
template
d) Edit the sequencing data or the
template
e) Copy/export the alignment
sequence
Perform physical experimentSimulate the cloning experiment
using a Genome Compiler wizard to
generate the template
Learn more…

12
Look for these projects inside the Sample Projects folder in the Materials Box:
• Template sequence: pcDNA3.1 C-HA plus RaVC
• .Ab1 files:RaVC Forward & RaVC Reverse
The Materials for the Exercise

13
Exercise Overview
Using Genome
Compiler Sequence
Alignment tool, we
will align and analyse
the sequencing data
of the RaVC gene to
the in-silico
generated RaVC
template sequence
which was cloned
into the pcDNA3.1 C-
HA backbone

14
A. Open in-silico Template Sequence in Genome Compiler
• Open the template sequence: pcDNA3.1 C-HA plus RaVC from the Sample Projects folder inside the Materials Box:

15
B. Upload Sequencing Data
With your template sequence open, click the “Align” icon in the tool bar
The Alignment Settings will open, where you can upload the sequences to align by doing one of the following:
• Dragging and dropping them from the materials box
• Uploading them from your computer
• Copy and pasting the raw DNA sequence
16
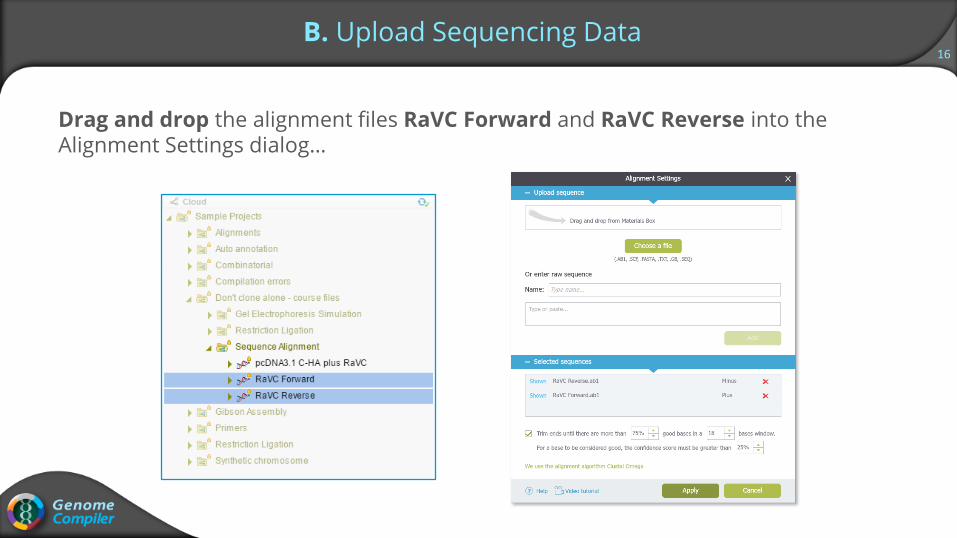
Drag and drop the alignment files RaVC Forward and RaVC Reverse into the Alignment Settings dialog…
B. Upload Sequencing Data

17
B. Upload Sequencing Data
• Sequences you upload will be added to the “Selected sequences” panel
• Here, you can also choose which strand to run the alignment on. Both strands are selected by default. If you specify only one strand, the alignment will be faster
• You can use the auto-trimming option to trim noisy data at both ends of your alignment. You can define a percentage cut off for good bases within a defined base pair window
• Select the auto-trimming option and then “Apply”…

18
C. Compare Sequencing Data to Template
• In the circular view, areas of consistency are shown in green, mismatches, additions, and gaps are shown in red, while trimmed regions are shown in grey

19
C. Compare Sequencing Data to Template
• A summary table automatically opens, listing all the template positions and types of discrepancies between your template and aligned sequences
• Click on the column headers to sortthe data
• Click on the rows to take you to the exact template location in the sequence where the discrepancy occurs

20
C. Compare Sequencing Data to Template
• Switch to the Sequence view for a more detailed view of the alignment
• The alignment name is listed on each new sequence line. Open the dropdown menu to reveal a number of possible actions
• Of importance, is the ability to adjust the chromatogram peaks height using the horizontal scroll bar along the top of the menu and to manually trim the sequence

21
C. Compare Sequencing Data to Template
You can also expand the sequence view for a more detailed view of the alignment by selecting the “Expand View” button at the top right of Sequence View Panel

22
D. Edit the Sequencing Data or the Template
Manual Trimming
Use the manual trimming tool to further eliminate erroneous data from the ends of the sequence
For example for the RavC reverse alignment, go to template position 1665bp and manually trim the “right edge” to 1653bp:

23
D. Edit the Sequencing Data or the Template
Fix Mismatches
• You can edit or change areas of inconsistency in the template sequence or the aligned sequence
• Mismatches are marked in red in the alignment sequence. By right clicking on the specific mismatch, you can choose to copy the base from the template to the alignment or to replace it in the template sequence

24
D. Edit the Sequencing Data or the Template
Fix mismatches
For example to edit the template sequence:
• Click on the mismatch at template position 1064bp in the summary table for the RaVC forward alignment
• Then right click on the discrepancy and select “Replace in template”

25
D. Edit the Sequencing Data or the Template
Add or remove any additions that were found in the sequencing results
• You can add extra nucleotides in the alignment sequence, which are not present in the template sequence
For example, click on the addition at template position 1738bp in the summary table for the RaVC forward alignment
• Click on the ‘+’ sign (indicating an addition in the alignment sequence) to add the extra base pairs to the template sequence or to delete them from the alignment

26
D. Edit the Sequencing Data or the Template
Edit any gaps in the sequence
• Gaps in the alignment sequence compared to the template sequence can be edited as well
For example, click on the gap at template position 1696bp in the summary table for the RaVC forward alignment
• By right clicking on the gap area, you can choose to add the missing base pairs from the template, or to delete this area from the template

27
D. Edit the Sequencing Data or the Template
Fix ambiguous base calls
• For any N base calls, you can choose to assign one of the 4 bases
For example, click on the mismatch at template position 776bp in the summary table for the RaVC Reverse alignment
• Then raise the chromatogram peaks height using the horizontal scroll bar in the alignment name dropdown menu
• Use the peaks to identify the correct base call and then right click on the N, and select the desired base from the menu

28
E. Copy/Export the Alignment Sequence
After you finished going over and editing your alignment sequence, you can then copy or export it

Learn more about Genome Compiler
www.genomecompiler.com