pals user guide · singpass account, please create a pals account. sn step screenshot 1 go to avs...
TRANSCRIPT

1
National Parks Board (NParks)
PALS User Guide
For Pet Owners

2
Table of Contents
1 Account Registration for First-time SingPass and Non-SingPass Users……………....
2 Account Login for Existing Users…………………..………………………….…………...
3 Password Management
3.1. Password Reset (Applicable to PALS Account only) ……………….............................
3.2. Change Password………………………………………………………………..…….…...
4 Applying for New Licence
4.1. Applying for New Licence……………………….……………………….………...……....
4.2. Download licence……………………………………………………………………………
4.3. View Application………………………………………………………………………..……
5 Licence Renewal
5.1. Licence Renewal….…………………………………………………….………..……..…...
6 Update Licence Details
6.1. Update User Profile………………………………………………….…..…………….….…
6.2. Update Dog Details (e.g. Sterilisation Status, Dog Address)……..……………….…....
7 Cancellation of Licence
7.1. Cancel Licence……………………………………….……………………………………...
8 Change of Dog Owner
8.1. Initiate Change of Dog Ownership…………………………………….……….…………
8.2. Accept Change of Dog Ownership………………………………………………………..
..3
..7
..9
10
11
19
20
21
24
27
30
33
35

3
1. Account Registration for First-time SingPass and Non-SingPass Users
First-time users who have a SingPass account can log in using their SingPass; For those without a
SingPass account, please create a PALS account.
SN Step Screenshot
1 Go to AVS PALS website: pals.avs.gov.sg
2a For first-time users with Singpass: Click on “Login with SingPass” Enter “SingPass ID” and “SingPass”. Click “Login” to proceed.

4
2b For first-time users without SingPass: Click on “Create new profile”

5
3 Complete “Create Profile” by entering your particulars. Mandatory fields are marked with red asterisk ( * ). Click “Save” to proceed. Note: Password must contain: (i) At least one alphabet and numeric; (ii) At least one special characters: ~!@#$%^&*_-+=`|\(){}[]:;"'<>,.?/ (iii) At least 8 characters.
E.g. abc#1234

6
4 Once your user profile is saved, a notification will inform you that your profile is successfully created and active. You will be redirected automatically to the post-login landing page.
PALS Landing Page

7
2. Account Login for Existing Users
SN Step Screenshot
1 Go to AVS PALS website: pals.avs.gov.sg
2a For existing SingPass
users: Click on “Log in with SingPass” Enter “SingPass ID” and “SingPass”. Click “Login” to proceed.
2b For existing users
without SingPass:
Click on “Login with PALS Account”

8
Enter
“NRIC/FIN/Passport
No” and “Password”.
Click on “Login” to
proceed.
2c To complete 2FA
authentication, select
a. “Link SMS OTP”
for one time
password to be
sent to your
mobile
b. “Link OneKey
Token” for one
time password
to be sent to
your one key
token
c. Click “here to
register with
OneKey”
To skip authentication
,click on ” here to skip
2FA Authentication”
Click on “here” to
register with OneKey

9
3 . Password Management
3.1 Password Reset (Applicable to PALS Account only)
SN Step Screenshot
1 Click on “Forgot Password” in PALS login page to reset your password.
2 Enter
“NRIC/FIN/Passport”, “Registered Email” and the “verification code”. Click “Submit” to continue.
3 A new password will be
sent to your email.
4 Retrieve the new
password from your email and login to PALS with the new password.

10
3.2 Change Password
SN Step Screenshot
1 Click on ‘Profile’ ‘Change Password’.
2 Enter “Current Password”, “New Password” and “Re-confirm Password”. Note: Password must contain: (i) At least one alphabet and numeric; (ii) At least one special characters: ~!@#$%^&*_-+=`|\(){}[]:;"'<>,.?/ (iii) At least 8 characters.
E.g. abc#1234
Click “Submit” to proceed
3 An acknowledgement message indicating “Your password has been changed” will be displayed.

11
4. Applying for New Licence
4.1 Applying for New Licence
SN Step Screenshot
1 Click on ‘e-Service’ ‘Apply Licence’.
12
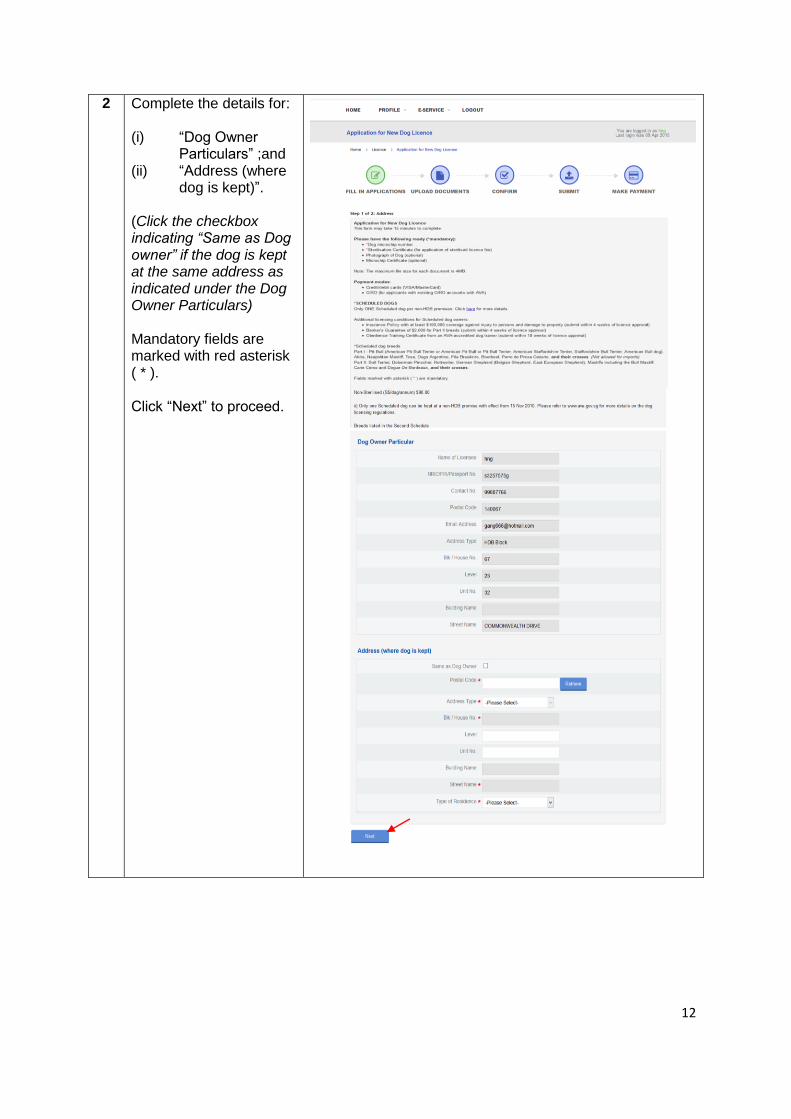
2 Complete the details for: (i) “Dog Owner
Particulars” ;and (ii) “Address (where
dog is kept)”.
(Click the checkbox indicating “Same as Dog owner” if the dog is kept at the same address as indicated under the Dog Owner Particulars) Mandatory fields are marked with red asterisk ( * ). Click “Next” to proceed.

13
3 Complete the details for “Dog Particulars”. Mandatory fields are marked with red asterisk ( * ). Select licence period (up to 3 years). Click “Next” to proceed.
4 Only click on the “Apply
Diplomatic Dog Licence” checkbox if you are a foreign diplomat on official duty in Singapore. Click “Next” to proceed.
14
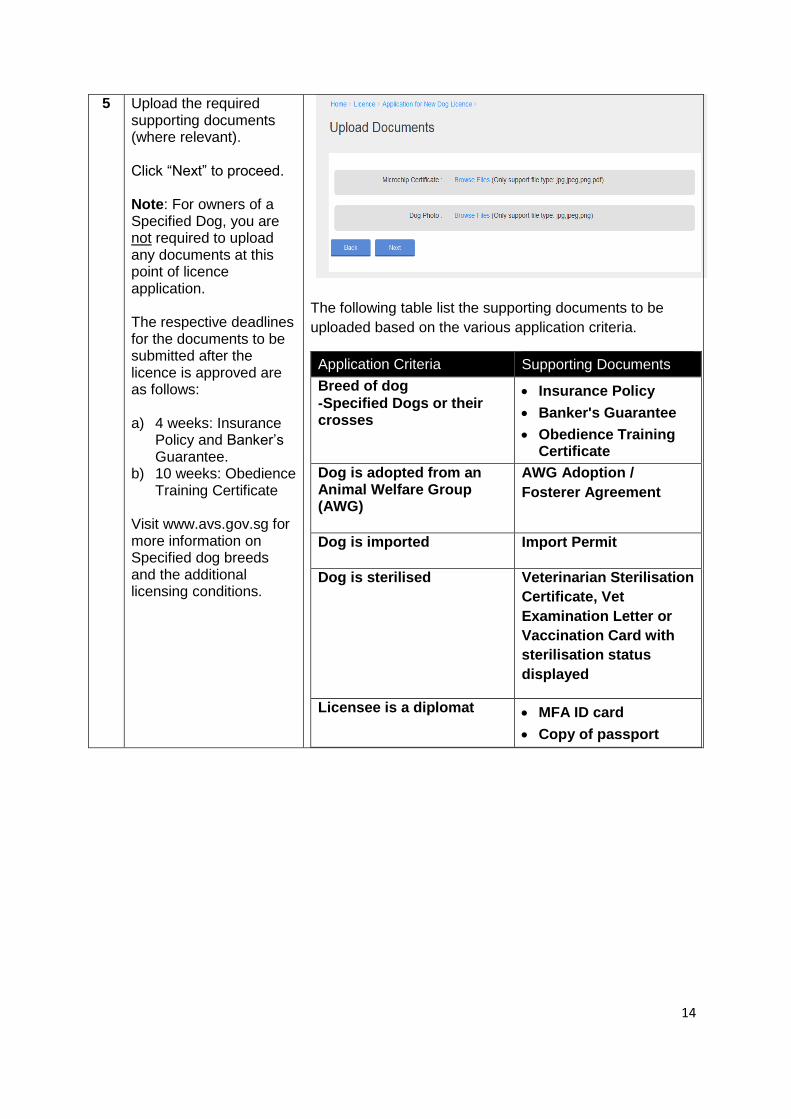
5 Upload the required supporting documents (where relevant). Click “Next” to proceed. Note: For owners of a Specified Dog, you are not required to upload any documents at this point of licence application. The respective deadlines for the documents to be submitted after the licence is approved are as follows: a) 4 weeks: Insurance
Policy and Banker’s Guarantee.
b) 10 weeks: Obedience Training Certificate
Visit www.avs.gov.sg for more information on Specified dog breeds and the additional licensing conditions.
The following table list the supporting documents to be
uploaded based on the various application criteria.
Application Criteria Supporting Documents
Breed of dog
-Specified Dogs or their crosses
Insurance Policy
Banker's Guarantee
Obedience Training Certificate
Dog is adopted from an Animal Welfare Group (AWG)
AWG Adoption /
Fosterer Agreement
Dog is imported
Import Permit
Dog is sterilised
Veterinarian Sterilisation
Certificate, Vet
Examination Letter or
Vaccination Card with
sterilisation status
displayed
Licensee is a diplomat
MFA ID card
Copy of passport
15
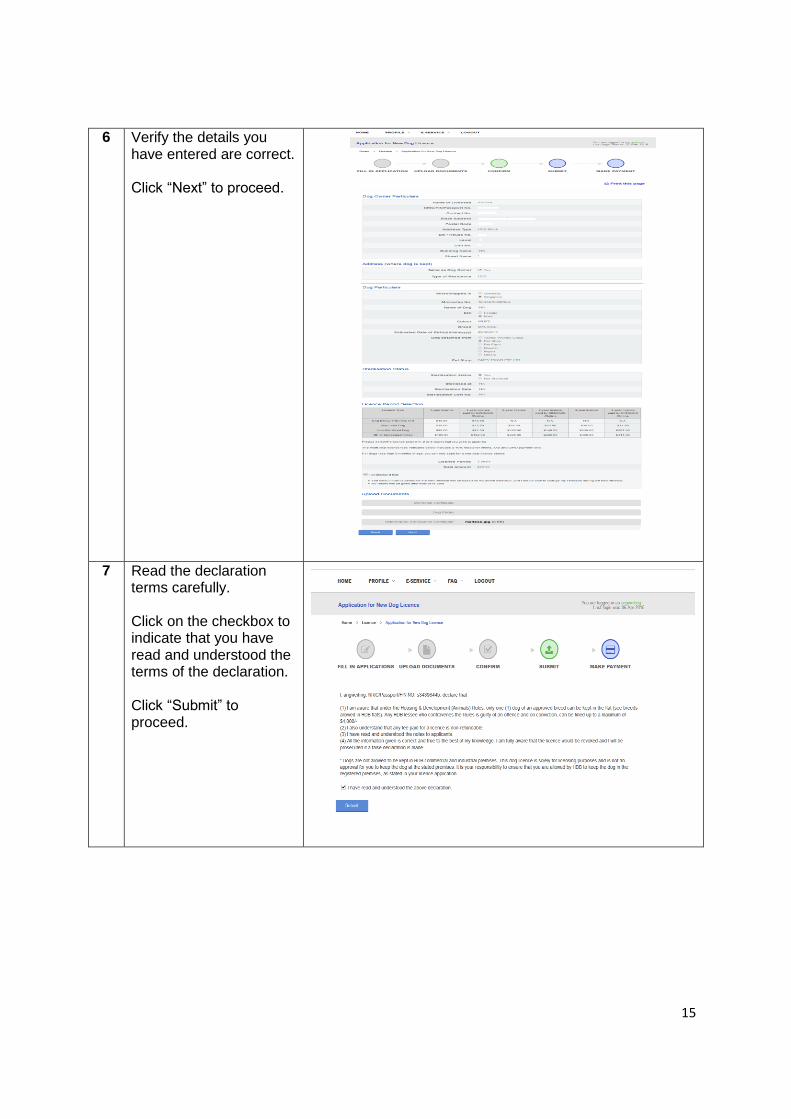
6 Verify the details you have entered are correct. Click “Next” to proceed.
7 Read the declaration terms carefully. Click on the checkbox to indicate that you have read and understood the terms of the declaration. Click “Submit” to proceed.

16
8a For online payment: Click on the “Make Payment” button to proceed with payment. Click on “Go back to amend licence period” button if you wish to amend the licence period selected (up to 3 years). An acknowledgement page stating that your licence has been applied successfully will be displayed upon the completion of your online payment. Refer to Section 4.2 on how to download your licence.
Payment via online
8b If you have exited the payment page and wish to return to make payment, go to ‘Home’ “My Applications” tab. Select and click on the application that had been submitted earlier. Click on “Make Payment” to proceed with the payment.

17
Note: Payment must be made within 2 weeks from the time of licence approval. In the event that payment is not received within 2 weeks, you will be required to resubmit your dog licence application and make payment for a new dog licence. Select licence period (up to 3 years). Read and understand the terms, click the checkbox and “Confirm”. Click on “Make payment” button. An acknowledgement page stating that your licence has been applied successfully will be displayed upon the completion of your online payment. Refer to Section 4.2 on how to download your licence.
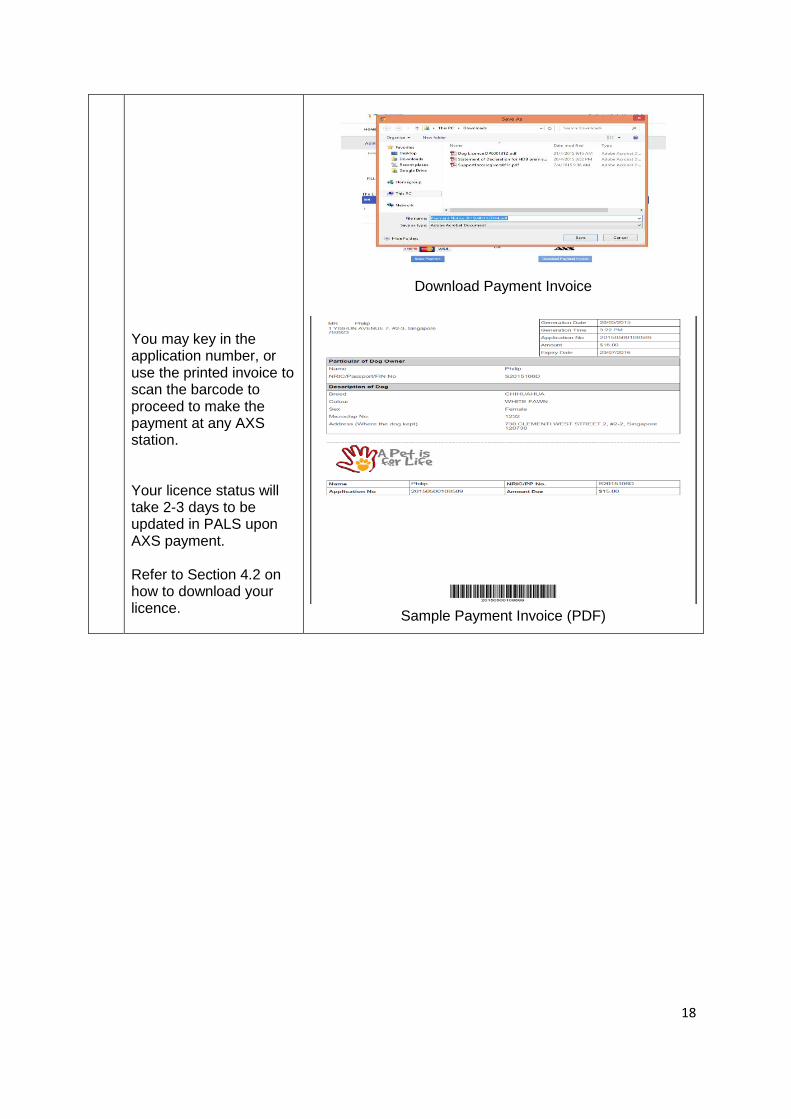
8c For payment via AXS terminals: Click “Download Payment Invoice” to download and print the invoice.
Payment via AXS
18
You may key in the application number, or use the printed invoice to scan the barcode to proceed to make the payment at any AXS station. Your licence status will take 2-3 days to be updated in PALS upon AXS payment. Refer to Section 4.2 on how to download your licence.
Download Payment Invoice
Sample Payment Invoice (PDF)

19
4.2 Download Licence
SN Step Screenshot
1 Click on ‘My Licences’ tab. Select and click on the ‘Download Licence’ icon.
2 A “Save As” window will appear. Save the licence into your desired file location for ease of retrieval.
20
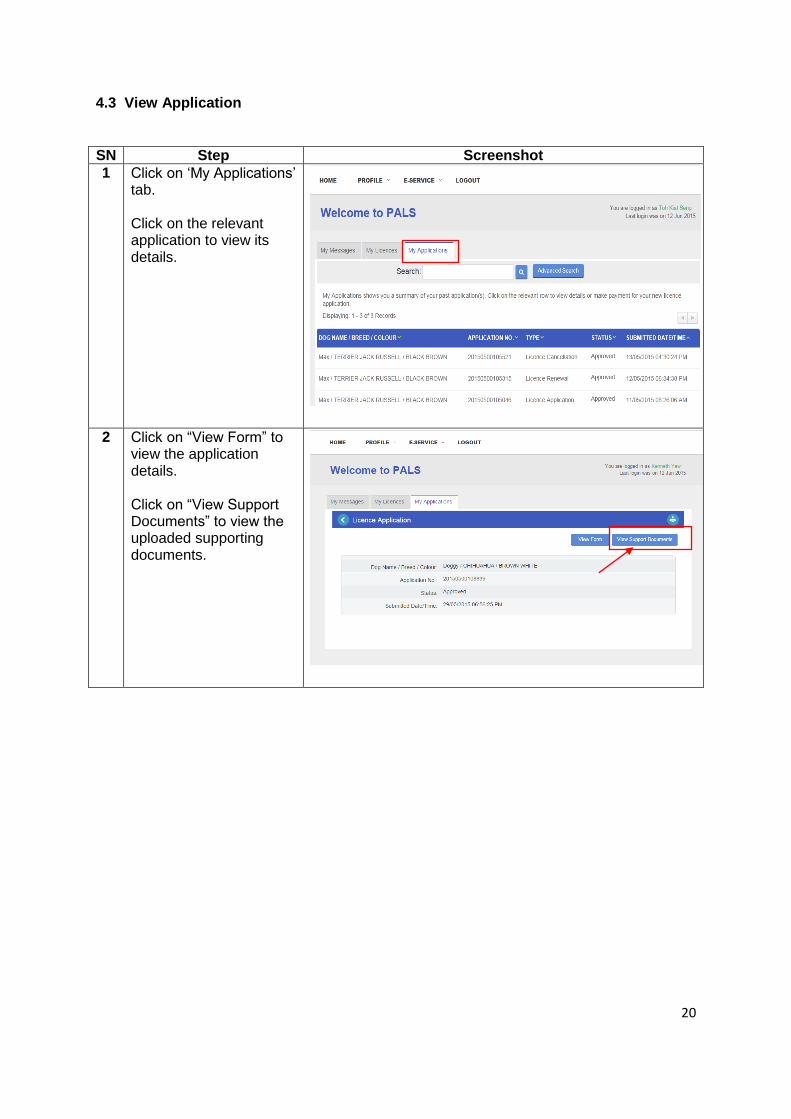
4.3 View Application
SN Step Screenshot
1 Click on ‘My Applications’ tab. Click on the relevant application to view its details.
2 Click on “View Form” to view the application details. Click on “View Support Documents” to view the uploaded supporting documents.
21
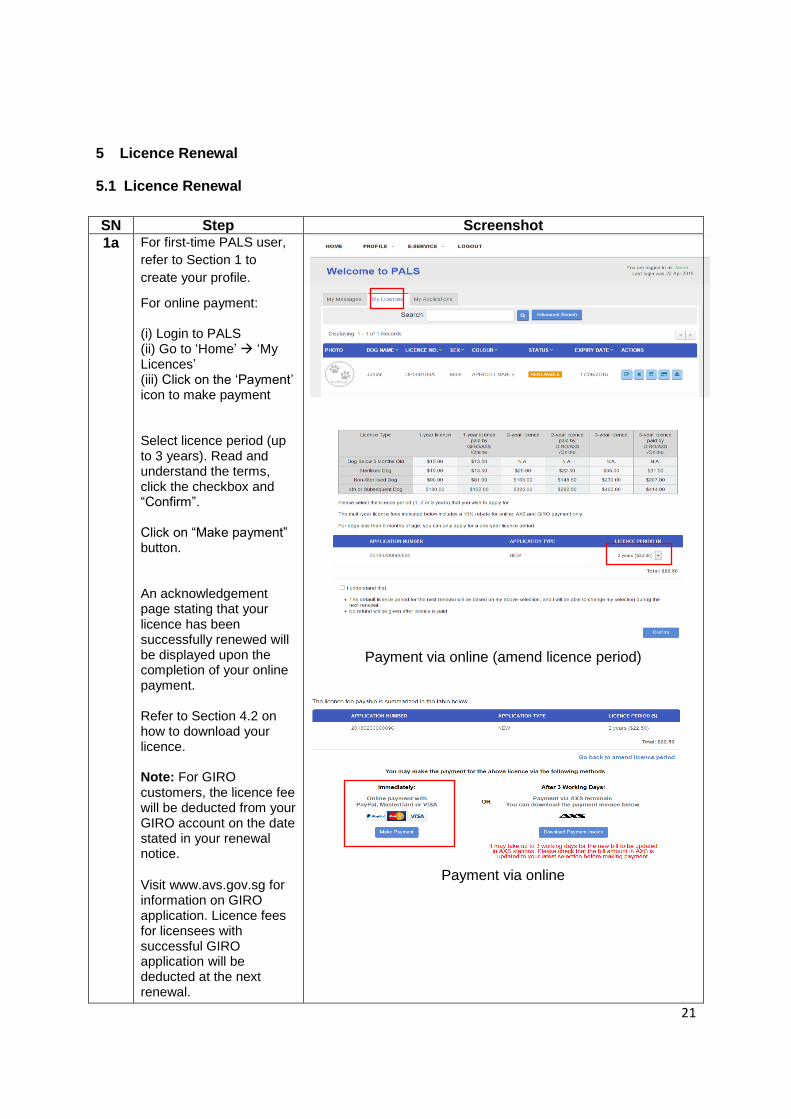
5 Licence Renewal
5.1 Licence Renewal
SN Step Screenshot
1a For first-time PALS user,
refer to Section 1 to
create your profile.
For online payment: (i) Login to PALS (ii) Go to ‘Home’ ‘My Licences’ (iii) Click on the ‘Payment’ icon to make payment Select licence period (up to 3 years). Read and understand the terms, click the checkbox and “Confirm”. Click on “Make payment” button. An acknowledgement page stating that your licence has been successfully renewed will be displayed upon the completion of your online payment. Refer to Section 4.2 on how to download your licence. Note: For GIRO customers, the licence fee will be deducted from your GIRO account on the date stated in your renewal notice.
Visit www.avs.gov.sg for information on GIRO application. Licence fees for licensees with successful GIRO application will be deducted at the next renewal.
Payment via online (amend licence period)
Payment via online

22
1b For online payment
without logging into
PALS:
(i) Click on “Renew
Licence without Login”
(ii) Key in the last 5
characters of your
NRIC/FIN/Passport no.
and dog licence no.
(iii) Click on “Next”.
Select licence period
(up to 3 years). Read
and understand the
terms, click the
checkbox and
“Confirm”.
Click on “Make payment” button. An acknowledgement page stating that your licence has been applied successfully will be displayed upon the completion of your online payment. Refer to Section 4.2 on how to download your licence.
23
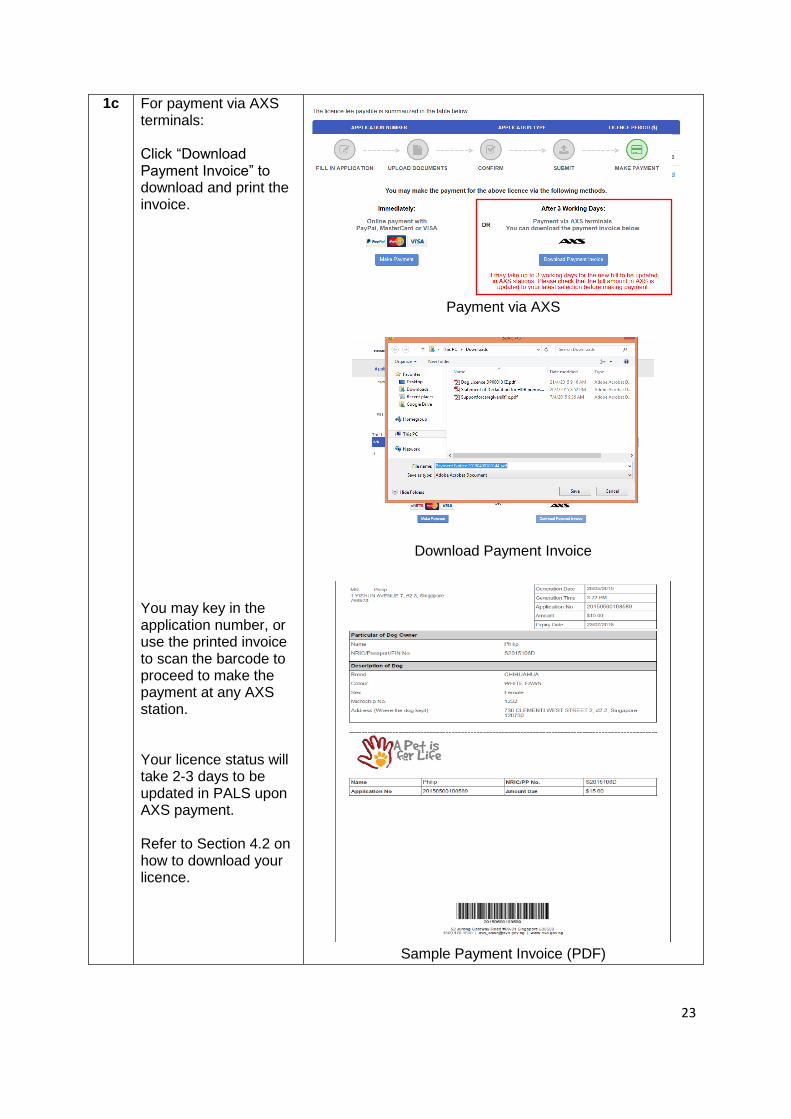
1c For payment via AXS terminals: Click “Download Payment Invoice” to download and print the invoice. You may key in the application number, or use the printed invoice to scan the barcode to proceed to make the payment at any AXS station. Your licence status will take 2-3 days to be updated in PALS upon AXS payment. Refer to Section 4.2 on how to download your licence.
Payment via AXS
Download Payment Invoice
Sample Payment Invoice (PDF)

24
6 Update Licence Details
6.1 Update User Profile
SN Step Screenshot
1 Click on ‘Profile’
‘Update Profile’.
25
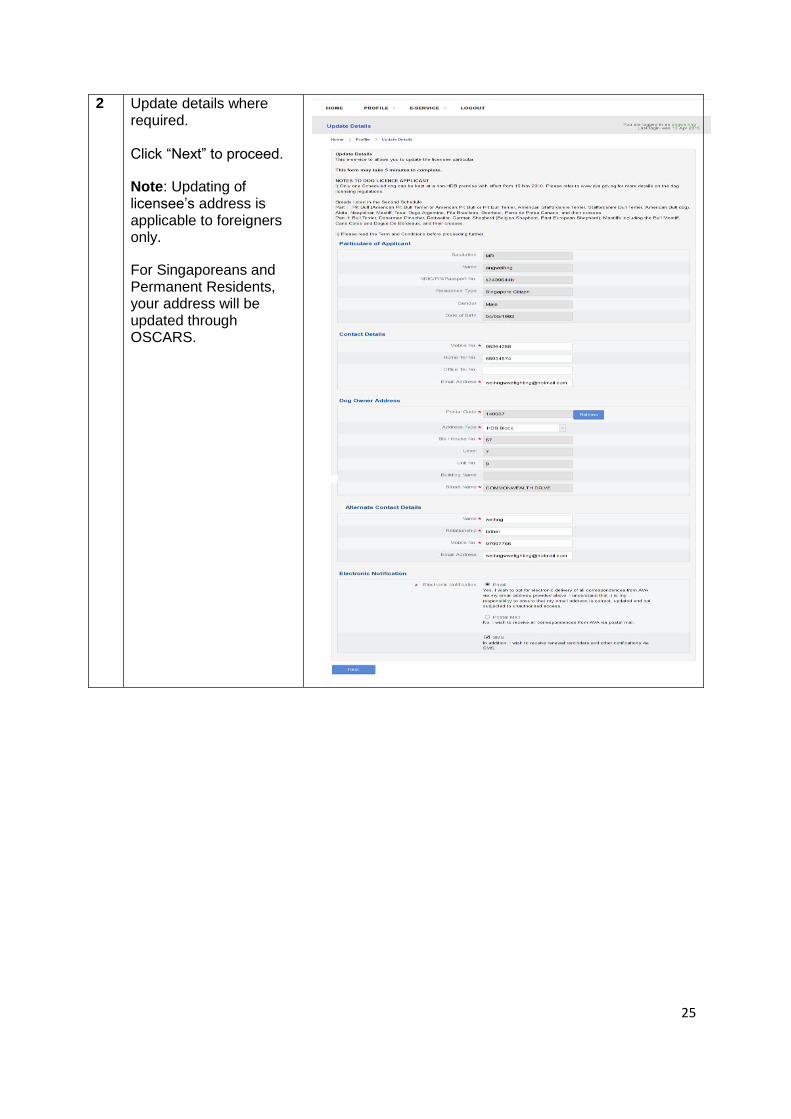
2 Update details where required. Click “Next” to proceed.
Note: Updating of licensee’s address is applicable to foreigners only.
For Singaporeans and Permanent Residents, your address will be updated through OSCARS.
26
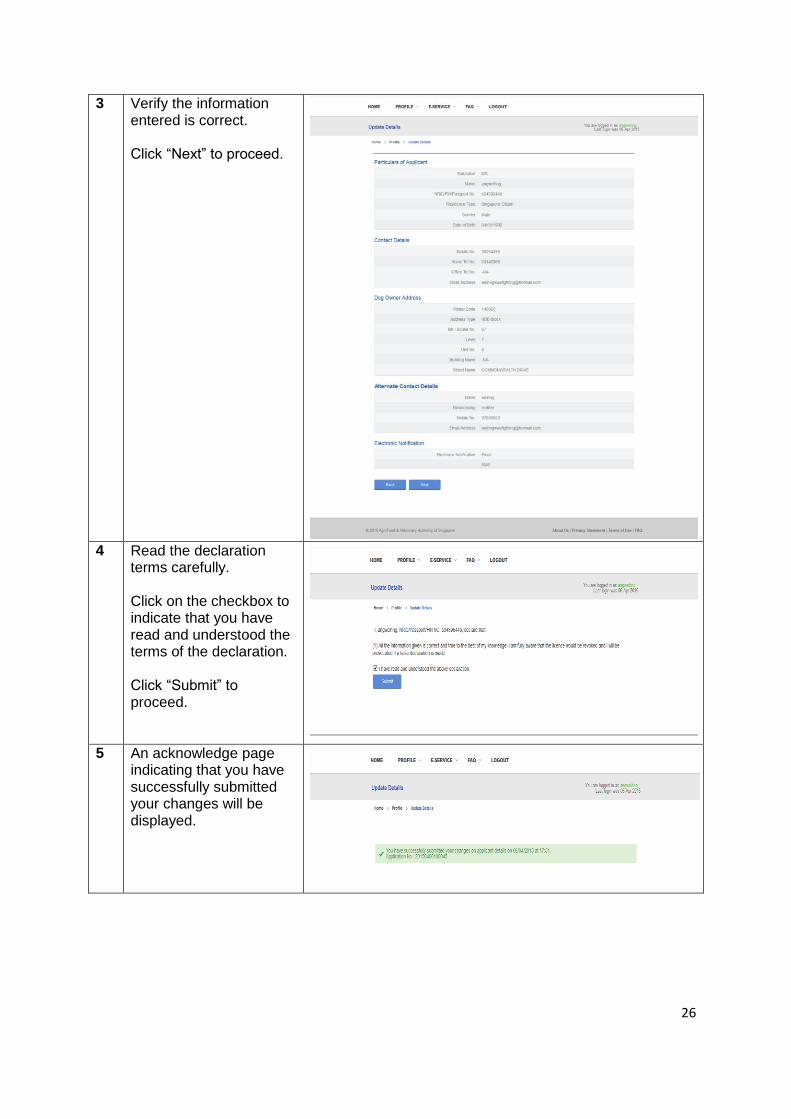
3 Verify the information entered is correct. Click “Next” to proceed.
4 Read the declaration
terms carefully. Click on the checkbox to indicate that you have read and understood the terms of the declaration. Click “Submit” to proceed.
5 An acknowledge page indicating that you have successfully submitted your changes will be displayed.

27
6.2 Update Dog Details (e.g. Sterilisation Status, Address)
SN Step Screenshot
1 Click on ‘My Licences’ tab. Select and click on the ‘Update’ icon.
2 Update the details for the
“Dog Particulars”.
Click on the “Upload dog
photo” checkbox to
attach a photo at the
“Upload Documents”
page.
28
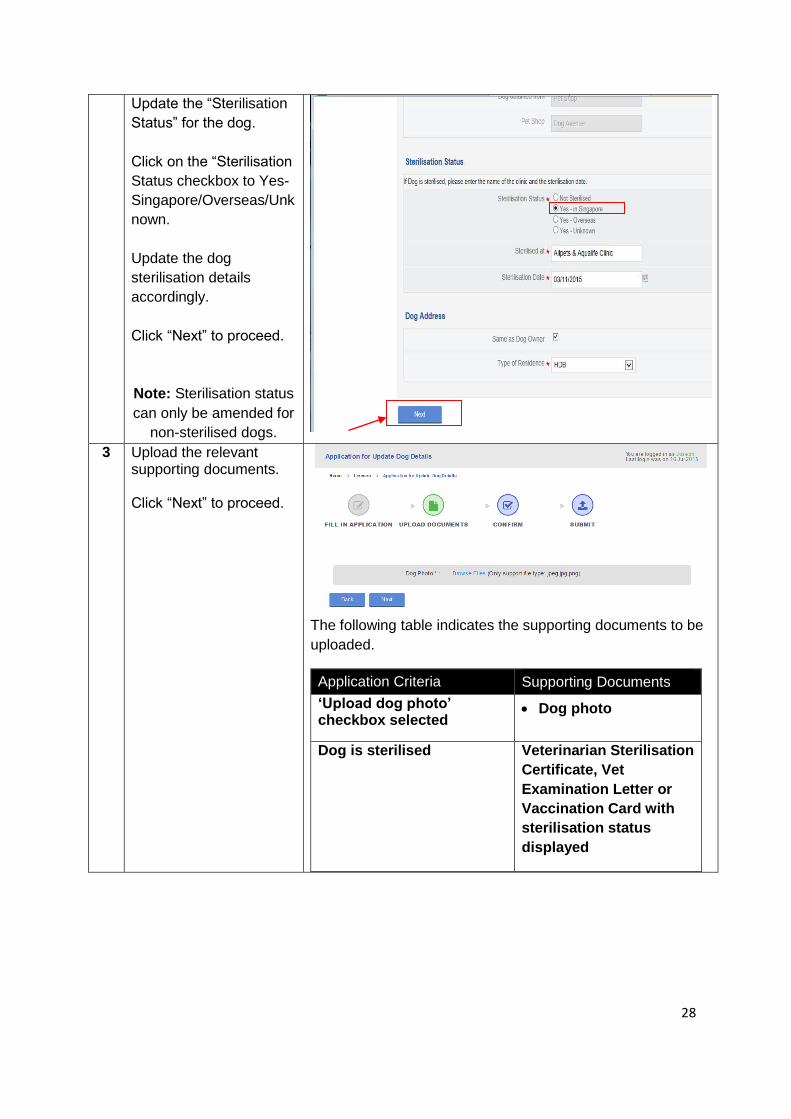
Update the “Sterilisation
Status” for the dog.
Click on the “Sterilisation
Status checkbox to Yes-
Singapore/Overseas/Unk
nown.
Update the dog
sterilisation details
accordingly.
Click “Next” to proceed.
Note: Sterilisation status
can only be amended for
non-sterilised dogs.
3 Upload the relevant supporting documents. Click “Next” to proceed.
The following table indicates the supporting documents to be
uploaded.
Application Criteria Supporting Documents
‘Upload dog photo’ checkbox selected
Dog photo
Dog is sterilised
Veterinarian Sterilisation
Certificate, Vet
Examination Letter or
Vaccination Card with
sterilisation status
displayed

29
4 Verify the information
entered is correct.
Click “Next” to proceed.
(screenshot updated)
5 Read the declaration
terms carefully. Click on the checkbox to indicate that you have read and understood the terms of the declaration. Click “Submit” to
proceed.(screenshot
updated)
6 An acknowledge page
indicating that you have successfully submitted the changes will be displayed. .(screenshot updated)

30
7. Cancellation of Licence
7.1 Cancel Licence
SN Step Screenshot
1 Click on ‘My Licences’ tab. Select and click on the ‘Cancel licence’ icon.
31
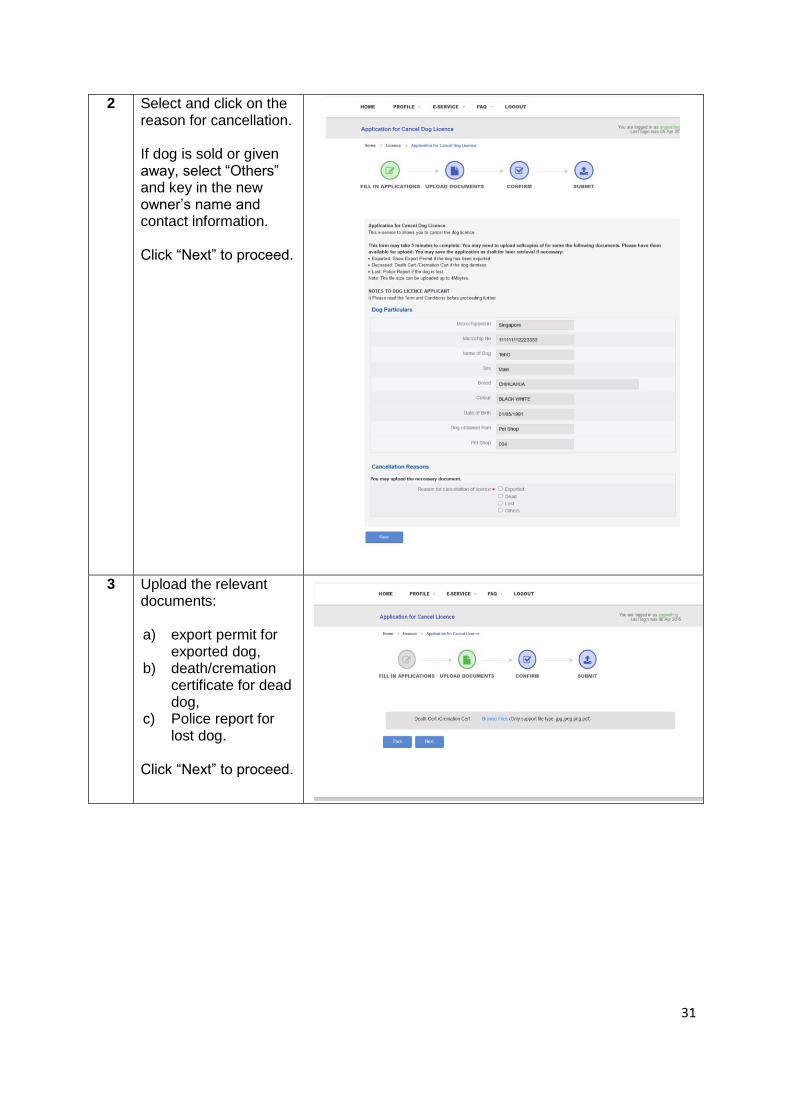
2 Select and click on the reason for cancellation. If dog is sold or given away, select “Others” and key in the new owner’s name and contact information. Click “Next” to proceed.
3 Upload the relevant
documents: a) export permit for
exported dog, b) death/cremation
certificate for dead dog,
c) Police report for lost dog.
Click “Next” to proceed.

32
4 Verify the details of the licence to be cancelled are correct. Click “Next” to proceed.
5 Read the declaration
terms carefully. Click on the checkbox to indicate that you have read and understood the terms of the declaration. Click “Submit” to proceed.
6 An acknowledge page
indicating that the licence is successfully cancelled will be displayed.

33
8 Change of Dog Owner
8.1 Initiate Change of Dog Ownership
SN Step Screenshot
1 Click on ‘My Licences’ tab. Select and click on the ‘Change Dog Ownership’ icon.
2 Complete “Change Dog
Ownership”. Click on ‘Change Ownership to Individual’. If the new owner is a pet shop or dog farm, click on ‘Change Ownership to Organisation’. Enter the new owner’s particulars. Mandatory fields are marked with red asterisk ( * ).

34
Select the ‘Yes’ button
to indicate that you wish
to transfer the dog to the
new applicant.
Click ‘Submit’ to
proceed.
3 Verify the information
entered is correct.
Click “Submit” to proceed.
4 An acknowledge page
indicating that you have successfully submitted the change of dog ownership request will be displayed.
5 The new dog owner will receive a notification containing the reference number to accept/reject the change of dog ownership. You will be notified of the outcome when the new owner accepts or rejects the request.
Dear Mr/Mrs Triv,
A request to change a dog's ownership to you has been initiated.
Please log in to PALS at pals.avs.gov.sg and go to e-Services >
Accept Change Dog Ownership to accept or reject the change
request by <date>.
Reference Number: X9ROBBNXXXXX
***************************************
This is a computer generated email. Please do not reply to this
email.
35
8.2 Accept Change of Dog Ownership
SN Step Screenshot
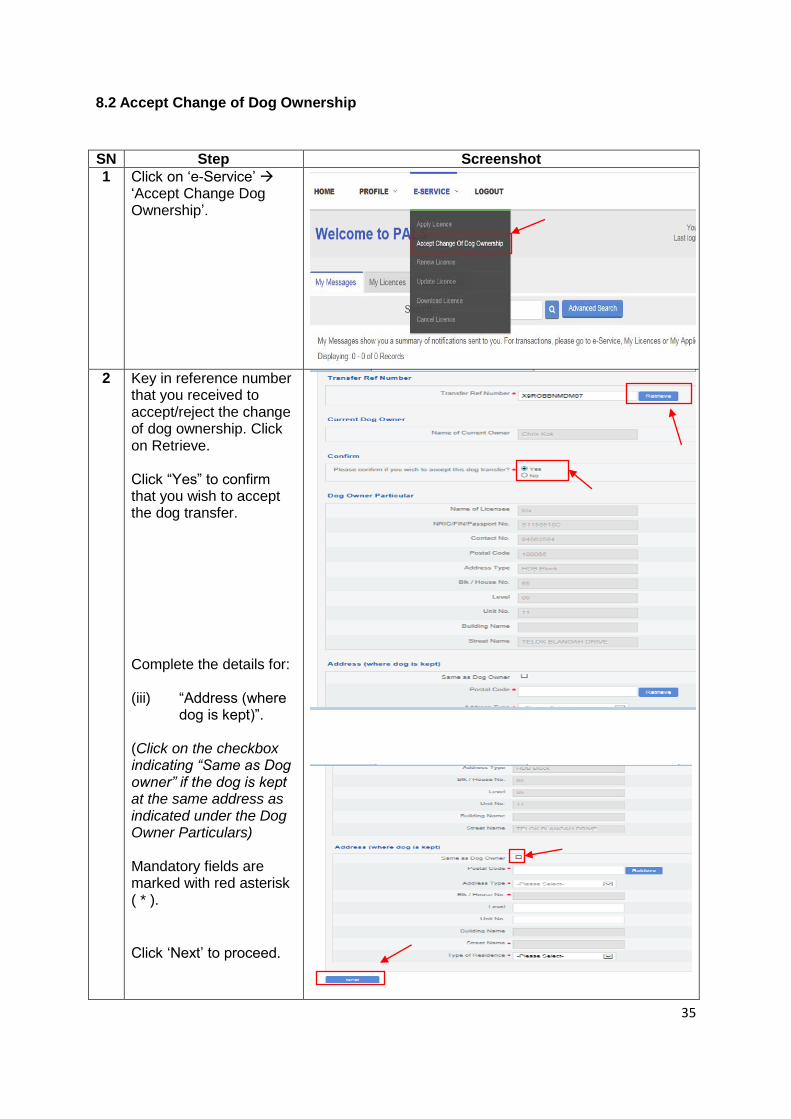
1 Click on ‘e-Service’ ‘Accept Change Dog Ownership’.
2 Key in reference number
that you received to accept/reject the change of dog ownership. Click on Retrieve. Click “Yes” to confirm that you wish to accept the dog transfer. Complete the details for: (iii) “Address (where
dog is kept)”.
(Click on the checkbox indicating “Same as Dog owner” if the dog is kept at the same address as indicated under the Dog Owner Particulars) Mandatory fields are marked with red asterisk ( * ).
Click ‘Next’ to proceed.

36
3 Update sterilisation status, if applicable. Click “Next” to proceed.
4 Upload the required
supporting documents (where relevant).
The following table list the supporting documents to
be uploaded based on the various application criteria.
Application Criteria Supporting Documents
Breed of dog
-Specified Dogs or their crosses
Insurance Policy
Banker's Guarantee
Obedience Training Certificate
Dog is adopted from an Animal Welfare Group (AWG)
AWG Adoption / Fosterer
Agreement
Dog is imported
Import Permit
Dog is sterilised
Veterinarian Sterilisation
Certificate, Vet
Examination Letter or
Vaccination Card with
sterilisation status
displayed
Licensee is a diplomat
MFA ID card
Copy of passport

37
Click “Next” to proceed. Note: For owners of a Specified Dog, you are not required to upload any documents at this point of licence application. The respective deadlines for the documents to be submitted after the licence is approved are as follows: c) 4 weeks: Insurance
Policy and Banker’s Guarantee.
d) 10 weeks: Obedience Training Certificate
Visit www.avs.gov.sg for more information on Specified dog breeds and the additional licensing conditions.
5 Verify the details you
have entered are correct.
Click “Next” to proceed.

38
6 Read the declaration
terms carefully.
Click on the checkbox to
indicate that you have
read and understood the
terms of the declaration.
Click “Submit” to
proceed.
7 An acknowledge page indicating that you have successfully submitted the change of dog ownership request will be displayed.
The previous licensee
will be notified of the
outcome when you have
accepted the change of
dog ownership.