part 4: configure ms failover and hyper-v clustering · part 4: configure ms failover and hyper-v...
TRANSCRIPT

Part 4: Configure MS Failover and Hyper-v clustering
To manage the core servers’ clustering abilities through a management console, you will need
the failover clustering feature added to a Windows 2008 r2 full (non-core) server or a
Windows 7 enterprise workstation with remote administration tools installed. In my case, my
existing management station is already Windows 2008 R2 so I will use it.
1. Install Failover Clustering
a. From Control Panel, click ‘Programs and Features’
b. Click ‘Turn Windows Features on or off’
c. Select ‘Features’ from the left pane
d. Click ‘Add Features’ from the right pane
e. Select Failover Clustering and click install
2. Run the Failover Cluster Manager
a. Logon to your chosen Management workstation
b. Go to Start > All Programs > Administrative Tools > Failover Cluster Manager
3. Validate a Configuration
a. From the Failover Cluster Manager, in the middle of the centre pane click the
‘Validate a Configuration ‘ link
b. Click next on the welcome screen
c. On the Select Servers page, add all the servers that you wish to join to your
cluster
d. Click ‘next’ once you have added all your servers
e. Choose to ‘Run’ all tests and click Next
f. Click Next on the Confirmation page
g. The test will take some time to complete

i. The warning about disconnections to storage relate to the shared
volumes only.
h. View the report and address any outstanding issues, if any, before continuing.
i. You will see the View Report button on the Summary page near the lower right
j. Review and address any noted warnings or errors before continuing
4. Create the Cluster
a. From the Failover Cluster Manager tab, click Create a Cluster
b. Click Next on the welcome page
c. On the Select Servers tab, add all the servers that passed the cluster validation
wizard in the previous step
d. Select a name for your cluster and click next
e. Review the confirmation dialog and click next to create.
f. Review the Summary tab and note any warnings.
5. Create the Cluster Shared Volumes

Now that the failover cluster is created we can create over CSVs for the Hyper-v
servers to use.
a. From the Failover Cluster Manager tab, click Manage a cluster
b. Enter the name of your newly created cluster and click ok
c. Highlight your cluster name in the Left pane, and in the right pane, click
‘Enable Cluster Shared Volumes…’
d. Once enabled, right click ‘Cluster Shared Volumes’ from the left pane and
select ‘Add Storage’

e. You should see both of the Virtual Disks created earlier on the SAN – add both,
one at a time calling them Volume1 and Volume2 respectively
f. Once added, highlight ‘Cluster Shared Volumes’ and the centre screen should
look similar to this;
g. Notice that the location on your system drive where the CSVs have mapped
your shared SAN storage.
i. You can also see which node is considered the current owner.
**Note: At a file system level, you should only ever add or remove data
through the current CSV owner and no other member nodes. Do so with
extreme caution as well.
h. Setup of the Nodes and CSV is complete, we can now move on to setting up our
Hyper-v cluster
Set up the Hyper-v cluster using SCVMM
Using a Hyper-v cluster provides greater availability than running standalone Hyper-v servers.
If one server fails, other servers in the cluster will take control over any running VMs that
were on the failed node, providing virtually uninterrupted service (a couple of seconds for
transition). This reason alone obviously is the most common and understandable justification
for the added complexity required in establishing a cluster. At this stage you can now run a
highly available Hyper-v cluster and manage it by utilizing both the failover cluster manager
and Hyper-v manager together, running on a management workstation.
Another great advantage of Hyper-v clustering comes to light when using System Center
Virtual Machine Manager 2008 R2 (SCVMM) - Live Migration ability. With this functionality you
can actively move running VMs from one host to another with virtually no loss in connectivity
to the running VM (a few seconds at most). This functionality greatly improves the ability to
perform maintenance on nodes, as well as monitor and adjust resource allocation on the fly
between the nodes for optimal performance. If you have System Centre Operations Manager

2007 sp1 (SCOMM) or later, you can even further expand upon this advantage and improve
performance tuning even further (not covered in this article).
Though you can control most aspects of your cluster though a combination of Hyper-v
manager and failover cluster manager from a remote management station, I will only be
covering administration of the Hyper-v cluster through SCVMM.
Create an SCVMM server
If you do not already have an SCVMM server configured and online, you will want to install and
configure System Centre Virtual Machine Manager 2008 R2 onto a standalone server now. You
should follow the Microsoft hardware recommendations as a best practice for the server
deployment, especially, however I simply have created a VM for SCVMM and it works perfectly
fine for my needs since I have only a few Hyper-v servers onsite. One of the caveats here
though, is not to put the SCVMM VM on any node in the Hyper-v cluster to avoid potential
migration issues.
I will not cover the actual SCVMM install as it is pretty straight forward. I recommend
installing the SCVMM client management software onto your management workstation, after
you complete the SCVMM server installation, for convenience. One caveat with the SCVMM
server install is that it will suggest the use of 443 for BITs by default. You should change this
to another port number when prompted as 443 will often conflict during live migrations and
P2Vs etc. on servers running web services. The port number you choose in lieu is not too
critical since any work processed is done in the background and you will not need to actually
specify the port when administering from SCVMM.
Add the cluster to SVMM
Our first step will be to add our newly created Hyper-v cluster nodes to the SCVMM
management console.
1. Launch SCVMM from your management station
2. Select’ Hosts’ from the lower left hand navigation pane
3. Select Add Host from the upper right ‘Actions’ pane

a. Select Windows Server-based host on Active Directory domain
b. Enter in credentials for a user that has administrative rights on all of the nodes
c. Check the Host is in a trusted domain box and click next
d. On the ‘select Host servers’ page, enter the domain and add each of the Nodes
you created

Click next and then yes on the Hyper-v role prompt pop-up
e. On the configuration setting page, check the ‘Reassociate host…’ checkbox and
click next
f. On the Host properties page, add the two paths to your CSV folders
For example, if you used Volume1 and Volume2 as the names for your
CSVs you would use;
1. C:\ClusterStorage\Volume1
2. C:\ClusterStorage\Volume2
g. On the summary page, click Add Hosts.
Configure virtual networking on all the nodes
In order for high availability to function properly with Hyper-v, all given virtual network card
names must match, including case.
1. From SCVMM, select Hosts from the left navigation pane, and drill down to the nodes.
2. Right click on your first node, and select ‘properties’
3. Select the Networking tab from the Host Properties screen.
4. All the Virtual Network adapter names listed here must match on all the member
nodes in your hyper-v cluster.
5. Create the Virtual Network adapters that you wish to make available for your VMs to
use. In this example lets create one called LAN, and another called DMZ
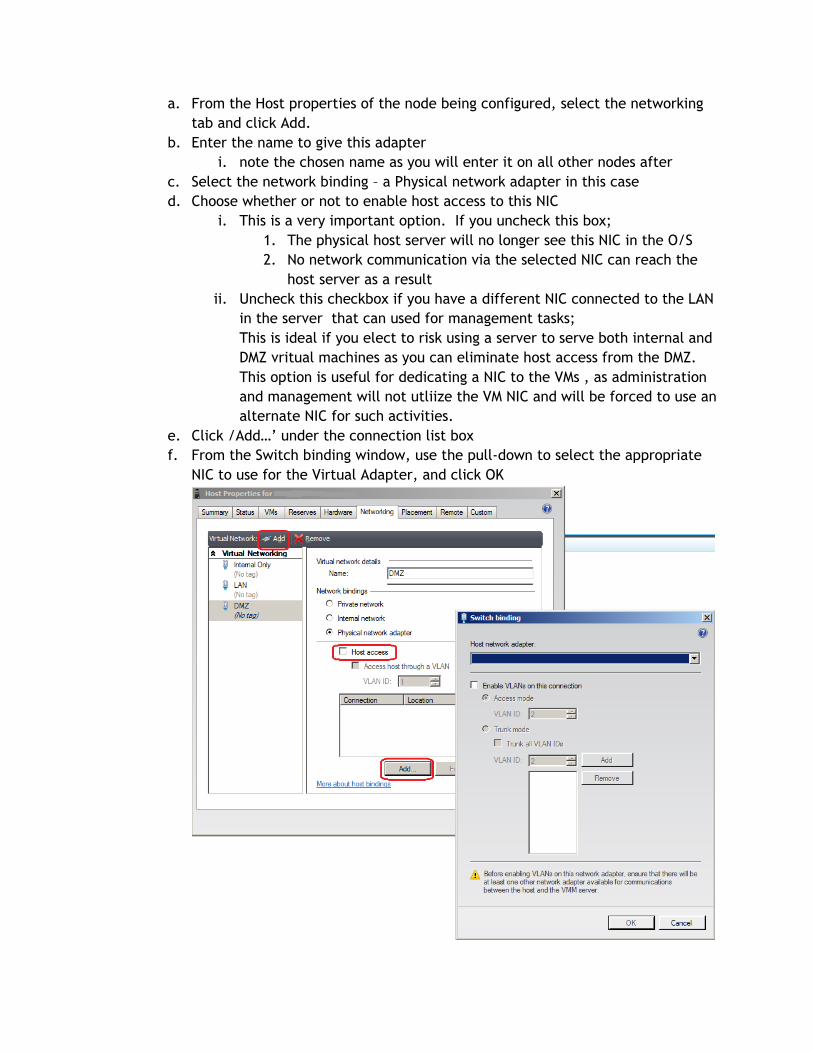
a. From the Host properties of the node being configured, select the networking
tab and click Add.
b. Enter the name to give this adapter
i. note the chosen name as you will enter it on all other nodes after
c. Select the network binding – a Physical network adapter in this case
d. Choose whether or not to enable host access to this NIC
i. This is a very important option. If you uncheck this box;
1. The physical host server will no longer see this NIC in the O/S
2. No network communication via the selected NIC can reach the
host server as a result
ii. Uncheck this checkbox if you have a different NIC connected to the LAN
in the server that can used for management tasks;
This is ideal if you elect to risk using a server to serve both internal and
DMZ vritual machines as you can eliminate host access from the DMZ.
This option is useful for dedicating a NIC to the VMs , as administration
and management will not utliize the VM NIC and will be forced to use an
alternate NIC for such activities.
e. Click /Add…’ under the connection list box
f. From the Switch binding window, use the pull-down to select the appropriate
NIC to use for the Virtual Adapter, and click OK

g. Repeat step 5 for all other Virtual adapters you wish to have available to your
VMs.
6. Repeat the above steps on every Hyper-v node in your cluster.
Again, ensure that all nodes have all the exact same virtual network adapter
names used.
Add VMs to your Hyper-v cluster
Using SCVMM, there are a few different ways to get VMs running on your Hyper-v cluster,
depending on your scenario. The most common are;
1. Moving a VM to the cluster from a different Hyper-v server that is not
part of the cluster
2. Moving a VM from one of the nodes local drives onto the CSV to become
highly available – a part of the cluster
3. Creating a new VM from SCVMM
1) Moving a VM from another Hyper-v server into the Hyper-v cluster using SCVMM
a. Open SCVMM
b. Add the Hyper-v host running the VM to be migrated to SCVMM using the Add
host wizard (see the ‘add the cluster to scvmm section for details if needed)
c. From the left hand navigation pane, select ‘Virtual Machines’
d. From the upper left navigation pane, select ‘All hosts’
e. You will now see all VMs associated with every host you have added to SCVMM,
listed in the upper centre pane.
f. Right click the VM to move over to your Hyper-v cluster (Sandbox2008r2Core in
this example)
g. Select ‘Migrate’

h. If the VM is running, you will get a warning about saving state during migration
– click yes to continue
On the Select Host page, you are presented with a list of servers that are
available for placement. Notice the Rating system column. You can customize
this rating based on different resource priority preferences.

i. Select the host of your choosing, preferrably the one with the best rating – and
click next
j. Once you click next, a prompt popup appears stating you much change the VM
to Highly available to migrate to the chosen host. Click yes to have the VM
become highly available
k. On the next page of the wizard, you select the path that the VM flies will be
moved to.

l. Choose one of the two paths and click next
i. You may recall from earlier that each path is actually one of the two
SAN Virtual disks mapped via CSV.
m. On the select networks page, select the appropriate virtual network card for
your VM and click next
n. On the summary page, review then click ‘Move’
o. The migration process will move over the VM files, update the version of
integration services, and start the VM on the cluster.
2) Migrate storage
a. If you recently added an existing host to a cluster, none of its existing VMs will
yet be ‘highly available’ until they are moved onto one of the CSVs. You will
want migrate those VMs storage to one of the CSV paths. The other time you
may use migrate storage, is when you have a highly available VM that you want
to move from one of your CSV volumes to the other, perhaps for performance
tuning reasons or storage constraints.
b. To migrate storage, right click the desired VM and select ‘Migrate Storage’
c. Select the pack to one of the volumes from the CSV and click next

d. On the summary page, review then click move.
e. There will be a period of unavailability for the VM during the storage migration
process but it is not significant due to the method used by SCVMM.