anti-virus for symbian os - dr. webdownload.geo.drweb.com/pub/drweb/symbian/drweb-symbian-s...for...
TRANSCRIPT
Anti-virusfor Symbian OS
© 2003-2013 Doctor Web. All rights reserved.
Dr.Web for SymbianVersion 6.00.3User Guide25.01.2013
Doctor Web Head Office2-12A, 3rd str. Yamskogo polyaMoscow, Russia125124
Web site: www.drweb.comPhone: +7 (495) 789-45-87
Refer to the official web site for regional and international officeinformation.
This document is the property of Doctor Web. No part of this documentmay be reproduced, published or transmitted in any form or by anymeans for any purpose other than the purchaser's personal use withoutproper attribution.
TRADEMARKSDr.Web, the Dr.WEB logo, Dr.Web, SpIDer Mail, SpIDer Guard, CureIt!,CureNet!, AV-Desk are trademarks and registered trademarks of DoctorWeb in Russia and/or other countries. Other trademarks, registeredtrademarks and company names used in this document are property oftheir respective owners.
DISCLAIMERIn no event shall Doctor Web and its resellers or distributors be liable forerrors or omissions, or any loss of profit or any other damage caused oralleged to be caused directly or indirectly by this document, the use of orinability to use information contained in this document.
Doctor Web
We thank all our customers for their support anddevotion to the Dr.Web products!
Doctor Web develops and distributes Dr.Web® informationsecurity solutions which provide efficient protection from
malicious software and spam.
Doctor Web customers can be found among home users from allover the world and in government enterprises, small companies
and nationwide corporations.
Dr.Web antivirus solutions are well known since 1992 forcontinuing excellence in malware detection and compliance
with international information security standards. State certificatesand awards received by the Dr.Web solutions, as well as the
globally widespread use of our products are the best evidence ofexceptional trust to the company products.

User Guide
4
Table of Contents
6Chapter 1. Introduction
7Document Conventions
8Main Features
8Distribution Kit
9Chapter 2. Licensing
9License Key File
10Acquire License Key File
12Use License Key File
12Licence Update
13Chapter 3. Installation
13System Requirements
13Install Application
15Uninstall Application
16Chapter 4. Getting Started
16Launch and Exit the Application
17Interface
18Help System
19Chapter 5. Program Functions
19Constant Anti-Virus Protection
21On-Demand Scanning
24Malicious Objects Neutralization
25Quarantine
26Anti-Spam
User Guide
5
28Black and White Lists
29Update
30Logging
32Appendices
32Appendix A. Contacting Support
Index 33
User Guide
6Chapter 1. Introduction
Chapter 1. Introduction
Thank you for purchasing Dr.Web for Symbian. This anti-virussolution offers reliable protection of mobile phones and communicatorsworking under the Symbian Series 60 operating system from variousvirus threats designed specifically for mobile devices, and spam. Theprogram employs the most advanced developments and technologiesof Doctor Web aimed at detection and neutralization of maliciousobjects which may represent a threat to the device operation andinformation security.
This manual is intended to help users of mobile devices to install andadjust Dr.Web for Symbian. It also describes all the basic functionsof the application.
The appendice contain information on the technical support.

User Guide
7Chapter 1. Introduction
Document Conventions
The following conventions and symbols are used in this document:
Convention Description
Bold Names of buttons and other elements of thegraphical user interface (GUI), and required userinput that must be entered exactly as given in theguide.
Green and bold Names of Dr.Web products and components.
Green and underlined Hyperlinks to topics and web pages.
Italic Placeholders which represent information that mustbe supplied by the user. For command-line input, itindicates parameter values.
In addition, it may indicate a term in position of adefinition.
CAPITAL LETTERS Names of keys and key sequences.
Plus sign («+») Indicates a combination of keys. For example,ALT+F1 means to hold down the ALT key whilepressing the F1 key.
A warning about potential errors or any otherimportant comment.
User Guide
8Chapter 1. Introduction
Main Features
Dr.Web for Symbian is a reliable anti-virus solution for users ofmobile devices working under the Symbian Series 60 operating system.The application protects devices from information security threats andspam by performing the following functions:
Constant anti-virus protection of the device in the real-timemode
Scanning of the whole file system of the device or files andfolders selected by user
Scanning of the files on removable memory cards
Scanning of the archives and installation files (zip, cab, sis, jar,rar)
Deletion of the infected objects or their isolation in quarantine
SMS and calls filtering based on adjustable black and white lists
Detailed reports on performed scans
Dr.Web virus databases updates via Internet
Access to context Help from any active application window
Dr.Web for Symbian has user-friendly interface and easycustomizable settings which help you configure all program options toset up the appropriate protection level.
Distribution Kit
Dr.Web for Symbian can be purchased either from the Dr.WebWeb shop or from official distributors. For more information onpurchasing, visit the Doctor Web official web site at http://estore.drweb.com/.
The distribution kit of Dr.Web for Symbian includes theDrWebs60.sis installation file and the drweb-symbian-s60-en.pdffile with this guide.
User Guide
9Chapter 2. Licensing
Chapter 2. Licensing
The key file regulates the use rights for the purchased product.
License Key File
A key file has the .key extension and contains, among other, thefollowing information:
Licensed period for the product
Users number limitation for the license
Other limitations
There are two types of key files:
License key file is purchased with the Dr.Web software andallows purchasers to use the software and receive technicalsupport. Parameters of the license key file are set in accordancewith the software's license agreement. The file also containsinformation about the purchaser and seller.
Demo key file is used for evaluation of Dr.Web products. It isdistributed free of change and provides full functionality of thesoftware. However demo key files have limited validity periodand cannot be renewed.
A valid license key file satisfies the following criteria:
License is not expired
The license applies to all components of the product
Integrity of the license key file is not violated
If any of the conditions are violated, the license key file becomesinvalid, Dr.Web for Symbian stops detecting and neutralizing themalicious programs.
User Guide
10Chapter 2. Licensing
The license key file is secured with digital signature. Do not edit orotherwise modify the file to prevent the license from compromise!
Acquire License Key File
You can receive a license key file in one of the following ways:
By e-mail in an archived attachment
Download it on your device from the Doctor Web server viaInternet using the License manager
With the application distribution kit
On separate media
To acquire a key file by e-mail
1. Launch an Internet browser and go to the site which isspecified on the product registration card supplied with yourcopy of the product.
2. Enter the serial number which is typed on the registration card.
3. Fill in the registration form.
4. The license key file is archived and sent to the e-mail addressyou specified in the registration form.
5. Extract the license key file to the computer that will be used forsynchronization of your device and copying the key file viaNokia Suite/Nokia PC Suite.
To receive a trial license key file by e-mail, fill in the registration format http://download.drweb.com/demoreq/.
User Guide
11Chapter 2. Licensing
To download a key file on the device
The key file download procedure requires a working connection tothe Internet via HTTP. To open the connection, use the built-inGPRS module of your device.
If you are using WAP, please contact your mobile operator toinquire about existing connection and download files limitations.
1. In the warning window with notification about absence of avalid license key file or in the main window of theprogramselect Options -> Get key to launch the Licensemanager.
2. In the Options list select the type of the key file that you wantto download.
You can download the license or demo key file.
If you have a serial number, select Get license key.
If you installed the program in purposes of evaluation,select Get demo key and proceed to step 4.
3. Enter the serial number and select Next.
4. Enter your personal data and select Next. This information isnecessary to receive the key file.
5. The key file will be downloaded and installed. Select theInternet access point if required. The key file downloadingprocedure log is displayed on the screen:
If the license key is downloaded successfully, selectFinish to return to the main window of the program.
If an error occurred, the error details are displayed.
In this case the key file will be automatically installed and ready to use.
For more information on licensing and types of license key files, visitthe Doctor Web official web site at http://www.drweb.com.
User Guide
12Chapter 2. Licensing
Use License Key File
If you have obtained the key file by e-mail or it was included into thedistribution kit, you should copy it to the special folder on the device tostart using it. You can use the Nokia Suite/Nokia PC Suite software.
To start using the key file of the device with Dr.Web forSymbian:
1. In the warning window with notification about absence of avalid license key file or in the main window of the programselect Options -> Get license.
2. Select Copy from file in the Options list.
3. Synchronize your device with the computer where the key fileresides and use Nokia Suite/Nokia PC Suite to copy the key filefrom the computer to the C:\Data\DrWeb\ folder located onyour mobile device.
4. Select Done on the device.
The key file will be installed and ready to use.
Licence Update
When license expires, you may need to update the license. The newlicense then should be registered with the product or the expiredlicense should be renewed if it is supported for your key file. Dr.Webfor Symbian supports hot license update without stopping orreinstalling the program.
To update license
Use the key file acquisition procedure. Dr.Web for Symbianautomatically switches to the new license.
User Guide
13Chapter 3. Installation
Chapter 3. Installation
Dr.Web for Symbian can be installed on the mobile device eitherusing the Nokia Suite/Nokia PC Suite software or manually.
System Requirements
To install and use Dr.Web for Symbian, ensure your mobile deviceworks under one of the following operating systems:
Symbian 9, Series60 3rd Edition, Series60 5th Edition, Symbian3,Symbian Belle.
Dr.Web for Symbian can be installed only on Nokia devices.
The Internet connection is also required for virus databases updateprocedure.
Install Application
Dr.Web for Symbian can be installed on your mobile device bysynchronisation with the PC using the Nokia Suite/Nokia PC Suite software or by launching the installation file directly on the mobiledevice.
Install application via Nokia Suite/Nokia PC Suite
1. To install Dr.Web for Symbian via Nokia Suite/Nokia PCSuite synchronize your device with computer:
If you are using Nokia Suite, double-click the applicationinstallation file DrWebs60.sis or drag the installation fileon the icon of the device you want to install theapplication to, in the devices area.
User Guide
14Chapter 3. Installation
If you are using Nokia PC Suite, launch the ApplicationInstaller. Specify the path to the installation fileDrWebs60.sis located on the computer. In the bottomof the Installer window the information about the selected
application is displayed. Click the installation button to send the file and start installation of the program onyour device.
2. On the device screen a window with a suggestion to install theapplication will open. Select OK/Yes. Then a window withinformation on the application (program version, supplier,certificate) will open. Select OK/Continue.
3. If a window with a suggestion to select the applicationlanguage opens, you can select one of the following languages:
English
Russian
French
Chinese (simplified)
Select Continue.
4. On the page Install where? select the device memory or thememory card for installation of the program.
5. The installation of Dr.Web for Symbian on the device starts.
6. If you are using Nokia PC Suite, on completion of installationclick Done in the Application Installer window.
Install application without Nokia Suite/Nokia PC Suite
1. To install Dr.Web for Symbian without Nokia Suite/Nokia PCSuite, copy the installation file of the program (DrWebs60.sis) on the device using the memory card or by connecting thedevice to the computer.
2. Select in the Menu of your device Tools -> ApplicationsManager. In the list of applications select Dr.Web.
3. Before installation select Options -> Show details to reviewthe information on the program, its supplier and securitycertificate. Then select Options -> Install.
4. Follow the instructions on installation of the program via NokiaSuite/Nokia PC Suite starting by step 3.
User Guide
15Chapter 3. Installation
Dr.Web for Symbian is now installed on your device. For furtheroperation of the application you need to obtain the key file.
Uninstall Application
Dr.Web for Symbian can be completely removed from your device.
To remove the application
1. In the Menu of your device select Tools -> ApplicationsManager.
2. Select Dr.Web in the list of installed applications and thenselect Options -> Uninstall.
3. Confirm the removal of the selected application. Theapplication will be removed from the device.
User Guide
16Chapter 4. Getting Started
Chapter 4. Getting Started
This section describes the interface of Dr.Web for Symbian andprovides step-by-step procedures for launching or exiting theapplication and accessing Online Help.
Launch and Exit the Application
To launch the application
To launch Dr.Web for Symbian in the Main menu of yourdevice select Dr.Web in the list of settings and installedapplications. The main window of the program will open.
To exit the application
To exit Dr.Web for Symbian in the main window of the program(see Interface) select Exit.

User Guide
17Chapter 4. Getting Started
Interface
The main window of Dr.Web for Symbian consists of four buttons,which provide access to all the main functions of the application (seeFigure 1):
Full scan – launches the scanning of the whole file system
Custom scan – allows to select the files and folders forscanning
Logs – opens the program logs and the list of quarantine
Settings – opens the list of application settings
Figure 1. The main window.
User Guide
18Chapter 4. Getting Started
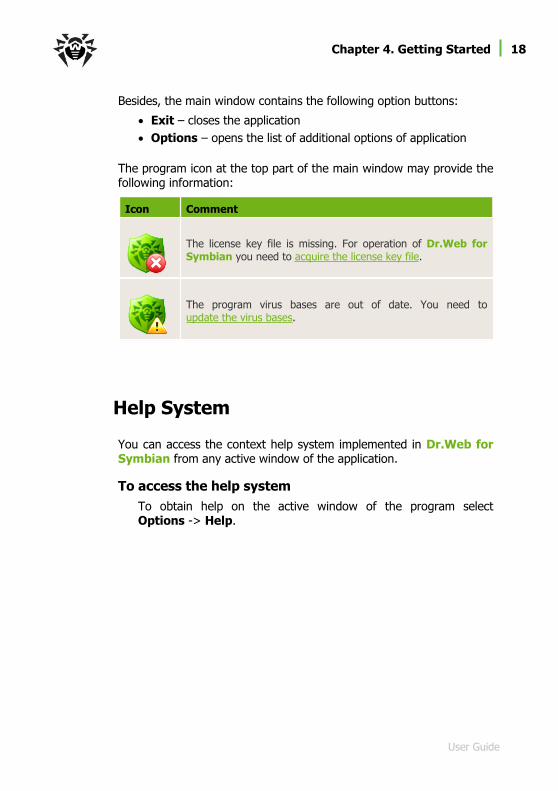
Besides, the main window contains the following option buttons:
Exit – closes the application
Options – opens the list of additional options of application
The program icon at the top part of the main window may provide thefollowing information:
Icon Comment
The license key file is missing. For operation of Dr.Web forSymbian you need to acquire the license key file.
The program virus bases are out of date. You need toupdate the virus bases.
Help System
You can access the context help system implemented in Dr.Web forSymbian from any active window of the application.
To access the help system
To obtain help on the active window of the program selectOptions -> Help.
User Guide
19Chapter 5. Program Functions
Chapter 5. Program Functions
This section describes main features of Dr.Web for Symbian andprovides step-by-step procedures for configuring protection of yourdevice against viruses and spam.
Constant Anti-Virus Protection
The main function implemented in Dr.Web for Symbian is the abilityto constantly scan the file system in real-time mode. This function isprovided carried out by a component called file monitor. It resides inthe memory of the device and checks all files as they are created ormodified, thus it protects the system against malicious objects.
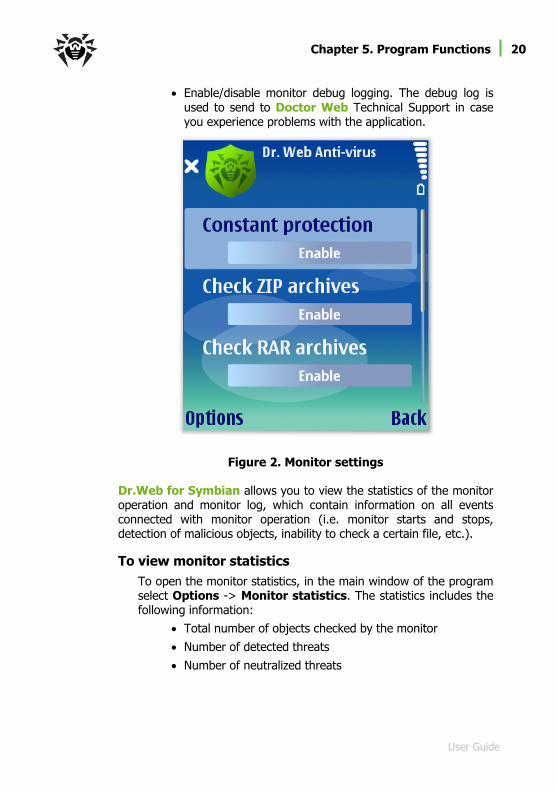
The monitor can be enabled in the Settings -> Monitor section. Toenable/disable the monitor, select the corresponding value for theConstant protection option. Activated, the monitor beginsprotecting the file system of the device. It remains active even if youclose the application.
On security threats detection, a message with information on them isdisplayed on the device screen. You can open the list of detectedthreats and choose the actions to apply to neutralize them.
To configure monitor
To configure the monitor, select Settings -> Monitor (seeFigure 2). You can configure the following parameters:
Enable/disable automatic launch of the file monitor andAnti-spam on device reboot and application update byselecting the corresponding value for the Automaticstartup option.
Enable/disable scanning of the ZIP, CAB, SIS and RARarchives by selecting the Enable/Disable value for thecorresponding options.
User Guide
20Chapter 5. Program Functions
Enable/disable monitor debug logging. The debug log isused to send to Doctor Web Technical Support in caseyou experience problems with the application.
Figure 2. Monitor settings
Dr.Web for Symbian allows you to view the statistics of the monitoroperation and monitor log, which contain information on all eventsconnected with monitor operation (i.e. monitor starts and stops,detection of malicious objects, inability to check a certain file, etc.).
To view monitor statistics
To open the monitor statistics, in the main window of the programselect Options -> Monitor statistics. The statistics includes thefollowing information:
Total number of objects checked by the monitor
Number of detected threats
Number of neutralized threats
User Guide
21Chapter 5. Program Functions
Number of check errors
Information on the virus databases (the date of the lastupdate and the number of virus records)
Select OK to close the statistics window.
To view monitor log
To open the monitor log, select Logs and then open the Monitortab.
On-Demand Scanning
Dr.Web for Symbian performs the scanning of the whole file systemof the mobile device or only of the critical files and folders selected byuser. This function is carried out by a component called scanner.
Scanning
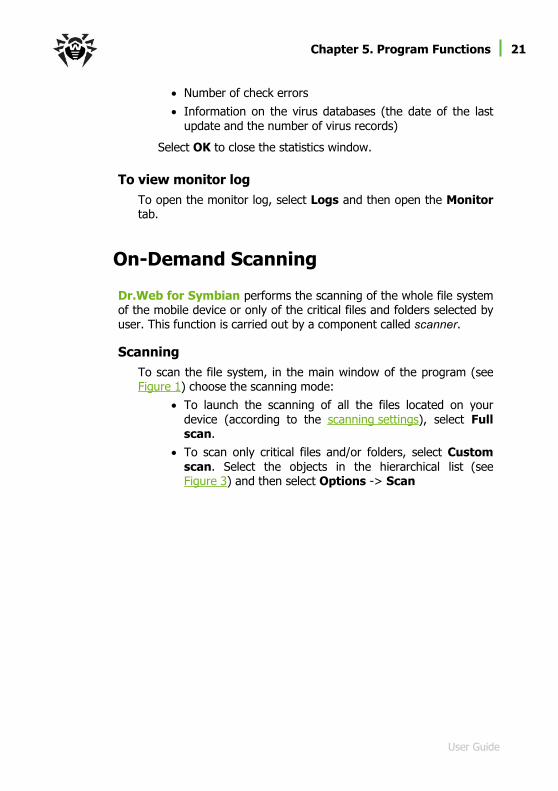
To scan the file system, in the main window of the program (seeFigure 1) choose the scanning mode:
To launch the scanning of all the files located on yourdevice (according to the scanning settings), select Fullscan.
To scan only critical files and/or folders, select Customscan. Select the objects in the hierarchical list (seeFigure 3) and then select Options -> Scan
User Guide
22Chapter 5. Program Functions
Figure 3. Custom scan. Select objects.
While performing the anti-virus check, the information on the totaltime of scanning, the number and the total size of scanned objects aswell as the name of the currently scanned file are displayed, providedthat the corresponding display settings had been made (see Figure 4).

User Guide
23Chapter 5. Program Functions
Figure 4. Scan window.
After the scanning completes, you can review the list of detectedmalicious objects and choose an action for each detected maliciousobject (see Malicious Objects Neutralization).
Scanning settings
To configure the scanning, select Settings in the main window ofthe program and then select Scanner section. You can specify thefollowing options:
Log file read errors – enables/disables logging theerrors of reading the files.
Log scan time – enables/disables logging the time ofscan start and stop.

User Guide
24Chapter 5. Program Functions
Scan ROM drive – enables/disables scanning of thedevice firmware.
Scan SD-Card � – enables/disables scanning of the filesand folders located on the removable memory cards.
On the Interface section you can specify the type of informationdisplayed during scanning. By setting the correspondent value ofthe Scanned file details option you can set up the program toshow/hide the name of the currently scanned file and the total sizeof checked files while scanning.
Selecting the value show for the Scanned file details optiondecreases the scanning rate.
To save the settings of current section and to return to the list ofsections select Back.
To save the settings of all sections and to return to the mainwindow select Back in the window of the settings sections list.
Dr.Web for Symbian logs events relating to the operation of thescanner that performs anti-virus checks (scanner starts and stops,detection of malicious objects, inability to check a certain file, etc).
To view the scanner log
In the main window of the program select View logs and openthe Scanner tab.
Malicious Objects Neutralization
On completion of the complete or custom scan Dr.Web for Symbianallows to choose one of the following actions in the Options list fordetected malicious object:
Delete – the object is completely removed from the memory ofthe device.
Quarantine – the object is moved to a special folder where it isisolated from the rest of the file system.
User Guide
25Chapter 5. Program Functions
Ignore – the object will be temporarily ignored. Next time youscan the system, the application detects the threat again.
Leave the detected objects in the file system only if you areabsolutely sure they do not present a threat.
Quarantine
Dr.Web for Symbian allows you to move the infected files toquarantine folder where they are isolated from the rest of file system.
To manage files in Quarantine
1. To display the list of quarantined objects, in the main windowselect Options -> Quarantine.
2. The list of quarantined objects opens (see Figure 5).
3. Select one or several files in the list.
4. Choose one of the following actions in the Options list to theapply to the selected files:
Restore – returns the files back to the folder where theywere moved from (use this action only if you are sure thatthe object is safe).
Delete – completely removes the files from the device.
To view the detailed information on the object from the list,select it and then select Options -> Details .

User Guide
26Chapter 5. Program Functions
Figure 5. Quarantine.
Anti-Spam
Anti-spam filters the calls and SMS messages allowing to block inautomatic or manual mode the undesired messages and calls, such asadvertisements or messages and calls from unknown numbers. Thefiltering is based on the black and white lists.
User Guide
27Chapter 5. Program Functions
To configure Anti-spam
To configure the operation of Anti-spam, select Anti-spam section inthe list of application settings. Open the Options tab and specify thefollowing options:
Automatic startup – allows to enable/disable automaticlaunch of Anti-spam (SMS and calls filtering) and file monitoron device reboot and application update.
For correct operation of Anti-spam it is recommended toset up the Enable value for this option.
Address book is – the White list value means that thecontacts from the address book are considered as included intothe white list, the Not in lists value cancels the adding thecontacts to the lists.
SMS filtering – allows to enable/disable message filtering.
Contact not in lists – allows to specify the program’s actionsfor SMS received from unknown numbers and numbers notincluded to black and white lists. You can select one of thefollowing values:
Prompt about incoming – in case this value is selected,the program prompts the user about rejecting/receivingthe message. Depending on the selected action, it will beproposed to the user to add the sender’s number to thewhite or black list respectively.
By white list – means that only the messages from thewhite list contacts will be passed and all the rest will beblocked.
By black list – means that all the messages except thosefrom the black list contacts will be passed.
Calls filtering – allows to enable/disable calls filtering.
User Guide
28Chapter 5. Program Functions
Calls filter type – allows to specify the type of calls filter:
By white list – means that only the calls from the whitelist contacts will be passed and all the rest will be blocked.
By black list – means that the calls from all numbersexcept those of black list contacts will be passed.
Reject calls – allows to specify the calls rejection with/withoutanswer. Rejecting a call without answer means that the call willbe blocked. If a call is rejected with answer, it is accepted andthen finished immediately.
Unknown call number – allows to pass/reject calls fromunknown numbers.
To save the settings of current section and to return to the list ofsections select Back.
Dr.Web for Symbian registers all the events concerning messagesfiltering and Anti-spam operation (component's starts and stops,information on filtered messages and calls, etc).
To view the Anti-spam log
In the main window of the program select Logs and open theSMS tab.
Black and White Lists
To create and edit the black and white lists use the corresponding tabsof the Settings -> Anti-spam section.
To add a contact to the list
1. Open the tab of the list you want to add a new contact to onthe Anti-spam section.
2. Select Options -> Add, then select on of the followingoptions:
Number – in this case you can enter manually theinformation on the contact you want to add to the list: inthe Number or Name field enter the phone number orthe mnemonic name of the contact.
User Guide
29Chapter 5. Program Functions
Contact – in this case you can choose the contact fromthe address book, for example, if the contact has severalphone numbers and you want to add them all into the list.
Group – in this case you can select a group from theaddress book of your mobile.
In the Description field you can enter any additionalinformation and comments for the contact.
3. Select Save. The contact will be added to the selected list.
Black list has a higher priority level, thus, if a number is added toboth black and white lists, the messages from this number will beblocked.
To edit the information on a contact/group in the list
1. Select a contact/group in the list and then select Options ->Edit.
2. Modify the information entered to the fields.
3. Select Save.
To remove a contact/group from the list
Select a contact/group in the list and then select Options ->Remove.
Update
Dr.Web for Symbian uses Dr.Web virus databases to detectmalicious software. These databases contain details and signatures forall viruses and malicious programs for mobile devices known at themoment of the application release. However modern computer virusesare characterized by the evolvement and modification; also newviruses sometimes emerge. Therefore, to mitigate the risk of infectionduring the licensed period, Doctor Web provides you with periodicalupdates to virus databases and application components. The updatercomponent of Dr.Web for Symbian helps you download the updatesvia Internet and automatically installs them.
User Guide
30Chapter 5. Program Functions
The update procedure requires a working connection to theInternet via HTTP. To open the connection, use the built-in GPRSmodule of your device.
If you are using WAP, please contact your mobile operator toinquire about existing connection and download files limitations.
To update the virus databases
1. In the main window of the program select Options ->Update.
2. In the updater window select Options -> Update.
3. After updates are downloaded and installed select Back toreturn to the main window.
You can check the program version and the version and creation dateof the virus databases in the Dr.Web for Symbian informationwindow.
To open application information
In the main window of application select Options -> About.
Logging
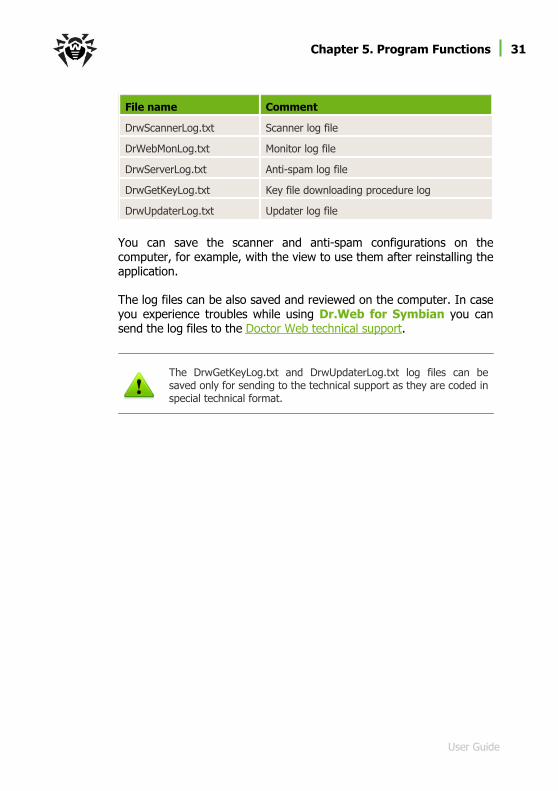
All events related to the operation of Dr.Web for Symbian and allmain components configurations are registered on the special fileslocated on the mobile device in the C:\Data\DrWeb directory (seeTable 1). You can access to this directory via Nokia Suite/Nokia PCSuite application.
Table 1. Dr.Web for Symbian configuration and log files.
File name Comment
DrWeb.dat Anti-spam configuration file
DrWebScanner.dat Scanner configuration file
User Guide
31Chapter 5. Program Functions
File name Comment
DrwScannerLog.txt Scanner log file
DrWebMonLog.txt Monitor log file
DrwServerLog.txt Anti-spam log file
DrwGetKeyLog.txt Key file downloading procedure log
DrwUpdaterLog.txt Updater log file
You can save the scanner and anti-spam configurations on thecomputer, for example, with the view to use them after reinstalling theapplication.
The log files can be also saved and reviewed on the computer. In caseyou experience troubles while using Dr.Web for Symbian you cansend the log files to the Doctor Web technical support.
The DrwGetKeyLog.txt and DrwUpdaterLog.txt log files can besaved only for sending to the technical support as they are coded inspecial technical format.

User Guide
32Appendices
Appendices
Appendix A. Contacting Support
Support is available to customers who have purchased a commercialversion of Doctor Web products. Visit Doctor Web TechnicalSupport web site at http://support.drweb.com/.
If you encounter any issues installing or using company products, takeadvantage of the following Doctor Web support options:
Download and review the latest manuals and guides athttp://download.drweb.com/
Read the frequently asked questions athttp://support.drweb.com/
Look for the answer in Dr.Web knowledge database athttp://wiki.drweb.com/
Browse the Dr.Web official forum at http://forum.drweb.com/
If you have not found solution for the problem, you can request directassistance from Doctor Web Technical Support by filling in theweb-from in the corresponding section of the support site athttp://support.drweb.com/.
For regional office information, see the Doctor Web official web siteat http://company.drweb.com/contacts/moscow.
User Guide
33
Index
A
about 29
access to help 18
anti-spam
black and white lists 28
log 26
settings 26
anti-spam log 26
anti-virus check 19, 21
appendices
technical support 32
B
black list 28
C
check
custom 21
for spam 26
full 21
configuration
anti-spam 26
monitor 19
scanner 21
constant protection 19
D
demo key file 9
distribution kit 8
document conventions 7
Dr.Web for Symbian 6
anti-spam 26
distribution kit 8
functions 19
getting started 16
help 18
install 13
interface 17
istall 13
launch 16
licensing 9
logging 30
main features 8
quarantine 25
requirements 13
uninstall 13, 15
update 29
E
exit application 16
G
getting help 18
H
help system 18
I
install 13
interface 17
introduction 6
User Guide
34
Index
K
key file
acquisition 10
get 10
renewal 12
update 12
use 12
validity 9
L
launch application 16
license
acquisition 10
renewal 12
update 12
use 12
validity 9
license key file 9
acquisition 10
renewal 12
update 12
use 12
licensing 9
logging 30
anti-spam 26
monitor 19
scanner 21
M
main features 8
monitor 19
logging 19
settings 19
monitor log 19
N
neutralization of malicious objects 24
P
program functions 19
Q
quarantine 24, 25
R
removal 13
renew license 12
requirements 13
S
scanner log 21
scanning
logging 21
settings 21
start to use 16
system requirements 13

User Guide
35
Index
T
technical support 32
U
uninstall 13, 15
update
license 12
virus databases 29
V
virus check 19, 21
virus databases
update 29
virus neutralization 24
W
white list 28

© 2003-2013 Doctor Web