pega robotic automation studio plug-in 7.1 installation ......refer to the pega robotic automation...
TRANSCRIPT

Pega Robotic Automation Studio Plug-in
Version 7.1
INSTALLATION INSTRUCTIONS
Start
Notice
© Copyright 2017Pegasystems Inc., Cambridge, MA
All rights reserved.
Trademarks
For Pegasystems Inc. trademarks and registered trademarks, all rights reserved. Other brand or product names are trademarks of their respective holders.For information about the third-party software that is delivered with the product, refer to the third-party license file on your installation media that is specific to your release.
Notices
This publication describes and/or represents products and services of Pegasystems Inc. It may contain trade secrets and proprietary information that are protected by various federal, state, and international laws, and distributed under licenses restricting their use, copying, modification, distribution, or transmittal in any form without prior written authorization of Pegasystems Inc.This publication is current as of the date of publication only. Changes to the publication may be made from time to time at the discretion of Pegasystems Inc. This publication remains the property of Pegasystems Inc. and must be returned to it upon request. This publication does not imply any commitment to offer or deliver the products or services described herein.This publication may include references to Pegasystems Inc. product features that have not been licensed by you or your company. If you have questions about whether a particular capability is included in your installation, please consult your Pegasystems Inc. services consultant.Although Pegasystems Inc. strives for accuracy in its publications, any publication may contain inaccuracies or typographical errors, as well as technical inaccuracies. Pegasystems Inc. may make improvements and/or changes to the publication at any time.Any references in this publication to non-Pegasystems websites are provided for convenience only and do not serve as an endorsement of these websites. The materials at these websites are not part of the material for Pegasystems products, and use of those websites is at your own risk.Information concerning non-Pegasystems products was obtained from the suppliers of those products, their publications, or other publicly available sources. Address questions about non-Pegasystems products to the suppliers of those products.This publication may contain examples used in daily business operations that include the names of people, companies, products, and other third-party publications. Such examples are fictitious and any similarity to the names or other data used by an actual business enterprise or individual is coincidental.This document is the property of:Pegasystems Inc.One Rogers StreetCambridge, MA 02142-1209USAPhone: (617) 374-9600Fax: (617) 374-9620www.pega.com
Updated: March 31, 2017
iii
CONTENTS
1 Installing the Studio plug-in
2 Minimum requirements
3 Installing the Pega Robotic Automation Studio plug-in using the Set-up wizard
8 Installing Studio via the command line

iv
Pega Robotic Automation Studio Plug-in 7.1 Installation Instructions 1
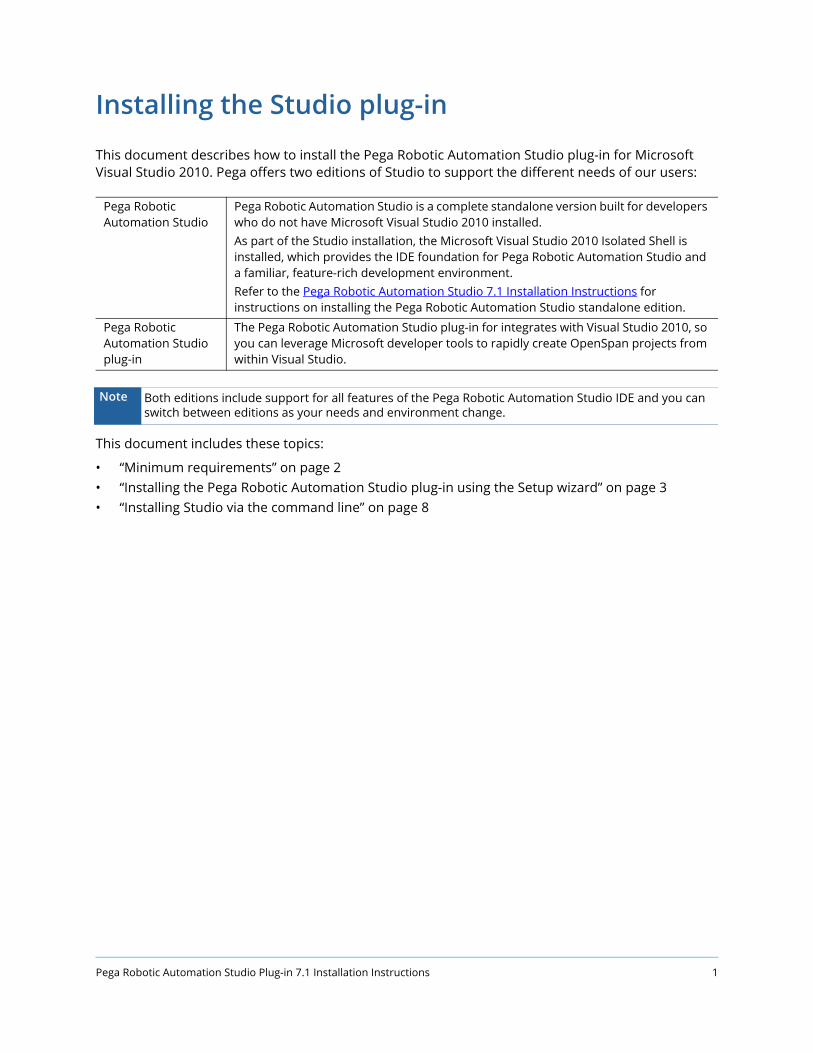
Installing the Studio plug-in
This document describes how to install the Pega Robotic Automation Studio plug-in for Microsoft Visual Studio 2010. Pega offers two editions of Studio to support the different needs of our users:
This document includes these topics:
• “Minimum requirements” on page 2• “Installing the Pega Robotic Automation Studio plug-in using the Setup wizard” on page 3• “Installing Studio via the command line” on page 8
Pega Robotic Automation Studio
Pega Robotic Automation Studio is a complete standalone version built for developers who do not have Microsoft Visual Studio 2010 installed.As part of the Studio installation, the Microsoft Visual Studio 2010 Isolated Shell is installed, which provides the IDE foundation for Pega Robotic Automation Studio and a familiar, feature-rich development environment.Refer to the Pega Robotic Automation Studio 7.1 Installation Instructions for instructions on installing the Pega Robotic Automation Studio standalone edition.
Pega Robotic Automation Studio plug-in
The Pega Robotic Automation Studio plug-in for integrates with Visual Studio 2010, so you can leverage Microsoft developer tools to rapidly create OpenSpan projects from within Visual Studio.
Note Both editions include support for all features of the Pega Robotic Automation Studio IDE and you can switch between editions as your needs and environment change.
Installing the Studio plug-in | Minimum requirements
Pega Robotic Automation Studio Plug-in 7.1 Installation Instructions 2
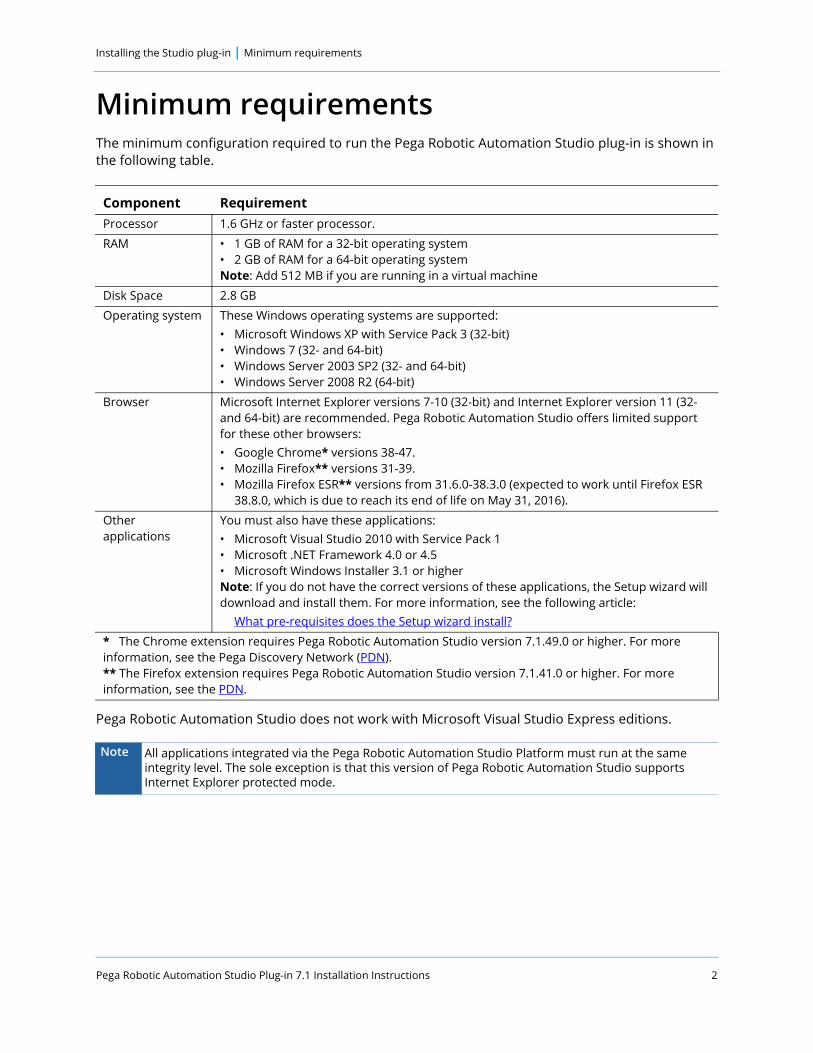
Minimum requirementsThe minimum configuration required to run the Pega Robotic Automation Studio plug-in is shown in the following table.
Pega Robotic Automation Studio does not work with Microsoft Visual Studio Express editions.
Component RequirementProcessor 1.6 GHz or faster processor.
RAM • 1 GB of RAM for a 32-bit operating system• 2 GB of RAM for a 64-bit operating systemNote: Add 512 MB if you are running in a virtual machine
Disk Space 2.8 GB
Operating system These Windows operating systems are supported:• Microsoft Windows XP with Service Pack 3 (32-bit)• Windows 7 (32- and 64-bit)• Windows Server 2003 SP2 (32- and 64-bit)• Windows Server 2008 R2 (64-bit)
Browser Microsoft Internet Explorer versions 7-10 (32-bit) and Internet Explorer version 11 (32- and 64-bit) are recommended. Pega Robotic Automation Studio offers limited support for these other browsers:• Google Chrome* versions 38-47.• Mozilla Firefox** versions 31-39.• Mozilla Firefox ESR** versions from 31.6.0-38.3.0 (expected to work until Firefox ESR
38.8.0, which is due to reach its end of life on May 31, 2016).
Other applications
You must also have these applications:• Microsoft Visual Studio 2010 with Service Pack 1• Microsoft .NET Framework 4.0 or 4.5• Microsoft Windows Installer 3.1 or higherNote: If you do not have the correct versions of these applications, the Setup wizard will download and install them. For more information, see the following article:
What pre-requisites does the Setup wizard install?
* The Chrome extension requires Pega Robotic Automation Studio version 7.1.49.0 or higher. For more information, see the Pega Discovery Network (PDN).** The Firefox extension requires Pega Robotic Automation Studio version 7.1.41.0 or higher. For more information, see the PDN.
Note All applications integrated via the Pega Robotic Automation Studio Platform must run at the same integrity level. The sole exception is that this version of Pega Robotic Automation Studio supports Internet Explorer protected mode.
Pega Robotic Automation Studio Plug-in 7.1 Installation Instructions 3
Installing the Studio plug-in | Installing the Pega Robotic Automation Studio plug-in using the Setup wizard
Installing the Pega Robotic Automation Studio plug-in using the Setup wizardFollow these steps to install the Pega Robotic Automation Studio plug-in:
1. Download and unzip the Pega Robotic Automation Studio plug-in for Microsoft Visual Studio 2010 setup file into a temporary folder location.
2. Make sure Microsoft Visual Studio is closed, then run the installation executable file (OpenSpanPluginVS2010Setup.exe). Be sure to select Run as Administrator.
The Setup wizard starts.
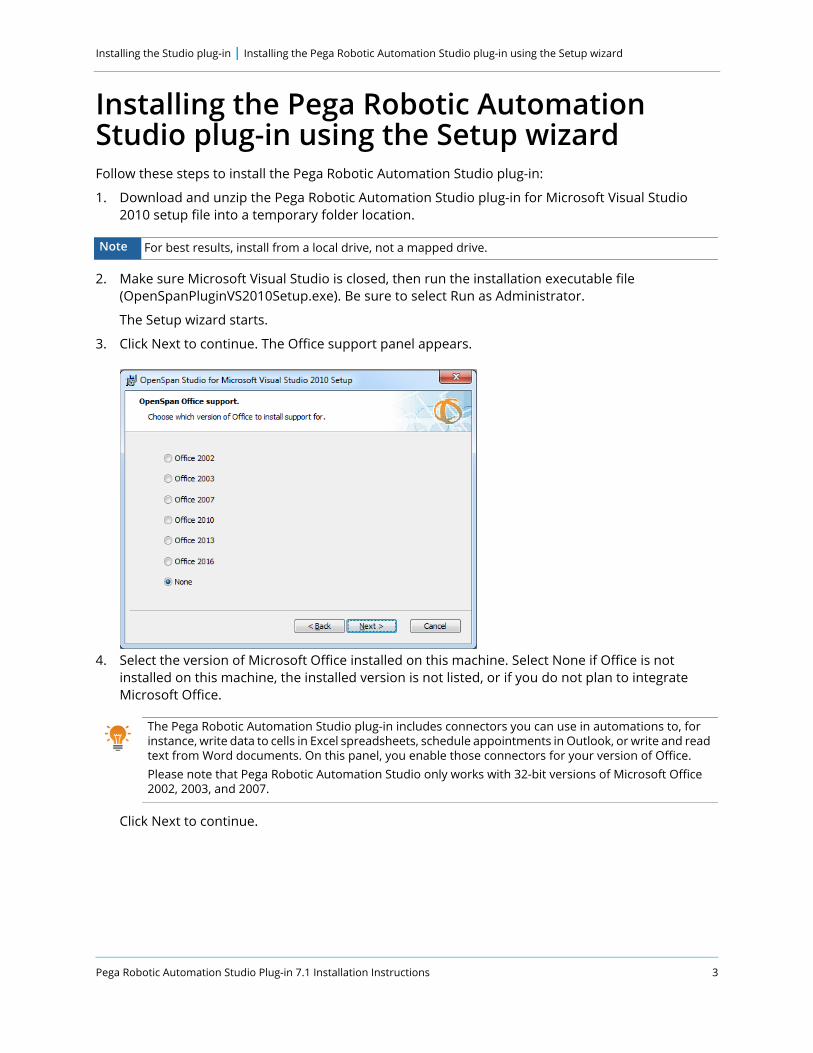
3. Click Next to continue. The Office support panel appears.
4. Select the version of Microsoft Office installed on this machine. Select None if Office is not installed on this machine, the installed version is not listed, or if you do not plan to integrate Microsoft Office.
Click Next to continue.
Note For best results, install from a local drive, not a mapped drive.
The Pega Robotic Automation Studio plug-in includes connectors you can use in automations to, for instance, write data to cells in Excel spreadsheets, schedule appointments in Outlook, or write and read text from Word documents. On this panel, you enable those connectors for your version of Office.Please note that Pega Robotic Automation Studio only works with 32-bit versions of Microsoft Office 2002, 2003, and 2007.
Installing the Studio plug-in | Installing the Pega Robotic Automation Studio plug-in using the Setup wizard
Pega Robotic Automation Studio Plug-in 7.1 Installation Instructions 4
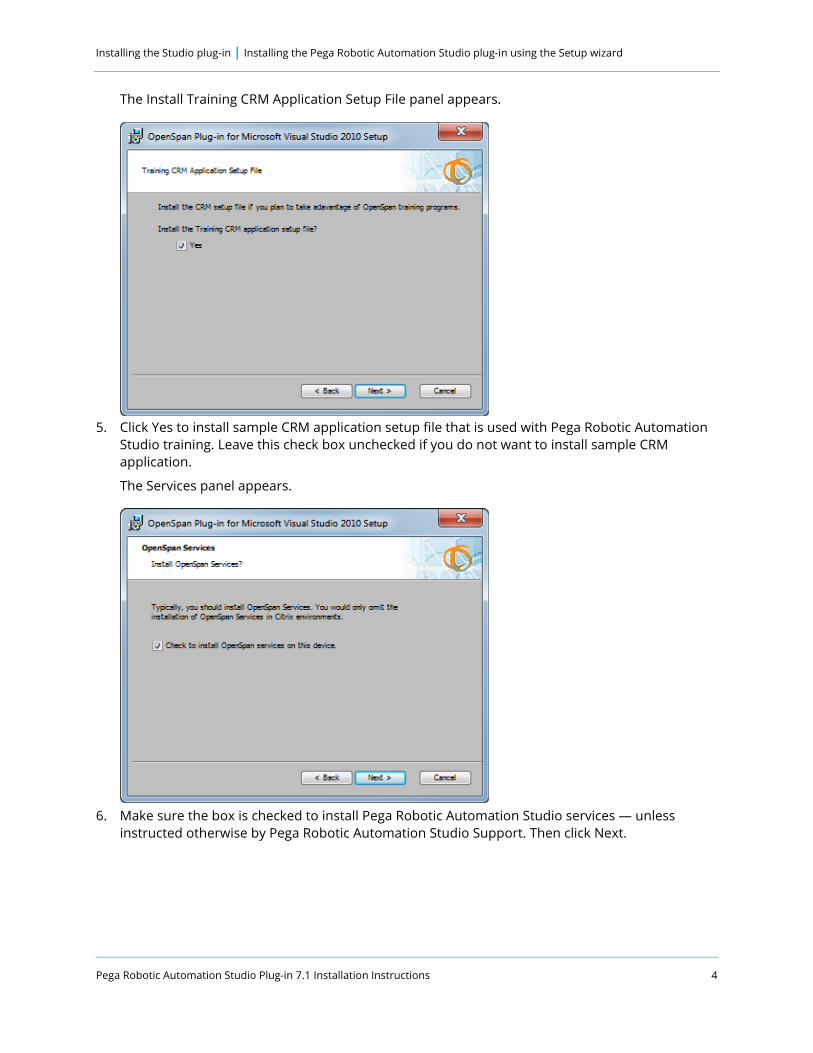
The Install Training CRM Application Setup File panel appears.
5. Click Yes to install sample CRM application setup file that is used with Pega Robotic Automation Studio training. Leave this check box unchecked if you do not want to install sample CRM application.
The Services panel appears.
6. Make sure the box is checked to install Pega Robotic Automation Studio services — unless instructed otherwise by Pega Robotic Automation Studio Support. Then click Next.
Pega Robotic Automation Studio Plug-in 7.1 Installation Instructions 5
Installing the Studio plug-in | Installing the Pega Robotic Automation Studio plug-in using the Setup wizard
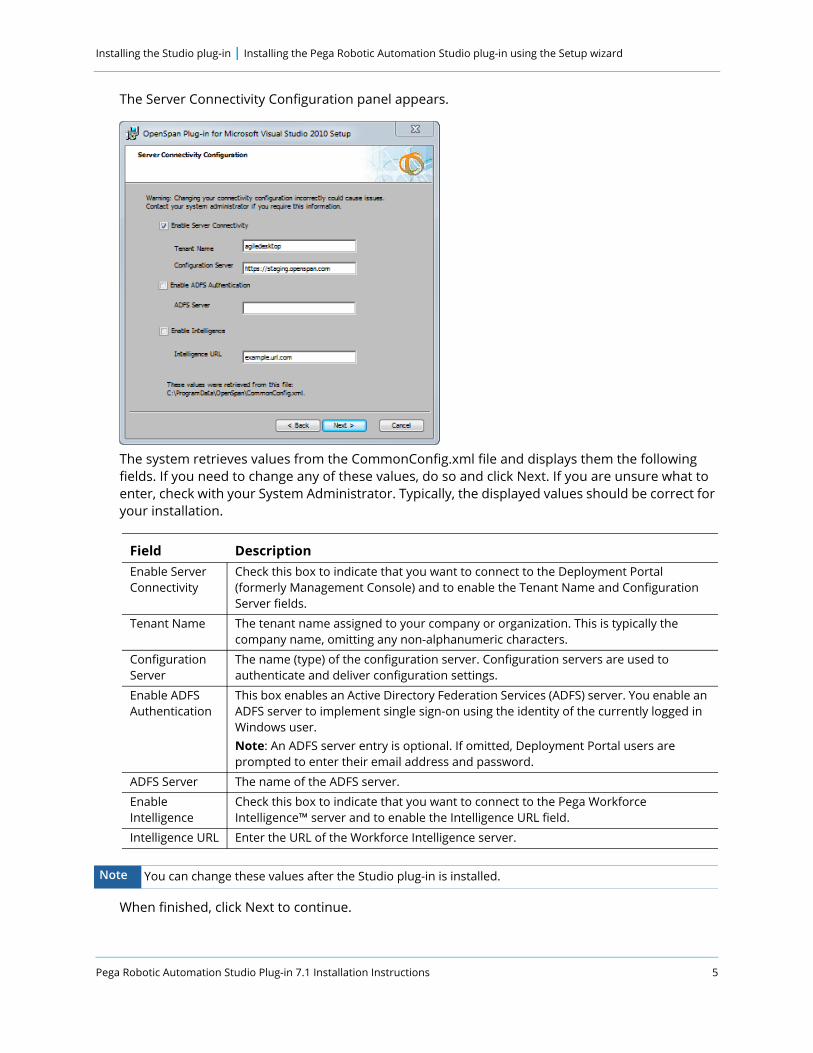
The Server Connectivity Configuration panel appears.
The system retrieves values from the CommonConfig.xml file and displays them the following fields. If you need to change any of these values, do so and click Next. If you are unsure what to enter, check with your System Administrator. Typically, the displayed values should be correct for your installation.
When finished, click Next to continue.
Field DescriptionEnable Server Connectivity
Check this box to indicate that you want to connect to the Deployment Portal (formerly Management Console) and to enable the Tenant Name and Configuration Server fields.
Tenant Name The tenant name assigned to your company or organization. This is typically the company name, omitting any non-alphanumeric characters.
Configuration Server
The name (type) of the configuration server. Configuration servers are used to authenticate and deliver configuration settings.
Enable ADFS Authentication
This box enables an Active Directory Federation Services (ADFS) server. You enable an ADFS server to implement single sign-on using the identity of the currently logged in Windows user.Note: An ADFS server entry is optional. If omitted, Deployment Portal users are prompted to enter their email address and password.
ADFS Server The name of the ADFS server.
Enable Intelligence
Check this box to indicate that you want to connect to the Pega Workforce Intelligence™ server and to enable the Intelligence URL field.
Intelligence URL Enter the URL of the Workforce Intelligence server.
Note You can change these values after the Studio plug-in is installed.
Installing the Studio plug-in | Installing the Pega Robotic Automation Studio plug-in using the Setup wizard
Pega Robotic Automation Studio Plug-in 7.1 Installation Instructions 6
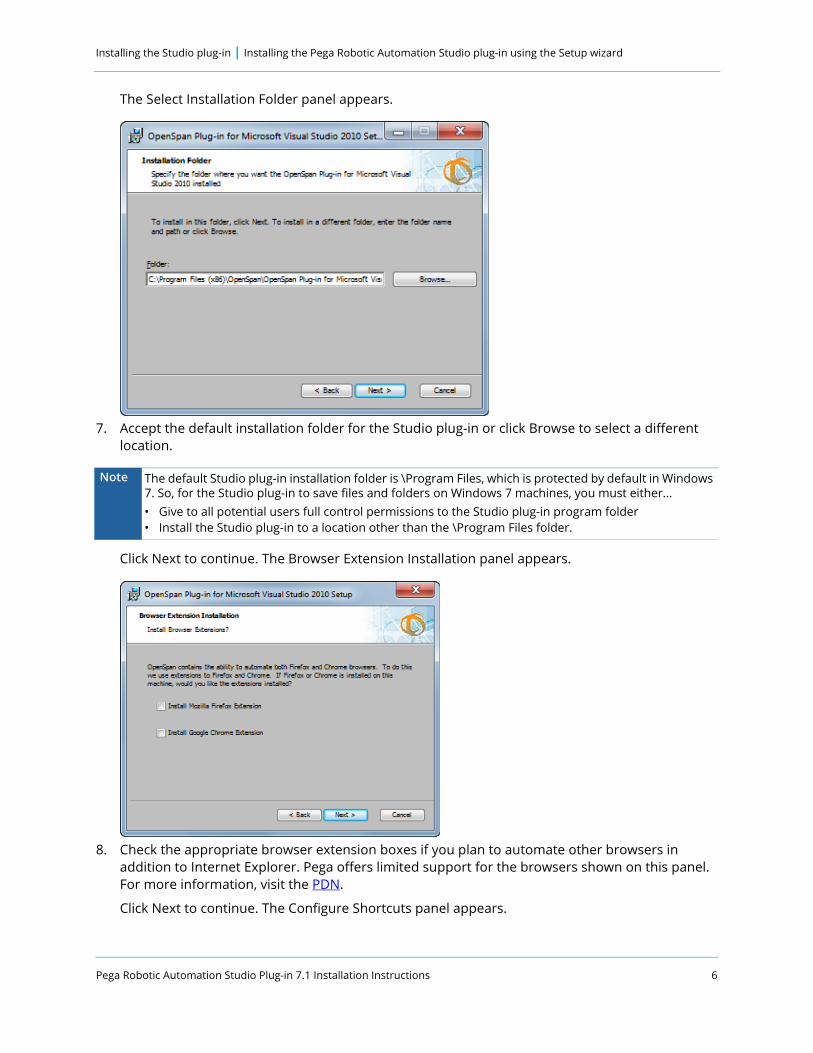
The Select Installation Folder panel appears.
7. Accept the default installation folder for the Studio plug-in or click Browse to select a different location.
Click Next to continue. The Browser Extension Installation panel appears.
8. Check the appropriate browser extension boxes if you plan to automate other browsers in addition to Internet Explorer. Pega offers limited support for the browsers shown on this panel. For more information, visit the PDN.
Click Next to continue. The Configure Shortcuts panel appears.
Note The default Studio plug-in installation folder is \Program Files, which is protected by default in Windows 7. So, for the Studio plug-in to save files and folders on Windows 7 machines, you must either...• Give to all potential users full control permissions to the Studio plug-in program folder• Install the Studio plug-in to a location other than the \Program Files folder.
Pega Robotic Automation Studio Plug-in 7.1 Installation Instructions 7
Installing the Studio plug-in | Installing the Pega Robotic Automation Studio plug-in using the Setup wizard
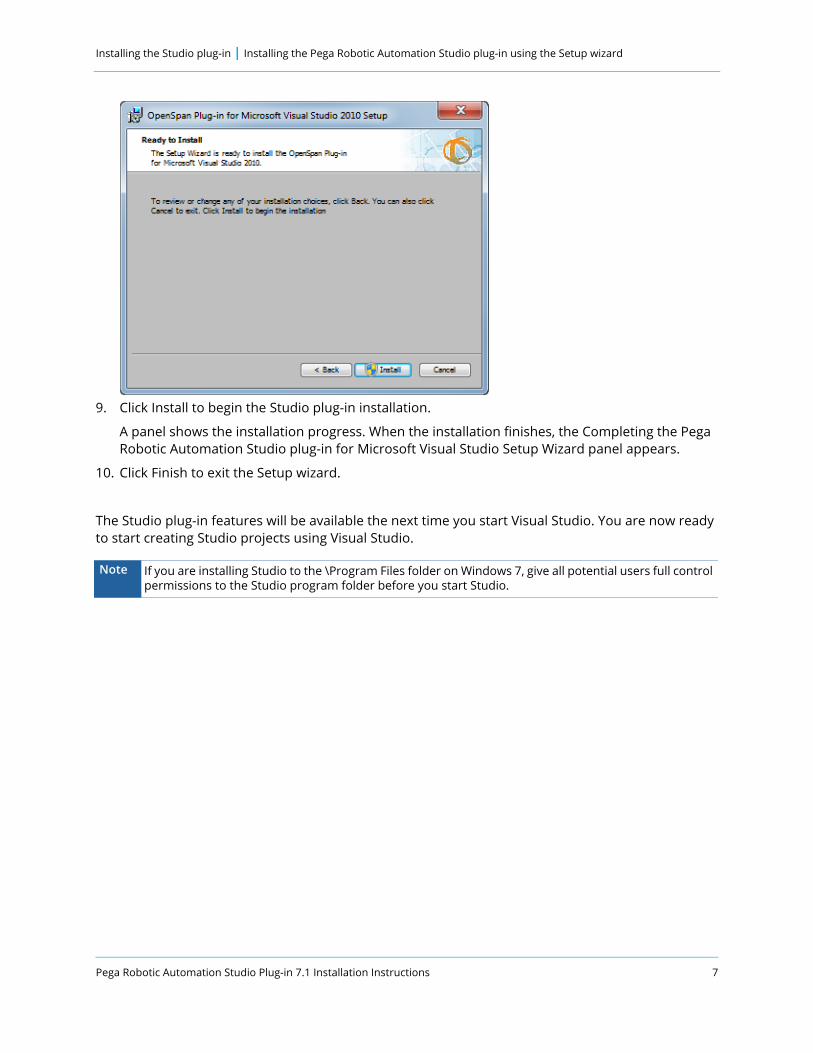
9. Click Install to begin the Studio plug-in installation.
A panel shows the installation progress. When the installation finishes, the Completing the Pega Robotic Automation Studio plug-in for Microsoft Visual Studio Setup Wizard panel appears.
10. Click Finish to exit the Setup wizard.
The Studio plug-in features will be available the next time you start Visual Studio. You are now ready to start creating Studio projects using Visual Studio.
Note If you are installing Studio to the \Program Files folder on Windows 7, give all potential users full control permissions to the Studio program folder before you start Studio.
Installing the Studio plug-in | Installing Studio via the command line
Pega Robotic Automation Studio Plug-in 7.1 Installation Instructions 8
Installing Studio via the command lineYou can bypass the Setup Wizard and install Studio via the command line using the OpenSpanStudioVS2010Setup.exe program. Here is an example of the command line syntax:
OpenSpanPluginVS2010Setup.exe (switches) (parameters)
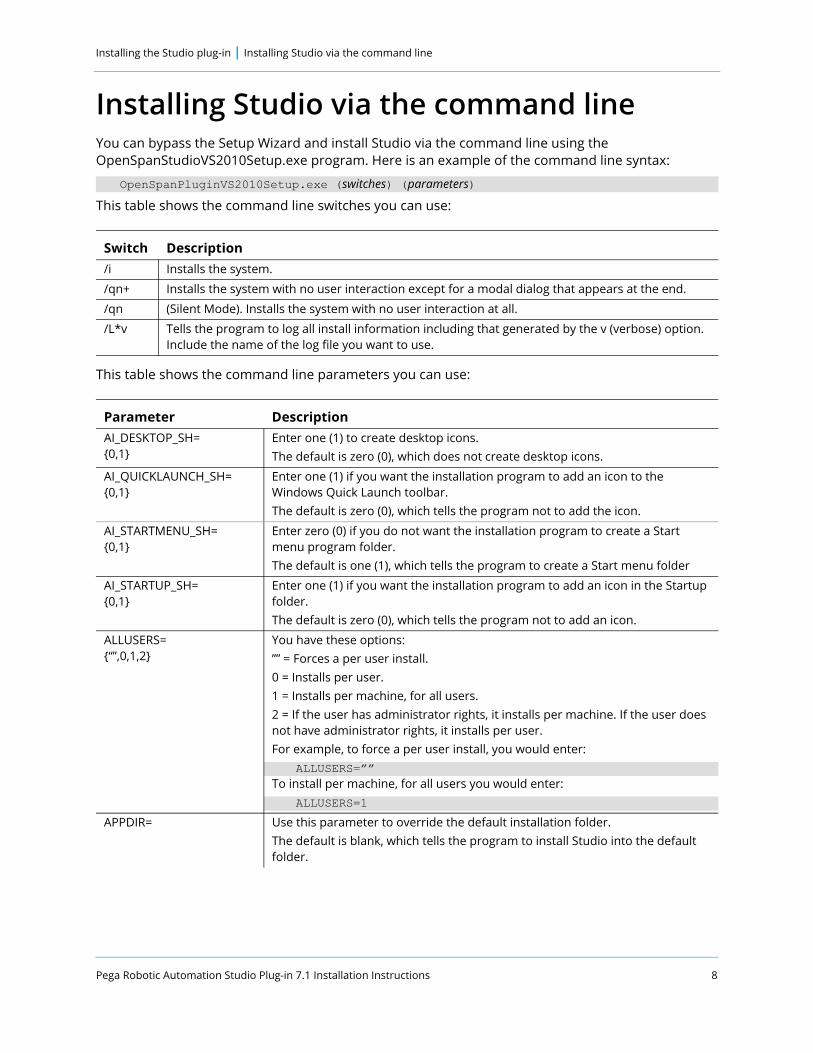
This table shows the command line switches you can use:
This table shows the command line parameters you can use:
Switch Description/i Installs the system.
/qn+ Installs the system with no user interaction except for a modal dialog that appears at the end.
/qn (Silent Mode). Installs the system with no user interaction at all.
/L*v Tells the program to log all install information including that generated by the v (verbose) option. Include the name of the log file you want to use.
Parameter DescriptionAI_DESKTOP_SH={0,1}
Enter one (1) to create desktop icons.The default is zero (0), which does not create desktop icons.
AI_QUICKLAUNCH_SH={0,1}
Enter one (1) if you want the installation program to add an icon to the Windows Quick Launch toolbar.The default is zero (0), which tells the program not to add the icon.
AI_STARTMENU_SH={0,1}
Enter zero (0) if you do not want the installation program to create a Start menu program folder.The default is one (1), which tells the program to create a Start menu folder
AI_STARTUP_SH={0,1}
Enter one (1) if you want the installation program to add an icon in the Startup folder.The default is zero (0), which tells the program not to add an icon.
ALLUSERS={“”,0,1,2}
You have these options:”” = Forces a per user install.0 = Installs per user.1 = Installs per machine, for all users.2 = If the user has administrator rights, it installs per machine. If the user does not have administrator rights, it installs per user.For example, to force a per user install, you would enter:
ALLUSERS=””To install per machine, for all users you would enter:
ALLUSERS=1
APPDIR= Use this parameter to override the default installation folder. The default is blank, which tells the program to install Studio into the default folder.
Pega Robotic Automation Studio Plug-in 7.1 Installation Instructions 9
Installing the Studio plug-in | Installing Studio via the command line
Here is an example:
OpenSpanPluginVS2010Setup.exe /qn+ /L*v LogFileName.txt INSTALL_OFFICE=2016 AI_STARTMENU_SH=1 AI_DESKTOP_SH=1
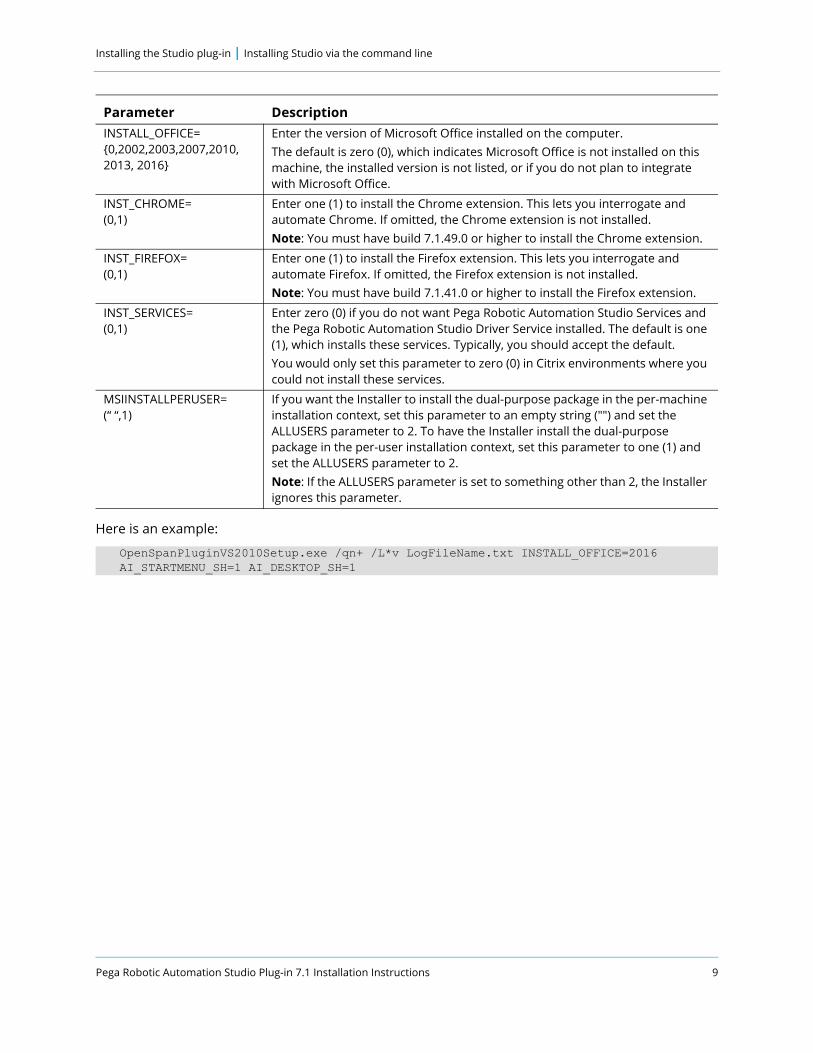
INSTALL_OFFICE={0,2002,2003,2007,2010, 2013, 2016}
Enter the version of Microsoft Office installed on the computer. The default is zero (0), which indicates Microsoft Office is not installed on this machine, the installed version is not listed, or if you do not plan to integrate with Microsoft Office.
INST_CHROME=(0,1)
Enter one (1) to install the Chrome extension. This lets you interrogate and automate Chrome. If omitted, the Chrome extension is not installed.Note: You must have build 7.1.49.0 or higher to install the Chrome extension.
INST_FIREFOX=(0,1)
Enter one (1) to install the Firefox extension. This lets you interrogate and automate Firefox. If omitted, the Firefox extension is not installed.Note: You must have build 7.1.41.0 or higher to install the Firefox extension.
INST_SERVICES=(0,1)
Enter zero (0) if you do not want Pega Robotic Automation Studio Services and the Pega Robotic Automation Studio Driver Service installed. The default is one (1), which installs these services. Typically, you should accept the default.You would only set this parameter to zero (0) in Citrix environments where you could not install these services.
MSIINSTALLPERUSER=(“ “,1)
If you want the Installer to install the dual-purpose package in the per-machine installation context, set this parameter to an empty string ("") and set the ALLUSERS parameter to 2. To have the Installer install the dual-purpose package in the per-user installation context, set this parameter to one (1) and set the ALLUSERS parameter to 2.Note: If the ALLUSERS parameter is set to something other than 2, the Installer ignores this parameter.
Parameter Description
Installing the Studio plug-in | Installing Studio via the command line
Pega Robotic Automation Studio Plug-in 7.1 Installation Instructions 10
INDEX
Symbols.NET Framework requirements 2
AActive Directory Federation
Services (ADFS) 5ADFS Server field 5administrator rights 8AI_DESKTOP_SH parameter 8AI_QUICKLAUNCH_SH
parameter 8AI_STARTMENU_SH parameter 8AI_STARTUP_SH parameter 8ALLUSERS parameter 8, 9APPDIR parameter 8
CChrome extension 2, 9command line
parameters 8switches 8
company name 5Configuration Server field 5CRM application 4
Ddesktop icon 8
EEnable ADFS Authentication
field 5Enable Intelligence field 5Enable Server Connectivity field 5
FFirefox extension 2, 9
Iinstallation folder 6INSTALL_OFFICE parameter 9INST_CHROME parameter 9INST_FIREFOX parameter 9INST_SERVICES parameter 9integrity level 2Intelligence URL field 5
Mmapped drives 3Microsoft Office 3, 9Microsoft Visual Studio
Express 2requirements 2
Microsoft WindowsInstaller 2requirements 2
Index 12
MSIISNTALLPERUSER parameter 9
OOpenSpanPluginVS2010Setup.exe
program 3, 8OpenSpanRuntimeEntSetup.exe
program 8
Pprocessor requirements 2Program Files folder 6, 7
QQuick Launch toolbar 8
RRAM requirements 2Run as Administrator 3
SSetup wizard 3shortcuts 6single sign-on 5Start menu folder 8Startup folder 8
TTenant Name field 5
Vvirtual machine requirements 2